

Page 1
PARTY
QuickStart
# 223.7553.900
®
www.barbecook.com
Page 2

USER MANUAL AND ASSEMBLY INSTUCTIONS 5
MODE D'EMPLOI ET INSTRUCTIONS 6
GEBRAUCHSANLEITUNG UND DIE AUFBAUANLEITUNG 7
HANDLEIDING EN GEBRUIKSAANWIJZING 9
MODO DE EMPLEO E INSTRUCCIONES 11
INSTRUZIONI PER L
A
S INTROÇÕES DE MONTAGEM E FONCIONAMENTO
B
RUKS- OG MONTERINGSANVISNING 15
'USO E IL MANUALE DI MONTAGGIO 12
14
MONTERINGS- OCH BRUKSANVISNING 17
PAKKAUKSESSA ON GRILLIN 18
1
Page 3
A
B
11
3
10
9
6
7
8
2
Page 4
C
2
4
5
1
D
A
16
12
15
13
B
C
14
D
3
Page 5

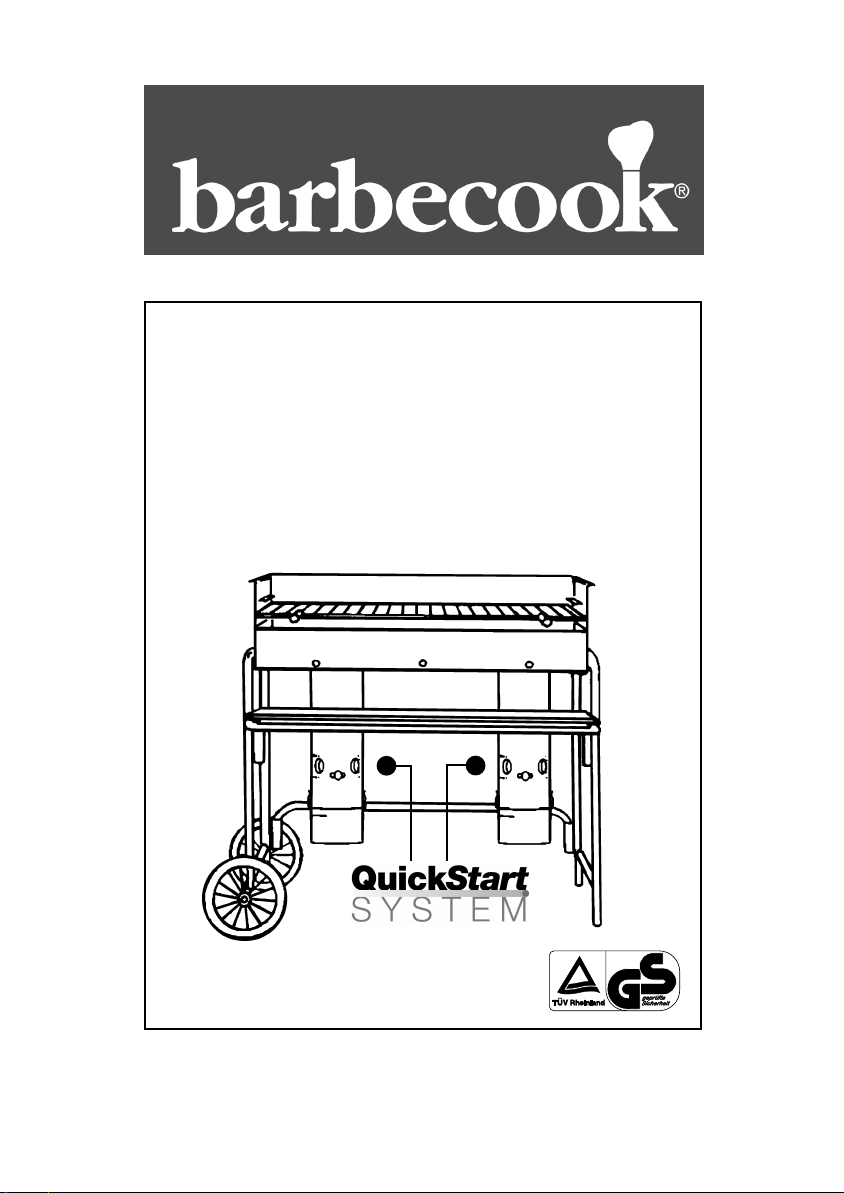
n° QUANTITY DESCRIPTION
1 2 Charcoal grid / Grill de fond inox / Feuerrost / Kolenrooster / Parrilla /
Griglia di base / Grelha / Nedra galler / Bunnrist / Alaritilä
2 1 Bowl / Foyer / Herd / Haard / Solera / Focolare / Chão do forno /
Eldstad / Ildsted / Tulisija
3 1 Support left / Jambe gauche / Linkes Fahrgestell / Linker onderstel /
Soporte izquierdo / Parte sinistra del carrello / Suporte esquerdo /
Underrede vänster / Understell til venstre / Alusta vasenpuolinen
4 4 Screw / Vis / Schraube / Schroeven / Tornillos / Viti / Parafusos /
Skruvar / Skruer / Ruuvit
5 4 Nut / Ecrous / Schraube / Moeren / Tuercas / Dadi / Porcas /
Muttrar / Mutre / Mutterit
6 2 Screw / Vis / Schraube / Schroeven / Tornillos / Viti / Parafusos /
Skruvar / Skruer / Ruuvit
7 2 Wheels / Roues / Räder / Wielen / Ruedas / Ruote / Rodas / Hjul /
Hjul / Pyörät
8 2 Clips / Clips / Klammern / Klemmen / Abrazaderas / Morsetti / Braçadeiras
/ Klämmor / Klemmer / Kiinnittimet
9 1 Cross tube / Traverse / Querträger / Dwarsbuis / Conducto transversal /
Tubo trasversale / Conduta transversal / Tvärrör / Tverrør / Poikkiputki
10 1 Support right / Montant droit / Rechtes Fahrgestell / Rechter onderstel /
Soporte derecho / Parte destra del carrello / Suporte direito /
Underrede höger / Understell til høyre / Alusta oikeanpuolinen
11 1 Table / Desserte / Serviertisch / Dientafel / Table de madera / Vassoio /
Chapa de covertura / Hjälpbord / Hjelpebord / Apupöytä
12 1 Cooking grill / Gril de cuisson / Grillrost / Braadrooster / Parilla /
Griglia per la cottura / Grades de cozer / Grillgaller / Grillrist / Grilliritilä
13 2 Tube / Tube / Grillfuss / Aanmaakbuis / Válvula de encendido /
Tubo di accensione / Válvula acendedora / Tändrör / Tennrør / Sytytysputki
14 1 Ashtray / Cendrier / Aschenbecher / Asbak / Cajón para ceniza /
Posacenere / Gaveta para as cinzas / Asklåda / Askeskuff / Tuhkalaatikko
15 1 Screws and nuts tube / Ecous + vis tubes / Schrauben Grillfuss /
Vijs + moer aanmaakbuis / Tornillos + Tuercas Válvula de encendido /
Viti + Dadi Tubo di accensione / Parafusos + Porcas Válvula acendedora /
Skruvar + Muttrar Tändrör / Skruer + Mutre Tennrør /
Ruuvit + Mutterit Sytytysputki
16 1 Connection lightening tube/bowl / Connection tube/foyer /
Verbindung Grillfuss/Herd / Verbinding buis/kuip /
Conexión Válvula de encendido/Solera /
Collegamento Focolare/Tubo di accensione /
Conexão Válvula/Chão do forno / Underrede Tändor/Eldstad /
Understell Tennrør/Ildsted / Alusta sytytysputki /Tulisija
4
Page 6

CONGRATULATIONS ON THE
PURCHASE OF A BARBECOOK
®
!IMPORTANT:
Your barbecook®QuickStart®has an
extremely simple lighting system. Starter
fluid or firelighters should not be used.
Always follow the instructions for use. Please
check before every use if the clips are closed.
The barbecue can not be used when the clips
are open.
ASSEMBLY
1) Attach the wheels (n° 7) to the left tubing
(n° 3) and fix them with the clasps
(n° 8). Make sure the clasps are tightened
sufficiently.
2) Put the cross bar (n° 9) on both left and
right tubings and fix them with the screws
(n° 6).
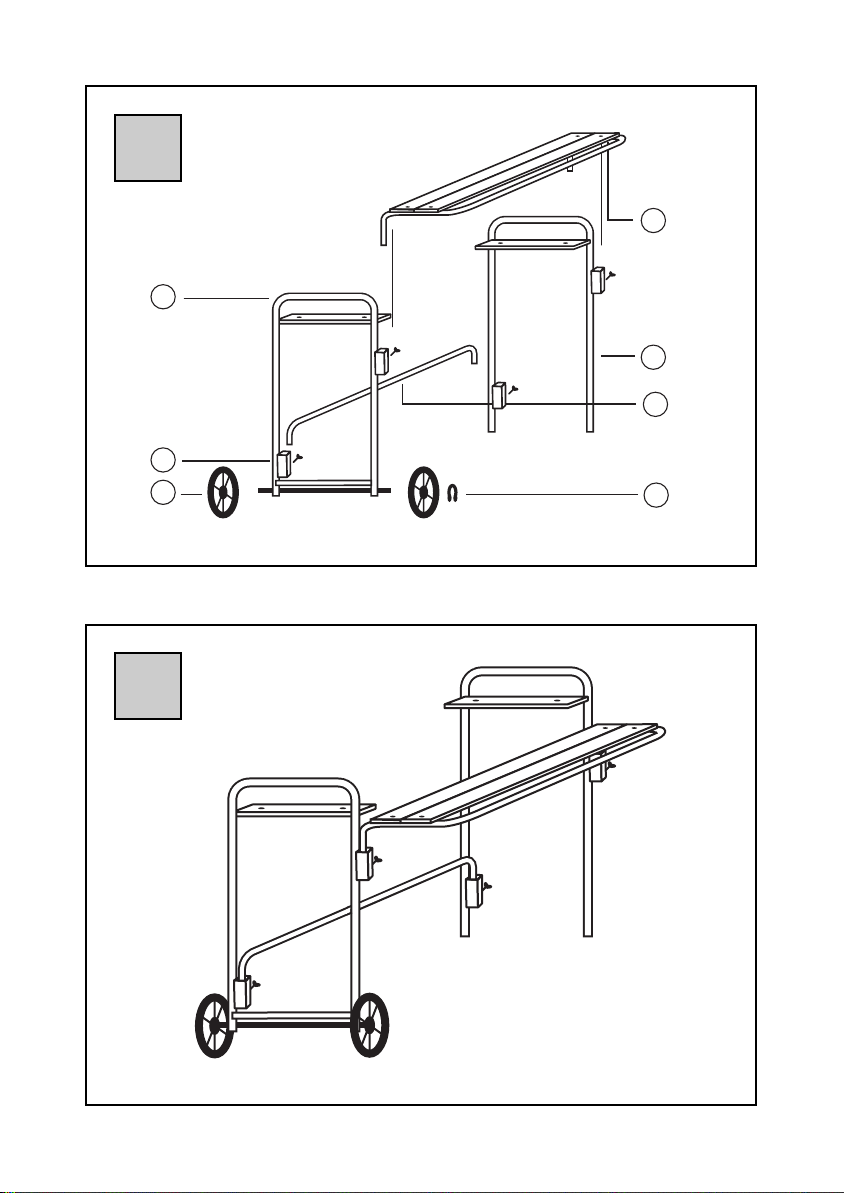
3) Put the front wooden board (n° 11) in the
holders on both left and right tubing.
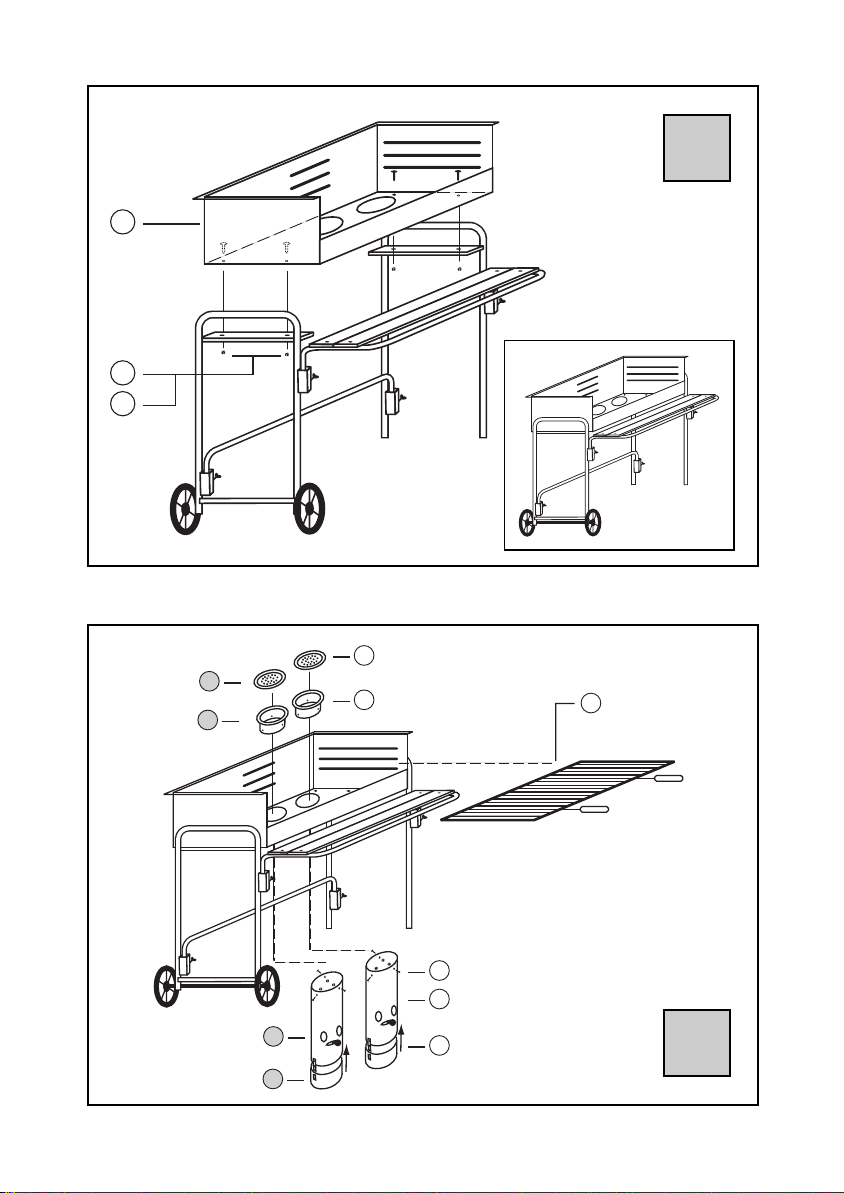
4) Fix the herd (n° 2) with screws (n° 4 & 5).
5) Attach the two lightening tubes (n°13) to
the herd (n°2) with the three screws and
nuts ( n°15).
6) Attach the ashtray (n°14) with the clips to
the lightening tube (n°13).
7) Put the two stainless steel charcoal grills
in the herd (n°1).
8) Put the cooking grid (n° 12) in the desired
position.
match or lighter. The burning paper will
light the charcoal. The smoke you see is
produced by the humidity of the charcoal
and the newspaper. After at least
15 minutes, your barbecook
®
is ready for
use. (At that moment, the glowing
charcoal is covered with a fine layer of
grey ashes.)
We advise to wait to install the cooking
grill on the barbecue until it is ready for
use.
B) Regulating the fire:
The fire intensity can be regulated in a
simple way by opening or closing the
ventilation hole.
C) Maintenance:
After having used the barbecue, remove
the ground grid and brush the ashes
toward the centre of the bowl. Afterwards,
release the barbecook
®
from the
QuickStop®and pour out the water / ash
mixture on an appropriate spot.
FIRST TIME USE
When using the barbecook®for the first time,
we strongly recommend to have it burn for
30 minutes without cooking meals. This
initial period is necessary.
USEFUL HINTS AND
PRECAUTIONARY MEASURES
INSTRUCTIONS FOR USE
A) Lighting:
Remove the ground grid (1). Take three
double sheets of newspaper and scrumple
them up separately in the form of a torch.
Insert these sheets of newspaper in the
inner tube (13). Put the ground grid back
in place and spread dry charcoal on top of
the ground grid (do not use too much
charcoal when lighting the barbecue).
Open the ventilation hole and light the
newspaper throught the hole with a long
1) The barbecook®can be used only out of
doors.
2) Always install the barbecue on a solid
base, away from inflammable and
meltable objects.
3) It is recommended to empty out the
QuickStop
®
each time the barbecue has
been used.
4) The bowl of the barbecook®has a capacity
of approximately 8L. (Optima) – 10L.
(Major & Arena). Do not use too much
charcoal in the bowl (max. 50%).
5
Page 7

5) Never use alcohol or petrol to light or stir
up the fire.
6) Never move the barbecue before the fire is
completely extinguished and the barbecue
is cooled off completely.
7) Keep children and pets at a safe distance,
protect yourselves against the fire.
8) For safety reasons, we advise to keep a
bucket of water or sand in the
neighbourhood of the burning barbecue.
Models equipped with the QuickStop
system shall be filled with water before
use.
9) Never roast meat in the flames. Wait to
put the cooking grill in place until the
charcoal is covered with a fine layer of
ashes. For fatty food, we recommend to
use a grill pan.
10) Always use dry and purified charcoal of
the DIN 51749 type.
GUARANTEE
The barbecook®comes with a limited two
years warranty on production flaws, from the
date of purchase and to the extent the use
corresponds with the present instructions for
use. The receipt mentioning the date of
purchase counts as guarantee card.
This barbecook®is not suited for professional
use.
Wear, corrosion, deformation and
discoloration (especially on stainless steel
models) of the parts that are directly exposed
to the fire is quite normal and will therefore
in no event ever be considered as a
production flaw: it is the logical result of
their use. Hence, the ground grid can be
strongly deformed after some time and it is
normal to have this part replaced.
!IMPORTANT: We wish to advise that the
barbecue of the stainless steel models is
made of stainless steel AISI 304/430, while
the cooking grid and the accessories brace
are made of chromed steel.
VOUS VOILA PROPRIETAIRE D’UN
®
BARBECOOK
; NOUS VOUS EN
FELICITONS
!IMPORTANT:
Les barbecook®QuickStart®s’allument
facilement et en aucun cas vous aurez besoin
de liquide d’allumage ni de soufflet. Lisez
donc attentivement ce qui suit! Suivez
®
toujours les prescriptions du manuel.
Veuillez verifier avant chaque usage si les
clips sont fermés. Ne jamais allumer le
barbecue avec les clips ouverts.
ASSEMBLAGE:
1) Montez les roues (n° 7) sur le jambage
gauche (n° 3) et bloquez celles-ci avec les
clips (n° 8) que l'on enfonce avec un
marteau.
2) Montez la traverse (n° 9) et fixez la avec
les vis (n° 6).
3) Mettez la planche de desserte (n° 11).
4) Montez le foyer n° 2 et fixez la avec les
écrous (n° 4) et les vis (n° 5).
5) Montez les deux tubes (n° 13) au foyer
(n° 2 ) et fixez-les avec les trois écrois et
vis ( n° 15).
6) Attachez le cendrier (n° 14) avec les clips
au tube (n° 13).
7) Mettez en place les deux grils de fond
inoxydable (n° 1).
8) Mettez en place le gril de cuisson (n° 12)
suivant la hauteur de cuisson désirée.
MODE D’EMPLOI
A) Allumage:
Enlevez la grille de fond (1). Froissez trois
feuilles de papier journal (en forme de
torche et placez les dans le tube (13).
Ensuite replacez la grille de fond sur
laquelle vous déposez votre charbon de
bois bien sec.
Ouvrez l’entrée d’air, allumez le papier à
sa base. Ensuite le papier suffira à allumer
le charbon de bois. La fumée dégagée au
départ est celle de l’humidité du papier et
6
Page 8

du charbon. Au bout de 15 min., vous
pouvez commencer la cuisson. (les
braises sont recouvertes d’une fine
pellicule grise).
B) Réglage du feu:
L’intensité du foyer peut être réglée en
ouvrant ou en fermant l’entrée d’air.
C) Entretien:
Après utilisation, brossez les cendres vers
le centre de la cuve après avoir ôté la
grille de fond. Ensuite, il suffit de verser le
mélange cendres/eau du QuickStop
®
dans
un endroit approprié.
PREMIER USAGE
A la première mise en route, veuillez faire
fonctionner le barbecook
dire sans aliments, pendant au moins
30 minutes à feu doux. Ce "rodage" est
indispensable.
®
"a blanc", c’est à
RENSEIGNEMENTS UTILES ET
PRECAUTIONS
1) Cet appareil est uniquement destiné à un
usage en plein air.
2) Placez le barbecue sur une surface stable
et à l’écart de matières combustibles ou
sensibles à la chaleur.
3) Il est recommandé de vider le QuickStop
après chaque usage .
4) La cuve de votre barbecue a une capacité
d’environ 8L. (optima) - .10L. (Major &
Arena)
Ne pas surcharger la cuve (max. 50%)
5) N’utilisez jamais d’alcool liquide ou
d’essence pour allumer ou réactiver le feu.
6) Ne déplacez jamais le barbecue avant qu’il
ne soit froid.
7) Eloignez les enfants et les animaux du
barbecue, protégez-vous du feu.
8) Pour toute sécurité il est conseillé d’avoir
un seau d’eau ou de sable pres du
barbecue. Pour les modèles avec un
QuickStop
remplir à chaque fois avec de l’eau.
®
nous vous conseillons de le
9) Ne grillez jamais dans les flammes mais
attendez jusqu’à les braises soient
recouvertes d’une fine pellicule grise.
Pour des aliments gras nous vous
proposons d’utiliser une grille antiflamme
10) Utilisez du charbon de bois epuré du type
DIN 51749
GARANTIE
Votre barbecook®est garanti deux ans à
partir de la date d’achat du barbecue, contre
tout vice de fabrication et pour autant qu’il
soit utilisé selon les spécifications de ce mode
d’emploi. Le reçu ou le ticket de caisse du
commerçant tient lieu de garantie.
L’usure, la rouille, la déformation et la
décoloration (en particulier de l’acier
inoxydable) éventuelle des pièces exposées
au feu sont normales et en aucun cas
considérées comme vice de fabrication; c’est
le résultat logique de leur utilisation.
Ainsi, la grille de fond peut, à l’usage, se
déformer fortement et il est normal de la
remplacer après un certain laps de temps,
fonction du nombre d’utilisations.
!IMPORTANT: Pour les modèles en acier
inoxydable, le barbecue est en acier
inoxydable AISI 304/403, sauf la grille de
cuisson et la bague porte accessoires qui sont
en acier chromé.
®
WIR BEGLÜCKWÜNSCHEN SIE ZU
DEM KAUF IHRES BARBECOOK
WICHTIG!:
Ihr barbecook®ist mit QuickStart
ausgestattet. Dieses System erlaubt das
Anzünden Ihres Grills mit einfachem
Zeitungspapier und sorgt nach einer
Viertelstunde für grillbereite Kohle, ohne daß
Sie Anzündeflüssigkeiten oder sonstige
Hilfsmittel benötigen. Folgen Sie immer der
Gebrauchsanleitung. Er ist darauf zu achten
das die Rasterungen immer geschlossen sind.
Das gerät ist nicht im Betriebsbereitungszustand wenn die Rasterungen geöffnet sind.
®
®
7
Page 9

MONTAGE:
1) Die Räder (nr. 7) auf das linke Fahrgestell
montieren (nr. 3) und festsetzen mit den
dazugehörigen Klammern (nr. 8). Darauf
achten, daß die Klammern genügend
angespannen werden.
2) Der Querträger (nr. 9) montieren auf die
Fahrgestelle (nr. 3 & 10) und festsetzen
mit den dazugehörigen Schrauben (nr. 6).
3) Der hölzerne Serviertich in die
metallischen Einwürfe des Fahrgestells
schieben.
4) Der Herd (nr. 2) montieren und festsetzen
mit den dazugehörigen Schrauben (nr. 4
& 5).
5) Die beide Grillfusse (n°13) am Herd (n°2)
montieren und festsetzen mit den
dazugehörigen Schrauben ( n°15).
6) Den Aschenbecher (n°14) mit den Clipsen
am Grillfuss (n°13) festmachen.
7) Den zwei edelstahlen Feuerrosts in den
Herd stellen (n°1).
8) Zuletzt muß der Bratrost (nr. 12) auf die
gewünschte Höhe geschoben werden.
GEBRAUCHSANLEITUNG
Wir empfehlen Ihnen, den Grillrost erst
auf Ihren Grill zu legen, wenn Sie zu
Grillen beginnen.
B) Regelung der Glut:
Die Intensität der Glut kann einfach
durch Öffnen und Schließen des
Luftzufuhrreglers geregelt werden.
C) Pflege:
Nach Gebrauch den Kohlenrost entfernen
und die Asche zur Mitte der Kohlenwanne
bürsten. Danach wieder das Oberteil
Ihres barbecook
®
abnehmen, QuickStop
entnehmen, so daß Sie einfach die
Mischung Wasser/Asche an einem dazu
geeigneten Ort ausgießen können.
ERSTER GEBRAUCH
Beim ersten Gebrauch Ihres barbecook®wird
empfohlen, das Feuer zuerst dreißig Minuten
lang brennen zu lassen, ohne zu Grillen.
Diese Einlaufperiode ist notwendig.
NÜTZLICHE HINWEISE UND
VORKEHRUNGEN
®
A) Anzünden:
Kohlenrost wegnehmen (1). Drei
Doppelseiten Zeitungspapier jeweils in
Fackelform zerknüllen und von oben in
den Grillfuß einführen (13). Kohlenrost
zurücklegen und trockene Holzkohle
darauf verteilen (beim Anzünden nicht
zuviel Holzkohle verwenden).
Luftzufuhrregler öffnen und das Zeitungspapier mit einem langen Streichholz oder
einem Anzünder anzünden. Das
brennende Papier genügt um die Kohle
anzuzünden. Die Rauchentwicklung, die
nach dem Anzünden entsteht, ist der
Feuchtigkeit der Kohle und des
Zeitungspapiers zuzuschreiben. Nach
mindestens 15 Minuten ist Ihr barbecook
gebrauchsfertig (die glühende Holzkohle
ist dann mit einer feinen, grauen
Aschenschicht bedeckt).
1) Dieses Gerät darf ausschließlich im Freien
verwendet werden.
2) Den Grill immer auf einen festen
Untergrund stellen, außer Reichweite von
brennbaren oder schmelzbaren
Gegenständen.
3) Es wird empfohlen, den QuickStop
jedem Gebrauch zu leeren.
4) Die Kohlenwanne Ihres barbecook
hat eine Kapazität von +/- 8L. (Optima)
+/- 10L. (Major und Arena). Nicht zuviel
Holzkohle in die Kohlenwanne geben
(höchstens 50% füllen).
5) Nie Alkohol oder Benzin zum Anzünden,
oder Schüren des Feuers verwenden.
6) Den Grill nie umstellen bevor das Feuer
®
völlig gelöscht und der Grill restlos
abgekühlt ist.
7) Kinder und Tiere in sicherem Abstand des
Grills halten und vor Feuer schützen.
8
®
nach
®
Page 10

8) Als zusätzliche Sicherheitsmaßnahme
raten wir Ihnen, stets einen Eimer Wasser
oder Sand in die Nähe des brennenden
Grills zu stellen. Für die mit QuickStop
ausgestatteten Modelle wird empfohlen,
diesen vor jedem Gebrauch mit Wasser zu
füllen.
9) Grillen Sie nie in den Flammen. Warten
Sie bis die Holzkohle mit einer feinen
Aschenschicht bedeckt ist. Für fettes
Grillgut wird der Gebrauch einer
Grillpfanne empfohlen.
10) Verwenden Sie immer trockene und
gereinigte Holzkohle des Typs DIN 51749.
GARANTIE
Ihr barbecook®hat eine Garantie auf evtl.
Herstellungsmängel von zwei Jahren ab
Kaufdatum, soweit er, wie in dieser
Gebrauchsanleitung beschrieben verwendet
wurde. Ihr Kassenbeleg mit Angabe des
Datums gilt als Garantieschein.
Dieser varbecook®ist nicht geeignet für
gewerbliche Zwecke.
Eventueller Verschleiß, Rostbildung,
Verformung und Verfärbung (insbesondere
bei den Modellen aus rostfreiem Stahl) der
Unterteile, die direkt dem Feuer ausgesetzt
sind, sind normal und stellen auf keinen Fall
Herstellungsfehler dar: sie sind das logische
Ergebnis Ihres Gebrauchs.
Der Kohlenrost kann sich zum Beispiel nach
gewisser Zeit stark verformen und es ist
normal, diesen zu ersetzen.
WICHTIG!: Für die Modelle aus rostfreiem
Stahl weisen wir darauf hin, daß der Grill
selbst aus rostfreiem Stahl AISI 304/430
gefertigt ist, während der Grillrost und der
Zusatzbügel aus Chromstahl hergestellt sind.
U HEEFT NET UW BARBECOOK
AANGEKOCHT: GEFELICITEERD
®
!BELANGRIJK:
Uw barbecook®QuickStart®heeft een uiterst
eenvoudig aanmaaksysteem waardoor u in
geen enkel geval aanmaakvloeistof of andere
aanmaakmiddelen hoeft te gebruiken.
Volg steeds de gebruiksaanwijzingen.
De barbecue enkel aansteken indien de
clipsen gesloten zijn. Vóór elk gebruik
nagaan of de clipsen goed gesloten zijn.
MONTAGE:
1) Monteer de wielen (nr. 7) op het linker
onderstel (nr. 3) en zet die vast met
bijhorende klemmen (nr. 8). Zorg ervoor
dat de klemmen voldoende worden
aangedraaid.
2) Monteer de dwarsbuis (nr. 9) op beide
onderstellen en maak die vast met de
voorziene schroeven (nr. 6).
3) Schuif vervolgens de houten dientafel (nr.
11) in de metalen gleuven die voorzien
zijn aan het onderstel.
4) Monteer de haard (nr. 2) en maak die vast
met bijhorende schroeven (nr. 4 en 5).
5) Bevestig de twee aanmaakbuizen (nr.13)
aan de kuip (nr. 2) met de drie vijzen en
moeren (nr. 15).
6) Bevestig de asbak (nr.14) met de clipsen
aan de aanmaakbuis (nr. 13).
7) Plaats de twee inox grondroosters in de
haard (nr.1).
8) Schuif tenslotte de braadgrill (nr. 12) op
de gewenste hoogte.
GEBRUIKSAANWIJZING
A) Aanmaken:
Neem het grondrooster weg (1). Neem
drie dubbele vellen krantenpapier en
verfrommel ze elk afzonderlijk in
toortsvorm. Steek deze vellen
krantenpapier in de buis (13). Plaats het
grondrooster terug en giet hierop droge
®
9
Page 11

houtskool (bij het aansteken niet té veel
houtskool gebruiken).
Open de luchttoevoerregelaar en steek
hierlangs de kranten aan met behulp van
een lange lucifer of aansteker. Het
brandende papier volstaat om de kolen
aan te steken. De rookontwikkeling die
ontstaat na het aansteken is te wijten aan
de vochtigheid van de kolen en het
krantenpapier. Na minimum 15 minuten
is uw barbecook
®
klaar voor gebruik. (de
gloeiende houtskool is op dit moment met
een fijn grijs aslaagje bedekt).
Wij raden u aan het braadrooster pas op
uw barbecue te plaatsen eenmaal deze
klaar is voor gebruik.
B) Regelen van het vuur:
De intensiteit van het vuur kan op een
eenvoudige manier geregeld worden door
het openen of sluiten van de
luchttoevoerregelaar.
C) Onderhoud:
Verwijder na gebruik het grondrooster en
borstel de assen naar het midden van
kuip. Daarna maakt u uw barbecook
®
los
van de QuickStop®en kan u gemakkelijk
het mengsel water / assen weggieten op
een daartoe aangewezen plaats.
EERSTE GEBRUIK
Bij het eerste gebruik van uw barbecook
raden wij u ten stelligste aan deze dertig
minuten te laten branden zonder gerechten te
bereiden. Deze inwerkperiode is noodzakelijk.
NUTTIGE TIPS EN
VOORZORGSMAATREGELEN
1) Dit toestel mag enkel en alleen in de open
lucht gebruikt worden.
2) Plaats de barbecue steeds op een vast
ondergrond uit de buurt van brandbare en
smeltbare voorwerpen.
3) Het is aanbevolen de QuickStop
gebruik te ledigen.
®
na elk
4) De kuip van uw barbecook®heeft een
capaciteit van ongeveer 8L. (optima) –
10L. (Major & Arena). Gebruik niet te
veel houtskool in de kuip (max. 50%).
5) Gebruik nooit alcohol of benzine voor het
aansteken of aanwakkeren van het vuur.
6) Verplaats de barbecue nooit vooraleer het
vuur volledig gedoofd is en de barbecue
volledig afgekoeld is.
7) Houd kinderen en dieren op een veilige
afstand van de barbecue, bescherm u
tegen het vuur.
8) Voor alle veiligheid raden wij u aan steeds
een emmer water of zand in de nabijheid
van de brandende barbecue te plaatsen.
Voor de modellen uitgerust met een
QuickStop
®
is het aangewezen deze voor
elk gebruik met water te vullen.
9) Rooster nooit in de vlammen. Wacht met
rooster tot de houtskool met een fijne
aslaag bedekt is. Voor vette etenswaren
raden wij het gebruik van een grillpan
aan.
10) Gebruik steeds droge en gezuiverde
houtskool van het type DIN 51749.
GARANTIE
Uw Barbecook®geniet een garantie van twee
jaar op alle fabricagefouten en dit vanaf de
datum van aankoop en in die mate dat het
gebruik in overeenstemming is met deze
gebruiksaanwijzing. Uw kasticket met
®
vermelding van de datum van aankoop is uw
garantiebewijs.
Deze barbecook
professionele doeleinden.
Eventuele slijtage, roestvorming, vervorming
en verkleuring (in het bijzondere bij de
roestvrij stalen modellen) van de onderdelen
die rechtstreeks blootgesteld zijn aan het
vuur zijn normaal en worden onder geen
enkel beding aanzien als fabricagefouten: het
is het logische resultaat van hun gebruik.
Hierdoor kan het grondrooster na enige tijd
sterk vervormen en het is normaal dit
onderdeel te vervangen.
®
is niet geschikt voor
10
Page 12

!BELANGRIJK: Voor de modellen in
roestvrij staal wijzen wij erop dat de
barbecue zelf uit roestvrij staal AISI 304/430
vervaardigd is terwijl het braadrooster en
de accessoirebeugel gemaakt zijn uit
verchroomd staal.
ACABA DE COMPRAR SU
®
BARBECOOK
FELICIDADES
!IMPORTANTE!:
Su barbecook®QuickStart®tiene un sistema
de encendido muy simple que ya no exige ni
líquido de encendido ni otros medios.
Siga siempre las instrucciones para su buen
funcionamiento.
MONTAJE:
1) Monte las ruedas (n° 7) en el soporte
izquirdo (n° 3) y fijelas con las abrazaderas
correspondientes (n° 8). Cuide de que se
fijen las abrazaderas firmemente.
2) Monte la traviesa (n° 9) en ambos
bastidores y fijelas con los tornillos
correspondientes (n° 6).
3) Coloque luego la tabla de madera (n° 11)
en los soportes provistos en el bastidor.
4) Monte el fogón (n° 2) y fijelo con los
tornillos correspondientes (n° 4 y 5).
5) Fije las dos válvulas de encendido (nº 13)
en la cuba (nº 2) con los tres tornillos y
tuercas (nº 15).
6) Fije el cajón para ceniza (nº 14) con las
grapas en la válvula de encendido (nº 13).
7) Coloque las dos parrillas de acero
inoxidable en la solera (nº 1).
8) Deslice finalmente la parilla (n° 12) en la
altura deseada.
INSTRUCCIONES PARA EL USO
A) Encender:
Saque la parrilla base (1). Tome tres hojas
de papel de periódico y arrúguelas cada
una por separado en forma de antorcha.
Introduzca estas hojas de papel en el tubo
(13). Vuelva a poner la parrilla base y
vierta sobre ésta carbón de leña seco (no
utilice demasiado carbón de leña al
encender).
Abra la palanca de alimentación de aire y
encienda los periódicos con la ayuda de
un fósforo largo o un encendedor. El papel
encendido basta para encender los
carbones. La formación de humo que se
produce después del encendido es debido
a la humedad de los carbones y del papel
de periódico. Después de 15 minutos
como mínimo su barbecook
®
está lista
para su uso. (En este momento el carbón
de leña esta cubierto con una capa de
ceniza fina y gris).
Aconsejamos poner la parrilla para asado
sobre su barbacoa solamente una vez que
ésta esté lista para su uso.
B) Ajustar el fuego:
La intensidad del fuego puede regularse de
manera simple abriendo o cerrando la
palanca de alimentación de aire.
C) Mantenimiento:
Quite después de uso la parrilla de base y
cepille las cenizas al centro de la cuba.
Después suelte su barbecook
®
del
QuickStop®de modo que pueda
fácilmente verter la mezcla agua/cenizas
en un sitio indicado a este fin.
PRIMER USO
Para el primer uso de su barbecook®le
aconsejamos hacerlo arder durante unos
treinta minutos sin asar comida. Este tiempo
de preparación es esencial.
CONSEJOS UTILES Y MEDIDAS DE
PRECAUCION
1) Este aparato solamente puede utilizarse al
aire libre.
2) Coloque la barbacoa siempre en una base
fija lejos de objetos inflamables .
3) Es recomendable vaciar el QuickStop
después de cada uso.
®
11
Page 13

4) La cuba de su barbecook®. tiene una
capacidad de más o menos 8L (Optima) –
10L. (Major & Arena).
No utilice demasiado carbón de leña en la
cuba (máx. 50%).
5) Nunca utilice alcohol o gasolina para
encender o avivar el fuego.
6) Nunca traslade la barbacoa antes de que el
fuego esté completamente extinguido y la
barbacoa del todo fria.
7) Mantenga los niños y animales a una
distancia segura de la barbacoa, protéjase
usted contra el fuego.
8) Para toda seguridad, le aconsejamos
siempre tener un balde de agua o arena
cerca de la barbacoa quemando. Para los
modelos equipados de un QuickStop
®
, es
aconsejable llenarlos con agua antes de
cada uso.
9) Nunca asar a la parrilla dentro de las
llamas. Espere para asar hasta que el
carbón de leña esté cubierto con una
capita de ceniza fina. Para comestibles
grasos, aconsejamos utilizar una sartén
para el asador.
10) Siempre utilice carbón de leña seco y
depurado del tipo DIN 51749.
GARANTIA
Su barbecook®tiene una garantía de dos años
para todos los defectos de fabricación y desde
la fecha de compra y en la medida que el uso
concuerde con este modo de empleo. Su
tíquet mencionando la fecha de compra es su
certificado de garantía.
Su barbecook®no es apto para fines
profesionales.
Desgaste eventual, corrosión, deformación y
decoloración (especialmente con los modelos
en acero inoxidable) de las piezas que son
directamente expuestas al fuego, son
fenómenos normales y no son, bajo ningún
concepto, considerados como defectos de
fabricación: es el resultado lógico de su uso.
La parrilla base puede fácilmente deformarse
y es una cosa normal reponer esta pieza.
!IMPORTANTE!: Para los modelos en acero
inoxidable, observamos que la barbacoa
misma está fabricada en acero inoxidable
AISI 304/430 mientras que la parrilla para
asado y la horquilla de accesorios están
hechas de acero cromado.
CI CONGRATULIAMO CON VOI PER
L’ACQUISTO DEL BARBECOOK
®
!IMPORTANTE:
Il Vostro barbecook®QuickStart®è munito
di un sistema di accensione molto facile.
E’ superfluo l’uso di fluidi o cubetti per
accendere il barbecue.
Osservare sempre le istruzioni per l’uso.
MONTARE:
1) Montare le ruote (n. 7) sulla parte sinistra
del carrello (n. 3) e fissarle con gli appositi
morsetti (n. 8). Controllare che i morsetti
siano sufficientemente serrati.
2) Montare il tubo trasversale (n. 9) sulle
due parti del carrello e fissarlo con le
apposite viti (n. 6).
3) Inserire il vassoio di legno (n. 11) nelle
fessure di metallo sul carello.
4) Montare il focolare (n. 2) e fissarlo per
mezzo delle apposite viti (n. 4 e 5).
5) Fissare i due tubi di accensione (n. 13)
alla vasca (n. 2) per mezzo di tre viti e
dadi (n. 15).
6) Fissare il posacenere (n. 14) al tubo di
accensione (n. 13) per mezzo dei clip.
7) Installare le due griglie di base in acciaio
inossidabile nel focolare (n. 1).
8) Inserire la griglia per la cottura (n. 12)
all'altezza desiderata.
ISTRUZIONI PER L’USO
A) Accensione:
Togliere la griglia di base (1).
Accartocciare tre fogli di giornale
separatamente e inserirli nel tubo (13).
Rimettere la griglia di base e coprirla con
12
Page 14

uno strato di carbonella asciutta (non
usare troppa carbonella per l’accensione).
Aprire i fori di ventilazione e accendere i
fogli di giornale attraverso questi fori con
un fiammifero lungo. La carta bruciante
basta per accendere la carbonella. Il fumo
che si sviluppa dopo l’accensione è dovuto
all’umidità della carta di giornale e della
carbonella. Dopo 15 minuti il vostro
barbecook
®
è pronto per l’uso (sulla brace
rovente si è formato un sottile strato di
cenere grigia).
Vi consigliamo di mettere la griglia di
cottura sul barbecue soltanto quando è
pronto per l’uso.
B) Regolazione del fuoco:
L’intensità del fuoco può essere regolata
aprendo o chiudendo i fori di ventilazione.
C) Pulizia:
Dopo l’uso, togliere la griglia di base e
spazzolare la cenere verso il centro del
braciere. Poi rimuovere il barbecook
®
dal
QuickStop®. Il misto di acqua e di cenere
può allora essere buttato via.
PRIMO USO
Quando usate il barbecook®per la prima
volta, Vi consigliamo di lasciare bruciare la
brace per almeno 30 minuti senza alimenti.
Questo operazione iniziale è necessaria.
INFORMAZIONI UTILI E
PRECAUZIONI
1) Usare il barbecue solo all’aria aperta.
2) Sistemare sempre il barbecue su una
superficie stabile e mai vicino a oggetti
infiammabili o fondibili.
3) Vi consigliamo di vuotare sempre il
QuickStop
4) Il braciere del barbecook
di circa 8L. (Optima) – 10L. (Major &
Arena). Non mettere troppa carbonella
nel braciere. Riempirlo a metà al
massimo.
®
dopo l’uso.
®
ha una capacità
5) Non usare mai alcool o benzina per
accendere o alimentare il barbecue.
6) Non spostare il barbecue finché il fuoco
non è completamente spento e il barbecue
sia completamente raffreddato.
7) Tenere i bambini e gli animali a distanza
di sicurezza dal barbecue: proteggeteli dal
fuoco.
8) Per maggior sicurezza. Vi consigliamo di
mettere sempre un secchio riempito di
acqua o di sabbia vicino al barbecue.
Per i modelli muniti di QuickStop
consigliamo di riempire sempre il
serbatoio per l’acqua prima dell’uso.
9) Non cuocere mai direttamente sulle
fiamme. Aspettare fino a quando si è
formato uno strato di cenere grigia sulla
superficie della brace. Per alimenti grassi
consigliamo l’uso di una padella a
grigliare.
10) Usare sempre della carbonella asciutta e
depurata del tipo DIN 51749.
GARANZIA
Forniamo una garanzia valevole per la durata
di due anni dalla data dell’acquisto. La
garanzia copre tutti i difetti di fabbrica a
condizione che l’uso sia conforme alle
istruzioni per l’uso. Lo scontrino con la data
dell’acquisto vale come garanzia.
Questo barbecook®è inadatto per uso
professionale.
L’eventuale usura, corrosione, deformazione
e scolorimento (in particolare per i modelli
in acciaio inossidabile) delle parti che sono
direttamente esposte al fuoco, sono normali
e non sono mai considerate come difetti di
fabbrica. È il risultato logico del loro uso. A
causa dell’esposizione al fuoco, la griglia di
base si deformerà e dovrà essere sostituita.
!IMPORTANTE: Per i modelli in acciaio
inossidabile Vi informiamo che il barbecue
stesso è in acciaio inossidabile AISI 304 e/o
430 e che la griglia di cottura e il maniglione
sono in acciaio cromato.
®
,
13
Page 15

ACABA DE COMPRAR O SEU
BARBECOOK®: PARABÉNS.
!IMPORTANTE:
É extremamente simples acender o seu
barbecook®QuickStart®, pois não necessita
de utilizar qualquer líquido combustível nem
qualquer outro meio combustível.
Siga sempre o modo de emprego.
MONTAGEM:
1. Monte as rodas (n° 7) no suporte
esquerdo (n° 3) fixe-as por meio dos clipes
(n° 8) correspondentes. Faça com que os
clipes se fixam suficientemente.
2. Monte o tubo transversal (n° 9) em ambos
os suportes e fixe-o por meio dos
parafusos (n° 6) previstos.
3. Depois ponha a chapa de cobertura em
madeira (n° 11) nos fixadores previstos
no suporte.
4. Monte o fogareiro (n° 2) e fixe-o por meio
dos parafusos correspondentes (n° 4 & 5).
5) Fixe as duas válvulas de incêndio (nº 13)
na cuba (nº 2) com três parafusos e porcas
(nº 15)
6) Fixe a gaveta para as cinzas (nº 14) com
os grampos na válvula acendedora (nº 13)
7) Coloque as duas grelhas de aço inoxidável
no chão do forno (nº 1)
8. Finalemente meta as grades de cozer
(n° 12) na altura desejada.
um fósforo comprido ou um isqueiro. O
carvão começará a arder assim que o
papel estiver a arder. A fumaça que surge
depois de ter acendido o papel é devida à
humidade do carvão e do papel de jornal.
Espere pelo menos 15 minutos antes de
utilizar o seu barbecook
®
para a
preparação de alimentos (o carvão em
brasa estará então coberto de uma fina
camada de cinzas).
É aconselhável não instalar a grelha de
assar no grelhador antes que este estiver
pronto para o uso.
B) Regulação da brasa:
A intensidade da brasa pode ser regulada
de maneira muito simples: é só abrir ou
fechar mais o regulador do suprimento de
ar.
C) Manutenção:
Depois do uso, retire a grelha de base e
varra as cinzas para o meio do recipiente.
Em seguida retire o seu barbecook
®
do
QuickStop®. Desta maneira, poderá
facilmente deitar fora, num local
apropriado, a mistura de água e cinzas.
PRIMEIRA UTILIZAÇÃO
Quando usar pela primeira vez o seu
barbecook®, aconselhamos que o deixe
arder durante trinta minutos sem preparar
alimentos. Este período de acção inicial é
absolutamente necessário.
MODO DE EMPREGO
A) Acendimento:
Retire a grelha de base (1). Tome três
folhas duplas de papel de jornal e
amarrote-as uma por uma em forma de
tocha. Ponha os papéis assim amarrotados
dentro do tubo (13). Recoloque a grelha
de base e deite carvão seco por cima (não
ponha demasiado carvão para acender o
aparelho).
Abra o regulador do suprimento de ar e
acenda por aqui os jornais, por meio de
INFORMAÇÕES ÚTEIS E MEDIDAS
DE PRECAUÇÃO
1) Este aparelho só pode ser usado ao ar livre
2) O grelhador deve ser posto num lugar
plano e firme, fora do alcance de objectos
inflamáveis e fundíveis.
3) Aconselha-se esvaziar o QuickStop
depois de cada uso
4) O recipiente do seu barbecook®tem uma
capacidade de cerca de 8L. (Optima) –
10L. (Major & Arena). Não ponha
demasiado carvão no recipiente (no
máximo 50%)
14
®
Page 16

5) Nunca use álcool ou gasolina para acender
ou atiçar o fogo.
6) Nunca transporte o grelhador antes de o
fogo ter apagado por completo e o
grelhador estar completamente
arrefecido.
7) Mantenha crianças e animais a uma
distância segura do grelhador, e proteja-se
a si próprio contra o fogo.
8) Por motivos de segurança aconselhamos
que mantenha sempre um balde com água
ou areia nas proximidades do grelhador
quando este estiver em uso. Para os
modelos equipados com o QuickStop
aconselha-se enchê-lo de água antes de
cada uso.
9) Não grelhe os seus alimentos
directamente nas chamas. Não grelhe os
alimentos antes que o carvão esteja
coberto de uma fina camada de cinzas.
Para alimentos muito gordurosos,
aconselhamos o uso de uma panela de
grelhar.
10) Use sempre carvão seco e purificado do
tipo DIN 51749.
GARANTIA
O seu barbecook®tem uma garantia de dois
anos contra todos os erros de fabricação, a
partir da data de compra e na medida em que
se usar o grelhador de acordo com este modo
de emprego. O talão de compra, indicando a
data de aquisição, é a sua garantia.
Este barbecook®não é apropriado para fins
profissionais.
É normal que possam surgir desgaste,
ferrugem, deformação e descoloração
(principalmente nos modelos de aço
inoxidável) nas partes que estão
directamente expostas às chamas, e isto não
pode, de forma alguma, ser considerado
como erro de fabricação: é uma consequência
lógica do seu uso.
Por isto, a grelha de base poderá deformar-se
fortemente após algum tempo, e é normal
que esta parte terá de ser substituída.
!IMPORTANTE: Para os modelos em aço
inoxidável, assinala-se que o grelhador
propriamente dito é feito de aço inoxidável
AISI 304/430, ao passo que a grelha de assar
e o porta-acessórios são feitos de aço
cromado.
GRATULERAR TILL KÖPET AV
BARBECOOK
®
VIKTIGT!
®
Denna Barbecook grill har ett mycket
,
effektivt tändningssystem "QuickStart
gör all tändvätska och andra tändningsmedel
helt onödiga.
Följ alltid instruktionerna i bruksanvisningen.
MONTERING:
1. Montera hjulen (n° 7) på de vänstra
rördelarna (n° 3) och lås dem med
spännena (n° 8). Kontrollera att spännena
sitter tillräckligt hårt.
2. Montera tvärslån (n° 9) på både höger och
vänster sida och lås dem med skruvar (n°
6).
3. Montera fronthyllan (n° 11).
4. Sätt fast kroppen (n° 2) med skruvar (n° 4
& 5).
5) Fäst med de tre skruvarna och muttrarna
(n° 15) de två tändrören (n° 13) i lådan
(n° 2)
6) Fäst asklådan (n° 14) med klämmarna vid
tändröret (n° 13)
7) Placera de två rostfria nedre gallren i
eldstaden (n° 1).
8. Placera grillgallret (n° 12) i önskat läge.
BRUKSANVISNING
A) Att tända
Avlägsna bottengallret (1). Ta tre dubbla
sidor av en vanlig dagstidning och knyckla
ihop dem var för sig i form av facklor.
Stick ner tidningspappret i tändröret (13).
Lägg tillbaka bottengallret och häll på torr
träkol. OBS! Använd inte mer kol än vad
som går åt till en grillning.
®
" som
15
Page 17

Öppna luftspjället nere på tändröret och
tänd tidnings-papperet genom hålet med
en tändsticka eller tändare. Det brinnande
tidningspappret räcker för att tända kolet.
Rökutvecklingen som uppstår en kort
stund när du tänt på, kommer från fukten
i papperet och kolet. Efter max 10 - 15
min är din Barbecook grill klar att
användas. Vi rekommenderar att du
väntar med att placera grillgallret på
grillen tills dess att den är färdig för
användning.
B) Att reglera värmen:
Värmen på grillglöden kan regleras genom
att öppna eller stänga luftspjället som på
så sätt ökar eller minskar lufttillförseln.
C) Underhåll:
När grillen är helt släckt kan du enkelt
borsta ned askan och överblivet kol i foten
“QuickStop
®
”. Lossa sedan klämmorna,
lyft av övre delen och töm ut blandningen
av vatten/aska på lämplig plats.
6) Se till att barn och djur håller sig på säkert
avstånd från en tänd grill.
7) För säkerhets skull är det alltid att
rekommendera att brandsläckningsutrustning finns till hands (ex en hink
vatten) vid användande av öppen eld dit
grillning räknas.
Om din Barbecook grill dessutom är
utrustad med QuickStop
®
är det en fördel
om du använder denna funktion när du
grillar.
8) Undvik att grilla över öppen låga, vänta
tills en fin glöd uppstår, det blir bättre
resultat då.
9) Om du grillar fet eller kraftigt marinerad
mat som droppar, kan du med fördel
använda en Barbecook grillpanna (art.nr
223.0220.20 sid 22 i katalogen)
10) Använd alltid torr och om möjligt kol enl.
Svenska SIS-normen 18 72 10 som enl.
koldistributören då garanterar lättantändlighet,jämn och ren glödbädd samt högt
värmevärde.
FÖRSTA ANVÄNDNINGSTLLFÄLLET
Innan du använder din Barbecook-grill första
gången måste du låta den brinna c:a 30 min.
Utan någon mat på. Det är absolut
nödvändigt att elda in grillen på detta sätt
första gången du skall grilla.
NYTTIGA TIPS
SÄKERHETSÅTGÄRDER
1) All kolgrillning får endast ske utomhus.
2) Placera alltid grillen på ett fast och stadigt
underlag utan farlig närhet till föremål
som kan fatta eld eller smälta.
3) Töm om möjligt QuickStop
varje grillning.
4) Använd inte för mycket grillkol när du
grillar, fyll på efter hand istället.
5) Använd aldrig alkohol eller bensin för att
tända eller sätta ny fart på grillen.
Flytta aldrig grillen innan den har
slocknat helt.
®
på aska efter
GARANTI
För Barbecook-grillar gäller en garanti på två
år från och med inköpsdatumet för
eventuella tillverkningsfel. Garantin gäller
endast under förutsättning att den Barbecook
produkt som omfattas av garantin används
enl. beskrivningen i denna bruksanvisning.
Spara inköpskvittot som då gäller som
garantibevis.
VIKTIG INFORMATION
Denna Barbecook produkt är inte
konstruerad för yrkesmässig användning.
Eventuellt slitage, rostbildning, (gäller ej
rostfria modeller) värmedeformation och
missfärgning (i synnerhet på de rostfria
modellerna) av de delar som utsätts för
värme, är normalt och betraktas under inga
omständigheter som tillverkningsfel. Det är
en logisk följd av användningen.
Detta innebär att bottengallret som utsätts
för extremt hög värme efter en tid ser ut som
"rostigt" kan slå sig av värmen, och kan
behöva bytas ut efter några års användande.
16
Page 18

Barbecooks rostfria modeller är tillverkade
av ett rostfritt stål typ AISI 304/430
Grillgaller, värmegaller samt bygel är
tillverkade i kromat stål.
GRATULERER MED DIN NYE
BARBECOOK®!
!VIKTIG:
Barbecook®QuickStart®har et svært enkelt
tennesystem, slik at du ikke behøver å bruke
tennvæske eller andre tennprodukter.
Følg alltid bruksanvisningen
MONTER
1) Monter hjulene (nr.7) på det venstre
understellet (nr.3) en fest med de
tilhørende klemmene (nr. 8). Sørg for at
klemmene settes fast skikkelig.
2) Monter tverrøret (nr. 9) på begge
understellene og fest det med de
tilhørende skruene (nr. 6)
3) Skyv deretter hjelpebordet (nr. 11) i
metallsporene som er laget i understellet.
4) Monter ildstedet (nr. 2) og fest det ved
hjelp av de tilhørende skruene (nr. 4 og
5).
5) Fest de to tennrørene (nr. 15) på
beholderen (nr. 2) ved hjelp av de tre
skruene og mutrene (nr. 15).
6) Fest askeskuffen (nr. 14) på tennrøret ved
hjelp av klemmene (nr. 13)
7) Plasser de to bunnristene av rustfritt stål i
ildstedet (nr. 1).
8) Skyv til slutt stekegrillen (nr. 12) til
ønsket høyde.
BRUKSANVISNING
A) Påtenning:
Ta ut bunnristen (1). Krøll tre doble
avispapirark hver for seg i form av en
fakkel. Stikk inn avispapiret i røret. (13).
Sett bunnristen tilbake og strø på tørr
trekull (ikke bruk altfor mye trekull ved
påtenning).
Åpne spjeldet og tenn på avisene ved hjelp
av en lang fyrstikk eller lighter. Det
brennende papiret rekker til å tenne på
kullet. Røyken som oppstår etter
påtenning skyldes fuktighet i kull og
avispapir. Etter ca. 15 minutter (minst) er
din barbecook
®
klar til bruk (da har det
dannet seg et lag med hvit aske oppå det
glødende trekullet).
Vi anbefaler at du legger på stekeristen
først når barbecuen er klar til bruk.
B) Justering av ilden:
Det er enkelt å justere ildens intensitet
ved å åpne eller lukke spjeldet.
C) Vedlikehold:
Ta ut bunnristen etter bruk, og børst
asken til midten av karet. Skill deretter
barbecook
®
fra QuickStop®og kast
blandingen av vann og aske på et egnet
sted.
FØRSTE GANG DU BRUKER
BARBECUEN
Vi anbefaler på det sterkeste å la din
barbecook®brenne i ca. 30 minutter uten å
tilberede mat når du bruker den for første
gang. Denne tiden er helt nødvendig til å
innlede bruken av den.
NYTTIGE TIPS OG
FORHOLDSREGLER
1) Dette apparatet bør kun brukes utendørs.
2) Sett alltid barbecuen på et stabilt
underlag, og ikke i nærheten av
gjenstander som kan brenne eller smelte.
3) Vi anbefaler å tømme QuickStop
hver bruk.
4) Karet til din barbecook
®
har et innhold på
ca. 8L. (Optima) – 10L. (Major & Arena).
Ikke bruk for mye trekull i karet (maks.
50 %)
5) Bruk aldri alkohol eller bensin for å tenne
eller få ilden til å ta seg.
®
etter
17
Page 19

6) Flytt aldri barbecuen før ilden er helt
sloknet, og barbecuen er fullstendig
avkjølt.
7) Hold barn og dyr på trygg avstand fra
barbecuen og beskytt deg selv mot ilden.
8) For sikkerhets skyld anbefaler vi at du
alltid setter en bøtte med vann eller sand
i nærheten av barbecuen når den er
påtent. For de modeller som er utstyrt
med QuickStop
®
, anbefaler vi at den fylles
med vann før hver bruk.
9) Stek aldri mat i selve flammene. Vent med
å steke til trekullet er dekket med et tynt
askelag. Vi anbefaler å bruke en grillpanne
for å tilberede fete matvarer.
10) Bruk alltid tørr og ren trekull av type DIN
51749.
GARANTI
Din barbecook®har en garanti på to år for
alle produksjonsfeil fra og med kjøpedato, og
såfremt den er brukt i overensstemmelse
med denne bruksanvisningen. Kassalappen
med apparatets kjøpedato gjelder som ditt
garantibevis.
Denne barbecook®egner seg ikke for
profesjonell bruk.
Eventuell slitasje, rust, deformasjon og/eller
fargeendringer (især på våre modeller av
rustfritt stål) av de delene som kommer i
direkte berøring med ilden, er normalt og vil
ikke under noen omstendighet bli betraktet
som produksjonsfeil, fordi det kun er et
logisk resultat av apparatets bruk.
Dette kan medføre sterk deformasjon av
bunnristen etter en tid, og det er normalt at
denne delen må skiftes ut.
VIKTIG! Med hensyn til modellene av
rustfritt stål understreker vi at selve
barbecuen er laget av rustfritt stål AISI
304/430 mens stekeristen og bøylen er laget
av forkrommet stål.
ONNITTELEMMEL OLET OSTANUT
®
UUDEN BARBECOOK
GRILLIN
!TÄRKEÄÄ:
Barbecook®QuickStart®-grillissäsi on varsin
yksinkertainen sytytysjärjestelmä, jonka
ansiosta sinun ei tarvitse käyttää
sytytysnestettä tai muuta sytytysainetta.
Noudata aina käyttöohjeita
ASENNA
1) Asenna pyörät (nro 7) vasemmanpuoliseen alustaan (nro 3) ja kiinnitä ne
mukaan kuuluvilla kiinnittimillä (nro 8).
Varmista että kiinnittimet istuvat tiukasti.
2) Laita poikkiputki (nro 9) molempiin alustoihin ja kiinnitä se siihen tarkoitukseen
oheistetuilla ruuveilla (nro 6).
3) Työnnä sen jälkeen puinen apupöytä (nro
11) alustassa oleviin metallisiin uriin.
4) Asenna tulisija paikalleen (nro 2) ja
kiinnitä se mukaan kuuluvilla ruuveilla
(nro 4 ja 5).
5) Kiinnitä kolmella ruuvilla ja mutterilla
(nro 15) kaksi sytytysputkea (nro 13)
laatikkoon (nro 2).
6) Kiinnitä tuhkalaatikko (nro 14)
kiinnittimillä sytytysputkeen (nro 13).
7) Aseta kaksi ruostumattomasta teräksestä
valmistettua alaritilää tulisijaan (nro 1).
8) Työnnä lopuksi grilliritilä (nro 12)
paikalleen halutulle korkeudelle.
KÄYTTÖOHJEET
A) Sytyttäminen:
Poista pohjaritilä (1). Kolme kaksinkertaisesta sanomalehtipaperista kaksi
erillistä soihtua ja pujota soihdut putken
aukkoon (13). Laita pohjaritilä takaisin
paikoilleen ja sirottele ritilälle kuivaa
puuhiiltä. (Älä käytä liian paljon puuhiiltä
sytytykseen).
Avaa ilma-aukon säädin ja sytytä
sanomalehtisoihdut pitkällä tulitikulla.
Palava paperi riittää hiilten sytyt-
18
Page 20

tämiseksi. Sytytyksen aikana muodostuu
savua joka johtuu hiilissä olevasta
kosteudesta ja sanomalehtipaperista.
15 minuutin kuluttua barbecook
®
on käyttövalmis (hiilloksen peittää nyt
hieno harmaa tuhkakerros).
Suosittelemme paistoritilän asettamista
grilliin vasta kun tämä on valmis
käytettäväksi.
B) Tulen säätäminen:
Tulen voimakkuuden voi helposti säätää
avaamalla tai sulkemalla ilma-aukon
säätimen.
C) Huolto:
Poista käytön jälkeen pohjaritilä ja harjaa
tuhka astian keskelle. Sen jälkeen irrotat
barbecook
®
-grillin QuickStop®ista ja voit
helposti heittää pois tuhka- ja vesiseoksen
sopivaan paikkaan.
-grillisi
6) Älä koskaan siirrä grilliä ennen kuin tuli
on täysin sammunut ja grilli on täysin
kylmennyt.
7) Katso lapset ja eläimet ovat turvallisella
etäisyydellä grillistä. Suojaudu tulta
vastaan.
8) Kehotamme sinua pitämään aina
varmuuden vuoksi sangollisen vettä tai
hiekkaa palavan grillin läheisyydessä.
Quikstopilla varustetuissa grillimalleissa
on syytä täyttää laatikko ennen jokaista
käyttökertaa.
9) Älä koskaan käristä liekeissä. Odota
kunnes puuhiili on peittynyt hienoon
tuhkakerrokseen. Rasvaisille ruoille
suosittelemme grillipannun käyttöä.
10) Käytä aina kuivaa ja puhdasta puuhiiltä,
tyyppiä DIN 51749.
TAKUU
ENSIMMÄINEN KÄYTTÖKERTA
Suosittelemme vakavasti että ensimmäisen
käyttökerran aluksi annat hiilten hehkua
noin kolmekymmentä minuuttia ilman että
valmistat grillillä ruokia. Tämä kuuma
esipoltto on todella tarpeen.
HYÖDYLLISIÄ VIHJEITÄ JA
HUOLTOTOIMENPITEITÄ
1) Tätä laitetta saa käyttää vain ulkoilmassa.
2) Sijoita aina grilli kiinteälle alustalle
riittävälle etäisyydelle herkästi syttyvistä
ja sulavista esineistä.
3) Suosittelemme Quikstopin tyhjentämistä
jokaisen käyttökerran jälkeen.
4) Barbecook
on noin 8L. (Optima) – 10L. (Major &
Arena). Älä täytä liikaa puuhiiltä
laatikkoon (enintään 50 %)
5) Älä koskaan käytä alkoholia tai bensiiniä
tulen sytyttämiseksi tai sen jälleen
sytyttämiseksi.
®
-grillin laatikon kapasiteetti
Barbecook®-grillissäsi on kahden vuoden
takuu. Se kattaa kaikki valmistusvirheet, ja
se on voimassa ostopäivästä lukien,
edellyttäen että grilliä on käytetty tämän
käyttöohjeen mukaisesti. Ostopäivämäärällä
varustettu kassakuittisi on takuutodistuksesi.
Tämä barbecook®-grilli ei sovellu
ammattikäyttöön.
Mahdolliset suoraan tulelle alttiiden
osien kulumiset, ruosteenmuodostukset,
epämuodostumiset ja värinmuutokset
(koskee eritoten malleja ruostumattomasta
teräksestä) ovat normaaleja, eikä niitä
missään tapauksessa katsota valmistusvirheiksi; ne ovat loogisia normaalin käytön
seurauksia.
Käytössä pohjaritilä voi jonkun ajan kuluttua
voimakkaasti vääntyä, jolloin on normaalia
että tämä osa on vaihdettava uuteen.
!TÄRKEÄÄ: Ruostumattomasta teräksestä
valmistetuissa malleissa itse grilli on
ruostumatonta terästä AISI 304/430, kun
taas grillausritilä ja suojakaari ovat
kromattua terästä.
19
Page 21

V
I
S
I
T
w
w
w
.
b
a
r
b
e
c
o
o
k
.
c
o
m
20
Page 22

barbecook®is a registered trade mark of
SAEY Home & Garden N.V.
Industrielaan 4
B-8501 Heule (Kortrijk)
Belgium
http://www.barbecook.com
 Loading...