

Page 1
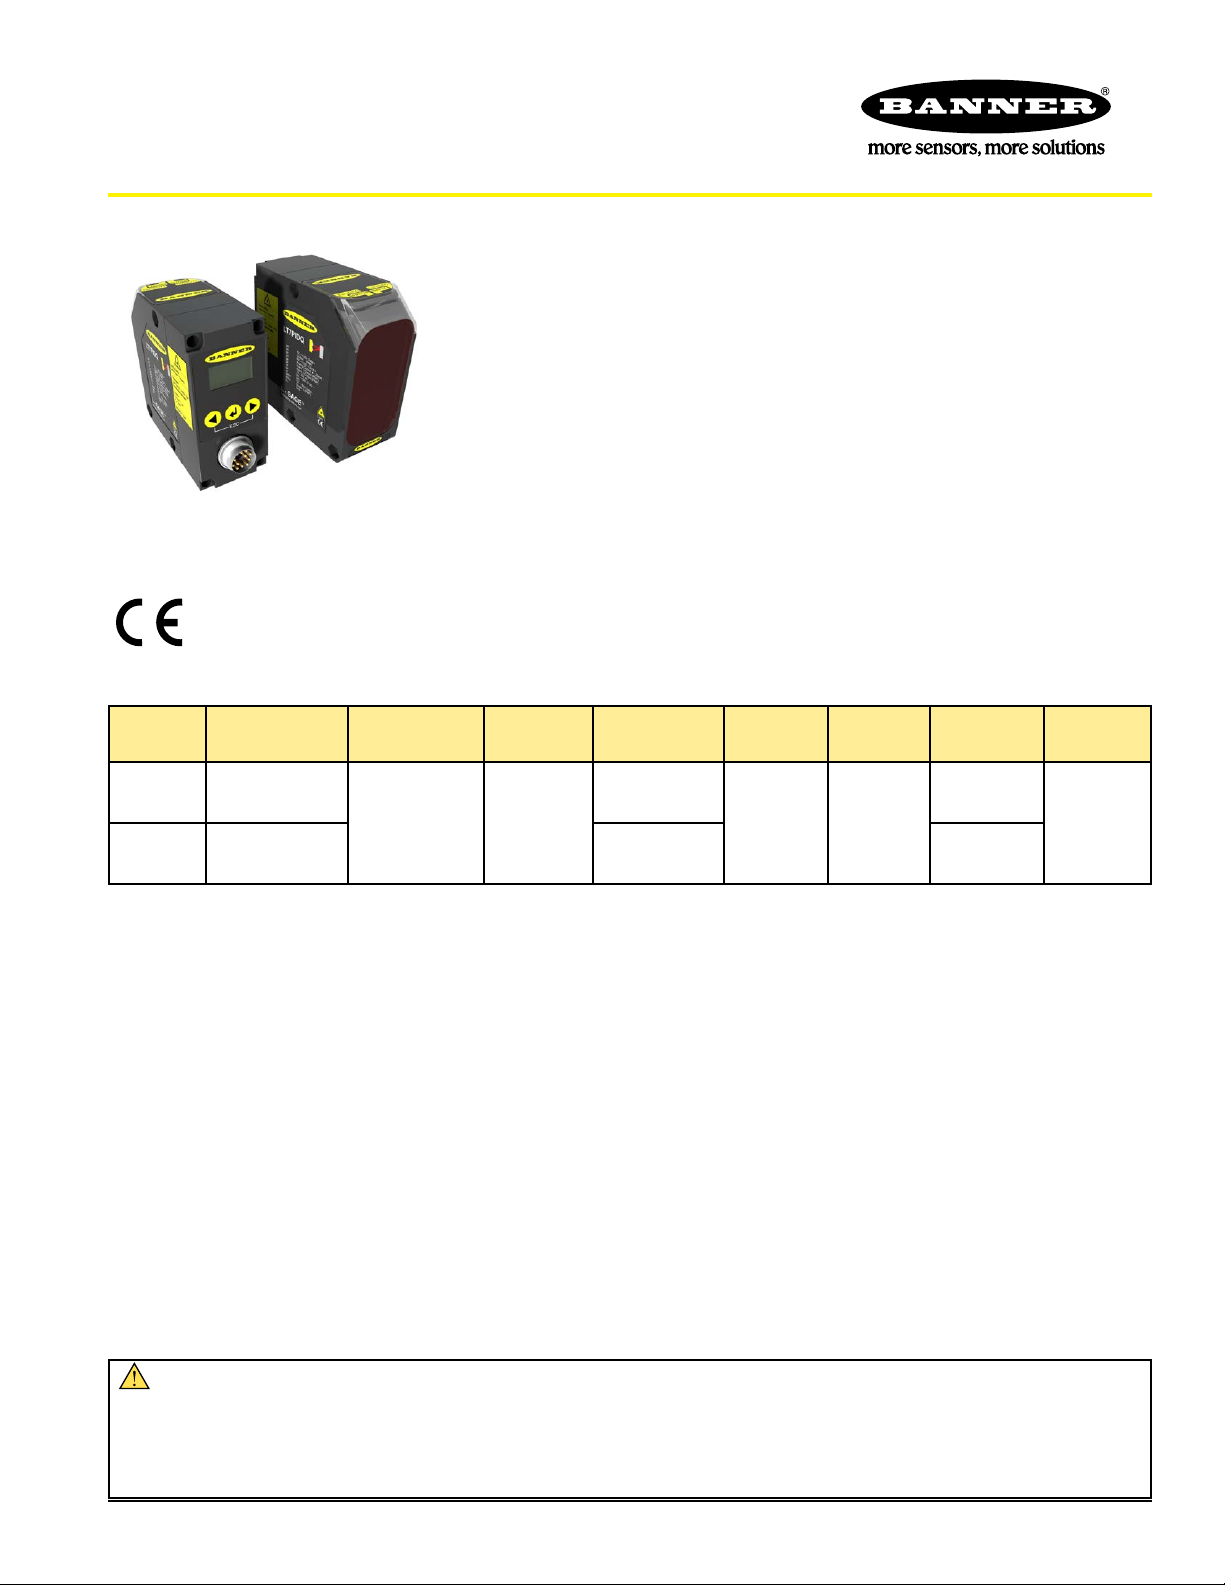
L-GAGE® LT7 Long-Range Time-of-Flight Laser Sensor
Self-contained retroreflective- and diffuse-mode laser distance sensors
Features
• Extremely long range: diffuse model up to 10 m with white target, up to 7 m with
gray target, up to 3 m with black target; up to 250 m for retroreflective models
• Visible pilot laser for easy alignment
• Multiple outputs in each model: discrete outputs can be used for precision
background suppression; and alarm outputs together with display provide easy
troubleshooting
• Diffuse models: Two discrete (PNP) plus 2 alarm outputs, and 4-20 mA analog
• Retroreflective models: Two discrete (PNP) plus 2 alarm outputs
• Fast, easy-to-use TEACH-mode programming via integrated push-buttons or serial
interface (no potentiometer adjustments)
• Ongoing LCD display of sensing distance (selectable in hundredths of an inch
or millimeters)
• RS422- or SSI-compatible serial connection options
Models
Sensing
Models
LT7PIDQ Diffuse
LT7PLVQ Retroreflective
Mode
Laser
Class Cable*
Class 2
Pilot Laser, Class
1 Sensing Laser
Integral
12-pin
M16 QD
connector
Sensing
Range**
0.5 to 10 m
(20" to 33')
0.5 to 250 m
(20" to 820')
Supply
Voltage
18 to
30V dc
* Requires a mating cable; see page 20.
** Diffuse-mode range specified using a 90% reflectance white card.
Retroreflective-mode range specified using the appropriate specified retro target; see page 22.
Discrete
Outputs
2 PNP
plus
2 Alarm
Analog
Output Serial
4-20 mA
RS422
or SSI
N/A
WARNING . . . Not To Be Used for Personnel Protection
Never use these products for personnel protection. Doing so could lead to serious injury or death.
These products do NOT include the self-checking redundant circuitry necessary to allow their use in personnel safety applications. A failure or malfunction can cause either an
energized or de-energized output condition. Consult your current Banner Safety Products catalog for safety products that meet OSHA, ANSI, and IEC standards for personnel
protection.
Printed in USA June 2013 P/N 120244 Rev. B
Page 2
L-GAGE® LT7 Long-Range Time-of-Flight Sensor
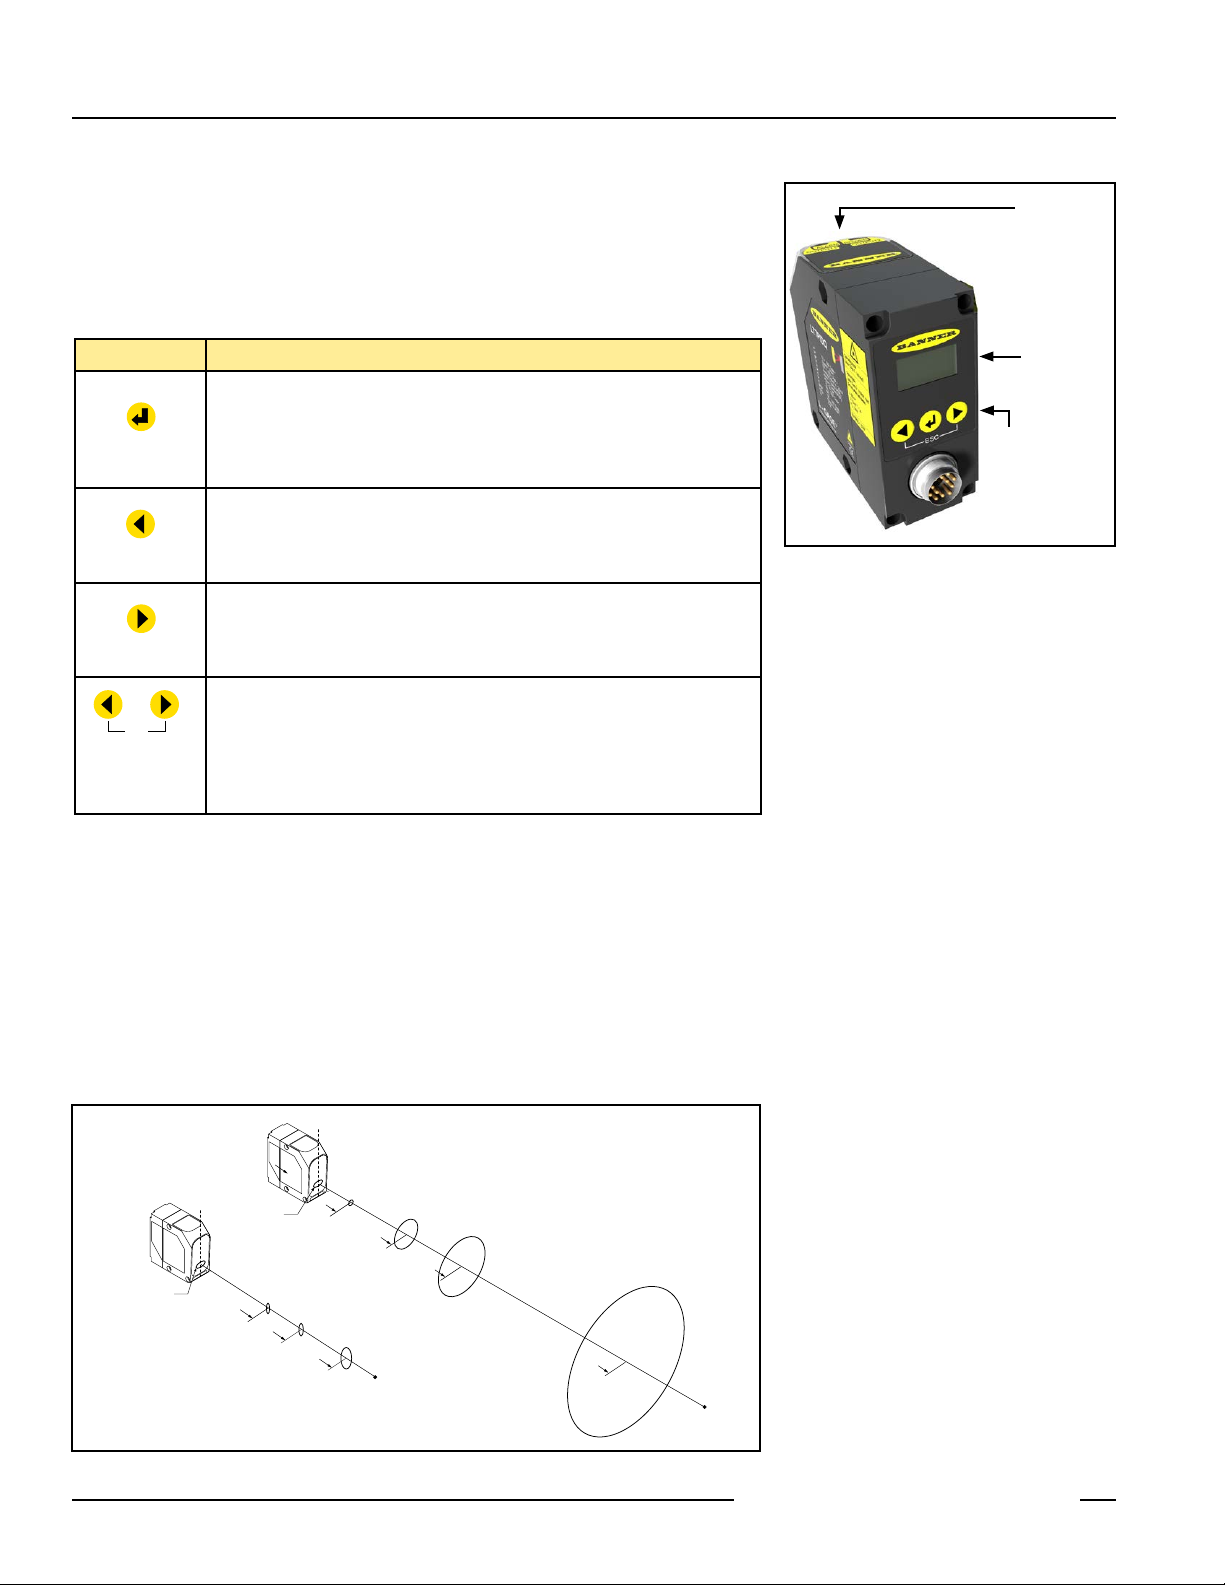
ESC
Diffuse
Overview
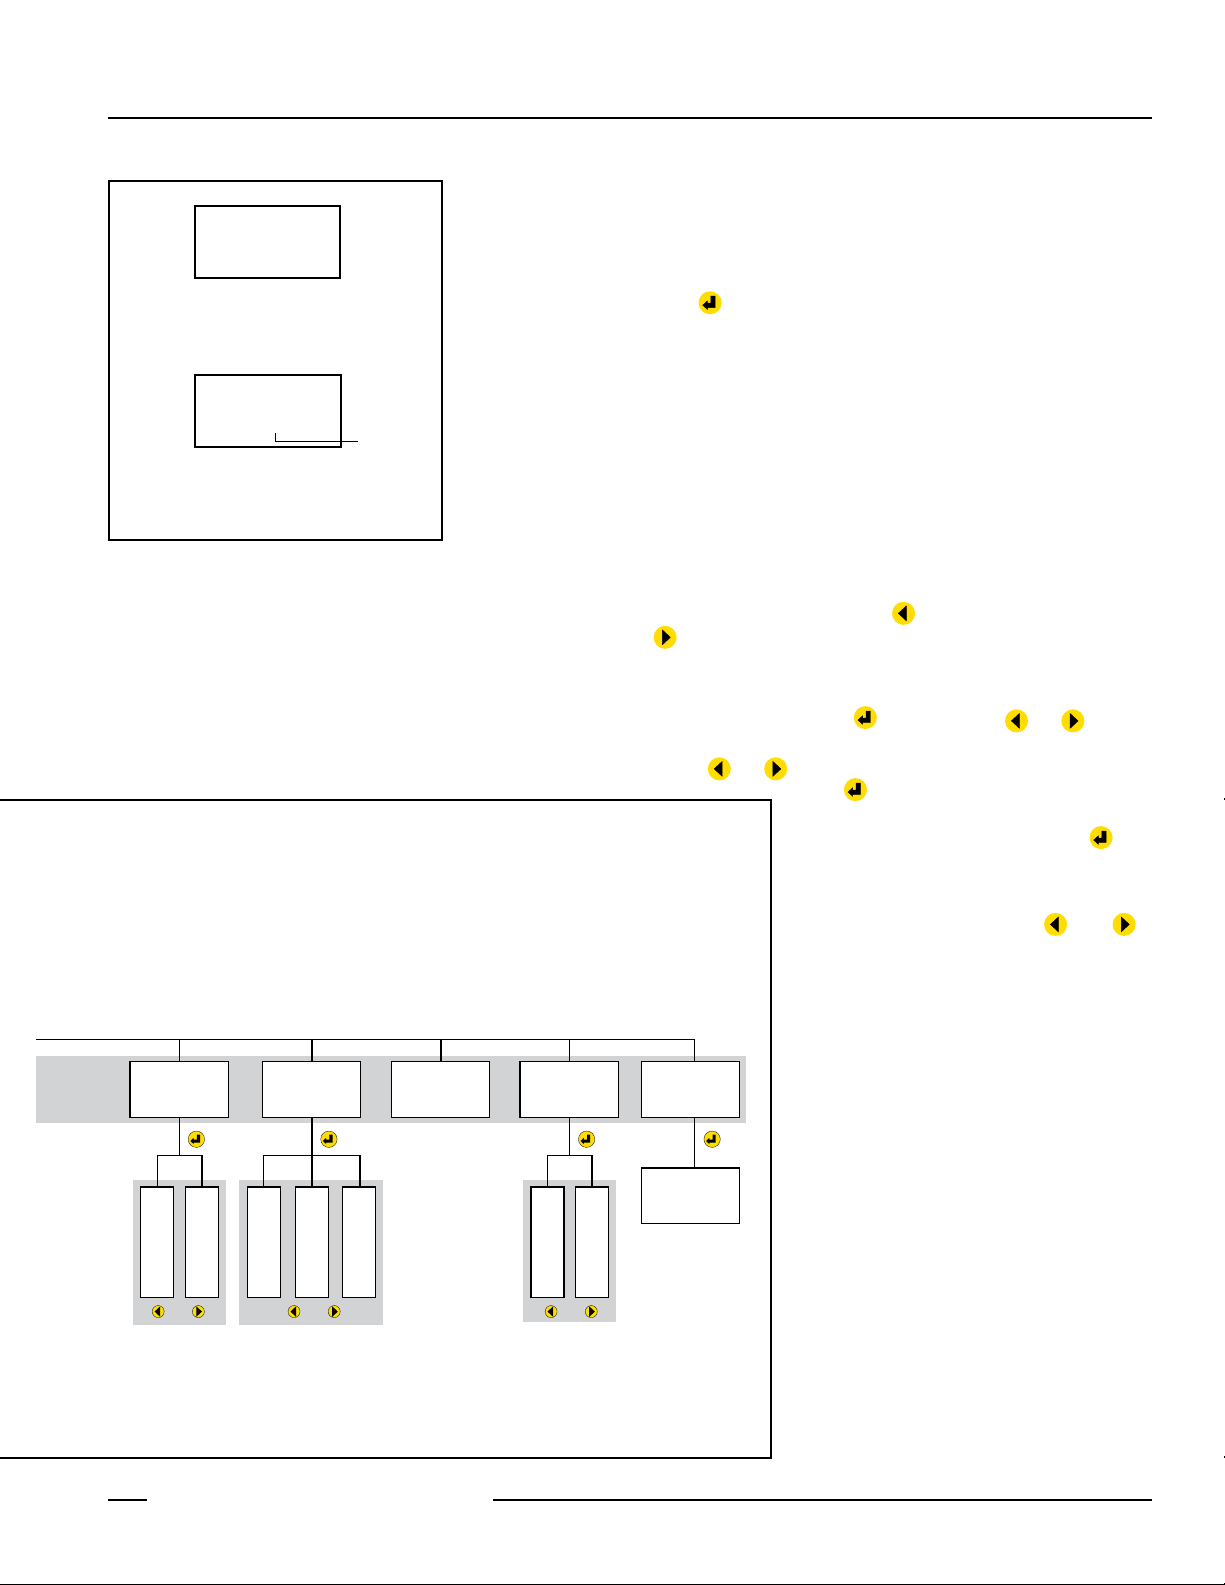
The sensor has an LCD display and 3 push buttons, which control all programming
functions. Serial interface programming can also be accomplished, via SSI or RS422.
Four status indicator LEDs on the sensor front/top provide ongoing status of power and
outputs.
Button Functions
• Run mode: Switches from Run mode to Programming mode
• Programming mode: Selects function and switches one menu level down
• Programming mode: Records value and switches one menu level up
Enter
Left Arrow
Right Arrow
Left and right
arrow buttons
simultaneously
• Manual adjust: Moves cursor one position to left or ends entry when cursor is
at the far left.
• Run mode: Press to light display
• Programming mode: Scrolls to the next menu position to the left (Figure 7)
• Manual adjust: Decreases current digit by 1
• QuickSet menu: Enables teach-in of Q1
• Run mode: Press to light display
• Programming mode: Scrolls to the next menu position to the right (Figure 7)
• Manual adjust: Increases current digit by 1
• QuickSet menu: Enables teach-in of Q2
• Escape: Cancels active function and switches to one menu level above (Figure
7) without saving new values
• Important: Both arrows must be pressed simultaneously. Previous value is
unchanged.
Status
Indicator
LEDs
2-line
Digital
Display
Programming
Push Buttons
Figure 1. Sensor features
The sensor has a 2-line LCD display and 4 LED indicators for ongoing indication of
sensing status: Power ON, Alarm, and Outputs 1 and 2.
In Run mode, the current measured value is displayed in the top line of the sensor’s
display, in millimeters or hundredths of an inch, as selected.
Sensing Options
Sensing Beam. The sensor uses an infrared Class 1 laser for sensing, and a visible red
Class 2 laser (or Pilot laser) for alignment. Both lasers are aimed at the identical target
spot. The laser beams are collimated to focus a compact spot, even at long sensing
distances (see Figure 2).
Retroreflective
10 m
4 x 12 mm
10 m
Ø 20 mm
50 m
10 x 20 mm
Ø 100 mm
100 m
Ø 200 mm
Ø 500 mm
250 m
10 x 5 mm
10 x 5 mm
3 x 10 mm
4 m
6 m
Figure 2. Light spot dimensions
2 P/N 120244 Rev. B
Banner Engineering Corp. • Minneapolis, MN U.S.A
www.bannerengineering.com • Tel: 763.544.3164
Page 3
L-GAGE® LT7 Long-Range Time-of-Flight Sensor
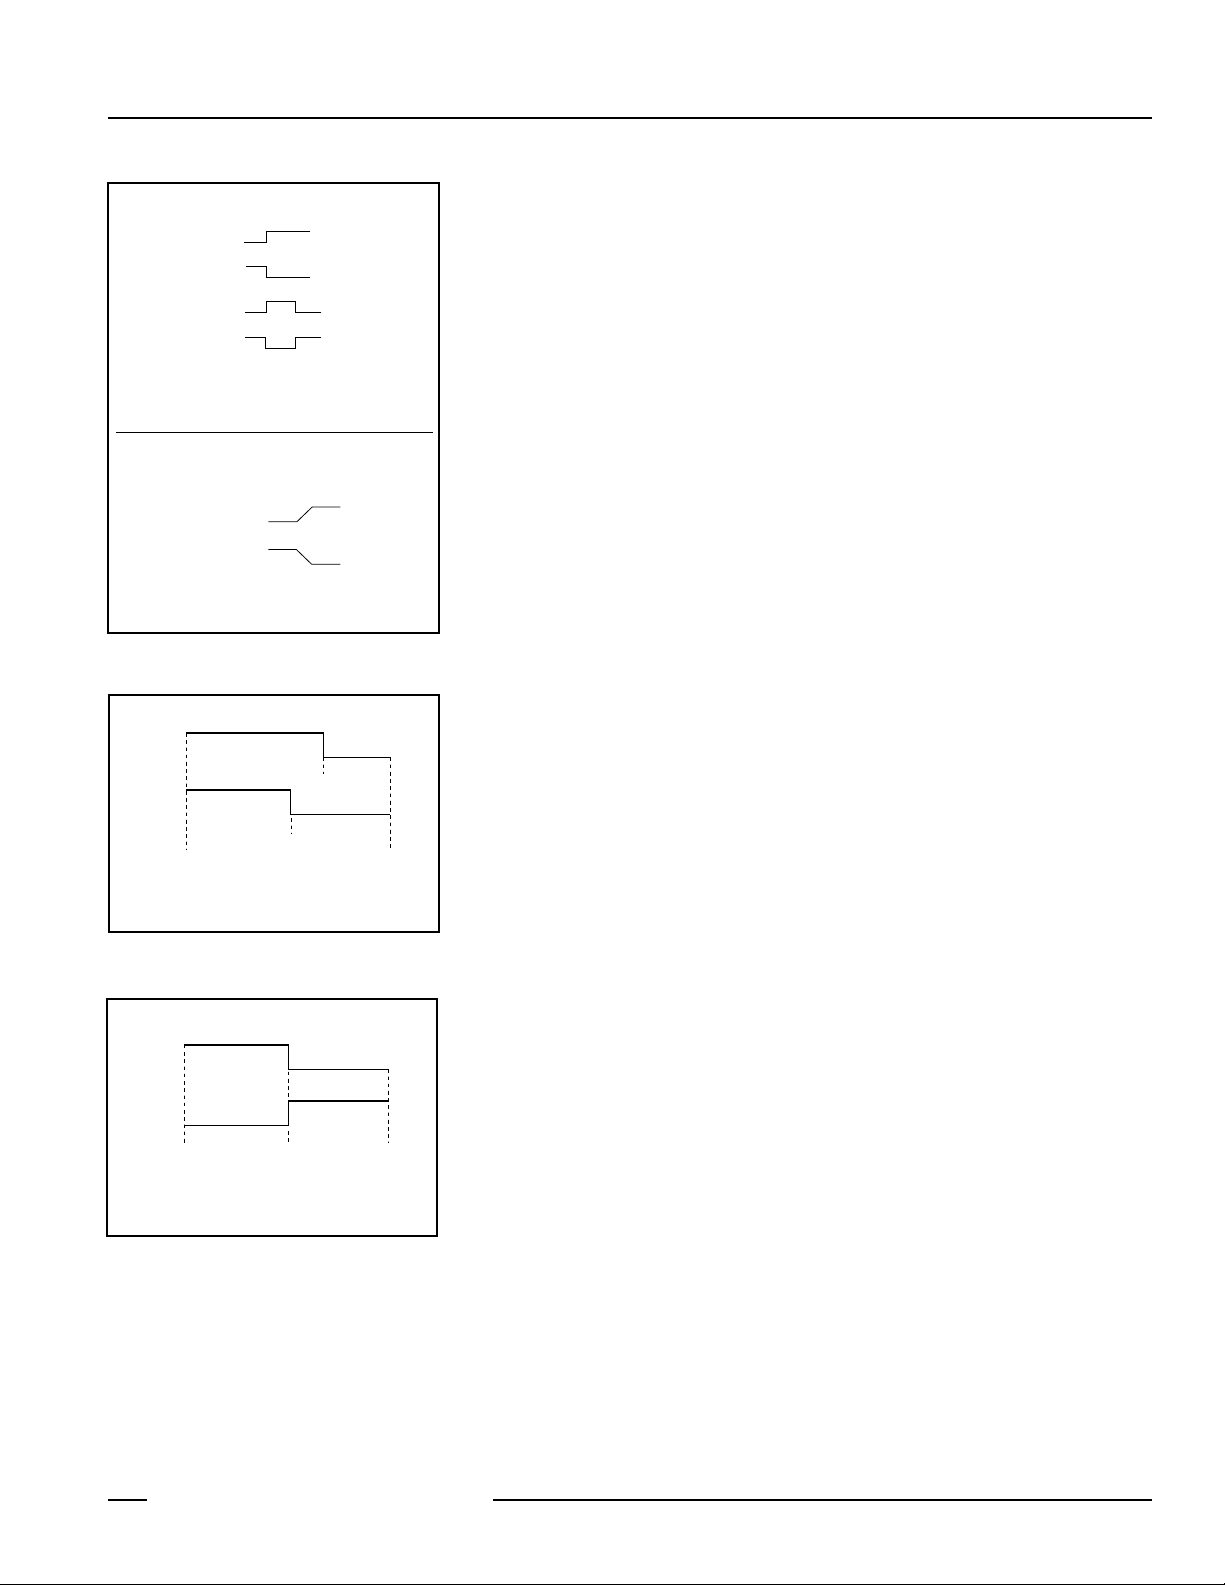
Discrete Outputs (Q1 and Q2) –
Single-point switching
Normally Closed
Normally Open
Two-point switching
Normally Closed
Normally Open
Hysteresis: Manually adjustable in ± 1 mm steps,
symmetrically around the switching point.
(If upper limit is reached, limit value of
measurement range becomes the upper limit.)
Analog Output (model LT7PIDQ only) –
NOTE: Analog A1 and A2 must be at least 300 mm apart.
A2
Mode 1 – Positive Slope
Mode 2 – Negative Slope
Two main TEACH methods:
• Individually teach A1 and A2 limits via manual input.
• Copy Discrete Output limits to Analog.
A1
A1
A2
Figure 3. Teach-mode options for each
output
Output 1
Output 2
Near
Sensing
Range
Figure 4. Each discrete output has its own limit for
background suppression
Output 1
Output 2
Near
Sensing
Range
Figure 5. The two discrete outputs share identical limits
for background suppression, but are
complementary
Point Q1.1
Teach
Point Q2.1
Teach
Point
(Q1.1 and
Q2.1 are
identical)
Teach
Far
Sensing
Range
Far
Sensing
Range
Password. A Password function is included to provide a measure of security for the
sensor settings. If Password is set to ON, the password must be entered before any
programming can take place. The password is always “1234”; it cannot be changed.
(The security results from the requirement to know the entry procedure and the timeout
function. If the password is not entered within approximately 10 seconds, the sensor will
return automatically to Run mode.) Measuring continues in the “background” while the
password is entered).
Select measurement in millimeters or inches (actually, hundredths of an inch. To “see”
whole inches on the display, imagine a decimal point on the display, two spaces in from
the right; see Figure 8).
Offset. An offset value can be entered or taught, which increases or reduces the measured
value, in order to compensate for a mounting position that does not correspond with the
zero point of the device. (For example, 3000 actual distance minus 1200 mm offset value
equals 1800 mm adjusted output value.) The offset value can be up to 100,000 mm (or
corresponding inch value); the plus or minus is also selectable. The offset value reverts to
0 if the factory preset function is used. The offset value applies equally to all outputs.
Factory Preset. Sensor easily reverts to factory preset conditions:
Teach-In –
Q1 and Q2 (Discrete) – single switchpoint (full sensing range), ± 5mm hysteresis
QA (Analog) – Mode 1, rising (positive slope, full sensing range)
Offset – 0
Unit – mm
Serial – RS422
Password – OFF
Multiple Outputs. The sensing distance can be taught using QuickSet, Teach-In, or by
manually entering the distance value(s). Either one or two sensing conditions may be
taught for each output (see Figures 4 and 5).
Discrete outputs: The two outputs may be configured identically or they may have
completely independent limits and configuration. One or two sensing conditions can be
taught for each. If one condition is taught, the output sets a switching threshold, around
which the selected hysteresis is applied. The two-point TEACH result differs, depending on
whether QuickSet or TEACH-IN is used to set the limits. In QuickSet, the sensor averages
the two taught values, then centers a 200 mm window around the averaged point (100
mm to each side). TEACH-IN window limits remain as taught; the window can be any
size. The selected hysteresis is applied to each threshold and window near limit and far
limit equally, no matter how they are taught.
Analog outputs: Analog limits 1 and 2 must be at least 300 mm apart. Individually teach
4 mA (A1) and 20 mA (A2) points or use the Copy function (selectable in the Analog
Output Mode menu) to copy the discrete limits (only the first limits of discrete 1 and 2) to
the analog output. (If copying Discrete limits to Analog, Discrete limits 1 and 2 must be
at least 300 mm apart, or sensor will not copy those limits.) The order in which they are
copied determines the analog output slope. For Mode 1 (positive slope) selected:
Q1, then Q2 – Limit Q1.1 becomes A1 (4 mA); Q2.1 becomes A2 (20 mA)
Q2, then Q1 – Limit Q1.1 becomes A2 (20 mA); Q2.1 becomes A1 (4 mA)
Manual Adjust: After Teach mode, Manual Adjust (or Edit) may be used to adjust the
value set for any output. It also can be used instead of Teach mode, to input a precise
limit value.
Banner Engineering Corp. • Minneapolis, MN U.S.A
www.bannerengineering.com • Tel: 763.544.3164
P/N 120244 Rev. B 3
Page 4
L-GAGE® LT7 Long-Range Time-of-Flight Sensor
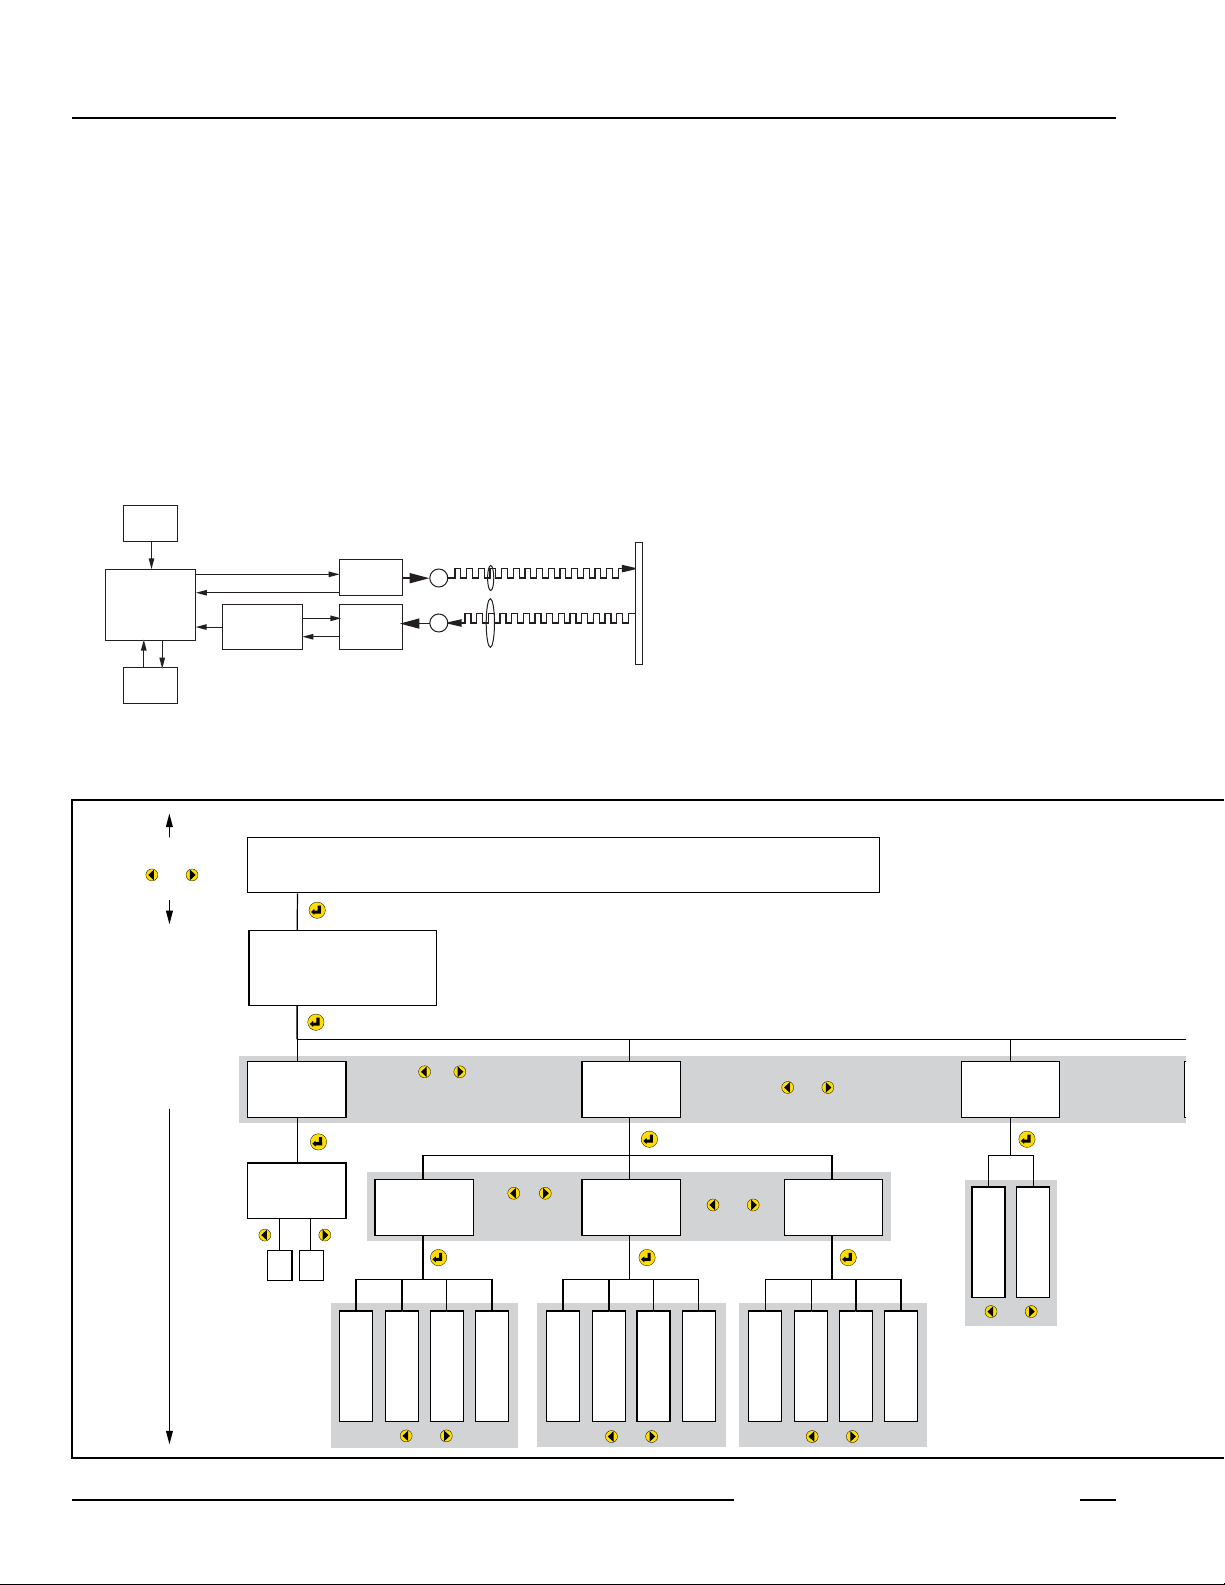
Mode Q1
Teach-In
(Set Q1)
Teach 1.1
Teach 1.2
Hyst 1
Teach-In
(Setup)
Mode Q2
Teach-In
(Set Q2)
Teach 2.1
Teach 2.2
Hyst 2
Mode Analog
Teach-In
Analog
Copy Q>A
Teach A1
Teach A2
Q1
Q2
QuickSet
(Enter)
4564 mm
Q1 |||| q2
Run Mode
Main Menu
Unit
(MM)
Unit > mm
Unit > inch
Serial > SSI
Password (Required only
if Password option is ON.
Factory preset is Password
OFF.
• Visible Pilot Laser OFF.
• Measuring Laser ON.
• Press or to
light display backlight
• Visible Pilot Laser ON.
• Measuring Laser ON.
• Display backlight ON.
Use or to scroll
between Main Menu
selections.
Use or to
scroll between
selections.
or
or or
or
or
Offset
(0)
Offset nnnn
Offset > clear?
or or or or
*Ext. Bus requires specialized sensor; not currently available.
Output 1
Menu
Output 2
Menu
Analog Output
Menu
Theory of Operation
A short electrical pulse drives a semiconductor laser diode to emit a pulse of light. The
emitted light is collimated through a lens, which produces a very narrow laser beam.
The laser beam bounces off the target, scattering some of its light through the sensor’s
receiving lens to a photodiode, which creates an electrical pulse. The time interval
between the two electrical pulses (transmitting and receiving the beam) is used to
calculate the distance to the target, using the speed of light as a constant.
Multiple pulses are evaluated by the sensor’s microprocessor, which calculates the
appropriate position value. The outputs energize whenever the target is located between
the user-programmed window limits or when the preset switching threshold is crossed.
Outputs may be programmed for a variety of functions.
User
Interface
Microprocessor
Time-of-Flight
Engine
Output
Circuitry
Figure 6. Theory of operation
Emitter
Circuitry
Analog
Signal
Processing
Laser
Lenses Target
Emitter
E
R
Receiver
Element
Figure 7. Programming menu tree
4 P/N 120244 Rev. B
Banner Engineering Corp. • Minneapolis, MN U.S.A
www.bannerengineering.com • Tel: 763.544.3164
Page 5
DIST mm
1475
Sensor measures 1475 mm distance
to target.
L-GAGE® LT7 Long-Range Time-of-Flight Sensor
Sensor Programming
The sensor may be programmed using either the on-board push buttons along with the
sensor’s LCD display, or via a serial interface. For serial interface instructions, see page
14. Sensor TEACH-mode instructions follow.
From Run mode, press Enter
OFF (factory setting), the sensor will proceed to the Main menu (see Figure 7). When the
sensor enters Programming mode, several things occur:
to access Programming mode. If Password is set to
DIST in
32512
Sensor measures 325.12" distance
to target.
Figure 8. Run mode display
Imaginary
decimal
point
• Sensor display lights up.
• Visible red Pilot laser turns ON.
• Measurement laser remains ON, alternating with the Pilot laser.
• Sensor proceeds to QuickSet on the Main menu (see Figure 7).
QuickSet: The received energy value is displayed in the form of a bar graph (the more
bars, the stronger the received signal). Outputs Q1 and Q2 are indicated as ON or OFF by
the LED indicators on the front of the sensor, and whether the “Q” is capitalized on the
display (Q1 = output 1 ON; q1 = output 1 OFF), press
to output Q1, and press
to teach the current condition to Q2. (Other Teach properties
to teach the current condition
are programmed in the Teach-In menu.) To quit the menu, use either the Enter button or
the Escape function.
Manual Adjust: After Teach-In and pressing Enter
to save, press
or
to
activate Manual Adjust (or Edit) mode for any output. The cursor flashes below the righthand digit of the display; press
or
to increase or decrease value by one unit.
Press
to save that digit and move cursor
to the next position left, and so on, until the
left-most digit is adjusted. Then press
to
adopt the manually adjusted value and switch
one menu level up.
Escape function: Press buttons
and
simultaneously to escape; sensor will go up
one menu level each time, and may not retain
new settings, depending on the programming
procedure.
Unit
(MM)
Unit > mm
Unit > inch
or or or
Banner Engineering Corp. • Minneapolis, MN U.S.A
www.bannerengineering.com • Tel: 763.544.3164
P/N 120244 Rev. B 5
Serial
(RS422)
Serial > SSI
Serial > Ext. Bus*
*Ext. Bus requires specialized sensor; not currently available.
RS422
(see page 13)
Serial > RS422
Password
(OFF)
Password (OFF)
Password (ON)
Factory
(Preset)
Factory > OK
Page 6
L-GAGE® LT7 Long-Range Time-of-Flight Sensor
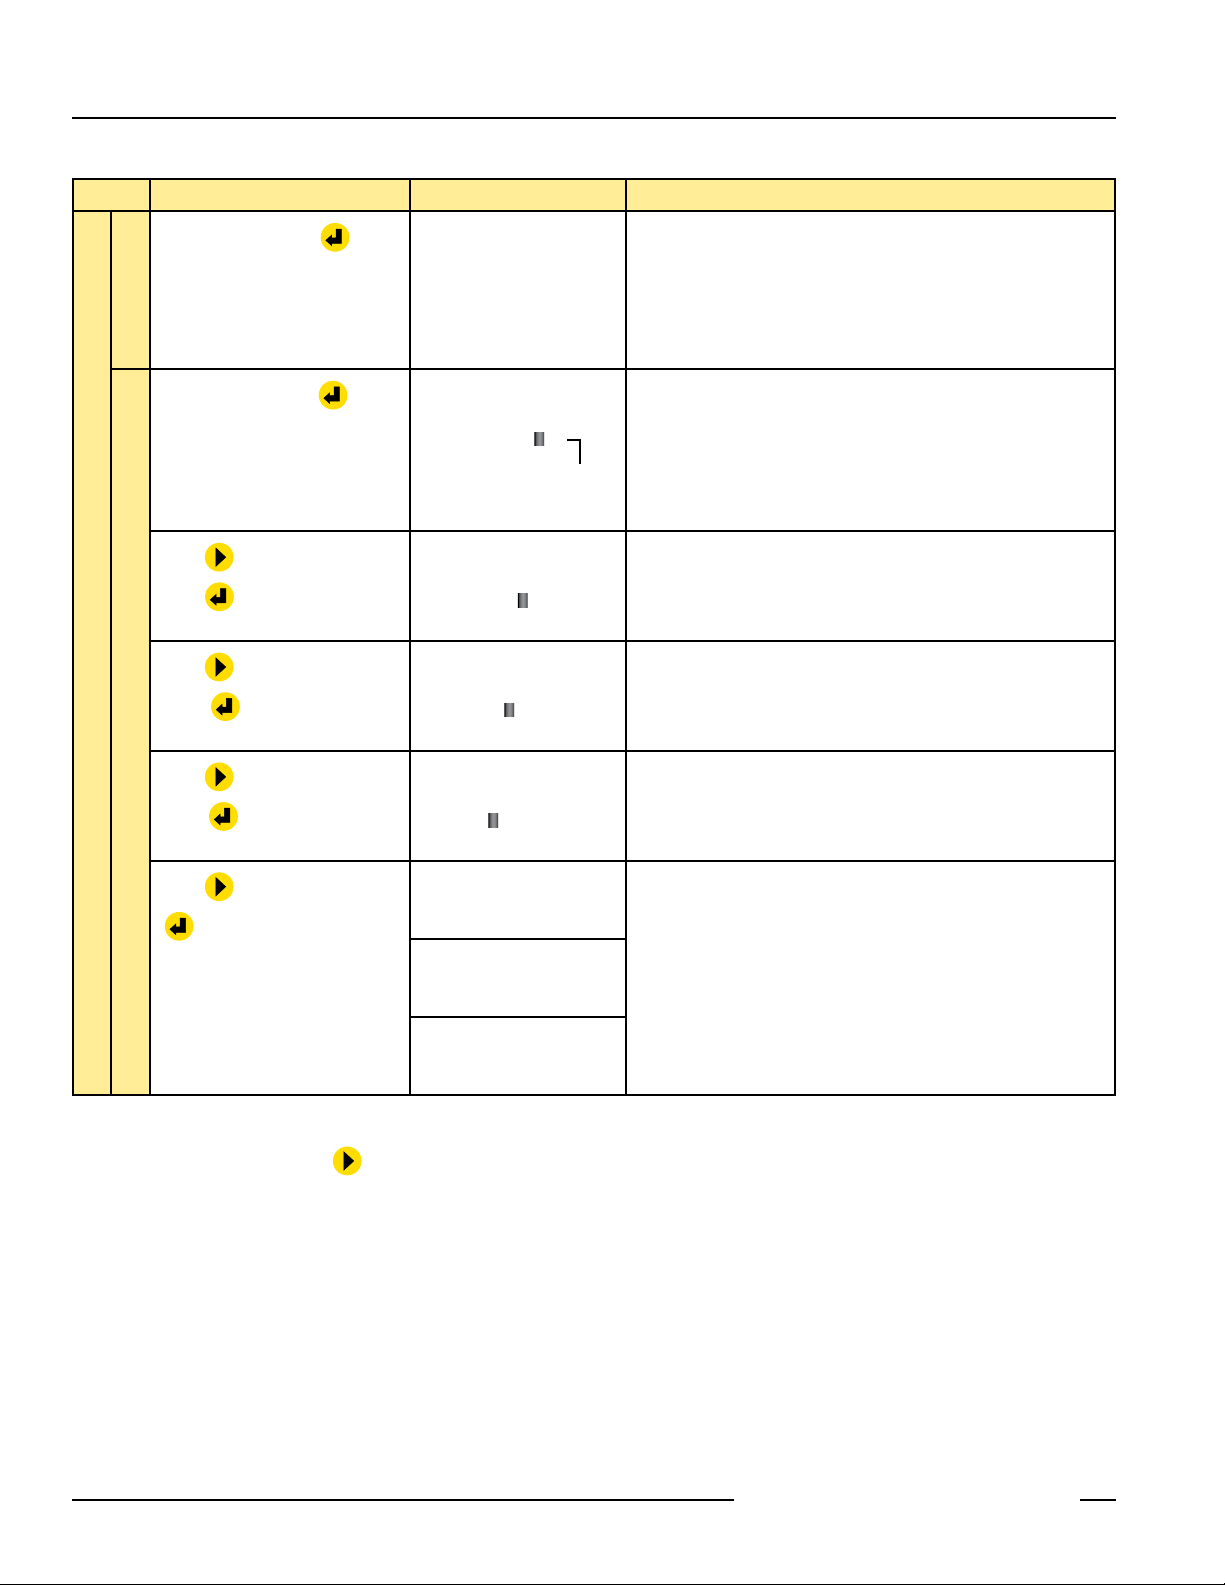
Procedure Example Displays Result
QuickSet
From Run mode, press
<ENTER>
No Password
If password is not required (factory preset condition), sensor proceeds
to QuickSet on the Main menu (Figure 7).
From Run mode, press
Press
press
Press
Programming Mode
press
Press
button 4 times,* then
button 3 times, then
button twice, then
Password Required
press
Press
button once, then press
PASSWORD
_ _ _ _
Blinking
Cursor
PASSWORD
_ _ _ 4
PASSWORD
_ _ 3 4
PASSWORD
_ 2 3 4
PASSWORD
1 2 3 4
PASSWORD
OK!
Sensor waits for valid password (1234); cursor blinks on right-hand
digit. If no password is begun within 10 seconds, sensor returns
automatically to Run mode.
Sensor inserts a 4 in the right-hand digit, then moves blinking cursor to
third position.
Sensor inserts a 3 in the third digit, then moves blinking cursor to
second position.
Sensor inserts a 2 in the second digit, then moves blinking cursor to
first position.
Sensor displays completed password and OK message, then proceeds
to QuickSet on the Main menu.
* Either arrow button may be pressed;
6 P/N 120244 Rev. B
QuickSet
ENTER
button will decrease number by one each time.
Banner Engineering Corp. • Minneapolis, MN U.S.A
www.bannerengineering.com • Tel: 763.544.3164
Page 7
L-GAGE® LT7 Long-Range Time-of-Flight Sensor
q1 Q2
196
Main
Menu
QuickSet
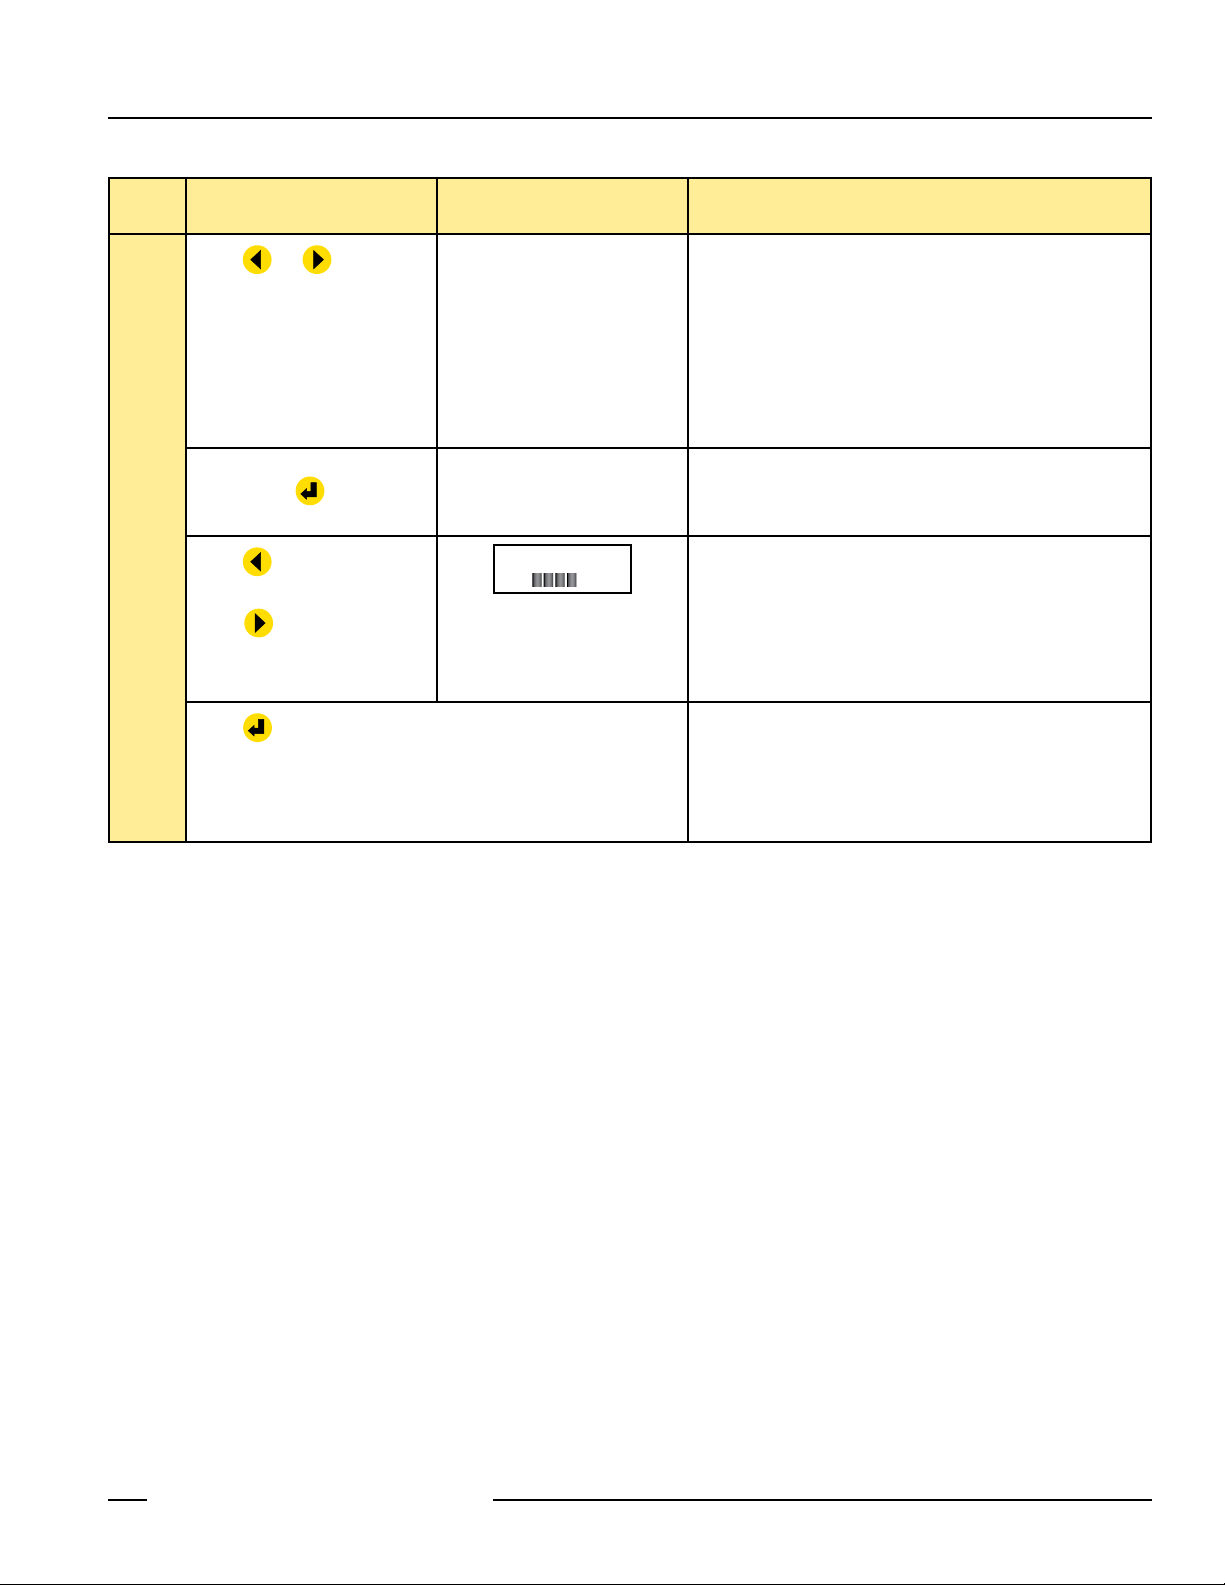
Procedure Example Displays Result
QuickSet
Press
through Main menu options
With QuickSet visible on the
display, press
Press
<ENTER>
condition to Output 1.
Press
condition Output 2.
Press
– or –
Use Escape function*
or
to teach current
to teach current
to scroll
Bars indicate a strong signal
TEACH IN
OFFSET
UNIT
SERIAL
RS422
PASSWORD
FACTORY <PRESET>
QuickSet
<ENTER>
196 mm to target
Output 1 OFF
Output 2 ON
Sensor scrolls through Main menu options.
See following steps for procedures if other than QuickSet is
selected.
Sensor enters QuickSet program.
Current measured value is displayed on top line; received energy
value is indicated by bar graph (the more bars, the stronger the
received signal). Outputs Q1 and Q2 are indicated as ON or OFF by
the LED status indicators and by whether the “Q” is capitalized on
the display (Q1 = Output 1 ON; q1 = Output 1 OFF).
Sensor saves settings and returns to Main menu.
* Escape function available throughout Programming mode; returns sensor one step higher in menu.
Banner Engineering Corp. • Minneapolis, MN U.S.A
www.bannerengineering.com • Tel: 763.544.3164
P/N 120244 Rev. B 7
Page 8
L-GAGE® LT7 Long-Range Time-of-Flight Sensor
Main
Menu
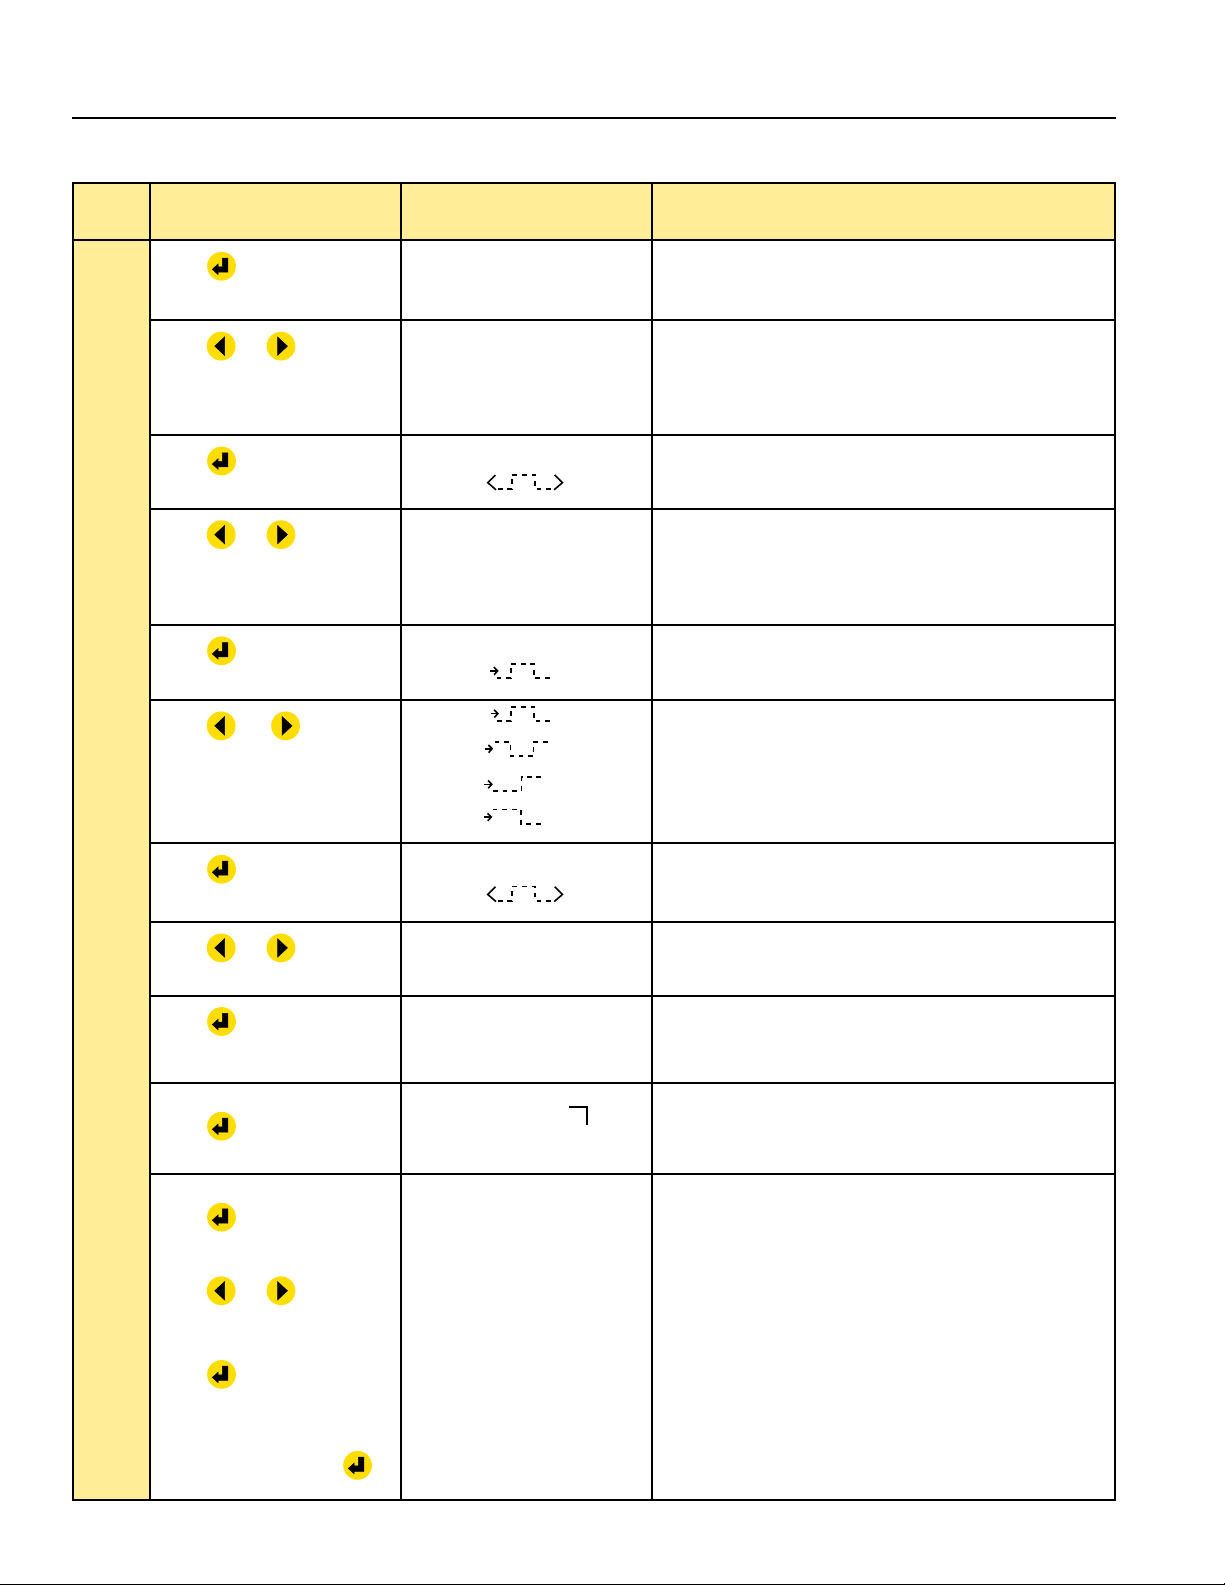
Procedure Example Displays Result
Press
menu.
Press
through output options.
Press
output.
Press
through options for Output 1.
Press
options.
Press
through options.
to enter TEACH-IN
or
to scroll
to select displayed
or
to scroll
to view output mode
or
to scroll
TEACH-IN
<SETQ1>
<SETQ1>
<SETQ2>
<ANALOG> (diffuse model only)
MODE Q1 Sensor displays current output and mode selections.
MODE Q1
TEACH1.1
TEACH1.2
HYST 1
MODE Q1 Sensor displays arrow to denote options can be viewed.
Sensor displays current output selected.
Sensor displays output options.
Sensor displays TEACH options for selected output.
See following steps for procedures if other than mode Q1.
Sensor displays output mode options.
TEACH-IN
Press
output mode.
to select displayed
(Setup) – Discrete
Press
through options for Output 1.
Press
option.
TEACH1.1
Press
condition.
Manual Adjust
Press
Adjust.
Press
or increase value of each digit.
Press
one digit left.
When cursor is at left-hand digit
or
to select displayed
to teach target
to access Manual
or
to select and move
to scroll
to decrease
MODE Q1 Sensor saves selected option.
TEACH 1.1
< 203>
TEACH 1.1
203
TEACH1.1
<241>
TEACH1.1
241
Limit 1 value
Sensor again displays TEACH options for selected output.
Sensor is ready to learn limit 1.
Proceed by teaching limit 1.1 target condition or via Manual Adjust
Sensor saves limit 1 setting and returns to Output 1 menu level.
Blinking cursor indicates active digit (beginning with right-hand
digit).
Sensor saves setting and returns to Output 1 menu level.
and value is correct, press
8 P/N 120244 Rev. B
Banner Engineering Corp. • Minneapolis, MN U.S.A
www.bannerengineering.com • Tel: 763.544.3164
Page 9

L-GAGE® LT7 Long-Range Time-of-Flight Sensor
Main
Menu
Procedure Example Displays Result
TEACH 1.2
From Output 1 menu, press
teach 1.2 limit.
Repeat process on previous page
for limit 1.2.
Hysteresis
Press
function.
Press
increase value of each digit.
Press
TEACH-IN
digit left.
(Setup) – Discrete
When cursor is at left-hand digit
and value is correct, press
Use Escape function to go up one
menu level, or use
return to other Output 1 functions.
to
to select hysteresis
or
to decrease or
to select and move one
or
to
TEACH1.2
<12000>
HYST 1
< ±005>
HYST 1
±254
HYST 1
<±254> If value
is valid
– or –
HYST 1
LIMITED! If value is
outside
accepted limits
Sensor again displays TEACH options for selected output.
Blinking cursor indicates active digit (beginning with right-hand
digit).
Factory default setting is ± 005 (the minimum setting).
Maximum hysteresis setting is ± 254 mm or ± 9.99".
Sensor saves setting and returns to Hyst 1 menu level.
Repeat as desired for Output 2.
Teach processes for Outputs 1 and 2 are identical.
If value is outside accepted limits, sensor does not save new
setting.
TEACH Analog output individual limits using the same procedures as described above (except that the Analog output has no hysteresis
option). The Analog output has one unique function – copying the Discrete output limits (Q1.1 and Q2.1); for this procedure, see steps
below.
From TEACH-IN menu,
press
scroll to Analog Teach.
Select Analog mode, as for
discrete limits.
Press
TEACH-IN
Press
between options.
Press
option.
and
or
to copy Q to A
and
to select displayed
or
to scroll
to
(Setup) – Analog; Copy Discrete Limits
(If discrete limits are less than 300 mm apart)
TEACH-IN
<ANALOG>
COPY Q->A
<ENTER>
COPY Q->A
->Q1 & Q2
– or –
COPY Q->A
->Q2 & Q1
– or –
<300 mm
Sensor is ready to learn analog limits.
Procedure is identical to teaching discrete limits, except for copy/
paste function.
Sensor is ready to copy discrete limits to Analog output.
The option selected, in combination with the selected mode,
determines the analog output slope.
For Mode 1 (positive slope):
Q1 & Q2 – Limit Q1.1 becomes A1 (4 mA); Q2.1 becomes A2 (20
mA)
Q2 & Q1 – Limit Q1.1 becomes A2 (20 mA); Q2.1 becomes A1
(4 mA)
For Mode 2 (negative slope), the above is reversed.
If discrete limits are not at least 300 mm apart, display will show
< 300 mm and sensor will not perform the copy function.
Banner Engineering Corp. • Minneapolis, MN U.S.A
www.bannerengineering.com • Tel: 763.544.3164
P/N 120244 Rev. B 9
Page 10

L-GAGE® LT7 Long-Range Time-of-Flight Sensor
Main
Menu
OFFSET
Procedure Example Displays Results
NOTE: Selected Offset value applies to all outputs equally.
Press
To Clear Offset, press
To Adjust Offset:
If no value was previously entered,
current sensing distance will be
displayed.
< 0 >
Press
distance.
-or-
Use
Offset Value adjustment.
to enter Offset menu.
to save current sensing
and
to activate
OFFSET
0
-then-
OFFSET
426
-or-
OFFSET
->CLEAR?
OFFSET
CLEARED!
OFFSET
0
-then-
OFFSET
426
• Used to zero sensor to predetermined setting.
• Expressed in either mm or hundredths of an inch, depending on
Unit selected (see below).
• Displayed Offset value is equal to the previously programmed
setting, followed by the current sensing distance.
• See following steps for procedure if other than Offset Value is
selected.
• If no value was previously entered, current sensing distance will
be displayed; see steps below.
• If a value is currently entered, the first option will be Offset
Clear?
Sensor clears Offset Value setting and returns to Main menu.
Cursor blinks on right-hand digit.
Press
decrease or increase value of each
digit;
hand digit between + and -.
Press
blinking cursor one position to left.
When cursor is at left-hand digit
and value is correct, press
Press
Press
between mm and inch options.
or
or
to save digit and move
or
UNIT
< MM >
When correct option is displayed,
press
.
10 P/N 120244 Rev. B
to
also toggles left-
to toggle
OFFSET
- 428
OFFSET
< -428>
UNIT
->MM
– or –
UNIT
->INCH
DIST mm
<5392>
Sensor saves each digit sequentially (including + or - sign).
Sensor saves setting and returns to Main menu.
Sensor is ready to accept new unit setting.
Select measurement in millimeters or inches (actually, hundredths
of an inch. To “see” whole inches on the display, imagine a
decimal point, two spaces in from the right.)
Sensor saves setting and returns to Main menu.
Banner Engineering Corp. • Minneapolis, MN U.S.A
www.bannerengineering.com • Tel: 763.544.3164
Page 11

L-GAGE® LT7 Long-Range Time-of-Flight Sensor
Main
Menu
SERIAL
RS422
PASSWORD
Procedure Example Displays Results
See page 13.
RS422>
Dependent on serial connection selection; see page 13.
ENTER>
Press
• Press
< OFF >
• Press
• Press
or
between ON and OFF settings.
to save setting.
to enter Factory
Preset menu.
to toggle
PASSWORD
->OFF
PASSWORD
< OFF >
F-PRESET
->OK
Sensor is ready to accept new password setting.
If Password is set to ON, password must be entered each time
Programming mode is entered.
Sensor saves setting and returns to Main menu.
Returns sensor to factory preset conditions.
If activated, all previous settings are lost.
Use Escape function to exit without changing settings.
Factory settings are:
Teach-In – Limit value of measurement range; Q1 and Q2
single switching, normally open, analog mode 1, rising slope
Offset – 0
Unit – mm
Serial – RS422
Password – OFF
FACTORY
<PRESET>
Use Escape function to leave
settings as they are.
Press
Preset settings.
Use Escape function to return to
Run mode.
Run
Mode
Banner Engineering Corp. • Minneapolis, MN U.S.A
www.bannerengineering.com • Tel: 763.544.3164
P/N 120244 Rev. B 11
to revert to Factory
FACTORY
<PRESET>
F-PRESET
OK!
FACTORY
<PRESET>
DIST in
4839
Sensor returns to Main menu without changing settings.
Sensor returns to Main menu with factory preset condtions.
Sensor returns to Main menu with all saved settings.
Page 12

L-GAGE® LT7 Long-Range Time-of-Flight Sensor
Alignment
Wherever the visible pilot laser spot is located, the sensing/measuring laser will be located
in the same position. For fine adjustment, use bracket model SMBLT7 with the fine-adjust
accessory kit SMBLT7F (see page 22) to provide up to ±3° angle in both X and Y axes.
Aligning the sensor manually (without the alignment aid accessory) – either model:
1. Mount the sensor.
2. Activate any Programming menu item (see Figure 7), so that the pilot laser is
ON.
3. Hold the retroreflector or target object at a short distance, for example less than
1 m (3'), and verify that the laser light spot is centered on it.
4. Move the reflector or target to its final position; verify that the laser spot is still
centered on it. Adjust as necessary.
5. Tighten the sensor mountings.
Using the alignment aid. For precise alignment of retroreflective models at long
distances, the alignment aid accessory (see Figure 9) is useful. It makes the visible pilot
laser spot easier to adjust, even when it is positioned off of the retroreflective target and at
a long distance – farther than 50 m (160').
1. Mount the sensor.
2. Mount the alignment aid on the front of the sensor, over the laser emitters as
shown in Figure 9.
3. Activate any menu item (see Figure 7), so that the pilot laser is ON.
4. Aim the sensor at the reflector.
5. Rotating the barrel as needed (depending on sensor mounting location), look into
the sight hole from about 2" (50 mm) away.
6. Turn the focus screw (opposite the sight hole) to focus the spot as sharply as
possible.
7. Adjust the sensor or target position until the laser spot is centered on the target.
8. Tighten the sensor mountings, recheck alignment; if ok, remove alignment aid.
NOTE: While alignment aid scope is in place, any measurements shown on the display will
be inaccurate. Also, the Pilot LED will be visible only through the alignment aid sight hole
(red laser light will not be visible to the naked eye on the target or another surface).
Sight
Hole
Focus
Screw
Figure 9. Alignment aid, mounted on sensor
Installation Notes
Some targets (those with a stepped plane facing the sensor, a boundary line, or rounded
targets) pose specific problems for sensing distances. For such applications, see Figure
10 for suggested mounting orientations.
12 P/N 120244 Rev. B
Recommended
Not Recommended
Figure 10. Sensor orientation for typical
Banner Engineering Corp. • Minneapolis, MN U.S.A
www.bannerengineering.com • Tel: 763.544.3164
targets
Page 13

L-GAGE® LT7 Long-Range Time-of-Flight Sensor
Serial Communications
Factory delivery status settings are underlined below.
Serial Select (RS422/SSI)
With Serial Select it is possible to select the interface from RS422-compatible,
SSI1/10-compatible, or SSI1/8-compatible connections.
RS422-/ or SSI-Compatible
Depending on the setting made in Serial Select, the appropriate interface parameters are
displayed or altered. The following settings are possible:
• RS422
Baud rate: 4.8 or 9.6 or 19.2 or 38.4 or 57.6 kBaud
Data bit: 8 or 7
Stop bit: 1 or 2
REPEAT or SINGLE: REPEAT: the sensor continuously sends measured data via the
serial interface without waiting for a request.
SINGLE mode: a string of measured data is supplied only on request.
Parity: even (but not shown on LCD menu)
• SSI: 1/10 = LSB = 0.1 mm (10MIL) or 1/8 = LSB = 0.125 mm (8MIL)
6 possible codes:
BINARY24
BINARY24E
BINARY25
GRAY24
GRAY24E
GRAY25
Serial Response Speed
The distance measurement inside the sensor is recalculated every 12 ms. It is not a
moving average, but rather a new average is calculated for the previous 12 ms of data.
With the SSI output, the data can be read every 1.4 ms (likely the “same” reading for 8 or
9 readings, then a change). For most accurate target location prediction, sample at the 1.4
ms read rate of the SSI and see “when” the change happens. Worst case, that data will be
for the average target location over the previous 12 ms, plus 1.4 ms delay (i.e., the 12 ms
average was changed just after the previous read started).
Banner Engineering Corp. • Minneapolis, MN U.S.A
www.bannerengineering.com • Tel: 763.544.3164
P/N 120244 Rev. B 13
Page 14

L-GAGE® LT7 Long-Range Time-of-Flight Sensor
RS422 Protocol
All commands via the RS422 serial interface have the following structure:
<STX><Command><[Data]><EOT>
The sensor answers all commands as follows:
<NAK> = the command was not recognized or the data is outside
the limit values.
or
<ACK> = the command was recognized and executed; the command
requires no return data.
or
<Data> = the command was recognized and the requested data has
been sent.
RS422 Cable
The RS422 interface is defined as a reliable, serial interface in full duplex mode, with
transfer rates up to 10 MBaud; max. cable length 1,000 m (4,000'). The shielded cable is
connected to the sensor connector and the ground terminal of the control cabinet.
RS422 User Commands and Their Meanings
Command Data to LT7* Data from LT7 Meaning
Get All Parameters
All parameters in text format:
LT7 $Revision x.xx$
Pilot laser status • Pilot laser status (ON/OFF/xx seconds ON)
Serial settings • Serial settings (see page 13)
Discrete Output Q1 settings • Discrete output condition
Discrete Output Q2 settings
GAP
Analog Output QA settings • Analog output condition (Diffuse sensors only)
Output status • Output unit of measure (mm or hundredth inch “10MIL”)
Offset status • Offset setting (in mm or hundredth inch)
Password setting • Password (enabled/disabled)
Error status
ECM — ACK
GDB — Energy value — 0 to -120dB
GNR — xxxxxxxxxx
All sensor parameters are displayed:
• Sensor software revision (number)
ON: Output high
OFF: Output low
Output mode (see IM1, IM2)
Limit 1 setting (see IL1, IL2)
Limit 2 setting (see IL4, IL5)
Hysteresis (see IH1, IH2)
Invert status (ON/OFF; see IN1, IN2)
Value (0 to 4095)
Limit 1 setting (see IL3)
Limit 2 setting (see IL6)
Invert status (ON/OFF; see INA)
• Error status (see GSI)
Execute Continuous Measurement
Set and triggered by the next request for measured values
Gain Level
Indicates the amount of receiving energy
Get Serial Number
Emitted as ASCII text (max. 24 characters)
Definitions:
STX: start transmission (hex 02 or CTRL B)
EOT: end of text (hex 04 or CTRL D)
NAK: no acknowledgement (hex 15 or CTRL U)
ACK: acknowledge (hex 06 or CTRL F)
Command: 3-digit command (ASCII text)
[Data]: whole numbers (ASCII text)
In ASCII text (command + data), spaces and
capitals/small letters are ignored.
14 P/N 120244 Rev. B
Banner Engineering Corp. • Minneapolis, MN U.S.A
www.bannerengineering.com • Tel: 763.544.3164
Page 15

L-GAGE® LT7 Long-Range Time-of-Flight Sensor
Command Data to LT7* Data from LT7 Meaning
Get Error Status
0: No error
1: Error
Bit 7: Transmitter faulty
Bit 7
Bit 6
Bit 5
GSI —
X X X X X X X X
GTE — ±xxx
GVE — LT7 $Revision x.xx$
GCM — All available commands
ICM 0, 1 ACK
IDO Input desired value ACK
IVL 0, 1 ACK
ISB 0, 1 ACK
ESM — <meas. value>
EPW — ACK
Discrete Output Q1
000.. 254
IH1
IL1
IL4
IM1 0, 1, 2 ACK
IN1 0, 1 ACK
Input desired limit value (not
Input desired limit value (not
or
000.. 999
including Offset)
including Offset)
Bit 4
ACK
ACK
ACK
Bit 3
Bit 2
Bit 6: Receiver blinded or faulty
Bit 1
Bit 0
Bit 5: Temperature warning: T < -10°C or T > +70°C
Bit 4: Target out of range or transmitter faulty
Bit 3: Temperature error: T > +85°C
Bit 2: Supply voltage too low
Bit 1: PLL unlocked
Bit 0: Not used
Get Temperature
Internal temperature in °C
Get Version
Software version is displayed
Help Command/Get Commands
All available commands are displayed in text format
Input Continuous Measurement Mode
0: Continuous measurement output
1: Output of single measurement values
Input Offset Setting (All Outputs)
Up to 12,000 mm (plus or minus) or 480.00" (plus or minus)*
Enable Visible Laser
0: Pilot laser OFF
1: Pilot laser ON
Input Stand-by
0: Operation
1: Stand-by
Trigger/Execute Single Measurement
Request for measured value with single measurement output
Write Parameter Page/Execute Parameter Write
Parameters are stored
Set Discrete Q1 Hysteresis
0 - 254 mm or
0" - 9.99"
Input Discrete Q1 Limit 1
0 - 12,000 mm or 0" - 480.00"*
Selected Offset value will be applied to this limit
Input Discrete Q1 Limit 2
0 - 12,000 mm or 0" - 480.00"*
Selected Offset value will be applied to this limit
Discrete Output Q1 Mode
0: Inactive
1: 1 switching point
2: 2 switching points
Invert Discrete Output Q1
0: Q
1: Q inverted
*Decimal point and comma are “imaginary.” Do not input commas or periods in data (e.g., 12000 for mm or 48000 for inches).
Banner Engineering Corp. • Minneapolis, MN U.S.A
www.bannerengineering.com • Tel: 763.544.3164
P/N 120244 Rev. B 15
Page 16

L-GAGE® LT7 Long-Range Time-of-Flight Sensor
Command Data to LT7 Data from LT7 Meaning
Discrete Output Q2
000.. 254
IH2
or
000.. 999
IL2
IL5
Input desired limit value (not
including Offset)
Input desired limit value (not
including Offset)
IM2 0, 1, 2 ACK
IN2 0, 1 ACK
Analog Output QA (Diffuse sensor models only)
IL3
IL6
Input desired limit value (not
including Offset)
Input desired limit value (not
including Offset)
INA 0, 1 ACK
ACK
ACK
ACK
ACK
ACK
Set Discrete Q2 Hysteresis
0 - 254 mm or
0" - 9.99"
Input Discrete Q2 Limit 1
0 - 12,000 mm or 0" - 480.00"*
Selected Offset value will be applied to this limit
Input Discrete Q2 Limit 2
0 - 12,000 mm or 0" - 480.00"*
Selected Offset value will be applied to this limit
Discrete Output Q2 Mode
0: Inactive
1: 1 switching point
2: 2 switching points
Invert Discrete Output Q2
0: Q
1: Q inverted
Input Analog QA Limit 1
0 - 12,000 mm or 0" - 480.00"*
Selected Offset value will be applied to this limit
Input Analog QA Limit 2
0 - 12,000 mm or 0" - 480.00"*
Selected Offset value will be applied to this limit
Invert Analog Output QA
0: Q
1: Q inverted
*Decimal point and comma are “imaginary.” Do not input commas or periods in data (e.g., 12000 for mm or 48000 for inches).
SSI-Compatible Interface
T = Duration of clock signal,
minimum 2 µSec = 500 kHz, max. 13 µSec = 77 kHz
Tv = Delay time max. 360 ns
T
Clock
Tv
SSI Data
Gn G1 G0Gn-1
Figure 11. SSI-compatible interface timing
Tm
Tm = Minimum time between last rising edge and reloading
of SSI approx. 24 µSec.
Gn = MSB (here Gray Code)
24 bit transmission: G1 = second LSB, G0 = LSB
24+E transmission: G1 = LSB, G0 = Error bit
25 bit transmission: G1 = second LSB, G0 = LSB
NOTE: With SSI-compatible transmission, data updates in synchronization with the readout
cycle. The data is as up-to-date as the time interval between two readouts. An
intermittent readout is therefore recommended. After a longer readout interval, the data
contents of the first readout can be “out-of-date” and should be ignored.
16 P/N 120244 Rev. B
Banner Engineering Corp. • Minneapolis, MN U.S.A
www.bannerengineering.com • Tel: 763.544.3164
Page 17

L-GAGE® LT7 Long-Range Time-of-Flight Sensor
SSI Cable
The maximum baud rate for reliable data transfer depends on the cable length (see table).
The shielded connection cable is connected to the sensor connector and the ground
terminal of the control cabinet.
SSI Cable Length
Cable Length < 25 m < 50 m < 100 m < 200 m < 400 m
Baud Rate < 500 kHz < 400 kHz < 300 kHz < 200 kHz < 100 kHz
CAUTION . . . This sensor contains no
user-serviceable components.
Do not attempt to repair.
Incorrect component values may produce hazardous
laser radiation levels.
Troubleshooting; Error Codes
In the event of errors, corresponding error messages appear on the display and the error
outputs Qs and Qp (active low) are set according to the table below.
Multiple errors may simultaneously exist. The error status may be interrogated via the
RS422 “GSI” command. (For example, if a too-low supply voltage causes a counter error,
the GSI command would report “00000110”.)
LCD Error
Message
BLINDING Active 0 1 0 0 0 0 0 0 Internal error or ambient light too strong
LAS. ERR. Active Active 1 0 0 0 0 0 0 0
LOW VOLT Active Active 0 0 0 0 0 1 0 0
NO VALUE 0 0 0 0 0 0 0 0
PLL UNLOCKED Active Active 0 0 0 0 0 0 1 0 Counter error – repair or replace sensor
OVERTEMP
Dist (mm)
> Maximum
Out (Active Low) Bit
Qs Qp 7 6 5 4 3 2 1 0
Active 0 0 1 0 0 0 0 0
Active
(Laser
OFF)
Active
(Laser
OFF)
Active 0 0 0 1 0 0 0 0 No target in range or sensor badly aligned
0 0 1 0 1 0 0 0
Meaning
Measurement laser faulty – repair or replace
sensor
Voltage too low or error in measurement of
supply voltage
First measurement after switching ON –
sensor not yet ready. Message disappears
automatically when ready (after 300 ms).
Temperature out of acceptable range (below
-10°C or above +70°C)
Operating temperature too high (above +85°C
within housing); measurement laser switches
OFF. Switch sensor off; sensor may operate
after a cool-down period.
Banner Engineering Corp. • Minneapolis, MN U.S.A
www.bannerengineering.com • Tel: 763.544.3164
P/N 120244 Rev. B 17
Page 18

L-GAGE® LT7 Long-Range Time-of-Flight Sensor
Specifications
LT7PLVQ LT7PIDQ
Sensing Range 0.5 to 250 m (using specified reflector) 6% Black card: 0.5 to 3 m
18% Gray card: 0.5 to 7 m
90% White card: 0.5 to 10 m
Supply Voltage 18 to 30V dc (10% maximum ripple)
Power Consumption < 4.5 W @ 25º C
Supply Protection Circuitry Protected against reverse polarity and transient over voltages
Measuring Laser Infrared, 900 nm, Class 1
Laser Control Measurement laser is ON when sensor is ON. Pilot (visible) laser enabled during Programming mode; alternates with
measurement laser.
Spot Size See Figure 2.
Pilot Laser Visible red, 650 nm, Class 2
Discrete & Analog Output
Protection
Discrete Outputs
Discrete Switch Points
Discrete Output Hysteresis
Alarm Outputs
Analog Output N/A 4-20 mA
Maximum Cable Length 100 m
Output Response Time 12 ms
Linearity ± 10 mm
Resolution/Repeatability ± 2 mm ± 4 mm
Color Sensitivity
(Diffuse Models)
Temperature Effect < ± 5 mm over the total sensing range
Minimum Analog
Window Size
Adjustments See pages 2-11. Push-button-directed password enable/disable, measurement unit select, offset value select, output
Serial Interface RS422 or SSI compatible
Serial Measurement Speed SSI: 1.4 ms (SSI cycle 80 µs); RS422: 2.9 ms @ 57.6 kBaud
Protected against continuous overload and short circuit
(2) 100 mA, PNP
Adjustable in 1 mm steps
Adjustable, 10 mm min.
50 mA, PNP (N.O.)
N/A Contact Factory.
N/A 300 mm
limits set, output mode select, analog output slope select (diffuse models only), and output limit manual adjust.
Indicators 4 LEDs: Green Power ON/OFF, Red Alarm (Error) LED, Orange Output 1 and Output 2 conducting LEDs,
2-line digital LCD display. See page 2 for more information.
Construction ABS shock-resistant housing; PMMA window; polycarbonate displays
Dimensions 93 x 93 x 42 mm; see page 19
Weight Approximately 230 g
Environmental Rating IEC IP67
Connections 12-pin M16 connector; 100 m (330’) max. cable length; use only cables listed on page 20
Operating Conditions Temperature: −10 to +50 °C (+14 to 132 °F) in continuous operation
Storage Temperature −30 to +75 °C (−22 to +167 °F)
Banner Engineering Corp. • Minneapolis, MN U.S.A
18 P/N 120244 Rev. B
www.bannerengineering.com • Tel: 763.544.3164
Page 19

Specifications, cont’d
10 mm x 5 mm
Vibration/Shock EN 60947-5-2
Application Notes
• All specifications are based on the specified surface at constant ambient conditions and
following a minimum operating time of 15 minutes.
• For best accuracy, allow a 15-minute warmup before programming or operating
• Crosstalk avoidance: Light spots must be separated by at least 200 mm.
• Also see page 12 for target orientation notes.
Certifications
Description of Laser Classes
L-GAGE® LT7 Long-Range Time-of-Flight Sensor
Operating Mode
Laser Class 1
Setup Mode
Laser Class 2
Do not stare into beam
Dimensions
LT7PIDQ
wh TX + / SSI: Data +
bn Output 1 (PNP)
gn RX + / SSI: Clock +
ye Analog Output: 4 - 20mA
gy Alarm 1 Output (PNP)
pk Alarm 2 Output (PNP)
rd 18 - 30V dc
bk RX - / SSI: Clock -
vt N/C
gy/pk
rd/bu Output 2 (PNP)
bu Gnd
L - GAGE
bannerengineering.com
bannerengineering.com
TX - / SSI: Data -
TM
Class 1 (Infrared Sensing Laser)
Lasers that are safe under reasonably foreseeable
conditions of operation, including the use of optical
instruments for intrabeam viewing.
Reference 60825-1 Amend. 2 © IEC:2001(E),
section 8.2.
Class 2 (Visible Pilot Laser)
Lasers that emit visible radiation in the wavelength
range from 400 nm to 700 nm
where eye protection is normally afforded by
aversion responses, including the blink reflex. This
reaction may be expected to
provide adequate protection under reasonably
foreseeable conditions of operation, including the
use of optical instruments for intrabeam viewing.
Reference 60825-1 Amend. 2 © IEC:2001(E),
section 8.2.
OUTPUT1 OUTPUT2
ALARM POWER
42.0 mm
1.65"
95.0 mm
3.74"
3.21"
0.23"
Operating Mode
Laser Class 1
Setup Mode
Laser Class 2
Do not stare into beam
42.8 mm
(Infrared)
(Visible - Red)
1.68"
LT7PIDQ
wh TX + / SSI: Data +
bn Output 1 (PNP)
gn RX + / SSI: Clock +
ye Analog Output: 4 - 20mA
gy Alarm 1 Output (PNP)
pk Alarm 2 Output (PNP)
rd 18 - 30V dc
bk RX - / SSI: Clock -
vt N/C
gy/pk
TX - / SSI: Data rd/bu Output 2 (PNP)
bu Gnd
L - GAGE
bannerengineering.combannerengineering.com
TM
42.0 mm
1.65"
Class 1
Ø 5.7 mm
0.22"
M5 Threaded
27.5 mm
1.08"
Emitter
Operating Mode
(Infrared)
Laser Class 1
Setup Mode
Laser Class 2
(Visible - Red)
Do not stare into beam
Class 1
93.0 mm
ESC
3.66"
19.75 mm
0.78"
81.5 mm
5.75 mm
52.0 mm
2.05"
24.0 mm
0.94"
Banner Engineering Corp. • Minneapolis, MN U.S.A
www.bannerengineering.com • Tel: 763.544.3164
P/N 120244 Rev. B 19
Page 20

L-GAGE® LT7 Long-Range Time-of-Flight Sensor
Hookups
*See pinout below.
red
bu
bn
red/bu
ye
gy
pk
wh
gn
gy/pk
bk
vt
load 1
+
18 - 30V dc
–
load 2
No Connection for Retro models
4-20 mA
Alarm Output 1 (Qs)
Alarm Output 2 (Qp)
RS422: Tx+ SSI: Data+
RS422: Rx+ SSI: Clock+
RS422: Tx– SSI: Data–
RS422: Rx– SSI: Clock–
No Connection
Pin* Name Cable Color Description
A TX+ White RS422: Transmitter data / SSI: Data +
B Q1 Brown Discrete Output 1
C RX+ Green RS422: Receiver data / SSI: Clock +
D analog Yellow Analog Output 4 to 20 mA
E Qs Gray Alarm Output 1
F Qp Pink Alarm Output 2
G V+ Red +18 to 30V dc
H RX- Black RS422: Receiver data / SS1: Clock –
J NC Violet
K TX- Gray/Pink RS422: Transmitter data / SS1: Data –
L Q2 Red/Blue Discrete Output 2
M GND Blue 0V (GND)
Accessories
Quick-Disconnect Cables
Style Model Length Pinout
12-pin Euro-style
right-angle
(Rating pending;
consult factory)
12-pin Euro-style
straight
(IP67)
MQDC-1210RA
MQDC-1230RA
MQDC-1210ST
MQDC-1230ST
3 m (10 ft)
10 m (30 ft)
3 m (10')
10 m (30')
F
G
E
D
H
M
L
J
C
A
K
B
Refer to hookups above for pin descriptions.
20 P/N 120244 Rev. B
Banner Engineering Corp. • Minneapolis, MN U.S.A
www.bannerengineering.com • Tel: 763.544.3164
Page 21

Accessory Mounting Brackets
0.71"
140.5 mm
20°
L-GAGE® LT7 Long-Range Time-of-Flight Sensor
SMBLT7
(5.53")
90.5 mm
(3.56")
• Right-angle bracket
• 300 series stainless steel
• Fine-adjust accessory available (model SMBLT7F)
53.0 mm
(2.09")
11.0 mm
(0.43")
25.0 mm
(0.98")
49.5 mm
1.95"
14.0 mm
(0.55")
45.0 mm
(1.77")
Ø 3.1 mm
(0.12")
3.0 mm
(0.12")
SMBLT7F
• Fine-adjust accessory for model SMBLT7 bracket;
bracket sold separately
• 304 series stainless steel
• Mounting hardware included
14.0 mm
(0.55")
Opening for set screw
(included)
10.0 mm
(0.39")
Ø 3.0 mm
(0.12")
45°
18.0 mm
16.9 mm
0.67"
32.0 mm
(1.26")
Using the Bracket and Fine-Adjust Accessory
Bolt the two accessories to the base and/or angle of the bracket as shown in the photo above, aligning the small pins in the accessory
with the small holes in the bracket. Install the sensor on the bracket, and the bracket on the mounting surface, using the bracket’s curved
slots for rough alignment. Tighten these bolts finger-tight. Tighten or loosen the SMBLT7F set screws to fine-adjust the sensor alignment
in each axis; then tighten all bolts.
Banner Engineering Corp. • Minneapolis, MN U.S.A
www.bannerengineering.com • Tel: 763.544.3164
P/N 120244 Rev. B 21
Page 22

L-GAGE® LT7 Long-Range Time-of-Flight Sensor
Retroreflectors
Model
BRT-250
BRT-540
BRT-700
BRT-TVHG-8X10P
LT7 Retro
Sensor Range
50 m (163')
200 m (655')
250 m (820')
For distances
up to
100 m (328')
Alignment Aid
Model Description
LAT-2
Clip-on attachment for sensor; allows laser spot to be seen
easily at long distances ≥ 50 m
Description
Reflector mounted to rigid
aluminum backing
250 x 250 mm (9.8" x 9.8")
540 x 540 mm (21.3" x 21.3")
700 x 700 mm (27.6" x 27.6")
Retroreflective Tape
203 x 254 mm (8" x 10")
NOTE: Retroreflective material has a pressure-sensitive adhesive.
For maximum adhesion, surfaces must be clean and dry before
applying. For best results, use full-size; target may be trimmed as
necessary.
22 P/N 120244 Rev. B
Banner Engineering Corp. • Minneapolis, MN U.S.A
www.bannerengineering.com • Tel: 763.544.3164
Page 23

L-GAGE® LT7 Long-Range Time-of-Flight Sensor
Banner Engineering Corp. • Minneapolis, MN U.S.A
www.bannerengineering.com • Tel: 763.544.3164
P/N 120244 Rev. B 23
Page 24

L-GAGE® LT7 Long-Range Time-of-Flight Sensor
Banner Engineering Corp. warrants its products to be free from defects in material and workmanship for one year following the date of shipment. Banner Engineering Corp. will
repair or replace, free of charge, any product of its manufacture which, at the time it is returned to the factory, is found to have been defective during the warranty period. This
warranty does not cover damage or liability for misuse, abuse, or the improper application of the Banner product.
THIS LIMITED WARRANTY IS EXCLUSIVE AND IN LIEU OF ALL OTHER WARRANTIES WHETHER EXPRESS OR IMPLIED (INCLUDING, WITHOUT LIMITATION, ANY WARRANTY
OF MERCHANTABILITY OR FITNESS FOR A PARTICULAR PURPOSE), AND WHETHER ARISING UNDER COURSE OF PERFORMANCE, COURSE OF DEALING OR TRADE USAGE.
This Warranty is exclusive and limited to repair or, at the discretion of Banner Engineering Corp., replacement. IN NO EVENT SHALL BANNER ENGINEERING CORP. BE LIABLE
TO BUYER OR ANY OTHER PERSON OR ENTITY FOR ANY EXTRA COSTS, EXPENSES, LOSSES, LOSS OF PROFITS, OR ANY INCIDENTAL, CONSEQUENTIAL OR SPECIAL
DAMAGES RESULTING FROM ANY PRODUCT DEFECT OR FROM THE USE OR INABILITY TO USE THE PRODUCT, WHETHER ARISING IN CONTRACT OR WARRANTY, STATUTE,
TORT, STRICT LIABILITY, NEGLIGENCE, OR OTHERWISE.
Banner Engineering Corp. reserves the right to change, modify or improve the design of the product without assuming any obligations or liabilities relating to any product previously
manufactured by Banner Engineering Corp.
P/N 120244
Banner Engineering Corp., 9714 Tenth Ave. No., Minneapolis, MN 55441 • Phone: 763.544.3164 • www.bannerengineering.com • Email: sensors@bannerengineering.com
 Loading...