

Page 1
Page 2

"IMPORTANT SAFETY INSTRUCTIONS"
When using the needle felting machine, basic safety precautions should always be followed,
Including the following.
"Read all instructions before using".
DANGER -T
o reduce the risk of electric shock.
1. The needle felting machine should never be left unattended when plugged in.
Always unplug this needle felting machine from the electrical outlet immediately after
using and before cleaning.
2. Always unplug before replacing light bulb. Replace bulb with same type rated 15 watts/1
10
volts in 1
10V/120V area. (15 watts 230 volts in 220V/240V area).
W
ARNING -To reduce the risk of burns, fire, electric shock, or injury to persons.
1. Do not allow to be used as a toy. Close attention is necessary when the felting machine is
used by or near children.
2. Use this needle felting machine only for its intended use as described in this manual.
Use only attachments recommended by the manufacturer as contained in this manual.
3. Never operate this felting machine if it has a damaged cord or plug, if it is not working
properly, if it has been dropped or damaged, or dropped into water. Return the needle felting machine to the nearest authorized Baby Lock retailer for examination, repair, electrical
or mechanical adjustment.
4. Never operate the needle felting machine with any air openings blocked. Keep ventilation
openings of the needle felting machine and foot controller free from the accumulation of
lint, dust, and loose cloth.
5. Never drop or insert any object into any opening.
6. Do not use outdoors.
7. Do not operate where aerosol (spray) products are being used or where oxygen is being
administered.
8. To disconnect, turn the main switch to the symbol "O" position which represents off, then
remove plug from outlet.
9. Do not unplug by pulling on the cord. To unplug, grasp the plug, not the cord.
10. Keep fingers away from all moving parts. S
pecial care is required around the felting
machine needles.
Page 3

11. Always use the proper needle plate. The wrong needle plate can cause the needles to break.
European
Union only
12. Do not use bent needles.
13. Do not pull or push fabric while stitching. It may deflect the needles causing them to break.
14. Switch the needle felting machine to the symbol "O" position when making any adjustments
in the needle area, such as changing needles, changing needle plate, or changing cloth
presser, and the like.
15. Always unplug the needle felting machine from the electrical outlet when removing covers,
lubricating, or when making any of the servicing adjustments mentioned in the instruction
manual.
16. Keep fingers away from moving parts, especially the area near the needles.
17. Please note that on disposal, this product must be safely recycled in accordance with relevant National legislation relating to electrical / electronic products. If in doubt please contact your ret
18. The appliance is not intended for use by young children or infirm persons
without supervision.
19. Young children should be supervised to ensure that they do not play with the
appliance.
"SA
VE THESE INSTRUCTIONS"
ailer for guidance.
"This needle felting machine is intended for household use."
Page 4
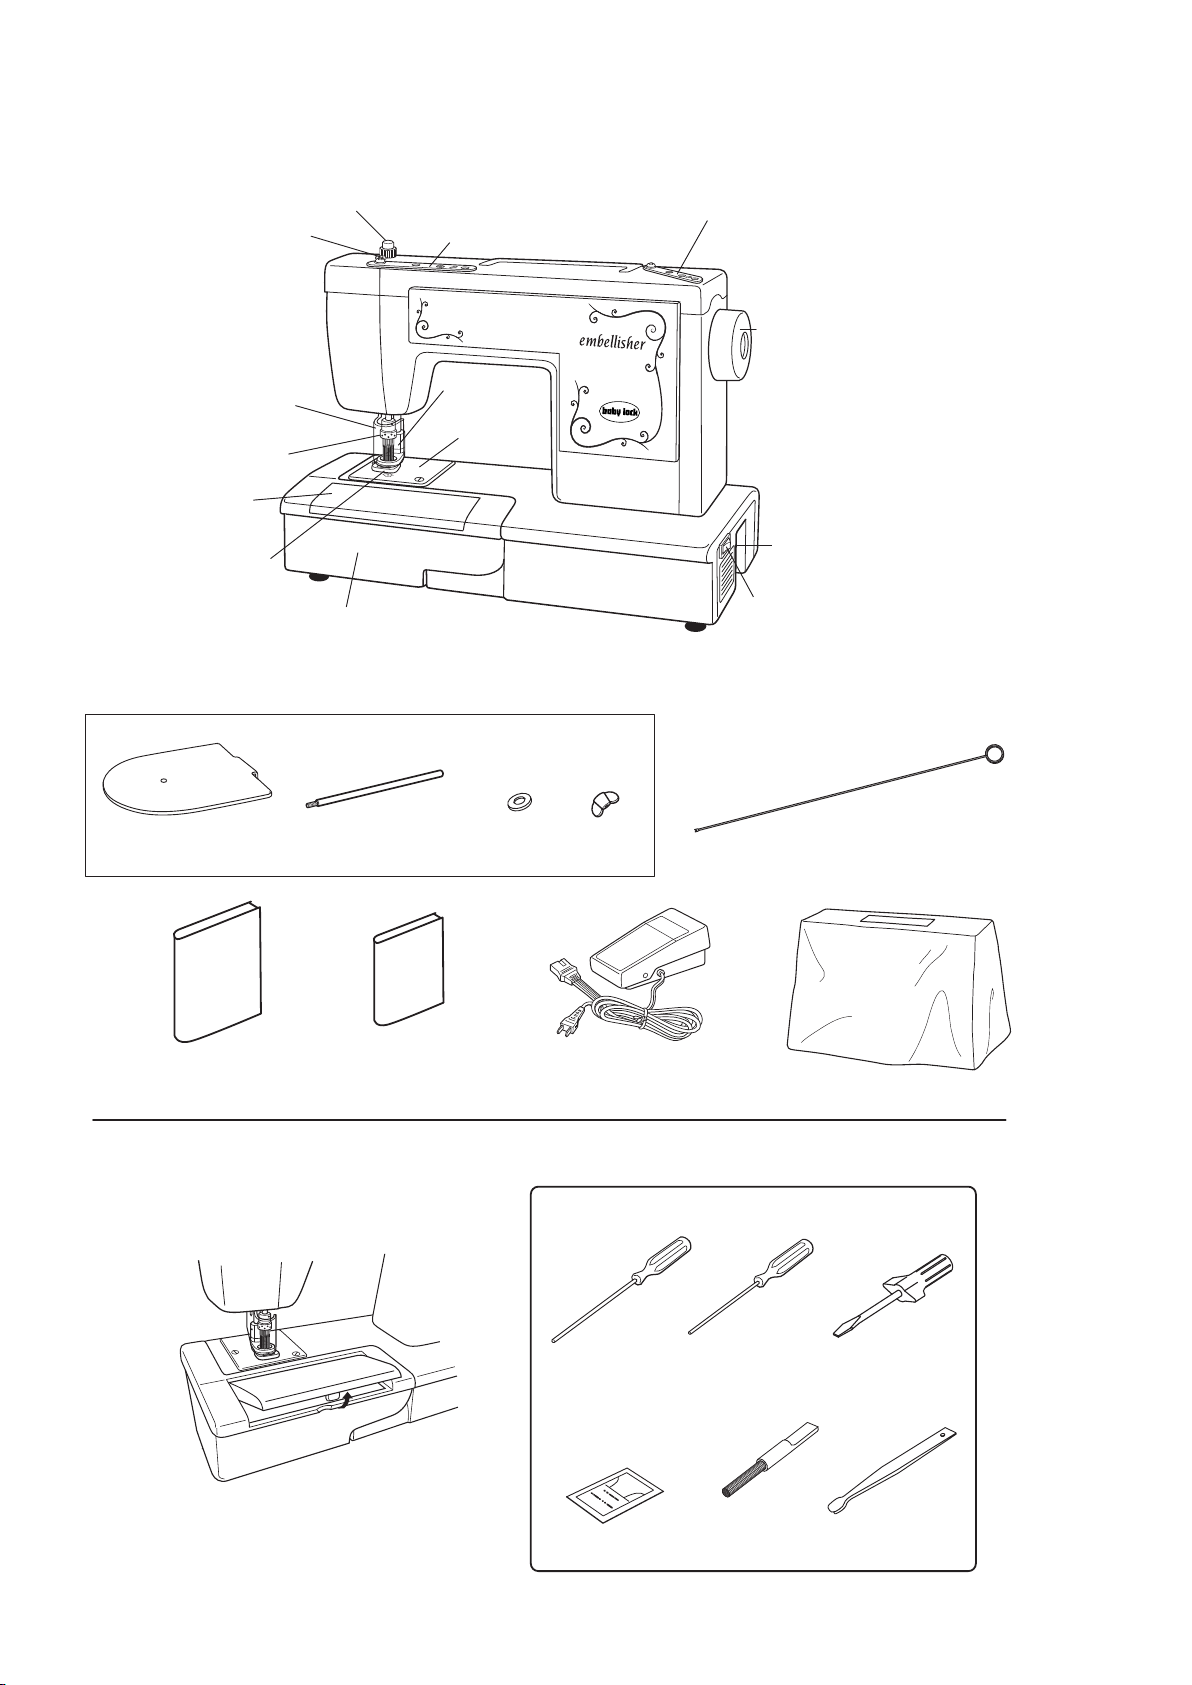
1
Cloth presser height adjusting screw
Handwheel
Yarn & ribbon guide
Ribbon guide
Yarn port
Power switch
Yarn threader
Yarn stand Yarn stand pin
Washer
Wing nut
Socket for
foot controller
Sewing table
Yarn Stand components
Accessory
storage
Ribbon
slot
Needle
plate
Cloth
presser
Needle clamp
holder
Finger guard
Machine cover
Foot controller
Instruction book
Art of Embellishing Book
Detail of accessories
(large:2mm)
(small:1.5mm)
Allen screwdriver Screwdriver
Package of needle
(#365A017)
Lint brush
Tweezers
1.Overview of Baby Lock Embellisher
Page 5
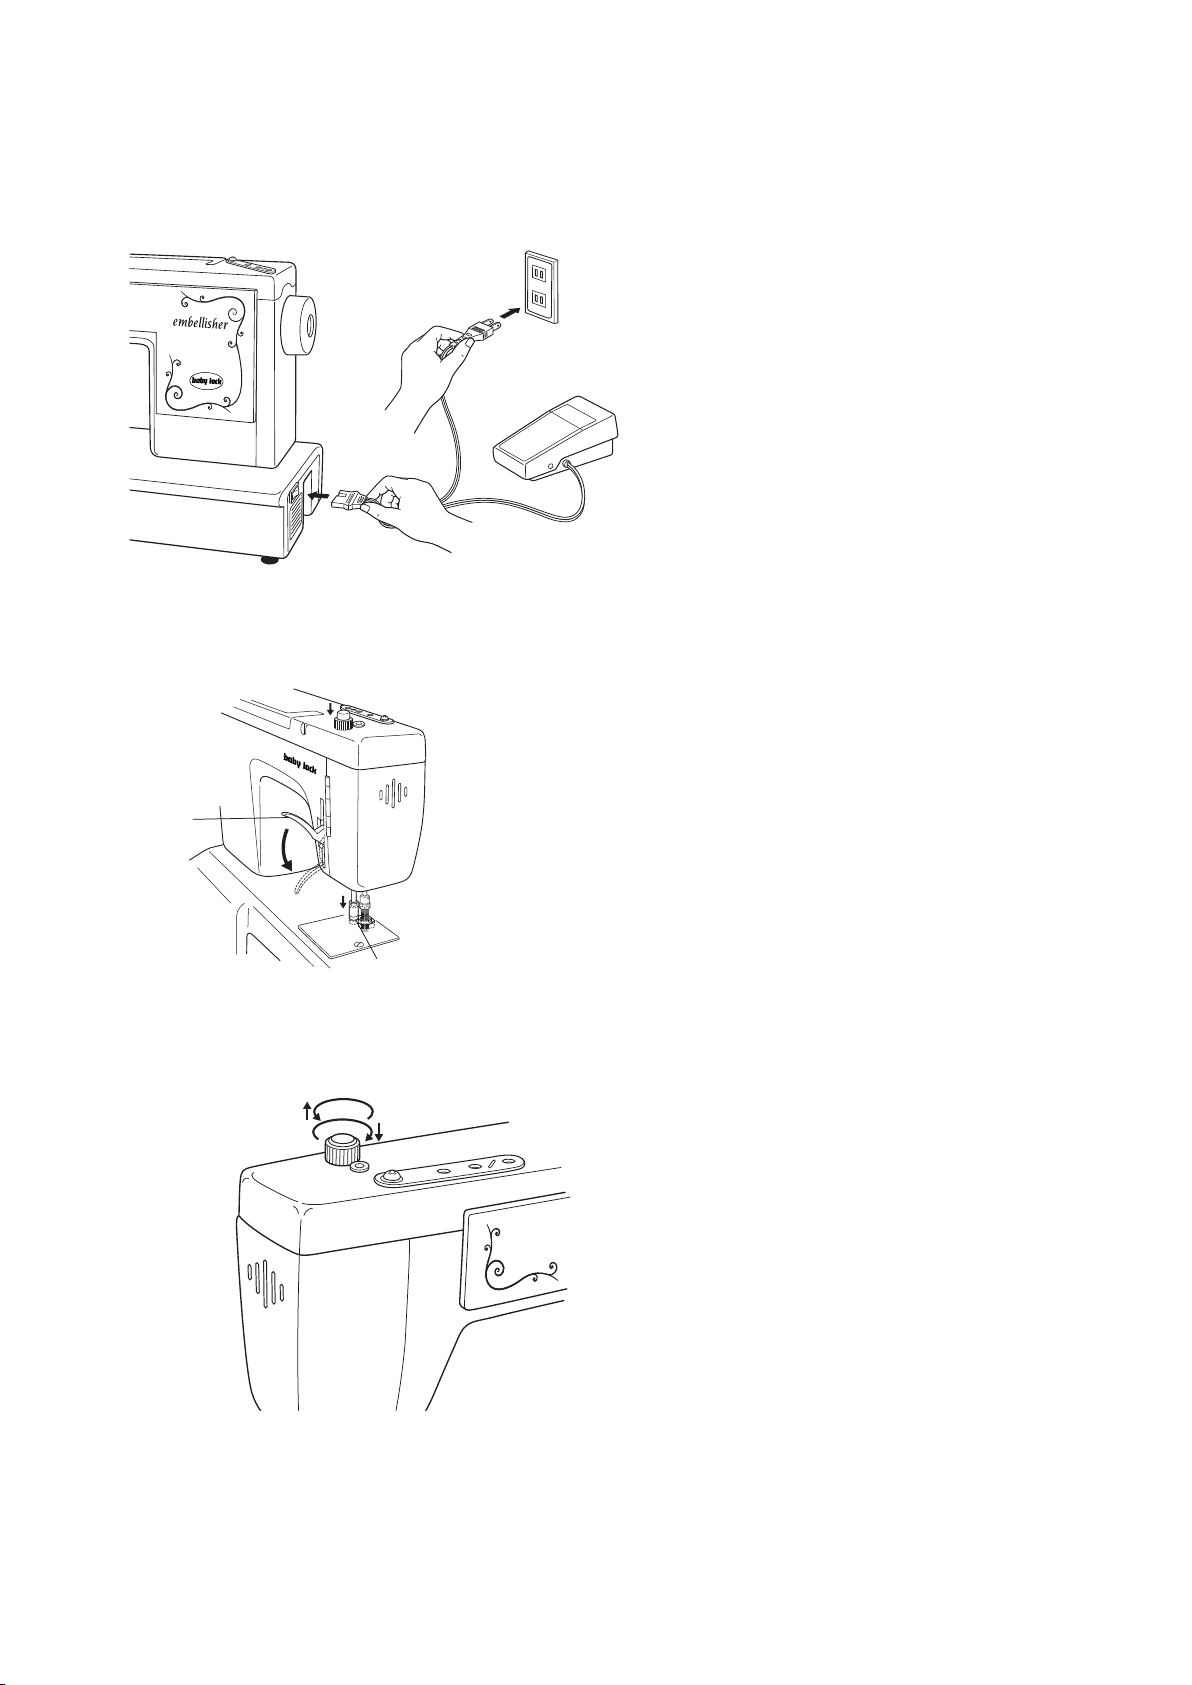
2. Setting Up Your Baby Lock Embellisher
Cloth presser height adjusting screw
Turn left (counter-clockwise)
Cloth presser is raised
Turn right (clockwise)
Cloth presser is lowered
Cloth presser
Cloth presser
lifter lever
1. Plug in the machine: Plug the power cord
into the machine first, then into a wall outlet. Always make sure the power is off and
remove the plug from the wall outlet when
the machine is not in use, or when making
any adjustments such as changing needles
or light bulb. Available foot control for
U.S.A.: Model EZ-168A.
2. Polarized Plug: This appliance has a polarized plug (one blade wider than the other).
To reduce the risk of electric shock, this
plug is intended to fit in a polarized outlet
only one way. If the plug does not fit fully in
the outlet, reverse the plug. If it still does
not fit, contact a qualified electrician to
install the proper outlet. Do not modify the
plug in any way.
3. Foot control: The felting speed of the
machine is determined by the amount of
pressure applied to the foot control. When
not in use, do not place anything on the
foot control or the machine could start inadvertently and the foot control or motor could
burn out.
4. Cloth Presser: The cloth presser is to
prevent cloth/fabric/material from flapping
during the felting process. Place the
cloth/fabric/materials on the needle plate
and under the cloth presser. Lower the
cloth presser lifter lever. To adjust the
height of the cloth presser, turn the cloth
presser height adjusting screw until you get
the correct height for your cloth/ fabric/
material. Turn the cloth presser height
adjusting screw counter-clockwise to raise
the cloth presser. Turn the cloth presser
height adjusting screw clockwise to lower
the cloth presser. The cloth/fabric/material
should move freely under the cloth presser
without any restrictions.
2
Page 6

3
2. Setting Up Your Baby Lock Embellisher cont.
5. Set up yarn stand
a) From the top side of the yarn stand, insert
the threaded end of the yarn stand pin into
opening in yarn stand.
b) Place washer and wing nut on the threads
of yarn stand pin and tighten with fingers.
c) Insert the "L" shape side of yarn stand into
slotted opening located on the back of the
machine body.
Page 7

3. Remove and replace Finger Guard
Finger guard is a safety device to reduce
risk of injury.
If you would like to remove finger guard,
special care is required around the felting
needles.
To remove finger guard:
a) Open the lamp cover.
b) Loosen the screw of finger guard by
turning it counterclockwise.
c) Remove finger guard.
d) Retighten the screw slightly by turning
it clockwise.
screw from vibrating out.
e) Close the lamp cover.
This will prevent the
To replace finger guard:
a) Open the lamp cover.
b) Loosen the screw for finger guard by
turning it counterclockwise.
c) Replace finger guard.
d) Tighten the screw by turning it clock
wise.
e) Rotate handwheel several turns,
making sure needle clamp and needle
screws are not touching the finger
guard.
f) Close the lamp cover.
-
4
Page 8

4. Start Embellishing
Let your creativity soar with your new Baby Lock Embellisher! Now you can make your
projects even more distinctive. Let your imagination run free with new ways to create beautiful
felted embellishment on your crafts, home decorating, quilting, sewing, and scrapbooking.
What kind of fabrics and trims can I use with the Embellisher?
Just about any fabric can be felted with the Embellisher. However, some fabrics tend to have
more favorable results after fabrics are laundered then used for embellishing. The recommended fabrics and trims are those made from natural fibers such as linen, wool, wool roving,
and wool or cotton yarns.
The best characteristic for fabrics is a napped or textured surface. A
napped surface will adhere to a natural fiber/napped surface/or mixed fiber base.
Avoid types of synthetics with "wash and wear" weaves and finishes which have a smooth
surface.
Can I launder my embellished projects?
To determine if your embellished project is washable, it is recommended that you do a test
sample first from the fabrics you intend to use. Wash the finished sample the same way you
will wash it after the project is completed.
For example, if you plan on washing and drying the completed project with a load of jeans,
then do the same with the test sample. Do not "p
amper" the test sample unless you plan on
p
ampering the finished project.
NOTE: Laundering rules of "pre-washing":
Pre-washing all fabrics before sewing does not apply
. With the Embellisher, you want the
finished project to "shrink" so the felted fibers will stay meshed. With this in mind, be sure to
make the project a little larger to allow for shrinkage.
Because of not pre-washing fabrics before embellishing, color fading can occur when working
with bright and contrasting colors. Be sure to make a test sample and wash it for best results.
5
Page 9
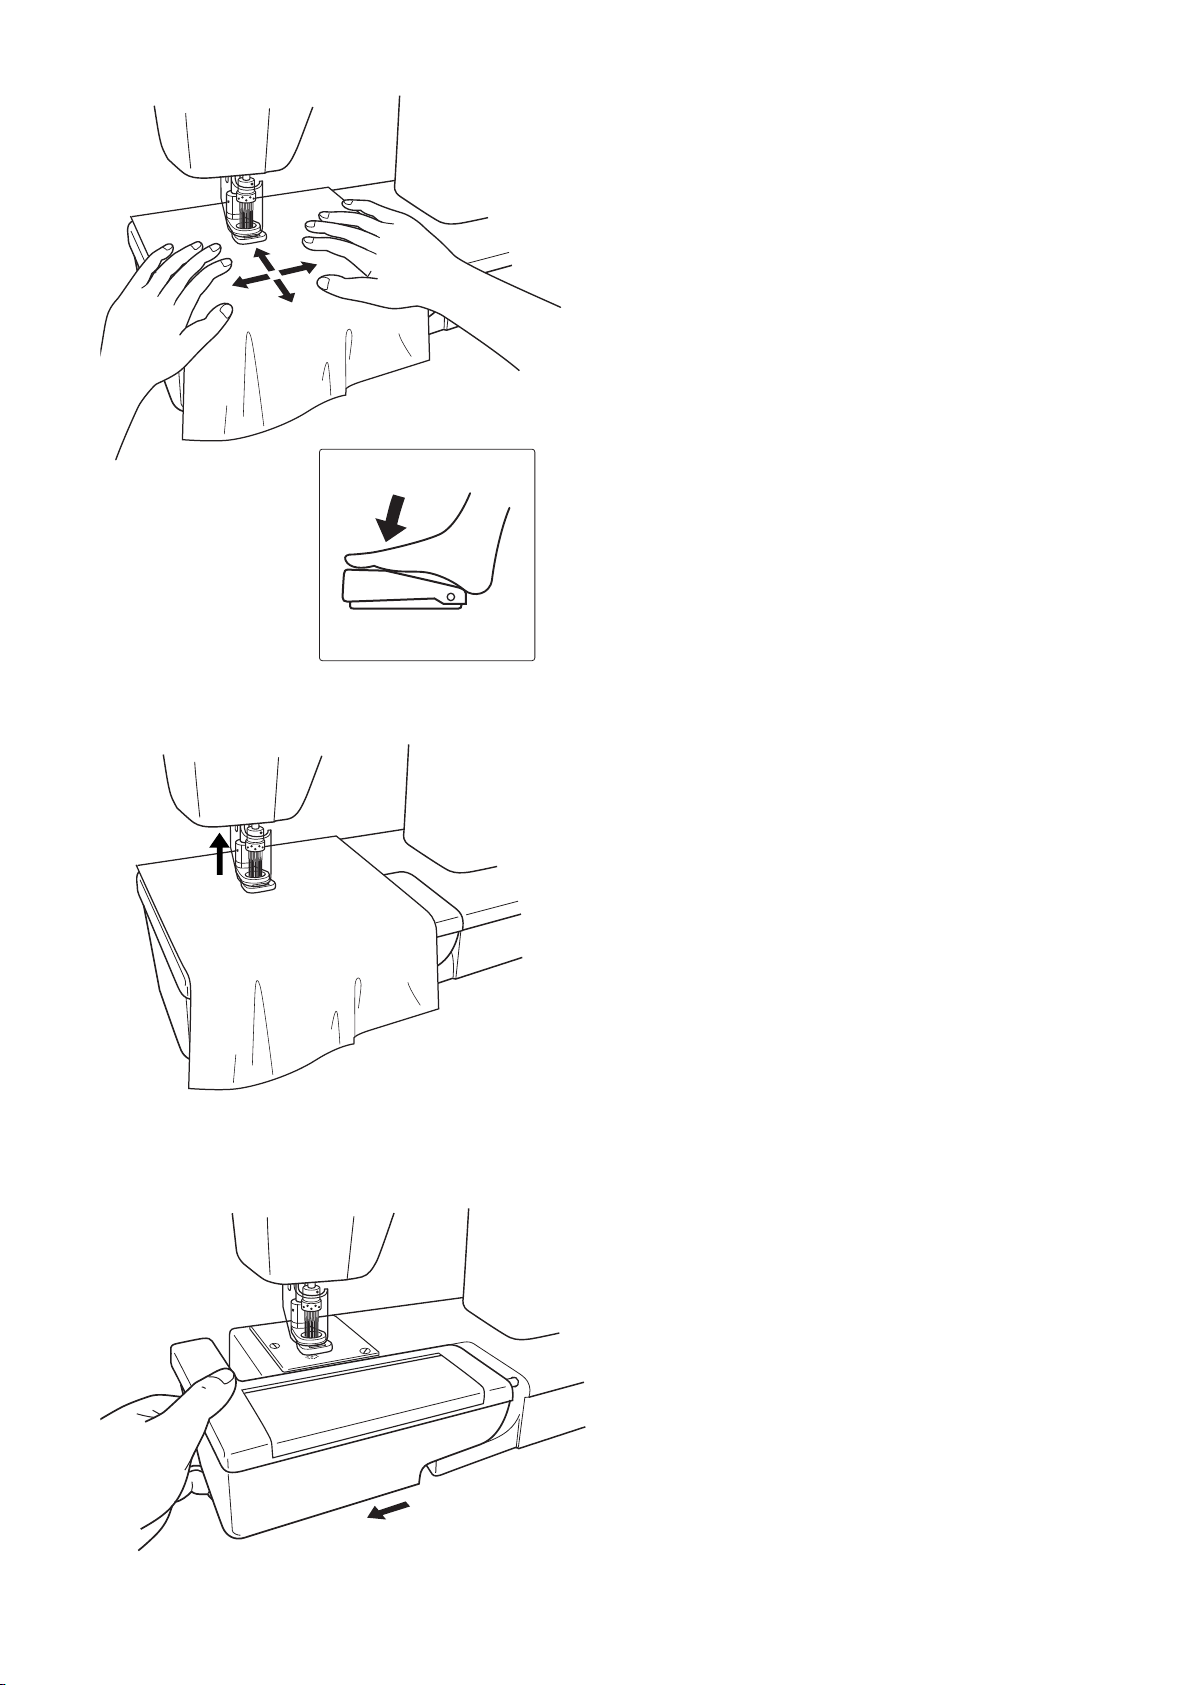
4. Start Embellishing cont.
Layer the cloth/fabric/materials that will be felted
together to create the embellishment. Make sure
the smaller piece to be felted is on the correct side
of the project.
NOTE:Depending on the look you want to achieve
this can be either right or wrong side of project.
Place the layers to be felted together under the
cloth presser. Lower the cloth presser lif
If needed, adjust the height of the cloth presser at
this time so the project can move freely under the
cloth presser.
Move the cloth/fabric/materials in any direction so
that the needles can mesh the layers together.
ter lever.
ATTENTION: Always check to make sure the fabric under cloth presser will move freely or does not
flap before embellishing. If necessary
cloth presser height adjusting screw.
When you have finished embellishing, turn the
handwheel toward you making sure the needles
are completely out of the project. Never remove
the embellished project with the needles in the
project, as the needles can bend or break.
NOTE: Always make sure the cloth presser lifter
lever is lowered before starting to embellish. If the
cloth presser lifter lever is not lowered, the
materials can easily be lifted by the needles and
can cause needle breakage.
Remove the sewing table by sliding it to the left
and the machine will convert to a free arm. This
will allow you to embellish sleeves, pant legs, and
small areas.
This will also give you access to the free arm door
to clean out the lint that has accumulated from
embellishing.
, adjust the
6
Page 10

5. Yarn Embellishing
1. Rotate the yarn & ribbon guide toward the
back of the machine. Align the guide with
the top of the yarn stand pin.
2. Place yarn or thread on the yarn stand and
pull yarn end from center.
3. While sitting in front of the machine insert
yarn into the third hole of the yarn & ribbon
guide as shown in Fig. 1.
4. Wrap yarn to the underside of yarn & ribbon
guide and insert into the second hole as
shown in Fig. 2.
5. Once again, wrap yarn to the underside of
yarn & ribbon guide and insert into the first
hole as shown in Fig. 3.
NOTE: If the tension of yarn is too tight, use
only the third hole of yarn & ribbon guide. (Fig.
1)
If this does not help the tension check that the
yarn diameter is not too large. See page 8 for
additional information.
Fig. 1 Fig. 2 Fig. 3
7
Page 11

5. Yarn Embellishing cont.
Yarn threader
Fig. 4
5. Rotate the handwheel to bring the needle
bar to its highest position.
6. Raise the cloth presser lifter lever.
7. Insert yarn into the yarn port using the yarn
threader. (Fig. 4)
8. Pull the yarn from the bottom of the cloth
presser. (Fig. 5)
9. Place fabric under the cloth presser.
10.
While embellishing with yarn, fabric may
be moved in all four directions. (Fig. 6)
11. Lower the cloth presser lifter lever.
ATTENTION: Since there is such a wide variety of yarns to select from use care when
using dense, fuzzy, or thick yarns. It is recommended to test sew a sample using all yarns
before sewing on your project.
wheel several t
resistance with needle penetration.
ommended for use in this machine should not
exceed 4mm (5/32 inches) in diameter. Yarn
needs to be able to slide freely within the yarn
port.
imes to insure there is no
Turn hand-
Yarn rec-
Fig. 5
NOTE: If needle bar is not rotated to the highest position, the yarn will not go down through
the inside of the needle bar.
At the beginning of the yarn
embellishing, slightly pull the
end of the yarn.
Fig. 6
8
Page 12

1. Rotate the yarn & ribbon guide toward the back
of the machine. Align the guide with the top of
the yarn stand pin.
2. Place ribbon on the yarn stand.
3. Insert the ribbon into the slot of the yarn &
ribbon guide.
4. Rotate the ribbon guide toward the front of the
machine.
5. Insert the ribbon into slot of the ribbon
guide.
6. Rotate the handwheel to bring the needle bar to
its highest position.
7. Slide ribbon into the ribbon slot of the cloth
presser.
8. Raise the cloth presser lifter lever.
9. Place fabric under the cloth presser.
10. Lower the cloth presser lifter lever.
ATTENTION: Only guide the fabric towards the
back of the machine while embellishing with ribbon
or using the ribbon slot on the cloth presser to
avoid the ribbon from getting tangled.
NOTE: Maximum width of the ribbon slot is 10mm
therefore ribbon over 10mm is not recommended
for this machine.
If ribbon is narrower than 10mm the needles will
embellish on out
side of ribbon area.
Since there is such a wide variety of ribbons to
select from use care when using dense or thick
ribbons. It is recommended to test sew a sample
using all ribbons before sewing on your project.
T
urn handwheel several times to insure there is no
resist
ance with needle penetration.
6. Ribbon Embellishing
9
Page 13

Allen screwdriver
1.5mm
Needle clamp
fixing screw
Needle fixing
screws
Needle clamp
fixing screw
Red alignment
mark
Needle plate
Allen screwdriver
2mm
7. Maintenance
Changing the Needle(s)
Use #365A017 needles for the Embellisher machine.
Do not use any other type of needles
Note: #365A017 needle is a very special needle and is
exclusive for the Embellisher machine. See your Baby
Lock retailer for replacement needles.
Caution: When changing needle(s), unplug the power cord
from the electrical outlet.
1. Open lamp cover and remove finger guard. (see page
4.)
2. Turn the handwheel until the needle bar is at the highest
position and then lower the cloth presser lifter lever.
3. Lower the cloth presser to the lowest position by turning
the cloth presser height adjusting screw clockwise.
4. While holding the needle clamp holder, loosen the needle clamp fixing screw by turning the large 2mm allen
screwdriver counter-clockwise.
5. Lower the needle clamp holder slowly into the cloth
presser. The needles must not touch the cloth presser.
Tilt the needle clamp holder slightly forward and remove
it from the machine.
6. To remove the individual outer needles, loosen the
needle fixing screw on the needle clamp holder by turning the small 1.5mm allen screwdriver counter-clockwise and remove the needle(s) by using tweezers.
Insert the new needle(s) until the top of the needle
touches the top of the needle hole. Tighten the needle
fixing screw with the small 1.5mm allen screwdriver by
turning the allen screw clockwise. Center needle is
replaced by loosening the center needle fixing screw,
replace needle and then tightening the screw.
Note: #365A017 needles do not have a front or back,
therefore, you can insert the shank of the needle in any
direction.
7. When replacing the needle clamp holder, make sure the
needle bar is in its highest position. Tilt the needle clamp
holder so the needles will slide into the cloth presser
and slide the clamp up onto the needle bar until the red
mark on the needle bar and needle clamp holder align.
Tighten the needle clamp fixing screw by turning with
the large 2mm allen screwdriver clockwise. Adjust the
cloth presser to desired height.
8. Replace finger guard and close lamp cover.
10
Page 14

7. Maintenance Cont.
Replacement of light bulb
Swing the lamp cover towards the left to open.
Remove the light bulb and replace with new
one that is the same type rated 15 watts/120
volts or 15 watts/230 volts.
ATTENTION: To prevent possibly injury,
unplug main power cord prior to replacing light
bulb. Make sure the light bulb is cool to the
touch before removing it from the machine.
Cleaning
Remove the sewing table and open the free
arm door.
Clean the lint from inside free arm door, needle
clamp holder, cloth presser and needle plate
periodically.
Dust or lint may cause needle breakage.
Lubrication
Lubricate with one or two drops of oil when
necessary. See the illustration showing the oiling points in the machine. For recommended
oil for your machine please cont
act your Baby
Lock retailer.
11
Page 15

Trouble Shooting
Needle bent or needle breakage:
1. Are you moving the materials too quickly?
2. Are the needles touching the cloth presser or needle plate?
3. Is there dust or lint around the edge of the needles, cloth presser, or holes of the needle
plate?
4. Does the free arm area need to be cleaned?
For problems other than bent needles or needle breakage,
please contact your Baby Lock retailer.
Specifications
Needle: #365A017
Number of needles: 12
Needle clamp holder: Round type (2.5 intervals between needles)
Feeding: Manual
Light bulb: 15W/120V or 15W/230V
Measurement: 15.9" x 6.7" x 11.8" (height)
405mm X 170mm X 300mm (height)
Weight: 12.8 pounds
5.8kg
12
Page 16

EMB12
EI-35-Ta
2008.8.1200
 Loading...