

Page 1

USER MANUAL
USER MANUAL
USER MANUALUSER MANUAL
Aztech WL559E
Wall Plugged 300Mbps High Speed Wireless-
N Range Extender
Page 2

User Manual
Table of Contents
About the Device ........................................................................................................ 3
Minimum System Requirements ................................................................. 4
Package Contents ........................................................................................ 4
Device Overview .......................................................................................... 5
Front Panel ................................................................................................................ 5
Bottom Panel ............................................................................................................ 5
Top View .................................................................................................................... 5
Aztech WL559E RSSI LED BEHAVIOUR ............................................................ 6
Tips for placing the Range Extender .......................................................................... 8
Configuring the Device ................................................................................ 8
Aztech WL559E - Modes of Operation ........................................................ 13
Use the Device as a Wireless Repeater ...................................................... 14
Use the Device as a Wireless Bridge .......................................................... 14
Configure the WL559E as a Wireless AP ..................................................... 16
Changing the Wireless Settings ................................................................. 18
Changing the Wireless Security Settings ................................................... 20
WPS – WiFi Protected Setup ....................................................................... 22
Configuring Wireless MAC Filtering ............................................................ 23
Viewing the Home Page ............................................................................ 24
System Management ............................................................................................... 26
Accessing System Management ................................................................ 26
What’s on System Management ................................................................ 26
Device Information ................................................................................................. 27
LAN Configuration ................................................................................................... 28
Firmware Upgrade .................................................................................................. 30
Configuration Settings ............................................................................................ 30
Reboot ..................................................................................................................... 32
System Password .................................................................................................... 33
Setting a Static IP on your PC .................................................................... 33
FCC Notice ................................................................................................................. 42
Page 2 of 43
Page 3

About the Device
Aztech
Aztech WL559E
Aztech Aztech
802.11b/g/n standards with one 10/100Base
802.11b/g/n standards with one 10/100Base----T Ethernet
802.11b/g/n standards with one 10/100Base802.11b/g/n standards with one 10/100Base
includes Wireless Received Signal Strength
includes Wireless Received Signal Strength Indicator (RSSI) LEDs
includes Wireless Received Signal Strengthincludes Wireless Received Signal Strength
and
and supports
and and
Access Point and wireless clients.
Access Point and wireless clients.
Access Point and wireless clients. Access Point and wireless clients.
WL559E
WL559E is designed with MIMO technology to extend the reach of any
WL559EWL559E
existing wireless router/AP to maximize the coverage in your home
existing wireless router/AP to maximize the coverage in your home
existing wireless router/AP to maximize the coverage in your home existing wireless router/AP to maximize the coverage in your home
or office. It basically recei
or office. It basically receives the signal from your wireless router/AP
or office. It basically receior office. It basically recei
WL559E Wireless
WL559EWL559E
supports a dedicated WPS button for
supportssupports
is designed with MIMO technology to extend the reach of any
is designed with MIMO technology to extend the reach of any is designed with MIMO technology to extend the reach of any
a dedicated WPS button for easy configuration with your
a dedicated WPS button for a dedicated WPS button for
Wireless----N Range Extend
WirelessWireless
N Range Extender supports wireless
N Range ExtendN Range Extend
ves the signal from your wireless router/AP
ves the signal from your wireless router/AP ves the signal from your wireless router/AP
User Manual
er supports wireless
er supports wireless er supports wireless
T Ethernet port,
T Ethernet T Ethernet
Indicator (RSSI) LEDs
Indicator (RSSI) LEDs Indicator (RSSI) LEDs
easy configuration with your
easy configuration with your easy configuration with your
port,
port, port,
and repeats it to extend the range to farther locations that are
and repeats it to extend the range to farther locations that are
and repeats it to extend the range to farther locations that are and repeats it to extend the range to farther locations that are
previously unreachable.
previously unreachable.
previously unreachable. previously unreachable.
The
The WL559E
WL559E is e
The The
WL559EWL559E
(WPA), and the latest WPA2 encryption with TKIP and AES
(WPA), and the latest WPA2 encryption with TKIP and AES algorithm to
(WPA), and the latest WPA2 encryption with TKIP and AES(WPA), and the latest WPA2 encryption with TKIP and AES
protect your wireless network from unauthorized access. MAC Address
protect your wireless network from unauthorized access. MAC Address
protect your wireless network from unauthorized access. MAC Address protect your wireless network from unauthorized access. MAC Address
Filtering for wireless links provides an additional layer of security for
Filtering for wireless links provides an additional layer of security for
Filtering for wireless links provides an additional layer of security for Filtering for wireless links provides an additional layer of security for
your wireless network.
your wireless network.
your wireless network. your wireless network.
The device comes with 1 x 10/100M Auto MDI/MDIx Ethernet port
The device comes with 1 x 10/100M Auto MDI/MDIx Ethernet port
The device comes with 1 x 10/100M Auto MDI/MDIx Ethernet port The device comes with 1 x 10/100M Auto MDI/MDIx Ethernet port
that can be u
that can be used to connect to an existing wired network to serve as a
that can be uthat can be u
wireless
wireless access point
wireless wireless
is equipped with 64/128
quipped with 64/128----bit WEP, WIFI Protected Access
is eis e
quipped with 64/128quipped with 64/128
sed to connect to an existing wired network to serve as a
sed to connect to an existing wired network to serve as a sed to connect to an existing wired network to serve as a
access point or wireless bridge. It can also be used to
access pointaccess point
or wireless bridge. It can also be used to
or wireless bridge. It can also be used to or wireless bridge. It can also be used to
bit WEP, WIFI Protected Access
bit WEP, WIFI Protected Access bit WEP, WIFI Protected Access
algorithm to
algorithm to algorithm to
configure the device via its web
configure the device via its web----based GUI, or upgrade the firmware
configure the device via its webconfigure the device via its web
when connected to the Network Interface Card of your PC.
when connected to the Network Interface Card of your PC.
when connected to the Network Interface Card of your PC.when connected to the Network Interface Card of your PC.
based GUI, or upgrade the firmware
based GUI, or upgrade the firmware based GUI, or upgrade the firmware
Page 3 of 43
Page 4

User Manual
Minimum System Requirements
Your computer must meet the following minimum requirements.
Your computer must meet the following minimum requirements.
Your computer must meet the following minimum requirements.Your computer must meet the following minimum requirements.
Any operating system can be used
Any operating system can be used
Any operating system can be usedAny operating system can be used
Web Browser
Web Browser
Web BrowserWeb Browser
233MHz processor
233MHz processor
233MHz processor233MHz processor
Ethernet network adapter
Ethernet network adapter
Ethernet network adapterEthernet network adapter
Or Wireless network adapter
Or Wireless network adapter
Or Wireless network adapterOr Wireless network adapter
Package Contents
Package contents are listed below. For any
Package contents are listed below. For any missing items, please
Package contents are listed below. For anyPackage contents are listed below. For any
contact your dealer immediately. Product contents may vary for
contact your dealer immediately. Product contents may vary for
contact your dealer immediately. Product contents may vary for contact your dealer immediately. Product contents may vary for
different models.
different models.
different models.different models.
Aztech
Aztech WL559
Aztech Aztech
Ethernet cable
Ethernet cable
Ethernet cableEthernet cable
Easy Start Guide
Easy Start Guide
Easy Start GuideEasy Start Guide
Resource CD
Resource CD
Resource CDResource CD
WL559EEEE
WL559WL559
missing items, please
missing items, please missing items, please
Page 4 of 43
Page 5
Device Overview
LABEL
DESCRIPTION
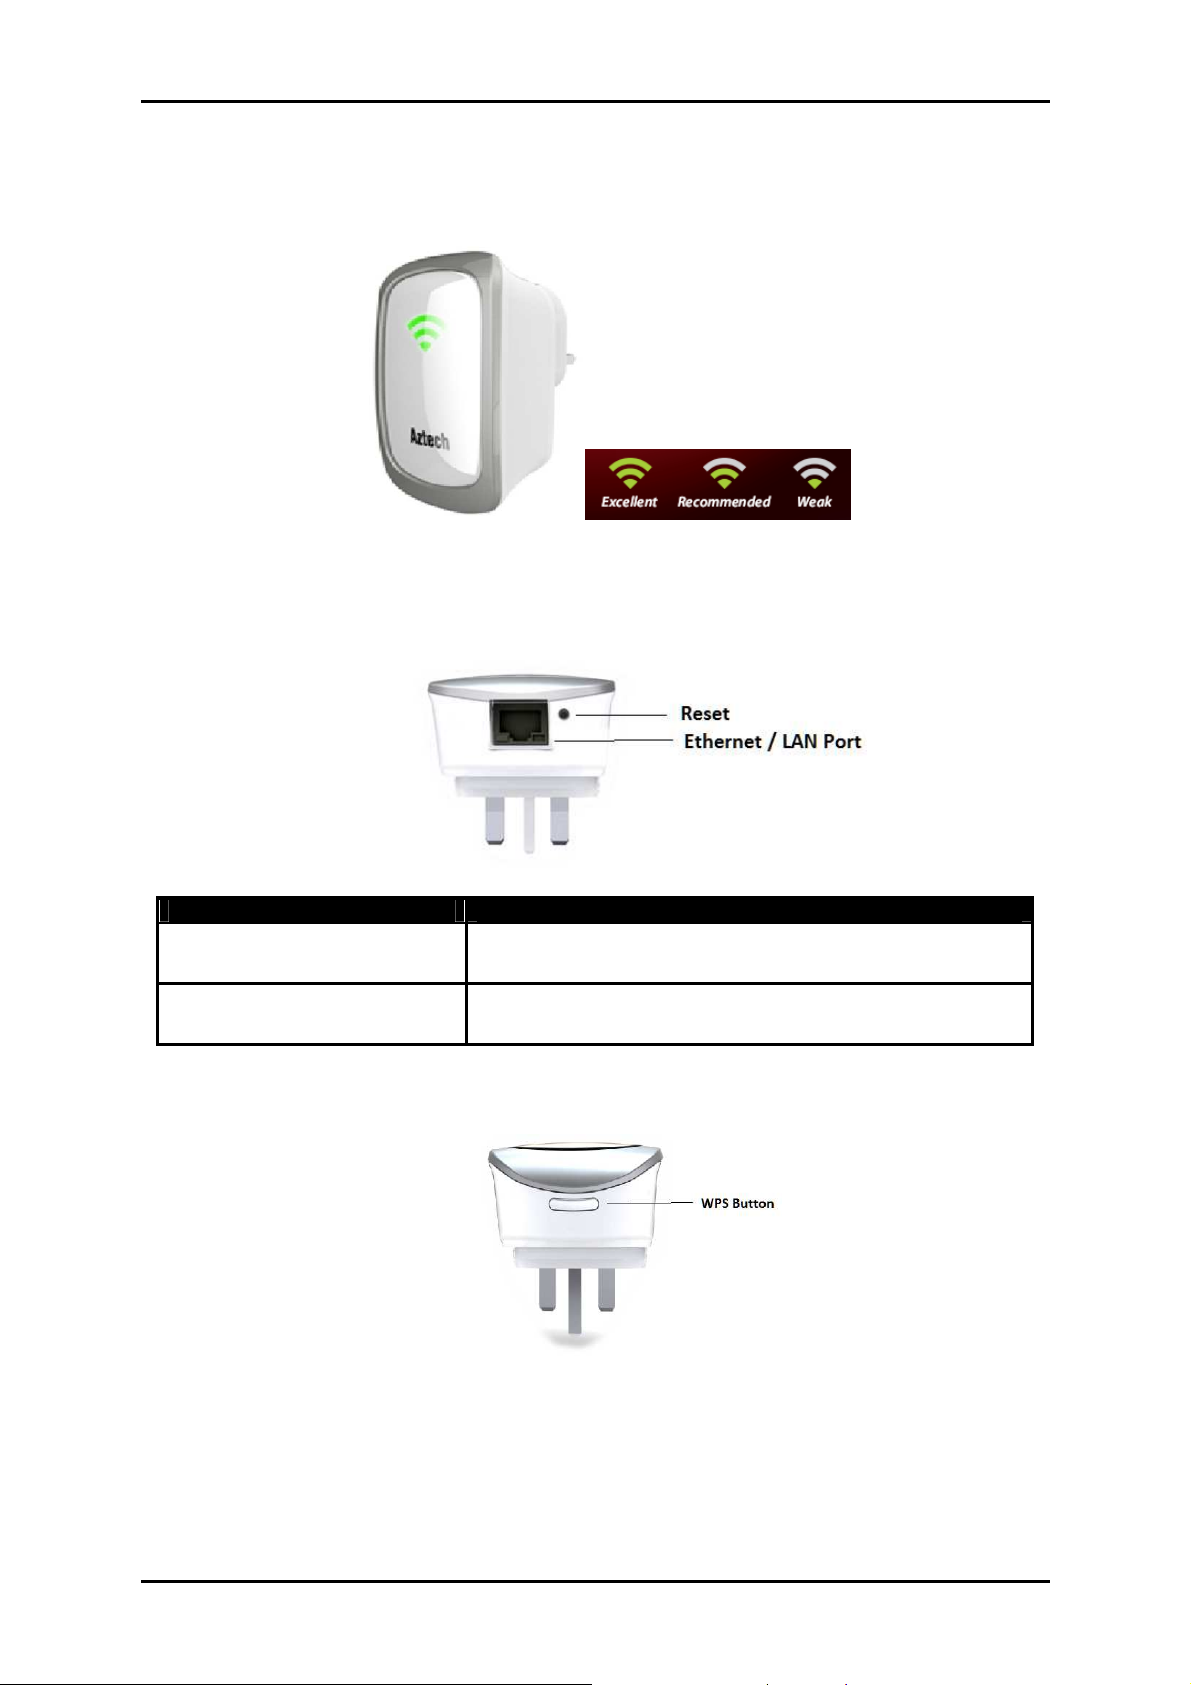
Front Panel
Bottom Panel
User Manual
RESET
ETHERNET PORT Connect to computers/Ethernet devices
Press the Reset button using a pin for 5 seconds to restore the
device to default factory settings
Top View
WPS or Wifi Protected Setup button allows for easier setup of the
WPS or Wifi Protected Setup button allows for easier setup of the
WPS or Wifi Protected Setup button allows for easier setup of the WPS or Wifi Protected Setup button allows for easier setup of the
Wireless
Wireless----N Range Extender with the Wireless A
WirelessWireless
Wireless
Wireless Clients (
Wireless Wireless
N Range Extender with the Wireless Access
N Range Extender with the Wireless AN Range Extender with the Wireless A
Clients (Laptops etc).
Clients (Clients (
Laptops etc).
Laptops etc).Laptops etc).
ccess point and the
ccessccess
point and the
point and the point and the
Page 5 of 43
Page 6
User Manual
LED CO
LOR/BEHAVIOUR
MODE
GREEN
GREEN
GREEN
ORANGE
Wireless
LED should be
LED should be ON if
LED should be
LED should b
e ON
LED should be
LED should be OFF
LED should be OFF
LED should be
LED should be
LED should be OFF
LED should be OFF
LED should be OFF if
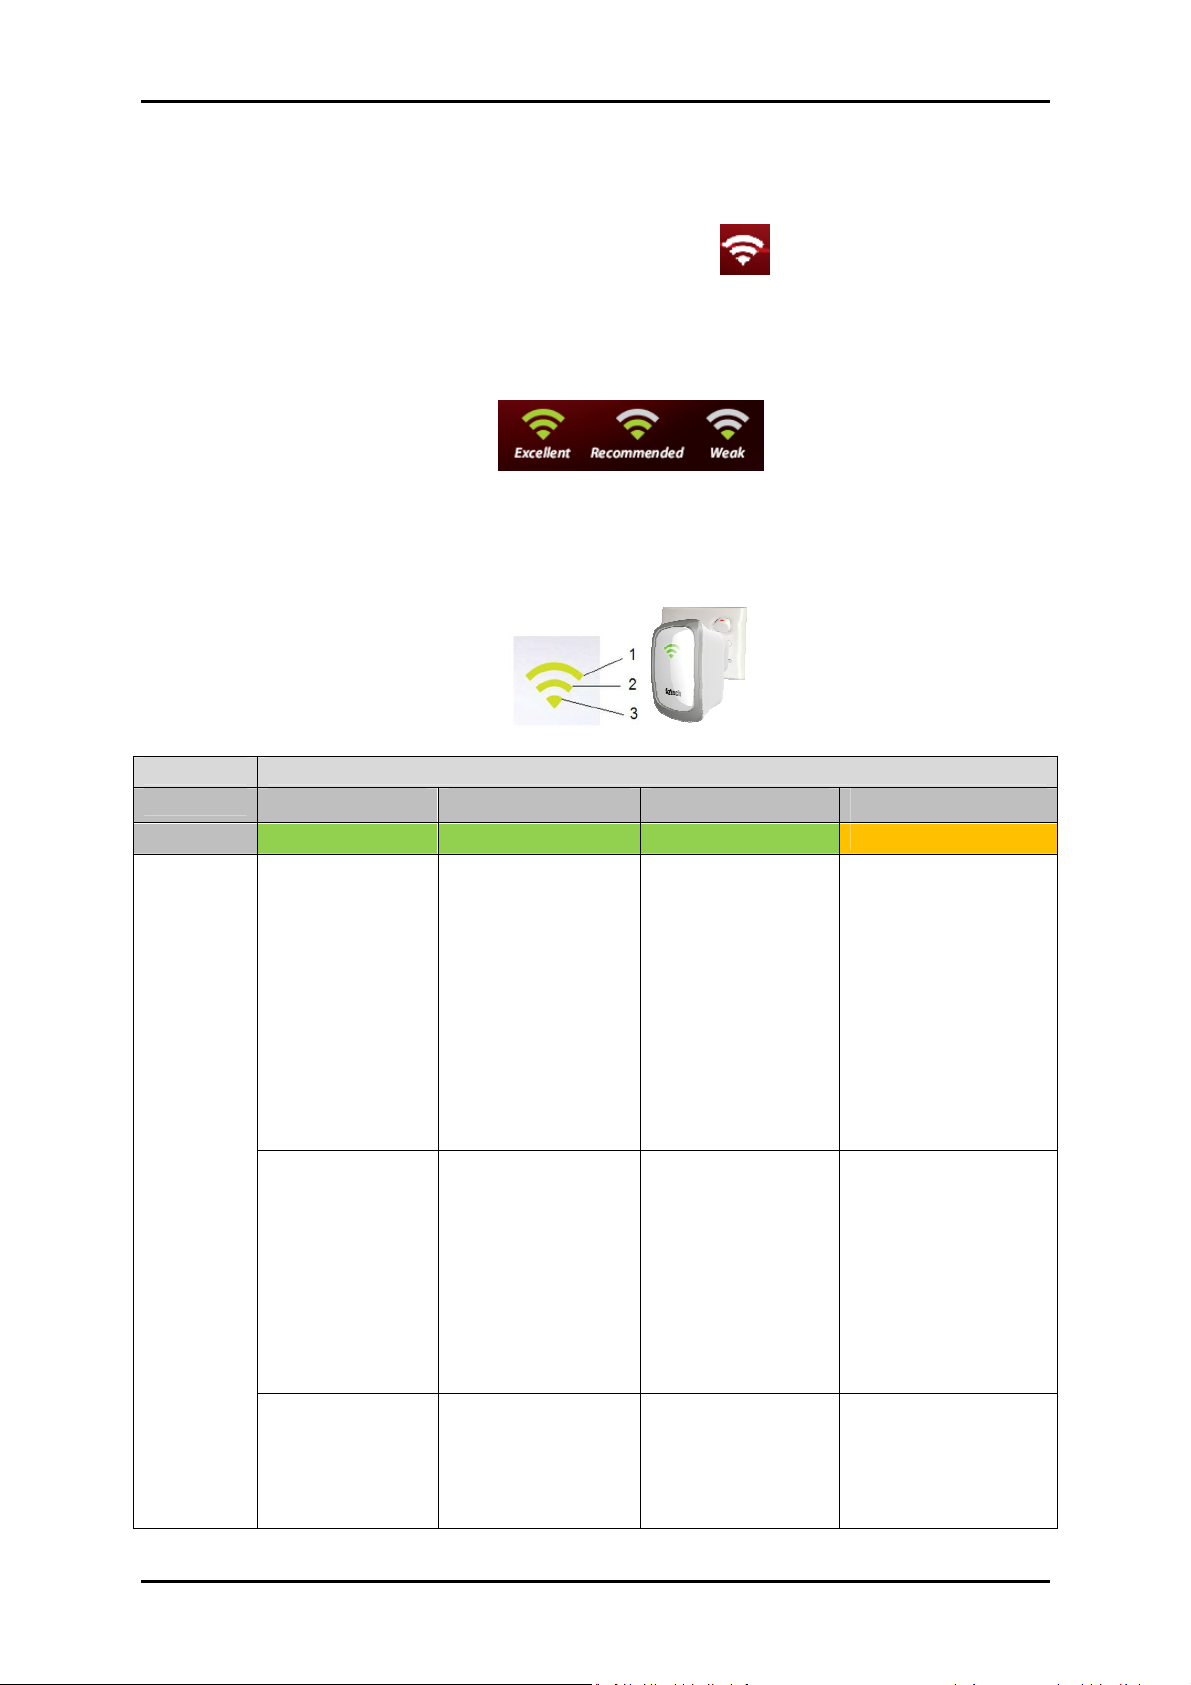
Aztech WL559E RSSI LED BEHAVIOUR
The WL559E provides for a Wireless Received Signal Strength Indicator
The WL559E provides for a Wireless Received Signal Strength Indicator
The WL559E provides for a Wireless Received Signal Strength Indicator The WL559E provides for a Wireless Received Signal Strength Indicator
(RSSI), which is a combination of 3 LEDs
(RSSI), which is a combination of 3 LEDs on the front panel, to
(RSSI), which is a combination of 3 LEDs (RSSI), which is a combination of 3 LEDs
allow you to determine how strong t
allow you to determine how strong the wireless signal is from your
allow you to determine how strong tallow you to determine how strong t
router
router or access point
routerrouter
The following table gives an overview on how the three LEDs on the
The following table gives an overview on how the three LEDs on the
The following table gives an overview on how the three LEDs on the The following table gives an overview on how the three LEDs on the
front panel of the WL559E behave.
front panel of the WL559E behave.
front panel of the WL559E behave.front panel of the WL559E behave.
or access point to your WL559E
or access pointor access point
to your WL559E....
to your WL559Eto your WL559E
he wireless signal is from your
he wireless signal is from your he wireless signal is from your
on the front panel, to
on the front panel, to on the front panel, to
Repeater
LED 1 LED 2 LED 3 LED 3
ON if WL559E is
connected to
Router and RSSI
value is equal to
HIGH.
OFF while
WL559E is
booting up.
WL559E is
connected to
Router and RSSI
value is greater
than or equal to
MID.
while WL559E is
booting up.
blinking if WL559E
is NOT connected
to any Router. LED
should be ON if
WL559E is
connected to
Router and RSSI
value is greater
than or equal to
LOW.
while WL559E is
booting up.
during boot up. After
full boot up, LED will
no longer be Orange
It will switch to
GREEN..
blinking for 2 mins
once WPS button is
pressed. LED should
stop blinking and ON
for 5 secs when WPS
authentication is
successful. Then LED
should be OFF.
Page 6 of 43
OFF while
WL559E is doing
WPS
authentication.
while WL559E is
doing WPS
authentication.
while WL559E is
doing WPS
authentication.
WL559E is connected
to Router.
Page 7

User Manual
Access
LED should be
LED should be OFF
LED should be OFF
LED should be ON
LED should be
LED should be ON
LED will blink 2x
LED will be blinking if
LED should be
LED should be OFF
LED will blink for 2
Wireless
LED should be
LED should be ON if
LED should be
LED should be ON
LED should be
LED should be OFF
LED should be OFF
LED should be
LED should be
LED should be OFF
LED should be OFF
LED should be OFF if
Point
BRIDGE
OFF while
WL559E is
booting up.
ON after fully
boot up
OFF while
WL559E is doing
WPS
authentication.
ON if WL559E is
connected to
Router and RSSI
value is equal to
HIGH.
while WL559E is
booting up.
after f
fully boot up
while WL559E is
doing WPS
authentication.
WL559E is
connected to
Router and RSSI
value is greater
than or equal to
MID.
when AP is
completely boot up
once
authentication with
the WPS is
successful
blinking if WL559E
is NOT connected
to any Router. LED
should be ON if
WL559E is
connected to
Router and RSSI
value is greater
than or equal to
LOW.
when AP is fully boot
up
not connected to a
router
minutes when WPS
button is pressed.
during boot up. After
fully bootup, LED will
OFF.
OFF while
WL559E is
booting up.
OFF while
WL559E is doing
WPS
authentication.
while WL559E is
booting up.
while WL559E is
doing WPS
authentication.
while WL559E is
booting up.
while WL559E is
doing WPS
authentication.
blinking for 2 mins
once WPS button is
pressed. LED should
stop blinking and ON
for 5 secs when WPS
authentication is
successful. Then LED
should be OFF.
WL559E is connected
to Router.
Page 7 of 43
Page 8

User Manual
Tips for placing the Range Extender
Before proceeding to con
Before proceeding to configure your
Before proceeding to conBefore proceeding to con
identify the areas where you have good wireless reception and weak
identify the areas where you have good wireless reception and weak
identify the areas where you have good wireless reception and weak identify the areas where you have good wireless reception and weak
or no wireless signal
or no wireless signal at all. Based from thi
or no wireless signal or no wireless signal
the W
the Wireless
the Wthe W
good wireless reception and where you have poor wireless coverage.
good wireless reception and where you have poor wireless coverage.
good wireless reception and where you have poor wireless coverage. good wireless reception and where you have poor wireless coverage.
This will serve as the
This will serve as the
This will serve as the This will serve as the
illustrati
illustration below is an example of a network diagram.
illustratiillustrati
ireless----N Range Extender
irelessireless
on below is an example of a network diagram.
on below is an example of a network diagram.on below is an example of a network diagram.
N Range Extender in between a location where you have
N Range ExtenderN Range Extender
at all. Based from this assessment you may place
at all. Based from thiat all. Based from thi
figure your WL559E
figure your figure your
in between a location where you have
in between a location where you have in between a location where you have
identified location
identified location
identified locationidentified location
WL559E, it is
WL559EWL559E
s assessment you may place
s assessment you may place s assessment you may place
, it is a good idea to
, it is , it is
for the
for the WL559E
for the for the
a good idea to
a good idea to a good idea to
WL559E. The
WL559EWL559E
. The
. The . The
NOTE: Placement of the Wireless
NOTE: Placement of the Wireless----N Range Extend
NOTE: Placement of the WirelessNOTE: Placement of the Wireless
the best possible results for extending your existing wireless signal. It
the best possible results for extending your existing wireless signal. It
the best possible results for extending your existing wireless signal. It the best possible results for extending your existing wireless signal. It
is
is ideal for the
ideal for the WL559E
isis
ideal for the ideal for the
good wireless signal from the wireless router/Access Point (AP) so as
good wireless signal from the wireless router/Access Point (AP) so as
good wireless signal from the wireless router/Access Point (AP) so as good wireless signal from the wireless router/Access Point (AP) so as
WL559E to be placed in a location where it
WL559EWL559E
to be placed in a location where it can receive
to be placed in a location where it to be placed in a location where it
N Range Extender is crucial to get
N Range ExtendN Range Extend
er is crucial to get
er is crucial to get er is crucial to get
can receive
can receive can receive
to avoid disconnection and packet loss.
to avoid disconnection and packet loss.
to avoid disconnection and packet loss.to avoid disconnection and packet loss.
Configuring the Device
Setting up the device is easy. Follow the ste
Setting up the device is easy. Follow the steps below to configure the
Setting up the device is easy. Follow the steSetting up the device is easy. Follow the ste
WL559E
WL559E to connect to
WL559EWL559E
Page 8 of 43
to connect to your current wirele
to connect toto connect to
your current wireless router/A
your current wireleyour current wirele
ps below to configure the
ps below to configure the ps below to configure the
ss router/Access
ss router/Ass router/A
ccess PPPPoint
ccess ccess
oint.
ointoint
.
. .
Page 9
TTTThe
he WL559E
WL559E can be configured using either wired or wireless
he he
WL559EWL559E
connection with your laptop or PC
connection with your laptop or PC.
connection with your laptop or PCconnection with your laptop or PC
To configure your WL559E via the Web GUI:
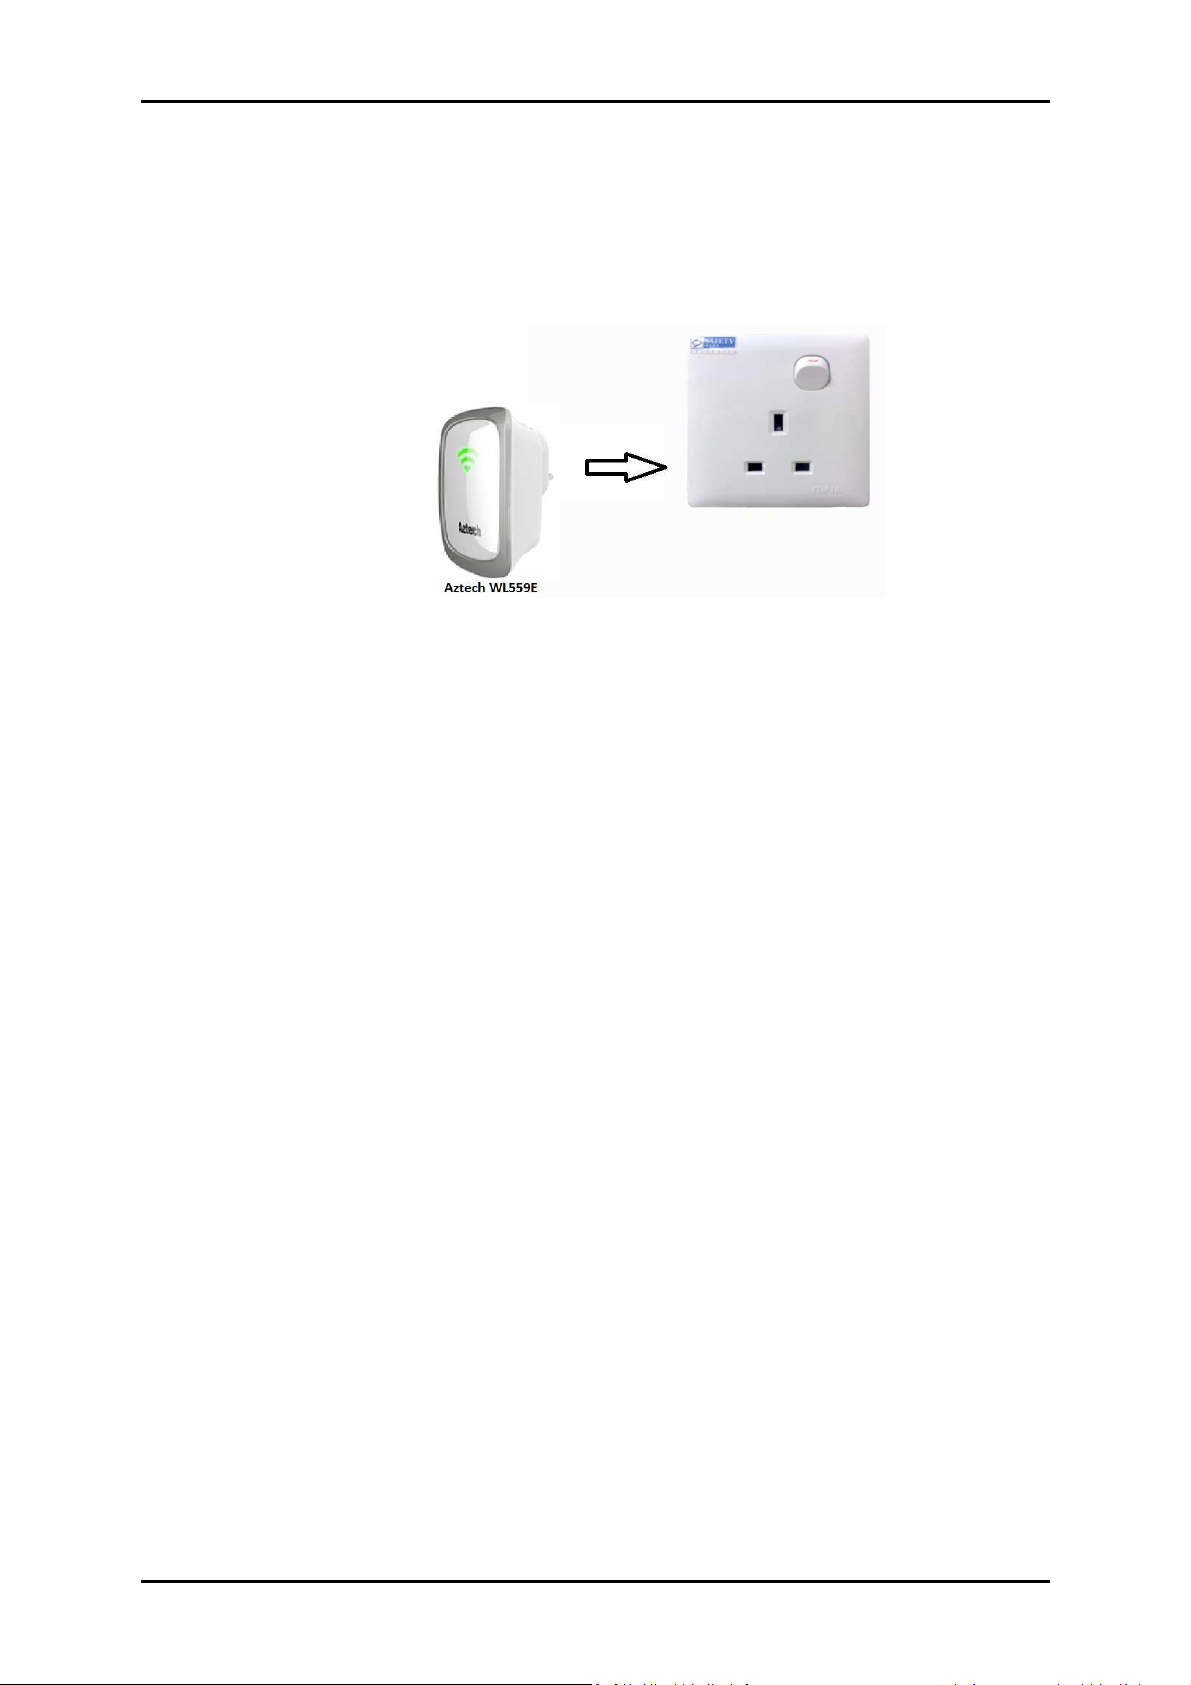
1.
1. Connect the
Connect the Aztech
1.1.
Connect the Connect the
2.
2. For the wired method, connect
For the wired method, connect an Ethernet cabl
2.2.
For the wired method, connectFor the wired method, connect
can be configured using either wired or wireless
can be configured using either wired or wireless can be configured using either wired or wireless
Aztech WL559E
Aztech Aztech
WL559E to a power outlet.
WL559EWL559E
to a power outlet.
to a power outlet.to a power outlet.
User Manual
.
. .
an Ethernet cable from your PC’s
an Ethernet cablan Ethernet cabl
e from your PC’s
e from your PC’s e from your PC’s
Ethernet port to the Ethernet port at the base of the
Ethernet port to the Ethernet port at the base of the WL559E
Ethernet port to the Ethernet port at the base of the Ethernet port to the Ethernet port at the base of the
3.
3. Once a connection to the
Once a connection to the WL559E
3.3.
Once a connection to the Once a connection to the
receive an IP address
receive an IP address (eg: 10.0.10.1)
receive an IP addressreceive an IP address
configuration using the web graphical user i
configuration using the web graphical user interface
configuration using the web graphical user iconfiguration using the web graphical user i
4.
4. On your PC or laptop, launch a browser (Eg: Internet
On your PC or laptop, launch a browser (Eg: Internet Explorer,
4.4.
On your PC or laptop, launch a browser (Eg: Internet On your PC or laptop, launch a browser (Eg: Internet
Safari etc).
Safari etc).You will be prompted to login to the WebUI of the repeater.
Safari etc).Safari etc).
Key in admin/admin for username/password.
Key in admin/admin for username/password.
Key in admin/admin for username/password. Key in admin/admin for username/password.
You will be prompted to login to the WebUI of the repeater.
You will be prompted to login to the WebUI of the repeater. You will be prompted to login to the WebUI of the repeater.
WL559E is established, your PC/laptop will
WL559EWL559E
(eg: 10.0.10.1) and you can
(eg: 10.0.10.1)(eg: 10.0.10.1)
is established, your PC/laptop will
is established, your PC/laptop will is established, your PC/laptop will
and you can then
and you canand you can
nterface of the WL559E
nterfacenterface
WL559E....
WL559EWL559E
then start the
then then
of the WL559E....
of the WL559Eof the WL559E
Explorer, Firefox,
Explorer,Explorer,
start the
start the start the
Firefox,
Firefox, Firefox,
The
The WL559E
WL559E will
The The
WL559EWL559E
you launch your web browser.
you launch your web browser.
you launch your web browser. you launch your web browser.
will now
now automatically
willwill
now now
automatically redirec
automaticallyautomatically
redirect you to the web GUI once
redirecredirec
t you to the web GUI once
t you to the web GUI once t you to the web GUI once
Page 9 of 43
Page 10
User Manual
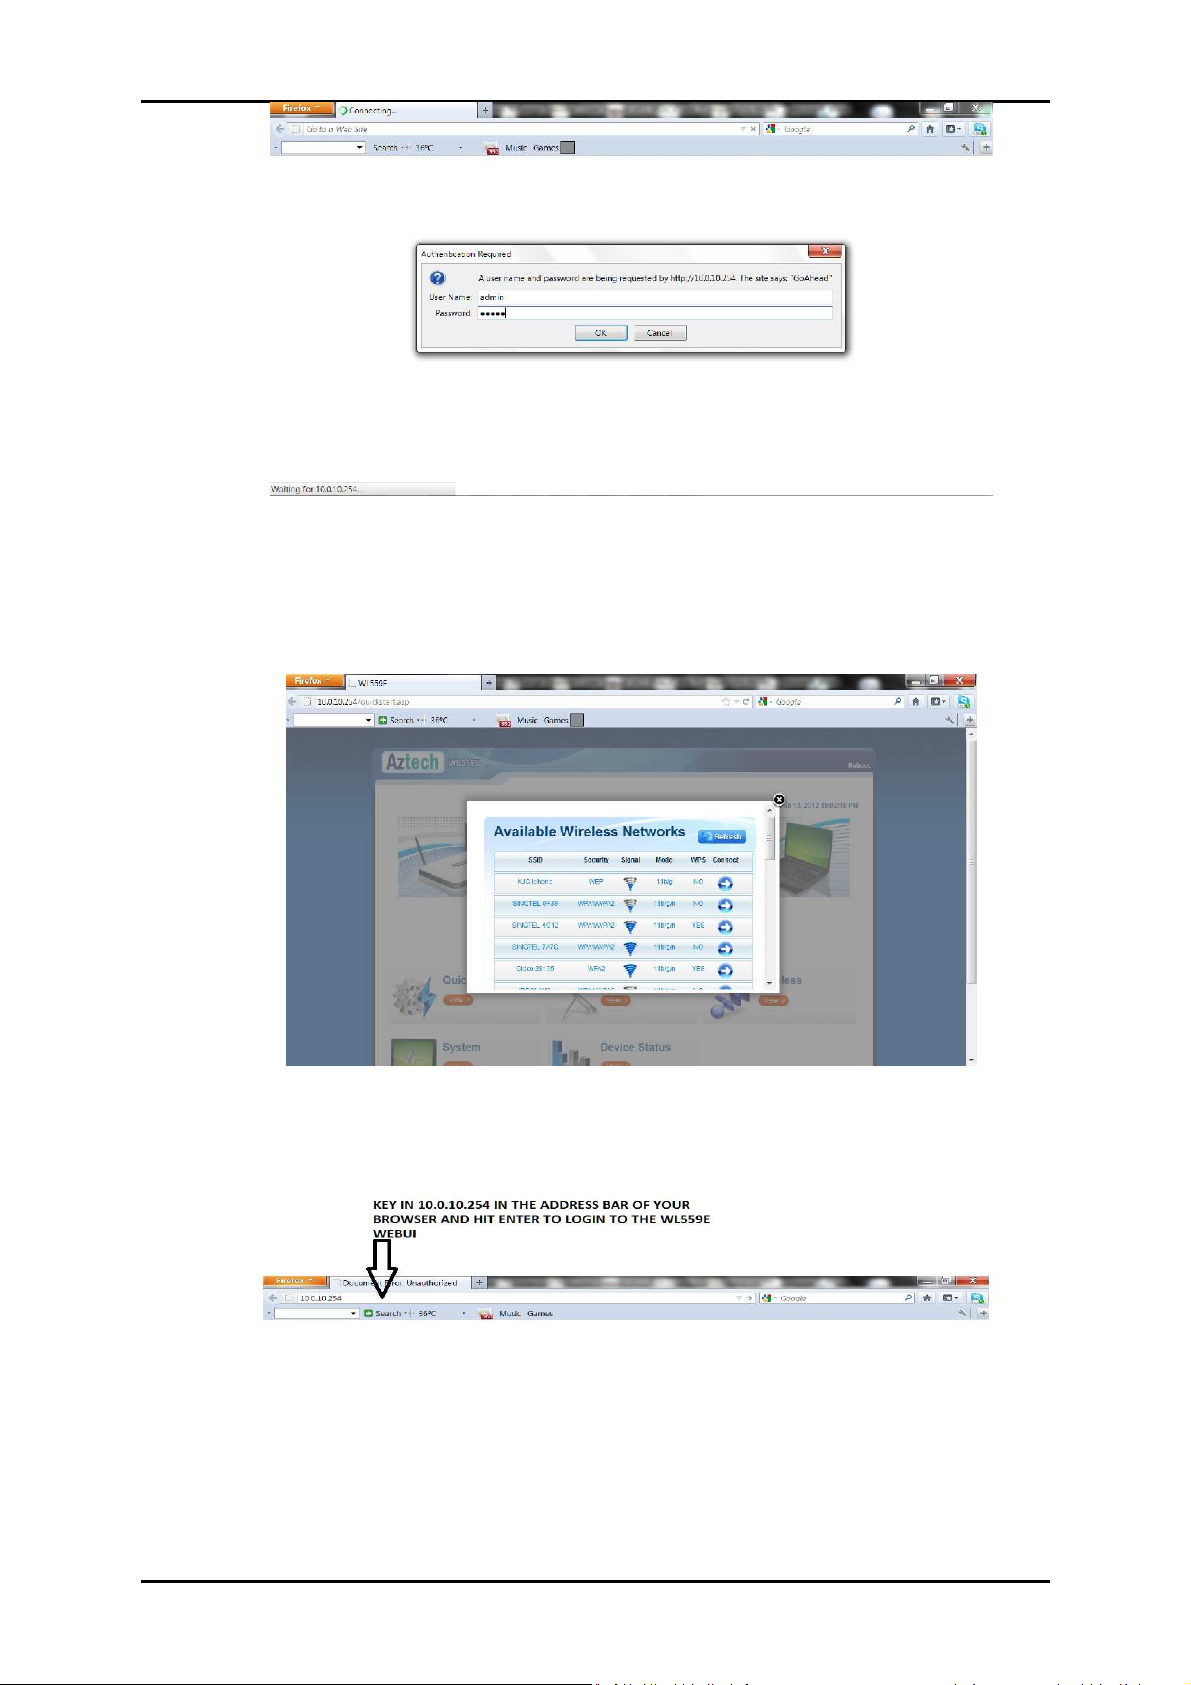
After step 4, the following WL559E WebU
After step 4, the following WL559E WebUIIII will be launched on your
After step 4, the following WL559E WebUAfter step 4, the following WL559E WebU
browser. A Wireless site survey is performed
browser. A Wireless site survey is performed to
browser. A Wireless site survey is performed browser. A Wireless site survey is performed
available neighboring wireless routers or Access points
available neighboring wireless routers or Access points....
available neighboring wireless routers or Access pointsavailable neighboring wireless routers or Access points
will be launched on your
will be launched on your will be launched on your
to scan and
scan and display
toto
scan andscan and
display all
displaydisplay
all
all all
5.
5. If
If in any case
5.5.
If If
input
input 10.0.10.254 on the address bar of your browser as shown below
inputinput
6.
6. Once yo
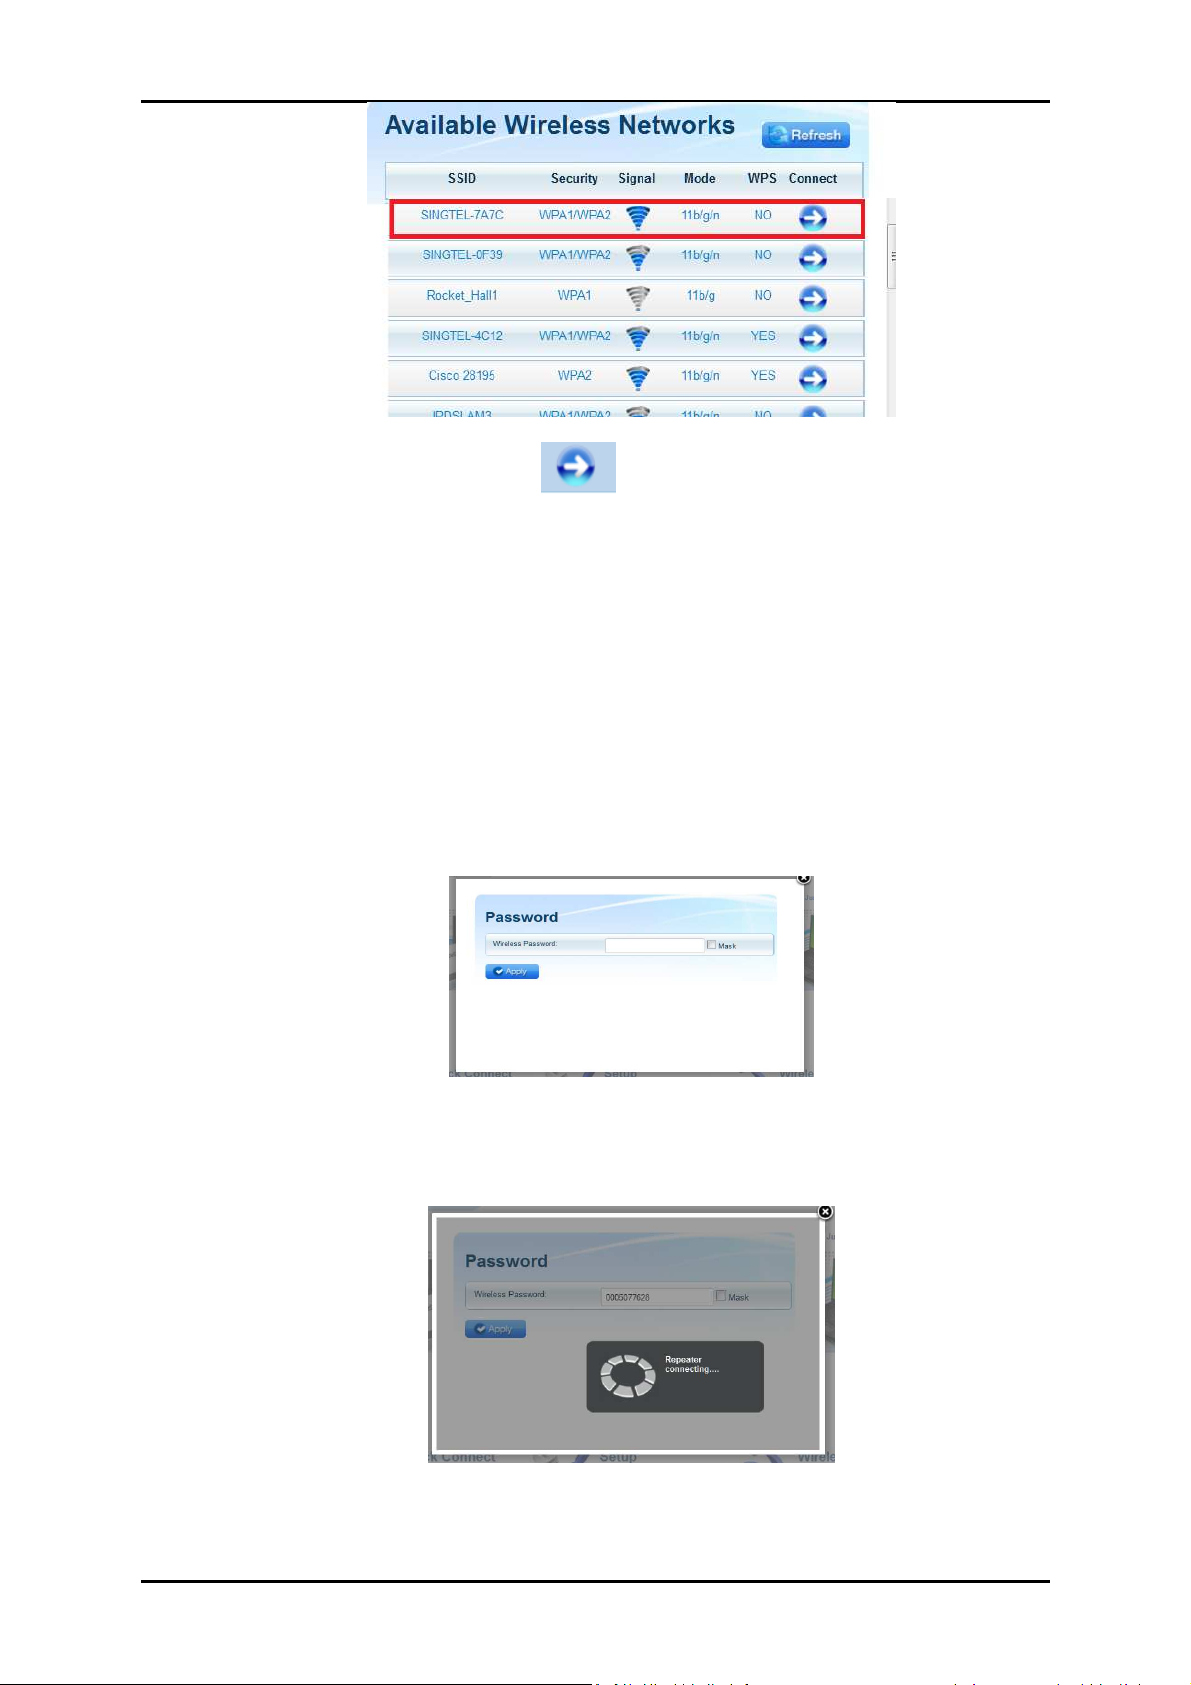
Once you are able to view the list of W
6.6.
Once yoOnce yo
Access point names, scroll the list to find
Access point names, scroll the list to find the W
Access point names, scroll the list to find Access point names, scroll the list to find
of your router at home
of your router at home (Eg: SINGTEL
of your router at homeof your router at home
Page 10 of 43
in any case this does
in any case in any case
10.0.10.254 on the address bar of your browser as shown below
10.0.10.254 on the address bar of your browser as shown below10.0.10.254 on the address bar of your browser as shown below
u are able to view the list of Wireless
u are able to view the list of Wu are able to view the list of W
this does not happen
this doesthis does
not happen,
not happennot happen
(Eg: SINGTEL----7A7C as shown below)
(Eg: SINGTEL(Eg: SINGTEL
, alternately ,
alternately ,you may manually
, ,
alternately ,alternately ,
ireless network name
ireless ireless
the Wireless n
the Wthe W
7A7C as shown below)
7A7C as shown below)7A7C as shown below)
you may manually
you may manuallyyou may manually
network names or
network namenetwork name
ireless network name
ireless nireless n
etwork name
etwork name etwork name
s or
s or s or
Page 11
User Manual
7.
7. Click the
Click the Connect
7.7.
Click the Click the
wireless network
wireless network name
wireless network wireless network
8.
8. Click
Click ““““Refresh
8.8.
Click Click
the lis
the listttt and the WL559E will rescan and update the list of Wireless
the listhe lis
Connect button
ConnectConnect
Refresh” button
RefreshRefresh
and the WL559E will rescan and update the list of Wireless
and the WL559E will rescan and update the list of Wireless and the WL559E will rescan and update the list of Wireless
” button if you don't see your wireless
” button” button
button located on the right side of the
buttonbutton
name you want to connect to.
name name
you want to connect to.
you want to connect to. you want to connect to.
if you don't see your wireless network name
if you don't see your wireless if you don't see your wireless
located on the right side of the
located on the right side of the located on the right side of the
network name on
network namenetwork name
on
on on
network names
network names....
network namesnetwork names
9.
9. Input the
Input the selected W
9.9.
Input the Input the
your existing wireless network at home
your existing wireless network at home. Click the Apply button to
your existing wireless network at homeyour existing wireless network at home
commit the changes.
commit the changes. Ensure to key in the correct Wi
commit the changes.commit the changes.
selected Wireless network
selected Wselected W
ireless network password/
ireless network ireless network
Ensure to key in the correct Wireless password.
Ensure to key in the correct WiEnsure to key in the correct Wi
password/key/passphrase
password/password/
. Click the Apply button to
. Click the Apply button to . Click the Apply button to
key/passphrase of
key/passphrasekey/passphrase
reless password.
reless password.reless password.
of
of of
10.
10. The repeater will now start connecting to your wireless router at
10.10.
home and display the following message “Repeater Connecting”
home and display the following message “Repeater Connecting”
home and display the following message “Repeater Connecting”home and display the following message “Repeater Connecting”
The repeater will now start connecting to your wireless router at
The repeater will now start connecting to your wireless router at The repeater will now start connecting to your wireless router at
Page 11 of 43
Page 12

User Manual
11.
11. After successfully saving the settings, the WL559E will reboot
11.11.
and connect to your wireless router.
and connect to your wireless router.
and connect to your wireless router. and connect to your wireless router.
The LED
The LEDs on the front
The LEDThe LED
connection indicating the current signal strength
connection indicating the current signal strength between your
connection indicating the current signal strengthconnection indicating the current signal strength
Wireless router and the Aztech WL559E.
Wireless router and the Aztech WL559E.
Wireless router and the Aztech WL559E.Wireless router and the Aztech WL559E.
12.
12. On the WebUi, you will be able to notice that the connection
12.12.
between your Wireless r
between your Wireless router and the WL559E has been established
between your Wireless rbetween your Wireless r
After successfully saving the settings, the WL559E will reboot
After successfully saving the settings, the WL559E will reboot After successfully saving the settings, the WL559E will reboot
s on the front of the device will light up on
s on the front s on the front
On the WebUi, you will be able to notice that the connection
On the WebUi, you will be able to notice that the connection On the WebUi, you will be able to notice that the connection
of the device will light up on a successful
of the device will light up on of the device will light up on
outer and the WL559E has been established
outer and the WL559E has been establishedouter and the WL559E has been established
a successful
a successful a successful
between your
between your between your
as well
as well....
as wellas well
13.
13. Plug the
13.13.
where signal strength is strong as indicated by the 3 LEDs on the front
where signal strength is strong as indicated by the 3 LEDs on the front
where signal strength is strong as indicated by the 3 LEDs on the front where signal strength is strong as indicated by the 3 LEDs on the front
panel of the device
panel of the device
panel of the devicepanel of the device
14.
14.
14.14.
and
and sma
andand
Plug the WL559E
Plug the Plug the
You may now
You may now connect your
You may now You may now
smartphones with the WL559E Wireless Repeater
rtphones with the WL559E Wireless Repeater....
smasma
rtphones with the WL559E Wireless Repeaterrtphones with the WL559E Wireless Repeater
WL559E to a power ou
WL559EWL559E
to a power outlet at the identified location
to a power outo a power ou
connect your wwwwireless devices such a
connect your connect your
ireless devices such as laptops
ireless devices such aireless devices such a
tlet at the identified location
tlet at the identified location tlet at the identified location
s laptops
s laptops s laptops
NOTE
NOTE:
NOTENOTE
:
: :
*You may need to reboot your laptop to connect to the
*You may need to reboot your laptop to connect to the WL559E
*You may need to reboot your laptop to connect to the *You may need to reboot your laptop to connect to the
**You may need to enable Enhanced Compatibility if you are using
**You may need to enable Enhanced Compatibility if you are using
**You may need to enable Enhanced Compatibility if you are using **You may need to enable Enhanced Compatibility if you are using
Windows 7 OS with certain brands of Wireless routers.
Windows 7 OS with certain brands of Wireless routers.
Windows 7 OS with certain brands of Wireless routers.Windows 7 OS with certain brands of Wireless routers.
Page 12 of 43
WL559E....
WL559EWL559E
Page 13

User Manual
***Do
***Do not select AUTO from channel selection. If your wireless AP is
***Do***Do
using auto channel, you would still need to select the current channel
using auto channel, you would still need to select the current channel
using auto channel, you would still need to select the current channel using auto channel, you would still need to select the current channel
it is using. The
it is using. The WL559E
it is using. The it is using. The
switches to a different channel.
switches to a different channel.
switches to a different channel.switches to a different channel.
not select AUTO from channel selection. If your wireless AP is
not select AUTO from channel selection. If your wireless AP is not select AUTO from channel selection. If your wireless AP is
WL559E will automatically follow your wireless AP if it
WL559EWL559E
will automatically follow your wireless AP if it
will automatically follow your wireless AP if it will automatically follow your wireless AP if it
Aztech WL559E - Modes of Operation
Aztech WL559E supports three modes of operation:
Aztech WL559E supports three modes of operation:
Aztech WL559E supports three modes of operation:Aztech WL559E supports three modes of operation:
Wireless Repeater or Range Extender Mode [Default mode]
Wireless Repeater or Range Extender Mode [Default mode]
Wireless Repeater or Range Extender Mode [Default mode]Wireless Repeater or Range Extender Mode [Default mode]
Wireless Bridge Mode
Wireless Bridge Mode
Wireless Bridge ModeWireless Bridge Mode
Wireless Access Point Mode
Wireless Access Point Mode
Wireless Access Point ModeWireless Access Point Mode
Page 13 of 43
Page 14

User Manual
Use the Device as a Wireless Repeater
Once the wireless connection f
Once the wireless connection from the
Once the wireless connection fOnce the wireless connection f
PPPPoint
oint/router is established you can connect your wireless devices like
/router is established you can connect your wireless devices like
ointoint
/router is established you can connect your wireless devices like /router is established you can connect your wireless devices like
laptops and smartphon
laptops and smartphones through the Wireless
laptops and smartphonlaptops and smartphon
These devices will
These devices will now
These devices will These devices will
and should be able t
and should be able to access the Internet from farther locations
and should be able tand should be able t
previously unreachable by your wireless signal.
previously unreachable by your wireless signal.
previously unreachable by your wireless signal. previously unreachable by your wireless signal.
Setup Diagram
Setup Diagram
Setup DiagramSetup Diagram
now obtain an IP address from the main AP/router
now now
es through the Wireless----N Range Extender
es through the Wirelesses through the Wireless
obtain an IP address from the main AP/router
obtain an IP address from the main AP/router obtain an IP address from the main AP/router
o access the Internet from farther locations
o access the Internet from farther locations o access the Internet from farther locations
rom the WL559E
rom the rom the
WL559E to the main A
WL559EWL559E
to the main Access
to the main Ato the main A
N Range Extender.
N Range ExtenderN Range Extender
ccess
ccess ccess
.
. .
Use the Device as a Wireless Bridge
Connect wired devices to your wireless network by connecting an
Connect wired devices to your wireless network by connecting an
Connect wired devices to your wireless network by connecting an Connect wired devices to your wireless network by connecting an
Ethernet cable from a wired device, such as a
Ethernet cable from a wired device, such as a Desktop PC, Game
Ethernet cable from a wired device, such as a Ethernet cable from a wired device, such as a
Console or Internet
Console or Internet----ready LCD TV, to the Ethernet port of the
Console or InternetConsole or Internet
To setup the Aztech WL559E as a Wireless
To setup the Aztech WL559E as a Wireless Bridge
To setup the Aztech WL559E as a Wireless To setup the Aztech WL559E as a Wireless
1.
1. Connect a PC/laptop to the WL559E. Plug an Ethernet cable to the
Connect a PC/laptop to the WL559E. Plug an Ethernet cable to the
1.1.
Connect a PC/laptop to the WL559E. Plug an Ethernet cable to the Connect a PC/laptop to the WL559E. Plug an Ethernet cable to the
Ethernet port at the base portion of the device. Once a
Ethernet port at the base portion of the device. Once a connection to
Ethernet port at the base portion of the device. Once aEthernet port at the base portion of the device. Once a
the device is established, your PC/laptop will receive an IP address
the device is established, your PC/laptop will receive an IP address
the device is established, your PC/laptop will receive an IP address the device is established, your PC/laptop will receive an IP address
and you can start the configuration using the web graphical user
and you can start the configuration using the web graphical user
and you can start the configuration using the web graphical user and you can start the configuration using the web graphical user
interface.
interface.
interface.interface.
ready LCD TV, to the Ethernet port of the WL559E
ready LCD TV, to the Ethernet port of the ready LCD TV, to the Ethernet port of the
Bridge::::
BridgeBridge
Desktop PC, Game
Desktop PC, Game Desktop PC, Game
WL559E....
WL559EWL559E
connection to
connection to connection to
Page 14 of 43
Page 15

User Manual
2.
2. The device will redirect you to the web GUI once you launch your web
The device will redirect you to the web GUI once you launch your web
2.2.
The device will redirect you to the web GUI once you launch your web The device will redirect you to the web GUI once you launch your web
browser. If in any case it
browser. If in any case it does not, you may manually input
browser. If in any case it browser. If in any case it
10.0.10.254 on the address bar.
10.0.10.254 on the address bar. Input username as admin and
10.0.10.254 on the address bar.10.0.10.254 on the address bar.
password as admin. Click the OK button.
password as admin. Click the OK button.
password as admin. Click the OK button.password as admin. Click the OK button.
3.
3. On your browser, close the Wireless Site survey that displays the list
On your browser, close the Wireless Site survey that displays the list
3.3.
On your browser, close the Wireless Site survey that displays the list On your browser, close the Wireless Site survey that displays the list
of the available Wireless networks. Select “
of the available Wireless networks. Select “Quick Co
of the available Wireless networks. Select “of the available Wireless networks. Select “
WebUi homepage as shown below.
WebUi homepage as shown below.
WebUi homepage as shown below.WebUi homepage as shown below.
does not, you may manually input
does not, you may manually input does not, you may manually input
Input username as admin and
Input username as admin and Input username as admin and
Quick Connect
Quick CoQuick Co
nnect” from the
nnectnnect
” from the
” from the ” from the
4.
4. Choose the desired Wireless router from the Wireless Site survey to
Choose the desired Wireless router from the Wireless Site survey to
4.4.
Choose the desired Wireless router from the Wireless Site survey to Choose the desired Wireless router from the Wireless Site survey to
connect to and select the
connect to and select the button.
connect to and select the connect to and select the
button.
button.button.
5.
5. Select “Bridge” as shown
Select “Bridge” as shown below
5.5.
Select “Bridge” as shown Select “Bridge” as shown
of the Wireless router. Key in
of the Wireless router. Key in the correct Wireless Password /
of the Wireless router. Key inof the Wireless router. Key in
below .The WL559E will auto fill the
belowbelow
.The WL559E will auto fill the details
.The WL559E will auto fill the .The WL559E will auto fill the
the correct Wireless Password /
the correct Wireless Password / the correct Wireless Password /
details
details details
passphrase of your wireless router then
passphrase of your wireless router then select “Apply”.
passphrase of your wireless router thenpassphrase of your wireless router then
will then get applied.
will then get applied.
will then get applied. will then get applied.
select “Apply”. The settings
select “Apply”.select “Apply”.
The settings
The settings The settings
Page 15 of 43
Page 16

User Manual
6.
6. Connect the Wired Client to the Ethernet port of the WL559E similar to
Connect the Wired Client to the Ethernet port of the WL559E similar to
6.6.
Connect the Wired Client to the Ethernet port of the WL559E similar to Connect the Wired Client to the Ethernet port of the WL559E similar to
the setup shown below.
the setup shown below.
the setup shown below.the setup shown below.
Setup Diagram
Setup Diagram
Setup DiagramSetup Diagram
Configure the WL559E as a Wireless AP
Use the
Use the WL559E
Use the Use the
modem
modem----router into a wireless capable networking device to
modemmodem
to
to connect
to to
smartphones.
smartphones.
smartphones. smartphones.
To setup the
To setup the Aztech WL559E
To setup the To setup the
1.
1. Connect a PC
Connect a PC/laptop to the
1.1.
Connect a PCConnect a PC
Ethernet port at the base portion of the device.
Ethernet port at the base portion of the device. Once a connection to
Ethernet port at the base portion of the device.Ethernet port at the base portion of the device.
the device is established, your PC/laptop will receive an IP address
the device is established, your PC/laptop will receive an IP address
the device is established, your PC/laptop will receive an IP address the device is established, your PC/laptop will receive an IP address
and you can start the configuration u
and you can start the configuration using the web graphical user
and you can start the configuration uand you can start the configuration u
WL559E also
WL559EWL559E
router into a wireless capable networking device to be able
router into a wireless capable networking device to router into a wireless capable networking device to
connect to
connect connect
also as a Wireless Access
also also
to wireless
wireless----enabled devices such as laptops and
to to
wirelesswireless
Aztech WL559E as
Aztech WL559EAztech WL559E
/laptop to the WL559E
/laptop to the /laptop to the
as a Wireless Access Point,
as a Wireless Access as a Wireless Access
enabled devices such as laptops and
enabled devices such as laptops and enabled devices such as laptops and
as a
a WWWWireless AP:
as as
WL559E. Plug an Ethernet cable to the
WL559EWL559E
ireless AP:
a a
ireless AP:ireless AP:
. Plug an Ethernet cable to the
. Plug an Ethernet cable to the . Plug an Ethernet cable to the
sing the web graphical user
sing the web graphical user sing the web graphical user
Point, to turn a regular
Point,Point,
to turn a regular
to turn a regular to turn a regular
Once a connection to
Once a connection to Once a connection to
be able
be able be able
interface.
interface.
interface.interface.
Page 16 of 43
Page 17

User Manual
2.
2. The device will redirect you to the web GUI once you launch your web
The device will redirect you to the web GUI once you launch your web
2.2.
The device will redirect you to the web GUI once you launch your web The device will redirect you to the web GUI once you launch your web
browser. If in any case it does not, you may manually input
browser. If in any case it does not, you may manually input
browser. If in any case it does not, you may manually input browser. If in any case it does not, you may manually input
10.0.10.254 on the address bar.
10.0.10.254 on the address bar. Input username as admin and
10.0.10.254 on the address bar.10.0.10.254 on the address bar.
password as admin. Click the
password as admin. Click the OK button.
password as admin. Click thepassword as admin. Click the
3.
3. On your browser, c
On your browser, close the Wireless Site survey that displays the list
3.3.
On your browser, cOn your browser, c
of the available Wireless networks. Select “Setup” from the WebUi
of the available Wireless networks. Select “Setup” from the WebUi
of the available Wireless networks. Select “Setup” from the WebUi of the available Wireless networks. Select “Setup” from the WebUi
homepage as shown below.
homepage as shown below.
homepage as shown below.homepage as shown below.
lose the Wireless Site survey that displays the list
lose the Wireless Site survey that displays the list lose the Wireless Site survey that displays the list
OK button.
OK button.OK button.
Input username as admin and
Input username as admin and Input username as admin and
4.
4. Select “Access Point” as shown below, Set the desired Wireless
Select “Access Point” as shown below, Set the desired Wireless
4.4.
Select “Access Point” as shown below, Set the desired Wireless Select “Access Point” as shown below, Set the desired Wireless
network name and
network name and the security type and then select “Apply”.The
network name and network name and
settings will
settings will then get applied.
settings willsettings will
then get applied.
then get applied.then get applied.
the security type and then select “Apply”.The
the security type and then select “Apply”.The the security type and then select “Apply”.The
5.
5. U
Unplug the Ethernet cable from your PC and connect it to an available
nplug the Ethernet cable from your PC and connect it to an available
5.5.
UU
nplug the Ethernet cable from your PC and connect it to an available nplug the Ethernet cable from your PC and connect it to an available
Ethernet port in your modem
Ethernet port in your modem----router to match the hardware setup
Ethernet port in your modemEthernet port in your modem
illustrated below.
illustrated below.
illustrated below.illustrated below.
router to match the hardware setup
router to match the hardware setup router to match the hardware setup
Setup Diagram
Setup Diagram
Setup DiagramSetup Diagram
Page 17 of 43
Page 18

User Manual
NOTE:
NOTE:
NOTE: NOTE:
To change any wireless settings on the
To change any wireless settings on the WL559E
To change any wireless settings on the To change any wireless settings on the
set a static IP address on your wireless network card to be able to
set a static IP address on your wireless network card to be able to
set a static IP address on your wireless network card to be able to set a static IP address on your wireless network card to be able to
access the web GUI before you can configure the settings.
access the web GUI before you can configure the settings.
access the web GUI before you can configure the settings. access the web GUI before you can configure the settings.
WL559E, you would need to
WL559EWL559E
, you would need to
, you would need to , you would need to
Setting a Static IP on your PC
Setting a Static IP on your PC
Setting a Static IP on your PCSetting a Static IP on your PC
Please refer to the steps on how
Please refer to the steps on how to set a static IP on your PC
Please refer to the steps on howPlease refer to the steps on how
included in this
included in this user
included in this included in this
user manual
manual,
user user
manualmanual
, please scroll down
please scroll down to page #
, ,
please scroll down please scroll down
to set a static IP on your PC ((((also
to set a static IP on your PC to set a static IP on your PC
to page #28.
to page #to page #
Changing the Wireless Settings
Modify the default Wireless Settings
Modify the default Wireless Settings of the WL559E
Modify the default Wireless Settings Modify the default Wireless Settings
of the WL559E to suit your own
of the WL559E of the WL559E
also
also also
28.
28.28.
to suit your own
to suit your own to suit your own
preference.
preference.
preference. preference.
To change the Wireless settings via the Web GUI:
1.
1. Set a stati
Set a static IP
1.1.
Set a statiSet a stati
and Launch
and Launch your browser
and Launchand Launch
Page 18 of 43
c IP (Eg:10.0.10.2)
(Eg:10.0.10.2) on your PC. Connect the PC to the WL559E
c IP c IP
(Eg:10.0.10.2) (Eg:10.0.10.2)
your browser
your browseryour browser
on your PC. Connect the PC to the WL559E
on your PC. Connect the PC to the WL559E on your PC. Connect the PC to the WL559E
Page 19

User Manual
2.
2. Input admin for both username and password fields and click on OK
Input admin for both username and password fields and click on OK
2.2.
Input admin for both username and password fields and click on OKInput admin for both username and password fields and click on OK
3.
3. Close the Wireless Site survey pop
Close the Wireless Site survey pop up and
3.3.
Close the Wireless Site survey pop Close the Wireless Site survey pop
as shown belo
as shown below.
as shown beloas shown belo
4.
4. You can change the
You can change the Basic settings,
4.4.
You can change the You can change the
change wireless MAC filtering settings from this section
change wireless MAC filtering settings from this section
change wireless MAC filtering settings from this section change wireless MAC filtering settings from this section
w.
w. w.
Basic settings, wireless
Basic settings, Basic settings,
up and click on the “Wireless” icon
up andup and
click on the “Wireless” icon
click on the “Wireless” icon click on the “Wireless” icon
wireless security
wireless wireless
security settings
security security
settings and
settings settings
5.
5. You can make any changes to the
You can make any changes to the basic
5.5.
You can make any changes to the You can make any changes to the
basic wireless settings of the
basic basic
wireless settings of the
wireless settings of the wireless settings of the
and
and and
WL559E by selecting the “Wireless Basic Settings” icon and
WL559E by selecting the “Wireless Basic Settings” icon and Clic
WL559E by selecting the “Wireless Basic Settings” icon and WL559E by selecting the “Wireless Basic Settings” icon and
to commit the changes
to commit the changes
to commit the changesto commit the changes
Click Apply
ClicClic
k Apply
k Apply k Apply
6.
6. Ensure to recreate the wireless profile on your computer to match the
Ensure to recreate the wireless profile on your computer to match the
6.6.
Ensure to recreate the wireless profile on your computer to match the Ensure to recreate the wireless profile on your computer to match the
new settings
new settings
new settingsnew settings
Page 19 of 43
Page 20

User Manual
Changing the Wireless Security Settings
Modify the default Wireless Security Settings to suit your own
Modify the default Wireless Security Settings to suit your own
Modify the default Wireless Security Settings to suit your own Modify the default Wireless Security Settings to suit your own
preference.
preference.
preference. preference.
To change the Wireless security settings via the Web GUI:
1.
1. Set
Set a static IP
1.1.
2.
2. Input admin for both username and password fields and click on OK
2.2.
3.
3. Click the
3.3.
a static IP (Eg:10.0.10.2)
SetSet
a static IP a static IP
and Launch your browser
and Launch your browser
and Launch your browserand Launch your browser
Input admin for both username and password fields and click on OK
Input admin for both username and password fields and click on OKInput admin for both username and password fields and click on OK
Click the ““““Wireless
Click the Click the
change the wireless security settings as preferred from this page
change the wireless security settings as preferred from this page
change the wireless security settings as preferred from this pagechange the wireless security settings as preferred from this page
(Eg:10.0.10.2)on your PC. Connect the PC to the WL559E
(Eg:10.0.10.2)(Eg:10.0.10.2)
Wireless”””” button, and click the Security menu. Y
WirelessWireless
button, and click the Security menu. You can
button, and click the Security menu. Ybutton, and click the Security menu. Y
on your PC. Connect the PC to the WL559E
on your PC. Connect the PC to the WL559E on your PC. Connect the PC to the WL559E
ou can
ou can ou can
4.
4. Then Select the “Security Settings” icon to make the necessary
Then Select the “Security Settings” icon to make the necessary
4.4.
Then Select the “Security Settings” icon to make the necessary Then Select the “Security Settings” icon to make the necessary
changes.
changes.
changes.changes.
Page 20 of 43
Page 21

User Manual
5.
5. You can choose any of the Wireless Security modes, set the new
You can choose any of the Wireless Security modes, set the new
5.5.
You can choose any of the Wireless Security modes, set the new You can choose any of the Wireless Security modes, set the new
wireless key or password for your WL559E.
wireless key or password for your WL559E.
wireless key or password for your WL559E.wireless key or password for your WL559E.
6.
6. The supported security modes are WEP, WPA
The supported security modes are WEP, WPA----PSK
6.6.
The supported security modes are WEP, WPAThe supported security modes are WEP, WPA
WPA/WPA2.Recommend to use WPA/WPA2 security type.
WPA/WPA2.Recommend to use WPA/WPA2 security type.
WPA/WPA2.Recommend to use WPA/WPA2 security type. WPA/WPA2.Recommend to use WPA/WPA2 security type.
7.
7. Click Apply to commit the changes
Click Apply to commit the changes
7.7.
Click Apply to commit the changesClick Apply to commit the changes
8.
8. Ensure to recreate the wireless profile on your computer to match the
Ensure to recreate the wireless profile on your computer to match the
8.8.
Ensure to recreate the wireless profile on your computer to match the Ensure to recreate the wireless profile on your computer to match the
PSK, WPA2
, WPA2----PSK and
PSKPSK
, WPA2, WPA2
PSK and
PSK and PSK and
new settings
new settings
new settingsnew settings
Page 21 of 43
Page 22

User Manual
WPS – WiFi Protected Setup
WPS or WiF
WPS or WiFi Protected Setup makes it
WPS or WiFWPS or WiF
Range Extend
Range Extender with your Wireless router and your Wireless client.
Range ExtendRange Extend
Note: Your Wireless router at home as well as your Wireless clients
Note: Your Wireless router at home as well as your Wireless clients
Note: Your Wireless router at home as well as your Wireless clients Note: Your Wireless router at home as well as your Wireless clients
must support
must support WiFi Protected Setup feature
must supportmust support
The Azte
The Aztech WL559E provides for a dedicated WPS
The AzteThe Azte
the device.
the device.
the device.the device.
i Protected Setup makes it easier
i Protected Setup makes it i Protected Setup makes it
er with your Wireless router and your Wireless client.
er with your Wireless router and your Wireless client.er with your Wireless router and your Wireless client.
WiFi Protected Setup feature
WiFi Protected Setup featureWiFi Protected Setup feature
ch WL559E provides for a dedicated WPS button
ch WL559E provides for a dedicated WPS ch WL559E provides for a dedicated WPS
easier to setup the W
easiereasier
to setup the Wireless
to setup the Wto setup the W
button on the top of
buttonbutton
ireless----N
irelessireless
on the top of
on the top of on the top of
N
N N
To connect the WL559E to your wireless router/AP via WPS:
1.
1. Press the WPS button on the
Press the WPS button on the WL559E
1.1.
Press the WPS button on the Press the WPS button on the
Enrollee mode.
Enrollee mode.
Enrollee mode.Enrollee mode.
2.
2. Press the WPS button on your wireless route
Press the WPS button on your wireless router/AP within 2 minutes.
2.2.
Press the WPS button on your wireless routePress the WPS button on your wireless route
3.
3. The 2 devices should associate automatically within 2 minutes.
The 2 devices should associate automatically within 2 minutes.
3.3.
The 2 devices should associate automatically within 2 minutes. The 2 devices should associate automatically within 2 minutes.
WL559E for 5 seconds to activate WPS
WL559EWL559E
for 5 seconds to activate WPS
for 5 seconds to activate WPS for 5 seconds to activate WPS
r/AP within 2 minutes.
r/AP within 2 minutes.r/AP within 2 minutes.
To connect a wireless client to the WL559E via WPS:
1.
1. Press the WPS button on the
Press the WPS button on the WL559E
1.1.
Press the WPS button on the Press the WPS button on the
Registrar mode.
Registrar mode.
Registrar mode.Registrar mode.
2.
2. Press the WPS button on your wirel
Press the WPS button on your wireless client within 2 minutes.
2.2.
Press the WPS button on your wirelPress the WPS button on your wirel
Page 22 of 43
WL559E for 2 seconds to activate WPS
WL559EWL559E
ess client within 2 minutes.
ess client within 2 minutes.ess client within 2 minutes.
for 2 seconds to activate WPS
for 2 seconds to activate WPS for 2 seconds to activate WPS
Page 23

3.
3. The 2 devices should associate automatically within 2 minutes.
The 2 devices should associate automatically within 2 minutes.
3.3.
The 2 devices should associate automatically within 2 minutes. The 2 devices should associate automatically within 2 minutes.
Configuring Wireless MAC Filtering
Wireless MAC Filtering allows you to select which wireless clients to
Wireless MAC Filtering allows you to select which wireless clients to
Wireless MAC Filtering allows you to select which wireless clients to Wireless MAC Filtering allows you to select which wireless clients to
allow or deny access to the Wireless
allow or deny access to the Wireless----N Range Extender
allow or deny access to the Wirelessallow or deny access to the Wireless
To configure Wireless MAC Filtering via the Web GUI:
N Range Extender.
N Range ExtenderN Range Extender
.
. .
User Manual
1.
1. Set
Set a static IP (Eg:10.0.10.2) on your PC and connect your PC to the
1.1.
2.
2. Input admin for both username and password fields and click on OK
2.2.
3.
3. Close the Wireless Site survey popu
3.3.
a static IP (Eg:10.0.10.2) on your PC and connect your PC to the
SetSet
a static IP (Eg:10.0.10.2) on your PC and connect your PC to the a static IP (Eg:10.0.10.2) on your PC and connect your PC to the
WL559E and launch the browser
WL559E and launch the browser ....
WL559E and launch the browser WL559E and launch the browser
Input admin for both username and password fields and click on OK....
Input admin for both username and password fields and click on OKInput admin for both username and password fields and click on OK
Close the Wireless Site survey popup and
Close the Wireless Site survey popuClose the Wireless Site survey popu
the homepage as shown below.
the homepage as shown below.
the homepage as shown below.the homepage as shown below.
p and Click the
p and p and
Click the ““““Wireless
Click the Click the
Wireless”””” icon on
WirelessWireless
icon on
icon on icon on
4.
4. C
Click
lick ““““MAC filter
4.4.
CC
lick lick
MAC filter” icon.
MAC filterMAC filter
” icon.
” icon. ” icon.
5.
5. You can
You can either
5.5.
You can You can
either select Allow or Deny
either either
select Allow or Deny tab to apply the
select Allow or Deny select Allow or Deny
tab to apply the Policy
tab to apply thetab to apply the
Policy
Policy Policy
Page 23 of 43
Page 24

User Manual
6.
6. E
6.6.
Enter the MAC address of the wireless client you wish to allow/deny
nter the MAC address of the wireless client you wish to allow/deny
EE
nter the MAC address of the wireless client you wish to allow/deny nter the MAC address of the wireless client you wish to allow/deny
access to the
access to the Wireless
access to theaccess to the
Allow WiFi MAC address access
Allow WiFi MAC address access
Allow WiFi MAC address accessAllow WiFi MAC address access
Wireless----N Range Ex
WirelessWireless
N Range Extender.
N Range ExN Range Ex
tender.
tender.tender.
Deny WiFi MAC address access
Deny WiFi MAC address access
Deny WiFi MAC address accessDeny WiFi MAC address access
7.
7. Click
Click to
7.7.
Click Click
8.
8. Click Apply to commit the settings
Click Apply to commit the settings
8.8.
Click Apply to commit the settingsClick Apply to commit the settings
to add
add one or more
to to
one or more Wifi MAC address
add add
one or more one or more
Wifi MAC address ....
Wifi MAC address Wifi MAC address
Viewing the Home Page
The Home Page will provide
The Home Page will provide you
The Home Page will provideThe Home Page will provide
WL559E and a
WL559E and also provide
WL559E and aWL559E and a
To view the Home Page via the Web GUI:
1.
1. Once connected to the WL559E, Launch a
Once connected to the WL559E, Launch a browser
1.1.
Once connected to the WL559E, Launch aOnce connected to the WL559E, Launch a
laptop.
laptop.
laptop.laptop.
lso provide information about your device.
lso providelso provide
information about your device.
information about your device.information about your device.
you with icons to help configure the
with icons to help configure the
youyou
with icons to help configure the with icons to help configure the
browser on your PC or
browserbrowser
on your PC or
on your PC or on your PC or
2.
2. Input admin for both username and password fields and click on OK
Input admin for both username and password fields and click on OK....
2.2.
Input admin for both username and password fields and click on OKInput admin for both username and password fields and click on OK
3.
3. A Wireless site survey pop up will be
A Wireless site survey pop up will be displayed.
3.3.
A Wireless site survey pop up will be A Wireless site survey pop up will be
Page 24 of 43
displayed.
displayed. displayed.
Page 25

User Manual
4.
4. Close the site survey to access the Home page of the WL559E WebUI
Close the site survey to access the Home page of the WL559E WebUI
4.4.
Close the site survey to access the Home page of the WL559E WebUIClose the site survey to access the Home page of the WL559E WebUI
Page 25 of 43
Page 26

User Manual
System Management
The System Management menu is used for device settings
The System Management menu is used for device settings
The System Management menu is used for device settings The System Management menu is used for device settings
administration.
administration.
administration.administration.
Accessing System Management
To access the Web User Interface:
1.
1. With the WL550E connect
With the WL550E connected to your PC ,launch
1.1.
With the WL550E connectWith the WL550E connect
2.
2. Input admin for both username and password fields and click on OK
Input admin for both username and password fields and click on OK
2.2.
Input admin for both username and password fields and click on OKInput admin for both username and password fields and click on OK
3.
3. Close the Wireless Site Survey pop
Close the Wireless Site Survey pop----up.
3.3.
Close the Wireless Site Survey popClose the Wireless Site Survey pop
4.
4. Click on “System”
Click on “System”
4.4.
Click on “System” Click on “System”
ed to your PC ,launch your browser.
ed to your PC ,launched to your PC ,launch
up.
up.up.
your browser.
your browser.your browser.
What’s on System Management
System Management includes the following options:
System Management includes the following options:
System Management includes the following options:System Management includes the following options:
Page 26 of 43
Page 27

Device
Device Infor
Device Device
LAN Configuration
LAN Configuration
LAN ConfigurationLAN Configuration
Firmware
Firmware Upgrade
FirmwareFirmware
Configuration
Configuration Settings
Configuration Configuration
Reboot
Reboot
RebootReboot
System
System Password
System System
Information
mation
InforInfor
mationmation
Upgrade
UpgradeUpgrade
Settings
SettingsSettings
Password
PasswordPassword
User Manual
Device Information
This page shows the device information. Below is the list of
This page shows the device information. Below is the list of
This page shows the device information. Below is the list of This page shows the device information. Below is the list of
information shown in this menu.
information shown in this menu.
information shown in this menu.information shown in this menu.
Page 27 of 43
Page 28

User Manual
Firmware Version
Firmware Version –––– Shows the current firm
Firmware Version Firmware Version
Build Date
Build Date –––– Shows the firmware release date
Build Date Build Date
Serial Number
Serial Number –––– Shows the serial number of the device
Serial Number Serial Number
ETH MAC Address
ETH MAC Address –––– Shows device’s Ethernet interface MAC address
ETH MAC Address ETH MAC Address
Wireless MAC Address
Wireless MAC Address –––– Shows device’s wireless interface MAC
Wireless MAC Address Wireless MAC Address
addre
address
addreaddre
Wireless Status
Wireless Status –––– Shows the status of the wireless interface.
Wireless Status Wireless Status
ss
ssss
Shows the firmware release date
Shows the firmware release dateShows the firmware release date
Shows the current firmware version of the device
Shows the current firmShows the current firm
Shows the serial number of the device
Shows the serial number of the deviceShows the serial number of the device
Shows device’s Ethernet interface MAC address
Shows device’s Ethernet interface MAC addressShows device’s Ethernet interface MAC address
Shows device’s wireless interface MAC
Shows device’s wireless interface MAC Shows device’s wireless interface MAC
Shows the status of the wireless interface.
Shows the status of the wireless interface.Shows the status of the wireless interface.
ware version of the device
ware version of the deviceware version of the device
LAN Configuration
This page allows you to change the IP address of the device.
This page allows you to change the IP address of the device.
This page allows you to change the IP address of the device.This page allows you to change the IP address of the device.
Page 28 of 43
Page 29

NOTE: You may change the IP address of the
NOTE: You may change the IP address of the WL559E
NOTE: You may change the IP address of the NOTE: You may change the IP address of the
within the same subnet of your existin
within the same subnet of your existing network.
within the same subnet of your existinwithin the same subnet of your existin
g network.
g network. g network.
WL559E to an IP address
WL559EWL559E
User Manual
to an IP address
to an IP address to an IP address
This will allow you access to the
This will allow you access to the WL559E
This will allow you access to the This will allow you access to the
associated to your wireless router/AP.
associated to your wireless router/AP.
associated to your wireless router/AP.associated to your wireless router/AP.
WL559E web GUI even after it is
WL559EWL559E
web GUI even after it is
web GUI even after it is web GUI even after it is
Please
Please remember to reserve the assigned IP address on your router’s
PleasePlease
DHCP server to prevent any IP conflict on your network.
DHCP server to prevent any IP conflict on your network.
DHCP server to prevent any IP conflict on your network.DHCP server to prevent any IP conflict on your network.
remember to reserve the assigned IP address on your router’s
remember to reserve the assigned IP address on your router’s remember to reserve the assigned IP address on your router’s
Page 29 of 43
Page 30

User Manual
Firmware Upgrade
Firmware menu allows you to see the current firmware version and
Firmware menu allows you to see the current firmware version and
Firmware menu allows you to see the current firmware version and Firmware menu allows you to see the current firmware version and
build date as well as upgrade the firmware of the device.
build date as well as upgrade the firmware of the device.
build date as well as upgrade the firmware of the device.build date as well as upgrade the firmware of the device.
Firmware Information
Firmware Information –––– Shows the current firmware’s version and
Firmware Information Firmware Information
build date
build date
build datebuild date
Firmware Upgrade
Firmware Upgrade –––– Load a new firmware upgrade fil
Firmware Upgrade Firmware Upgrade
NOTE: Make sure you connect to the device via Ethernet cable when
NOTE: Make sure you connect to the device via Ethernet cable when
NOTE: Make sure you connect to the device via Ethernet cable when NOTE: Make sure you connect to the device via Ethernet cable when
upgrading the firmware to avoid corruption during the firmware
upgrading the firmware to avoid corruption during the firmware
upgrading the firmware to avoid corruption during the firmware upgrading the firmware to avoid corruption during the firmware
upgrade procedure.
upgrade procedure.
upgrade procedure.upgrade procedure.
Load a new firmware upgrade file to the device
Load a new firmware upgrade filLoad a new firmware upgrade fil
Shows the current firmware’s version and
Shows the current firmware’s version and Shows the current firmware’s version and
e to the device
e to the devicee to the device
Configuration Settings
This page allows you to backup and restore the current device
This page allows you to backup and restore the current device
This page allows you to backup and restore the current device This page allows you to backup and restore the current device
con
configuration as well as to reset the device to its factory default
figuration as well as to reset the device to its factory default
concon
figuration as well as to reset the device to its factory default figuration as well as to reset the device to its factory default
settings.
settings.
settings.settings.
Page 30 of 43
Page 31

Backup
Backup –––– To backup the current configuration of the device to a file
Backup Backup
To backup the current configuration of the device to a file
To backup the current configuration of the device to a fileTo backup the current configuration of the device to a file
User Manual
Update
Update –––– To restore a configuration file to the device
Update Update
Restore
Restore –––– To reset the device to factory default se
RestoreRestore
To restore a configuration file to the device
To restore a configuration file to the deviceTo restore a configuration file to the device
To reset the device to factory default settings
To reset the device to factory default seTo reset the device to factory default se
ttings
ttingsttings
Page 31 of 43
Page 32

User Manual
Reboot
Reboot allows you to reboot
Reboot allows you to reboot or power cycle
Reboot allows you to reboot Reboot allows you to reboot
settings to take effect.
settings to take effect. Select the link “Reboot” at the top right corner
settings to take effect.settings to take effect.
of the WL559E WebUI.
of the WL559E WebUI.
of the WL559E WebUI.of the WL559E WebUI.
Reboot
Reboot –––– Allows you to reboot the device
Reboot Reboot
or power cycle the device for new
or power cycle or power cycle
Select the link “Reboot” at the top right corner
Select the link “Reboot” at the top right corner Select the link “Reboot” at the top right corner
Allows you to reboot the device
Allows you to reboot the deviceAllows you to reboot the device
the device for new
the device for new the device for new
Page 32 of 43
Page 33

System Password
Password menu al
Password menu allows you to change the
Password menu alPassword menu al
to access the
to access the Web based
to access the to access the
Web based Graphical User Interface (GUI).
Web based Web based
lows you to change the WL559E
lows you to change the lows you to change the
Graphical User Interface (GUI).
Graphical User Interface (GUI).Graphical User Interface (GUI).
WL559E’s
WL559EWL559E
User Manual
’s system
system password
’s ’s
system system
password
password password
Password
Password –––– Allows you to change the
Password Password
accessing the web GUI.
accessing the web GUI.
accessing the web GUI.accessing the web GUI.
Allows you to change the username and
Allows you to change theAllows you to change the
username and password
username and username and
password for
passwordpassword
for
for for
Setting a Static IP on your PC
The
The WL559E
WL559E Wireless
The The
WL559EWL559E
your PC upon initial installation. Once you have associated it with your
your PC upon initial installation. Once you have associated it with your
your PC upon initial installation. Once you have associated it with your your PC upon initial installation. Once you have associated it with your
Wireless----N Ra
WirelessWireless
N Range Extender
N RaN Ra
nge Extender will only give an IP address to
nge Extendernge Extender
will only give an IP address to
will only give an IP address to will only give an IP address to
Page 33 of 43
Page 34

User Manual
Wireless Router/AP, you will no longer have access to the device’s
Wireless Router/AP, you will no longer have access to the device’s
Wireless Router/AP, you will no longer have access to the device’s Wireless Router/AP, you will no longer have access to the device’s
web GUI. If you wish to change any settings on the
web GUI. If you wish to change any settings on the WL559E
web GUI. If you wish to change any settings on the web GUI. If you wish to change any settings on the
to
to set a Static IP address on your PC. Just remember to set it back to
set a Static IP address on your PC. Just remember to set it back to
to to
set a Static IP address on your PC. Just remember to set it back to set a Static IP address on your PC. Just remember to set it back to
“Obtain and IP address automatically” after you are done.
“Obtain and IP address automatically” after you are done.
“Obtain and IP address automatically” after you are done. “Obtain and IP address automatically” after you are done.
To set a static IP address on your PC using Windows XP:
1.
1. Click Start > Control Panel
Click Start > Control Panel
1.1.
Click Start > Control PanelClick Start > Control Panel
WL559E, you need
WL559EWL559E
, you need
, you need , you need
2.
2. Click on Network and Inte
Click on Network and Internet Connections
2.2.
Click on Network and InteClick on Network and Inte
3.
3. Click on Network Connections
Click on Network Connections
3.3.
Click on Network ConnectionsClick on Network Connections
rnet Connections
rnet Connectionsrnet Connections
4.
4. Right
Right----Click on the Network Adapter you will use to
4.4.
RightRight
WL559E
WL559E and click Properties
WL559EWL559E
Page 34 of 43
Click on the Network Adapter you will use to configure the
Click on the Network Adapter you will use toClick on the Network Adapter you will use to
and click Properties
and click Propertiesand click Properties
configure the
configure the configure the
Page 35

5.
5. Click to select Internet Protocol (TCP/IP) and click Pro
Click to select Internet Protocol (TCP/IP) and click Properties
5.5.
Click to select Internet Protocol (TCP/IP) and click ProClick to select Internet Protocol (TCP/IP) and click Pro
perties
pertiesperties
User Manual
6.
6. Select “Use the following IP address:” and key in 10.0.10.1
Select “Use the following IP address:” and key in 10.0.10.1 for eg,
6.6.
Select “Use the following IP address:” and key in 10.0.10.1 Select “Use the following IP address:” and key in 10.0.10.1
the IP address and 255.255.255.0 for the Subnet mask. Leave the
the IP address and 255.255.255.0 for the Subnet mask. Leave the
the IP address and 255.255.255.0 for the Subnet mask. Leave the the IP address and 255.255.255.0 for the Subnet mask. Leave the
other fields blank.
other fields blank.
other fields blank.other fields blank.
for eg, as
for eg, for eg,
7.
7.
Click OK to commit the settings.
Click OK to commit the settings.
7.7.
Click OK to commit the settings.Click OK to commit the settings.
as
as as
To set a static IP address on your PC using Windows Vista:
1.
1. Click Start > Control Panel
Click Start > Control Panel
1.1.
Click Start > Control PanelClick Start > Control Panel
Page 35 of 43
Page 36

User Manual
2.
2. Double
Double----Click Network and Sharing Center
2.2.
DoubleDouble
3.
3. Click Manage network connections
Click Manage network connections
3.3.
Click Manage network connectionsClick Manage network connections
Click Network and Sharing Center
Click Network and Sharing CenterClick Network and Sharing Center
4.
4. Right
Right----Click on the Network Adapter you will use to con
4.4.
RightRight
WL559E
WL559E and click Properties
WL559EWL559E
Click on the Network Adapter you will use to configure the
Click on the Network Adapter you will use to conClick on the Network Adapter you will use to con
and click Properties
and click Propertiesand click Properties
figure the
figure the figure the
5.
5. Click to select Internet Protocol Version 4 (TCP/Ipv4) and click
Click to select Internet Protocol Version 4 (TCP/Ipv4) and click
5.5.
Click to select Internet Protocol Version 4 (TCP/Ipv4) and click Click to select Internet Protocol Version 4 (TCP/Ipv4) and click
Properties
Properties
PropertiesProperties
Page 36 of 43
Page 37

User Manual
6.
6. Select “Use the following IP address:” and key in 10.0.10.1 as the IP
Select “Use the following IP address:” and key in 10.0.10.1 as the IP
6.6.
Select “Use the following IP address:” and key in 10.0.10.1 as the IP Select “Use the following IP address:” and key in 10.0.10.1 as the IP
address and 255.255.255.0 for t
address and 255.255.255.0 for the Subnet mask. Leave the other
address and 255.255.255.0 for taddress and 255.255.255.0 for t
fields blank.
fields blank.
fields blank.fields blank.
he Subnet mask. Leave the other
he Subnet mask. Leave the other he Subnet mask. Leave the other
7.
7. Click OK to commit the settings.
Click OK to commit the settings.
7.7.
Click OK to commit the settings.Click OK to commit the settings.
To set a static IP address on your PC using Windows 7:
1.
1. Click Start > Control Panel
Click Start > Control Panel
1.1.
Click Start > Control PanelClick Start > Control Panel
Page 37 of 43
Page 38

User Manual
2.
2. Click View network status and tasks
Click View network status and tasks
2.2.
Click View network status and tasks Click View network status and tasks
3.
3. Click Change adapter settings
Click Change adapter settings
3.3.
Click Change adapter settingsClick Change adapter settings
4.
4. Right
Right----Click on the Network Adapter you will use to configure the
4.4.
RightRight
WL559E
WL559E and click Properties
WL559EWL559E
Click on the Network Adapter you will use to configure the
Click on the Network Adapter you will use to configure the Click on the Network Adapter you will use to configure the
and click Properties
and click Propertiesand click Properties
5.
5. Click to select Internet Protocol Version 4 (TCP/Ipv4) and click
Click to select Internet Protocol Version 4 (TCP/Ipv4) and click
5.5.
Click to select Internet Protocol Version 4 (TCP/Ipv4) and click Click to select Internet Protocol Version 4 (TCP/Ipv4) and click
Properties
Properties
PropertiesProperties
Page 38 of 43
Page 39

User Manual
Select “Use the following IP address:” and key in 10.0.10.1 as the IP
Select “Use the following IP address:” and key in 10.0.10.1 as the IP
Select “Use the following IP address:” and key in 10.0.10.1 as the IP Select “Use the following IP address:” and key in 10.0.10.1 as the IP
address and 255.255.255.0 for the Subnet mask. Leave the other
address and 255.255.255.0 for the Subnet mask. Leave the other
address and 255.255.255.0 for the Subnet mask. Leave the other address and 255.255.255.0 for the Subnet mask. Leave the other
fields blank.
fields blank.
fields blank.fields blank.
6.
6. Click OK to commit the settings
Click OK to commit the settings
6.6.
Click OK to commit the settingsClick OK to commit the settings
Page 39 of 43
Page 40

User Manual
Safety Precautions
Do not open, se
Do not open, service, or change any component.
Do not open, seDo not open, se
Only qualified technical specialists are allowed to service the
Only qualified technical specialists are allowed to service the
Only qualified technical specialists are allowed to service the Only qualified technical specialists are allowed to service the
equipment.
equipment.
equipment. equipment.
Observe safety precautions to avoid electric shock
Observe safety precautions to avoid electric shock
Observe safety precautions to avoid electric shockObserve safety precautions to avoid electric shock
Check voltage before connecting to the power supply. Connecting to
Check voltage before connecting to the power supply. Connecting to
Check voltage before connecting to the power supply. Connecting to Check voltage before connecting to the power supply. Connecting to
the wrong voltage will damage
the wrong voltage will damage the equipment.
the wrong voltage will damagethe wrong voltage will damage
rvice, or change any component.
rvice, or change any component. rvice, or change any component.
the equipment.
the equipment.the equipment.
Page 40 of 43
Page 41

User Manual
FCC Notice
This equipment has been tested and found to comply with the limits for a Class B digital device, pursuant
to Part 15 of the FCC Rules. These limits are designed to provide reasonable protection against harmful
interference in a residential installation. This equipment generates, uses, and can radiate radio frequency
energy and, if not installed and used in accordance with the instructions, may cause harmful interference
to radio communications. However, there is no guarantee that interference will not occur in a particular
installation. If this equipment does cause harmful interference to radio or television reception, which can
be determined by turning the equipment off and on, the user is encouraged to try to correct the
interference by one or more of the following measures:
• Reorient or relocate the receiving antenna.
• Increase the separation between the equipment and receiver.
• Connect the equipment into an outlet on a circuit different from that to which the receiver is
connected.
• Consult the dealer or an experienced radio or television technician for help.
Modifications
Modifications
ModificationsModifications
The FCC requires the user to be notified that any changes or modifications made to this device that are not
expressly approved by Aztech could void the user’s authority to operate the equipment.
This device complies with Part 15 of the FCC rules.
This device complies with Part 15 of the FCC rules.
This device complies with Part 15 of the FCC rules.This device complies with Part 15 of the FCC rules.
This device complies with Part 15 of the FCC rules. Operation is subject to the following two conditions:
1. This device may not cause harmful interference, and
2. This device must accept any interference received, including interference that may cause
undesired operation.
Exposure Information to Radio Frequency Energy
Exposure Information to Radio Frequency Energy
Exposure Information to Radio Frequency EnergyExposure Information to Radio Frequency Energy
This equipment complies with FCC radiation exposure limits set forth for an uncontrolled environment. This
equipment should be installed and operated with minimum distance of 20 cm between the radiator and
your body.
Page 42 of 43
Page 42

User Manual
© Copyright 2012
Copyright 2012 All rights reserved
Copyright 2012Copyright 2012
All rights reserved.
All rights reservedAll rights reserved
No part of this document may be reproduced, republished, or retransmitted in any form or by any means
whatsoever, whether electronically or mechanically, including, but not limited to, by way of photocopying,
recording, information recording, or through retrieval systems without the express written permission. We
reserve the right to revise this document at any time without the obligation to notify any person and/or
entity. All other company or product names mentioned are used for identification purposes only and may
be trademarks of their respective owners.
LIMITATION OF LIABILITY AND DAMAGES
THE PRODUCT AND THE SOFTWARES WITHIN ARE PROVIDED "AS IS," BASIS. THE MANUFACTURER AND
MANUFACTURER’S RESELLERS (COLLECTIVELY REFERRED TO AS “THE SELLERS”) DISCLAIM ALL WARRANTIES,
EXPRESS, IMPLIED OR STATUTORY, INCLUDING WITHOUT LIMITATION THE IMPLIED WARRANTIES OF NONINFRINGEMENT, MERCHANTABILITY OR FITNESS FOR A PARTICULAR PURPOSE, OR ANY WARRANTIES ARISING
FROM COURSE OF DEALING, COURSE OF PERFORMANCE, OR USAGE OF TRADE. IN NO EVENT WILL THE SELLERS
BE LIABLE FOR DAMAGES OR LOSS, INCLUDING BUT NOT LIMITED TO DIRECT, INDIRECT, SPECIAL WILLFUL,
PUNITIVE, INCIDENTAL, EXEMPLARY, OR CONSEQUENTIAL, DAMAGES, DAMAGES FOR LOSS OF BUSINESS
PROFITS, OR DAMAGES FOR LOSS OF BUSINESS OF ANY CUSTOMER OR ANY THIRD PARTY ARISING OUT OF THE
USE OR THE INABILITY TO USE THE PRODUCT OR THE SOFTWARES, INCLUDING BUT NOT LIMITED TO THOSE
RESULTING FROM DEFECTS IN THE PRODUCT OR SOFTWARE OR DOCUMENTATION, OR LOSS OR INACCURACY OF
DATA OF ANY KIND, WHETHER BASED ON CONTRACT, TORT OR ANY OTHER LEGAL THEORY, EVEN IF THE PARTIES
HAVE BEEN ADVISED OF THE POSSIBILITY OF SUCH DAMAGES. THE ENTIRE RISK AS TO THE RESULTS AND
PERFORMANCE OF THE PRODUCT OR ITS SOFTWARE IS ASSUMED BY CUSTOMER. BECAUSE SOME STATES DO NOT
ALLOW THE EXCLUSION OR LIMITATION OF LIABLITY FOR DAMAGES, THE ABOVE LIMITATION MAY NOT APPLY TO
THE PARTIES. IN NO EVENT WILL THE SELLERS’ TOTAL CUMULATIVE LIABILITY OF EACH AND EVERY KIND IN
RELATION TO THE PRODUCT OR ITS SOFTWARE EXCEED THE AMOUNT PAID BY CUSTOMER FOR THE PRODUCT.
Page 43 of 43
 Loading...