

Page 1
WIPC480FHD
PLEASE KEEP THIS USER MANUAL FOR FUTURE USE
1080p Cloud Camera
USER MANUAL
Page 2

TABLE OF CONTENTS
SIGNING UP / LOGGING IN..............................................................................................................4
ADDING A CAMERA VIA WIFI..........................................................................................................6
LIVE VIEW.........................................................................................................................................10
PLAYING BACK THE RECORDED VIDEO........................................................................................13
USING CLOUD STORAGE SERVICE.................................................................................................15
MANAGING DEVICE.......................................................................................................................17
MANAGING NOTIFICATIONS.........................................................................................................19
MANAGING ACCOUNT.................................................................................................................20
2
Page 3

PRIVACY PROTECTION NOTICE
We conduct business in compliance to the Personal Data Protection Act (PDPA) and has
implemented policies to protect your personal information.
We will not use your information other than for the purpose you have consented to. We will
retain your information for as long as there is business or legal need.
Protection of Personal Information
We are committed to ensure your information is secure. We have put in place necessary
physical and network security, and procedures to safeguard your information.
We conduct internal audits to prevent and detect fraud, to ensure security of our systems
and your personal information.
Access and Correction of Personal Information
Should you have inquiries relating to your personal information we have on you, please
email to dpo@aztech.com.
ABOUT THIS USER MANUAL
• The User Manual is a general document for introducing the AztechRaptorVue App
(downloadable on iOS and Android smartphones). There might be some descriptions
that do not apply to the device you add to AztechRaptorVue account, or the interfaces
might be different, or the operations might be different, or the appearances might be
different, and in these cases, the actual product and process shall govern.
• All the designs and software are subject to change without prior written notice.
• All trademarks and registered trademarks mentioned herein are the properties of their
respective owners.
• Any loss caused by not complying with the operations described in the User Manual
should be borne by the user.
• Upgrade the reader software or try other mainstream reader software if the User Manual
cannot be opened.
• There might still be deviation in technical data, functions and operations description, or
errors in print. If there is any doubt or dispute, please refer to our nal explanation.
• Please visit our website or contact your local service engineer for more information.
3
Page 4
BASIC OPERATIONS
The User Manual introduces the operations of AztechRaptorVue App, and some functions
might associate with the operations on the device, in these cases, please refer to the Easy
Start Guide that comes with the device.
SIGNING UP / LOGGING IN
Step 1
Connect your smartphone to your wireless router.
Step 2
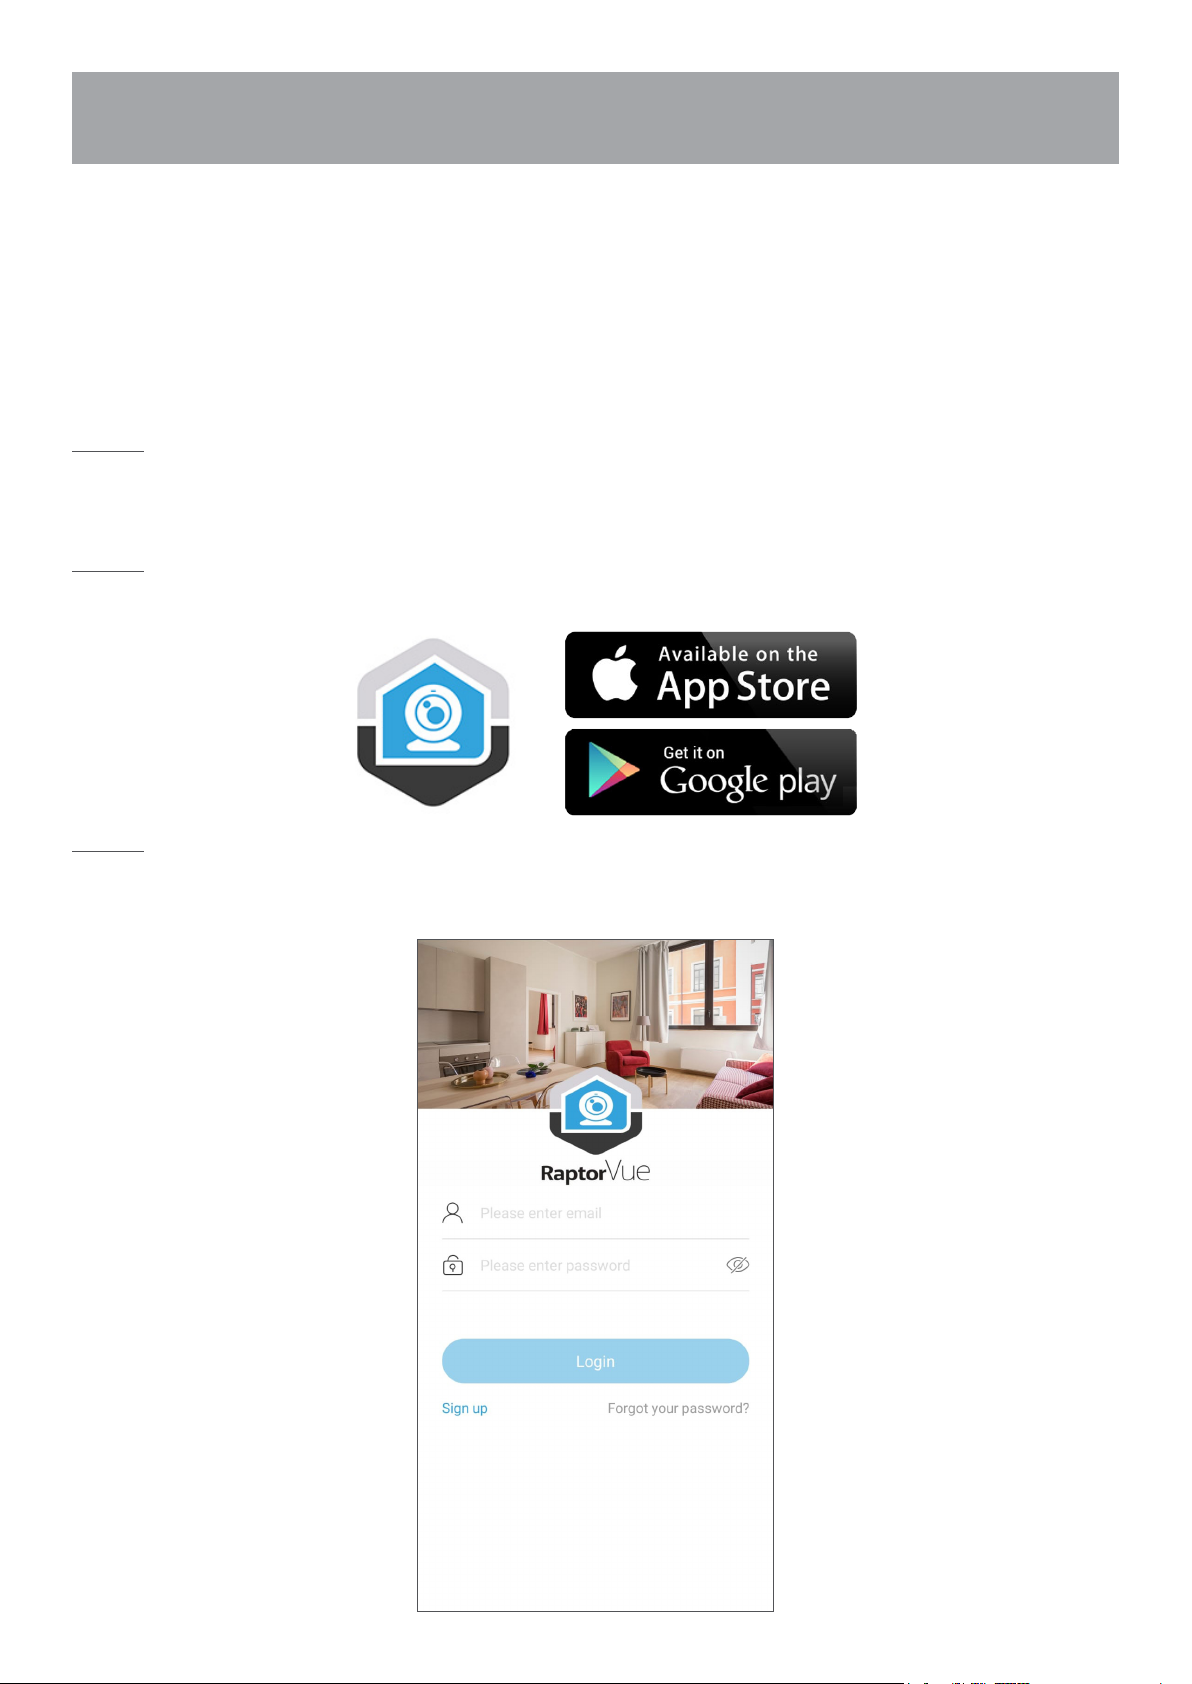
Download the AztechRaptorVue app from Google Play or App Store on your phone.
Step 3
Install and launch the app. Tap Sign up to create a new account.
4
Page 5
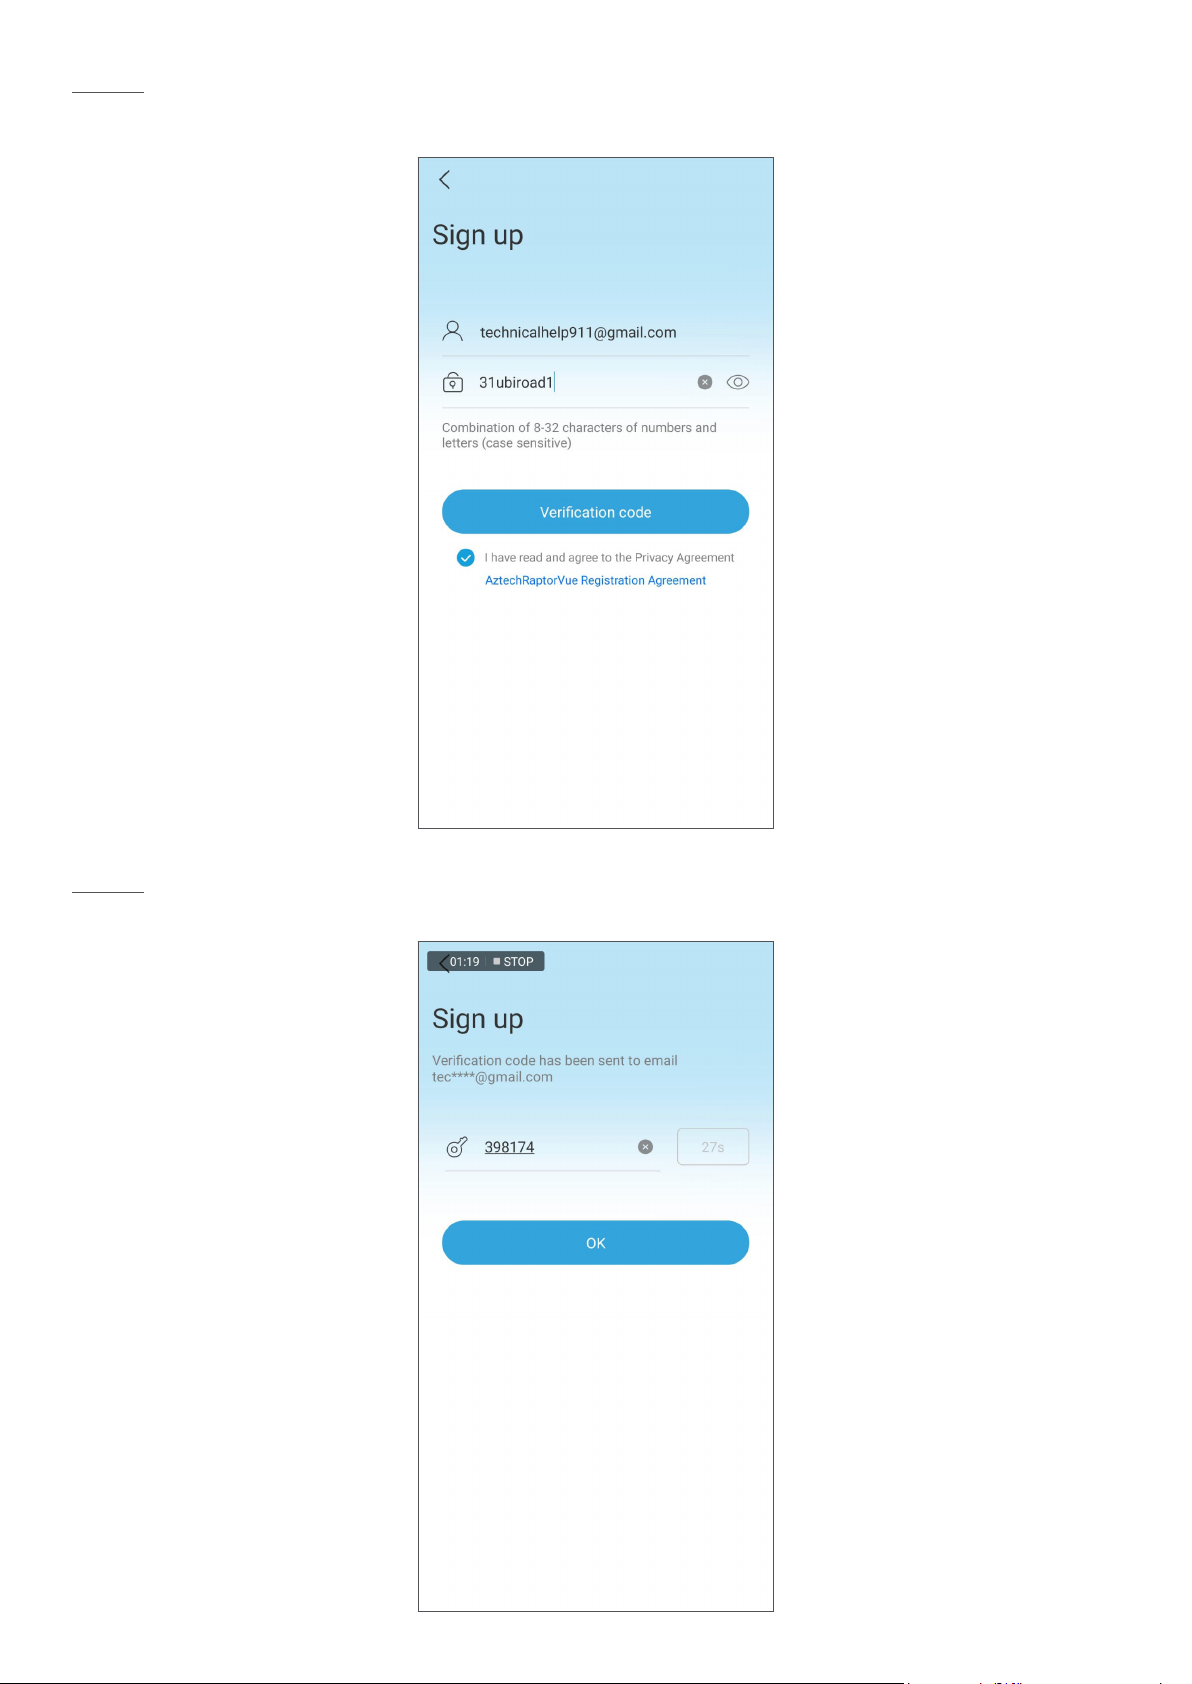
Step 4
Enter your email address, set your password, and tap Verication code.
Step 5
Enter the verication code that is sent to the email you entered in Step 4, and tap OK.
5
Page 6

Step 6
Tap Login.
ADDING A CAMERA VIA WIFI
Step 1
Tap the (+) icon in the middle, or on the top right of the screen to add a new camera.
6
Page 7
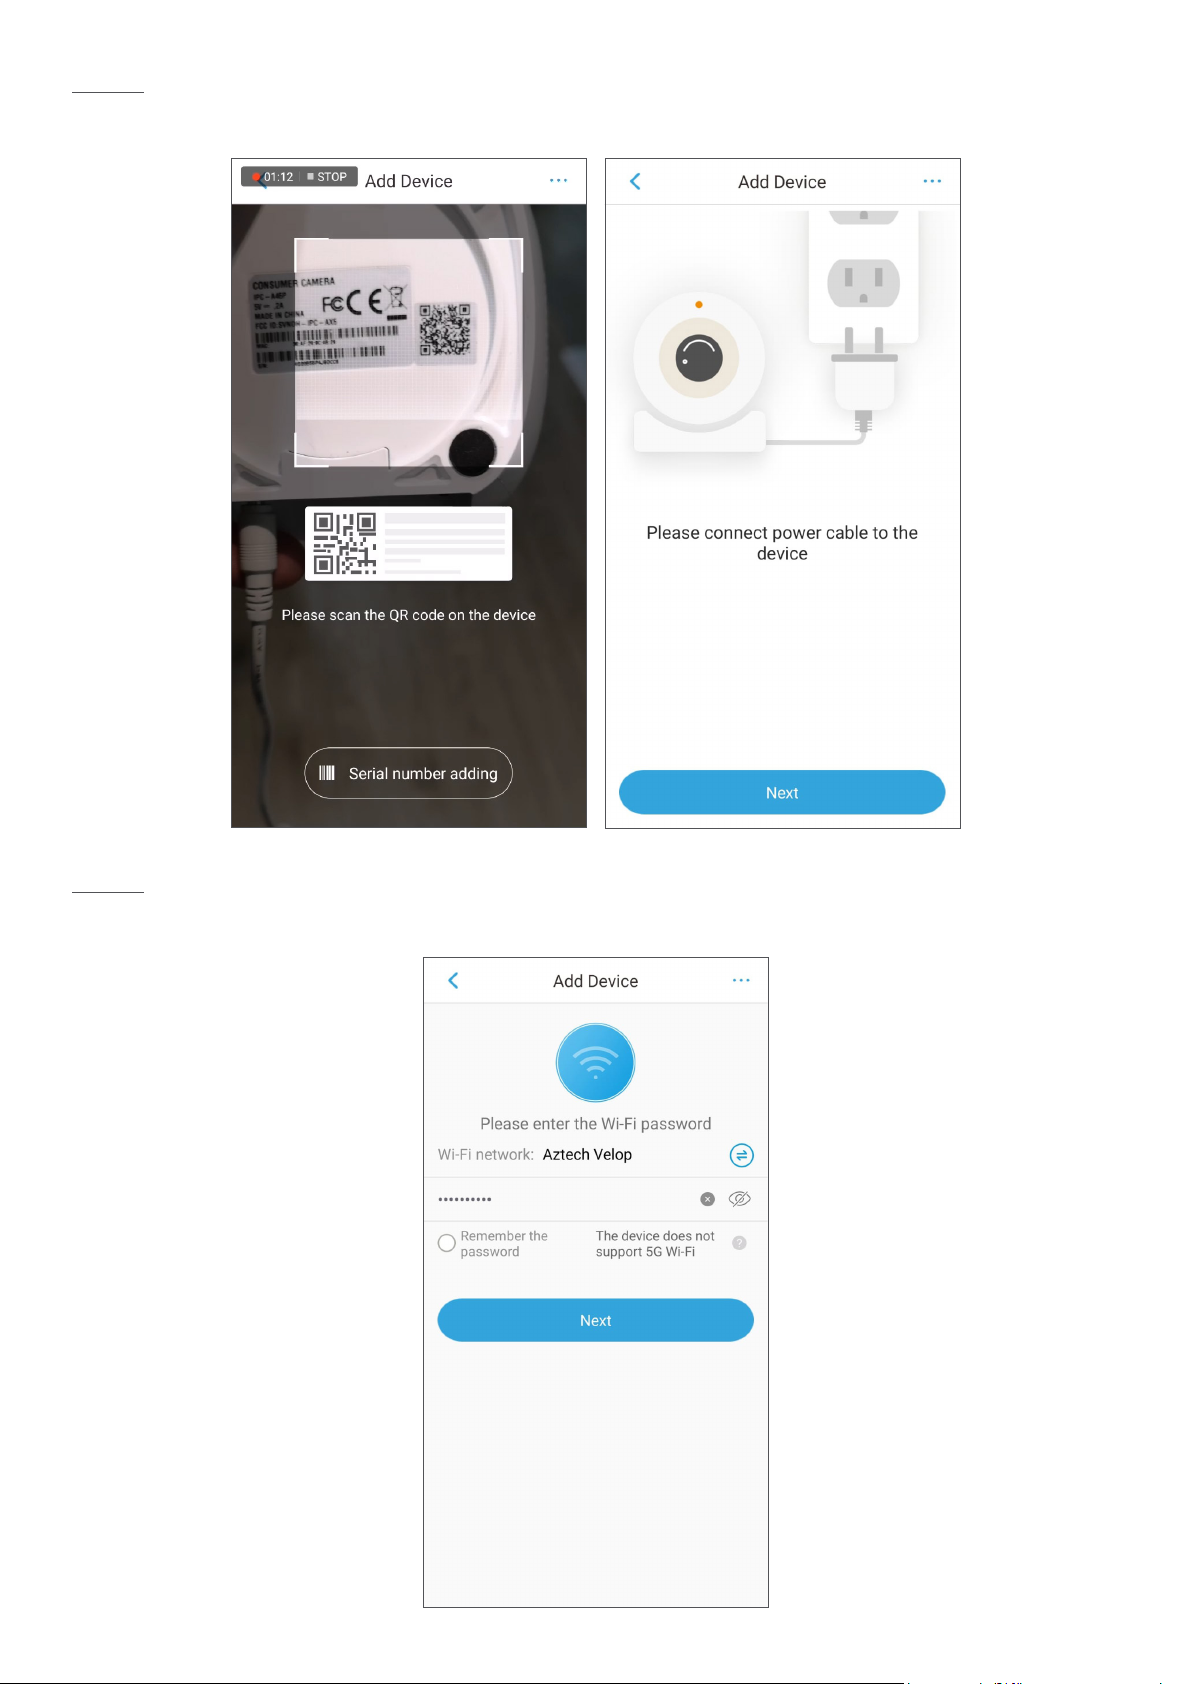
Step 2
Scan the QR code on the base of the camera and tap Next.
Step 3
Enter the WiFi password of your wireless router and tap Next.
7
Page 8

Step 4
Turn up the volume of your smartphone and point its speaker to the microphone of the
camera.
Wait until the camera connects to the wireless router.
Step 5
Create a secure password for your Aztech RaptorVue camera, and tap Next.
8
Page 9

Step 6
Once the camera is successfully added, change the time zone to the country you set up
the Aztech RaptorVue camera in, and tap Complete.
Step 7
Tap the (X) icon to rename the camera, e.g. Living Room.
Tap Complete to nish the setup and you may start operating the Aztech RaptorVue
camera.
9
Page 10

LIVE VIEW
The live view provides real-time video display in normal display mode and landscape
display mode. You can perform operations such as pause, window splitting, and mute. The
zooming operation by gesture (pinch out to zoom in or pinch in to zoom out) is completed
through digital zoom.
Live view (normal display mode)
Live view (landscape display mode)
10
Page 11

ICON FUNCTION
Plays or pauses the video.
Switches between single-window view and four-window view.
Switches between standard denition and high denition.
Mutes or unmutes the video.
Displays video in landscape mode. Tap to exit the
landscape display mode.
In landscape display mode, tap to lock the screen from
auto switching to normal display mode by gravity. The icon
switches to .
Tap the view record history icon to view the recorded videos.
Tap this icon to take a snapshot.
11
Page 12

ICON FUNCTION
Tap this icon to enable two-way talk function. The icon
switches to in normal display mode and in
landscape display mode. Tap again to stop two-way talk
function.
Tap this icon to start instant recording. The icon switches to
in normal display mode and in landscape
display mode.
Tap this icon to display the pan-tilt-zoom (PTZ) control panel.
You can move the camera in both horizontal and vertical direction to get different angle of view.
NOTE:
This function is available only on the camera supporting PTZ.
12
Page 13
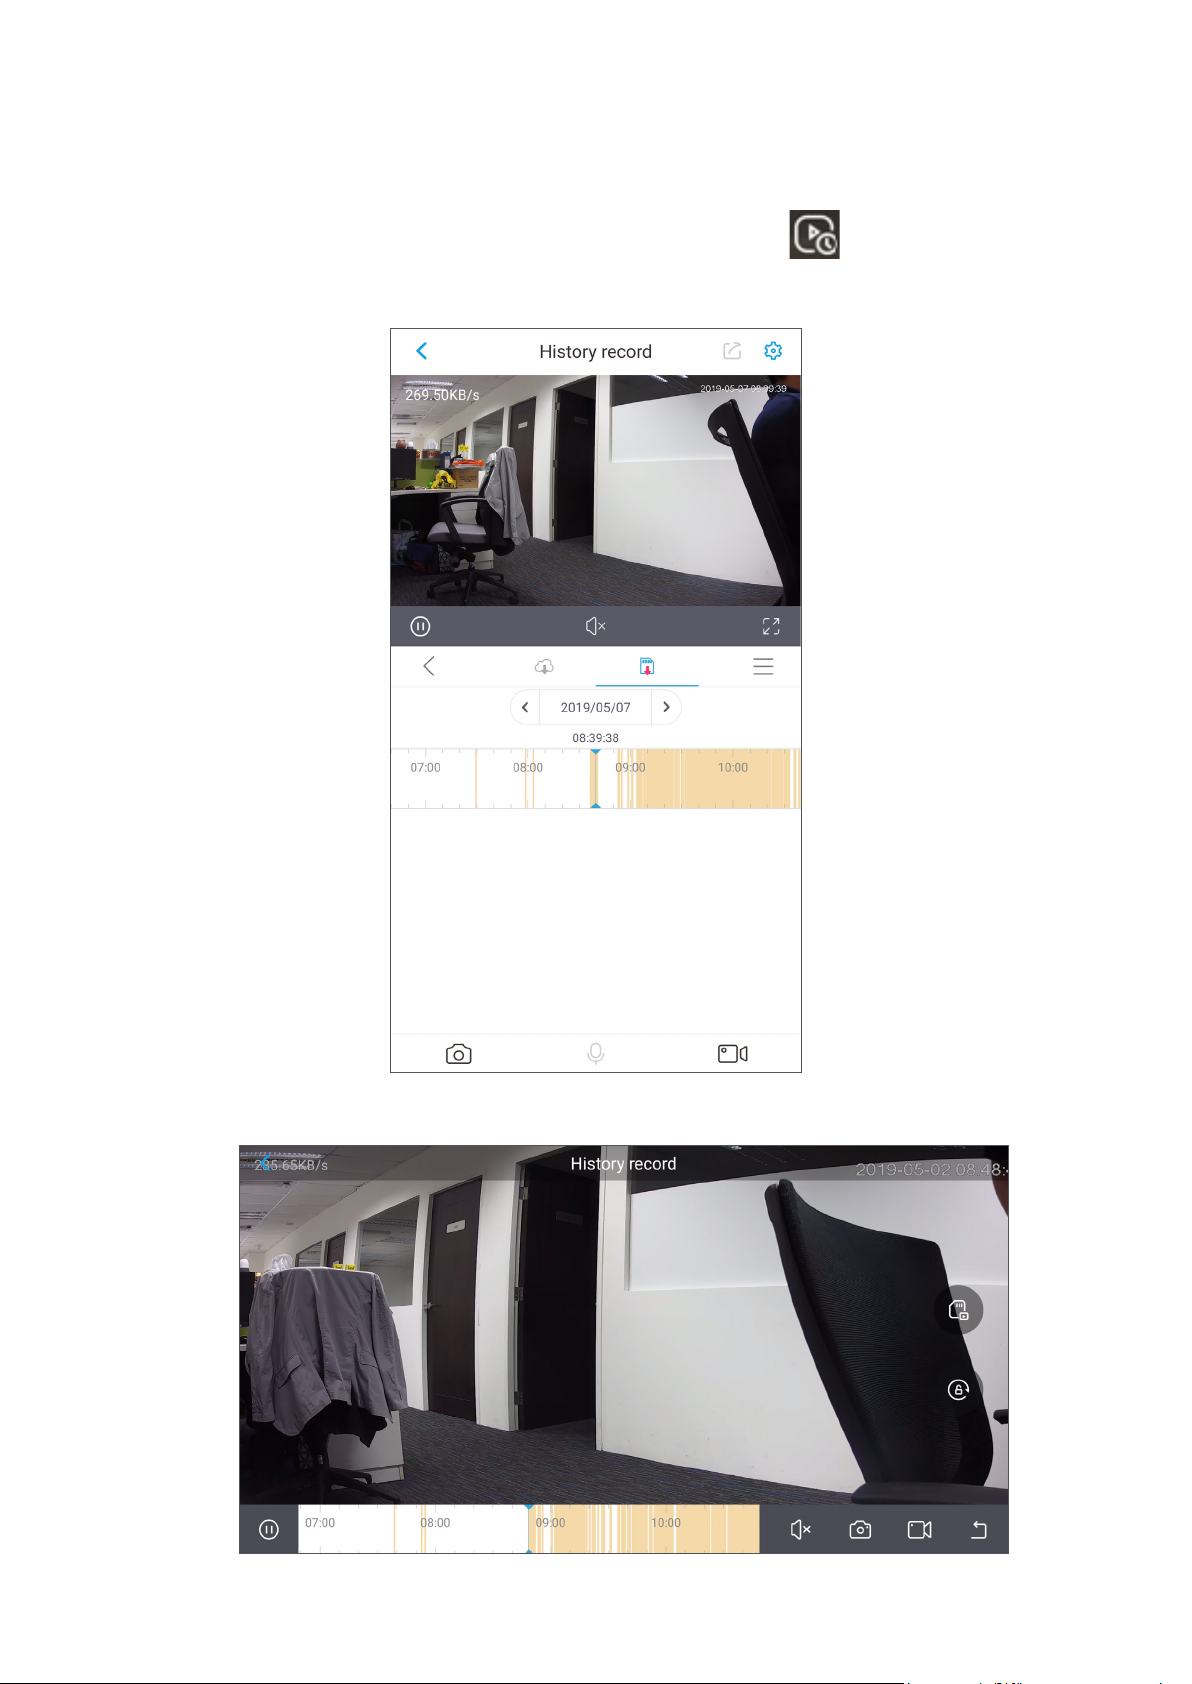
PLAYING BACK THE RECORDED VIDEO
• On the live view interface in normal display mode, tap View history record.
• On the live view interface in landscape display mode, tap .
The History record interface is displayed.
History record (normal display mode)
History record (landscape display mode)
13
Page 14

ICON FUNCTION
Plays or pauses the recorded video.
Mutes or unmutes the video.
Displays video in landscape mode. Tap to exit the
landscape display mode.
Tap this icon to take a snapshot.
Tap this icon to start instant recording. The icon switches to
in normal display mode and in landscape display
mode.
Tap this icon to exit the record history and display the live view
interface.
In the normal display mode, tap this icon to display the
recorded videos that are stored in the Cloud server. The icons
turns to once it is selected.
In the normal display mode, tap this icon to display the
recorded videos that are stored in the SD card. The icons turns
to once it is selected.
In landscape display mode, switches between displaying the
recorded videos that are stored in the Cloud server and that
are stored in the SD card.
Tap this icon to display the videos that are either stored in the
Cloud service or in the SD card in list.
14
Page 15

ICON FUNCTION
In landscape display mode, tap to lock the screen from
auto switching to normal display mode by gravity. The icon
switches to .
In the calendar list, select the time when you want to view the
recorded videos.
This function is only available in normal display mode.
The time bar shows the time when there are recorded videos.
Tap and hold the time bar to drag to the time where you want
to view the recorded video.
NOTE:
The orange represents recorded videos of local alarm event,
and the blue represents general recorded videos.
USING CLOUD STORAGE SERVICE
The AztechRaptorVue App provides you the Cloud service to extend your storage capability.
To use this service, do the following:
Step 1
Go to the My Account tab, tap My Cloud, then My Plan.
15
Page 16
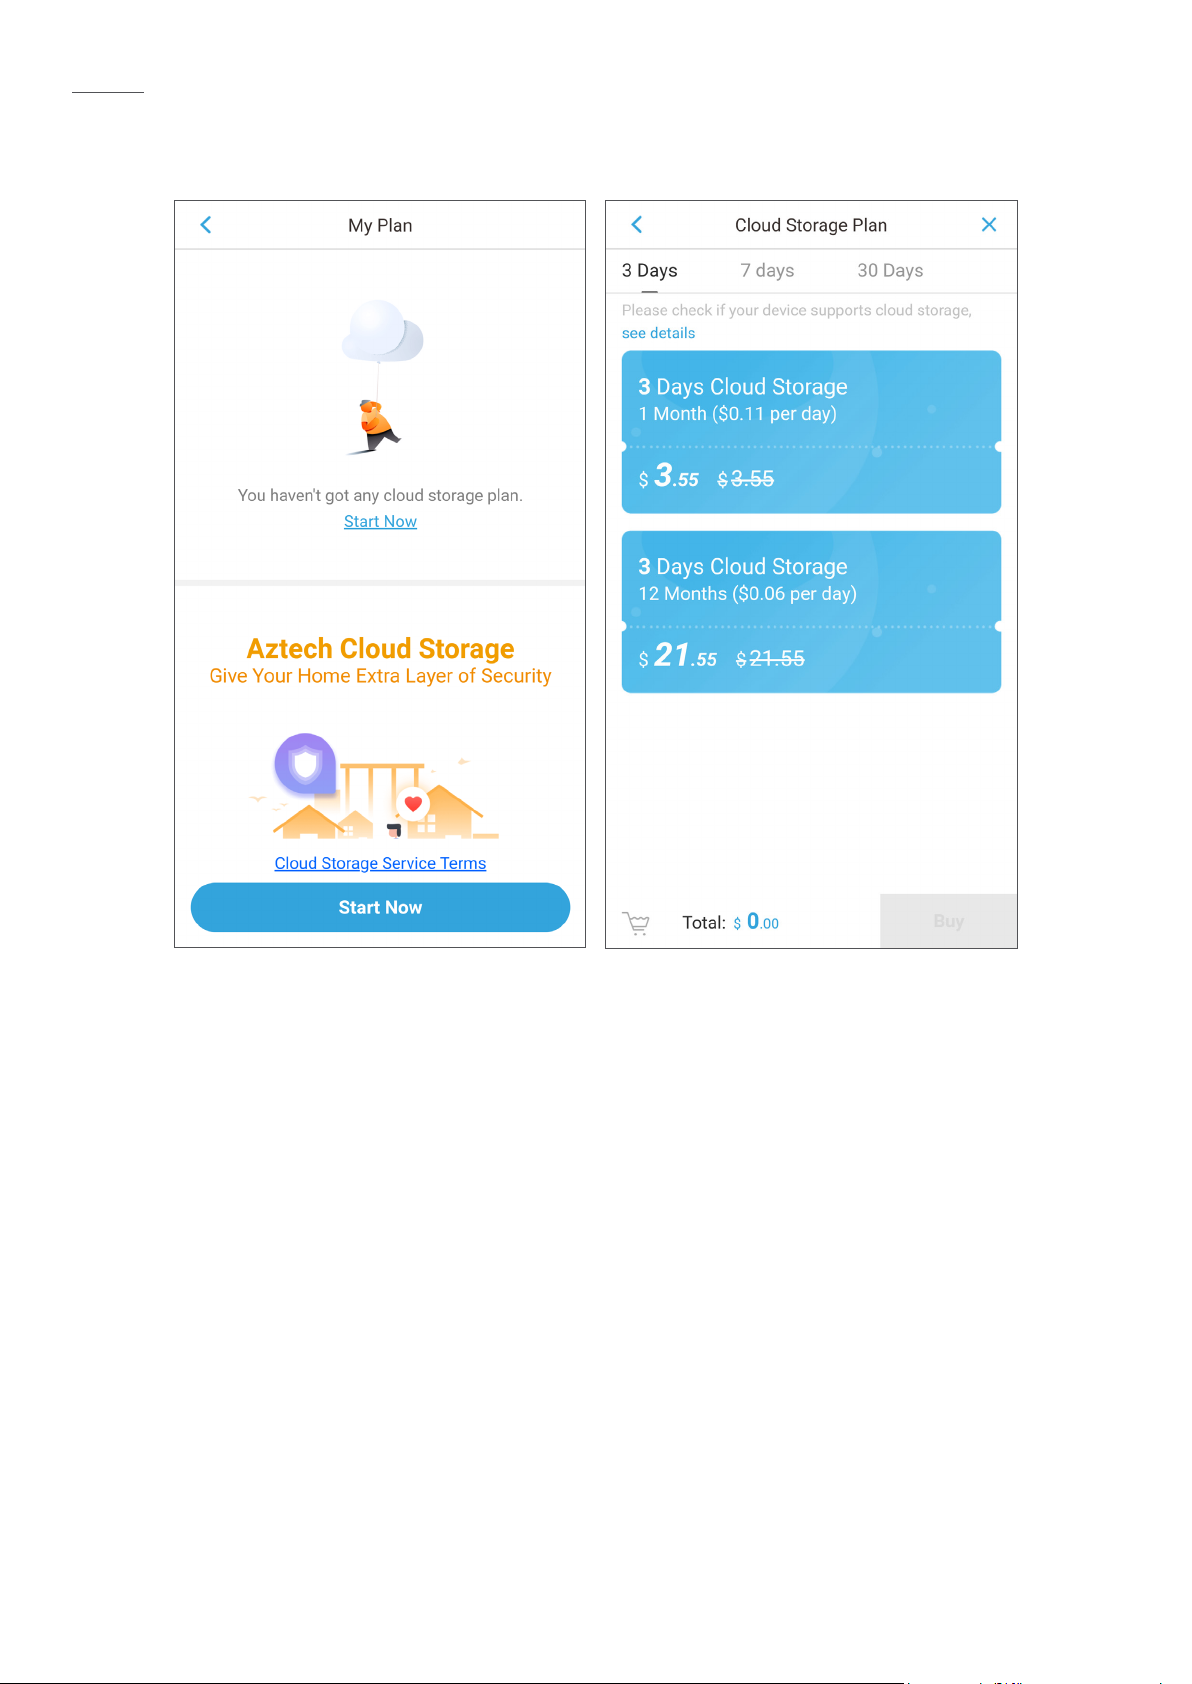
Step 2
The service introduction interface is displayed.
Tap Start Now, and follow the onscreen instructions to complete the purchase.
16
Page 17

MANAGING DEVICE
You can congure the settings for the added IP camera such as recording schedule, time
zone, and alarms.
Step 1
To enter the device management interface, tap My Device on the My Account tap, and
then tap the device name.
The Device Info interface is displayed.
NOTE:
The Device Info interface shows the functions that you can congure on the device. The
actual interface might be different depending on the device you added.
17
Page 18

PARAMETER FUNCTION
Device Name
Activity Zones
Alarm Information
Storage Status
Customize Video
Encryption
Device management parameters
Displays device information such as device name, model
name, and SN. You can also reset device password from here.
You can dene a motion detection area. When the object
appears in this area, the system activates alarm.
Enables the alarm activation function, such as motion
detection, local alarm, and PIR alarm.
You can view the storage status of cloud storage and device
SD card storage.
If the Customize Video Encryption function is enabled, you can
set a password for viewing the videos that are stored in the
Cloud. When you log in to AztechRaptorVue App from other
smartphones, you should enter this password for the rst time to
access the live view interface.
Time Zone
You can congure the time zone and enable DST for the
device.
Rotate Image Enables the image rotate function.
Device Indicator Enables the LED indicator at the back of the camera.
Device Sharing
You can share the added devices to other AztechRaptorVue
App users.
Cloud Update Indicates if there is an updated version.
Wi-Fi Cong You can congure the Wi-Fi connection settings from here.
Delete Device
Tap Delete Device to delete the device from your
AztechRaptorVue App.
18
Page 19

MANAGING NOTIFICATIONS
You can read the personal alerts, system notications, and view the recorded videos on the
Notice interface.
• Personal Alert
A reserved area for notication that relates to your account, such as cloud storage
expire notication, or device share notication. Please note the incoming App update.
• System Info
View the notications that are pushed from server.
• Recorded video
Tap the video to enter the calendar interface. Tap the date that you want to view the
recorded videos, and tap the specic le to view the recorded video.
19
Page 20

MANAGING ACCOUNT
You can view the information such as cloud service, device information, and account
settings on the My Account interface.
PARAMETER FUNCTION
My Cloud
My Device Enters the device information interface.
Downloads Displays the videos that are in the process of downloading.
Local Files
Settings
View the orders of Cloud storage plan such as unpaid order,
paid order, and cancelled order.
You can view the recorded videos or snapshots.
• For iOS smartphone, you can share the local les with other
apps, download to your smartphone, or delete the les.
• For Android smartphone, you can only share the local les
with other apps or delete the les.
You can change account password, set motion detection
period, reset device password, view the version information
and FAQ, provide feedback, join the user experience plan,
clear cache, and exit the current account.
20
Page 21

Copyright © 2019 Aztech Technologies Pte Ltd. All rights reserved.
 Loading...