

Page 1

VGS3D-AGP GRAPHICS
2D/3D ACCELERATED CARD
Users Manual
Version 1.0
Page 2

2
VGS3D-AGP GRAPHICS CARD USER'S MANUAL
PART 15 FCC COMPLIANCE STATEMENT
This device complies with Part 15 of FCC Rules. Operation is subject to the following two conditions:
1. This device may not cause harmful interference, and
2. This device must accept any interference received, including interference that may cause
undesired operation.
Operating Environment
For Home or Office Use
Notice
This equipment has been tested and found to comply with the limits of a Class B digital device, pursuant to
Part 15 of the FCC Rules. These limits are designed to provide reasonable protection against harmful
interference in a residential installation. This equipment generates, uses and can radiate radio frequency
energy and, if not installed and used in accordance with the instructions, may cause harmful interference to
radio communications. However, there is no guarantee that interference will not occur in a particular
installation, if this equipment does cause harmful interference to radio or television reception, which can be
determined by turning the equipment off and on, the user is encouraged to try to correct the interference by
one or more of the following measures:
Reorient or relocate the receiving antenna.
Increase the separation between the equipment and receiver.
Connect the equipment into an outlet on a circuit different from that to which the receiver is
connected.
Consult the dealer or an experienced radio/TV technician for help.
Caution
To comply with the limits for the Class B digital device according to Part 15 of FCC Rules, this device must
be installed in computer equipment certified to comply with the Class B limits. All cables used to connect
the computers and peripherals must be shielded and grounded. Operation with non-certified/shielded cables
may result in radio/TV interference.
Modification
Any modification not expressly approved by the manufacturer of this device could void the users authority
to operate the device.
Party Responsible for Product Compliance:
Aztech Labs, Inc.
45645 Northport Loop East
Fremont, CA 94538, U.S.A.
P/N: 040-112309-101
Page 3

VGS3D-AGP GRAPHICS CARD USER'S MANUAL
3
©Copyright
The software described in this manual is protected by international copyright laws. Under this copyright law, you
are prohibited from duplicating the software for any purpose other than making archival copies for the sole
purpose of backing-up against loss.
In addition, no part of this manual may be reproduced or transmitted, in any form or by any means, electronic or
mechanical, including photocopying, recording, or information storage and retrieval systems, for any purpose other
than the purchasers personal use, without the prior written permission of Aztech Systems Ltd.
PentiumII is a registered trademark of Intel Corp.
Microsoft, Windows and Windows NT are registered trademarks of Microsoft Corp.
Savage3D is a registered trademark of S3 Inc.
All other company or product names are trademarks or registered trademarks or service marks of their
respective owners and are hereby recognized as such.
Disclaimer Statement
Aztech Systems Ltd specifically disclaims all warranties, either expressed or implied, including but not limited to
implied warranties of merchantability and fitness for a particular purpose, with respect to the hardware, software,
and the accompanying written materials. Aztech Systems Ltd reserves the right to revise or make improvements to
its product at any time and without obligation to notify any person of such revisions or improvements.
In no event shall Aztech Systems Ltd be liable for any consequential or incidental damages, including any loss of
business profits or any other commercial damages, arising out of the use of its product.
Page 4
4
VGS3D-AGP GRAPHICS CARD USER'S MANUAL
6
13
22
5
21
25
28
Table Of Contents
Setting up Your Graphics Card ---------------------------------------
1.1 Minimum System Requirements ------------------------------------
1.2 Safety Precaution -------------------------------------------------------------
1.3 Installation Notes --------------------------------------------------------------
1.4 Package Checklist --------------------------------------------------------------
1.5 Installation Procedure------------------------------------------------------
1.6 Upgrading Windows® 95 OSR2.0 to OSR2.1 --------------------
1.7 Upgrading Windows NT® 4.0 with Service Pack 3 ---------
1.8 Installing the Graphics Card---------------------------------------------
1.9 Connecting the Graphics Card ----------------------------------------
Installing the Graphics Card Drivers ------------------------------
2.1 Installing the Drivers in Windows® 95 ----------------------------
2.2 Installing the Drivers in Windows® 98 ----------------------------
2.3 Installing DirectX 6.0 in Windows
®
95/98 ------------------------
2.4 Installing the Drivers in Windows NT® 4.0 ----------------------
Testing the Graphics Card in Windows
®
95/98 ---------------
Adjusting the Graphics Card's Display Properties ---------
Frequently Asked Questions -------------------------------------------
Technical Specifications --------------------------------------------------
Sound Card Layout-----------------------------------------------------------
6
7
7
8
9
9
9
12
13
16
20
20
31
Page 5

5
Setting up Your Graphics Card
Congratulations on your purchase of the VGS3D-AGP Graphics 2D/3D Accelerated
Card!
Based on the Savage3D chipset from S3 Inc., the VGS3D-AGP's powerful and
well-balanced 2D/3D graphics accelerator features high end capabilities such as z-
buffering, alpha blending, perspective correction and sophisticated Tri-linear
filtering. All these help to deliver the ultimate PC graphics performance in today's
graphics-intensive applications and games.
Page 6

6
CHAPTER 1 SETTING UP YOUR GRAPHICS CARD
1.1 Minimum System Requirements
PC-based computer with PentiumII® processor.
AGP Bus slot.
10MB hard disk space (system files and drivers only).
CD-ROM drive.
Windows® 95 OSR 2.1, Windows® 98 or Windows NT® 4.0 with Service
Pack 3.
USB upgrade supplement if you are running Windows® 95 OSR 2.0.
Windows NT® Service Pack 3 or later if you are running Windows NT
®
4.0.
1.2 Safety Precaution
Do not remove your graphics card from its protective bag until you are
ready to install it.
Always try to hold your graphics card by its edges. Avoid touching any
electronic components on your graphics card.
Static electricity can cause permanent damage to your graphics card. To
prevent such damage, you must ground yourself while installing the
card. You can do this in either of two ways :
» Use a grounding strap, which is a coiled wire with a clip at one
end and an elastic strap at the other. Wear the strap around your
wrist and attach the clip to any non-painted metal surface of the
computers chassis.
Page 7

CHAPTER 1 SETTING UP YOUR GRAPHICS CARD
7
» If you do not have a grounding strap, touch any non-painted
surface of the computer's chassis before you begin installation, and
again every minute or so until the installation is completed.
1.3 Installation Notes
Computers vary in appearance and layout. Therefore, the installation
procedures in this chapter apply generally and you should compare the
illustrations here with your computer before you start the graphics card
installation.
A Philips-type screwdriver is required for the graphics card installation.
Your computers documentation should come in handy during the
graphics card installation. Have it ready by your side when you start
the graphics card installation.
If you have an existing graphics card (that is non-Plug-and-Play-based)
installed in your computer, you must first un-install its drivers before
you remove the graphics card. Refer to your existing graphics card
documentation for more details on this.
1.4 Package Checklist
VGS3D-AGP Graphics 2D/3D Accelerated Card
Installation CD with User Manual and software applications
This Easy Start Guide
Page 8
8
CHAPTER 1 SETTING UP YOUR GRAPHICS CARD
1.5 Installation Procedure
To take advantage of all the features of the AGP graphics card,
please check that your system has Windows® 95 OSR2.1 or later
versions and DirectX 6.0 installed. If you are running Windows
NT® 4.0, make sure that it has been upgraded with Service Pack 3.
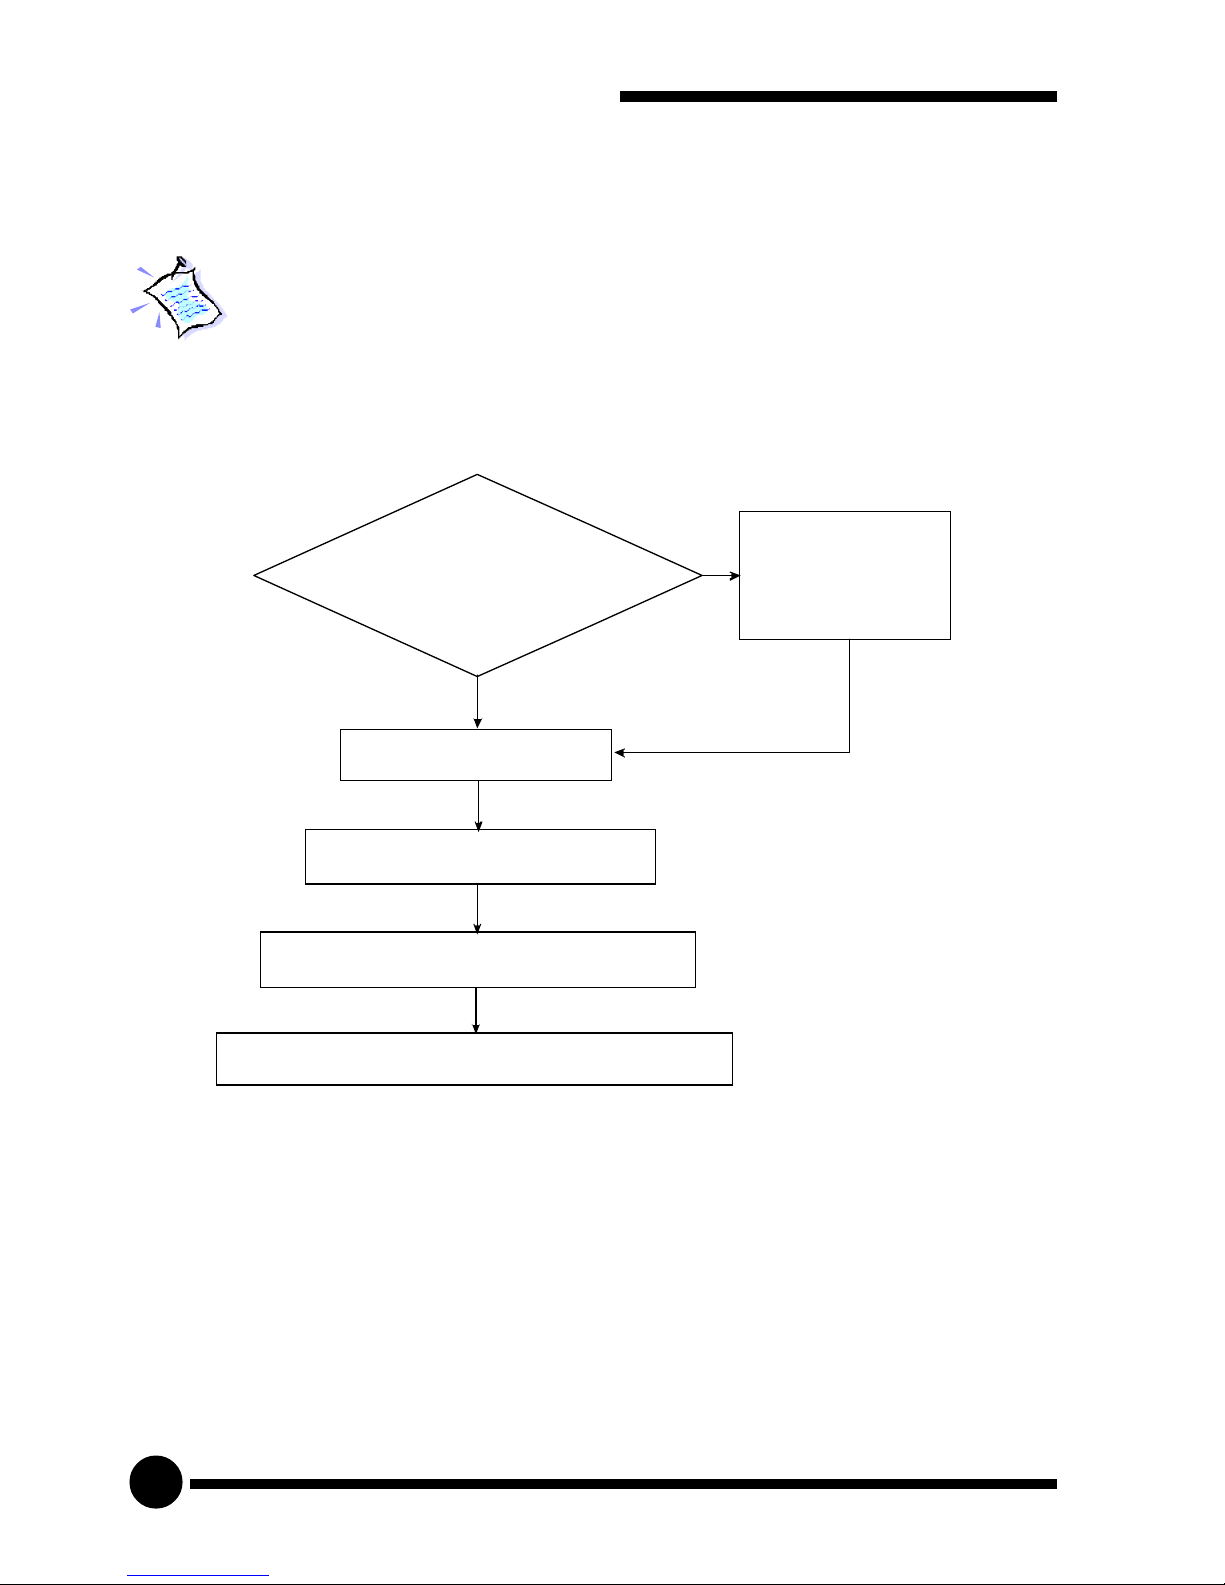
The following Installation Procedure is recommended:
1. If you are running Windows® 95 OSR2.0, upgrade it to Windows® 95
OSR2.1. If you are running Windows NT® 4.0, upgrade it with Service
Pack 3.
2. Install the graphics card.
3. Install the graphics card drivers from the Installation CD.
4. Install DirectX6 (for Windows® 95/98 only).
5. Set the colour palette from the Display Properties, Settings tab to 16-
bit or higher in order to reveal the S3 Gamma tab.
1a.
1b.
Window s
95 OSR2.1 or above?
Windows NT 4.0 upgrade d
with Service
Pack 3?
®
®
2.
Install Graphics Card
3.
Insta ll Graphics Card Drivers
4.
Install DirectX6 (for Windows 95/98)
®
5.
Set colour palette to 16-bit colour or higher
a.
b.
Upgrade OSR2.0
to OSR2.1
Upgrade with
Service Pack
No
Ye s
Page 9
CHAPTER 1 SETTING UP YOUR GRAPHICS CARD
9
1.6 Upgrading Windows® 95 OSR2.0 to OSR2.1
To upgrade from OSR2.0 to OSR2.1, first make sure you have OSR2.0
installed. By installing the USB upgrade, Windows® 95 OSR2.0 will be
upgraded to OSR2.1.
1.7 Upgrading Windows NT® 4.0 with Service Pack 3
If you are using Windows® NT Service Pack 1 or 2, upgrade to Service Pack
3 before installing the card.
1.8 Installing the Graphics Card
You need to remove any existing graphics card installed in your
computer. Note that if the graphics card is non-plug-and-play-
based, you need to un-install it's drivers before you remove it.
Check your existing graphics card documentation for details on
this.
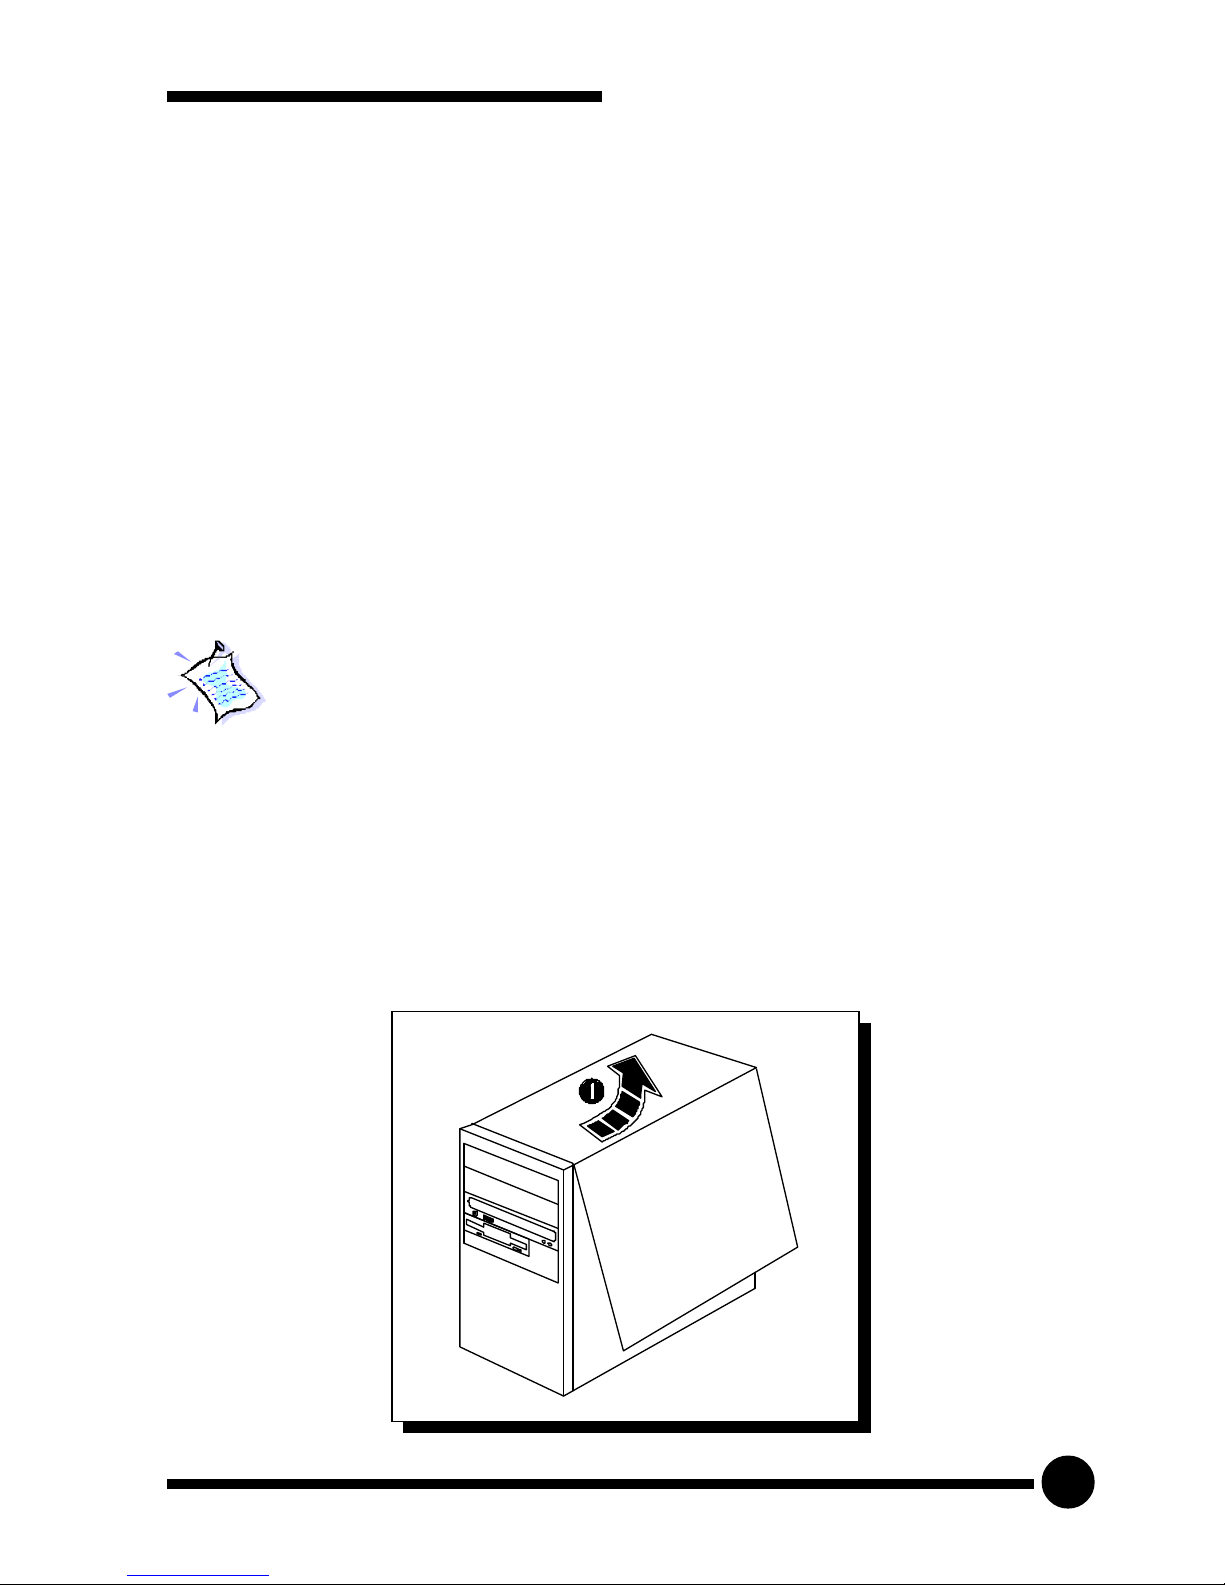
Remember to switch off your computer and any connected
devices before starting with the installation of your graphics card.
1. Remove your computer s chassis cover and set it aside, somewhere out
of your way.
Page 10
10
CHAPTER 1 SETTING UP YOUR GRAPHICS CARD
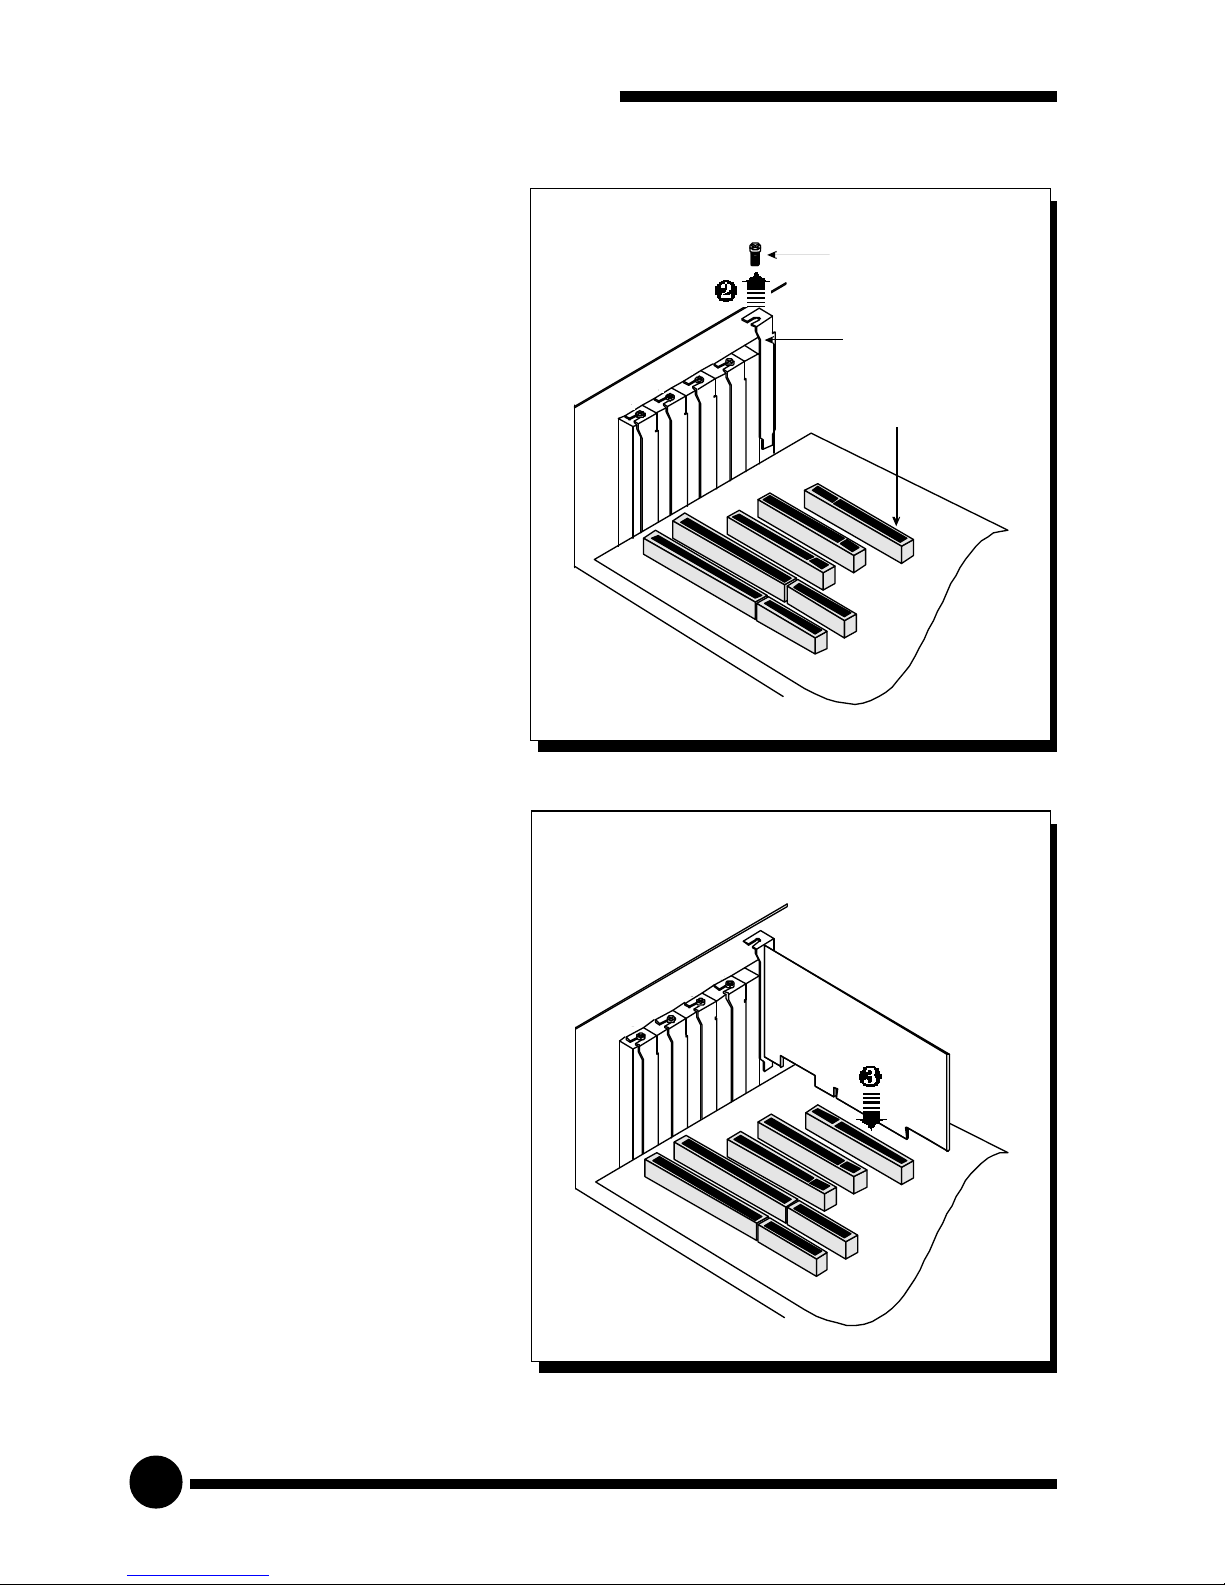
2. Remove the cover plate of
the AGP Bus slot. Keep
the mounting screw to
secure your graphics card
later.
3. Align your graphics card
with the AGP Bus slot
and firmly push it into
the slot. If the card cannot
be slide in, do not force it.
Make sure the graphics
card is lined up properly
and try again.
Mounting Screw
AGP Bus Slot
Cover Plate
Graphics Card
Page 11

CHAPTER 1 SETTING UP YOUR GRAPHICS CARD
11
4. Secure your graphics card to the computer chassis with a mounting
screw.
5. Replace your computer s chassis cover.
Page 12
12
CHAPTER 1 SETTING UP YOUR GRAPHICS CARD
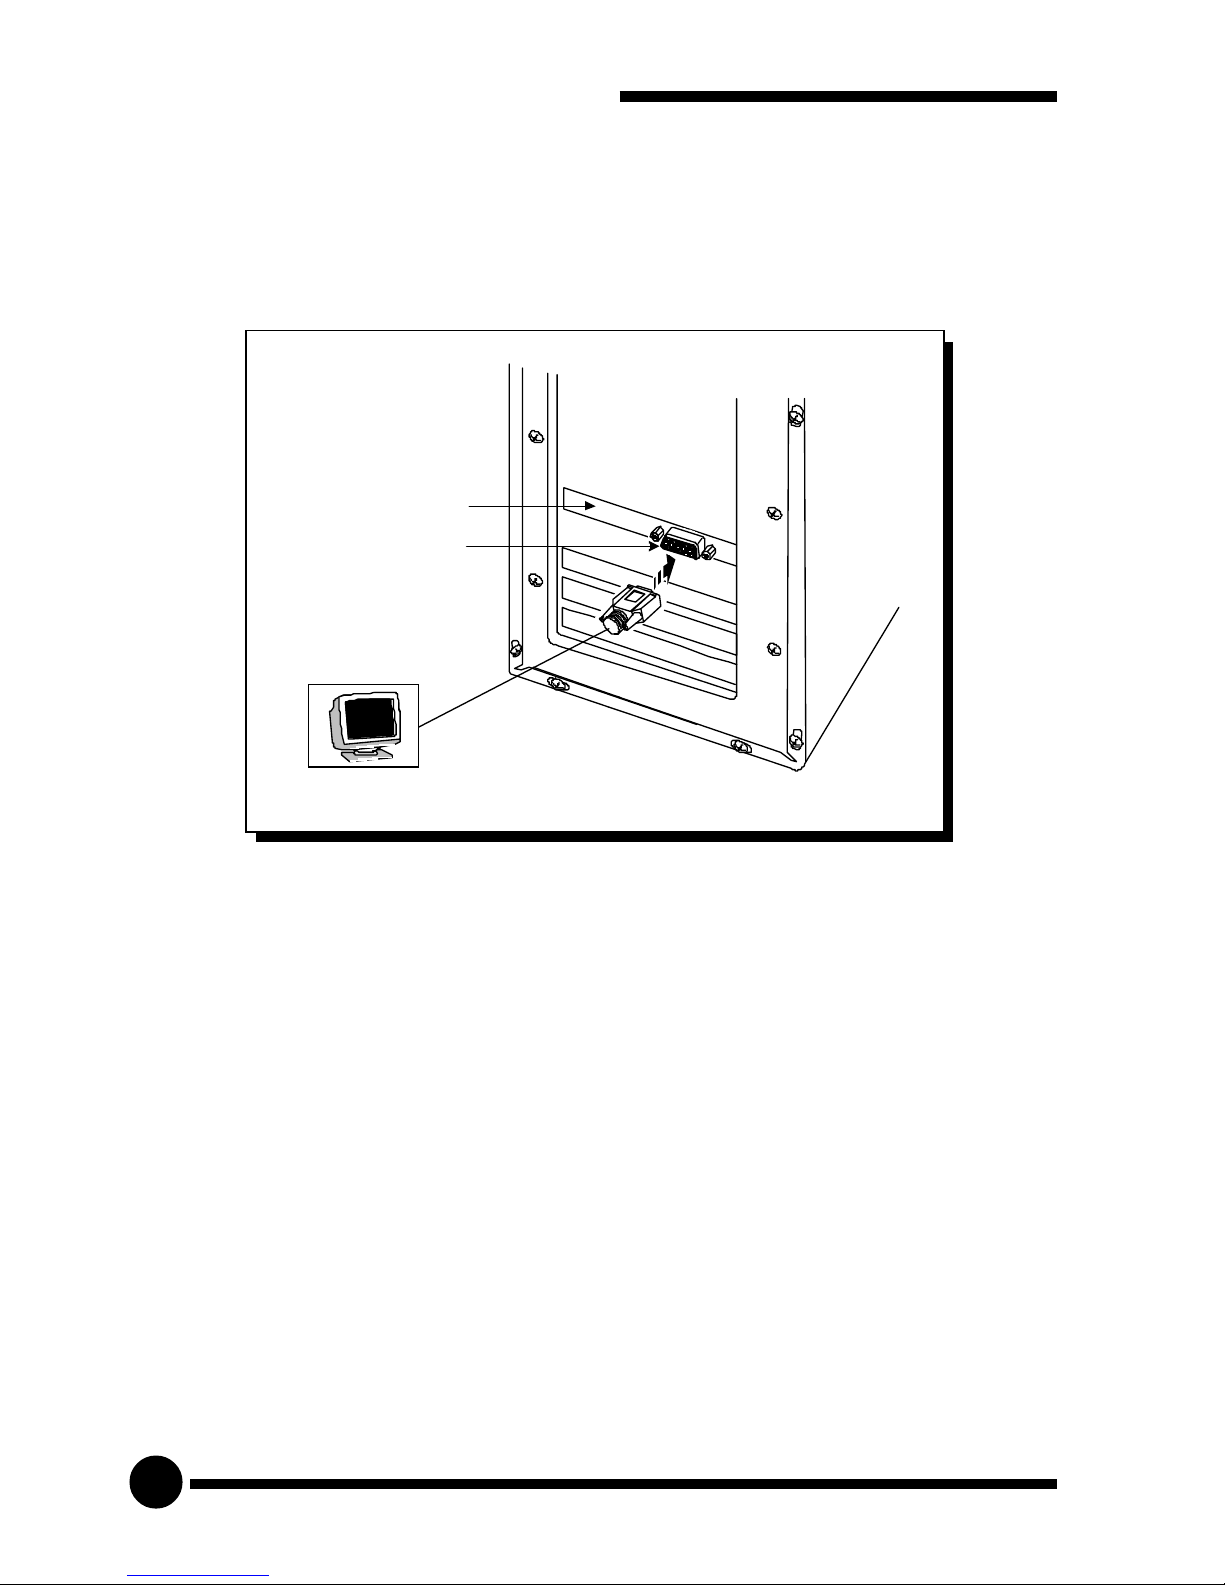
1.9 Connecting the Graphics Card
6. Plug your standard 15-pin male monitor cable into the VGA port.
Graphics Card
VGA Port
Page 13
13
Installing the Graphics Card
Drivers
To take advantage of all the features of the AGP graphics card, please check that
your system has Windows® 95 OSR2.1 or later versions and DirectX 6.0 installed.
If you are running Windows NT® 4.0, make sure that it has been upgarded with
Service Pack 3 or later.
2.1 Installing the Drivers in Windows® 95
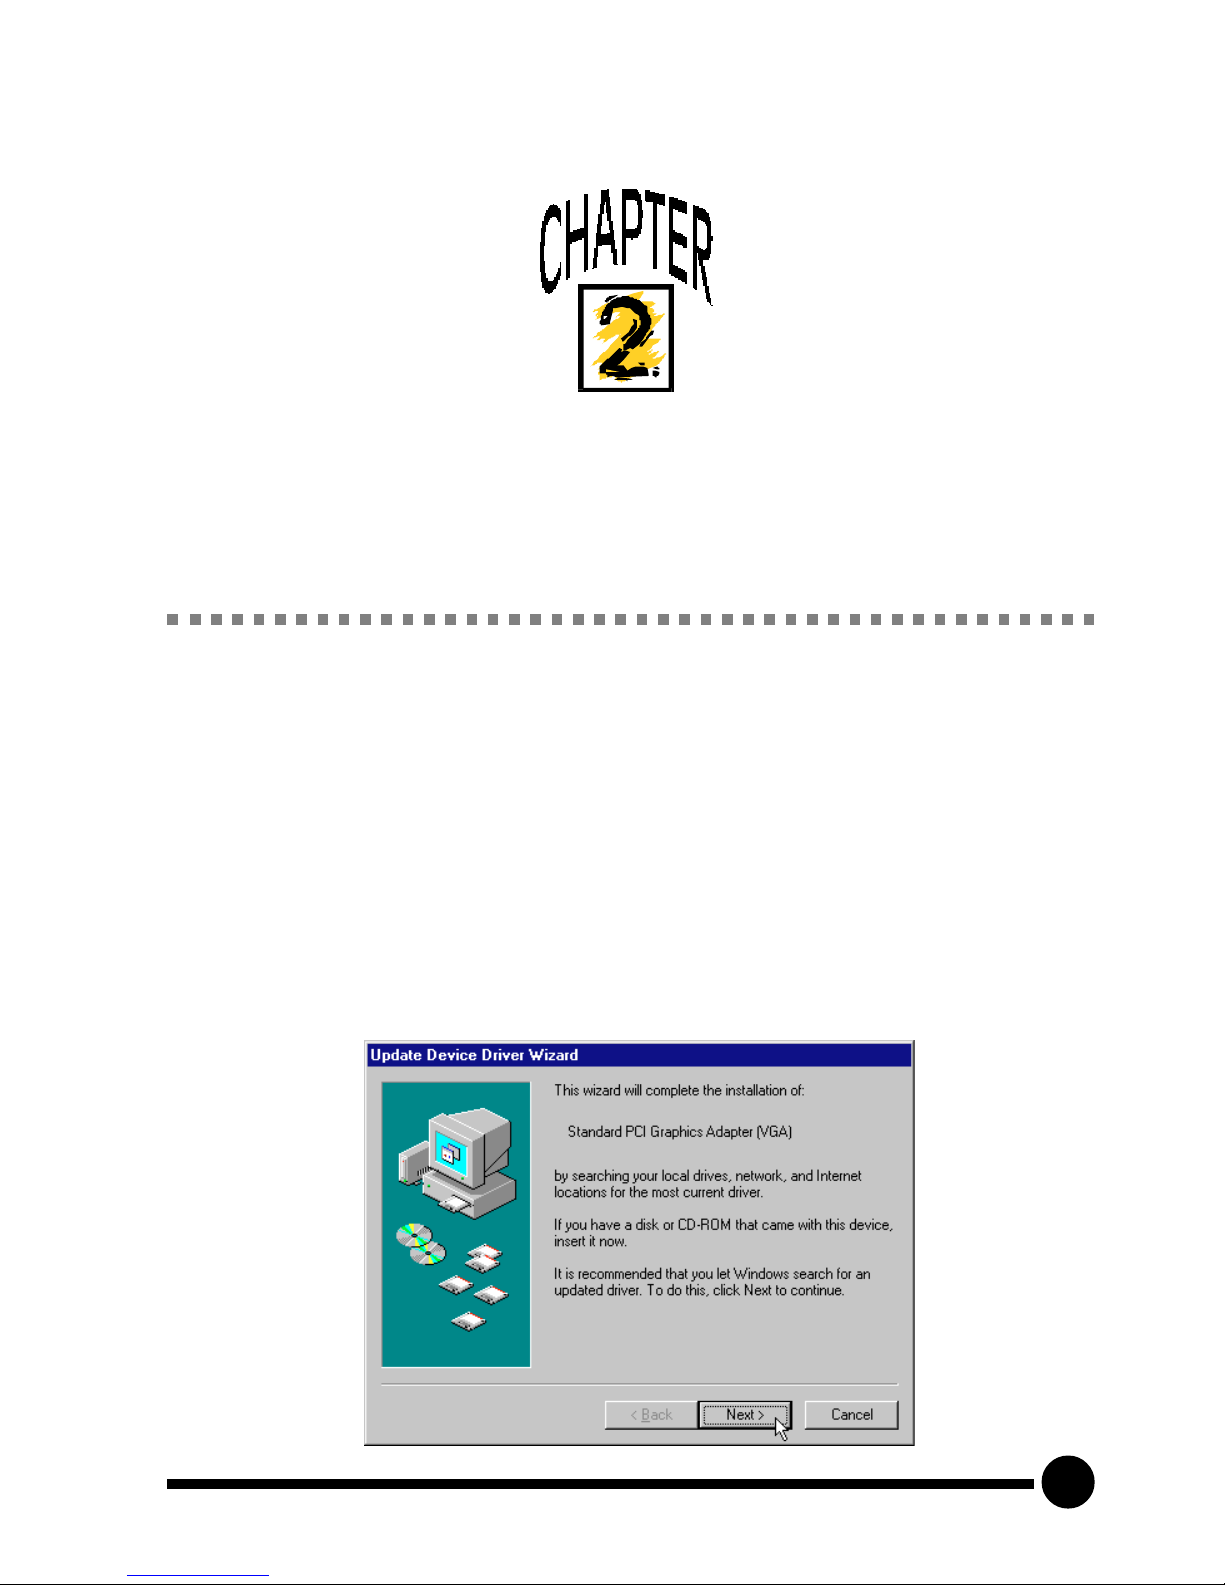
1. Turn on your computer to start Windows® 95. Windows® 95 will detect
the newly-installed graphics card and an Update Device Driver Wizard
window will appear. Place the Installation Disk on the CD-ROM drive
and click Next.
Page 14

14
CHAPTER 2 INSTALLING THE GRAPHICS CARD DRIVERS
2. Allow the system to search for an updated driver and click Finish to
use the driver found.
3. When prompted to restart the system, click Yes to restart. This is to
ensure that the new graphics settings take effect.
Page 15

CHAPTER 2 INSTALLING THE GRAPHICS CARD DRIVERS
15
4. After restarting, a program folder called "VGS3D-AGP Information" will
be created. It provides a link to the User's Manual, a list of FAQs and
the Readme.txt file. In order to read the User's Manual, Acrobat Reader
is required. Install Acrobat Reader first if you do not have the program.
8. From the Start button on the taskbar, click Settings and choose Control
Panel. Double-click the Display icon. Three tabs (S3 Gamma,
S3dometer and S3 Refresh) are added to the Display Properties window.
If you do not see the S3 Gamma tab, click the Settings tab and change
the Colour Palette to 16-bit or higher. Refer to the chapter on Adjusting
the Graphics Card's Display Properties for more details.
Please proceed to install DirectX 6.0.
Page 16

16
CHAPTER 2 INSTALLING THE GRAPHICS CARD DRIVERS
2.2 Installing the Drivers in Windows® 98
1. Turn on your computer to start Windows® 98. Windows® 98 detects the
newly-installed graphics card. Click Next to continue.
2. Place the Installation Disk into the CD-ROM drive.
3. Select the Search for the best driver for your device. (Recommended)
option and click Next to continue.
Page 17

CHAPTER 2 INSTALLING THE GRAPHICS CARD DRIVERS
17
4. Enable the CD-ROM drive selection to direct Windows to search for the
drivers on the installation disk. Click Next to continue.
5. Windows will prompt that it is ready to install the drivers. Click Next
and then Finish to complete the installation of the drivers.
Page 18

18
CHAPTER 2 INSTALLING THE GRAPHICS CARD DRIVERS
6. When prompted to restart the system, click Yes. This is to ensure that
the new graphics settings take effect.
7. After restarting, a program folder called "VGS3D-AGP Information" will
be created. It provides a link to the User's Manual, a list of FAQs and
the Readme.txt file. In order to read the User's Manual, Acrobat Reader
is required. Install Acrobat Reader first if you do not have the program.
Page 19

CHAPTER 2 INSTALLING THE GRAPHICS CARD DRIVERS
19
8. From the Start button on the taskbar, click Settings and choose Control
Panel. Double-click the Display icon. Select the Settings tab and make
sure that the Colour Palette is set to 16-bit or higher. Click the
Advanced... button. Three tabs (S3 Gamma, S3dometer and S3 Refresh)
are added to the Display Properties window.
Refer to the chapter on Adjusting the Graphics Card's Display Properties
for more details.
Please proceed to install DirectX 6.0.
Page 20

20
CHAPTER 2 INSTALLING THE GRAPHICS CARD DRIVERS
2.3 Installing DirectX 6.0 in Windows® 95/98
1. Place the Installation Disk onto the CD-ROM drive.
2. In Windows® 95/98, click the Start button and then Run.
3. In the text box, type "D:\Directx6\directx\dxsetup.exe" (where D is the
letter of your CD-ROM drive) and click OK.
4. A DirectX(R) Setup window appears. Make sure that under Options,
Direct-3D Hardware Acceleration Enabled is checked. Click Reinstall
DirectX.
5. Follow all on-screen instructions to complete the installation of DirectX.
Please proceed to the next chapter on testing the card.
2.4 Installing the Drivers in Windows NT® 4.0
1. Start Windows NT® 4.0.
2. Place the Installation Disk in the CD-ROM drive.
3. From the Windows NT® taskbar, click the Start button and then select
Settings, Control Panel.
4. Double-click the Display icon.
5. Click the Settings tab and then click the Display Type button.
6. Click the Change button and a Change Properties window appears.
7. Place the Installation Disk into the CD-ROM drive and click Have
Disk. The system will locate the driver.
8. Click OK twice to finish the installation of the drivers.
Page 21

21
Testing the Graphics Card in
Windows® 95/98
1. From the Windows® 95/98 taskbar, click the Start button and then select
Settings and Control Panel.
2. Double-click the System icon.
3. A System Properties window appears. Click the Device Manager tab.
4. Double-click on the Display adapters to reveal the VGS3D-AGP
graphics card. Double-click on it.
5. A VGS3D-AGP Properties window appears. Under the General tab,
check that the Device Status has the message: "This device is working
properly". This means that your graphics card had been installed
properly.
Page 22

22
2. Click the S3dometer tab.
The S3dometer allows the user
to choose whether to automate
tasks such as DirectX 6 texture
compression, trilinear filtering
and flip buffers.
You can also specify how much
memory the system should use
for AGP.
Adjusting the Graphics Card's
Display Properties
When the drivers have been successfully installed, you can change the display
resolution, color and other settings. Other than the information in this Easy Start,
more details can be obtained by clicking on the button at the top-right of the
Display Properties window and then clicking on the section you wish to know
more about.
1. Double-click the Display icon from the Control Panel. The Display
Properties window appears.
Page 23

CHAPTER 4 ADJUSTING THE GRAPHICS CARD'S DISPLAY PROPERTIES
23
3. Click the S3 Gamma tab.
The red, green and blue Color
Channels can be adjusted to
optimise the color display
when running different games/
applications. By checking the
Link RGB check-box, all three
colors can be adjusted
simultaneously. After setting a
color scheme, it can be saved
for future use.
4. Click the S3 Refresh tab.
To change the refresh rate for
each resolution, click the
ChangeConfiguration button.
A refresh rate of more than
60Hz is recommended to
prevent flickering.
Page 24

24
5. During the playback of various video format such as MPEG, you can
fine-tune the colours of your video. Double-click the S3 Video Color
Control icon from the Control Panel.
Page 25

25
Frequently Asked Questions
Why does my Monitor display flicker badly?
Change your Refresh Rate at your Display properties in the
Control Panel to 60Hz or higher. Refresh rate below 60Hz
generally flickers badly. It is also Monitor-dependent.
There are no refresh rate settings for some of the screen
resolutions.
The refresh rates for these screen resolutions are fixed at a certain
value.
My System hangs when playing games such as Forsaken or
MageSlayer.
There are patches available for downloading from the Web Sites
of the respective Games Vendors that will enable the fixing of
these issues.
There is no display after I plugged in the Card and switched
on the System.
Page 26

26
APPENDIX A FREQUENTLY ASKED QUESTIONS
Check that your monitor cables and power cables are plugged in
properly and power supply switched on. The card may not be
inserted fully into the AGP slot. Try taking out and putting back
the card again.
I am unable to obtain 1600X1200 resolution on my monitor.
The highest resolution that the Graphic Card is able to run is
dependent on the Monitor itself. If your monitor does not support
this resolution, then you will not be able to go up to this
resolution.
I cannot get 16 color using screen resolutions above 1280X1024.
Screen resolutions above 1280X1024 can only be run at a
minimum of 256 color. This is a common implementation among
Graphic Cards Manufacturers.
Under Windows NT® 4.0, I am unable to install the Graphics
Card correctly.
Under Windows NT® 4.0, you must first install Windows NT® 4.0
Service Pack 3 or later in order to get AGP support.
I am having difficulties installing the Graphic Card Under
Windows® 95.
Please ensure that you have installed USB Supplement from
Microsoft and there are no conflicting devices in your device
Manager that may be causing Resources allocation problem. Also
check that you have installed DirectX 6.0 or later for best
performances.
Page 27

APPENDIX A FREQUENTLY ASKED QUESTIONS
27
Do I need to install DirectX 6.0 in the Installation CD under
Windows NT® 4.0?
The DirectX 6.0 is meant for Windows® 95 SR2.1 or later. Do not
install it under Windows NT® 4.0.
Can I install the VGS3D-AGP Graphics Card under Windows
®
95 OSR1 or earlier?
Due to the fact that Windows® 95 OSR1 or earlier does not have
support for AGP devices, the features of the VGS3D-AGP will not
be fully utilised.
After the drivers are installed and Windows restarted, there is
Plug and Play detection of my Monitor. Why is this so?
The Plug and Play detection of your monitor is to enable the
VGS3D-AGP Graphics Card to detect the capabilities and limits
of your Monitors Supported Resolutions and Refresh Rates. If
you are uncertain of what to choose, just click the Next button
and let Windows select the most appropriate drivers for your
Monitor.
I do not see the Gamma Utility in my Display Properties.
The Gamma Utility only works for 16-Bit color and above. If you
select 256 color or lower, then Gamma Utility Tab in Display
properties will not be visible.
How do I reinstall S3 Dometer utility?
Go to the Utility\Dometer Directory and right click on the file
S3dometr.inf. Choose Install and the Dometer utility will be
installed into your Display Properties. Note that all the bundled
utilities are for Windows® 95 SR2.1 and Windows® 98 only.
Page 28

28
Technical Specifications
Chipset
• S3 Savage3D
Memory
• 8MB SDRAM on board
Bus Type
• 2X AGP support/AGP 1.0 compliant
• Full AGP implementation including full side band AGP support and direct
memory execution
Integrated RAMDAC
• 250MHz RAMDAC with Gamma Correction
Resolution
• Supports 1,600 x 1,200 maximum resolution with 32-bit color
Rendering
• 128-bit Dual Rendering Pipeline
Page 29

APPENDIX B TECHNICAL SPECIFICATIONS
29
Refresh Rate
• Maximum 85Hz refresh rate
3-D Capabilities
• Single Cycle Trilinear Filtering
• H/W S3 Texture Compression (adopted as standard for DirectX 6)
• True Color Rendering which enables the use of 16M colors versus tradi-
tional 64K thus producing more realistic images
• 16-bit or 24-bit Z-Buffering
• Single Cycle Trilinear Filtering
• Specular Lighting & Diffuse Shading
• Alpha Blending Modes
• Fog (Vertex & Table)
• Special effects like Sprite anti aliasing, reflection, procedural textures and
atmospheric effects
2D Capability
• 1600 x 1200 in 32-bit colors
• 8MB Frame Buffer
• Highly optimized 128-bit graphics engine
• Full featured 2D Engine for acceleration of Bitblt, Rectangle Fill, Line
Draw, Polygon Fill, Panning/Scrolling and H/W Cursor
API Support
• OpenGL
• Direct 3D
Operating Systems & Drivers Support
• Windows
®
95
• Windows
®
98
• Windows NT
®
4.0 & 5.0
• DirectDraw and DirectVideo
• OpenGL
TM
ICD for Windows 9X and NT
Page 30

30
APPENDIX B TECHNICAL SPECIFICATIONS
Video/Display/BIOS
• Multi-monitor Capability
• Optimized for Software DVD MPEGII Decoder
• Feature Motion Compensation and sub picture blending to enhance
software DVD playback
• Multiple Video Windows and image mirroring to provide ideal solution
for video conferencing
• 60MHz VIP VMI video port allows for HDTV Resolution as well as pro-
vides low cost connection to MPEG-2 decoders and video digitizers
• Brightness, Hue, Saturation Control
Connectors
• VGA connector
• VIP/LPB connector
Power Management
• PCI Power Management
The product specifications herein are subject to change without
prior notifications.
Page 31

31
Card Layout
 Loading...