

Page 1

VDSL5038GRV(AC)
VDSL2 WIRELESS-AC 4-PORT
GATEWAY WITH USB 2.0 HOST
Page 2

User Manual
Page 2 of 60
© Copyright 2015 All rights reserved.
No part of this document may be reproduced, republished, or retransmitted in any form or
by any means whatsoever, whether electronically or mechanically, including, but not limited
to, by way of photocopying, recording, information recording, or through retrieval systems
without the express written permission. We reserve the right to revise this document at any
time without the obligation to notify any person and/or entity. All other company or product
names mentioned are used for identification purposes only and may be trademarks of their
respective owners.
LIMITATION OF LIABILITY AND DAMAGES
THE PRODUCT AND THE SOFTWARES WITHIN ARE PROVIDED "AS IS," BASIS. THE MANUFACTURER
AND MANUFACTURER’S RESELLERS (COLLECTIVELY REFERRED TO AS “THE SELLERS”) DISCLAIM
ALL WARRANTIES, EXPRESS, IMPLIED OR STATUTORY, INCLUDING WITHOUT LIMITATION THE
IMPLIED WARRANTIES OF NON-INFRINGEMENT, MERCHANTABILITY OR FITNESS FOR A
PARTICULAR PURPOSE, OR ANY WARRANTIES ARISING FROM COURSE OF DEALING, COURSE
OF PERFORMANCE, OR USAGE OF TRADE. IN NO EVENT WILL THE SELLERS BE LIABLE FOR
DAMAGES OR LOSS, INCLUDING BUT NOT LIMITED TO DIRECT, INDIRECT, SPECIAL WILLFUL,
PUNITIVE, INCIDENTAL, EXEMPLARY, OR CONSEQUENTIAL, DAMAGES, DAMAGES FOR LOSS OF
BUSINESS PROFITS, OR DAMAGES FOR LOSS OF BUSINESS OF ANY CUSTOMER OR ANY THIRD
PARTY ARISING OUT OF THE USE OR THE INABILITY TO USE THE PRODUCT OR THE SOFTWARES,
INCLUDING BUT NOT LIMITED TO THOSE RESULTING FROM DEFECTS IN THE PRODUCT OR
SOFTWARE OR DOCUMENTATION, OR LOSS OR INACCURACY OF DATA OF ANY KIND,
WHETHER BASED ON CONTRACT, TORT OR ANY OTHER LEGAL THEORY, EVEN IF THE PARTIES
HAVE BEEN ADVISED OF THE POSSIBILITY OF SUCH DAMAGES. THE ENTIRE RISK AS TO THE
RESULTS AND PERFORMANCE OF THE PRODUCT OR ITS SOFTWARE IS ASSUMED BY CUSTOMER.
BECAUSE SOME STATES DO NOT ALLOW THE EXCLUSION OR LIMITATION OF LIABLITY FOR
DAMAGES, THE ABOVE LIMITATION MAY NOT APPLY TO THE PARTIES. IN NO EVENT WILL THE
SELLERS’ TOTAL CUMULATIVE LIABILITY OF EACH AND EVERY KIND IN RELATION TO THE
PRODUCT OR ITS SOFTWARE EXCEED THE AMOUNT PAID BY CUSTOMER FOR THE PRODUCT.
Page 3

User Manual
Page 3 of 60
Contents
About the Device ........................................................................................................ 5
Requirements ................................................................................................ 7
Package Contents ....................................................................................... 7
Device Design ............................................................................................... 8
Front Panel ..................................................................................................... 8
Back Panel ..................................................................................................... 9
Getting Started ........................................................................................................... 10
Planning Your Network .............................................................................. 11
Remove or Disable Conflicts ..................................................................... 13
Internet Sharing, Proxy, and Security Applications ............................... 13
Configuring TCP/IP Settings ....................................................................... 14
Configuring Internet Properties ................................................................ 14
Removing Temporary Internet Files .......................................................... 15
Setup the Device ........................................................................................ 16
Connecting to the Internet ....................................................................... 19
Connecting Via Quick Setup .................................................................... 19
About the Web User Interface ................................................................................. 24
Accessing the Web User Interface .......................................................... 24
Web User Interface Modes ....................................................................... 25
Switching Modes ......................................................................................... 25
Rebooting and Logging Out .................................................................... 25
Basic Mode ................................................................................................................. 26
Menus ........................................................................................................... 26
Home ............................................................................................................ 27
Wizard ........................................................................................................... 28
Quick Start ................................................................................................... 29
Advanced Mode ....................................................................................................... 31
Network ........................................................................................................ 32
Wireless ......................................................................................................... 39
Wireless ......................................................................................................... 42
Page 4

User Manual
Page 4 of 60
System .......................................................................................................... 48
VoIP ............................................................................................................... 51
Status ............................................................................................................ 55
Router Care Tips ......................................................................................................... 57
FCC Statement ........................................................................................................... 58
Page 5

User Manual
Page 5 of 60
About the Device
Aztech VDSL5038GRV(AC) Residential gateway is an integrated device
which greatly aims to become the best companion of your customer’s
needs. Aztech hyped up the VDSL5038GRV(AC) exquisitely with dozens of
features users would easily appreciate and utilize.
An Ideal ADSL2/2+, VDSL2, FTTH via ONT Solution. Equipped with both a
Gigabit WAN port for FTTH via ONT and an RJ-11 port for DSL
connectivity, your VDSL5038GRV(AC) can easily work for both Fibre
and ADSL2/2+ or VDSL2 connections.
Fast and Reliable Concurrent Dual Band Wireless Connectivity. Wireless
connectivity is supported by the 802.11n wireless standard for the
2.4GHz, and the 802.11ac wireless standard for the 5.0GHz frequency
band. It simply shares fast and reliable speeds of up to 300Mbps on the
2.4GHz, and speeds of up to 900Mbps on the 5.0GHz band
concurrently for all of your wireless devices.
Connect Easily using Wi-Fi Protected Setup (WPS). Instead of
connecting conventionally to your wireless network by entering a
passphrase key, WPS enabled devices can easily connect to your
VDSL5038GRV(AC) through a simple press of the WPS button on both
devices.
Use your connection to make calls. With the VDSL5038GRV(AC), you
may use your internet connection in making calls by just connecting
your regular phone directly to the Voice port. You can now rely directly
on your internet connection whenever you are making calls.
Page 6

User Manual
Page 6 of 60
USB 2.0 Ports for both Printer and File Storage. Having you in mind when
we created this device, two (2) USB ports were placed to support
network printing, and even file storage and sharing.
Easy Installation and Setup. Unlike other complex devices, the
VDSL5038GRV(AC) uses an intuitive design making the device easy to
setup and use. You can also easily manage various router features
through an OS Independent Web User Interface that you can easily
access after connecting to the device.
Page 7

User Manual
Page 7 of 60
Requirements
Your computer must meet the following minimum requirements.
Any operating system can be used
Web Browser
233MHz processor (or higher)
Ethernet network adapter
An active ADSL/VDSL Internet account or ONT for Fibre connection
Package Contents
Package contents are listed below. For any missing items, please contact
your dealer immediately. Product contents vary for different models.
Router
Ethernet cable
Telephone cable
FXS Phone Splitter
12V 2.0A DC Power Adapter
Easy Start Guide
Warranty Policy
Note: You may also download the Easy Start Guide, and the User Manual
by visiting this link: http://www.aztech.com/support/
Page 8

User Manual
Page 8 of 60
LED STATUS DESCRIPTION
POWER Off No power is supplied to the
device
Green (Steady) Connected to a Power Supply
Red (Steady) Error on the device
ETH LAN 1-4 OFF No Ethernet connection
Green (Steady) Connected Ethernet Device
using Gigabit Ethernet cable
Green (Blinking) Transmitting/Receiving data
through Gigabit Ethernet Cable
Orange (Steady) Connected Ethernet Device
using Fast Ethernet cable
Orange (Blinking) Transmitting/Receiving data
through Fast Ethernet Cable
2.4GHz OFF There is no device connected
/5.0GHz wirelessly
Green (Blinking) There is data transmission
Green (Steady) There is a device connected
wirelessly
VOICE 1&2 Off VoIP not configured or disabled
Green (Steady) VoIP configured and activated
Red (Steady) VoIP call in-progress
USB OFF No USB connection
ON USB device is connected.
IPTV OFF IPTV interface is not up
Green (Steady) IPTV Interface is up and Set-top
box is active
Red (Steady) IPTV is up and Set-top box is
inactive/or not connected
DSL OFF There is no DSL signal or there is
no connectivity to the ONT
Green (Blinking) Establishing DSL Signal
Green (Steady) DSL signal is established or
connectivity to the ONT is
established
WAN Ethernet interface is
connected
INTERNET OFF No internet
Red (Steady) DSL, PPT Authentication Failed
Green (Steady) Internet interface is up
Device Design
Front Panel
Page 9
User Manual
Page 9 of 60
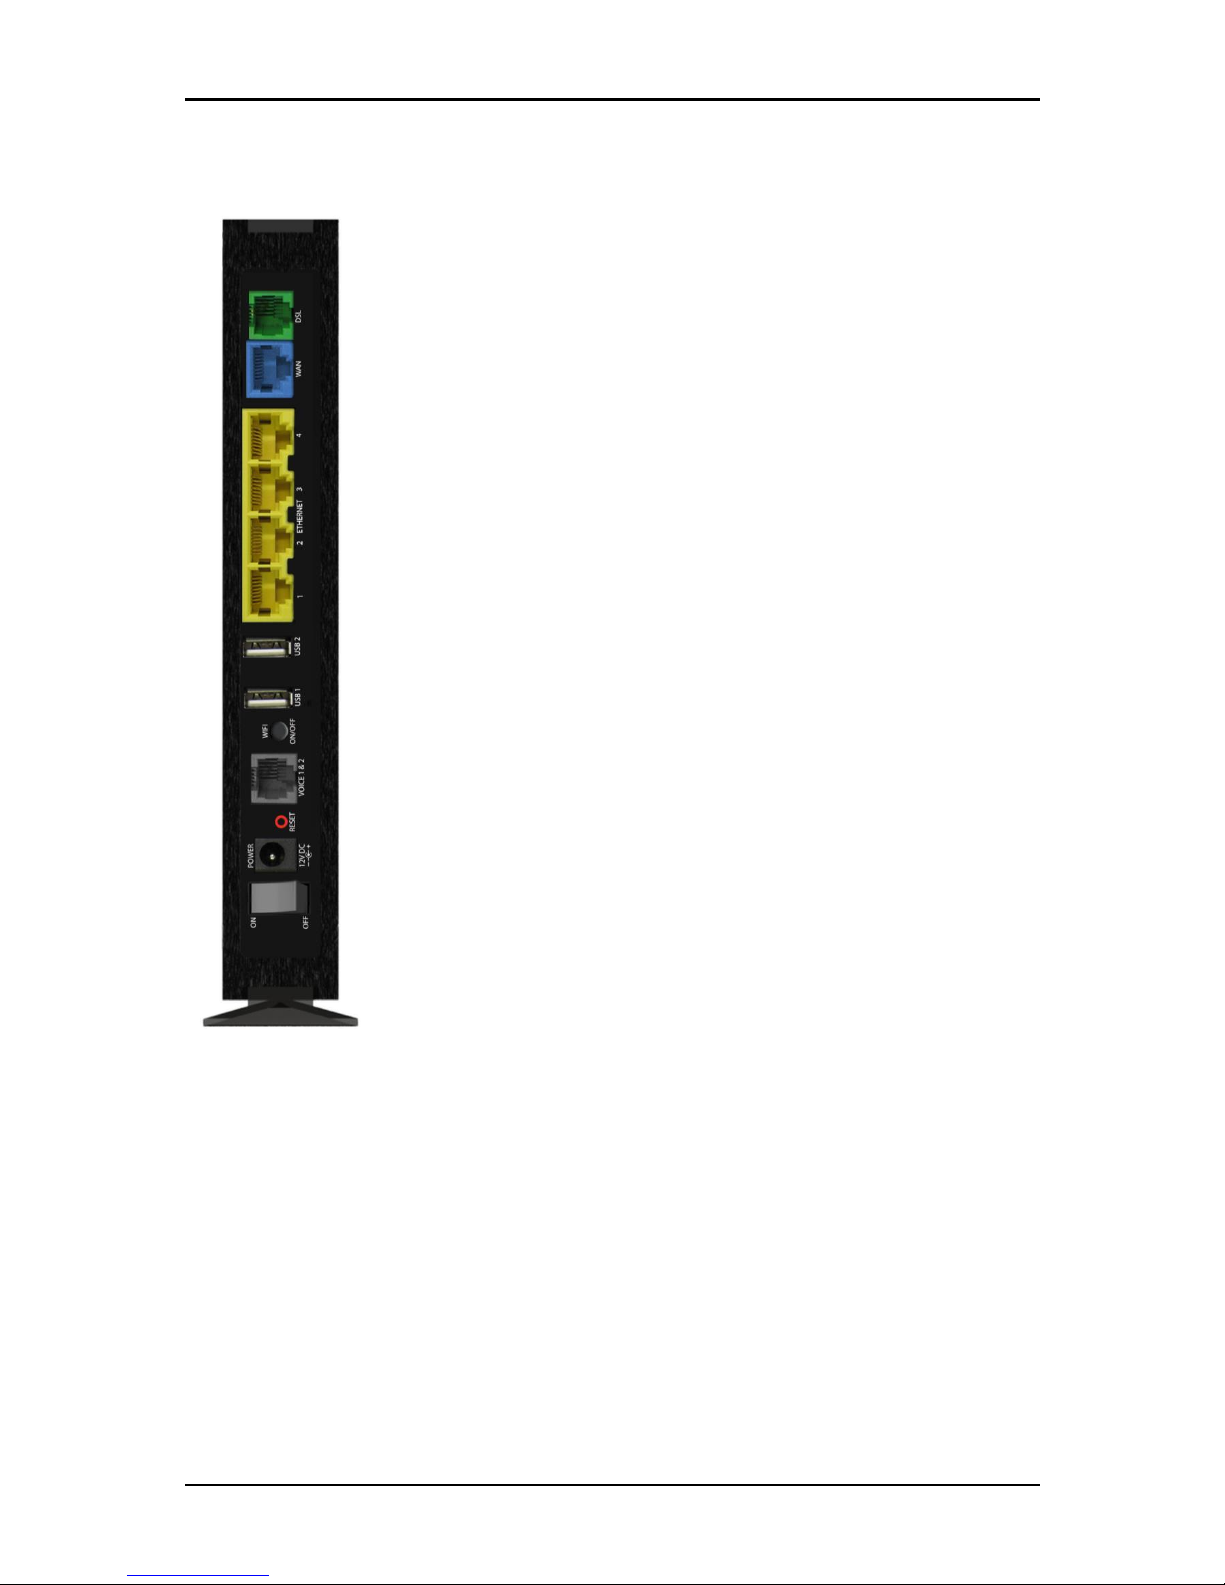
PORT/BUTTON DESCRIPTION
DSL / LINE Connecting the modem to an ADSL/VDSL line
ETHERNET WAN For WAN connection through an Ethernet cable
ETHERNET 1 - 4 Connecting computers and other Ethernet devices
USB 1 & 2 For USB devices such as printers and USB external hard
drives
WIFI ON/OFF Turns ON/ OFF the VDSL5038GRV(AC)’s wireless
VOICE 1 & 2 Port for Voice over IP Phones
RESET To reset the modem to the factory default
configuration
POWER Adapter input
ON/OFF Switch Turns ON/OFF the VDSL5038GRV(AC)
Back Panel
Page 10
User Manual
Page 10 of 60
Getting Started
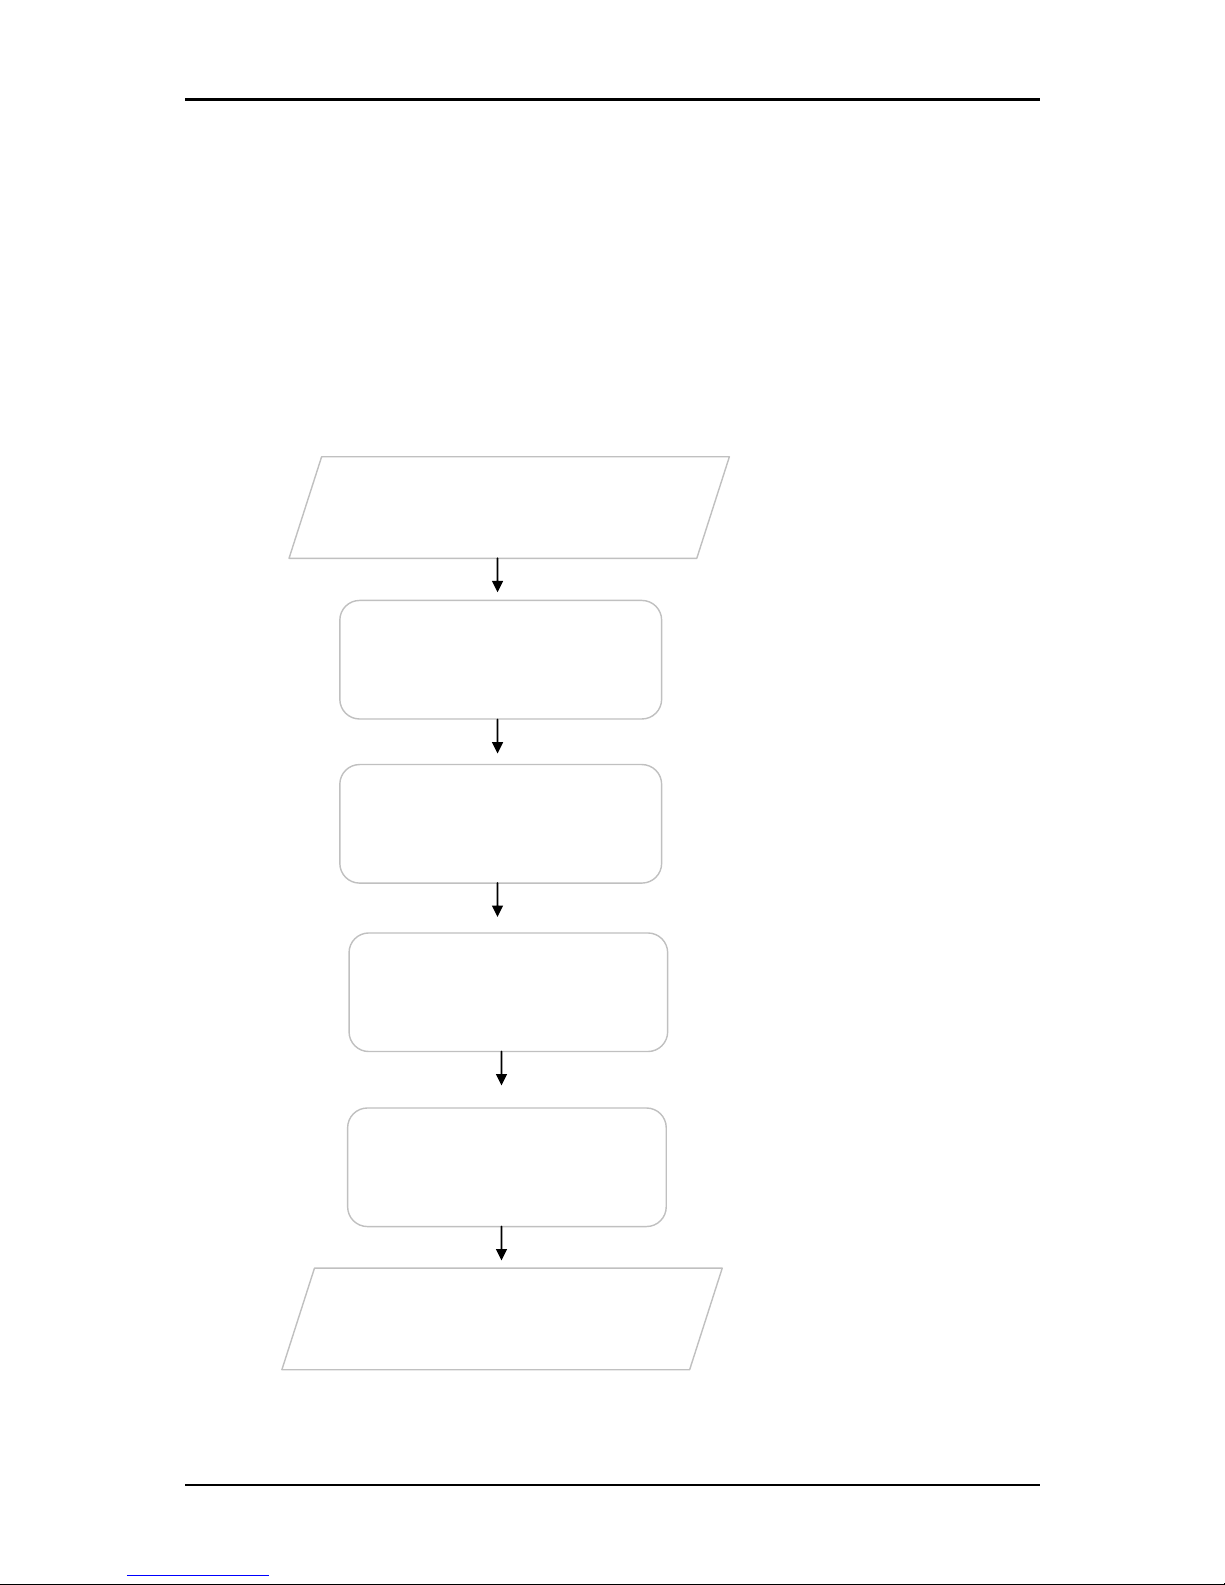
Setting up the device is easy. The flowchart below provides an outline of the
steps needed in order to complete the installation. Brief descriptions appear
beside each step. Detailed instructions are provided in the subsequent
pages.
You may need to check some
settings or disable some
applications before
proceeding with the
installation.
Connect the telephone
cables, Ethernet cables, and
power adapter.
For ADSL and VDSL
subscribers, use the Quick
Start Web GUI to setup your
PPPoE connection.
The Web User Interface is
primarily available for
ADSL/VDSL subscribers. Fibre
Subscribers need not to
configure their internet
settings since it has already
been pre-configured and
ready to use.
You may see the suggested
network setup for ADSL/VDSL
and Fibre Subscribers.
Remove/Disable
Conflicts
Plan your Network
Ready to Use
Setup the Router
Connect to the
Internet
Web Interface
Use Quick Setup
Page 11
User Manual
Page 11 of 60
Planning Your Network
Before moving ahead to setup your network, it is a good idea to draw out a
network diagram to help identify your network devices and plan out how to
connect these devices.
Separate network diagrams are provided for both ADSL/VDSL and Fibre
subscribers.
For xDSL Subscribers:
Each port in the router can be used for different connections. For example:
Ethernet 1 – Set-top Box
Ethernet 2 – Game Console
Ethernet 3 – Dad’s Computer
Ethernet 4 – Mom’s Computer
DSL/LINE - DSL Microfilter
Page 12
User Manual
Page 12 of 60
For Fibre Subscribers:
Each port in the router can be used for different connections. For example:
Ethernet 1 – Set-top Box
Ethernet 2 – Game Console
Ethernet 3 – Dad’s Computer
Ethernet 4 – Mom’s Computer
Ethernet WAN – ONT
To create a network diagram:
For wireless devices, identify the wireless devices you want to include in
the network and to which frequency band you plan to connect each.
For wired devices, identify which router port you want to use for each
device.
Page 13

User Manual
Page 13 of 60
Remove or Disable Conflicts
To ensure that the router installation moves on smoothly, you need to remove
or disable conflicts that may interfere with the installation. Probable conflicts
may include:
Internet sharing applications
Proxy software
Security software
TCP/IP settings
Internet properties
Temporary Internet files
Internet Sharing, Proxy, and Security Applications
Internet sharing, proxy software, and firewall applications may interfere with
the router installation. These should be removed or disabled before starting
the installation.
If you have any of the following or similar applications installed on your
computer, remove or disable them according to the manufacturer’s
instructions.
Internet Sharing
Applications
Proxy Software
Security Software
Microsoft Internet Sharing
WinGate
Symantec
WinProxy
Zone Alarm
Page 14

User Manual
Page 14 of 60
Configuring TCP/IP Settings
Check if your computer uses the default TCP/IP settings.
To check the TCP/IP properties:
1. Select Start > Run. The Run dialog box would appear.
2. Enter control ncpa.cpl on the input box, and then click the OK button.
This would open the Network Connections window in your computer.
3. Right-click LAN and then select Properties. The Local Area Connection
Properties dialog box would appear.
4. Select Internet Protocol (TCP/IP) and then click Properties. The Internet
Protocol (TCP/IP) dialog box would appear.
5. Select Obtain an IP address automatically.
6. Click the OK button to close the Internet Protocol (TCP/IP) dialog box.
7. Click the OK button to close the Local Area Connection Properties
dialog box.
Configuring Internet Properties
To set the Internet Properties:
1. Select Start > Run. This opens the Run dialog box.
2. Enter control inetcpl.cpl and then click OK to open the Internet
Properties window.
3. Click on the Connections tab.
4. In the Dial-up and Virtual Private Network settings pane, select Never
dial a connection.
5. Click OK to close Internet Properties.
Page 15

User Manual
Page 15 of 60
Removing Temporary Internet Files
Temporary Internet files are files from Web sites that are stored in your
computer. Delete these files to clean the cache and remove footprints left by
the Web pages you visited.
To remove temporary Internet files:
1. Select Start > Run to open the Run dialog box.
2. Enter control and then click the OK button to open the Control Panel.
3. Double-click on Internet Options.
4. On the Internet Options window, in the Temporary Internet Files pane,
click Delete Cookies.
5. Click Delete Files.
6. Click OK to close Internet Properties.
Page 16

User Manual
Page 16 of 60
Setup the Device
When installing the router, find an area where there are enough electrical
outlets for the router, the main computer, and your other computer devices.
NOTE: Different setup procedures are provided for both ADSL/VDSL and Fibre
subscribers.
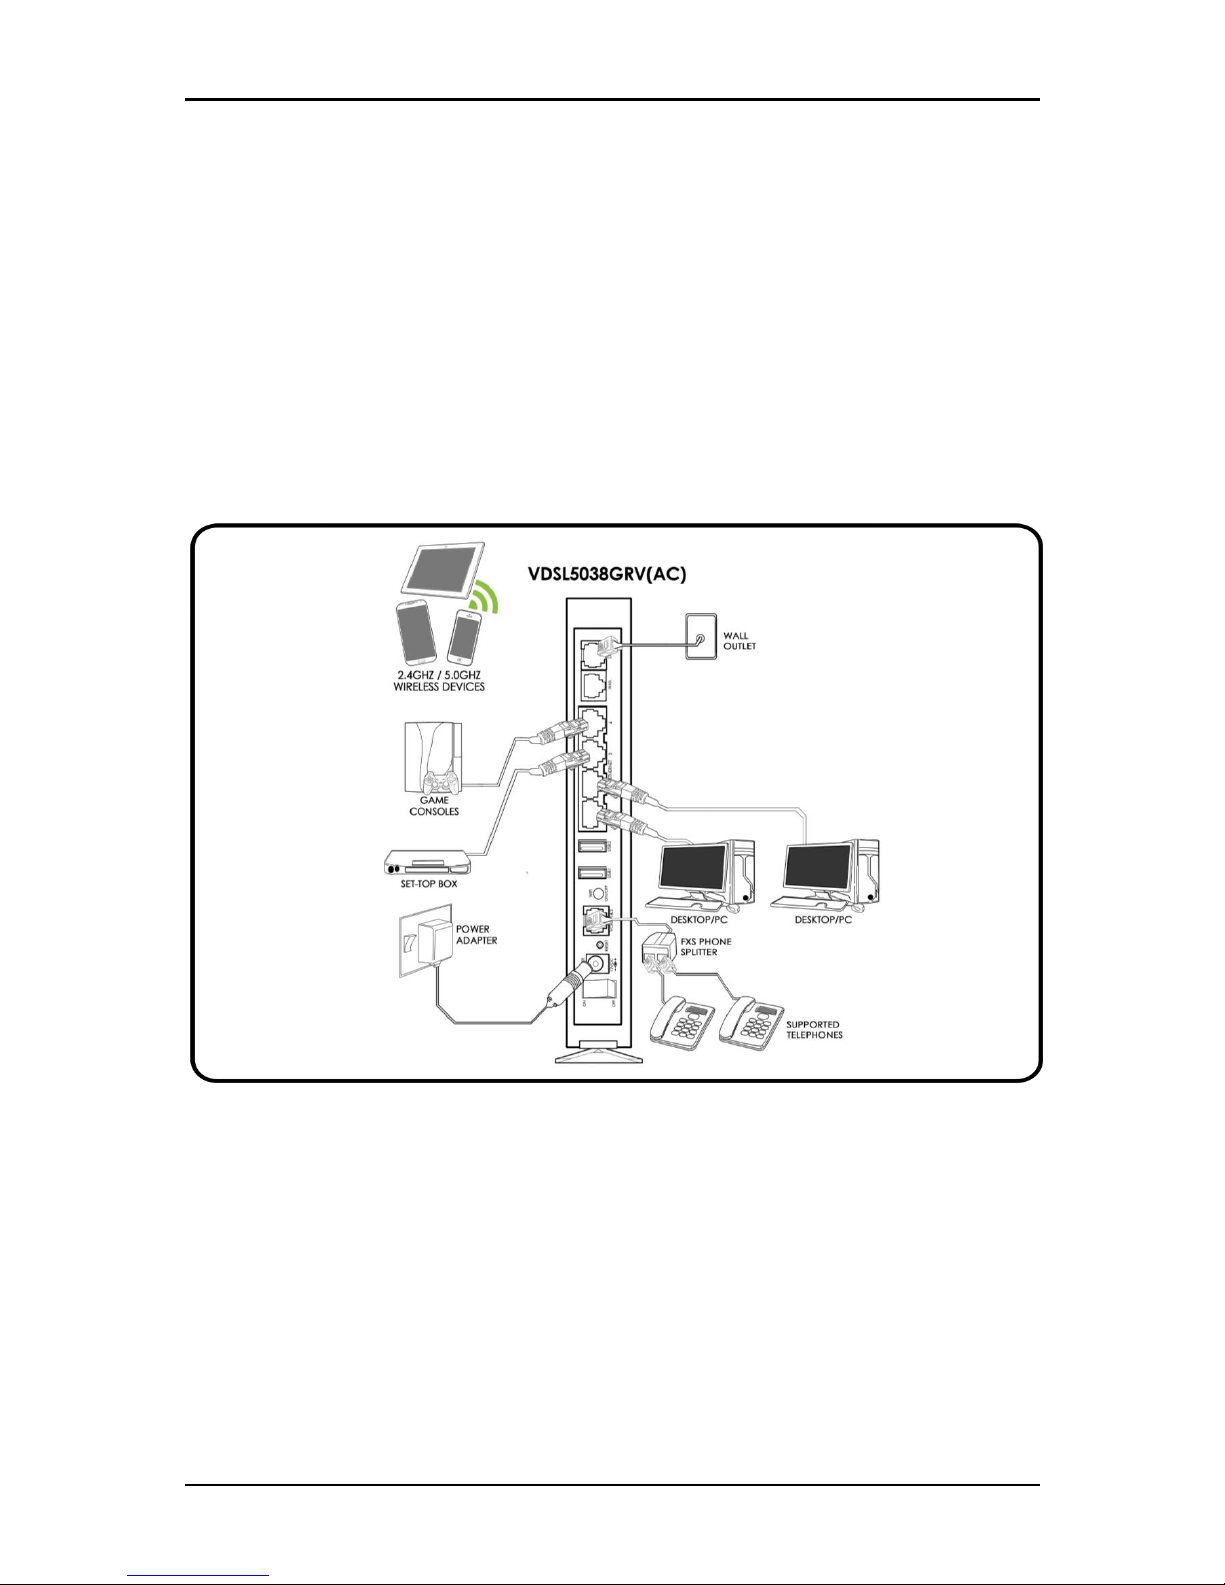
For ADSL/VDSL Subscribers:
For ADSL/VDSL subscribers, please follow the instructions below in setting up
your device:
1. Plug one end of the Ethernet cable from the router’s Ethernet port and
then plug the other end into the Ethernet port of your computer.
2
1
3 5 4
Page 17

User Manual
Page 17 of 60
2. If you have another device that you need to connect into the router,
use another Ethernet cable. Plug one end of an Ethernet cable from
the computer’s Ethernet port and then plug the other end into an
available Ethernet port in the router.
3. Using the telephone cable provided in the package, connect the DSL
port to an available phone jack in your house.
4. Connect the FXS Phone Splitter to your router’s Voice port. You may
connect two supported Phones on the P1 and P2 ports of your FXS
Phone Splitter.
5. Connect the power adapter from the router’s 12V 2.0A DC port into
the power outlet.
Page 18
User Manual
Page 18 of 60
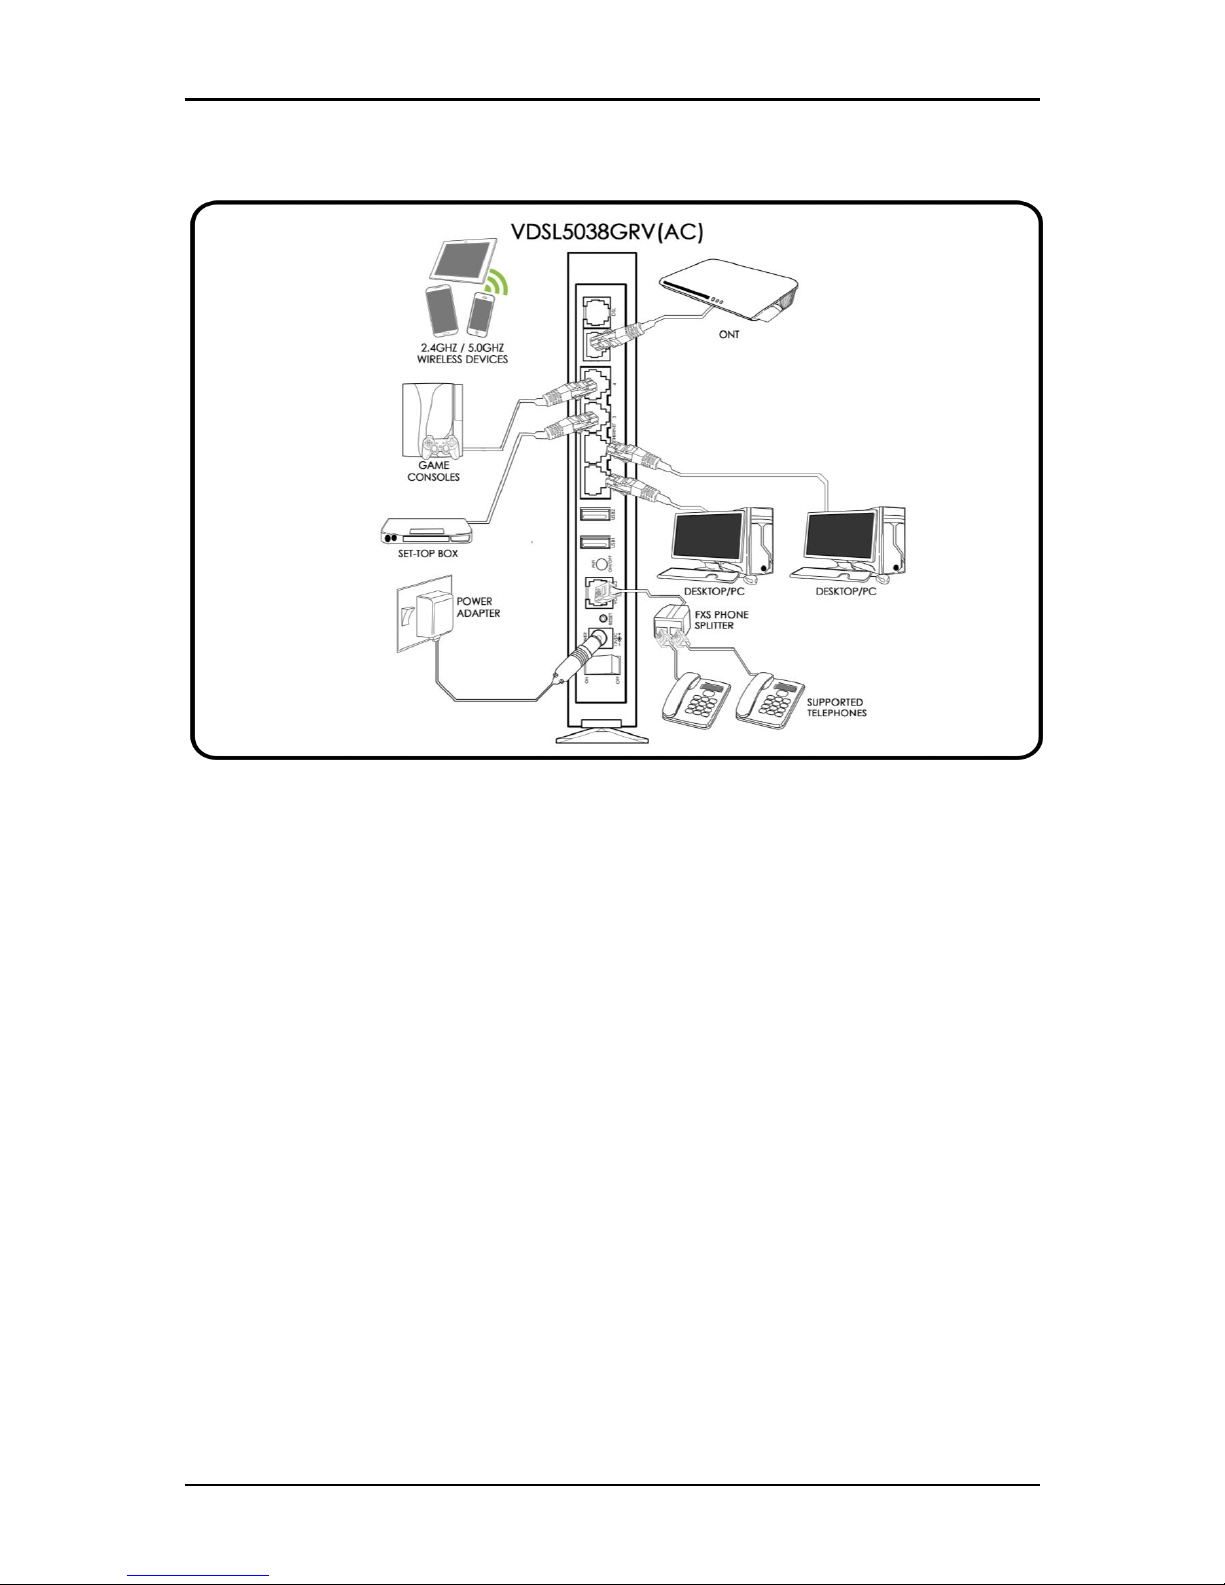
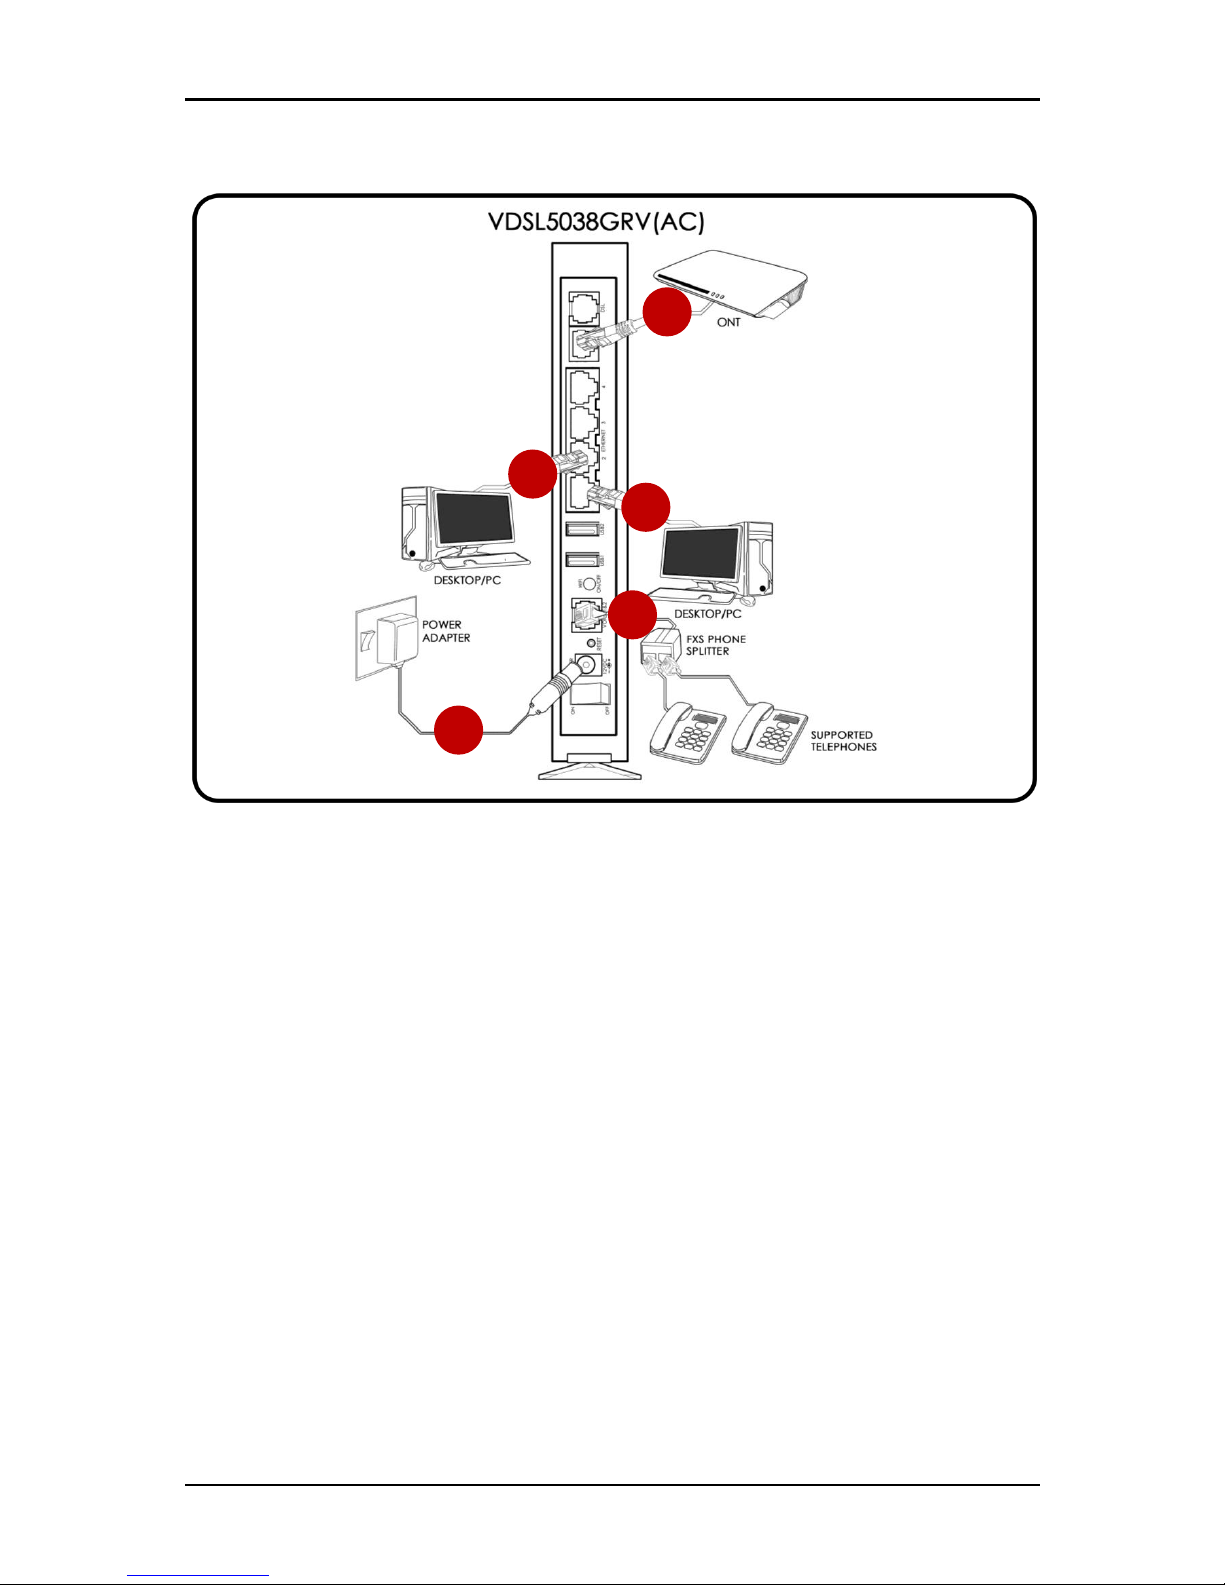
For Fibre Subscribers:
For Fibre subscribers, please follow the instructions below:
1. Plug one end of the Ethernet cable from the router’s Ethernet port and
then plug the other end into the Ethernet port of your computer.
2. If you have another device that you need to connect into the router,
use another Ethernet cable. Plug one end of an Ethernet cable from
the computer’s Ethernet port and then plug the other end into an
available Ethernet port in the router.
3. Using another Ethernet cable, plug one end of an Ethernet cable to
the WAN port of your router, and then plug the other end to the
available Ethernet port of your ONT.
4. Connect the FXS Phone Splitter to your router’s Voice port. You may
connect two (2) supported phones to the FXS Phone Splitter.
5. Connect the power adapter from the router’s 12V 2.0A DC port into
the power outlet.
1
2 3 5
4
Page 19

User Manual
Page 19 of 60
Connecting to the Internet
You can use the Web Interface to setup your Internet connection.
Connecting Via Quick Setup
For ADSL/VDSL subscribers, you can use the steps provided in the subsequent
pages to quickly setup your Internet connection.
NOTE: For Fibre subscribers, internet configuration is not necessary to
connect to the internet. Internet configuration settings are already pre-
configured and are ready to use.
There are two ways in connecting via Quick Setup:
Connecting to the Internet via the User mode GUI
Connecting to the Internet via the Web Interface Setup Wizard
Page 20

User Manual
Page 20 of 60
To connect to the Internet via the User mode GUI:
1. Launch any web browser (e.g. Internet Explorer, Google Chrome).
2. On the address bar type 192.168.1.1 and press enter to access the Web
User Interface.
3. Enter admin as its username and password. You will then be redirected
to the web user interface of your VDSL5038GRV(AC).
NOTE: admin is the default username and password of your
VDSL5038GRV(AC)’s web user interface.
4. You can setup your internet connection in two (2) ways:
Page 21

User Manual
Page 21 of 60
A. Through the Wizard menu
a) On the Web User Interface, click Wizard.
b) On the next page, click Next to continue.
c) On the Language and Time Zone section, select a Time Zone on
the Time Zone drop down list and select an NTP Server or enter
the preferred Custom NTP Server then click Next.
d) On the WAN Connection section, enter correctly the Connection
Type, the User Name and Password, and the VPI/VCI values
provided to you by your Internet Service Provider (ISP) then click
Next.
Page 22

User Manual
Page 22 of 60
e) On the Wireless Setup section, you may enable or disable any or
all frequency bands, change the SSID (Wireless Network Name)
and Passphrase (Wireless Password) of each frequency band,
and determine the Country you are in. Click Next to proceed.
f) On the Summary section, verify if the entered details are correct.
Click Apply to finalize the Wizard process.
g) You may now start surfing the Internet.
Page 23

User Manual
Page 23 of 60
B. Through the QuickStart menu
a) On the Web User Interface, click Quick Start.
b) Choose the Connection Type, and enter the Username and
Password provided by your Internet Service Provider (ISP).
c) You may disable/enable the Wireless and its broadcast, change
your wireless’ SSID (wireless network name), enable/disable the
WPA/WPA2 and change the passphrase (wireless password) of
both the 2.4GHz and 5.0GHz frequency bands in this area.
d) Click Apply to apply changes.
e) You may now surf the internet.
Page 24

User Manual
Page 24 of 60
About the Web User Interface
The Web User Interface is used to configure both the basic and advanced
router settings of your VDSL5038GRV(AC).
Accessing the Web User Interface
To access your VDSL5038GRV(AC)’s Web User Interface:
1. Launch any web browser (e.g. Internet Explorer, Google Chrome).
2. Type-in 192.168.1.1 on the address bar and then press Enter. You will be
redirected to the login page of your VDSL5038GRV(AC)’s web user
interface.
3. On the Login page, type in admin as its username and password. You
will be redirected to your VDSL5038GRV(AC)’s Web User Interface’s
Home page.
Page 25

User Manual
Page 25 of 60
Web User Interface Modes
The Web User Interface is subdivided into two (2) different modes:
Basic Mode
Advanced Mode
Switching Modes
To switch modes, simply click the Advanced Mode / Basic Mode button
located on the upper left corner of the VDSL5038GRV(AC)’s Web User
Interface as seen below.
When in Basic Mode:
When inAdvanced Mode:
Rebooting and Logging Out
Upon logging in to the VDSL5038GRV(AC)’s web user interface, you are also
given an option to reboot the device, or logout of the web user interface.
Reboot is similar to restart and would be useful in instances wherein a device
restart is essential for the configured settings to take effect. Logout on the
other hand allows you to logout the current account you used to login.
Page 26

User Manual
Page 26 of 60
Basic Mode
The Basic Mode displays your router information and its current configuration.
It allows you to quickly configure router settings to have access to the
Internet, and also includes a setup wizard that easily guides users to setup
their device in a procedural manner.
Menus
The Basic Mode Web User Interface includes the following menus:
Home
Wizard
Quick Setup
Page 27

User Manual
Page 27 of 60
Home
The Home page of the web user interface displays a summary of the overall
information or statuses of your Internet Connection, LAN Connection, Wireless
Connection, 2.4GHz and 5.0GHz wireless clients, Local Network, storage, and
printer. In configuring other router features, you may use this page as a
reference to the other details that you might need.
Internet Connection. This section provides details of your Internet
connection such as the xDSL Line Status, Connection Status,
Connection Type, your router’s WAN IP Address, etc.
LAN Connection. This section provides details of your Local Area
Network connection such as the LAN IP Address, LAN MAC Address,
Page 28

User Manual
Page 28 of 60
LAN Net Mask and DHCP Server status. Do take note that upon
disabling the wireless connection
Wireless Connection. This section provides an overview of the Wireless
Connection information of both 2.4GHz and 5.0GHz frequency bands.
Details such as each band’s wireless SSID, Broadcast SSID, Wireless
mode, WLAN MAC Address and Security can be found in this area for
quick viewing.
Local Network. This section provides the details of the directly
connected local clients to your router such as the hostname, IP
Address, MAC address, and the lease expiry time provided for the
device.
Storage. This section provides the details of any external USB storage
devices connected to the VDSL5038GRV(AC).
Printer. This section shows the connected and or detected printers in
the network.
Wizard
The Wizard page of the web user interface is a quick procedural method of
setting up your device. Steps such as setting the Language and Time Zone,
configuring the connection type, and configuring both the 2.4GHz and
5.0GHz Wireless settings are provided in this area.
Page 29

User Manual
Page 29 of 60
Quick Start
The Quick Start page of the web user interface allows users to configure their
Language and Time Zone settings, the WAN connection, and the Wireless
settings.
A. WAN Connection. This section of the Quicksetup allows you to
configure your WAN connection settings to have internet access.
NOTE: Most of the fields in this area require you to refer to the Internet
connection details provided to you by your Internet Service Provider
(ISP) to complete this area.
B. Wireless 2.4GHz / 5.0GHz. Allows you to configure both of your
VDSL5038GRV(AC)’s 2.4GHz and 5.0GHz Wireless Settings.
Page 30

User Manual
Page 30 of 60
WLAN Enabled. Enable or disable the wireless connection of the
device. Once the Wireless connection is disabled, you would not be
able to connect to your device wirelessly.
Broadcast SSID. Broadcasts or Hides the Wireless SSID. Do take note
that upon disabling the SSID broadcast, you would have to
manually input the connection details (e.g. SSID, Encryption mode,
and Password) before you can connect wirelessly to your router.
SSID. Allows you to change the default wireless network name set
on your router. The default SSID can be seen on the sticker
underneath your router.
WPA/WPA2 Enabled. Allows you to enable or disable the password
of your wireless network. By enabling this encryption, you would be
able to change the default wireless password set on your router.
Passphrase. The wireless password of your network. This field can
only be accessed if the WPA/WPA2 checkbox is enabled.
Page 31

User Manual
Page 31 of 60
Advanced Mode
The Advanced Mode page can be accessed from the Basic page by
clicking on the Advanced Mode button located at the upper left corner of
your screen. Other router features may easily be accessed and configured in
this mode.
The Advanced Mode contains the following menus:
Network
Wireless
Application
System
VoIP
Status
Page 32

User Manual
Page 32 of 60
Network
The Advanced Mode – Network page allows you to change the default
configuration of the modem. The Advanced Mode - Network page is also the
default page of the Advanced Mode.
The Network page contains the following sub menus:
Internet
LAN
DHCP Reservation
Ethernet Media Type
xDSL
SNMP
TR069
IPv6RD
Page 33

User Manual
Page 33 of 60
A. Network. Allows you to change the WAN Transfer Mode, the ATM VC
settings, the IP version implemented in the network and its options, the
QoS properties, the encapsulation mode, activate and enter the range
of VLANs to be used, enable/disable default route, and enter your
account details.
WAN Transfer Mode. Allows you to change the current transfer
mode implemented in your network.
ATM VC. Allows you to modify the router’s ATM VC Internet
connection settings. Please refer to the Internet Connection details
given by your ISP before configuring this area. Click Apply for the
settings to take effect.
QoS. Allows you to set/configure the Quality of Service parameters
of your router. Click Add for the settings to take effect.
IPv4/IPv6. Allows you to change the current IP version
implemented in your network.
Encapsulation. Allows you to change the current encapsulation
you would be using for your internet connection. You may have to
Page 34

User Manual
Page 34 of 60
refer to the internet connection details provided to you by your
Internet Service Provider (ISP).
Connection Setting. Allows you to set the connection method of
your internet connection. This is highly suggested to be set on
Always On. You may also configure the TCP MSS Option in this
area.
IP Common Option. Allows you to enable or disable the default
route feature.
IPv4 Options. Allows you to enable Network Address Translation,
specify the dynamic route method to be used, and enable or
disable IGMP proxy.
IPv6 Address. Allows you to configure the DHCP IPv6 Mode used,
DHCP PD mode, and the MLD Proxy.
Page 35

User Manual
Page 35 of 60
B. LAN. Allows you to change the LAN Properties of your network, such as
the Router’s local IP, the DHCP properties, the DNS properties, enabling
of Radvd and its properties, and the configuration of the DHCPv6
properties. The LAN page also allows you to view the DHCP client list
table.
Router Local IP. Allows you to change the IP properties used by
your router. Do take note that by changing the IP address of your
VDSL5038GRV(AC), the default IP address previously entered in the
address bar to access the Web User Interface (e.g. 192.168.1.1)
would also be changed.
DHCP. Allows you to enable/disable/relay the DHCP feature of
your router. The range of IP addresses, the pool count it would use,
and the physical ports where DHCP would be applied can also be
configured in this area.
Page 36

User Manual
Page 36 of 60
DNS. Allows you to enable/disable the DNS property of your router,
and specify the Primary and Secondary DNS it would use.
DHCP Client List. Displays the number of devices currently
connected to your VDSL5038GRV(AC) and each of the
connected device’s IP Address, MAC Address, and lease expiry
time.
IPv6 Address. Allows you determine the IPv6 address that would
apply to your network, including its subnet.
Radvd. Allows you to enable/disable router advertisements in the
network including its properties such as its mode and flags set.
DHCPv6. Allows you to enable/disable the DHCP properties of the
IPv6 network, and to configure automatically/manually the IP
addresses provided.
Page 37

User Manual
Page 37 of 60
C. DHCP Reservation. Allows you to reserve IP addresses from the IP range
provided dynamically by entering the IP address of the device and
registering the device’s corresponding MAC Address.
D. Ethernet Media Type. Allows you to control the bandwidth provided in
each Ethernet port of your VDSL5038GRV(AC).
E. xDSL Mode. Allows you to determine the DSL mode and the ADSL type
used by your router.
F. SNMP. Allows you to enable/disable both SNMP/SNMPv3 including the
properties of each corresponding protocol.
Page 38

User Manual
Page 38 of 60
G. CWMP. Allows you to activate/deactivate TR069 and enter the properties
needed such as its URL, and the corresponding usernames and
passwords.
H. IPv6RD. Allows you to enter the IPv6 prefix and its subnet mask, specify
and IPv4 address to be used and its mask length, and indicate a 6RD
border relay IPv4 address.
Page 39

User Manual
Page 39 of 60
Wireless
The Advanced – Wireless page allows you to change the default
configuration settings of your Wireless LAN connection on the router. The
Advanced – Wireless page contains the following sub menus:
Basic
Security
MAC Filter
A. Basic. Allows you to change the default Wireless Name (SSID) set on the
device, Hide or Broadcast the Wireless Name and change other
advanced wireless configurations of both the 2.4GHz and 5.0GHz
frequency bands. Click Apply for the settings to take effect.
Wireless Band. Allows you to select the wireless band that you
want to configure.
Page 40

User Manual
Page 40 of 60
Access Point Settings. Allows you to enable the AP properties of
your VDSL5038GRV(AC), change its channel and beacon
interval, specify a range for the RTS/CTS/Fragmentation threshold
and DTIM, determine the number of clients that would be able to
connect, and change the wireless mode implemented by the
router on the wireless network.
Mode Settings. Content varies to the current mode implemented
by the router (in this case, since the mode 802.11b+g+n is
implemented, 11n Settings is shown).
SSID Settings. Allows you to define an SSID for each SSID index,
and also allows you to enable or disable the SSID broadcast.
Page 41

User Manual
Page 41 of 60
B. Security. Allows you to change the default Wireless Security of each
frequency band set on the router (e.g. its authentication type, passphrase,
etc). This page also allows you to enable/disable and change the
properties of the WPS feature. Click Apply for the settings to take effect.
C. MAC Filter. Allows you to control which wireless clients to Allow or Deny
access to the router by entering the MAC address of the wireless client to
the Access control list. Click Apply for the settings to take effect.
Page 42

User Manual
Page 42 of 60
Wireless
The Advanced – Applications page allows you to change/set the router’s
application features.
The Advanced – Applications page contains the following sub menus:
DDNS
ACL
Filter
Routing
NAT
QoS
Port Mapping
Parental
Firewall
A. DDNS. Allows you to set a static host name with a Dynamic IP address.
Page 43

User Manual
Page 43 of 60
B. ACS. Allows you to allow/limit applications from accessing the WAN or
LAN interfaces.
C. Filter Type. Allows you to apply various kinds of filtering which would
allow or deny the IP address specified, access, depending on the filter
rules set. By default, the filter type is set to IP/MAC Filter.
IP/MAC Filter. Allows you to allow/deny access to specific
source/destination/MAC addresses and or interfaces specified. It is
also allows you to determine your preferred DSCP range and the
protocol to be implemented.
Page 44

User Manual
Page 44 of 60
Application Filter. Allows you to activate/deactivate the application
filter and allow/deny ICQ, MSN, YMSG, and or Real Audio access in
the network.
URL Filter. Allows you to defined URL indexes which upon activating
will allow/deny access to the corresponding URL specified.
D. Routing. Allows you to configure certain routes statically into your
system. This will cause overriding of the default gateway or interface
that would have been taken for reaching a particular destination
host/subnet.
Page 45

User Manual
Page 45 of 60
E. NAT. Allows you to configure the DMZ, Port Forwarding, and Port
Triggering in each interface.
DMZ. Allows you to set a host between a private local network and
a public network. This feature allows outside users from getting
direct access to your local network.
Port Forwarding. Allows you to set a direct incoming traffic from the
Internet to a specific computer in your local network.
Page 46

User Manual
Page 46 of 60
Port Triggering. Allows you to configure the router to allow local
users to temporarily open ports based on trigger ports.
F. QoS. Allows you to set/configure the Quality of Service parameters of
your router. Click Add for the settings to take effect.
Page 47

User Manual
Page 47 of 60
G. Port Mapping. Allows ATM PVCs to be permanently routed to a physical
interface on the device.
H. Parental Control. Allows you to limit (1) MAC Addresses on having
internet access on specific times of day/s within a week, and (2) URLs
on being accessed on specific times of day/s within a week.
I. Firewall. Allows you to enable or disable Firewall and SPI. By default the
said attributes are disabled.
Page 48

User Manual
Page 48 of 60
System
The Advanced – System page allows you to view system information, back-
up and Restore settings, and do Firmware upgrade on the router.
The Advanced – System menu has the following sub menus:
Information
UPnP
Settings
Firmware
Reboot
Password
A. Information. Displays detailed information of the router’s Firmware
version, LAN/WLAN MAC Address and System Uptime.
Page 49

User Manual
Page 49 of 60
B. Time Zone. Allows you to change or synchronize the current time zone
used by your router.
C. UPnP. Allows you to enable/disable UPnP application set on the router.
D. Settings. This section allows you to Save, Restore, and Factory default
reset your router’s configuration.
Back-up. Click Backup button to save romfile.cfg on your computer,
this will serve as your router’s back-up configuration file.
Restore. Click Browse to select romfile.cfg that was saved on your
computer to restore your router to the last saved configuration then
click Restore for the settings to take effect.
Factory Default. Allows you to Restore the router’s factory default.
Click Reset for the settings to take effect.
Page 50

User Manual
Page 50 of 60
E. Firmware. Allows you to change the firmware saved on the router.
F. Password. Allows you to change the password set on the router to
access the Web User Interface.
Page 51

User Manual
Page 51 of 60
VoIP
The Advance – Status page displays various router connection statistics for
ADSL, LAN, and WLAN. This page also has the following sub menus:
Basic
Call Control
Media
Speed Dial
Advanced
Page 52

User Manual
Page 52 of 60
A. Basic. Allows you to configure the basic settings of each SIP Line such
as the line status, its password, display and authentication name, and
other SIP settings.
B. Call Control. Allows you to enable or disable call related functions and
features of each SIP Line such as call forwarding, call transferring, DND
mode, and three way conferencing.
NOTE: You have to activate the status of the VoIP SIP line first before
you can configure its settings. This can be done on the VoIP Basic
menu.
Page 53

User Manual
Page 53 of 60
C. VoIP Media. Allows you to change the audio codec applied to each
SIP line, and change the packet interval time set in each codec.
NOTE: You have to activate the status of the VoIP SIP line first before
you can configure its settings. This can be done on the VoIP Basic
menu.
D. Speed Dial. Allows you to configure and register speed dial indexes
and each index’s corresponding number for future use.
NOTE: You have to activate the status of the VoIP SIP line first before
you can configure its settings. This can be done on the VoIP Basic
menu.
Page 54

User Manual
Page 54 of 60
E. Advanced. Allows you to enable WAN binding, adjust call volumes for
both listening and speaking, define registration and reregistration
expiration times, and change other advanced features of each SIP
line.
Page 55

User Manual
Page 55 of 60
Status
The Status page displays various router connection statistics for xDSL, LAN, and
WLAN. This page also has the following sub menus:
Statistics
xDSL Status
System Log
Diagnostics
Network Tools
A. Statistics. Provides statistical information of LAN, ADSL and WLAN interface.
Page 56

User Manual
Page 56 of 60
B. xDSL Status. Displays detailed information of the xDSL quality.
C. System Log. Displays the router’s system log.
D. Diagnostics. Display the test results for the connectivity of the physical
layer and protocol for xDSL, ATM, WLAN/LAN port and L0041N connection,
click Start test to start the test.
E. Network Tools. Allows you to test the router’s Internet connectivity.
Page 57

User Manual
Page 57 of 60
Router Care Tips
1. Do not deface the router.
2. Do not use any power adapters with the router other than the supplied
adapter as it may damage the device rendering it unusable.
3. Do not let the router get wet, when water gets in contact with the router,
the internal components can corrode which breaks down the router.
4. Install the router on a flat surface and ensure that there is enough space
for air to circulate.
5. Avoid dropping the router, depending on the surface where it lands, the
router can get cracked casing or internal components may get
dislodged affecting its functionality.
6. Clean the router's casing with a soft damp cloth and remove dust that
may cover the router casing's ventilation regularly.
7. Turn off the router and disconnect the power adapter from the power
outlet if it will be unattended for a long time.
Safety Precautions
Do not open, service, or change any component.
Only qualified technical specialists are allowed to service the
equipment.
Observe safety precautions to avoid electric shock
Check voltage before connecting to the power supply. Connecting to
the wrong voltage will damage the equipment.
Page 58

User Manual
Page 58 of 60
FCC Statement
This equipment has been tested and found to comply with the limits for a
Class B digital device, pursuant to part 15 of the FCC Rules. These limits are
designed to provide reasonable protection against harmful interference in a
residential installation. This equipment generates, uses and can radiate radio
frequency energy and, if not installed and used in accordance with the
instructions, may cause harmful interference to radio communications.
However, there is no guarantee that interference will not occur in a particular
installation. If this equipment does cause harmful interference to radio or
television reception, which can be determined by turning the equipment off
and on, the user is encouraged to try to correct the interference by one or
more of the following measures:
Reorient or relocate the receiving antenna.
Increase the separation between the equipment and receiver.
Connect the equipment into an outlet on a circuit different from that to
which the receiver is connected.
Consult the dealer or an experienced radio/TV technician for help.
Page 59

User Manual
Page 59 of 60
FCC Radiation Exposure Statement
This equipment complies with FCC RF radiation exposure limits set forth for an
uncontrolled environment. This transmitter must not be co-located or
operating in conjunction with any other antenna or transmitter. This
equipment should be installed and operated with a minimum distance of 20
centimeters between the radiator and your body.
This device complies with Part 15 of the FCC Rules. Operation is subject to the
following two conditions:
This device may not cause harmful interference and
This device must accept any interference received, including
interference that may cause undesired operation.
CAUTION!
Any changes or modifications not expressly approved by the party
responsible for compliance could void the user's authority to operate the
equipment.
Page 60

User Manual
Page 60 of 60
Copyright © 2015 Aztech Technologies Pte Ltd (CRN:199800635M). All rights reserved.
 Loading...