

Page 1

VC3000
Aztech Smart Robotic Vacuum Cleaner
USER MANUAL
PLEASE RETAIN THIS USER MANUAL FOR FUTURE USE.
Page 2

Page 3

USER MANUAL CONTENTS
SAFETY INSTRUCTIONS 4
PACKAGE CONTENTS 5
APPLIANCE OVERVIEW 5
TOP VIEW 5
BOTTOM VIEW 6
CONTROL PANEL BUTTONS AND DISPLAY 6
REMOTE CONTROL BUTTONS 8
VIRTUAL WALL 9
DOCKING STATION 10
USING THE AZTECH VC3000 10
SETTING THE TIME 12
SETTING THE CURRENT DAY 12
SETTING THE CURRENT TIME 12
SETTING THE CLEANING SCHEDULE 13
SETTING THE DAY SCHEDULE 13
SETTING THE TIME SCHEDULE 13
CARE AND MAINTENANCE 14
REPLACING / INSTALLING THE VC3000’S BATTERY 14
CLEANING THE DUSTBIN COMPARTMENT 14
CLEANING / REPLACING THE ONE FIT ALL CLEANING SYSTEM 15
REMOVING / INSTALLING THE SUCTION INLET 17
TROUBLESHOOTING 18
Page 4

4
SAFETY INSTRUCTIONS
Ensure that the appliance and all of its parts and components are properly
installed, prepared, and deployed.
Before using, check if the power voltage of your Aztech VC3000
corresponds correctly to your home’s power supply.
If the Aztech VC3000 would not be used for a long period, remove the
batteries of the vacuum cleaner and its components and store it in a cool
dry place.
To extend the battery life of the appliance, for its rst use or reuse (after
a long period of rest), charge the vacuum cleaner’s battery for at least
16 hours. The Aztech VC3000’s battery would be able to reach optimal
performance after 2 to 3 times of full charging and discharging.
If not in use, ensure to unplug your appliance’s power adapter.
Do not place the appliance in hot places or in places commonly exposed
to multiple sources of heat such as refrigerators.
Do not use wet hands in operating the appliance and in inserting or
removing its power adapter to prevent electrical shocks. We suggest that
you thoroughly dry your hands rst before utilizing the Aztech VC3000.
Always check if the Docking Station is properly connected to the power
outlet before use.
Switch OFF the vacuum cleaner before doing any cleaning, relocation, or
appliance maintenance.
When unplugging the Docking Station’s power adapter, do not pull or tug
its cord. Hold the power adapter properly on its base when unplugging it
from the power outlet. Also, ensure that the power cord is kept away from
heat and or sharp edges that could cause external damage to the cord.
Do not use the appliance if the power cord is damaged. Always use the
dedicated power cord included in the product package.
This appliance is strictly intended for household (indoor) use only.
Commercial spaces may expose the device to over usage and or other
external factors (e.g. number of people, excessive variety of dirt) which
may cause damage to the appliance.
Should damages be found in the appliance, please do not use the
appliance and immediately bring it to the Aztech Service Center for repair
or replacement.
Do not use the appliance on small and highly elevated spaces (e.g.
Bedside tables, chairs) where its movement is extremely limited. This may
expose the appliance to damages.
The Smart Robotic Vacuum Cleaner is not intended for use by persons
with reduced physical, sensory or mental capabilities, and or lack of
experience or knowledge. Constant supervision should be provided
to these individuals in using, cleaning, operating the appliance or by a
person responsible for their safety.
•
•
•
•
•
•
•
•
•
•
•
•
•
•
•
Page 5
5
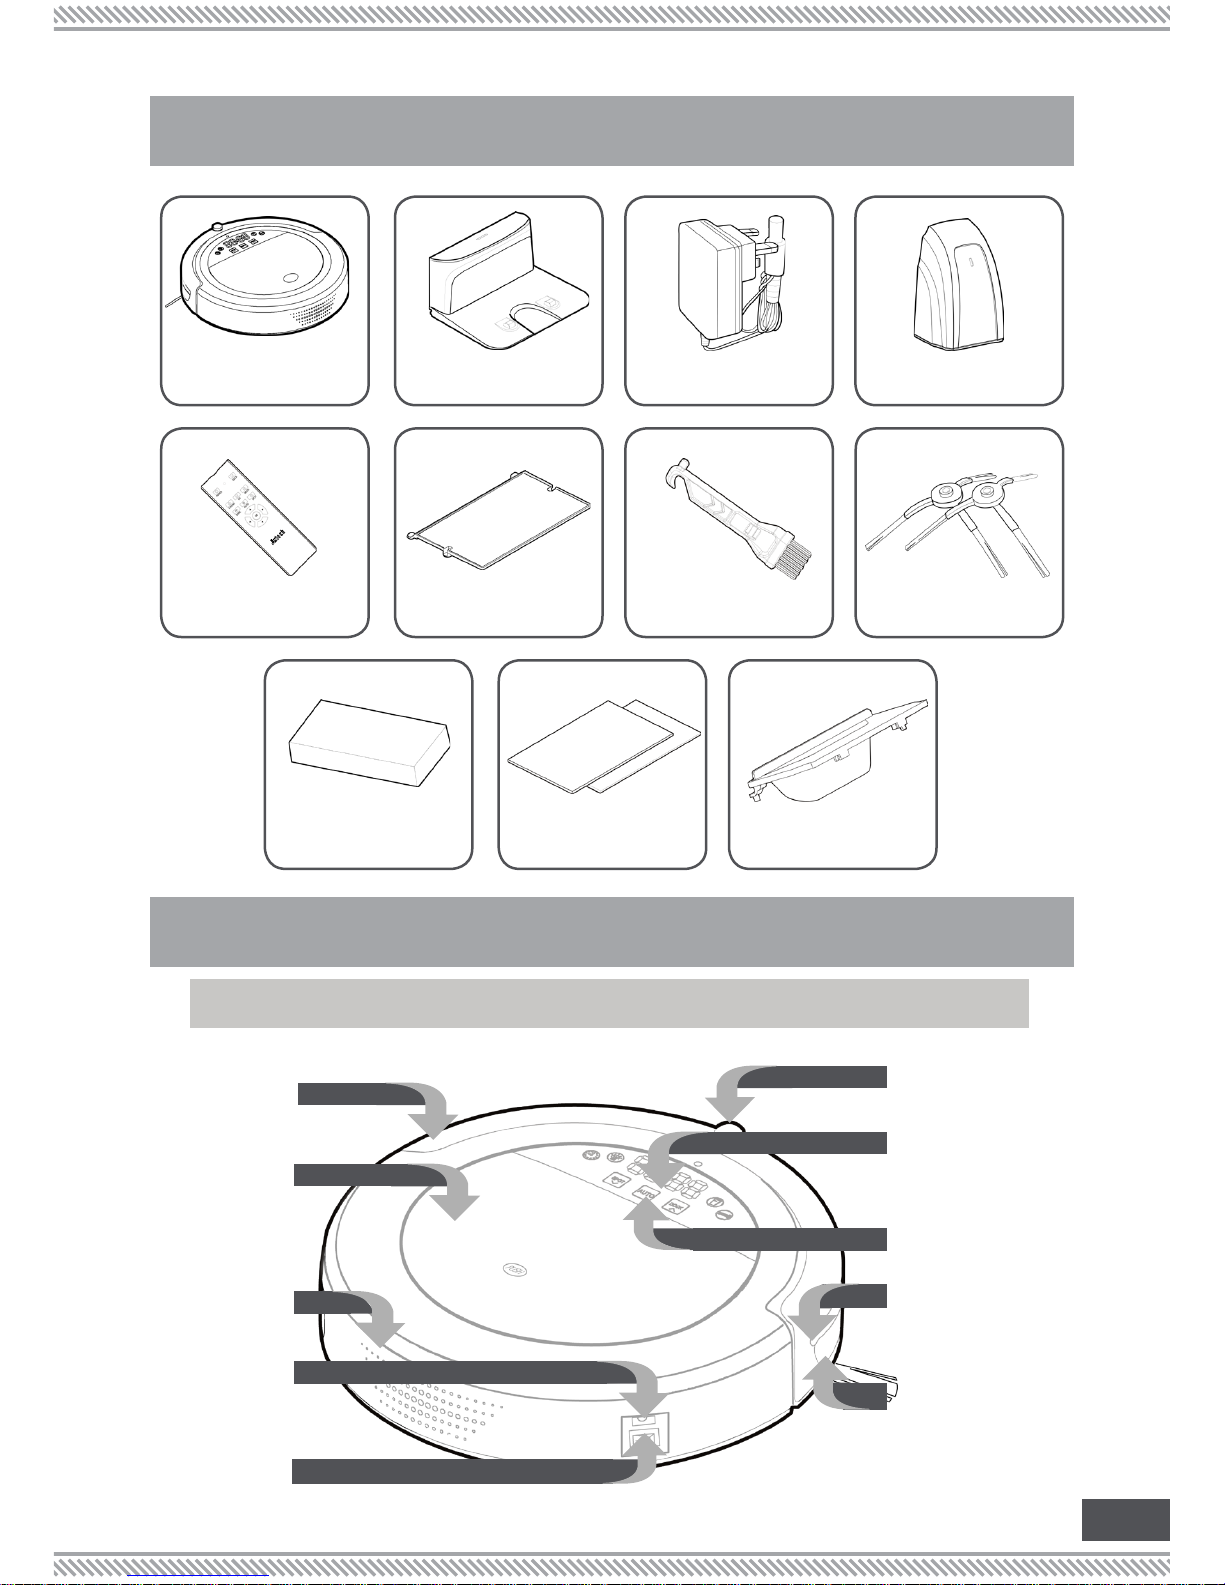
PACKAGE CONTENTS
VC3000 Docking Station Power Adapter Virtual Wall
Trailing Bar Cleaning Brush (2) Side Brush
Suction InletHEPA Filter (2) Mops
Remote Control
APPLIANCE OVERVIEW
Bumper
Dust
Cover
Exhaust
Inlet
Charging
Signal
Receiver
LED Display
Area
Touch
Buttons/
Indicators
Bumper
Bar
Sensor
Window
DC
Charging
Interface
Power
Switch
TOP VIEW
Page 6
6
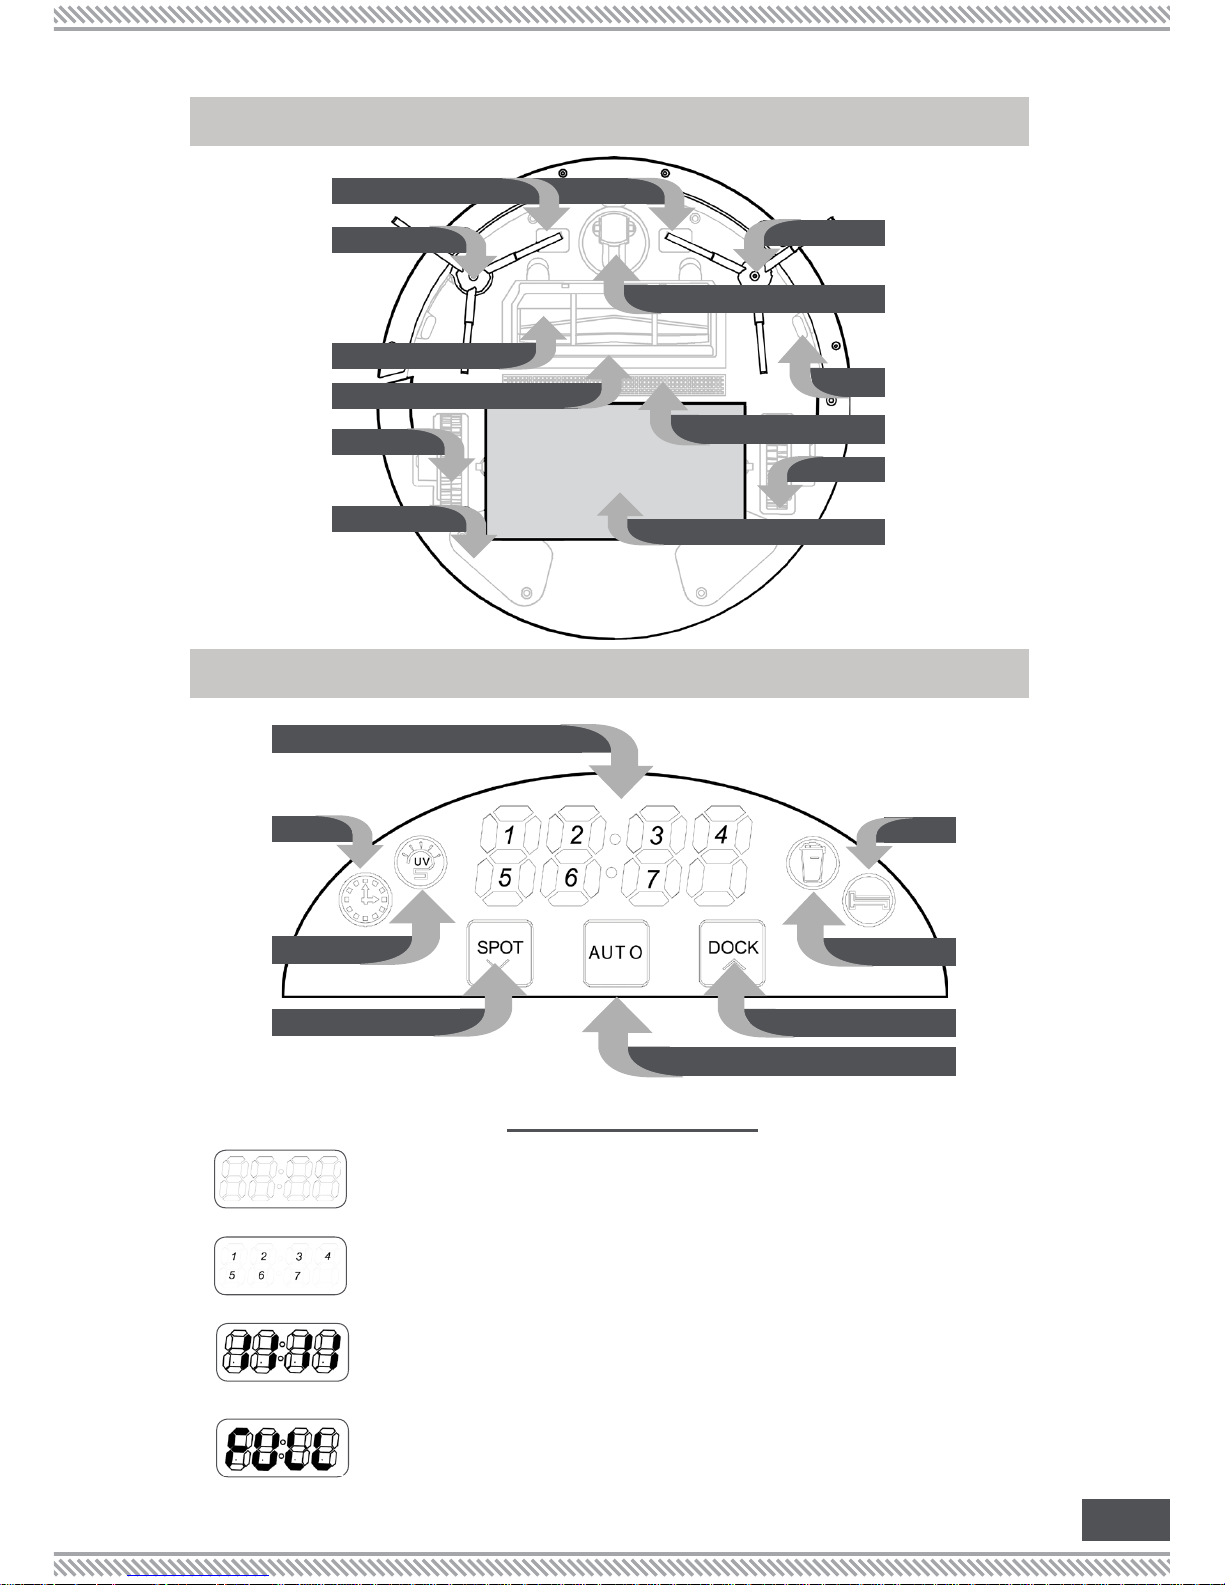
Battery
Compartment
Left Wheel
Lifting
Bracket
Roller Brush
Left Side
Brush
Charging
Electrodes
Lifting
Trailing
Bar
UV Lamp
Cliff Sensor
Universal
Wheel
Right Side
Brush
Right Wheel
Digital
Display
Schedule
Indicator
UV Mode
Indicator
SPOT
Dark
Cleaning
Mode
Indicator
Garbage
Indicator
DOCK
AUTO
Current Time Display. Displays the current time (in 24-
hour format) of the day.
•
CURRENT TIME DISPLAY
DAY DISPLAY
CHARGING
Day Display. Displays the current Day set on the device
(e.g. 1 stands for Monday, 2 stands for Tuesday)
•
Charging Status Display.
Displays (1) a series of 1s to indicate that the
appliance is currently charging, and
Displays (2) FULL to indicate that the appliance has
already nished charging.
•
»
»
FULLY CHARGED
DIGITAL DISPLAY
BOTTOM VIEW
CONTROL PANEL BUTTONS AND DISPLAY
Page 7

7
AUTO. Press this button and the vacuum cleaner will start
automatic cleaning. During this mode, once the vacuum
cleaner’s battery becomes low, the vacuum cleaner will
automatically return to its Docking Station.
•
SPOT.
Press this button and the vacuum cleaner will enter
SPOT cleaning mode. During this mode, the vacuum
cleaner enters a 1m2 range and will start cleaning this
area in an expanding spiral mode for 2 to 3 minutes.
•
NOTE: Touch any button on the vacuum cleaner’s control
panel to stop its cleaning operation.
Error Code Display. Displays different error codes
(provided in the TROUBLESHOOTING section of this
user manual) which corresponds to the current error(s)
encountered by the appliance.
•
ERROR DISPLAY
SCHEDULE INDICATOR. Indicates that you can now enter
the preferred cleaning schedule(s) using the Remote
Control. This LED automatically turns ON upon pressing
the button on the Remote Control.
•
UV MODE INDICATOR. Indicates that the vacuum cleaner’s
UV lamp is currently ENABLED or DISABLED By default, the
UV lamp feature is enabled, and the UV icon is ON.
•
GARBAGE INDICATOR.
Turns ON to indicate any of the
following:
The suction inlet of the vacuum cleaner is blocked by
dust
The dustbin has reached full capacity
The dirt sensor is covered by dust
•
»
»
»
DARK CLEANING MODE INDICATOR.
Indicates that the
vacuum cleaner has entered Dark Cleaning mode. This
LED automatically turns ON upon pressing the button
on the Remote Control.
•
DOCK. Press this button and the vacuum cleaner will
automatically locate its Docking Station to charge.
•
CLEANING MODE INDICATORS
VACUUM CLEANER BUTTONS
Page 8
8
Correctly insert two (2) AAA batteries in the
Remote Control’s battery compartment
while observing the correct polarity.
•
In using the Remote Control, ensure that
you are 4 meters near the vacuum cleaner
and that the Remote Control is properly
aimed at the vacuum cleaner’s sensor.
•
NOTE: Incorrect battery installation may
damage the Remote Control and or cause
unexpected operation failures.
**OBSERVE POLARITY
4 METERS
** Aim the Remote Control at
the vacuum cleaner’s sensor
TIPS IN USING THE REMOTE CONTROL
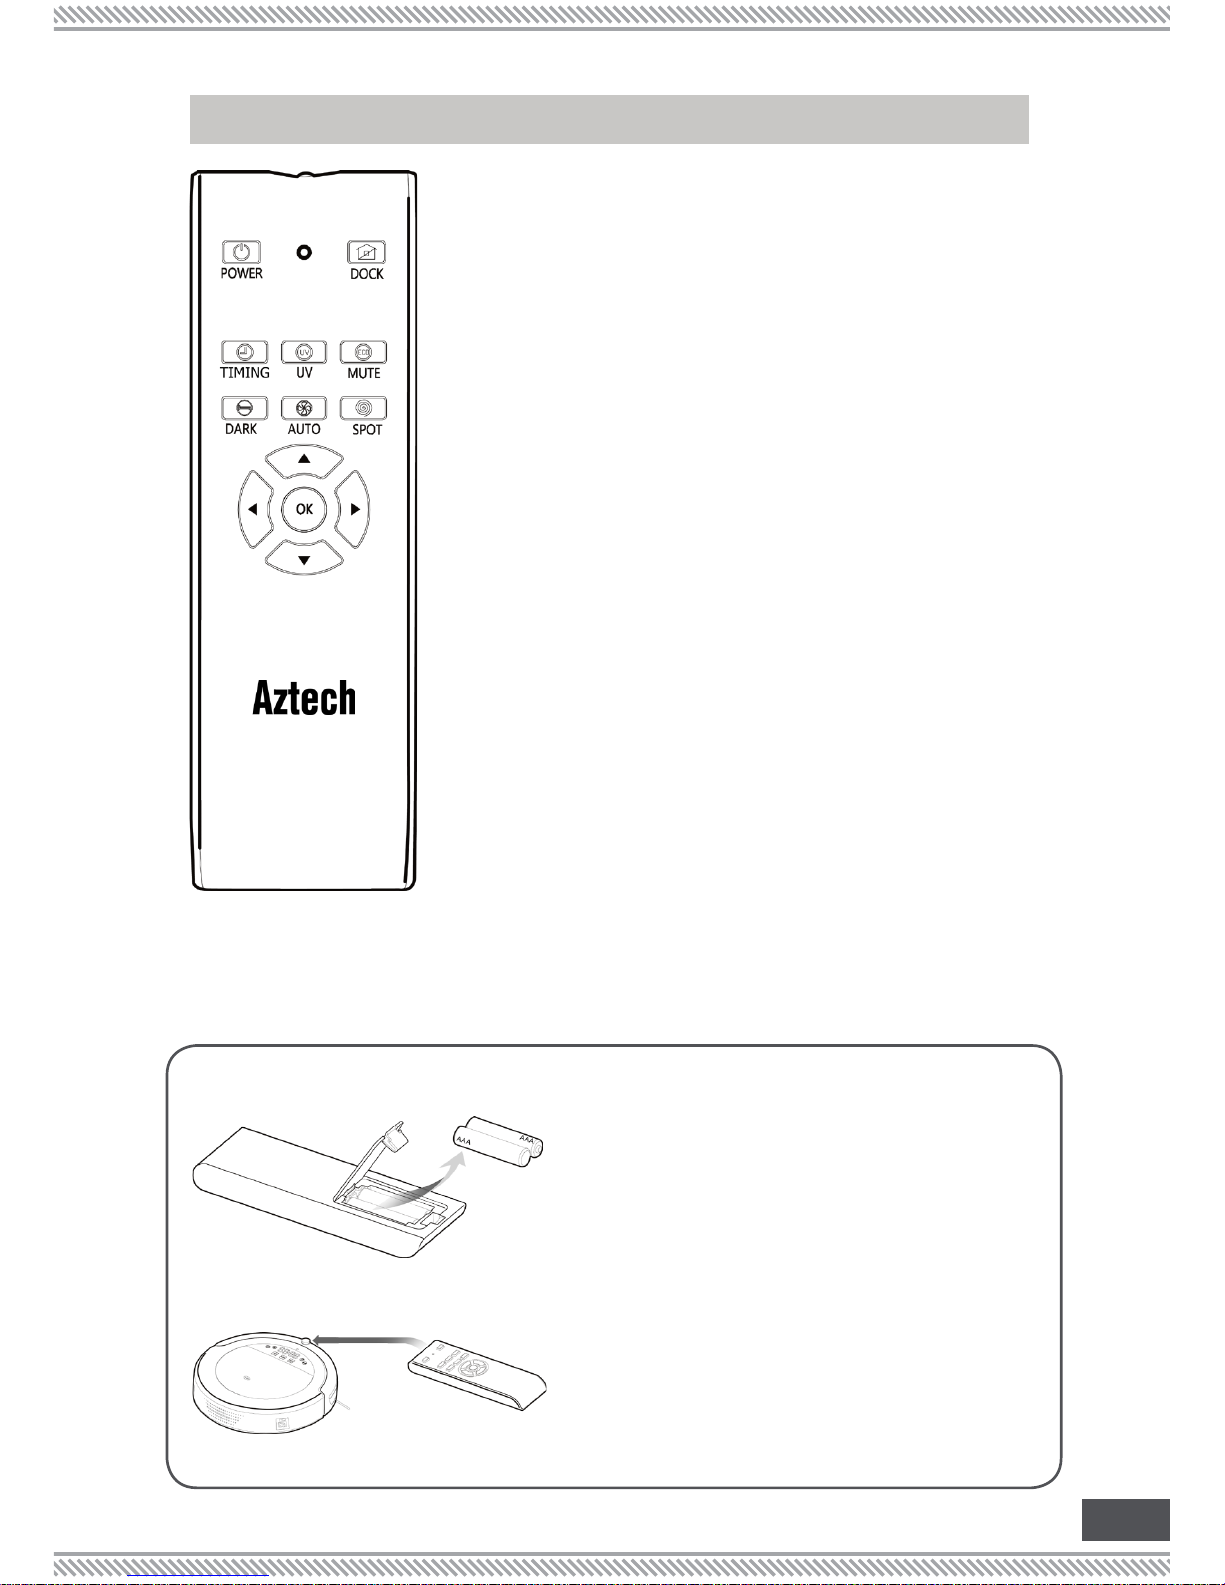
DOCK. Press this button and the vacuum cleaner
will automatically proceed to its Docking Station
to charge.
•
UV. Press this button and the vacuum cleaner will
turn the UV lamp ON or OFF.
•
MUTE
. Press this button and the vacuum cleaner
will enter mute cleaning mode.
•
SPOT.
Press this button and the cleaner will enter
spiral cleaning mode.
•
POWER
. Press this button and the cleaner will enter
sleep mode.
•
TIME.
Press this button to enter time/schedule
cleaning mode.
•
NOTE: Press and hold this button for ten (10)
seconds to wake up the vacuum cleaner.
DARK.
Press this button and the vacuum cleaner
will enter dark area cleaning mode.
•
AUTO.
Press this button and the vacuum cleaner
will enter automatic cleaning mode.
•
Arrow Buttons. Press any of these buttons and the
cleaner will correspond to the direction of the
button pressed.
•
OK. Press this button to conrm entered settings.
You may also press this button to enter blocker
following cleaning mode.
•
REMOTE CONTROL BUTTONS
Page 9

9
Correctly insert two (2) AA batteries in the
Virtual Wall’s battery compartment as
indicated on the image below.
•
Both Side and Front IR Window’s control range
is up to 4 meters. The distance, however, is
affected by the environment and current
battery power.
•
NOTE: Incorrect battery installation may
damage the Virtual Wall and or cause
unexpected operation failures.
The Virtual Wall is highly suggested to be
placed in doorways and or before stairs to
limit the vacuum cleaner’s movement.
•
TIPS IN USING THE VIRTUAL WALL
**OBSERVE
CORRECT BATTERY
POLARITY
Always make sure that the Front and Side IR Windows are free from any blockage
and or obstructions that may hinder its functionality.
The Virtual Wall should at least be 50cm away from the vacuum cleaner’s
Docking Station to avoid any interference.
•
•
(3)
Front &
Side IR
(0)
Power
(1)
Front IR
(2)
Side IR
Side
Switch
Side
Indicator
Side IR
Window
Front IR
Window
Front
Indicator
SIDE SWITCH IS ON POSITION
(0). The Virtual Wall is switched
OFF.
•
SIDE SWITCH IS ON POSITION
(1). Only the Virtual wall’s Front
IR Window would be ON.
•
SIDE SWITCH IS ON POSITION
(2). Only the Virtual wall’s Side
IR Window would be ON.
•
SIDE SWITCH IS ON POSITION (3).
Both Front and Side IR Windows
would be ON
•
NOTE:
Battery duration would
largely depend on how long it
will be used and the number of
IR windows enabled. ENSURE to
turn OFF the Virtual Wall when
not in use.
VIRTUAL WALL
Page 10

10
In charging the Aztech VC3000, ensure to
switch it ON rst before placing it correctly
to its Docking Station.
•
Ensure that there are no obstacles and or
uneven surfaces 2 meters in front of the and
0.5 meters on both sides of the Docking
Station.
•
TIPS IN USING THE DOCKING STATION
Ensure that the IR emission window is free of
any blockage. This may hinder the vacuum
cleaner in locating the Docking Station
whenever charging automatically
•
Always keep the Docking Station’s power
cord neatly arranged. You may use the
allotted wire storage located behind the
Docking Station to arrange it accordingly.
•
USING THE AZTECH VC3000
TIPS BEFORE USING YOUR VACUUM CLEANER
Before use, ensure that the appliance and all of its parts and components are
properly installed (and deployed).
Before using, check if the power voltage of your vacuum cleaner corresponds
to your home’s power supply.
To hasten its cleaning procedure, remove any object which may hinder your
vacuum cleaner’s cleaning operation (e.g. Glass bottles, fabrics, wiring).
•
•
•
DOCKING STATION
Page 11

11
STEP 1
Position the Docking Station on a smooth and
stable ground and plug the Docking Station’s
power adapter to its power outlet. You may
then switch ON the Aztech VC3000 and lodge
it into the Docking Station to begin charging the
vacuum cleaner.
Ensure to do the following:
For rst use/reuse (after a long period of rest),
charge the vacuum cleaner’s battery for at
least 16 hours. Do take note that you have to
SWITCH ON the Aztech VC3000 for it to start
charging.
Keep the Docking Station’s wiring tidily kept
and arranged in its wiring compartment
found on its back.
Both the Docking Station’s front (2 meters)
and sides (0.5 meters) should be free from
obstacles and or blockages which may
hinder the vacuum cleaner in locating and or
lodging into the Docking Station.
•
•
•
STEP 2
Correctly insert the needed batteries of the
Remote Control (2 x AAA) and the Virtual Wall
(2 x AA) and position the Virtual Wall on the
preferred location where you want to limit the
vacuum cleaner’s movement.
STEP 3
On the Aztech VC3000 or on its Remote
Control, press the AUTO button to begin
automatic cleaning. The Aztech VC3000 would
automatically return to its Docking Station to
charge itself once it runs out of batteries.
**OBSERVE BATTERY POLARITY
CONTROL
PANEL
REMOTE
CONTROL
Page 12

12
SETTING THE TIME
Press the button to start entering the
current day and time.
1.
Press the or button to shift between
hour and minute.
1.
Press the or button to shift between
Monday to Sunday.
2.
Press the button to select the day
and it will be highlighted. If you wish to
cancel, select the button and the
selected DAY will ash.
3.
Press the
OK
button to select current day
and to begin entering the current hour
and minute.
4.
Press the or to increase or decrease
the time value.
2.
Press the
OK
or button to save the
current hour and minute setting and the
vacuum cleaner will automatically enter
standby mode.
3.
SELECT CANCEL
SETTING THE CURRENT DAY
SETTING THE CURRENT TIME
SHIFT
DAYS
SHIFT
HOUR &
MINUTE
INCREASE DECREASE
Page 13

13
Press the
button, then press the
button to start entering the cleaning
schedule.
1.
Press the or button to shift between
hour and minute.
1.
Press the or button to shift between
Monday to Sunday.
2.
Press the button to select the day and
it will be highlighted. If you wish to cancel
day selection, select the button and
the DAY will ash.
3.
Press the OK button to select current
day and to begin entering the current
hour and minute.
4.
Press the or to increase or decrease
the time value.
2.
Press the OK button to save the cleaning
schedule and the vacuum cleaner will
automatically enter standby mode.
3.
Press the button to save the current
hour and week setting and press the
button to automatically enter standby
mode.
4.
SELECT CANCEL
INCREASE DECREASE
SETTING THE CLEANING SCHEDULE
SETTING THE DAY SCHEDULE
SETTING THE TIME SCHEDULE
SHIFT
DAYS
SHIFT
HOUR &
MINUTE
Page 14

14
CARE AND MAINTENANCE
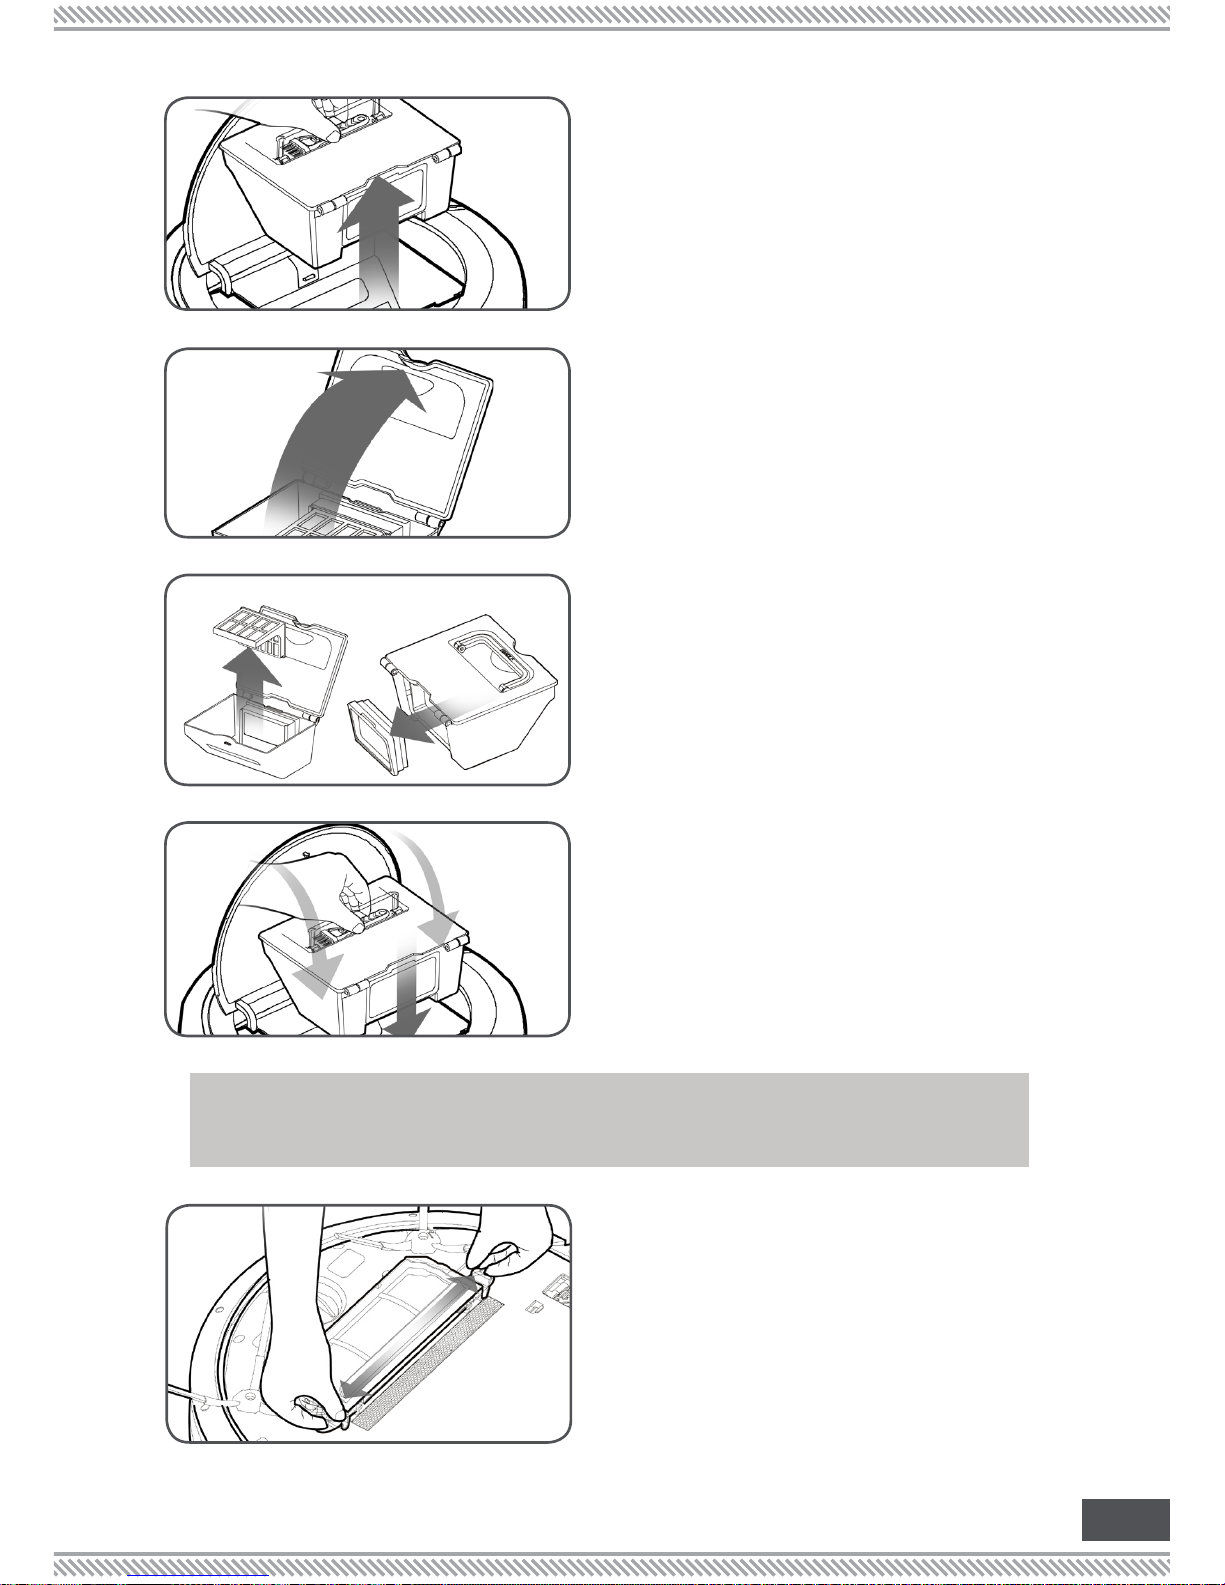
On the vacuum cleaner, loosen the
battery compartment’s screws using
a screwdriver and lift the battery
compartment lid.
1.
Unbuckle the vacuum cleaner’s battery
and replace the vacuum cleaner’s
battery as needed by locking into place
the buckle of the vacuum cleaner with
the new battery correctly.
2.
NOTE: Only use genuine Aztech VC3000
battery replacements in replacing your
Aztech VC3000’s battery.
TIPS IN SAVING BATTERY LIFE
When not in use, place the vacuum cleaner in its charging state to
constantly keep the vacuum cleaner’s battery in its optimal state.
If the vacuum cleaner would not be used for a long period of time,
ensure to regularly charge the cleaner once a month to constantly
keep the vacuum cleaner’s battery in its optimal state.
•
•
Press the PUSH button on the dust cover
to open the dust cover.
1.
Properly secure into place the battery
inside the battery compartment.
3.
Fasten the battery compartment lid
screws as required.
4.
LOOSEN
UNBUCKLE
SECURE INTO PLACE
FASTEN
PUSH DUST
COVER
REPLACING / INSTALLING THE
VC3000’S BATTERY
CLEANING THE DUSTBIN COMPARTMENT
Page 15
15
Carefully take out the dust bin from the
vacuum cleaner.
2.
Dislodge the dustbin compartment
cover’s buckle and remove dirt and
other rubbish contents as required.
3.
You may remove the 3D and the HEPA
lter from the dust bin compartment, and
wash each component separately with
water.
4.
Dry each component properly. You
may use a hair dryer’s cool air setting
to properly dry each part. You may
then Reassemble the dustbin and its
components as required and reinstall
the dustbin compartment to the vacuum
cleaner.
5.
Using your index ngers, unlock the U
shaped buckle on both sides of the
cleaning bracket to remove the cleaning
bracket.
1.
PULL OUT
OPEN DUST
BIN
3D FILTER HEPA
RETURN AND
LOCK
UNLOCK
BUCKLES
CLEANING / REPLACING THE ONE FIT ALL
CLEANING SYSTEM
Page 16

16
You may strip out the ONE FIT ALL brush
from the roller for deeper cleaning or
component replacement.
5.
NOTE: In replacing the ONE FIT ALL brush,
ensure to ONLY use genuine Aztech
products.
Install the right side of the roller brush into
the vacuum cleaner’s drive shaft. The
semi-circular hole of the roller brush must
align to the semi-circle gure of the drive
shaft. You may have to rotate the roller
brush to align these.
6.
Ensure that the roller brush is properly
lodged in and installed. The soft semi-
circular rubber cap of the brush must be
atly positioned on the vacuum cleaner.
7.
Align the buckles of the cleaning bracket
to the two (2) U-shaped grooves on the
surface of the vacuum cleaner and press
down to lock.
8.
Remove the brush’ tube xing member
and rubber cap on both sides of the
roller brush and remove the hair knotted
around the brush tube xing member.
4.
Pull up the left side of the brush and slowly
lift out the roller brush to completely
remove the component from the
vacuum cleaner.
2.
You may wash the brush with water as
needed. Ensure to completely dry the
cleaning component afterwards.
3.
PULL OUT BRUSH
WASH AND DRY
THE BRUSH
REMOVE AND
CLEAN BRUSH
FIX
STRIP ONE FIT
ALL BRUSH
OPTION:
INSTALL ROLLER
BRUSH
LOCK PROPERLY
INTO PLACE
ALIGN CLEANING
BRACKET BUCKLES
Page 17

17
Using the cleaning brush, dislodge the
cleaning bracket from the rack by inserting
the cleaning brush into the two gaps of
the cleaning bracket and gently turning it
to separate the two components.
3.
Install the suction inlet buckle to the two
rubber columns of the bracket and press
down the suction inlet until it rmly locks
into place.
4.
Lodge the Aztech VC3000 to its Docking
Station, press the AUTO button on the
remote or on the vacuum cleaner, and
you may now start using the suction
function.
5.
Pull up the left side of the brush and slowly
lift out the roller brush to completely
remove the component from the vacuum
cleaner.
2.
Using your index ngers, unlock the U
shaped buckle on both sides of the
cleaning bracket to remove the cleaning
bracket.
1.
The Aztech VC3000 provides the Suction option as an alternative method in cleaning
areas with excessive fur or pet hair, which would often get stuck on the vacuum
cleaner’s default brush setting. With the suction option, you will save more time when it
comes to brush cleaning.
UNLOCK
BUCKLES
PULL OUT BRUSH
DISLODGE
BRACKET
INSTALL
SUCTION INLET
INSTALL
SUCTION INLET
REMOVING / INSTALLING THE SUCTION INLET
Page 18

18
During use, there would be cases wherein the Aztech VC3000 would stop working
and would be sending an alarm sound followed by a digital display of the error it
encountered.
TROUBLESHOOTING
FAULT
CODE
FAILURE CAUSE SOLUTION
E001
Ground Sensor
failure
The sensor tip is blocked
or the cleaner is stuck
by stairs
Gently clean the ground sensor or
carefully lift the vacuum cleaner
manually.
E002
Suction inlet is
blocked or the
dustbin is full
Garbage sensor tip is
dusty and or the suction
is blocked.
Clear the dirt on the sensor tip and
suction inlet.
E003
Left or right
wheel failure
Lines or wiring got
tangled in either the left
or right wheel.
Gently clean the ground sensor or
carefully lift the vacuum cleaner
manually to untangle cables or wiring.
E004
Left or right
side brush
failure
Cables or wiring got
tangled in either the left
or right side brush.
Gently clean the ground sensor or
carefully lift the vacuum cleaner
manually to untangle cables or wiring.
E005
Left or right
wheel lifted up
Left or right wheel
lifted up
Position the vacuum cleaner on a
smooth and stable ground.
E006
Roller brush
failure
Lines or wiring got
tangled on the roller
brush.
Clear or remove the tangled lines or
wiring.
E007
Dust cover
failure
The dust cover is open or
is not tightly secured.
Properly close the dust cover of the
vacuum cleaner tightly.
E008
Dustbin Failure
The dust bin
compartment is
improperly positioned
Reinstall the dustbin compartment and
ensure that it is properly locked into
place.
E009
Battery is low
The vacuum cleaner’s
battery ran out of power
Place the vacuum cleaner back to its
Docking Station to charge the vacuum
E010
The vacuum
cleaner does
not charge
The vacuum cleaner is
turned OFF or the battery
is improperly installed
Turn ON the vacuum cleaner. The
vacuum cleaner can only charge
once ON.
Reinstall the batteries.
•
•
E011
Sensor or
blocker failure
Sensor is blocked
Clean the transparent part of the
vacuum cleaner’s bumper
Page 19

Page 20

Copyright © 2015 Aztech Technologies Pte Ltd (CRN:199800635M ). All rights reserved.
 Loading...