

Page 1
AZTECH VC2000
Smart Robotic Vacuum Cleaner
V1.0
Before using the Robotic Vacuum Cleaner,
please read this manual carefully to ensure the
safe & proper operation of the robot
Page 2

User Manual
Page 2 of 20
Legal Notice
2013 © All rights reserved. Version 1.0
No part of this document may be reproduced, republished, or retransmitted in any form or
by any means whatsoever, whether electronically or mechanically, including, but not limited
to, by way of photocopying, recording, information recording, or through retrieval systems
without the express written permission. We reserve the right to revise this document at any
time without the obligation to notify any person and/or entity. All other company or product
names mentioned are used for identification purposes only and may be trademarks of their
respective owners.
LIMITATION OF LIABILITY AND DAMAGES
THE PRODUCT AND THE SOFTWARES WITHIN ARE PROVIDED "AS IS," BASIS. THE MANUFACTURER
AND MANUFACTURER’S RESELLERS (COLLECTIVELY REFERRED TO AS “THE SELLERS”) DISCLAIM
ALL WARRANTIES, EXPRESS, IMPLIED OR STATUTORY, INCLUDING WITHOUT LIMITATION THE
IMPLIED WARRANTIES OF NON-INFRINGEMENT, MERCHANTABILITY OR FITNESS FOR A
PARTICULAR PURPOSE, OR ANY WARRANTIES ARISING FROM COURSE OF DEALING, COURSE
OF PERFORMANCE, OR USAGE OF TRADE. IN NO EVENT WILL THE SELLERS BE LIABLE FOR
DAMAGES OR LOSS, INCLUDING BUT NOT LIMITED TO DIRECT, INDIRECT, SPECIAL WILLFUL,
PUNITIVE, INCIDENTAL, EXEMPLARY, OR CONSEQUENTIAL, DAMAGES, DAMAGES FOR LOSS OF
BUSINESS PROFITS, OR DAMAGES FOR LOSS OF BUSINESS OF ANY CUSTOMER OR ANY THIRD
PARTY ARISING OUT OF THE USE OR THE INABILITY TO USE THE PRODUCT OR THE SOFTWARES,
INCLUDING BUT NOT LIMITED TO THOSE RESULTING FROM DEFECTS IN THE PRODUCT OR
SOFTWARE OR DOCUMENTATION, OR LOSS OR INACCURACY OF DATA OF ANY KIND,
WHETHER BASED ON CONTRACT, TORT OR ANY OTHER LEGAL THEORY, EVEN IF THE PARTIES
HAVE BEEN ADVISED OF THE POSSIBILITY OF SUCH DAMAGES. THE ENTIRE RISK AS TO THE
RESULTS AND PERFORMANCE OF THE PRODUCT OR ITS SOFTWARE IS ASSUMED BY CUSTOMER.
BECAUSE SOME STATES DO NOT ALLOW THE EXCLUSION OR LIMITATION OF LIABILITY FOR
DAMAGES, THE ABOVE LIMITATION MAY NOT APPLY TO THE PARTIES. IN NO EVENT WILL THE
SELLERS’ TOTAL CUMULATIVE LIABILITY OF EACH AND EVERY KIND IN RELATION TO THE
PRODUCT OR ITS SOFTWARE EXCEED THE AMOUNT PAID BY CUSTOMER FOR THE PRODUCT.
Page 3

User Manual
Page 3 of 20
Contents
About the Product ....................................................................................................... 4
Main Features ............................................................................................................... 4
Package Contents ....................................................................................................... 5
Device Design .............................................................................................................. 6
Device Indicators and Buttons ................................................................................... 7
Cleaning Modes ........................................................................................................... 8
Device Installation ....................................................................................................... 9
Installing batteries to the Main Body ..................................................................... 9
Installing the Virtual Wall’s Battery ......................................................................... 9
Installing the Docking Station ............................................................................... 10
Setting the Day ....................................................................................................... 10
How to Start and Pause Cleaning ........................................................................... 11
To Start Cleaning .................................................................................................... 11
To Pause Cleaning ................................................................................................. 11
Charging Methods ..................................................................................................... 11
How to Schedule Cleaning ...................................................................................... 12
How does the Virtual Wall Work? ............................................................................ 12
How to Mop? .............................................................................................................. 13
Care and Maintenance ........................................................................................... 13
Cleaning the Dust Bin ............................................................................................ 13
Cleaning Main Brush and Clean Brush ............................................................... 14
Cleaning Side Brushes............................................................................................ 15
Cleaning the Mop .................................................................................................. 15
Cleaning the Universal Wheel .............................................................................. 15
Cleaning the Right and Left Wheel ..................................................................... 16
Device Troubleshooting ............................................................................................ 17
Troubleshooting your Robot:................................................................................. 17
Common Problems and Solutions: ...................................................................... 17
Technical Specifications ........................................................................................... 18
Cleaner .................................................................................................................... 18
Remote Control ...................................................................................................... 18
Docking Station ...................................................................................................... 18
Virtual Wall ............................................................................................................... 18
Page 4

User Manual
Page 4 of 20
About the Product
The Aztech VC2000 is equipped with a rechargeable battery, wireless remote controller, and
is running through an advanced intelligent program that allows it to charge automatically,
and vacuum by itself.
The Aztech VC2000 can easily mop different kinds of floors (carpets, wood floors, ceramic
tiles, marble, etc.), has a strong dust absorption ability, can efficiently sterilize the area it
cleans, and also allows you to schedule its cleaning with its day and night recognition.
Main Features
Wireless 2.4GHz Remote Controller. You don't have to point at the VC2000 to operate
it conveniently. The remote control has a direction control function of rocker handle.
Frequency Conversion Technology. Use this technology of your remote controller to
adjust the cleaning speed according to different working environments. This will allow
you to minimize or maximize power consumption and also lower the noise rate of your
device.
Powerful Suction. The VC2000 has combined the advantages of traditional vacuum
cleaners and intelligent cleaners perfectly. It can easily absorb any dust on the
surface that it cleans.
Easy-Clean Dust Bin .With humanized design, you can clean the dust bin easily.
High-Efficient Sterilization. Enhanced high power UV lamps that can help kill bacteria
efficiently.
Day and Night Recognition. The VC2000 can recognize day or night automatically,
and will enter into different cleaning modes according to different times. At night, the
VC2000 will enter into mute cleaning mode and will not disturb rest (Day is from 8:00
to 18:00 by default).
Page 5
User Manual
Page 5 of 20
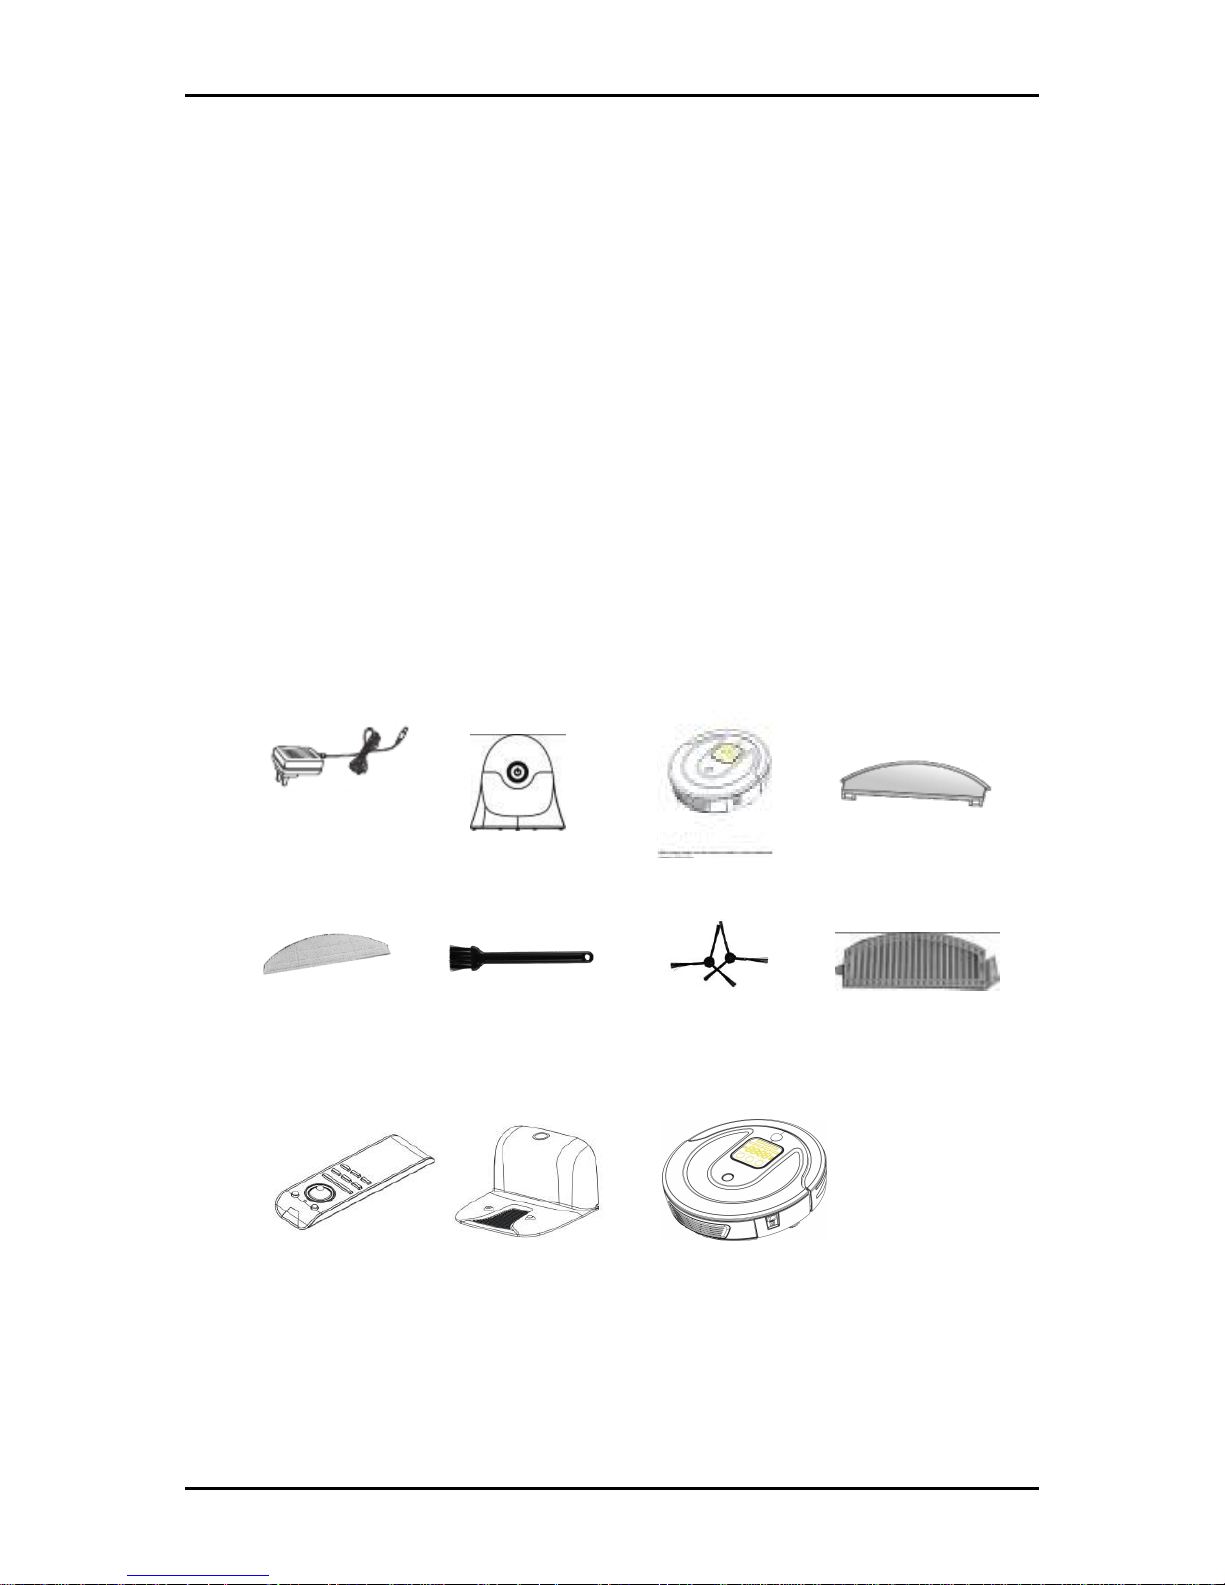
Package Contents
The package contains the following items:
User Manual x 1 pc
Mop Set x 1 pc
Mop x 1 pc
Clean Brush x 1 pc
Side Brush x 2pcs
Filter x 1pc
Adapter x 1 pc
Virtual Wall×1 pc
Main Body x1pc
Remote Control x 1 pc
Dock Station x 1 pc
Adapter
Virtual Wall
User Manual
Mop Plate
Mop
Clean Brush
Side Brush (two)
Filter
Remote Control Dock Station
Main Body
Page 6
User Manual
Page 6 of 20
Device Design
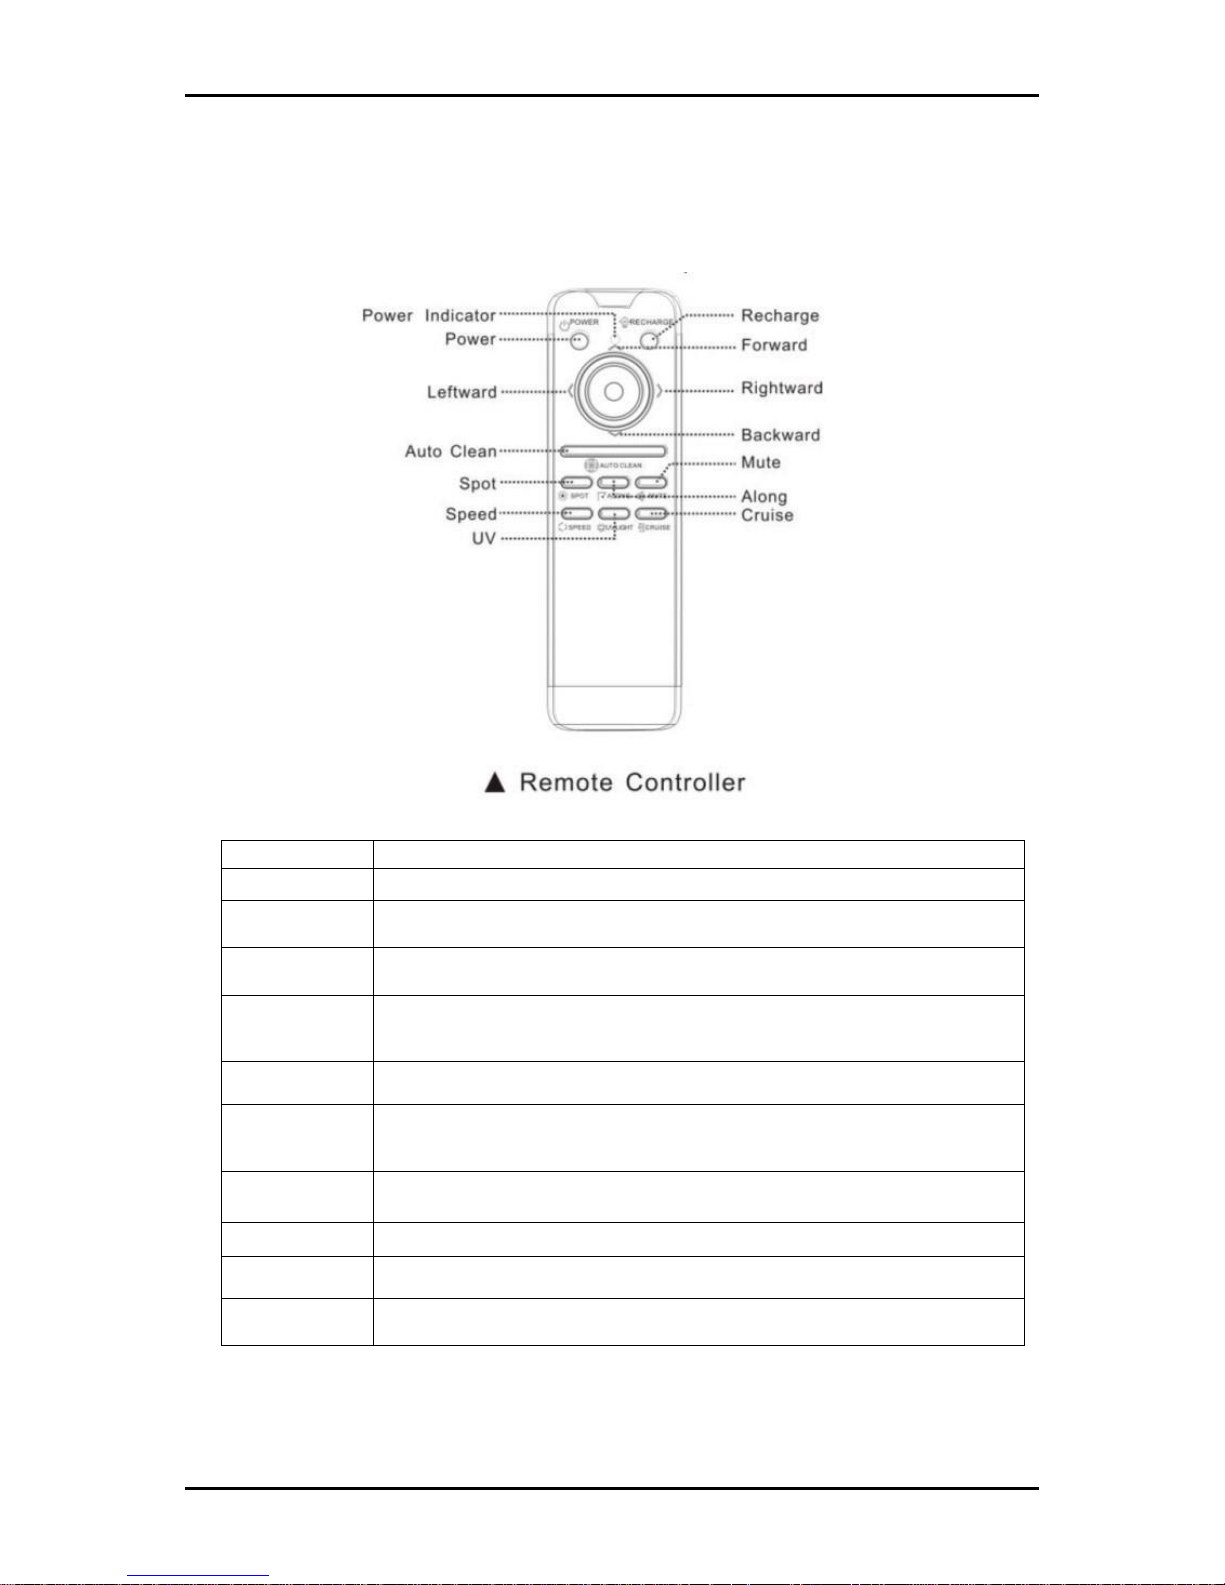
Remote Control Buttons and Functions
Button
Function
Power
Power Button
Power
Indicator
Lights up when pressing any button to indicate that the remote
control is working properly.
RECHARGE
If pressed, the VC2000 will locate its Docking Station to recharge
automatically
AUTO Clean
The VC2000 will enter into AUTO cleaning mode after pressing this
button.
SPOT
If pressed, the VC2000 will enter SPOT cleaning mode.
MUTE
Press this button to exchange between normal cleaning mode and
mute cleaning mode.
ALONG
Press this button and the VC2000 will enter into edge cleaning mode.
SPEED
Press this button to adjust your vacuum’s cleaning speed.
UV
Turns ON/OFF UV sterilization function.
CRUISE
Press this button and the VC2000 will enter into zigzag cleaning
mode.
Page 7

User Manual
Page 7 of 20
Device Indicators and Buttons
LED/BUTTON
Function
Description
Day Light
Indicator
Indicates the days where cleaning is
scheduled.
UV Light
Indicates if the UV light is enabled or
disabled.
Power
Indicates the power of the VC2000’s battery.
Time/Error
Code Light
Displays the schedule of cleaning/error
encountered by the device.
Clean
After pressing, the VC2000 will enter into
cleaning mode or will pause its cleaning.
Schedule
After pressing, you can select the Day and
cycle from Monday to Sunday, including
time.
Charge
After pressing, the VC2000 enters AUTOrecharging mode.
When setting Day and Hours/Minutes,
pressing this button confirms the setting of
Day, Hours, and Minutes
Page 8

User Manual
Page 8 of 20
Cleaning Modes
AUTO Mode
The VC2000 will clean automatically in all kinds of
cleaning paths till it returns to the Docking Station to
recharge
SPOT Cleaning Mode
The VC2000 will spiral approximately 2.4 meters in
diameter, intensively cleaning a localized area.
Edge Cleaning Mode
When detecting walls or furniture, the VC2000 will clean
along the wall or navigate around furniture with its side
brushes. This mode can help to clean the dust at the
corner of sofas, beds, walls, etc. This cleaning process will
last for 25 minutes till the VC2000 returns to the Docking
Station
Mute Cleaning Mode
The VC2000 will complete its cleaning under ultra-low
noise and will not affect people’s work or rest.
Scheduled Cleaning Mode
You can schedule the cleaning time according to your
requirement. The VC2000 will clean automatically at the
specified time.
Cruise Cleaning Mode
The VC2000 will clean in cruise cleaning path, just like
artificial mopping. The cleaning area will be enlarged and
best cleaning effects will be provided.
Page 9

User Manual
Page 9 of 20
Device Installation
Please read and follow the instructions written below carefully. You may also use the
diagrams provided for reference.
Installing batteries to the Main Body
1. Unfasten the base plate’s screw using a screwdriver and open its base plate.
2. Insert the battery correctly, and fasten the battery with the base plate using a screw driver.
3. Connect the charging dock and the vacuum cleaner.
4. Plug the charging dock’s power adapter to a power outlet.
NOTE: For FIRST use, charge the battery for 8 hours. Ensure to use the original
battery provided in the packaging box to avoid damage to your product.
Installing the Remote Control’s battery:
1. Lift the clasp of the battery cover at the back of the remote control.
2. Install two (2) AAA alkaline batteries correctly (pay attention to the correct polarity).
3. Close the battery cover.
Installing the Virtual Wall’s Battery
1. Open the base plate of virtual wall located underneath the device.
2. Place the batteries correctly (observe the polarities of the batteries).
3. Close the base plate.
Page 10

User Manual
Page 10 of 20
BATTERY TIPS:
Take out the device’s battery if the vacuum would not be used.
Switch off the device first, before taking out its batteries.
Do not put its battery in any 45
o
C environment or even, near water or damp surfaces.
Do not apply external load to the battery.
The battery must be recycled for safe treatment.
Do not throw used batteries to fire.
In case of battery leakage, avoid exposure to skin and even clothes. If exposed,
immediately wipe the leak with a clean dry cloth. If possible, bring the used batteries
to the maintenance outlet for proper disposal.
Do not use any other battery on your device aside from those included in the
package, or given by the supplier.
Installing the Docking Station
1. Connect the power adapter to a power socket and Docking Station.
2. Tie up the spare electric wire and put it into the back hopper. Then put ou tgoing wire
along the slot.
3. Place the Docking Station against any immovable surface to prevent it from sliding
during vacuum docking. Clear the objects within one meter from both sides and
within two meters from the front of Docking Station.
Setting the Current Date and Time
Setting the Day
1. Turn on the power switch, and press the CHARGE button instantly to enter the current
time setting.
2. Press SCHEDULE button to select the correct Day, then press CHARGE button twice to
confirm (When the Day light is always on; it means the setting is successful).
Setting the Minute and Hour
1. Press the SCHEDULE button continuously till the first figure on the time display flashes,
then press CHARGE button to select the correct Hour.
2. Press the SCHEDULE button continuously till the second figure on the time display
flashes, and press the CHARGE button to select the correct figure of Hour. You can
complete the Minute setting in the same way.
3. Press the CLEAN button to save the setting.
Page 11

User Manual
Page 11 of 20
How to Start and Pause Cleaning
To Start Cleaning
1. Turn ON the power switch.
2. Touch the CLEAN button and the VC2000 will enter into AUTO cleaning mode. The
AUTO LED will always light on until the VC2000 returns to its Docking Station to
recharge.
To Pause Cleaning
1. Touch any button as shown below and the VC2000 will enter into a STAND-BY state
and PAUSE cleaning.
2. Turn off the power switch.
Charging Methods
A. Auto-Recharging. When the cleaning work is done or the battery power is running
low, the VC2000 will return to its Docking Station to recharge automatically.
Note: If in any case the VC2000 has not been able to return to its Docking Station to
recharge (e.g. if the vacuum is in an environment with multiple obstacles, or is too far
from its Docking Station) you have to charge your device manually.
B. Manual Charging. If the VC2000 will be used for the first time or you want to charge
the VC2000 during its cleaning, please charge the VC2000 manually.
To manually charge your vacuum, you may do the following:
A. If battery is completely drained you may:
a.1 position the VC2000 pointing at the Docking Station manually. After one
beep, the red light and blue light blinks alternatively indicating that the VC2000 is
charging.
a.2 Charge the VC2000 directly with its power adapter.
B. If you wish to charge the vacuum while it is cleaning, press the CHARGE button on the
display screen of your vacuum, or on the remote control, and the VC2000 will return
to its Docking Station to recharge automatically.
Page 12

User Manual
Page 12 of 20
How to Schedule Cleaning
1. Schedule the "Day”
a) Switch ON your device, the VC2000 will enter into the stand-by state.
b) Press the SCHEDULE button to select the "Day " you want, then press the CHARGE
button twice to confirm (if the Day light LED turns ON, the setting is successful).
You can schedule the VC2000 to clean per day and up to seven times per
week.
2. Schedule the "Hour" and "Minute"
a) Press the SCHEDULE button continuously until the first figure on the time display
flashes.
b) Select the appropriate Hour by pressing the CHARGE button.
c) Press the SCHEDULE button continuously until the second figure on the time
display flashes.
d) Press the CHARGE button to select the appropriate figure of Hour. You can
complete the scheduled Minute setting in the same way.
3. Press CLEAN Button to save the setting of scheduled cleaning time.
Note: You must set the current time before setting a schedule
How does the Virtual Wall Work?
The Virtual Wall creates an invisible barrier that Aztech VC2000 will not cross. This invisible
barrier can be used to confine the VC2000 to a particular room or area and prevent it from
getting too close to electrical or computer cords, delicate objects on the floor, etc. it can be
set to block an opening up to seven feet long.
It is important to take note that the width of the Virtual Wall’s beam also increases as its
length increases, creating a cone-shaped area which the VC2000 cannot pass. The Virtual
Wall also creates a halo of protection around itself, preventing the cleaner from getting too
close to the virtual wall device.
*Turn on the virtual wall, and place it on the outside of the doorway you wish to block.
Page 13

User Manual
Page 13 of 20
How to Mop?
The mop is only suitable for hard smooth floors. Please remove mop and mop plate when
using the VC2000 on the carpet.
Care and Maintenance
Before performing the maintenance of the VC2000, please ensure that the power switch is
OFF.
Cleaning the Dust Bin
If your VC2000’s dust bin is full, the suction power will be weakened. Please empty the dust
bin before and after every use.
To Empty the Dust Bin, kindly follow the instructions below:
1. Press the dust bin button to pop up the dust bin. (refer to Pic 1)
2. Hold the dust bin with both hands, use thumbs to press each side button and stretch
other fingers, the dust bin will be open completely. Use the cleaning brush to clean
the dust bin and HEPA Filter.
3. Close the bottom board of dust bin.
4. Install the dust bin to the VC2000.
Page 14

User Manual
Page 14 of 20
Cleaning Main Brush and Clean Brush
Excessive amounts of foreign materials adhering to the brushes can damage the VC2000.
Please clean the brushes at least once per week.
1. Turn the VC2000 over and put it on a smooth soft and level surface (Pic 1).
2. Remove brush bracket by lifting both fixed clasps (Pic 2).
3. Lift up the right side of brushes and take them out in order (Pic 3).
4. Clean any hair and dirt tangled around the brushes with a cleaner or cut the hair
gently with scissors. Do not wash the brushes (Pic 4).
5. Install the main brush and dusting brush into the VC2000 (Pic 5).
6. Make the flanges of brush bracket align with the fixed grooves of main body, then
press the fixed clasps inward. Clicks indicate that the installation is done (Pic 6).
Note: Ensure that the flanges of brush bracket are aligned with the fixed grooves of main
body. Also ensure that the side brushes are not stuck underneath the brush bracket.
Cleaning the Sensors and the Charging Terminal
Turn the VC2000 over and place it on a smooth soft and level surface. Use a soft dry cloth or
cleaning brush to clean the sensors and charging terminal.
Pic 1
Pic 2
Pic 3
Pic 4
Pic 5
Pic 6
Page 15

User Manual
Page 15 of 20
Cleaning Side Brushes
Excessive amounts of foreign materials adhering to the brushes can damage the VC2000.
Please clean the brushes at least once per week.
1. Turn the VC2000 over, put it on a smooth soft and level surface, and remove the
screws from the center of side brushes with a screwdriver (Pic 1).
2. Pull out the side brushes and wash them (Pic 2).
3. After drying the side brushes in well-ventilated place avoiding direct sunlight, install
them to the VC2000 using a screwdriver (Pic 3).
Cleaning the Mop
To avoid odors, the mop should be washed properly after every use. Please follow the steps
provided below:
1. Separate the mop from the mop plate.
2. Wash the mop carefully.
3. Dry the mop in a sunny, well-ventilated place.
Cleaning the Universal Wheel
1. Turn the VC2000 over, put it on a smooth soft and level surface, and then pull out the
universal wheel.
2. Clean the hair and debris from the universal wheel.
3. Install the universal wheel into the VC2000.
Pic 1
Pic 2
Pic 3
Pic 1
Pic 2
Pic 3
Pic 1
Pic 2
Pic 3
Page 16

User Manual
Page 16 of 20
Cleaning the Right and Left Wheel
1. Turn the VC2000 over, put it on a smooth soft and level surface, remove the brush
bracket
2. Clean the right and left wheels using a dry cloth.
Pic 1
Pic 2
Page 17

User Manual
Page 17 of 20
Device Troubleshooting
Troubleshooting your Robot:
Error Code
Error Cause
How to solve?
E001
The battery power is low
Charge the VC2000 in time
E002
The main brush or dusting
brush don't work properly
Clean the main brush and dusting brush and
check their installation
E003
Cliff sensors failure
Wipe off the cliff sensors with a dry cloth
E004
Dust bin or fan does not
work properly
Check the installations of the dust bin and fan
components
E005
The left wheel does not
work properly
Check the state of left wheel
E006
The right wheel does not
work properly
Check the state of right wheel
E007
The left wheel is off the
ground
Ensure the cleaner is placed in proper position.
E008
The right wheel is off the
ground
Ensure that the cleaner is placed in proper
position.
Common Problems and Solutions:
Common Problems
Solutions
The VC2000 can't
be started
Confirm that the power switch is turned ON.
The track/cleaning
route is abnormal
Wipe off the cliff sensors with a dry cloth. If having the mop installed,
please confirm that the installation is correct.
Please turn off the power switch, and then restart the VC2000.
Suction power is
weakened
Please clean the suction inlet.
Please empty the dust bin.
Please clean the filter.
Noise becomes
louder
Please confirm that the installation of dust bin is correct.
Please confirm that the installation of fan components is correct.
Please confirm that the filter installation is correct.
Please clean the center brushes.
The remote
controller can't be
start
Please replace the batteries and confirm the battery installation is
correct.
Please confirm that using the remote controller within 15 meters.
The VC2000 can't
recharge
automatically
Please confirm that the Docking Station is plugged in.
Please remove the objects around the Docking Station.
Please wipe off the contact pieces for Docking Station with a soft
dry cloth.
The power turns off
automatically
It's a normal phenomenon. The VC2000 has the energy-saving
function. If you don't operate it within 10 minutes when the power
switch is on. The power will turn off automatically and the VC2000 will
enter into energy-saving mode.
Note: If the problems are still present using the methods above, kindly perform the
operations below:
1. Turn off the power switch, and then restart the VC2000.
2. If the problems still exists after restarting the VC2000. It is suggested to bring the
VC2000 to the specified customer care center.
Page 18

User Manual
Page 18 of 20
Technical Specifications
Cleaner
Rated Voltage
Lithium-ion Battery DC 14.8V
Lithium-ion Battery
2200mA
Working Hours
120 minutes
Rated Power
20-25W
Operating Temperature Range
-5℃~40℃
Operating Humidity Range
≤85RH
AC/DC adaptor
AC 100/240V-50/60Hz DC 24V 1000mA
Specification
φ360*92mm
Weight
3.34kgs
Noise Level
<45dB
Dustbin Capacity
0.8L
Place of Origin : China
Remote Control
Rated Voltage
Battery
2 x AAA Alkaline Battery(not included)
Remote Mode
wireless
Receiving & Transmitting Distance
≤10M (Not effected by obstacles)
Operating Temperature Range
-5℃~40℃
Operating Humidity Range
≤85RH
Specification
Weight
0.076kg
Docking Station
No.
Models
Parameters
1
Specification
190*150*120mm
2
Weight
0.35kg
3
Rated Voltage
DC 24V 1000mA
Virtual Wall
No.
Models
Parameters
1
Specification
112*108*72mm
2
Weight
0.25kg
3
Rated Voltage
3V
Page 19

User Manual
Page 19 of 20
Safety Warnings
CAUTION
Do not disassemble, maintain, or transform the product; this can void the warranty of
your product. Maintenance technicians designated by the company are the only
ones allowed to disassemble, maintain and transform the product
Do not touch the power cord or the electric appliance with a wet hand; this may
cause electric shock and other personal injuries.
Do not use any other charger aside from the one supplied with the VC2000, it may
cause product damage, electric shock or fire due to voltage mismatch.
Do not bend or twist the power cord severely or place any unnecessary weight on it;
this may damage the power cord, cause fire, and even electric shock.
Do not place the VC2000 near, lighters, matches and any other combustible
materials.
This appliance should only be used by children aged 8 years and above, and persons
with reduced physical, sensory or mental capabilities or lack of experience and
knowledge. Supervision or instruction concerning the use of the appliance in a safe
way should be given to the people involved.
While cleaning, keep away any electrical cords from the robot’s brushes.
Remove the plug from the power outlet before cleaning or maintaining the
appliance.
Attention
Do not forget to turn off the power when moving or storing the VC2000.
During use, check whether the charger and socket are connected properly.
To extend the vacuum’s battery life; on its first use, ensure to charge the battery for at
least 8 hours before using the device.
Please use the VC2000 cautiously when there are children present. This is to avoid
accidents that may harm your children or damage your device.
Do not place liquids, or any combustible material near your device.
Do not use the VC2000 outdoors. The smart robotic vacuum cleaner is only intended
to do indoor cleaning.
Always ensure that the power cord of the charger is inserted properly during
operation; this is to avoid electric shocks, short circuits, and even fire.
If the device would not be used for a long time, remove the battery from the
machine and store it in a cool dry.
Remove all fragile objects (including luminous objects, fabrics, glass bottles, etc.)in its
cleaning area before using to avoid property damage.
Do not stand or sit on the VC2000 to avoid personal injuries and device damage.
Ensure that the batteries have been fully charged before use.
Page 20

User Manual
Page 20 of 20
Copyright © 2013 Aztech Technologies Pte Ltd (CRN:199800635M). All rights reserved.
 Loading...