

Page 1

56K USB Modem
Page 2

Easy Start Guide
© Copyright 2007 All rights reserved.
No part of this document may be reproduced, republished, or retransmitted in any form or by any means
whatsoever, whether electronically or mechanically, including, but not limited to, by way of photocopying,
recording, information recording, or through retrieval systems without the express written permission. We
reserve the right to revise this document at any time without the obligation to notify any person and/or
entity. All other company or product names mentioned are used for identification purposes only and may
be trademarks of their respective owners.
LIMITATION OF LIABILITY AND DAMAGES.
THE PRODUCT AND THE SOFTWARES WITHIN ARE PROVIDED "AS IS," BASIS. THE MANUFACTURER AND
MANUFACTURER’S RESELLERS (COLLECTIVELY REFERRED TO AS “THE SELLERS”) DISCLAIM ALL WARRANTIES,
EXPRESS, IMPLIED OR STATUTORY, INCLUDING WITHOUT LIMITATION THE IMPLIED WARRANTIES OF NONINFRINGEMENT, MERCHANTABILITY OR FITNESS FOR A PARTICULAR PURPOSE, OR ANY WARRANTIES ARISING
FROM COURSE OF DEALING, COURSE OF PERFORMANCE, OR USAGE OF TRADE. IN NO EVENT WILL THE SELLERS
BE LIABLE FOR DAMAGES OR LOSS, INCLUDING BUT NOT LIMITED TO DIRECT, INDIRECT, SPECIAL WILLFUL,
PUNITIVE, INCIDENTAL, EXEMPLARY, OR CONSEQUENTIAL, DAMAGES, DAMAGES FOR LOSS OF BUSINESS
PROFITS, OR DAMAGES FOR LOSS OF BUSINESS OF ANY CUSTOMER OR ANY THIRD PARTY ARISING OUT OF THE
USE OR THE INABILITY TO USE THE PRODUCT OR THE SOFTWARES, INCLUDING BUT NOT LIMITED TO THOSE
RESULTING FROM DEFECTS IN THE PRODUCT OR SOFTWARE OR DOCUMENTATION, OR LOSS OR INACCURACY OF
DATA OF ANY KIND, WHETHER BASED ON CONTRACT, TORT OR ANY OTHER LEGAL THEORY, EVEN IF THE PARTIES
HAVE BEEN ADVISED OF THE POSSIBILITY OF SUCH DAMAGES. THE ENTIRE RISK AS TO THE RESULTS AND
PERFORMANCE OF THE PRODUCT OR ITS SOFTWARE IS ASSUMED BY CUSTOMER. BECAUSE SOME STATES DO NOT
ALLOW THE EXCLUSION OR LIMITATION OF LIABLITY FOR DAMAGES, THE ABOVE LIMITATION MAY NOT APPLY TO
THE PARTIES. IN NO EVENT WILL THE SELLERS’ TOTAL CUMULATIVE LIABLIITY OF EACH AND EVERY KIND IN
RELATION TO THE PRODUCT OR ITS SOFTWRE EXCEED THE AMOUNT PAID BY CUSTOMER FOR THE PRODUCT.
Page 2 of 16
Page 3

Contents
Easy Start Guide
About the Product..........................................4
System Requirements .............................................................4
Software..............................................................................................................4
Hardware ............................................................................................................4
Device Design ..........................................................................5
Getting Started ..............................................6
Check Package Contents ......................................................... 7
Connect the Device.................................................................. 7
Install Driver and Connect to the Internet ............................. 8
For Windows Vista..............................................................................................8
For Windows XP..................................................................................................9
For Windows 2000........................................................................................... 11
For Windows ME .............................................................................................. 13
For Windows 98SE ........................................................................................... 14
Page 3 of 16
Page 4

Easy Start Guide
About the Product
Thank you for purchasing this product. With this 56K USB Modem, you can perform a
comprehensive range of modem-related functions that include downloading of graphic-
intensive web pages, streaming high bandwidth audio/video, and receiving large-file
size software programs at speeds of up to 56Kbps, including sending and receiving fax.
System Requirements
Your computer must meet the following minimum requirements
Software
Windows (98 SE, Me, 2000, XP 32-bit, XP 64-bit, Vista 32-bit and Vista 64-bit)
Hardware
233 MHz processor
64 MB RAM
CD-ROM drive
Available USB port
10MB available hard disk space (system files and modem drivers only)
Page 4 of 16
Page 5
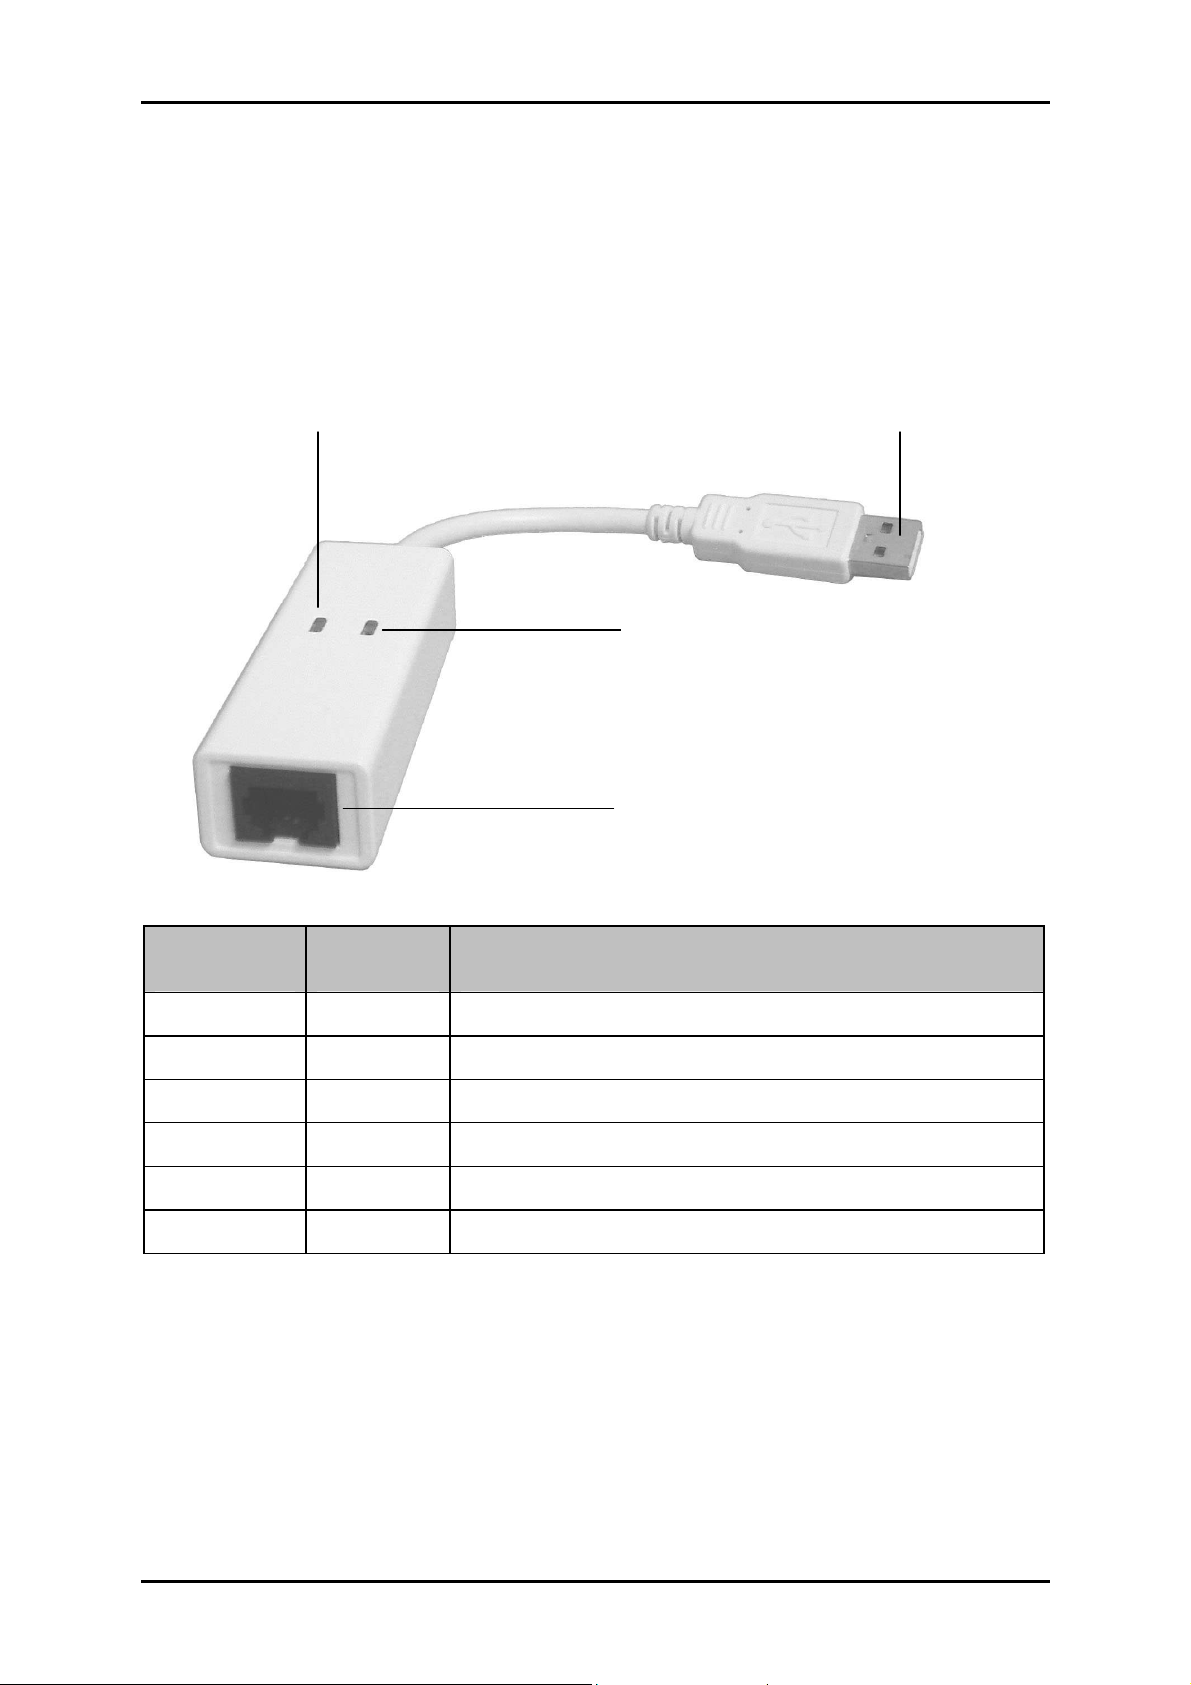
Device Design
In Use
In Use
In UseIn Use
Power
Power
PowerPower
USB
USB
USBUSB
Easy Start Guide
Line
Line
LineLine
Label
Label Status
LabelLabel
POWER
POWER Off No power is supplied to the device
POWERPOWER
Steady light Power is detected
In Use
In Use Off No activity
In UseIn Use
Steady light Data is being transmitted/received
USB
USB Used for connecting to the computer
USBUSB
Line
Line Used for connecting to the telephone line via telephone cable
LineLine
Status Description
StatusStatus
Description
DescriptionDescription
Page 5 of 16
Page 6
Easy Start Guide
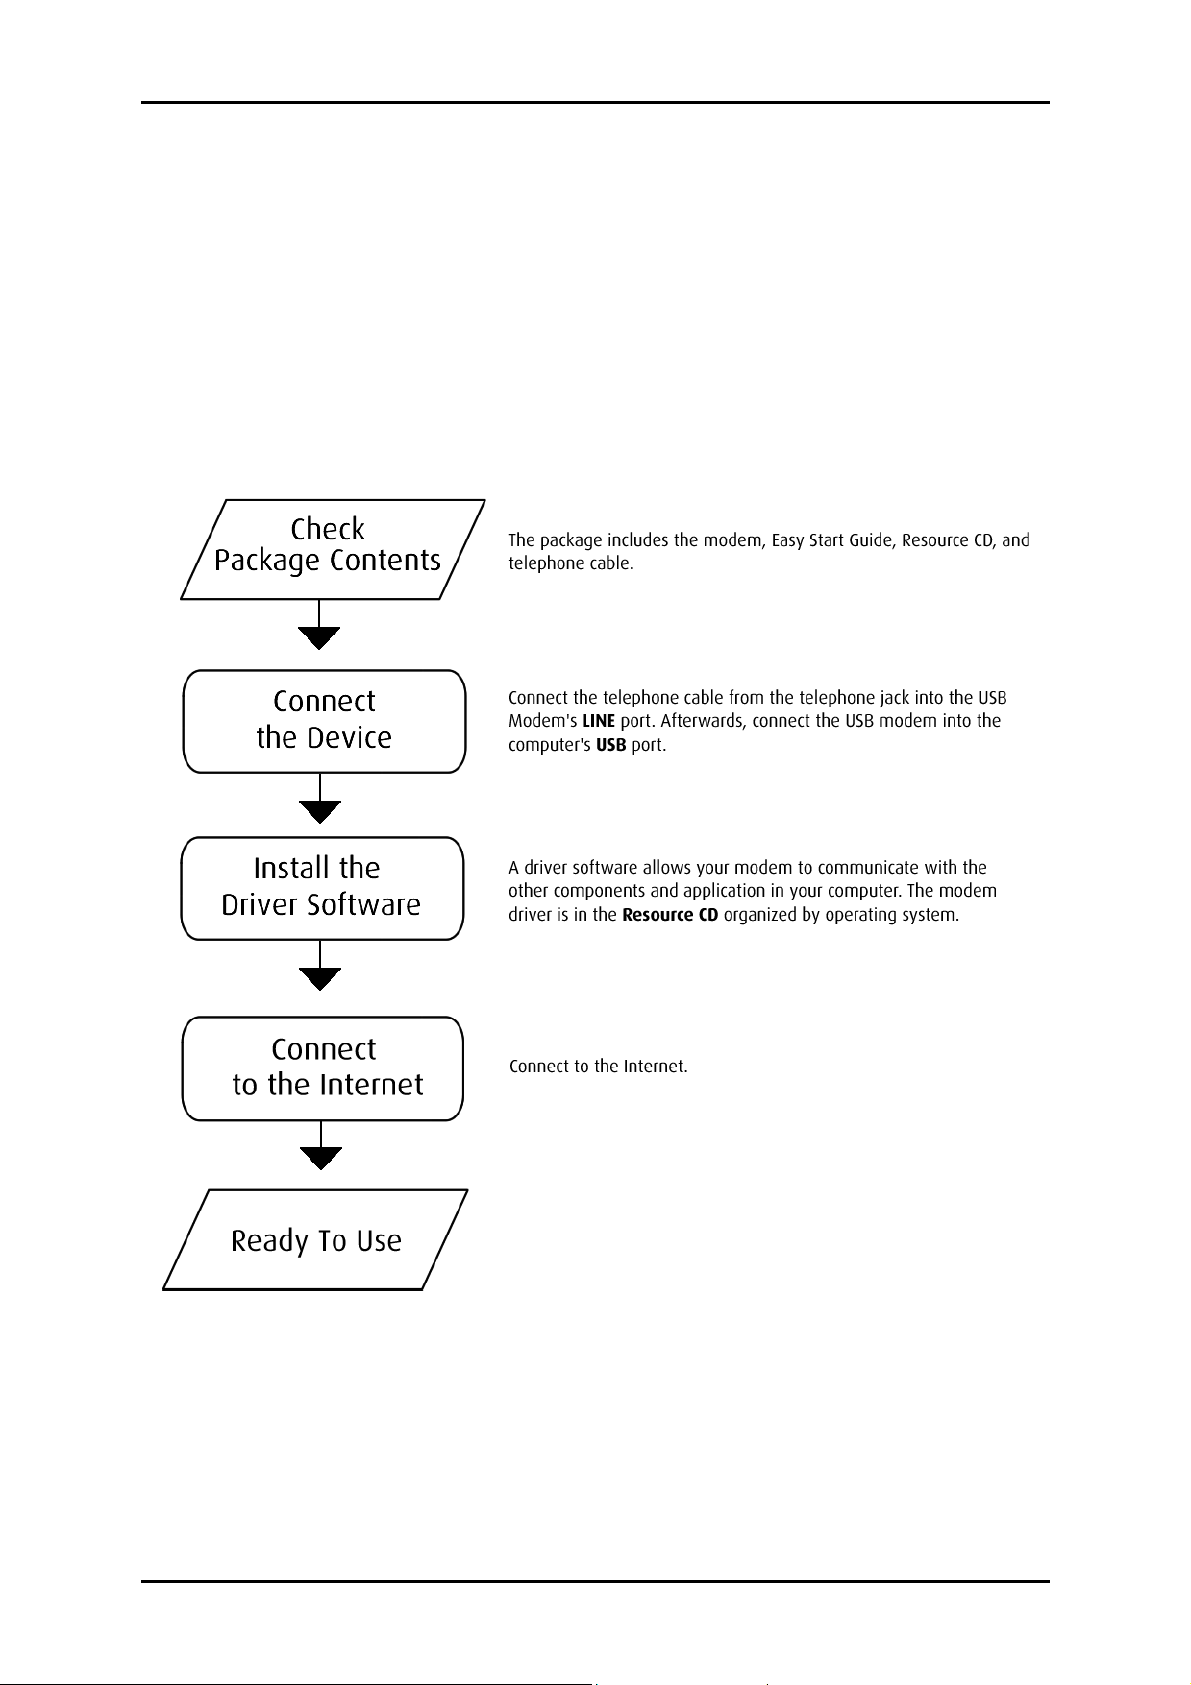
Getting Started
Setting up the device is easy. The flowchart below provides an outline of the steps you
need to go through. There are brief descriptions beside each step to help you along.
Detailed instructions are provided in the subsequent pages.
Page 6 of 16
Page 7

Check Package Contents
For any missing items, please contact your dealer immediately.
56K USB Modem
Easy Start Guide
Resource CD
Telephone cable
Connect the Device
Easy Start Guide
To connect the 56K USB Modem:
1. Connect one end of the telephone cable to the telephone jack and the other end
to the 56K USB Modem’s LINE
2. Connect the 56K USB Modem into the computer’s USB
LINE port.
LINE LINE
USB port.
USB USB
Page 7 of 16
Page 8

Easy Start Guide
Install Driver and Connect to the Internet
A driver software allows your device to communicate with the other components and
application in the computer. After installing the driver, you can connect to the Internet.
For Windows Vista
Note:
Note: Connect the device before proceeding with these steps.
Note: Note:
To install the driver software:
1. Close Found New Hardware when it opens after you connect the device.
2. Insert the Resource CD in the CD-ROM.
3. Select Start > Run. This opens the Run dialog box.
4. Enter d:/winvista/setup.exe in the Run dialog box, where d is your CD-ROM drive,
and then click OK.
5. Click Continue when User Account Control opens.
6. Click OK when the Device driver installation wizard opens.
7. Click OK again when the Device driver installation wizard opens.
To connect to the Internet:
1. Select Start > Settings > Control Panel. This opens Control Panel.
2. Right-click Network and Sharing Center and then select Open.
3. Click Set up a connection or network below Tasks. A new dialog box opens.
4. Select Set up dial up connection and then click Next.
5. Enter the information from your Internet Service Provider:
a. Enter the dial-up phone number
b. Enter the User name
Page 8 of 16
Page 9

c. Enter the Password
d. Enter Connection Name
e. Select Allow other people to use this connection to share this connection
with other computer user accounts
6. Click Connect.
For Windows XP
To install the driver software:
Note:
Note: Connect the device before proceeding with these steps.
Note: Note:
Easy Start Guide
1. The Found New Hardware Wizard opens informing you about the detected
hardware. Select No, not this time and then click Next.
2. Insert the Resource CD into the CD-ROM drive.
3. Select Install from a list or specific location (Advanced) and then click Next.
4. Click Browse to specify the location of the driver software for your operating
system in the Resource CD.
5. Click Next.
6. Click Finish to end the installation. A notification appears at the bottom of the
screen informing you that the hardware is ready to use.
Page 9 of 16
Page 10

Easy Start Guide
To connect to the Internet:
1. Select Start > Connect To > Show All Connections. This opens Network
Connections.
2. Click Create a new connection under Network Tasks.
3. Click Next when the New Connection Wizard opens.
4. Select Connect to the Internet and then click Next.
5. Select Set up my connection manually and then click Next.
6. Select Connect using a dial-up modem and then click Next.
7. Enter the ISP Name and then click Next.
8. Enter the Phone number of the ISP and then click Next.
9. To share the connection to all user’s, select Anyone’s use and then click Next.
Otherwise, select My use only.
10. Enter the User name, Password, confirm the Password, and then click Next.
11. Click Finish.
12. The Connect dialog box opens. Click Dial.
Page 10 of 16
Page 11

Easy Start Guide
For Windows 2000
Note:
Note: Connect the device before proceeding with these steps.
Note: Note:
To install the driver software:
1. Click Next when the Found New Hardware Wizard opens.
2. Select Search for a suitable driver for my device (Recommended) and then click
Next.
3. Insert the Resource CD in the CD-ROM.
4. Select Specify a location and then click Next.
5. Click Browse, specify the driver location for your operating system in the Resource
CD, and then click OK.
6. Click Next when the driver name is found.
7. Click Finish.
Page 11 of 16
Page 12

Easy Start Guide
To connect to the Internet:
1. Select Start > Settings > Network and Dial-Up Connections. This opens Network
and Dial-Up Connections.
2. Right-click Make New Connection and select Make New Connection. This opens
the Network Connection Wizard.
3. Click Next in the Network Connection Wizard.
4. Select Dial-Up to the Internet and then click Next. This opens the Internet
Connection Wizard.
5. Select I want to set up my Internet Connection manually, or I want to connect
through a local area network (LAN) and then click Next in the Internet Connection
Wizard.
6. Select I connect through a phone line and a modem, and then click Next.
7. Enter the phone number you dial to connect to your ISP and then click Next.
8. Enter your User name and Password, and then click Next.
9. Enter the Connection Name and then click Next.
10. Select No when you are asked to set up an Internet mail account, and then click
Next. An icon for the new connection that was just set up appears in Network and
Dial-Up Connections.
11. Right-click the icon for the new connection and then select Connect. A dialog box
opens with the connection User name and Password.
12. Click Dial.
Page 12 of 16
Page 13

Easy Start Guide
For Windows ME
Note:
Note: Connect the device before proceeding with these steps.
Note: Note:
To install the driver software:
1. When the Add New Hardware Wizard opens, Select Specify the location of the
driver (Recommended) and then click Next.
2. Select Specify a location and then click Browse. Specify the location of the driver
software for your operating system in the Resource CD.
3. Click Next.
4. Click Next.
5. Click Finish.
6. When the Add New Hardware Wizard opens again, Select Specify the location of
the driver (Recommended) and then click Next.
7. Select Specify a location and then click Browse. Specify the location of the driver
software for your operating system in the Resource CD.
8. Click Next.
9. Click Finish.
To connect to the Internet:
1. Select Start > Settings > Dial-Up Networking. This opens Dial-Up Networking.
2. Right-click Make New Connection and then select Open. This opens Make New
Connection.
3. Enter a name for the computer you are dialing and then click Next.
4. Enter the telephone number of the computer you want to call and then click Next.
5. Click Finish. A new icon for the new connections appears in Dial-Up Networking.
Page 13 of 16
Page 14

Easy Start Guide
6. In the Dial-up Networking window, right-click the new connection and then select
Connect. This opens Connect To.
7. Enter your User name and Password.
8. Click Connect.
For Windows 98SE
Note:
Note: Connect the device before proceeding with these steps.
Note: Note:
To install the driver software:
1. Click Next when the Add New Hardware Wizard opens.
2. Select Search for the best driver for your device and click Next.
3. Insert the Resource CD in the CD-ROM.
4. Back to the Add New Hardware Wizard, select Specify a location.
5. Click Browse to specify the location of the driver software for your operating
system in the Resource CD.
6. Click Next.
7. Click Next when Windows recognizes the device.
8. When Windows requests for the Windows 98 Second Edition CD-ROM, insert it in
the CD-ROM and then click OK.
9. Click Finish.
10. Click Yes to restart the computer.
Page 14 of 16
Page 15

Easy Start Guide
To connect to the Internet:
1. Right-click My Computer on the desktop and then select Open.
2. Right-click Dial-Up Networking and then select Open.
3. Right-click Make New Connection and then select Open. This opens Make New
Connection.
4. Enter a name for the computer you are dialing and then click Next.
5. Enter the telephone number of the computer you want to call and then click Next.
6. Click Finish.
7. In the Dial-up Networking window, right-click the new connection and then select
Connect. This opens Connect To.
8. Enter your User name and Password.
9. Click Connect.
Page 15 of 16
Page 16

Easy Start Guide
Safety Precaution
For your safety, be sure to read and follow all warning notices and instructions.
Do not remove the device from its protective bag until you are ready to install it.
Do not attach electronic components on the device.
Static electricity can cause permanent damage to the device. During installation,
you must ground your self with a grounding strap or if you do not have a
grounding strap, touch any non-painted surface of your computer chassis before
you begin installation. Do this every minute until the installation is completed.
Remi
Reminder:
nder: Product warranty does not apply to damage caused by lightning, power
RemiRemi
nder: nder:
surges, or wrong voltage usage.
Page 16 of 16
 Loading...