

Page 1

TNT2-AGP
TNT2-AGP(A)
TNT2-AGP(B)
TNT2 128-bit Graphics Accelerator
Users Manual
Version 1.0
Page 2

GRAPHICS CARD USER'S MANUAL
©Copyright
The software described in this manual is protected by international copyright laws. Under this copyright law, you
are prohibited from duplicating the software for any purpose other than making archival copies for the sole
purpose of backing-up against loss.
In addition, no part of this manual may be reproduced or transmitted, in any form or by any means, electronic or
mechanical, including photocopying, recording, or information storage and retrieval systems, for any purpose other
than the purchasers personal use, without the prior written permission of Aztech Systems Ltd.
PentiumII is a registered trademark of Intel Corp.
Microsoft, Windows and Windows NT are registered trademarks of Microsoft Corp.
All other company or product names are trademarks or registered trademarks or service marks of their
respective owners and are hereby recognized as such.
Disclaimer Statement
Aztech Systems Ltd specifically disclaims all warranties, either expressed or implied, including but not limited to
implied warranties of merchantability and fitness for a particular purpose, with respect to the hardware, software,
and the accompanying written materials. Aztech Systems Ltd reserves the right to revise or make improvements to
its product at any time and without obligation to notify any person of such revisions or improvements.
In no event shall Aztech Systems Ltd be liable for any consequential or incidental damages, including any loss of
business profits or any other commercial damages, arising out of the use of its product.
○○○○○○○○○○○○○○○○○○○○○○○○○○○○○○○○○○○○○○○○○
2
Page 3
GRAPHICS CARD USER'S MANUAL
Table of Contents
Setting up Your Graphics Card -----------------------------------
1.1 Minimum System Requirements-----------------------------------
1.2 Safety Precaution ------------------------------------------------------
1.3 Installation Notes ------------------------------------------------------
1.4 Installation Procedure ------------------------------------------------
1.5 Upgrading Windows® 95 OSR2.0 to OSR2.1 ---------------
1.6 Upgrading Windows NT® 4.0 with Service Pack 3 ----------
1.7 Installing the Graphics Card ----------------------------------------
1.8 Connecting the Graphics Card-------------------------------------
Installing the Graphics Card Drivers ----------------------------
2.1 Installing the Drivers in Windows® 95 ---------------------------
2.2 Installing the Drivers in Windows® 98 ---------------------------
2.3 Installing DirectX 6.0 in Windows® 95/98 ------------------
2.4 Installing the Drivers in Windows NT® 4.0 --------------------
Testing the Graphics Card in Windows® 95/98 &
Adjusting the Display Properties --------------------------------
3.1 Testing the Graphics Card ------------------------------------------
3.2 Adjusting the Graphics Card's Display Properties ------------
4
4
5
5
6
6
6
7
10
11
11
14
17
17
18
18
18
Frequently Asked Questions --------------------------------------
Technical Specifications---------------------------------------------
Card Layout ------------------------------------------------------------
○○○○○○○○○○○○○○○○○○○○○○○○○○○○○○○○○○○○○○○○○
19
23
25
3
Page 4

○○○○○○○○○○○○○○○○○○○
Setting up Your Graphics Card
Congratulations on your purchase of the TNT2-AGP 128-bit Graphics
1.1 Minimum System Requirements
PC-based computer with PentiumII® processor.
AGP Bus slot.
10MB hard disk space (system files and drivers only).
CD-ROM drive.
Accelerator
Windows® 95 OSR 2.1, Windows® 98 or Windows NT® 4.0 with Service
Pack 3.
USB upgrade supplement if you are running Windows® 95 OSR 2.0.
Windows NT® Service Pack 3 or later if you are running Windows NT
4.0.
○○○○○○○○○○○○○○○○○○○○○○○○○○○○○○○○○○○○○○○○○
4
®
Page 5
CHAPTER 1 SETTING UP YOUR GRAPHICS CARD
1.2 Safety Precaution
Do not remove your graphics card from its protective bag until you are
ready to install it.
Always try to hold your graphics card by its edges. Avoid touching any
electronic components on your graphics card.
Static electricity can cause permanent damage to your graphics card. To
prevent such damage, you must ground yourself while installing the
card. You can do this in either of two ways :
» Use a grounding strap, which is a coiled wire with a clip at one
end and an elastic strap at the other. Wear the strap around your
wrist and attach the clip to any non-painted metal surface of the
computers chassis.
» If you do not have a grounding strap, touch any non-painted
surface of the computer's chassis before you begin installation, and
again every minute or so until the installation is completed.
1.3 Installation Notes
Computers vary in appearance and layout. Therefore, the installation
procedures in this chapter apply generally and you should compare the
illustrations here with your computer before you start the graphics card
installation.
A Philips-type screwdriver is required for the graphics card installation.
Your computers documentation should come in handy during the
graphics card installation. Have it ready by your side when you start
the graphics card installation.
If you have an existing graphics card (that is non-Plug-and-Play-based)
installed in your computer, you must first un-install its drivers before
you remove the graphics card. Refer to your existing graphics card
documentation for more details on this.
○○○○○○○○○○○○○○○○○○○○○○○○○○○○○○○○○○○○○○○○○
5
Page 6
CHAPTER 1 SETTING UP YOUR GRAPHICS CARD
1.4 Installation Procedure
To take advantage of all the features of the AGP graphics card,
please check that your system has Windows® 95 OSR2.1 or later
versions and DirectX 6.0 or later installed. If you are running
Windows NT® 4.0, make sure that it has been upgraded with
Service Pack 3.
The following Installation Procedure is recommended:
1. If you are running Windows® 95 OSR 2.0, upgrade it to Windows® 95 OSR
2.1. If you are running Windows NT® 4.0, upgrade it with Service Pack 3.
2. Install the graphics card.
3. Install the graphics card drivers from the Installation CD.
4. Install DirectX 6 or later versions (for Windows® 95/98 only).
1.5 Upgrading Windows® 95 OSR2.0 to OSR2.1
To upgrade from OSR2.0 to OSR2.1, first make sure you have OSR2.0
installed. By installing the USB upgrade, Windows® 95 OSR2.0 will be
upgraded to OSR2.1.
1.6 Upgrading Windows NT® 4.0 with Service Pack 3
If you are using Windows NT® Service Pack 1 or 2, upgrade to Service Pack
3 before installing the card.
○○○○○○○○○○○○○○○○○○○○○○○○○○○○○○○○○○○○○○○○○
6
Page 7
CHAPTER 1 SETTING UP YOUR GRAPHICS CARD
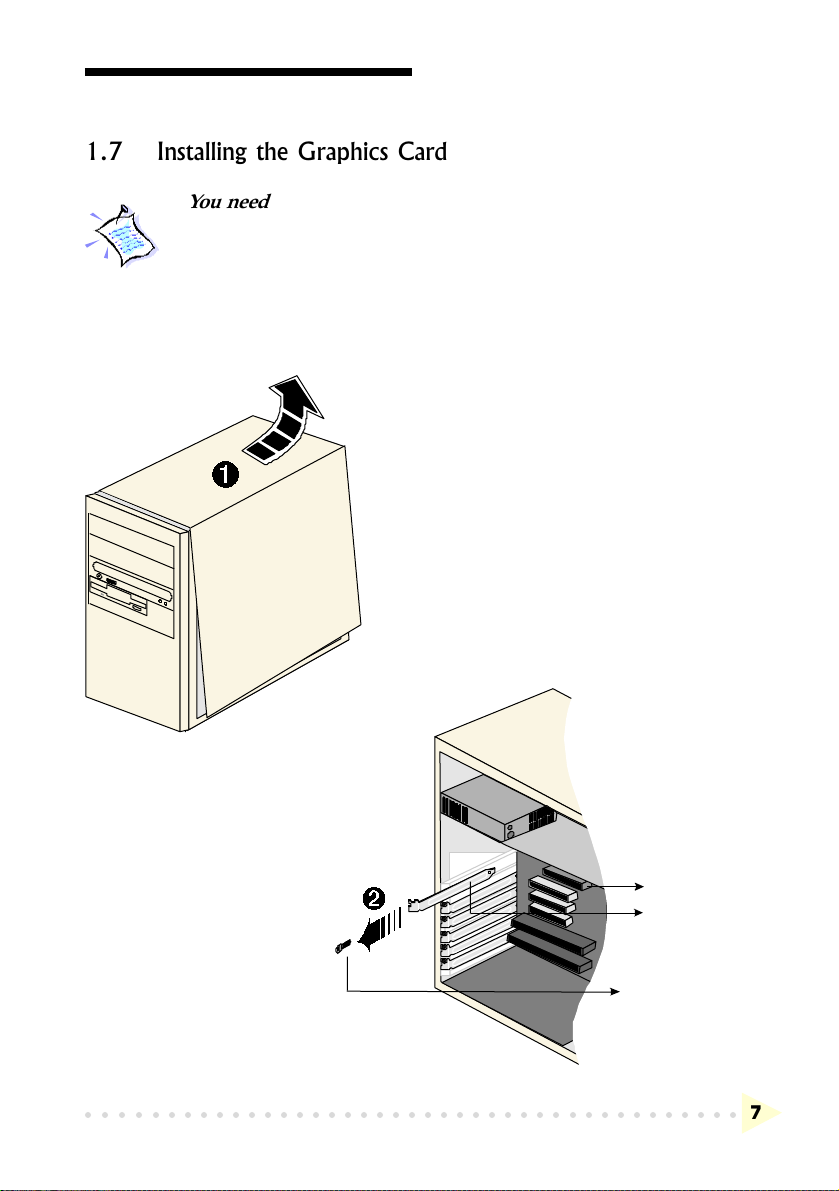
1.7 Installing the Graphics Card
You need to remove any existing graphics card installed in your
computer. Note that if the graphics card is non-plug-and-play-based,
you need to un-install it's drivers before you remove it. Check your
existing graphics card documentation for details on this.
Remember to switch off your computer and any connected
devices before starting with the installation of your graphics card.
1.
Remove your computers
chassis cover and set it aside,
somewhere out of your way.
Remove the cover
2.
plate of the AGP
Bus slot. Keep the
mounting screw to
secure your
graphics card later.
○○○○○○○○○○○○○○○○○○○○○○○○○○○○○○○○○○○○○○○○○
AGP Bus Slot
Cover Plate
Mounting Screw
7
Page 8
CHAPTER 1 SETTING UP YOUR GRAPHICS CARD
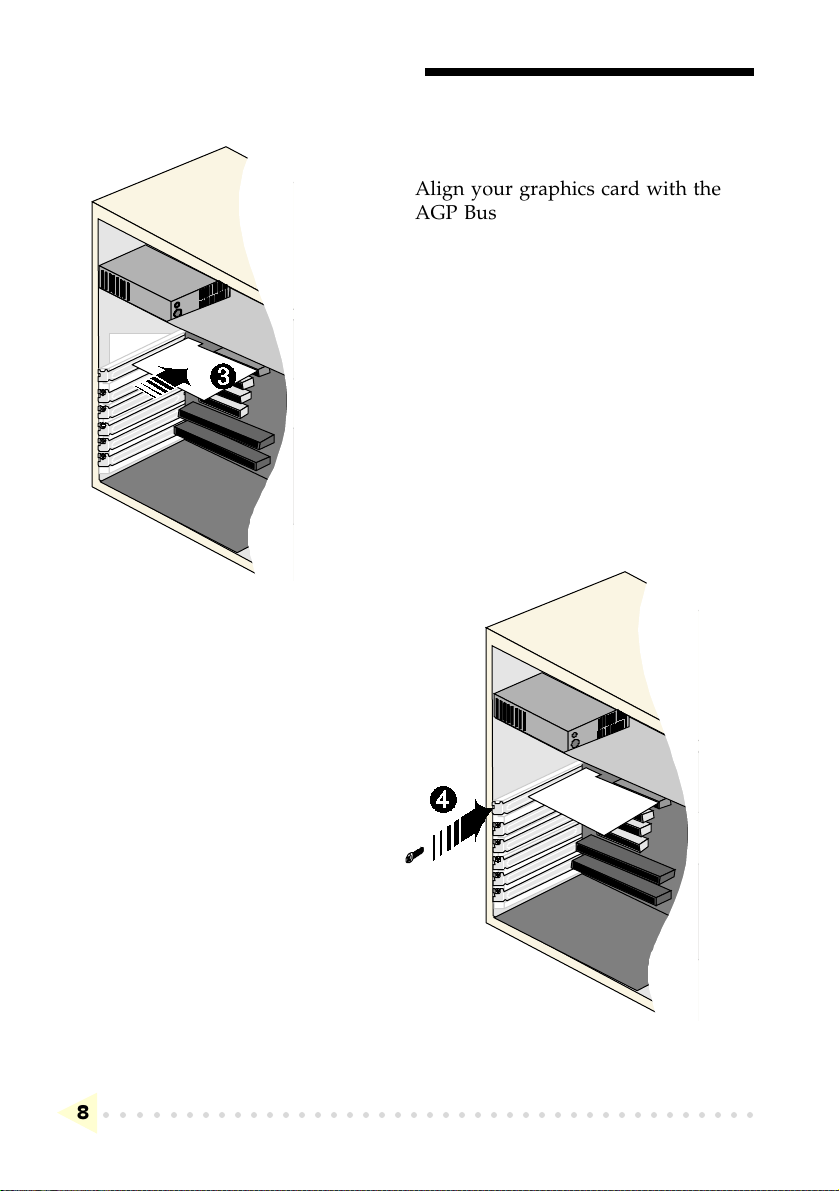
3.
Align your graphics card with the
AGP Bus slot and firmly push it into
the slot. If the card cannot be slide
in, do not force it. Make sure the
graphics card is lined up properly
and try again.
4.
Secure your graphics card to
the computer chassis with a
mounting screw.
○○○○○○○○○○○○○○○○○○○○○○○○○○○○○○○○○○○○○○○○○
8
Page 9

CHAPTER 1 SETTING UP YOUR GRAPHICS CARD
5.
Replace your computers chassis
cover.
○○○○○○○○○○○○○○○○○○○○○○○○○○○○○○○○○○○○○○○○○
9
Page 10

CHAPTER 1 SETTING UP YOUR GRAPHICS CARD
1.8 Connecting the Graphics Card
1. Plug your standard 15-pin male monitor cable into the VGA port, or, if
you are using a Digital Flat Panel, connect the video cable to the
Digital Flat Panel Jack * of the graphics card.
The TNT2-AGP and TNT2-AGP(A) models support both Composite
Video (CVBS) and S-Video (Y/C). If your TV is equipped with an S-
Video Jack, it is recommended that an S-video cable be connected for
better resolution.
Connect one end of the S-Video cable to the S-Video Jack of the
graphics card and the other end to the S-Video In of a TV set.
Otherwise, connect one end of the RCA-type cable to the TV Out Jack
of the graphics card and the other end to the Video In of a TV.
TV Out Jack
S-Video Jack
VGA Port
Digital Flat Panel
*
TNT2-AGP
Graphics
Card
* Digital Flat Panel Jack is available on TNT2-AGP
S-Video Jack and TV Out Jack are available on TNT2-AGP and TNT2-
AGP(A)
○○○○○○○○○○○○○○○○○○○○○○○○○○○○○○○○○○○○○○○○○
10
Page 11

○○○○○○○○○○○○○○○○○○○
Installing the Graphics Card Drivers
To take advantage of all the features of the AGP graphics card, please check that
your system has Windows® 95 OSR2.1 or later versions and DirectX 6.0 (or
later) installed. If you are running Windows NT® 4.0, make sure that it has been
upgraded with Service Pack 3 or later.
2.1 Installing the Drivers in Windows® 95
1. Turn on your computer to start Windows® 95. Windows® 95 will detect
the newly-installed graphics card and an Update Device Driver Wizard
window will appear. Place the Installation CD on the CD-ROM drive
and click Next.
○○○○○○○○○○○○○○○○○○○○○○○○○○○○○○○○○○○○○○○○○
11
Page 12

CHAPTER 2 INSTALLING THE GRAPHICS CARD DRIVERS
2. Allow the system to search for an updated driver and click Finish to
use the driver found.
3. When prompted to restart the system, click Yes to restart. This is to
ensure that the new graphics settings take effect.
○○○○○○○○○○○○○○○○○○○○○○○○○○○○○○○○○○○○○○○○○
12
Page 13

CHAPTER 2 INSTALLING THE GRAPHICS CARD DRIVERS
4. After restarting, a program folder called "TNT2-AGP Information" will
be created. It provides a link to the User's Manual, a list of FAQs and
the Readme.txt file. In order to read the User's Manual, Acrobat Reader
is required. Install Acrobat Reader first if you do not have the program.
5. From the Start button on the taskbar, click Settings and choose Control
Panel. Double-click the Display icon. Click the Settings tab and change
the Colour Palette to 16-bit or higher.
Please proceed to install DirectX 6.0.
○○○○○○○○○○○○○○○○○○○○○○○○○○○○○○○○○○○○○○○○○
13
Page 14

CHAPTER 2 INSTALLING THE GRAPHICS CARD DRIVERS
2.2 Installing the Drivers in Windows® 98
1. Turn on your computer to start Windows® 98. Windows® 98 detects the
newly-installed graphics card. Click Next to continue.
2. Place the Installation CD into the CD-ROM drive.
3. Select the Search for the best driver for your device. (Recommended)
option and click Next to continue.
○○○○○○○○○○○○○○○○○○○○○○○○○○○○○○○○○○○○○○○○○
14
Page 15

CHAPTER 2 INSTALLING THE GRAPHICS CARD DRIVERS
4. Enable the CD-ROM drive selection to direct Windows to search for the
drivers on the Installation CD. Click Next to continue.
5. Windows will prompt that it is ready to install the drivers. Click Next
and then Finish to complete the installation of the drivers.
○○○○○○○○○○○○○○○○○○○○○○○○○○○○○○○○○○○○○○○○○
15
Page 16

CHAPTER 2 INSTALLING THE GRAPHICS CARD DRIVERS
6. When prompted to restart the system, click Ye s. This is to ensure that
the new graphics settings take effect.
7. After restarting, a program folder called "TNT2-AGP Information" will
be created. It provides a link to the User's Manual, a list of FAQs and
the Readme.txt file. In order to read the User's Manual, Acrobat Reader
is required. Install Acrobat Reader first if you do not have the program.
8. From the Start button on the taskbar, click Settings and choose Control
Panel. Double-click the Display icon. Select the Settings tab and make
sure that the Colour Palette is set to 16-bit or higher. Click the
Advanced... button.
Please proceed to install DirectX 6.0.
○○○○○○○○○○○○○○○○○○○○○○○○○○○○○○○○○○○○○○○○○
16
Page 17

CHAPTER 2 INSTALLING THE GRAPHICS CARD DRIVERS
2.3 Installing DirectX 6.0 in Windows® 95/98
1. Place the Installation CD onto the CD-ROM drive.
2. In Windows® 95/98, click the Start button and then Run.
3. In the text box, type "D:\Directx6\directx\dxsetup.exe" (where D is the
letter of your CD-ROM drive) and click OK.
4. A DirectX(R) Setup window appears. Make sure that under Options,
Direct-3D Hardware Acceleration Enabled is checked. Click Reinstall
DirectX.
5. Follow all on-screen instructions to complete the installation of DirectX.
Please proceed to the next chapter on testing the card.
2.4 Installing the Drivers in Windows NT® 4.0
1. Start Windows NT® 4.0.
2. Place the Installation CD in the CD-ROM drive.
3. From the Windows NT® taskbar, click the Start button and then select
Settings, Control Panel.
4. Double-click the Display icon.
5. Click the Settings tab and then click the Display Type button.
6. Click the Change button and a Change Properties window appears.
7. Place the Installation CD into the CD-ROM drive and click Have Disk.
Browse to D:\winntX (D is the CD-ROM drive's letter). The system
will locate the driver.
8. Click OK twice to finish the installation of the drivers.
○○○○○○○○○○○○○○○○○○○○○○○○○○○○○○○○○○○○○○○○○
17
Page 18

○○○○○○○○○○○○○○○○○○○
Testing the Graphics Card in
Windows® 95/98 &
Adjusting the Display Properties
3.1 Testing the Graphics Card
1. From the Windows® 95/98 taskbar, click the Start button and then select
Settings and Control Panel.
2. Double-click the System icon.
3. A System Properties window appears. Click the Device Manager tab.
4. Double-click on the Display adapters to reveal the TNT2-AGP graphics
card. Double-click on it.
5. A TNT2-AGP Properties window appears. Under the General tab,
check that the Device Status has the message: "This device is working
properly". This means that your graphics card had been installed
properly.
3.2 Adjusting the Graphics Card's Display Properties
When the drivers have been successfully installed, you can change the display
resolution, color and other settings (Windows® 95/98 only). Other than the
information in this User's Manual, more details can be obtained by clicking on
the button at the top-right of the Display Properties window and then
clicking on the section you wish to know more about.
○○○○○○○○○○○○○○○○○○○○○○○○○○○○○○○○○○○○○○○○○
18
Page 19

○○○○○○○○○○○○○○○○○○○
Frequently Asked Questions
You may encounter some problems or doubts while installing or using your card.
This chapter highlights some of the more common issues concerning your card and
their possible solutions. Reviewing this chapter can help you solve many problems
and often eliminate the need for telephone assistance.
Why does my Monitor display flicker badly?
Change your Refresh Rate at your Display properties in the
Control Panel to 60Hz or higher. Refresh rate below 60Hz
generally flickers badly. It is also Monitor-dependent.
There are no refresh rate settings for some of the screen
resolutions.
The refresh rates for these screen resolutions are fixed at a certain
value.
My System hangs when playing games such as Forsaken or
MageSlayer.
There are patches available for downloading from the Web Sites
of the respective Games Vendors that will enable the fixing of
these issues.
○○○○○○○○○○○○○○○○○○○○○○○○○○○○○○○○○○○○○○○○○
19
Page 20

APPENDIX A FREQUENTLY ASKED QUESTIONS
There is no display after I plugged in the Card and switched
on the System.
Check that your monitor cables and power cables are plugged in
properly and power supply switched on. The card may not be
inserted fully into the AGP slot. Try taking out and putting back
the card again.
I am unable to obtain 1600X1200 resolution on my monitor.
The highest resolution that the Graphic Card is able to run is
dependent on the Monitor itself. If your monitor does not support
this resolution, then you will not be able to go up to this
resolution.
I cannot get 16 color using screen resolutions above 1280X1024.
Screen resolutions above 1280X1024 can only be run at a
minimum of 256 color. This is a common implementation among
Graphic Cards Manufacturers.
Under Windows NT® 4.0, I am unable to install the Graphics
Card correctly.
Under Windows NT® 4.0, you must first install Windows NT® 4.0
Service Pack 3 or later in order to get AGP support.
I am having difficulties installing the Graphics Card Under
Windows® 95.
Please ensure that you have installed USB Supplement from
Microsoft and there are no conflicting devices in your device
Manager that may be causing Resources allocation problem. Also
check that you have installed DirectX 6.0 or later for best
performances.
○○○○○○○○○○○○○○○○○○○○○○○○○○○○○○○○○○○○○○○○○
20
Page 21

APPENDIX A FREQUENTLY ASKED QUESTIONS
Do I need to install DirectX 6.0 in the Installation CD under
Windows NT® 4.0?
The DirectX 6.0 is meant for Windows® 95 SR2.1 or later. Do
not install it under Windows NT® 4.0.
Can I install the TNT2-AGP Graphics Card under Windows® 95
OSR1 or earlier?
Due to the fact that Windows® 95 OSR1 or earlier does not have
support for AGP devices, the features of the TNT2-AGP will not
be fully utilised.
After the drivers are installed and Windows restarted, there is
Plug and Play detection of my Monitor. Why is this so?
The Plug and Play detection of your monitor is to enable the
TNT2-AGP Graphics Card to detect the capabilities and limits of
your Monitors Supported Resolutions and Refresh Rates. If you
are uncertain of what to choose, just click the Next button and
let Windows select the most appropriate drivers for your Monitor.
○○○○○○○○○○○○○○○○○○○○○○○○○○○○○○○○○○○○○○○○○
21
Page 22

○○○○○○○○○○○○○○○○○○○
Technical Specifications
GENERAL
♦ Full Power True 128-bit TwiN-Texel (TNT) architecture
♦ 2 Texture mapped, lit pixels per clock
♦ Single pass multi-texture rendering
♦ 128-bit wide frame buffer interface
♦ 32MB SDRAM Memory on board (TNT2-AGP(B) 16MB)
♦ 4X/2X/1X AGP interface with full sideband support
♦ Optimized for Direct3D acceleration with complete support for DirectX5.0
and 6.0
♦ Video acceleration for DirectShow , MPEG-1, MPEG-2 and Indeo
♦ Triple 8-bit 300MHz Palette DAC
♦ Digital Flat Panel Support (TNT2-AGP only)
♦ NTSC and PAL output (TNT2-AGP and TNT2-AGP[A] only)
♦ Operating at memory bus speed of 150MHz
♦ Resolution of up to 2048 x 1536 @ 60Hz
♦ True color rendering
®
3D CAPABILITIES
♦ 100% Hardware Triangle Setup
♦ Optimized Direct3D acceleration
♦ Complete DirectX 6.0 support
♦ 32-bit Z-buffering with 8-bit stencil buffer
♦ Twin texel (TNT) 32-bit graphics pipeline
♦ 2 texture mapped, lit pixels per clock
♦ single pass multi-texturing support
♦ square and non-square support
♦ TextureBlend supports:
♦ Multi-texture
♦ Bump map
♦ Texture modulation
○○○○○○○○○○○○○○○○○○○○○○○○○○○○○○○○○○○○○○○○○
22
Page 23

APPENDIX B TECHNICAL SPECIFICATIONS
♦ Light maps
♦ Reflection maps
♦ Detail textures
♦ Environmental maps
♦ Procedural textures
♦ Backend blend
♦ DirectX6.0: 121 modes supported for source and destination and alpha
blending
♦ 32-bit ARGB rendering with destination alpha
♦ point sampled, bilinear, trilinear and 8-tap anisotropic filtering (better than
trilinear Mip mapping)
♦ Per pixel perspective correct texture mapping
♦ Fog
♦ Light
♦ Mip mapping
♦ Anti-aliasing, full scene and order independent
2D CAPABILITIES
♦ High performance 128-bit 2D/GUI/DirectDraw Acceleration
♦ Fast 32-bit VGA/SVGA support
♦ True color hardware cursor
♦ Hardware color dithering
♦ Full feature 2D Engine for acceleration of BLT, indexed, DIB, color transla-
tion, transparent BLT, stretchBLT, points, lins, lines, polylines, polygons,
fills, patterns, arbitrary rectangular clipping and fast text rendering from
hardware font cache
♦ Pipeline optimized for multiple color depths including 32,24,16,15 and 8-
bits per pixel
♦ Multi-buffering (Double, Triple, Quad buffering) for smooth animation and
video playback
VIDEO/DISPLAY/BIOS
♦ Advanced support for DirectDraw
♦ Back-end hardware video scaling for video conferencing and playback
♦ Hardware color space conversion
♦ Multiple video windows feature
♦ Flashable BIOS allows easy upgrading
○○○○○○○○○○○○○○○○○○○○○○○○○○○○○○○○○○○○○○○○○
23
Page 24

APPENDIX B TECHNICAL SPECIFICATIONS
♦ Composite and S-Video Out Connector (TNT2-AGP and TNT2-AGP[A] only)
♦ MDP-20 DFP Connector (TNT2-AGP only)
DIGITAL FLAT PANEL SUPPORT (TNT2-AGP only)
♦ Using Silicon Image, Inc Sil154
♦ Full compatibility with all PanelLink
®
receivers
♦ Resolution support from VGA - SXGA
♦ Digital Scaling and filtering for flat panels up to 1280X1024
♦ 24-bit True Color support in all modes (16.7 million colors)
TV OUTPUT (TNT2-AGP and TNT2-AGP[A] only)
♦ Supports 640x480, 640x400, 720x400, 800x600 and 512x384 resolutions
in PAL/NTSC modes
♦ Full support for Multiple-line flicker-filthering and Macrovision 7.1
API SUPPORT
♦ OpenGL ICD
♦ Direct3D
♦ DirectDraw
♦ DirectVideo
♦ DirectShow
♦ ActiveX
OPERATING SYSTEM & DRIVER SUPPORT
♦ Windows
♦ Windows
♦ Windows
♦ Windows NT
®
2000
®
98 Retail or later
®
95 SR 2.1 or later
®
4.0 with Service Pack 3 or later
The product specifications herein are subject to change without prior
notifications.
○○○○○○○○○○○○○○○○○○○○○○○○○○○○○○○○○○○○○○○○○
24
Page 25

○○○○○○○○○○○○○○○○○○○
Card Layout
Digital Flat Panel Jack is available on TNT2-AGP
TV Out Jack and S-Video Jack are available on TNT2-AGP and TNT2-AGP(A)
○○○○○○○○○○○○○○○○○○○○○○○○○○○○○○○○○○○○○○○○○
25
 Loading...