


 Loading...
AXIS 216FD Fixed Dome
Network Camera
User’s Manual

About this Document
This manual is intended for administrators and users of the AXIS 216FD Network Camera, and is applicable for software release 4.34 and later. It includes instructions for using and managing the AXIS 216FD on your network. Previous experience of networking will be of use when using this product. Some knowledge of UNIX or Linux-based systems may also be beneficial, for developing shell scripts and applications. Later versions of this document will be posted to the Axis Website, as required. See also the product’s online help, available via the Web-based interface.
Safety Notices Used In This Manual
Caution! - Indicates a potential hazard that can damage the product.
Important! - Indicates a hazard that can seriously impair operation.
Do not proceed beyond any of the above notices until you have fully understood the implications.
Intellectual Property Rights
Axis AB has intellectual property rights relating to technology embodied in the product described in this document. In particular, and without limitation, these intellectual property rights may include one or more of the patents listed at http://www.axis.com/patent.htm and one or more additional patents or pending patent applications in the US and other countries.
This product contains licensed third-party software. See the menu item “About” in the product’s user interface for more information.
This product contains source code copyright Apple Computer, Inc., under the terms of Apple Public Source License 2.0 (see http://www.opensource.apple.com/apsl/).
The source code is available from: http://developer.apple.com/darwin/projects/bonjour/
Legal Considerations
Video and audio surveillance can be prohibited by laws that vary from country to country. Check the laws in your local region before using this product for surveillance purposes.
This product includes one (1) MPEG-4 decoder license. To purchase further licenses, contact your reseller.
Electromagnetic Compatibility (EMC)
This equipment generates, uses and can radiate radio frequency energy and, if not installed and used in accordance with the instructions, may cause harmful interference to radio communications. However, there is no guarantee that interference will not occur in a particular installation.
If this equipment does cause harmful interference to radio or television reception, which can be determined by turning the equipment off and on, the user is encouraged to try to correct the interference by one or more of the following measures:
Re-orient or relocate the receiving antenna. Increase the separation between the equipment and receiver. Connect the equipment to an outlet on a different circuit to the receiver. Consult your dealer or an experienced radio/TV technician for help. Shielded (STP) network cables must be used with this unit to ensure compliance with EMC standards.
USA - This equipment has been tested and found to comply with the limits for a Class B computing device pursuant to Subpart B of Part 15 of FCC rules, which are designed to provide reasonable protection against such interference when operated in a commercial environment. Operation of this equipment in a residential area is likely to cause interference, in which case the user at his/her own expense will be required to take whatever measures may be required to correct the interference.
Canada - This Class B digital apparatus complies with Canadian ICES-003.
Europe - This digital equipment fulfills the requirements for radiated emission according to limit B of EN55022/1998, and the requirements for immunity according to EN55024/1998 residential, commercial, and light industry.
Japan - This is a class B product based on the standard of the Voluntary Control Council for Interference from Information Technology Equipment (VCCI). If this is used near a radio or television receiver in a domestic environment, it may cause radio interference. Install and use the equipment according to the instruction manual.
Australia - This electronic device meets the requirements of the Radio communications (Electromagnetic Compatibility) Standard AS/NZS CISPR22:2002.
Equipment Modifications
This equipment must be installed and used in strict accordance with the instructions given in the user documentation. This equipment contains no user-serviceable components. Unauthorized equipment changes or modifications will invalidate all applicable regulatory certifications and approvals.
Liability
Every care has been taken in the preparation of this manual. Please inform your local Axis office of any inaccuracies or omissions. Axis Communications AB cannot be held responsible for any technical or typographical errors and reserves the right to make changes to the product and manuals without prior notice. Axis Communications AB makes no warranty of any kind with regard to the material contained within this document, including, but not limited to, the implied warranties of merchantability and fitness for a particular purpose. Axis Communications AB shall not be liable nor responsible for incidental or consequential damages in connection with the furnishing, performance or use of this material.
Trademark Acknowledgments
Apple, Boa, Bonjour, Ethernet, Internet Explorer, Linux, Microsoft, Mozilla, Netscape Navigator, OS/2, Real, QuickTime, UNIX, Windows, WWW are registered trademarks of the respective holders. Java and all Java-based trademarks and logos are trademarks or registered trademarks of Sun Microsystems, Inc. in the United States and other countries. Axis Communications AB is independent of Sun Microsystems Inc.
UPnPTM is a certification mark of the UPnPTM Implementers Corporation.
This product includes MPEG-4 AAC audio coding technology licensed by Fraunhofer IIS. Refer to FHG audio home page http://www.iis.fraunhofer.de/amm/
Support
Should you require any technical assistance, please contact your Axis reseller. If your questions cannot be answered immediately, your reseller will forward your queries through the appropriate channels to ensure a rapid response. If you are connected to the Internet, you can:
•download user documentation and firmware updates
•find answers to resolved problems in the FAQ database. Search by product, category, or phrases
•report problems to Axis support by logging in to your private support area
•visit Axis Support at www.axis.com/techsup/
Safety Notice - Battery Replacement
The AXIS 216FD uses a 3.0V CR2032 Lithium battery as the power supply for its internal real-time clock (RTC). Under normal conditions this battery will last for a minimum of 5 years. Low battery power affects the operation of the RTC, causing it to reset at every power-up. A log message will appear when the battery needs replacing.
The battery should not be replaced unless required!
If the battery does need replacing, please observe the following:
•Danger of Explosion if battery is incorrectly replaced
•Replace only with the same or equivalent battery, as recommended by the manufacturer.
•Dispose of used batteries according to the manufacturer's instructions.
WEEE Directive
The European Union has enacted a Directive 2002/96/EC on Waste Electrical and Electronic Equipment (WEEE Directive). This directive is applicable in the European Union member states.
The WEEE marking on this product (see right) or its documentation indicates that the product must not be disposed of together with household waste. To prevent possible harm to human health and/or the environment, the product must be disposed of in an approved and environmentally safe recycling process. For further information on how to dispose of this product correctly, contact the product supplier, or the local authority responsible for waste disposal in your area.
Business users should contact the product supplier for information on how to dispose of this product correctly. This product should not be mixed with other commercial waste.
AXIS 216FD User’s Manual Rev.1.0
Part No: 26031
February 2006
Copyright© Axis Communications AB, 2006

4 AXIS 216FD
Contents |
|
Product Features . . . . . . . . . . . . . . . . . . . . . . . . . . . . . . . . . . . . . . . . . . . . . . . . . . . . . . . . . . . . . . . |
. 6 |
Key features . . . . . . . . . . . . . . . . . . . . . . . . . . . . . . . . . . . . . . . . . . . . . . . . . . . . . . . . . |
.6 |
Overview . . . . . . . . . . . . . . . . . . . . . . . . . . . . . . . . . . . . . . . . . . . . . . . . . . . . . . . . . . . . |
.7 |
LED indicators . . . . . . . . . . . . . . . . . . . . . . . . . . . . . . . . . . . . . . . . . . . . . . . . . . . . . . . . |
.8 |
Accessing the Camera . . . . . . . . . . . . . . . . . . . . . . . . . . . . . . . . . . . . . . . . . . . . . . . . . . . . . . . . . . . |
. 9 |
Access from a browser . . . . . . . . . . . . . . . . . . . . . . . . . . . . . . . . . . . . . . . . . . . . . . . . . |
9 |
Setting the Password . . . . . . . . . . . . . . . . . . . . . . . . . . . . . . . . . . . . . . . . . . . . . . . . . |
10 |
Accessing the camera from the Internet . . . . . . . . . . . . . . . . . . . . . . . . . . . . . . . . . . . |
10 |
Focusing . . . . . . . . . . . . . . . . . . . . . . . . . . . . . . . . . . . . . . . . . . . . . . . . . . . . . . . . . . . |
11 |
The Live View Page . . . . . . . . . . . . . . . . . . . . . . . . . . . . . . . . . . . . . . . . . . . . . . . . . . . . . . . . . . . . . |
12 |
Video Streams . . . . . . . . . . . . . . . . . . . . . . . . . . . . . . . . . . . . . . . . . . . . . . . . . . . . . . . . . . . . . . . . . |
14 |
How to stream MPEG-4 . . . . . . . . . . . . . . . . . . . . . . . . . . . . . . . . . . . . . . . . . . . . . . . |
14 |
MPEG-4 clients . . . . . . . . . . . . . . . . . . . . . . . . . . . . . . . . . . . . . . . . . . . . . . . . . . . . . . |
15 |
Motion JPEG . . . . . . . . . . . . . . . . . . . . . . . . . . . . . . . . . . . . . . . . . . . . . . . . . . . . . . . . |
15 |
Configuration . . . . . . . . . . . . . . . . . . . . . . . . . . . . . . . . . . . . . . . . . . . . . . . . . . . . . . . . . . . . . . . . . . |
17 |
Accessing the Setup tools . . . . . . . . . . . . . . . . . . . . . . . . . . . . . . . . . . . . . . . . . . . . . . |
17 |
AXIS Media Control . . . . . . . . . . . . . . . . . . . . . . . . . . . . . . . . . . . . . . . . . . . . . . . . . . . |
17 |
Video and Image settings . . . . . . . . . . . . . . . . . . . . . . . . . . . . . . . . . . . . . . . . . . . . . . |
18 |
Audio . . . . . . . . . . . . . . . . . . . . . . . . . . . . . . . . . . . . . . . . . . . . . . . . . . . . . . . . . . . . . . . . . . . . . . . . . |
21 |
Audio Settings . . . . . . . . . . . . . . . . . . . . . . . . . . . . . . . . . . . . . . . . . . . . . . . . . . . . . . |
21 |
Live View Config . . . . . . . . . . . . . . . . . . . . . . . . . . . . . . . . . . . . . . . . . . . . . . . . . . . . . . . . . . . . . . . |
24 |
Layout . . . . . . . . . . . . . . . . . . . . . . . . . . . . . . . . . . . . . . . . . . . . . . . . . . . . . . . . . . . . . |
24 |
HTML Examples . . . . . . . . . . . . . . . . . . . . . . . . . . . . . . . . . . . . . . . . . . . . . . . . . . . . . . |
27 |
External Video . . . . . . . . . . . . . . . . . . . . . . . . . . . . . . . . . . . . . . . . . . . . . . . . . . . . . . . |
27 |
Sequence Mode . . . . . . . . . . . . . . . . . . . . . . . . . . . . . . . . . . . . . . . . . . . . . . . . . . . . . . |
27 |
Event Configuration . . . . . . . . . . . . . . . . . . . . . . . . . . . . . . . . . . . . . . . . . . . . . . . . . . . . . . . . . . . . . |
28 |
Event Servers . . . . . . . . . . . . . . . . . . . . . . . . . . . . . . . . . . . . . . . . . . . . . . . . . . . . . . . |
28 |
Configuring Event Types . . . . . . . . . . . . . . . . . . . . . . . . . . . . . . . . . . . . . . . . . . . . . . . |
29 |
Motion Detection . . . . . . . . . . . . . . . . . . . . . . . . . . . . . . . . . . . . . . . . . . . . . . . . . . . . |
31 |
Port Status . . . . . . . . . . . . . . . . . . . . . . . . . . . . . . . . . . . . . . . . . . . . . . . . . . . . . . . . . |
32 |
System Options . . . . . . . . . . . . . . . . . . . . . . . . . . . . . . . . . . . . . . . . . . . . . . . . . . . . . . . . . . . . . . . . |
33 |
Security . . . . . . . . . . . . . . . . . . . . . . . . . . . . . . . . . . . . . . . . . . . . . . . . . . . . . . . . . . . . |
33 |
Date & Time . . . . . . . . . . . . . . . . . . . . . . . . . . . . . . . . . . . . . . . . . . . . . . . . . . . . . . . . |
34 |
Network - Basic TCP/IP Settings . . . . . . . . . . . . . . . . . . . . . . . . . . . . . . . . . . . . . . . . . |
35 |
Network - Advanced TCP/IP Settings . . . . . . . . . . . . . . . . . . . . . . . . . . . . . . . . . . . . . . |
35 |
SMTP (email) . . . . . . . . . . . . . . . . . . . . . . . . . . . . . . . . . . . . . . . . . . . . . . . . . . . . . . . . |
38 |
UPnP™ . . . . . . . . . . . . . . . . . . . . . . . . . . . . . . . . . . . . . . . . . . . . . . . . . . . . . . . . . . . . . |
38 |
RTP / MPEG-4 . . . . . . . . . . . . . . . . . . . . . . . . . . . . . . . . . . . . . . . . . . . . . . . . . . . . . . . |
38 |
Ports & Devices . . . . . . . . . . . . . . . . . . . . . . . . . . . . . . . . . . . . . . . . . . . . . . . . . . . . . . |
38 |
LED Settings . . . . . . . . . . . . . . . . . . . . . . . . . . . . . . . . . . . . . . . . . . . . . . . . . . . . . . . . |
38 |
Maintenance . . . . . . . . . . . . . . . . . . . . . . . . . . . . . . . . . . . . . . . . . . . . . . . . . . . . . . . . |
39 |
Support . . . . . . . . . . . . . . . . . . . . . . . . . . . . . . . . . . . . . . . . . . . . . . . . . . . . . . . . . . . . |
39 |

AXIS 216FD 5
Resetting to the Factory Default Settings . . . . . . . . . . . . . . . . . . . . . . . . . . . . . . . . . . . . . . . . . . . 40 Advanced . . . . . . . . . . . . . . . . . . . . . . . . . . . . . . . . . . . . . . . . . . . . . . . . . . . . . . . . . . 40
The I/O Terminal Connector . . . . . . . . . . . . . . . . . . . . . . . . . . . . . . . . . . . . . . . . . . . . . . . . . . . . . . 41 Pinout and Interface . . . . . . . . . . . . . . . . . . . . . . . . . . . . . . . . . . . . . . . . . . . . . . . . . . . . . . . . . . . . 41 Troubleshooting . . . . . . . . . . . . . . . . . . . . . . . . . . . . . . . . . . . . . . . . . . . . . . . . . . . . . . . . . . . . . . . . 43 Technical Specifications . . . . . . . . . . . . . . . . . . . . . . . . . . . . . . . . . . . . . . . . . . . . . . . . . . . . . . . . . 48 Glossary of Terms . . . . . . . . . . . . . . . . . . . . . . . . . . . . . . . . . . . . . . . . . . . . . . . . . . . . . . . . . . . . . . . 52 Index . . . . . . . . . . . . . . . . . . . . . . . . . . . . . . . . . . . . . . . . . . . . . . . . . . . . . . . . . . . . . . . . . . . . . . . . . 58
6 AXIS 216FD - Product Features
Product Features
AXIS 216FD Fixed Dome Network Camera is a high-performance, progressive-scan camera for professional surveillance. Its discreet, compact casing effectively protects against tampering. Two-way audio support enables communication with visitors or intruders. Multi-window motion detection and simultaneous Motion JPEG and MPEG-4 allow for optimization both on image quality and bandwidth efficiency. Up to 30 fps in VGA. Multi-level password protection, IP-address filtering and HTTPS encryption ensures network security. Power over Ethernet reduces cabling and enables centralized power back up. Supported by the industry's largest base of surveillance applications, this camera constitutes the perfect solution for securing e.g. stores, schools and offices.
For indoor use only
Key features
•Discreet and compact design, effectively protecting against tampering
•Superior image quality with progressive scan and 30 frames per second in VGA
•Simultaneous Motion JPEG and MPEG-4 for optimized quality and bandwidth
•Two-way audio support including built-in microphone
•Power over Ethernet for reduced cabling and consolidated power
•Multi-window motion detection with alarm image buffering

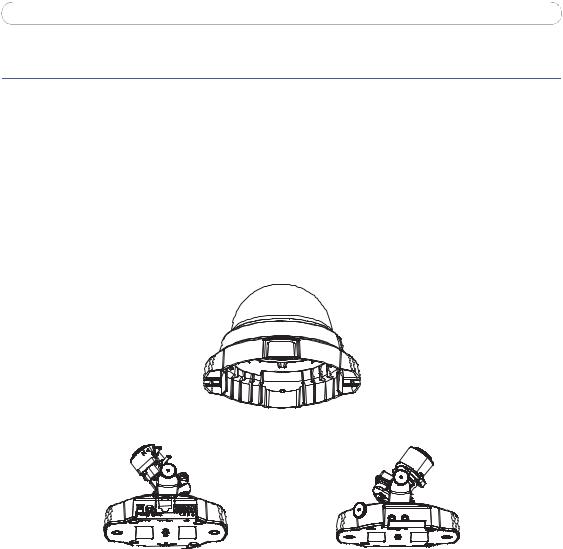
Overview
Status indicator (LED) 
Control button
Power connector
Power indicator (LED)
Camera unit
Microphone
|
|
Network |
|
|
|
|
connector |
|
|
|
|
and PoE |
I/O terminal |
|
Network |
||||
|
||||
indicator |
|
connector |
||
(LED) |
|
|
||
AXIS 216FD - Product Features 7
Dome casing
Cover plates
Audio out Audio in
Serial number (S/N)
The serial number is required during the installation.
Please make a note of the serial number and retain for future reference.
Microphone - Built-in microphone for one way audio.
To prevent unauthorized listening, the internal microphone can be disabled by inserting a plug in the 'Audio in' connector.
Power Connector - For connection of the PS-H power adapter (included).
I/O Connector - The I/O terminal connector provides the physical interface to one transistor output, one digital input and an auxiliary connection point for DC power. For more information, see The I/O Terminal Connector, on page 42.
Network Connector - The camera connects to the network via a standard network connector. Supporting NWAY, the camera detects the speed of the local network segment (10BaseT/100BaseTX Ethernet). Supporting PoE (Power over Ethernet), the camera can be powered directly from the network cabling.

8 AXIS 216FD - Product Features
Audio out- Audio output (line level), which can be connected to a public address (PA) system or an active speaker with a built-in amplifier. A pair of headphones can also be attached. A stereo connector must be used for the audio out.
Audio in - One 3.5mm input for a mono microphone, or for line-in mono signal (left channel is used from a stereo signal).
Serial Number Label - The serial number may be required during installation.
Control Button - Press this button to install using the AXIS Internet Dynamic DNS Service, or to restore the factory default settings, as described in Resetting to the Factory Default Settings, on page 41.
I/O terminal connector:
Pin |
Function |
Description |
|
|
|
4 |
Transistor |
With a maximum load of 50mA and a maximum voltage of 24V |
|
Output |
DC, this output has an open-collector NPN transistor with the |
|
|
emitter connected to the GND pin. If used with an external relay, |
|
|
a diode must be connected in parallel with the load, for protec- |
|
|
tion against voltage transients. |
|
|
|
3 |
Digital Input |
Connect to GND to activate, or leave floating (or unconnected) to |
|
|
deactivate. |
|
|
|
2 |
3.3V DC |
Can be used to power auxiliary equipment, max 50mA. |
|
|
|
1 |
GND |
|
|
|
|
LED indicators: |
|
|
LED |
Color |
Description |
|
|
|
Network |
Green |
Steady for connection to 100 Mbit/s network. Flashes for network activity. |
|
|
|
|
Amber |
Steady for connection to 10 Mbit/s network. Flashes for network activity. |
|
|
|
|
Unlit |
No connection. |
|
|
|
Status |
Green |
Shows steady green for normal operation. |
|
|
Note: The Status LED can be configured to be unlit during normal operation, |
|
|
or to flash only when the camera is accessed. See the online help files for |
|
|
more information. Go to Setup > System Options > LED settings |
|
|
|
|
Amber |
Steady during startup, reset to factory default or when restoring settings. |
|
|
|
|
Red |
Slow flash for failed upgrade. |
|
|
|
Power |
Green |
Normal operation. |
|
|
|
|
Amber |
Flashes green/amber during firmware upgrade. |
|
|
|
AXIS 216FD - Accessing the Camera 9
Accessing the Camera
Before accessing the camera it must be installed. Please see the installation guide supplied with your product.
The camera can be used with most standard operating systems and browsers. The recommended browser is Microsoft Internet Explorer with Windows, Safari with Macintosh and Mozilla with other operating systems.
Notes: • To view streaming video in Microsoft Internet Explorer, set your browser to allow ActiveX controls and allow the AXIS Media Control (AMC) to be installed on your workstation.
•QuickTimeTM and Real PlayerTM are also supported for viewing streaming MPEG-4 video and audio.
•If your workstation restricts the use of additional software components, the camera can be configured to use a Java applet for viewing motion JPEG.
•The AXIS 216FD includes one (1) decoder license for viewing MPEG-4 video streams. This is automatically installed with AMC. The administrator can disable the installation of the MPEG-4 decoder, to prevent unlicensed copies being installed.
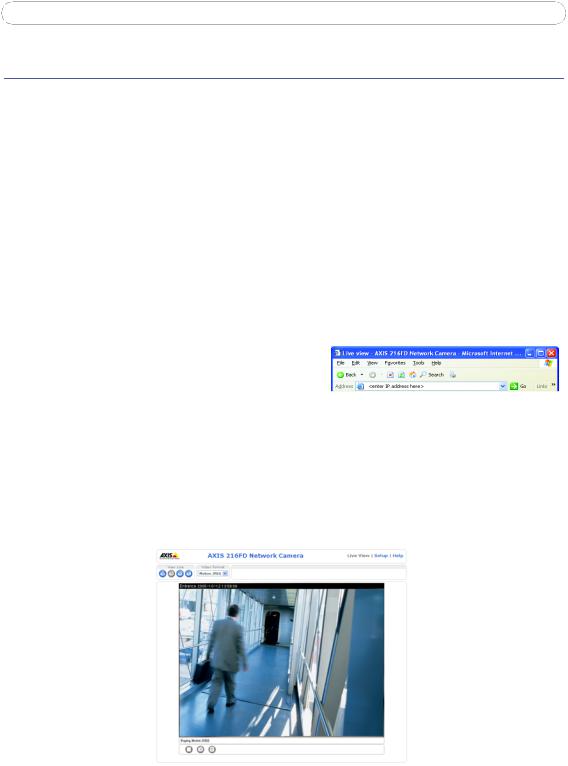
Access from a browser
1.Start a browser (e.g. Internet Explorer, Mozilla)
2.Enter the IP address or host name of the camera in the Location/Address field of your browser.
To access the camera from a Macintosh computer (Mac OSX), simply click on the Bonjour tab and select the AXIS 216FD from the drop-down list.
3.If this is the first time the camera is accessed, see Setting the Password, on page 10. Otherwise enter your user name and password, as set by the administrator.
4.The camera’s Live View page is now displayed in your browser.
Note: The layout of the Live View page may have been customized to specific requirements. Consequently, some of the examples and functions featured here may differ from those displayed on your own Live View page.
10 AXIS 216FD - Accessing the Camera
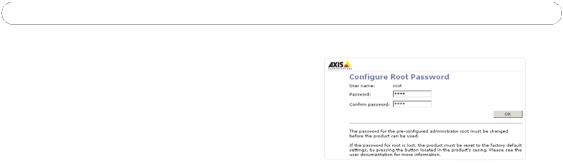
Setting the Password
1.When accessing the camera for the first time, the ‘Configure Root Password’ dialog will be displayed on the screen.
2.Enter a password and then re-enter it, to confirm the spelling. Click OK.
3.The ‘Enter Network Password’ dialog will appear. Enter the User name: root
Note: The default administrator user name root is permanent and cannot be deleted.
4.Enter the password as set in step 2 above, and click OK. If the password is lost, the camera must be reset to the factory default settings. See page 41.
5.If required, click Yes to install the AXIS Media Control (AMC). You will need administrator rights on the computer to do this.
Accessing the camera from the Internet
Once installed, the camera is accessible on your local network (LAN). To access the camera from the Internet you must configure your broadband router to allow incoming data traffic to the camera. To do this, enable the NAT-traversal feature, which will attempt to automatically configure the router to allow access to the camera. This is enabled from
Setup > System Options > Network > TCP/IP Advanced.
For more information, please see NAT traversal (port mapping), on page 36. See also the AXIS Internet Dynamic DNS Service at www.axiscam.net or, for Technical notes on this and other topics, visit the Axis Support Web at www.axis.com/techsup
AXIS 216FD - Accessing the Camera 11
Adjusting the image
Image |
Focus |
|
balance |
puller |
|
Zoom puller |
||
ring |
||
Tilt |
Tilt |
|
adjustment |
||
adjustment |
||
screw |
||
screw |
||
|
Locking screw 

1.Open the Live View page in the Web interface and make the following adjustments on the camera:
2.Loosen the locking screw and tilt adjustment screws.
3.Turn the lens to the desired position.
4.Once satisfied, gently tighten the locking screw and tilt adjustment screws to secure the camera’s position.
5.Turn the image balance ring to set the horizontal position.
6.Open the Focus Adjustment page in the Web interface under Basic Configuration > Focus and follow the on-screen instructions. Use the image window to adjust the focus and zoom.
•To set the focus and zoom, loosen the zoom and focus pullers counterclockwise and rotate the rings.
•Lock the focus and zoom pullers in position by rotating the screws clockwise.
12 AXIS 216FD - Accessing the Camera
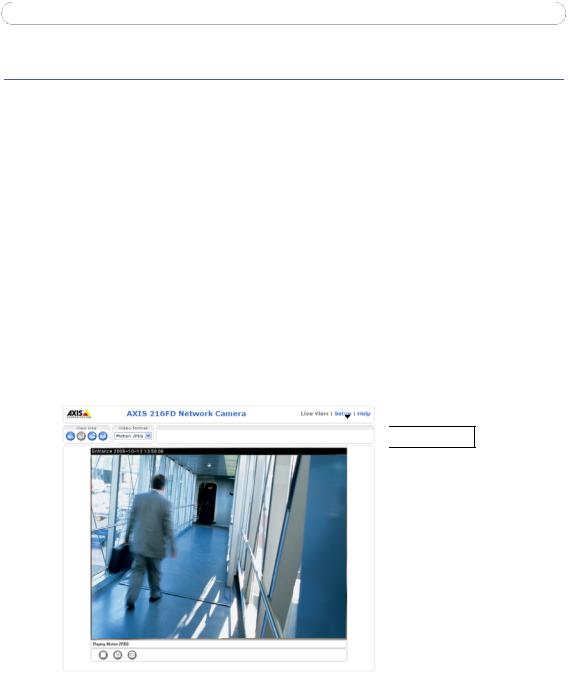
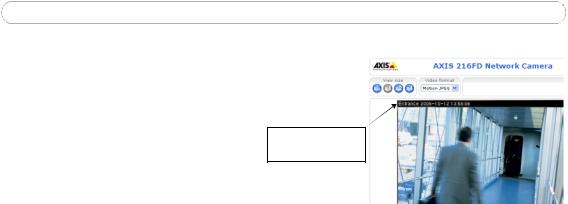
The Live View Page
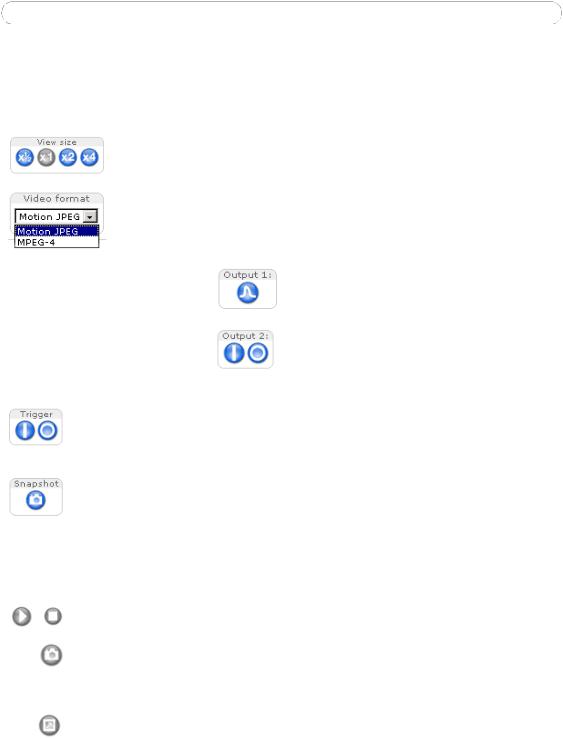
Depending on whether or not the Live View page has been customized, the buttons described below may or may not be visible.
To resize the video image, click the View Size buttons: half-size (x1/2), full-size (x1), x2 or x4. Note that this does not change the video image’s resolution, but simply how it is displayed.
The Video Format drop-down list allows the video format on the Live View page to be temporarily changed.
The Output buttons control the output directly from the Live View page. These buttons are configured under Setup > Live View Config > Layout.
Pulse - click this button to activate the output for a defined period of time, e.g. to switch on a light for 20 seconds.
Active/Inactive - click these buttons to manually start and stop a connected device, e.g. switch a light on/off.
The Action buttons can trigger an event directly from the Live View page. These are configured under Setup > Live View Config > Layout.
The Snapshot button saves a snapshot of the video image currently being displayed. Right-click on the video image to save it in JPEG format on your computer. This button is primarily intended for use when the AMC viewer toolbar is not available.
The AMC viewer toolbar (AXIS Media Control) is available in Microsoft Internet Explorer only. It displays the following buttons:
The Play/Stop button starts and stops the live video stream.
The Snapshot button saves a snapshot of the video image currently being displayed. The Snapshot function and the target directory for saving snapshots can be configured from the AMC Control Applet in the Windows Control Panel (Internet Explorer only).
Click the View Full Screen button to make the video image fill the entire screen area. No other windows will be visible. Press Esc (Escape) on the computer keyboard to exit full screen.

AXIS 216FD - Accessing the Camera 13
AMC audio controls
There are audio controls for controlling the client computer’s speaker output. These controls are only available when audio is enabled, see AXIS Media Control, on page 17 and Audio, on page 21.
Click the Speaker and Microphone buttons to switch the sound off and on for the speaker and microphone, respectively.
Use the sliders to control the volume on the speaker and microphone. The volume can be set between 0 and 100.
The Buffer slider controls the size of the buffer for audio. A higher level will reduce audio break-up, but may introduce a noticeable lag in audio transmission. There are four settings i.e. min, low, high and max.
When using Half-duplex mode, this button toggles between allowing you to speak and listen. The first icon indicates that you can talk and the speaker attached to the camera will play your voice. The second indicates that you will hear audio from the camera, but no audio will be sent to any web clients.
When in simplex talk mode, the icon toggles between allowing you to speak and is dimmed when you do not want other clients to receive any audio.

14 AXIS 216FD - Video Streams
Video Streams
The AXIS 216FD provides several different image and video stream formats. The type to use depends on your requirements and on the properties of your network.
The Live View page in the AXIS 216FD provides access to MPEG-4 and Motion JPEG video streams, as well as to single JPEG images. Other applications and clients can also access these video streams/images directly, without going via the Live View page.
How to stream MPEG-4
This video compression standard makes good use of bandwidth, and can provide DVD-quality video streams at less than 1 Mbit/s. Note that the image settings of the MPEG-4 stream are the same for all clients.
Deciding on the combination of protocols and methods to use depends on your viewing requirements, and on the properties of your network. The available options in AMC are:
Unicast RTP |
This unicast method (RTP over UDP) should be your |
|
|
|
first consideration for live video, especially when it is |
|
|
|
important to always have an up-to-date video stream, |
Unicasting is used for video-on-demand |
|
|
even if some images are dropped. |
||
|
|
broadcasting, so that there is no video traf- |
|
|
|
||
RTP over RTSP |
This unicast method (RTP tunneled over RTSP) is use- |
fic on the network until a client connects |
|
|
ful as it is relatively simple to configure firewalls to |
and requests the stream. |
|
|
allow RTSP traffic. |
Note: There is a maximum of 20 simulta- |
|
|
|
neous viewers. |
|
RTP over RTSP over HTTP |
This unicast method can be used to traverse firewalls. |
||
|
|||
|
Firewalls are commonly configured to allow the HTTP |
|
|
|
protocol, thus allowing RTP to be tunneled. |
|
|
|
|
|
|
Multicast RTP |
This method (RTP over TCP) should be your first con- |
Multicasting provides the most efficient |
|
|
sideration for live video, especially when it is impor- |
usage of bandwidth, especially when there |
|
|
tant to always have an up-to-date video stream, even |
are large numbers of clients viewing simul- |
|
|
if some images are dropped. |
taneously. Note however, that a multicast |
|
|
|
broadcast cannot pass a network router |
|
|
|
unless the router is configured to allow this. |
|
|
|
It is thus not possible to multicast over e.g. |
|
|
|
the Internet. |
|
|
|
|
AMC will negotiate with the camera to determine exactly which transport protocol to use in the order listed above. This order can be changed and the options disabled, to suit any specific requirements.
Important!
MPEG-4 is licensed technology. The AXIS 216FD includes one viewing client license. Installing additional unlicensed copies of the viewing client is prohibited. To purchase additional licenses, contact your Axis reseller.
AXIS 216FD - Video Streams 15
MPEG-4 clients
AXIS Media Control (AMC)
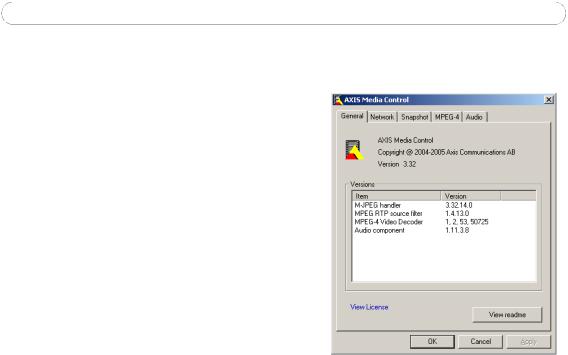
The recommended method of accessing live video (MPEG-4 and Motion JPEG) from the AXIS 216FD is to use the AXIS Media Control (AMC) in Microsoft Internet Explorer in Windows.
The AMC control panel can be used to configure various video and audio settings. Please see the readme file included in the tool for more information.
The AMC control panel is automatically installed on first use, after which it can be configured. Open the AMC Control Panel from:
•Windows Control Panel (from the Start menu)
•Alternatively, right-click the video image in Internet Explorer and click Settings in the menu.
QuickTime™ & Real Player™
To access the video stream from e.g. QuickTime™ or Real Player™ the following paths can be used:
•rtsp://<ip>/mpeg4/media.amp
•rtsp://<ip>/mpeg4/media.3gp
Notes: • The AXIS 216FD supports QuickTime 6.5.1 (or later) and Real Player 10.5 (or later)
•QuickTime adds latency to the video and audio stream (up to 3 seconds)
•It may be possible to use other players to view the MPEG-4 stream using the paths above, although this is not guaranteed by Axis
•<ip> = IP address
Motion JPEG
This format uses standard JPEG still images for the video stream. These images are then displayed and updated at a rate sufficient to create a stream that shows constantly updated motion.
The Motion JPEG stream uses considerable amounts of bandwidth, but provides excellent image quality and access to each and every individual image contained in the stream. The recommended method of accessing Motion JPEG live video from the AXIS 216FD is to use the AXIS Media Control (AMC) in Microsoft Internet Explorer in Windows.
Note also that multiple clients accessing Motion JPEG streams can use different image settings.

16 AXIS 216FD - Video Streams
Alternative methods of accessing the video stream
Video/images from the AXIS 216FD can also be accessed in the following ways:
•Motion JPEG server push (if supported by the client, e.g. Mozilla/Firefox). This option maintains an open HTTP connection to the browser and sends data as and when required, for as long as required. See HTML Examples, on page 27.
•Still JPEG images in a browser. Enter e.g. the path: http://<ip>/axis-cgi/jpg/image.cgi?resolution=320x240
•Windows Media Player. This requires AMC and the MPEG-4 viewing client to be installed. The paths that can be used are listed below in the order of preference.
•Unicast via RTP: axrtpu://<ip>/mpeg4/media.amp
•Unicast via RTSP: axrtsp://<ip>/mpeg4/media.amp
•Unicast via RTSP, tunneled via HTTP: axrtsphttp://<ip>/mpeg4/media.amp
•Multicast: axrtpm://<ip>/mpeg4/media.amp
Note: <ip> = IP address
AXIS 216FD - Configuration 17
Configuration
This section describes how to configure the camera, and is intended for product Administrators, who have unrestricted access to all the Setup tools, and Operators, who have access to the settings for Video & Image, Audio, Live View Config and Event Configuration.
The camera is configured from Setup, from a standard browser (see Minimum web browsing requirements, on page 50).
The descriptions below show examples of the features available in the AXIS 216FD. For details of each setting, please refer to the online help available from the setup tools. Click  to access the online help.
Accessing the Setup tools
Follow the instructions below to access the Setup Tools from a browser.
1.Start your browser and enter the IP address or host name of the camera in the location/address field.
2.The Live View page is now displayed. Click Setup to display the Setup tools.
 Setup tools
AXIS Media Control
The AXIS Media Control (AMC) is installed automatically the first time the camera is accessed from Microsoft Internet Explorer. The AMC control panel can be opened by right-clicking on the video image in the Live View web page. The AMC control panel can be used to configure various video and audio settings. Please see the readme file included in the tool for more information.
18 AXIS 216FD - Configuration
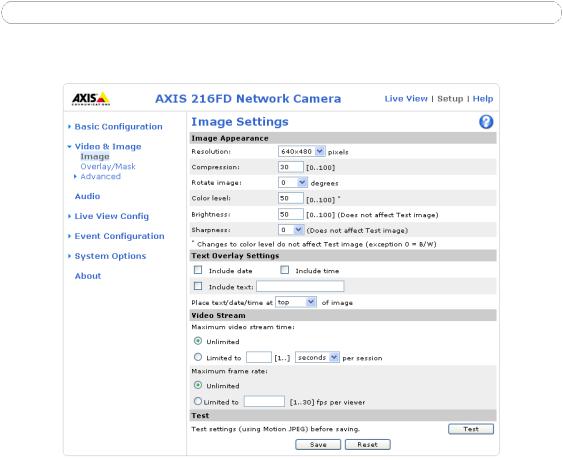
Video and Image settings
Image Appearance
Use these settings to change the image as required. The video image can be rotated and fine-tuned by adjusting the color level, the brightness and the sharpness.
The configuration of the video image will affect the camera’s overall performance, depending on how it is used and on the available bandwidth. Setting higher resolution and lower compression improves video image quality, but increases the amount of bandwidth used.
Please see the online help for further information on these settings.
Text Overlay Settings
Use these settings to include a text, date and time overlay.
The text, date and time overlay is included on one line at the top or bottom of the video image.
Video Stream
AXIS 216FD - Configuration 19
Text, date and time overlay
Define the maximum video stream time per session in seconds, minutes or hours. When the set time has expired, a new stream can be started by refreshing the page in the browser. For unlimited video stream time, select the Unlimited radio button. Note that the maximum video stream time does not apply to clients connecting via multicast.
The frame rate allowed to each viewer can also be limited, to avoid bandwidth problems on the network. To allow the highest available frame rate, select the Unlimited radio button.
For a preview of the image before saving, click Test. When satisfied with the settings, click Save. Please note that the preview image will be in JPEG format, even though the settings are valid both for Motion JPEG and MPEG-4.
Overlay/Mask
The following options are available for overlays and masks:
•Uploaded image as overlay
•Configurable areas as privacy mask
Uploaded image as overlay is a text and/or a static image superimposed over the video image, for extra information.
Configurable areas as privacy mask are configurable areas of solid color that can be used to block out certain parts of the video image.
Advanced - Camera Settings
These pages include different settings for fine-tuning the video image.
To compensate for the lighting conditions, the white balance and exposure control can be adjusted.
DC-Iris should always be set to Enabled, except during focusing. DC-Iris is a varifocal lens which automatically regulates the amount of light entering the camera.
Loading...