

Page 1
AXISQ8665–LEPTZNetworkCamera
ENGLISH
FRANÇAIS
DEUTSCH
ITALIANO
ESPANÕL
ò
ò
¨
¨
¾
¾
InstallationGuide
Page 2

LegalConsiderations
Videosurveillancecanberegulatedbylawsthatvaryfrom
countrytocountry.Checkthelawsinyourlocalregion
beforeusingthisproductforsurveillancepurposes.
Thisproductincludesone(1)H.264decoderlicense.To
purchasefurtherlicenses,contactyourreseller.
Liability
Everycarehasbeentakeninthepreparationofthis
document.PleaseinformyourlocalAxisofceofany
inaccuraciesoromissions.AxisCommunicationsABcannot
beheldresponsibleforanytechnicalortypographicalerrors
andreservestherighttomakechangestotheproductand
manualswithoutpriornotice.AxisCommunicationsAB
makesnowarrantyofanykindwithregardtothematerial
containedwithinthisdocument,including,butnotlimited
to,theimpliedwarrantiesofmerchantabilityandtnessfor
aparticularpurpose.AxisCommunicationsABshallnot
beliablenorresponsibleforincidentalorconsequential
damagesinconnectionwiththefurnishing,performance
oruseofthismaterial.Thisproductisonlytobeusedfor
itsintendedpurpose.
IntellectualPropertyRights
AxisABhasintellectualpropertyrightsrelatingto
technologyembodiedintheproductdescribedinthis
document.Inparticular,andwithoutlimitation,these
intellectualpropertyrightsmayincludeoneormoreof
thepatentslistedatwww.axis.com/patent.htmandoneor
moreadditionalpatentsorpendingpatentapplicationsin
theUSandothercountries.
Thisproductcontainslicensedthird-partysoftware.See
themenuitem“About”intheproduct’suserinterfacefor
moreinformation.
ThisproductcontainssourcecodecopyrightAppleComputer,
Inc.,underthetermsofApplePublicSourceLicense2.0
(seewww.opensource.apple.com/apsl).Thesourcecodeis
availablefromhttps://developer.apple.com/bonjour/
EquipmentModications
Thisequipmentmustbeinstalledandusedin
strictaccordancewiththeinstructionsgiveninthe
userdocumentation.Thisequipmentcontainsno
user-serviceablecomponents.Unauthorizedequipment
changesormodicationswillinvalidateallapplicable
regulatorycerticationsandapprovals.
TrademarkAcknowledgments
AXISCOMMUNICATIONS,AXIS,ETRAX,ARTPECandVAPIX
areregisteredtrademarksortrademarkapplicationsofAxis
ABinvariousjurisdictions.Allothercompanynamesand
productsaretrademarksorregisteredtrademarksoftheir
respectivecompanies.
Apple,Boa,Apache,Bonjour,Ethernet,InternetExplorer,
Linux,Microsoft,Mozilla,Real,SMPTE,QuickTime,UNIX,
Windows,WindowsVistaandWWWareregistered
trademarksoftherespectiveholders.Javaandall
Java-basedtrademarksandlogosaretrademarksor
registeredtrademarksofOracleand/oritsafliates.
TM
UPnP
isacerticationmarkoftheUPnP
Corporation.
SD,SDHCandSDXCaretrademarksorregisteredtrademarks
ofSD-3C,LLCintheUnitedStates,othercountriesorboth.
Also,miniSD,microSD,miniSDHC,microSDHC,microSDXC
arealltrademarksorregisteredtrademarksofSD-3C,LLC
intheUnitedStates,othercountriesorboth.
TM
Implementers
RegulatoryInformation
Europe
ThisproductcomplieswiththeapplicableCEmarking
directivesandharmonizedstandards:
•ElectromagneticCompatibility(EMC)Directive
2004/108/EC.SeeElectromagneticCompatibility(EMC)
onpage2.
•LowVoltage(LVD)Directive2006/95/EC.SeeSafety
onpage3.
•RestrictionsofHazardousSubstances(RoHS)Directive
201 1/65/EU.SeeDisposalandRecyclingonpage3.
Acopyoftheoriginaldeclarationofconformitymaybe
obtainedfromAxisCommunicationsAB.SeeContact
Informationonpage3.
ElectromagneticCompatibility(EMC)
Thisequipmenthasbeendesignedandtestedtofulll
applicablestandardsfor:
•Radiofrequencyemissionwheninstalledaccordingto
theinstructionsandusedinitsintendedenvironment.
•Immunitytoelectricalandelectromagneticphenomena
wheninstalledaccordingtotheinstructionsandused
initsintendedenvironment.
USA
Thisequipmenthasbeentestedusingashieldednetwork
cable(STP)andfoundtocomplywiththelimitsfora
ClassAdigitaldevice,pursuanttopart15oftheFCCRules.
Theselimitsaredesignedtoprovidereasonableprotection
againstharmfulinterferencewhentheequipmentis
operatedinacommercialenvironment.Thisequipment
generates,uses,andcanradiateradiofrequencyenergy
and,ifnotinstalledandusedinaccordancewiththe
instructionmanual,maycauseharmfulinterferenceto
radiocommunications.Operationofthisequipmentin
aresidentialareaislikelytocauseharmfulinterference
inwhichcasetheuserwillberequiredtocorrectthe
interferenceathisownexpense.
Theproductshallbeconnectedusingashieldednetwork
cable(STP)thatisproperlygrounded.
Canada
ThisdigitalapparatuscomplieswithCANICES-3(ClassA).
Theproductshallbeconnectedusingashieldednetwork
cable(STP)thatisproperlygrounded.
Cetappareilnumériqueestconformeàlanorme
NMBICES-3(classeA).Leproduitdoitêtreconnectéà
l'aided'uncâbleréseaublindé(STP)quiestcorrectement
misàlaterre.
Europe
ThisdigitalequipmentfulllstherequirementsforRF
emissionaccordingtotheClassAlimitofEN55022.The
productshallbeconnectedusingashieldednetworkcable
(STP)thatisproperlygrounded.Notice!ThisisaClassA
product.Inadomesticenvironmentthisproductmaycause
RFinterference,inwhichcasetheusermayberequired
totakeadequatemeasures.
Thisproductfulllstherequirementsforemissionand
immunityaccordingtoEN50121-4andIEC62236-4railway
applications.
Thisproductfulllstherequirementsforimmunity
accordingtoEN50130-4residential,commercial,
light-industrialandindustrialenvironments.
Australia/NewZealand
ThisdigitalequipmentfulllstherequirementsforRF
emissionaccordingtotheClassAlimitofAS/NZSCISPR22.
Theproductshallbeconnectedusingashieldednetwork
cable(STP)thatisproperlygrounded.Notice!Thisisa
Page 3

ClassAproduct.Inadomesticenvironmentthisproduct
maycauseRFinterference,inwhichcasetheusermaybe
requiredtotakeadequatemeasures.
Japan
この装置は、クラスA情報技術装置です。この装
置を家庭環境で使用すると電波妨害を引き起こす
ことがあります。この場合には使用者が適切な対
策を講ずるよう要求されることがあります。本
製品は、シールドネットワークケーブル(STP)を
使用して接続してください。また適切に接地し
てください。
Korea
이기기는업무용(A급)전자파적합기기로서판매
자또는사용자는이점을주의하시기바라며,가
정외의지역에서사용하는것을목적으로합니다.
적절히접지된STP(shieldedtwistedpair)케이블
을사용하여제품을연결하십시오.
Safety
AXISQ8665–LE120VACcomplieswith
IEC/EN/UL60950-1andIEC/EN/UL60950-22,
SafetyofInformationTechnologyEquipment.Theproduct
shallbegroundedeitherthroughashieldednetworkcable
(STP)orotherappropriatemethod.
AXISQ8665–LE24VAC,100VAC,230VACcomply
withIEC/EN60950-1andIEC/EN60950-22,Safetyof
InformationTechnologyEquipment.Theproductshallbe
groundedeitherthroughashieldednetworkcable(STP)or
otherappropriatemethod.
PhotobiologicalSafety
Thisproductfulllstherequirementsforphotobiological
safetyaccordingtoIEC/EN62471(riskgroup2).
DisposalandRecycling
Whenthisproducthasreachedtheendofitsusefullife,
disposeofitaccordingtolocallawsandregulations.For
informationaboutyournearestdesignatedcollectionpoint,
contactyourlocalauthorityresponsibleforwastedisposal.
Inaccordancewithlocallegislation,penaltiesmaybe
applicableforincorrectdisposalofthiswaste.
Europe
22369Lund
Sweden
Tel:+46462721800
Fax:+4646136130
www.axis.com
Support
Shouldyourequireanytechnicalassistance,pleasecontact
yourAxisreseller.Ifyourquestionscannotbeanswered
immediately,yourresellerwillforwardyourqueriesthrough
theappropriatechannelstoensurearapidresponse.Ifyou
areconnectedtotheInternet,youcan:
•downloaduserdocumentationandsoftwareupdates
•ndanswerstoresolvedproblemsintheFAQdatabase.
Searchbyproduct,category,orphrase
•reportproblemstoAxissupportstaffbylogginginto
yourprivatesupportarea
•chatwithAxissupportstaff
•visitAxisSupportatwww.axis.com/techsup/
LearnMore!
VisitAxislearningcenterwww.axis.com/academy/for
usefultrainings,webinars,tutorialsandguides.
Thissymbolmeansthattheproductshallnotbe
disposedoftogetherwithhouseholdorcommercialwaste.
Directive2012/19/EUonwasteelectricalandelectronic
equipment(WEEE)isapplicableintheEuropeanUnion
memberstates.Topreventpotentialharmtohumanhealth
andtheenvironment,theproductmustbedisposedofin
anapprovedandenvironmentallysaferecyclingprocess.
Forinformationaboutyournearestdesignatedcollection
point,contactyourlocalauthorityresponsibleforwaste
disposal.Businessesshouldcontacttheproductsupplierfor
informationabouthowtodisposeofthisproductcorrectly.
Thisproductcomplieswiththerequirementsof
Directive2011/65/EUontherestrictionoftheuseof
certainhazardoussubstancesinelectricalandelectronic
equipment(RoHS).
China
Thisproductcomplieswiththerequirementsofthe
legislativeactAdministrationontheControlofPollution
CausedbyElectronicInformationProducts(ACPEIP).
ContactInformation
AxisCommunicationsAB
Emdalavägen14
Page 4

Page 5

AXISQ8665–LEPTZNetworkCamera
ENGLISH
SafetyInformation
ReadthroughthisInstallationGuidecarefullybeforeinstallingtheproduct.KeeptheInstallation
Guideforfuturereference.
HazardLevels
DANGER
WARNING
CAUTION
NO
TICE
NO NO
TICE TICE
Indicatesahazardoussituationwhich,ifnotavoided,willresultin
deathorseriousinjury.
Indicatesahazardoussituationwhich,ifnotavoided,couldresult
indeathorseriousinjury.
Indicatesahazardoussituationwhich,ifnotavoided,couldresult
inminorormoderateinjury.
Indicatesasituationwhich,ifnotavoided,couldresultindamage
toproperty.
OtherMessageLevels
ImportantIndicatessignicantinformationwhichisessentialfortheproduct
NoteIndicatesusefulinformationwhichhelpsingettingthemostout
tofunctioncorrectly.
oftheproduct.
5
Page 6

AXISQ8665–LEPTZNetworkCamera
SafetyInstructions
WARNING
•TheAxisproductshallbeinstalledbyatrainedprofessional.
CAUTION
•Riskofinjury.Theproductshallbeinstalledsothatitisaccessibleonlyforauthorized
personnelduetomovingpartsduringoperation.
•TheLightSensorBoxdeliveredwiththisequipment(notvalidfor24VAC)istobe
installedinaRestrictedAccessLocation(RAL).
NO
TICE
NO NO
TICE TICE
•TheAxisproductshallbeusedincompliancewithlocallawsandregulations.
•StoretheAxisproductinadryandventilatedenvironment.
•AvoidexposingtheAxisproducttoshocksorheavypressure.
•Donotinstalltheproductonunstablebrackets,surfacesorwalls.
•UseonlyapplicabletoolswheninstallingtheAxisproduct.Usingexcessiveforcewith
powertoolscouldcausedamagetotheproduct.
•Donotusechemicals,causticagents,oraerosolcleaners.
•Useacleanclothdampenedwithpurewaterforcleaning.
•Useonlyaccessoriesthatcomplywithtechnicalspecicationoftheproduct.Thesecanbe
providedbyAxisorathirdparty.
•UseonlysparepartsprovidedbyorrecommendedbyAxis.
•Donotattempttorepairtheproductbyyourself.ContactAxissupportoryourAxis
resellerforservicematters.
•Areadilyandeasilyaccessibledisconnectingdevicemustbeincorporatedintheelectrical
systemofthebuildingforrapidintervention.
•Thisisapermanentlyconnectedequipment(eldwired).Theshort-circuitandovercurrent
protectionisprovidedinthebuildinginstallationanditshallbeofmaximum20A.
Transportation
NO
TICE
NO NO
TICE TICE
•WhentransportingtheAxisproduct,usetheoriginalpackagingorequivalenttoprevent
damagetotheproduct.
6
Page 7

AXISQ8665–LEPTZNetworkCamera
ENGLISH
Battery
TheAxisproductusesa3.0VBR/CR2032lithiumbatteryasthepowersupplyforitsinternal
real-timeclock(RTC).Undernormalconditionsthisbatterywilllastforaminimumofveyears.
LowbatterypoweraffectstheoperationoftheRTC,causingittoresetateverypower-up.When
thebatteryneedsreplacing,alogmessagewillappearintheproduct’sserverreport.Formore
informationabouttheserverreport,seetheproduct´ssetuppagesorcontactAxissupport.
Thebatteryshouldnotbereplacedunlessrequired,butifthebatterydoesneedreplacing,contact
Axissupportatwww.axis.com/techsupforassistance.
WARNING
•Riskofexplosionifthebatteryisincorrectlyreplaced.
•ReplaceonlywithanidenticalbatteryorabatterywhichisrecommendedbyAxis.
•Disposeofusedbatteriesaccordingtolocalregulationsorthebatterymanufacturer's
instructions.
7
Page 8

8
Page 9
AXISQ8665–LEPTZNetworkCamera
ENGLISH
InstallationGuide
ThisInstallationGuideprovidesinstructionsforinstallingAXISQ8665-LEPTZNetworkCamera
onyournetwork.Forotheraspectsofusingtheproduct,seetheUserManualavailableat
www.axis.com
ProductVariants
ProductPowervariant
AXISQ8665–LE24VAC
100VAC
120VAC
230VAC
InstallationSteps
1.Makesurethepackagecontents,toolsandothermaterialsnecessaryfortheinstallation
areinorder.Seepage9.
2.Studythehardwareoverview.Seepage1 1.
3.Studythespecications.Seepage18.
4.Installthehardware.Seepage20.
5.Accesstheproduct.Seepage34.
PackageContents
•AXISQ8665-LE
-PTZNetworkCamera
-Baseunit
-Sunshield
•IRilluminatorskit
-2illuminators
-Bracket
-Screws
•Lightsensorboxpre-mountedwith10mpowerandsignalcablesforconnectionto
mainunit(protectedwithconduit)
(NotvalidforAXISQ8665–LE24VACvariant.)
•Auxiliaryequipmentforinstallation
9
Page 10
AXISQ8665–LEPTZNetworkCamera
•InstallationandManagementSoftwareCD
•Printedmaterials
-InstallationGuide(thisdocument)
-Extraserialnumberlabel(2x)
RequiredHardware(soldseparately)
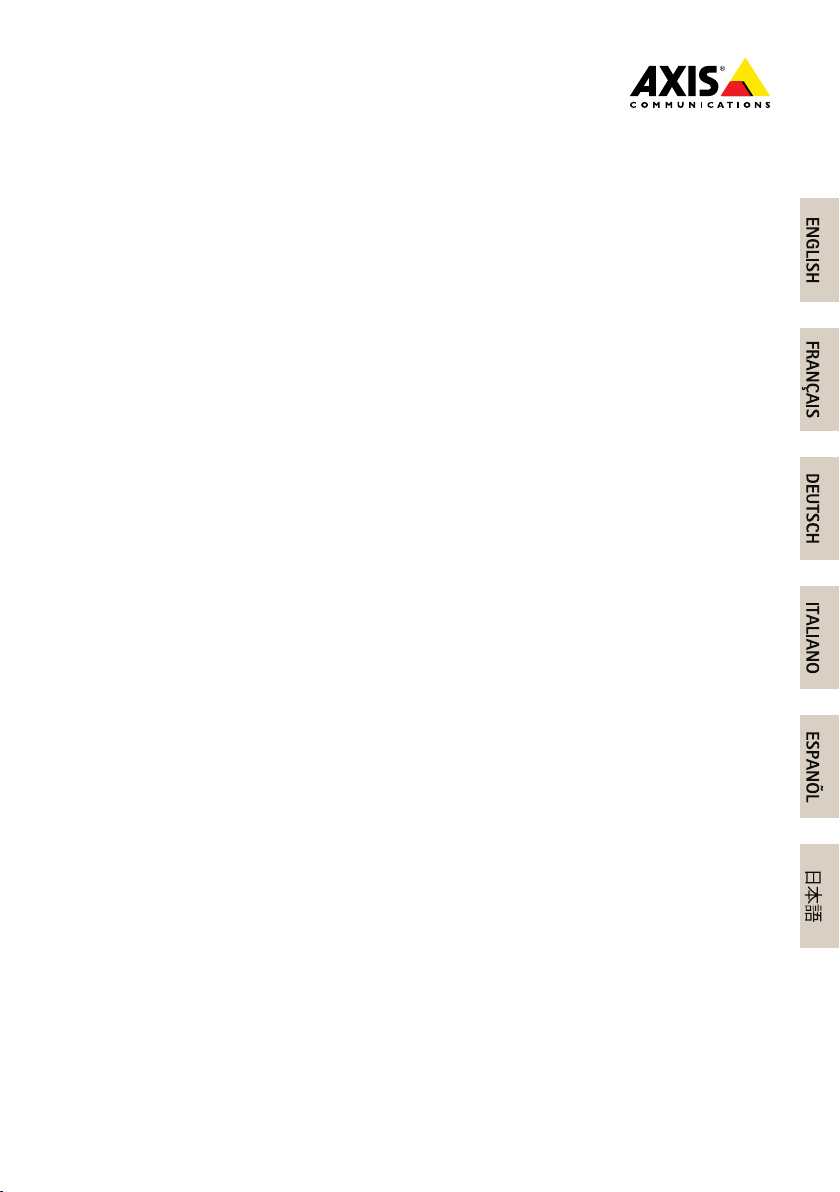
•AXISWallBracketKorAXISColumnBracketK
AXISWallBracketKAXISColumnBracketK
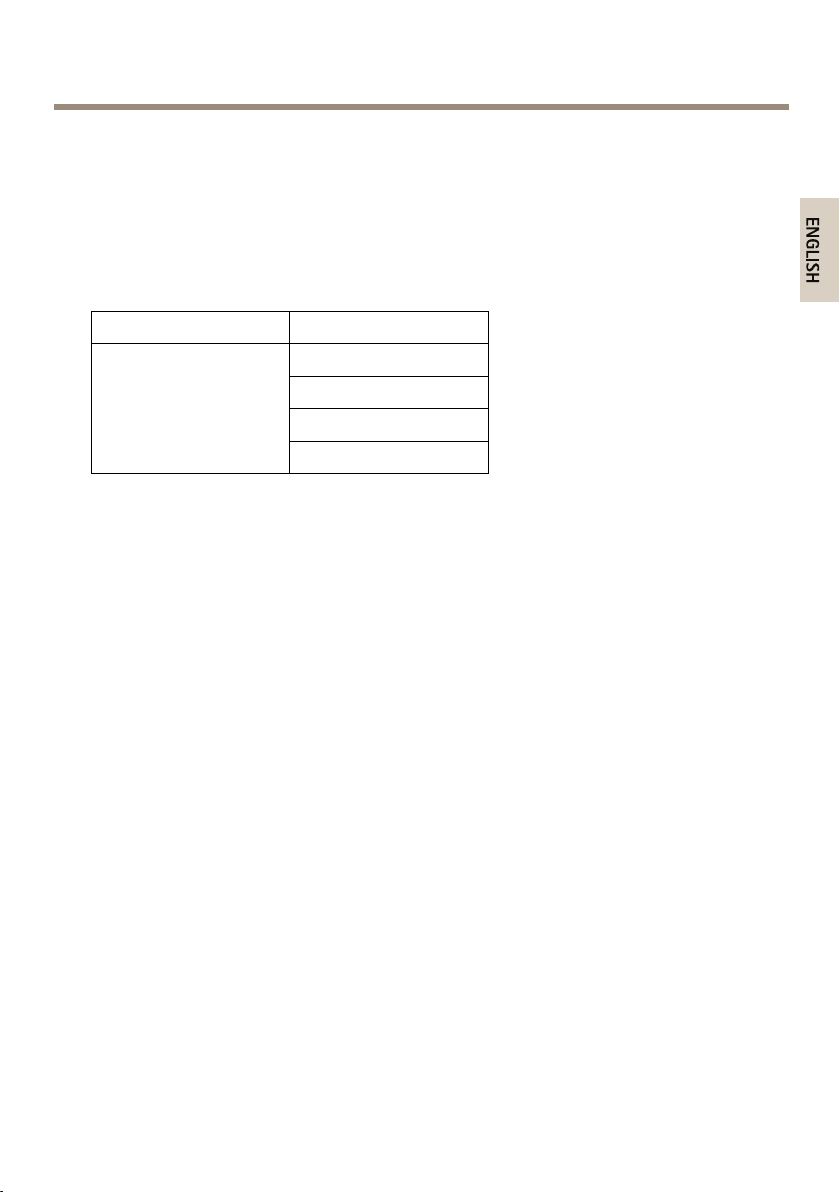
•WallConduitorColumnConduit
WallConduitColumnConduit
OptionalAccessories
•AXIST95A64CornerBracket
•AXIST95A67PoleBracket
•AXISWasherKitA
•AXIST8604MediaConverterSwitch
•AXIST8640EthernetoverCoaxAdaptorPoE+
Forinformationaboutavailableaccessories,seewww.axis.com
10
Page 11

AXISQ8665–LEPTZNetworkCamera
ENGLISH
RecommendedTools
•RJ45crimptool
•Ratchetset
•Drillfordrillingholesinmountingsurface
•Loctite®243threadlock
HardwareOverview
•ForanoverviewofthehousingunitseeHousingUnitonpage13
•Foranoverviewofthebuttonsandconnectorsonthecamera,seeCameraUniton
page14
•Foranoverviewoftheilluminators,seepage14
•Foranoverviewofthelightsensorbox,seepage15
11
Page 12
AXISQ8665–LEPTZNetworkCamera
1
2
3
4
5
6
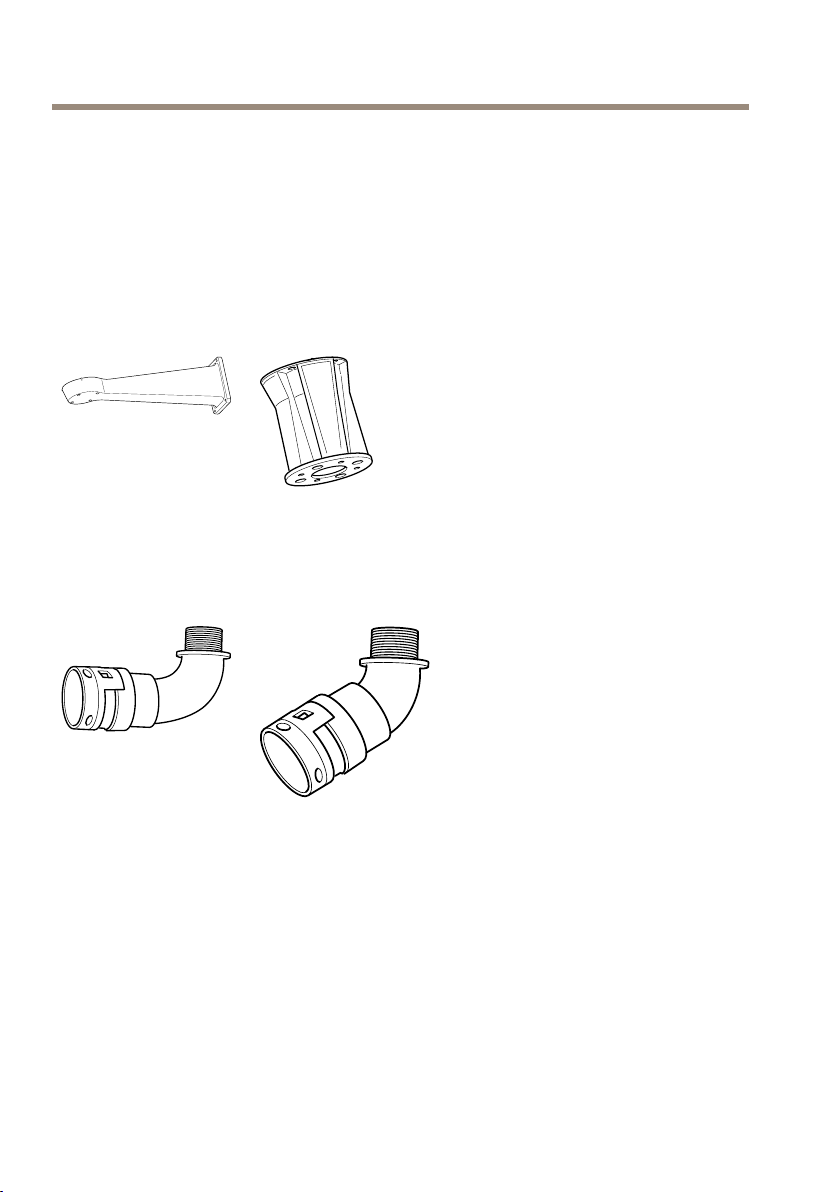
1
Sunshield
2
Illuminatorsbracket
3
Illuminators
4
LightSensorBox(NotvalidforAXISQ8665–LE24VAC.)
5
PTZNetworkCamera
6
BaseUnit
12
Page 13
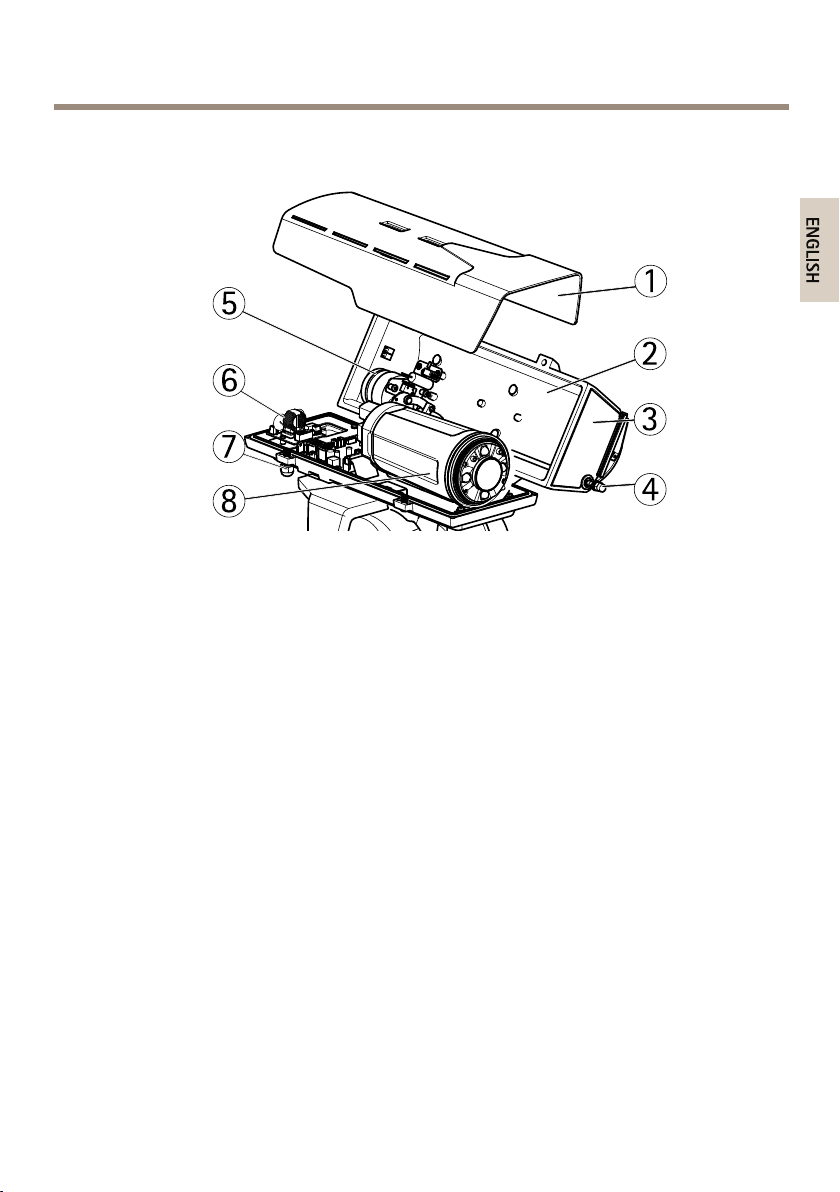
HousingUnit
4
3
1
2
6
5
7
8
ENGLISH
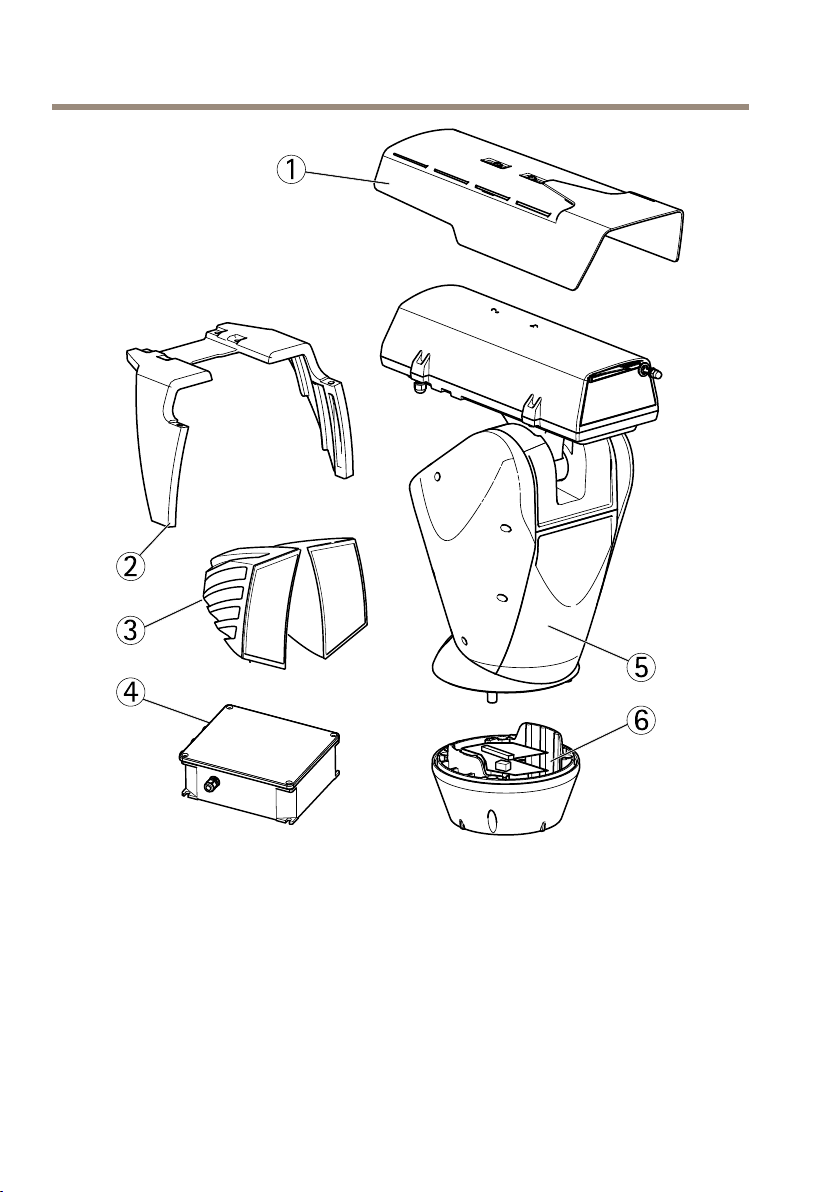
1
Sunshield
2
Topcover
3
Protectivewindow
4
Wiper
5
Wipermotor
6
Illuminatorcircuitboard
7
Illuminatorcableglands
8
Cameraunit
AXISQ8665–LEPTZNetworkCamera
13
Page 14
AXISQ8665–LEPTZNetworkCamera
4
1
2
3
5
6
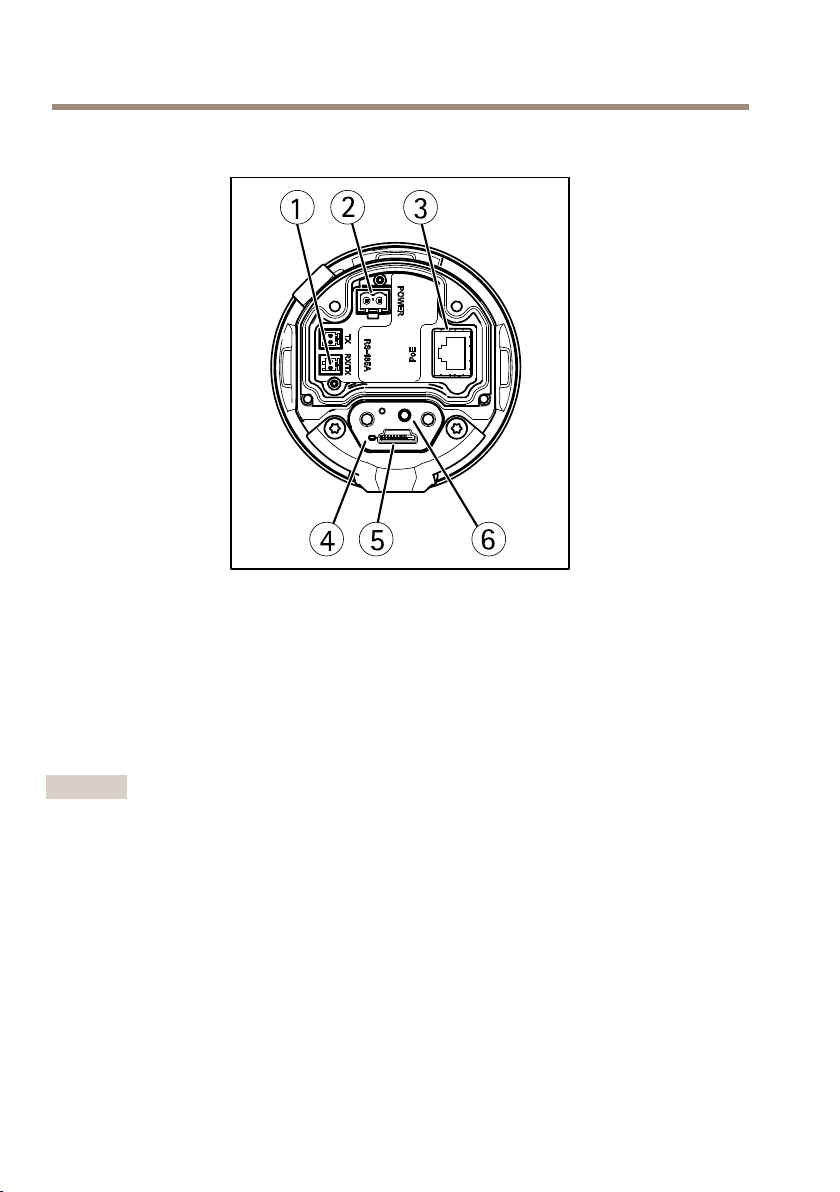
CameraUnit
1
RS485/RS422connector
2
Powerconnector
3
Networkconnector
4
StatusindicatorLED
5
microSDmemorycardslot
6
Controlbutton
IRIlluminator
Important
Donotchangethepositionoftheswitch-onthresholdregulator.
14
Page 15

3
4
1
2
1
ENGLISH
2
3
4
AXISQ8665–LEPTZNetworkCamera
Twilightsensor
Cable
Switch-onthresholdregulator
Infraredpowercontrol
LightSensorBox
ThelightsensorboxisnotvalidforAXISQ8665–LE24VAC.
15
Page 16

AXISQ8665–LEPTZNetworkCamera
1
2
3
4
5
1
Lid
2
Screw(4x)
3
Conduit(includingpower,groundandsignalcables)
4
Cablegland(incomingmainspower)
5
Day/nightsensor
16
Page 17

AXISQ8665–LEPTZNetworkCamera
ENGLISH
ConnectorsandButtons
Forspecicationsandoperatingconditions,seepage18.
NetworkConnector
RJ45Ethernetconnector.
NO
TICE
NO NO
TICE TICE
Theproductshallbeconnectedusingashieldednetworkcable(STP).Allcablesconnecting
theproducttothenetworkshallbeintendedfortheirspecicuse.Makesurethatthe
networkdevicesareinstalledinaccordancewiththemanufacturer’sinstructions.For
informationaboutregulatoryrequirements,seeElectromagneticCompatibility(EMC)on
page2.
ControlButton
Forlocationofthecontrolbutton,seeHardwareOverviewonpage11.
Thecontrolbuttonisusedfor:
•Resettingtheproducttofactorydefaultsettings.Seepage37.
•ConnectingtoanAXISVideoHostingSystemserviceorAXISInternetDynamicDNS
Service.Formoreinformationabouttheseservices,seetheUserManual.
SDCardSlot
NO
TICE
NO NO
TICE TICE
•RiskofdamagetoSDcard.Donotusesharptoolsorexcessiveforcewheninserting
orremovingtheSDcard.
•Riskofdataloss.Topreventdatacorruption,theSDcardshouldbeunmountedbefore
removal.Tounmount,gotoSetup>SystemOptions>Storage>SDCardandclick
Unmount.
ThisproductsupportsmicroSD/microSDHC/microSDXCcard(notincluded).
ForSDcardrecommendations,seewww.axis.com
17
Page 18
AXISQ8665–LEPTZNetworkCamera
Specications
OperatingConditions
Product
AXISQ8665–LE
De-icing
Theproduct’sautomaticde-icingprocessstartswhentheproductisswitchedonandtheair
temperatureisbelow0°C(32°F).Thede-icingprocessensuresthattheproductworksproperly
evenatlowtemperatures.Thede-icingperiodlastsforamaximumof90minutes.Duringthis
periodthecameraisturnedoff.
Classication
IEC/EN/UL60529IP66.
NEMA250Type4X
TemperatureHumidity
-40°Cto55°C
(-40°Fto131°F)
15to100%RH
(condensing)
Power
Power
Consumption
AXISQ8665–LE
UnitInputVoltage
BaseUnit
LightSensorBox100VAC,200W
IRactiveIRinactive
Max:113W
Typical:94W
24VAC,8A
120VAC,200W
230VAC,200W
Max:55W
Typical:40W
Important
•Toreducetheriskofre,useUL-listedorCSA-certiedtelecommunicationlinecord.
•TomaintaintheIPratingofthelightsensorbox,theexternaldiameterofthecables
mustbe7mm.Thepowersupplycablebetweenthepan/tiltunitandthelightsensor
boxcannotbelongerthan10m(33ft.).
18
Page 19
AXISQ8665–LEPTZNetworkCamera
L
N
N
PE
L
INCOMING
MAINS VOLTAGE
EXTERNAL PROTECTIVE
GROUND WIRE
AXIS Q8665-LE
LIGHT SENSOR BOX
1
2
3
ENGLISH
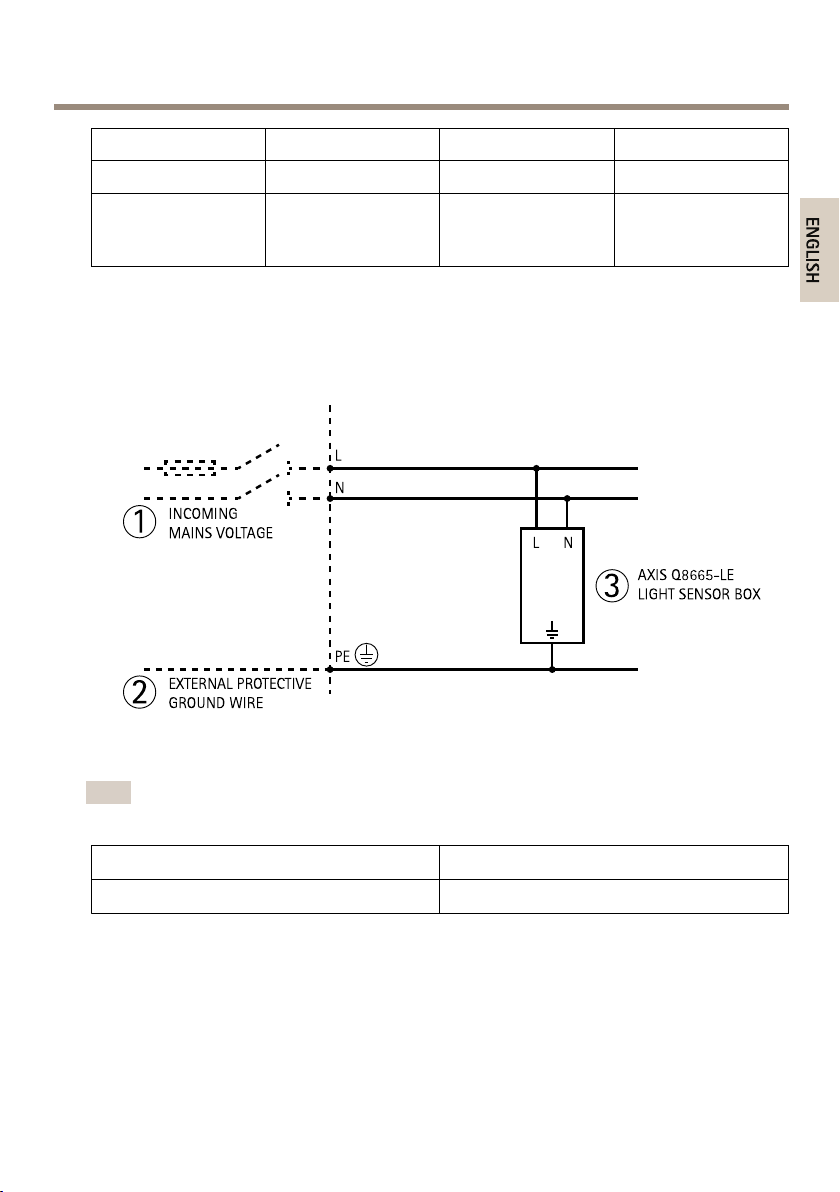
PowerCable
Mainssupplycable
Mainssupplycable
forlightsensorbox
LightSensorBox
ConnectionDiagram
Variant
24VAC
100VAC
120VAC
230VAC
NumberofwiresCablearea
3(L,N,PE)From3.3mm
12)to2.1mm
14)
2
(AWG
2
(AWG
IRIlluminatorSpecication
Note
Horizontalandverticalbeampatterns
60°
Tolightupthesceneadequately,adjusttheangleoftheilluminatorsaccordingtothecamera’s
eldofview,seeInstalltheIRIlluminatorsonpage29.
Thedistancesandtheperformancedependonsceneandtheenvironmentallightconditions.
Maximumdistance(850nm)
Upto150m(490ft.)
19
Page 20

AXISQ8665–LEPTZNetworkCamera
InstalltheHardware
LightSensorBox
ConnecttheCables
InstructionsnotvalidforAXISQ8665–LE24VAC.
WARNING
•Theelectricalconnectionsandconduitinstallationsshallbemadebyacertiedelectrician
andincompliancewithlocalregulations.
•Riskofelectricshock.Theproductshallbegroundedusingagroundingwire.Makesure
bothendsofthegroundingwireareincontactwiththeirrespectivegroundingsurfaces.
•Themainssupplyshallbedisconnectedduringinstallation.
NO
TICE
NO NO
TICE TICE
Thepowersupplyspeciedwiththeproductshallbeused.Usinganyotherpowersupply
willvoidthewarrantyandcouldleavetheunitatarisk.
Note
•Thegroundwireshouldbeabout10mmlongerthantheothertwowires,toprevent
accidentaldisconnection.
•Ifusingtheday/nightsensor,placethelightsensorboxsothattheday/nightsensor
cantrackthechangesindaylight.
1.Removethelidandopenthelightsensorbox,seethehardwareoverviewonpage15.
Note
Tomaketheinstallationeasier,itispossibletoremovetheconnectorblockandre-mount
itwhenthewiresareconnected.
2.Connectthemainssupplywirestothemainssupplyconnectorblock.
20
Page 21
AXISQ8665–LEPTZNetworkCamera
TR3
J3
F2F1 L1 L2 K1
J4 J5
J6
P1
TR4TR1
L N
J2
J1
TR2 24~ 24~
24~
24 VAC Supply
Incoming mains
24~
status
+-
LN
4 5 7
6
31
2
ENGLISH
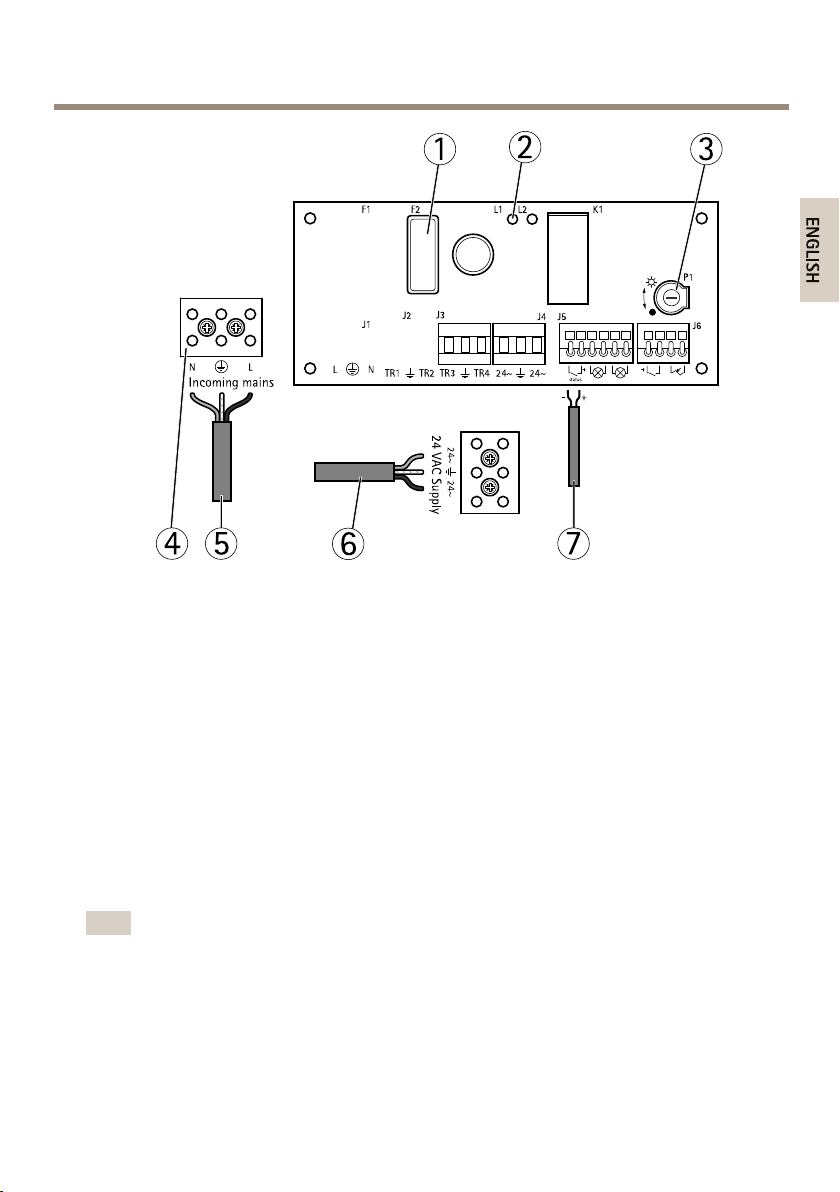
1
Fuseholderandfuse(T8AL250V)
2
FuseLED
3
PotentiometerP1
4
Mainssupplyblockconnector
5
Mainssupplycable
6
Pan/tiltunitpowersupplycable(24VAC)(pre-mounted)
7
Signalcable(pre-mounted)
3.Tightenthecableglandcaponrmly.
4.Ifneeded,adjustthepotentiometerP1toincreaseordecreasethesensitivityofthe
day/nightsensor,seeAdjusttheDay/NightSensoronpage21.
5.Closethelightsensorboxandtightenthescrews.
AdjusttheDay/NightSensor
Note
Thecamera'sbuilt-inday/nightsensorisactivatedperdefault.Tousetheday/nightsensor
onthelightsensorboxitmustbeactivatedfromtheproduct’ssettingspage.
Ifusingtheday/nightsensoronthelightsensorbox,adjustthepotentiometertosuitthespecic
conditionsonsite.
21
Page 22
AXISQ8665–LEPTZNetworkCamera
3
1
2
4
•Turnthepotentiometerclockwisetoincreasethethresholdandadvancetheswitch
tonightmode.
•Turnthepotentiometercounterclockwisetodecreasethethresholdanddelaytheswitch
tonightmode.NightmodeisindicatedbyaredLEDontheboard.Theswitchtonight
modewillactivatetheilluminators.
InstalltheBracket(soldseparately)
Thebracketsaresoldseparately.Seewww.axis.comforinformationonavailablemounting
accessories.
WARNING
Riskofinjury.Makesuretheproductissecuredtothebuildingsurfacebeforeoperation.
Important
•Whenattachingthebrackettoaconcretesurface,usedowelpinswithatractiontorque
ratingof≤300dN.
•Whenattachingthebrackettoametalsurface,usescrewswithadiameterof8mm.
1.Prepareawall,parapetorpoleforinstallingtheselectedbracket.
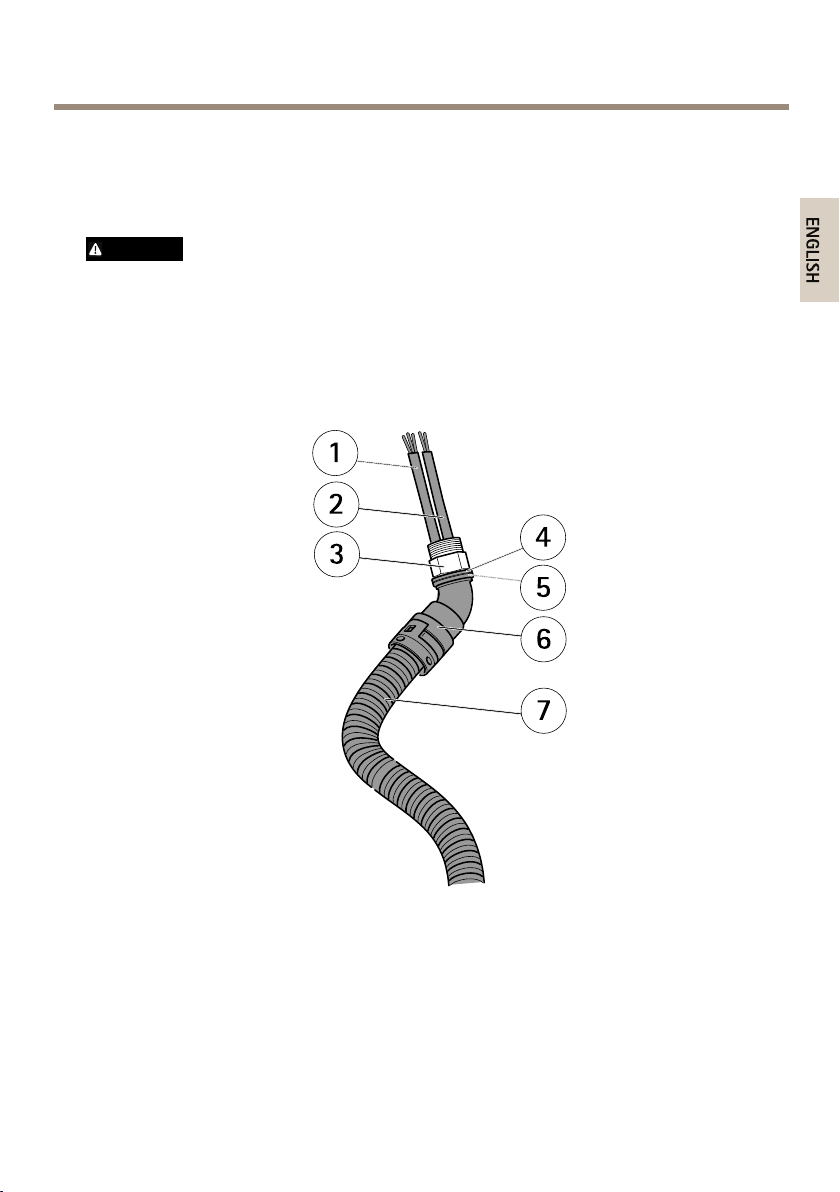
2.Routethenetworkandconduitcablethroughthebracket.Leaveacableslackof
50cm(12in)forconnectiontothebaseunit.
1
Networkcable
2
Conduitcablewithpowerandsignalcables
22
Page 23
AXISQ8665–LEPTZNetworkCamera
1
2
3
4
6
7
5
ENGLISH
3
Columnbracket
4
Wallbracket
AttachtheBaseUnittotheBracket
WARNING
Theelectricalconnectionsandconduitinstallationsshallbemadebyacertiedelectrician
andincompliancewithlocalregulations.
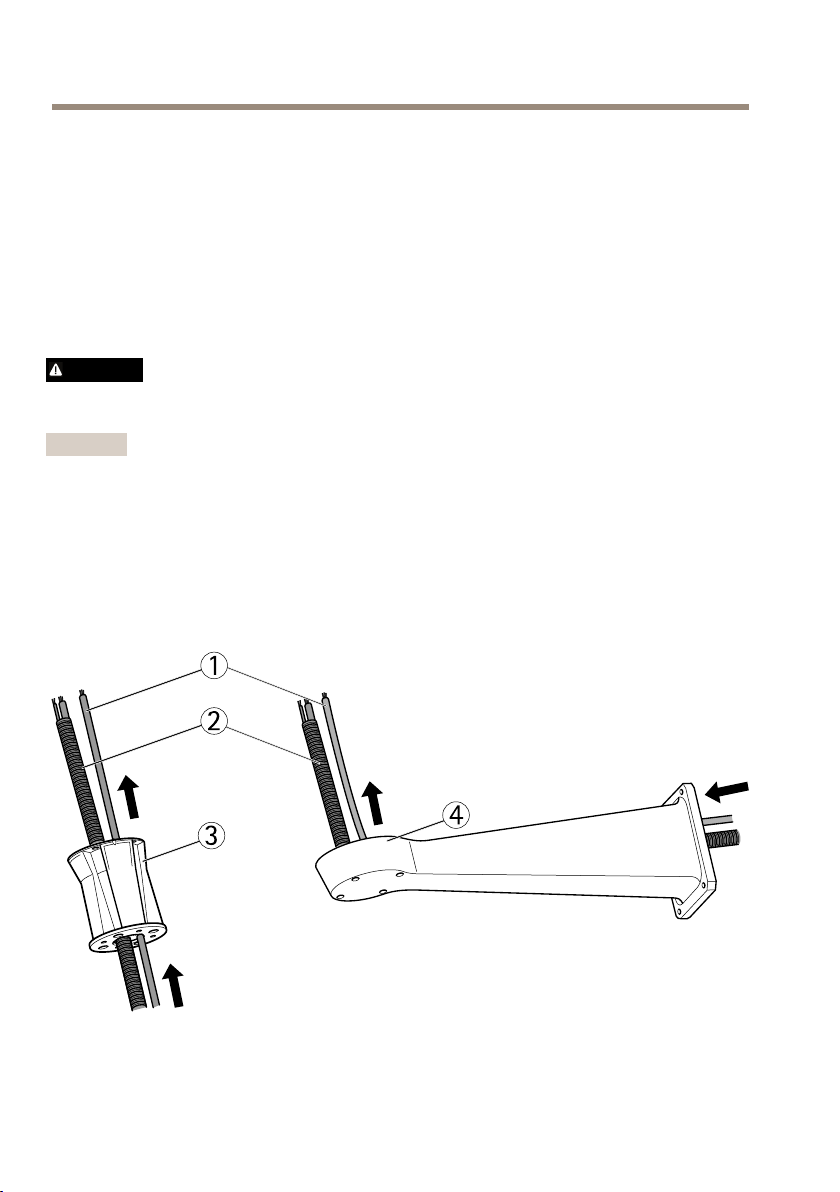
1.Removethedesiccantbag,whichisplacedinthebaseunit.
2.Attachtheconduittotheconduitcable.
3.Attachtwowashersandthenuttotheconduit.
1
Powercable
2
Signalcable
3
Fixingnut
4
Washer
5
Washer
6
Conduit
7
Conduitcable
23
Page 24
AXISQ8665–LEPTZNetworkCamera
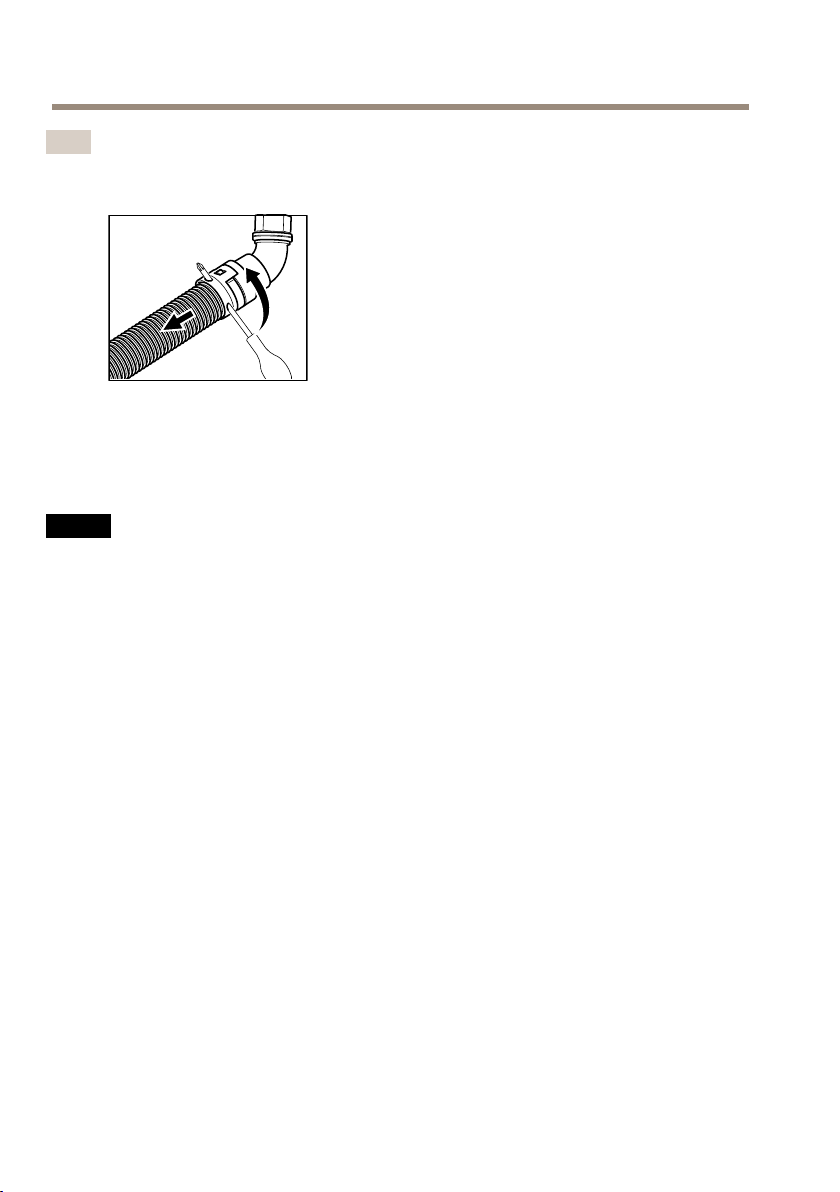
Note
Toreleasetheconduitfromtheconduitcable,insertascrewdriverandturntheconduit
whilepullingtheconduit.
4.Makesurethesealisinposition.
5.Routethepowerandsignalcablesthroughthecableglandshownintheillustration.
6.Attachthexingnuttotheconduit.
7.Routethenetworkcablethroughthecableglandshownintheillustration.
NO
TICE
NO NO
TICE TICE
Tomaintaintheproduct'sIPratingandreducecablestrain,makesuretotightenthe
cableglands.
8.Topreventthecablesfromslippingout,tightenthecableglandsafterthecableshave
beenroutedthrough.
9.Attachacabletietosecurethecables.
24
Page 25

AXISQ8665–LEPTZNetworkCamera
WARNING
I
/
O
PW
R
Network
Use appropriate rubber
gland size to maint ain
IP classication and
cable strain relief.
See manual for more
information.
1
1
2
3
4
5
6
7
7
8
8
ENGLISH
1
Networkcable
2
Baseunit
3
Seal
4
Important
ThedipswitchesinthebaseunitareconguredwiththecorrectPTZprotocolinthe
Conduitcable
5
Fixingnut
6
Cabletie
7
Signalcable
8
Powercable
factoryandmustnotbechanged.
10.Connecttheilluminatorsignalcabletotheconnector(ALARMSand1)onthebaseunit.
25
Page 26
AXISQ8665–LEPTZNetworkCamera
VIDEO
RS485
GND
B
A
1
2
3
4
REL.2
REL.1
ALAR
M
S
F1
F2
N
L
Pos. 7
(-)
Pos. 8
(+)
1
2
3
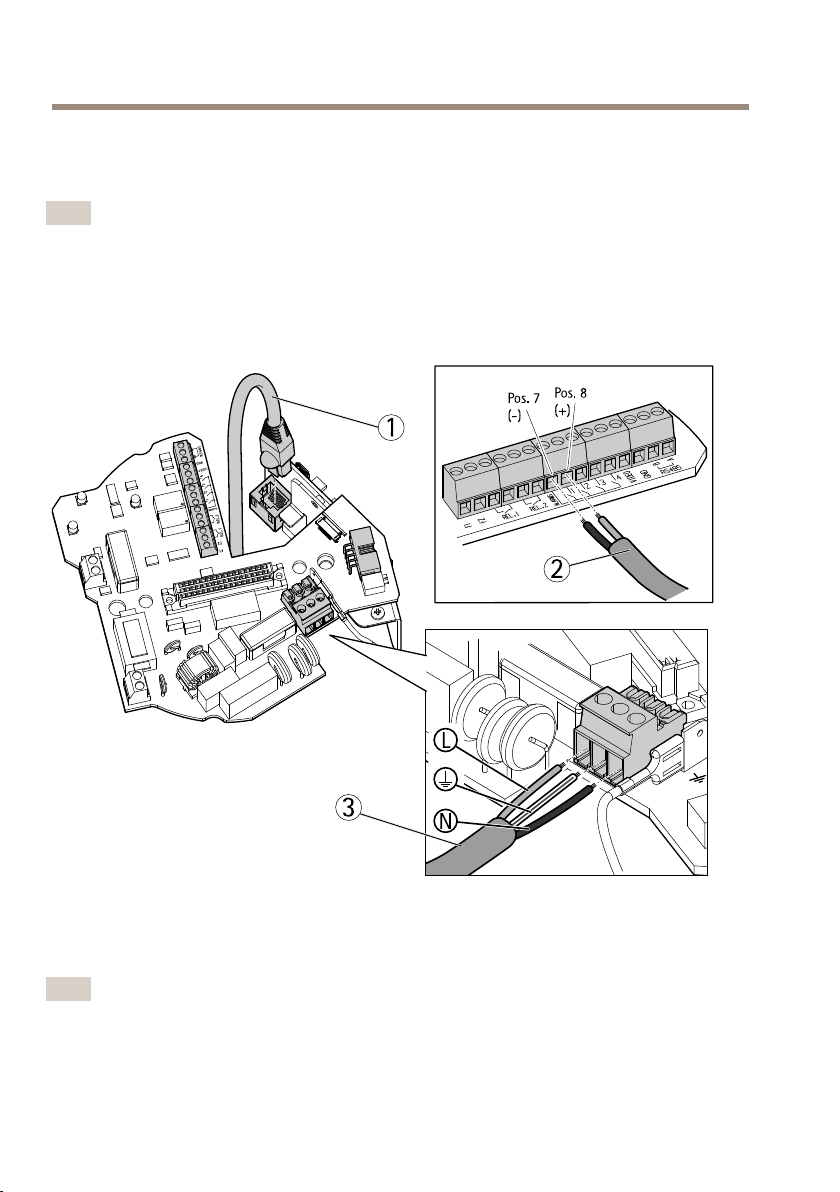
11.UsingaRJ45crimptool,stripandcrimpthenetworkcableaccordingtothe
manufacturer’sinstructions.
12.Connectthenetworkcabletothenetworkconnectoronthebaseunit.
Note
Tomaketheinstallationeasier,itispossibletoremovethepowerconnectorblockfromthe
circuitboardandmountitwhenthecablesarecorrectlyconnected.
13.Connectthepowercabletothepowerconnectoronthebaseunit.Makesurethe
green/yellowgroundwireisconnectedtothemiddlepin.
1
Networkcable
2
Signalcables
3
Powercables
Note
Thebaseunitcanbeattachedtothebracketinfourdifferentpositions.
26
Page 27
AXISQ8665–LEPTZNetworkCamera
1
2
3
4
1
2
3
4
5
6
7
5
6
8
ENGLISH
14.Usethealignmentindicatorstondasuitablepositionthatallowsaccesstothe
congurationboard,whichcanbeopenedforeasyaccesstothenetworkconnector
duringforexampletroubleshooting.
15.Ifthereiscableslackafterthecableshavebeenconnected,loosenthecableglands,
removetheslackandattachthecableglandsagain.
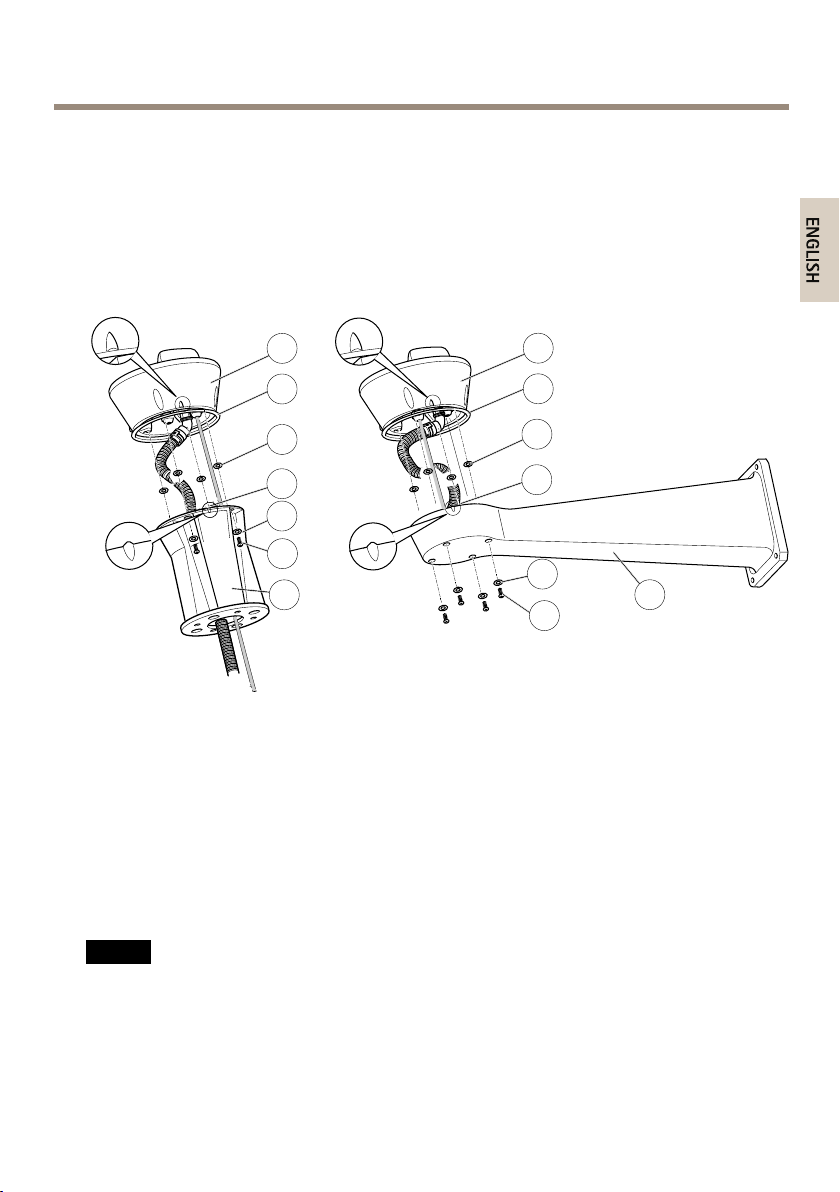
16.Attachthebaseunittothebracketusingthescrewsandthewashers.
17.ApplyLoctite
®
243threadlockeronthescrewsandtightenthescrews(torque4Nm).
1
Baseunit
2
Seal
3
Washer(4x)
4
Alignmentindicator
5
Washer(4x)
6
Screw(4x)
7
Columnbracket
8
Wallbracket
AttachthePan/TiltUnittotheBaseUnit
NO
TICE
NO NO
TICE TICE
Usethealignmentindicatorstoaligntheunits.Incorrectalignmentcouldcausedamage
tocomponents.
27
Page 28
AXISQ8665–LEPTZNetworkCamera
4
6
5
7
1
2
3
Important
•Assembletheproductinanuprightposition.Donotinstalltheproductupsidedown.
•Makesuretoconnectthepan/tiltunitstraightfromaboveasshownintheillustration.
Donottiltitontothebaseunit.
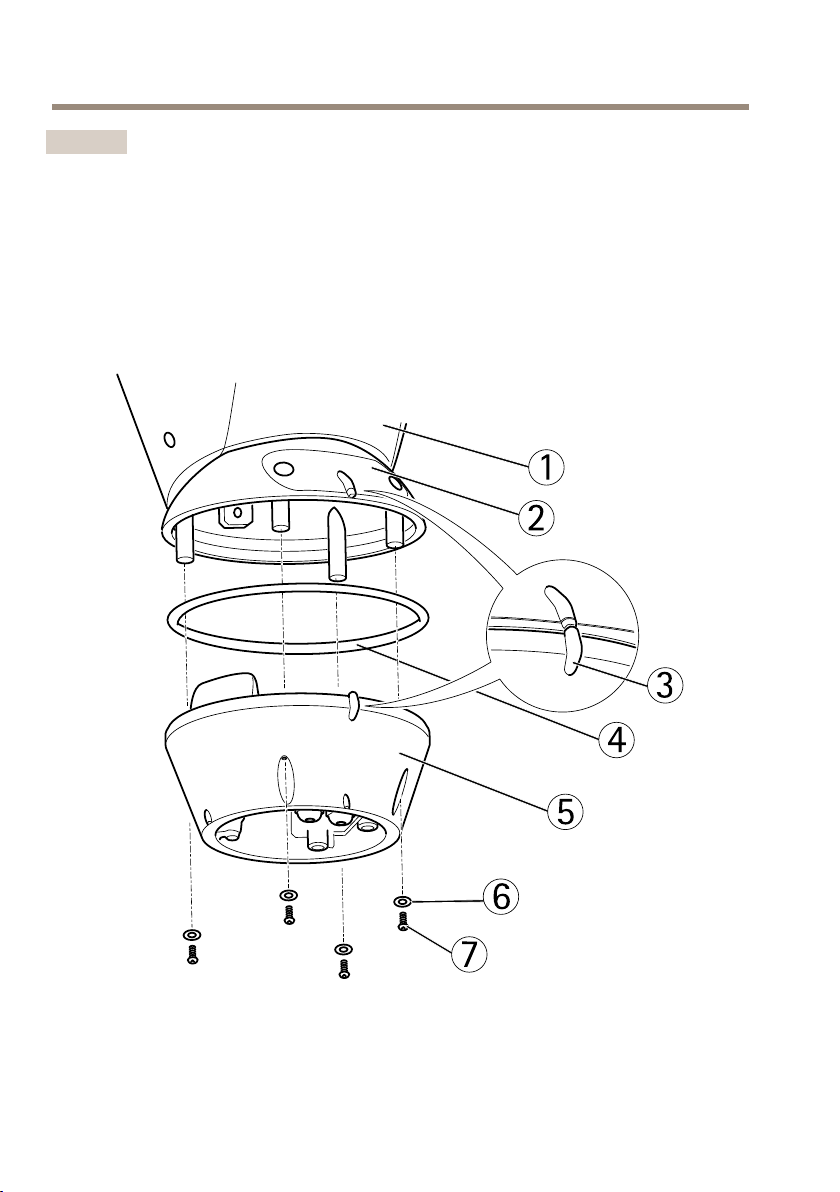
1.Makesurethesealisinposition.
2.Tiltthecamerahousingback.
3.Attachthepan/tiltunittothebaseunitandtightenthescrews(torque4Nm)usingthe
suppliedallenkey.
1
Pan/tiltunit
2
Congurationboardlid
3
Alignmentindicators
4
Seal
28
Page 29

AXISQ8665–LEPTZNetworkCamera
ENGLISH
5
Base
6
Washer(4x)
7
Screw(4x)
4.Themechanicalinstallationiscomplete.Toaccessthecameraunit,seesectionAccess
theProductonpage34.Seealsotheproduct’susermanualforinformationonhowto
accessthevideostream.
InstalltheIRIlluminators
WARNING
•Emissionofinfraredlight(riskgroup2)whichcanbeharmfulforeyes.Payattentionto
theprovidedindications.Avoidprolongedeyeexposureoruseappropriateshielding
oreyeprotection.
•Riskofelectricshock.Makesurethepowersupplyisdisconnected.
CAUTION
Duringnormaloperation,thesurfaceoftheilluminatorcanreachhightemperatures.Do
notallowdirectcontactandpositiontheappliancewhereitisinaccessibletounauthorized
personnel.Beforetouching,switchofftheilluminatorandallowtocoolforaminimum
periodof10minutes.
Important
Toworkproperlybothilluminatorsmustbeinstalledtogether.
1.Positionthebracketonthebottomofthehousing.
2.Installthescrewsandthewashersintheholesandtightenthem(torque4Nm).Make
surethebracketisfastenedrmly.
29
Page 30

AXISQ8665–LEPTZNetworkCamera
2
3
1
1
Bracket
2
Screw
3
Washer
3.Slidetheilluminatorontotheupperandlowerbracketxings.
4.Adjusttheangleoftheilluminatorstosuittheenvironment.
5.Attachthescrewsandwashers(torque6Nm).
30
Page 31

AXISQ8665–LEPTZNetworkCamera
5
4
7
6
1
2
3
ENGLISH
4
Bracketxing
5
Illuminatorxing
6
Screw
7
Washers
ConnecttheIRIlluminators
1.Removethetwoscrewsandremovethetopcoverofthehousing.
1
Sunshield
2
Screw
31
Page 32

AXISQ8665–LEPTZNetworkCamera
4
5
3
Topcover
Important
Toensuresafetyandcorrectoperationoftheunit,donotleaveasurplusofthecables
externally.
2.Threadthecablesthroughthehousing.Leaveacableslackof25cm(10in).
4
Topcover
5
Cables
3.Connectthecablesasshownintheillustration.
Note
Becarefulnottosqueezeanyofthecableswhenclosingthehousing.
4.Closethehousingandattachthetwoscrews.
32
Page 33

B
R
B
R
BL
BL
BR
BR
BL
BL
A1
B1
A2
B2
4
4
3
3
2
2
1
1
Seethetableforcablepositions.
ENGLISH
AXISQ8665–LEPTZNetworkCamera
Leftilluminator
Positionin
illustration
4
3
2
1
AdjusttheIRIlluminatorPower
Important
Donotchangethepositionoftheswitch-onthresholdregulator.
•ToadjustthepoweroftheIRilluminator,loosenthehermeticplug.
Referenceon
theboard
WHWhiteorYellowWHWhiteorYellow
BKBlackBKBlack
A1
B1RedB2Red
CablecolorReferenceon
GreenorBlue
-AdjusttheIRpowercontrolclockwisetoincreasethepower.
-AdjusttheIRpowercontrolcounter-clockwisetodecreasethepower.
Rightilluminator
theboard
A2
Cablecolor
GreenorBlue
33
Page 34

AXISQ8665–LEPTZNetworkCamera
1
2
1
IRpowercontrol
2
Switch-onthresholdregulator
AccesstheProduct
UsethetoolsprovidedontheInstallationandManagementSoftwareCDtoassignanIPaddress,
setthepasswordandaccessthevideostream.Thisinformationisalsoavailablefromthesupport
pagesonwww.axis.com/techsup/
PanTiltZoom
CAUTION
Hazardousmovingparts.Keepngersandotherbodypartsawayfromtheproductduring
operation.
ThePTZfunctionalityiscontrolledthroughthenetworkcamera.ThePTZcontrolswillbeavailable
fromtheLiveViewpageinthenetworkcamera’swebpagesafterenablingthePTZfunctionality.
SeetheUserManual,availableatwww.axis.com
AccesstheCameraUnit
ToaccessthecameraunitformountingtheSDcardorresettingthecameratofactorydefault
settings,removethetwoscrewsandopenthetopcover.
34
Page 35

AXISQ8665–LEPTZNetworkCamera
3
1
4
2
ENGLISH
MountSDCard
1.Removethepowercable,thenetworkcableandtheRX/TXcable.
2.Removethefourscrews.
1
Screw
2
Powercable
3
RX/TXcable
35
Page 36

AXISQ8665–LEPTZNetworkCamera
5
6
4
Networkcable
3.LiftthecameraincludingthebracketandinserttheSDcard.
5
Bracket
6
SDcard
4.Attachthecablesandattachthefourscrews.
36
Page 37

AXISQ8665–LEPTZNetworkCamera
ENGLISH
ResettoFactoryDefaultSettings
Important
Resettofactorydefaultshouldbeusedwithcaution.Aresettofactorydefaultwillreset
allsettings,includingtheIPaddress,tothefactorydefaultvalues.
Note
TheinstallationandmanagementsoftwaretoolsareavailableontheCDsuppliedwiththe
productandfromthesupportpagesonwww.axis.com/techsup
Toresettheproducttothefactorydefaultsettings:
1.Disconnectpowerfromtheproduct.
2.Pressandholdthecontrolbuttonandreconnectpower.SeeHardwareOverviewon
page11.
3.Keepthecontrolbuttonpressedforabout15–30secondsuntilthestatusLEDindicator
ashesamber.
4.Releasethecontrolbutton.TheprocessiscompletewhenthestatusLEDindicatorturns
green.Theproducthasbeenresettothefactorydefaultsettings.IfnoDHCPserveris
availableonthenetwork,thedefaultIPaddressis192.168.0.90
5.Usingtheinstallationandmanagementsoftwaretools,assignanIPaddress,setthe
password,andaccessthevideostream.
Itisalsopossibletoresetparameterstofactorydefaultviathewebinterface.GotoSetup
>SystemOptions>Maintenance.
ChangetheFuseintheLightSensorBox
DANGER
Riskofelectricshock.Disconnectpowersupplytotheequipmentpriortoworkinginside
panel.
CAUTION
•Theelectricalconnectionsandconduitinstallationsshallbemadebyacertiedelectrician
andincompliancewithlocalregulations.
•Riskofre.Forcontinuedprotectionagainstriskofre,thefusesmustbereplaced
withthesametypeandrating.
1.Disconnectthepowersupply.
2.Openthelidtothelightsensorboxbyremovingthescrews.
3.Checkthefusebyusingamultimeter.
-Ifthefuseisintact,continuetoChangetheFusesintheBaseUnitonpage38.
37
Page 38

AXISQ8665–LEPTZNetworkCamera
TR3
J3
F2F1 L1 L2 K1
J4 J5
J6
P1
TR4TR1
L N
J2
J1
TR2 24~ 24~
24~
24 VAC Supply
Incoming mains
24~
status
+-
LN
4 5 7
6
31
2
-Ifthefuseisblown,changethefuse.Seethetablebelow.
4.Attachthelidonthelightsensorbox.
1
Fuseholderandfuse
2
FuseLED
3
PotentiometerP1
4
Mainssupplyblockconnector
5
Mainssupplycable
6
Pan/tiltunitpowersupplycable(24VAC)(pre-mounted)
7
Signalcable(pre-mounted)
FuseSpecication
VoltageFuse
100/120/230VAC
ChangetheFusesintheBaseUnit
DANGER
Riskofelectricshock.Turnoffpowersupplytoequipmentpriortoworkinginsidebaseunit.
T8AL250V
38
Page 39

AXISQ8665–LEPTZNetworkCamera
VI
DEO
R
S485
GND
B
A
1
2
3
4
REL.2
REL.1
ALARMS
F1
F2
1
2
3
4
ENGLISH
CAUTION
•Theelectricalconnectionsandconduitinstallationsshallbemadebyacertiedelectrician
andincompliancewithlocalregulations.
•Riskofre.Forcontinuedprotectionagainstriskofre,thefusesmustbereplaced
withthesametypeandrating.
1.Separatethepan/tiltunitfromthebaseunitbyremovingthefourscrews,seesection
HardwareOverview.
2.Checkthefusesbyusingamultimeter.Ifthefusesareblown,changethefuses.See
thetablebelow.
1
Pan/tiltunit
2
Baseunit
3
FuseF1
4
FuseF2
FuseSpecication
VoltageFuseF15x20FuseF25x20
24/100VAC50/60Hz
120VAC50/60Hz
230VAC50/60Hz
3.Attachthepan/tiltunittothebaseunit.
F6.3A250VT8A250V
F6.3A250VT4A250V
F6.3A250VT2A250V
39
Page 40

AXISQ8665–LEPTZNetworkCamera
FurtherInformation
TheUserManualisavailableatwww.axis.com
Visitwww.axis.com/techsuptocheckifthereisupdatedrmwareavailableforyournetwork
product.Toseethecurrentlyinstalledrmwareversion,gotoSetup>About.
VisitAxislearningcenterwww.axis.com/academyforusefultrainings,webinars,tutorialsand
guides.
WarrantyInformation
ForinformationaboutAxis’productwarrantyandtheretorelatedinformation,see
www.axis.com/warranty/
40
Page 41

AXISQ8665–LEPTZNetworkCamera
FRANÇAIS
Informationssurlasécurité
Lisezattentivementceguided'installationavantd'installerl'appareil.Conservezleguide
d'installationpourtouteréférenceultérieure.
Niveauxderisques
DANGER
AVERTISSEMENT
ATTENTION
VIS
A AAVIS VIS
Indiqueunesituationdangereusequi,siellen'estpasévitée,
entraîneraledécèsoudesblessuresgraves.
Indiqueunesituationdangereusequi,siellen'estpasévitée,
pourraitentraînerledécèsoudesblessuresgraves.
Indiqueunesituationdangereusequi,siellen'estpasévitée,
pourraitentraînerdesblessureslégèresoumodérées.
Indiqueunesituationqui,siellen'estpasévitée,pourrait
endommagerl'appareil.
Autresniveauxdemessage
ImportantIndiquelesinformationsimportantes,nécessairespourassurerle
NoteIndiquelesinformationsutilesquipermettrontd'obtenirle
bonfonctionnementdel'appareil.
fonctionnementoptimaldel'appareil.
41
Page 42

AXISQ8665–LEPTZNetworkCamera
Consignesdesécurité
AVERTISSEMENT
•LeproduitAxisdoitêtreinstalléparunprofessionnelhabilité.
ATTENTION
•Risquedeblessure.Leproduitdoitêtreinstallédefaçonàêtreaccessibleuniquementà
unpersonnelautoriséenraisondespiècesenmouvementpendantlefonctionnement.
•LeBoîtierducapteurdelumièrelivréaveccetappareil(nonvalidepourlaversion24V
CA)doitêtreinstallédansunEmplacementàAccèsRestreint.
VIS
A AAVIS VIS
•LeproduitAxisdoitêtreutiliséconformémentauxloisetrèglementationslocalesen
vigueur.
•ConserverceproduitAxisdansunenvironnementsecetventilé.
•NepasexposerceproduitAxisauxchocsouauxfortespressions.
•Nepasinstallerceproduitsurdessupports,surfacesoumursinstables.
•Utiliseruniquementdesoutilsrecommandéspourl'installationdel'appareilAxis.
L'applicationd'uneforceexcessivesurl'appareilavecdesoutilspuissantspourrait
l'endommager.
•Nepasutiliserdeproduitschimiques,desubstancescaustiquesoudenettoyants
pressurisés.
•Utiliserunchiffonpropreimbibéd'eaupurepourlenettoyage.
•Utiliseruniquementdesaccessoiresconformesauxcaractéristiquestechniquesduproduit.
IlspeuventêtrefournisparAxisouuntiers.
•UtiliseruniquementlespiècesderechangefourniesourecommandéesparAxis.
•Nepasessayerderéparerceproduitparvous-même.Contacterl'assistancetechnique
d'AxisouvotrerevendeurAxispourdesproblèmesliésàl'entretien.
•Undispositifdedéconnexionaccessibleaisémentetrapidementdoitêtreintégréau
systèmeélectriquedubâtimentpouruneinterventionrapide.
•Ils'agitd'unéquipementconnectéenpermanence(connectéensérie).Laprotection
contrelescourts-circuitsetlessurintensitésestfournieparlesinstallationsdubâtiment
etseralimitéeà20Amaxi.
Transport
VIS
A AAVIS VIS
•LorsdutransportduproduitAxis,utilisezl'emballaged'origineouunéquivalentpour
éviterd'endommagerleproduit.
42
Page 43

AXISQ8665–LEPTZNetworkCamera
FRANÇAIS
Batterie
LeproduitAxisutiliseunebatterieaulithiumBR/CR20323,0Vcommealimentationdeson
horlogeentempsréelinterne(RTC).Dansdesconditionsnormales,cettebatterieauneduréede
vieminimaledecinqans.
Silabatterieestfaible,lefonctionnementdel'horlogeentempsréelpeutêtreaffectéetentraîner
saréinitialisationàchaquemisesoustension.Unmessageenregistréapparaîtdanslerapportde
serveurduproduitlorsquelabatteriedoitêtreremplacée.Pourtoutcomplémentd'information
concernantlerapportdeserveur,reportez-vousauxpagesdeCongurationduproduitoucontactez
l'assistancetechniqued'Axis.
Labatteriedoitêtreremplacéeuniquementencasdebesoin,etpourcefaire,contactezl'assistance
techniqued'Axisàl'adressewww.axis.com/techsupetobtenirdel'aide.
AVERTISSEMENT
•Risqued'explosionsilabatterieestremplacéedefaçonincorrecte.
•Remplacez-launiquementparunebatterieidentiqueouunebatterierecommandéepar
Axis.
•Mettezaurebutlesbatteriesusagéesconformémentauxréglementationslocalesou
auxinstructionsdufabricantdelabatterie.
43
Page 44

44
Page 45

AXISQ8665–LEPTZNetworkCamera
FRANÇAIS
Guided'installation
Ceguided'installationexpliquecommentinstallerlacaméraréseauAXISQ8665-LEPTZsurvotre
réseau.Pourtouteautreinformationrelativeàl’utilisationduproduit,consultezlemanuelde
l’utilisateurdisponiblesurlesitewww.axis.com
Variantesduproduit
ProduitVarianteduproduit
AXISQ8665–LE24VCA
100VCA
120VCA
230VCA
Procéduresd’installation
1.Assurez-vousquelecontenudel’emballage,lesoutilsetautresmaterielsnecessairesà
l’installationsontbiendisponibles.Cf.page45.
2.Consultezladescriptiondumatériel.Cf.page47.
3.Étudiezlescaractéristiques.Cf.page54.
4.Installezlematériel.Cf.page56.
5.Accédezauproduit.Cf.page71.
Contenudel’emballage
•AXISQ8665-LE
-CaméraréseauPTZ
-Unitédebase
-Pare-soleil
•Kitd'éclairageinfrarouge
-2illuminateurs
-Support
-Vis
•Boîtierducapteurdelumièrepréinstalléaveccâblesd'alimentationetdesignalde10m
pourconnexionàl'unitéprincipale(protégéepartube)
(NonvalidepourlavarianteAXISQ8665–LE24VAC.)
•Matérielauxiliairepourinstallation
45
Page 46

AXISQ8665–LEPTZNetworkCamera
•CDd’installationetdegestion
•Documentsimprimés
-Guided'installation(cedocument)
-Étiquettesupplémentairereprenantlenumérodesérie(2x)
Matérielsrequis(vendusséparément).
•SupportmuralKAXISousupportcolonneKAXIS
SupportmuralKAXISSupportcolonneKAXIS
•Tubemuraloutubedecolonne
TubemuralTubedecolonne
Accessoiresenoption
•Supportd'angleAXIST95A64
•SupportcolonneAXIST95A67
•RondelleAXISKitA
•ConvertisseurdemédiaAXIST8604
•AdaptateurEthernetsurcâblecoaxialavecPoE+AXIST8640
Pourplusd'informationssurlesaccessoiresdisponibles,consultezlesitewww.axis.com
46
Page 47

AXISQ8665–LEPTZNetworkCamera
FRANÇAIS
Outilsrecommandés
•PinceàsertirRJ45
•Ensembleàcliquet
•Perceusepourpercerdestrousdanslasurfacedemontage
•FreinletLoctite®243
Aperçudumatériel
•Pouruneprésentationduboîtier,consultezBoîtierpage49
•Pouruneprésentationdesboutonsetdesconnecteurssurlacaméra,consultezCaméra
page50
•Pouruneprésentationdel'éclairage,consultezpage50
•Pouruneprésentationduboîtierducapteurdelumière,consultezpage51
47
Page 48

AXISQ8665–LEPTZNetworkCamera
1
2
3
4
5
6
1
Pare-soleil
2
Supportd'illuminateurs(2x)
3
Illuminateurs
4
Boîtierducapteurdelumière(nonvalidepourlemodèleAXISQ8665–LE24VAC.)
5
CaméraréseauPTZ
6
Unitédebase
48
Page 49

AXISQ8665–LEPTZNetworkCamera
4
3
1
2
6
5
7
8
FRANÇAIS
Boîtier
1
Pare-soleil
2
Couverclesupérieur
3
Fenêtredeprotection
4
Essuyage
5
Moteurd'essuyage
6
Circuitimpriméilluminateur
7
Presse-étoupesd'illuminateur
8
Caméra
49
Page 50

AXISQ8665–LEPTZNetworkCamera
4
1
2
3
5
6
Caméra
1
ConnecteurRS485/RS422
2
Connecteurd'alimentation
3
Connecteurréseau
4
Voyantd’état
5
LogementdecartemicroSD
6
Boutondecommande
Éclairageinfrarouge
Important
Nemodiezpaslapositiondurégulateurdeseuild'enclenchement.
50
Page 51

3
4
1
2
1
FRANÇAIS
Capteurcrépusculaire
2
Câble
3
Régulateurdeseuildedéclenchement
4
Commandedepuissanceinfrarouge
AXISQ8665–LEPTZNetworkCamera
Boîtierducapteurdelumière
Leboîtierducapteurdelumièren'estpasvalidepourlemodèleAXISQ8665–LE24VAC.
51
Page 52

AXISQ8665–LEPTZNetworkCamera
1
2
3
4
5
1
Couvercle
2
Vis(x4)
3
Tube(aveccâblesd'alimentation,demiseàlaterreetdesignal)
4
Presse-étoupe(alimentationsecteurd'entrée)
5
Capteurjour/nuit
52
Page 53

AXISQ8665–LEPTZNetworkCamera
FRANÇAIS
Connecteursetboutons
Pourlescaractéristiquesetlesconditionsd'utilisation,consultezpage54.
Connecteurréseau
ConnecteurEthernetRJ45.
VIS
A AAVIS VIS
Leproduitdoitêtreconnectéàl'aided'uncâbleréseaublindé(STP).Touslescâbles
reliantleproduitaucommutateurréseaudoiventêtredestinésàleurusagespécique.
Assurez-vousquelespériphériquesréseausontinstallésconformémentauxinstructions
dufabricant.Pourplusd’informationssurlesexigencesréglementaires,consultez
ElectromagneticCompatibility(EMC)onpage2.
Boutondecommande
Pourconnaîtrel'emplacementduboutondecommande,consultezAperçudumatérielpage47.
Leboutondecommandepermetderéaliserlesopérationssuivantes:
•Réinitialisationduproduitauxparamètresd’usinepardéfaut.Cf.page74.
•ConnexionauserviceduSystèmed'hébergementvidéoAXISouauserviceAXISInternet
DynamicDNS.Pourplusd'informationssurcesservices,reportez-vousauManuelde
l'utilisateur.
EmplacementpourcarteSD
VIS
A AAVIS VIS
•LacarteSDrisqued'êtreendommagée.Nepasutiliserd'outilstranchantsetnepasforcer
lorsdel'insertionouduretraitdelacarteSD.
•Risquedepertededonnées.Pouréviterlacorruptiondesdonnées,lacarteSDdoitêtre
démontéeavantsonretrait.Pourcefaire,rendez-vousdansSetup>SystemOptions>
Storage>SDCard(Conguration>Optionsdusystème>Stockage>CarteSD)et
cliquezsurUnmount(Démonter).
CetappareilestcompatibleavecunecartemicroSD/microSDHC/microSDXC(cartenonfournie).
PourobtenirdesconseilssurlacarteSD,rendez-voussurwww.axis.com
53
Page 54

AXISQ8665–LEPTZNetworkCamera
Caractéristiquestechniques
Conditionsd’utilisation
Produit
AXISQ8665–LE
Dégivrage
Leprocessusdedégivrageautomatiqueduproduitcommencelorsqueleproduitestmissous
tensionetquelatempératuredel'airestinférieureà0°C(32°F).Leprocessusdedégivrageassure
queleproduitfonctionnecorrectementmêmeàbassestempératures.Lecyclededégivragedureau
maximum90minutes.Pendantledégivrage,lacaméraesthorstension.
Classication
IEC/EN/UL60529IP66.
NEMA250Type4X
TempératureHumidité
-40°Cà55°C
(-40°Fà131°F)
Humiditérelative
de15à100%
(condensation)
Alimentation
Consommation
électrique
AXISQ8665–LE
Appareil
Unitédebase
Boîtierducapteurdelumière
IRactifIRinactif
Max:1 13W
Standard:94W
Tensiond'entrée
24VCA,8A
100VCA,200W
120VCA,200W
230VCA,200W
Max:55W
Standard:40W
Important
•Pourréduirelerisqued'incendie,utilisezuncordontéléphoniquecertiéCSAou
homologuéUL.
•PourmaintenirlaclassicationIPduboîtierducapteurdelumière,lediamètreexterne
descâblesdoitêtrede7mm.Lalongueurducâbled'alimentationentrel'unitéde
panorama/inclinaisonetleboîtierducapteurdelumièrenedoitpasêtresupérieureà
10m(33pi).
54
Page 55

AXISQ8665–LEPTZNetworkCamera
L
N
N
PE
L
INCOMING
MAINS VOLTAGE
EXTERNAL PROTECTIVE
GROUND WIRE
AXIS Q8665-LE
LIGHT SENSOR BOX
1
2
3
FRANÇAIS
Câbled’alimentation
Câbled'alimentation
secteur
Câbled'alimentation
secteurpourleboîtier
ducapteurdelumière
Boîtierducapteurdelumière
Schémadeconnexion
Variante
24VCA
100VCA
120VCA
230VCA
Nombredels
3(L,N,PE)De3,3mm
Zonedecâble
à2,1mm
2
(AWG12)
2
(AWG14)
Caractéristiquesdel'éclairageIR
Note
Faisceauxdelumièrehorizontauxetverticaux
60°
Pouréclairerl'intégralitédelascènedefaçonadéquate,l'angled'éclairagedoitêtreajusté
conformémentauchampdevisiondelacaméra.VoirInstallationdel'éclairageinfrarougepage66.
Lesdistancesetlesperformancesdépendentdelascèneetdesconditionsd'éclairage.
Distancemaximale(850nm)
Jusqu'à150m(490pi)
55
Page 56

AXISQ8665–LEPTZNetworkCamera
Installationdumatériel
Boîtierducapteurdelumière
Branchementdescâbles
InstructionsnonvalidespourlemodèleAXISQ8665–LE24VAC.
AVERTISSEMENT
•Lesbranchementsélectriquesetlesinstallationsdeconduitsdoiventêtreréalisésparun
électriciencertiéetconformémentàlaréglementationlocale.
•Risquedechocélectrique.Leproduitdoitêtremisàlaterreàl'aided'uncâbledemiseà
laterre.Assurez-vousquelesdeuxextrémitésducâbledemiseàlaterresontencontact
aveclessurfacesdemiseàlaterrecorrespondantes.
•L'alimentationsecteurdoitêtredébranchéependantl'installation.
VIS
A AAVIS VIS
Leblocd'alimentationspéciéavecleproduitdoitêtreutilisé.L'utilisationdetoutautre
alimentationannulelagarantieetpeutexposerl'appareilàdesrisques.
Note
•Pourévitertoutedéconnexionintempestive,leldemiseàlaterredoitêtrepluslong
d'environ10mmquelesdeuxautresls.
•Sivousutilisezlecapteurjour/nuit,placezleboîtierducapteurdelumièredesortequele
capteurjour/nuitpuissesuivreleschangementsdelumièredujour.
1.Retirezlecouvercleetouvrezleboîtierducapteurdelumière,reportez-vousàlavue
d'ensembledumatérielsurpage51.
Note
Pourfaciliterl'installation,ilestpossiblederetirerleblocconnecteurd'alimentationde
lacarteetdeleremonterlorsqueleslssontconnectés.
2.Branchezlescâblesd'alimentationsecteuraublocdeconnexiondel'alimentation
secteur.
56
Page 57

AXISQ8665–LEPTZNetworkCamera
TR3
J3
F2F1 L1 L2 K1
J4 J5
J6
P1
TR4TR1
L N
J2
J1
TR2 24~ 24~
24~
24 VAC Supply
Incoming mains
24~
status
+-
LN
4 5 7
6
31
2
FRANÇAIS
1
Porte-fusiblesetfusible(T8AL250V)
2
Voyantdufusible
3
PotentiomètreP1
4
Blocdeconnexiondel'alimentationsecteur
5
Câbled'alimentationsecteur
6
Câbled'alimentationdel'unitépanoramique/inclinaison(24VAC)(préinstallé)
7
Câbledusignal(préinstallé)
3.Serrezlebouchonsdepresse-étoupefermement.
4.Sibesoin,ajustezlepotentiomètreP1pouraugmenteroudiminuerlasensibilitédu
capteurjour/nuit.VoirRéglageducapteurjour/nuitpage57.
5.Fermezleboîtierducapteurdelumièreetserrezlesvis.
Réglageducapteurjour/nuit
Note
Lecapteurjour/nuitdelacaméraestactivépardéfaut.Pourutiliserlecapteurjour/nuitsur
leboîtierducapteurdelumière,ildoitêtreactivéàpartirdelapagedesréglagesduproduit.
Sivousutilisezlecapteurjour/nuitsurleboîtierducapteurdelumière,ajustezlepotentiomètre
pourvousadapterauxconditionsspéciquessursite.
57
Page 58

AXISQ8665–LEPTZNetworkCamera
•Tournezlepotentiomètreversladroitepouraugmenterleseuiletavancezl'interrupteur
enmodenuit.
•Tournezlepotentiomètreverslagauchepourdiminuerleseuiletretardezl'interrupteur
enmodenuit.Lemodenuitestindiquéparunvoyantrougesurletableau.Lepassage
enmodenuitactivelesilluminateurs.
Installezlesupport(venduséparément)
Lessupportssontvendusséparément.Consultezlesitewww.axis.compourplusd’informationssur
lesaccessoiresdemontagedisponibles.
AVERTISSEMENT
Risquedeblessure.Vériezqueleproduitestbienxéàlasurfacedubâtimentavant
delemettreenservice.
Important
•Lorsquevousxezlesupportsurunesurfaceenbéton,utilisezlesgoujonsavecuncouple
nominaldetractionde≤300dN.
•Lorsquevousxezlesupportsurunesurfacemétallique,utilisezdesvisd'undiamètre
d'aumoins8mm.
1.Préparezunmur,unparapetouunmâtpourinstallerlesupportsélectionné.
2.Acheminezlecâbleréseauettubeàtraverslesupport.Laissezunelongueurde
50cm(12po)decâblepourlaconnexionàl'unitédebase.
58
Page 59

3
1
2
4
1
FRANÇAIS
Câbleréseau
2
Câbledutubeaveccâblesd'alimentationetdesignal
3
Supportcolonne
4
Supportmural
Fixationdel'unitédebaseausupport
AXISQ8665–LEPTZNetworkCamera
AVERTISSEMENT
Lesbranchementsélectriquesetlesinstallationsdeconduitsdoiventêtreréalisésparun
électriciencertiéetconformémentàlaréglementationlocale.
1.Retirezlesachetdéshydratant,quiestplacédansl'unitédebase.
2.Fixezletubeaucâbledutube.
3.Fixezdeuxrondellesetl'écrouautube.
59
Page 60

AXISQ8665–LEPTZNetworkCamera
1
2
3
4
6
7
5
1
Câbled’alimentation
2
Câbledusignal
3
Écroudexation
4
Rondelle
5
Rondelle
6
Tube
7
Câbledutube
Note
Pourdégagerletubeducâbledutube,insérezuntournevisettournezletubetouten
tirantdessus.
4.Assurez-vousquelejointestenplace.
60
Page 61

AXISQ8665–LEPTZNetworkCamera
WARNING
I
/
O
PW
R
Network
Use appropriate rubber
gland size to maint ain
IP classication and
cable strain relief.
See manual for more
information.
1
1
2
3
4
5
6
7
7
8
8
FRANÇAIS
5.Acheminezlescâblesd'alimentationetdusignalàtraverslepresse-étoupeindiqué
dansl'illustration.
6.Fixezl'écroudexationautube.
7.Acheminezlecâbleréseauàtraverslepresse-étoupeindiquédansl'illustration.
VIS
A AAVIS VIS
Andemaintenirlaclassicationdesproduits,ilestimportantdeserrerlespresse-étoupes.
8.Pouréviterauxcâblesdeglisser,serrezlespresse-étoupesaprèsyavoirpassélescâbles.
9.Fixezunefrettedecâblespourjointslesxer.
1
Câbleréseau
2
Unitédebase
3
Joint
4
Câbledutube
61
Page 62

AXISQ8665–LEPTZNetworkCamera
5
Écroudexation
6
Frettedecâbles
7
Câbledusignal
8
Câbled’alimentation
Important
LescommutateursDIPdel'unitédebasesontcongurésaveclebonprotocolePTZenusine
etnedoiventpasêtrechangés.
10.Raccordezlecâbled'illuminateurauconnecteur(ALARMESet1)surl'unitédebase.
11.Al'aided'unoutildesertissageRJ45,dénudezetsertissezlecâbleréseauconformément
auxinstructionsdufabricant.
12.Branchezlecâbleréseauauconnecteurréseaudel'unitédebase.
Note
Pourfaciliterl'installation,ilestpossiblederetirerleblocconnecteurd'alimentationdela
carteetdelemonterquandlescâblessontcorrectementconnectés.
13.Branchezlecâbled'alimentationauconnecteurd'alimentationdel'unitédebase.
Assurez-vousqueleldeterrevert/jauneestconnectéàlabrochedumilieu.
62
Page 63

AXISQ8665–LEPTZNetworkCamera
VIDEO
RS485
GND
B
A
1
2
3
4
REL.2
REL.1
ALAR
M
S
F1
F2
N
L
Pos. 7
(-)
Pos. 8
(+)
1
2
3
FRANÇAIS
1
Câbleréseau
2
Câblesdusignal
3
Câblesd’alimentation
Note
L'unitédebasepeutêtrexéesurlesupportenquatrepositionsdifférentes.
14.Utilisezlesindicateursd'alignementsurlesdifférentesunitéspourtrouveruneposition
appropriéequipermetd'accéderàlacartedeconguration,quipeutêtreouvertpourun
accèsfacileauconnecteurréseau,parexemplepourledépannage.
15.Sidujeupersisteaprèsraccordementdescâbles,desserrezlespresse-étoupes,supprimez
lejeu,puisxezdenouveaulespresse-étoupes.
16.Fixezl'unitédebaseausupportàl’aidedesvisetdesrondellesfournies.
17.AppliquezdufreinletLoctite
®
243surlesvisetserrezlesvis(coupledeserrage4Nm).
63
Page 64

AXISQ8665–LEPTZNetworkCamera
1
2
3
4
1
2
3
4
5
6
7
5
6
8
1
Unitédebase
2
Joint
3
Rondelle(x4)
4
Témoind'alignement
5
Rondelle(x4)
6
Vis(x4)
7
Supportcolonne
8
Supportmural
Fixationdel'unitédepanorama/inclinaisonàl'unitédebase
VIS
A AAVIS VIS
Utilisezlesindicateursd'alignementpouralignerlesunités.Unalignementincorrectpeut
causerdesdommagesauxcomposants.
Important
•Assemblezleproduitenpositionverticale.Nepasinstallerleproduitàl'envers.
•L'unitédepanorama/inclinaisondoitêtremontéebiendroitecommeindiquédans
l'illustration.Nepasl'inclinersurl'unitédebase.
1.Assurez-vousquelejointestenplace.
2.Rebasculezleboîtierdelacaméra.
3.Fixezl'unitédepanorama/inclinaisonàl'unitédebaseetserrezlesvis(coupledeserrage
4Nm)àl'aidedelacléAllen.
64
Page 65

AXISQ8665–LEPTZNetworkCamera
4
6
5
7
1
2
3
FRANÇAIS
1
Unitédepanorama/inclinaison
2
Couvercledelacartedeconguration
3
Témoinsd'alignement
4
Joint
5
Socle
6
Rondelle(x4)
7
Vis(x4)
4.L'installationmécaniqueestterminée.Pouraccéderàlacaméra,reportez-vousàla
sectionAccèsauproduitpage71.Pourplusd'informationssurl'accèsauuxdedonnées
vidéo,reportez-vousaumanueldel’utilisateurduproduit.
65
Page 66

AXISQ8665–LEPTZNetworkCamera
Installationdel'éclairageinfrarouge
AVERTISSEMENT
•Émissiondelumièreinfrarouge(groupederisque2)quipeutêtredangereusepourles
yeux.Suivezattentivementlesrecommandations.Éviteztouteexpositionprolongéedes
yeuxouutilisezundispositifdeprotectionouuneprotectionpourlesyeux.
•Risquedechocélectrique.Assurez-vousquel'alimentationestdébranchée.
ATTENTION
Enfonctionnementnormal,ilestpossiblequelasurfacedel'éclairageatteignent
destempératuresélevées.Éviteztoutcontactdirectetplacezl'appareilàunendroit
inaccessibleaupersonnelnonautorisé.Avantdeletoucher,mettezl'éclairagehorstension
etlaissez-lerefroidirpendantaumoins10minutes.
Important
Pourfonctionnercorrectement,lesdeuxilluminateursdoiventêtreinstallésensemble.
1.Placezlesupportsurlefondduboîtier.
2.Placezlesvisetlesrondellesdanslestrousetserrez-les(coupledeserrage4Nm).
Vériezquelesupportestsolidementxé.
66
Page 67

AXISQ8665–LEPTZNetworkCamera
2
3
1
FRANÇAIS
1
Support
2
Vis
3
Rondelle
3.Faitesglisserl'illuminateursurlesxationssupérieureetinférieuredusupport.
4.Ajustezl'angledesilluminateursparrapportàl'environnement.
5.Fixezlesvisetlesrondelles(coupledeserrage6Nm).
67
Page 68

AXISQ8665–LEPTZNetworkCamera
5
4
7
6
1
2
3
4
Fixationdusupport
5
Fixationdel'illuminateur
6
Vis
7
Rondelles
Raccordementdel'éclairageinfrarouge
1.Retirezlesdeuxvisetdéposezlecouverclesupérieurduboîtier.
1
Pare-soleil
2
Vis
68
Page 69

AXISQ8665–LEPTZNetworkCamera
4
5
FRANÇAIS
3
Couverclesupérieur
Important
Andegarantirlebonfonctionnementdel'unitéentoutesécurité,nelaissezaucuncâble
dépasseràl'extérieur.
2.Faitespasserlescâblesparleboîtier.Laissezunelongueurdecâblede25cm(10po).
4
Couverclesupérieur
5
Câbles
3.Branchezlescâblescommeindiquédansl'illustration.
Note
Faitesattentionànepinceraucundescâblesàlafermetureduboîtier.
4.Fermezleboîtieretxezlesdeuxvis.
69
Page 70

AXISQ8665–LEPTZNetworkCamera
B
R
B
R
BL
BL
BR
BR
BL
BL
A1
B1
A2
B2
4
4
3
3
2
2
1
1
Pourconnaîtrelapositiondescâbles,reportez-vousautableau.
ÉclairagegaucheÉclairagedroit
Positiondans
l'illustration
4
3
2
1
Référencesurle
tableau
WHBlancoujauneWHBlancoujaune
BKNoirBKNoir
A1VertoubleuA2Vertoubleu
B1RougeB2Rouge
Couleurducâble
Référencesurle
tableau
Couleurducâble
Réglezlapuissancedel'éclairageinfrarouge.
Important
Nemodiezpaslapositiondurégulateurdeseuild'enclenchement.
•Pourajusterl'éclairageinfrarouge,desserrezlebouchonhermétique.
-Ajustezlacommandedepuissanceinfrarougeversladroitepouraugmenter
lapuissance.
-Ajustezlacommandedepuissanceinfrarougeverslagauchepourréduire
lapuissance.
70
Page 71

AXISQ8665–LEPTZNetworkCamera
1
2
FRANÇAIS
1
Commandedepuissanceinfrarouge
2
Régulateurdeseuildedéclenchement
Accèsauproduit
UtilisezlesoutilsfournissurleCDd’installationetdegestionpourattribueruneadresseIP,
congurezlemotdepasseetaccédezauuxdedonnéesvidéo.Cesinformationssontégalement
disponiblessurlespagesd’assistancetechniquedusitewww.axis.com/techsup
Panoramique/Inclinaison/Zoom
ATTENTION
Piècesmobilesdangereuses.Eloignezlesdoigtsetautrespartiesducorpspendantle
fonctionnement.
LafonctionnalitéPTZestcontrôléeparlacaméraréseau.LescommandesPTZserontdisponiblesà
partirdelapaged'imageendirectdanslespagesWebdelacaméraréseauaprèsl'activationdela
fonctionnalitéPTZ.VoirleManueld'utilisation,disponibleàl'adressewww.axis.com
Accèsàlacaméra
PouraccéderàlacaméraandemonterlacarteSDouréinitialiserlacaméraauxparamètres
d'usinepardéfaut,retirezlesdeuxvisetouvrezlecouverclesupérieur.
71
Page 72

AXISQ8665–LEPTZNetworkCamera
3
1
4
2
InstallationdelacarteSD
1.Retirezlecâbled'alimentation,lecâbleréseauetlecâbleRX/TX.
2.Retirezlesquatrevis.
1
Vis
2
Câbled’alimentation
3
CâbleRX/TX
72
Page 73

AXISQ8665–LEPTZNetworkCamera
5
6
FRANÇAIS
4
Câbleréseau
3.SoulevezlacaméraaveclesupportetinsérezlacarteSD.
5
Support
6
CarteSD
4.Fixezlescâblesetremettezenplacelesquatrevis.
73
Page 74

AXISQ8665–LEPTZNetworkCamera
Réinitialisationauxparamètresd'usinepardéfaut
Important
Laréinitialisationauxparamètrespardéfautdoitêtreutiliséeavecprudence.Cette
opérationreconguretouslesparamètres,ycomprisl'adresseIP,auxvaleursd'usinepar
défaut.
Note
Leslogicielsd'installationetdegestionsontdisponiblessurleCDfourniavecleproduitet
surlespagesd'assistancedusitewww.axis.com/techsup
Pourréinitialiserl'appareilauxparamètresd'usinepardéfaut:
1.Déconnectezl'alimentationdel'appareil.
2.Maintenezleboutondecommandeenfoncéetremettezl'appareilsoustension.
ConsultezAperçudumatérielpage47.
3.Maintenezleboutondecommandeenfoncépendant15à30secondes,jusqu’àcequele
voyantd'étatpasseàl’orangeetclignote.
4.Relâchezleboutondecommande.Leprocessusestterminélorsquelevoyantd'étatpasse
auvert.Lesparamètresd’usinepardéfautdel'appareilontétérétablis.Enl'absenced'un
serveurDHCPsurleréseau,l'adresseIPpardéfautest192.168.0.90.
5.Utilisezlesoutilsd'installationetdegestionpourattribueruneadresseIP,congurerle
motdepasseetaccéderauuxdedonnéesvidéo.
Ilestégalementpossiblederétablirlesparamètresd’usineàpartirdel’interfaceWeb.Accédezà
Setup>SystemOptions>Maintenance(Conguration>Optionsdusystème>Maintenance)
(Conguration>Congurationducontrôleursupplémentaire>Conguration>Optionsdu
système>Maintenance).
Changementd'unfusibledansleboîtierducapteurdelumière
DANGER
Risquedechocélectrique.Avanttouteinterventionàl'intérieurdupanneau,mettez
l’alimentationdel'équipementhorstension.
ATTENTION
•Lesbranchementsélectriquesetlesinstallationsdeconduitsdoiventêtreréalisésparun
électriciencertiéetconformémentàlaréglementationlocale.
•Risqued'incendie.Pourassureruneprotectionpermanentecontrelerisqued'incendie,
vousdevezremplacerlesfusiblespardesfusiblesdemêmetypeetdemêmeampérage.
1.Débranchezl'alimentation.
2.Ouvrezlecouvercleduboîtierducapteurdelumièreenretirantlesvis.
74
Page 75

AXISQ8665–LEPTZNetworkCamera
TR3
J3
F2F1 L1 L2 K1
J4 J5
J6
P1
TR4TR1
L N
J2
J1
TR2 24~ 24~
24~
24 VAC Supply
Incoming mains
24~
status
+-
LN
4 5 7
6
31
2
FRANÇAIS
3.Vériezlefusibleàl'aided'unmultimètre.
-Silefusibleestintact,passezàChangementdesfusiblesdansl'unitédebase
page76.
-Silefusibleafondu,changezlefusible.Reportez-vousautableauci-dessous.
4.Fixezlecouverclesurleboîtierducapteurdelumière.
1
Porte-fusiblesetfusible
2
Voyantdufusible
3
PotentiomètreP1
4
Blocdeconnexiondel'alimentationsecteur
5
Câbled'alimentationsecteur
6
7
Câbled'alimentationdel'unitépanoramique/inclinaison(24VAC)(préinstallé)
Câbledusignal(préinstallé)
Caractéristiquestechniquesdesfusibles
TensionFusible
100/120/230VCA
T8AL250V
75
Page 76

AXISQ8665–LEPTZNetworkCamera
VI
DEO
R
S485
GND
B
A
1
2
3
4
REL.2
REL.1
ALARMS
F1
F2
1
2
3
4
Changementdesfusiblesdansl'unitédebase
DANGER
Risquedechocélectrique.Avanttouteinterventionàl'intérieurdel'unitédebase,mettez
l’alimentationdel'équipementhorstension.
ATTENTION
•Lesbranchementsélectriquesetlesinstallationsdeconduitsdoiventêtreréalisésparun
électriciencertiéetconformémentàlaréglementationlocale.
•Risqued'incendie.Pourassureruneprotectionpermanentecontrelerisqued'incendie,
vousdevezremplacerlesfusiblespardesfusiblesdemêmetypeetdemêmeampérage.
1.Séparezl'unitédepanorama/inclinaisondel'unitédebaseenretirantlesquatrevis,
reportez-vousàlasectionAperçudumatériel.
2.Vériezlesfusiblesàl'aided'unmultimètre.Silesfusiblesontfondu,changezles
fusibles.Reportez-vousautableauci-dessous.
1
Unitédepanorama/inclinaison
2
Unitédebase
3
Caractéristiquestechniquesdesfusibles
TensionFusibleF15x20FusibleF25x20
24/100VCA50/60Hz
FusibleF1
4
FusibleF2
F6,3A250VT8A250V
76
Page 77

AXISQ8665–LEPTZNetworkCamera
FRANÇAIS
120VCA50/60Hz
230VCA50/60Hz
3.Fixationdel'unitédepanorama/inclinaisonàl'unitédebase.
F6,3A250VT4A250V
F6,3A250VT2A250V
Pourobtenirplusderenseignements
LeManueldel’utilisateurestdisponibleàl’adressesuivante:www.axis.com
Consultezlesitewww.axis.com/techsuppourvériersiunemiseàjourdumicroprogrammeest
disponiblepourvotreappareilréseau.Pourconnaîtrelaversiondumicroprogrammeactuellement
installée,reportez-vousàlapageSetup>About(Conguration>Àproposde).
VisitezlecentredeformationenligneAxissurlesitewww.axis.com/academypourensavoirplus
surlesformations,leswebinaires,lestutorielsetlesguides.
Informationssurlagarantie
PourobtenirdeplusamplesinformationssurlagarantieduproduitAXISetdesrenseignements
connexes,allezsurlesitewww.axis.com/warranty/
77
Page 78

78
Page 79

AXISQ8665–LEPTZNetworkCamera
DEUTSCH
Sicherheitsinformation
LesenSiedasInstallationshandbuchsorgfältigdurchbevorsiedasProduktinstallieren.Bewahren
SiedasInstallationshandbuchfürzukünftigeZweckeauf.
Gefährdungsstufen
GEFAHRWeistaufeinegefährlicheSituationhin,die,fallsnichtverhindert,
WARNUNGWeistaufeinegefährlicheSituationhin,welche,fallsnicht
VORSICHTWeistaufeinegefährlicheSituationhin,welche,fallsnicht
HINWEIS
HINWEIS HINWEIS
zuTododerschwerenVerletzungenführt.
verhindert,zuTododerschwerenVerletzungenführenkann.
verhindert,zugeringfügigerodermäßigerVerletzungführenkann.
WeistaufeinegefährlicheSituationhin,welche,fallsnicht
verhindert,zuSachschädenführenkann.
WeitereNachrichtenstufen
WichtigWeistaufwichtigeInformationenhin,diedenrichtigenBetrieb
BeachtenWeistaufnützlicheInformationenhin,diedieoptimale
desProduktsgewährleisten.
VerwendungdesProduktsunterstützen.
79
Page 80

AXISQ8665–LEPTZNetworkCamera
Sicherheitsanweisungen
WARNUNG
•DasAxisProduktmussvongeschultemPersonalinstalliertwerden.
VORSICHT
•Verletzungsgefahr.DasinstallierteProduktdarfaufgrunddersichbewegendenTeile
währenddesBetriebsnurfürautorisiertesPersonalzugänglichsein.
•DieimLieferumfangderAusrüstungenthaltendeLichtsensorbox(nichtfür24VAC
geeignet)mussaneinemOrtmiteingeschränktemZuganginstalliertwerden.
HINWEIS
HINWEIS HINWEIS
•DieAnwendungdesAxisProduktsmussunterBeachtungderörtlichgeltendenrechtlichen
Bestimmungenerfolgen.
•LagernSiedasAxisProduktineinertrockenenundbelüftetenUmgebung.
•AchtenSiedarauf,dassdasAxisProduktwederStößennochstarkemDruckausgesetztist.
•InstallierenSiedasProduktnichtaninstabilenHalterungen,OberächenoderWänden.
•VerwendenSiebeiderInstallationdesAxisProduktsausschließlichpassendeWerkzeuge.
EinzugroßerKraftaufwandmitelektrischenWerkzeugenkanndasProduktbeschädigen.
•VerwendenSiekeinechemischen,ätzendenoderaerosolhaltigenReinigungsmittel.
•VerwendenSiezumReinigeneinsauberes,mitlauwarmemWasserangefeuchtetesTuch.
•VerwendenSienurZubehör,dasdentechnischenDatendesProduktsentspricht.Dieses
istvonAxisoderDrittanbieternerhältlich.
•VerwendenSieausschließlichErsatzteiledievonAxisbereitgestelltoderempfohlen
werden.
•VersuchenSienicht,dasProduktselbstständigzureparieren.WendenSiesichbezüglich
ReparaturundWartungandenAxisSupportoderIhrenAxisHändler.
•InderelektrischenAnlagedesGebäudesmusseinebetriebsbereiteundleichtzu
erreichendeAbschalteinrichtunginstalliertsein.
•EshandeltsichumfestgeschalteteAusrüstung(Feldverkabelung).DieelektrischeAnlage
desGebäudesmussmiteinemÜberstrom-undKurzschlussschutzbiszu20Aausgestattet
sein.
Transport
HINWEIS
HINWEIS HINWEIS
•BeiBedarftransportierenSiedasAxisProduktinderOriginalverpackungodereiner
entsprechendenVerpackung,sodassSchädenvermiedenwerden.
80
Page 81

AXISQ8665–LEPTZNetworkCamera
DEUTSCH
Batterie
DasAxis-Produktistmiteiner3,0V-BR/CR2032-Lithium-Batterieausgestattet,mitderdieinterne
Echtzeituhr(RTC)versorgtwird.UnternormalenBedingungenhatdieBatterieeineLebensdauer
vonmindestensfünfJahren.
BeientladenerBatterieistderBetriebderEchtzeituhrnichtmehrgewährleistet,sodassdieUhrbei
jedemSystemstartzurückgesetztwird.SieerhalteneineProtokollnachrichtimServerberichtdes
Produkts,wenneinBatteriewechselerforderlichist.WeitereInformationenüberdenServerbericht
ndenSieaufdenSetup-SeitendesProdukts,oderwendenSiesichandenAxisSupport.
DieBatteriesolltenurbeiBedarfersetztwerden.WendenSiesichindiesemFallandenAxis
Supportunterwww.axis.com/techsup.
WARNUNG
•ExplosionsgefahrbeifehlerhaftemBatteriewechsel.
•DieBatteriedarfnurdurcheineidentischeBatterieodereinevonAxisempfohlene
Batterieersetztwerden.
•VerbrauchteBatteriensindgemäßdenörtlichenVorschriftenoderdenAnweisungendes
Herstellerszuentsorgen.
81
Page 82

82
Page 83

AXISQ8665–LEPTZNetworkCamera
DEUTSCH
Installationsanleitung
IndieserAnleitungwirddieInstallationderAXISQ8665-LE-Netzwerk-KamerainIhrem
Netzwerkbeschrieben.WeitereInformationenzurVerwendungdiesesProduktsndenSieim
Benutzerhandbuchunterwww.axis.com.
Ausführungen
Produkt
AXISQ8665–LE24VAC
Stromversorgung
100VAC
120VAC
230VAC
Installationsschritte
1.StellenSiesicher,dassdiePackungsinhalte,Werkzeugeundanderenotwendige
MaterialienfürdieInstallationinOrdnungsind.SieheSeite83.
2.MachenSiesichmitderHardware-Übersichtvertraut.SieheSeite85.
3.MachenSiesichmitdentechnischenDatenvertraut.SieheSeite92.
4.InstallierenSiedieHardware.SieheSeite94.
5.ZugriffaufdasProdukt.SieheSeite109.
Lieferumfang
•AXISQ8665-LE
-PTZ-Netzwerk-Kamera
-Basiseinheit
-Sonnenblende
•Infrarotleuchtensatz
-2Leuchten
-Halterung
-Schrauben
•Lichtsensorbox,Stromversorgungs-undSignalkabel(10m)zumAnschlussandas
Hauptgerätvormontiert(geschütztdurchKabelführung)
(nichtbeiAXISQ8665–LE24VAC)
•Installationszubehör
83
Page 84

AXISQ8665–LEPTZNetworkCamera
•CD-ROMmitInstallations-undVerwaltungssoftware
•GedruckteDokumente
-Installationsanleitung(diesesDokument)
-ZusätzlicheEtikettenmitderSeriennummer(2x)
ErforderlicheBefestigungsteile(separaterhältlich)
•AXISWandhalterungKoderAXISSäulenhalterungK
AXISWandhalterungKAXISSäulenhalterungK
•KabelführungfürdieWand-oderSäulenmontage
Kabelführungfürdie
Wandmontage
Kabelführungfürdie
Säulenmontage
OptionalesZubehör
•AXIST95A64-Eckhalterung
•AXIST95A67-Masthalterung
•AXISUnterlegscheibensatzA
•AXIST8604-Media-Konverter-Switch
•AXIST8640-Ethernet-over-Coax-AdapterPoE+
84
Page 85

AXISQ8665–LEPTZNetworkCamera
DEUTSCH
Unterwww.axis.comndenSieInformationenüberverfügbaresZubehör.
EmpfohleneWerkzeuge
•RJ-45-Crimp-Werkzeug
•Ratschensatz
•BohrmaschinezumBohrenvonLöchernindieMontageäche
•Loctite®243-Gewindekleber
ÜbersichtüberdieHardware
•EineÜbersichtüberdasGehäusendenSieunterGehäuseaufSeite87.
•EineÜbersichtüberdieTastenundAnschlüssederKamerandenSieunterKameraeinheit
aufSeite88.
•EineÜbersichtüberdieLeuchtenndenSieunterSeite88.
•EineÜbersichtüberdieLichtsensorboxndenSieunterSeite89.
85
Page 86

AXISQ8665–LEPTZNetworkCamera
1
2
3
4
5
6
1
Sonnenblende
2
Leuchtenhalterung
3
Leuchten
4
Lichtsensorbox(nichtfürAXISQ8665–LE24VAC)
5
PTZ-Netzwerk-Kamera
6
Basiseinheit
86
Page 87

AXISQ8665–LEPTZNetworkCamera
4
3
1
2
6
5
7
8
DEUTSCH
Gehäuse
1
Sonnenblende
2
ObereAbdeckung
3
Schutzfenster
4
Wischer
5
Wischermotor
6
Leuchtenplatine
7
DurchführungfürdieLeuchtenkabel
8
Kameraeinheit
87
Page 88

AXISQ8665–LEPTZNetworkCamera
4
1
2
3
5
6
Kameraeinheit
1
RS485-/RS422-Anschluss
2
Netzanschluss
3
Netzwerkanschluss
4
LED-Statusanzeige
5
EinschubfürmicroSD-Speicherkarte
6
Steuertaste
Infrarotleuchte
Wichtig
BewegenSiedenReglerfürdenEinschaltschwellenwertnicht.
88
Page 89

AXISQ8665–LEPTZNetworkCamera
3
4
1
2
DEUTSCH
1
Dämmerungssensor
2
Kabel
3
ReglerfürdenEinschaltschwellenwert
4
ReglerfürdieInfrarotleistung
Lichtsensorbox
DieLichtsensorboxistanderAXISQ8665–LE24VACnichtvorhanden.
89
Page 90

AXISQ8665–LEPTZNetworkCamera
1
2
3
4
5
1
Deckel
2
Schraube(4x)
3
Kabelführung(einschließlichStromversorgungs-,Erdungs-undSignalkabeln)
4
Kabeldurchführung(eingehendesStromversorgungskabel)
5
Tag-Nacht-Sensor
90
Page 91

AXISQ8665–LEPTZNetworkCamera
DEUTSCH
AnschlüsseundTasten
FürdietechnischenDatenundBetriebsbedingungensieheSeite92.
Netzwerkanschluss
RJ45-Ethernetanschluss.
HINWEIS
HINWEIS HINWEIS
DasProduktmussmiteinemabgeschirmtenNetzwerkkabel(STP)angeschlossenwerden.
AlleKabel,diedasProduktmitdemNetzwerkswitchverbinden,müssenhierfürausgelegt
sein.StellenSiesicher,dassdieNetzwerkgerätegemäßdenAnweisungendesHerstellers
installiertwurden.InformationenzugesetzlichenBestimmungenndenSieunter
ElectromagneticCompatibility(EMC)onpage2.
Steuertaste
DiePositionderSteuertastendenSieunter:ÜbersichtüberdieHardwareaufSeite85.
DieSteuertastehatfolgendeFunktionen:
•ZurücksetzendesProduktsaufWerkseinstellungen.SieheSeite112.
•VerbindenmiteinemAXISVideoHostingSystem-ServiceodereinemAXISInternet
DynamicDNS-Service.WeitereInformationenzudiesenDienstenndenSieinder
Bedienungsanleitung.
SD-Kartensteckplatz
HINWEIS
HINWEIS HINWEIS
•GefahrvonSchädenanderSD-Karte.VerwendenSiebeimEinlegenoderEntfernender
SD-Kartekeinescharfen/spitzenWerkzeugeundwendenSienichtzuvielKraftan.
•GefahrvorDatenverlust.UmeinerBeschädigungderAufnahmenvorzubeugen,solltedie
SD-KartevordemmechanischenAuswerfengetrenntwerden.RufenSiezumTrennen
Setup>SystemOptions>Storage>SDCard(Einrichtung>Systemoptionen>
Speicher>SD-Karte)aufundklickenSieaufUnmount(Trennen).
DiesesProduktunterstütztmicroSD-/microSDHC-/microSDXC-Karten(separaterhältlich).
EmpfehlungenzuSD-KartenndenSieunterwww.axis.com.
91
Page 92

AXISQ8665–LEPTZNetworkCamera
TechnischeDaten
Betriebsbedingungen
Produkt
AXISQ8665–LE
Enteisen
DieautomatischeEnteisungdesProduktsbeginntbeieingeschaltetemProduktund
Lufttemperaturenunter0°C.DurchdieEnteisungwirdsichergestellt,dassdasProduktauchbei
niedrigenTemperaturenordnungsgemäßfunktioniert.DieEnteisungläuftmaximal90Minuten.
WährenddieserZeitistdieKameraausgeschaltet.
Klassikation
IEC/EN/UL60529IP66.
NEMA250Typ4X
Temperatur
-40°Cbis55°C
Luftfeuchtigkeit
15bis100%rF
(kondensierend)
Stromversorgung
StromverbrauchInfrarotleuchtenaktiviertInfrarotleuchtendeaktiviert
AXISQ8665–LE
Gerät
Basiseinheit
Lichtsensorbox
Max.:113W
Normal:94W
Eingangsspannung
24VAC,8A
100VAC,200W
120VAC,200W
230VAC,200W
Max.:55W
Normal:40W
Wichtig
•VerwendenSiezurMinderungderBrandgefahreinUL-gelistetesoderCSA-zertiziertes
Telekommunikationskabel.
•DerAußendurchmesserderKabelmuss7mmbetragen,damitdieSchutzklasseder
Lichtsensorboxerhaltenbleibt.DasStromversorgungskabelzwischendemPLZ-Modulund
derLichtsensorboxdarfnichtlängerseinals10msein.
92
Page 93

AXISQ8665–LEPTZNetworkCamera
L
N
N
PE
L
INCOMING
MAINS VOLTAGE
EXTERNAL PROTECTIVE
GROUND WIRE
AXIS Q8665-LE
LIGHT SENSOR BOX
1
2
3
DEUTSCH
Stromversorgungskabel
Stromversorgungskabel
StromversorgungskabelfürdieLichtsensorbox
Ausführung
24VAC
100VAC
120VAC
230VAC
AnzahlderAdernKabelquerschnitt
3(L,N,PE)Von3,3mm
12)bis2,1mm
14)
2
(AWG
2
(AWG
Lichtsensorbox
Anschlussschaltbild
SpezikationderInfrarotleuchten
Beachten
HorizontaleundvertikaleStrahlrichtung
60°
DerBeleuchtungswinkelsolltedemSichtwinkelderKameraangepasstwerden,damitdiegesamte
Szeneentsprechendausgeleuchtetist,sieheInstallierenderInfrarotleuchtenaufSeite104.
DieBeleuchtungsweiteunddieLeistunghängenvonderjeweiligenSzeneundden
Umgebungslichtbedingungenab.
MaximaleBeleuchtungsweite(850nm)
Bis150m
93
Page 94

AXISQ8665–LEPTZNetworkCamera
InstallierenderHardware
Lichtsensorbox
AnschließenderKabel
AnwendungengeltennichtfürAXISQ8665–LE24VAC.
WARNUNG
•DieInstallationenderelektrischenVerbindungenundKabelkanälemüssenvoneinem
zugelassenenElektrikerinÜbereinstimmungmitörtlichenBestimmungenvorgenommen
werden.
•Stromschlaggefahr.DasProduktsolltemiteinemErdungskabelgeerdetwerden.
SorgenSiedafür,dassbeideEndendesErdungskabelsKontaktmitdenentsprechenden
Erdungsächenhaben.
•DieStromversorgungmusswährendderInstallationunterbrochensein.
HINWEIS
HINWEIS HINWEIS
DasinderProduktdokumentationangegebeneNetzteilistzuverwenden.WennSieein
anderesNetzteilverwenden,erlischtdieGarantieunddersichereBetriebdesGerätsist
nichtgewährleistet.
Beachten
•DieErdungsleitungmussca.10mmlängerseinalsdieanderenLeitungen.Sowird
verhindert,dassdieErdungunbeabsichtigtgetrenntwird.
•BeiVerwendungdesTag-Nacht-SensorsistdieLichtsensorboxsozuplatzieren,dassder
Tag-Nacht-SensordasTageslichterfassenkann.
1.EntfernenSiedieAbdeckungundöffnenSiedieLichtsensorbox,sieheHardwareübersicht
Seite89.
Beachten
ZurVereinfachungderInstallationkannderAnschlussblockvonderPlatineabgezogenund
nachdemAnschlussderLeitungenwiederaufgestecktwerden.
2.VerbindenSiedasStromversorgungskabelmitderStromversorgungamAnschlussblock.
94
Page 95

AXISQ8665–LEPTZNetworkCamera
TR3
J3
F2F1 L1 L2 K1
J4 J5
J6
P1
TR4TR1
L N
J2
J1
TR2 24~ 24~
24~
24 VAC Supply
Incoming mains
24~
status
+-
LN
4 5 7
6
31
2
DEUTSCH
1
SicherungshalterundSicherung(T8AL250V)
2
Sicherungs-LED
3
PotenziometerP1
4
AnschlussblockfürdieStromversorgung
5
Stromversorgungskabel
6
StromversorgungskabelfürSchwenk-/Neigemodul(24VAC)(vormontiert)
7
Signalkabel(vormontiert)
3.ZiehenSiedieKappederKabelverschraubungfest.
4.StellenSieggf.dasPotenziometerP1höheroderniedrigerein,umdieEmpndlichkeit
desTag-Nacht-Sensorseinzustellen.SieheEinstellendesTag-Nacht-SensorsaufSeite95.
5.SchließenSiedieLichtsensorboxundziehenSiedieSchraubenfest.
EinstellendesTag-Nacht-Sensors
Beachten
DerintegrierteTag-Nacht-SensorderKameraiststandardmäßigaktiviert.Der
Tag-Nacht-SensoranderLichtsensorboxmussaufderSeitemitdenProdukteinstellungen
aktiviertwerden.
WennSiedenTag-Nacht-SensoranderLichtsensorboxverwenden,stellenSiedasPotenziometer
entsprechenddenGegebenheitenvorOrtein.
95
Page 96

AXISQ8665–LEPTZNetworkCamera
•DrehenSiedasPotenziometerimUhrzeigersinn,umdenGrenzwertzuerhöhenunddas
SchaltenindenNacht-Moduszubeschleunigen.
•DrehenSiedasPotenziometerentgegendemUhrzeigersinn,umdenGrenzwertzu
verringernunddasSchaltenindenNacht-Moduszuverzögern.DerNacht-Moduswird
durcheineroteLEDangezeigt.BeimUmschaltenindenNacht-Moduswerdendie
Leuchtenaktiviert.
AnbringenderHalterung(separaterhältlich)
DieHalterungensindseparaterhältlich.Unterwww.axis.comndenSieInformationenüber
verfügbaresMontagezubehör.
WARNUNG
Verletzungsgefahr.StellenSievordemBetriebsicher,dassdasProduktander
Montageächebefestigtist.
Wichtig
•BeimAnbringenderHalterungaufBetonsindStiftemiteinemZugmomentvon
≤300dNzuverwenden.
•BeimAnbringenderHalterungaufMetallsindSchraubenmiteinemDurchmesservon
mindestens8mmzuverwenden.
1.BereitenSieeineWand,eineBrüstungodereinenHochständerfürdieInstallationder
ausgewähltenHalterungvor.
2.FührenSiedasNetzwerk-unddasLeitungskabeldurchdieHalterung.Esmüssen
50cmzusätzlichesKabelfürdenAnschlussanderBasiseinheitvorhandensein.
96
Page 97

3
1
2
4
1
DEUTSCH
Netzwerkkabel
2
LeitungskabelmitStromversorgungs-undSignalkabeln
3
HalterungfürSäulenmontage
4
Wandhalterung
AnbringenderBasiseinheitanderHalterung
AXISQ8665–LEPTZNetworkCamera
WARNUNG
DieInstallationenderelektrischenVerbindungenundKabelkanälemüssenvoneinem
zugelassenenElektrikerinÜbereinstimmungmitörtlichenBestimmungenvorgenommen
werden.
1.NehmenSiedenAntikondensationsbeutelausderBasiseinheit.
2.BefestigenSiedieKabelführungamLeitungskabel.
3.BringenSiezweiUnterlegscheibenunddieMutteranderKabelführungan.
97
Page 98

AXISQ8665–LEPTZNetworkCamera
1
2
3
4
6
7
5
1
Stromversorgungskabel
2
Signalkabel
3
Befestigungsmutter
4
Unterlegscheibe
5
Unterlegscheibe
6
Kabelführung
7
Leitungskabel
Beachten
FührenSieeinenSchraubendreherdurchdieÖffnungenderKabelführungunddrehenSie
dieseunterZug,umKabelführungundLeitungskabelzutrennen.
4.StellenSiesicher,dasssichdieDichtunganderrichtigenPositionbendet.
98
Page 99

AXISQ8665–LEPTZNetworkCamera
WARNING
I
/
O
PW
R
Network
Use appropriate rubber
gland size to maint ain
IP classication and
cable strain relief.
See manual for more
information.
1
1
2
3
4
5
6
7
7
8
8
DEUTSCH
5.FührenSiedieStromversorgungs-undSignalkabeldurchdieinderAbbildunggezeigte
Kabelverschraubung.
6.BringenSiedieBefestigungsmutteranderKabelführungan.
7.FührenSiedasNetzwerkkabeldurchdieinderAbbildunggezeigteKabelverschraubung.
HINWEIS
HINWEIS HINWEIS
ZiehenSiedieKabelverschraubungenfest.Diesistwichtig,damitdieSchutzartdes
ProduktsbeibehaltenwerdenkannundkeinübermäßigerZugaufdieKabelausgeübtwird.
8.ZiehenSiedieKabelverschraubungennachdemDurchführenfest.SokönnendieKabel
nichtherausrutschen.
9.SichernSiedieKabelmithilfeeinesKabelbinders.
1
Netzwerkkabel
2
Basiseinheit
99
Page 100

AXISQ8665–LEPTZNetworkCamera
3
Dichtung
4
Leitungskabel
5
Befestigungsmutter
6
Kabelbinder
7
Signalkabel
8
Stromversorgungskabel
Wichtig
DieDIP-SchalterinderBasiseinheitwurdenwerkseitigmitdemrichtigenPTZ-Protokoll
konguriert.HiersindkeineÄnderungenerforderlich.
10.SchließenSiedasSignalkabelderLeuchtenandenAnschluss(ALARMSund1)der
Basiseinheitan.
11.MantelnSiedasNetzwerkkabelabundcrimpenSieesgemäßdenAnweisungendes
HerstellersmiteinemfürRJ-45geeignetenCrimp-Werkzeug.
12.VerbindenSiedasNetzwerkkabelmitdemNetzwerkanschlussanderBasiseinheit.
Beachten
ZurVereinfachungderInstallationkannderAnschlussblockvonderPlatineabgezogenund
nachdemordnungsgemäßenAnschlussderKabelwiederaufgestecktwerden.
13.VerbindenSiedasStromversorgungskabelmitdemStromanschlussanderBasiseinheit.
StellenSiesicher,dassdergrün-gelbeErdungsleiterandenmittlerenPolangeschlossen
wird.
100
 Loading...