

Page 1

AXISQ604Series
ENGLISH
AXISQ6042PTZDomeNetworkCamera
AXISQ6044PTZDomeNetworkCamera
AXISQ6045PTZDomeNetworkCamera
InstallationGuide
Page 2

LegalConsiderations
Videoandaudiosurveillancecanberegulatedbylawsthat
varyfromcountrytocountry.Checkthelawsinyourlocal
regionbeforeusingthisproductforsurveillancepurposes.
Thisproductincludesone(1)H.264decoderlicenseand
one(1)AACdecoderlicense.Topurchasefurtherlicenses,
contactyourreseller .
Liability
Everycarehasbeentakeninthepreparationofthis
document.PleaseinformyourlocalAxisofceofany
inaccuraciesoromissions.AxisCommunicationsABcannot
beheldresponsibleforanytechnicalortypographicalerrors
andreservestherighttomakechangestotheproductand
manualswithoutpriornotice.AxisCommunicationsAB
makesnowarrantyofanykindwithregardtothematerial
containedwithinthisdocument,including,butnotlimited
to,theimpliedwarrantiesofmerchantabilityandtnessfor
aparticularpurpose.AxisCommunicationsABshallnot
beliablenorresponsibleforincidentalorconsequential
damagesinconnectionwiththefurnishing,performance
oruseofthismaterial.Thisproductisonlytobeusedfor
itsintendedpurpose.
IntellectualPropertyRights
AxisABhasintellectualpropertyrightsrelatingto
technologyembodiedintheproductdescribedinthis
document.Inparticular,andwithoutlimitation,these
intellectualpropertyrightsmayincludeoneormoreof
thepatentslistedatwww .axis.com/patent.htmandoneor
moreadditionalpatentsorpendingpatentapplicationsin
theUSandothercountries.
Thisproductcontainslicensedthird-partysoftware.See
themenuitem“About”intheproduct’suserinterfacefor
moreinformation.
ThisproductcontainssourcecodecopyrightAppleComputer,
Inc.,underthetermsofApplePublicSourceLicense2.0
(seewww.opensource.apple.com/apsl).Thesourcecodeis
availablefromhttps://developer.apple.com/bonjour/
EquipmentModications
Thisequipmentmustbeinstalledandusedin
strictaccordancewiththeinstructionsgiveninthe
userdocumentation.Thisequipmentcontainsno
user-serviceablecomponents.Unauthorizedequipment
changesormodicationswillinvalidateallapplicable
regulatorycerticationsandapprovals.
TrademarkAcknowledgments
AXISCOMMUNICATIONS,AXIS,ETRAX,ARTPECandVAPIX
areregisteredtrademarksortrademarkapplicationsofAxis
ABinvariousjurisdictions.Allothercompanynamesand
productsaretrademarksorregisteredtrademarksoftheir
respectivecompanies.
Apple,Boa,Apache,Bonjour ,Ethernet,InternetExplorer,
Linux,Microsoft,Mozilla,Real,SMPTE,QuickTime,UNIX,
Windows,WindowsVistaandWWWareregistered
trademarksoftherespectiveholders.Javaandall
Java-basedtrademarksandlogosaretrademarksor
registeredtrademarksofOracleand/oritsafliates.
TM
UPnP
isacerticationmarkoftheUPnP
Corporation.
SD,SDHCandSDXCaretrademarksorregisteredtrademarks
ofSD-3C,LLCintheUnitedStates,othercountriesorboth.
Also,miniSD,microSD,miniSDHC,microSDHC,microSDXC
arealltrademarksorregisteredtrademarksofSD-3C,LLC
intheUnitedStates,othercountriesorboth.
TM
Implementers
RegulatoryInformation
Europe
ThisproductcomplieswiththeapplicableCEmarking
directivesandharmonizedstandards:
•ElectromagneticCompatibility(EMC)Directive
2004/108/EC.SeeElectromagneticCompatibility(EMC)
onpage2.
•LowVoltage(LVD)Directive2006/95/EC.SeeSafety
onpage3.
•RestrictionsofHazardousSubstances(RoHS)Directive
201 1/65/EU.SeeDisposalandRecyclingonpage3.
Acopyoftheoriginaldeclarationofconformitymaybe
obtainedfromAxisCommunicationsAB.SeeContact
Informationonpage3.
ElectromagneticCompatibility(EMC)
Thisequipmenthasbeendesignedandtestedtofulll
applicablestandardsfor:
•Radiofrequencyemissionwheninstalledaccordingto
theinstructionsandusedinitsintendedenvironment.
•Immunitytoelectricalandelectromagneticphenomena
wheninstalledaccordingtotheinstructionsandused
initsintendedenvironment.
USA
Thisequipmenthasbeentestedusingashieldednetwork
cable(STP)andfoundtocomplywiththelimitsfora
ClassAdigitaldevice,pursuanttopart15oftheFCCRules.
Theselimitsaredesignedtoprovidereasonableprotection
againstharmfulinterferencewhentheequipmentis
operatedinacommercialenvironment.Thisequipment
generates,uses,andcanradiateradiofrequencyenergy
and,ifnotinstalledandusedinaccordancewiththe
instructionmanual,maycauseharmfulinterferenceto
radiocommunications.Operationofthisequipmentin
aresidentialareaislikelytocauseharmfulinterference
inwhichcasetheuserwillberequiredtocorrectthe
interferenceathisownexpense.
Theproductshallbeconnectedusingashieldednetwork
cable(STP)thatisproperlygrounded.
Canada
ThisClassAdigitalapparatuscomplieswithCanadian
ICES-003.Theproductshallbeconnectedusingashielded
networkcable(STP)thatisproperlygrounded.
CetappareilnumériquedelaclasseAestconfomeàla
normeNMB-003duCanada.Leproduitdoitêtreconnecté
àl'aided'uncâbleréseaublindé(STP)quiestcorrectement
misàlaterre.
Europe
ThisdigitalequipmentfulllstherequirementsforRF
emissionaccordingtotheClassAlimitofEN55022.The
productshallbeconnectedusingashieldednetworkcable
(STP)thatisproperlygrounded.Notice!ThisisaClassA
product.Inadomesticenvironmentthisproductmaycause
RFinterference,inwhichcasetheusermayberequired
totakeadequatemeasures.
Thisproductfulllstherequirementsforemissionand
immunityaccordingtoEN50121-4andIEC62236-4railway
applications.
Thisproductfulllstherequirementsforimmunity
accordingtoEN61000-6-1residential,commercialand
light-industrialenvironments.
Thisproductfulllstherequirementsforimmunity
accordingtoEN61000-6-2industrialenvironments.
Thisproductfulllstherequirementsforimmunity
accordingtoEN55024ofceandcommercialenvironments
Page 3

Australia/NewZealand
ThisdigitalequipmentfulllstherequirementsforRF
emissionaccordingtotheClassAlimitofAS/NZSCISPR22.
Theproductshallbeconnectedusingashieldednetwork
cable(STP)thatisproperlygrounded.Notice!Thisisa
ClassAproduct.Inadomesticenvironmentthisproduct
maycauseRFinterference,inwhichcasetheusermaybe
requiredtotakeadequatemeasures.
Japan
この装置は、クラスA情報技術装置です。この装
置を家庭環境で使用すると電波妨害を引き起こす
ことがあります。この場合には使用者が適切な対
策を講ずるよう要求されることがあります。本
製品は、シールドネットワークケーブル(STP)を
使用して接続してください。また適切に接地し
てください。
Korea
이기기는업무용(A급)전자파적합기기로서판매
자또는사용자는이점을주의하시기바라며,가
정외의지역에서사용하는것을목적으로합니다.
적절히접지된STP(shieldedtwistedpair)케이블
을사용하여제품을연결하십시오.
Safety
ThisproductcomplieswithIEC/EN/UL60950-1,Safetyof InformationTechnologyEquipment.Ifitsconnectingcables areroutedoutdoors,theproductshallbegroundedeither throughashieldednetworkcable(STP)orotherappropriate method.
Thepowersupplyusedwiththisproductshallfulll
therequirementsforSafetyExtraLowVoltage
(SELV)andLimitedPowerSource(LPS)accordingto
IEC/EN/UL60950-1.
DisposalandRecycling
Whenthisproducthasreachedtheendofitsusefullife,
disposeofitaccordingtolocallawsandregulations.For
informationaboutyournearestdesignatedcollectionpoint,
contactyourlocalauthorityresponsibleforwastedisposal.
Inaccordancewithlocallegislation,penaltiesmaybe
applicableforincorrectdisposalofthiswaste.
Europe
22369Lund
Sweden
Tel:+46462721800
Fax:+4646136130
www.axis.com
Support
Shouldyourequireanytechnicalassistance,pleasecontact
yourAxisreseller.Ifyourquestionscannotbeanswered
immediately,yourresellerwillforwardyourqueriesthrough
theappropriatechannelstoensurearapidresponse.Ifyou
areconnectedtotheInternet,youcan:
•downloaduserdocumentationandsoftwareupdates
•ndanswerstoresolvedproblemsintheFAQdatabase.
Searchbyproduct,category,orphrase
•reportproblemstoAxissupportstaffbylogginginto
yourprivatesupportarea
•chatwithAxissupportstaff(selectedcountriesonly)
•visitAxisSupportatwww.axis.com/techsup/
LearnMore!
VisitAxislearningcenterwww.axis.com/academy/for
usefultrainings,webinars,tutorialsandguides.
Thissymbolmeansthattheproductshallnotbe
disposedoftogetherwithhouseholdorcommercialwaste.
Directive2012/19/EUonwasteelectricalandelectronic
equipment(WEEE)isapplicableintheEuropeanUnion
memberstates.Topreventpotentialharmtohumanhealth
andtheenvironment,theproductmustbedisposedofin
anapprovedandenvironmentallysaferecyclingprocess.
Forinformationaboutyournearestdesignatedcollection
point,contactyourlocalauthorityresponsibleforwaste
disposal.Businessesshouldcontacttheproductsupplierfor
informationabouthowtodisposeofthisproductcorrectly.
Thisproductcomplieswiththerequirementsof
Directive2011/65/EUontherestrictionoftheuseof
certainhazardoussubstancesinelectricalandelectronic
equipment(RoHS).
China
Thisproductcomplieswiththerequirementsofthe
legislativeactAdministrationontheControlofPollution
CausedbyElectronicInformationProducts(ACPEIP).
ContactInformation
AxisCommunicationsAB
Emdalavägen14
Page 4

Page 5

AXISQ604Series
ENGLISH
SafetyInformation
ReadthroughthisInstallationGuidecarefullybeforeinstallingtheproduct.KeeptheInstallation
Guideforfuturereference.
HazardLevels
DANGER
WARNING
CAUTION
NO
TICE
NO NO
TICE TICE
Indicatesahazardoussituationwhich,ifnotavoided,willresultin
deathorseriousinjury.
Indicatesahazardoussituationwhich,ifnotavoided,couldresult
indeathorseriousinjury.
Indicatesahazardoussituationwhich,ifnotavoided,couldresult
inminorormoderateinjury.
Indicatesasituationwhich,ifnotavoided,couldresultindamage
toproperty.
OtherMessageLevels
ImportantIndicatessignicantinformationwhichisessentialfortheproduct
NoteIndicatesusefulinformationwhichhelpsingettingthemostout
tofunctioncorrectly .
oftheproduct.
5
Page 6

AXISQ604Series
SafetyInstructions
WARNING
•TheAxisproductshallbeinstalledbyatrainedprofessional.
NO
TICE
NO NO
TICE TICE
•TheAxisproductshallbeusedincompliancewithlocallawsandregulations.
•TousetheAxisproductoutdoors,orinsimilarenvironments,itshallbeinstalledinan
approvedoutdoorhousing.
•StoretheAxisproductinadryandventilatedenvironment.
•AvoidexposingtheAxisproducttoshocksorheavypressure.
•Donotinstalltheproductonunstablebrackets,surfacesorwalls.
•UseonlyapplicabletoolswheninstallingtheAxisproduct.Excessiveforcecouldcause
damagetotheproduct.
•Donotusechemicals,causticagents,oraerosolcleaners.Useacleanclothdampened
withpurewaterforcleaning.
•Useonlyaccessoriesthatcomplywithtechnicalspecicationoftheproduct.Thesecanbe
providedbyAxisorathirdparty .
•UseonlysparepartsprovidedbyorrecommendedbyAxis.
•Donotattempttorepairtheproductbyyourself.ContactAxissupportoryourAxis
resellerforservicematters.
Transportation
NO
TICE
NO NO
TICE TICE
•WhentransportingtheAxisproduct,usetheoriginalpackagingorequivalenttoprevent
damagetotheproduct.
Battery
TheAxisproductusesa3.0VBR/CR2032lithiumbatteryasthepowersupplyforitsinternal
real-timeclock(RTC).Undernormalconditionsthisbatterywilllastforaminimumofveyears.
LowbatterypoweraffectstheoperationoftheRTC,causingittoresetateverypower-up.When
thebatteryneedsreplacing,alogmessagewillappearintheproduct’sserverreport.Formore
informationabouttheserverreport,seetheproduct´ssetuppagesorcontactAxissupport.
Thebatteryshouldnotbereplacedunlessrequired,butifthebatterydoesneedreplacing,contact
Axissupportatwww .axis.com/techsupforassistance.
6
Page 7

AXISQ604Series
ENGLISH
WARNING
•Riskofexplosionifthebatteryisincorrectlyreplaced.
•ReplaceonlywithanidenticalbatteryorabatterywhichisrecommendedbyAxis.
•Disposeofusedbatteriesaccordingtolocalregulationsorthebatterymanufacturer's
instructions.
DomeCover
NO
TICE
NO NO
TICE TICE
•Becarefulnottoscratch,damageorleavengerprintsonthedomecoverbecausethis
coulddecreaseimagequality.Ifpossible,keeptheprotectiveplasticonthedomecover
untiltheinstallationiscomplete.
•Donotcleanadomecoverthatlookscleantotheeyeandneverpolishthesurface.
Excessivecleaningcoulddamagethesurface.
•Forgeneralcleaningofthedomecoveritisrecommendedtouseanon-abrasive,
solvent-freeneutralsoapordetergentmixedwithpurewaterandasoft,cleancloth.Rinse
wellwithpurelukewarmwater.Drywithasoft,cleanclothtopreventwaterspotting.
•Neveruseharshdetergents,gasoline,benzeneoracetoneetc.andavoidcleaningthe
domecoverindirectsunlightoratelevatedtemperatures.
7
Page 8

8
Page 9

AXISQ604Series
ENGLISH
InstallationGuide
ThisInstallationGuideprovidesinstructionsforinstallingAXISQ6042/Q6044/Q6045MkIIPTZ
DomeNetworkCameraonyournetwork.Forotheraspectsofusingtheproduct,seetheUser
Manualavailableatwww.axis.com
InstallationSteps
1.Makesurethepackagecontents,toolsandothermaterialsnecessaryfortheinstallation
areinorder .Seepage9.
2.Studythehardwareoverview.Seepage10.
3.Studythespecications.Seepage17.
4.Installthehardware.Seepage18.
5.Accesstheproduct.Seepage26.
PackageContents
•AXISQ6042/Q6044/Q6045PTZDomeNetworkCamera
•Cleartransparentdomecover(premounted)
•Smokedtransparentdomecover
•Mountingkitforhardceilingsanddropceilings
•AXIST8123HighPoEMidspan1-port(LPS)
•InstallationandManagementSoftwareCD
•Printedmaterials
-InstallationGuide(thisdocument)
-Drilltemplate(2x)
-Extraserialnumberlabel(2x)
-AVHSAuthenticationkey
OptionalAccessories
•AXIST91AMountingAccessories
•Multi-connectorcableforconnectionofI/O,audioandpower
Forinformationaboutavailableaccessories,seewww.axis.com
9
Page 10

AXISQ604Series
1
2
4
5
6
7
8
9
10
3
HardwareOverview
1
Unitholder(3x)
2
Camerabaselid
3
CamerabaselidscrewT20(3x)
4
Hookforsafetywire
5
Partnumber(P/N)&Serialnumber(S/N)
6
Cabletrack(2x)
7
Foamgasket
8
Networkconnector(PoE+)
9
Multi-connector
10
Topcover
10
Page 11

CameraUnit
1
2
3
4
1
2
3
4
5
ENGLISH
DomeCover
AXISQ604Series
1
SDcardslot(SDHC)
2
StatusLEDindicator
3
Controlbutton
4
Powerbutton
1
DomebracketscrewT20(4x)
2
Domebracket
3
Domecover
4
DomeringscrewT20(4x)
5
Domering
11
Page 12

AXISQ604Series
1
2
1
2
3
4
5
6
7
HardCeilingMount
DropCeilingMount
1
Mountingplate
2
Safetywire
1
Mountingplate
2
MountingplatescrewT20(3x)
3
Bracketarm
4
BracketarmscrewT20(3x)andwasher(3x)
5
Bracketring
6
Trimring
7
Safetywire
12
Page 13

AXISQ604Series
ENGLISH
LEDIndicators
LED
Status
Color
Unlit
Amber
Amber/redFlashesamber/redifnetworkconnectionisunavailable
RedFlashesredforrmwareupgradefailure.
GreenShowssteadygreenfor10secondsfornormaloperation
Indication
Connectionandnormaloperation
Steadyduringstartup.Flashesduringrmwareupgrade.
orlost.
afterrestart.
MidspanLEDIndicators
LED
Port
ACGreenSteadywhenACpowerinputconnected.
Color
UnlitNocameraconnected.
GreenSteadywhencameraconnected,normaloperation.
Green,ashingSlowashwhenovercurrentorshortcircuitcondition
Green,ashing
Indication
ontheport.
Fastashwheninputvoltageisoutofrangeorother
internalerror.
ConnectorsandButtons
Forspecicationsandoperatingconditions,seepage17.
NetworkConnector
RJ45EthernetconnectorwithPoweroverEthernetPlus(PoE+).
NO
TICE
NO NO
TICE TICE
Usethesuppliedmidspan.
13
Page 14

AXISQ604Series
NO
TICE
NO NO
TICE TICE
Theproductshallbeconnectedusingashieldednetworkcable(STP).Allcablesconnecting
theproducttothenetworkshallbeintendedfortheirspecicuse.Makesurethatthe
networkdevicesareinstalledinaccordancewiththemanufacturer’sinstructions.For
informationaboutregulatoryrequirements,seeElectromagneticCompatibility(EMC)on
page2.
I/OandAudioConnector
Terminalconnectorforconnectingexternalequipment:
•Audioequipment
•Input/Output(I/O)devices
Whenconnectingexternalequipment,amulti-connectorcable(availablefromAxis)isrequired
inordertomaintaintheproduct’sIPrating.Formoreinformation,seeMulti-ConnectorCable
(soldseparately)onpage15.
SDCardSlot
AnSDcard(notincluded)canbeusedforlocalrecordingwithremovablestorage.Formore
information,seeSpecicationsonpage17.
NO
TICE
NO NO
TICE TICE
Topreventcorruptionofrecordings,theSDcardshouldbeunmountedbeforeremoval.To
unmount,gotoSetup>SystemOptions>Storage>SDCardandclickUnmount.
Note
ForSDcardrecommendationsseewww.axis.com
ControlButton
Thecontrolbuttonisusedfor:
•Resettingtheproducttofactorydefaultsettings.Seepage26.
•ConnectingtoanAXISVideoHostingSystemserviceorAXISInternetDynamicDNS
Service.Formoreinformationabouttheseservices,seetheUserManual.
PowerButton
Pressandholdthepowerbuttontotemporarilypowertheproductwhenthedomecoveris
removed.Thepowerbuttonisalsousedwiththecontrolbuttontoresetthecameratofactory
defaultsettings.Seepage26.
14
Page 15

AXISQ604Series
ENGLISH
Multi-ConnectorCable(soldseparately)
WhenconnectingexternalequipmenttotheAxisproduct,amulti-connectorcable(availablefrom
Axis)isrequiredinordertomaintaintheproduct’sIPrating.Themulti-connectorcablecanbe
purchasedfromyourAxisreseller .
Connectthemulti-connectorcabletotheproduct’smulti-connector.Tolocatethemulti-connector,
seeHardwareOverviewonpage10.Thecableprovidesthefollowingconnectors:
Powerconnector-3-pinterminalblockusedforpowerinput.Seeimagebelow.UseaSafetyExtra
LowVoltage(SELV)compliantlimitedpowersource(LPS)witheitheraratedoutputpowerlimited
to≤100Woraratedoutputcurrentlimitedto≤5A.
Audioin(pink)-3.5mminputforamonomicrophone,oraline-inmonosignal(leftchannelis
usedfromastereosignal).
Audioout(green)-3.5mmoutputforaudio(linelevel)thatcanbeconnectedtoapublicaddress
(PA)systemoranactivespeakerwithabuilt-inamplier.Astereoconnectormustbeusedforthe
audioout.
I/Oterminalconnector-Usewithexternaldevicesincombinationwith,forexample,tampering
alarms,motiondetection,eventtriggering,timelapserecordingandalarmnotications.Inaddition
tothe0VDCreferencepointandpower(DCoutput),theI/Oconnectorprovidestheinterfaceto:
•Digitaloutput—ForconnectingexternaldevicessuchasrelaysandLEDs.
ConnecteddevicescanbeactivatedbytheVAPIX®ApplicationProgramming
Interface,outputbuttonsontheLiveViewpageorbyanActionRule.Theoutput
willshowasactive(shownunderSystemOptions>Port&Devices>Port
Status)ifthealarmdeviceisactivated.
•Digitalinput—Analarminputforconnectingdevicesthatcantogglebetween
anopenandclosedcircuit,forexample:PIRs,door/windowcontacts,glass
breakdetectors,etc.Whenasignalisreceivedthestatechangesandtheinput
becomesactive(shownunderSystemOptions>Port&Devices>PortStatus).
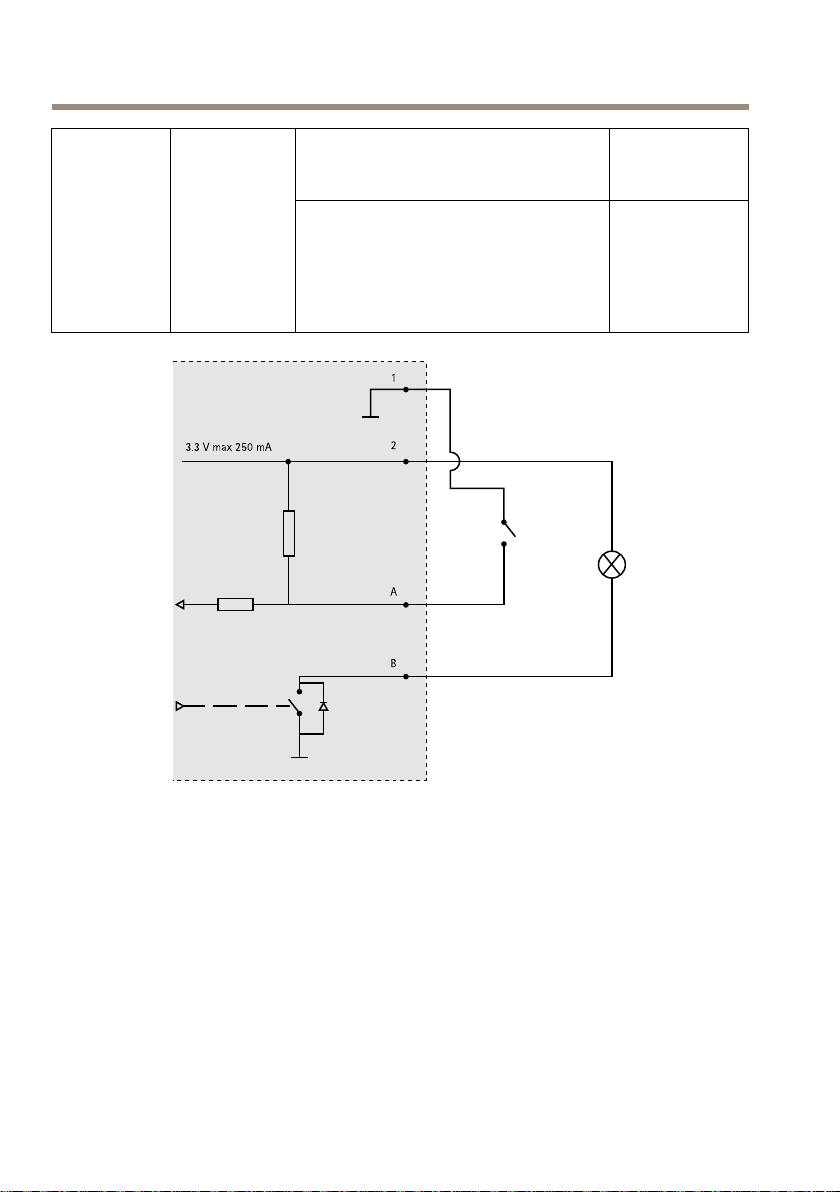
FunctionPinNotes
0VDC(-)
DCoutput
1
2
Canbeusedtopowerauxiliaryequipment.
Note:Thispincanonlybeusedaspower
out.
Specications
3.3VDC
Maxload=
250mA
15
Page 16
AXISQ604Series
3.3 V max 250 mA
1
2
A
B
Congurable
(Inputor
Output)
3–6
Digitalinput–Connecttopin1to
0tomax40VDC
activate,orleaveoating(unconnected)
todeactivate.
Digitaloutput–Connectedtopin1when
activated,oating(unconnected)when
deactivated.Ifusedwithaninductive
0tomax40VDC,
opendrain,
100mA
load,e.g.arelay,adiodemustbe
connectedinparallelwiththeload,for
protectionagainstvoltagetransients.
Connectiondiagram
A
I/Oconguredasinput
B
I/Oconguredasoutput
16
Page 17

AXISQ604Series
1 2 3 4 5 6
ENGLISH
I/Oconnector
DCpowerinputACpowerinput
Specications
OperatingConditions
TheAxisproductisintendedforindooruse.
Product
AXISQ6042
AXISQ6044
AXISQ6045
PowerConsumption
Classication
IEC60721-4-3
Class3K3,3M3
IEC60529IP52
TemperatureHumidity
0°Cto50°C
(32°Fto122°F)
10–85%RH(non-condensing)
NO
NO NO
ProductPoE+
AXISQ6042
AXISQ6044
AXISQ6045
TICE
TICE TICE
UseaSafetyExtraLowVoltage(SELV)compliantlimitedpowersource(LPS)witheither
aratedoutputpowerlimitedto≤100Woraratedoutputcurrentlimitedto≤5A.Axis
recommendsusingthesuppliedmidspan.
DCAC
21.1W
20.7W
21.8W
24–34VDC,max.17.4W20–24VAC,max.24.7VA
24–34VDC,max.17.9W20–24VAC,max.25.9VA
24–34VDC,max.17.8W20–24VAC,max.26.0VA
17
Page 18

AXISQ604Series
Connectors
SDCardSlot
SupportsSDcardswithupto64GBofstorage.Forbestrecordingperformance,useanSDHC
orSDXCcardwithspeedclass10.
InstalltheHardware
NO
TICE
NO NO
TICE TICE
•TheAXISproductshallbeconnectedusingashieldednetworkcable(STP).Allcables
connectingtheproducttothemidspanshallbeshielded(STP)andintendedfortheir
specicuse.Makesurethatthemidspanisproperlygrounded.Forinformationabout
regulatoryrequirements,seeRegulatoryInformationonpage2.
•Mounttheproductwiththedomecoverfacingdownward.
•Becarefulnottoscratch,damageorleavengerprintsonthedomecoverbecausethis
coulddecreaseimagequality.Ifpossible,keeptheprotectiveplasticonthedomecover
untiltheinstallationiscomplete.
TheAxisproductcanbeinstalledwiththecablesroutedthroughoralongthewallorceiling.
Readalltheinstructionsbeforeinstallingtheproduct.Someinstallationstepswouldbenetfrom
beingcompletedtogetherbecausetheyrequireremovalofthedomecover.
Ahardwareinstallationcanincludethefollowing:
•Theproductissuppliedwithacleardomecover(premounted).Asmokeddomecoveris
availableasanaccessory.Toreplacethedomecover,seepage18.
•AstandardorhighcapacitySDcard(notincluded)canbeusedtostorerecordingslocally
intheproduct.ToinstallanSDcard,seepage19.
•Toinstalltheproductusingthehardceilingmount,seepage19.
•Toinstalltheproductusingthedropceilingmount,seepage20.
•ToinstalltheproductusingacompatiblebracketfromAXIST91AMountingAccessories
(soldseparately),seepage23.
•Toinstallthesuppliedmidspan,seepage25.
ReplacetheDomeCover
Replacingthedomecoverisonlynecessaryifyouwanttousethesmokeddomecoverorifthe
domecoverisscratchedordamaged.SparedomecoverscanbepurchasedfromyourAxisreseller
1.Loosenthedomeringscrewsandremovethedomecover.
18
Page 19

AXISQ604Series
1
2
ENGLISH
2.Removethedomebracketscrewsandremovethedomebracketandthedomecover
fromthedomering.
3.Attachthedomebracketandthedomecovertothedomeringandtightenthescrews
(torque1.2Nm).
4.ToinstallanSDcard(notincluded),seeInstallanSDCardonpage19.
5.Attachthedomecovertothetopcoverandtightenthescrews(torque1.5Nm).
InstallanSDCard
ItisoptionaltoinstallastandardorhighcapacitySDcard(notincluded),whichcanbeusedfor
localrecordingwithremovablestorage.
1.Loosenthedomeringscrewsandremovethedomecover.
2.InsertanSDcard(notincluded)intotheSDcardslot.
3.Attachthedomecovertothetopcoverandtightenthescrews(torque1.5Nm).
NO
TICE
NO NO
TICE TICE
Topreventcorruptionofrecordings,theSDcardshouldbeunmountedbeforeitisejected.
Tounmount,gotoSetup>SystemOptions>Storage>SDCardandclickUnmount.
HardCeilingMount
1.Preparetheceilingforinstallationofthemountingplate.Thesupplieddrilltemplate
canbeusedtopositiontheholes.Makesuretousedrillbits,screwsandplugsthat
areappropriateforthematerial.
2.Installthemountingplate.Thearrowonthemountingplatewillalignwiththelogotype
onthecamera.
1
Mountingplate
2
Safetywire
3.Loosenthecamerabaselidscrewsandremovethecamerabaselid.
4.Securethecamerausingthesuppliedsafetywire.
19
Page 20

AXISQ604Series
1
2
3
5.Routeandconnectthenetworkcableandthemulti-connectorcable(soldseparately),if
applicable,tothecamera.
NO
TICE
NO NO
TICE TICE
•Becarefulnottodamagethecableswhenconnectingthem.
•Makesurethatthefoamgasketholesarealignedwiththecabletracksand,ifapplicable,
removethecut-outpieceforthemulti-connectorcablefromthefoamgasket.
1
Cableholders
2
Multi-connectorcable(soldseparately)
3
Networkcable(notincluded)
6.Turnthecableholderstokeepthecablesinplace.
7.Putthecamerabaselidbackinitsoriginalpositionandtightenthescrews(torque
1.5Nm).
8.Slidetheunitholdersonthenetworkcameraintotheslotsinthemountingplateand
rotatethecameraunit.
9.Installthesuppliedmidspan.Seepage25.
DropCeilingMount
WARNING
Thecombinedweightofthecameraandceilingmountisapproximately3200g(7.1lb.).
Makesurethattheceilingmaterialisstrongenoughtosupportthisweight.
NO
TICE
NO NO
TICE TICE
Theceilingtileshouldbe5–60mm(0.2–2.4in.)thick.
1.Removetheceilingtileinwhichthedropceilingmountistobetted.
2.Cutaholeintheceilingtileforthedropceilingmount.Usethesuppliedtemplateto
markthepositionandcutaroundthetemplate.
20
Page 21

AXISQ604Series
1
2
1
2
3
ENGLISH
1
Ceilingtile
2
Holediameter225mm(8.9in.)
3.Assembletheceilingbracketandattachittotheceilingtile.Makesurethearrowson
themountingplateandtheceilingbracketarepointinginthesamedirectionforthe
logotypesonthecameraandthetrimringtoalign.
4.Tightenthebracketarmscrews.
5.Loosenthecamerabaselidscrewsandremovethecamerabaselid.
6.Routeandconnectthenetworkcableandthemulti-connectorcable(soldseparately),if
applicable,tothecamera.
NO
TICE
NO NO
TICE TICE
•Becarefulnottodamagethecableswhenconnectingthem.
•Makesurethatthefoamgasketholesarealignedwiththecabletracksand,ifapplicable,
removethecut-outpieceforthemulti-connectorcablefromthefoamgasket.
1
Cableholders
2
Multi-connectorcable(soldseparately)
3
Networkcable(notincluded)
7.Turnthecableholderstokeepthecablesinplace.
8.Putthecamerabaselidbackinitsoriginalpositionandtightenthescrews(torque
1.5Nm).
9.Securethecamerausingthesuppliedsafetywire.
21
Page 22

AXISQ604Series
2
1
3
4
5
1
2
3
4
5
Mountingplate
Ceilingbracket
Ceilingtile
Safetywire
Hookforsafetywire
10.Slidetheunitholdersonthenetworkcameraintotheslotsinthemountingplateand
rotatethecameraunit.
11.Installthesuppliedmidspan.Seepage25.
12.Installtheceilingtilewiththecameramountedonit.
13.Putthetrimringontheceilingbracketandtightenthescrews.
22
Page 23

AXISQ604Series
1
2
ENGLISH
1
Trimring
2
TrimringscrewT20(4x)
BracketMount(soldseparately)
1.Installtheselectedbracketaccordingtotheinstructionssuppliedwiththebracket.If
drillingisrequired,makesuretousedrillbits,screwsandplugsthatareappropriatefor
thematerial.
2.Loosenthecamerabaselidscrewsandremovethecamerabaselid.
3.Routethenetworkcableandthemulti-connectorcable,ifapplicable,throughtheholes
inthemountingbracket.
4.Securethecamerausingthesuppliedsafetywire.
23
Page 24

AXISQ604Series
1
2
3
4
1
2
3
1
ScrewT30(3x)
2
Slotforunitholder(3x)
3
Safetywire
4
Wallbracket(mountingexample)
5.Connectthenetworkcableandthemulti-connectorcable(soldseparately),ifapplicable,
tothecamera.
NO
TICE
NO NO
TICE TICE
•Becarefulnottodamagethecableswhenconnectingthem.
•Makesurethatthefoamgasketholesarealignedwiththecabletracksand,ifapplicable,
removethecut-outpieceforthemulti-connectorcablefromthefoamgasket.
1
Cableholders
2
Multi-connectorcable(soldseparately)
3
Networkcable(notincluded)
24
Page 25

AXISQ604Series
1
2
3
4
ENGLISH
6.Turnthecableholderstokeepthecablesinplace.
7.Putthecamerabaselidbackinitsoriginalpositionandtightenthescrews(torque
1.5Nm).
8.Slidetheunitholdersonthenetworkcameraintotheslotsinthemountingbracketand
rotatethecameraunit.
9.Securethenetworkcameratothemountingbracketbytighteningthescrews.
10.Installthesuppliedmidspan.Seepage25.
InstalltheMidspan
ThesuppliedmidspanenablesAxisnetworkvideoproductswithhighpowerconsumptiontoreceive
dataandpoweroverthesamenetworkcable.
1.Connectthemidspan(datain)tothenetworkswitchusinganetworkcable.
2.Connectthemidspan(dataandpowerout)tothecamerausingthenetworkcablethat
hasbeenconnectedtothecamera.
3.Connectthemidspantoagrounded(earthed)mainspoweroutlet(100–240VAC)using
thesuppliedpowercable.
1
Dataandpowerout(connecttoAxisproduct)
2
Datain(connecttonetwork)
3
ACinputLEDindicator
4
PortLEDindicator
4.MakesurethattheLEDsonthemidspanindicatethecorrectconditions.SeeMidspan
LEDIndicatorsonpage13.
25
Page 26

AXISQ604Series
AccesstheProduct
UsethetoolsprovidedontheInstallationandManagementSoftwareCDtoassignanIPaddress,
setthepasswordandaccessthevideostream.Thisinformationisalsoavailablefromthesupport
pagesonwww.axis.com/techsup/
ResettoFactoryDefaultSettings
Important
Resettofactorydefaultshouldbeusedwithcaution.Aresettofactorydefaultwillreset
allsettings,includingtheIPaddress,tothefactorydefaultvalues.
Note
TheinstallationandmanagementsoftwaretoolsareavailableontheCDsuppliedwiththe
productandfromthesupportpagesonwww.axis.com/techsup
Toresettheproducttothefactorydefaultsettings:
1.Pressandholdthecontrolbuttonandthepowerbuttonforabout15–30secondsuntil
thestatusLEDindicatorashesamber.SeeHardwareOverviewonpage10.
2.Releasethecontrolbuttonbutcontinuetoholddownthepowerbuttonuntilthestatus
LEDindicatorturnsgreen.
3.Releasethepowerbuttonandassembletheproduct.
4.Theprocessisnowcomplete.Theproducthasbeenresettothefactorydefaultsettings.
IfnoDHCPserverisavailableonthenetwork,thedefaultIPaddressis192.168.0.90
5.Usingtheinstallationandmanagementsoftwaretools,assignanIPaddress,setthe
passwordandaccessthevideostream.
Itisalsopossibletoresetparameterstofactorydefaultviathewebinterface.GotoSetup
>SystemOptions>Maintenance.
FurtherInformation
TheUserManualisavailableatwww.axis.com
Visitwww.axis.com/techsuptocheckifthereisupdatedrmwareavailableforyournetwork
product.Toseethecurrentlyinstalledrmwareversion,gotoSetup>About.
VisitAxislearningcenterwww.axis.com/academyforusefultrainings,webinars,tutorialsand
guides.
26
Page 27

AXISQ604Series
ENGLISH
WarrantyInformation
ForinformationaboutAxis’productwarrantyandtheretorelatedinformation,see
www.axis.com/warranty/
27
Page 28

Page 29

Errata
Valid for AXIS Q60 Series
About this document
This document is a correction of AXIS Q60 Series Installation Guide AXIS Q6042/Q6044/Q6045.
page 2
Regulatory Information
USA
This equipment has been tested using an unshielded network cable (UTP) and
found to comply with the limits for a Class A digital device, pursuant to part
15 of the FCC rules. This equipment has also been tested using a shielded
network cable (STP) and found to comply with the limits for a Class A digital
device, pursuant to part 15 of the FCC rules. These limits are designed to
provide reasonable protection against harmful interference when the
equipment is operated in a commercial environment. This equipment
generates, uses, and can radiate radio frequency energy and, if not installed
and used in accordance with the instruction manual, may cause harmful
interference to radio communications. Operation of this equipment in a
residential area is likely to cause harmful interference in which case the user
will be required to correct the interference at his own expense.
page 14
Network Connector
Due to local regulations or the environmental and electrical conditions in which
the product is to be used, a shielded network cable (STP) may be appropriate or
required. All cables connecting the product to the network and that are routed
outdoors or in demanding electrical environments shall be intended for their
specific use. Make sure that the network devices are installed in accordance
with the manufacturer’s instructions. For information about regulatory
requirements, see Regulatory Information.
page 18
Install the Hardware
Due to local regulations or the environmental and electrical conditions in which
the product is to be used, a shielded network cable (STP) may be appropriate or
required. All cables connecting the product to the network and that are routed
outdoors or in demanding electrical environments shall be intended for their
specific use. Make sure that the network devices are installed in accordance
with the manufacturer’s instructions. For information about
regulatory requirements, see Regulatory Information.
Errata, Installation Guide
AXIS Q60 Series
© Axis Communications AB,
2014
Date: October 2014
Part No: 60286
Part No (original document):
59146
Page 30

Page 31

Page 32

InstallationGuide
AXISQ604Series
©AxisCommunicationsAB,2014
Ver.M2.8
Date:August2014
PartNo.59146
 Loading...