


AXISQ60-ESeries
AXISQ6042-EMkIIPTZDomeNetworkCamera
AXISQ6044-EPTZDomeNetworkCamera
AXISQ6045-EMkIIPTZDomeNetworkCamera
InstallationGuide

Legalconsiderations
Videosurveillancecanberegulatedbylawsthatvaryfrom
countrytocountry.Checkthelawsinyourlocalregion
beforeusingthisproductforsurveillancepurposes.
Thisproductincludesthefollowinglicences:
•one(1)H.264decoderlicense
Topurchasefurtherlicenses,contactyourreseller.
Liability
Everycarehasbeentakeninthepreparationofthis
document.PleaseinformyourlocalAxisofceofany
inaccuraciesoromissions.AxisCommunicationsABcannot
beheldresponsibleforanytechnicalortypographicalerrors
andreservestherighttomakechangestotheproductand
manualswithoutpriornotice.AxisCommunicationsAB
makesnowarrantyofanykindwithregardtothematerial
containedwithinthisdocument,including,butnotlimited
to,theimpliedwarrantiesofmerchantabilityandtnessfor
aparticularpurpose.AxisCommunicationsABshallnot
beliablenorresponsibleforincidentalorconsequential
damagesinconnectionwiththefurnishing,performance
oruseofthismaterial.Thisproductisonlytobeusedfor
itsintendedpurpose.
Intellectualpropertyrights
AxisABhasintellectualpropertyrightsrelatingto
technologyembodiedintheproductdescribedinthis
document.Inparticular,andwithoutlimitation,these
intellectualpropertyrightsmayincludeoneormoreof
thepatentslistedataxis.com/patentandoneormore
additionalpatentsorpendingpatentapplicationsinthe
USandothercountries.
Thisproductcontainslicensedthird-partysoftware.See
themenuitem“About”intheproduct’suserinterfacefor
moreinformation.
ThisproductcontainssourcecodecopyrightApple
Computer,Inc.,underthetermsofApplePublicSource
License2.0(seeopensource.apple.com/apsl).Thesource
codeisavailablefromdeveloper.apple.com/bonjour/.
Equipmentmodications
Thisequipmentmustbeinstalledandusedin
strictaccordancewiththeinstructionsgiveninthe
userdocumentation.Thisequipmentcontainsno
user-serviceablecomponents.Unauthorizedequipment
changesormodicationswillinvalidateallapplicable
regulatorycerticationsandapprovals.
Trademarkacknowledgements
AXISCOMMUNICATIONS,AXISandVAPIXareregistered
trademarksortrademarkapplicationsofAxisABinvarious
jurisdictions.Allothercompanynamesandproductsare
trademarksorregisteredtrademarksoftheirrespective
companies.
Apple,Apache,Bonjour,Ethernet,InternetExplorer,
Linux,Microsoft,Mozilla,Real,SMPTE,QuickTime,UNIX,
Windows,andWWWareregisteredtrademarksofthe
respectiveholders.JavaandallJava-basedtrademarksand
logosaretrademarksorregisteredtrademarksofOracle
and/oritsafliates.TheUPnPWordMarkandUPnPLogo
aretrademarksofOpenConnectivityFoundation,Inc.in
theUnitedStatesorothercountries.
trademarksofSD-3CLLC.SD,SDHCandSDXCare
trademarksorregisteredtrademarksofSD-3C,LLCinthe
UnitedStates,othercountriesorboth.
SD,SDHC,andSDXCLogosare
Regulatoryinformation
Europe
ThisproductcomplieswiththeapplicableCEmarking
directivesandharmonizedstandards:
•ElectromagneticCompatibility(EMC)Directive
2014/30/EU.SeeElectromagneticcompatibility(EMC)
onpage2.
•LowVoltageDirective(LVD)2014/35/EU.SeeSafety
onpage3.
•RestrictionofHazardousSubstances(RoHS)Directive
201 1/65/EUand2015/863,includinganyamendments,
updatesorreplacements.SeeDisposalandrecycling
onpage3.
Acopyoftheoriginaldeclarationofconformitymaybe
obtainedfromAxisCommunicationsAB.SeeContact
informationonpage3.
Electromagneticcompatibility(EMC)
Thisequipmenthasbeendesignedandtestedtofulll
applicablestandardsfor:
•Radiofrequencyemissionwheninstalledaccordingto
theinstructionsandusedinitsintendedenvironment.
•Immunitytoelectricalandelectromagneticphenomena
wheninstalledaccordingtotheinstructionsandused
initsintendedenvironment.
USA
Thisdevicecomplieswithpart15oftheFCCRules.
Operationissubjecttothefollowingtwoconditions:
1.Thisdevicemaynotcauseharmfulinterference,and
2.thisdevicemustacceptanyinterferencereceived,
includinginterferencethatmaycauseundesired
operation.
Thisequipmenthasbeentestedusingashieldednetwork
cable(STP)andfoundtocomplywiththelimitsfora
ClassAdigitaldevice,pursuanttopart15oftheFCCRules.
Theselimitsaredesignedtoprovidereasonableprotection
againstharmfulinterferencewhentheequipmentis
operatedinacommercialenvironment.Thisequipment
generates,uses,andcanradiateradiofrequencyenergy
and,ifnotinstalledandusedinaccordancewiththe
instructionmanual,maycauseharmfulinterferenceto
radiocommunications.Operationofthisequipmentin
aresidentialareaislikelytocauseharmfulinterference
inwhichcasetheuserwillberequiredtocorrectthe
interferenceathisownexpense.Theproductshallbe
connectedusingashieldednetworkcable(STP)thatis
properlygrounded.
Contactinformation
AxisCommunicationsInc.
300ApolloDrive
Chelmsford,MA01824
UnitedStatesofAmerica
Tel:+19786142000
Canada
ThisdigitalapparatuscomplieswithCANICES-3(ClassA).
Theproductshallbeconnectedusingashieldednetwork
cable(STP)thatisproperlygrounded.Cetappareil
numériqueestconformeàlanormeCANNMB-3(classeA).
Leproduitdoitêtreconnectéàl'aided'uncâbleréseau
blindé(STP)quiestcorrectementmisàlaterre.
Europe
ThisdigitalequipmentfulllstherequirementsforRF
emissionaccordingtotheClassAlimitofEN55032.The
productshallbeconnectedusingashieldednetworkcable
(STP)thatisproperlygrounded.Notice!ThisisaClassA

product.Inadomesticenvironmentthisproductmaycause
RFinterference,inwhichcasetheusermayberequired
totakeadequatemeasures.
Australia/NewZealand
ThisdigitalequipmentfulllstherequirementsforRF
emissionaccordingtotheClassAlimitofAS/NZSCISPR32.
Theproductshallbeconnectedusingashieldednetwork
cable(STP)thatisproperlygrounded.Notice!Thisisa
ClassAproduct.Inadomesticenvironmentthisproduct
maycauseRFinterference,inwhichcasetheusermaybe
requiredtotakeadequatemeasures.
Japan
この装置は、クラスA機器です。この装置を住宅環
境で使⽤すると電波妨害を引き起こすことがあり
ます。この場合には使⽤者が適切な対策を講ずる
よう要求されることがあります。VCCI‒A
本製品は、シールドネットワークケーブル(STP)を
使⽤して接続してください。また適切に接地し
てください。
本製品は電気通信事業者(移動通信会社、固定通
信会社、インターネットプロバイダ等)の通信回線
(公衆無線LANを含む)に直接接続することがで
きません。本製品をインターネットに接続する場
合は、必ずルータ等を経由し接続してください。
Korea
이기기는업무용환경에서사용할목적으로적합
성평가를받은기기로서가정용환경에서사용하
는경우전파간섭의우려가있습니다.적절히접지
된STP(shieldedtwistedpair)케이블을사용하여
제품을연결하십시오.
Safety
ThisproductcomplieswithIEC/EN/UL60950-1and
IEC/EN/UL60950-22,SafetyofInformationTechnology
Equipment.Theproductshallbegroundedeitherthrougha
shieldednetworkcable(STP)orotherappropriatemethod.
Disposalandrecycling
Whenthisproducthasreachedtheendofitsusefullife,
disposeofitaccordingtolocallawsandregulations.For
informationaboutyournearestdesignatedcollectionpoint,
contactyourlocalauthorityresponsibleforwastedisposal.
Inaccordancewithlocallegislation,penaltiesmaybe
applicableforincorrectdisposalofthiswaste.
Europe
Thissymbolmeansthattheproductshallnotbe
disposedoftogetherwithhouseholdorcommercialwaste.
Directive2012/19/EUonwasteelectricalandelectronic
equipment(WEEE)isapplicableintheEuropeanUnion
memberstates.Topreventpotentialharmtohumanhealth
andtheenvironment,theproductmustbedisposedofin
anapprovedandenvironmentallysaferecyclingprocess.
Forinformationaboutyournearestdesignatedcollection
point,contactyourlocalauthorityresponsibleforwaste
disposal.Businessesshouldcontacttheproductsupplierfor
informationabouthowtodisposeofthisproductcorrectly.
Thisproductcomplieswiththerequirementsof
Directive2011/65/EUand2015/863ontherestrictionof
theuseofcertainhazardoussubstancesinelectricaland
electronicequipment(RoHS).
China
有毒有害物质或元素
部
件
名
称
电
气
实
装
部
分
0:表示该有毒有害物质在该部件所有均质材料中
的含量均在GB/T26572标准规定的限量要求以下。
X:表示该有毒有害物质至少在该部件的某一均质
材料中的含量超出GB/T26572标准规定的限量要
求。
Contactinformation
AxisCommunicationsAB
Emdalavägen14
22369Lund
Sweden
Tel:+46462721800
Fax:+4646136130
axis.com
汞
铅
(Pb)
X
镉
(Hg)
(Cd)
00000
六价
多溴
铬
联苯
(Cr-
(PB-
(VI))
B)
Support
Shouldyourequireanytechnicalassistance,pleasecontact
yourAxisreseller.Ifyourquestionscannotbeanswered
immediately,yourresellerwillforwardyourqueriesthrough
theappropriatechannelstoensurearapidresponse.Ifyou
areconnectedtotheInternet,youcan:
•downloaduserdocumentationandsoftwareupdates
•ndanswerstoresolvedproblemsintheFAQdatabase,
searchbyproduct,category,orphrase
•reportproblemstoAxissupportstaffbylogginginto
yourprivatesupportarea
•chatwithAxissupportstaff
•visitAxisSupportataxis.com/support
Learnmore!
VisitAxislearningcenteraxis.com/academyforuseful
trainings,webinars,tutorialsandguides.
多溴
二苯
醚
(PBDE)
Thisproductcomplieswiththerequirementsof
SJ/T11364-2014,Markingfortherestrictionofhazardous
substancesinelectricalandelectronicproducts.


AXISQ60-ESeries
Safetyinformation
Hazardlevels
DANGER
Indicatesahazardoussituationwhich,ifnotavoided,willresultindeathorseriousinjury.
WARNING
Indicatesahazardoussituationwhich,ifnotavoided,couldresultindeathorseriousinjury.
CAUTION
Indicatesahazardoussituationwhich,ifnotavoided,couldresultinminorormoderate
injury.
NO
TICE
NO NO
TICE TICE
Indicatesasituationwhich,ifnotavoided,couldresultindamagetoproperty.
Othermessagelevels
Important
Indicatessignicantinformationwhichisessentialfortheproducttofunctioncorrectly.
Note
Indicatesusefulinformationwhichhelpsingettingthemostoutoftheproduct.
5

AXISQ60-ESeries
Safetyinstructions
WARNING
TheAxisproductshallbeinstalledbyatrainedprofessional,andincompliancewithlocal
lawsandregulations.
NO
TICE
NO NO
TICE TICE
•TheAxisproductshallbeusedincompliancewithlocallawsandregulations.
•StoretheAxisproductinadryandventilatedenvironment.
•AvoidexposingtheAxisproducttoshocksorheavypressure.
•Donotinstalltheproductonunstablepoles,brackets,surfacesorwalls.
•UseonlyapplicabletoolswheninstallingtheAxisproduct.Usingexcessiveforcewith
powertoolscouldcausedamagetotheproduct.
•Donotusechemicals,causticagents,oraerosolcleaners.
•Useacleanclothdampenedwithpurewaterforcleaning.
•Useonlyaccessoriesthatcomplywiththetechnicalspecicationofyourproduct.These
canbeprovidedbyAxisorathirdparty.AxisrecommendsusingAxispowersource
equipmentcompatiblewithyourproduct.
•UseonlysparepartsprovidedbyorrecommendedbyAxis.
•Donotattempttorepairtheproductyourself.ContactAxissupportoryourAxisreseller
forservicematters.
•Donotpointthecameralenstowardthesunorotherhigh-intensityradiationsources
becausethiscouldcausedamagetothecamera.
•Thepowersupplyshallbepluggedintoasocketoutletinstalledneartheproductand
shallbeeasilyaccessible.
•Usealimitedpowersource(LPS)witharatedoutputpowerlimitedto≤100Wandarated
outputcurrentlimitedto≤5A.
Transportation
NO
TICE
NO NO
TICE TICE
•WhentransportingtheAxisproduct,usetheoriginalpackagingorequivalenttoprevent
damagetotheproduct.
Battery
TheAxisproductusesa3.0VCR2032lithiumbatteryasthepowersupplyforitsinternalreal-time
clock(RTC).Undernormalconditionsthisbatterywilllastforaminimumofveyears.
6

AXISQ60-ESeries
Lithiumcoincell3.0Vbatteriescontain1,2-dimethoxyethane;ethyleneglycoldimethylether
(EGDME),CASno.110-71-4.
Domecover
NO
TICE
NO NO
TICE TICE
•Becarefulnottoscratch,damageorleavengerprintsonthedomecoverbecausethis
coulddecreaseimagequality.Ifpossible,keeptheprotectiveplasticonthedomecover
untiltheinstallationiscomplete.
•Donotcleanadomecoverthatlookscleantotheeyeandneverpolishthesurface.
Excessivecleaningcoulddamagethesurface.
•Forgeneralcleaningofthedomecoveritisrecommendedtouseanon-abrasive,
solvent-freeneutralsoapordetergentmixedwithpurewaterandasoft,cleancloth.Rinse
wellwithpurelukewarmwater.Drywithasoft,cleanclothtopreventwaterspotting.
•Neveruseharshdetergents,gasoline,benzene,acetone,orsimilarchemicals.
•Avoidcleaningthedomecoverindirectsunlightoratelevatedtemperatures.
•Makesurethedomeisattachedinoperationmode,otherwisefocusmaybeaffected.
7

8

AXISQ60-ESeries
InstallationGuide
ThisInstallationGuideprovidesinstructionsforinstallingoneofthefollowingnetworkcameras
onyournetwork:
•AXISQ6042-EMkIIPTZDomeNetworkCamera
•AXISQ6044-EPTZDomeNetworkCamera
•AXISQ6045-EMkIIPTZDomeNetworkCamera
Forotheraspectsofusingtheproduct,seetheUserManualavailableatwww.axis.com
InstallationSteps
1.Makesurethepackagecontents,toolsandothermaterialsnecessaryfortheinstallation
areinorder.Seepage9.
2.Studythehardwareoverview.Seepage10.
3.Studythespecications.Seepage13.
4.Installthehardware.Seepage14.
5.Accesstheproduct.Seepage18.
Packagecontents
•Networkcamera
-AXISQ6042-EMkIIPTZDomeNetworkCamera,or
-AXISQ6044-EPTZDomeNetworkCamera,or
-AXISQ6045-EMkIIPTZDomeNetworkCamera
•Cleardomecover(premounted)
•Sunshield,includingscrewsT20(3x)
•RJ45Push-pullConnector(IP66)
•AxisHighPoEmidspan1-port(LPS)
•Printedmaterials
-InstallationGuide(thisdocument)
-Extraserialnumberlabel(2x)
-AVHSAuthenticationkey
Recommendedtools
•Torx®screwdriverT20
•Torx®screwdriverT30
•ScrewdriverPH2(tochangethedomecover)
9
AXISQ60-ESeries
•Cableshoepliers
•Diagonalpliers
Optionalaccessories
Foracompletelistofavailableaccessoriesforthisproduct,gototheproduct’spageonaxis.com
andselectSoftware&Accessories.
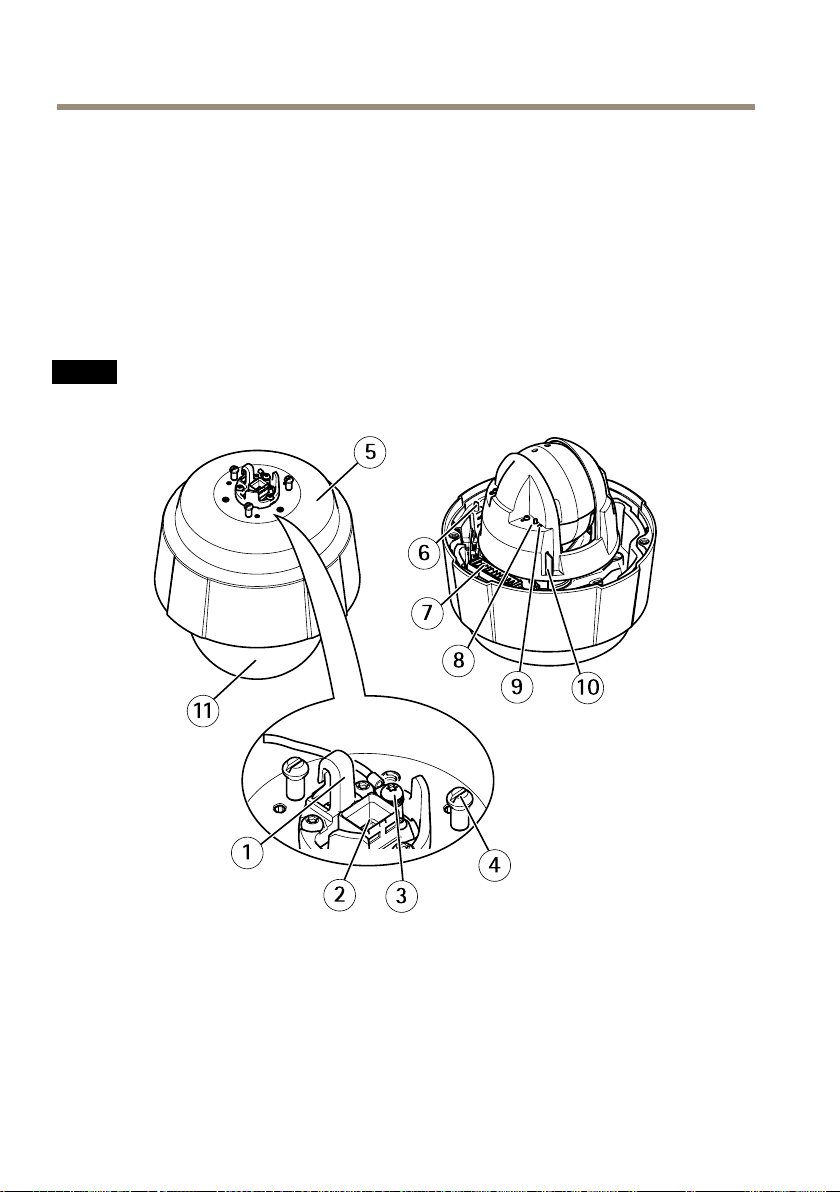
Hardwareoverview
NO
TICE
NO NO
TICE TICE
Makesurethedomeisattachedinoperationmode,otherwisefocusmaybeaffected.
1
Hookforsafetywire
2
Networkconnector(HighPoE)
3
Groundscrew
4
Unitholder(3x)
5
Partnumber(P/N)&Serialnumber(S/N)
6
Powerbutton
7
Heater
10

AXISQ60-ESeries
8
Controlbutton
9
StatusLEDindicator
10
SDcardslot
11
Dome
DomeCover
1
DomebracketscrewPH2(4x)
2
Domebracket
3
Rubbergasket
4
Domering
5
DomeringscrewT30(4x)
6
Domecover
11
AXISQ60-ESeries
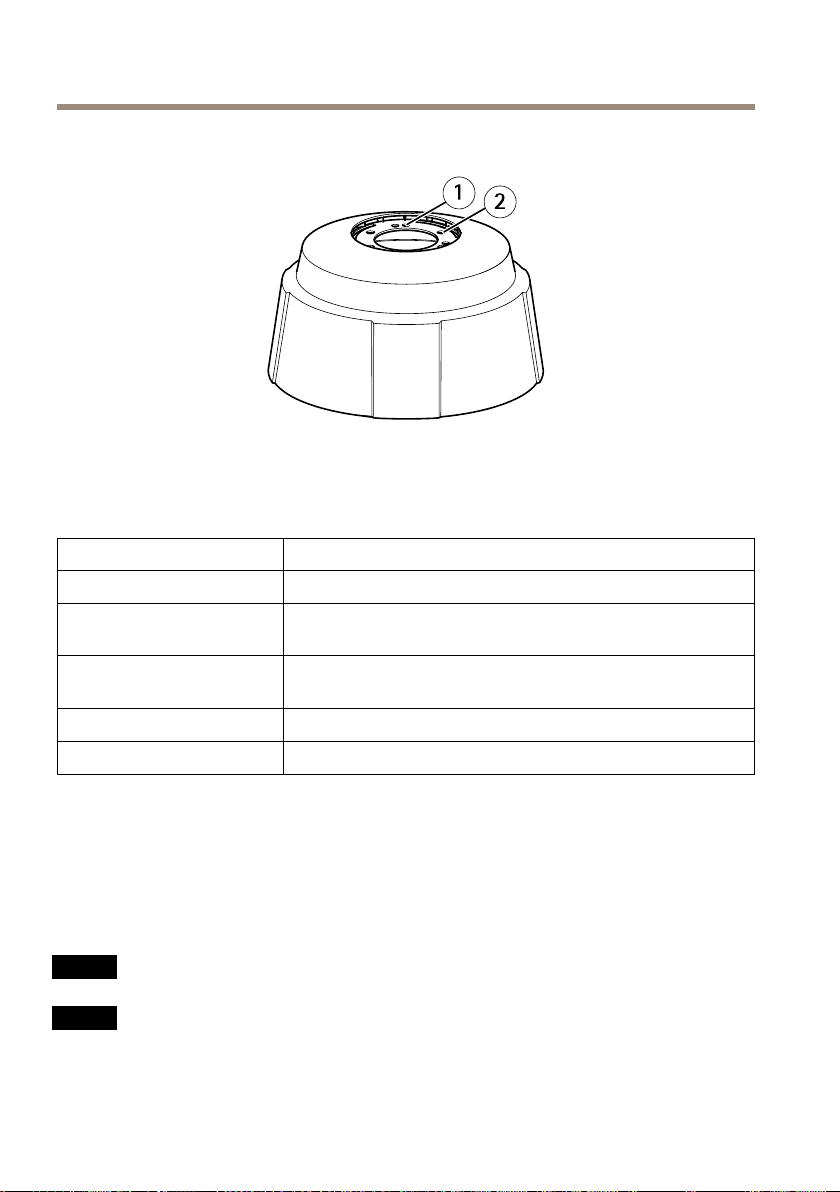
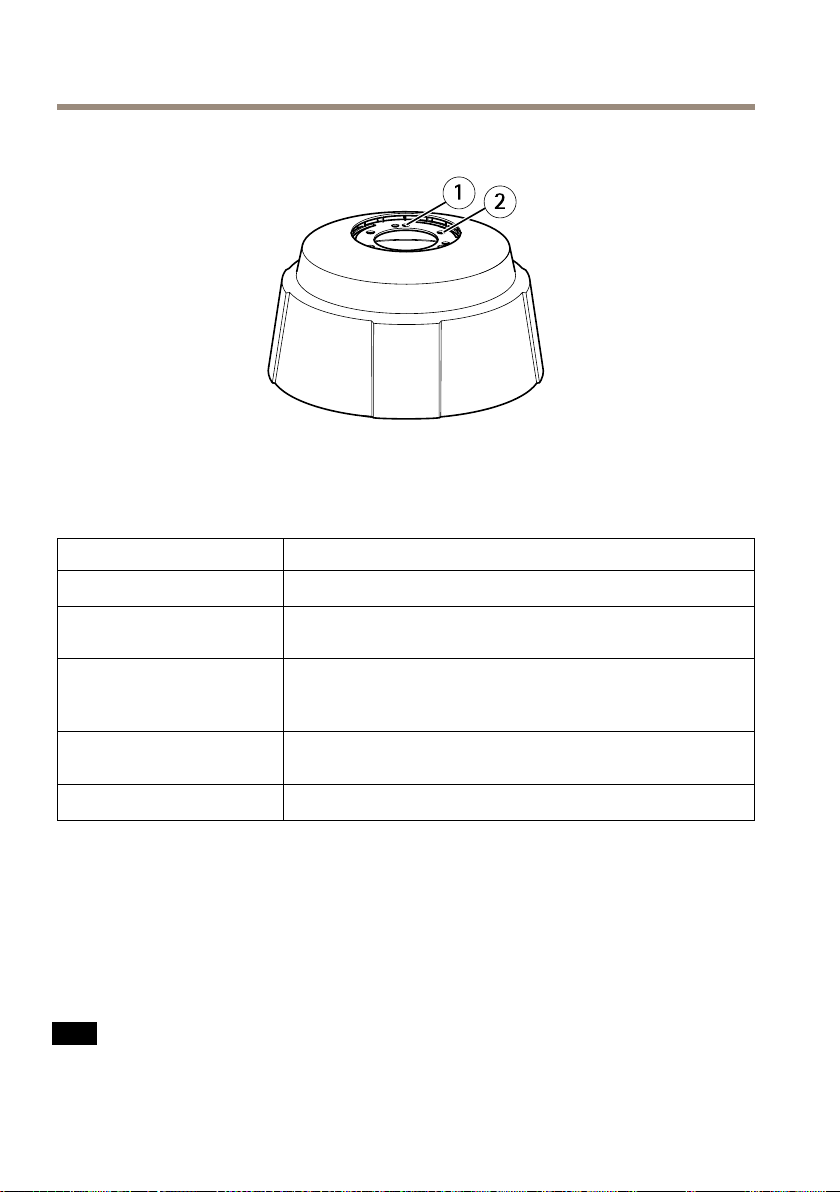
Sunshield
LEDIndicators
1
Screwholes
2
Holesforunitholders
StatusLED
Unlit
GreenSteadygreenfor10secondsfornormaloperationafterstartup
Amber
Amber/RedFlashesamber/redifnetworkconnectionisunavailableorlost.
RedFirmwareupgradefailure.
Indication
Connectionandnormaloperation.
completed.
Steadyduringstartup.Flashesduringrmwareupgradeorreset
tofactorydefault.
Connectorsandbuttons
Forspecicationsandoperatingconditions,seepage13.
Networkconnector
RJ45Push-pullConnector(IP66)withHighPoweroverEthernet(HighPoE).
NO
TICE
NO NO
TICE TICE
Usethesuppliedmidspan.
NO
TICE
NO NO
TICE TICE
Theproductshallbeconnectedusingashieldednetworkcable(STP).Allcablesconnecting
theproducttothenetworkshallbeintendedfortheirspecicuse.Makesurethatthe
12

AXISQ60-ESeries
networkdevicesareinstalledinaccordancewiththemanufacturer’sinstructions.For
informationaboutregulatoryrequirements,seeElectromagneticcompatibility(EMC)on
page2.
NO
TICE
NO NO
TICE TICE
TocomplywiththeIP66-rateddesignofthecameraandmaintaintheIP66protection,
thesuppliedRJ45Push-pullConnector(IP66)shallbeused.Alternatively,usetheRJ45
IP66-ratedcablewithpremountedconnectorwhichisavailablefromyourAxisreseller.Do
notremovetheplasticnetworkconnectorshieldfromthecamera.
SDcardslot
NO
TICE
NO NO
TICE TICE
•RiskofdamagetoSDcard.Donotusesharptools,metalobjects,orexcessiveforcewhen
insertingorremovingtheSDcard.Useyourngerstoinsertandremovethecard.
•Riskofdatalossandcorruptedrecordings.DonotremovetheSDcardwhiletheproduct
isrunning.UnmounttheSDcardfromtheproduct’swebpagebeforeremoval.
ThisproductsupportsSD/SDHC/SDXCcards.
ForSDcardrecommendations,seeaxis.com.
Controlbutton
Forlocationofthecontrolbutton,see.
Thecontrolbuttonisusedfor:
•Resettingtheproducttofactorydefaultsettings.Seepage19.
•ConnectingtoanAXISVideoHostingSystemservice.Tondoutmoreaboutthis
service,seeaxis.com
Powerbutton
Pressandholdthepowerbuttontotemporarilypowertheproductwhenthedomecoveris
removed.Thepowerbuttonisalsousedwiththecontrolbuttontoresetthecameratofactory
defaultsettings.Seepage19.
Specications
OperatingConditions
TheAxisproductisintendedforoutdooruse.
13
AXISQ60-ESeries
Product
AXISQ6042-EMkII
AXISQ6044-E
AXISQ6045-EMkII
*ArcticTemperatureControlenablescamerastart-upattemperaturesaslowas-50°C(-58°F)
Classication
IEC60721-4-3
Class3K3,3M3
IEC60529IP66
TemperatureHumidity
-50°Cto50°C
(-58°Fto122°F)*
10–100%RH(condensing)
StorageConditions
TheAxisproductisintendedforoutdooruse.
ProductTemperature
AXISQ6042-EMkII
AXISQ6044-E
AXISQ6045-EMkII
-50ºCto60ºC(-58ºFto140ºF)
PowerConsumption
NO
TICE
NO NO
TICE TICE
UseaSafetyExtraLowVoltage(SELV)compliantlimitedpowersource(LPS)witheither
aratedoutputpowerlimitedto≤100Woraratedoutputcurrentlimitedto≤5A.Axis
recommendsusingthesuppliedmidspan.
ProductHighPoEAxisHighPoEmidspan
AXISQ6042-EMkII100–240VAC,
AXISQ6044-E
AXISQ6045-EMkII
Max60W
(included)
max53W,
typical15.3W
100–240VAC,max74W
Installthehardware
Readalltheinstructionsbeforeinstallingtheproduct.Someinstallationstepswouldbenetfrom
beingcompletedtogetherbecausetheyrequireremovalofthedomecover.
NO
TICE
NO NO
TICE TICE
•Theproductshallbeconnectedusingashieldednetworkcable(STP).Allcablesconnecting
theproducttothenetworkshallbeintendedfortheirspecicuse.Makesurethatthe
14

AXISQ60-ESeries
networkdevicesareinstalledinaccordancewiththemanufacturer’sinstructions.For
informationaboutregulatoryrequirements,seeElectromagneticcompatibility(EMC)
onpage2.
•Mounttheproductwiththedomecoverfacingdownward.
•Becarefulnottoscratch,damageorleavengerprintsonthedomecoverbecausethis
coulddecreaseimagequality.Ifpossible,keeptheprotectiveplasticonthedomecover
untiltheinstallationiscomplete.
Attachthesunshield(optional)
ThesunshieldprotectsthecameraagainstUVlightandhelpskeepthetemperatureinsidethe
cameradown.
1.Slidethesunshieldovertheunitholdersonthecameraunit.
2.Securethesunshieldusingthesuppliedscrews(T20).
Changethedomecover(optional)
Thepremountedcleardomecovercanbereplacedifyouwanttouseasmokeddomecoverorifthe
domecoverisscratchedordamaged.Smokeddomecoversandsparecleardomecoverscanbe
purchasedfromyourAxisreseller.
Forlocationofthecomponents,seeHardwareoverviewonpage10.
1.Loosenthedomeringscrewsandremovethedomecover.
2.Removethedomebracketscrews,thedomebracket,andthedomecoverfromthedome
ring.
3.Makesuretherubbergasketisttedcorrectlyonthedomecover.
4.Alignthebulgeonthedomecoverwithoneofthelogotypesonthedomering.
5.Attachthedomebracketandthedomecovertothedomeringandtightenthescrews
(torque1.2Nm).
6.ToinstallanSDcard,seeHowtoinstallanSDcard(optional)onpage15.
7.Toattachthedomecovertothetopcover,alignthebulgeonthedomecoverwiththe
heateronthecameraunitandtightenthescrews(torque1.5Nm).
HowtoinstallanSDcard(optional)
InstallinganSDcardisoptional.AstandardorhighcapacitySDcard(notincluded)canbeusedto
storerecordingslocallyintheproduct.
1.Loosenthedomeringscrewsandremovethedomecover.
2.InsertanSDcardintotheSDcardslot.
3.Toattachthedomecovertothetopcover,alignthebulgeonthedomecoverwiththe
heateronthecameraunitandtightenthescrews(torque1.5Nm).
15

AXISQ60-ESeries
Installthecameraonabracketmount
WARNING
Riskofelectricshock.Theproductshallbegroundedusingagroundingwire.Makesure
bothendsofthegroundingwireareincontactwiththeirrespectivegroundingsurfaces.
NO
TICE
NO NO
TICE TICE
TocomplywiththeIP66-rateddesignofthecameraandmaintaintheIP66protection,
thesuppliedRJ45Push-pullConnector(IP66)shallbeused.Alternatively,usetheRJ45
IP66-ratedcablewithpremountedconnectorwhichisavailablefromyourAxisreseller.Do
notremovetheplasticnetworkconnectorshieldfromthecamera.
Thisproductcanbemountedwiththecablesroutedthroughoralongthewallorroof.
1.Installtheselectedbracketaccordingtotheinstructionssuppliedwiththebracket.If
drillingisrequired,makesuretousedrillbits,screwsandplugsthatareappropriatefor
thematerial.
2.Securethecamerausingthesuppliedsafetywire.
3.Routethenetworkcableandagroundingwirethroughtheholesinthemounting
bracket.Makesurethegroundingwireisasshortaspossibletomakethecurrentpath
asshortaspossible.
4.Loosenthegroundingscrewandremovethewasherandcableshoe.
16

1
Networkconnector–RJ45Push-pullConnector(IP66)
2
Networkconnectorandnetworkconnectorshield
3
GroundscrewT20
4
Washer
5
Cableshoe
AXISQ60-ESeries
5.Attachthegroundingwire(torque1.5to2Nm)tothecableshoeusingcableshoepliers.
6.Putthecableshoeandwasherbackintheiroriginalpositionsandtightenthescrew
(torque0.5Nm).Makesurethecableshoeisincontactwiththegroundingsurface.
NO
TICE
NO NO
TICE TICE
Becarefulnottodamagethenetworkcablewhenconnectingit.
7.IftheRJ45Push-pullConnector(IP66)hasnotbeenconnectedtothenetworkcable,
seetheinstructionssuppliedwiththeconnector.Forinformationhowtoassemblean
IP66-ratedRJ45connector,seepage19.
8.Connectthenetworkcable.
9.Slidetheunitholdersonthenetworkcameraintotheslotsinthemountingbracketand
rotatethecameraunit.
10.Securethenetworkcameratothemountingbracketbytighteningthescrews.
17

AXISQ60-ESeries
1
ScrewT30(3x)
2
Slotforunitholder(3x)
3
Safetywire
11.Installthesuppliedmidspan,seetheInstallationGuidedeliveredwiththemidspanor
nditonwww.axis.com
Howtoaccesstheproduct
TondAxisdevicesonthenetworkandassignthemIPaddressesinWindows®,useAXISIPUtility
orAXISDeviceManager.Bothapplicationsarefreeandcanbedownloadedfromaxis.com/support
Formoreinformationaboutusingtheproduct,seetheUserManualavailableataxis.com
18

AXISQ60-ESeries
Resettofactorydefaultsettings
Furtherinformation
•Forthelatestversionofthisdocument,seeaxis.com
•Theusermanualisavailableataxis.com
•Tocheckifthereisupdatedrmwareavailableforyourdevice,seeaxis.com/support
•Forusefulonlinetrainingsandwebinars,seeaxis.com/academy
ScantheQRcodetoviewavideoonhowtoassemblethesuppliedRJ45Push-pullConnector(IP66).
Warrantyinformation
ForinformationaboutAxis’productwarrantyandtheretorelatedinformation,goto
axis.com/warranty.
19

20

AXISQ60-ESeries
Informationssurlasécurité
Niveauxderisques
DANGER
Indiqueunesituationdangereusequi,siellen'estpasévitée,entraîneraledécèsoudes
blessuresgraves.
AVERTISSEMENT
Indiqueunesituationdangereusequi,siellen'estpasévitée,pourraitentraînerledécès
oudesblessuresgraves.
ATTENTION
Indiqueunesituationdangereusequi,siellen'estpasévitée,pourraitentraînerdes
blessureslégèresoumodérées.
VIS
A AAVIS VIS
Indiqueunesituationqui,siellen'estpasévitée,pourraitendommagerl'appareil.
Autresniveauxdemessage
Important
Indiquelesinformationsimportantes,nécessairespourassurerlebonfonctionnementde
l’appareil.
Note
Indiquelesinformationsutilesquipermettrontd’obtenirlefonctionnementoptimalde
l’appareil.
21

AXISQ60-ESeries
Consignesdesécurité
AVERTISSEMENT
LeproduitAxisdoitêtreinstalléparunprofessionnelqualiéetconformémentauxloiset
règlementationslocalesenvigueur.
VIS
A AAVIS VIS
•LeproduitAxisdoitêtreutiliséconformémentauxloisetrèglementslocaux.
•ConserverceproduitAxisdansunenvironnementsecetventilé.
•NepasexposerceproduitAxisauxchocsouauxfortespressions.
•Nepasinstallerceproduitsurdespoteaux,supports,surfacesoumursinstables.
•Utiliseruniquementdesoutilsrecommandéspourl'installationdel'appareilAxis.
L'applicationd'uneforceexcessivesurl'appareilavecdesoutilspuissantspourrait
l'endommager.
•Nepasutiliserdeproduitschimiques,desubstancescaustiquesoudenettoyants
pressurisés.
•Utiliserunchiffonpropreimbibéd'eaupurepourlenettoyage.
•Utiliseruniquementdesaccessoiresconformesauxcaractéristiquestechniquesdevotre
produit.IlspeuventêtrefournisparAxisouuntiers.Axisrecommanded'utiliserun
équipementd'alimentationAxiscompatibleavecvotreproduit.
•UtiliseruniquementlespiècesderechangefourniesourecommandéesparAxis.
•Nepasessayerderéparervous-mêmeceproduit.Contacterl'assistancetechniqued'Axis
ouvotrerevendeurAxispourdesproblèmesliésàl'entretien.
•Évitezdepointerl’objectifdelacaméraverslesoleiloutouteautresourcederadiation
dehauteintensité.Celarisqued’endommagerlacaméra.
•L'alimentationélectriquedoitêtrebranchéeàuneprisedecourantinstalléeprèsde
l'équipementetêtrefacilementaccessible.
•Utilisezunesourced'alimentationlimitée(LPS)dontlapuissancedesortienominaleest
limitéeà≤100Wetdontlecourantdesortienominalestlimitéà≤5A.
Transport
VIS
A AAVIS VIS
•LorsdutransportduproduitAxis,utilisezl'emballaged'origineouunéquivalentpour
éviterd'endommagerleproduit.
22

AXISQ60-ESeries
Batterie
LeproduitAxisutiliseunebatterieaulithiumCR20323,0Vcommealimentationdesonhorloge
entempsréelinterne(RTC).Dansdesconditionsnormales,cettebatterieauneduréedevie
minimaledecinqans.
Lespilesboutons3,0Vaulithiumcontiennentdu1,2-diméthoxyéthane,éthylèneglycoldiméthyl
éther(EGDME),CASn°1 10-71-4.
Couverclededôme
VIS
A AAVIS VIS
•Veillezànepasrayer,endommageroulaisserd'empreintessurlecouvercledudômecar
celapourraitaltérerlaqualitéd'image.Laissez,sipossible,laprotectionenplastiquesur
lecouvercledudômejusqu’àlandel’installation.
•Nenettoyezpaslecouvercledudômes'ilsemblepropreàl'œilnuetnefrottezjamaissa
surface.Unnettoyageexcessifpourraitendommagerlasurface.
•Pourlenettoyagegénéralducouvercledudôme,ilestrecommandéd'utiliserunproduit
nonabrasif,unsavonneutresanssolvantouundétergentmélangéavecdel'eaupureet
unchiffondouxpropre.Rincezbienàl'eautièdepure.Séchezavecunchiffondouxet
proprepouréviterlestâchesd'eau.
•N'utilisezjamaisdedétergentsagressifs,d'essence,debenzène,d'acétoneouautres
produitschimiquessimilaires.
•Évitezdenettoyerlecouvercledudômedanslalumièredirectedusoleiloulorsqueles
températuressontélevées.
•Vériezqueledômeestxéenmodedefonctionnement,sinonlamiseaupointpeuten
êtreaffectée.
23

24

AXISQ60-ESeries
Guided’installation
Ceguided'installationexpliquecommentinstallerl'unedescamérasréseausuivantessurvotre
réseau:
•CaméradômeréseauPTZAXISQ6042-EMkII
•CaméradômeréseauPTZAXISQ6044-E
•CaméradômeréseauPTZAXISQ6045-EMkII
Pourtouteautreinformationrelativeàl’utilisationduproduit,consultezlemanueldel’utilisateur
disponiblesurlesitewww.axis.com
Procéduresd’installation
1.Assurez-vousquelesoutilsetautresmatérielsnécessairesàl'installationsontinclus
dansl'emballage.Cf.page25.
2.Consultezladescriptiondumatériel.Cf.page26.
3.Étudiezlescaractéristiques.Cf.page30.
4.Installezlematériel.Cf.page31.
5.Utilisezleproduit.Cf.page34.
Contenudel’emballage
•Caméraréseau
-CaméradômeréseauPTZAXISQ6042-EMkII,ou
-CaméradômeréseauPTZAXISQ6044-E,ou
-CaméradômeréseauPTZAXISQ6045-EMkII
•Couverclededômenonfumé(prémonté)
•Pare-soleil,fourniavecvisT20(x3)
•Connecteurpousser-tirerRJ45(conformeàlanormeIP66)
•InjecteurdepuissanceHighPoEAxis1port(LPS)
•Documentsimprimés
-Guided’installation(cedocument)
-Étiquettesupplémentairedenumérodesérie(x2)
-Cléd’authenticationAVHS
Outilsrecommandés
•TournevisTorx®T20
•TournevisTorx®T30
25

AXISQ60-ESeries
•TournevisPH2(pourremplacerlecouvercledudôme)
•Pinceàsertirpourcossesdecâble
•Pincecoupantediagonale
Accessoiresenoption
Pourunelistecomplètedesaccessoiresdisponiblespourceproduit,accédezàlapageduproduit
suraxis.cometsélectionnezLogicieletaccessoires.
Aperçudumatériel
VIS
A AAVIS VIS
Vériezqueledômeestxéenmodedefonctionnement,sinonlamiseaupointpeuten
êtreaffectée.
1
Crochetpourcâbledesécurité
2
Connecteurréseau(HighPoE)
3
Visdemiseàlaterre
4
Supportdel'appareil(x3)
5
Référence(P/N)etnumérodesérie(S/N).
26

Couverclededôme
6
Boutond’alimentation
7
Régulateurdechaleur
8
Boutondecommande
9
Voyantd’état
10
EmplacementpourcarteSD
11
Dôme
AXISQ60-ESeries
1
VisdusupportpourcaméradômePH2(x4)
2
Supportpourcaméradôme
3
Jointencaoutchouc
4
Garniturepourcaméradôme
5
VisdelagarniturepourcaméradômeT30(x4)
6
Couverclededôme
27
AXISQ60-ESeries
Pare-soleil
1
Trousdevis
2
Trouspoursupportsdecaméra
Voyants
LEDdestatutIndication
Éteinte
VertVertetxependant10secondespourindiquerun
OrangeFixependantledémarrage.Clignotependantlesmisesàniveau
Orange/RougeClignoteenorange/rougeencasd'indisponibilitéoudeperte
Rouge
Branchementetfonctionnementnormaux.
fonctionnementnormalaprèsledémarrage.
dumicroprogrammeoulerétablissementdesvaleurspardéfaut
conguréesenusine.
delaconnexionréseau.
Échecdelamiseàniveaudurmware.
Connecteursetboutons
Pourlescaractéristiquesetlesconditionsd'utilisation,consultezpage30.
Connecteurréseau
Connecteurpousser-tirerRJ45(conformeàlanormeIP66)avecalimentationhautepuissance
parEthernet(PoEhautepuissance).
VIS
A AAVIS VIS
Utilisezl'injecteurfourni.
28

AXISQ60-ESeries
VIS
A AAVIS VIS
Leproduitdoitêtreconnectéàl'aided'uncâbleréseaublindé(STP).Touslescâbles
reliantleproduitaucommutateurréseaudoiventêtredestinésàleurusagespécique.
Assurez-vousquelespériphériquesréseausontinstallésconformémentauxinstructions
dufabricant.Pourplusd’informationssurlesexigencesréglementaires,consultez
Electromagneticcompatibility(EMC)onpage2.
VIS
A AAVIS VIS
PourêtreconformeàlanormeIP66delacaméraetmaintenirlaprotectionIP66,ilest
nécessaired'utiliserleconnecteurpousser-tirerRJ45fourni(conformeàlanormeIP66).
Sinon,utilisezlecâbleRJ45compatiblenormeIP66avecconnecteurpréinstallé,disponible
auprèsd'unrevendeurAxis.Neretirezpasleblindageenplastiqueduconnecteurréseau
delacaméra.
FentepourcarteSD
VIS
A AAVIS VIS
•RisquededommagesàlacarteSD.N'utilisezpasd'outilstranchantsoud'objets
métalliquespourinsérerouretirerlacarteSD,etneforcezpaslorssoninsertionoude
sonretrait.Utilisezvosdoigtspourinséreretretirerlacarte.
•Risquedepertededonnéesetd'enregistrementscorrompus.NeretirezpaslacarteSD
pendantqueleproduitfonctionne.DémontezlacarteSDdelapageWebduproduit
avantleretrait.
CeproduitestcompatibleaveclescartesSD/SDHC/SDXC.
PourdesrecommandationssurlescartesSD,rendez-voussuraxis.com.
Boutondecommande
Pourconnaîtrel'emplacementduboutondecommande,consultez.
Leboutondecommandepermetderéaliserlesopérationssuivantes:
•Réinitialisationduproduitauxparamètresd’usinepardéfaut.Cf.page35.
•ConnexionauserviceduSystèmed’hébergementvidéoAXIS.Pourensavoirplussurce
service,consultezlesiteaxis.com.
Boutond’alimentation
Appuyezsurleboutond'alimentationetmaintenez-leenfoncépouralimentertemporairementle
produitlorsduretraitducouverclededôme.Leboutond'alimentationestégalementutiliséavecle
boutondecommandepourréinitialiserlacaméraauxparamètresd'usinepardéfaut.Cf.page35.
29

AXISQ60-ESeries
Caractéristiquestechniques
Conditionsd'utilisation
L'appareilAxisestuniquementdestinéàdesutilisationsenextérieur.
Produit
AXISQ6042-EMkII
AXISQ6044-E
AXISQ6045-EMkII
*Lecontrôledetempératurearctiquepermetdedémarrerlacamérapar-50ºC(-58ºF)
Classication
IEC60721-4-3
Classe3K3,
3M3
IEC60529IP66
+TempératureHumidité
De-50°Cà50°C
(-58°Fà122°F)*
10à100%humiditérelative
(sanscondensation)
Conditionsdestockage
L'appareilAxisestuniquementdestinéàuneutilisationenextérieur.
Produit
AXISQ6042-EMkII
AXISQ6044-E
AXISQ6045-EMkII
+Température
De-50ºCà60ºC(-58ºFà140ºF)
Consommationélectrique
VIS
A AAVIS VIS
Utilisezunesourced'alimentationlimitée(LPS)conformeauxexigencesdeTrèsbasse
tensiondesécurité(TBTS)dontlapuissancedesortienominaleestlimitéeà≤100Woudont
lecourantdesortienominalestlimitéà≤5A.Axisrecommanded'utiliserl'injecteurfourni.
ProduitHighPoEInjecteurdepuissanceHighPoE
AXISQ6042-EMkII100-240VCA,
AXISQ6044-E
AXISQ6045-EMkII
Max.60W
Axis(inclus)
max.53W,
standard15,3W
100à240VCA,max.74W
30
 Loading...