

Page 1

AXISQ17Series
AXISQ1785-LENetworkCamera
AXISQ1786-LENetworkCamera
RepaintingInstructions
Page 2

AXISQ17Series
Impactonwarranty
Impactonwarranty
ThisproductisapprovedforrepaintbyAxis,providedthatyoufollowtheinstructionsinthisdocumentandat
www.axis.com/warranty-implication-when-repainting
Riskswithrepainting
ThereareseveralriskswhendisassemblingorassemblinganAxisproduct.Thereisalwaysacertainyieldlossduringassembly.Training
ofoperatorsandtheuseofcorrecttoolsmediatessomeoftheproblemsbuttheycanneverbefullyavoided.Someoftherisksinclude:
ESDDamage-AlwayshandletheproductinanESDsafeenvironment.EvenifprecautionsaretakenthereisalwaysariskofESD
damage.Thedamagecanremainundetectedandcauseproblemsduringthelifetimeoftheequipment.
Dustcontamination-Openingacameramayexposethelensandsensortodustorpaint.Dustwillaffecttheopticalperformance.
Lensesneedtobedisassembledinadust-freeenvironment,preferablyacleanroom.
Paintoverspray-Maskingthedifferentcomponentsoftheequipmentiscritical.Failuretomasksensitiveareascancauseproblems
withassemblingtheequipment.Anyareasthatarenotpaintedatfactoryorhaveadifferentsurfacetreatmentthantherestofthe
parts(threads,groundandelectricalcontactsurfaces)mustalsobemaskedtoensurefunction.
2
Page 3
AXISQ17Series
Howtorepainttheproduct
Howtorepainttheproduct
Preparations
•Ifapplicable,disassembletheequipmentaccordingtotheinstructionsinthisdocument.
•Cleanallpartstoberepaintedthoroughlytoremovegrease,dust,oroil.
•Toensurereassemblyandfunctionalityoftheproduct,maskopeningsforscrews,LEDindicators,ormicrophonesbefore
painting.
Pretreatmentofparts
Dependingonthepartmaterialandtypeofpaintappliedatfactory,differentpretreatmentshouldbedoneforthenewpaintto
adhereaswellaspossible.Cleanthepartsproperlytoremoveoil,greaseanddust.
Formoreinformationonthematerialsusedintheproduct,seeitsdatasheetatwww.axis.com
Powdercoatedparts-Useaprimer.Alternatively,removetheoriginalpowdercoatingdowntothebasematerial,usingne
sandpaper,andcleanthepartsbeforepainting.
Anodisedandchromatedparts-Useaprimer .
Uncoatedstainlesssteel-Nospecialpretreatmentisneeded,butmakesurethatthesurfaceiscleanbeforepainting.
Plastic-Useaprimer.
Disassembly
1
Lid
2
Screw
1.Removethescrewandthelidfromthefoot.
3
Page 4

AXISQ17Series
Howtorepainttheproduct
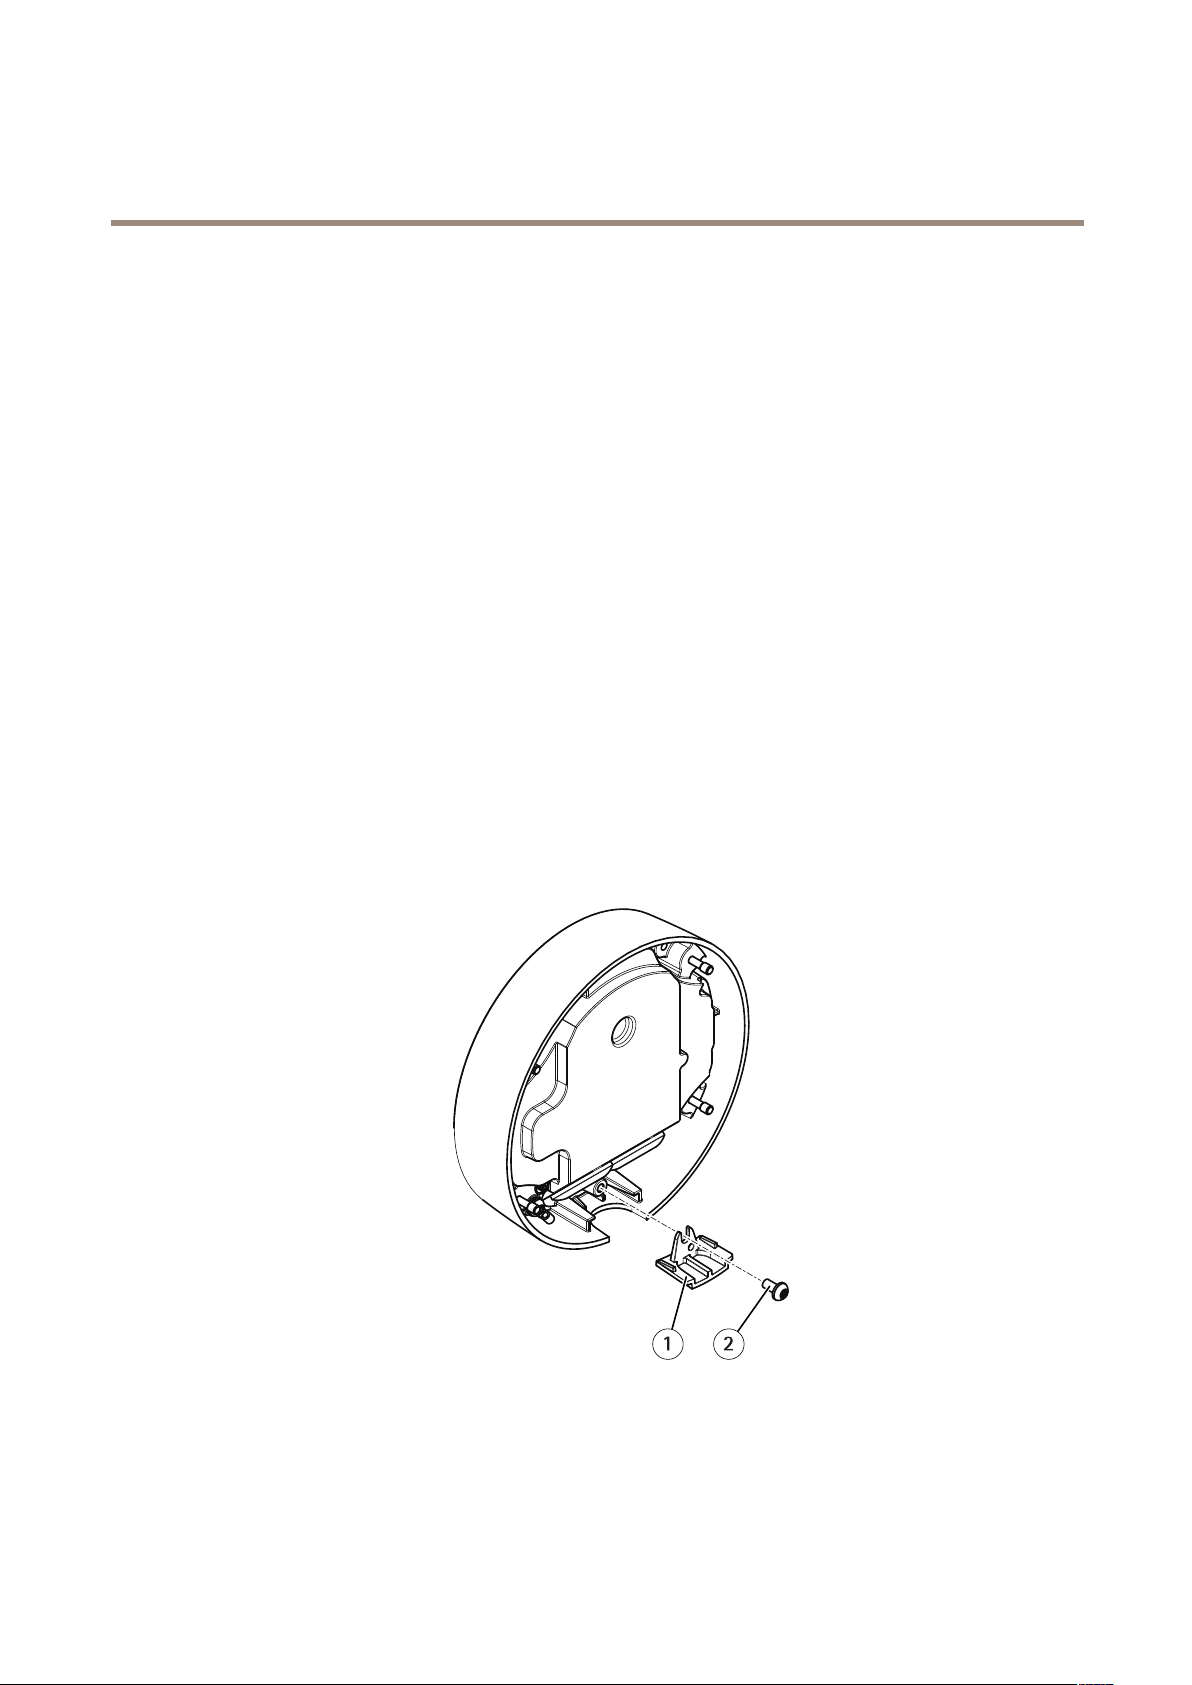
1
Weathershield
2
Holder
3
Screw
2.Removetheweathershield.
3.Removetheholderfromtheweathershield.
4.Removethescrewfromtheholder .
1
Screw
2
Cover
5.Removethescrewsandthememorycardcover.
6.Removethescrewsfromthememorycardcover.
4
Page 5

AXISQ17Series
Howtorepainttheproduct
1
Screw
2
Lockscrew
3
Topcover
4
Pin
5
Clamp
6
Bottomcover
7.Removethefourscrews,thebottomcover,andthepin.
8.Removetheclamp.
9.Loosenthelockscrewandremovethetopcover.
10.Removethelockscrewfromthetopcover.
Masking
1.Maskallscrewsandscrewholes.
5
Page 6

AXISQ17Series
Howtorepainttheproduct
2.Masktheentiretopofthefoot.
3.Masktheentirebottomofthefoot.
4.Maskthebackofthelid.
5.Masktheundersideoftheweatherhsield.
6.Masktheholderasillustratedabove.
7.Masktheinsideofthememorycardcover.
8.Masktheinsideofthearmcovers.
6
Page 7

AXISQ17Series
Howtorepainttheproduct
9.Maskthebottomofthefoot.
10.Maskeverythingbetweenthefootandtheballjoint.
11.Maskeverythingbehindthememorycardcover.
12.Masktheslotsfortheweathershield.
13.Maskthefrontofthecamera.
Repainting
1.Applyathinandevenlayerofspraypaintaccordingtotheinstructionsofthepaintmanufacturer.
2.Letthepaintdry.
3.Togetabettercoverageandclearercolor,applyasecondlayerofspraypaint.
4.Whenthepaintisdry,removethemasking.
7
Page 8

AXISQ17Series
Howtorepainttheproduct
Reassembly
1
Cover
2
Washer
3
Wedgespacer
1.Placethecoverovertheballjoint.
2.Alignthescrewholeinthewedgespacerwiththeholeinthewasher.
1
Clamp
3.Placetheclampoverthecable.
4.Rotatetheclamp180°sothattheopeningfacesup.
8
Page 9

AXISQ17Series
Howtorepainttheproduct
1
Screw
2
Screw
3
Cover
4
Washer
5
Pin
5.Makesurethatthetabonthewasherisintherecessinthecover.
6.Placethepinintherecessinthecover.
7.Attachthecover,thefourscrews,andthelockscrew.Donottightenthescrews.
8.Tightenthefourscrewswith1Nm(0.7lbft)tighteningtorque.
9.Assemblethememorycardcover.
10.Assembletheweathershield.
9
Page 10

RepaintingInstructionsVer.M1.6
AXISQ17Series
©AxisCommunicationsAB,2018
Date:November2018
PartNo.T10124109
 Loading...