

Page 1

AXIS 5570e
Host-to-LAN Print Servers
User’s Manual
AXIS 5570e User’s Manual 1
Page 2

Regulatory Information
Safety Notices Take some time to read through the safety notices before installing the print server. Please observe all safety markings and
Important: Observe “Important:” in the text to avoid operational impairment. Do not proceed until you have fully understood the
Electromagnetic Compatibility
(EMC)
USA This equipment has been tested and found to comply with the limits for a Class B digital device, pursuant to Part 15 of the FCC
Europe This digital equipment fulfils the requirements for radiated emission according to limit B of EN55022, and the requirements
Japan This is a class B product based on the standard of the Voluntary Control Council for Interference from Information
Australia This electronic device meets the requirements of the Radio communications (Electromagnetic Compatibility) Standard 1998
instructions when using this product.
implications.
Rules. These limits are designed to provide reasonable protection against harmful interference in a residential installation. This
equipment generates, uses and can radiate radio frequency energy and, if not installed and used in accordance with the
instructions, may cause harmful interference to radio communications. However, there is no guarantee that interference will not
occur in a particular installation. If this equipment does cause harmful interference to radio or television reception, which can be
determined by turning the equipment off and on, the user is encouraged to try to correct the interference by one or more of the
following measures:
- reorient or relocate the receiving antenna
- increase the separation between the equipment and receiver
- connect the equipment into an outlet on a circuit different from that to which the receiver is connected
- consult the dealer or an experienced radio/TV technician for help. Shielded (STP) network cables must be used with this unit to
ensure compliance with the class B limits..
for immunity according to EN55024 residential, commercial, and light industry. Compliance is not valid for unshielded
network cables.
Technology Equipment (VCCI). If this is used near a radio or television receiver in a domestic environment, it may cause radio
interference. Install and use the equipment according to the instruction manual. Compliance is not valid for unshielded
network cables.
AS/NZS 3548. Compliance is not valid for unshielded network cables.
Liability Every care has been taken in the preparation of this manual; if you detect any inaccuracies or omissions, please inform your
Axis’ Trademarks AXIS IP JumpStarter, AXIS ThinWizard, axinstall, AXIS Print Monitor, AXIS AddPrinter.
Other Trademark
Acknowledgments
Support Services Should you require technical assistance, please contact your Axis dealer. If your questions cannot be answered immediately,
Patent information Axis AB has intellectual property rights relating to technology embodied in the product that is described in this document. In
Software Acknowledgments This product includes software developed by the OpenSSL Project for use in the OpenSSL Toolkit.
local Axis office, which can be found on the cover of this document. Axis Communications AB cannot be held responsible for
any technical or typographical errors and reserves the right to make changes to the product and manuals without prior
notice. Axis Communications AB makes no warranty of any kind with regard to the material contained within this document,
including, but not limited to, the implied warranties of merchantability and fitness for a particular purpose. Axis
Communications AB shall not be liable nor responsible for incidental or consequential damages in connection with the
furnishing, performance or use of this material.
Adobe Acrobat Reader, Aix, Apple, Debian, Ethernet, EtherTalk, IBM, LAN Manager, LAN Server, Macintosh, Microsoft, Novell
NetWare, OS/2, OS/400, AS/400, Red Hat, Solaris, SuSe, UNIX/Linux, Microsoft Windows, are registered trademarks of the
respective holders.
your Axis dealer will forward your queries through the appropriate channels to ensure you a rapid response. On the Internet
you can find online manuals, technical support, software updates, application software, corporate information, etc..
particular, and without limitation, these intellectual property rights may include one or more of the patents listed at
http://www.axis.com/patent.htm and one or more additional patents or pending patent applications in the US and other
countries.
USER’S MANUAL AXIS 5570e EN
Part No. 27980, Revision 2.5
Date: November 2006 - Copyright © Axis Communications AB
This manual applies to the AXIS 5570e with firmware version 7.10 or higher.
2 AXIS 5570e User’s Manual
Page 3

Table of Contents
Table of Contents
Table of Contents . . . . . . . . . . . . . . . . . . . . . . . . . . . . . . . . . . . 3
Section 1 Introduction . . . . . . . . . . . . . . . . . . . . . . . . . . . . . . . . . . . . . . . 6
About this Manual . . . . . . . . . . . . . . . . . . . . . . . . . . . . . 6
Support Services . . . . . . . . . . . . . . . . . . . . . . . . . . . . . . . 7
Supported Environments . . . . . . . . . . . . . . . . . . . . . . . . . 7
Section 2 Product Overview . . . . . . . . . . . . . . . . . . . . . . . . . . . . . . . . . . . 8
Package Contents . . . . . . . . . . . . . . . . . . . . . . . . . . . . . . 8
Protocols and Datastreams . . . . . . . . . . . . . . . . . . . . . . . 9
Physical Description . . . . . . . . . . . . . . . . . . . . . . . . . . . 10
AXIS Network Product CD . . . . . . . . . . . . . . . . . . . . . . . 11
Print Server Features and Benefits . . . . . . . . . . . . . . . . 12
Section 3 Basic Installation . . . . . . . . . . . . . . . . . . . . . . . . . . . . . . . . . . 13
Quick Overview . . . . . . . . . . . . . . . . . . . . . . . . . . . . . . . 13
Connect the Hardware . . . . . . . . . . . . . . . . . . . . . . . . . 13
Installation Guide . . . . . . . . . . . . . . . . . . . . . . . . . . . . . 14
Setting the IP Address . . . . . . . . . . . . . . . . . . . . . . . . . . 15
Dynamic IP Address Assignment . . . . . . . . . . . . . . . . . . 15
Section 4 Setting Up - AS/400 (iSeries) . . . . . . . . . . . . . . . . . . . . . . . . . 21
SNA Printing - 5494 Mode . . . . . . . . . . . . . . . . . . . . . . 21
TN5250E Printing (SCS over IP) . . . . . . . . . . . . . . . . . . . 28
PPR/PPD Printing - IPDS Data Streams . . . . . . . . . . . . . 30
Section 5 Setting Up - IBM Mainframe (zSeries) . . . . . . . . . . . . . . . . . . 35
SNA Printing . . . . . . . . . . . . . . . . . . . . . . . . . . . . . . . . . 35
TCP/IP TN3270E Printing . . . . . . . . . . . . . . . . . . . . . . . . 41
PPR/PPD Printing - IPDS data streams . . . . . . . . . . . . . . 49
Section 6 Adding Printers in Windows . . . . . . . . . . . . . . . . . . . . . . . . . . 62
Adding Printers in Windows 2000 / XP / 2003 using AXIS
AddPrinter Wizard . . . . . . . . . . . . . . . . . . . . . . . . . . 63
Adding Printers in Windows 2000 / XP / 2003 using
Windows Add Printer Wizard . . . . . . . . . . . . . . . . . . 65
Adding Printers in Windows 2000 / XP / 2003 using the
Microsoft LPR Monitor . . . . . . . . . . . . . . . . . . . . . . . 71
Adding Printers in Windows NT Using the Microsoft LPR
Monitor . . . . . . . . . . . . . . . . . . . . . . . . . . . . . . . . . . 72
AXIS Print Monitor Software . . . . . . . . . . . . . . . . . . . . . 74
Adding Printers over TCP/IP in Windows NT using AXIS Print
Monitor . . . . . . . . . . . . . . . . . . . . . . . . . . . . . . . . . . 75
Adding NetBIOS/NetBEUI Printers in Windows 2000 using
AXIS Print Monitor . . . . . . . . . . . . . . . . . . . . . . . . . . 76
Adding Printers over NetBIOS/NetBEUI in Windows NT using
AXIS Print Monitor . . . . . . . . . . . . . . . . . . . . . . . . . . 77
Adding Printers in Windows 98 and Me over TCP/IP using
AXIS Print Monitor . . . . . . . . . . . . . . . . . . . . . . . . . . 78
Adding Printers in Windows 98 and Me over
AXIS 5570e User’s Manual 3
Page 4

Table of Contents
NetBIOS/NetBEUI using AXIS Print Monitor . . . . . . . 80
Section 7 Adding Printers in Macintosh . . . . . . . . . . . . . . . . . . . . . . . . . 81
Bonjour Printing in Mac OS X . . . . . . . . . . . . . . . . . . . . 81
Installation in Mac OS X using AppleTalk . . . . . . . . . . . 83
Installation of LPR printing in MAC OS X . . . . . . . . . . . 83
Installation on Mac OS 9.1 or older, using AppleTalk . . . 84
Choosing a Printer . . . . . . . . . . . . . . . . . . . . . . . . . . . . . 84
Section 8 Adding Printers in NetWare . . . . . . . . . . . . . . . . . . . . . . . . . . 88
Setup using NDPS . . . . . . . . . . . . . . . . . . . . . . . . . . . . . 88
Setup using iPrint . . . . . . . . . . . . . . . . . . . . . . . . . . . . 102
Basic Setup with AXIS NetPilot . . . . . . . . . . . . . . . . . . 107
Advanced Installation using AXIS NetPilot . . . . . . . . . 109
Basic Queue-based printing over IP . . . . . . . . . . . . . . . 111
Section 9 Adding Printers in UNIX/Linux . . . . . . . . . . . . . . . . . . . . . . . 114
Print Tools . . . . . . . . . . . . . . . . . . . . . . . . . . . . . . . . . . 114
Typical Invocation via a Windows Manager . . . . . . . . . 115
Typical Invocation from a Terminal Window . . . . . . . . 116
Debian 3.0 . . . . . . . . . . . . . . . . . . . . . . . . . . . . . . . . . . 117
Red Hat 7.3 . . . . . . . . . . . . . . . . . . . . . . . . . . . . . . . . . 118
SuSE 8.0 . . . . . . . . . . . . . . . . . . . . . . . . . . . . . . . . . . . 120
AXIS axinstall Script . . . . . . . . . . . . . . . . . . . . . . . . . . 121
Print Methods on TCP/IP Networks . . . . . . . . . . . . . . . 122
Section 10 Adding Printers in OS/2 . . . . . . . . . . . . . . . . . . . . . . . . . . . . 124
TCP/IP Printing . . . . . . . . . . . . . . . . . . . . . . . . . . . . . . 124
NetBIOS/NetBEUI Printing in OS/2 . . . . . . . . . . . . . . . 125
Section 11 Management and Configuration . . . . . . . . . . . . . . . . . . . . . . 127
Using a Web Browser for Print Server Management . . 127
Using AXIS ThinWizard for Print Server Management . 132
Using FTP for Print Server Management . . . . . . . . . . . 134
Using Telnet . . . . . . . . . . . . . . . . . . . . . . . . . . . . . . . . 136
Using SNMP . . . . . . . . . . . . . . . . . . . . . . . . . . . . . . . . 139
Using Novell Utilities . . . . . . . . . . . . . . . . . . . . . . . . . . 140
Configuring the Print Server from an IBM Host . . . . . . 141
Section 12 Configuration Possibilities . . . . . . . . . . . . . . . . . . . . . . . . . . 143
Autodetect Printer Type . . . . . . . . . . . . . . . . . . . . . . . . 143
Auto-IP . . . . . . . . . . . . . . . . . . . . . . . . . . . . . . . . . . . . 143
Changing Language in the Print Server’s Web Interface . .
144
E-mail Notification . . . . . . . . . . . . . . . . . . . . . . . . . . . 144
IPP (Internet Printing Protocol) . . . . . . . . . . . . . . . . . . 145
Logical Printers for Customized Printing . . . . . . . . . . . 153
Network Speed . . . . . . . . . . . . . . . . . . . . . . . . . . . . . . 160
NetWare Packet Signature Levels . . . . . . . . . . . . . . . . 161
Flash Loading of Firmware over the Web . . . . . . . . . . . 161
TCP/IP Restrictions . . . . . . . . . . . . . . . . . . . . . . . . . . . 162
Enabling Secure Web Services — SSL/TLS . . . . . . . . . . 163
4 AXIS 5570e User’s Manual
Page 5

Table of Contents
Enabling the SNMP3 Protocol . . . . . . . . . . . . . . . . . . . 166
Overriding Port Status . . . . . . . . . . . . . . . . . . . . . . . . . 167
Enabling IEEE 802.1X Port-based Authentication . . . . 167
Section 13 Upgrading the Firmware . . . . . . . . . . . . . . . . . . . . . . . . . . . 169
Upgrading the Firmware . . . . . . . . . . . . . . . . . . . . . . . 169
Obtaining the Software . . . . . . . . . . . . . . . . . . . . . . . . 171
Section 14 SNA Parameter Overview . . . . . . . . . . . . . . . . . . . . . . . . . . . 172
Communication Parameters . . . . . . . . . . . . . . . . . . . . 172
Updating parameters . . . . . . . . . . . . . . . . . . . . . . . . . . 174
Auto-configuration and Mapping . . . . . . . . . . . . . . . . 175
Section 15 SNA Gateways . . . . . . . . . . . . . . . . . . . . . . . . . . . . . . . . . . . 177
Section 16 Extended IBM Printer Emulation . . . . . . . . . . . . . . . . . . . . . . 179
Section 17 IBM Fonts . . . . . . . . . . . . . . . . . . . . . . . . . . . . . . . . . . . . . . . 182
Section 18 IBM Print Formatting . . . . . . . . . . . . . . . . . . . . . . . . . . . . . . 186
Section 19 IPDS Overview . . . . . . . . . . . . . . . . . . . . . . . . . . . . . . . . . . . 190
IPDS Parameter Settings . . . . . . . . . . . . . . . . . . . . . . . 190
IPDS System Languages . . . . . . . . . . . . . . . . . . . . . . . . 190
IPDS Fonts . . . . . . . . . . . . . . . . . . . . . . . . . . . . . . . . . . 194
Printer Resident Fonts . . . . . . . . . . . . . . . . . . . . . . . . . 195
Immediate Font Substitutions . . . . . . . . . . . . . . . . . . . 196
Unsupported Fonts . . . . . . . . . . . . . . . . . . . . . . . . . . . 196
Typographical Fonts . . . . . . . . . . . . . . . . . . . . . . . . . . 196
Section 20 DBCS Support . . . . . . . . . . . . . . . . . . . . . . . . . . . . . . . . . . . . 197
Configuring the AS/400 Host, 5494 CU mode . . . . . . . 197
Configuring the Axis Network Print Server . . . . . . . . . 197
Verifying the Communications Link . . . . . . . . . . . . . . . 198
Amending Device Features . . . . . . . . . . . . . . . . . . . . . 198
Extended IBM Printer Emulation . . . . . . . . . . . . . . . . . 199
Font Tables . . . . . . . . . . . . . . . . . . . . . . . . . . . . . . . . . 200
Section 21 Digital Copier Support . . . . . . . . . . . . . . . . . . . . . . . . . . . . . 202
Section 22 IP Addressing . . . . . . . . . . . . . . . . . . . . . . . . . . . . . . . . . . . . 204
Section 23 The Test Button . . . . . . . . . . . . . . . . . . . . . . . . . . . . . . . . . . 208
Section 24 Troubleshooting . . . . . . . . . . . . . . . . . . . . . . . . . . . . . . . . . . 209
Section 25 Technical Specification . . . . . . . . . . . . . . . . . . . . . . . . . . . . . 212
Section 26 The Parameter List . . . . . . . . . . . . . . . . . . . . . . . . . . . . . . . . 216
NetWare Parameter Combinations . . . . . . . . . . . . . . . 246
TCP Ports Opened for Raw Printing . . . . . . . . . . . . . . . 247
SNMP Device Index . . . . . . . . . . . . . . . . . . . . . . . . . . . 247
Section 27 Glossary . . . . . . . . . . . . . . . . . . . . . . . . . . . . . . . . . . . . . . . . 249
Index . . . . . . . . . . . . . . . . . . . . . . . . . . . . . . . . . . . . . . . . . . 255
AXIS 5570e User’s Manual 5
Page 6

Introduction
Section 1 Introduction
Thank you for purchasing the AXIS 5570e print server. This product has
been developed to connect your printers anywhere in your network,
allowing all network users access to the shared printer resources.
The AXIS 5570e is a LAN attached multi-protocol print server that prints
IBM and ASCII data streams to any ASCII printer. Supporting IBM
Mainframes, AS/400, NetWare, UNIX, LAN Server Manager, Windows
and Apple EtherTalk, these products are ideal for IBM Mainframe and
AS/400 sites that are migrating from pure IBM networks to LAN
environments.
About this Manual
This manual is applicable for the AXIS 5570e with firmware version 7.10
or higher, providing introductory information as well as detailed
instructions on how to set up and manage the print server in various
network environments. It is intended for everyone involved in installing
and managing the print server. To fully benefit from this manual, you
should be familiar with basic networking principles.
These instructions are based on the settings in a new and unconfigured
print server. To reload the default parameters, you can perform a Factory
Default, which will restore most of the settings. See “Performing a Factory
Default” on page 208.
6 AXIS 5570e User’s Manual
Page 7

Support Services
Supported Environments
Introduction
Should you require any technical assistance, please contact your Axis
reseller. If your questions cannot be answered immediately, your Axis
reseller will forward your queries through the appropriate channels to
ensure a rapid response.
If you are connected to the Internet, you can:
• Download user documentation and firmware updates
• Find answers to previously resolved problems in the FAQ database.
Search by product, category or phrase
• Report problems to Axis support staff by logging in to your private
support area
• Visit the Axis support Web at www.axis.com/techsup
The Axis Network Print Server is the ideal print server in mixed
environments as it can communicate with all the major computer systems
and network protocols including:
• IBM Mainframe and AS/400
• Windows
•NetWare
•UNIX
• Windows clients connected to LANtastic networks
•Macintosh
• Internet via any standard Web browser
AXIS 5570e User’s Manual 7
Page 8

Product Overview
Section 2 Product Overview
Package Contents
Verify that nothing is missing from the AXIS 5570e package by using the
check list below. Please contact your dealer if anything is missing or
damaged. All packing materials are recyclable.
AXIS 5570e
Axis Print Server Model Power Adapter
AXIS 5570e
TCP/IP
IPDS SNA
PS-H
Item
CD
Warranty Sheet
Printed Material
Adhesive Holder & Clip
USB Cable*
Title
AXIS Network Product CD
Warranty Axis Servers (USA)
Warranty Axis Servers (other countriesI
AXIS 5570e User’s Guide
ACC AXIS 5500 CLIPS K
70 cm
* The USB cable supports USB Low-Speed and Full-Speed. Hi-Speed is not
supported.
8 AXIS 5570e User’s Manual
Page 9
Protocols and Datastreams
The AXIS 5570e is available in two versions; IPDS SNA and TCP/IP. The
tables below display the functionality of each version.
AXIS 5570e
AXIS 5570e IPDS SNA (part no. 0193) TCP/IP (part no. 0188)
IPDS support
SCS support
3270DS support
TN3270E
TN5250E
SNA support
Digital Copier Support
Note:
Product Overview
•
••
••
••
••
•
•
All models may not be available in all countries in which Axis operates. Please contact your
local sales representative for more information.
AXIS 5570e User’s Manual 9
Page 10
Product Overview
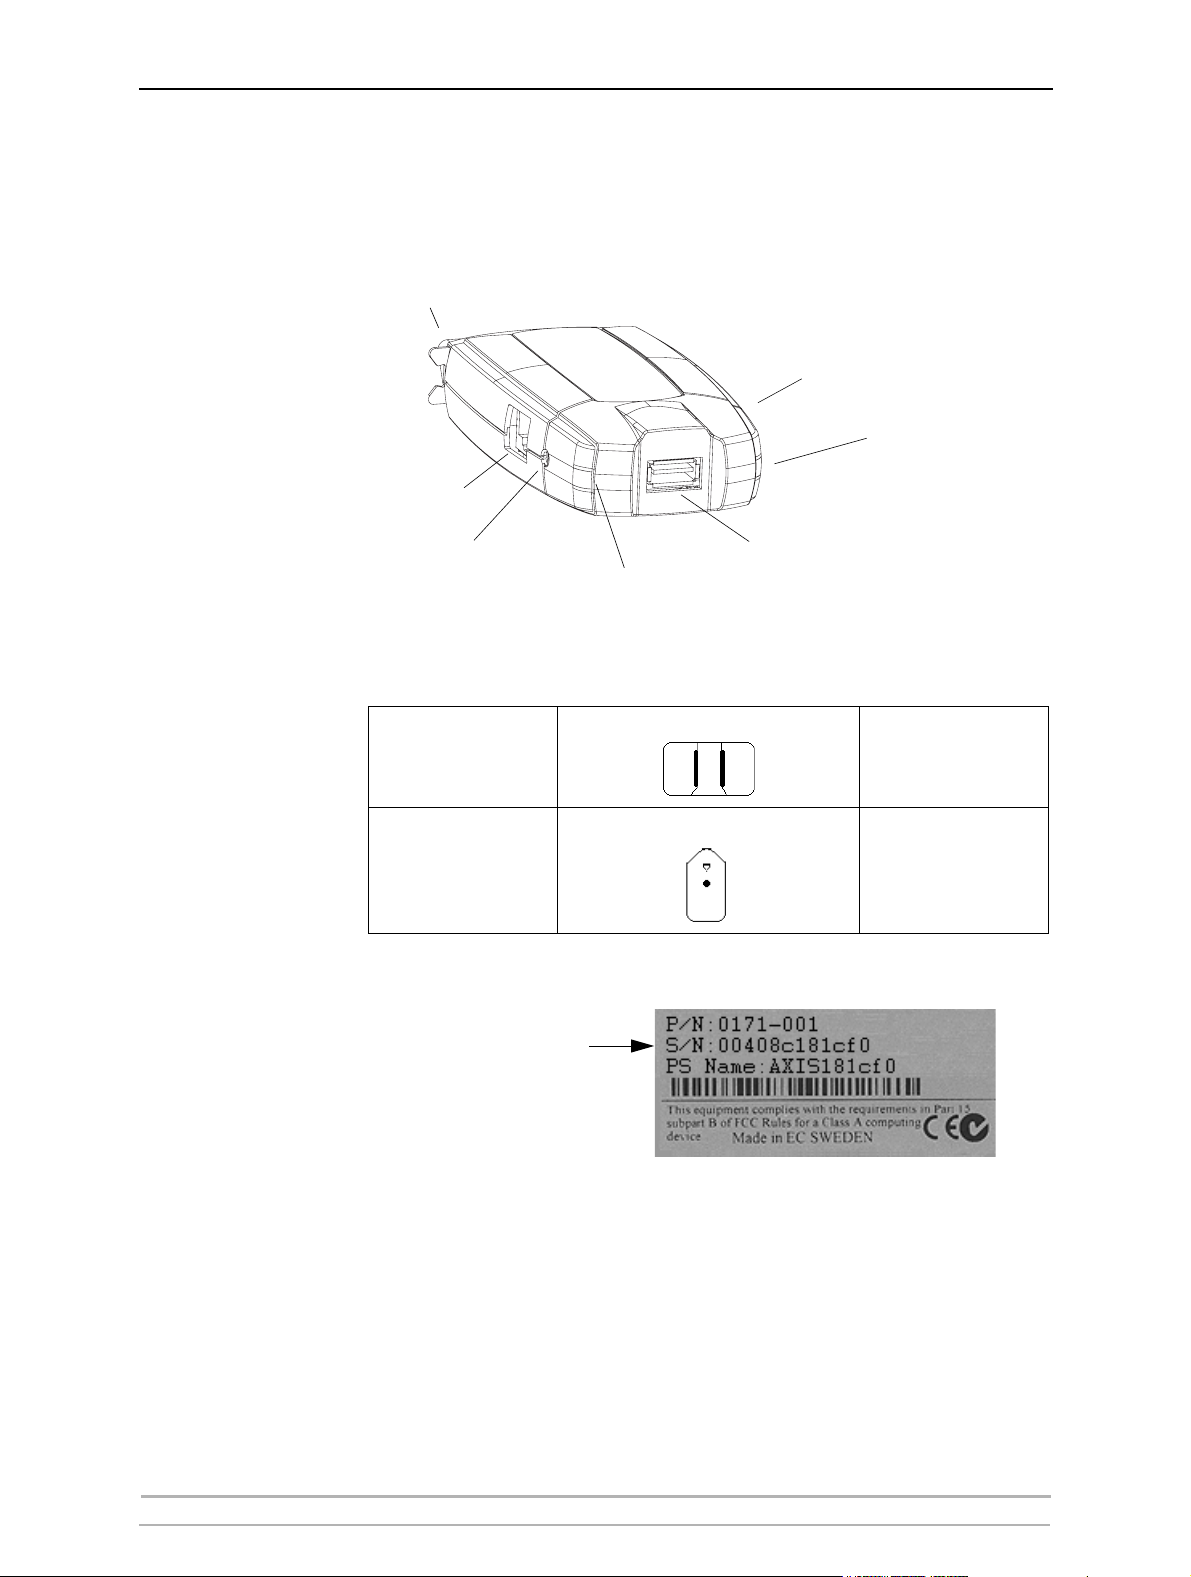
Physical Description
AXIS 5570e
Ethernet Connector
LPT1
Test Button
Network Indicator
Mounting the AXIS
5570e
Backside Label on
Print Server
Power Connector
USB1
Power Indicator
Using the supplied clip and holder, the AXIS 5570e can be mounted e.g.
on the back of the printer or on a wall.
Fasten to print server
Adhesive Clip
Adhesive Holder
by peeling off adhesive
tape.
Fasten to mounting
surface by peeling off
adhesive tape.
Serial number
Network Connector The AXIS 5570e is designed for 10baseT Ethernet or 100base TX Fast
Ethernet networks and is connected to the network via a standard RJ-45
(Category 5 or 6 twisted pair) cable.
Printer Ports
AXIS 5570e AXIS 5570e is equipped with one USB port that is USB 1.1 and 2.0 Low-
and Full-Speed compliant, and one high-speed IEEE 1284 compatible
parallel port.
10 AXIS 5570e User’s Manual
Page 11

Product Overview
Test Button The test button is used for:
• Printing a test page to check the connection to the printer.
• Printing the parameter list showing the print server settings.
• Performing a Factory Default of the print server, which will restore
most of the parameters and settings to their factory default values.
See Performing a Factory Default, on page 208.
Network Indicator The network indicator flashes to indicate network activity.
Power Indicator The power indicator is lit while power is applied. If it is not lit, or if it
flashes, there is a problem with the print server or its Power Adapter.
Compatible Printers Any standard printer can be used except host-based printers (also known
as CAPT,GDI, PPA or Windows-based printers).
Configuration and
Management
The print server can be configured and managed from its internal Web
pages, using HTTP as well as HTTPS in the secure mode. These Web pages
offer you a platform independent management tool that is suitable for all
supported network environments. See Using a Web Browser for Print
Server Management, on page 127.
AXIS Network Product CD
The AXIS Network Product CD provides an easy-to-use electronic catalog,
that includes Axis software, firmware and user documentation. If your
computer is set to French, German, Italian or Spanish, the information
will automatically be presented in that language, otherwise you will see
the English version.
To read the PDF documents you need an Acrobat Reader, which can be
fetched at http://www.adobe.com/products/acrobat/readermain.html
Start-up Procedures
for Windows
If your computer is configured to autostart CDs, the AXIS Network
Product CD will start automatically when inserted into a local CD drive on
Windows 98, Me, NT, 2000 and XP platforms. You can also navigate to
the CD root directory and start the index.htm file from within the
Windows file manager.
Start-up Procedures
for UNIX/Linux,
and Mac OS
Latest Versions The latest version of Axis documentation, software and firmware is
AXIS 5570e User’s Manual 11
Using your preferred file manager application, navigate to the CD root
directory and click index.htm
available on www.axis.com
Page 12

Product Overview
Print Server Features and Benefits
Reliability The Axis Network Print Server print server provides high performance
and reliability combined with low power consumption. The electronic
circuits are based on the AXIS ETRAX 100LX chip, which comprises an
integrated 32 bit RISC processor and associated network controllers.
Flexibility In the IBM Mainframe and AS/400 environment, the Axis Network Print
Server can emulate IBM twinax and coax print and control functionality.
This means that the Axis Network Print Server can effectively replace
coax/twinax attached printers and control units on the LAN.
It supports printing in all the major computer systems and environments,
including five different print methods in the TCP/IP environment. The
integrated IPP (Internet Printing Protocol) function allows for printing
from LAN to LAN via a WAN, such as the Internet.
Speed The AXIS ETRAX 100LX chip has been specifically designed for LAN
products. It supports data transfer rates of up to 200 Mbit/s (100 Mbit
Ethernet full duplex). High speed Centronics communication such as ECP,
Hewlett-Packard Fast Mode, High Speed and IBM Fast Byte is supported.
Easy to Install The print server installs, operates and is managed in a reliable and easy
fashion.
Security You can assign a password to restrict login and printer access. It is also
possible to disable protocols and to configure a secure mode (https). See
“Enabling Secure Web Services — SSL/TLS” on page 163.
Monitoring The internal print server Web pages and AXIS ThinWizard (3.04 and up)
allow you to continuously monitor printer status. The Web pages are used
to monitor single Axis units while AXIS ThinWizard can be used to
monitor multiple Axis units. Integrity of your printing is also monitored
via interactive communication with the IBM host.
The AXIS 5570e additionally supports SNMP for remote monitoring.
Futureproof The firmware stored in the print server Flash memory can be upgraded
over the network. This allows you to quickly update and enhance its
operational features when new print server software becomes available.
See “Upgrading the Firmware” on page 169.
NetWare Packet
Signature
The print server supports NetWare Packet Signature Level 1, 2, 3, which
protects servers and clients using the NetWare Core Protocol services.
NCP packet signature prevents packet forgery by requiring the server and
the client to sign each NCP packet. See your Novell NetWare
documentation for detailed information.
12 AXIS 5570e User’s Manual
Page 13

Section 3 Basic Installation
Quick Overview
Follow these steps to make your printer network ready:
1. Connect the Hardware, on page 13
2. Setting the IP Address, on page 15
3. “Installation Guide” on page 14
Connect the Hardware
1. Make sure that the printer is switched off and that the Power Adapter is
disconnected
from the print server.
Basic Installation
2. Locate the serial number, found on the underside label of the print server,
and write it down. Example: S/N: 00408c181cf0
3. Connect the printer(s) to the print server.
4. Connect the print server to the network (Ethernet Connector) using a
twisted pair RJ45 cable (of category 5 or better).
5. Switch on the printer and make sure it is ready for printing (display showing
“Online”, “Ready”, etc.).
6. Connect the Power Adapter to the print server. The power indicator lights
up. If the network indicator starts to flash, the print server is correctly
connected to the network.
7. Wait 1 minute and press the test button once. A test page will be printed
on the connected printer — keep it handy during the installation. The test
page will show the assigned IP address of the print server.
The print server can now be installed in your network using one of the
methods detailed in the Installation Guide, on page 14.
Notes:
• The test page includes a list of the most important parameters, including the network
speed and the firmware version number.
• Each print server is pre-configured with a unique node address that is identical to the
serial number. The node address can be changed using any standard Web browser. Please
refer to Management and Configuration, on page 127, for more information.
• The AXIS 5570e
not supporting high speed, this function can be disabled by using any standard Web
browser. Please refer to “Management and Configuration” on page 127, for more
information.
uses high speed Centronics communication. For use with older printers
AXIS 5570e User’s Manual 13
Page 14
Basic Installation
Installation Guide
After connecting the Axis Network Print Server to your network, you are
now ready to perform the basic setup procedures. The method of
installation that you choose should be dictated by your printing
requirements and the type of network into which you are integrating.
1. Start out with setting an IP address on the print server, described in
“Setting the IP Address” on page 15.
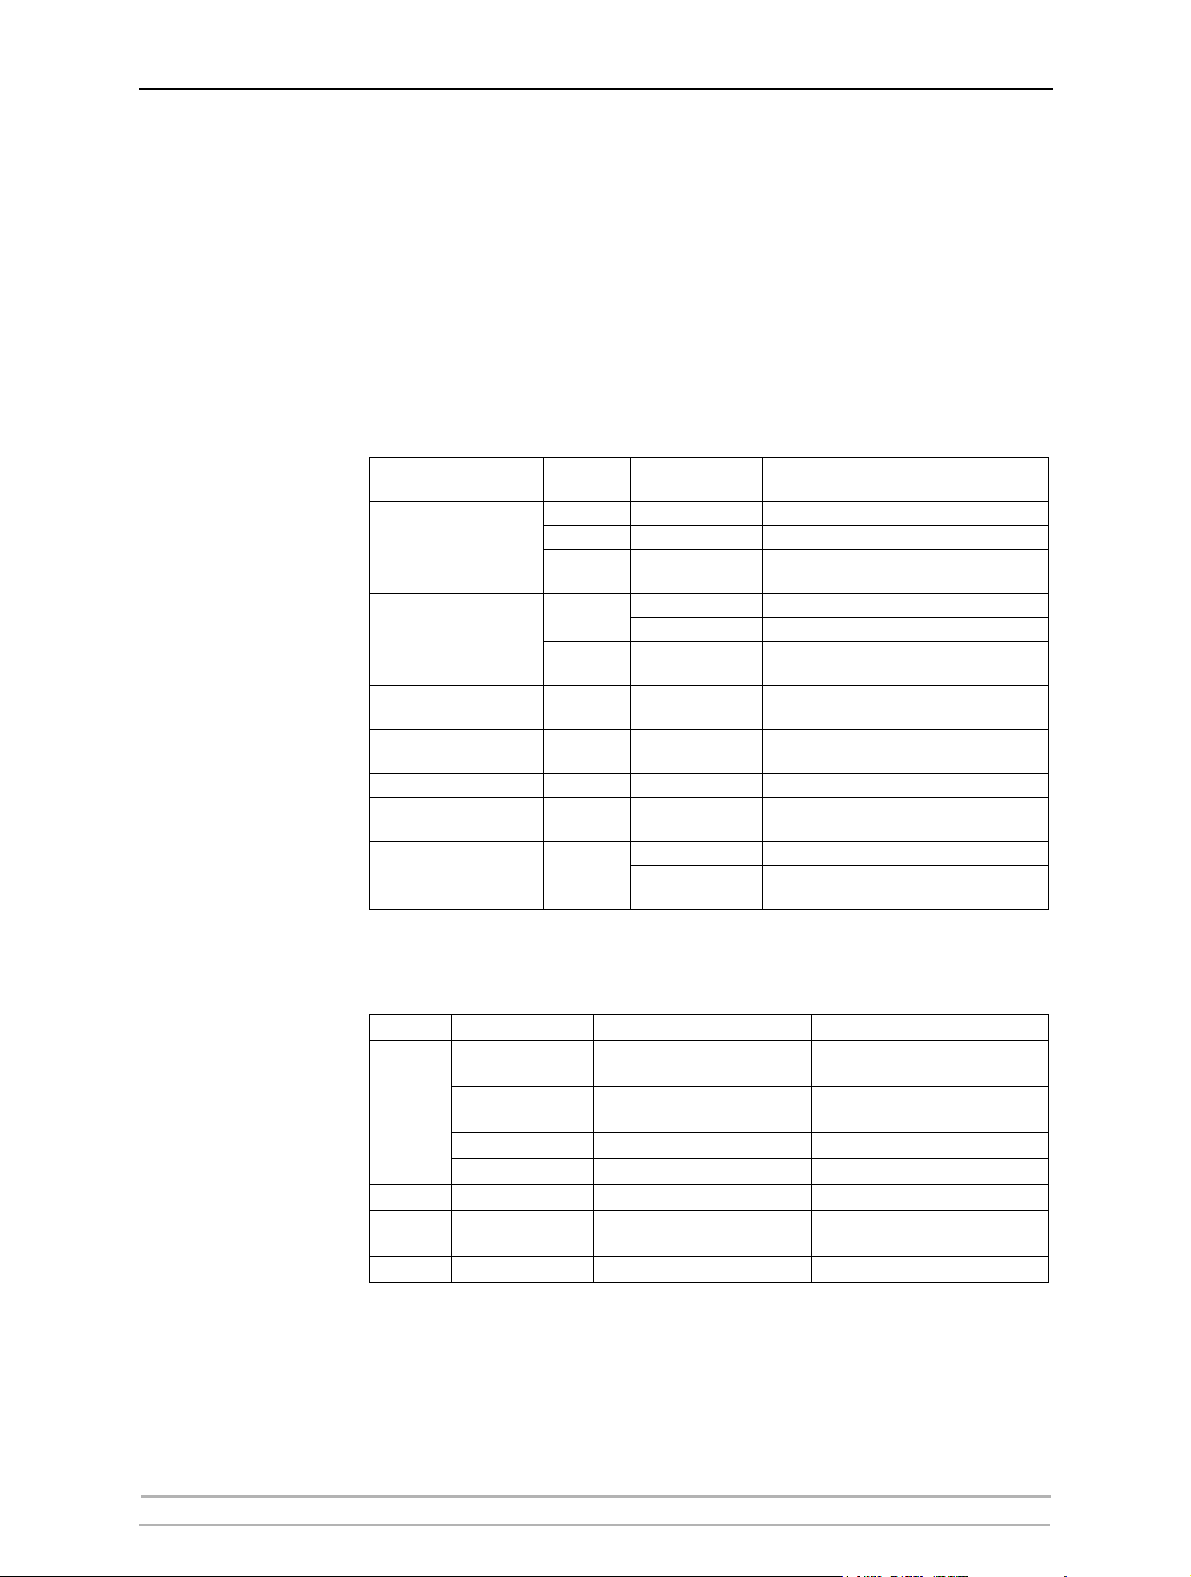
2. Refer to the table below to determine which setup procedures that are
relevant to your network environment.
Environment
AS/400
IBM
Mainframe
Windows
98/NT/Me/2000/XP/2003
NetWare
Macintosh TCP/IP, AppleTalk “Adding Printers in Macintosh” on page 81
UNIX TCP/IP
OS/”
Data
Stream
SCS / IPDS SNA “SNA Printing - 5494 Mode” on page 21
SCS TN5250E (TCP/IP) “TN5250E Printing (SCS over IP)” on page 28
IPDS PPR/PPD (TCP/IP)
SCS / IPDS
IPDS PPR/PPD (TCP/IP)
Network
Configuration
SNA “SNA Printing” on page 35
TN3270E (TCP/IP) “TCP/IP TN3270E Printing” on page 41
TCP/IP,
NetBIOS/NetBEUI
TCP/IP
IPX/SPX
TCP/IP “TCP/IP Printing” on page 124
NetBIOS/NetBEUI
Actions
“PPR/PPD Printing - IPDS Data Streams” on
page 30
“PPR/PPD Printing - IPDS data streams” on
page 49
“Adding Printers in Windows” on page 62
“Adding Printers in NetWare” on page 88
“Adding Printers in UNIX/Linux” on page
114
“NetBIOS/NetBEUI Printing in OS/2” on page
125
Installation Tools The recommended installation tools and management methods for the
Axis Network Print Server are summarized here:
Protocols Operating Systems Configuration method Management method
Windows
2000/XP/2003
TCP/IP
IPX/SPX NetWare Novell Utilities Novell Utilities
NetBIOS
NetBEUI
AppleTalk Macintosh Bonjour, Web browser, Mac-FTP Web browser, Mac-FTP
Windows 98/NT/Me
Mac OS X Native Mac OS X tool Web browser
UNIX Native Unix/Linux tools Web browser, FTP, Telnet, SNMP
Windows 95/98
NT/Me/2000/2003
AXIS AddPrinter Wizard
AXIS Print Monitor software and
Windows Add Printer Wizard
AXIS Print Monitor Web browser. FTP, Telnet, SNMP
Web browser, FTP, Telnet, SNMP
AXIS ThinWizard
Web browser, FTP, Telnet, SNMP
14 AXIS 5570e User’s Manual
Page 15
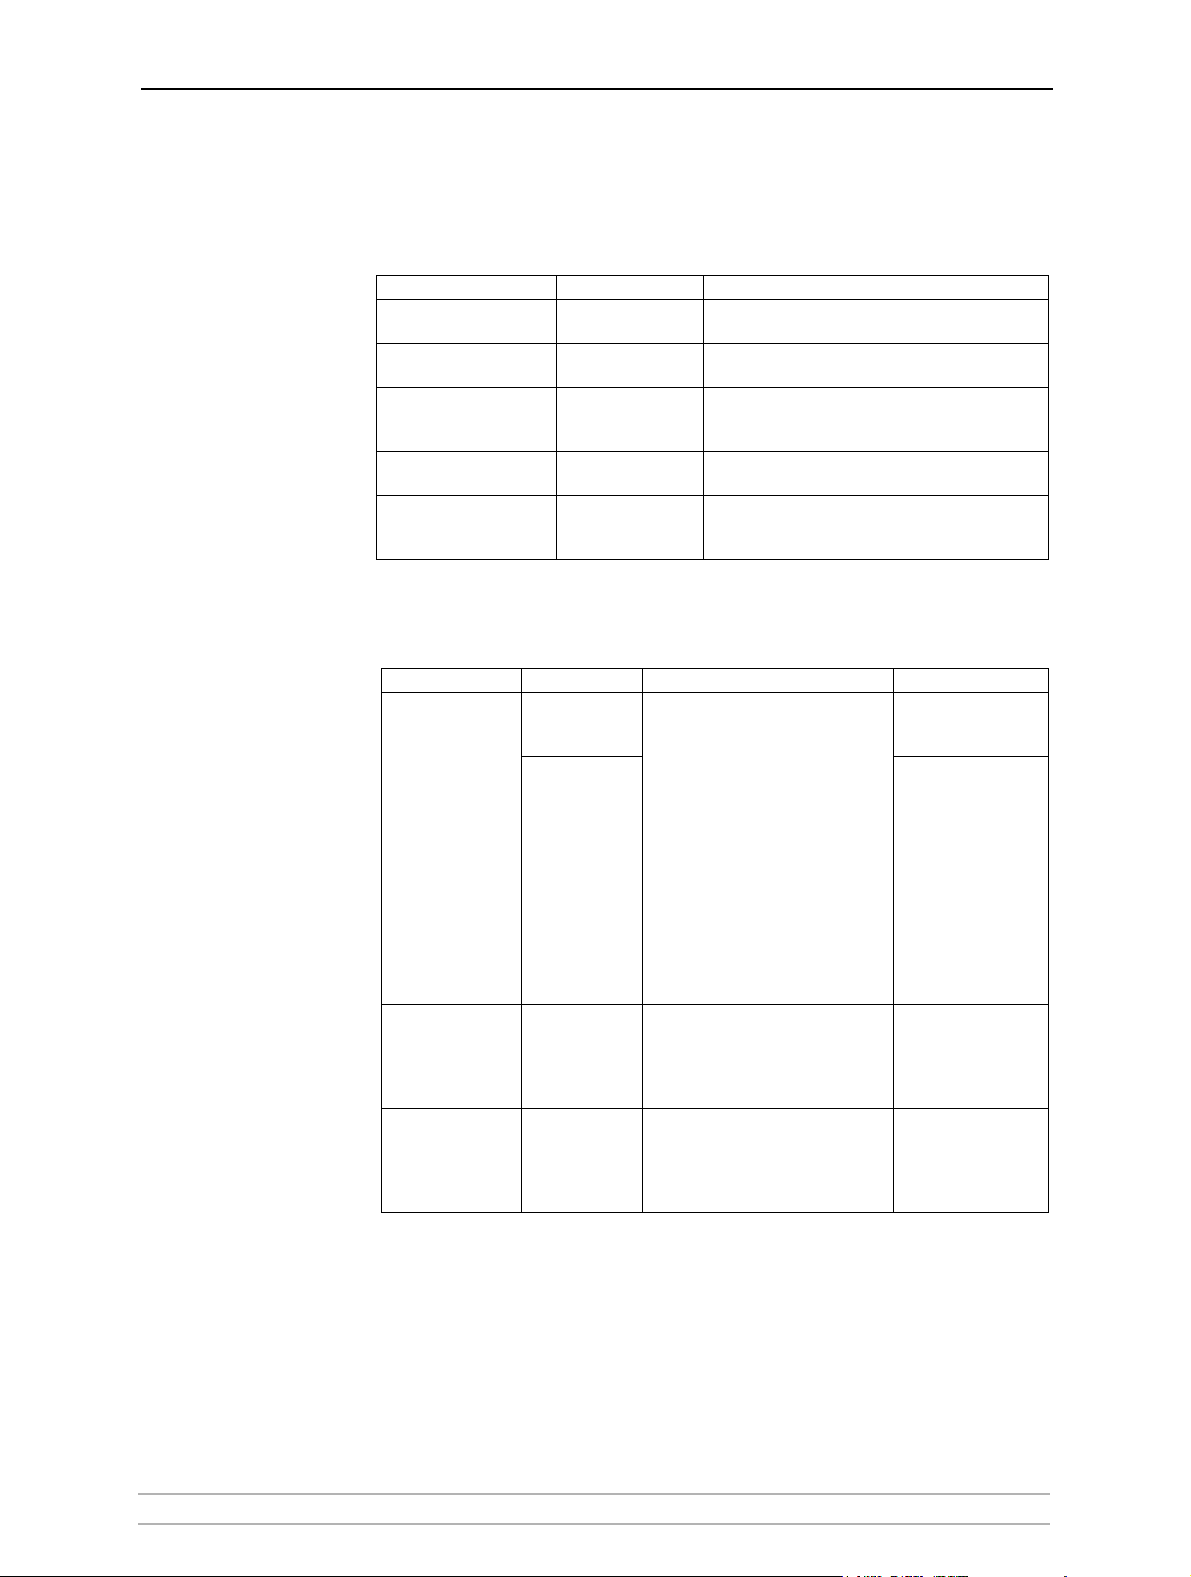
Setting the IP Address
Dynamic IP Address
Assignment
Manual IP Address
Assignment
Method Server required Comment
AXIS AddPrinter Wizard
DHCP DHCP server
RARP RARP server
BOOTP BOOTP server
Auto-IP No server required.
See “Adding Printers in Windows 2000 / XP / 2003 us-
ing AXIS AddPrinter Wizard” on page 63
Dynamic assignment of IP addresses. See Dynamic IP Address Assignment, on page 15
Static assignment of IP addresses. Cannot be used
over routers.
See Dynamic IP Address Assignment, on page 15
Static assignment of IP addresses.
See Dynamic IP Address Assignment, on page 15
Automatic assignment of IP addresses for Windows
environments.
See Dynamic IP Address Assignment, on page 15
Basic Installation
Method Platform Comment See
Setting the IP Address
using arp/ping, on
page 17
Windows
Requires the IP address for each
device to be downloaded
individually.
Cannot be used over routers.
You must define the Default
arp/ping
UNIX
Mac OS X
Router and Subnet Mask. Log in
to the print server’s Web pages
and select Admin | Network
Settings | Detailed View |
Setting the IP Address
using arp/ping, on
page 17
TCP/IP Network| Default
Router and Subnet Mask.
DHCP, Auto-IP, BOOTP and
RARP must first be set to No
Adding Printers in
AXIS
AddPrinter Wizard
AXIS
ThinWizard
Windows
2000, XP, 2003
Windows
2000/XP
Axis software that allows you to find
print servers in your network and assign an IP address to them.
Axis software that assists in setting
the IP address of multiple print servers simultaneously. This software is
recommended for large organizations
and enerprise networks.
Windows 2000 / XP /
2003 using AXIS AddPrinter Wizard, on
page 63
Using AXIS ThinWizard for Print Server
Management, on
page 132
Dynamic IP Address Assignment
Obtaining an IP
Address through
DHCP
AXIS 5570e User’s Manual 15
If you have a DHCP server on your network, your print server will
receive an IP address automatically. The IP address will then appear on
the test page printed when you press the test button once.
You should now be able to access the print server’s internal Web pages as
described on Accessing the Web Pages, on page 128
Page 16

Basic Installation
If you are not working in a DHCP network, you need to set the IP
address of the print server manually. See “Manual IP Address
Assignment” on page 15.
Obtaining an IP
Address through
Auto-IP
Auto-IP may be used to set the IP address automatically in the absence of
a DHCP server.
The default Auto-IP address structure is: 169.254.xxx.xxx.
Important: The Auto-IP function will only function when the DHCP parameter is
enabled in the print server.
This function is enabled automatically upon installation of a brand new
print server. If you perform a Factory Default using the test button on the
print server and you do not have a DHCP server on your network, Auto-IP
will automatically set the IP address of the print server.
The DHCP Enabled parameter is enabled/disabled in the print server’s
Web pages: Admin => Network Settings => Detailed View => TCP/IP
Network => DHCP Enabled: Yes/No.
Notes:
• Use a Web browser with JavaScript support and Java enabled.
• The Axis Network Print Server supports WINS (Windows Internet Name Service), which is
recommended when setting the IP address using DHCP in Windows environments.
• If you are working in a WINS/ DDNS network, you can access the print server’s Web pages
using its default host name: In the Web browser’s Location/Address field, enter the
default print server name AXISxxxxxx (xxxxxx are the last six digits of the serial number,
found on the print server’s underside label). Example: If the serial number is 00 40 8c 18
16 36, type AXIS181636 and press Enter.
• DHCP, RARP and BOOTP can be used to set the IP address in UNIX.
• If you are working in a network that does not use dynamic IP address assignment, refer to
“Manual IP Address Assignment” on page 15 to assign an IP address to the print server
manually.
Manual IP Address
Assignment
To establish communication with the TCP/IP network, an IP address must
be assigned to your Axis Network Print Server. Choose the appropriate
method according to your network:
• arp/ping - use this method to set the IP address for each new print
server individually.
This method cannot be used over routers.
Refer to
“Setting the IP Address using arp/ping”
on page 17.
• AXIS ThinWizard software is the primary recommended tool for
large organizations.
It can set IP addresses, discover and group print servers, install new
firmware and configure multiple Axis products concurrently.
Refer to
“Using AXIS ThinWizard for Print Server Management”
on
page 132
16 AXIS 5570e User’s Manual
Page 17

Note:
Basic Installation
If you are using host names, you can map a unique host name to the IP address. Refer to your
system manuals for instructions on how this is performed on your system.
Setting the IP Address
using arp/ping
Important!
Refer to the appropriate section below to assign an IP address to your
Axis Network Print Server using arp/ping:
Windows
Open a Command Prompt and enter the following syntax:
Syntax Example
arp -s <Internet address> <Ethernet address>
1.
2.
ping <Internet address>
arp -s
192.168.3.191
ping
192.168.3.191
00-40-8c-18-16-36
The host will return reply from 192.168.3.191, or a similar message. This
indicates that the address has been set and that communication is
established. You are now ready to print.
UNIX, Mac OS X
Open a Terminal and enter the following syntax:
Syntax Example
arp -s <Internet address> <Ethernet address>
1.
2.
ping <Internet address>
arp -s
192.168.3.191
ping
192.168.3.191
00:40:8c:18:16:36
The host will return psname is alive, or a similar message. This indicates
that the address has been set and that communication is established. You
are now ready to print.
Using RARP in
UNIX/Linux
You must define the Default Router and Subnet Mask when you set a static IP address. Log
in to the print server’s Web pages and select Admin | Network Settings | Detailed View |
TCP/IP Network | Default Router and Subnet Mask.
DHCP, Auto-IP, BOOTP and RARP must first be set to No!
Notes:
• The Ethernet address is equal to the serial number, which is located on the underside
label of the AXIS 5570e.
• The arp command varies between different UNIX systems. Some BSD type systems
expect the host name and node address in reverse order. Furthermore IBM AIX systems
will require the additional argument ether.
Example:
arp -s ether <host name> 00:40:8c:10:00:86 temp
• When you execute the ping command for the first time, you may experience a
significantly longer response time than usual.
• The ability to set the IP address with ARP and PING will only be enabled the first 10
minutes after restarting the print server.
Follow the instructions below to set the IP address using RARP.
AXIS 5570e User’s Manual 17
Page 18

Basic Installation
Example:
1. Append the following line to your Ethernet Address table. This is typically
located in the
<Ethernet address> <host name>
00:40:8c:10:00:86 npsname
/etc/ethers file:
2. Update, if necessary, your host table and alias name databases, as required
by your system.
3. If it is not already running, start the RARP daemon. This is typically
performed using the
rarpd -a command.
4. Restart the AXIS 5570e to download the IP address.
Notes:
• The Ethernet address is equal to the serial number, which can be found on the underside
label of the AXIS 5570e.
• If you are a IBM AIX user, you will probably not have access to a RARP daemon. If this is
the case, you can use either the arp or BOOTP methods instead.
Using BOOTP
in UNIX/Linux
Example:
Follow the instructions below to set the IP address using BOOTP:
1. Append the following entry to your boot table. This is typically performed
by editing the file:
<host name>:ht=<hardware type>:vm=<vendor magic>:\
:ha=<hardware address>:ip=<IP address>:\
:sm=<subnet mask>:gw=<gateway field>
npsname:ht=ether:vm=rfc1048:\
:ha=00408c100086:ip=192.168.3.191:\
:sm=255.255.255.0:gw=192.168.1.1
/etc/bootptab
The Axis Network Print Server can automatically download a customized
config file from a TFTP server. Just add the name of the config file and
the TFTP server’s IP address to your boot table. The config file is
downloaded immediately after the Axis Network Print Server receives its
IP address.
18 AXIS 5570e User’s Manual
Page 19

Basic Installation
Notes:
• The Axis Network Print Server supports WINS (Windows Internet Name Service), which is
recommended when setting the IP address using DHCP in Windows environments.
• The Ethernet Address is the same as the serial number, found on the print server’s under-
side label. Enter the Ethernet Address in the same format as in the example above.
• Setting the IP address with arp and ping is only possible in the first 10 minutes after
re-booting the print server.
• When you execute the ping command for the first time, you may experience a signifi-
cantly longer response time than usual.
• The arp command varies between different UNIX systems.
• You need root privileges on your UNIX system in order to execute the arp command and
run axinstall .
• Some BSD type systems expect the host name and serial number in reverse order. Further-
more IBM AIX systems will require the additional argument ether.
Example: arp -s ether <host name> <Ethernet Address> temp
Managing DHCP Follow the instructions below to download the IP address using DHCP:
1. Edit or create a scope in the DHCP manager of the DHCP daemon. The
entries included in this scope should contain the following parameters:
• range of IP addresses
•subnet mask
• default router IP address
• WINS server IP address(es)
• lease duration
2. Activate the scope.
The Axis Network Print Server will automatically download the DHCP
parameters.
If you are using WINS, you must include at least one WINS server IP
address in the DHCP scope. Immediately after the IP address has been
received, the Axis Network Print Server registers its host name and IP
address on the WINS server.
The Axis Network Print Server can automatically download a customized
config file from a TFTP server. Just add the name of the config file and
the TFTP server’s IP address to your DHCP scope. The config file is
downloaded immediately after the Axis Network Print Server receives its
IP address.
System Privileges You need root privileges on your UNIX system, or administrator
privileges on a Windows NT server.
Ethernet Address You need to know the Ethernet address of your AXIS 5570e to perform
the installation. The Ethernet address is based upon the serial number of
your print server. This means, for example, that a print server with the
serial number 00408C100086, will have the corresponding Ethernet
address of 00 40 8C 10 00 86. The serial number is located on the
underside label of the print server.
AXIS 5570e User’s Manual 19
Page 20

Basic Installation
IP Address If you do not have a DHCP server on your network, you must obtain an
Important:
unused IP address from your network administrator.
DO NOT use the IP addresses used in the following examples when installing your Axis
Network Print Server. Always consult your network administrator before assigning an IP
address to your Axis Network Print Server.
Registering and
Resolving
Host Names
WINS Host Name
Rules
DDNS Host Name
Rules
In order to register the host name of the Axis Network Print Server in
networks with dynamic IP address settings, WINS (Windows Internet
Name Service) and DDNS (Dynamic Domain Naming System) are
supported. It is recommended that at least one of these methods be used
when setting the IP address of the Axis Network Print Server using DHCP.
The host name of the Axis Network Print Server is specified by the
PS_NAME parameter. Refer to The Parameter List, on page 216.
WINS only supports 15 character long host names. If your host name is
longer than 15 characters, the Axis Network Print Server truncates the
host name to 15 characters when registering with a WINS server. You can
view the Axis Network Print Server host name that is registered at a
WINS server, in the print server’s Web interface. Refer to Section 11
Management and Configuration, on page 127.
DDNS supports 53 character long host names, but they can only consist
of the characters ‘A-Z’, ’a-z’ and ‘-’. If your host name consists of any
other characters, they are converted to ‘-’, when registering with a DDNS
server. You can view the Axis Network Print Server host name that is
registered at a DDNS server, in the print server’s Web interface. Refer to
Section 11 Management and Configuration, on page 127.
If the host name matches another entry in the DDNS data base, the Axis
Network Print Server deletes the entry before registering.
Notes:
• The host name limitations conclude that if you want to register the same host name at a
WINS server and a DDNS server, the host name should be no longer than 15 characters
and it should only contain the characters:
‘A - Z’, ‘a-z’ and ‘-’
• Refer to your system manuals or to your network administrator for instructions on how
host name resolutions are performed on your system.
• If the host name has not been mapped to the IP address, you can still perform the
following instructions on how to download the IP address. In this case, simply replace
the host name entry with the IP address wherever required.
20 AXIS 5570e User’s Manual
Page 21
Section 4 Setting Up - AS/400 (iSeries)
This section describes how to configure the Axis Network Print Server for
printing SCS and IPDS data streams using SNA and TCP/IP transport
protocols in the AS/400 (iSeries) environment.
Note:
SNA is only available for print server models with the SNA option installed. Please refer to
Protocols and Datastreams, on page 9
A number of protocols and print methods are available. Looking at SCS
over TCP/IP printing, we strongly recommend the TN5250E alternative.
This print method offers superior control and management features as
well as automatic configuration and high throughput using the Axis
Network Print Server.
If you have decided to use SNA, we recommend the 5494 mode.
Compared to the 3174 mode, this alternative yields better text formatting
options as well as automatic configuration.
Setting Up - AS/400 (iSeries)
Proceed to the setup section that is relevant to your network
environment, as described in the table below:
Printing
protocol
SNA - 5494
Mode
TN5250E
(TCP/IP)
PPR/PPD (TCP/IP) IPDS
If you intend to operate your Axis Network Print Server in a multiprotocol environment, you should also proceed to the other relevant
sections in this manual.
SNA Printing - 5494 Mode
The 5494 mode provides a significantly richer set of features for
formatting text and is the recommended emulation mode in AS/400
environments.
The 5494 mode supports DBCS which accommodates printing from
AS/400 host systems using languages that employ double-byte character
sets, namely Chinese, Japanese and Korean. Refer to DBCS Support, on
page 197 for further information.
Data
streams
SCS
IPDS
SCS
Action Comment
SNA Printing - 5494 Mode
TN5250E Printing (SCS over IP)
PPR/PPD Printing - IPDS Data Streams
on page 30
, on page 21
, on page 28Recommended method
Recommended method
for SNA
for SCS over TCP/IP
,
Recommended method
for IPDS over TCP/IP
The AXIS print server supports printing SCS and IPDS data streams via
the SNA transport protocol.
AXIS 5570e User’s Manual 21
Page 22

Setting Up - AS/400 (iSeries)
M
Note:
SNA is only available for print server models with the SNA option installed. Please refer to
Protocols and Datastreams, on page 9.
Configuring for SNA printing in 5494 Mode is described in three separate
stages:
• The AS/400 Host System Checklist
• Configuring the Axis Network Print Server
• Verifying the communication
The AS/400 Host
System Checklist
Note:
If you are using AS/400 Version 3 Release 1 or higher, the AS/400 host in
5494 CU mode is automatically configured. The instructions in this
section describe this automated configuration procedure.
If you are using a pre-version 3 release, you must perform the
configuration procedure manually. If this is the case, please refer to the
Axis Web site for further documentation.
You will find an AS/400 Parameter checklist in the AXIS 5570e User’s Guide where you can
enter the values described in this section for future reference.
1. Type
DSPNETA on the AS/400 command line and press Enter. For future
reference, note the values of the
location
parameters. Press F3.
Local network ID and Default local
Example:
DSPNETA
Display Network Attributes
System: S1032BB0
Current system name . . . . . . . . . . . . . . : S1032BB0
Pending system name . . . . . . . . . . . . . . :
Local network ID . . . . . . . . . . . . . . . . : > APPN
Local control point name . . . . . . . . . . . . : S1032BB0
Default local location . . . . . . . . . . . . . : > S1032BB0
Default mode . . . . . . . . . . . . . . . . . . : BLANK
APPN node type . . . . . . . . . . . . . . . . . : *ENDNODE
Data compression . . . . . . . . . . . . . . . . : *NONE
Intermediate data compression . . . . . . . . . : *NONE
Maximum number of intermediate sessions . . . . : 200
Route addition resistance . . . . . . . . . . . : 128
Server network ID/control point name . . . . . . : *LCLNETID
*ANY
Press Enter to continue.
F3=Exit F12=Cancel
ore...
The required parameter values are highlighted in bold.
2. Type WRKLIND *ELAN and press Enter:
to get a list of all line descriptions on the system. Type
5 in front of the line
description and press Enter.
22 AXIS 5570e User’s Manual
Page 23

3. Press F11 to display keywords.
*
Display Line Description S44A6643
Line description . . .: LIND ETHLINE
Option . . . . . . . .: OPTION *BASIC
Category of line . . .: *ELAN
Resource name . . . .: RSRCNAME LIN061
Online at IPL . . . . : ONLINE *YES
Vary on wait . . . . .: VRYWAIT *NOWAIT
Network controller . .: NETCTL ETHLINET
Local adapter address : ADPTADR 08005AB77D49
Exchange identifier . : EXCHID 056A6643
Ethernet standard . .: ETHSTD *ALL
Line speed . . . . . .: LINESPEED 10M
Enable only for TCP/IP: TCPONLY *NO
Current line speed . .: 10M
Duplex . . . . . . . .: DUPLEX *HALF
Current duplex . . . .: *HALF
Maximum controllers. .: MAXCTL 50
Press Enter to continue.
F3=Exit
F11=NonDisplay keywords
Setting Up - AS/400 (iSeries)
More...
F12=Cancel
4. For future reference, note the values of the
(ADPTADR) and Maximum Controllers (MAXCTL) parameters. Press Enter
Local Adapter Address
to view the active switched controllers display.
Display Line Description S44A6643
Line description . . : LIND ETHERNET
Option . . . . . . . : OPTION *ACTSWTCTL
Category of line . . :
--------------Active Switched Controllers--------
CONTROLER1
CONTROLER2
CONTROLER3
Press Enter to continue. Bottom
F3=Exit F11= Nondisplay keywords F12=Cancel
ELAN
5. Press Enter to display the SSAP list. Make sure that there is at least one SSAP
entry dedicated for SNA. For your future reference, note the SSAP value for
this entry.
Verify that the number of controllers displayed on this screen does not
exceed the value for maximum controllers (MAXCTL) from above.
AXIS 5570e User’s Manual 23
Page 24

Setting Up - AS/400 (iSeries)
*
*
Note:
Display Line Description S44A6643
Line description .: LIND ETHLINE
Option . . . . . : OPTION
Category of line .:
SSAP List. . . . .: SSAP
----Source Service Access Points------
SSAP Maximum Frame Type
04 1496 *SNA
12 1496 *NONSNA
AA 1496 *NONSNA
C8 1496 *HPR
08 1496 *SNA
Press Enter to continue. Bottom
F3=Exit F11=Nondisplay keywords F12=Cancel
SSAP
ELAN
The SNA entry is normally set to SSAP 04.
6. Press Enter to display the
parameter. Ensure that the
Autocreate controller (AUTOCRTCTL)
AUTOCRTCTL parameter is set to *YES. Press F3
to return to the command line.
Display Line Description S44A6643
Line description . . : LIND ETHERNET
Option . . . . . . . : OPTION *APPN
Category of line . . : *ELAN
Link speed . . . . .: LINKSPEED 10M
Cost/connect time . .: COSTCNN 0
Cost/byte . . . . . : COSTBYTE 0
Security for line. . : SECURITY *NONSECURE
Propagation delay. . : PRPDLY *MIN
User-defined 1 . . . : USRDFN1 128
User-defined 2 . . . : USRDFN2 128
User-defined 3 . . . : USRDFN3 128
Autocreate controller: AUTOCRTCTL *YES
Autodelete controller: AUTODLTCTL 1440
Press Enter to continue. Bottom
F3=Exit
F11=Nondisplay keywords F12=Cancel
7. Type
DSPSYSVAL QCHRID on the command line and press Enter. Note the
code page for future reference. Press F3 to exit.
24 AXIS 5570e User’s Manual
Page 25

Setting Up - AS/400 (iSeries)
8. Type DSPSYSVAL QAUTOCFG on the command line and press Enter. Make sure
Autoconfigure device parameter is turned on (1). Press F3 to exit.
the
Display System Value
System value . . . . . : QAUTOCFG
Description . . . . . : Autoconfigure devices
Autoconfigure device . : 1 0=Off
1=On
9. Type
DSPSYSVAL QAUTORMT on a command line and press Enter. Make sure
the Autoconfigure remote controller parameter is turned
on(1). Press F3 to exit.
Display System Value
System value . . . . . : QAUTORMT
Description . . . . . : Autoconfigure of remote controllers
Autoconfigure remote controller : 1 0=Off
1=On
10. Type
DSPMODD QRMTWSC on the command line and press Enter. Press F11 to
display the keywords. Verify that the mode description exists on the system
and that it is configured as presented in the example below. Use the
command
WRKMODD QRMTWSC if you need to change a value.
Press F3.
Display Mode Description S44A6643
Mode description . . . . . . . :MODD QRMTWSC
Class-of-service . . . . . . . :COS #CONNECT
Maximum sessions . . . . . . . :MAXSSN 57
Maximum conversations. . . . . :MAXCNV 57
Locally controlled sessions. . :LCLCTLSSN 56
Pre-established sessions. . . .:PREESTSSN 0
Maximum inbound pacing value. .:MAXINPAC *CALC
Inbound pacing value . . . . . :INPACING 7
Outbound pacing value . . . . :OUTPACING 7
Maximum length of request unit.:MAXLENRU *CALC
Data compression . . . . . . . :DTACPR *NETATR
Inbound data compression . . . :INDTACPR *RLE
Outbound data compression . . :OUTDTACPR *RLE
Session level encryption . . . :SLE *NONE
Text . . . . . . . . . . . . . :TEXT This Mode
is IBM Supplied
Press Enter to continue. Bottom
F3= Exit F11=Nondisplay keywords F12=Cancel
AXIS 5570e User’s Manual 25
Page 26

Setting Up - AS/400 (iSeries)
11. Type DSPUSRPRF QUSER and press Enter. Make sure that the QUSER Status
*ENABLED.
is
Display User Profile - Basic
User profile . . . . . . . . . . . . . . . : QUSER
Previous sign-on . . . . . . . . . . . . . :
Sign-on attempts not valid . . . . . . . . : 0
Status . . . . . . . . . . . . . . . . . . : *ENABLED
Date password last changed . . . . . . . . : 08/08/00
Password expiration interval . . . . . . . : *SYSVAL
Set password to expired . . . . . . . . . : *NO
User class . . . . . . . . . . . . . . . . : *USER
Special authority . . . . . . . . . . . . : *NONE
Group profile . . . . . . . . . . . . . . : *NONE
Owner . . . . . . . . . . . . . . . . . . : *USRPRF
Group authority . . . . . . . . . . . . . : *NONE
Group authority type . . . . . . . . . . . : *PRIVATE
Supplemental groups . . . . . . . . . . . : *NONE
Assistance level . . . . . . . . . . . . . : *SYSVAL
Current library . . . . . . . . . . . . . : *CRTDFT
More...
12. Page forward to the next screen by pressing Enter and verify that the
Maximum Storage Allowed parameter is set to
Display User Profile - Basic
User profile . . . . . . . . . . . . . . . : QUSER
Initial program . . . . . . . . . . . . . : *NONE
Library . . . . . . . . . . . . . . . . :
Initial menu . . . . . . . . . . . . . . . : MAIN
Library . . . . . . . . . . . . . . . . : *LIBL
Limit capabilities . . . . . . . . . . . . : *NO
Text . . . . . . . . . . . . . . . . . . . : Work Station User
Display sign-on information . . . . . . . : *SYSVAL
Limit device sessions . . . . . . . . . . : *SYSVAL
Keyboard buffering . . . . . . . . . . . . : *SYSVAL
Maximum storage allowed . . . . . . . . . : *NOMAX
Storage used . . . . . . . . . . . . . . : 832
Highest scheduling priority . . . . . . . : 3
Job description . . . . . . . . . . . . . : QDFTJOBD
Library . . . . . . . . . . . . . . . . : QGPL
More...
Press Enter to continue.
F3=Exit F12=Cancel
*NOMAX. Press F3.
Use the command
WRKCFGSTS *CTL xxxx* (where xxxx is the first 4
characters of the Axis Network Print Server 5494 LU Name)and press
Enter to delete any previously created Controller and Device descriptions
specific to your Axis Network Print Server. Delete the Device Descriptions
(indented text) first and then the Controllers. Print a test page if you are
unsure of the Axis Network Print Server 5494 LU Name.
Work with Configuration Status S1032BB0
Position to . . . . . Starting characters
Type options, press Enter.
1=Vary on 2=Vary off 5=Work with job 8=Work with description
9=Display mode status 13=Work with APPN status...
Opt Description Status -------------Job------------- FSIOP ACTIVE
ETHERNET ACTIVE
AXIS11 ACTIVE
AXIS11 ACTIVE
AXIS11 ACTIVE/TARGET SHEILA QUSER 010190
AXIS11 ACTIVE/SOURCE SHEILA QUSER 010190
AXIS11 ACTIVE/SOURCE SHEILA QUSER 010190
AXIS11 ACTIVE/SOURCE SHEILA QUSER 010190
26 AXIS 5570e User’s Manual
Page 27

Setting Up - AS/400 (iSeries)
Configuring the
Axis Network Print
Server
Note:
To perform the instructions presented in this section, you should first
assign an IP address to your Axis Network Print Server using one of the
methods presented in Setting the IP Address, on page 15.
After you have completed the procedures in the AS/400 Host system
checklist above, follow the instructions below to configure the Axis
Network Print Server for SNA printing in the AS/400 environment using
a Web browser:
1. Start a Web browser, e.g. Internet Explorer or Netscape Navigator.
2. Enter the IP address or the host name of the Axis Network Print Server in
the location field and press the Enter key on your keyboard. The internal Web
pages of the Axis Network Print Server will appear.
To protect the Admin pages and the Configuration Wizard from unauthorized use, enter a
password (default Pass) in the Root Password field under
Admin | General Settings.
3. Click the Configuration Wizard for IBM sessions button.
4. Click the Add Session button. This will start the Configuration Wizard
which is a step-by-step guide through the required IBM configuration
settings.
Notes for SCS printing:
• In the Configuration Wizard’s IBM Printer Emulation window, 38xx is the value used for
LaserWriter printers and all other values are used for matrix printers.
• In the Configuration Wizard Printer Driver window, PCL is used for LaserWriter printers, all
other values apply to matrix printers.
Note for IPDS printing:
In the Configuration Wizard, you can choose between PCL or PostScript printing. Choose the
printer language that corresponds to your printer.
AXIS 5570e User’s Manual 27
Page 28

Setting Up - AS/400 (iSeries)
Verifying the
Communication Link
1. Type WRKCFGSTS *CTL xxxx* on the AS/400 command line (xxxx is the
first four characters of the Axis Network Print Server 5494 LU
Name)and press Enter. After a couple of minutes, ensure that the
following items are displayed:
• One APPC controller with the same name as the Axis Network Print
Server 5494 LU Name.
• One APPC device with the same name as the Axis Network Print
Server 5494 LU Name, one controller session
currently active printer sessions
(QRMTWSC).
(QRMTWSC) and the
• One twinax controller named xxxxxRMT, where xxxxx are the first
five characters of the Axis Network Print Server 5494 LU Name.
• One, two or three twinax printer devices named xxxxPRT0z (xxxx
are the first four characters of the Axis Network Print Server 5494
LU Name and z is the printer device number).
The status of all items should now be ACTIVE or VARIED ON.
2. Type
STRPRTWTR xxxxPRT0z on the AS/400 command line (xxxxPRT0z is
the printer device name) and press Enter. This command starts the writer
for this printer device.
3. Press the Axis Network Print Server test button once to print a test page.
Ensure that the SNA status is defined on the test page as
LU-4.
Idle, Actv or
TN5250E Printing (SCS over IP)
TN5250E is the recommended protocol to use when printing SCS data
streams over TCP/IP. This print method offers superior control,
management and throughput for the Axis Network Print Server.
Before you Begin Make sure that the AS/400 host is running OS/400 V3R2 or higher with
TCP/IP support installed and configured.
Make sure that the latest PTFs are installed. Information about which
PTFs to use can be obtained from:
http://as400service.rochester.ibm.com/
The AS/400 Host
System Checklist
There is an AS/400 Parameter checklist in the AXIS 5570e Axis Network Print Server User’s
Guide where you can enter the values described in this section for future reference.
28 AXIS 5570e User’s Manual
Page 29

Setting Up - AS/400 (iSeries)
1. Type WRKCTLD *VWS on the AS/400 command line and press Enter to
determine the number of auto-configured virtual devices on your AS/400
system. Press F3.
Configuring the
Axis Network Print
Server
Important:
2. Type
DSPSYSVAL QAUTOVRT and press Enter. Make sure that the value of
QAUTOVRT parameter is greater than the number of auto-configured
the
virtual devices. Press F3.
3. Type
DSPSYSVAL QCHRID and press Enter. Note the system language (code
page) for future reference. Press F3.
4. Type
WRKTCPSTS OPTION *IFC and press Enter to determine the IP address
of the AS/400 server. Press F3.
Follow the instructions below to configure the Axis Network Print Server
for TN5250E printing using a Web browser:
1. Start a Web browser, e.g. Internet Explorer or Netscape Navigator.
2. Enter the IP address or the host name of the Axis Network Print Server in
the location field and press the Enter key on your keyboard. The internal Web
pages of the Axis Network Print Server will appear.
To protect the admin pages and the Configuration Wizard from unauthorized use, enter a
password (default Pass) in the Root Password field under Admin | General Settings.
Verifying the
Communication Link
3. Click the Configuration Wizard for IBM sessions button.
4. Click the Add Session button. This takes you to the Configuration Wizard
which is a step-by-step guide through the required configuration settings.
Notes:
• In the Configuration Wizard, you must choose a new and unused name for the printer (in
the ‘Printer Name’ field) when in the ‘TN5250E Protocol Configuration’ window.
• In the Configuration Wizard’s ‘Printer Driver’ window, PCL is used for LaserWriter printers,
all other values apply to matrix printers.
1. Type
WRKCFGSTS *DEV xxxx*, where xxxx are the first four characters of
the printer device name, on the AS/400 command line and press Enter. A
list of printer devices will be displayed. Make sure that a virtual printer
device is active.
2. Direct a printout to this printer device to check the integrity of the
communication link.
3. Press the test button on the Axis Network Print Server once to print a test
page. Make sure that the TN5250E status is defined on the test page as
Idle, Actv or LU-1.
AXIS 5570e User’s Manual 29
Page 30

Setting Up - AS/400 (iSeries)
PPR/PPD Printing - IPDS Data Streams
Note:
IPDS is only available for AXIS 5570e models with the IPDS option installed. For more
information, refer to Protocols and Datastreams, on page 9.
The configuration procedures presented in this section are divided into
three separate steps:
• Configuring the AS/400 host
• Configuring the AXIS 5570e
• Verifying the communication between the AXIS 5570e and the AS/400
Before you Begin Make sure that the AS/400 host is running OS/400 V3R6 or higher with
TCP/IP support installed and configured.
Make sure that the latest PTFs are installed. Information about which
PTFs to use can be obtained from:
Configuring the
AS/400 Host System
Creating a PSF
Configuration
http://as400service.rochester.ibm.com/
When configuring the AS/400 host system you can:
• create a PSF configuration
• create a printer device description
The system uses default values but you can optionally create a PSF
configuration by following the instructions below:
1. Issue the command
CRTPSFCFG.
2. Press F11 to display keywords.
3. Select a name for the PSF configuration and enter it at the
configuration (PSFCFG)
line. The name may comprise the letters A-Z and
PSF
the numerals 0-9, but must begin with a letter. A maximum of 10 characters
are allowed.
4. Enter
5. Enter
6. Enter
QGPL at the Library line.
*YES at the IPDS pass through (IPDSPASTHR) line.
*NORDYF at the Activate release timer (ACTRLSTMR) line.
7. Enter
*NOMAX at the Release timer (RLSTMR) line.
8. Press the Enter key on your keyboard to create the PSF configuration.
Many of the settings presented in the following panel example can be left
at their default settings. However, the settings that you must change are
highlighted in bold text and the settings that you must enter exactly as
shown in the example are highlighted in bold underlined
text.
30 AXIS 5570e User’s Manual
Page 31

Setting Up - AS/400 (iSeries)
Example:
Create PSF Configuration (CRTPSFCFG)
Type choices, press Enter.
PSF configuration. . . . . . . . PSFCFG > AXISPR1
Library . . . . . . . . . . . > QGPL
User resource library list . . . USRRSCLIBL *JOBLIBL
Device resource library list . . DEVRSCLIBL *DFT
+ for more values
IPDS pass through. . . . . . . . IPDSPASTHR > *YES
Activate release timer . . . . . ACTRLSTMR > *NORDYF
Release timer. . . . . . . . . . RLSTMR > *NOMAX
Restart timer. . . . . . . . . . RESTRTMR *IMMED
APPC and TCP/IP retry count. . . RETRY 15
Delay between APPC retries . . . RETRYDLY 90
Automatic session recovery . . . UAUTOSSNRCY *NO
Acknowledgment frequency . . . . ACKFRQ 100
Text ‘description’ . . . . . . . TEXT *BLANK
Bottom
Creating a Printer
Device Description
Create a printer device description by following the instructions below:
1. Issue the command
CRTDEVPRT and press Enter.
2. Press F11 to display keywords.
3. Select a name for the printer device and enter it at the
(DEVD)
line. The name may comprise the letters A-Z and the numerals 0-
Device Description
9, but must begin with a letter. A maximum of 10 characters are allowed.
In the following instructions the printer device name will be referred to as
AXISPR1.
4. Enter
5. Enter
6. Enter
7. Enter
8. Enter a port number at the
*LAN at the Device class (DEVCLS) line.
*IPDS at the Device type (TYPE) line.
0 at the Device model (MODEL) line.
*IP at the LAN attachment (LANATTACH) line.
Port number (PORT) line. The Axis print server
is pre-configured with the port numbers 5001, 5002 and 5003 for IPDS
printing.
9. Enter a FGID number at the
10. Define the
Remote location (RMTLOCNAME). Use the IP address of the Axis
Font Identifier (FONT) line, e.g. 11 (Courier).
Network Print Server.
11. (Optional) Enter the name of the previously created PSF configuration at the
User-defined object (USRDFNOBJ): Object line.
12. (Optional) Enter the library of the previously created PSF configuration at
User-defined object (USRDFNOBJ): Library line.
the
13. (Optional) Enter
Object type
*PSFCFG at the User-defined object (USRDFNOBJ):
line.
AXIS 5570e User’s Manual 31
Page 32

Setting Up - AS/400 (iSeries)
14. Press the Enter key on your keyboard to create the printer device
description.
Many of the settings presented in the following panel example can be left
at their default settings. However, the settings that you must change are
highlighted in bold text and the settings that you must enter exactly as
shown in the example are highlighted in bold underlined
text.
Create Device Desc (Printer) (CRTDEVPRT)
Type choices, press Enter.
Device description . . . . . . . DEVD > AXISPR1
Device class . . . . . . . . . . DEVCLS > *LAN
Device type . . . . . . . . . . TYPE > *IPDS
Device model . . . . . . . . . . MODEL > 0
LAN attachment . . . . . . . . . LANATTACH > *IP
Advanced function printing . . . AFP *YES
Port number . . . . . . . . . . PORT > 5001
Online at IPL . . . . . . . . . ONLINE *YES
Font: FONT
Identifier . . . . . . . . . . > 11
Point size . . . . . . . . . . *NONE
Form feed. . . . . . . . . . . . FORMFEED *FILE
Separator drawer . . . . . . . . SEPDRAWER *FILE
Separator program . . . . . . . SEPPGM *NONE
Library . . . . . . . . . . .
Printer error message . . . . . PRTERRMSG *INQ
More...
Message queue . . . . . . . . . MSGQ QSYSOPR
Library . . . . . . . . . . . *LIBL
Activation timer . . . . . . . . ACTTMR 170
Image configuration. . . . . . . IMGCFG *NONE
Maximum pending requests . . . . MAXPNDRQS 6
Print while converting . . . . . PRTCVT *YES
Print request timer. . . . . . . PRTRQSTMR *NOMAX
Form definition. . . . . . . . . FORMDF F1C10110
Library. . . . . . . . . . . . *LIBL
Remote location: . . . . . . . . RMTLOCNAME
Name or address. . . . . . . . > ‘192.168.5.23’
User-defined options . . . . . . USRDFNOPT *NONE
+ for more values
More...
32 AXIS 5570e User’s Manual
Page 33

Setting Up - AS/400 (iSeries)
User-defined objects . . . . . . USRDFNOBJ
Object . . . . . . . . . . . . > AXISPR1
Library . . . . . . . . . . > QGPL
Object type. . . . . . . . . . > *PSFCFG
Data transform program . . . . . USRDTATFM *NONE
Library. . . . . . . . . . . .
User-defined driver program. . . USRDRVPGM *NONE
Library. . . . . . . . . . . .
Text ‘description’ . . . . . . . TEXT IPDS over PPR/PPD
More...
Configuring the Print
Server
Note:
Follow the instructions below to configure your AXIS 5570e using a
standard Web browser:
1. Start a Web browser, e.g. Internet Explorer or Netscape Navigator.
2. Enter the IP address or the host name of the AXIS 5570e in the location field
and press the Enter key on your keyboard. The internal Web pages of the
AXIS 5570e will appear.
To protect the Admin pages and the Configuration Wizard from unauthorized use, enter a
password (default Pass) in the Root Password field under Admin | General Settings.
Note for IPDS printing:
In the Configuration Wizard, you can choose between PCL or PostScript printing. Choose the
printer language that corresponds to your printer.
3. Click the Configuration Wizard for IBM sessions button.
4. Click the Add Session button. This takes you to the Configuration Wizard
which is a step-by-step guide through the required configuration settings.
Verifying the
communication
Follow the instructions below to verify the communication by sending a
print job to the AXIS 5570e:
AXISPR1 is an example. Refer to Creating a Printer Device Description, on page 31 for
details.
1. Type
WRKCFGSTS *DEV AXISPR1 on the AS/400 command line and press
Enter to display the previously created printer device. The status of the
printer device should be
2. Vary on the printer device by typing
3. Press F5 to refresh the display. The printer device should now be
4. Start the printer writer by typing
VARIED OFF.
1 in the Opt field. Press ENTER.
VARIED ON.
STRPRTWTR AXISPR1 on the AS/400
command line. Press Enter.
5. Press F5 to refresh the display. The printer device should now be
ACTIVE/WRITER.
AXIS 5570e User’s Manual 33
Page 34

Setting Up - AS/400 (iSeries)
6. Direct a printout to this printer device. A successful printout verifies the
communication link between the AS/400 and the AXIS 5570e.
The AXIS 5570e is now ready for printing in the AS/400 environment.
34 AXIS 5570e User’s Manual
Page 35

Setting Up - IBM Mainframe (zSeries)
Section 5 Setting Up - IBM Mainframe (zSeries)
This section describes how to configure the Axis Network Print Server for
printing SCS, 3270 and IPDS data streams using SNA and TCP/IP
transport protocols in the IBM Mainframe (zSeries) environment.
Proceed to the setup section that is relevant to your network
environment, as described in the table below:
Printing protocol Data streams Action
SCS
SNA
IPDS
SCS
TN3270E (TCP/IP)
IPDS
PPR/PPD (TCP/IP) IPDS
Notes:
• IPDS is only available for print server models with the IPDS option installed.
• SNA is only available for print server models with the SNA option installed.
SNA Printing
TCP/IP TN3270E Printing
PPR/PPD Printing - IPDS data streams
, on page 353270DS
, on page 413270DS
, on page 49
SNA Printing
Important:
Please refer to “Protocols and Datastreams” on page 9.
If you intend to operate your Axis Network Print Server in a multiprotocol environment, you should also proceed to the other relevant
sections in this manual.
The Axis Network Print Server supports printing of SCS, 3270 and IPDS
data streams via the SNA transport protocol.
The Axis Network Print Server must be set up to emulate an IBM 3174 (3174 CU mode) in the
Mainframe/VTAM environment.
Configuring for SNA printing in 3174 CU Mode is described in three
separate stages:
• Configuring the IBM Mainframe Host system
• Configuring the Axis Network Print Server
• Verifying the communication
AXIS 5570e User’s Manual 35
Page 36

Setting Up - IBM Mainframe (zSeries)
Configuring the
Mainframe
Host System
These procedures are compulsory for printing in the IBM Mainframe
environment.
Configuring the host system requires you to do the following:
• Make sure that a VTAM Logon-mode entry is available for your Axis
Network Print Server.
• Create the VTAM Definition for the Major Node where the Print Server
definition is to be placed.
Before you Begin Make note of the Axis Network Print Server serial number that is found
on the underside label of the print server.
Important:
When using a concentrator gateway between the host and your print server, it is not necessary
to define separate VTAM Major Node and PU definitions for the Axis Network Print Server. You
will instead be working with the gateway VTAM definitions. Since the Axis Network Print
Server will appear to the host as one or several LU's attached to the gateway PU, you need only
add LU definitions to the gateway major node definition and then proceed to item 3 below.
1. Define a VTAM Major Node Definition where the Print Server
definitions will be placed. Using a channel attached 3174 as a gateway to
the host, this definition is typically defined as a Local Major Node.
If you are using a remotely attached gateway via a 37X5 communications
controller or a LAN attached 3172, you will be working with a
Switched Major Node definition.
Note:
2. Add the Print Server PU and LU definitions to the major node definition.
For Switched Major Node definitions you need to:
• Add the IDBLK (default = E07) and IDNUM (default = last 5 digits of the Axis
Network Print Server MAC address) entries to the PU definition.
• Code a PATH definition using the unit’s full 12 digit MAC address.
Example: An
00408C100086 will be defined as:
PA5570e1 PATH DIALNO=010400408C100086, GID=1, FID=1,
GRPNM=gggggg
‘GRPNM’ specifies the symbolic name of a GROUP statement in an NCP major node. That
GROUP statement defines a logical group of SDLC switched lines or token-ring switched lines.
Axis Network Print Server with a MAC/node address of
3. Make sure that the corresponding VTAM Logon-mode entries are
available and that the appropriate LU session types (LU1 or LU3) are used.
4. Vary ACTive the VTAM Major Node definition for the Axis Network
Print Server.
36 AXIS 5570e User’s Manual
Page 37

Setting Up - IBM Mainframe (zSeries)
Sample Sessions The examples below are based on samples given in VTAM
Customization (IBM part no: SC23-0112), with some changes to
optimize use for Axis Network Print Server. VTAM for MVS is assumed,
although the configuration for VM and VSE is similar.
Logon-mode Entry Creating a VTAM Logon-mode entry for your Axis Network Print Server.
Logon-mode entry for LU type 1 printing:
*
* For application output of LU-1 SNA Character Stream (SCS)
*
TITLE SCS5570e
SCS5570e MODEENT LOGMODE=SCS5570e, X
FMPROF=X03, X
TSPROF=X03, X
PRIPROT=XB1, X
SECPROT=XB0, X
COMPROT=X3080, X
RUSIZES=X8585, X
PSERVIC=X014000010000000001000000, X
PSNDPAC=X03, X
SRCVPAC=X03
Logon-mode entry for LU type 3 printing:
*
* For application output of LU-3 3270 Data Stream (3270DS)
*
TITLE ‘DSC5570e’
DSC5570e MODEENT LOGMODE=DSC5570e, X
FMPROF=X’03’, X
TSPROF=X’03’, X
PRIPROT=X’B1’, X
SECPROT=X’90’, X
COMPROT=X’3080’, X
RUSIZES=X’8585’, X
PSERVIC=X’030000000000185018507F00’, X
PSNDPAC=X’03’, X
SRCVPAC=X’03’
AXIS 5570e User’s Manual 37
Page 38

Setting Up - IBM Mainframe (zSeries)
Switched Major
Node Definitions
The example below shows how the print server PU, PATH, and LU
definitions may be coded in a switched major node definition.
* PU definition
* E07xxxxxx is the node ID set in Axis Network Print Server.
*
PU5570e1 PUADDR=04, X
PUTYPE=2, X
IDBLK=E07, X
IDNUM=nnnnn, X
MAXPATH=1, X
SSCPFM=USSSCS, X
USSTAB=USSMAST, X
VPACING=(0)
*
* Path definition
* xxxxxxxxxxxx is the 12 last digits of the MAC
* address of the Axis Network Print Server
*
PA5570e1 PATHDIALNO=0104xxxxxxxxxxxx, X
GID=1, X
PID=1, X
GRPNM=gggggg
*
* LU definitions. Use either LU5570e1 or LU5570e3
*
* LU type 1 (SCS)
*
LU5570e1 LULOCADDR=2, X
DLOGMOD=SCS5570e, X
VPACING=7, X
PACING=3
*
* LU type 3 (3270DS)
*
LU5570e3 LULOCADDR=2, X
DLOGMOD=DSC5570e, X
VPACING=7, X
PACING=3
38 AXIS 5570e User’s Manual
Page 39

Setting Up - IBM Mainframe (zSeries)
Note:
In the PU definition, IDNUM should be set to the five last digits of the Axis Network Print
Server node address,
the Axis Network Print Server serial number.
In the path definition,
the place holder, the next two set to the SAP and the remaining twelve digits set to the Axis
Network Print Server Ethernet or Node address. By default the Ethernet/Node address is
identical to the Axis Network Print Server serial number. A valid
supplied.
In the LU definition, the LOCADDR number maps to the Logical Printer number of the Axis
Network Print Server. The first eight Local Addresses pass the printout through Logical Printer
1-8. However, some IBM systems do not allow Local Address 1 to be used for printing. Refer
to “Logical Printers for Customized Printing” on page 153 for more information about
logical printers.
NODE_ADDR. By default NODE_ADDR stands for the five last digits of
PATH DIALNO should be comprised with its first two digits equal to
GRPNM must also be
Node Definitions The example below shows how the print server PU and LU definitions
may be coded in a local major node definition:
* 5570e DSPU DEFINITION
DSPU5570e5570ePU CUADDR=E31, X
MODETAB=MODE3290, X
PUTYPE=2,ISTATUS=ACTIVE,MAXBFRU=1
DSPULU02 LU LOCADDR=2 X
SSCPFM=USSSCS, X
USSTAB=USSTAB, X
PACING=1, X
VPACING=2, X
ISTATUS=ACTIVE, X
LOGAPPL=MWTC, X
DLOGMOD=SCS5570e
DSPULU03 LU LOCADDR=3, X
SSCPFM=USSSCS, X
USSTAB=USSTAB, X
PACING=1, X
VPACING=2, X
ISTATUS=ACTIVE, X
LOGAPPL=MWTC, X
DLOGMOD=SCS5570e
AXIS 5570e User’s Manual 39
Page 40

Setting Up - IBM Mainframe (zSeries)
Note:
If the LAN media at the remote (Print Server) location differs from that at the host location
(e.g. Remote LAN = Ethernet and Host LAN = Token Ring), the MAC address definitions must
be modified, as outlined below:
Print Server Modifications:
The Axis Network Print Server Host MAC address (H1_MAC_ADDR) must be bit-order reversed
for each byte,
e.g. if the host address is 08005AB77D49 the converted address will be 10005AEDBE92
Host Modifications:
The required Host modifications are dependent upon the VTAM definition for the Major Node
where the Print Server definition is placed.
Case 1:
VTAM Major Node definition is a Switched Major Node.
The MAC address of the Axis Network Print Server must be bit-order reversed in the PATH
entry. An
defined using the MAC/node address 000231D8602B as follows:
Case 2:
VTAM Major Node definition is a Local Major Node.
When using a channel attached controller as gateway to the host, the MAC address of the
Axis Network Print Server is configured in the gateway. The address must be reversed, as in
case 1 above.
Axis Network Print Server with a MAC/node address of 00408C1B06D4 will be
Configuring the
Axis Network Print
Server
Important:
To perform the instructions presented in this section, you should first
assign an IP address to your Axis Network Print Server using one of the
methods presented in Setting the IP Address, on page 15.
The purpose of the configuration of the Axis Network Print Server is to
emulate a LAN attached IBM 3174 Control Unit running SNA PU2.0.
Follow the instructions below to configure the Axis Network Print Server
using a Web browser:
1. Start a Web browser, e.g. Internet Explorer or Netscape Navigator.
2. Enter the IP address or the host name of the Axis Network Print Server in
the location field and press the Enter key on your keyboard. The internal Web
pages of the Axis Network Print Server will appear.
To protect the Admin pages and the Configuration Wizard from unauthorized use, enter a
password (default Pass) in the Root Password field under Admin | General Settings.
3. Click the Configuration Wizard for IBM sessions button.
4. Click the Add Session button. This will start the Configuration Wizard
which is a step-by-step guide through the required configuration settings.
Notes for SCS printing:
• In the Configuration Wizard’s IBM Printer Emulation window, 38xx is the value used for
LaserWriter printers and all other values are used for matrix printers.
• In the Configuration Wizard Printer Driver window, PCL is used for LaserWriter printers, all
other values apply to matrix printers.
40 AXIS 5570e User’s Manual
Page 41

Setting Up - IBM Mainframe (zSeries)
A
Note for IPDS printing:
In the Configuration Wizard, you can choose between PCL or PostScript printing. Choose the
printer language that corresponds to your printer.
Verifying the
Communication Link
Procedures 1. Power on the Print Server and wait for 2 minutes.
Note:
The easiest way to test the communication is by sending a print job to the
Axis Network Print Server. If there are problems, press the test button
once to print the test page where you can find the present SNA link
status.
2. Press the test button once to print a test page and make sure that the SNA
status line is defined as either:
•Idle
•Actv
•LU-1
•LU-3
Please refer to the Parameter List and FAQ on the Axis Web site, if the status line indicates
that the SNA link is not active.
The Axis Network Print Server is now ready for use in the SNA
environment.
TCP/IP TN3270E Printing
The following procedures describe how to configure the Axis Network
Print Server for SCS, 3270DS and IPDS printing, using TCP/IP TN3270E.
This is achieved by establishing communication between the Axis
Network Print Server and Mainframe host via a TN3270E server, using the
TCP/IP transport protocol for the SCS, 3270 and IPDS data streams, as
illustrated below:
Print server
XIS
IPDS is only available for print server models with the IPDS option installed. Please refer to
“Protocols and Datastreams” on page 9
AXIS 5570e User’s Manual 41
Page 42

Setting Up - IBM Mainframe (zSeries)
Configuring for TN3270E printing is described in four separate stages:
• Configuring the IBM Mainframe Host system
• Configuring the Axis Network Print Server
• Configuring the TN3270E server
• Verifying the communication
Configuring the
Mainframe Host
Configuring the
Axis Network Print
Server
Important:
Consult your TN3270E server documentation and make sure that the
appropriate VTAM host system definitions are set up for
mainframe-to-TN3270E server SNA communication.
Follow instructions below to configure the Axis Network Print Server
using a Web browser:
1. Start a Web browser, e.g. Internet Explorer or Netscape Navigator.
2. Enter the IP address or the host name of the Axis Network Print Server in
the location field and press the Enter key on your keyboard. The internal Web
pages of the Axis Network Print Server will appear.
To protect the Admin pages and the Configuration Wizard from unauthorized use, enter a
password (default Pass) in the Root Password field under Admin | General Settings.
3. Click the Configuration Wizard for IBM sessions button.
4. Click the Add Session button. This will start the Configuration Wizard
which is a step-by-step guide through the required configuration settings.
Notes for SCS printing:
• In the Configuration Wizard, Non-IPDS Printer Emulation uses value structure 38xx for
LaserWriter printers. All other values can be used for matrix printers.
• In the Configuration Wizard’s Printer Driver window, PCL is used for LaserWriter printers, all
other values apply to matrix printers.
Note for IPDS printing:
• The AXIS 5570e supports eight concurrent TN3270E host sessions.
• In the Configuration Wizard, you can choose between PCL or PostScript printing. Choose the
printer language that corresponds to your printer.
42 AXIS 5570e User’s Manual
Page 43

Setting Up - IBM Mainframe (zSeries)
A
Configuring the TN3270E server
Note:
The TN3270E server may be implemented as a software package running
on the mainframe itself, a router or other server hardware.
Configuration examples for two popular TN3270E-capable servers are
described below, namely:
• Microsoft SNA Server
• Novell NetWare for SAA.
Print server
XIS
Typical Axis Network Print Server TCP/IP TN3270E Network Configuration
• Configuration procedures can differ from other TN3270E servers.
• For additional information about configuring other TN3270E servers, refer to the Support
pages on www.axis.com
Microsoft SNA Server Communication is established in two separate stages, SNA Server-to-Host
connection and SNA Server to Axis Network Print Server connection, as
described below:
SNA Server-to-Host Connection
Follow the steps below to set-up a SNA Server-to-Host connection for the
Axis Network Print Server:
1. Start Microsoft SNA Server Manager and click the Servers folder. The
Main SNA Server Manager Window is featured in the illustration below.
2. Insert a new Connection to the host under Connections. Refer to the online
help for assistance on how to configure the connection.
3. Select the new connection and Insert a 3270 Application LU (LUA) to this
connection.
4. Set the LU Number to the LU Number specified in the host.
5. Set the LU Name to the name you want to use for the printer device. This
is the same name that you specify in the TN3270E Printer Name parameter
of the Axis Network Print Server.
AXIS 5570e User’s Manual 43
Page 44

Setting Up - IBM Mainframe (zSeries)
6. Click OK.
SNA Server - Axis Network Print Server connection
1. Select the new LUA and drag it to the TN3270 connection definition
(highlighted in the SNA Server Manager Window above).
SNA Server Manager Main Window
Verifying the
Communication:
2. Select the properties of the LUA.
3. Click the TN3270 tab in the properties popup window.
4. Select Generic Printer Type.
5. Click the IP Address List tab.
6. Specify the IP Address of the client(s) that you want to assign to this LU. This
is the IP address of the Axis Network Print Server, i.e. the same as the
INT_ADDR parameter in the Print Server.
7. Click OK.
1. Activate the connection you created in step 2 of the above SNA Server -
Axis Network Print Server connection procedures. The status of the
connection should be “active”.
2. Make sure the corresponding LU in the host is activated.
3. Activate the TN3270 connection to the Axis Network Print Server. The LUA
should change status to SSCP.
4. Check that the printer is connected to the Axis Network Print Server.
5. Send a print job from the host.
The Axis Network Print Server is now ready for use.
44 AXIS 5570e User’s Manual
Page 45

Setting Up - IBM Mainframe (zSeries)
Notes:
• You can check the status of the TN3270E connection by printing a test page from the Print
Server. This is done by pressing the test button once. Make sure the TN3270E status (St:) line
for your server connection is defined as either:
•SSCP
•LU-1
•LU-3
• For additional information about configuring other TN3270E servers, refer to the Technical
Notes on www.axis.com
NetWare for
SAA Server
To set-up a TN3270E connection to the Axis Network Print Server you
have to set up PU and LU definitions. This is done by following the steps
below:
1. Start the NWSAA Administrator.
2. Double-click the NWSAA Node. The panel below will appear.
3. Enter the Node ID for the host.
4. Leave the rest at their default settings.
Peer PU profile
5. Click the TN3270 icon. The panel below will appear.
6. Select All Available Host PU profiles.
7. Enter the user name, from the User List, that you want all TN3270 clients
to use.
8. Specify the maximum number of TELNET connections you want to allow
each TN3270 client.
AXIS 5570e User’s Manual 45
Page 46

Setting Up - IBM Mainframe (zSeries)
9. Leave the rest at their default settings and click OK.
10. Press the “insert” key to create a new Host PU Profile. Choose Host PU Profile
from the list displayed in the dialog. Then the panel below will appear.
PU profile name and Logical adapter
Printer LU
11. Enter a unique name as PU profile name.
12. Enter the number of dependent LUs you want for this PU.
13. Enter the starting LU number.
14. Enter the Node ID (the same ID as for item 3 above).
15. Choose logical adapter.
16. Set maximum frame size to transmit inbound to match the MAXDATA in
the host definition.
17. Enter the host node address.
18. Leave the rest at their default settings.
19. Click the LU Defaults icon. The panel below will appear
20. Set Default LU category to Public.
46 AXIS 5570e User’s Manual
Page 47

Notes:
Setting Up - IBM Mainframe (zSeries)
21. Set Default LU type to Printer (LU type 1 or 3).
22. Specify the VTAM LU name prefix. Click OK.
• When the LUs are created the default names for the Printer Devices will be <name prefix>
followed by a two digit number starting at the number you entered in the starting dependent LU number field.
• In the example below, eight LUs are created automatically. The LU names created will be
BRLTST04 through to BRLTST0B. These names must correspond to the Printer Names you
specify for the TN3270E sessions in the Print Server.
You can now generate a configuration report from NW for SAA. To do
this, simply mark the server icon in the left window and select
Generate Server Configuration Report from the function
menu.
The following table is a summary of a report generated by this command
for the example above.
Profile Name NWSAA
SNA Network ID: SEEDB
Peripheral node control point name: CPNAME
Block ID/PU ID: 05D 66204
Local/Partner SAP for ILUs: 04
Logical Adapter: E100B_1
PU Profile: NWSAAPU
Adapter Name E100B_1
Adapter Type: LLC 802.2
Terminate peer link if no active APPC sessions: No
Logical adapter number: 0
Number of local service access points: 2
Enable adapter at startup: Yes
PU Profile Name NWSAAPU
Number of dependent LUs: 8
Starting dependent LU number: 4
Peripheral node control point name: NWSAAPU
Node ID (block/PU ID): 05D 66204
Offline test mode: No
Assign only LUs activated by the host: Yes
Enable SDDLU Support: No
Adapter Name: E100B_1
Adapter Type: LLC 802.2
Maximum Session Count: 9
VTAM Name Prefix: BRLTST
Default LU Type: 1
Default Model Number: 2
Default LU Category: Public
Maximum frame size to transmit inbound: 0521
Remote node address: 020066800000
Remote Service Access Point: 04
Local Service Access Point: 04
Enable PU profile at startup: Yes
AXIS 5570e User’s Manual 47
Page 48

Setting Up - IBM Mainframe (zSeries)
LU id Category VTAM LU Name Type Mod Termination
0 Public 14 2 TSELF
4 Public BRLTST04 1 2 TSELF
5 Public BRLTST05 1 2 TSELF
6 Public BRLTST06 1 2 TSELF
7 Public BRLTST07 1 2 TSELF
8 Public BRLTST08 1 2 TSELF
9 Public BRLTST09 1 2 TSELF
10 Public BRLTST0A 1 2 TSELF
11 Public BRLTST0B 1 2 TSELF
PU Profile Names NetWare SAA
Maximum connections per client 5
Use IP client name No
TN3270 NetWare User ID Admin
Client Response Timer 120
Printer End of Job Timer 9999
Method
Summary of a report generated by Generate Server
Configuration Report (bold text = not default).
Verifying the
Communication:
Follow the steps below to test the communication by sending a print job
to the Axis Network Print Server.
1. Make sure the printer is connected to the Axis Network Print Server and
the corresponding LU in the host is activated.
2. Send a print job from the host.
The Axis Network Print Server is now ready for use. If needed, it can be
further adapted to your system using the Web-based configuration pages
or IBM Printer Emulation. Please refer to Extended IBM Printer
Emulation, on page 179.
You can check the status of the TN3270E connection by printing a test page from the Print
Server. This is done by pressing the test button once. Make sure the TN3270E status (St:) line
for your server connection is defined as either:
• SSCP
•LU-1
•LU-3
For additional information about configuring other TN3270E servers, refer to the Technical
Notes on www.axis.com
48 AXIS 5570e User’s Manual
Page 49

Setting Up - IBM Mainframe (zSeries)
PPR/PPD Printing - IPDS data streams
Important:
IPDS is only available for print server models with the IPDS option installed. Please refer to
“Protocols and Datastreams” on page 9.
Before you Begin In order to use the Axis Network Print Server to print IPDS data using
TCP/IP as the transport protocol, the following software must be installed
and configured on your MVS:
• PSF/MVS Version 2 release 2.0 with APAR OW15599.
• MVS Scheduler APAR OW12236 to support the two new
keywords:
IPADDR and PORTNO.
• TCP/IP version 3 release 1, or higher
PRINTDEV
Configuration
Procedures
Specifying the TCP/IP
Address Space Name
The configuration procedures presented in this section are divided into
seven separate steps:
1. Specifying the TCP/IP address space name
2. Defining the MVS control unit
3. Modifying the TCP/IP profile on your MVS system, if necessary
4. Configuring the Axis Network Print Server
5. Verifying the communication between the Axis Network Print Server and
the IBM Mainframe
6. Defining the Axis Network Print Server as a writer-controlled printer to JES
7. Defining the printer to PSF with a
PRINTDEV statement, including the IP
address and port number.
To specify a TCP/IP address space name you should enter the following
EXEC statement in the appropriate PSF writer procedure:
//STEP01 EXEC PGM=APSPPIEP,REGION=4096K,PARM=(,,,,tcpip_name)
where
parameter is not coded, PSF uses the default name
description of the
tcpip_name is the name of the TCP/IP address space. If this
TCPIP. For a full
PARM parameter refer to IBM’s user documentation
covering the print service facility.
Defining the
MVS Control Unit
If you have not already done so, you must define the communications
control unit, e.g. the 3172 control unit or the 3745 control unit, to MVS.
The tool to use is dependent on your MVS version:
• When using a version earlier than MVS 4.1.0, you should use an MVS
Configuration Program (MVSCP).
• When using a version of MVS 4.1.0 or higher, you can use a HardWare
Configuration Definition (HCD) or an MVSCP.
AXIS 5570e User’s Manual 49
Page 50

Setting Up - IBM Mainframe (zSeries)
For more information about using these methods, please refer to one of
the following publications:
• MVS/ESA Planning: Dynamic I/O Configuration
• OS/390 HCD Planning
•HCD User's Guide
Modifying the
TCP/IP Profile
The TCP/IP profile contains system configuration statements used to
initialize the TCP/IP address space. Among those statements, the
following are subject to special considerations when you are printing
from PSF on TCP/IP-attached printers:
• DATABUFFERPOOLSIZE
• SMALLDATABUFFERPOOLSIZE
• TINYDATABUFFERPOOLSIZE
• KEEPALIVEOPTIONS
• GATEWAY
Below is an excerpt from an example TCP/IP Profile (not a complete
profile) . Examples of the statements above are printed in bold:
ACBPOOLSIZE 1000
ADDRESSTRANSLATIONPOOLSIZE 1500
CCBPOOLSIZE 150
DATABUFFERPOOLSIZE 160 32768
ENVELOPEPOOLSIZE 750
IPROUTEPOOLSIZE 300
LARGEENVELOPEPOOLSIZE 50
RCBPOOLSIZE 50
SCBPOOLSIZE 256
SKCBPOOLSIZE 256
SMALLDATABUFFERPOOLSIZE 256
TCBPOOLSIZE 512
TINYDATABUFFERPOOLSIZE 256
UCBPOOLSIZE 100
KEEPALIVEOPTIONS INTERVAL 10 SENDGARBAGE FALSE ENDKEEPALIVEOPTIONS
GATEWAY
; * Network First Hop Linkname Packet Size Subnet mask Subnet value
10 = BCPLAN 2000 255.255.255.0 10.10.12.0
DEFAULTNET 10.10.12.1 BPCLAN 2000 255.255.255.0 0
Note:
If you change any of the values in the TCP/IP profile, you must restart TCP/IP to activate the
new settings.
50 AXIS 5570e User’s Manual
Page 51

Setting Up - IBM Mainframe (zSeries)
The table below provides more information about the statements.
Statement Explanation
Defines the number and size of the data buffers. It is recommended
DATABUFFERPOOLSIZE
SMALLDATABUFFERPOOLSIZE
TINYDATABUFFERPOOLSIZE
KEEPALIVEOPTIONS
GATEWAY
that you specify at least 160 data buffers and a buffer size of
32768 bytes
Defines the number of small data buffers. It is recommended that
you specify at least 256 small data buffers
Defines the number of tiny data buffers. It is recommended that
you specify at least 256 tiny data buffers
PSF relies on TCP to detect when a connection with a TCP/IPattached printer or an Axis Network Print Server is no longer
available. When no data has been exchanged between PSF and its
connection partner, TCP sends keep-alive probes to the connection
partner periodically. These periodic probes, called keep-alive
transmissions, enable TCP to discover when a connection is no
longer usable even if the connection partner is abruptly powered off
or is no longer accessible through the network.
The frequency of keep-alive transmissions is controlled by the
INTERVAL parameter on the KEEPALIVEOPTIONS statement. The
frequency applies to all TCP applications that direct TCP to send
keep alive transmissions. The default frequency is after about two
hours of inactivity.
We recommend that you specify a shorter interval than the default,
such as 10 minutes, for the interval between keep-alive
transmissions.
Also, if any target host on you network requires that the keep-alive
packet contains data, specify SENDGARBAGE TRUE
The Packet_size parameter of the GATEWAY statement defines the
maximum transmission unit (MTU) for the MVS host. The MTU size
must not exceed the maximum size that can be sent through the
control unit; if it does, transmission problems will occur.
The MTU size should be 2000 bytes and the MTU size for the MVS
host should be the same as the MTU size for the printer.
For values in the GATEWAY statement other than the packet size,
specify the values that are correct for your installation.
For more information about the TCP/IP profile and the statements
described in this section, please refer to:
• IBM TCP/IP MVS Customization and Administration Guide
• IBM TCP/IP Performance and Tuning Guide
Configuring the
Axis Network Print
Server
Follow the instructions below to configure your Axis Network Print
Server using a standard Web browser:
1. Start a Web browser, e.g. Internet Explorer or Netscape Navigator.
2. Enter the IP address or the host name of the Axis Network Print Server in
the location field and press the Enter key on your keyboard. The internal Web
pages of the Axis Network Print Server will appear.
Note:
To protect the Admin pages and the Configuration Wizard from unauthorized use, enter a
password (default Pass) in the Root Password field under Admin | General Settings.
AXIS 5570e User’s Manual 51
Page 52

Setting Up - IBM Mainframe (zSeries)
Note for IPDS printing:
In the Configuration Wizard, you can choose between PCL or PostScript printing. Choose the
printer language that corresponds to your printer.
3. Click the Configuration Wizard for IBM sessions button.
4. Click the Add Session button. This will start the Configuration Wizard
which is a step-by-step guide through the required IBM configuration
settings.
Verifying the
communication
Note:
Note:
You can verify the communication between the MVS system and the Axis
Network Print Server by pinging the print server from the MVS system. A
successful ping indicates that the MVS system can communicate with the
Axis Network Print Server.
From an TSO session, enter the following command:
TSO PING <IP_address>
The IP address is the IP address of the Axis Network Print Server.
In JES2, enter the following command from the System Display and
Search Facility (SDSF) menu 6:
ping <IP_address>
The IP address is the IP address of the Axis Network Print Server.
Here is an example of a successful ping:
EZA0458I Ping V3R1: Pinging host 10.50.45.200
(Use ATTN to interrupt.)
EZA0463I PING: Ping #1 response took 0.055 seconds
Successes so far = 1
And here is an example of an unsuccessful ping:
EZA0458I Ping V3R1: Pinging host 10.50.45.200
(Use ATTN to interrupt.)
EZA0464I PING: Ping #1 timed out
If the ping is not successful, make sure the Axis Network Print Server is
configured according to the instructions in Setting the IP Address, on
page 15 and in Configuring the Axis Network Print Server, on page 42.
If these items are all in order, consult your TCP/IP network administrator.
JES definitions When a TCP-attached printer is to be used with JES, it must be defined for
deferred-printing mode. To use a PSF printer for deferred printing under
JES, you must first code JES initialization statements to define FSSs and
FSAs for PSF printers. For JES2, the FSS is defined by an
and the FSA is defined by a
PRTnnnn statement. For JES3, the FSS is
FSS statement,
52 AXIS 5570e User’s Manual
Page 53

Setting Up - IBM Mainframe (zSeries)
defined by an FSSDEF statement, and the FSA is defined by a DEVICE
statement.
The maximum number of FSSs and FSAs that are supported are:
• FSSs = 2000
• FSAs per FSS = 64
The actual number of FSAs per FSS depends on several factors like:
• The virtual region size below the 16-megabyte line
• The number and the size of form definitions and page definitions
• The number of buffers specified (
BUFNO) for channel-attached printers
• The block sizes of the font, page segment, overlay, form definition, and
page definition libraries
JES2 Initialization The example below shows a sample JES2 statements for a TCP/IP-
attached Axis Network Print Server:
FSS (FSS1) PROC=SAMPPROC,HASPFSSM=HASPFSSM
PRT1 FSS=FSS1,MODE=FSS,PRMODE=(LINE,PAGE,),
CLASS=C,UCS=0,SEP=NO,SEPDS=NO,CKPTPAGE=100
START=YES,MARK=NO,TRKCELL=YES
Note:
This is only an example. For specific coding for JES parameters, refer to the JES publication
for the level of JES you are using.
The following paragraphs describe the JES2 initialization statements
shown above, which are typical of the JES2 statements used with PSF.
For more detailed descriptions of all JES2 initialization statements, refer
to the JES2 initialization and tuning publication for your operating
system.
FSS Statement The
omitted, JES2 generates a default FSS for that device. The
initialization statement defines an FSS to JES2. The
associated with one or more
FSA. For a description of all FSS parameters, refer to the JES2
initialization and tuning publication for your operating system. The FSS
statement contains the following parameters for PSF:
FSS initialization statement is optional but recommended. If it is
FSS
FSS statement is
PRTnnnn statements that define each printer
AXIS 5570e User’s Manual 53
Page 54

Setting Up - IBM Mainframe (zSeries)
FSS Statement Explanation
FSS (fasname)
PROC
HASPFSSM
Specifies the unique 1- to 8-character name of a particular FSS. This name is
referenced in the
with this FSS. When you start the first printer that has an FSA definition for
that FSS, an FSS address space is created for PSF. PSF manages this FSS and the
printer FSA for the first printer. If you start a second printer with an FSA
definition for the same FSS, PSF manages a separate FSA for the second printer
in that FSS.
Specifies a procedure for starting the PSF FSS. The procedure, which must be
defined before that FSS is started, is a member of either SYS1.PROCLIB or a
library concatenated to SYS1.PROCLIB.
Specifies the 1- to 8-character name of the load module that is loaded into the
PSF FSS address space. This load module contains the various FSI service
routines that JES2 supplies. For PSF, specify the default value
(
HASPFSSM=HASPFSSM).
PRTnnnn statement for each printer FSA that is associated
PRTnnnn Statement: A PRTnnnn statement, which is required to define each printer nnnn
statement FSA, is associated with an
should have a unique
CNTL, ENDCNTL, and PRINTDEV statements for the PSF startup procedure
specified in the
PRTnnnn name that must match the label on the
PROC parameter.
FSS statement. Each printer FSA
Note:
The label on the PRINTDEV statement must be 8 characters or fewer. PSF accepts the
PRTnnnn, PRINTnn, and PRINTERn formats. PRTnnnn is the recommended format.
PRTnnnn parameters create JES2 default values that are used unless
The
other values are specified in the application program JCL. The
PRTnnnn
statement contains the following parameters:
PRTnnnn
Statement
CKPTPAGE
CLASS
FSS
MARK
MODE
Explanation
Specifies the number of pages between data-set checkpoints. If checkpoint
intervals are too frequent, printer performance is significantly reduced. If
intervals are too infrequent, and a PSF error occurs, the job has to be
reprocessed from the last checkpoint. In this case, printer performance is
significantly reduced if PSF errors continue to occur. The recommended
starting value is 100.
Specifies the output classes processed by the printer. By defining print classes
you can handle disabled mechanisms.
Specifies the FSS for this device and must match the FSA name specified in
the corresponding FSS statement. This parameter is required.
Enables form markings to be placed on the job trailer pages. For the Axis
Network Print Server you should set this parameter to NO.
Note: This parameter is new in JES2 and replaces the MARK | NOMARK
parameter.
Specifies that the printer is managed by an FSS. This parameter is required.
54 AXIS 5570e User’s Manual
Page 55

Setting Up - IBM Mainframe (zSeries)
PRTnnnn
Statement
PRMODE
SEP
SEPDS
START
TRKCELL
UCS
Explanation
Specifies the data-set processing modes supported for the printer. It lists all
the PRMODE values that the printer accepts. If the Axis Network Print Server is
connected to a PostScript printer, the correct setting is
PRMODE=(PAGE,LINE,).. This setting indicates that composed-page
and line data sets can be printed.
Enables job-header and job-trailer separator pages to be produced.
Note1: If the Distributed Print Function (DPF) of PSF/2 is installed, you may
need to set this parameter to
Note2: This parameter is new in JES2 and replaces the SEP | NOSEP parameter.
Enables formatted data-set header separator pages to be produced.
Note: This parameter is new in JES2 and replaces the SEPDS | NOSEPDS
parameter.
Specifies the way that the printer is started. The parameter value NO specifies
that the printer is to be started by an operator command. The parameter value
YES.
YES specifies that the printer, if it is ready, is to start automatically when
JES2 starts processing.
Note: This parameter is new in JES2 and replaces the DRAIN | START
parameter.
Specifies whether track-cell despooling is to be used or not. It is recommended
to set this parameter to
Specifies a default font. If you want to select a font in the startup procedure
instead of the JES2 default font, you should set this parameter to
YES.
0.
JES3 Initialization Below is sample JES3 statements for an TCP/IP attached Axis Network
Print Server. In the example the JNAME=PRT1 has been used.
FSSDEF,TYPE=WTR,FSSNAME=FSS3,PNAME=SAMPPRO3,SYSTEM=SYS1,TERM=NO
DEVICE,DTYPE=PRTAFP1,JNAME=PRT1,JUNIT=(,SYS1,,ON),FSSNAME=FSS3
MODE=FSS,PM=(LINE,PAGE,),CHARS=(YES,GT12),
CARRIAGE=(TES,A868),CKPNTPG=100,HEADER=YES,WC=(C)
Note:
This is only an example. For specific coding for JES parameters, refer to the JES publication
for the level of JES you are using.
The following paragraphs describe the JES3 initialization statements
shown above, which are typical of the JES3 statements used with PSF.
For more detailed descriptions of all JES3 initialization statements, refer
to the JES3 initialization and tuning publication for your operating
system.
FSSDEF Statement: The FSSDEF initialization statement is optional but recommended. If it is
omitted, JES3 generates a default FSS for the printer being invoked.
AXIS 5570e User’s Manual 55
Page 56

Setting Up - IBM Mainframe (zSeries)
The FSSDEF statement can contain the following parameters:
FSSDEF
Statement
TYPE
FSSNAME
PNAME
SYSTEM
TERM
Explanation
Specifies that the FSS is an output writer for deferred printing. This parameter is
required.
Specifies the unique name of a particular FSS. This parameter is required.
Specifies a procedure for starting a specific PSF FSS. The procedure, which must
be defined before the FSS is started, is a member of the procedure library
defined by the
IATPLBST procedure library. Different FSSDEF initialization statements can refer
to the same startup procedure.
The
PNAME parameter specifies either a startup procedure supplied with PSF, or
one of your organization’s procedures.
Specifies the JES3 processor on which the FSS is run. The name must match the
STCPROC parameter of the STANDARDS statement or of the
NAME parameter in the MAINPROC statement for the processor.
Specifies the way that the FSS is terminated. The parameter value YES indicates
that the FSS is terminated if the JES3 global address space is terminated by a
*RETURN or *DUMP operator command.
DEVICE Statement: A DEVICE statement is required for each printer. The DEVICE parameters
create JES3 default values that are used unless other values are specified
in the JCL application program. The DEVICE statement can contain the
following parameters:
Device
Statement
CARRIAGE Specifies the JES default page definition.
Explanation
The value
YES specifies that the page definition can be changed during
startup procedures.
The value
NO specifies that the page definition cannot be changed during
startup procedures.
The value
aaaa specifies that the un-prefixed name, 1 to 4 characters
long, of the page definition is to be used as default. The name specified
here, or the JES3 system default, is the PSF default page definition.
CHARS Specifies a default JES3 font.
Specifies the number of pages between data-set checkpoints. If checkpoint
intervals are too frequent, printer performance is significantly reduced. If
CKPNTPG
DTYPE
FSSNAME
HEADER
JNAME
intervals are too infrequent, and a PSF error occurs, the job has to be reprocessed
from the last checkpoint. In this case, printer performance is significantly
reduced if PSF errors continue to occur. The recommended starting value is 100.
Identifies the printer device type. For the Axis Network Print Server you should
specify the parameter value
Specifies a unique FSS for this printer DEVICE statement. The value must match
the value coded for the FSSNAME parameter in the corresponding FSSDEF
statement.
Specifies if job and data set header pages are printed. If DPF is installed, you may
need to specify HEADER=YES.
Specifies the name of the printer FSA. Each printer FSA should have a unique
JNAME. This unique JNAME is 8 characters or fewer and must correspond to its
label on the
startup procedure specified in the
CNTL, ENDCNTL, and PRINTDEV statements for the PSF
PRTAFP1. This parameter is required.
PNAME parameter. This parameter is required.
56 AXIS 5570e User’s Manual
Page 57

Device Statement Explanation
JUNIT
MODE
PM
WC
Specifies:
1. The device address (host-connected, channel-attached, non-SNA printers
only). Do not specify a device address for the Axis Network Print Server when
using TCP/IP attachment.
2. The name of the processor to which the device is attached
3. A destination class for messages about the device
4 .Whether the device is initially online or offline
This parameter is required.
Specifies that the printer is managed by an FSS. This parameter is required.
Specifies which data-set processing mode is supported. For the Axis Network
Print Server attached to Postscript printers, the correct setting is
PRMODE=(LINE,PAGE,), indicating that composed-page and line data
sets can be printed.
Specifies the print output class that the printer is to process. You may want to
consider handling disabled mechanisms by defining print classes.
Setting Up - IBM Mainframe (zSeries)
Defining the
printer to PSF
Note:
Each Axis Network Print Server must be defined to PSF with a PRINTDEV
statement in the PSF startup procedure. The following keywords are
required on the PRINTDEV statement:
• IPADDR='xxx.xxx.xxx.xxx'
• PORTNO='xxxx'
The IPADDR parameter specifies the IP address of the Axis Network Print
Server in dotted-decimal notation.
Do not specify a host name in place of the dotted-decimal address.
The PORTNO keyword specifies the TCP/IP port to use for the print
session. This port number must match the port number set up for the Axis
Network Print Server in Configuring the Axis Network Print Server, on
page 42.
Below is a sample procedure,
your installation. The
PORTNO keywords. In the PRINTDEV example below, the TCP/IP port
and
PRINTDEV statement includes the required IPADDR
APSWPROT, which you can modify to suit
number 5100 is used, but any port, larger that 1024, can be used as long
as the same port is set up in the Axis Network Print Server.
APSWPROT procedure contains JCL parameters to produce a startup
The
procedure for either 240-pel and 300-pel printers, but the references to
300-pel resolution are commented out. To create separate startup
procedures, make two copies of
commented instructions in
APSWPROT, and then follow the
APSWPROT. Keep one unchanged copy as your
startup procedure for a resolution of 120 or 240 pels. In the second copy,
delete or comment out all references to 240-pel resolution, and make all
references to 300-pel resolution active. This changed copy is your startup
procedure for 300-pel resolution.
If you want to print both 240-pel and 300-pel AFP/IPDS jobs, create two
AXIS 5570e User’s Manual 57
Page 58

Setting Up - IBM Mainframe (zSeries)
separate FSAs, one for jobs with resolution of 120 or 240, and one for
jobs with resolution of 300 pels. The 240-pel resolution FSA uses 240-pel
resources, and the 300-pel resolution FSA uses 300-pel resources. Both
FSAs are defined to drive the same printer; however, only one FSA can be
active at one time for a given printer. You should define separate classes
or destinations for each FSA. Your installation must route the appropriate
jobs to the appropriate class or destination. The two FSAs can be defined
in the same or in separate startup procedures.
//APSWPROT PROC
//********************* THE PSF TCP/IP WRITER PROCEDURE **********************
//*
//*01* MODULE-NAME = APSWPROT
//* $MOD(APSWPROT) COMP(APS) PROD(PSF) : RELEASE 2.2.0
//*
//*01* DESCRIPTIVE-NAME = START PROCEDURE FOR PSF:
//*
//* TCP/IP ATTACHED DEVICES
//*
//*01* STATUS = VERSION 2, RELEASE 2, LEVEL 0
//*
//*01* FUNCTION = THIS PROCEDURE IS COPIED FROM THE
//* DISTRIBUTION LIBRARY TO SYS1.PROCLIB.
//* THIS COPY IS PERFORMED BY MACRO ‘SGAPS5PR’.
//*
//*01* NOTES = THE FULL NAME OF THE DEFAULT PAGEDEF IS
//* P1A06462.
//* THE FULL NAME OF THE DEFAULT FORMDEF IS
//* F1A10110.
//* THE FULL NAMES OF THE DEFAULT FONTS ARE
//* X0GF10, X0GS10, X0TU10, AND X0GU10
//* THE FULL NAME OF THE SEPARATOR PAGE PAGEDEF IS
//* P1V06483
//* THE FULL NAME OF THE SEPARATOR PAGE FONT IS
//* X0GT15
//*
58 AXIS 5570e User’s Manual
Page 59

Setting Up - IBM Mainframe (zSeries)
Example continues
CONT...
//* REQUIRED ACTIONS =
//* RESOLUTION - THIS START PROCEDURE IS SET UP FOR DRIVING
//* A TCP/IP DEVICE AT 240 PEL RESOLUTION. TO CHANGE IT
//* TO DRIVE 300 PEL RESOLUTION TCP/IP ATTACHED DEVICES:
//*
//* A) COMMENT OUT THE FIRST PRINTDEV STATEMENT AND UNCOMMENT
//* THE SECOND PRINTDEV STATEMENT
//*
//* B) THE FONT02 DATA SET MUST CONTAIN THE CONVERTED
//* DEFAULT FONTS LISTED IN THE PRINTDEV.
//* THE FONTS ARE CONVERTED USING THE FONT
//* CONVERSION UTILITY APSRCF30. SEE THE PSF
//* SYSTEM PROGRAMMING GUIDE.
//*
//*01* CHANGE-ACTIVITY :
//* $H1=LAPS0001, HAF1103, 080195 DKU1JAU : TCP/IP SUPPORT
//*
//**** END OF SPECIFICATIONS ***/
//STEP01 EXEC PGM=APSPPIEP,REGION=4096K
//JOBHDR OUTPUT PAGEDEF=V06483, /* JOB SEPARATOR PAGEDEF */
// FORMDEF=A10110,CHARS=GT15 /* JOB SEPARATOR FORMDEF */
//JOBTLR OUTPUT PAGEDEF=V06483, /* JOB SEPARATOR PAGEDEF */
// FORMDEF=A10110,CHARS=GT15 /* JOB SEPARATOR FORMDEF */
//DSHDR OUTPUT PAGEDEF=V06483, /* DS SEPARATOR PAGEDEF */
// FORMDEF=A10110,CHARS=GT15 /* DS SEPARATOR FORMDEF */
//MSGDS OUTPUT PAGEDEF=V06462, /* MESSAGE DATASET PAGEDEF */
// FORMDEF=A10110 /* MESSAGE DATASET FORMDEF */
//FONT01 DD DSN=SYS1.FONTLIBB, /* SYSTEM FONTS - 240 PEL */
// DISP=SHR
//FONT02 DD DSN=SYS1.FONT300, /* SYSTEM FONTS - 300 PEL */
// DISP=SHR
//PSEG01 DD DSN=SYS1.PSEGLIB, /* SYSTEM PAGE SEGMENTS */
// DISP=SHR
//OLAY01 DD DSN=SYS1.OVERLIB, /* SYSTEM MEDIUM OVERLAYS */
// DISP=SHR
//PDEF01 DD DSN=SYS1.PDEFLIB, /* SYSTEM PAGEDEFS */
// DISP=SHR
//FDEF01 DD DSN=SYS1.FDEFLIB, /* SYSTEM FORMDEFS */
// DISP=SHR
AXIS 5570e User’s Manual 59
Page 60

Setting Up - IBM Mainframe (zSeries)
Example continues
CONT...
//* ************************************************************ */
//* PRINTDEV
//* ************************************************************ */
//PRT1 CNTL
//PRT1 PRINTDEV FONTDD=*.FONT01, /* 240 PEL FONT LIBRARY DD */
//* /* <-- SEE REQUIRED ACTIONS */
//* /* ABOVE */
//*PRT1 PRINTDEV FONRDD=*.FONT02, /* 300 PEL FONT LIBRARY DD */
//* /* <-- SEE REQUIRED ACTIONS */
//* /* ABOVE */
// OVLYDD=*.OLAY01, /* OVERLAY LIBRARY DD */
// PSEGDD=*.PSEG01, /* SEGMENT LIBRARY DD */
// PDEFDD=*.PDEF01, /* PAGEDEF LIBRARY DD */
// FDEFDD=*.FDEF01, /* FORMDEF LIBRARY DD */
// JOBHDR=*.JOBHDR, /* JOB HEADER SEPARATOR */
//* /* OUTPUT */
// JOBTRLR=*.JOBTLR, /* JOB TRAILER SEPARATOR */
//* /* OUTPUT */
// DSHDR=*.DSHDR, /* DATA SET HEADER */
//* /* SEPARATOR */
// MESSAGE=*.MSGDS, /* MESSAGE DATA SET OUTPUT */
// BUFNO=5, /* NUMBER OF WRITE DATA BUFFERS*/
// PAGEDEF=A06462, /* DEVICE PAGEDEF DEFAULT */
// FORMDEF=A10110, /* DEVICE FORMDEF DEFAULT */
// CHARS=(GF10, /* DEVICE */
// GS10,TU10,GU10), /* DEFAULT FONT SET */
// PIMSG=YES, /* ACCUMULATE DATA SET */
//* /* MESSAGES */
// DATACK=BLOCK, /* REPORT ALL DATA-CHECK */
//* /* ERRORS */
// TRACE=NO, /* CREATE INTERNAL TRACE */
// FAILURE=WCONNECT, /* PSF ACTION ON PRINTER */
//* /* FAILURE */
// TIMEOUT=REDRIVE, /* PSF ACTION ON TIMEOUT */
// MGMTMODE=IMMED, /* PRINTER MANAGEMENT MODE */
// DISCINTV=40, /* DISCONNECT INTERVAL IN */
//* /* SECONDS */
// IPADDR=’xxx.xxx.xxx.xxx’ /* Axis Network Print Server IP
ADDRESS */
// PORTNO=’5100’, /* TCP/IP PORTO */
//PRT1 ENDCNTL
Although it is not recommended, it is possible to drive the printer with
just one FSA, if one of the following conditions are met:
• All the resources in the resource libraries are resolution-independent,
and all the jobs that use inline resources or user libraries contain
resources that are resolution-independent.
• All jobs that request a resolution that is different from the resolutiondependent resources in the PSF system and security libraries contain the
resources at the requested resolution, either as inline resources or in the
user's library.
Even if a PSF user requests 120-pel resolution for an AFP print job being
sent to the printer, PSF requires 240-pel resources from the library. Do
not store 120-pel resources in the library.
60 AXIS 5570e User’s Manual
Page 61

Setting Up - IBM Mainframe (zSeries)
Starting and Stopping
the PSF/MVS Printer
When operating the Axis Network Print Server when emulating a TCP/IP
attached IPDS printer, you should use JES operator commands, just as if
the printer were channel-attached or SNA-attached.
Starting the Printer To start a TCP/IP-attached printer, do the following:
1. Start TCP/IP.
2. Power on the printer(s).
3. Power on the Axis Network Print Server.
4. Start the printer FSA as indicated below.
Before starting a PSF FSS, you must have a cataloged startup procedure
in SYS1.PROCLIB or any other system procedure library. This procedure
specifies PSF initialization parameters and libraries that contain system
and installation resources. The name of this procedure can be specified in
the FSSDEF statement of the JES initialization deck. If the name is
omitted, JES3 supplies a default name, that is chosen for the defined
printer.
When you install PSF, you must create or update the required libraries
referenced by the startup procedure, and you should consider any need to
increase the region size, as specified in the EXEC statement, to
accommodate resources and an increased number of printer FSAs. The
startup procedure can also specify defaults that cannot be set with JES
initialization statements for printer FSA definitions.
Stopping the Printer You can stop a TCP/IP-attached printer in several ways but this is the
recommended method:
Stop the PSF FSA for the printer by entering the following command
from the MVS console.
JES2:
$Pprinter-name
JES3:
*VARY printer-name, OFF
*CANCEL printer-name
The variable printer-name specifies the name of the printer FSA as defined in JES
definitions, on page 52.
You can now disconnect the Power Adapter from the Axis Network Print
Server.
AXIS 5570e User’s Manual 61
Page 62

Adding Printers in Windows
Section 6 Adding Printers in Windows
Having connected the Axis Network Print Server to your network, as
described in “Connect the Hardware” on page 13, this section describes
how to install the Axis Network Print Server in the Windows
environment. Identify your Windows platform and follow the installing
instructions from the list below.
Overview of
Installation Methods
Refer to the table below to determine the most appropriate installation
method according to your computer environment:
Windows
Platform
Windows 2000,
XP, Server 2003
Windows 2000 NetBIOS/NetBEUI
Windows NT
Windows 98, Me
Printing Protocol Method See...
“Adding Printers in Windows 2000 /
XP / 2003 using AXIS AddPrinter Wizard” on page 63
“Adding Printers in Windows 2000 /
XP / 2003 using Windows Add Printer
Wizard” on page 65
“Adding Printers in Windows 2000 /
XP / 2003 using the Microsoft LPR
Monitor” on page 71
“Adding NetBIOS/NetBEUI Printers in
Windows 2000 using AXIS Print Monitor” on page 76
Adding Printers in Windows NT Using
the Microsoft LPR Monitor, on page
72
Adding Printers over NetBIOS/NetBEUI in Windows NT using AXIS Print
Monitor, on page 77
“Adding Printers in Windows 98 and
Me over TCP/IP using AXIS Print Monitor” on page 78
“Adding Printers in Windows 98 and
Me over NetBIOS/NetBEUI using AXIS
Print Monitor” on page 80
TCP/IP (LPR)
TCP/IP (LPR)
NetBIOS/NetBEUI
TCP/IP (LPR)
NetBIOS/NetBEUI
AXIS AddPrinter
Wizard
Windows Add Printer
Wizard
Microsoft
LPR Monitor
AXIS Print Monitor
software
Windows Add Printer
Wizard
AXIS Print Monitor
software
If you intend to operate your Axis Network Print Server in a multiprotocol environment, you should also proceed to the other relevant
sections in this manual.
Client/Server Network For client/server printing, each computer sends print jobs through a
network server computer.
The printer must first be installed on the server computer (from the Add
Printer Wizard, AXIS Print Monitor) and then shared on the network,
which makes it a network printer. It will then appear as a Network
Printer (in Windows Add Printer Wizard and in AXIS Print Monitor) on
the client computers. Each client computer must install the appropriate
printer drivers in order to print properly.
For Windows 98 and Me, it is only necessary to install AXIS Print Monitor on a server for
client/server printing.
62 AXIS 5570e User’s Manual
Page 63

Adding Printers in Windows
Peer-to-Peer Network In Peer-to-Peer networks, each computer prints directly to the network
printer. The network printer appears as a Local Printer (in Windows Add
Printer Wizard and in AXIS Print Monitor), and needs to be added to each
client computer that wants to print. Each client computer must install the
appropriate printer drivers in order to print properly.
In Windows 98 and Me, AXIS Print Monitor must be installed on all (printing) client
computers for Peer-to-Peer printing.
SNMP Device Index When using the TCP/IP protocol (and if the printer driver permits), the
print server can use SNMP Status to find out if the printer is ready to
accept a new job. See “SNMP Device Index” on page 247.
Adding Printers in Windows 2000 / XP / 2003 using AXIS AddPrinter Wizard
AXIS AddPrinter is a Wizard that locates your network printers and helps
you install them in your Windows environment. When you have
completed the Wizard, the network printer is ready for use. To install a
network printer you must be logged in as an Administrator or be a
member of the Administrators' group.
1. Install AXIS AddPrinter Wizard on all Windows 2000, Windows XP and
Windows Server 2003 workstations that will print via the print server.
2. Before you continue, ensure that the print server is properly connected to
the printer, network and power.
3. Start AXIS AddPrinter. Click Next. The Wizard will perform an automatic
search for all Axis network printers, which is indicated by the progress bar
at the bottom of the screen.
4. Select a printer from the Select Network Printer list and click Next.
If the printer does not appear, see Easy Access to All Network Printers,
below.
AXIS 5570e User’s Manual 63
Page 64

Adding Printers in Windows
5. The Wizard searches for a suitable printer driver.
If a suitable driver is not found, you will be asked to select a driver, otherwise
the Wizard suggests which Printer Model and Printer Driver to use.
Click Change driver to select another driver, or click Finish to accept and
install the suggested driver.
Easy Access to All
Network Printers
Find... If the print server is located outside your local subnet it will not appear in
Refresh If the print server has just been switched on, the printer has not had time
Set IP To set or change the IP address, select the print server and click Set IP.
The installation is complete and you can start using the network printer.
The Wizard's Select Network Printer list also provides quick and easy
access to all connected and configured network printers.
the list. This may be the case if your router blocks SLP traffic. Click Find.
Enter the IP address or host name displayed on the print server’s Test page
and click OK. Example: 192.168.3.191 or AXIS181cf0
to report its presence. This process can take a few minutes. In this case,
Printer Model is stated as No printer connected. Click Refresh to rescan
your local network segment for available print servers and update the
status. If you still do not see the expected values, click Help and select
Troubleshooting.
Decide whether you want to configure the IP settings manually or want
the Wizard to suggest a static IP address.
Example: Select Suggest... and click OK. Confirm — or modify — the
Wizard’s suggested IP settings. Click OK.
Note: The Suggest... option is only available when the computer has one
network card.
64 AXIS 5570e User’s Manual
Page 65

Adding Printers in Windows
Go Straight to the
Print Server’s Web
Interface
Right-click on a printer in the Select Network Printer list and select Print
server home page to configure the print server from its embedded Web
pages.
Adding Printers in Windows 2000 / XP / 2003 using Windows Add Printer Wizard
Follow the instructions below to use the standard Windows method for
adding a network printer in Windows 2000/ Windows XP
(Windows XP Professional is described in this example).
Windows XP:
1. Go to Start | Printers and Faxes and click the Add a Printer icon to start
the Add Printer Wizard. Click Next.
(Windows XP Home Edition: Choose Start | Control Panel | Printers and
Faxes | Add a Printer to start the Windows Add Printer Wizard)
Windows 2000:
1. Go to Start | Settings | Printers and click the Add Printer icon to start
the Add Printer Wizard. Click Next.
AXIS 5570e User’s Manual 65
Page 66

Adding Printers in Windows
2. In the Wizard, select Local Printer attached to this computer.
Make sure the Automatically detect and install my Plug and Play printer
check box is not
checked. Click Next.
3. Click the Create a new port radio button and select Standard TCP/IP Port
from the list. Click Next and the Add Standard TCP/IP Printer Port Wizard
starts. Click Next.
4. Enter the IP address of the print server (Example: 192.168.3.191)
The Port Name field will be filled in automatically when you enter the IP
address. Add the port you want to use as a suffix (optional).
AXIS 5570e
Physical Port Add suffix Entry example
USB port Type _USB1 192.168.3.191_USB1
LPT1 (parallel port) Type _LPT1 192.168.3.191_LPT1
If you have an old version of Windows, it will not detect the USB port. If
so, type “_LPT2” instead of “_USB1” in the example above, e.g.
192.168.3.191_LPT2.
For additional information, see “*Tcpmon.ini” on page 70.
66 AXIS 5570e User’s Manual
Page 67

Adding Printers in Windows
5. Click Next.
6. In the Additional Port Information Required window, enter the Device Port
you want to use. You will see the available ports in a drop-down menu:
AXIS 5570e
Physical Port Add suffix Entry example
USB port Type _USB1 192.168.3.191_USB1
LPT1 (parallel port) Type _LPT1 192.168.3.191_LPT1
If you have an old version of Windows, it will not detect the USB port. If
so, type “_LPT2” instead of “_USB1” in the example above, e.g.
192.168.3.191_LPT2.
For additional information, see “*Tcpmon.ini” on page 70.
AXIS 5570e User’s Manual 67
Page 68

Adding Printers in Windows
7. Click Next.
Click Next and Finish
68 AXIS 5570e User’s Manual
Page 69

Adding Printers in Windows
8. Select Manufacturer and Printer from the driver list. Click Next.
9. Choose whether you want to keep the existing driver or to replace it. If you
already have the printer’s driver installed, you will be asked whether to keep
it or to replace it.
10. Click Next. Supply a name for the printer and choose whether you want to
make it your default printer. Click Next.
AXIS 5570e User’s Manual 69
Page 70

Adding Printers in Windows
11. Choose whether you want to share the printer with other network users,
print a test page, etc. Select the appropriate radio button and click Next and
Finish.
12. Print a test page to verify your installation.
You have now completed the installation.
*Tcpmon.ini
If you have an old version of Windows, the USB port will not be recognized.
For the USB port to appear as an option in the Windows Device Port list (see Step 5 above ), you
must install Axis tcpmon Upgrade Utility, a script that aids Windows in recognizing the USB port.
This script upgrades the tcpmon.ini file (in the system32 directory) by adding new Axis print
server ports in the Windows Available Ports list. The old tcpmon.ini file will be saved as
tcpmon.ini_bak in the same directory, no other information will be affected. You have to be
logged in as an Administrator to use this program.
The program is available here: ftp.axis.com/pub_soft/prt_srv/utility/tcpmon
70 AXIS 5570e User’s Manual
Page 71

Adding Printers in Windows
Adding Printers in Windows 2000 / XP / 2003 using the Microsoft LPR Monitor
This section describes how to set up a Windows 2000/XP/2003 server for
LPR printing over the TCP/IP protocol, using the built-in Microsoft LPR
Monitor i.e. Print Services for UNIX.
Note:
See “Alternative Method for LPR Printing” on page 72 for instructions on how
to set up printing over LPR without installing Print Services for Unix.
Basic Setup If you have not already done so, you should perform the TCP/IP basic
setup procedures prior to installing a printer for LPR printing.
Preparing for
LPR Printing
Installing an LPR
printer
Windows XP: 1. Go to Start | Printers and Faxes and click the Add a Printer icon to start
Windows 2000: 1. Go to Start | Settings | Printers and click the Add Printer icon to start
Follow the following steps to prepare for LPR printing:
1. Open the Control Panel.
2. Click Add/Remove Programs.
3. Click Add/Remove Windows Components.
4. Check Other Network File and Print Services and click Details.
5. Check Print Services for Unix and click OK.
6. Click Next and Finish.
7. Close Add/Remove Programs and the Control Panel.
Follow the instructions below to use the standard Windows method for
installing an LPR printer in Windows 2000/XP/2003:
the Add Printer Wizard. Click Next.
the Add Printer Wizard. Click Next.
2. Select the appropriate radio button: Local Printer. Click Next.
3. Click the Create a new port radio button and select LPR Port from the list.
Click Next.
AXIS 5570e User’s Manual 71
Page 72

Adding Printers in Windows
4. Enter the name of the server (or its IP address) in the field Name and address
of server providing lpr (Example: AXIS100086) and enter the port you want
to use in the field Name of printer or print queue on that server (Example:
LPT1). Click OK.
Ports available USB port Parallel port 1 Parallel port 2 Serial port
AXIS 5570e USB1 LPT1 — —
End the Wizard in the usual manner: select Manufacturer and Printer,
keep/replace driver, name the printer, make it default or not, share it or not
and finally decide whether you want to print a test page.
Client/Server Printing Select Network printer instead of Local Printer in Step 2 above if your
print server has already been installed by the administrator on another
computer. Follow the instructions in the Add Printer Wizard to complete
the installation.
Important!
Alternative Method for
LPR Printing
• Make sure that the Automatically detect and install my Plug and Play printer checkbox is
not checked
• Press F1 to access the Windows online help system if you need additional help when
installing a printer/print server using this method.
If you wish to print over LPR but do not wish to install Print Services for
Unix you can do this by changing the printing protocol after having
installed the printer using the Standard TCP/IP method, see “Adding
Printers in Windows 2000 / XP / 2003 using Windows Add Printer
Wizard” on page 65 for instructions. LPR is chosen by default with this
method.
Once the printer is installed, follow these instructions to change the
printing protocol:
1. Go to Start | Settings | Printers.
2. Double-click the installed printer.
3. Select Properties from the Printer menu.
4. Click the Ports tab.
5. Click the Configure Port button.
6. Click the LPR radio button and enter the queue name (PR1, PR2...).
7. Click OK to finish.
Adding Printers in Windows NT Using the Microsoft LPR Monitor
If you have not already done so, you should perform the TCP/IP basic
72 AXIS 5570e User’s Manual
Page 73

Adding Printers in Windows
setup procedures prior to installing a printer for LPR printing.
Preparing for
LPR Printing
Installing an LPR
Printer
In the Control Panel, double-click the Network icon. Select the Services
tab. If the TCP/IP Printing entry appears, then TCP/IP is already installed.
Close the Network folder and go on to Installing an LPR printer, below.
First, prepare for LPR printing:
1. Open the Control Panel and double-click the Network icon.
2. Select Protocols.
3. Add TCP\IP Protocol.
4. Select Services.
5. Add Microsoft TCP\IP Printing.
1. Go to Start | Settings | Printers | Add Printer. Select My Computer (for
peer-to-peer printing) and click Next.
2. From the Available Ports list, choose the appropriate printer port, which will
appear as the host name or IP address of the print server. Skip to step 7.
3. If the host name or IP address of the print server you wish to use does not
appear in the list, click Add Port.
4. Choose LPR Port from Available Printer Ports and click New Port.
5. Type the print server’s name or IP address in the field Name or address of
server providing lpd (Example: 10.13.6.198). Then enter which port to use
in the field Name of printer or print queue on that server according to the
table below (Example: LPT1). Click OK and then Close.
Ports available USB port Parallel port 1 Parallel port 2 Serial port
AXIS 5570e USB1 LPT1 — —
6. The added print server will now appear in the Available Ports list.
7. Click Next, choose an appropriate driver and finish the installation in the
normal manner.
AXIS 5570e User’s Manual 73
Page 74

Adding Printers in Windows
AXIS Print Monitor Software
AXIS Print Monitor is the recommended tool to use for network printing
in Windows NT, 98 and Me environments. AXIS Print Monitor is
available free of charge on www.axis.com
AXIS Print Monitor
Overview
AXIS Print Monitor allows the print server to be connected in the same
simple fashion as connecting a local printer. Once installed, it is
automatically initialized upon system startup. AXIS Print Monitor has
been developed for peer-to-peer printing, allowing your print jobs to be
sent directly to the print server.
Printing Environments AXIS Print Monitor supports printing over TCP/IP (LPR and Raw TCP) and
NetBIOS/NetBEUI. To enable printing in these environments, please
ensure that the desired printing protocols are running on your client.
Peer-to-Peer Printing The AXIS Print Monitor needs to be installed on each workstation to
perform peer-to-peer printing. Once installed, the AXIS Print Monitor
allows you to access all network printers, just as if they were connected
directly to your workstation.
Client/Server Printing AXIS Print Monitor needs only to be installed on one server to perform
client/server printing. The installed printers must be configured to be
shared to allow clients to use them. Pop-up messages should not be
enabled on the server as they will not be displayed on the client
platforms.
Note:
AXIS Print Monitor can also be used for DOS printing. Please refer to the AXIS Print Monitor’s
Readme file for instructions. The Readme file is located in the same folder where AXIS Print
Monitor is installed on your PC.
74 AXIS 5570e User’s Manual
Page 75

Adding Printers over TCP/IP in Windows NT using AXIS Print Monitor
1. Install AXIS Print Monitor on all workstations that will print via the print
server. AXIS Print Monitor is available free of charge on www.axis.com
2. To start the Add Printer Wizard, select Settings | Printers from the Start
menu and double-click the Add Printer icon.
3. The Wizard asks you to select My Computer or Network printer server.
Select My Computer, click Next.
4. Click Add Port... In the Available Ports dialog, select AXIS Port and click New
Port...
5. Select LPR (TCP/IP) as your choice of protocol and click OK.
6. Enter the IP address or the host name of your print server (Example: enter
an IP address: 192.168.3.191 or a host name: AXIS181636).
7. In the Logical Printer Name field, enter the port you wish to use; USB1,
LPT1, LPT2 or COM1. Click OK, click Close.
8. Select Manufacturer, Printers, choose a printer name and if you want to use
the printer as your default printer. Choose if you want to share the printer
and print a test page. Click Finish.
Adding Printers in Windows
9. You may now configure the port, as described below.
Configure the Port: 1. Select Settings | Printers from the Start menu and highlight the printer
you wish to configure. Select File | Properties | Ports and click Configure
Port.
2. Choose whether error condition pop-up messages are to be displayed by
checking the box in the Configure AXIS Ports dialog. Define the frequency
at which the error messages should be displayed after retry. Click OK.
Even if the desired printer is available in the Manufacturers and Printers lists, you are advised
to use the print driver provided with the printer. This assures you of the latest driver software.
AXIS 5570e User’s Manual 75
Page 76

Adding Printers in Windows
Adding NetBIOS/NetBEUI Printers in Windows 2000 using AXIS Print Monitor
See to it that the NetBEUI protocol is installed on your client. Follow the
procedure below to install Axis Printer Ports from a Windows 2000
workstation:
1. To start the Add Printer Wizard, select Settings | Printers from the Start
menu and double-click the Add Printer icon. Start the installation by
clicking Next.
2. The Wizard asks you to select Local printer or Network printer. Select Local
printer. Click Next.
3. Click Create a new port. In the Available Ports dialog, select AXIS Port and
click Next.
4. Select NetBIOS/NetBEUI as your choice of network protocol and click OK.
5. Select the AXIS Port you want to add from the list of available ports. The
port appears as <name>.<port> (Example: AX100086.LP1). The <port> is
taken from the table below. Click OK.
Note:
Ports available USB port Parallel port 1 Parallel port 2 Serial port
AXIS 5570e US1 LP1 — —
6. Choose the appropriate printer driver for your printer. Click Next and
proceed directly to step 9. It is only necessary to perform steps 7 - 8 if your
printer does not appear in the list.
Even if the desired printer is available in the Manufacturers and Printers lists, you are
advised to use the printer driver provided with the printer. This assures you of the latest driver
software.
7. Click the Have Disk... button. Insert the printer driver diskette/CD that was
provided with your printer, select the appropriate diskette/CD drive and click
OK.
8. Select the printer driver you want to install and click Next.
9. Enter an appropriate name for your printer and click Next.
10. Choose whether you want to share the printer with other network users and
click Next.
11. Choose whether you want to print a test page, click Next and then Finish.
76 AXIS 5570e User’s Manual
Page 77

Adding Printers in Windows
Adding Printers over NetBIOS/NetBEUI in Windows NT using AXIS Print Monitor
See to it that the NetBEUI protocol is installed on your client. Follow the
procedure below to install Axis Printer Ports from a Windows NT
workstation:
1. Install AXIS Print Monitor on all workstations that will print via the print
server.
2. To start the Add Printer Wizard, select Settings | Printers from the Start
menu and double-click the Add Printer icon.
3. The Wizard asks you to select My Computer or Network printer server.
Select My Computer. Click Next.
4. Click Add Port... In the Available Ports dialog, select AXIS Port and click New
Port...
5. Select NetBIOS/NetBEUI as your choice of network protocol and click OK.
6. Select the AXIS Port you want to add from the list of available ports. The
port appears as <name>.<port> (Example: AX100086.LP1). The <port> is
taken from the table below. Click OK.
Note:
Ports available USB port Parallel port 1 Parallel port 2 Serial port
AXIS 5570e US1 LP1 — —
7. Close the Printer Ports window.
8. Click the Configure Port... button. Choose whether error condition pop-up
messages are to be displayed by checking the box in the Configure Axis Ports
dialog. Define the frequency at which the error messages should be
displayed after retry. Click OK. Continue the installation by clicking Next.
9. Choose the appropriate printer driver for your printer. Click Next and
proceed directly to step 12. It is only necessary to perform steps 10-11 if
your printer does not appear in the list.
Even if the desired printer is available in the Manufacturers and Printers lists, you are
advised to use the printer driver provided with the printer. This assures you of the latest driver
software.
10. Click the Have Disk... button. Insert the printer driver diskette/CD that was
provided with your printer, select the appropriate diskette/CD drive and click
OK.
11. Select the printer driver you want to install and click Next.
12. Enter an appropriate name for your printer and click Next.
13. Choose whether you want to share the printer with other network users and
click Next.
14. Choose whether you want to print a test page and then click Finish.
AXIS 5570e User’s Manual 77
Page 78

Adding Printers in Windows
Adding Printers in Windows 98 and Me over TCP/IP using AXIS Print Monitor
1. Install AXIS Print Monitor on all workstations that will print via the Axis
print server.
2. Next, start the Windows Add Printer Wizard: select Settings | Printers from
the Start menu and double-click the Add Printer icon.
3. After clicking Next in the first dialog, the Wizard asks you to select between
Local Printer and Network Printer. You must select Local Printer as the print
server emulates a local printer port. Click Next.
4. Choose the appropriate print driver for your printer. If the desired print
driver already appears within the displayed Manufacturers and printers
lists, highlight your selection, click Next and proceed directly to step 7. It
is only necessary to perform steps 5- 6 if your printer does not feature in
the model list.
5. Click the Have Disk... button. Insert the printer driver diskette/CD into the
appropriate disk drive of your computer.
6. Select the type of printer you want to install from the diskette/CD and click
Next. If you already have the printer’s driver installed, you will be asked
whether to keep it or to replace it.
7. Select the Printers@TCP/IP Port and click Next.
8. Enter an appropriate name for your printer and choose whether you want
it to be the default printer. Click Next.
9. In the next window, do not
10. The printer you have defined will now be displayed in the Printers Folder.
Right-click the printer object and select Properties.
11. Click the Details tab within the Properties page and then click Add Port to
display the available monitors.
12. Click the radio button “other”. Select AXIS Port and then click OK.
13. Select LPR (TCP/IP) as your choice of protocol and click OK.
14. Enter the IP address or the host name of your print server (Example IP
address: 192.168.3.191 or host name: AXIS181636).
In the Logical Printer Name field, enter the port you wish to use; USB1,
LPT1, LPT2 or COM1.
15. The TCP/IP port will then be added automatically to the list of available ports.
Click Apply and OK.
16. You may now configure the port, as described below. The Axis Printer Port
is now installed.
order a Test Page to be written, just click Finish.
78 AXIS 5570e User’s Manual
Page 79

Adding Printers in Windows
Configure the Port: 1. Select Settings | Printers from the Start menu and highlight the printer
you wish to configure. Select File | Properties | Details and click Port
Settings.
2. Choose whether error condition pop-up messages are to be displayed by
checking the box in the Configure AXIS Ports dialog. Define the frequency
at which the error messages should be displayed after retry. Click OK.
Even if the desired printer is available in the Manufacturers and Printers lists, you are advised
to use the print driver provided with the printer. This assures you of the latest driver software.
AXIS 5570e User’s Manual 79
Page 80

Adding Printers in Windows
Adding Printers in Windows 98 and Me over NetBIOS/NetBEUI using AXIS Print Monitor
Follow the procedures below to install Axis NetBIOS/NetBEUI printer
ports on a Windows 98 workstation, using AXIS Print Monitor:
1. To start the Add Printer Wizard, select Settings | Printers from the Start
menu and double-click the Add Printer icon.
2. After clicking Next in the first dialog, the Wizard asks you to select Local
printer or Network printer. Select Local printer. Click Next.
3. Choose the appropriate printer driver for your printer. If the desired printer
driver appears in the displayed Manufacturers and Printers lists, highlight
your selection, click Next and proceed directly to step 6. It is only necessary
to perform steps 4 - 5 if your printer does not appear in the model list.
Note:
Even if the desired printer is available in the Manufacturers and Printers lists, you are
advised to use the printer driver provided with the printer. This assures you of the latest driver
software.
4. Click the Have Disk... button. Insert the printer driver diskette/CD that was
provided with your printer, select the appropriate diskette/CD drive and click
OK.
5. Select the printer driver you want to install and click Next.
6. Select the AXIS Printer Port from the Available Ports list. The port names
appears as <name>.<port>. Here, <name> is AX followed by the last six
digits of the print server’s serial number (e.g. AX100086) and <port> is taken
from the table below. Click the Configure Port button.
Ports available USB port Parallel port 1 Parallel port 2 Serial port
AXIS 5570e US1 LP1 — —
Example: AX100086.LP1
7. Choose whether error condition pop-up messages are to be displayed by
checking the box in the Configure AXIS Ports dialog. Define the frequency
at which the error messages should be displayed after retry. Click OK and
Next.
8. Enter an appropriate name for your printer and click Next.
9. Choose whether you wish to print a test page and click Finish.
80 AXIS 5570e User’s Manual
Page 81

Section 7 Adding Printers in Macintosh
Having connected the AXIS 5570e to your network, this section now
describes how to set up your print server for printing in Mac OS X and
earlier Macintosh environments using AppleTalk.
If you intend to use the print server in a multi-protocol environment,
refer to the chapters pertaining to the respective operating systems in this
manual.
Bonjour Printing in Mac OS X
Bonjour is available from Mac OS X 10.2 and up. Bonjour is enabled by
default in the print server. You can alter the Bonjour parameters from the
print server’s Web interface: select Admin | Network Settings | Detailed
View | TCP/IP Network.
1. From the Apple menu, select Go | Applications | Utilities and start the
Print Center or the Printer Setup Utility.
Adding Printers in Macintosh
2. Click Add in the Printer List.
3. From the drop-down list, select Bonjour.
4. High-light the printer you want to install. The print server’s default name
is AXISxxxxxx Network Print Server (where the xs represent the last six
digits of the print server’s serial number) followed by the ports available.
Example: AXIS610282 Network Print Server_USB1.
5. Click Add to finish the installation. The print server has now been added to
the Printer List.
6. If you wish to configure printer settings, click Printers | Configure Printer.
AXIS 5570e User’s Manual 81
Page 82

Adding Printers in Macintosh
To Change the
Bonjour Service Name
You can change the print server’s Bonjour service name via the print server’s
Web interface: Admin | Network Settings | Detailed View | TCP/IP Network
=> Bonjour Service Name.
If the print server using Bonjour is already installed and the print server
name or service name is changed, the print server must be removed from
the Printer List and then re-installed with the new Bonjour service name.
82 AXIS 5570e User’s Manual
Page 83

Installation in Mac OS X using AppleTalk
This section describes setting up your print server for printing in the Mac
OS X.
1. Start Print Center (from Go | Applications | Utilities | Print Center)
2. Select Printers | Add Printer...
3. From the Printer List dialog, select AppleTalk.
4. Now, the ports of your print server will appear in the list of available printers.
The port is shown as <host name>_<port>.
Example: AXIS100086_LPT1.
5. Select the print server port you want to use.
6. Select an appropriate printer driver for your printer from the Printer Model
drop-down list. If the printer is not available in the list, select Generic.
(Note: Generic is only used for postscript printers.)
You can also browse for a printer driver on your computer or network by
selecting Other... from the list.
Adding Printers in Macintosh
7. Click Add to complete the installation.
Installation of LPR printing in MAC OS X
If you want to print using LPR, select:
1. Printers | Add Printer...
2. From the Printer List dialog, select LPR printers using IP.
3. Enter the IP address or host name of the print server in the LPR printer’s
Address field. You must uncheck the Use Default Queue on Server check
box and enter a Queue Name:
Ports available USB port Parallel port 1 Parallel port 2 Serial port
AXIS 5570e USB1 LPT1 — —
Choose a printer driver from the Printer Model list and click Add to finish.
AXIS 5570e User’s Manual 83
Page 84

Adding Printers in Macintosh
Installation on Mac OS 9.1 or older, using AppleTalk
Basic Configuration On Mac OS 9.1 or older, basic configuration in AppleTalk is performed
simply by opening the Chooser window and selecting a printer.
You can change the default name of your print server or any of default
parameters by editing the print server’s config file. To access the config
file from a Macintosh, you can use:
• any Web browser with Javascript enabled
• FTP using MacTCP, Fetch or Anarchie
In order to use any of these methods, you must assign an IP address to the
print server as described in “Setting Parameters” on page 86.
Choosing a Printer
Selecting a Printer The method for choosing a printer varies depending on which version of
LaserWriter printer driver you are using.
Autodetect Printer
Type
• The LaserWriter 7.0 driver assumes that you use a standard PostScript
driver, and cannot take advantage of any printer specific features.
• The LaserWriter 8.0 driver uses PPD files that contain printer
descriptions. This gives you full control over any features your printer
might have.
The print server can automatically detect the type of printer you are using if you enable Autodetect Printer Type. The print server can then recognize Epson and Hewlett Packard InkJet printers. Most Epson and Hewlett Packard InkJet printers that have Mac OS printer drivers for network printing are supported. Without the Autodetect Printer Type function, the AppleTalk printer type has to be specified manually in the print server. For Epson InkJets it would be "EPSONLQ2" and for HP InkJets it would be "DeskWriter". If the print server does not recognize the connected printer, the default setting "LaserWriter" will be used as printer type. "LaserWriter" is the recommended setting to be used with all PostScript printers.
To enable Autodetect Printer Type, log in to your print server’s Web
interface and select Admin | Network Settings | Detailed View |
Macintosh | Auto Detect Printer Type | Yes.
See the Help pages in the print server’s Web interface for details.
LaserWriter 7.0 Printer
Driver
84 AXIS 5570e User’s Manual
Follow the instructions below to choose a printer:
1. Select Chooser from the Apple menu.
2. Click the LaserWriter icon.
3. If your network has more than one zone, click on the zone you want. (If your
network does not have any zones, this box will not appear.)
Page 85

Adding Printers in Macintosh
4. Click the name of the printer you want — the ports are shown as <host
name>_<port>. Example: AXIS100086_USB1.
5. Click the Close box. This completes the configuration and closes the
Chooser.
Repeat this procedure for each Macintosh computer on the network using
the print server.
LaserWriter 8.0
Printer Driver
Follow the instructions below to choose a printer:
1. Select Chooser from the Apple menu.
2. Click the LaserWriter 8.0 icon.
3. If your network has more than one zone click on the zone you want. (If your
network does not have any zones, this box will not appear.)
4. Click the name of the printer you want — the ports are shown as <host
name>_<port>. Example: AXIS100086_USB1.
5. Click Setup... and then Auto Setup. If the selected printer supports bidirectional printing and the appropriate PPD file is available, the installation
is performed automatically and you can therefore proceed directly to step
7 (if this is not the case, the PPD file must be selected manually, as described
in step 6).
6. Choose the PPD file matching your printer, and click OK.
If your printer does not appear in the PPD file list, please contact your printer
vendor. Use the Generic PPD if you do not need any printer specific features.
7. Click OK, and then click the Close box. This completes the configuration and
closes the Chooser.
Repeat this procedure for each Macintosh computer on the network using
the print server.
Bi-directional
Support
The AXIS 5570e allow the printer driver to communicate directly with the
printer and consequently facilitates complete functional control over
print jobs, e.g. automatic downloading of fonts not resident in the printer.
This functionality has backward compatibility with older printers and
Macintosh computers, which means that the AXIS 5570e can generate
appropriate responses to Macintosh printer queries when the connected
printer does not support bi-directional communication.
Verifying the Setup You simply need to print a document from the Macintosh computer to
verify communication to the chosen printer. The basic installation can be
considered complete if the print test is satisfactory. The AXIS 5570e is
now ready for use.
BCP and TBCP You should specify if you want to enable or disable binary transfer of
print data in the print server’s Web interface (Admin | Network Settings
| Detailed View | Macintosh | Binary Protocol for Printer n. By enabling
AXIS 5570e User’s Manual 85
Page 86

Adding Printers in Macintosh
Notes:
binary transfer you reduce printing time, provided that the print job is
sent as binary data to the print server. This is particular true when you are
printing large bitmaps.
• TBCP enables the print server to use the TBCP (Tagged Binary
Communication Protocol) to transfer print data to the printer. Select
this alternative when using Postscript printers.
• BCP enables the print server to use the BCP (Binary Communications
Protocol) to transfer print data to the printer. Select this alternative
when using Postscript printers.
• None disables all binary transfers, select this alternative for all nonPostScript printers and for ASCII PostScript printing.
• If you have have set the Autodetect Printer Type parameter to YES, the text output format
will be chosen automatically (Admin | Network Settings | Detailed View | Macintosh | Auto
Detect Printer n Type | Yes).
• Some printers, e.g. Epson InkJet printers, can not be used when TBCP is enabled.
Setting Parameters In AppleTalk, you can change a limited number of the parameters of the
AXIS 5570e. You can:
• enable and disable binary data transfers for your printing
• select the type of binary transfer protocol to use
• specify the AppleTalk printer type
• set the IP address
However, by assigning an IP address to your print server, you have access
to all of the print server parameters via any standard Web browser or via
FTP. Refer to “Management and Configuration” on page 127 for more
information.
Example: The following example describes how you set the print server parameters
in AppleTalk.
Important:
DO NOT use the parameter values from this example when configuring your print server. You
should select values that are appropriate for your printers and network settings.
Follow the instructions below:
1. Open the Chooser from the Apple menu.
2. Select a network printer driver — any LaserWriter will do.
3. Select the printer port ending with _CFG.
4. Close the Chooser.
5. Open a text editor, e.g. SimpleText.
86 AXIS 5570e User’s Manual
Page 87

Note:
Note:
Adding Printers in Macintosh
6. Write a text file containing the parameters you want to set:
BINARY_TYPE_1. :BCP
INT_ADDR. :192.168.3.191
ATYPE_1. :EPSONLQ2
Parameters that you do not want to set should be excluded from the text file. Refer to the
Parameter list in this manual for information about which values that are valid for each
parameter.
7. Print the text file. The settings will be stored in the print server.
8. Open the Chooser and select the printer port you wish to use for printing
documents.
9. Close the Chooser.
The _CFG port disappears 60 minutes after the AXIS 5570e has been powered on. If you want
it to reappear, you must restart your print server.
AXIS 5570e User’s Manual 87
Page 88

Adding Printers in NetWare
Section 8 Adding Printers in NetWare
This section describes how to continue the installation of the AXIS 5570e
in the NetWare environment. Identify which transport protocol you are
running on your network and which installation method you should use.
Continue the installation by selecting the appropriate installing
instructions from the table below:
Installation
method
NDPS
iPrint
Queue-based
printing
Transport protocol Action
TCP/IP
IPX/SPX
iPrint over LPR
iPrint over IPP
IPX/SPX
Basic Configuration
IPX/SPX
Advanced
configuration
See “Setup using NDPS” on page 88 and
“Public Access Printers” on page 89
“Controlled Access Printers” on page 93
See “Setup using iPrint” on page 102 and
“Install a printer using AXIS LPR Gateway Configuration
Snap-in” on page 105
See “Setup using iPrint” on page 102 and
“Install a printer with AXIS IPP Gateway Configuration
Snap-in” on page 104
To install using the AXIS NetPilot Installation Wizard,
see “Basic Setup with AXIS NetPilot” on page 107
If you need a more advanced installation that is not
covered by the AXIS NetPilot Installation Wizard, see
“Advanced Installation using AXIS NetPilot” on page
109
See “NetWare Administration” on page 113. for information on Novell’s
administration tools.
If you intend to operate your AXIS 5570e in a multi-protocol, mixed
environment, you should also proceed to the other relevant sections in
this manual.
Setup using NDPS
The AXIS 5570e supports Novell Distributed Print Services (NDPS). You
can run NDPS over Pure IP (TCP/IP) or IPX/SPX.
Before the AXIS 5570e can be installed, make sure that NDPS is installed
and a Broker is loaded on your NetWare file server.
Axis Network Print Server uses the AXIS NDPS Gateway for printing in
networks using either IP or IPX as transport protocols. The printer
gateways are included with the NDPS software (from version 5.1 and up)
and are automatically installed together with NDPS.
Installing the Axis
Network Print Server
in the NDPS
environments
88 AXIS 5570e User’s Manual
Having assigned an IP address to the AXIS 5570e as described in Setting
the IP Address, on page 15, you are now ready to install the Axis Network
Print Server for NDPS printing. You can select to install the connected
printers as public or controlled access printers. Follow the instructions
below to install the Axis Network Print Server using NDPS:
Page 89

Adding Printers in NetWare
Important:
• The NDPS Enabled parameter of the Axis Network Print Server is by default enabled. It must
be set to Yes in order for the communication between the print server and the NDPS gateway
to be enabled. To change this parameter, log in to the print server’s Web pages and choose:
Admin | Network Settings | Detailed View | NetWare=> NDPS Enabled => Yes.
• If you do not have an NDPS Manager object available, start out with creating one in the NetWare Administrator.
Public Access Printers Follow these instructions to create a public access printer using the NDPS
Manager object in your NetWare administrator utility:
1. Double-click on the NDPS Manager object you will be using to control
the Printer Agents.
2. On the Identification page for the NDPS Manager, click the printer Agent
List button. The Printer Agent List dialog will appear.
3. Click New. The Create Printer Agent dialog will appear.
4. Type a name of your choice in the NDPS Printer Agent field:
5. Select the Axis Gateway configuration in the Gateway Type window.
6. Click OK
7. In the Select the printer’s type window, choose your printer. If you cannot
find the printer, select an appropriate Generic one (PCL, PS, etc)
8. Select TCP/IP (default) or IPX as network protocol. Click Next.
AXIS 5570e User’s Manual 89
Page 90

Adding Printers in NetWare
9. You will find the print server in the next window with the printer attached
on the connected port. Depending on the transport protocol you used when
you start the installation, the print server should appear as following:
• TCP/IP Network protocol:
IP Address and Port, e.g: 192.168.70.243 and LPT1
1. Only the ports with a connected printer show up in this window. If the
printer is not in the displayed print list, click Manually specify the print
server and do the following:
Enter the print server’s IP address in the IP Address Field
2. Choose a port in the Print Server Port field
e.g., 192.168.70.243 and LPT1
The available ports are :
Ports available USB port Parallel port 1 Parallel port 2 Serial port
AXIS 5570e other/unknown LPT1 — —
Note: “other/unknown”, stands for the USB1 port.
90 AXIS 5570e User’s Manual
Page 91

Adding Printers in NetWare
IPX Network protocol:
All the available ports will be presented, regardless if the printers are
or not connected to those ports, e.g.
LPT1 AXIS5FF66A_P1
LPT2 AXIS5FF66A_P2
USB1 AXIS5FF66A_P2
COM1 AXIS5FF66A_P3
The IPX Addresses for the above printers will appear as:
<IPX External Network Number>:<Print server’s HW
address>:<Socket Number>
i.e.: 01d7e1c2:00408c5ff6a6:400c
where 400c, 401c, and 402c are the socket numbers corresponding to
the LPT1, LPT2, USB1 and COM1 physical ports:
LPT1 400c
LPT2 401c
USB1 401c
COM1 402c
AXIS 5570e User’s Manual 91
Page 92

Adding Printers in NetWare
If the printer is not in the displayed print list, click Manually specify
the print server and do the following:
1. Enter the <IPX External Network Number> in the Network field.
2. Enter the <Print server’s HW address> in the LAN HW address field.
3. Choose a port in the Print Server Port field, e.g. 01d7e1c2:00408c5ff6a6
and LPT1
Ports available USB port Parallel port 1 Parallel port 2 Serial port
AXIS 5570e other/unknown LPT1 — —
Note: other/unknown, stands for the USB1 port.
4. When done, select your printer and click Finish.
92 AXIS 5570e User’s Manual
Page 93

Adding Printers in NetWare
5. Next, select the printer drivers for each client operating system. (Windows
2000, NT and 95/98). These drivers will be automatically downloaded to
users’ workstations when they install this printer in the future.
6. Click Continue and OK in the next NDPS window. The new Printer Agent
appears in the Printer Agent List window.
Controlled Access
Printers
Check the Status: it should be Idle.
7. Press Cancel to close the NDPS Manager
To install the printer on the workstation, See “Installing an NDPS Printer
on the Workstation” on page 99.
Follow these steps to create a controlled access printer as an object in the
Directory Tree, using the NetWare administrator utility:
1. Log in as Admin.
2. Start the NW Admin utility on any Workstation
(SYS:PUBLIC\WIN32\nwadmin32.exe).
3. Browse the context your NDPS Manager resides in.
AXIS 5570e User’s Manual 93
Page 94

Adding Printers in NetWare
4. From the Object menu, select Create. The New Object dialog appears.
5. Select NDPS Printer. The Create NDPS Printer dialog appears.
6. Type a name of your choice in the NDPS Printer Name field, e.g.
AXIS5FF66A_IPX1
In the Printer Agent Source field, select the source of the Printer Agent. The
following options are available:
- Create a New Printer Agent. If you select this option, you are asked to
select either the Novell Gateway or a third party Gateway.
- Printer Agent on Existing NDS Object. Use a Printer already configured
as a controlled access printer (NDPS Printer Object).
If you select this option, a list of current NDPS Printer Objects in this
container will be displayed from which you can select the one you want to
use.
- Public Access Printer Agent. Use an existing Printer Agent representing
a Public Access Printer.
7. Select Create a New Printer Agent and click Create to display the Create
Printer Agent dialog.
94 AXIS 5570e User’s Manual
Page 95

Adding Printers in NetWare
8. Confirm the Printer Agent name (default is the name of the new printer you
are creating) and browse to select the NDPS Manager to which you want
to assign it
9. Select AXIS Gateway Configuration in the Gateway Type field.
10. Click OK.
11. In the Select the printer’s type window choose your printer. If you cannot
find the printer, select an appropriate Generic one (PCL, PS, etc)
12. Select TCP/IP (default) or IPX as network protocol.
13. Click Next.
14. You will find the print server in the next window with the printer attached
on the connected port.
Depending on the transport protocol you used when you start the
installation, the print server will appear as:
AXIS 5570e User’s Manual 95
Page 96

Adding Printers in NetWare
• TCP/IP Network protocol:
IP Address and Port, e.g.
192.168.70.243
and
LPT1
Only the ports with a connected printer will show up in this window.
If the printer is not in the displayed print list:
1. Click Manually specify the print server enter the print server’s IP address
in the IP Address Field.
2. Choose a port in the Print Server Port field e.g., 192.168.70.243 and LPT1:
Ports available USB port Parallel port 1 Parallel port 2 Serial port
AXIS 5570e other/unknown LPT1 — —
Note: other/unknown stands for the USB1 port.
96 AXIS 5570e User’s Manual
Page 97

Adding Printers in NetWare
IPX Network protocol:
All the available ports will be presented, regardless if the printers are
or not connected to those ports,.
LPT1 AXIS5FF66A_P1
LPT2 AXIS5FF66A_P2
USB1 AXIS5FF66A_P2
COM1 AXIS5FF66A_P3
The IPX Addresses for the above printers will appear as:
<IPX External Network Number>:<Print server’s HW
address>:<Socket Number>
i.e.: 01d7e1c2:00408c5ff6a6:400c
where 400c, 401c, and 402c are the socket numbers corresponding to
the LPT1, LPT2, USB1 and COM1 physical ports:
LPT1 400c
LPT2 401c
USB1 401c
COM1 402c
If the printer is not
in the displayed print list:
1. Click Manually specify the print server and enter the <IPX External
Network Number> in the Network field.
2. Enter the <Print server’s HW address> in the LAN HW address field.
AXIS 5570e User’s Manual 97
Page 98

Adding Printers in NetWare
3. Choose a port in the Print Server Port field:
e.g.: 01d7e1c2:00408c5ff6a6 and LPT1.
Ports available USB port Parallel port 1 Parallel port 2 Serial port
AXIS 5570e other/unknown LPT1 — —
Note: other/unknown stands for the USB1 port.
4. When done, select your printer and click Finish.
5. Next, select the printer drivers for each client operating system. (Windows
2000, NT and 95/98). These drivers will be automatically downloaded to
users’ workstations when they install this printer in the future.
6. Click Continue and OK in the next NDPS window. Your printer will appear
as an NDS object in the Directory Tree and will offer a full range of network
security options.
To install the printer on the workstation, See “Installing an NDPS Printer
98 AXIS 5570e User’s Manual
Page 99

on the Workstation” on page 99.
Adding Printers in NetWare
Installing an NDPS
Printer on the
Workstation
Using Novell Printer
Manager
To install the printer on a workstation, use either Novell Printer Manager
(NetWare 5.1 only) or the Add Printer Wizard on the local workstation.
1. Log in as Admin.
2. On the any workstation, browse to
<NW 5.1 File Server>\SYS:PUBLIC\Win32
and start Nwpmw32.exe (Novell Printer Manager).
The Novell Printers dialog appears, displaying a list of installed Public or
Controlled printers (if any printers have previously been installed on the
workstation).
3. From the Printer Manager’s Printer pull down menu, select New.
4. Click Add. A list of available printers appears.
AXIS 5570e User’s Manual 99
Page 100

Adding Printers in NetWare
5. The list of available printers shows the NDPS Public Access Printers on the
network and the NDPS Controlled Access Printers in you current NDS
context. To see the Controlled Access Printers in other context that you have
rights to, click the Browse button and select your choice. Click OK.
6. Once selected, click Install. The Novell Printers – Install dialog appears.
7. Click OK. The default driver for that printer is then automatically
downloaded.
If the printer object does not have a printer driver associated with it, or a
driver was not found, you will be prompted to either to choose from a list
of printer drivers provided by NDPS or to provide a disk with the appropriate
driver.
The Novell Printers dialog appears with the new printer, e.g.
AXIS5FF6A6_IPX1
in the installed list.
8. Click Close.
In the Novell Printer Manager window the new installed NDPS printer
appears with the name e.g. AXIS5FF6A6_IPX1
and is available for print jobs.
100 AXIS 5570e User’s Manual
 Loading...