

Page 1

AXIS 2460
Network DVR
User’s Manual
Page 2

2
AXIS 2460 User’s Manual
About This Document
This document is intended for both administrators and
users of th e AXIS 2460 Ne t w ork DVR, and is applicable for
firmware release 3.10 and above. The document contains
information for configuring, managing and using the unit,
as well as a general overview of the product functionality.
Detailed instructions for using the product are also
available in the on-l in e Help.
Readers are recommended to use this document as a
supplement to the on- line infor mation ava ilable via the
Web-based interface. Later versions of this document will
be posted to the Axis Website, as and when required.
Safety Notices Used in This Manual
Caution! - Indicates a potential hazard that can damage the
product.
Important! - Indicates a hazard that can seriously impair
operation.
Do not proceed beyond any of the above safety notices
until you have fully understood the implications.
Caution - To prevent fire or electrical shock, d o not expose
the unit to rain or moisture, nor remove the cover. For
service, please return the unit to the place of purchase.
The AXIS 2460 conforms to the safety standard EN60950,
C-UL.
Intellectual Property Rights
Axis AB has intellectual property rights relating to
technolo gy embodie d in the produ ct described in this
document. In particular, and without limitation, these
intellectual property rights ma y in clude one or more of the
patents listed at http://www.axis.com/patent.htm and one
or more additional patents or pending patent a p plications
in the US and other countries.
Legal Considerations
Camera surveillance may be prohibited by laws that vary
from country to country. Check the laws in your local
region before using the AXIS 2460 for surveillance
purposes.
Electromagnetic Compatibility (EMC)
This equipment generates, uses, and can radiate radio
frequency energy, and if not installed and used in
accordance with the instruction manual, may cause
interference to radio communications. Operation of this
equipmen t in a residential area is likely to cause
interference, in which case th e user at his/her o w n expense will
be required to take whatever measures may be required to
correct t he interfer ence. Shielded cables s hould be used with
this unit to ensure compliance with EMC standards
USA - This equipment has been tested and found t o co mply
with the limits for a Class A computing device pursuant to
Subpart B of Part 15 of FCC rules, wh ich are designed to
provide reasona ble protection aga ins t s uch in te r f erence when
operated in a commercial environment.
Europe - This digital equipment fulfills t he
requirements for radiated emission accordi ng to limit B of
EN55022/1994, and the requirements for immunity according
to EN55024/1998 residential, commercial, and light industry.
Liability
Every care has been taken in the preparation of this manual. If
you detect any inaccuracies or omissions, please inform your
local Axis office. Axis Communications AB cannot be held
responsible for any technical or typographical errors and reserves
the right to make changes to the product and manuals without
prior notice. Axis Communications AB makes no warranty of any
kind with regar d to th e m ate ria l co nta in ed w ithi n th is do cume nt ,
including, but not limited to, the implied warranties of
merchantability and fitness for a particular purpose. Axis
Communications AB shall not be liable nor responsible for
incidental or consequential damages in connection with the
furnishing, performance or use of this material.
Trademark Acknowledgments
Acrobat, Adobe, Boa, Ethernet, IBM, Internet Explorer, LAN
Manager, Linux, Macintosh, Microsoft, Netscape Navigator,
OS/2, UNIX, Windows, WWW are registered trademarks of the
respective holders. Java and all Jav a-b ase d trade m ar ks and
logos are trademarks or registered tra dem arks of Sun
Microsystems, Inc. in the United States and other countries. Axis
Communications AB is independen t of Sun Mic ros ystems Inc.
AXIS 2460 Network DVR User’s Manual
Revision: 1.1
Part no: 20300
Dated: April 2003
Copyright © Axis Communications AB,
2002-2003
AXIS COMMUNICATIONS
<Product Name> Quick User’s Guide
Page 3

AXIS 2460 User’s Manual
Table of Contents
Product Overview . . . . . . . . . . . . . . . . . . . . . . . . . . . . . . . . . . . . . . . . . . . . . . . . . 5
Features and Benefits . . . . . . . . . . . . . . . . . . . . . . . . . . . . . . . . . . . . . . . . . . . . . . . . . . 5
Description . . . . . . . . . . . . . . . . . . . . . . . . . . . . . . . . . . . . . . . . . . . . . . . . . . . . . . 9
The Front Panel . . . . . . . . . . . . . . . . . . . . . . . . . . . . . . . . . . . . . . . . . . . . . . . . . . . . . . . 9
The Rear Panel . . . . . . . . . . . . . . . . . . . . . . . . . . . . . . . . . . . . . . . . . . . . . . . . . . . . . . . 10
Checking The Hardware Inventory. . . . . . . . . . . . . . . . . . . . . . . . . . . . . . . . . . . . 11
Installing the AXIS 2460 Network DVR . . . . . . . . . . . . . . . . . . . . . . . . . . . . . . . . 12
Network Installation . . . . . . . . . . . . . . . . . . . . . . . . . . . . . . . . . . . . . . . . . . . . . . . . . . 12
Installing via the Null Modem Cable . . . . . . . . . . . . . . . . . . . . . . . . . . . . . . . . . . . . . . 15
Connecting and Configuring Cameras . . . . . . . . . . . . . . . . . . . . . . . . . . . . . . . . . 18
Complete Camera Settings . . . . . . . . . . . . . . . . . . . . . . . . . . . . . . . . . . . . . . . . . . . . . 18
Setting up Events and Alarms . . . . . . . . . . . . . . . . . . . . . . . . . . . . . . . . . . . . . . . 20
About Events . . . . . . . . . . . . . . . . . . . . . . . . . . . . . . . . . . . . . . . . . . . . . . . . . . . . . . . . 20
The Recording Options Overview . . . . . . . . . . . . . . . . . . . . . . . . . . . . . . . . . . . . . . . . . 20
Creating a Simple Event . . . . . . . . . . . . . . . . . . . . . . . . . . . . . . . . . . . . . . . . . . . . . . . 21
Configuring Alarms . . . . . . . . . . . . . . . . . . . . . . . . . . . . . . . . . . . . . . . . . . . . . . . . . . . 22
Creating an Alarm-Controlle d E v ent . . . . . . . . . . . . . . . . . . . . . . . . . . . . . . . . . . . . . . 22
Complete Event Set tin g s . . . . . . . . . . . . . . . . . . . . . . . . . . . . . . . . . . . . . . . . . . . . . . . 23
Complete Alarm Settings . . . . . . . . . . . . . . . . . . . . . . . . . . . . . . . . . . . . . . . . . . . . . . . 27
Event Examples . . . . . . . . . . . . . . . . . . . . . . . . . . . . . . . . . . . . . . . . . . . . . . . . . . . . . . 28
3
Working with Recordings . . . . . . . . . . . . . . . . . . . . . . . . . . . . . . . . . . . . . . . . . . 30
The AXIS Video Player . . . . . . . . . . . . . . . . . . . . . . . . . . . . . . . . . . . . . . . . . . . . . . . . . 33
Creating an AVI Movie . . . . . . . . . . . . . . . . . . . . . . . . . . . . . . . . . . . . . . . . . . . . . . . . . 35
About Codecs . . . . . . . . . . . . . . . . . . . . . . . . . . . . . . . . . . . . . . . . . . . . . . . . . . . . . . . 36
System Options. . . . . . . . . . . . . . . . . . . . . . . . . . . . . . . . . . . . . . . . . . . . . . . . . . 37
System Options Overview . . . . . . . . . . . . . . . . . . . . . . . . . . . . . . . . . . . . . . . . . . . . . . 38
Network Settings . . . . . . . . . . . . . . . . . . . . . . . . . . . . . . . . . . . . . . . . . . . . . . . . . . . . . 39
Mail Settings . . . . . . . . . . . . . . . . . . . . . . . . . . . . . . . . . . . . . . . . . . . . . . . . . . . . . . . . 40
COM-Ports . . . . . . . . . . . . . . . . . . . . . . . . . . . . . . . . . . . . . . . . . . . . . . . . . . . . . . . . . . 41
Modem Settings . . . . . . . . . . . . . . . . . . . . . . . . . . . . . . . . . . . . . . . . . . . . . . . . . . . . . 42
ISP Settings . . . . . . . . . . . . . . . . . . . . . . . . . . . . . . . . . . . . . . . . . . . . . . . . . . . . . . . . . 43
Date & Time . . . . . . . . . . . . . . . . . . . . . . . . . . . . . . . . . . . . . . . . . . . . . . . . . . . . . . . . . 43
Users . . . . . . . . . . . . . . . . . . . . . . . . . . . . . . . . . . . . . . . . . . . . . . . . . . . . . . . . . . . . . . 45
Firewall Settings . . . . . . . . . . . . . . . . . . . . . . . . . . . . . . . . . . . . . . . . . . . . . . . . . . . . . 46
Maintenance . . . . . . . . . . . . . . . . . . . . . . . . . . . . . . . . . . . . . . . . . . . . . . . . . . . . . . . . 47
Support . . . . . . . . . . . . . . . . . . . . . . . . . . . . . . . . . . . . . . . . . . . . . . . . . . . . . . . . . . . . 48
Page 4

4
AXIS 2460 User’s Manual
The Factory Default Settings. . . . . . . . . . . . . . . . . . . . . . . . . . . . . . . . . . . . . . . . . 49
Appendix A - Recording Storage and Reduction . . . . . . . . . . . . . . . . . . . . . . . . . . 50
Appendix B - The LED Indicators . . . . . . . . . . . . . . . . . . . . . . . . . . . . . . . . . . . . . 54
Appendix C - Troubleshooting . . . . . . . . . . . . . . . . . . . . . . . . . . . . . . . . . . . . . . . 55
Appendix D - Other IP Setup Methods . . . . . . . . . . . . . . . . . . . . . . . . . . . . . . . . . 58
Appendix E - Updating the Firmware. . . . . . . . . . . . . . . . . . . . . . . . . . . . . . . . . . 61
Appendix F - Installing Hard Disks. . . . . . . . . . . . . . . . . . . . . . . . . . . . . . . . . . . . 62
Appendix G - Unit Connectors . . . . . . . . . . . . . . . . . . . . . . . . . . . . . . . . . . . . . . . 64
Appendix H - Technical Specifications . . . . . . . . . . . . . . . . . . . . . . . . . . . . . . . . . 69
Index . . . . . . . . . . . . . . . . . . . . . . . . . . . . . . . . . . . . . . . . . . . . . . . . . . . . . . . . . . 71
Page 5
AXIS 2460 User’s Man ual Product Overview
Product Overview
The AXIS 2460 Network DVR (Digital Video Recorder) records directly from up to four
analog video cameras via standard video cabling. All administration and viewing of
recorded material is via a sta ndard web browse r (Inter net Expl orer) over a TCP /IP network.
The AXIS 2460 includes all of the necessary components for recording and viewing
recorded sequence s over the ne twork, includi ng its own b uilt-i n Web ser ver, pr oviding full
Web-based control of the product management and configuration functions via a browser
over the network.
5
The AXIS 2460 Network DVR
Used primarily via a direct Ethernet or Fast Ethernet network connection, the AXIS 2460
can also connect to an Internet Service Provider via an external modem.
The installa ti on pro ces s is sim pl e and the pro d u ct in teg rat e s seam l es s ly int o yo ur
networking and application environments. The AXIS 2460 offers a cost-effective imaging
solution with minimal installation and maintenance costs.
Features and Benefits
Ease of Use - The AXIS 2460 Network DVR:
• is completely independent of any other server
• is easily installed, simply by assigning an IP address
• requires no further hardware such as PC frame-grabber cards
• only needs Microsoft Internet Explorer 5.0 or higher for viewing live images or recordings
over the network.
• works with Windows 98, ME, XP, NT and 2000.
Page 6

6
Product Overview AXIS 2460 User’s Manual
Recordin gs - The AXIS 2460 allows continuous unattended recording to a hard disk. Live
images can be viewed while recording, administration can be performed at any time, and
playback can be started while other recordings are in progress. Digital image storage
eliminates the multiple-use degradation associated with video tapes.
• Remote access from any PC over the network
• Continuous, event/alarm, manual and scheduled recording modes.
• Records and displays events directly — no waiting for tapes to engage or rewind
• Event driven recording maximizes disk space by only recordi ng when an even t is det ecte d .
• Instant video retrieval from recordings list
• Automatic removal of recordings older than X days/hours can be enabled
• Searcha b l e R ecordings Li st
• No glitches when changing tapes, or forgetting to change tapes.
Optimized Storage/reduction - The AXIS 2460 manages the recordings stored on its disks via
a system that makes the best use o f the avai lable sp ace. A speci al red uct ion alg ori thm, the
patent-pending Axis APViS, ensures that the recordings you designate as "important" are
retained for mu ch longer than when usi ng a simple FIF O (First-in Fir st-out) system. Instead
of abruptly deleting recordings, the reduction algorithm gradually reduces the recording’s
frame rate, thus saving on disk space and allowing the recording to be kept for much
longer. The re ducti on p r oce ss is fu lly configurab le and r eco rd in gs c an a ls o b e lo cke d, th us
preventing any reduction.
Secure Storage - The AXIS 2460 ensures that no recordings are totally lost in the case of a
disk failure. This is accomplished by virtue of the fact that a recording consists of a series
of images that are much the s ame and whic h are d is trib uted among all t he co nnect ed hard
disks in a sequential fashion. If every fourth image is lost, this only means a reduction in
frame rate, not that all the information is lost. In this way, important surveillance video is
assured, even in the unlikely event of a hard disk failure.
As an example, if you h ave 4 h ard di sk s a nd o ne o f them f a il s, th e red uc tio n i n fr ame r ate
will be (100/4) %.
Built-in Video Player - No need for extra viewing software. Simply click on the desired
recording in the recordings list in your browser and the AXIS Video Player starts
automatically.
• Playback and forward/reverse search at adjustable speeds, or view frame-by-frame
• Playback by date/time, event and camera
• Playback by choosing a recording from the recording list
• Snapshots are easily saved, and AVI movies can be quickly created using the AXIS AVI Maker
ActiveX component (included).
Page 7

AXIS 2460 User’s Man ual Product Overview
Live Viewing - Quad or single display of live images in your browser. No other software
required.
Built-in support for PTZ Devices - Connected cameras can be controlled and positioned with
the aid of a Pan/Tilt/Zoom device. These devices are connected and controlled directly
from the AXIS 2460.
Simple Administration - Using a standard browser (Internet Explorer), all of the AXIS 2460’s
functions are con figured a nd manage d over th e network, di rectly f rom its own Web pages.
There are global settings and there are individual event settings.
Security - Access can be restricted to defined users only, at three different authorization
levels, from Administr ator t o Viewer . Pass words ens ure pr otecti on agains t unau thorize d or
unintentional recording, playback or administration. The built-in firewall guards against
unauthorized use of the AXIS 2460.
Fully Configurable Event Settings - The AXIS 2460 makes it easy to set up events. When al l of
the criteria for the event have been fulfilled, the event will begin to record. It is also
possible to configure pre-buffers and a fixed recording duration, as well as send event
notification via e-mail.
7
Alarm Inputs and External Devices - Up to four separate alarm devices can be used to trigger
events (recordings). The single output relay can be used to control external equipment.
Supporting the RS-232 and RS-485 communication protocols, the AXIS 2460 includes the
physical interfaces for connecting a variety of external devices, such as; doorbells,
switches and alarm relays. You can even drive annunciators and other audible alarm
devices using the relay output.
Cost-effective - The AXIS 2460 provides a reliable and low-cost resource for high-quality
recordings and imaging over the network. Requires none of the hidden accessories
normally required by other imaging systems, such as expensive software, management
workstations, dedicated applications or PC frame-grabber cards.
Open Standards Environment - The AXIS 2460 supports TCP/IP networking, SMTP, HTTP and
other Internet-related protocols. It integrates easily into other WWW/Intranet applications
and CGI scripts. Note however, that only Internet Explorer on Windows can display live
images and recordings.
Image Updating - The on-board AXIS ETRAX 100-LX processor combined with the
revolutionary AXIS ARTPEC-1 Real Time Picture Encoder provides an amazing
power-synergy to deliver up to 25/30 frames/second over 10Mbps or 100Mbps networks.
High Compression - The AXIS ARTPEC chip affords both an efficient and variable ratio of
JPEG image compression th at can be defined by the user.
Page 8

8
Product Overview AXIS 2460 User’s Manual
Modem Support - The Point-to-Point Protocol (PPP) support allows you to use your AXIS
2460 remotely over a serial link, just as if it were located on your local network. You can
initially set up the unit over the network, or from a computer connected directly by the
supplied Null Modem cable, and then access it via a standard Dial-up (PPP) connection.
Linux Operating System - The AXIS 2460 includes modified versions of the Boa Web server,
and Linux operating system - both of which are freely distributed under the GNU General
Public License, as published by the Free Software Foundation. This software provides a
stable and reliable platform for open-source development of the product. In accordance
with the GNU General Public License, Axis has published the kernel for this product at
http://developer.axis.com/.
Page 9

AXIS 2460 User’s Manual Description
Description
Please read the following information to familiarize yourself with the AXIS 2460, making
particular note of where the connectors and indicators are located. This section provides a
useful reference when installing the product.
The Front Panel
Please refer to the numbered explanations for a brief description of the indicators on the
front panel.
❶
9
❻❼❺❸❹❷
❶Power Button - To switch the unit ON, simply press the button once. To switch the unit
OFF, press and hold the button in for 1-2 seconds, until the power indicator
Amber. The shutdown process will then continue and can take up to 60 seconds to
complete. This saves settings, recordings etc, before shutting down. If the power is simply
disconnected, there wi ll be a serious risk of losing recorded material.
❷Power - The Power indicator shows Green during normal operation.
❸Network - The Network indicator flashes for network activity. A solid Red indicator
signifies no network connection.
❹Disk - The Disk indicator flashes Amber when writing to the disk, and Green when
reading.
❺Status - The Status indicator shows Green for normal operation.
❻Video 1-4 - The indicators for the video inputs indicate if the input is enabled and if
recording is in progress.
❷ turns
❼Alarm 1-4 - The indicators show Yellow to indicate an alarm on the input.
Note: For a complete listing of the LED indicator colors and their meanings, please see The LED Indica-
tors, on page 54.
Page 10

10
Description AXIS 2460 User’s Manual
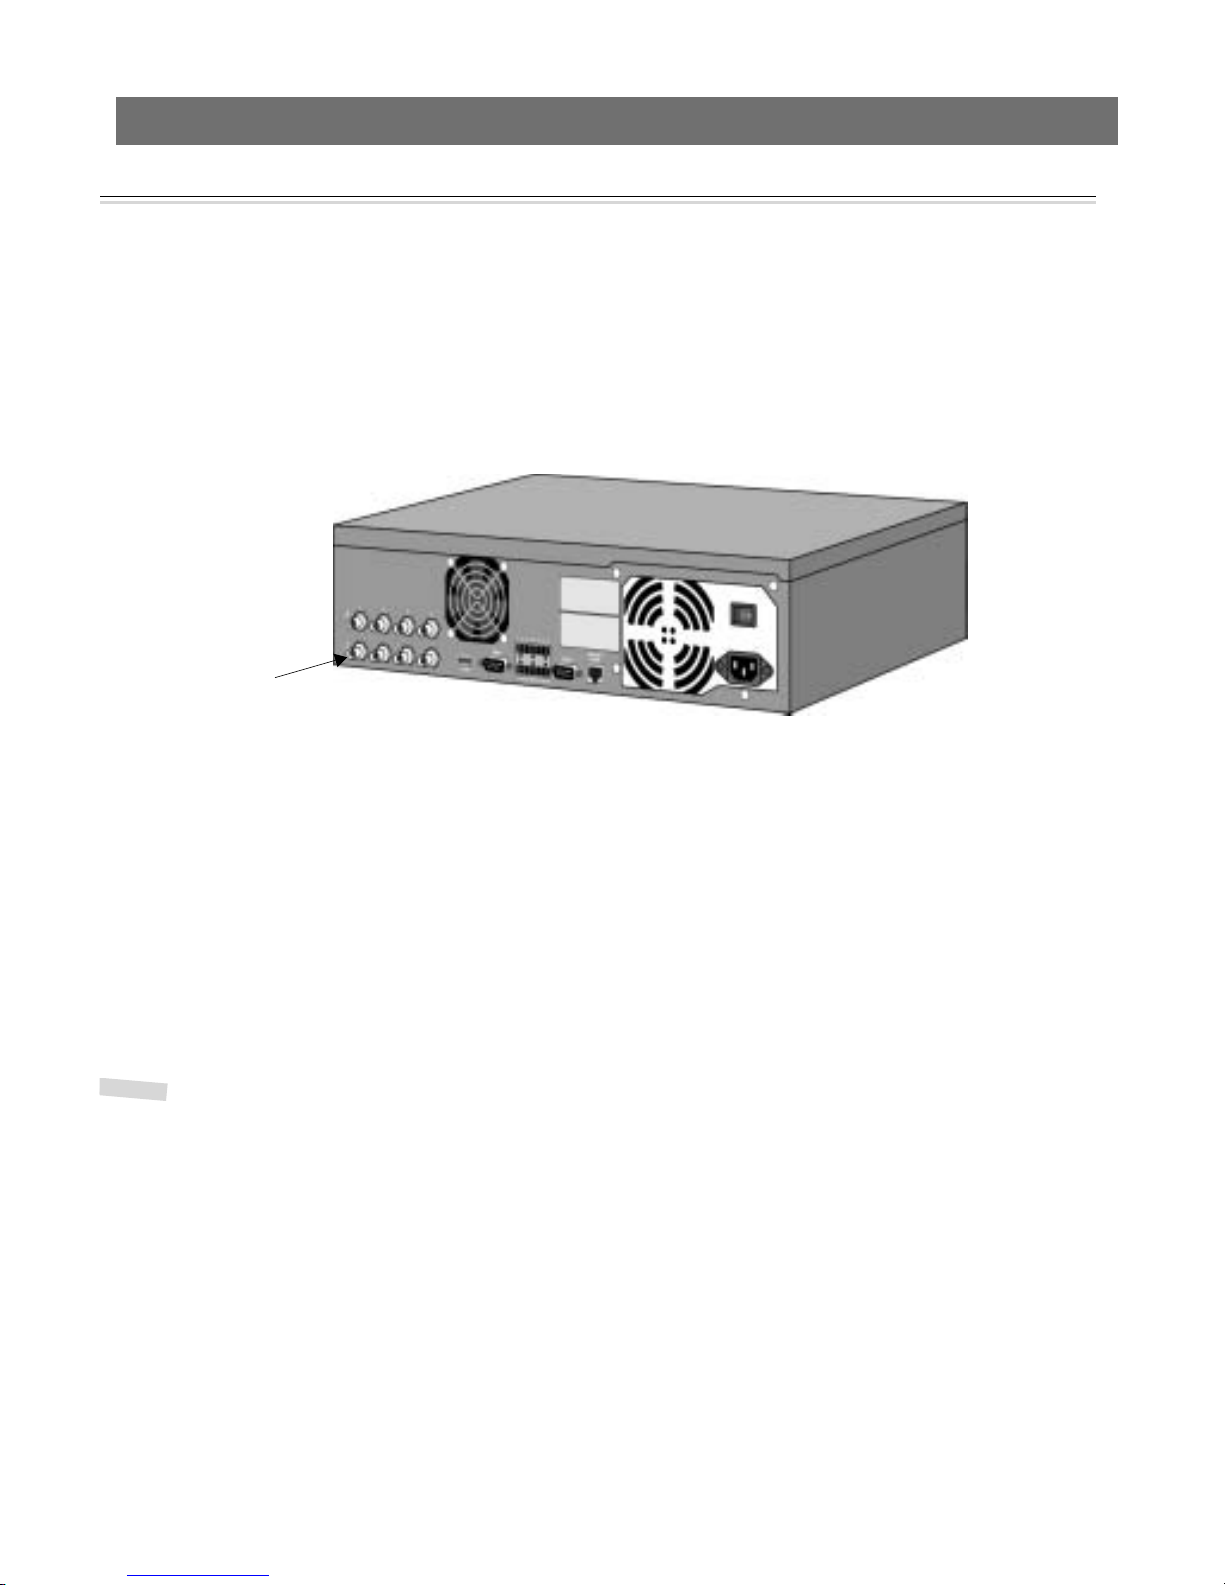
The Rear Panel
❼
❶
❸
❷
❶Video Outputs (4) - These outputs provide loop-throug h co nnection s, and can be used for
direct monitoring of the connected video cameras.
❷
Video Inputs (4) - Connect your standard PAL or NTSC video cameras to these inputs.
Factory Default butt on - This button will reset the unit to the original factory default
❸
settings. Use a paperclip or similar to press the button. See also The Factory Default
Settings, on page 49.
❹
Dip switches - Each video output has a single line termination switch. The unit is shipped
with the line termination enabled for each input; that is, with the DIP switches set to ON
(down). When, e.g., a monitor is connect ed in parallel with the video input (to moni tor the
input directly), the input termination should be disabled - by moving the DIP switch up to
the OFF-position. Failure to do so can cause the picture qua lity to be impaired.
❹
❺
❻
❽
❺
❾
❿
❺
COM-Port s - These ports can be used for controlling devices via TCP/IP or HTTP, or for
connecting Pan/Tilt/Zoom devices
• COM-1 - RS-232, max 115 Kbps. This port is multiplexed with the RS-485 port on the
terminal block, that is, only one interface can be used at once.
• COM-2 - RS-232, max 115 Kbps, half-duplex. A modem is connected here.
❻
Terminal Block Connector - 4 Alarm inputs, 1 relay output, and the RS-485 port are
connected via the terminal block. See Unit Connectors, on page 64 for more information.
❼
Serial Number - This serial number is used for setting the IP address.
Network Connector - 10baseT Ethernet or 100baseTX Fast Ethernet via the RJ-45 socket.
❽
❾
Main Power Switch - This switch should only be used after shutting down the unit
correctly with the help of the Power button on the front panel. Switch the unit off here if
you need to e.g. move the unit to another location, or to install a hard disk.
❿
Power Connector - Connect the power cable here. Using an Uninteruptible Power Supply
(UPS) is strongly recommended.
Page 11
AXIS 2460 User’s Manu a l Checking The Hardware Inventory
Mounting the Recorder
Important!
The AXIS 2460 is intended for indoor use only.
The unit is designed for conventional rack mounting, using the 2 brackets and screws
supplied. To fit the brackets, remove the 2 foremost screws on each side panel and then
screw the bracket on, as shown in the illustration below.
11
Remove the 2 screws on the side panel. Mount the bracket as
shown, using one of the supplied screws for the third hole.
Checking The Hardware Inventory
Check the items supplied with your AXIS 2460 against the list below and contact your
dealer if you find anything is missing or damaged.
Item Description Quantity Item Description Quantity
AXIS 2460 Network DVR 1 Power Cord 1
Null Modem Cable 1m 1 Rack Holder
Kit
This Document AXIS 2460 User’s Man-
ual v1.1
Disk Media AXIS Network Product CD
v1.2 (or later)
* If the unit is supplied with hard disks, then these kits are already installed.
1 Hard disk
Holder Kit *
1 Warranty
Document
2 brackets, 2
screws
1
0, 1 or 2
1
Page 12
12
Installing the AXIS 2460 Network DVR AXIS 2460 User’s Manual
Installing the AXIS 2460 Network DVR
Before you begin the installation of your AXIS 2460 Network DVR, please read the
following notice concerning operating systems and browsers:
Important!
The AXIS 2460 was developed for use with Microsoft Internet Explorer (5.0 or higher) running on Windows 98/ME/XP/NT or 2000. This is because the v iewing of live images and the built-in Video Player both
require an ActiveX control for their function, which is currently only supported by Internet Explorer.
Other browsers and other operating systems can be used for installing the unit and for administration
purposes, but live images and the Video Player will not function correctly.
Network Installation
• Easy installation - Use The AXIS IP Installer. See Using the AXIS IP Installer on page 59.
• Quick installation - Follow the instructions below to install the AXIS 2460 onto an Ethernet
network.
• Macintosh users - Please refer to Notes for Macintosh Users on page 60.
❶Make sure that the main power switch is
set to O. Attach the power cable to the unit
and connect it to your local mains supply.
❷Connect an Ethernet cable
to the AXIS 2460 and attach it
to the network.
❸ Note the Serial number on the rear panel of the
unit. You need to know this to set the IP address.
Serial number same as
MAC/Ethernet address; e.g.
00408c100086 =
00-40-8c-10-00-86
❹ Setting the IP address using ARP and PING (as described below) will require
Administrator privileges on Windows NT, Windows 2000 and Windows XP Professional.
This is not required for Windows 98, ME or XP Home. Use of the arp command on UNIX
systems may require root access.
Page 13

AXIS 2460 User’s Manual Installing th e AXIS 2460 Ne twork DVR
Using the appropriate method for your operating system, assign your product with a
unique IP address (do not
follows:
use the example below) from a computer on your network, as
13
Windows - Start a co mmand prompt and ty pe these commands:
Syntax:
arp -s <IP address> <Ethernet address> <my PC IP address>
ping -t <IP address>
Example:
arp -s 123.123.123.123 00-40-8c-10-00-86 123.123.123.122
ping -t 123.123.123.123
UNIX - Type these commands in your command line:
Syntax:
arp -s <IP address> <Ethernet address> temp
ping <IP address>
Example:
arp -s 123.123.123.123 00:40:8c:10:00:86 temp
ping 123.123.123.123
Note: On some UNIX systems, the arp command can be located in a directory that is not on
the command path.
Y ou will now see ‘
Request timed out...’ messages repe atedly re turne d in the c ommand
window.
❺Now turn the main power switch on the rear panel to I.
❻After approximately 30-40 seconds, the message ‘Reply from 123.123.123.123..’
or similar, is returned within the prompt window. Check that the Power Indicator is
permanently lit and that the Network Indicator flashes intermittently.
❼Exit Ping. The IP address has now been set and you are ready to access the AXIS 2460
from your browser, as described below.
Page 14
14
Installing the AXIS 2460 Network DVR AXIS 2460 User’s Manual
Verifying and Completing the Installation From Your Browser
1. Start your browser and enter the IP address of your AXIS 2460 in the location/address
field. Any cameras connected to the unit will be shown as disabled. Click the links
provided to enable them. See also Connecting and Configuring Cameras on page 18.
2. After connecting and enabling your cameras, live images will then be visible in your
browser. To see the image from a single camera, click on the camera link above the
images.
Links to individual
cameras.
The Administration
tools.
3. Continue the unit’s configuration using the Administration Tools.
Page 15

AXIS 2460 User’s Manual Installing th e AXIS 2460 Ne twork DVR
Installing via the Null Modem Cable
This section describes how to install the AXIS 2460 using the null modem cable. For information
on how to configure the unit for modem operation
Important!
• Although instructions for installing the AXIS 2460 using a null modem cable are provided below, it is
recommended that, whenever possible, the unit is initially installed and configured over a network.
• The information and examples featured here are specific to Windows 2000, but the process is similar in
other versions of Windows. Refer to your system information for further information on creating a
Dial-Up Networking connection if you are using any other operating system.
• Windows Dial-Up Networking and TCP/IP must be correctly installed prior to commencing with the
modem cable connection. Detailed information on how to check this is provided in Windows Help.
Connecting Your Computer Using the Null Modem Cable
❶Connect the supplied Null modem cable
between the COM-2 Serial Connector on
the AXIS 2460 and the COM-port on your
computer.
the front panel and check that the Power
Indicator lights up.
❷Press the Power button on
❸From the Start menu, open the
Control Panel and click Phone and
Modem Options. Select Modems.
, please see the configuration section.
❹If a Standard Modem is already set up, you
should proceed directly to the next page. If no
modem is installed, click Add and go to step 5.
15
❺Check the box: Don’t detect my modem,
I will select it from a list. Click Next>.
❻Select the Standard 28800
modem from the displayed
list of modems. Click Next>.
❼Select the serial port to which your
AXIS 2460 is now connected via the
Null Modem cable. Click Ne xt>.
❽A Standard 28800 modem connection
is now available for the AXIS 2460. Click
Finish to complete the installation.
Page 16
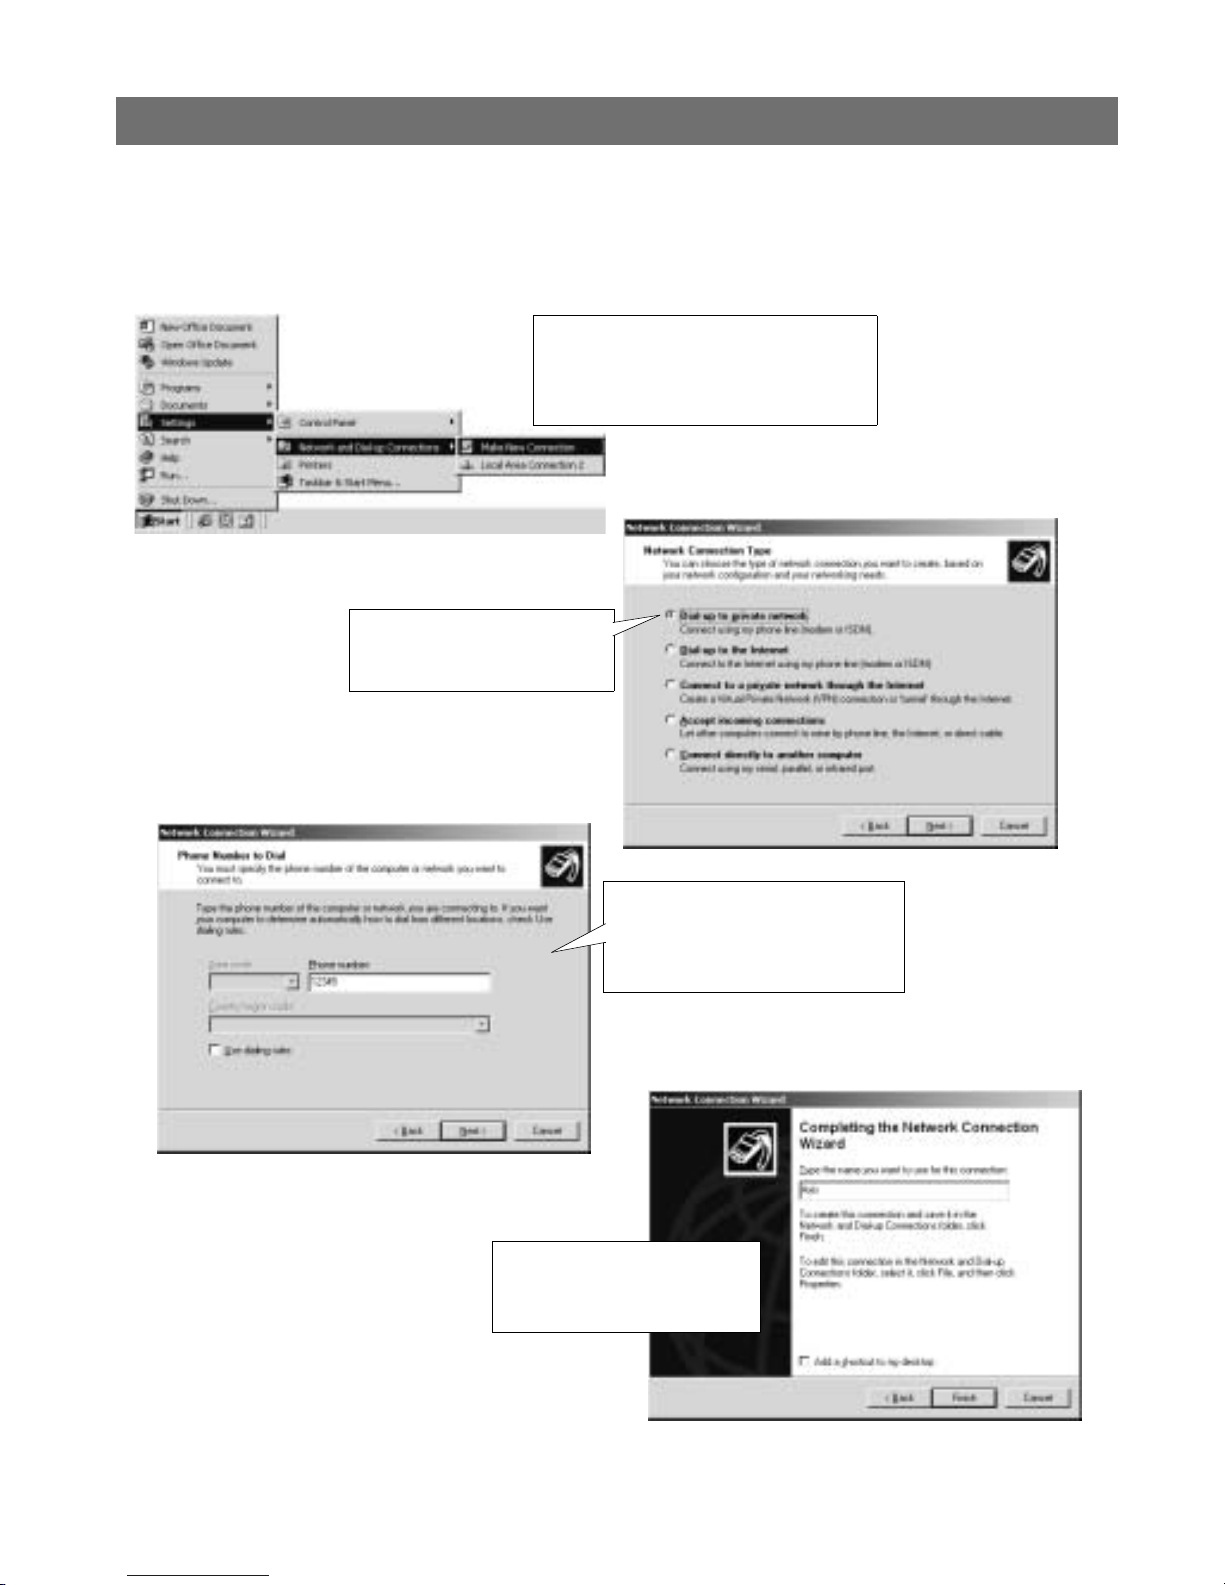
16
Installing the AXIS 2460 Network DVR AXIS 2460 User’s Manual
Creating a Dial-Up Networking Connection
Follow the steps below to create a dedicated Dial-Up connection to your Network DVR:
❶ Click the Start button, Settings, Network
and Dial-up Connections, an d fin a ll y , Make
New Connection. Click Next> when the
Wizard starts.
❷Set the type of connection as
Dial-up to Private Network. Click
Next.
❸ A telephone number is requested
in this dialog, but as it won’t actually
be used, simply enter any dummy
number. Click Next>.
❹ Provide the co nnection w ith a
name (Axis in our example) and
then click Finish.
Page 17

AXIS 2460 User’s Manual Installing th e AXIS 2460 Ne twork DVR
❻Select the installed modem and
click Configure.
❺After clicking Finish in the Network
Connection Wizard, the Dial-up dialog
opens. Click Properties.
❼Set the Maximum Speed to 115200
bps. Click OK twice to get back to the
dial-up dialog.
❽Finally, enter the default User
name Root and the password
pass. Click Dial.
17
Step 3 - Verifying the Connection and Completing the Installation
Having started your Dial-Up connection, as described above, you can quickly test the
connection by accessing the AXIS 2460 from your browser (Internet Explorer).
abc.xyz
❶ Type in any URL containing a period in the address field
of your browser to display the AXIS 2460 Start Page, as
shown here.
The cameras will be shown as disabled or there will be No connection. See Connecting and
Configuring Cameras on page 18 for information on how to enable cameras.
❷ The start page of the AXIS 2460 opens.
The Administration tools are here.
Page 18
18
Connecting and Configu r in g Cameras AXIS 2460 User’s Manual
Connecting and Configuring Cameras
Up to four standard analog video cameras can be connected to the AXIS 2460. The
connectors are located on the rear panel (s ee als o page 10) and the status for each input is
indicated on the front panel by an LED (see page 9).
1. Position the camera as required.
2. Connect the camera to the input on the rear panel of the Network DVR.
Connect
camera(s) here.
3. Connect power to the camera.
4. Now start your browser and enter th e IP address of your AXIS 2460 , as describ ed in the
installation sect ion. The camera w ill prob ably be indica ted as being Disabled. Cl ick the
link provided to go to the configurati on page f or the camera, and enable it by checki ng
the box. Click Save and then return to Live Quad View.
If for some reason the camera should stop functioning, e.g. a loss of power or a cable
break, the LED for the input on the front p anel will show red, and the image in th e browser
will go black.
Note: The camera will automatically start recording as soon as it is enabled. This is controlled by a
default event called Continuous Recording, which is supplied pre-configured with the unit.
Complete Camera Settings
The Camera Options provide the tools for configuring the cameras connected to the AXIS
2460. These tools are accessed from the administration tools on the left hand side of the
main window. Click the Edit button to set or change the configuration for the camera.
The following settings are available for each camera:
Enabled - Check this box to enable the camera. A d is abl ed c amer a cannot be u se d to r eco rd
from.
Camera Name - The name you provide here for the camera will be used in image headings
and in all menus that show camera names.
Page 19

AXIS 2460 User’s Manual Connecting and Configuring Cameras
Image Header - Check the relevant box to include the camera name, date and/or time in
image headers.
Color Settings - Choose to view the camera images in black & white or in color. Black &
white generates smaller file sizes and the contrast is usually higher than when using color.
Image Resolution - Select Low, Normal or High resolution. High resolution will reduce the
frame rate, due to the larger file sizes involved. The exact resolutions are as follows;
• QCIF = 176 x 112 (NTSC), 176 x 144 (PAL) - Low resolution
• CIF = 352 x 240 (NTSC), 352 x 288 (PAL) - Normal resolution
• 4CIF = 704 x 480 (NTSC), 704 x 576 (PAL) - High resolution
Image Compression - Select the level of compression for your images. Lower compression
optimizes picture quality, but generates larger image file sizes.
Offset Adjustment - Enter values in these fields to change the horizontal and vertical
synchronization for the imag e. This can be used to eliminate any black border su rrounding
the image.
19
Note: The settings for Color, Resolution and Compression will all affect the size of the
generated files. This will also affect the length of time the recordings are stored
for.
Input/Modulation for Camera
Automatically De tect and Store - Click the button to have the AXIS 2460 automatic a lly detect
the modulation type for the connected camera.
Set Manua lly - Select the correct video modulation type from the drop-down list.
Pan Tilt Zoom
If you are using a Pan Tilt Zoom (PTZ) unit to control the camera’s position, click the
Modify button to create and modify preset positions. See also the online help for more
information on how to set up Preset positions.
Page 20

20
Setting up Events and Alarm s AXIS 2460 User’s Manual
Setting up Events and Alarms
The AXIS 2460 Network DVR can be used in a wide variety of surveillance applications
and can also use external alarm devices and output equ ipment. Using the Web interface, it
is a simple matter to configure events, alarms and recordings.
This section describe s how to config ure events and alarms and provi des a few examples of
typical applications. For a complete rundown of all the available settings, please see
Complete Event Settings, on page 23.
You may also need to make various other general settings, for example, define users, set
the date and time, make network settings, etc. Please refer to System Options, on page 37.
About Events
Each recording made by the AXIS 2460 Network DVR is the result of a configured Event.
An event is a set of parameters that define the conditions that must be met before any
recording is made. T hese parameter s ar e time -based or al arm-ba sed, b ut they can als o be a
combination of the two. There are also events that run continuously.
Your AXIS 2460 is supplied with five pre-configured events. The first four are named
Manual Recording, and there is one for each video input/camera. These events are run
whenever the camera’s Rec button is clicked. Thes e 4 default events can al l be disabled, bu t
they cannot be deleted. The fifth pre-configured event is called Continuous Recording,
which runs as soon as one or more camer as are enabled . This event can be d isabled and /or
deleted.
The Recording Options Overview
Page 21

AXIS 2460 User’s Manual Setting up Events and Alarm s
The Record ing Options Over vi ew allows you to:
• Define the Recording Mode to use for the entire system. This will determine how quickly the
recordings will be reduced, before eventually being deleted. Select the appropriate radio button for Normal, Extended or Extended - Long. Please see Recording Storage and Reduction, on
page 50 for detailed information on the recording mode.
• Set a maximum Store Time for all the recordings from each connected camera, in hours, days
or with no limit. This is useful if, for example, the laws in your country require you to delete
recordings after a certain amount of time has elapsed.
Note: The priority assigned to an individual recording is also a factor in determining how long it will be
saved for. For more information, see
Priority, on page 52.
Creating a Simple Event
The tools for creating an event are found among the administration too ls under Recording
Options. Follow these steps to create a simple event that runs o nly at certain times, with no
alarms configured:
21
1. Click on Event Settings.
2. Click on Add an Event. The list will be updated with your new event. Click on the Edit
button to the right.
3. Select the radio button for During Time Period under Event is Activated. Selecting
this will reveal the Time Period Settings. Select the d ays of th e week and the s tart and
stop times for the event. Note that these Time Period settings will be used every
for as long as the event is enabled.
4. Enable the event by checking the box provided. Give your event a suitable name by
filling in the Name field.
5. Select the Priority that will apply for the event. This determines for how long the
recordings created by the event will be saved at a higher frame rate. See also Priority,
on page 52.
6. Select the camera that the event will record from by checking the appropriate box
under Record from Camera. If several cameras are selected, the event will create
recordings from each camera. A unique ID number is appended to each recording so
that they can easily be distinguished from each other.
7. Set the Desired Recording Frequency to the required setting.
week,
8. Finally, click the Save button.
Page 22

22
Setting up Events and Alarm s AXIS 2460 User’s Manual
Configuring Alarms
Before setting up an alarm-controlled event, one or more alarm inputs must first be
configured.
The AXIS 2460 has four alarm inputs and one output relay. These are configured
individually and can be enabled or disabled. The mode of operation is either Generated
When Circuit is Open (Falling) or Generated When Circuit is Closed (Rising). Note that
this applies to the phy sical alarm devices connected to the Network DVR.
Configuring an Alarm Input
1. Enable the input. This must be done to allow events to use the input. If you have an
event that does not use a particular input, then this can be disabled for that particular
event, by setting the event to ignore the alarm input.
2. Provide a suitable name for the input, e.g. Fire alarm.
3. Check the devi ce you ar e using t o see i f the alarm will be ge nerated when the ci rcuit i s
open or closed. This setti ng does no t determine if the alarm input is enabled or not, but
simply how it functions. Make the setting accordingly.
4. Click Save.
Output Relay Settings
When the output relay is enabled on this page it will then be available to all events, which
in turn can have the relay enabled or disabled, independently of each other. The settings
available are Enabled and Output Name, as described above for inputs.
Creating an Alarm-Controlled Event
Events that use alarms are configured in much the same way as other events. The alarms
can be used independently of time settings or in combination with them.
Follow the description below to create an alarm-controlled event:
1. Follow step s 1 to 7 as li sted for a si mple event, b ut in step 3, select th e radio bu tton for
When Alarm is Triggered or Alarm Triggered during Time Period. These options w ill
reveal the Time Period Settings and the Alarm Input Settings, respectively.
2. Make the time settings for the event (if used).
Page 23

AXIS 2460 User’s Manual Setting up Events and Alarm s
3. Under the heading Alarm Inputs, select how the event will react to each Alarm Input.
The options available are Acti ve, Inactive or -----. The first option means that the
alarm must have been triggered, the second that the alarm must be in an untriggered
state, and the third o ptio n means that th e alarm inp ut will e ff ectivel y be ig nored . Note
that the criteria for all enabled alarms must be met before the event will begin to
record.
4. If the alarm input is marked as Disabled, click the Alarm Settings button to go to the
alarm configuration page (see above).
5. In the section Advanced Settings, you can choose to include a Pre-Buffer, which will
record immediately before the event, and/or a Recording Duration, which specifies a
fixed length of time the event will record for, starting from when the event is initially
triggered. This length can be s et in seconds, minutes or hours . If no Recording Duration
is specified, the event will record only for as long as i t is active.
6. Click the Save button.
23
Complete Event Settings
The Event Settings list displ ays all of the even ts cur rentl y co nfigu red i n the Networ k DVR.
There is one event prede fined f or each camera , called Camera X - Manua l Re cordin g. This
manual event can be disabled, but not deleted. It has the same settings as other events
except that it is not possible to define any alarm triggers or to schedule it. This event is
triggered when the Rec button is pressed.
To add a new event, click the Add an Event button. Then click the Edit button to the right
of the new event to enable it, rename it and make other necessary settings, as described
below.
The AXIS 2460 can hold a maximum of 25 events. The text at the bottom of the event list
shows how many events are currently in use, and how many more can be added.
Page 24

24
Setting up Events and Alarm s AXIS 2460 User’s Manual
To remove an event from the AXIS 2460, click the Remove button to the right of the event
in the list. A removed event is preserved on the AXIS 2460 until the recordings generated
by it have been removed, at which point the event is automatically deleted. If there is no
space available to add new events, it is also possible to manually delete events on the
Advanced Event Settings page - click the Advanced button in the lower right corner of
the window .
Editing Events
The following settings must be made for each event:
Event is Activated...
Select how the event will run. The options are:
• Always - The event runs all of the time
• During Time Period (opens further options - see below)
• When Alarm is Triggered (opens further options - see below)
• When Alarm is Triggered During Time Period (opens further options - see below)
The second and last options are used to specify only certain periods when the event will
record. This is useful for configuring events that will e.g. be operational only outside
working hours.
Edit Eve nt
Enabled - Check or uncheck this box to activate or deactivate the event.
Priority - The priority given to the event will influence how quickly the Recording Mode
(see page 20) will run, and consequently, for how long this recording will retain a higher
frame rate and be stored for. The higher the priority the slower the reduction. Top priority
will maintain the high frame rate for approximately 8 times as long as an event at Low
priority. Note that Normal Priority will not affect the Recording Mode.
Name - Provide the event with a suitable name. This name will be used wherever the event
is shown. The name can contain up to 20 characters.
Desired Recording Frequen cy
Select eit he r the
maximum rate, or
define your own
frequency in
frames per second,
minute or hour.
Image
Resolution
QCIF (low)
CIF (med ium)
4CIF (high)
Image
Compression
Medium 30/25 fps 7.5/6.25 fps
Medium 30/25 fps 7.5/6.25 fps
Medium 10/9 fps 3/3 fps
Recording Frequency
1 Camera (NTSC/PAL)
Recording Frequency 4
Cameras (NTSC/PAL)
Page 25

AXIS 2460 User’s Manual Setting up Events and Alarm s
Note that this is the desired frame rate. The actual frame rate will depend on the number of
enabled cameras and if these cameras are sy nch roni zed or not. When u sin g mor e t han one
camera, the frame rate for each camera can be calculated by dividing the frame rate for 1
camera by the number of camer as used. The table shown above features examples of the
theoretical frame rates for 1 and 4 cameras, using synchronized cameras. To get the frame
rates for 2 or 3 cameras, divide the frequency for 1 camera by 2 or 3, respectively.
Record from Camera - Select the cameras that the event will record from. The event can
record on all 4 camera s if nece ssary. Note that using e.g. 2 cameras will create 2 recor dings
each time the event is activated.
Time Period Settings
This section will only be displayed if the Event Type is set as During Time Period or as
Alarm Triggered During Time Period. To configure, specify the day s of the we ek the event
will be active, by checking the appropriate boxes. Set the start time and stop time in the
fields provided. Please note that these sett ings will be valid every
changed or disabled.
week until the event is
25
Recording will begin at the Start Time and will continue up to and including the Stop
Time on the days selected. For exam ple, r ecord ing from 08 :00 u ntil 08: 00 wi ll prod uce a 1
minute recording, and recording from 08:00 until 08:59 will produce a 60 minute
recording.
Events must be set to start and stop on the same day, It is not po ssibl e in a singl e event to
record from e.g. 18:00 to 06:00 on the following day. If this type of configuration is
required, two separate events must be used, one from 18:00 until 23:59 on the first day and
the other from 00:00 until 5:59 for the following day.
Alarm Input Settings
This section will only be displayed if the Event Type is set as When Alarm is Triggered or
Alarm Triggered During Time Period. Specify for each configured and enabled alarm how
and when the event should react to the alarms.
Note: Before the event will record , the conditions for ALL of the configured alarm inputs
must first be met. Unless a Recording Duration has been specified, recording will
stop as soon as any of these conditions ceases to be valid.
The options for how the events will react are:
• Active - the event will react to the alarm when it has been triggered.
• Inactive - this alarm input must be inactive, that is, it must not have been triggered.
• ----- - this alarm will not affect the event.
Page 26

26
Setting up Events and Alarm s AXIS 2460 User’s Manual
These three options can be selected in any combination, e.g.
•Alarm 1 - Active
• Alarm 2 - Inactive
• Alarm 3 - -----
•Alarm 4 - Active
If the alarm input is shown as Disabled, click the Alarm Setting s button to the rig ht, to go
to the alarm configuration page.
Recording Buffer Settings
Pre-Buffer - Specify the length of the period to record immediately preceding the event.
Configurable in seconds, minutes or hours. Useful for e.g. seeing what happened
immediately before a fire alarm. This setting is optional.
Recording Duration - Specify the lengt h of ti me to reco rd. Used to s pe cify an e xact durati on,
this setting can be used to e.g. take snapshots of predictable conditions of a constant
length and which do not vary. Configurable in seconds, minutes or hours. This setting is
optional.
Pan/Tilt/Zoom Control
If a camera uses a Pan/Tilt/Zoom (PTZ) device, it is possible to define which preset position
the device will move to when the event is triggered.
If several events are recording at the same time, the PTZ device will move to the preset
position for the event that has the highest prior ity. When this event stops recording, the
PTZ device will then assume the preset position for the next active event that has the
highest priority.
Preset positions for each camera are defined under Camera Options.
Output Relay
To display the checkbox for the Output relay in the event settings, it must first be enabled
on the Alarm Settings page. This will enable the checkbox for all events. Once the
checkbox is visible, the output relay can then be enabled or disabled independently for
each event. Once the output relay has been activated by the event, it will remain active as
long as the event is recording.
If the heading for the Output relay is marked as Disabled, click the Alarm Settings button
to go to the alarms page.
Page 27

AXIS 2460 User’s Manual Setting up Events and Alarm s
Send an email to [email address] when this event occurs
Send email - Check this box to send an e-mail to the specif ied reci pient whenever t his even t
occurs.
Include Image - Checking this box will attach to the e-mail an image from each of the
cameras used by the event.
Note: If you see the text (No Mail Recipient is Specified), an address must be entered on
the e-mail Settings page. Click the E-mail Settings button to go directly to that
page.
Complete Alarm Settings
This section describes how to configure alarms for the four inputs and one output. Note
that this describes the configuration of the physical alarm devices connected to the
Network DVR. These settings will also influence the behaviour of the alarm LEDs on the
front panel.
27
Input Settings
The following settings can be configured for each input:
Enabled - Check to enable the input. This must always be done if you want the various
events to be able to use the input.
Input Name - Used wherever the input is shown. Use a descriptive name.
Generated When Circuit is... - Select Open (Falling) or Closed (Rising). The correct setting will
depend on the actual device used, and whether it generates an alarm when the circuit
closes or when it opens. This setting does not determine if the alarm input is enabled or
not, but simply how it functions. Nor does the setting have anything to do with the setting s
for Active/Inactive on the event settings page.
Output Relay Settings
When the output rel ay i s e nabl ed on th is pag e i t w i ll then be av a ila bl e t o al l eve nts, wh i ch
in turn can have the relay enabled or disabled, independently of each other. The settings
available are Enabled and Output Name, as described above for inputs.
After making these settings, click Save.
Page 28

28
Setting up Events and Alarm s AXIS 2460 User’s Manual
Event Examples
These examples mainly cover the alarm input settings and time periods. As our starting
point we will use the four alarm inputs
1. Main Door Open - A sensor showing that the main door to the building has been
opened.
2. Window Open - A sensor showing that a window in an exposed location has been
opened.
3. Motion Detected - A motion detector registering movement outside the boiler room
door.
4. Smoke detected - A smoke detector located on the ceiling in the boiler room detects
smoke.
Four cameras are connected, as follows:
• Camera 1 - Covers main door
• Camera 2 - Covers window
• Camera 3 - Covers passage and door to boiler room
• Camera 4 - Inside boiler room
Example 1 - Smoke detection.
At the simplest level we will always want to make a recording (start an event) if there is
smoke in the boiler room. This event should be configured as follows:
1. Check the box for Came ra 4.
2. Set the alarm activation to When Alarm is Triggered.
3. Set the alarm input settings to 1------, 2------, 3------, 4-Active.
4. Configure a pr e-buffer of e.g. 10 minutes, to record what ha ppened immedi ately befor e
the alarm.
Example 2 - Night time entry.
Records entry through the main door outside working hours.
1. Set the camera to 1.
2. Set the alarm activation to Alarm Triggered During Time Period.
3. Set the weekdays and times when the event will be enabled.
4. Set the alarm input settings to 1-Active, 2-----, 3-----, 4-----.
5. Configure a recording duration of 5 minutes.
Page 29

AXIS 2460 User’s Manual Setting up Events and Alarm s
Example 3 - Entry to Boiler Room at night.
This event should be configured as follows:
1. Set the cameras to 1 and 3.
2. Set the ala r m ac t ivation to Alar m Triggered During Time Period.
3. Set the weekdays and times when the event will be enabled.
4. Set the alarm input settings to 1-Active, 2-----, 3-Active, 4-----.
5. Configure a pre-buffer of e.g. 5 minutes.
29
Page 30

30
Working with Recordings AXIS 2460 User’s Manual
Working with Recordings
The Recordings page provides access to all the recordings stored on the AXIS 2460
Network DVR. Each recording is represented by one line in the list. The Play button will
automatically start the built-in AXIS Video Player and play back the recording. It is also
possible, using various criteria, to search for particular recordings.
The AXIS 2460 records and manages the recordings on the connected disks so that disk
capacity is always used to its maximum extent. The frame rate of a recorded sequence is
reduced over time , so that event ually the record ings are o verwritten. The r eduction pro cess
is fully configurable and is described on page 50. A recording can also be preserved at its
original frame rate indefinitely, by locking it.
The Recordings List
The recordings list shows the available information for each recording. Clicking any table
heading (except Status or Tools) will sort the listing according to that particular criteria.
The sort order can be reversed by clicking the same heading once more.
By default, the recordings list displays up to 1000 results, with the recordings currently in
progress being displayed first, followed by completed recordings. If there are more than
1000 recordings, there will also be the option to view the following 1000 results.
Page 31

AXIS 2460 User’s Manual Working wit h Recordings
Each line in the rec ordings list shows the following information:
• Rec ID - An event will create a recording (or one recording for each camera used by the event)
every time it is triggered. This ID number distinguishes different recordings created by the
same event.
• Priority - Determines how quickly the video frame rate for this recording will be reduced. This
is also determined by the setting made on the Recording Options Overview page. See also
page 52.
• Event/Camera - Shows the name of the e vent t hat cr eated the re cording, an d the camera use d
to create it.
• Start/Sto p tim e - The time when the event started to record an d when it ended . Note that if
there was a pre-buffer configured, then this will not be reflected in the Start time, nor will it
automatically be played back. To view the pre-buffer, restart the recording at the very beginning.
• Status - Sho ws REC if the event is currently recording. Also shown is a graded bar denoting
the recording's current degree of reduction. The darker green color denotes less reduction,
whereas the paler yellow color denotes higher reduction. See also page 53.
31
• Tools - The Play button and the Lock button.
Viewing a Recording
Find the recording you wish to view. Click on the Play button and the AXIS Video Player
will start at the point when the event itself started. If there was a pre-buffer configured,
then this will not automatically be played back. To view the pre-buffer, restart the
recording at the very beginning. For full details on using the player, see page 33.
Searching for a Recording
To search for a particular recording, simply enter the criteria you wish to search by. The
search options are: Camera Name, Event Name and Time. The more criter ia you enter , the
more exact the search results will be. To use a time as search critera, enter the time in the
fields provided and check the box Include time in search. After selecting the search
criteria, click Search.
Searching using time criteria means that the AXIS 2460 will display those recordings that
were running at that particular time, (i.e. the time can be anywhere in the recording and
not necessarily at the start).
Page 32

32
Working with Recordings AXIS 2460 User’s Manual
The following diagram provides a graphical overview.
Search Time X
A
B
C
D
E
F
Time
Recordings A, B and C in the diagram will be returned in the search results, as they were
running at the specified search time. Recordings, D, E and F will not be included in the
search results.
By default, the search function displays up to 1000 results, with the recordings currently in
progress being displayed first, followed by completed recordings. If there are more than
1000 recordings that meet the search criteria, there will also be the option to view the
following 1000 results.
Locking a Recording
The Tools column in the recordings list shows a small icon that indicates whether or not
the recordin g ha s been locked. A locked recording is equiva lent to a saved recording. This
means that the recording will not
reduces the frame rate and finally erases the recording.
A recording is shown as U nlocked by the icon and as Locked by the icon. A
recording can be locked or unlocked at any time, simply by clicking on the icon.
Note: A recording cannot be manually deleted. The only way to do this is to reformat
the disks, in which case all recordings will be deleted.
be affected by the reduction process that otherwise
Page 33

AXIS 2460 User’s Manual Working wit h Recordings
The AXIS Video Player
The AXIS 2460 includes the AXIS Video Player for viewing your recordings. The player
will start whenever a re cording is played back, us ing the Play butto n in the reco rdings list.
Playback commences automatically, from the start of the event. If there was a pre-buffer
configured then this will not automatically be played. To view the pre-buffer, restart the
recording at the very beginning.
As well as all the standard controls, the player also provides several other functions, such
as; Time Zoom, a snapshot function and a tool for creating AVI-movies.
The event’s name.
The recording’s ID number.
The camera used for
the recording.
33
A yellow LED will light up to
indicate when the alarm
was triggered.
Player Controls
Playback speed control
Time Bar
Skip to start
Time-Zoom controls
Skip to end
Magnify button
AVI Maker button
Snapshot button
Simple Playback
The simplest way to play a recording is to use the player control buttons at the lower rig ht
of the player window. These are, from left to right:
Steps backwards one frame at a time
Normal playback in reverse
Pauses playback
Normal playback
Steps forwards one frame at a time
Page 34

34
Working with Recordings AXIS 2460 User’s Manual
It is also possible to click anywhere on the Timebar (the graded bar at the bottom of the
screen) to go directly to that position in the recording. The dates and times shown above
the Timebar show the approximate position in the recording. The slider control showing
the current position in the recording can also be dragged to a new location.
To skip to the beginning o f the r ecording, click the button. To sk ip to the e nd, click t he
button. These buttons are located at the very ends of the Timebar.
The playback speed can be adjusted by dragging the slider control shown below the
playback buttons .
Time Zoom
The Video Player also has a built-in feature that allows you to focus specifically on a
limited section of a recording - Time Zoom. This is very useful if you have a long
recording, but only wish to view a short sequence contained in it. Follow the procedure
described below to create a Time Zoom view from a recording.
1. On the Time bar, decrease the size of the pl ayb a ck ar ea by dr ag gi ng the slider and/o r
the slider so that only the section of interest is shown in white. The rest of the
recording is now shown in gray. The area in white can be played in the same way as
described above for simple playback.
2. To zoom the selection so that it fills the whole of the Timebar, click the Zoom+
icon. The rest of the recording is now hidden from view.
3. Repeat the abo ve procedure i f you are not satisf ied with the sel ection you hav e created.
4. To decrease the amount of space the selection occupies on the Timebar, click the
Zoom- icon. The parts of the recording that were previously hidden are now shown
in gray.
To return the record ing to its original state, whereby the entire recording occupies all of
the Timebar, decrease the size of the selection on the Timebar by clicking the Zoom- icon.
If you have zoomed the recording several times, you must also decrease it several times.
Alarm Inputs
Each alarm input is indicated by an LED in the upper right corner of the player window.
When playback reaches a point in the reco rding where an alarm was triggered, this will be
indicated by the LED changing color to yellow.
Page 35

AXIS 2460 User’s Manual Working wit h Recordings
Other Functions
Magnify - Click the Magnify icon to increase the size of the image. Click it again to
return to the default size.
Snapshot - To save a JPEG snapshot from a recording, find the point in the re cording
from which you wish to save a snapshot. You may need to pause the recording, or step it
forwards or backwards frame-by-frame. Now click the Snapshot icon. This will open a
dialog asking you where to save the snapshot.
Creating an AVI Movie
Clicking the AVI Maker icon will open a dialog from which you will be able to create
an AVI-movie from your recording. This movie can then be distributed to others. A movie
can also be created from a Time-Zoom selection, as described above. Follow these steps to
create a movie:
35
❶ Set the frame rate for playback
and then click the Start button.
❸ The AVI-Maker starts and a progress indi-
cator appears. When the process is finished,
the AVI can be pl ay ed in y ou r st and ard vie wer.
❷ Select the compression method.
The default setting is usually suitable. Click OK.
Page 36

36
Working with Recordings AXIS 2460 User’s Manual
About Codecs
The word codec (as used in this manual) is short for compressor/decompressor. Codecs are
various types of computer algorithms that are applied to audio, video, and image files, to
compress the size of the files. The benefit of this is that the files do not use as much disk
space when stored, or as much network bandwidth when streamed.
The amount and type of compression applied to your AVI-movies depends entirely on the
codec used. Most operating systems provide a basic set of codecs, some of which may be
suitable for creating AVIs. There are, however, many alternatives available. These can be
found by e.g., searching the Internet. It is also important to note that the same codec used
for creating the AVI must also be used for viewing it. This should be considered when
distributing files to others.
If your computer/player does not have the correct codec to decompress a file, it may
attempt to download it. Windows Media Player is one example of an application that will
do this.
Page 37

AXIS 2460 User’s Manu al System Options
System Options
This section lists and describes those administration tools used for the general
configuration of the AXIS 2460 Network DVR - the System Options. The topics covered
are, for example, network settings, date and time settings, users, etc. For information on
how to set up events, configure alarms, play back recordings, etc., please see the relevant
chapters.
Important!
• When accessing the AXIS 2460 f or th e fir st ti me, you will be a ssumed to be the product ’s administ rator and will be logged in as such, with the user name root and the default password pass.
• You should change the root password as soon as possible. Until this has been done, the security features in the product will not be enabled. Furthermore, all Axis products are shipped with the same
password by default. For further information, refer to Users, on page 45.
• Javascript must be enabled in your browser for the AXIS 2460 Web-based interface to work.
37
Accessing The System Options
The System Options can be used for configuring and managing your AXIS 2460 at any
time. Follow the instructions below to access the System Options from your browser:
1. Start your browser and enter the IP address of the AXIS 2460 in the location/address
field. If you are accessing the unit via the Null Modem Cable, you can alternatively
enter any text containing a period, for example;
2. The AXIS 2460 start p age is display ed. Click Administration and then System Options.
my.2460
Page 38

38
System Options AXIS 2460 User’s Manual
3. The System Overview is now displayed. Links to all of the product’s functions are
presented as; a) links in the left hand margin, b) as a clic kable schematic di agram of the
unit. Click the relevant link for the parameters or functions you wish to configure. On-line
help is available by clicking the yellow question mark at the upper right.
The system is configured and modified directly from these pages. This can be done from
any computer that can access the unit.
System Options Overview
The table below provides a brief overview of the System Options. Each section is exp lained
in more detail in the pages that follow.
Administration Description See page
Network Settings Configure TCP/IP settings, enable BOOTP and restrict bandwidth. page 39
Mail Settings Configure SMTP-settings for sending e-mail messages notifying recipients of recordings,
error messages, syst em messages, etc.
COM-Ports Configure the COM-ports for Generic TCP/IP, Generic HTTP, Pan Tilt Zoom devices, or a
modem (port 2 only).
Pan/Tilt/Zoom Select the PTZ driver(s) to use on the COM-ports. page 42
Modem Configure the connected modem. page 42
Modem - ISP Settings Make settings for connecting to your ISP. page 43
Date & Time Set the system time, manually or automatically. page 43
Users Create and delete users and passwords, and modify the Administrator’s password. page 45
Firewall Protect your AXIS 2460 against unauthorized access, using the built-in firewall. Allowed
IP addresses and protocols can be specifed.
Maintenance Provides tools for restarting the server, formatting all disks and for resetting to the
factory default settings.
Maintenance - Advanced Displays information about the connected disks and provides tools for formatting and
checking individual disks.
Support Provides links to all of the support and help functions for the product. page 48
page 40
page 41
page 46
page 47
page 47
Page 39

AXIS 2460 User’s Manu al System Options
Network Settings
From the Network Settings, configure the TCP/IP network settings as follows:
Automatic Configuration
Enable BO OT P - Check this box to use BOOTP to automatically assign an IP address. This
requires a BOOTP server on your system.
Manual Configuration
IP Address - Specify a unique 32-bit IP address for your Network DVR, to establish
communication with your network. Written as four numbers separated by periods, each
number within the address must be in the range 0 - 255. For example: 123. 123.123.123
Note: IP addresses can be assigned at random within isolated networks, provided that
each given address is unique. To avoid unnecessary number duplication and IP
clashes, only use registered IP addresses when connecting to the Internet. It is
strongly recommended that you contact your network administrator prior to
assigning an IP address for your product.
39
Default Router - Specify the default router (Gateway) used for connecting to other networks
and network segments.
Subnet Mask - Specify the subnet mask for the Network DVR.
Host Name - If you are running a DNS server on your network and wish to connect to the
AXIS 2460 using a name, then enter the product’s host name here. The host name is
usually the same as the assigned DNS Name. A host name is always the first part of a Fully
Qualified Domain Name and is always one word, with no period. For example, myserver
is the host name in the Fully Qualified Domain Name myserver.axis.com.
Domain Name - Enter the name of the domain your AXIS 2460 belongs to.
Primary DNS Server - Ente r the IP address of the p rimary DNS s erver. This s pecifies the server
that normally provides the translation of domain names to IP addresses on your network. If
the server is not able to resolve a domain name immediately, it will then distribute the
domain name query to other DNS servers on the network.
Secondary DNS Server - Specify the IP address of the secondary DNS server. This is the
address of the se rver norm ally us ed to p r ovid e th e domain name translation if the pr i mary
DNS server is unavailable.
Page 40

40
System Options AXIS 2460 User’s Manual
Media type - This can be used to change the network speed for your AXIS 2460. Normally,
there is no need to use anything other than Auto-negotiate, which will automatically
select the correct media type. However, if you are using a switch or similar device on your
network and need to speci fy the me dia ty pe, then th is c a n be d one by se lec t in g the co rr ec t
type from the drop-down list.
HTTP Port - Enter the HTTP port the AXIS 2460 will use. The default setting is 80. Alterna-
tively, any port in the range 1024-65535 may be used, but check first with your system
administrator before changing the default setting. See also Firewall Settings, on page 46.
Bandwidth Control
Using the Network Bandwidth Use drop-down list, it is possible to define the maximum
bandwidth used by the DVR. This can help minimize the impact on other services running
on your network, which is useful when connecting to busy networks. The options are; 0.1
to 2.0 MBit/s or Unlimited.
Mail Settings
The AXIS 2460 can be configured to send event and error e-mail messages to predefined
addresses.
Mail Servers
Primary Mail Server - Enter the name or IP address of the server providing your mail
facilities.
Secondary Mail Server - Enter the name or IP address of a secondary mail serv er. This wil l be
used if the primary mail server is unavailable.
Use Modem - Check this box to use a modem for sending e-mail messages. Note that
COM-Port 2 must be con figured to use a modem.
Event Message Settings
E-mail Address - Specify the recipient for e-mails sent when a recording is made. E-mails
will only be sent for those events that have been configured to do this.
Page 41

AXIS 2460 User’s Manu al System Options
System Log Message Settings
The AXIS 2460 can send system log messages (e.g. errors) to notify the recipient that a
system event has occurred. After selecting the required level, each time there is an
occurence of this type, a message will be generated. There are 3 levels to choose from:
• Critical - This level will show serious errors that require immediate attention and which
prevent the unit from functioning properly.
• Critical and Warnings - As above, but also shows non-critical errors, e.g. when one of
several disks stops functioning.
• Critical, Warnings and Info - as above, but also includes information about e.g. completed
formatting, notification of restarts, etc.
E-mail Address - Specify the recipient for the e-mail messages sent when the specified
system events occur.
Mail Reply Settings
41
The e-mail address specified here will be used as the reply address included in any e-mail
sent by the AXIS 2460 Network DVR.
COM-Ports
The AXIS 2460 Network DVR is supplied with two RS-232 serial ports and one RS-485
serial port. Devices connecte d to a COM-port on the AXIS 2460 can be accesse d via TCP/IP
or HTTP. Settings are managed and configured directly from the user interface, simply by
clicking the desired port, as described below.
For detailed listings of all of the available settings for each mode, as well as more
information about the different interface modes and pinout info, please see Unit
Connectors, on page 64. The on-line help also provides information on this topic.
The RS-232 ports are connected via the two 9-pin D-sub connectors on the rear of the unit.
One of these port s, CO M- 1, i s mu lti plexed with the RS-485 i nterf ace on the I/O-B termi nal
block connector. The RS-485 port supports the connection of an external device.
The RS-232 port COM-2 can also be used for connecting external devices, but also for
connecting a modem.
Both COM-Ports support Generic HTTP and Generic TCP/IP and a Pan/Tilt/Zoom device
can be used on either.
Page 42

42
System Options AXIS 2460 User’s Manual
Using a Pan/TIlt/Zoom device
To use a PTZ device, select the port which will connect the device and select the interface
to use. Then click Save. Now click on the menu link for Pan/Tilt/Zoom. The resultin g
dialog will now allow you to select the driver for the PTZ you are using. Select the
camera(s) that will be controlled by the device and finally, click the Save button. To make
specific settings for the device, cl ick the Modify... button. See the online help for more
information.
Setting the RS-232 Port for use with a Modem (COM-Port 2 only)
From System Options in the Administration tools, select COM-Port 2 and click the radio
button for Modem. Click Save. To configure the modem, click on the Modem link (also
from the System Options on the main Administration page).
Modem Settings
If you are intending to use your AXIS 2460 over a dial-up modem connection, define the
appropriate communication settings for your modem and click the Save button. Note that
a modem can be used only on COM-port 2.
Communication Settings
Modem Type - Select a modem from the list of supported V.90 compatible modems in the
drop-down list - selecting Generic if the modem you want to use does not appear in the
list.
Note: Although most external modems are known to work well with the AXIS 2460,
only the modems listed in the drop-down list have been fully tested.
Disable Incoming Calls - Check this bo x if you do not want your modem to answ er inco ming
calls.
Flow Contr ol - Synchronizes the connecte d modems. Hardware flow control is accomplis hed
by enabling the Control to Send (CTS) and Return to Send (RTS) signals for the serial
interface. If using Software control, the modems will still be sy nchronized, but the flow
control will use XON/XOFF. If using NONE , there will be no synchronization.
Baud Rate (bps) - Set the baud rate for the connected modem.
Init String - This defines the Attention Code (AT) command sent when starting the dial-up
connection, to initi alize the connected modem. Using the At tention Code ATz (the common
code for initializing most commercial modems), the Network DVR will normally configure
the port settings for the connected modem automatically.
Page 43

AXIS 2460 User’s Manu al System Options
If you enter your own stri ng h ere and i t p r oves inco mpati b le with y our co nnected mo de m,
click the Default button to reset the string to the default value.
Important!
If the communication settings are not displayed after clicking Save, it is likely that the default initialization string used by the AXIS 2460 is incompatible with your modem. In th is case, you must enter the correct initialization string for the connected modem and click Save once again.
ISP Settings
Provide the contact information used for connectin g to your ISP.
Internet Service Provider - Enter the service provider's name.
Phone Number - This is the telephone number, including any regional code, to your ISP.
Country codes should also be provided if you are dialing inter nationally.
43
User Name - ISP su bscribers are provided with a unique user name and password. Enter
your user name here.
Password - Enter the password associated with your user name.
Redial Attempts - Define the number of dial-up attempts the Network DVR should make to
the host modem/ISP before timing-out; that is, before it stops trying to establish a modem
connection.
Redial Interval - Defines how soon after an unsuccessful dial-up attempt the Recorder will
try again.
Date & Time
Click Date and Time to define the time and date settings for your AXIS 2460, either
manually or automatically, as described below.
Current Network DVR Time
Shows the current date and time.
New Network DVR Time
Synchron ize with comp uter time - Sets the time according to the clock on your computer.
Page 44

44
System Options AXIS 2460 User’s Manual
Synchronize with NTP Server - This option wil l cause th e AXIS 2 460 to obtain the correct time
from an NTP server. Specify the NTP server's IP address or DNS name and set the
appropriate time zone for the Recorder's location.
Set manually - Using this option allows you to manually enter the time and date.
Automatically adjust for daylight saving time changes - Check this box to automatically update
the time changes caused by daylight saving.
Important!
If a user or an NTP-server puts the clock back, this may lead to there being several recordings from the
same point in time (although they were actually recorded at different times). This might also mean that
a recording ends before it starts! (at least according to the local time seen by the user). Most importantly, all of the recordings stored on the AXIS 2460 are always available - even if the clock is set back.
Page 45

AXIS 2460 User’s Manu al System Options
Users
To prevent any unaut ho riz e d use of th e pro du ct , th e AX IS 24 60 su pp or ts mul ti-user
password protectio n, where ac cess i s re stricted to defi ned user s only , of wh ich th ere can be
a maximum of 20. An Administrator has unrestricted access to the product's
administration tools and can determine the registration and rights for all other users.
The Users list displays all the users authorized to use the Network DVR.
Important!
• When accessing the AXIS 2460 and the administration tools for the first time, you will be assumed to
be the Administrator and will be logged in as such, with the user name root and the default password pass. The root password should be changed as soon as possible. When this has been done, the
product’s security features will be enabled, and access to the Administration tools will be restricted
to defined users only.
• Although changing the Administrator’s password restricts access to the Admin tools, by default, the
AXIS 2460 will still allow anonymous viewing access, which means that anybody on the network can
access the product’s images in a browser. To restrict open viewing access, simply register at least one
authorized user. This stops the anonymous viewing service and only allows specified users to access
the images.
• All Axis products are shipped with the same password by default.
45
Adding Users
The following fields must be completed for each new user
• User Name - m ust contain at least one, but not more tha n f o urteen charac ters.
• Password - must contain at lea s t f o ur , but not more than fourteen characters.
• Confirm Password - repeat the above password here.
User Rights - Chec k the appropr iate boxes to d efine the acces s righ ts and privile ges for each
specified user ; where the level of user access can be described as follows:
• Administrator - An Administrator has unrestricted access to the administration tools and
can consequently determine the registration of all other users.
• Operator - An Operator can adjust recorder and camera settings, as well as start, stop and
view recordings.
• View - Provides the lowest level of access, which only allows the user to see live im age s,
to see recordings and to start or stop a recording manually.
• Dial-In - Optionally allows the user to access the AXIS 2460 via a dial-in connection.
After making the sett ings f or the new u ser, cli ck the Add/Change button. This button only
updates the list locally. To save the settings, click the Save button.
Page 46

46
System Options AXIS 2460 User’s Manual
Deleting Users
To delete a user, highlight the name in the User list and click the Delete button. This will
update the user list locally. To save the changes, click the Save button.
Changing the properties for existing Users
Select the user, make the necessary changes and click the Add/Change button. This
updates the user list locally. To save the changes, click the Save button.
Firewall Settings
The built-in firewall protects your AXIS 2460 against unauthorized access. To restrict
access, you can add IP addresses to the list of allowed addresses - no others will be
permitted acces s.
Enable/Disable Firewall - Click this button to enable or disable the firewall function.
Allowed IP Addresses - This list box shows the currently configured IP addresses.
Adding Allowed IP Addr es ses
IP Address - Add a single IP address or a whole range of addresses. This last option can be
useful if you have a large number of IP addresses that all need access to the Network DVR.
To add a range of addresses type e.g. 123.123.123.* This will add all the addresses in the
range 123.12 3.123 .00 to 123. 123 .123. 255. Up to 256 a llo wed I P addres ses can be spe cifie d.
Allow - Check the boxes for the protocols that users will be allowed to use to access the
Network DVR. These can be FTP and/or HTTP. See below for special considerations
concerning HTTP.
TCP Port no. - If you have particular requirements concerning which ports access will be
allowed on, enter these here. To allow HTTP (see above) the port value must correspond to
the value set on the Network Settings page. If this is set to some other value than 80 (the
default setting), then this value must be added manually in this field. If the setting on the
Network Settings page is 80, then nothing needs to be configured here.
After adding the above information click the Add New button or the Save button to save
the change s.
Note: If you are accessing the AXIS 2460 via a proxy server, the proxy server's IP
address must be added to the list of allowed IP numbers.
Page 47

AXIS 2460 User’s Manu al System Options
Deleting and Modifying the Properties for Allowed IP Addresses
To delete an IP address, select it in the list and click the Delete button. To modify an IP
address, select it from the list of allowed addresses, make the necessary changes and then
click the Save button.
Maintenance
This section provides tools for the following:
• Restart - This will restart the DVR.
• Clean - Er as es ALL recordings and formats ALL of the hard disks.
• Restore - Erases and formats all disks and resets the DVR to its factory default settings.
See also the description of how to reset to the factory default settings on page 49.
Maintenance - Advanced
The advanced maintenance function provides tools for maintaining the installed disks. The
information and tools for each disk are as follows:
47
Model - Shows the brand of disk and the bus it is mounted on.
Status - The disk's current status is shown as follows:
Signifies that the disk is connected and being used by the DVR
to store images.
The disk is connected, but is not currently be ing used to store
images, probably due to a corrupt file system. Run error
checking or format the disk before attempting to use it.
The drive cannot be used as it is either being formatted or
having its file system checked.
ERROR The disk has errors and is no longer in use. Check the log files
for detailed error information.
Size - The total disk capacity, shown in Gigabytes.
Error Checking - Click the Check button to check the disk for errors. No recordings can be
made on this disk whilst error checking is in progress. If other healthy disks are present,
then any recording will continue on those disks instead.
Formatting - Click the Format button to format a single disk. If all the disks need to be
formatted, use the Clean function on the Maintenance page.
Page 48

48
System Options AXIS 2460 User’s Manual
Important!
Formatting will p e rmanently erase all the information stored on the disk. The Format button is only
available for a disk that actually needs formatting.
Support
This section of the System Options provides various information and reports, which may
be useful when troubleshooting. The following items are available:
Paramet ers - This link displays a listing of all of the AXIS 2460's parameters and their
current settings. This list should be included when requesting help from the support desk.
Server Report - The Server Report displays a listing of important information about the
AXIS 2460. If you need to contact the Axis Support desk for help with a problem, please
include this report with your query.
Log Files - This link opens a page that shows buttons for opening the available log files,
that is; the Info Log, the Warning Log and the Critical Log. These log files can be useful
when troublehooting the product, or if you should need to contact support services.
Release Notes - Information about the components included in the firmware release.
About - Displays information abou t th e de ve l op m ent of th e pro duct.
Page 49

AXIS 2460 User’s Manual The Factory Default Settings
The Factory Default Settings
In certain circumstances, it may be necessary to reinstate the Factory Default settings for
your AXIS 2460. This is performed in one of two ways:
• By pressing the Factory Default Button, located on the rear panel. This option will reset
ALL the parameters currently configured in the unit, i.e. network settings, events, etc.
• By clicking the Restore button from the Maintainence page under System Options. This
action will reset most of the unit’s parameters but will save the IP-address, the Subnet
mask, the Default Router and the Mac (Ethernet) address.
Follow the instructions below to reinstate the product factory default settings using the
Control Button:
1. Switch off the AXIS 2460 by pressing the Power button on the front panel.
2. Press and hold the Factory Default Button pressed, and press the Power button again.
49
3. Keep the Factory Default Button pressed until the Status Indicator displays yellow (note
that this may take up to 15 second s), then release the C ontrol Butto n. When the Status
Indicator displays green (which can take up to several minutes) the AXIS 2460 will
then have been reset to the original factory default settings.
Note: Both methods of resetting to the factory default settings will also format all the con-
nected hard disks.
Page 50

50
Recording Storage and Reduction AXIS 2460 User’s Manual
Appendix A - Recording Storage and Reduction
The AXIS 2460 records and manages the stored images on the connected disks so that the
storage capacity is always used to its maximum extent. Once the disks are filled,
something must be done to make space available fo r new reco rding s. The AXI S 24 60 does
this by gradually reducing the frame rate of recorded sequences so that eventually there
are no more frames and the recor ding has effectiv ely been del eted. An impo rtant reco rding
that needs to be kept at its original frame rate indefinitely can be explicitly locked and thus
protected against the reduction process.
The rate and amount of frame rate reduction for an individual recording is controlled by a
number of factors:
•the Recording Mode set for the whole system
•the Priority set for the event that created the individual recording
• other factors that affect file size and thus hard disk space, e.g. image resolution, image
compression, etc.
Selecting the Recording Mode
The technology used for image storage on the AXIS 2460 is called APViS™ (Axis
Prioritized Vi deo Stor age). This te chnolog y (invente d by Axis a nd patent pending ) extends
the length of time recordings are stored for by intelligently reducing the frame rate of all
recordings not explicitl y locked. Ol der recor dings and thos e of less im portance (s ee Priority
below) will thus gradually be reduced until finally deleted.
As the available recording modes all describe a ratio between the length of time the
recordings are stored for and the frame rate at which they stored, you should consider
what you require from your recordings when selecting the mode.
• Normal Mode - a standard FIFO (First In - First Out) algorithm that simply overwrites
older recordings with new ones, with no prior reduction in frame rate. Normal mode will
keep all of your recordings at the original frame rate for their entire lifespan, but they will
be overwritten relatively quickly.
• Extended Mode - stores recordings for longer than Normal mode, but at the expense of
frame rate reductions in older and less important recordings.
• Extended Long Mode - extends storage time by using even greater reduction, and even
earlier in the recording. This mode also reduces the frame rate of more recent recordings.
If you need to save recordings for as long as possible and can accept the highest degree of
frame rate reduction, then this is the best choice.
Page 51

AXIS 2460 User’s Manual Recording Storage and Reduct ion
The recording mode will apply to the whole system and is selected on the Recording
Options Overview page in the administration tools. The following diagrams provide a
graphical overview of how a recording (identical in all three cases) will be reduced and
stored by the different recording modes.
51
Frame rate
100 %
50 %
0 %
Frame rate
100 %
Time x
Normal
Mode
Frame rate
100 %
Extended Mode
50 %
0 %
Time 2x
50 %
0 %
While Normal mode has kept the frame rate at 100% the whole time, the other modes have
reduced the recording. Extended mode has reduced the frame rate at roughly equal
intervals, and saved the recording for roughly twice as long. Extended Long mode has
quickly reduced the recording to a much lower frame rate, which is then maintained for
much longer.
Extended Long Mode
Time 5.25x
Page 52

52
Recording Storage and Reduction AXIS 2460 User’s Manual
Approximate Storage Times
The table below shows approximations of: a) the total recording storage time in days and,
b) the number of days until the first frame rate reduction. These are shown as total/first
reduction. The basis for the examples is as follows:
• four 40 GB hard disks installed
• a recording frame rate of 1 fps per camera
• recording on 4 cameras from an indoor office scene.
Image
Resolution
QCIF (low) 176 x 112 176 x 144 High 3 kB 126/- 268/67 702/11.5
QCIF 176 x 112 176 x 144
QCIF 176 x 112 176 x 144
CIF (Normal) 352 x 2 40 352 x 288 High 8 kB 45/- 96/24 253/4
CIF 352 x 240 352 x 288
CIF 352 x 240 352 x 288
4CIF (High) 704 x 480 704 x 576 High 24 kB 13/- 28/7 73/1
4CIF 704 x 480 704 x 5 76
4CIF 704 x 480 704 x 5 76
NTSC PAL Normal Extended Extended Long
Modulation
Image
Compression
Normal 4 kB 94/- 199/50 522/8.5
Low 8 kB 45/- 96/24 253/4
Normal 13 kB 27/- 57/14 149/2.5
Low 17 kB 20/- 42/10 110/2
Normal 36 kB 7.5/- 16/4 43/0.5
Low 61 kB 3.5/- 7/1.5 18/0.3
Image
file size
Storage Time for Recording Mode
Priority
If the Recording Mo de is bes t ex plain e d as a function tha t reduc e s th e fra m e rat e of
recordings stored in the AXIS 2460, then Priority can be described as the means of
controlling the speed of the Recording Mode. The higher the priority, the more the
reduction process will be slowed down. The maximum storage time (i.e. the slowest
reduction) for a recording will thus be achieved by setting the Recording Mode to Extended
Long and the event’s priority to Top.
It is also important to understand that priority is comparative, that is, it will only be
relevant when there are r ecord ings that use differe nt pr iori ties. Set ting e.g. To p pr iority for
all events/recordings would be meaningless.
An event’s Priority is set when creating the event.
Page 53

AXIS 2460 User’s Manual Recording Storage and Reduct ion
The available priorities are as follows:
Top Priority - Slows the reduction process down the most.
High Priority
Normal Priority - This is the default level for a new event.
Low Priority
Note: None of the available Priority levels will affect the Normal Recording Mode.
Status
The status icon shown for each individual recording in the recordings list shows the
current degree of reduction, as explained here:
The recording has not yet been reduced.
53
Slight reduction at start of recording.
50% reduction throughout.
Some reduction at start of recording, none at end.
75% reduction throughout.
The oldest parts of the recording have now been deleted.
Reduced throughout. This recording will soon be deleted.
Note: To prevent an individual recording from being reduced, click the Lock button for that recording.
Page 54

54
The LED Indicators AXIS 2460 User’s Manual
Appendix B - The LED Indicators
The front panel LED indicators use different colors to indicate the unit’s status. The various
indications are as follows:
Indicator Green Amber Red
Power
Network
Disk
Status
Video
Alarm
Solid for normal operation. Goes to amber when powering down.
Flashes for 100 Mbit activity. Flashes for 10 Mbit activity. Solid red indicates no network con-
nection.
Flashes green when readin g
from the disk.
Solid for normal operation. Solid during second stage of flash
Solid for video signal present,
but no recording in progress.
The alarm inputs will show yellow whenever an alarm is triggered on the input.
Flashes amber when writing to the
disk.
upgrade or factory default. Flashes
during system initiation.
Solid amber for video signal present
and recording in progress.
Flashes red for a non-functional disk.
Shows solid red if ALL disks are out of
action.
Flashes slow red for an illegal serial
number. Return the unit to Axis.
Solid red for no video signal.
Notes: •The indicators will also show amber at initial power to the unit, as well as green and/or red dur-
ing the unit’s start-up phase. This is normal and does not indicate a malfunction.
•The Power indicator also flashes green and amber during a firmware upgrade.
Page 55

AXIS 2460 User’s Manual Troubleshooting
Appendix C - Troubleshooting
This appendix provides useful information to help you to resolve difficulties with your
AXIS 2460. Symptoms, possible causes and remedial actions are provided in a quick
reference table.
Checking the Firmware
One of your first actions when attempting to solve a problem should be to check the
firmware version currently installed. An updated version may contain a correction that
fixes your par ticular proble m. For more informatio n, please s ee Updating the Firmware, on
page 61.
Pinging Your IP Address
By sending a packet to the specified address and waiting for a reply, the Ping utility can
determine whether a specific IP address is accessible. It also provides a particularly useful
method for confirming addressing conflicts with your AXIS 2460 on the network.
55
Follow the instructions below in association with Symptoms, Possible Causes and Remedial
Actions, on page 56, and run PING to troubleshoot TCP/IP problems on your network:
1. Start a Command window.
2. Type
3. If you recieve the reply
ping x.x.x.x, where x.x.x.x is the IP address of the AXIS 2460.
destination host unreachable, then the AXIS 2460 is not
accessible on your subnet. You must obtain a new IP address and reinstall the unit.
Please see Installing the AXIS 2460 Network DVR, on page 12.
4. If this does not solve the problem, disconnect
the AXIS 2460 from the network and run
the PING command again. See the table below for an interpretation of the results.
Ping Reply Interpretation and recommendation
Reply from <IP address>: bytes = 32; time = 10
ms.....
Request timed out This IP address is not used and is available for use with your AXIS 2460. If
The IP address is already in use and cannot be used again. You must obtain
a new IP address.
you already installed the unit using this IP address, the installation may
have failed. In this case, reinstall the unit. See page 12. Also check all
cabling.
Page 56

56
Troubleshooting AXIS 2460 User’s Manual
Symptoms, Possible Causes and Remedial Actions
Symptoms Possible causes Remedial actions
The AXIS 2460 cannot be
accessed from a browser.
The IP address is already
being used by another
device.
1. Disconnect your AXIS 2460 from the network.
2. Run the Ping utility (as described in Pinging Your IP Address, on
page 55) and follow the appropriate recommendations.
Note: The assigned IP number can be assumed valid if Ping returns
“request timed out” - in which case you should set the IP address
again, power-up the unit and then try accessing it again.
The IP address is located on a
different subnet.
The IP address has changed. Check that there is no BOOTP server running on your network.
Possible problem with your
proxy server.
Other networking problems. Test the network cable by connecting it to some other network
The AXIS 2460 works locally,
but not externally.
The Network indicator
displays red.
The Status indicator flashes
red at long intervals.
The Disk indicator flashes red
at short intervals.
The Disk indicator is solid red. ALL hard disks disconnected
Video indicator(s) solid red. Lost video signal. Check the cabling, the power to the camera and the camera
No image using Refresh
and/or slow updating of
images.
Firewall protection. Check the Internet firewall with your system administrator.
Default routers required. Check if you need to configure the default router settings.
Proxy not specified. Add the proxy server to the list of allowed IP addresses.
Faulty cabling. See “Other networking problems” above.
Illegal serial number. Contact your Axis dealer.
Hard disk disconnected or
non-functional.
or non-functional.
Multiple clients attempting
to access the images.
Run the Ping utility (as described in Pinging Your IP Address, on
page 55). If this returns no response or similar, then this
diagnosis is probably correct.
In Windows, check that the IP address for your AXIS 2460 is on the
same subnet as your workstation. Exactly how this is done varies
from one version of Windows to another. See Windows’ help for
more information.
If your AXIS 2460 and your workstation are on different subnets,
you will not be able to set the IP address. Contact your network
administrator.
Try disabling the proxy default in your browser.
device and then Pinging that device from your workstation.
Test the network interface by connecting a local computer to the
unit, using a standard Crossover (hub-to-hub) Cable.
If the above actions do not resolve the problem, the AXIS 2460 may
be faulty. In this case, try to localize the problem by connecting the
unit to the serial port of a local computer, using the supplied Null
Modem Cable and report your findings to your local distributor.
Run error checking and/or format the faulty disk.
Run error checking and/or format the disks.
settings.
Try limiting the number of clients.
Page 57

AXIS 2460 User’s Manual Troubleshooting
Symptoms Possible causes Remedial actions
Cannot access the connec ted
modem.
Poor quality images. The Display Properties are
The Video Player does not
function / no live images.
Note: If you still have a problem after reading this information, please contact your reseller or visit the
Axis Support Web at www.axis.com/techsup/
Faulty configuration. Check that the COM-port is set to use a modem and that the
modem is correctly configured.
Faulty cabling. Check the power supply and the serial connection.
Open the Display Properties in your desktop and configure your
incorrectly configured for
your desktop.
The camera is not focused
correctly.
ActiveX disabled. Make sure that ActiveX is enabled in Microsoft Internet Explorer.
Wrong browser Microsoft Internet Explorer must be used to view live images and
display to show at least 65000 colors, i.e. at least 16-bit.
Note: Using only 16 or 256 colors on your computer will produce
dithering artifacts in the image.
Refocus the camera(s).
recordings.
57
Page 58

58
Other IP Setup Methods AXIS 2460 User’s Manual
Appendix D - Other IP Setup Meth ods
In addition to the ARP command (described earlier in the installation section of this
manual), you can alternatively set the IP address for your AXIS 2460 using any of the
following methods - as appropriate for your operating system:
Method Operating Systems See also...
BOOTP
Requiring a BOOTP daemon on your system, this method operates over the entire network. A request to an active daemon initiates a search of the boot table to find an entry matching the
unit’s Ethernet address. The daem on replys with the IP address
for the device, if a match is found.
AXIS IP Installer Windows Using the AXIS IP Installer, on page 59
UNIX
Notes: •Do not use the default or IP address featured in these examples when installing your AXIS 2460.
If in doubt, consult your network administrator to obtain an unused IP address.
•Make sure the AXIS 2460 is powered up and attached to the network.
•Server Privileges: Although no special privileges are required for Windows 98, ME or XP (Home),
you do need Administrator privileges for Windows NT, 2000 and Windows XP (Professional).
UNIX systems require Root privileges.
•Ethernet/Mac Address: The AXIS 2460 is pre-configured with a uni q ue Ethernet/Mac ad dress
based upon the serial number printed on the label on the rear of t he unit; where the serial nu mber typically follows the format 00-40-8c-xx-yy-zz. You must know the Ethernet/Mac address
to complete the installation.
Page 59

AXIS 2460 User’s Manual Other IP Setup Methods
Using the AXIS IP Installer
AXIS IP Installer is a Windows program that is ideal for setting the IP addresses for
multiple Axis networking products on your network. Also allo wing you to access the home
page of any Axis device connected to your network, this freely distributed software is
available for download from www.axis.com.
Installing the AXIS IP Installer:
1. Download the latest version of the AXIS IP Installer and run the Setup_IPInstaller.exe
program to start the installation.
2. The AXIS IP Installer - Setup dialog is displayed on the screen.
3. Follow the instructions as they appear on the screen.
4. Click Finish to complete the installation.
Setting the IP Address with AXIS IP Installer:
1. Run the AXIS IP Installer from the Start menu. The following window will appear:
59
2. Restart the AXIS 2460.
3. Select the serial number of your AXIS 2460 in the list. The se rial number is identical to
the unit’s Ethernet/Mac address.
4. Enter the IP ad dre s s. Cl ic k Set IP address. The IP address will now be set.
5. To access the home page of the AX IS 2460, cl ick Home page of selected Axis-server...
You can now configure the AXIS 2460 according to your requirements.
6. Click OK to exit the program.
For more help during the installation of the IP address, click Help or press the F1 key.
Page 60

60
Other IP Setup Methods AXIS 2460 User’s Manual
Notes for Macintosh Users
Important!
The AXIS 2460 was developed for use with Microsoft Internet Explorer (5.0 or higher) running on Windows 98/ME/XP/NT or 2000. This is because the v iewing of live images and the built-in Video Player both
require an ActiveX control for their function, something which is currently only supported by Internet
Explorer. Other browsers and other operating systems can be used for installing the unit and also for
administration purposes, but the Video Player will not function correctly.
The AXIS 2460 supports TCP/IP over Ethernet, or PPP Modem dial-up. You must use
TCP/IP on your Macintosh network, as there is no support for AppleTalk.
When using the AXIS 2 460 on a Macintosh, please observe the following points:
• The DVR has a default IP address of 192.36.253.80.
• Assign a temporary IP address to a Mac workstation in the same subnet (e.g. 192.36.253.81)
and then connect to the DVR.
• Reset the correct IP address for the Macintosh workstation.
• Changing the IP address for a Macintosh does not require a reboot.
Page 61

AXIS 2460 User’s Manual Updating the Fir mw ar e
Appendix E - Upda ting the Firmware
The AXIS 2460 firmware is stored in Flash memory. This memory is provided by a silicon
chip that, just like any other ROM device, re tains data content even after po wer is removed.
Flash memory is unique because it allows its data to be erased and rewritten. This means
that you can install firmware updates for your AXIS 2460 as soon as they become
available - without having to replace any parts. New firmware can be simply loaded into
the AXIS 2460 over the network.
Checking the Firmware Version
To check which firmware version is currently installed, click the link to the Release Notes
in the support section of the Administration tools.
Obtaining Updated Firmware
61
The latest version of the AXIS 2460 camera firmware is available free of charge from the
Axis website at www.axis.com or from your local distributor.
Updating the Firmware
The AXIS 2460 Flash memory is updated over the network using FTP. See the detailed
instructions supplied with each new release.
Important!
• Always rea d the instructions available with each new release, prior to updating your software.
• Downloading normally takes at least 30 seconds and up to 10 minutes, although it can take longer.
After starting the download, you should always wait at least 20 minutes before power-cycling the
AXIS 2460 - even if you suspect the download procedure has failed.
• In controlled environments, flash memory updates provide a very safe method for updating firmware.
However, flash products can become damaged if the update operation is not performed correctly.
Your dealer reserves the right to charge for any repair attributable to faulty updating.
Page 62

62
Installing Hard Disks AXIS 2460 User’s Manual
Appendix F - Ins talling Hard Disks
The AXIS 2460 can be fi tted wi th var io us br a nds of commer ci all y a vai la b le IDE h ar d di sk.
For more information about recommended brands, please visit www.axis.com and see the
product pages for the AXIS 2460.
Follow these instructions to install a disk:
1. Switch off power to the unit. First press the power button on the front panel until it
turns amber and wait u ntil the u nit shut s down. Th en set the main power swi tch on the
rear panel to 0.
2. Mount the disk(s) in the holder(s).
3. Set the disk in the upper position to master. If installing a second disk on the same
cable (channel) set this to slave. Exactly how this is done varies from one type of disk
to another. Refer to the documentation provided with the disk.
4. Remove the cover from the AXIS 2460. Connect the IDE-cable to the disk(s) and
connect the other end to the motherboard.
Connection for
IDE Channel A
Connection for
IDE Channel B
5. Connect the power cable to the disk(s).
Set upper disk
to Master.
Fasten with
screws here
6. Screw the disk holders in place inside the unit, using 2 screws on each side. Use a
magnetic screwd rive r.
Page 63

AXIS 2460 User’s Manual Installing Hard Disks
7. Replace the cover and screw it back into place. Set the main power switch to I. The
AXIS 2460 will now automatically detect and format the new disk(s).
Note: If the disk you installed has been used previously (a valid partition table will be detected), it will
be formatted. In this case the disk must be formatted manually, either by selecting Clean
not
from the Maintenance menu , which formats all the connected disks, or by formatting the individual disk from the Maintenance - Advanced menu.
Any disk errors in the AXIS 2460 are indicated by the Disk LED on the front panel. This
will flash red if one of sever al in stalled disks i s not fu nctioning , and it wi ll show a soli d red
if none of the disks are functioning.
63
Page 64

64
Unit Connectors AXIS 2460 User’s Manual
Appendix G - Unit Connectors
This section provides an overview of the product’s connectors, namely:
•2 x RS-232 S erial Connectors
•1 x I/O Terminal Block Connector
•4 x BNC Video Inputs
•4 x BNC Video Outputs
•1 x Ethernet network connector (RJ-45)
The RS-232 Serial Connectors
In the absence of a l ocal ne twor k c onne ction, t he 9 -pin D- sub co nnect or C OM2 prov id es a
dedicated physical interface for connecting a modem or computer to the AXIS 2460. This
RS-232 interfac e supports modem spee ds of u p to 115kbps and effecti vely all ows the AXI S
2460 to operate as a standalone unit, independent of any computer network. The
maximum cable length for RS-232 should not exceed 15 meters (50 feet).
If a local network connection is unavailable at the point of installation, you can simply
connect your PC to this connector using the supplied Null Modem Cable. This will a l low
you to complete the initial configuration of your product.
Both serial connectors (COM1 and COM2) can be used for running Generic TCP/IP or
Generic HTTP applications. The pi nout for COM1 is different to that of COM2.
Note: Axis Communications maintains a list of all supported modems. Please visit our Website at
www.axis.com for this and other late information on our products.
Pinout Information
A diagram of the RS-232 connectors, complete with pinout information, is shown below.
COM1 Pinout COM2 Pinout
Pin Function Pin Function
1 N ot conn ec te d 1 C D (Carrier Detect)
2 RXD (Receive Data) 2 RXD (Receive Data)
3 TXD (Transmit Data) 3 TXD (Transmit Data)
4 RTS (Return To Send) 4 DTR (Data Terminal Ready)
5 GND (Ground) 5 GND (Ground)
6 DSR (Data Signal Ready) 6 D SR (Data Signal Ready)
7 RTS (Request To Send) 7 R TS (Req ues t To Send)
8 N ot conn ec te d 8 CTS (Clear To Send)
9 N ot conn ec te d 9 RI (Ring Indicator)
2
1
76
4
3
8
5
9
Page 65

AXIS 2460 User’s Manual Unit Connectors
The I/O Terminal Bl oc k Connector
Typically used in association with programming scripts for
developing applications for event triggering, alarm notification via
e-mail, etc., the 16-pin I/O Terminal Block is located on the rear
panel and provides the interface to: a single relay switch output,
four digital photo-coupled inputs, and an RS-485 interface. See page
67 for more information about RS-485.
This section describes the pinout, interface support and the control
and monitoring functions provided by this connector.
Connector Pinout
The pinout for the Terminal Block (illustrated above) and signaling details for each pin is
fully described in the table below:
Pin Function Description
1 Not connected.
2 Not connected.
3 Digital Input 3 - Photocoupler Anode (+) Photocoupled Input 3: Electrically isolated from the chassis a nd connec 4 Digital Input 3 - Photocoupler Cathode (-)
5 Digital Input 4 - Photocoupler Anode (+) Photocoupled Input 4. As above.
6 Digital Input 4 - Photocoupler Cathode (-)
7 RS-485 - B (inverting) Serial Port 1- RS-485. A half-duplex RS-485 interface for controlling
8 RS-485 - A (non-inverting)
9 DC + Power Output 12V This can drive the photocoupler inputs or other equipment; such as an
10 DC - Power Output
11 Digital Input 1 - Photocoupler Anode (+) Input 1 Photocoupler input. As for Input 3.
12 Digital Input 1 - Photocoupler Cathode (-)
13 Digital Input 2 - Photocoupler Anode (+) Input 2 Photocoupler input. As for Input 3.
14 Digital Input 2 - Photocoupler Cathode (-)
15 Relay Switch Relay switch - electrically isolated from chassis and connectors.
16 Relay Switch
tors, this input can be supplied from an external DC voltage or the DC
Power Input/Output on pins 9 and 10. Driven by 5-24V.
auxiliary equipment. Note: Serial Port 1 is programmed as either
RS-232 (COM1 Connector) or RS-485 (Terminal Block Connector), via
the browser interface.
IR-sensor. A maximum current of 50mA can be sourced from the DC
output. Pin 10 is connected to the unit chassis and to Ground on each
serial port and video input. See the schematic diagram on page 68.
65
Note: For compatible replacement connectors, please contact Axis. Alternatively, contact
http://www.phoenixcontact.com, quoting: MC1.5/8-ST-3.81 (art no 1803633).
Page 66

66
Unit Connectors AXIS 2460 User’s Manual
Controlling and Monitoring
By entering http requests in your browser’s URL field, you can:
• drive the relay output high or low
• monitor the status of the 4 digital inputs
This requir es you to hav e ro ot acces s to the AXI S 246 0 and c ons equently, to suppl y a us er
name and password. Login as root and supply the root password (default = pass).
Tip!
Developers wishing to create applications incorporating sophisticated alarm conditioning using the
relay output and digital inputs are encouraged to read the Camera API, HTTP-Interface Specification,
available from the Axis Web at www.axis.com
Relay Output
You can use the supported relay output to directly drive a maximum load of 24V AC/DC at
100mA. By connecting additional relay circuitry, it can also drive heavier loads.
The output relay is controlled using http requests, as defined in the following examples:
Example 1: - Set output 1 ON.
http://myserver/axis-cgi/io/output.cgi?action=1:/
Example 2: - Set two 300ms pulses with 500ms delay between the pulses on output 1.
http://myserver/axis-cgi/io/output.cgi?action=1:/300\500/300\
Example 3: - Wait 1 second before setting output 1 ON.
http://myserver/axis-cgi/io/output.cgi?action=1:1000/
Digital Inputs
Four digital inputs allow the AXIS 2460 to be configured for time and alarm based image
recording. F or exampl e, by co nnecting a motion de tector to a digita l input, it is a rela tively
simple procedu re to send a single imag e (or video stream) to a remote imag ing libra ry each
time the detector is activated. These inputs can be driven by voltage s of 5-24V.
Querying the Status of Digital Inputs
The status of the four supported digital inputs can be queried in exactly the same way as
the relay output. Simply enter the following URL to query the status of the digital inputs:
Example: - Monitor data on input ports 1, 2, 3, and 4.
http://myserver/axis-cgi/io/input.cgi?check=1,2,3,4
Page 67

AXIS 2460 User’s Manual Unit Connectors
The AXIS 2460 then displays the status of the inputs, as follows:
Input 1 = 0
Input 2 = 1
Input 3 = 0
Input 4 = 0
The BNC Video Inputs
4 BNC composite video inputs with 75 Ohm/Hi Z termination. Autosensing for NTSC and
PAL. Each video input is termi nated usin g a coax/ BNC connect or. Phys ical c onnections are
made using RG59, 75 Ohm coax video cable. The recommended maximum cable length is
800 feet (250 me ters ).
The BNC Video Outputs
4 BNC video outputs that can be used for connecting the AXIS 2460 to a traditional analog
CCTV system or to a VCR. This output can be used independently of the Ethernet network
connector and both can be used at the same time. The video output signals are connected
directly to the video input signals (loopthroughs).
67
The Ethernet Network Connector
The RJ-45 network connector is used to connect the AXIS 2460 to a 10/100Mbit Ethernet
network running TCP/IP.
About RS-485
RS-485 is a standard for transmitting data over multi-drop communications line.
Supporting up to 32 dri vers and 32 receivers ov er a single twisted pair cab le, the maximum
cable length should not exceed 1220 meters ( 4000 feet). Typically used for connecting a
single master (e.g. a PC) to several addressable devices over the same cable. The master
decides which slave speaks and the slaves only speak when spoken to, by raising RTS.
The AXIS 2460 will act as either a master or a slave, depending on how communication is
initiated. RS-485 is similar to RS-232, but without a signal ground. Data detection is by
measuring the voltage difference between the positive and negative line. This eliminates
disturbance by interference, because interference appears identically on both lines
simultanously. This means greater distances can be covered than with RS-232.
Page 68

68
Unit Connectors AXIS 2460 User’s Manual
Schematic Diagram - With Possible Applications
Internal
voltages
Power
Supply
!
!
o
Mains Voltage
o
}
o
AXIS 2460
GND PIN 5
!
!
!
+12V
_
o
COM 1, 2
!!
VIDEO IN/ OUT 1-4
9
o
Switch, motion detector, etc.
10
o
11
o
12
o
13
o
14
o
o
o
+
Active
Control
Device
_
Relay
Switch
o
o
RS-485 A
RS-485 B
o
o
o
15
Optional
Relay
Switch
16
o
o
o
24V DC
8
7
o
o
Appliance
o
o
Mains Power
o
o
PTZ Camera
Page 69

AXIS 2460 User’s Manual Technical Spec ifications
Appendix H - Technical Specifications
System Requirements - Microsoft Internet Explorer 5.0 or higher, running on Windows 98,
ME, XP, NT or 2000. Other browsers on other operating systems (e.g. Linux, UNIX, Mac)
can be used for i nstal ling the pr oduct a nd for admini strativ e purp oses, but liv e imag es an d
the Video Player will not function correctly.
Networking Protocols - The AXIS 2460 uses the standard TCP/IP suite of protocols.
Installation - Physical network connection using RJ-45 twisted pair cable, or remote
connection using any standard serial modem. The product is intended for indoor use only.
Management - Remote configuration and status using Web-based Administration Tools.
Image Feature s - Time/date stamp, text overlay, variable size, color CGI control.
Image Resolution
69
• Low: 176 x 112 (NTSC), 176 x 144 (PAL)
• Normal: 352 x 240 (NTSC), 352 x 288 (PAL)
• High: 704 x 480 (NTSC), 704 x 576 (PAL)
Networking - 10baseT Ethernet or 100 baseTX Fast Ether net, TCP/IP, HTTP, FT P, SMTP, NTP,
ARP and BOOTP.
I/O Connector - Used for connecting external alarm devices, e.g. temperature sensors and
switches. Provides one relay switch output, four digital photo-coupled inputs, an RS-485
interface, and auxiliary power.
RS-232 Connectors
• COM-1 - RS-232, max 115 Kbps. Multiplexed with the RS-485 port on the terminal block.
• COM-2 - RS-232, max 115 Kbps, half-duplex. A modem is connected here.
RS-485 - Available from terminal block connector.
Video Inputs - 4 BNC composite video inputs with 75 Ohm/Hi Z termination. Autosensing
for NTSC and PAL.
Video Outputs - 4 BNC video loop-through ports.
Security - Multi-user password protection. Built-in Firewall. Allowed IP addresses can be
specified.
Operating Co nditions: - Temp: 41-104
Power - 50/6 0 Hz, 11 5/ 23 0V, Max 1A (typ ic al ly 60W) .
o
F (5-40oC), Humidity: 8-80% RHG.
Page 70

70
Technical Specificati o ns AXIS 2460 User’s Manual
Approvals EMC
• FCC Class A
• EN55022 Class B, EN55024
• C-Tick
Approvals Safety - EN60950, C-UL
Dimensions
• Height: 100mm (3.9")
• Width: 430mm (16.9")
• Depth: 320mm (12.6")
Weight
• No disks - 7.0 kg (15.4 lbs)
• 2 disks - 8.2 kg (18.1 lbs)
• 4 disks - 9.4 kg (20.7 lbs)
Hardware
• CPU - 32-bit RISC processor (ETRAX 100 LX v.2)
•Flash memory - 4 Mb
•RAM - 32 Mbyte
• ARTPEC-1 compression chip.
Complimentary Software
• AXIS IP Installer for quick installation of multiple units. Available from the Axis web site.
• The AXIS Camera Controller, the AXIS AVI Maker and the AXIS Video Player are ActiveX
components required when using Microsoft Internet Explorer. These components are
automatically installed the first time the product is used.
Networking Technology - Incorporating Axis ThinServer Technology, the AXIS 2460 is a
truly embedded system and self-contained product, based on the Linux operating system
and including the most popular network protocols and Web management tools. The
hardware is built on Axis’ own ETRAX-100LX 32-bit RISC processor, which is streamlined
and optimized for device connectivity to networks, independent of any other network
resource. The AXIS 2460 uses the industry's first dedicated network digital video
surveillance compression chip - the AXIS ARTPEC-1.
All specifications are subject to change without prior notice.
Page 71

AXIS 2460 User’s Manual
Index
71
Event settings 23
Events 20
A
Alarm indicators 9
Alarm input settings 25
Alarm-controlled events 22
Allowed IP addresses 46
AVI-Movies 35
AXIS IP Installer 58
B
Bandwidth control 40
BNC Video Output 67
Boa Web server 8
BOOTP 39, 58
Browsers - supported 12
C
CGI scripts 7
Codecs 36
COM-Ports 10, 41, 46
Compression 7
Configuring alarms 23
Configuring cameras 18
Connectors 64
Continuous Recording 20
Creating an AVI-Movie 35
Creating an ev e nt 21
D
Date & time settin gs 43
Dial-up Networking 16
Digital inputs and output 66
Dipswitch 10
Disk indicator 9
E
Editing events 24
Enabling cameras 18
Event examples 28
Event messages 40
F
Factory Default Button 10
Factory Default Settings 49
Firewall settings 46
Firmware update 61
Front panel 9
H
Hard disks 62
Hardware inventory 11
I
I/O Termin al B l o c k 65
Indicators 54
Installation
Hard disks 62
Modem 15
Network 12
IP address 39, 58
IP setup methods 58
ISP settings 43
L
LED indicators 54
Line termination switch 10
Linux 8
Locking a Recording 32
M
Macintosh 60
Mail settings 40
Manual Recording 20
Maximum store time 21
Microsoft Internet Explorer 12, 60
Modem installation 15
Modem settings 42
Mounting the unit 11
Page 72

72
Index AXIS 2460 User’s Man ua l
N
Network indicator 9
Network installation 12
Network s ettings 39
Null Modem Cable 15
O
Other IP setup methods 58
Output relay 26
Output relay settings 22
P
Passwords 45
PINGing the IP Address 55
Playback 33
Power button 9
PPP 8
Pre-buffer 26
Priority 53
R
Rear panel 10
Recording duration 26
Recording mode 21
Recording options 20
Recordings 30
Reduction of recordings 53
Relay output 65, 66
RS-232 connector 64
RS-232 port - using a modem 42
RS-485 67
System options 37
T
Technical specifications 69
Terminal block connector 10
Time period settings 25
Time Zoom 34
Troubleshooting 55
U
Updating th e firmware 61
Users 45
V
Verifying the installation 14
Video indicators 9
Video inputs 10
Video outputs 10
Video Player 33
Viewing a Recording 31
S
Searching for a Recording 31
Send e-mail 27
Serial connector 64
Setting up Events and Alarms 20
SMTP 7
Specifications 69
Status indicator 9
Store time 21
System Log messages 41
 Loading...