

Page 1

1 Unpack Box
VERIFY THAT YOU HAVE ALL THE ITEMS LISTED BELOW:
LPT1 Printer Connector
Network
Indicator
• Network cable
Ethernet Connector
External Power Supply
Connector
Power Indicator
• AXIS 1650
• Mounting clip
• Power adapter
• AXIS 1650 CD
ENGLISH
USB Connector
• USB cable
Part no. 25080
QI GUIDE AXIS 1650 EUR R2.0
• AXIS 1650 Set-Up Instructions
Page 2
2 Install Canon Printer Driver
Important: Please install the printer driver according to the manual that came with your Canon device. The printer driver must be installed before continuing.
3 Connect AXIS 1650
1. Make sure the Canon device is off and unplugged and that the AXIS 1650 external power supply
is disconnected.
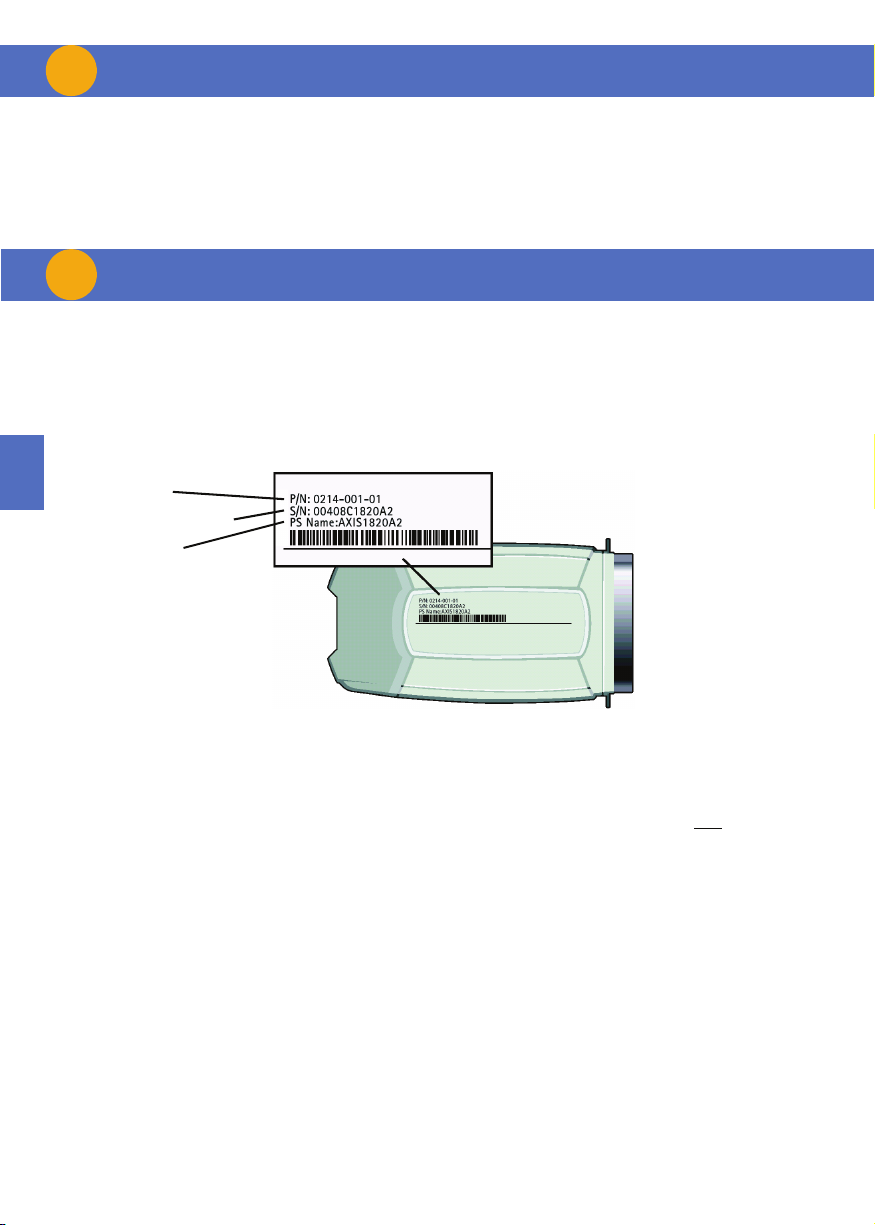
2. Locate the serial number, found on the underside label of the AXIS 1650, and write it down. You
will need this number to configure the AXIS 1650.
Product Name
ENGLISH
Serial Number/MAC Address
Print Server Name
3. Connect the AXIS 1650 to the Canon device. Please refer to the correct connection procedure
below for your Canon device.
Note: For Canon devices supporting both parallel and USB connections, select one
nection procedures below to connect the AXIS 1650.
of the con-
Page 3

3 Connect AXIS 1650 (contd.)
For CANON MF3110/3112, FAX-L400, MF5630/5650, MF5730/5750, PC-D320/D340 & LBP3200/1120
Connect the AXIS 1650 to the USB port using the USB cable.
For CANON iR1210/1230/1270F/1510/1530/1570F, PC1210D/1230D/1270D (LBP 810/1210)
Connect the AXIS 1650 to the printer’s parallel port, the LPT port. Secure in place by pressing
in locking clips.
ENGLISH
4. Connect AXIS 1650 to the Ethernet connector using a network cable.
5. Turn the Canon device on and wait for ready mode.
6. Connect AXIS 1650 to the external power supply connector using the power adapter.
The power indicator will light up. When the network indicator starts to flash, the AXIS 1650 is
correctly connected to the network.
Page 4

4 Mount Print Server USB only
Important: Do not drill into the Canon device; the provided wall screw is an optional wall mount. It
is recommended that you do not leave the AXIS 1650 hanging from the Canon device, please affix to
the Canon device.
The mounting clip comes with 3 parts:
• Transparent plastic holder
• Transparent plastic clip
• Wall screw
1. Peel off adhesive tapes and fasten AXIS 1650 to the plastic holder. It is recommended that the
holder be affixed to the AXIS logo side of the AXIS 1650.
2. Peel off adhesive tape and fasten plastic clip to the Canon device.
Wall Screw
ENGLISH
Holder
Clip
For CANON MF3110/3112, MF5630/MF5650 & MF5730/MF5750
It is recommended that the clip be affixed to the back side, upper right corner of the unit.
Page 5

4 Mount Print Server USB only (contd.)
For CANON FAX-L400 & PC-D320/D340
It is recommended that the clip be affixed to the left side, lower back corner of the unit.
ENGLISH
Page 6

5 Assign IP Address
INSTALL AXIS IP JUMPSTARTER
1. Insert AXIS 1650 CD into CD drive.
2. An AXIS 1650 window will pop up. If
auto-run is off, click on My Computer
and click on the AXIS 1650 CD and select
[Open].
3. Click the blue Software link on the upper
right.
ENGLISH
4. Click the blue AXIS IP JumpStarter link
to install.
5. A File Download window will appear,
select Run this program from its cur-
rent location radio-button and click
[OK].
Page 7

5 Assign IP Address (contd.)
6. IP JumpStarter Setup will appear, click
[Next].
7. To install in the default destination
folder, click [Next], otherwise select
another destination folder and continue.
8. A system requirement diagnostic will run
to ensure needs are sufficient, click
[Next].
9. IP JumpStarter will install, once completed be sure to check the action Create
a shortcut to AXIS IP JumpStarter on
your desktop. Click [Next], then [Finish].
10. Open IP JumpStarter. Select the AXIS
1650 from the serial number list. All
AXIS1650 appear with the default IP
address 192.168.0.90. If you are installing several AXIS 1650, check the serial
number to locate a specific AXIS 1650.
11. Select Server | Set IP Address and the
Set IP Address window appears.
ENGLISH
12. Click the radio button that corresponds
to your choice of IP setting method
(static or dynamic using DHCP). When
assigning a static IP address you also
have to define the Subnet Mask and
Default Gateway.
13. Click [OK] to save your settings.
14. You may be prompted to enter the server
root password (by default set to
<blank>), click [OK] and the AXIS 1650
will appear in the list with the assigned
IP address.
15. To verify that you have access to the
AXIS 1650’s Web pages, highlight the
AXIS 1650 in the list and select Server |
Server Home Page.
Page 8

6 Install AXIS CAPT Print Monitor
Note: Prior to installing AXIS CAPT Print Monitor 2.0, please uninstall any previous versions of
AXIS CAPT Print Monitor that may be on your operating system.
Note: CANON FAX-L400 can utilize Standard TCP/IP port in case of Windows 2000/XP/Server
2003. Refer to the manual of the server regarding the installation.
1. Insert AXIS 1650 CD into CD drive.
2. An AXIS 1650 window will pop up. If
auto-run is off, click on My Computer
and click on the AXIS 1650 CD and select
[Open].
ENGLISH
3. Click the Software link on the upper
right.
4. Click the AXIS CAPT Print Monitor link
to install.
5. A File Download window will appear,
select Run this program from its cur-
rent location and click [OK]
Page 9

6 Install AXIS CAPT Print Monitor (contd.)
6 CAPT Print Monitor will download. Once
complete, click [Open]. If the dialog box
closes, locate the destination folder that
CAPT Printer Monitor saved to and open.
7. InstallShield Wizard will begin the CAPT
Print Monitor Setup program. Click
[Next].
8. Review the license agreement. If you
agree and accept the terms, click [Yes].
9. For Windows XP/Server 2003: Make sure
the Allow this application to process
incoming network printer information
on the local subnet checkbox is checked.
10. Leave the Use the Unicast Communi-
cate Mode box unchecked and click
[Next].
ENGLISH
11. To start copying files, click [Next].
12. CAPT Print Monitor will be installed, once
completed click [Finish].
Page 10

7 Set-up Port in Windows 2000/XP/2003
1. Go to Start | Settings | Printers. (For
Windows XP/2003, go to Start | Settings
| Printers and Faxes.) Select the Canon
device and right click and select Properties. Select the Ports tab. Select [Add
Port].
ENGLISH
2. Select AXIS CAPT Port and click [New
Port].
3. If the IP address you assigned to AXIS
1650 is not on the list, enter the IP
address. Click [Add] and [OK]. If listed,
select the IP address and click [OK].
4. Click [Close] to close the Printer Ports
window. Click [Apply] to register the
port.
5. Go to General tab and click [Print Test
Page] to print a test page.
Page 11

8 Set-up Port in Windows 98/ME
1. Go to Start | Settings | Printers. Select
the Canon device and right click and
select Properties. Select the Details tab.
2. Select AXIS CAPT Port from the dropdown list and click [Apply].
3. If your desired port is not in the available
ports list, follow the Add Port instructions to add the new CAPT port.
ENGLISH
4. Go to General tab and click [Print Test
Page] to print a test page.
Page 12

9 Install AXIS ScanClient
If your Canon device also functions as a scanner, you can use your AXIS 1650 as a scanner server,
too. Note: You must have a working printing environment and the scanning software for the Canon device installed before continuing. See your Canon device manual as well as the previous sections of this Guide.
1. Locate AXISScanClient_SetUp.exe on
the AXIS 1650 CD or on www.axis.com.
Start the SetUp program by double-clicking its icon.
2. Select installation language and click
[OK].
ENGLISH
3. Installation is about to begin. Click
[Next].
6. Select Start Menu Folder (default folder
is AXIS ScanClient). Click [Next].
7. Check the values and click [Install] to
start the installation process.
8. After a short while AXIS ScanClient has
been installed on your computer. Click
[Finish] to complete the installation.
4. Accept the License Agreement. Click
[Next].
5. Select Destination Location (default
location is C:\Program Files\AXIS Communications\AXIS ScanClient). Click
[Next].
Page 13

10 Connect to the Scanner
These sections describe how to scan via an AXIS 1650 using AXIS ScanClient. For general information on scanning, see your Canon device manual. The examples in this section show Windows
XP and a Canon MF3110 with MF Toolbox 4.7.
AXIS ScanClient will open a channel between your computer and the scanner. The channel will
be open for five minutes to give you time to walk to the scanner and place the object to be
scanned on the flatbed. During these five minutes you have exclusive rights to the scanner (but
print jobs function as usual).
Connect to the Scanner
1. Start AXIS ScanClient (Start | AXIS
ScanClient). The client will search the
network for scanning devices. Mark the
one you would like to use by clicking on
it in the list (you can also select a scanner by entering its IP address). Click
[Connect].
2. If the scanner is busy AXIS ScanClient
will show who is using it, otherwise you
will be connected, as indicated on the
message line.
Prepare your Computer (first time only)
1. Connect to the scanner with AXIS Scan-
Client.
2. Go to Start | Printers and Faxes.
3. Click on Scanners and Cameras.
4. Right-click the device you would like to
use (example: WIA Canon MF3110) and
select Properties.
5. Select Events and select the event Canon
MF3110 Scan Button.
ENGLISH
Click [Help] to get information on how to connect and disconnect.
Under Actions, select the option Start
this program and select MF ToolBox
Ver4.7 in the list.
Click [OK].
Page 14

11 Scanning
ENGLISH
Starting a Scan from the Canon Device
When you have established a connection between your computer and the scanner with
AXIS ScanClient, place the object to be
scanned on the scanner flatbed.
1. If the Canon device is in Energy Save
mode, press its [Energy Saver key].
2. Press [Scan] on the Canon device.
3. Press [Start] on the Canon device.
4. The scanning will start.
5. When ready, remove the scanned object
from the flatbed and walk back to your
computer.
6. Close the receiving program on your
computer and end the scanning session
(see below).
Now you have prepared your computer for
scanning via AXIS 1650.
Note: These steps are just needed prior to the
first scanning from the computer.
Note: When waking up from Power Off or Energy Save mode the Canon device needs some
time (from 30 seconds to a few minutes) to
adjust the light and the scanner to produce
optimum scans. Press [Start] repeatedly until
scanning starts.
Page 15

11 Scanning (contd.)
Starting a Scan from your Computer
When you have established a connection between your computer and the scanner with
AXIS ScanClient, place the object to be
scanned on the scanner flatbed.
1. On your computer, start the receiving
program (e.g. Canon MF Toolbox —
Scan Function). Click [Save] to open the
Save dialog.
2. In the Save dialog, click [Start] to start
scanning.
Ending a Scanning Session
You end a scanning session by clicking [Disconnect] on the AXIS ScanClient.
The message line will change to Disconnect-
ed.
Note: The scanning session will automatically
end and the channel will be disconnected after 5 minutes of inactivity.
ENGLISH
3. When ready, close the Save dialog and
the Canon MF Toolbox. End the scanning
session (see below) and remove the
scanned object from the flatbed.
Page 16

ENGLISH
 Loading...