

Page 1
Page 2
Quick Installation Guide
This guide covers the installation and basic setup procedures for the
AXIS 150/152. If you need more detailed instructions, please refer to
the AXIS 150/152 User’s Manual.
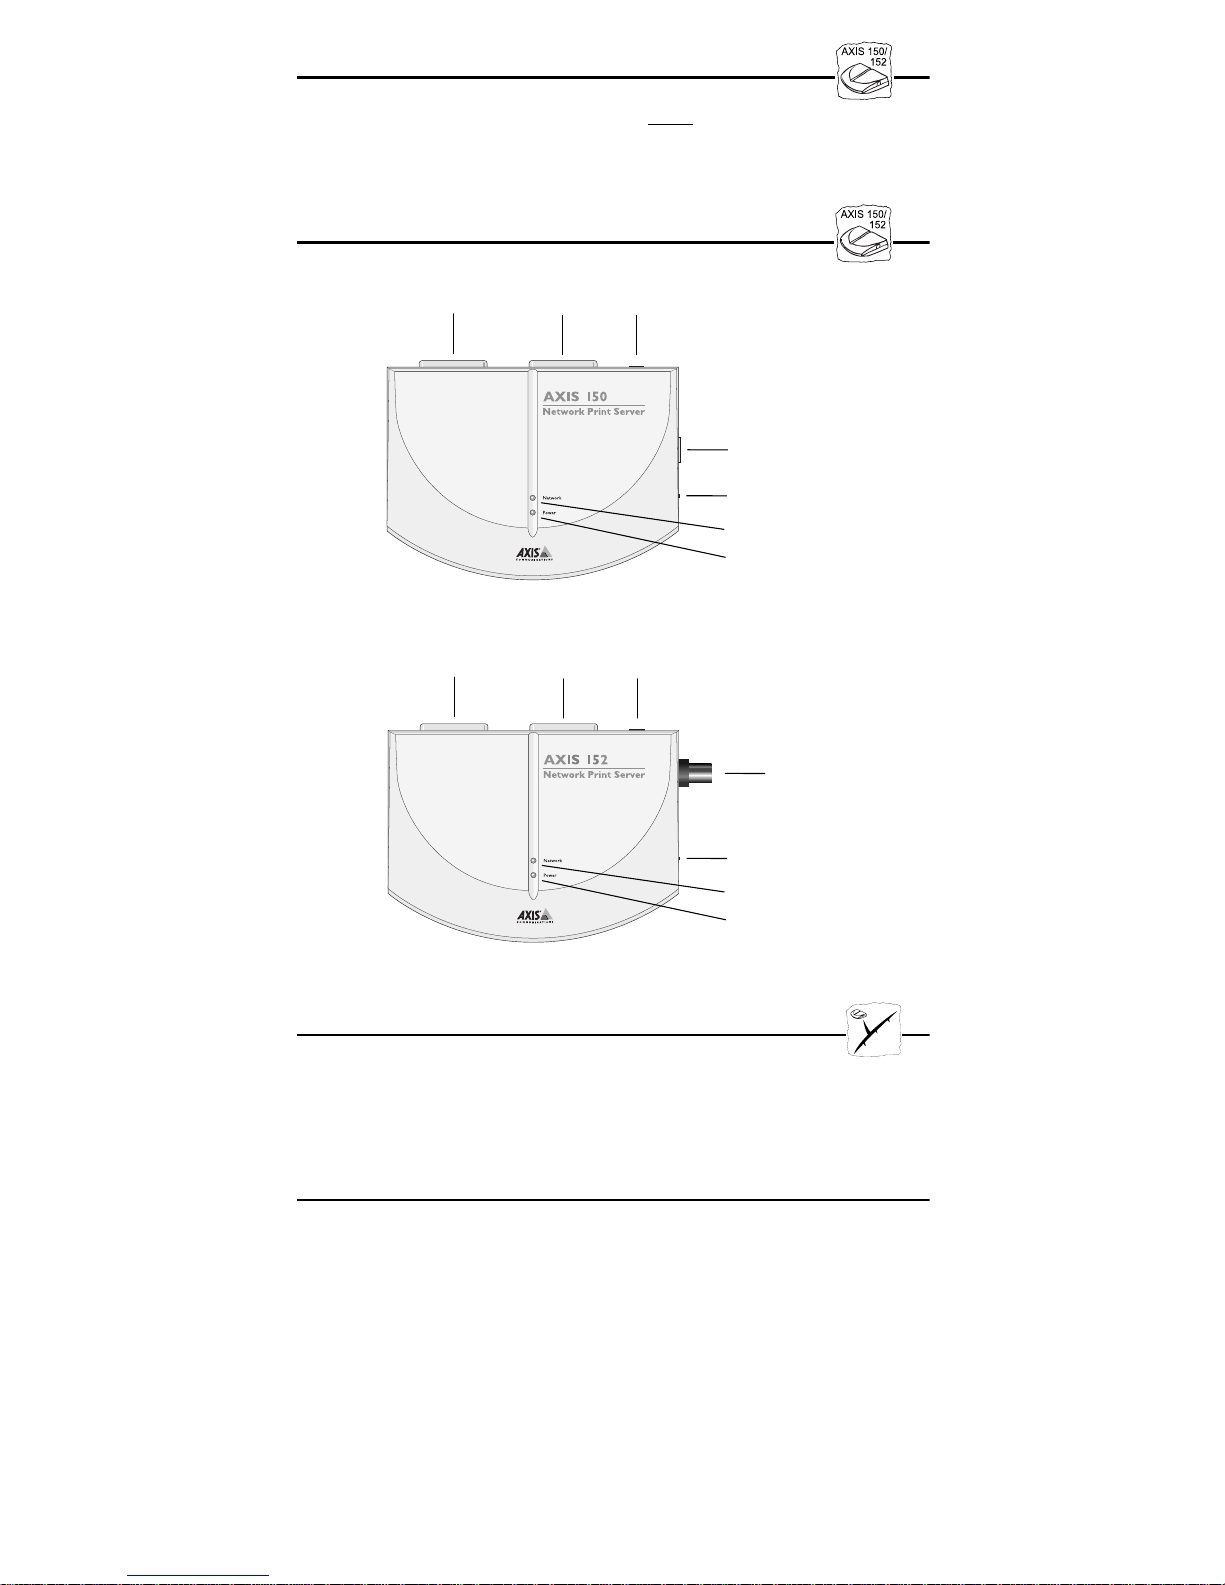
Physical Description
LPT1 Printer
Connector
LPT1 Printer
Connector
LPT2 Printer
Connector
AXIS 150 Network Print Server
LPT2 Printer
Connector
External Power
Supply Connector
External Power
Supply Connector
Ethernet
Connector
Test Button
Network Indicator
Power Indicator
Ethernet
Connector
Test Button
Network Indicator
Power Indicator
AXIS 152 Network Print Server
Installing the AXIS 150/152
You should proceed with the following instructions, as appropriate
for your type of network. Refer to all relevant sections if you intend
to use the AXIS 150/152 in a multiprotocol environment.
Hardware Installation
1. Note the serial number found on the underside label of the AXIS
150/152. You need this number during the configuration.
2. Switch off the printer. Remove the AXIS 150/152 power supply.
3. AXIS 150 only: Connect your AXIS 150 to the network using a
shielded twisted pair (10baseT) cable.
4. AXIS 152 only: Connect your AXIS 152 to the network using a
shielded thin wire (10base2) cable.
5. Switch on the printer. Connect the AXIS 150/152 power supply.
6. Ensure that the Network Indicator is flashing. To check the
connections, print a Test Page by depressing the Test Button.
Page 3

NetWare
By following the instructions detailed below, install your AXIS
150/152 with the AXIS NetPilot™ installation Wizard. Please note
that the AXIS NetPilot™ software requires a Windows platform
that uses NetWare or NetBIOS/NetBEUI.
1. Load the AXIS NetPilot™ software by following the instructions
on the label of the AXIS Utilities diskette. After loading the
software, double click on the AXIS NetPilot™ icon. AXIS
NetPilot™ then scans the network of all connected Axis
Network Print Servers.
2. AXIS units previously installed using the AXIS NetPilot™
appear as ‘Network Print Servers’ and un-installed units are
featured as ‘New Axis Units’. Select your AXIS 150/152 from the
‘New Axis Units’ sub-folder and then click the Install icon. The
installation Wizard guides you through the basic installation.
Click the Help icon should you require assistance throughout any
stage of the operation.
NetWare
To set up print queues:
1. Open the ‘Network Print servers’ folder and select the Network
Print Server you wish to set up.
2. Choose ‘Network’ from the Toolbar or Setup menu.
3. A new ‘Network environments’ window will now be open. From
this window you may create new print queues, connect to
previously established queues, and/or select the mode of
operation (Print Server or Remote Printer) for each printer.
To set up the advanced operating parameters:
1. Open the ‘Network Print Server’ folder and select the Network
Print Server you wish to setup.
2. Choose ‘Properties’ from the Toolbar or Setup menu.
3. A set of “tabbed” Property Pages will open which allow you to
refine the chosen mode of operation. e.g. password protection,
frame type selection and/or setting of the queue polling interval.
The NetWare Configuration is now complete and you can close the
AXIS NetPilot™.
To verify that the AXIS 150/152 is functioning correctly, we
recommend that you print a document from within a Windows
application, e.g. Microsoft Word. Please ensure that your printer is
selected as the Active Printer!
Windows
Supplied on the AXIS Utilities diskette, the AXIS Print Monitor
should be used for network printing within Windows 95 and
Windows NT environments. It allows AXIS Network Print Servers
to be connected in the same simple fashion as a local printer port and
once installed, is automatically initialized upon system startup.
Page 4

The AXIS Print Utility for Windows is also supplied on the AXIS
Utilities diskette and is the tool for network printing within
Windows for Workgroups and Windows 3.1 environments.
Follow the instructions on the AXIS Utilities diskette label to install
the appropriate printing tool for your environment.
Windows 95
The AXIS Print Monitor needs to be installed on each workstation
performing peer-to-peer printing. Once installed, the AXIS Print
Monitor then allows users to access to all network printers, just as if
they were connected directly to their workstation.
Peer-to-peer printing:
Follow the procedure below to install Axis printer ports from a
Windows 95 workstation:
1. To start the Add Printer Wizard, select settings - Printers from
the Start Menu and double-click on the add Printer icon.
2. After clicking Next> in the first dialog, the Wizard asks you to
select between Local Printer and Network Printer. Select Local
Printer. Click Next>.
3. Choose an appropriate print driver for your printer from the
manufacturer and model lists displayed. Click Next>.
4. Select the AXIS printer port to be installed from the Available
Ports list. The ports appear as <name>.LP1 and <name>.LP2,
where <name> is AX followed by the last six digits of the AXIS
150/152 serial number. For example AX560B35. Click the
Configure Port button.
5. Choose when pop-up messages are to be displayed from the
Configure AXIS Printer Ports dialog. Check the appropriate
boxes and then click Next>.
6. Enter an appropriate name for your printer and click Next>.
7. Choose whether you wish to produce a Test Page and then click
Finish.
Client-server printing:
The AXIS Print Monitor is not needed on the client platforms for
client-server printing.
Windows NT
The AXIS Print Monitor needs to be installed on each workstation
performing peer-to-peer printing. Once installed, the AXIS Print
Monitor then allows users to access to all network printers, just as if
they were connected directly to their workstation.
Peer-to-peer printing:
Follow the procedure below to install Axis printer ports from a
Windows 95 workstation:
Page 5

1. To start the Add Printer Wizard, select settings - Printers from
the Start Menu and double-click on the add Printer icon.
2. The Wizard asks you to select between My Computer and
Network Printer Server. Select My Computer. Click Next>.
3. Click Add Port... in the Available ports dialog. Select AXIS Port
and then click New Port...
4. Select the AXIS port you wish to add and then click OK. The
ports appear as <name>.LP1 and <name>.LP2, where <name> is
AX followed by the last six digits of the AXIS 150/152 serial
number, e.g. AX560B35. Click OK.
5. Close the Printer ports Window.
6. Click the Configure Port... button and choose when pop-up
messages are to be displayed. Check the appropriate boxes and
then click OK. Continue the installation by clicking Next>.
7. Choose the appropriate print driver for your printer from the
manufacturer and model lists displayed.
8. Enter an appropriate name for your printer and click Next>.
9. Choose whether you wish to share the printer with other network
users and click Next>.
10.Choose whether you wish to produce a Test Page and then click
Finish. The Axis Printer Port is now installed.
Client-server printing:
The AXIS Print Monitor is not needed on the client platforms for
client-server printing.
Windows 3.1
Windows 3.1 requires network support such as LAN Server or LAN
Manager Workstation software to be installed in order to redirect a
local printer port to a network device. When installed, proceed as
described under Windows for Workgroups below.
Windows for Workgroups
All Windows 3.1 and Windows for Workgroups users, requiring
access to a network printer in peer-to-peer mode, will need to install
the AXIS Print Utility for Windows onto their workstations.
Client-server printing:
This print method is suitable for larger networks and requires only
one user to install the AXIS Print Utility for Windows software onto
their workstation. The setup procedure is described below:
1. Install the AXIS Print Utility for Windows onto the file server.
2. Set up your AXIS 150/152 from the file server as described in the
peer-to-peer printing section below, but additionally check the
Share box for your printer.
Page 6

Your shared printers can now be used by all the Windows clients and
you do not need to install the AXIS Print Utility for Windows on
the clients.
Important Note: The server setup described above should only be
made on a Windows for Workgroups workstation.
peer-to-peer printing:
This print method does not require a file server and is recommended
for smaller networks. Follow these steps to install your AXIS
150/152 for peer-to-peer printing at a Windows for Workgroups or
Windows 3.1 workstation:
1. Double-click the AXIS Print Utility icon.
2. In the Port menu, click Add.
3. In the NPS Port list, select the AXIS 150/152 port to be installed.
The ports appears as <name>.LP1 and <name>.LP2, where
<name> is AX followed by last six digits of your print server
number. For example: AX560B35.LP1. Note that this
alphanumeric name will be superseded by any new name given to
your AXIS 150/152 when using AXIS NetPilot™.
4. Accept or change the suggested Windows port name, and type
any comments in the Description field. Make a note of the
Windows port name as you will need this later. Click OK to
install the Windows port.
5. In the Port menu, click Connect to bring up the Windows
Printers dialog.
6. Select a printer driver from the list of Installed Printers, or click
Add>> to install a new driver. Click Connect...
7. Select the Windows port name, defined in step 4 above, that
should now feature at the bottom of the Ports list.
8. Click OK to close the Connect dialog, and click Close to close
Printers.
The setup is completed and you can now print through your AXIS
150/152.
Important note: AXIS Print Utility for Windows must be running
when you print through your AXIS 150/152. We strongly
recommend that you copy the AXIS Print Utility icon into your
StartUp file.
Windows Clients using LANtastic
From any Windows client, the AXIS 150/152 may also be used for
network printing within LANtastic environments. Your choice of
Axis utility software should be guided by type of Windows client
employed. Simply refer to the appropriate Windows section for your
client, above. Please ensure that your LANtastic client is running the
NetBIOS/NetBEUI protocol.
Page 7

OS/2
Firstly, ensure that the NetBEUI protocol is active. If necessary, use
MPTS/LAPS (LAN Server) or SETUP (LAN Manager) to activate
it.
Load AXIS Print Utility for OS/2 and install your AXIS 150/152:
1. Insert the AXIS Print Utility for OS/2 disk into your disk drive,
and open an OS/2 window. Execute the install.exe program.
2. With the AXIS Print Utility for OS/2 is running, install your
AXIS 150/152 by clicking Install. The ports appear as
<name>.LP1 and <name>.LP2, where <name> is AX followed by
last six digits of your print server number e.g. AX100086.LP1.
Note that this alphanumeric name will be superseded by any new
name given to your AXIS 150/152 when using AXIS NetPilot™.
3. Select the ports you want to install, then click Install
Repeat this procedure for each server using the AXIS 150/152.
Create a Print Queue (OS/2 version 1.x):
1. Double-click the Print Manager icon, click Setup, then select
Printers...
2. Click Add to make a new printer definition, then type a name of
your choice in the Name field.
3. Select \PIPE\<name>.LP1 or \PIPE\<name>.LP2 from the
Device list, then select a printer driver suitable for your printer.
4. Click Add, then click OK to confirm the printer definition.
5. Click Setup, then select Queues...
6. Click Add to create a print queue. Type a name in the Name
field.
7. Click Add, then click OK to confirm the queue definition.
Create a Print Queue (OS/2 version 2.x and above):
1. Double-click the Templates folder, which is located in the OS/2
systems folder. Drag the Printer icon out to the Workplace Shell
(or into a folder), while holding the right mouse button down.
.
2. Type a name of your choice in the Name field.
3. Select \PIPE\<name>.LP1 or \PIPE\<name>.LP2 from the
Output port list, and select a printer driver suitable for your
printer from the Default printer driver list.
4. Click Create to confirm the printer definition.
Print queue sharing:
Open an OS/2 window and issue the following command:
NET SHARE queue_name /PRINT, where queue_name is the
name of the queue to be created.
Note: AXIS Print Utility for OS/2 must be running when you print
through your AXIS 150/152. We strongly recommend that you copy
the AXIS Print Utility icon into your StartUp file.
Page 8

AXIS 150/152 Quick Installation Guide
Part No: 13925
Revision: 2.3, Date: October 1997
Copyright © Axis Communications AB, 1996-1997
China (Beijing Office)
Phone: +86 - 10 6510 2705/6/7/8, Fax: +86 - 10 6510 2703
Email: axisbj@public3.bta.net.cn
China (Shanghai Office)
Phone: +86 - 21 6445 4522, Fax: +86 - 21 6445 4757
Email: axissh@npc.haplink.com.cn
England
Phone: +44 1753 714310, Fax: +86 1753 540990
Email: info@uk.axis.com
France
Phone: +33 1 49 69 15 50, Fax: +33 1 49 69 15 59
Email: info@fr.axis.com
Hong Kong
Phone: +852 2836 0813, Fax: +852 2573 5935
Email: info@axis.com.hk
Japan
Phone: +81 3 3545 8282/8, Fax: +81 3 3545 8280
Email: info@axiscom.co.jp
Korea
Phone: +82 2 780 9636, Fax: +82 2 780 5802
Singapore
Phone: +65 250 8077, Fax: +65 352 1655
Email: info@axis.com.sg
Sweden
Phone: +46 46 270 18 00, Fax: +46 46 13 61 30
Email: info@axis.com, URL: http://www.se.axis.com/
Taiwan
Phone: +886 2 8780 5972, Fax: +886 2 8780 5975
USA
Phone: (617) 938-1188, 1-800-444-AXIS
Fax: (617) 938-6161
Email: info@axisinc.com, URL: http://www.axis.com/
 Loading...