

Page 1
Visualiser
Quick Start Guide
Version 7.12
Visualiser7.12QSG.doc 19/02/2009 14:08:00
Page 2

Useful Avolites phone numbers:-
Avolites England
Sales and service* (+44) (0) 20 8965 8522
Service out of hours* (+44) (0) 831 17 8888
Fax (+44) (0) 20 8965 0290
Email name@avolites.com
Website http://www.avolites.com
Distribution of Avolites products in USA:Avolites America
Sales and service* (+1) 423 938 2057
Fax (+1) 423 938 2059
*Before contacting Avolites for service enquiry please ensure that you have the product
serial number and the Software version. The serial number can be found on the back of the
desk near the power socket and on the keyboard drawer; the software version is displayed
on the title bar of the Diamond application on the VDU.
The latest version of this manual and Diamond Software can be downloaded from
the Avolites website.
The small print :
No Liability for Consequential Damages
Avolites has a policy of continuous product and documentation improvement. As such the detail within
this manual may not match the operation of the Diamond 4.
In no event shall Avolites be liable for any direct, indirect, special, incidental, or consequential
damages or loss whatsoever (including, without limitation, damages for loss of profits, business
interruption, or other pecuniary loss) arising out of the use or inability to use the Diamond even if
Avolites Ltd. has been advised of the possibility of such damages. Because some jurisdictions do not
allow the exclusion or limitation of liability for consequential or incidental damages, the above
limitation may not apply to you.
Avolites Ltd recognise that all trademarks within the manual are the property of their respective
owners.
Lindsey Markham: created October 2003
Richard Salzedo: formatted in standard form October 2003
Philip Rogers: updated February 2005
Alex Triffitt: updated January 2007
Gregory Haynes: updated February 2009
Visualiser7.12QSG.doc 19/02/2009 14:08:00
Reprint and revision history:
Page 3

C O N T E N T S
1 Quick Start Guide ................................................................................. 4
1.1 Installing Visualiser ......................................................................... 4
1.2 Installing on Windows Vista .............................................................. 5
1.3 Connecting Visualiser to an Avolites Console ...................................... 6
1.4 Installing Pearl Simulator ................................................................. 7
1.5 Using Export and Import to report a patch ......................................... 8
2 Frequently Asked Questions ................................................................. 10
Visualiser7.12QSG.doc 19/02/2009 14:08:00
Page 4
C H A P T E R O N E
START
Access the AVOLITES website:
Click
red download button
Select ‘DOWNLOADS/MANUALS’
Click ‘OPEN’ on the File Download screen
Follow the Installation Wizard
Yo
u can now run Visualiser by double
Are you instal
ling
CD
WEBSITE
Insert CD into computers CD Rom Drive
Search the CD Rom Dri
ve
Double click VIS
7.12
INSTALLER
In the new window which opens, double
Follow the Installation
Wizard
END
1 Quick Start Guide
1.1 Installing Visualiser
from our website or
a CD?
www.avolites.org.uk
Select ‘SOFTWARE’, then ‘VISULALISER’
clicking the shortcut on your desktop.
END
click VIS 7.12
Visualiser7.12QSG.doc 19/02/2009 14:08:00
Page 5

Extract
the file
, d3drm.dll
, from the a
bove zip file and copy
Follo
w the installation instructi
ons
Right click on the
Visualiser
application
Download
the following file:
Select the Compatibility tab
Tick the box next to "Run this program
If
the tick box
is greyed out click on "Show settings for all users" and
START
Click OK to confirm your
changes
1.2 Installing on Windows Vista
For Visualiser to work in Windows Vista you will require an extra file, 'd3drm.dll’.
Also, when you run Visualiser you will to use the option to run as administrator.
on the previous page
http://www.avolitesdownload.com/Uploads/Personalities/d3drm.zip
the DLL to the directory where Visualiser is installed
icon and select Properties
as an administrator"
tick the equivalent option in the new window (you may be asked for a
password to do this)
Visualiser7.12QSG.doc 19/02/2009 14:08:00
END
Page 6

Tur
n both console and
START
Connect your computer
Start Visualiser
Turn console key to
Use cursors to go to MIDI
END
In Visualiser, set DMX to
Press ‘EXIT’
Press Softkey F to ‘QUIT’
In Visualiser, set DMX to
Which console are
DIAMOND4
AZURE
PEARL OR
SAPPHIRE
Start Visualiser
Turn console on
Connect your computer
Turn both console and
Start Visualiser
Set console to ‘PROGRAM’
Press Softkey C ‘USER
Press ‘PREFERENCES’ key
Use cursors to go to 15.
END
In Visualiser, set DMX to
END
1.3 Connecting Visualiser to an Avolites Console
you using?
with Visualiser installed to
your Avolites console
using the Serial to MIDI
In & Out cable.
computer on
‘SYSTEM’
SETTINGS’
MIDI- and set to
VISUALISER
with Visualiser installed to
your Avolites console
using the Serial to MIDI
In & Out cable.
Simulator
computer on
MODE and set to
VISUALISER
Visualiser7.12QSG.doc 19/02/2009 14:08:00
RS232
RS232
Page 7

Select ‘
CONSOLES’ then ‘PEARL 2004’
START
Access the AVOLITES website:
Click the
link in th
e email you recieve
Click
and download the software
Select ‘DOWNLOADS
/MANUALS’
Fill in form and submit
END
You can now run Simulator by double
Are you installing
CD WEBSITE
Insert CD into computers CD Rom Drive
Search the CD Rom Drive
Double click SIMULATOR INSTALL
Click the correct red download button for
Follow the
Installation Wizard.
Double click PSIM
Follow the Installation Wizard
– check
When download is complete, click
You can now run Simulator by double
END
1.4 Installing Pearl Simulator
from our website or
a CD?
www.avolites.org.uk
‘PEARL2004 v1.2’
clicking the shortcut on your desktop
the file PEARL SIMULATOR will save to
and change if necessary
‘CLOSE’
clicking the shortcut on your desktop
Visualiser7.12QSG.doc 19/02/2009 14:08:00
Page 8

Close the program
Open s
aved ‘.CSV’ file
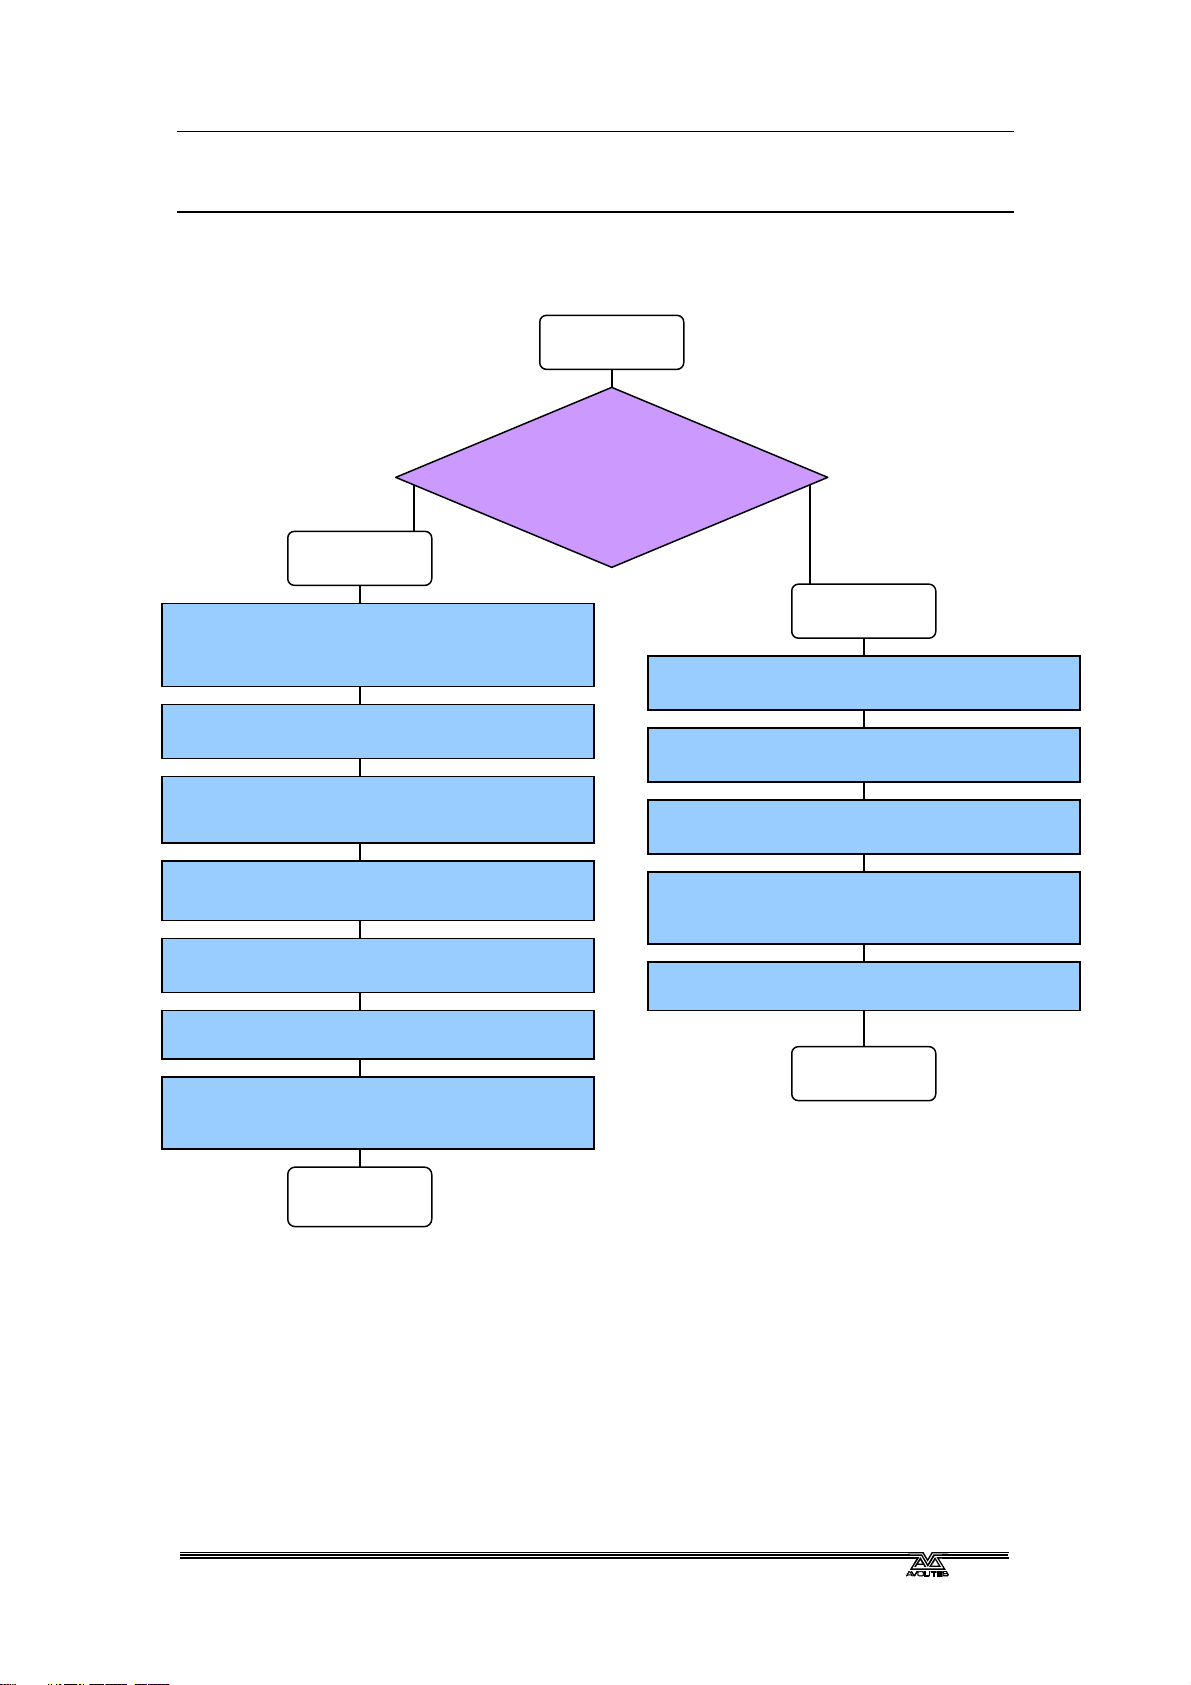
START
Go to ‘DESIGN’ Mode
Select ‘FILE’
Click on ‘EXPORT
Save onto a floppy disk
To specify fixture
handles
Note the fixture handle
Is this the order you
NO YES
Insert floppy into Avolites
Fig 1
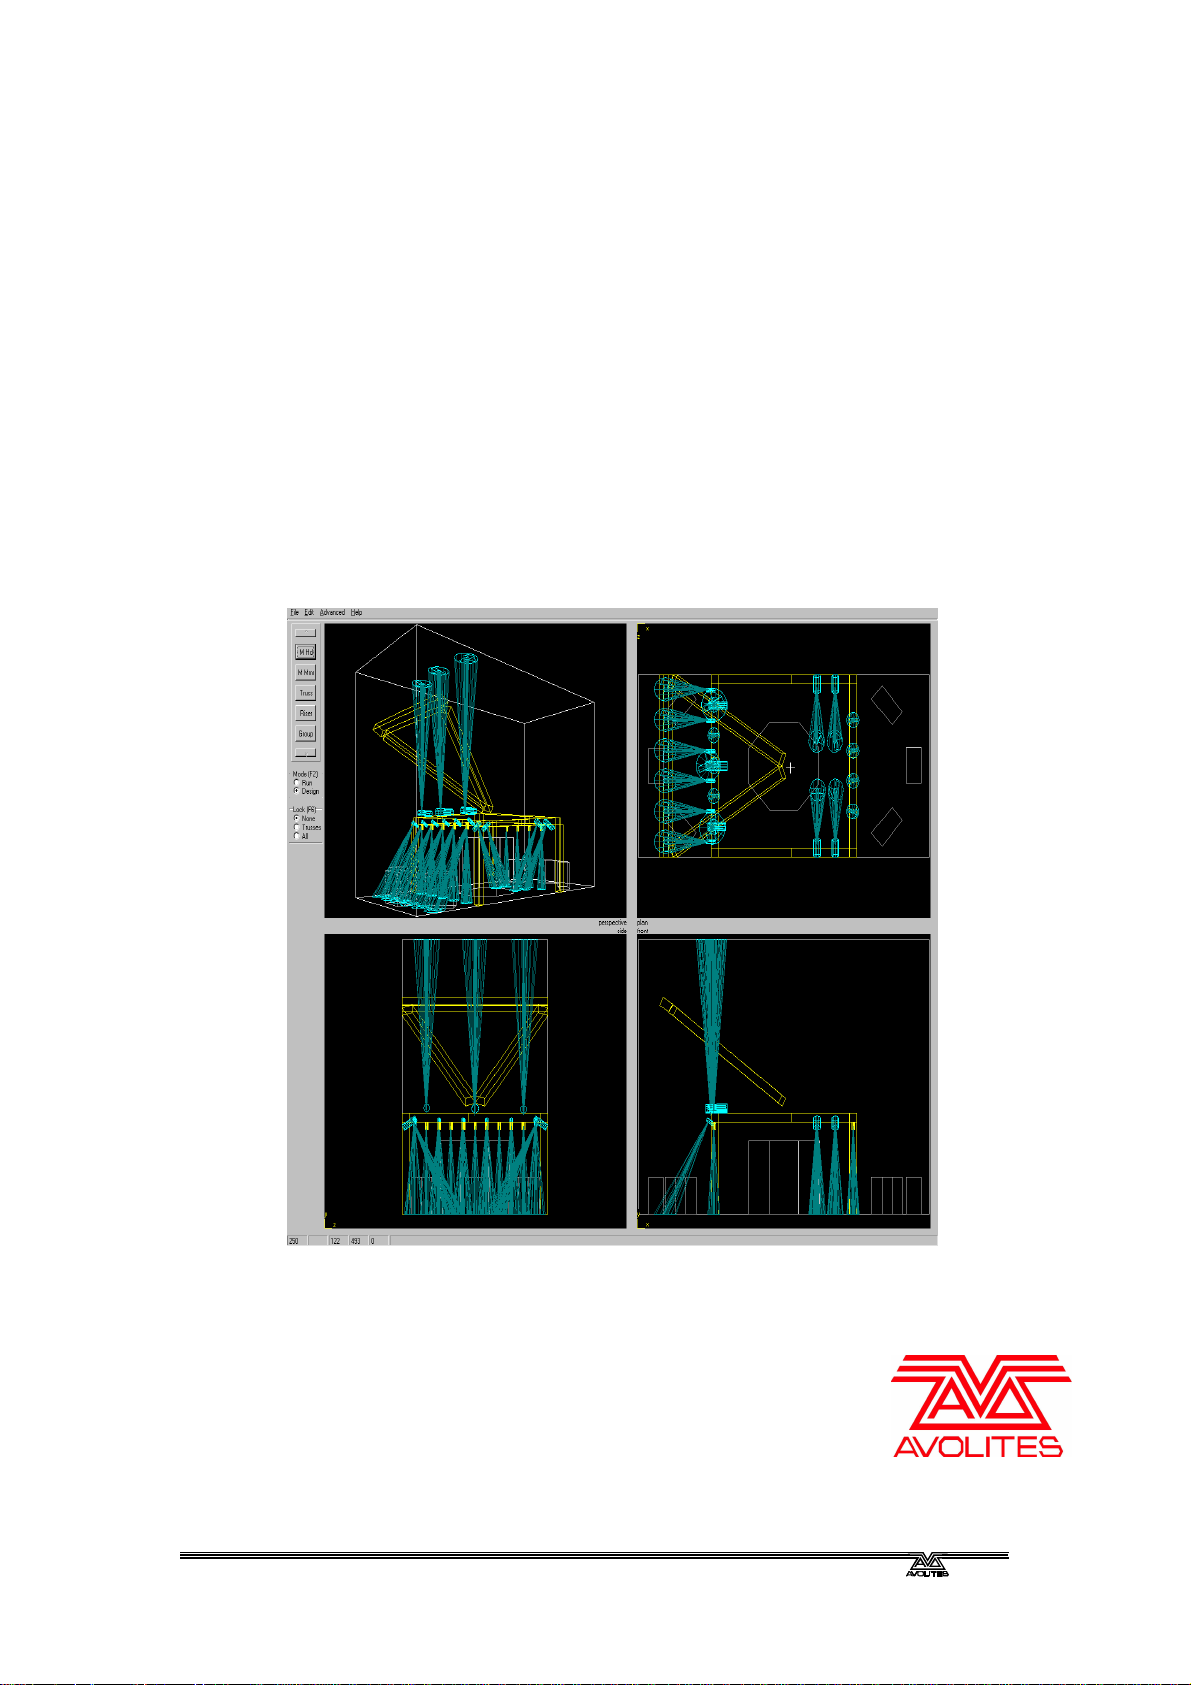
1.5 Using Export and Import to report a patch
Open the Visualiser program and complete your theatre:
REPORT’
column shows ‘-1’ for all
fixtures. See Figure 1.
want the console
patched in?
Fig 2
Visualiser7.12QSG.doc 19/02/2009 14:08:00
for patching, assign a
fixture handle number for
each fixture (these do not
have to be consecutive)
See Figure 2
Re-save document to
floppy disk
console
Page 9

Press the ‘DISK’ function
Press Softkey G ‘LOAD
Press Softkey G ‘LOAD
Do you want the
NO YES
Select your answer by
Turn key to ‘PROGRAM’
Set console to ‘PROGRAM’
Press the ‘DISK’ button
Did you change
NO YES
Your console will now
Read prompt line
Select your answer by
Your console will now
END
END
button
VISUALISER CSV FILE’
‘Automatically
Create Preset
pressing the relevant
VISUALISER CSV FILE’
console to
Softkey
patch fixtures from the
.csv file
fixture handle
numbers in your
.csv file?
pressing the relevant
Softkey
patch fixtures from the
.csv file
Visualiser7.12QSG.doc 19/02/2009 14:08:00
Page 10

START
Which console are
PEARL OR
AZURE
Turn the key to ‘SYSYEM’
Press Softkey A ‘SERVICE’
Press Softkey D ‘TESTS’
Press Softkey F ‘VIEW
A window
will appear on
Set the console to ‘AVO’
Press Softkey G ‘MIDI
A window
will appear on
END
END
C H A P T E R T W O
2 Frequently Asked Questions
2.1.1 I want to work in imperial and everything is metric (or
vice versa)?
In Run Mode, go to File and Open Theatre. There will be two blank theatres; one
‘blankmm.ttr’ (metric) and one ‘blankinches.ttr’ (imperial), simply open the
relevant theatre and start creating!
2.1.2 How can I check the RS232 lead is ok?
With the console set to MIDI – VISUALISER (see ‘Connecting Visualiser to an
Avolites Console’), select the MIDI VIEW. You will need a monitor attached.
SAPPHIRE
MIDI CODES
you using?
SCREEN’
the monitor displaying all
the midi port outputs and
inputs.
Visualiser7.12QSG.doc 19/02/2009 14:08:00
the monitor displaying all
the midi port outputs and
inputs.
Page 11

START
Select the Advanced Menu
Go into ‘DESIGN’ mode
Click on Serial Comm
Set the correct Com Port
Select the baud ra
te to
END
Connect the RS232 lead to the midi port on the consol and short out pins 2 & 3
on the D type connector using a piece of wire or a paper clip to connect pin 2 to
pin 3 (see diagram.
The MIDI screen should continuously display 5a in yellow followed by 5a in white,
if it does this the cable and console are fine.
If it does not do this then you have a problem with either the RS232 cable or the
console.
2.1.3 Checking the Console
Get a standard Midi cable and connect both ends into the console.
Perform the same test as above, with the midi screen and f it works the console is
fine and the RS232 cable is at fault.
If not then the chances are the console is not working correctly, contact Avolites
technical support.
2.1.4 Testing connection on the PC Side
Connect the D type connector to the PC and open the Visualiser program.
Visualiser7.12QSG.doc 19/02/2009 14:08:00
38400
Page 12

2.1.5 Checking the data from the console to the PC
Make sure the console is still set up as it was for the previous test.
In the main white part of the screen you should see a number of letter Z’s
appearing one after the other. If this is the case then the PC is receiving ok, go to
the next section below.
If this does not work try selecting another com port and make certain the D type
is plugged in properly to the PC
If neither of these work, the problem is within the PC or the operating system
set-up. You will need to look at your computer manuals to make sure the com
port has not been disabled.
2.1.6 Checking the data from the PC to the console
In the box labelled ‘Send ASCII’, type in number 1 on the PC keyboard, then
press enter.
Now look at the console monitor.
On the ‘MIDI monitor’ screen you should see 31 in white.
If this works then you have communication between the console and the PC,
check the Visualiser set up matches the com port you have selected in the serial
data check screen.
If you still have difficulties, please contact
vis@avolitesdownload.com
2.1.7 How do I get Pearl Simulator to talk to Visualiser?
Start up both programs on your computer.
Visualiser needs to be in ‘RUN’ mode; select ‘SIMULATOR’ as your DMX selection.
2.1.8 Can I transfer my Visualiser patch into an Avolites
console?
Yes, see ‘USING EXPORT & IMPORT REPORT’
2.1.9 Can I transfer my Visualiser patch to the Pearl
Simulator?
No, as the Pearl Simulator does not have a cache file present
Visualiser7.12QSG.doc 19/02/2009 14:08:00
 Loading...