


 Loading...
Pearl Expert Titan
Operator’s Manual
Version 3.0

|
|
Limited |
2010 |
|
Avolites |
|
|
Copyright |
|
|
|
|
|
|
PearlExpertTitan_Man_v3.doc 29/03/2010 13:28:00

Useful Avolites phone numbers:- |
|
|
2010 |
||
Avolites England |
|
|
|
|
|
Sales and service* |
(+44) |
(0) |
20 8965 8522 |
||
Service out of hours* |
(+44) |
(0) |
831 17 8888 |
||
Fax |
|
(+44) (0) 20 |
8965 0290 |
||
be downloaded from the |
|
website.Limited |
|||
name@avolites.com |
|
||||
Website |
http://www.avolites.com |
|
|||
*Before contacting Avolites for service enquiry please ensure that you have the product serial number and the Software version. The serial number can be found on the back of the desk near the power socket and on the keyboard drawer; the software version is displayed on the title bar of the Pearl application on the VDU.
The latest version of this manual and Pearl Expert Titan Software can
The small print :
No Liability for Consequential Damages
Avolites has a policy of continuous product and documentation improvement. As such the detail within this manual may not match the operation of the Pearl Expert Titan.
In no event shall |
be liable |
for any direct, indirect, special, incidental, or |
|
consequential damages or loss whatsoever (including, without limitation, damages for |
|||
loss of profits, business interruption, or other pecuniary loss) arising out of the use or |
|||
inability to use the Pearl even if |
|
Ltd. has been advised of the possibility of such |
|
damages. Because some jurisdictions do not allow the exclusion or limitation of liability |
|||
for consequential or incidental damages, the above limitation may not apply to you. |
|||
Avolites Ltd recognise that all trademarks within the manual are the property of their |
|||
respective owners. |
Avolites |
|
|
Copyright |
|
||
Reprint and revision history: |
|||
|
|
|
|
First produced September 2008
Revised for v1.1 April 2009 by TM
Revised for v1.2 June 2009 by TM
Revised for v2.0 September 2009 by TM
Revised for v3.0 March 2010 by TM
PearlExpertTitan_Man_v3.doc 29/03/2010 13:28:00

|
|
Limited |
2010 |
|
Avolites |
|
|
Copyright |
|
|
|
|
|
|
This manual was written by Tim Mitchell, Sabre Technology Ltd
http://www.sabretechnology.co.uk
PearlExpertTitan_Man_v3.doc 29/03/2010 13:28:00

Reference Manual Contents - Page 5
S E C T I O N S
1. |
SETTING UP THE CONSOLE |
|
|
2. |
PATCHING |
|
|
3. |
CONTROLLING DIMMERS AND FIXTURES |
||
4. |
PALETTES |
|
|
5. |
SHAPES |
|
Limited |
6. |
CUES |
|
|
|
|
||
7. |
CHASES |
|
|
8. |
CUE LISTS |
|
|
9. |
RUNNING THE SHOW |
|
|
10. |
REMOTE CONTROL |
|
|
11. |
USER SETTINGS AND OTHER OPTIONS |
|
|
12. |
WORKING WITH FIXTURE PERSONALITIES |
||
13. |
NETWORKING |
|
|
14. |
TITAN FOR PEARL USERS |
|
|
15. |
RELEASE NOTES |
Avolites |
|
|
|
||
16. |
GLOSSARY OF TERMS |
|
|
|
Copyright |
|
|
PearlExpertTitan_Man_v3.doc 29/03/2010 13:28:00
2010
13
29
39
51
59
65
79
89
103
107
113
129
133
145
147
159

Page 6 – Reference Manual Contents
|
|
Limited |
2010 |
|
Avolites |
|
|
Copyright |
|
|
|
|
|
|
PearlExpertTitan_Man_v3.doc 29/03/2010 13:28:00

|
|
|
|
|
Reference Manual Contents - Page 7 |
||||||
C O N T E N T S |
|
|
|
|
|
|
|
|
|||
|
|
|
|
|
|
|
|
|
|
||
1. |
|
Setting up the console |
|
2010 |
13 |
|
|||||
1.1 |
Guide to the console .............................................................. |
|
13 |
|
|||||||
1.2 |
Connecting up....................................................................... |
|
17 |
|
|||||||
|
|
|
1.2.1 |
Connecting mains power ...................................................................... |
|
17 |
|
||||
|
|
|
1.2.2 Starting up and shutting down.............................................................. |
|
17 |
|
|||||
|
|
|
1.2.3 |
Connecting DMX lines .......................................................................... |
|
17 |
|
||||
|
|
|
1.2.4 |
Connecting VDU monitors .................................................................... |
|
18 |
|
||||
|
|
|
1.2.5 Connecting the Touch Wing .................................................................. |
|
18 |
|
|||||
|
|
|
1.2.6 |
Other connections ............................................................................... |
|
18 |
|
||||
1.3 |
Using the displays and menus ................................................. |
|
19 |
|
|||||||
|
|
|
1.3.1 |
The onboard display ............................................................................ |
|
19 |
|
||||
|
|
|
1.3.2 Workspace windows on the VDU and Touch Wing |
20 |
|
||||||
|
|
|
|
|
|
|
|
||||
|
|
|
1.3.3 |
The Tools menu .................................................................................. |
|
|
|
|
|
22 |
|
|
|
|
1.3.4 |
Visualiser ........................................................................................... |
|
|
|
|
|
23 |
|
|
|
|
1.3.5 The Heads-Up Display (HUD)................................................................ |
|
|
|
|
|
24 |
|
|
|
|
|
1.3.6 |
Key profiles........................................................................................ |
|
|
|
|
|
25 |
|
|
|
|
1.3.7 |
Key macro recording ........................................................................... |
|
|
|
|
|
25 |
|
|
|
|
1.3.8 The Pearl Expert Titan application ......................................................... |
|
|
|
|
|
25 |
|
|
1.4 |
Loading and saving shows ...................................................... |
|
|
|
|
|
25 |
|
|||
|
|
|
1.4.1 |
Autosave ........................................................................................... |
|
|
|
|
|
25 |
|
|
|
|
1.4.2 Manual save and load .......................................................................... |
|
|
|
|
|
26 |
|
|
1.5 |
Backing up a show to USB drive .............................................. |
|
|
|
|
|
26 |
|
|||
|
|
|
1.5.1 Backup existing show files to USB pen drive ........................................... |
|
|
|
|
27 |
|
||
1.6 |
Clearing the console............................................................... |
|
|
|
|
|
27 |
|
|||
1.7 |
Rebooting into original Pearl Expert mode ................................. |
|
|
|
|
28 |
|
||||
2. |
|
Patching |
Limited |
|
|
|
|
29 |
|
||
2.1 |
Create |
|
|
|
|
|
29 |
|
|||
................................................................................. |
|
|
|
|
|
|
|||||
|
|
|
2.1.1 |
Preset faders (handles)........................................................................ |
|
|
|
|
|
29 |
|
|
|
|
2.1.2 |
Patching dimmers ............................................................................... |
|
|
|
|
|
30 |
|
|
|
|
2.1.3 Patching moving light fixtures............................................................... |
|
|
|
|
|
31 |
|
|
|
|
|
2.1.4 |
Visualiser Auto Patch ........................................................................... |
|
|
|
|
|
33 |
|
2.2 |
Edit ..................................................................................... |
|
|
|
|
|
|
33 |
|
||
|
|
|
2.2.1 Changing the DMX address of a fixture .................................................. |
|
|
|
|
33 |
|
||
|
|
|
2.2.2 |
Setting legends................................................................................... |
|
|
|
|
|
34 |
|
|
|
|
2.2.3 |
View Fixture Patch .............................................................................. |
|
|
|
|
|
34 |
|
|
|
|
2.2.4 |
Fixture Exchange ................................................................................ |
|
|
|
|
|
35 |
|
|
|
|
2.2.5 |
Update personalities............................................................................ |
|
|
|
|
|
35 |
|
2.3 |
Copy and Move ..................................................................... |
|
|
|
|
|
36 |
|
|||
|
|
|
2.3.1 Copying or moving a patched fixture ..................................................... |
|
|
|
|
36 |
|
||
|
|
|
2.3.2 |
Using copied fixtures ........................................................................... |
|
|
|
|
|
36 |
|
2.4 |
Delete.................................................................................. |
|
|
|
|
|
|
37 |
|
||
|
|
|
2.4.1 Deleting a patched fixture .................................................................... |
|
|
|
|
|
37 |
|
|
2.5 |
Advanced optionsAvolites.................................................................. |
|
|
|
|
|
37 |
|
|||
|
|
|
2.5.1 Swap pan and tilt................................................................................ |
|
|
|
|
|
37 |
|
|
|
|
|
2.5.2 |
Invert attributes ................................................................................. |
|
|
|
|
|
37 |
|
3. |
|
Controlling dimmers and fixtures |
|
|
|
|
39 |
|
|||
3.1 |
Create |
................................................................................. |
|
|
|
|
|
39 |
|
||
|
|
|
3.1.1 Selecting fixtures and dimmers for control ............................................. |
|
|
|
|
39 |
|
||
|
|
|
3.1.2 Setting fixtures to a start position ......................................................... |
|
|
|
|
|
40 |
|
|
|
|
|
3.1.3 |
Clearing selection................................................................................ |
|
|
|
|
|
41 |
|
|
|
|
3.1.4 Changing attributes using the wheels .................................................... |
|
|
|
|
42 |
|
||
|
|
|
3.1.5 Setting attributes using the Touch Wing................................................. |
|
|
|
|
43 |
|
||
|
|
|
3.1.6 Setting attributes by number................................................................ |
|
|
|
|
|
45 |
|
|
|
|
|
3.1.7 Selecting fixtures and dimmers by number (Channel) .............................. |
|
|
|
|
45 |
|
||
|
|
|
3.1.8 Selecting using a pattern ..................................................................... |
|
|
|
|
|
46 |
|
|
|
|
|
3.1.9 |
Attribute groups - IPCGBES.................................................................. |
|
|
|
|
|
46 |
|
|
|
|
3.1.10 |
Using fixture groups .......................................................................... |
|
|
|
|
|
47 |
|
|
|
|
3.1.11 Stepping through selected fixtures one at a time................................... |
|
|
|
|
48 |
|
||
|
|
|
3.1.12 Highlighting the selected fixture .......................................................... |
|
|
|
|
|
48 |
|
|
|
|
|
3.1.13 |
Align fixtures .................................................................................... |
|
|
|
|
|
48 |
|
|
|
|
3.1.14 |
Flip.................................................................................................. |
|
|
|
|
|
49 |
|
|
|
|
3.1.15 |
Fan mode......................................................................................... |
|
|
|
|
|
49 |
|
|
|
Copyright |
|
|
|
|
|
49 |
|
||
3.2 |
Edit ..................................................................................... |
|
|
|
|
|
|
|
|||
|
|
|
|
|
|
|
|
|
|
||
|
|
|
|
|
|
|
|
|
|
||
|
|
|
|
|
|
|
|
|
|
||
|
PearlExpertTitan_Man_v3.doc |
29/03/2010 13:28:00 |
|
|
|
|
|
|
|
||

Page 8 – Reference Manual Contents
|
3.2.1 |
The Channel Grid window..................................................................... |
49 |
3.3 |
Advanced options .................................................................. |
50 |
|
|
3.3.1 |
The ML menu button ........................................................................... |
50 |
4. |
Palettes |
|
|
|
2010 |
51 |
||||
4.1 |
Create |
................................................................................. |
|
51 |
||||||
|
4.1.1 Palette values stored as a reference ...................................................... |
51 |
||||||||
|
4.1.2 Which attributes are stored in palettes................................................... |
51 |
||||||||
|
4.1.3 |
|
Storing a palette................................................................................. |
52 |
||||||
|
4.1.4 Quick record on the Touch Wing ........................................................... |
53 |
||||||||
4.2 |
Playback .............................................................................. |
|
53 |
|||||||
|
4.2.1 Recalling a palette value ...................................................................... |
53 |
||||||||
|
4.2.2 |
|
Palette pages ..................................................................................... |
53 |
||||||
|
4.2.3 Quick palettes with no fixtures selected ................................................. |
54 |
||||||||
|
4.2.4 |
|
Setting palettes to fixtures in a playback................................................ |
54 |
||||||
4.3 |
Edit ..................................................................................... |
|
|
|
|
|
|
|
54 |
|
|
4.3.1 |
|
Editing palettes................................................................................... |
|
|
|
|
54 |
||
|
4.3.2 Setting legends for palettes.................................................................. |
|
|
|
|
55 |
||||
4.4 |
Copy and Move |
..................................................................... |
|
|
|
|
55 |
|||
|
4.4.1 Copying or moving a palette................................................................. |
|
|
|
|
55 |
||||
4.5 |
Delete.................................................................................. |
|
|
|
|
|
|
56 |
||
|
4.5.1 |
|
Deleting palettes................................................................................. |
|
|
|
|
56 |
||
4.6 |
Timing ................................................................................. |
|
|
|
|
|
56 |
|||
|
4.6.1 Fading a palette and fixture overlap ...................................................... |
|
|
|
|
56 |
||||
|
4.6.2 Master Time for palettes ...................................................................... |
|
|
|
|
57 |
||||
5. |
Shapes |
|
|
|
|
|
|
|
59 |
|
5.1 |
Playback .............................................................................. |
|
|
|
|
|
60 |
|||
|
5.1.1 |
|
Creating a shape................................................................................. |
|
|
|
|
60 |
||
|
5.1.2 Changing size and speed of a shape ......................................................Limited |
|
|
|
|
61 |
||||
|
5.1.3 Changing the phase of a shape across multiple fixtures............................ |
|
|
|
|
62 |
||||
5.2 |
Edit ..................................................................................... |
|
|
|
|
|
|
|
63 |
|
|
5.2.1 Editing shapes which are running .......................................................... |
|
|
|
|
63 |
||||
|
5.2.2 |
|
Reversing a shape............................................................................... |
|
|
|
|
63 |
||
5.3 |
Delete.................................................................................. |
|
|
|
|
|
|
63 |
||
|
5.3.1 |
|
Deleting shapes .................................................................................. |
|
|
|
|
63 |
||
5.4 |
Advanced options .................................................................. |
|
|
|
|
63 |
||||
|
5.4.1 |
|
Shape fade mode................................................................................ |
|
|
|
|
63 |
||
6. |
Cues |
|
|
|
|
|
|
|
65 |
|
6.1 |
Create |
................................................................................. |
|
|
|
|
|
65 |
||
|
6.1.1 How the Pearl works when programming ............................................... |
|
|
|
|
65 |
||||
|
6.1.2 |
|
Creating a cue .................................................................................... |
|
|
|
|
66 |
||
|
6.1.3 Using shapes in cues ........................................................................... |
|
|
|
|
67 |
||||
6.2 |
Playback .............................................................................. |
|
|
|
|
|
67 |
|||
|
6.2.1 |
|
HTP and LTP....................................................................................... |
|
|
|
|
67 |
||
|
|
|
|
Avolites |
|
|
|
|
67 |
|
|
6.2.2 Playing back a cue .............................................................................. |
|
|
|
|
|||||
|
6.2.3 |
|
Changing playback pages..................................................................... |
|
|
|
|
68 |
||
|
6.2.4 |
|
Releasing running playbacks................................................................. |
|
|
|
|
68 |
||
6.3 |
Edit ..................................................................................... |
|
|
|
|
|
|
|
68 |
|
|
6.3.1 |
|
Editing a cue ...................................................................................... |
|
|
|
|
68 |
||
|
6.3.2 Playback and Cue view ........................................................................ |
|
|
|
|
69 |
||||
|
6.3.3 |
|
The Include function............................................................................ |
|
|
|
|
70 |
||
|
6.3.4 Removing attributes from cues using “Off” ............................................. |
|
|
|
|
71 |
||||
6.4 |
Copy, Move and Link.............................................................. |
|
|
|
|
71 |
||||
|
6.4.1 Copying or moving a cue ..................................................................... |
|
|
|
|
71 |
||||
6.5 |
Delete.................................................................................. |
|
|
|
|
|
|
72 |
||
|
6.5.1 |
|
Deleting a cue .................................................................................... |
|
|
|
|
72 |
||
6.6 |
Timing ................................................................................. |
|
|
|
|
|
72 |
|||
|
6.6.1 Setting fade times and Overlap for a cue ............................................... |
|
|
|
|
72 |
||||
|
6.6.2 |
|
Changing fixture order......................................................................... |
|
|
|
|
74 |
||
|
6.6.3 Setting attribute fade times for a cue .................................................... |
|
|
|
|
75 |
||||
6.7 |
Advanced options .................................................................. |
|
|
|
|
76 |
||||
|
6.7.1 |
|
Release mask ..................................................................................... |
|
|
|
|
76 |
||
|
6.7.2 Shape size/speed on fader ................................................................... |
|
|
|
|
76 |
||||
|
6.7.3 |
|
Curve ................................................................................................ |
|
|
|
|
|
76 |
|
Copyright |
|
|
|
|
|
76 |
||||
|
6.7.4 |
|
Handle Paging .................................................................................... |
|
|
|
|
|||
|
|
|
|
|
|
|
|
|||
|
|
|
|
|
|
|
|
|||
|
|
|
|
|
|
|
|
|||
PearlExpertTitan_Man_v3.doc |
29/03/2010 13:28:00 |
|
|
|
|
|
|
|||

|
|
|
|
|
Reference Manual Contents - Page 9 |
||||||
|
|
|
6.7.5 |
Playback priority ................................................................................. |
|
|
|
|
|
76 |
|
|
|
|
6.7.6 |
Key Profile ......................................................................................... |
|
2010 |
76 |
|
|||
7. |
|
Chases |
|
|
79 |
|
|||||
7.1 |
Create |
................................................................................. |
|
79 |
|
||||||
|
|
|
7.1.1 |
Programming a chase.......................................................................... |
|
79 |
|
||||
7.2 |
Playback .............................................................................. |
|
80 |
|
|||||||
|
|
|
7.2.1 Playing back a chase ........................................................................... |
|
80 |
|
|||||
|
|
|
7.2.2 Connecting a chase for control.............................................................. |
|
80 |
|
|||||
|
|
|
7.2.3 Setting speed and crossfade for a Chase................................................ |
81 |
|
||||||
|
|
|
7.2.4 Manually controlling the steps of a chase ............................................... |
82 |
|
||||||
|
|
|
7.2.5 |
Changing chase direction ..................................................................... |
|
82 |
|
||||
|
|
|
7.2.6 Jumping to a step ............................................................................... |
|
82 |
|
|||||
7.3 |
Edit ..................................................................................... |
|
|
82 |
|
||||||
|
|
|
7.3.1 Opening a chase for editing.................................................................. |
|
82 |
|
|||||
|
|
|
7.3.2 Editing a chase using Unfold................................................................. |
|
|
|
|
|
83 |
|
|
7.4 |
Copy, Move and Link.............................................................. |
|
|
|
|
|
84 |
|
|||
|
|
|
7.4.1 Copying or moving a chase .................................................................. |
|
|
|
|
|
84 |
|
|
7.5 |
Delete.................................................................................. |
|
|
|
|
|
|
84 |
|
||
|
|
|
7.5.1 |
Deleting a chase ................................................................................. |
|
|
|
|
|
84 |
|
|
|
|
7.5.2 Deleting a step from a chase ................................................................ |
|
|
|
|
|
84 |
|
|
7.6 |
Timing ................................................................................. |
|
|
|
|
|
85 |
|
|||
|
|
|
7.6.1 Global timings for chases ..................................................................... |
|
|
|
|
|
85 |
|
|
|
|
|
7.6.2 Individual cue times in chases .............................................................. |
|
|
|
|
|
86 |
|
|
|
|
|
7.6.3 Setting attribute fade times for a cue in a chase ..................................... |
|
|
|
|
87 |
|
||
7.7 |
Advanced options .................................................................. |
|
|
|
|
|
88 |
|
|||
|
|
|
7.7.1 Loop/Stop on Final Cue........................................................................ |
|
|
|
|
|
88 |
|
|
|
|
|
7.7.2 |
Forwards/backwards/bounce/random .................................................... |
|
|
|
|
88 |
|
|
|
|
|
7.7.3 |
Cue linking......................................................................................... |
Limited |
|
|
|
|
88 |
|
|
|
|
7.7.4 |
Renumber cues................................................................................... |
|
|
|
|
88 |
|
|
8. |
|
Cue Lists |
|
|
|
|
89 |
|
|||
|
|
|
|
|
|
|
|||||
8.1 |
Create |
................................................................................. |
|
|
|
|
|
90 |
|
||
|
|
|
8.1.1 |
Programming a cue-list........................................................................ |
|
|
|
|
|
90 |
|
|
|
|
8.1.2 Changing legends for cues in a cue list .................................................. |
|
|
|
|
91 |
|
||
|
|
|
8.1.3 Autoloading a playback within a cue list ................................................. |
|
|
|
|
91 |
|
||
8.2 |
Playback .............................................................................. |
|
|
|
|
|
92 |
|
|||
|
|
|
8.2.1 Running a cue list ............................................................................... |
|
|
|
|
|
92 |
|
|
|
|
|
8.2.2 Killing a cue list .................................................................................. |
|
|
|
|
|
92 |
|
|
8.3 |
Edit ..................................................................................... |
|
|
|
|
|
|
93 |
|
||
|
|
|
8.3.1 |
Editing a cue lis using Unfold ............................................................... |
|
|
|
|
|
93 |
|
|
|
|
8.3.2 Editing a cue list which is running ......................................................... |
|
|
|
|
|
93 |
|
|
|
|
|
8.3.3 Editing a cue list while recording ........................................................... |
|
|
|
|
|
94 |
|
|
8.4 |
Copy, Move and Link.............................................................. |
|
|
|
|
|
95 |
|
|||
|
|
|
8.4.1 Copying or moving a cue list ................................................................ |
|
|
|
|
|
95 |
|
|
8.5 |
Delete.................................................................................. |
Deleting a cueAvoliteslist |
|
|
|
|
|
95 |
|
||
|
|
|
8.5.1 |
|
|
|
|
|
95 |
|
|
|
|
|
8.5.2 Deleting a cue from a cue list ............................................................... |
|
|
|
|
|
95 |
|
|
8.6 |
Timing ................................................................................. |
|
|
|
|
|
96 |
|
|||
|
|
|
8.6.1 Time and fade options for Cue Lists....................................................... |
|
|
|
|
|
96 |
|
|
|
|
|
8.6.2 Cue linking & Link Offset...................................................................... |
|
|
|
|
|
96 |
|
|
|
|
|
8.6.3 Individual attribute fade times .............................................................. |
|
|
|
|
|
98 |
|
|
|
|
|
8.6.4 |
Fixture overlap ................................................................................... |
|
|
|
|
|
98 |
|
|
|
|
8.6.5 Running a cue list to timecode .............................................................. |
|
|
|
|
|
99 |
|
|
8.7 |
Advanced options .................................................................. |
|
|
|
|
|
99 |
|
|||
|
|
|
8.7.1 |
Release mask .................................................................................... |
|
|
|
|
|
100 |
|
|
|
|
8.7.2 |
Fader mode....................................................................................... |
|
|
|
|
|
100 |
|
|
|
|
8.7.3 |
Handle Paging ................................................................................... |
|
|
|
|
|
100 |
|
|
|
|
8.7.4 |
Cue Options ...................................................................................... |
|
|
|
|
|
100 |
|
|
|
|
8.7.5 |
Autoload ........................................................................................... |
|
|
|
|
|
100 |
|
|
|
|
8.7.6 |
Key Profile ........................................................................................ |
|
|
|
|
|
101 |
|
9. |
|
Running the show |
|
|
|
|
|
103 |
|
||
9.1 |
Playback ............................................................................ |
|
|
|
|
|
103 |
|
|||
|
|
|
9.1.1 Back up the show .............................................................................. |
|
|
|
|
|
103 |
|
|
|
|
|
9.1.2 |
Operating modes ............................................................................... |
|
|
|
|
|
103 |
|
|
|
|
9.1.3 |
Master faders .................................................................................... |
|
|
|
|
|
103 |
|
|
|
Copyright |
|
|
|
|
|
103 |
|
||
|
|
|
9.1.4 Flash and swop buttons ...................................................................... |
|
|
|
|
|
|
||
|
|
|
|
|
|
|
|
|
|
||
|
|
|
|
|
|
|
|
|
|
||
|
|
|
|
|
|
|
|
|
|
||
|
PearlExpertTitan_Man_v3.doc |
29/03/2010 13:28:00 |
|
|
|
|
|
|
|
||

Page 10 – Reference Manual Contents
|
|
9.1.5 |
Playback priority ................................................................................ |
|
|
|
|
|
104 |
|||
|
|
9.1.6 Manual control during a show (“busking”) ............................................. |
2010 |
104 |
||||||||
9.2 |
|
Workspaces on touch screen and VDU .................................... |
105 |
|||||||||
|
|
9.2.1 |
View menu |
........................................................................................ |
|
|
|
|
|
105 |
||
|
|
9.2.2 Pearl Titan .............................................................application window |
|
|
|
|
|
105 |
||||
9.3 |
|
Organising the console ......................................................... |
|
|
|
|
|
105 |
||||
|
|
9.3.1 Using the Move ......................................................................function |
|
|
|
|
|
105 |
||||
10. |
Remote control |
|
|
|
|
|
|
107 |
||||
10.1 |
Setting up the remote .......................................................... |
|
|
|
|
|
107 |
|||||
|
|
10.1.1 |
|
Network setup ................................................................................. |
|
|
|
|
|
107 |
||
|
|
10.1.2 |
|
Console setup .................................................................................. |
Limited |
|
|
|
|
108 |
||
10.2 |
Operating the remote........................................................... |
|
|
|
|
109 |
||||||
|
|
10.2.1 |
|
Keypad |
|
|
|
|
|
109 |
||
|
|
|
|
|
|
|
|
|
||||
|
|
10.2.2 |
|
Fixture List ...................................................................................... |
|
|
|
|
|
110 |
||
|
|
10.2.3 |
|
Playback List ................................................................................... |
|
|
|
|
|
110 |
||
|
|
10.2.4 |
|
Settings screen ................................................................................ |
|
|
|
|
|
111 |
||
10.3 |
Troubleshooting .................................................................. |
|
|
|
|
|
111 |
|||||
11. User Settings and other options |
|
|
|
|
113 |
|||||||
11.1 |
Workspace setup ...............................on VDU and Touch Wing |
|
|
|
|
113 |
||||||
|
|
11.1.1 |
|
Opening workspace ............................................................. windows |
|
|
|
|
|
113 |
||
|
|
11.1.2 Selecting and ......................................positioning workspace windows |
|
|
|
|
113 |
|||||
|
|
11.1.3 |
|
Saving workspaces ........................................................................... |
|
|
|
|
|
114 |
||
|
|
11.1.4 |
|
Compatibility ............................................................................ view |
|
|
|
|
|
115 |
||
|
|
11.1.5 Configuring ........................................................the external monitor |
|
|
|
|
|
115 |
||||
11.2 |
Key Profiles ........................................................................ |
|
|
|
|
|
|
117 |
||||
|
|
11.2.1 Creating and ........................................................editing key profiles |
|
|
|
|
|
117 |
||||
|
|
|
|
|
Avolites |
|
|
|
|
|
|
|
|
|
11.2.2 Selecting a ......................................................................key profile |
|
|
|
|
|
118 |
||||
|
|
11.2.3 Individual ...................................................Key profiles for playbacks |
|
|
|
|
118 |
|||||
11.3 |
The System menu ............................................................... |
|
|
|
|
|
118 |
|||||
|
|
11.3.1 |
|
Avotalk Security ............................................................................... |
|
|
|
|
|
118 |
||
|
|
11.3.2 |
|
Network Settings ............................................................................. |
|
|
|
|
|
118 |
||
|
|
11.3.3 |
|
User Settings ................................................................................... |
|
|
|
|
|
118 |
||
|
|
11.3.4 |
|
Key Profiles ..................................................................................... |
|
|
|
|
|
119 |
||
|
|
11.3.5 Contrast And ...........................................Brightness (Lamp Intensity) |
|
|
|
|
119 |
|||||
|
|
11.3.6 |
|
Wipe ............................................................................................... |
|
|
|
|
|
|
120 |
|
|
|
11.3.7 |
|
Display Setup .................................................................................. |
|
|
|
|
|
120 |
||
11.4 |
Titan Tools menu................................................................. |
|
|
|
|
|
120 |
|||||
|
|
11.4.1 |
|
Virtual Panel .................................................................................... |
|
|
|
|
|
120 |
||
|
|
11.4.2 |
|
Visualiser ........................................................................................ |
|
|
|
|
|
|
120 |
|
|
|
11.4.3 |
|
VDU User ............................................................................ settings |
|
|
|
|
|
120 |
||
|
|
11.4.4 |
|
Factory settings ............................................................................... |
|
|
|
|
|
122 |
||
|
|
11.4.5 |
|
Exchange .............................................................................. fixture |
|
|
|
|
|
122 |
||
|
|
11.4.6 |
|
Setup DMX .......................................................................... outputs |
|
|
|
|
|
123 |
||
|
|
11.4.7 |
|
Hotkeys .......................................................................................... |
|
|
|
|
|
|
123 |
|
Copyright |
|
|
|
|
|
|
|
|
||||
11.5 |
Curves |
............................................................................... |
|
|
|
|
|
|
124 |
|||
11.6 |
Upgrading ........................................................the software |
|
|
|
|
|
127 |
|||||
12. |
Working with Fixture Personalities |
|
|
|
|
129 |
||||||
|
|
12.1.1 ....................................Downloading fixture personalities from Avolites |
|
|
|
|
129 |
|||||
|
|
12.1.2 .....................................Updating the personality cache on the console |
|
|
|
|
130 |
|||||
|
|
12.1.3 ..................................................Requesting a new fixture personality |
|
|
|
|
130 |
|||||
|
|
12.1.4 ...............................................Reporting a personality bug to Avolites |
|
|
|
|
130 |
|||||
|
|
12.1.5 |
.............................................................................. |
In an emergency |
|
|
|
|
|
130 |
||
13. |
Networking |
|
|
|
|
|
|
133 |
||||
13.1 |
Setting ................................................the Pearl’s IP address |
|
|
|
|
|
133 |
|||||
|
|
13.1.1 |
............................................................................ |
Setting IP address |
|
|
|
|
|
133 |
||
13.2 |
Setting ........................................................up DMX outputs |
|
|
|
|
|
133 |
|||||
|
|
13.2.1 ................................................................Setup DMX outputs screen |
|
|
|
|
|
134 |
||||
13.3 |
ArtNet................................................................................ |
|
|
|
|
|
|
|
134 |
|||
|
|
13.3.1 .....................................................................A simple ArtNet system |
|
|
|
|
|
135 |
||||
|
|
13.3.2 ..............................................................Setting up an ArtNet system |
|
|
|
|
|
136 |
||||
|
|
13.3.3 |
............................................................... |
Additional ArtNet Resources |
|
|
|
|
|
137 |
||
13.4 |
Connecting ......................................to a simulator with ACDI |
|
|
|
|
137 |
||||||
|
|
13.4.1 |
.............................................................................................. |
ACDI |
|
|
|
|
|
|
137 |
|
13.5 |
Module ......................................................................Setup |
|
|
|
|
|
|
139 |
||||
|
|
|
|
|
|
|
|
|
||||
|
|
|
|
|
|
|
|
|
||||
|
|
|
|
|
|
|
|
|
||||
PearlExpertTitan_Man_v3.doc |
29/03/2010 13:28:00 |
|
|
|
|
|
|
|
||||
|
|
|
|
|
Reference Manual Contents - Page 11 |
||||||
|
|
13.5.1 |
Installing additional Modules.............................................................. |
|
|
|
|
|
139 |
|
|
13.6 |
AvoTalk.............................................................................. |
|
|
2010 |
139 |
|
|||||
|
|
13.6.1 |
Example AvoTalk setup ..................................................................... |
|
140 |
|
|||||
13.7 |
All about IP addressing......................................................... |
|
141 |
|
|||||||
|
|
13.7.1 Setting your IP address..................................................................... |
|
141 |
|
||||||
|
|
13.7.2 |
Subnet Masks .................................................................................. |
|
142 |
|
|||||
|
|
13.7.3 Choosing an IP address and Subnet Mask............................................ |
142 |
|
|||||||
|
|
13.7.4 Automatically assigning IP addresses (DHCP)....................................... |
143 |
|
|||||||
|
|
13.7.5 Private IP address ranges.................................................................. |
|
143 |
|
||||||
13.8 |
Repairing a Network Connection ............................................ |
|
144 |
|
|||||||
|
14. Titan for Pearl users |
Limited |
145 |
|
|||||||
14.1 |
The controls and LCD ........................................................... |
145 |
|
||||||||
14.2 |
New programming features................................................... |
146 |
|
||||||||
|
15. Release notes |
|
147 |
|
|||||||
|
|
|
|
|
|
|
|||||
15.1 |
Version 3.0......................................................................... |
|
|
|
|
|
147 |
|
|||
|
|
15.1.1 |
Upgrading from: 2.0:........................................................................ |
|
|
|
|
147 |
|
||
|
|
15.1.2 New features in v3.0 ........................................................................ |
|
|
|
|
147 |
|
|||
|
|
15.1.3 |
Improvements in v3.0 ...................................................................... |
|
|
|
|
153 |
|
||
|
|
15.1.4 |
Changes in v3.0............................................................................... |
|
|
|
|
155 |
|
||
|
|
15.1.5 Bugs fixed in v3.0 ............................................................................ |
|
|
|
|
155 |
|
|||
|
16. Glossary of terms |
|
|
|
|
159 |
|
||||
|
|
|
|
Avolites |
|
|
|
|
|
|
|
|
Copyright |
|
|
|
|
|
|
|
|||
|
|
|
|
|
|
|
|
|
|||
|
|
|
|
|
|
|
|
|
|
||
|
|
|
|
|
|
|
|
|
|
||
|
|
|
|
|
|
|
|
|
|
||
|
PearlExpertTitan_Man_v3.doc |
29/03/2010 13:28:00 |
|
|
|
|
|
|
|
||

Page 12 – 1. Setting up the console
|
|
Limited |
2010 |
|
Avolites |
|
|
Copyright |
|
|
|
|
|
|
PearlExpertTitan_Man_v3.doc 29/03/2010 13:28:00

1. Setting up the console - Page 13
1.Setting up the console
This chapter contains: Connecting mains power, DMX lines,2010VDUs;
configuring the console and the various VDU windows; guide to where everything is on the console; loading and saving shows.
This manual applies only to the Pearl Expert Titan console but we’ll
refer to it simply as “the Pearl”. If you are using the classic Pearl Expert, or the Pearl 2008, 2004 or 2000Limitedconsoles, they have their own manuals as the operation is significantly different.
This manual includes instructions for the optional Expert Touch Wing.
Note: You can also operate the Pearl Expert Titan in “classic” Pearl Expert mode by rebooting the console into the desired mode. See section 1.7 on page 28.
1.1Guide to the console
Preset faders / handles
|
|
|
|
Copyright |
|
Programming and |
|
Playback faders and |
|
||
|
|||
page select rollers |
|
setup controls |
|
The Pearl has four main control areas:
The Master faders set overall levels on the console
The Preset faders/handles select and control individual fixtures (and you can store cues and chases here too)
The Playback faders and rollers select and control cues and programs
The Programming and setup controls configure and program the console
PearlExpertTitan_Man_v3.doc 29/03/2010 13:28:00

Page 14 – 1. Setting up the console
The main controls
Mode select keyswitch |
Preset faders / handles |
Master faders
Playback page select rollers
Main display |
|
Menu |
Command |
||
Control |
softkeys |
Numeric buttons |
|
||
Playback faders & |
|
||||
flash buttons |
wheels |
Fixture page |
keypad and |
Attribute |
|
buttons |
|||||
|
|
controls |
select buttons |
||
|
|
|
|||
• The Preset Faders are used to control individual dimmer channels |
|
||||
and fixture intensities. Cues and chases can also be stored on these |
|
||||
Copyright |
|
|
|
|
|
faders. The 2 buttons below the faders are used to select and flash |
|
||||
whatever is stored on the fader. Each fader and buttons is called a “Handle”.
• The Mode select keyswitch selects Programming, Run or System modes of operation.
• The Page select rollers let you select different pages of playbacks, and you can write the playback names on the rollers so you know what’s in them. There are 2 rollers each controlling 10 playback faders
• The Master faders control the overall output of the various parts of the console. You will normally have these set at Full.
• The Playback faders and flash buttons are used to play back cues or chases you have programmed, when you are running a show.
• The Main display is the nerve centre of the console and shows you what is going on. The display can show various screens of information.
• The Control wheels are used to set control values on the fixtures, and to set chase speeds and fades.
PearlExpertTitan_Man_v3.doc 29/03/2010 13:28:00
1. Setting up the console - Page 15
•
•
•
•
•
•
MIDI in
USB reserve sockets and switches (2)
The Menu softkeys (labelled A – G) are used to select control options. The display next to the buttons shows what each one will do. The options for each key change depending on what the console is doing. Softkey commands are shown in the manual with square brackets like this: A [Edit Times]
The Numeric keypad and other control buttons are used to enter values and change controls on the console.
The Fixture Page buttons are above the keypad, and allow selection
The blue Command buttons are used to carry out functions2010such as storing cues, copying, saving to disk, etc. These buttons have lights on to indicate when they are active.
of 4 pages for the Preset Faders.
The Attribute select buttons are used to select which attributes of a fixture (e.g. colour, gobo, pan, focus) are going to be controlled using the Control wheels. The buttons have lights on to show you which attributes are active. The bottom (red) button allows you to locate fixtures, which sets them to a known start position while programming.
A QWERTY keyboard and mouse touchpad is provided in a drawer on the front of the console.
Limited
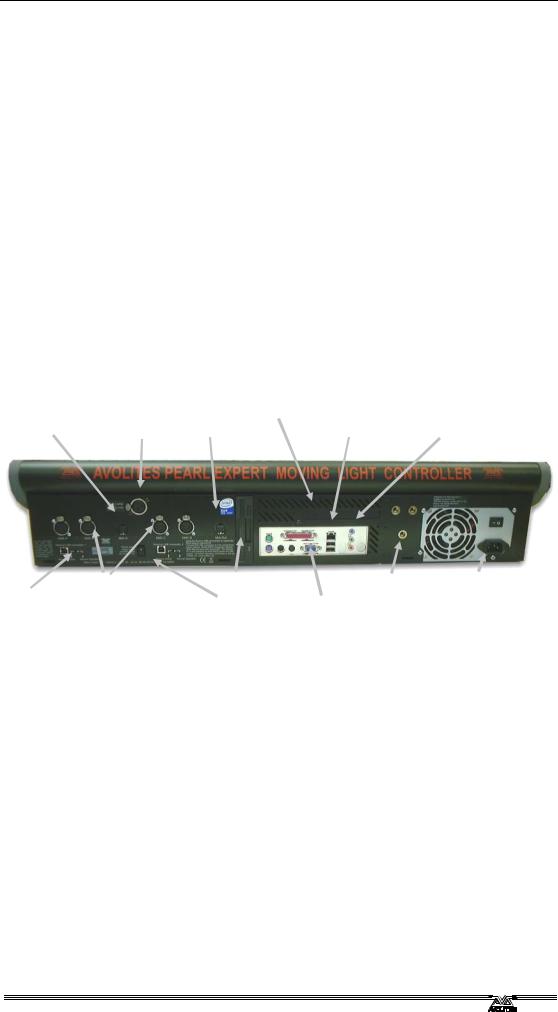
|
Expansion sockets |
Ethernet socket (top) |
||
|
for touch wing |
|||
Desk lamp socket |
MIDI out |
|
|
and 2x rear USB |
|
|
Audio in (blue) |
||
|
|
|
|
|
DMX outputs (4) |
|
VDU mounting Mains inlet |
||
|
|
|||
Floppy disk |
||||
Panel reset switch |
|
|
point |
|
VDU socket (blue) |
||||
|
Avolites |
|
||
The back panel
All the connections required for the console are found on the back panel. Most are self-explanatory.
•The Panel reset switch may be pressed to restart the front panel electronics if something odd happens with the switches and faders. The main board will continue running but the DMX output will be interrupted until the restart is completed.
•The USB reserve sockets and switches are for future expansion. The switches should be set to “Normal operation”.
Copyright
PearlExpertTitan_Man_v3.doc 29/03/2010 13:28:00

Page 16 – 1. Setting up the console
The Touch Wing
Context touch buttons
Workspace windows
Playback info
|
|
Workspace |
|
|
save/recall |
|
|
touch |
Window selection |
|
buttons |
|
|
|
buttons |
|
|
Macro buttons |
Window size/position |
Attribute display |
|
buttons |
|
|
|
|
|
Attribute wheels |
|
The optional Touch Wing uses a touch screen and additional wheels to provide a user-friendly interface for selecting fixtures, palettes, groups and setting attributes.
• |
The main area of the Touch Wing shows up to 4 workspace |
|
|
windows. You can select the content and configure the size |
|
|
and layout of these windows using the Window Selection and |
|
|
Size/Position buttons below the screen. |
|
• |
The arrangement of windows can be saved and recalled using |
|
|
the Workspaces touch buttons on the right of the screen. |
|
• |
Some windows have additional command buttons which are |
|
|
|
Avolites |
|
displayed in the Context touch buttons area on the top right |
|
|
of the screen when the window is active. |
|
• |
The three Attribute Wheels take over attribute control from |
|
|
the wheels on the console, which are then used for speed/fade |
|
|
control of chases. Below the wheels the Scroll Mode Button to |
|
|
switch the wheels into scroll mode – this is used to move a |
|
|
selection box around the screen when editing. |
|
• |
The Attribute Display shows which attributes are being |
|
|
controlled by the wheels, and the current settings. Touching the |
|
|
roller graphic will set the attributes to min or max. |
|
• |
Across the bottom of the screen there is an area showing |
|
|
information about the playbacks on the current roller pages. |
|
Copyright |
|
|
PearlExpertTitan_Man_v3.doc 29/03/2010 13:28:00

1. Setting up the console - Page 17
1.2 |
Connecting up |
|
|
|
1.2.1 |
Connecting mains power |
|
|
|
|
You can safely connect the Pearl to any voltage from 80 to 260V. |
|||
|
We recommend that you run the console from a computer UPS |
|||
|
(uninterruptible power supply) . If the console unexpectedly loses |
|||
|
power, you can lose data (up to the last Autosave) and the console |
|||
|
may want to check its disks on startup which can cause delays. The |
|||
|
UPS will protect you from most power problems and give you chance |
|||
|
to shut down the console normally. |
|
2010 |
|
1.2.2 |
Starting up and shutting down |
|||
|
||||
|
The Pearl runs a Windows-based operating system internally, so you |
|||
|
need to make sure it is shut down properly rather than just turning |
|||
|
off its power. |
|
|
|
|
Start up the console by pressing and releasing the Power switch at |
|||
|
the left hand side of the front edge. The console display and VDU |
|||
|
screen (if you are using one) should come alive. The Pearl takes |
|||
|
about 30 seconds to start up and a progress count is shown on the |
|||
|
console display. |
|
|
|
|
Shut down the console by pressing an releasing the Power switch |
|||
|
Avolites |
Limited |
|
|
again. The console will perform a controlled shutdown. Wait until the Power light has gone off (about 15 seconds) before you disconnect power from the console.
To carry out a Forced Shutdown of the console, if the normal shut down does not work, hold down the power switch for 5 seconds.
Note: Do not use the power switch on the rear of the console to switch off the console as this would not close down the console properly.
1.2.3Connecting DMX lines
The Pearl communicates with lighting fixtures using the DMX512 system. It can produce 12 universes of DMX (each 512 control channels). It has 4 physical DMX outputs for direct connection to fixtures and dimmers, and can also send DMX over Ethernet and wireless Ethernet systems to allow connection to remote DMX Ethernet nodes and to the Avolites Console DMX Interface (ACDI) system which is used to connect visualiser applications.
When you patch a dimmer or fixture you tell the Pearl which of the 12 DMX universes it is on. Each universe can be configured to come out of one or more of the 4 standard DMX outputs on the back of the console, or over an Ethernet protocol (see section 13 on page 133.)
The 4 standard DMX outputs come out of the 5 pin XLR sockets on the back of the console. They are wired like this:Copyright
Pin 1 |
Earth |
Pin 2 |
Data - |
Pin 3 |
Data + |
Pin 4 |
Not used |
Pin 5 |
Not used |
Each DMX line should pass through all the fixtures to be connected on
PearlExpertTitan_Man_v3.doc 29/03/2010 13:28:00

Page 18 – 1. Setting up the console
that line one after the other and have a DMX terminator fitted at the end (120 ohm resistor between pins 2 and 3). You should not split
the DMX lines using passive splitters (Y-splits) as this can mess up the data.
You should connect a computer VDU monitor to the Pearl, which is plugged into the VGA port on the rear of the console.
2010
• |
The external VDU can be disabled and if so will show a |
|
|
“disabled” message. To enable it, switch to System mode and |
|
|
|
Limited |
|
select [Display Setup] then press [External Display |
|
|
Disconnected]. The option will change to [External Display |
|
|
Connected] and the display will be enabled. |
|
• |
If you need to change the VDU resolution or settings, click on |
|
|
“Tools” at the very top of the screen and select “Control Panel”, |
|
|
then “External Monitor”, then select the option to match the |
|
|
resolution of your monitor. |
|
There are more details about setting up an external monitor, including troubleshooting help, in section 11.1.5 on page 115.
1.2.5Connecting the Touch Wing
The Touch Wing connects to the DVI port and the 9-pin D connector on the rear of the console, just above the panel with the rear USB/network sockets.
1.2.6Other connections
You can connect an external keyboard and mouse to the pc connectors on the rear of the console if for some reason you don’t like the keyboard with touchpad in the drawer on the front.
The console provides MIDI connections which can be used to connect MIDI timecode to the console for timecode-controlled cue lists.
You can connect the console to a LAN (local area network) using the RJ45 socket on the rear. This allows you to back up the console to another machine, or to link to a DMX-over-ethernet system.
A 3-pin XLR socket for a desk lamp is provided on the rear edge of the console. Suitable lamps are available from Avolites. The lamps are 12 volt, wired from pins 1 and 2 of the XLR.
Copyright
PearlExpertTitan_Man_v3.doc 29/03/2010 13:28:00

- Page 19
1.3 |
Using the displays and menus |
|
|
The Pearl Expert has many useful features on its onboard display and |
|
|
on the VDU. |
2010 |
1.3.1 |
The onboard display |
|
|
Information |
|
|
window |
|
|
|
|
PearlExpertTitan_Man_v3.doc

Page 20 – 1. Setting up the console
Action button: |
Option button: |
New menu |
2010 |
Text entry |
|||
console will carry |
cycles through a |
button: jumps to |
button: press |
out the action |
range of options |
a new menu |
and enter text |
shown |
|
|
using the |
|
|
|
keyboard |
1.3.2 Workspace windows on the VDULimitedand Touch Wing
The VDU screen and, if you are using it, the Touch Wing, show the workspace windows. These contain buttons for selecting fixtures, groups, palettes, playbacks and so on. Information windows such as Playback View, Channel Grid and the integrated Visualiser application can also appear as a workspace window.
4 window positions Context buttons
CopyrightUp to 4 windows can be shown on each screen in a 2x2 grid, but if you need a larger view, you can make a window twice as big, or it
can take up the whole area. You can move windows freely between the external VDU screen and the Touch Wing. Some possible window sizes/positions are shown below.
Quarter size Double wide Double height Maximised
PearlExpertTitan_Man_v3.doc 29/03/2010 13:28:00
1. Setting up the console - Page 21
Some workspace windows have option settings or commands associated with them. If the Touch Wing is connected, these are positioned in the “context buttons” area on the right of the Touch Wing as shown in the picture above. If the Touch Wing is not connected, a drop down context menu is available at the top right of each window.
Selecting and positioning workspace windows
You select which workspace windows
you want to see using the [Open Workspace Window] menu command
on the root menu, or by pressing the Window Selection buttons on the Touch Wing just below the screen.
You can change the positions and sizes of the windows by using [Window Options] on the View menu. The Touch Wing also has pushbuttons for these functions. [Min or Max] swaps the active window between full screen and quarter size. [Size and Position] moves the active window around the possible positions. [Select Window] gives you a list of windows to choose the active one, or on
the Touch Wing you can make a window active by touching its header
bar. Avolites
Limited
You can move the active window between the Touch Wing and the external VDU monitor by pressing View then [Window Options] then [Move Screen], or for the Touch Wing hold down the Avo button (on the main console) and press the Size/Position button.
If a window shown on the VDU contains touch buttons, you can click them using the mouse trackpad on the keyboard.
The function buttons (F1-F12) on the QWERTY keyboard can be used to select and move workspace windows. See the list in section 11.1.2 on page 113.
Saving workspaces
CopyrightYou can save different workspace setups to the Workspaces touch buttons on the Touch Wing or to grey handle buttons on the console.
This is done by pressing View then [Record Workspace], then touching one of the Workspaces buttons or pressing a grey button. This allows you to reconfigure the workspace at the touch of a button.
Workspaces are saved with the show.
Setting up and recording workspaces is described in more detail in section 11.1 on page 113.
Quick record
Some windows – Groups, Workspaces, Playbacks, and all the Palette windows - have a Quick Record function. Set up what
you want to record, then touch or click the button once. The button will light up red with a + sign. At this point you can enter a legend. Touch or click again to store the item.
The Quick Record function can be disabled using Key Profiles (see section 11.2.1 on page 117).
PearlExpertTitan_Man_v3.doc 29/03/2010 13:28:00
Page 22 – 1. Setting up the console
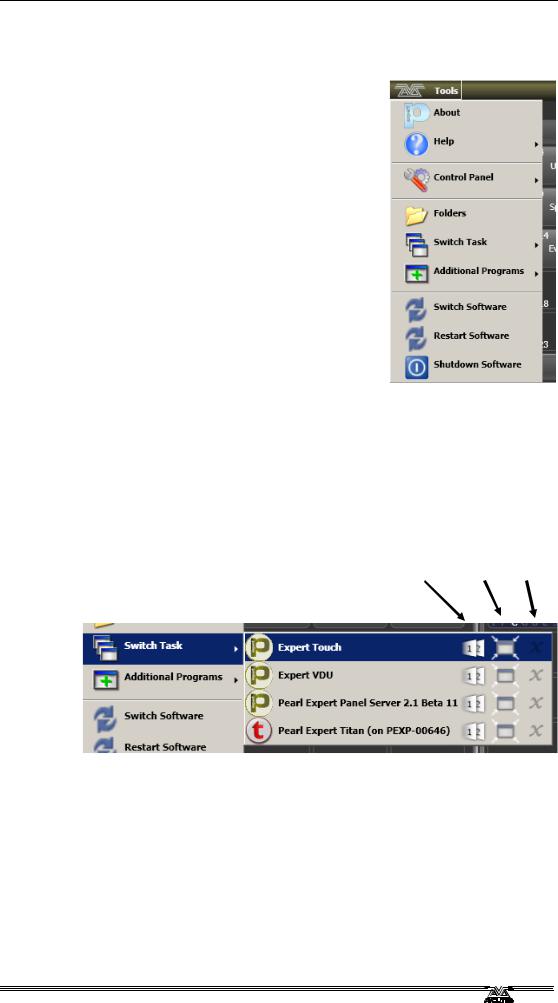
1.3.3 |
The Tools menu |
|
|
|
The Tools menu on the top left corner of |
|
|
|
the screen (or the Touch Wing) allows you |
|
|
|
to access Windows functions such as File |
|
|
|
explorer (to move files around), Control |
|
|
|
Panel (to setup hardware), and to stop or |
|
|
|
restart the Pearl application or run other |
|
|
|
show files or when updating the operatingLimitedsoftware. |
||
|
programs. |
|
|
|
About gives you information about the |
|
|
|
software version. |
|
|
|
Help shows you the online manual. |
|
|
|
Control Panel opens a sub-menu allowing |
|
|
|
changes to monitor settings and to the USB |
||
|
expert console which links the front panel |
|
|
|
controls to the system. The “More…” option |
|
|
|
opens Windows Control Panel allowing you |
|
|
|
to change the operating system |
|
|
|
configuration. |
Avolites |
|
|
|
|
|
|
Folders opens the file explorer. You ght need this when backing up |
||
|
Switch Task allows you to bring programs in front of the Pearl |
||
|
windows and move them between the Touch Wing and the external |
||
|
VDU screen. Click or touch the Switch Screen icon to swap the |
||
|
program between the Touch Wing and the external VDU. Click or |
||
|
touch the Centre icon to centre the window on the screen. Click or |
||
|
touch Close to close the program. |
|
|
Copyright |
|
Switch screen Centre Close |
|
|
|
||
Additional Programs allows you to run some diagnostic programs which might help Avolites Support find problems you’re having.
Switch Software allows you to run the Pearl Expert in “Classic” Pearl mode rather than Titan mode.
Restart and Shutdown Software restarts and closes the Titan and Pearl Expert software. You would normally only use these when upgrading the software.
PearlExpertTitan_Man_v3.doc 29/03/2010 13:28:00
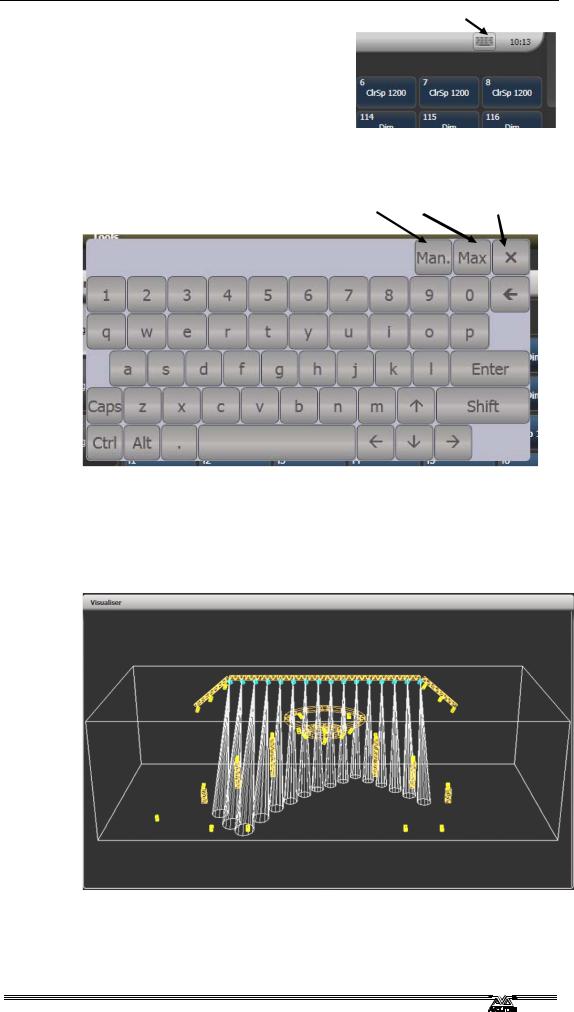
1. Setting up the console - Page 23
Keyboard button
The touch keyboard can be switched between large and2010small size using the Max/Min button and you close it using the large X button in the top right hand corner. It can be set to pop up automatically when
Manual/Auto Change size Close
keyboard at the top.
text input is required,Avolitesusing the Man/Auto button. You can also move it on the screen by touching and dragging the blank area of the
The small version of the keyboard (pictured) does not have some of the less frequently used buttons.
1.3.4Visualiser
The Pearl Expert runs Avolites Visualiser internally. This allows you to view the output of the console if you can’t use the real lights, enabling you to make changes to your show at home or in your hotel.
PearlExpertTitan_Man_v3.doc 29/03/2010 13:28:00
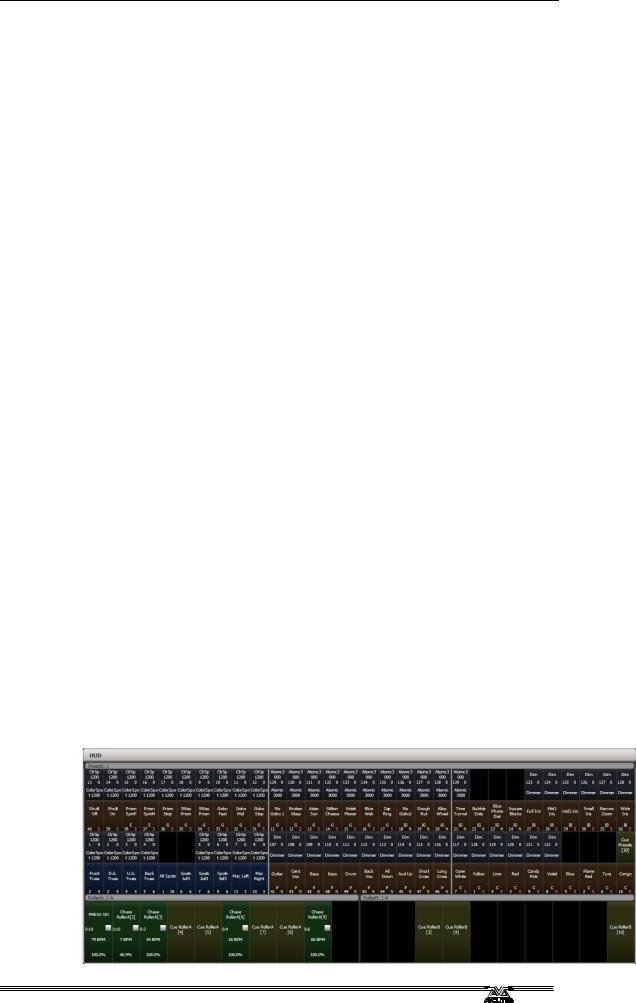
Page 24 – 1. Setting up the console
|
Visualiser is shown in a workspace window, either on the touch |
||||
|
screen or on the external monitor. Press [Window Options] then |
||||
|
|
|
|
|
2010 |
|
[Move Screen] on the View menu to move it between the touch |
||||
|
screen and external monitor. |
|
|
||
|
Configuration buttons for Visualiser are provided in the context button |
||||
|
area in the top right of the Touch Wing screen, or on the context |
||||
|
menu at the top right of the window if you aren’t using the Touch |
||||
|
Wing. |
|
|
|
|
|
• |
The operation of Visualiser is not covered in this manual, please |
|||
|
|
refer to the Visualiser manual. |
|
|
|
|
Auto Patch |
|
|
|
|
|
The Auto Patch function automatically creates a Visualiser rig from |
||||
|
your Pearl show. When you start Visualiser using softkey A on the |
||||
|
View menu, Visualiser will open with an automatic representation of |
||||
|
your patch. |
|
|
|
|
|
You will see the fixtures laid out on screen as they are on the console, |
||||
|
so any spaces between fixtures will be preserved and fixtures patched |
||||
|
to the top row of presets will be shown above fixtures patched to the |
||||
|
bottom row of presets. |
|
|
||
|
The Visualiser will start in run mode, with the simulator tab selected |
||||
|
so you can start controlling lights immediately. |
|
|||
|
Multiple dimmers patched to one handle will appear as a singe fixture |
||||
|
in Visualiser. |
|
Limited |
|
|
|
|
|
|
||
|
Fixture selection |
|
|
||
|
When a fixture is selected on the console, it is highlighted in blue in |
||||
|
Visualiser. |
|
|
|
|
1.3.5 |
The Heads-Up Display (HUD) |
|
|
||
|
The HUD window shows you what is stored in each fader and button |
||||
|
on the console: cues, chases, fixtures, dimmers, palettes, and fixture |
||||
|
groups. Any legends you enter are shown here. |
|
|||
|
The HUD window is a workspace window and is displayed by pressing |
||||
|
View then [Open Workspace Window] then [HUD]. It may be moved |
||||
|
around and resized using the normal workspace window controls. |
||||
Copyright |
Avolites |
|
|
||
Fixtures are highlighted in dark blue if in the programmer and in light blue if selected. Only fixtures, palettes and groups stored in the preset handles on the console are shown, handles on the Touch Wing are not shown on the HUD.
PearlExpertTitan_Man_v3.doc 29/03/2010 13:28:00

1. Setting up the console - Page 25
The Pearl allows you to reconfigure how the front panel2010buttons work to suit your method of working. You can also change the way some of the touch keys work on the Touch Wing. You can save your settings as a Key Profile. Different profiles can be selected for different users or to enhance the operation of the console for a particular use. See section 13.2 on page 133 for details.
Lighting programming can sometimesLimitedrequire a repeated sequence of button presses. You can record sequences of keypresses and play them back with a single keypress – this is called a macro. To record a macro:
1> Press the blue Macro (previously Insert) button (to the right of the numeric keys).
2> Press [Record]
3> Press a vacant preset Flash button. Recording starts. The Macro button flashes during recording.
4> Press the sequence of buttons you want to record.
5> Press Macro to finish recording.
(with no delay or timing between the presses).
To play back the macro,Avolitesjust press the grey Flash button where you recorded the macro. The macro will repeat all your button presses
When using the Touch Wing, macros may also be recorded into 10 dedicated buttons on the Wing. In addition you can display a workspace window with further macro touch buttons. The 10 hardware buttons are allocated to the first 10 macros in the window.
1.3.8The Pearl Expert Titan application
The Pearl Expert Titan application is the “engine room” of the console. The main reason you will need to use it is to configure DMX outputs. Use the Tools → Switch Tasks menu to bring the application window to the front.
Setting up DMX outputs is described in section 11.4.6 on page 123.
1.4Loading and saving shows
CopyrightYou can save any number of different shows on a USB drive or the Pearl’s internal hard disk. The Pearl will also autosave the show
periodically.
Note: You cannot transfer shows between the Pearl Expert Titan and other versions of the Pearl or Pearl Expert as the showfile format is different. You can load shows to/from other Titan consoles such as the Tiger Touch.
1.4.1Autosave
The Pearl will automatically save your show to its internal hard disk
PearlExpertTitan_Man_v3.doc 29/03/2010 13:28:00

Page 26 – 1. Setting up the console
when you shut it down. It will also autosave the show every 30 minutes in case the console loses power. The time remaining to the next auto save is shown on the status bar of the Titan application.
|
|
|
You can disable Autosave or alter the time between saves using |
|||
|
|
|
option D [Auto Save] on the Disk menu (selected using the blue Disk |
|||
|
|
|
button). Softkey A enables or disables autosave and Softkey B sets |
|||
|
|
|
the time between saves. We recommend that you have autosave |
|||
|
|
|
enabled while programming in case the console power fails, but |
|||
|
|
|
disable it while running a show as it can cause the console to pause |
|||
|
|
|
slightly at inconvenient moments. |
|
2010 |
|
1.4.2 |
Manual save and load |
|
||||
|
|
|
You can save your show at any time either with its current name or |
|||
|
|
|
with a new name. |
|
|
|
|
|
|
|
|
||
|
|
|
1> Press the blue Disk button (bottom right). |
|
||
|
|
2> |
Press [Save Show]. |
|
|
|
|
|
|
3> If you have a USB drive connected, use the softkeys to select |
|||
|
|
|
|
whether to save on “Removable Disk” or the internal hard drive. |
||
|
|
|
4> Enter a name for the show on the keyboard (the screen shows |
|||
|
|
|
|
a list of shows which already exist). |
|
|
|
|
|
5> Press Enter or [Save]. The show will be saved. |
|
||
|
|
|
6> Press Exit or [OK] to leave Disk mode. |
|
||
|
|
|
|
|
Limited |
|
|
|
|
If you save to hard drive, shows are saved in the C:/Program |
|||
|
|
|
Files/Avolites/Titan/ShowData folder, unless you change this in the |
|||
|
|
|
User Settings. |
|
|
|
|
|
|
The Pearl will automatically load the last show when it is turned on. |
|||
|
|
|
If you want to load a different show: |
|
|
|
|
|
|
|
|
|
|
|
|
|
1> Press the blue Disk button. |
|
|
|
|
|
2> |
Press [Load Show]. |
|
|
|
|
|
|
3> If you have a USB drive connected, select which drive you want |
|||
|
|
|
|
to load from. |
|
|
|
|
|
4> Available shows are listed on the softkeys; press the key to load |
|||
|
|
|
|
the show (the F and G keys show more pages). If you type the |
||
|
|
|
|
first few lettersAvolitesof the show name on the Qwerty keyboard, the |
||
|
|
|
|
list will only include shows starting with those letters, which can |
||
|
|
|
|
make it easier to locate the show you want. |
|
|
|
|
|
5> Press Exit to leave Disk mode. |
|
|
|
|
|
|
|
|||
|
|
|
You can save any number of different shows on the Pearl’s internal |
|||
|
|
|
hard disk. |
|
|
|
1.5 |
|
Backing up a show to USB drive |
|
|||
|
|
|
If you save to the internal hard drive, it’s a good idea to regularly |
|||
|
|
|
copy a backup of the show to an external storage device such as a |
|||
|
|
|
USB pen drive just in case something bad happens to the console. |
|||
|
|
|
One way to do this is to load the show from the hard disk then save it |
|||
|
|
|
to the removable disk using the Disk button as described in the |
|||
|
|
|
previous section. |
|
|
|
|
|
|
You can also use the VDU and mousepad to select options from the |
|||
|
CopyrightPearl Expert Titan window on the VDU as described below. |
|||||
PearlExpertTitan_Man_v3.doc 29/03/2010 13:28:00
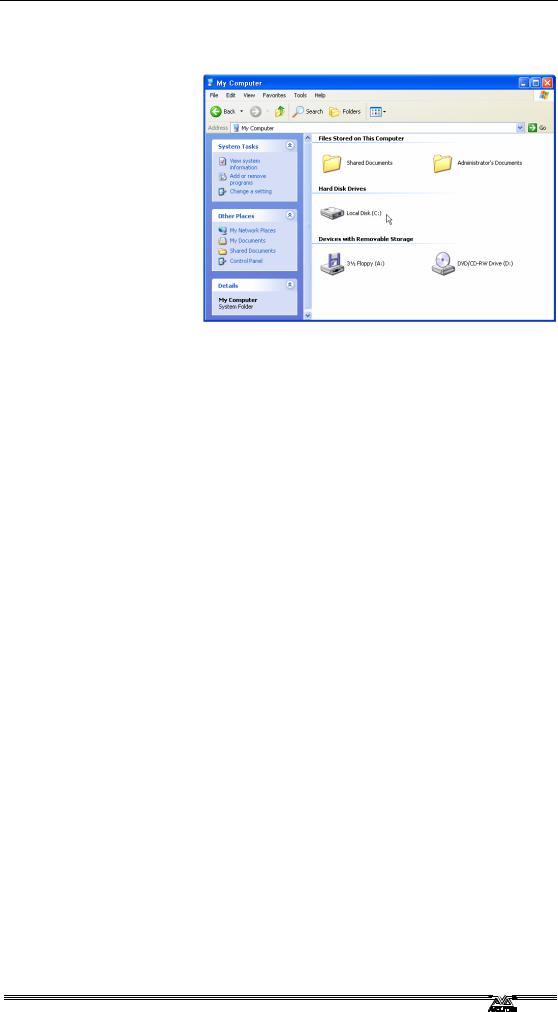
1. Setting up the console - Page 27
1.5.1Backup existing show files to USB pen drive
To backup existing show files to USB drive you need to copy the showfile across
using Windows functions.
|
|
1> |
On the |
|
|
|
|
|
Tools |
|
|
|
|
|
menu, |
|
|
|
|
|
click on |
|
|
|
|
|
the |
|
|
|
|
|
Folders |
|
|
|
|
|
icon. |
|
|
|
2> |
Double |
|
|
|
|
|
|
click on |
|
|
|
|
|
“Local |
|
|
|
|
|
Disk (C:)” |
|
|
|
3> |
Double |
|
|
|
|
|
|
click on the “Program Files” folder. |
||
|
4> |
Double click on the “Avolites” folder, then double click the |
|||
|
|
|
“Titan” folder, then double click the “ShowData” folder. |
||
|
5> |
The VDU screen will show a list of the saved shows. |
|||
|
6> |
Click on the show you want to backup. If you want to backup |
|||
|
|
|
more than one, hold down the Ctrl button on the keyboard |
||
|
|
|
while clicking them. |
Limited |
|
|
|
|
|
||
|
7> |
Right click on a selected file, and select “Send to” from the pop |
|||
|
|
|
up menu which appears. |
|
|
|
8> |
Select the removable USB drive where you want to make a |
|||
|
|
|
backup of the show file(s). The file will be copied. |
||
|
|
9> |
You cannot burn files to CD-R, you must use a USB drive. |
||
1.6 |
Clearing the console |
|
|||
|
|
When you start a new show on the Pearl it is usually a good idea to |
|||
|
|
clear the console. All programming and patching is deleted, but user |
|||
|
|
options are not changed. |
|
||
|
|
|
|
|
|
|
1> |
Press the blue Disk button. |
|
||
|
|
|
|
Avolites |
|
|
2> |
Press [New Show]. |
|
||
|
3> |
Press [OK] to confirm. |
|
||
|
|
4> |
Press Exit to leave Disk mode. |
|
|
|
• |
There is also an option E [Wipe] in the System menu (when the |
|||
|
|
|
key is turned to System) which has the same function, and is |
||
|
|
|
located in the same place as on the “classic” Pearl versions. |
||
|
Copyright |
|
|
||
PearlExpertTitan_Man_v3.doc 29/03/2010 13:28:00
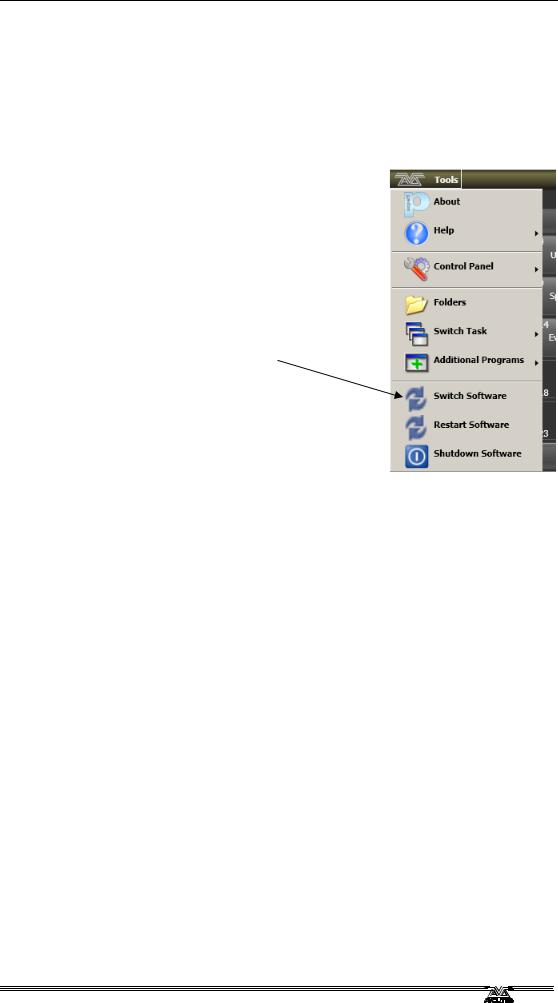
Page 28 – 1. Setting up the console
1.7 |
Rebooting into original Pearl Expert mode |
|
2010 |
You can run the Pearl Expert in either Titan mode or the original Pearl Expert mode. Click the [Switch Software] button on the VDU tools menu to reboot the console into the desired mode.
|
|
Limited |
|
Reboot into different |
|
|
mode |
|
Copyright |
Avolites |
|
|
|
|
PearlExpertTitan_Man_v3.doc 29/03/2010 13:28:00
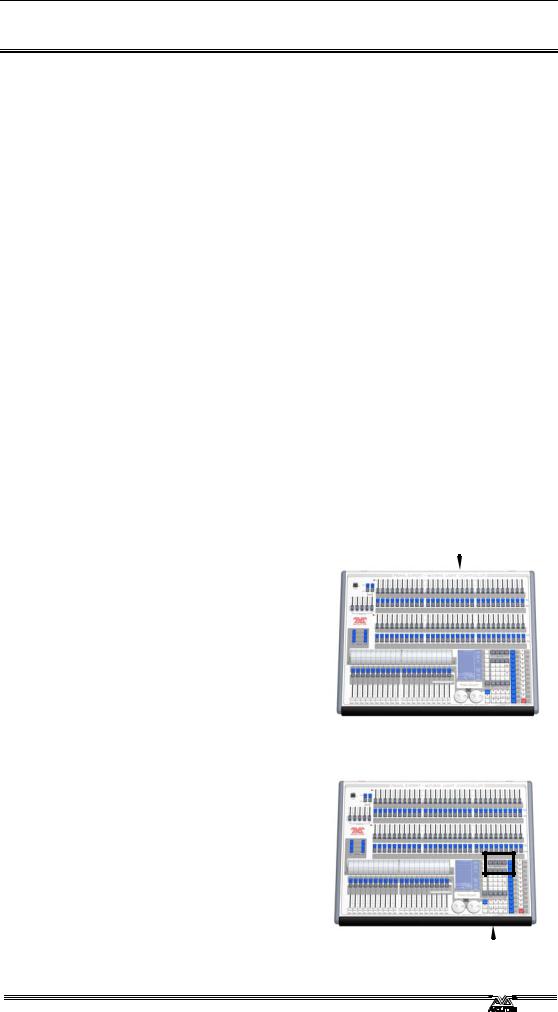
2. Patching - Page 29
2.Patching
This chapter contains: patching dimmers; patching moving light fixtures; checking the patching; changing the DMX address; deleting a patched fixture; patching options.
Patching is the process where you tell the Pearl
|
• |
What type of lighting units you have connected to it |
||||||
|
• |
What DMX addresses they are operating at |
|
2010 |
|
|||
|
• |
|
|
|
|
|
|
|
|
Which DMX line (universe) each unit is connected to (there are |
|||||||
|
|
12) |
|
|
|
|
|
|
|
• |
Which Preset Faders you want to use to access them |
||||||
|
You should normally plan out the lighting rig in advance to allow the |
|||||||
|
DMX addresses on your fixtures to be set up before they are rigged. |
|||||||
|
The easiest way to do this is to patch the fixtures on the console, |
|||||||
|
then read off the DMX addresses from the console (using the DMX |
|||||||
|
window on the VDU) and use them to set up the addresses on the |
|||||||
|
actual fixtures. |
|
|
|
|
|
|
|
|
Alternatively you can allocate the DMX addresses to the fixtures |
|||||||
|
yourself, and set up the console to match. |
|
|
|
||||
|
|
|
|
Limited |
|
|
||
|
The Pearl’s key must be set to Program before you can patch. |
|||||||
2.1 |
Create |
|
|
|
|
|
|
|
2.1.1 |
Preset faders (handles) |
|
|
|
|
|
||
|
To control intelligent fixtures or |
|
|
Handles (Preset faders) |
||||
|
dimmer channels, they must be |
|
|
|||||
|
|
|
|
|
|
|||
|
patched to a Preset, or to a |
|
|
|
|
|
||
|
|
|
|
|
|
|||
|
Fixture button on the Touch Wing. |
|
|
|
|
|
||
|
Presets are the faders, buttons |
|
|
|
|
|
||
|
and displays located in 2 rows |
|
|
|
|
|
||
|
along the top of the console. Each |
|
|
|
|
|
||
|
|
|
|
|
|
|||
|
preset consists of: |
|
|
|
|
|
||
|
|
|
Avolites |
|
|
|
|
|
•a fader, used to set the intensity of the fixture or dimmer
•a blue Select button which is used to select the fixture
•a grey Palette button which is used to store and select Palettes, Groups and various other
things
Copyright |
|
The fader and buttons are |
|
together referred to as a handle. |
|
There are 4 pages of presets |
|
controlled by the fixture page |
|
buttons, located just above the |
|
numeric keypad. Fixtures 1-60 are |
|
on page 0--, Fixtures 101-160 on |
|
page 1--, 201-260 on page 2— |
Pages of fixtures buttons |
|
|
PearlExpertTitan_Man_v3.doc 29/03/2010 13:28:00 |
|
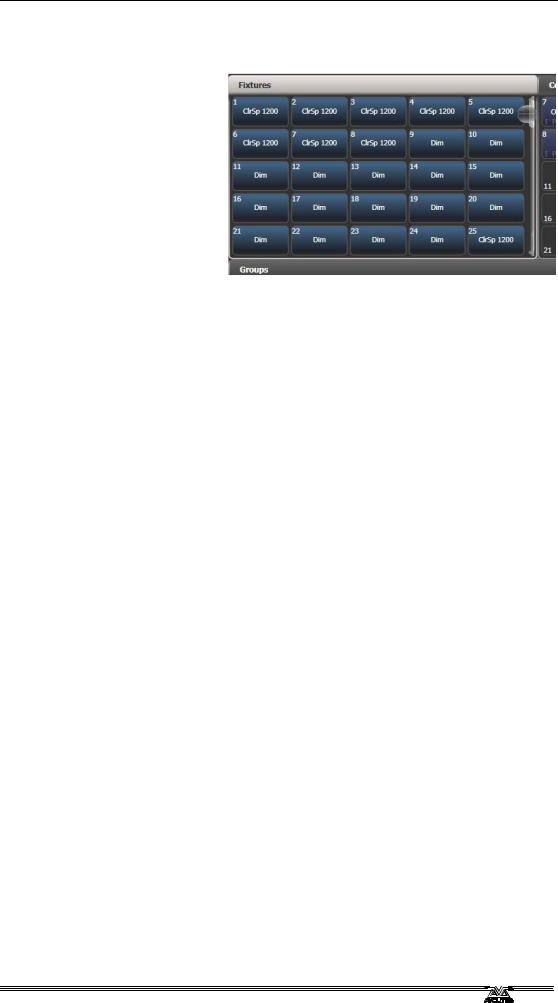
Page 30 – 2. Patching
If the Fixtures window is not shown, press View then [Open Workspace Window] then [Fixtures] to show it, or press the
Fixtures button on the Touch Wing.
Fixture touch buttons can be shown either in pages with Page buttons, or you can use the scroll bar to show different pages. Use the [Pages Show/Hide] touch button on the right of the screen to select between page buttons and scrolling mode. on the left of the screen. You can change the fixture page at any time.
|
Note: Fixture touch buttons on the Touch Wing are completely |
|||
|
|
separate from fixtures patched onto the preset faders, unless |
||
|
|
|
|
Limited |
|
|
the Compatibility View workspace is used – this view |
||
|
|
duplicates the blue/grey preset buttons on the touch screen. |
||
|
|
See section 11.1.4 on page 115 for more details. |
||
|
The Pearl also allows you to allocate fixtures and dimmers to Groups, |
|||
|
which can be useful if you usually select the same set of fixtures |
|||
|
together. Groups are described in the next chapter. |
|||
2.1.2 |
Patching dimmers |
|
||
|
Each dimmer channel is allocated to one fader. |
|||
|
|
|
||
|
1> |
Press Patch (one of the blue command buttons bottom right), |
||
|
|
then [Dimmers]. |
|
|
|
2> |
|
Avolites |
|
|
Softkey A [Line=] shows you which of the 12 DMX output lines |
|||
|
|
you are patching onto. Press A then enter a new number (1-12) |
||
|
|
to change the line. [Address=xx] shows the DMX address about |
||
|
|
to be patched. You can change this by pressing [Address=xx], |
||
|
|
typing in the new address on the numeric keypad and pressing |
||
|
|
Enter. |
|
|
|
3> |
To patch a single dimmer, press a preset Select button or a |
||
|
|
fixture touch button. To patch a range of dimmers, hold down |
||
|
|
the Select button for the first dimmer in the range, then press |
||
|
|
the last Select button in the range. On the Touch Wing, run |
||
|
|
your finger along the buttons. The range of dimmers will be |
||
|
|
patched to sequential DMX addresses. |
||
|
4> |
The Select buttons light up dimly to show that they are |
||
|
|
patched. Fixture Touch buttons turn dark blue and show fixture |
||
|
|
details. |
|
|
|
5> |
Repeat from step 2 for other dimmers. |
||
Copyright |
|
|
||
|
• |
When setting the DMX address using Softkey B, you can set the |
||
PearlExpertTitan_Man_v3.doc 29/03/2010 13:28:00
Loading...