


 Loading...
Avolites Arena
Operator’s Manual
Version 9.1

TitanUniversal_Man_v9-1_AR.doc 02 October 2015

Useful Avolites phone numbers:-
Avolites England |
|
Sales and service* |
(+44) (0) 20 8965 8522 |
Service out of hours* |
(+44) (0) 7831 178 888 |
Fax |
(+44) (0) 20 8965 0290 |
support@avolites.com |
|
Website |
http://www.avolites.com |
Before contacting Avolites for service enquiry please ensure that you have the product serial number and the software version. The serial number can be found on the back of the desk; the software version is displayed on the menu prompt when the Arena is switched to System mode.
The latest version of this manual and console software can be downloaded from the Avolites website.
The small print :
No Liability for Consequential Damages
Avolites has a policy of continuous product and documentation improvement. As such the detail within this manual may not match the operation of the console.
In no event shall Avolites be liable for any direct, indirect, special, incidental, or consequential damages or loss whatsoever (including, without limitation, damages for loss of profits, business interruption, or other pecuniary loss) arising out of the use or inability to use the console even if Avolites Ltd. has been advised of the possibility of such damages. Because some jurisdictions do not allow the exclusion or limitation of liability for consequential or incidental damages, the above limitation may not apply to you.
Avolites Ltd recognise that all trademarks within the manual are the property of their respective owners.
Reprint and revision history:
Titan Universal Manual v9: March 2015
Revised for v9.1/Arena console: Oct 2015
Revised for Arena UPS: Oct 2015
TitanUniversal_Man_v9-1_AR.doc 02 October 2015

Written by Tim Mitchell, Sabre Technology Ltd http://www.sabretechnology.co.uk
with examples by Nic Morris
TitanUniversal_Man_v9-1_AR.doc 02 October 2015

Reference Manual Contents - Page 5
SECTIONS |
|
|
1. |
QUICK START |
15 |
2. |
SETTING UP AND USING THE CONSOLE |
19 |
3. |
PATCHING |
50 |
4. |
CONTROLLING DIMMERS AND FIXTURES |
70 |
5. |
PALETTES |
94 |
6. |
SHAPES AND PIXEL MAPPER EFFECTS |
107 |
7. |
CUES |
145 |
8. |
CHASES |
165 |
9. |
CUE LISTS |
176 |
10. |
RUNNING THE SHOW |
195 |
11. |
REMOTE CONTROL |
209 |
12. |
USER SETTINGS AND OTHER OPTIONS |
215 |
13. |
FIXTURE PERSONALITIES |
233 |
14. |
NETWORKING THE CONSOLE |
237 |
15. |
USING DIFFERENT AVOLITES CONSOLES |
249 |
16. |
RELEASE NOTES |
251 |
17. |
TITAN COMMANDS QUICK REFERENCE |
271 |
18. |
GLOSSARY OF WORDS |
275 |
This icon shows important information which you should know about to avoid damage to your console or loss of important data.
This icon shows information which is useful to know.
This icon shows handy tips which will help you use the console more efficiently.
TitanUniversal_Man_v9-1_AR.doc 02 October 2015

Page 6 – Reference Manual Contents
TitanUniversal_Man_v9-1_AR.doc 02 October 2015

|
|
Reference Manual Contents - Page 7 |
|
|
CONTENTS |
|
|
1. |
Quick Start |
15 |
|
1.1 |
Patching fixtures ................................................................... |
15 |
|
1.2 |
Controlling fixtures ................................................................ |
15 |
|
1.3 |
Programming cues and chases................................................. |
16 |
|
1.4 |
Programming palettes ............................................................ |
17 |
|
1.5 |
DMX / network setup ............................................................. |
18 |
|
2. |
Setting up and using the console |
19 |
|
2.1 |
Guide to the Arena ................................................................ |
19 |
|
2.2 |
Connecting up....................................................................... |
24 |
|
|
2.2.1 |
Cautions ............................................................................................ |
24 |
|
2.2.2 |
Connecting mains power...................................................................... |
24 |
|
2.2.3 Starting up and shutting down.............................................................. |
24 |
|
|
2.2.4 |
Titan Healthcheck ............................................................................... |
25 |
|
2.2.5 |
Connecting DMX lines .......................................................................... |
25 |
|
2.2.6 Connecting the Titan Mobile Wing ......................................................... |
26 |
|
2.3 |
Using the touch screens and monitor........................................ |
27 |
|
|
2.3.1 |
Workspace windows ............................................................................ |
27 |
|
2.3.2 The menu area of the touch screen ....................................................... |
32 |
|
|
2.3.3 |
The toolbar ........................................................................................ |
33 |
|
2.3.4 The Heads-Up Display (HUD)................................................................ |
34 |
|
|
2.3.5 |
Visualiser........................................................................................... |
35 |
|
2.3.6 |
Key profiles........................................................................................ |
36 |
|
2.3.7 |
Undo/Redo......................................................................................... |
36 |
|
2.3.8 |
Key macro buttons.............................................................................. |
36 |
|
2.3.9 |
Locking the console............................................................................. |
37 |
|
2.3.10 |
Keyboard shortcuts ........................................................................... |
37 |
2.4 |
Multi-user operation............................................................... |
39 |
|
|
2.4.1 |
Users ................................................................................................ |
39 |
|
2.4.2 |
Handle Worlds .................................................................................... |
39 |
|
2.4.3 Linking to other TitanNet sessions......................................................... |
40 |
|
2.5 |
Titan Simulator ..................................................................... |
41 |
|
|
2.5.1 |
Installing Titan Simulator..................................................................... |
42 |
|
2.5.2 |
Running Titan Simulator ...................................................................... |
42 |
|
2.5.3 Using Virtual Panel with a console ......................................................... |
43 |
|
2.6 |
Loading and saving shows ...................................................... |
43 |
|
|
2.6.1 |
Saving the show ................................................................................. |
43 |
|
2.6.2 |
Loading a show................................................................................... |
44 |
|
2.6.3 Importing parts of other shows............................................................. |
45 |
|
|
2.6.4 |
Autosave ........................................................................................... |
46 |
|
2.6.5 Backing up existing show files to USB pen drive...................................... |
47 |
|
2.7 |
Clearing the console............................................................... |
47 |
|
2.8 |
Creating reports .................................................................... |
47 |
|
3. |
Patching |
50 |
|
3.1 |
Patching new fixtures or dimmers ............................................ |
50 |
|
|
3.1.1 Fixture select buttons and handles ........................................................ |
50 |
|
|
3.1.2 |
Patching dimmers ............................................................................... |
51 |
|
3.1.3 Patching moving light fixtures............................................................... |
52 |
|
|
3.1.4 |
Visualiser Auto Patch........................................................................... |
55 |
|
3.1.5 Patching fixtures with multiple cells (sub fixtures) ................................... |
55 |
|
|
3.1.6 |
Patching by RDM................................................................................. |
55 |
|
3.1.7 Finding a lost fixture............................................................................ |
56 |
|
3.2 |
Changing the patch................................................................ |
57 |
|
|
3.2.1 |
Patch View ......................................................................................... |
57 |
|
3.2.2 View detailed fixture information........................................................... |
58 |
|
|
3.2.3 Changing DMX address using Patch menu .............................................. |
59 |
|
|
3.2.4 |
Setting legends................................................................................... |
59 |
|
3.2.5 |
DMX view window ............................................................................... |
60 |
|
3.2.6 |
Fixture Exchange ................................................................................ |
61 |
|
3.2.7 |
Exchange Mapping .............................................................................. |
62 |
|
3.2.8 |
Update personalities............................................................................ |
64 |
3.3 |
Copying, moving and deleting fixtures ...................................... |
64 |
|
|
3.3.1 Copying or moving a patched fixture ..................................................... |
64 |
|
|
3.3.2 |
Using copied fixtures ........................................................................... |
65 |
TitanUniversal_Man_v9-1_AR.doc 02 October 2015

Page 8 – Reference Manual Contents
|
3.3.3 Deleting a patched fixture .................................................................... |
65 |
|
3.4 |
Advanced options .................................................................. |
66 |
|
|
3.4.1 Swap pan and tilt................................................................................ |
66 |
|
|
3.4.2 |
Invert attributes ................................................................................. |
66 |
|
3.4.3 |
Attribute limits.................................................................................... |
67 |
|
3.4.4 |
Fixture Offset ..................................................................................... |
67 |
|
3.4.5 Fixture / Attribute curves ..................................................................... |
68 |
|
|
3.4.6 Freeze fixtures or attributes ................................................................. |
68 |
|
|
3.4.7 |
Editing the personality......................................................................... |
68 |
4. |
Controlling dimmers and fixtures |
70 |
|
4.1 |
Using the select buttons and wheels......................................... |
70 |
|
|
4.1.1 Selecting fixtures and dimmers for control ............................................. |
70 |
|
|
4.1.2 Setting fixtures to a start position (Locate)............................................. |
71 |
|
|
4.1.3 |
Clearing selection................................................................................ |
72 |
|
4.1.4 Fixtures with multiple cells/subfixtures .................................................. |
73 |
|
|
4.1.5 Changing attributes using the wheels .................................................... |
75 |
|
|
4.1.6 Setting attributes using the touch screen ............................................... |
76 |
|
|
4.1.7 Setting attributes from the softkeys ...................................................... |
79 |
|
|
4.1.8 Adjusting attributes with the @ buttons ................................................. |
79 |
|
|
4.1.9 Selecting fixtures and dimmers by number (Channel) .............................. |
80 |
|
|
4.1.10 Selecting using a pattern.................................................................... |
81 |
|
|
4.1.11 Selecting fixtures which are in a palette or playback .............................. |
81 |
|
|
4.1.12 Attribute groups – IPCGBES-FX........................................................... |
82 |
|
|
4.1.13 |
Using fixture groups .......................................................................... |
82 |
|
4.1.14 Fixture Order and Fixture Layout in groups........................................... |
84 |
|
|
4.1.15 Stepping through selected fixtures one at a time................................... |
85 |
|
|
4.1.16 Highlighting the selected fixture with Prev/Next .................................... |
85 |
|
|
4.1.17 Flash selected fixtures to full .............................................................. |
86 |
|
|
4.1.18 Turn off unselected fixtures ................................................................ |
86 |
|
|
4.1.19 |
Align fixtures .................................................................................... |
86 |
|
4.1.20 |
Flip.................................................................................................. |
87 |
|
4.1.21 |
Fan mode......................................................................................... |
87 |
|
4.1.22 |
Setting fixture/attribute times............................................................. |
90 |
4.2 |
Viewing and using numerical values ......................................... |
91 |
|
|
4.2.1 The Channel Grid window..................................................................... |
91 |
|
4.3 |
Advanced options .................................................................. |
92 |
|
|
4.3.1 |
The ML Menu button........................................................................... |
92 |
|
4.3.2 Lamping fixtures on and off.................................................................. |
92 |
|
5. |
Palettes |
|
94 |
5.1 |
Creating palettes ................................................................... |
95 |
|
|
5.1.1 Which attributes are stored in palettes................................................... |
95 |
|
|
5.1.2 |
Storing a palette................................................................................. |
95 |
|
5.1.3 |
Nested palettes................................................................................... |
98 |
|
5.1.4 |
Quick record....................................................................................... |
98 |
|
5.1.5 Setting legends for palettes.................................................................. |
99 |
|
|
5.1.6 Creating an effects palette (shape or pixel mapper)................................ |
100 |
|
|
5.1.7 Creating a time palette ....................................................................... |
100 |
|
5.2 |
Recalling palettes ................................................................ |
101 |
|
|
5.2.1 Recalling a palette value ..................................................................... |
101 |
|
|
5.2.2 |
Palette pages .................................................................................... |
101 |
|
5.2.3 Only showing relevant palettes ............................................................ |
102 |
|
|
5.2.4 Quick palettes with no fixtures selected ................................................ |
102 |
|
|
5.2.5 Setting palettes to all fixtures in a playback .......................................... |
102 |
|
5.3 |
Editing palettes ................................................................... |
102 |
|
|
5.3.1 Viewing and editing the content of palettes ........................................... |
102 |
|
|
5.3.2 Changing the content of palettes.......................................................... |
103 |
|
|
5.3.3 Updating palettes used in a playback.................................................... |
104 |
|
5.4 |
Copying, moving and deleting palettes ................................... |
104 |
|
|
5.4.1 Copying or moving a palette................................................................ |
104 |
|
|
5.4.2 |
Deleting palettes................................................................................ |
105 |
5.5 |
Timing with palettes............................................................. |
105 |
|
|
5.5.1 Palettes with saved times.................................................................... |
105 |
|
|
5.5.2 Manually overriding palette times......................................................... |
105 |
|
|
5.5.3 Manual fixture overlap when recalling palettes....................................... |
106 |
|
|
5.5.4 Master Time for palettes ..................................................................... |
106 |
|
6. |
Shapes and Pixel Mapper effects |
107 |
|
TitanUniversal_Man_v9-1_AR.doc 02 October 2015

Reference Manual Contents - Page 9
6.1 |
Shape generator.................................................................. |
107 |
|
|
6.1.1 |
Selecting a shape............................................................................... |
107 |
|
6.1.2 Changing size and speed of a shape ..................................................... |
109 |
|
|
6.1.3 Changing the phase of a shape across multiple fixtures........................... |
110 |
|
6.2 |
Key frame shapes................................................................ |
111 |
|
|
6.2.1 Creating a key frame shape................................................................. |
111 |
|
|
6.2.2 Changing shape parameters in the Effect Editor ..................................... |
112 |
|
|
6.2.3 Saving a key frame shape to a cue....................................................... |
116 |
|
6.3 |
Pixel mapper....................................................................... |
117 |
|
|
6.3.1 Creating Pixel Mapper effects............................................................... |
117 |
|
|
6.3.2 Pixel mapper Layer Masters................................................................. |
120 |
|
6.4 |
Editing shapes and effects .................................................... |
120 |
|
|
6.4.1 Editing shapes and effects in cues........................................................ |
120 |
|
|
6.4.2 Selecting a running shape to edit ......................................................... |
121 |
|
|
6.4.3 |
Resynchronise shapes ........................................................................ |
121 |
|
6.4.4 Changing fixture order in a shape ........................................................ |
121 |
|
|
6.4.5 Removing or adding fixtures................................................................ |
121 |
|
|
6.4.6 |
Reversing a shape.............................................................................. |
121 |
|
6.4.7 |
Deleting shapes ................................................................................. |
122 |
6.5 |
Advanced options ................................................................ |
122 |
|
|
6.5.1 Fading shape size and speed ............................................................... |
122 |
|
6.6 |
Pixel Mapper examples ......................................................... |
122 |
|
|
6.6.1 |
Randomising effects ........................................................................... |
122 |
|
6.6.2 |
Overlaying effects .............................................................................. |
126 |
|
6.6.3 Creative use of fixture layouts ............................................................. |
128 |
|
|
6.6.4 Other Layout Editor tools .................................................................... |
132 |
|
|
6.6.5 Playback Order and Priorities............................................................... |
133 |
|
|
6.6.6 Displacement and Layer Properties....................................................... |
138 |
|
|
6.6.7 |
Spawn and Pre-Spool ......................................................................... |
140 |
7. |
Cues |
|
145 |
7.1 |
Creating a cue..................................................................... |
145 |
|
|
7.1.1 |
How the Arena works when programming ............................................ |
145 |
|
7.1.2 |
Creating a cue................................................................................... |
146 |
|
7.1.3 |
Quick Build cues ................................................................................ |
146 |
|
7.1.4 Using shapes/effects in cues................................................................ |
147 |
|
|
7.1.5 |
Blind mode........................................................................................ |
147 |
|
7.1.6 Recording cue with a mask.................................................................. |
147 |
|
|
7.1.7 Convert cue to chase or cue list ........................................................... |
147 |
|
7.2 |
Using a cue......................................................................... |
147 |
|
|
7.2.1 |
HTP and LTP...................................................................................... |
147 |
|
7.2.2 Playing back a cue ............................................................................. |
148 |
|
|
7.2.3 |
Changing playback pages.................................................................... |
148 |
|
7.2.4 |
Viewing active playbacks .................................................................... |
149 |
|
7.2.5 |
Speed Masters................................................................................... |
149 |
|
7.2.6 |
Releasing running playbacks................................................................ |
150 |
|
7.2.7 Release mask - releasing individual attributes........................................ |
150 |
|
|
7.2.8 Programming the Release / Power On state........................................... |
151 |
|
|
7.2.9 Turning off individual fixtures .............................................................. |
151 |
|
7.3 |
Editing cues........................................................................ |
152 |
|
|
7.3.1 Editing a cue by merging .................................................................... |
152 |
|
|
7.3.2 Updating stored values and palettes used in a cue ................................. |
152 |
|
|
7.3.3 Playback and Cue view ....................................................................... |
153 |
|
|
7.3.4 Using parts of existing cues - the Include function.................................. |
154 |
|
|
7.3.5 Removing attributes from cues using “Off” ............................................ |
155 |
|
7.4 |
Copying, moving, linking and deleting .................................... |
156 |
|
|
7.4.1 Copying or moving a cue .................................................................... |
156 |
|
|
7.4.2 |
Deleting a cue ................................................................................... |
156 |
7.5 |
Cue timing.......................................................................... |
157 |
|
|
7.5.1 Setting fade times and Overlap for a cue .............................................. |
157 |
|
|
7.5.2 |
Changing fixture order........................................................................ |
159 |
|
7.5.3 Setting attribute fade times for a cue ................................................... |
160 |
|
|
7.5.4 Editing times in the programmer.......................................................... |
161 |
|
7.6 |
Advanced options ................................................................ |
161 |
|
|
7.6.1 |
Release mask .................................................................................... |
161 |
|
7.6.2 Shape size/speed on fader .................................................................. |
162 |
|
|
7.6.3 |
Curve ............................................................................................... |
162 |
|
7.6.4 Locking a playback onto a handle......................................................... |
162 |
|
|
7.6.5 |
Playback priority ................................................................................ |
162 |
TitanUniversal_Man_v9-1_AR.doc 02 October 2015

Page 10 – Reference Manual Contents
|
7.6.6 |
Blind mode........................................................................................ |
163 |
|
7.6.7 |
Key Profile ........................................................................................ |
163 |
8. |
Chases |
|
165 |
8.1 |
Creating a chase ................................................................. |
165 |
|
|
8.1.1 |
Programming a chase......................................................................... |
165 |
|
8.1.2 Creating a chase with Quick Build ........................................................ |
166 |
|
8.2 |
Playback ............................................................................ |
166 |
|
|
8.2.1 Playing back a chase .......................................................................... |
166 |
|
|
8.2.2 Connecting a chase for control............................................................. |
167 |
|
|
8.2.3 Setting speed and crossfade for a chase ............................................... |
167 |
|
|
8.2.4 Manually controlling the steps of a chase .............................................. |
168 |
|
|
8.2.5 |
Changing chase direction .................................................................... |
168 |
|
8.2.6 Jumping to a step .............................................................................. |
168 |
|
8.3 |
Editing a chase.................................................................... |
169 |
|
|
8.3.1 Opening a chase for editing................................................................. |
169 |
|
|
8.3.2 Editing a chase using Unfold................................................................ |
169 |
|
8.4 |
Copying, moving, linking and deleting .................................... |
170 |
|
|
8.4.1 Copying or moving a chase ................................................................. |
170 |
|
|
8.4.2 |
Deleting a chase ................................................................................ |
170 |
|
8.4.3 Deleting a step from a chase ............................................................... |
170 |
|
8.5 |
Chase timing....................................................................... |
170 |
|
|
8.5.1 Global timings for chases .................................................................... |
170 |
|
|
8.5.2 Individual cue times in chases ............................................................. |
172 |
|
|
8.5.3 Setting attribute fade times for a cue in a chase .................................... |
173 |
|
8.6 |
Advanced options ................................................................ |
173 |
|
|
8.6.1 Loop/Stop on Final Cue....................................................................... |
173 |
|
|
8.6.2 |
Forwards/backwards/bounce/random ................................................... |
173 |
|
8.6.3 |
Cue linking........................................................................................ |
174 |
|
8.6.4 |
Release between cues ........................................................................ |
174 |
|
8.6.5 |
Renumber cues.................................................................................. |
174 |
9. |
Cue Lists |
176 |
|
9.1 |
Creating a cue list................................................................ |
176 |
|
|
9.1.1 Programming a cue list ....................................................................... |
176 |
|
|
9.1.2 Changing legends for cues in a cue list ................................................. |
178 |
|
|
9.1.3 Autoloading a playback within a cue list ................................................ |
178 |
|
|
9.1.4 Running a key macro from a cue list..................................................... |
179 |
|
|
9.1.5 Keyboard shortcuts/syntax for cue lists................................................. |
179 |
|
9.2 |
Cue List playback ................................................................ |
180 |
|
|
9.2.1 Running a cue list .............................................................................. |
180 |
|
|
9.2.2 Killing a cue list ................................................................................. |
181 |
|
9.3 |
Editing cue lists................................................................... |
181 |
|
|
9.3.1 |
Playback View window ........................................................................ |
181 |
|
9.3.2 Editing values in Cue View window ....................................................... |
181 |
|
|
9.3.3 Moving and copying cues .................................................................... |
182 |
|
|
9.3.4 Editing a cue list using Unfold.............................................................. |
183 |
|
|
9.3.5 Using Update to change tracked cues ................................................... |
183 |
|
|
9.3.6 Editing a cue list which is running ........................................................ |
184 |
|
|
9.3.7 Editing a cue list while recording.......................................................... |
184 |
|
|
9.3.8 Updating values in a range of cues....................................................... |
185 |
|
|
9.3.9 |
Disabling a cue .................................................................................. |
185 |
9.4 |
Copying, moving, linking and deleting .................................... |
185 |
|
|
9.4.1 Copying or moving a cue list ............................................................... |
185 |
|
|
9.4.2 Deleting a cue list .............................................................................. |
186 |
|
|
9.4.3 Deleting a cue from a cue list .............................................................. |
186 |
|
9.5 |
Cue list timing..................................................................... |
186 |
|
|
9.5.1 Time and fade options for Cue Lists...................................................... |
186 |
|
|
9.5.2 Cue linking & Link Offset..................................................................... |
187 |
|
|
9.5.3 Individual attribute fade times............................................................. |
188 |
|
|
9.5.4 |
Fixture overlap .................................................................................. |
188 |
|
9.5.5 Running a cue list to timecode............................................................. |
189 |
|
9.6 |
Advanced options ................................................................ |
190 |
|
|
9.6.1 |
Release mask .................................................................................... |
190 |
|
9.6.2 |
Fader mode....................................................................................... |
191 |
|
9.6.3 |
Release between cues ........................................................................ |
191 |
|
9.6.4 |
Handle Paging ................................................................................... |
191 |
|
9.6.5 |
Cue Options ...................................................................................... |
191 |
|
9.6.6 |
Autoload........................................................................................... |
192 |
TitanUniversal_Man_v9-1_AR.doc 02 October 2015
|
|
|
Reference Manual Contents - Page 11 |
|
|
|
9.6.7 |
Macro Links....................................................................................... |
192 |
|
|
9.6.8 |
Key Profile ........................................................................................ |
192 |
|
|
9.6.9 |
Shape Size/Shape Speed .................................................................... |
192 |
|
|
9.6.10 |
Tracking.......................................................................................... |
192 |
|
|
9.6.11 Move In Dark (MID) functions............................................................ |
192 |
|
|
|
9.6.12 Fire first cue option .......................................................................... |
193 |
|
10. |
Running the show |
195 |
||
10.1 |
Playback controls................................................................. |
195 |
||
|
|
10.1.1 Back up the show............................................................................. |
195 |
|
|
|
10.1.2 |
Label the console ............................................................................. |
195 |
|
|
10.1.3 |
Grand Master fader .......................................................................... |
195 |
|
|
10.1.4 |
Assignable Master faders................................................................... |
195 |
|
|
10.1.5 |
Speed Masters ................................................................................. |
196 |
|
|
10.1.6 |
Group Masters ................................................................................. |
197 |
|
|
10.1.7 Flash and swop buttons .................................................................... |
197 |
|
|
|
10.1.8 |
Playback priority .............................................................................. |
198 |
|
|
10.1.9 Locking a playback onto the same handle on every page....................... |
198 |
|
|
|
10.1.10 |
Viewing active playbacks................................................................. |
198 |
|
|
10.1.11 |
Blind mode .................................................................................... |
199 |
|
|
10.1.12 |
Busking with palettes...................................................................... |
199 |
10.2 |
Using multiple on-screen workspaces ..................................... |
200 |
||
|
|
10.2.1 |
View menu ...................................................................................... |
200 |
10.3 |
Organising the console ......................................................... |
200 |
||
|
|
10.3.1 Using the Move function.................................................................... |
201 |
|
10.4 |
Set List window................................................................... |
201 |
||
10.5 |
MIDI, DMX or audio triggering............................................... |
202 |
||
|
|
10.5.1 Connecting remote trigger sources ..................................................... |
202 |
|
|
|
10.5.2 Setting up remote triggering.............................................................. |
202 |
|
|
|
10.5.3 Classic Pearl MIDI triggers................................................................. |
204 |
|
|
|
10.5.4 |
MIDI show control............................................................................ |
205 |
|
|
10.5.5 Audio control (sound to light) ............................................................ |
205 |
|
10.6 |
Linking consoles for multi-user or backup................................ |
206 |
||
|
|
10.6.1 Setting up consoles for multi-user ...................................................... |
206 |
|
|
|
10.6.2 Setting up consoles for backup .......................................................... |
206 |
|
11. |
Remote control |
209 |
||
11.1 |
Setting up the remote .......................................................... |
209 |
||
|
|
11.1.1 Using an existing network ................................................................. |
210 |
|
|
|
11.1.2 Network setup using a dedicated access point...................................... |
210 |
|
11.2 |
Operating the remote........................................................... |
211 |
||
|
|
11.2.1 |
Keypad ........................................................................................... |
211 |
|
|
11.2.2 |
Controlling fixtures........................................................................... |
212 |
|
|
11.2.3 Recording groups and palettes........................................................... |
213 |
|
12. User Settings and other options |
215 |
|||
12.1 |
Configuring the Workspace ................................................... |
215 |
||
|
|
12.1.1 |
Opening workspace windows ............................................................. |
215 |
|
|
12.1.2 Selecting and positioning workspace windows...................................... |
215 |
|
|
|
12.1.3 |
Saving workspaces........................................................................... |
216 |
|
|
12.1.4 Compatibility windows for Pearl Expert shows...................................... |
217 |
|
|
|
12.1.5 Configuring an external monitor......................................................... |
217 |
|
12.2 |
Key Profiles ........................................................................ |
218 |
||
|
|
12.2.1 Creating and editing key profiles ........................................................ |
218 |
|
|
|
12.2.2 Selecting a Key Profile ...................................................................... |
219 |
|
|
|
12.2.3 Individual Key profiles for playbacks................................................... |
220 |
|
12.3 |
The System menu ............................................................... |
220 |
||
|
|
12.3.1 |
TitanNet Security ............................................................................. |
220 |
|
|
12.3.2 |
Network Settings ............................................................................. |
220 |
|
|
12.3.3 |
User Settings................................................................................... |
220 |
|
|
12.3.4 |
Key Profiles ..................................................................................... |
222 |
|
|
12.3.5 |
Wipe............................................................................................... |
222 |
|
|
12.3.6 |
DMX settings ................................................................................... |
223 |
|
|
12.3.7 |
DMX Merge Settings ......................................................................... |
223 |
|
|
12.3.8 |
Triggers .......................................................................................... |
223 |
|
|
12.3.9 |
Display Setup .................................................................................. |
223 |
|
|
12.3.10 |
Assign mastering............................................................................ |
223 |
12.4 |
DMX output mapping ........................................................... |
223 |
||
|
|
12.4.1 |
Configuring DMX outputs................................................................... |
223 |
TitanUniversal_Man_v9-1_AR.doc 02 October 2015

Page 12 – Reference Manual Contents
|
12.4.2 |
TitanNet Overview ............................................................................ |
225 |
|
12.4.3 |
DMX merge ..................................................................................... |
225 |
12.5 |
Curves |
............................................................................... |
226 |
12.6 |
Upgrading ........................................................the software |
230 |
|
12.7 |
Recovering/reinstalling .........................................the system |
230 |
|
|
12.7.1 ........................................................Booting from USB recovery stick |
231 |
|
|
12.7.2 .................................................................... |
Installation Instructions |
231 |
|
12.7.3 ............................................................................ |
Software licensing |
232 |
13. Fixture Personalities |
233 |
|
13.1.1 Downloading fixture personalities from Avolites |
....................................233 |
|
13.1.2 Updating the personality library on the console .................................... |
234 |
|
13.1.3 |
User/custom personalities ................................................................. |
234 |
13.1.4 Requesting a new fixture personality .................................................. |
235 |
|
13.1.5 Reporting a personality bug to Avolites ............................................... |
235 |
|
13.1.6 |
In an emergency.............................................................................. |
235 |
14. Networking the console |
237 |
||
14.1 |
Connecting the Arena to a network ........................................ |
237 |
|
|
14.1.1 |
Optical connections .......................................................................... |
237 |
|
14.1.2 |
Wired ethernet outputs ..................................................................... |
237 |
|
14.1.3 Changing the IP address of the network switch (TNS) ........................... |
238 |
|
|
14.1.4 Power and UPS behaviour ................................................................. |
238 |
|
14.2 |
Controlling fixtures over a network......................................... |
239 |
|
|
14.2.1 |
Setting IP address............................................................................ |
239 |
|
14.2.2 Setting up DMX outputs .................................................................... |
239 |
|
|
14.2.3 A simple Art-Net system ................................................................... |
239 |
|
|
14.2.4 Setting up an Art-Net system............................................................. |
241 |
|
|
14.2.5 |
Additional Art-Net Resources ............................................................. |
242 |
14.3 |
Connecting to a simulator with ACDI ...................................... |
242 |
|
|
14.3.1 |
ACDI .............................................................................................. |
243 |
14.4 |
Module Setup...................................................................... |
244 |
|
14.5 |
Using Active Fixtures with CITP ............................................. |
244 |
|
|
14.5.1 |
Example CITP setup ......................................................................... |
244 |
14.6 |
All about IP addressing......................................................... |
245 |
|
|
14.6.1 Setting your IP address..................................................................... |
245 |
|
|
14.6.2 |
Subnet Masks .................................................................................. |
245 |
|
14.6.3 Choosing an IP address and Subnet Mask............................................ |
246 |
|
|
14.6.4 Automatically assigning IP addresses (DHCP)....................................... |
247 |
|
|
14.6.5 Private IP address ranges.................................................................. |
247 |
|
15. Using different Avolites consoles |
249 |
||
15.1 |
The console controls ............................................................ |
249 |
|
15.2 |
Programming features in Titan .............................................. |
249 |
|
16. Release notes |
251 |
||
16.1 |
Version 9.1......................................................................... |
251 |
|
|
16.1.1 |
Upgrade Procedure........................................................................... |
251 |
|
16.1.2 Version 9.1 New Features.................................................................. |
252 |
|
|
16.1.3 |
Version 9.1 Improvements ................................................................ |
252 |
|
16.1.4 Version 9.1 Bugs fixed ...................................................................... |
252 |
|
16.2 |
Version 9.0......................................................................... |
255 |
|
|
16.2.1 |
Upgrade Procedure........................................................................... |
255 |
|
16.2.2 Version 9 New Features .................................................................... |
255 |
|
|
16.2.3 |
Improvements ................................................................................. |
266 |
|
16.2.4 |
Changes ......................................................................................... |
267 |
|
16.2.5 |
Bugs Fixed ...................................................................................... |
267 |
17. Titan Commands quick reference |
271 |
||
|
17.1.1 |
Fixtures .......................................................................................... |
271 |
|
17.1.2 |
Select If.......................................................................................... |
272 |
|
17.1.3 |
Record............................................................................................ |
272 |
|
17.1.4 |
Copy, Move ..................................................................................... |
273 |
|
17.1.5 |
Delete............................................................................................. |
273 |
|
17.1.6 |
Include ........................................................................................... |
273 |
|
17.1.7 |
Times ............................................................................................. |
273 |
|
17.1.8 |
Cue Lists......................................................................................... |
274 |
TitanUniversal_Man_v9-1_AR.doc 02 October 2015

|
Reference Manual Contents - Page 13 |
18. Glossary of words |
275 |
INDEX |
281 |
TitanUniversal_Man_v9-1_AR.doc 02 October 2015

Page 14 – 1. Quick Start
TitanUniversal_Man_v9-1_AR.doc 02 October 2015

1. Quick Start - Page 15
1. Quick Start
This section is a quick guide on how to do most things on the Arena . Each section has a link to take you to the appropriate manual section for more details.
Softkeys are shown in square brackets like [This].
1.1Patching fixtures
Press Patch, [Dimmers] or [Fixtures].
For Fixtures, from the softkeys choose fixture manufacturer (type on keyboard to filter the list) then fixture type, then fixture mode.
Set [DMX Line] and [Address]. Console will automatically set these if you don’t change them.
Press buttons in the Fixtures window to patch the fixture. You can also patch fixtures on the left hand playback faders using the blue select buttons. (Section 3.1.3, p52).
To patch a number of dimmers or fixtures at once, drag over buttons to draw a selection box on the screen. Or, set [Quantity] in the patch menu.
To change DMX address or line, use [Repatch Fixtures]. (Section 3.2, p57).
View fixture patch
To see an overview screen of how the console is patched, press Open View then Patch (Section 3.2.1 , p57).
Setting fixture options
Press Patch, [Edit Fixtures], or use the Patch View screen.
1.2Controlling fixtures
Select fixtures for control by pressing select buttons.
Press Locate to “home” selected fixtures with lamp on. If fixture is patched on a handle with a fader, the fader controls the dimmer. (Section 4.1.2. p71). Hold locate and press attribute button to remove that attribute from the locate (e.g. to locate without changing pan/tilt, hold Locate and press Pan/Tilt).
Select attribute to control using attribute bank buttons (labelled Intensity/Dimmer, Colour, Gobo etc), then turn the wheels to set fixture. Display shows which attribute each wheel is controlling.
(Section 4.1.5, p75).
Open Attribute window onscreen (Open View, Attribute Options) to select attributes from buttons. (Section 4.1.6, p76).
Use Palettes to store often-used colours, positions etc. for instant recall, see next page.
Fixture Groups
Fixtures may be grouped for quick selection, press Group, [Record Group], select fixtures for group, set legend using [Provide a legend],
TitanUniversal_Man_v9-1_AR.doc 02 October 2015

Page 16 – 1. Quick Start
press a handle to store. If the handle has a fader it becomes a master fader for the group. Order of fixture selection is remembered for use with shapes. (Section4.1.13, p82).
Shapes / effects
Titan can use preset shapes, patterns you create yourself (key frame shapes) or pixel mapped patterns.
Select fixtures. The order of fixture selection is used by shapes.
At top menu press [Shapes and Effects], [Shape Generator], [Create]. Select attribute of shape then select a shape to run. (Section 6.1.1, p107).
Or from the Shape Library window (Open View, [Open Workspace Window], [Shape Library]) you can select a shape directly. Filter the list of shapes using the attribute buttons.
Use the wheels and [Adjust Speed, Size and Phase]/[Adjust Phase, Spread and Offset] to configure the shape. Spread distributes the shape across a number of fixtures.
Key frame shapes are similar to a chase but you can spread the sequence across fixtures (Section 6.2, p111).
To use Pixel Mapper, save fixtures to a group, select the group. Use Layout Editor to set the real-world layout of the fixtures. Then use Effects Editor to create effects on the pixels. (Section 6.6,p122 ).
1.3Programming cues and chases
Cues
Set up the look to be recorded. Press Record.
Set [Record Mode] to Channel (saves only modified attributes), Fixture (saves all attributes of fixtures which have been modified or are selected), Stage (saves all attributes of all fixtures with nonzero dimmer), or Quick Build (merges palettes and playbacks into the cue when you select them).
To store, press blue Select button on playback fader, or press button in Playbacks window. (Section 7.1.2, 146).
Chases
Press Record twice (or Record then [Create Chase]) .
Press blue Select button on a playback fader, or press button in Playbacks window.
Set up the look for the first step, press playback select button to store. Repeat until all steps stored. Quick Build mode can be used to merge palettes and cues into chase steps.
Press Exit to finish storing chase steps. (Section 8.1.1, 165).
Timings
All times (cue times and fixture attribute times) are stored in the programmer and are saved when you store a cue.
TitanUniversal_Man_v9-1_AR.doc 02 October 2015

1. Quick Start - Page 17
To edit times in the programmer before saving, press the Times button (previously labelled “Set” on Quartz/Titan Mobile/Sapphire Touch/Tiger Touch and “Next Time” on Pearl Expert/Tiger Touch mk1).
For chases, speed and fade can be set with wheels A and B when the chase is running.
To edit times in a saved cue, at top level menu press [Edit Times] then the select button for the playback. Timing options are set from softkeys.
[Fixture Overlap] sets each fixture to fade in sequence (100%=all together, 0%=fixture waits for previous one to complete).
[Attribute times] sets individual fade times for different attributes.
[Fixture order] changes sequence for shapes and Overlap. (Section 8.5, p170).
Cue Lists
Cues may be stored in a Cue List which allows a full show to be run from a Go button. Chases can be included using Autoload. Cue lists can run in tracking or non-tracking mode, set from [Playback Options].
1.4Programming palettes
Set up the attributes to be recorded. If attribute is the same for all fixtures of one type (e.g. colour), only one fixture need be set up and palette will be “shared”.
Press Record, Palette.
Use [Set Mask] to choose attributes to record/exclude. If you are storing in a palette touch button the mask is automatically set.
Press a grey palette button to store, or touch a button in one of the Colours/Positions/Gobos windows. (Section 5.1.2, p95).
To recall palette, select fixtures, select recall mask using Attribute Bank buttons, press palette button.
To set a legend, press [Set Legend] then the palette’s button. Press [Picture] to draw a picture legend.
Quick Record
Press an unused button in one of the windows – the button turns red with a +. Press again to save the palette. The mask is automatically set to match the window (e.g. Positions window is masked for only position attributes).
Busking with palettes
To fade palettes when busking a show, select fixtures, type fade time on the keypad then recall the palette (you have to do this each time). If no fixtures selected, palette will recall to all applicable fixtures.
To set fixture overlap, type 0-100 then press [Set Overlap], then recall the palette.
To set a fade time for all palettes, press Palette then [Master Time]. (Section 5.5, p105). Faded palettes do not go into the programmer so don’t use fades when programming.
TitanUniversal_Man_v9-1_AR.doc 02 October 2015

Page 18 – 1. Quick Start
1.5DMX / network setup
The console can output up to 12 universes of DMX (called DMX Lines) which may be routed to the 8 XLR sockets or over Ethernet. The Pro versions of Pearl Expert and Tiger Touch can output 16 Universes.
The Titan One dongle is limited to a single universe. By connecting further Titan Processing Nodes to the network using TitanNet, you can control up to 64 universes.
Multiple consoles can be linked by Ethernet to provide a multi-user system, or to provide tracking backup (Section 10.6,p206).
Switch to System mode by holding Avo and pressing Disk, press [DMX Settings].
Select a Node on the left (where the DMX is going to), click the blue arrow. On the right, select the DMX line it will be fed by. The ‘i’ buttons set properties for Nodes/Lines. (Section 5.5, p223).
To change the IP address of the console, press [Network Settings] in System mode (Section 14.2.1, p239).
To change User Settings which let you personalise how the console works, hold down Avo and select [User Settings] (Section.12.3.3, p220).
TitanUniversal_Man_v9-1_AR.doc 02 October 2015
2. Setting up and using the console - Page 19
2. Setting up and using the console
Welcome to the Arena from Avolites. This manual is a reference guide to all the functions of the console.
We explain things in the order you’re most likely to use them, so we start with how to set up the console, then look at patching lights, controlling lights and how to program cues.
2.1 |
Guide to the Arena |
|
||
|
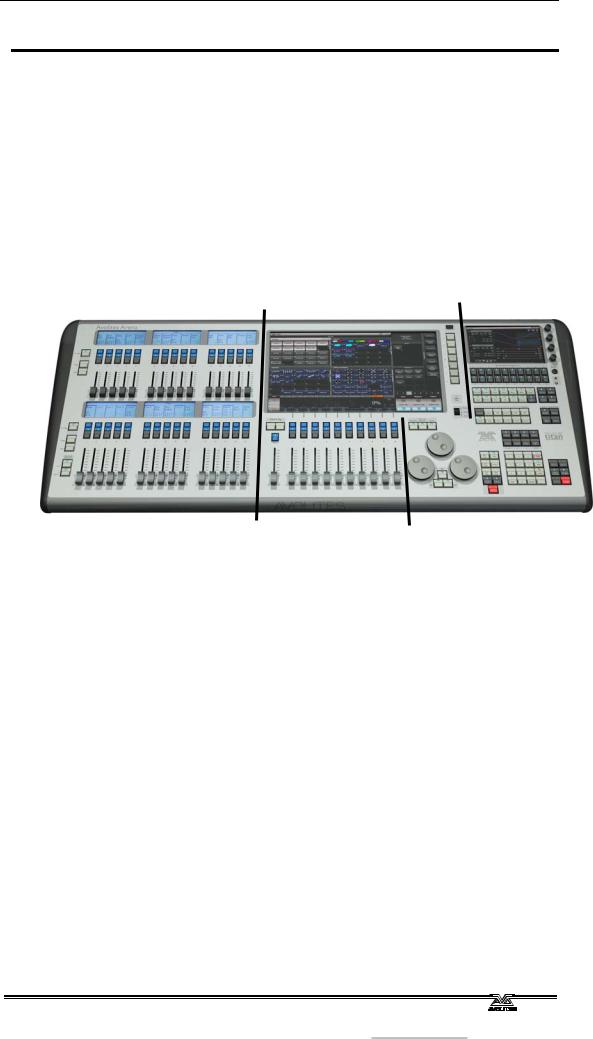
The Arena has five main control areas: |
|
||
|
|
Touch screen |
Mini screen and macro |
|
|
|
buttons |
||
|
|
|
|
|
|
|
|
|
|
|
|
|
|
|
Additional playback |
Playback faders and |
Programming and setup controls |
faders |
master |
|
The Touch screen contains fixture, palette and group select buttons. It also shows legends for the playback faders and shows the current menu page and softkey buttons on the top right of the screen.
The Playback faders select and control cues and programs. The additional playback faders provide further positions for storing cues, programs, fixtures and other elements.
The Mini screen gives you another touch screen and additional masters or playbacks using four rotary encoders.The macro buttons allow storage of frequent key sequences.
The Programming and setup controls configure and program the console
TitanUniversal_Man_v9-1_AR.doc 02 October 2015
Page 20 – 2. Setting up and using the console
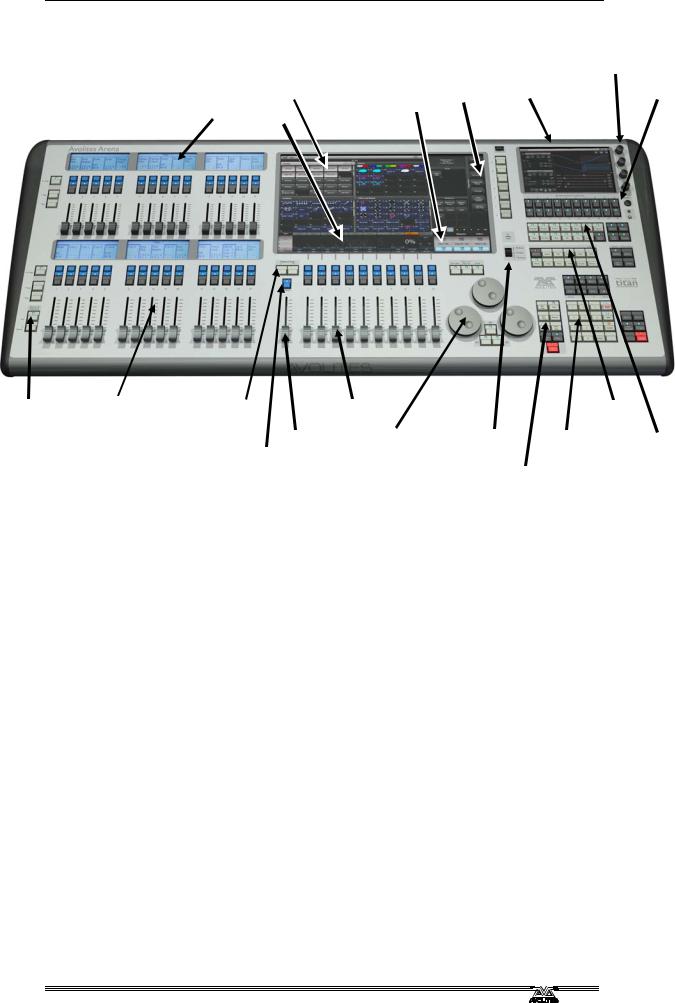
Workspace windows with |
System display |
Rotary encoders |
|
|
Mini screen |
Macro buttons |
|||
touch buttons |
and menu softkeys |
Playback legends |
Attribute display |
|
|
and info |
|
Page select |
Additional |
Main playback |
Main playback |
|
Function |
||
buttons for |
plabacks |
page select |
faders |
|
|
buttons |
|
additional |
|
buttons |
Master fader |
Control |
Mode |
Numeric |
Attribute |
playbacks |
|
|
|||||
|
|
|
wheels |
switch |
keypad and |
select buttons |
|
|
|
DBO (blackout) |
|||||
|
|
|
|
controls |
|
||
|
|
button |
|
|
Chase/cuelist |
|
|
control buttons
The main controls
The Workspace windows on the touch screen contain touch buttons for fixtures, palettes, groups, playbacks, macros and more. You can also set fixture attributes and show information windows.
The System display and menu area of the touch screen is the nerve centre of the console and shows you what is going on. This part of the display shows various screens of information depending on what you are currently doing.
The Menu Softkeys (labelled A – G) are used to select control options. The display next to the buttons shows what each one will do. The options for each key change depending on what the console is doing. Softkey commands are shown in the manual with square brackets like this: [Edit Times]
The Mini screen displays additional workspace windows. The four rotary encoders act like normal handles and can be allocated as masters or playbacks. Pressing the encoder is like pressing the blue button on a handle.
The Macro Buttons store frequently used sequences of keypresses which can be replayed with a single button press. Playbacks can also be stored here.
The Master fader controls the overall output of the console. You will normally have this set at Full. The DBO button allows you to blackout the whole console.
TitanUniversal_Man_v9-1_AR.doc 02 October 2015
2. Setting up and using the console - Page 21
The Playback faders are used to store and play back cues or chases. The Page Select buttons let you change to a different page of playbacks. The touch screen above the faders shows information about each playback. The Additional playback faders in two banks of 15 allow you to store more cues and chases, or store palettes, groups, or fixtures. Each bank of 15 has separate page select buttons and displays above the faders show what they are.
The Mode switch selects Programming, Run or System modes of operation.
The Control wheels are used to set control values (attributes) for the fixtures, and to set chase speeds and fades. The touch screen above the wheels shows information about the attributes being controlled. Press the Window Scroll Button to switch the wheels into scroll mode – this is used to move a selection box around the screen when editing.
The Numeric keypad and other control buttons are used to enter values and change controls on the console.
The Function buttons are used to carry out functions such as storing cues, copying, saving to disk, etc. These buttons have lights on to indicate when they are active.
The Attribute select buttons are used to select which attributes of a fixture (e.g. colour, gobo, pan, focus) are going to be controlled using the Control wheels. The buttons have lights on to show you which attributes are active. The bottom (red) button allows you to locate fixtures, which sets them to a known start position while programming.
The back panel (shown split into 3 parts)
USB and reset buttons
Monitor and network
TitanUniversal_Man_v9-1_AR.doc 02 October 2015

Page 22 – 2. Setting up and using the console
DMX and MIDI
All the connections required for the console are found on the back panel. There are 8 DMX outputs on 5-pin XLR, MIDI in/out/thru on 5- pin DIN, two desk lamp sockets, four Ethernet sockets from the internal Ethernet switch, an Opticon Duo optical terminal for fibre network, a DVI connector for external monitor, three USB sockets, SMPTE input, audio input on 1/4 inch jack and remote trigger terminal on 1/4 inch jack.
The Panel reset switch may be pressed to restart the front panel electronics if something odd happens with the switches and faders. The main processor will continue running but the DMX output will be interrupted until the restart is completed.
The UPS battery disconnect switch cuts off the power to the console when it is running on UPS, in the unlikely event of a complete lock up that can't be recovered by holding down the power switch.
Using the battery disconnect switch will also power down the inbuilt network switch (TNS). Be aware of this if you are running from a backup console connected via the network switch.
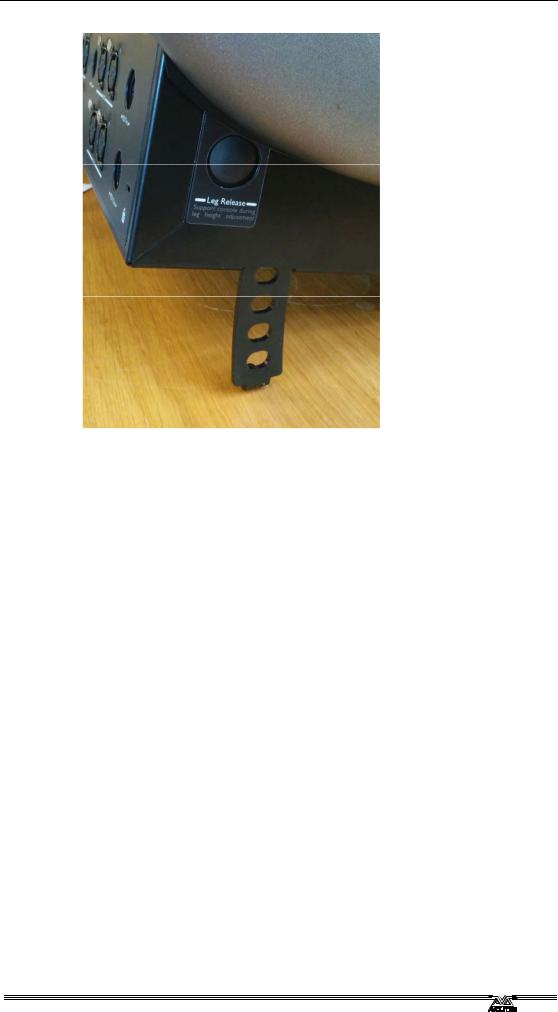
The Arena console has adjustable legs to angle the console for easier operation. Lift the rear of the console and press the Leg Release button at each side to set the leg to the desired height. Make sure you support the rear of the console when adjusting the height.
TitanUniversal_Man_v9-1_AR.doc 02 October 2015
2. Setting up and using the console - Page 23
TitanUniversal_Man_v9-1_AR.doc 02 October 2015
Page 24 – 2. Setting up and using the console
2.2Connecting up
2.2.1Cautions
Radio transmitters may affect the operation of the console and we recommend that they are not placed on, above or behind the console. If you are wearing one it is best placed in a back pocket or behind you when attached to a belt.
2.2.2Connecting mains power
You can safely connect the Arena to any voltage from 80 to 260V.
The Arena is fitted with an internal UPS (uninterruptible power supply) module. The UPS will protect you from most power problems and give you chance to shut down the console normally. The internal network switch is also powered by a separate UPS.
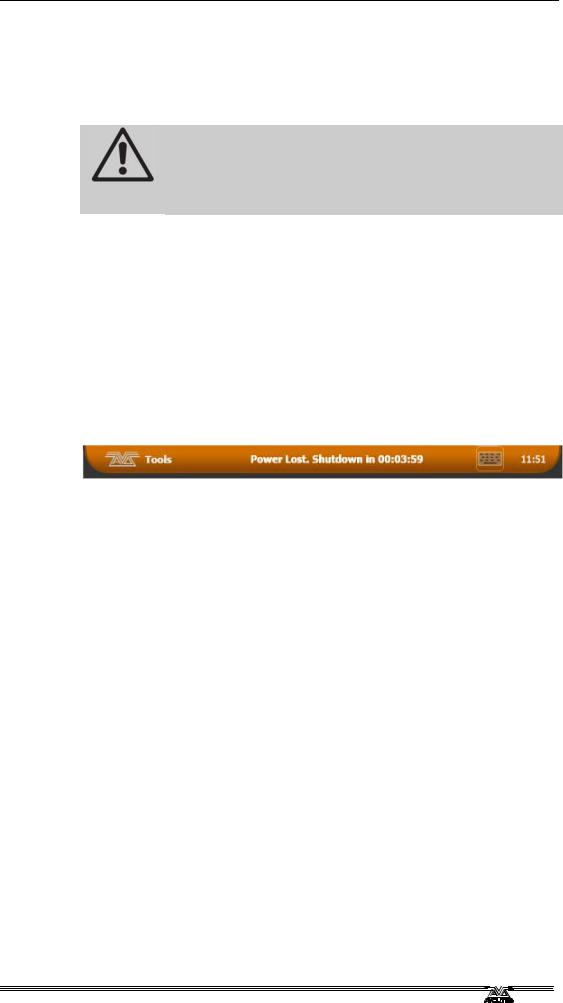
In case of power loss, the toolbar at the top of the screen will turn orange and display how long you've got before the console shuts down.
When the UPS battery runs low and the console is about to shut down, the toolbar turns red.
The Network Switch inside the Arena has an independent UPS system which allows the network switch to continue to run while the console is power cycled. When the console is shut down the network switch will continue to run for about 5 minutes.
This is important when a backup console is running the show through the network switch in the Arena, as it allows the Arena to be power cycled without losing the network link to the stage.
2.2.3Starting up and shutting down
The console runs a Windows-based operating system internally, so you need to make sure it is shut down properly rather than just turning off its power.
Start up the console by pressing and releasing the Power switch above the wheels. The console display should come alive. The console takes about 1 min 30 seconds to start up.
Shut down the console by pressing and releasing the Power switch again. The console will perform a controlled shutdown. Wait until the Power light has gone off (about 30 seconds) before you disconnect power from the console.
To carry out a Forced Shutdown of the console, if the normal shut down does not work, hold down the power switch for 5 seconds. You will lose any changes to your show since the last save.
Because of the UPS, you cannot just pull out the power to shut down the console if it is not possible to shutdown the console by any of the
TitanUniversal_Man_v9-1_AR.doc 02 October 2015
2. Setting up and using the console - Page 25
above means. In this case you should press the Battery Disconnect switch on the rear panel. This will also shut down the network switch so be careful if you are running a backup console via the switch.
When you shut down the Arena normally, the network switch will stay on for about 5 minutes then power off. There is no harm in leaving it to do this.
If the console has a power switch on the rear, do not use this to switch off the console as this would not close down the software properly and you will lose any changes to your show.
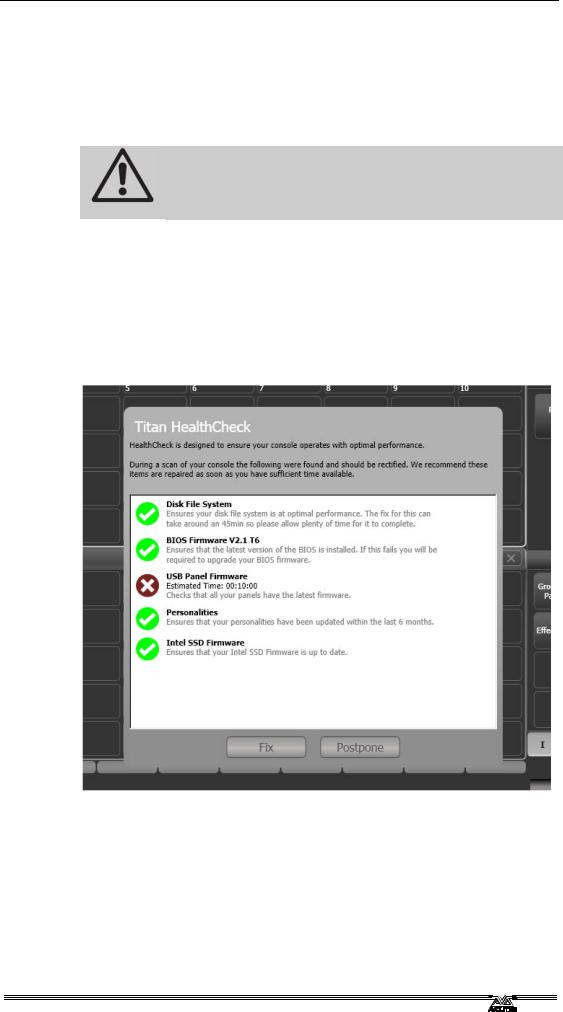
2.2.4Titan Healthcheck
When the Titan software starts up, it runs a small utility called Titan Healthcheck which checks the file system and the installed firmware and software for anything that might cause you problems. If any problems are found, a warning screen is displayed which offers the option to fix the problems.
Only run fixes if you have plenty of time as some fixes can take up to an hour to complete.
2.2.5Connecting DMX lines
The console communicates with lighting fixtures using the DMX512 system. The console itself can output 12 universes of DMX (each 512 control channels). If you need to output more universes, it is recommended to network the console to one or more Avolites TitanNet processing nodes. This off-loads the DMX processing,
TitanUniversal_Man_v9-1_AR.doc 02 October 2015

Page 26 – 2. Setting up and using the console
allowing the console to control up to 64 universes of DMX in total (see section 12.4.1 on page 223 for more details).
The console has 8 DMX outputs on 5-pin XLR for direct connection to fixtures and dimmers, and can send DMX over Ethernet and wireless Ethernet systems to allow connection to remote DMX Ethernet nodes, media servers, and so on.
When you patch a dimmer or fixture you tell the Arena which of the 12 (or 64 with TitanNet) DMX universes it is on. Each universe can be configured to come out of one or more of the standard DMX outputs on the back of the console, or over an Ethernet protocol (see section 14 on page 237.)
The Arena includes a built-in Ethernet switch and has an optical network connection. See section 14 on page 283 for details of how to network the Arena console.
By default, DMX Lines 1-8 are connected to the eight XLRs on the console.
The 5-pin XLR sockets on the console are wired like this:
Pin 1 |
Earth |
Pin 2 |
Data - |
Pin 3 |
Data + |
Pin 4 |
Not used |
Pin 5 |
Not used |
Each DMX line should pass through all the fixtures to be connected on that line one after the other and have a DMX terminator fitted at the end (120 ohm resistor between pins 2 and 3). You should not split the DMX lines using passive splitters (Y-splits) as this can corrupt the data.
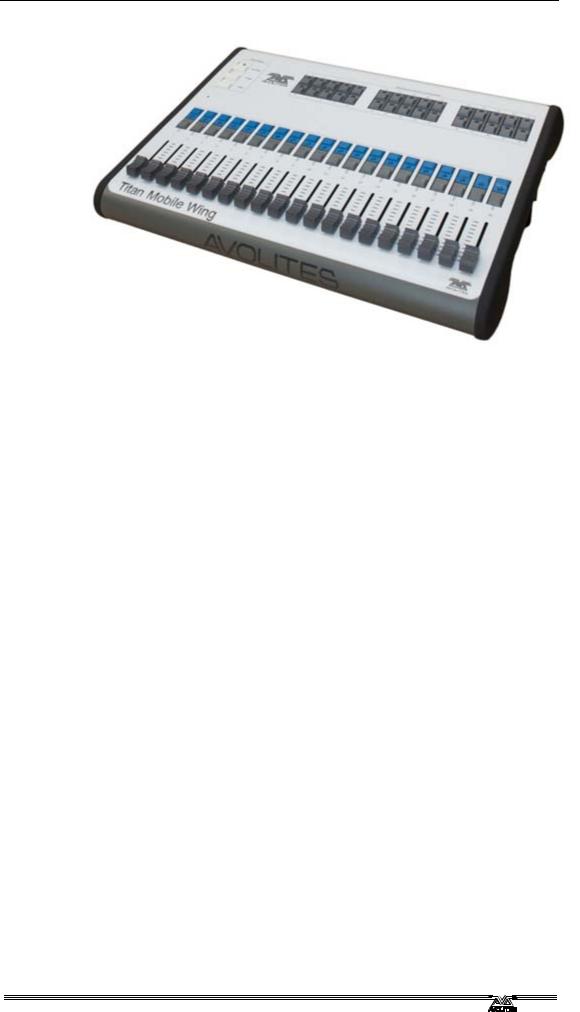
2.2.6Connecting the Titan Mobile Wing
The Titan Mobile Wing adds 20 additional playback faders and 30 macro/executor buttons to the main console. It connects by a single USB cable to the console.
It is designed to match the size of the Titan Mobile panel, but it can also be used with the Tiger Touch, Quartz, Arena and Sapphire Touch consoles.
If you want to see the legends and function information for the wing controls, you can open the Wing View workspace window.
TitanUniversal_Man_v9-1_AR.doc 02 October 2015
2. Setting up and using the console - Page 27
2.3Using the touch screens and monitor
The heart of the Arena is the main touch screen, but the Arena also has a smaller Mini touch screen on the right hand side of the console for additional workspace windows. The adjacent encoders can be set as Masters or Playback handles.
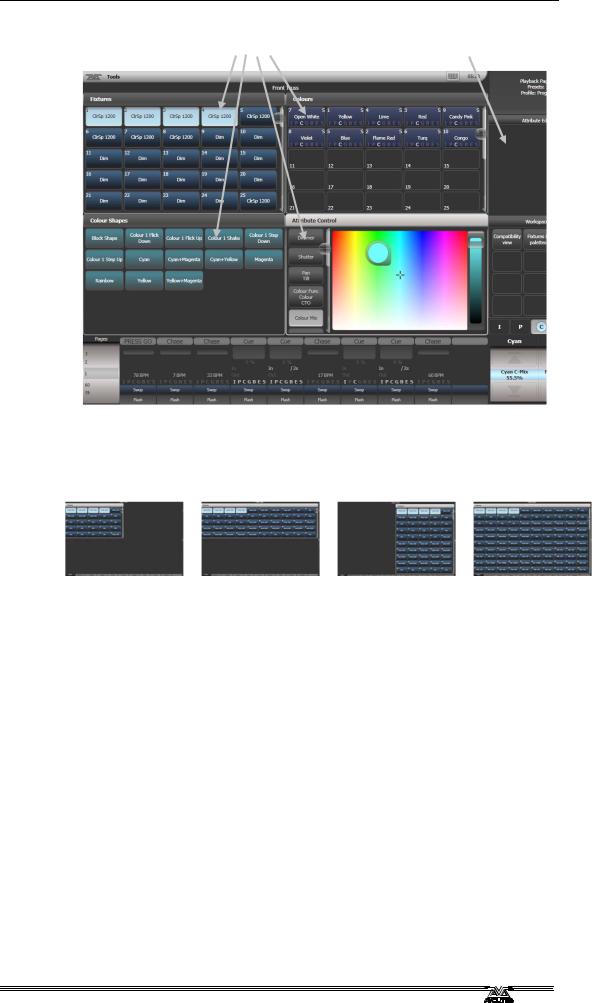
2.3.1Workspace windows
The main area of the screen contains the workspace windows. These contain buttons for selecting fixtures, groups, palettes, playbacks and so on. Information windows such as Playback View and the integrated Visualiser application can also appear as a workspace window. The Mini Screen can display additional workspace windows.
TitanUniversal_Man_v9-1_AR.doc 02 October 2015
Page 28 – 2. Setting up and using the console
4 window positions |
Context buttons |
Up to 4 windows can be shown on the screen in a 2x2 grid, but if you need a larger view, you can make a window twice as big, or maximise it to take up the whole screen. You can also move windows to an external screen which can show a further 4 windows. Some possible window sizes/positions are shown below.
Quarter size |
Double wide |
Double height |
Maximised |
Some windows have associated control buttons, these are positioned in the 'context buttons' area on the top right of the screen.
Selecting and positioning workspace windows
You select which workspace windows you want to see using the [Open Workspace Window] menu command on the root menu
You can also press the Open View button to access the [Open Workspace Window] option while in another menu.
You can change the positions and sizes of the windows by using the Window Control buttons . The min/max button swaps the active window between full screen and quarter size. The size/position button moves the active window around the possible positions. You make a window active by clicking/touching its header bar.
You can move the active window to a different monitor by pressing Avo and the Size/Position button, or Open View then [Window Options] then [Move Screen].
TitanUniversal_Man_v9-1_AR.doc 02 October 2015
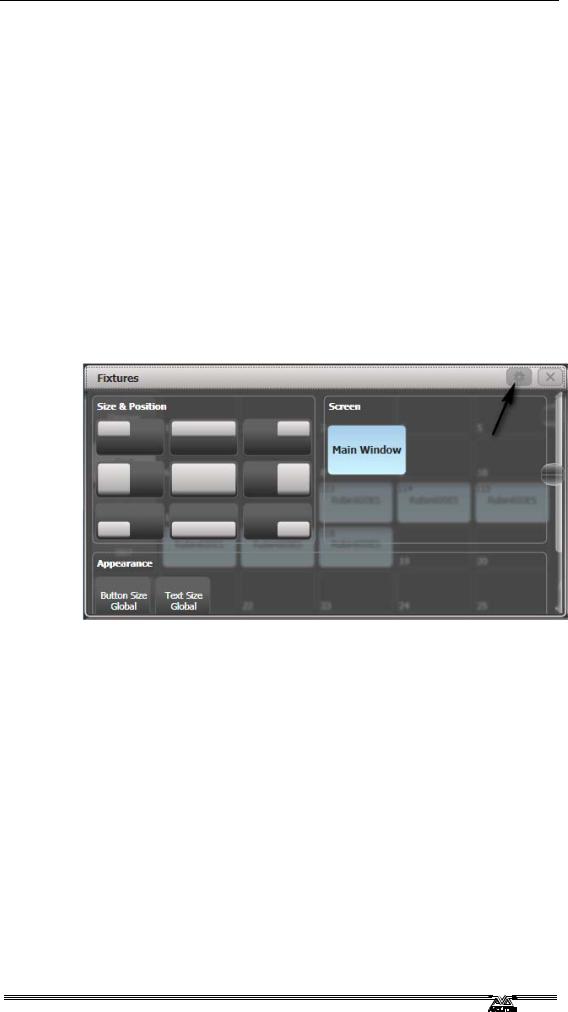
2. Setting up and using the console - Page 29
Window shortcuts
Press Open View then an Attribute Bank button to open the Palette window for that attribute.
Press Open View then Patch to open the Patch View window.
Press Open View then a fixture select button to open the Fixture View window showing patch details for that fixture.
Press Open View then Connect to open the View Cue window. Press Open View then Off to open the Active Playbacks window. Press Open View then Macro to open the Macro window.
Workspace window options
You can change the window sizes and positions by clicking the Cog/Setup button in the top right corner of the window. These options also allow you to set the button size and the text size of the window. The Screen options may vary depending on the setup of the console and if you have any external monitors. To open windows on the small screen, select [Mini Screen].
The Display button below the rotary encoders toggles through four fixed layouts for the Mini screen:
1-Workspace window(s) with encoder legends on the right
TitanUniversal_Man_v9-1_AR.doc 02 October 2015

Page 30 – 2. Setting up and using the console
2-Workspace window(s) with macro button legends below
3-Fixed playbacks window - in this mode the first two rows of touch buttons are the same as the macro buttons below. This window cannot be moved to another screen, and other windows open on the Mini screen will move to the main screen when this layout is set.
4-Workspace window(s) fill the full screen, no button/encoder legends shown.
Saving workspaces
You can save different workspace setups to the Workspaces touch buttons (to the left of the menu) by pressing Open View then [Record Workspace], then touching one of the Workspaces buttons. This allows you to reconfigure the workspace at the touch of a button.
Workspaces are saved with the show.
Setting up and recording workspaces is described in more detail in section 12.1 on page 215.
TitanUniversal_Man_v9-1_AR.doc 02 October 2015
Loading...