

Page 1
Tiger Touch
Operator’s Manual
Version 5.0
Page 2

TitanUniversal_Man_v5-0_TT.doc 23 September 2011
Page 3

Useful Avolites phone numbers:Avolites England
Sales and service* (+44) (0) 20 8965 8522
Service out of hours* (+44) (0) 831 17 8888
Fax (+44) (0) 20 8965 0290
Email support@avolites.com
Website http://www.avolites.com
Before contacting Avolites for service enquiry please ensure that you
have the product serial number and the Software version. The serial
number can be found on the back of the desk; the software version is
displayed on the menu prompt when
the Tiger Touch is switched to
System mode.
The latest version of this manual and console Software can be
downloaded from the Avolites website.
The small print :
No Liability for Consequential Damages
Avolites has a policy of continuous product and documentation improvement. As such
the detail within this manual may not match the operation of the console.
In no event shall Avolites be liable for any direct, indirect, special, incidental, or
consequential damages or loss whatsoever (including, without limitation, damages for
loss of profits, business interruption, or other pecuniary loss) arising out of the use or
inability to use the console even if Avolites Ltd. has been advised of the possibility of
such damages. Because some jurisdictions do not allow the exclusion or limitation of
liability for consequential or incidental damages, the above limitation may not apply to
you.
Avolites Ltd recognise that all trademarks within the manual are the property of their
respective owners.
Reprint and revision history:
Titan Universal Manual v5: Aug 2011
TitanUniversal_Man_v5-0_TT.doc 23 September 2011
Page 4

This manual was written by Tim Mitchell, Sabre Technology Ltd
http://www.sabretechnology.co.uk
TitanUniversal_Man_v5-0_TT.doc 23 September 2011
Page 5
Reference Manual Contents - Page 5
SECTIONS
1.
QUICK START 13
2. SETTING UP AND USING THE CONSOLE 17
3. PATCHING 37
4. CONTROLLING DIMMERS AND FIXTURES 49
5. PALETTES 69
6. SHAPES AND PIXEL MAPPER EFFECTS 79
7. CUES 109
8. CHASES 123
9. CUE LISTS 133
10. RUNNING THE SHOW 147
11. REMOTE CONTROL 153
12. USER SETTINGS AND OTHER OPTIONS 159
13. WORKING WITH FIXTURE PERSONALITIES 175
14. NETWORKING THE CONSOLE 179
15. USING DIFFERENT AVOLITES CONSOLES 189
16. RELEASE NOTES 193
17. GLOSSARY OF TERMS 201
This icon shows important information which you sh ould
know about to avoid damage to your console or loss of
important data.
This icon shows information which is useful to kn ow.
This icon shows handy tips which will help you use t he
console more efficiently.
TitanUniversal_Man_v5-0_TT.doc 23 September 2011
Page 6

Page 6 – Reference Manual Contents
TitanUniversal_Man_v5-0_TT.doc 23 September 2011
Page 7

Reference Manual Contents - Page 7
CONTENTS
1. Quick Start 13
1.1 Patching fixtures ................................................................... 13
1.2 Controlling fixtures ................................................................ 13
1.3 Programming cues and chases.................................................14
1.4 Programming palettes ............................................................ 14
1.5 DMX / network setup ............................................................. 15
2. Setting up and using the console 17
2.1 Guide to the Tiger Touch ........................................................ 17
2.2 Connecting up....................................................................... 21
2.2.1 Cautions ............................................................................................ 21
2.2.2 Connecting mains power...................................................................... 21
2.2.3 Starting up and shutting down.............................................................. 21
2.2.4 Connecting DMX lines.......................................................................... 21
2.2.5 Connecting a monitor .......................................................................... 22
2.2.6 Other connections............................................................................... 22
2.3 Using the touch screen and monitor ......................................... 23
2.3.1 Workspace windows ............................................................................ 23
2.3.2 The menu area of the touch screen ....................................................... 27
2.3.3 The toolbar ........................................................................................ 28
2.3.4 The Heads-Up Display (HUD) ................................................................ 29
2.3.5 Visualiser........................................................................................... 30
2.3.6 Key profiles........................................................................................ 30
2.3.7 Undo/Redo......................................................................................... 31
2.3.8 Key macro buttons.............................................................................. 31
2.3.9 Keyboard shortcuts ............................................................................. 32
2.3.10 Locking the console........................................................................... 33
2.4 Titan Simulator .....................................................................33
2.4.1 Installing Titan Simulator..................................................................... 33
2.4.2 Running Titan Simulator ...................................................................... 34
2.5 Loading and saving shows ...................................................... 34
2.5.1 Manual save and load.......................................................................... 34
2.5.2 Autosave ........................................................................................... 35
2.5.3 Backing up existing show files to USB pen drive...................................... 35
2.6 Clearing the console............................................................... 36
3. Patching 37
3.1 Patching new fixtures or dimmers............................................ 37
3.1.1 Fixture select buttons and handles ........................................................ 37
3.1.2 Patching dimmers ............................................................................... 38
3.1.3 Patching moving light fixtures............................................................... 39
3.1.4 Visualiser Auto Patch........................................................................... 41
3.1.5 Sub fixtures ....................................................................................... 41
3.2 Changing the patch................................................................41
3.2.1 Changing the DMX address of a fixture .................................................. 41
3.2.2 Setting legends................................................................................... 42
3.2.3 View Fixture Patch .............................................................................. 42
3.2.4 DMX view window............................................................................... 43
3.2.5 Fixture Exchange ................................................................................ 44
3.2.6 Update personalities............................................................................ 45
3.3 Copying, moving and deleting fixtures...................................... 45
3.3.1 Copying or moving a patched fixture ..................................................... 45
3.3.2 Using copied fixtures........................................................................... 46
3.3.3 Deleting a patched fixture.................................................................... 46
3.4 Advanced options.................................................................. 47
3.4.1 Swap pan and tilt................................................................................ 47
3.4.2 Invert attributes ................................................................................. 47
3.4.3 Freeze fixtures or attributes ................................................................. 48
3.4.4 Editing the personality......................................................................... 48
4. Controlling dimmers and fixtures 49
4.1 Using the select buttons and wheels......................................... 49
4.1.1 Selecting fixtures and dimmers for control ............................................. 49
4.1.2 Setting fixtures to a start position (Locate)............................................. 50
4.1.3 Clearing selection................................................................................ 51
TitanUniversal_Man_v5-0_TT.doc 23 September 2011
Page 8

Page 8 – Reference Manual Contents
4.1.4 Changing attributes using the wheels .................................................... 52
4.1.5 Setting attributes using the touch screen ............................................... 53
4.1.6 Setting attributes from the softkeys ...................................................... 56
4.1.7 Selecting fixtures and dimmers by number (Channel).............................. 56
4.1.8 Selecting using a pattern ..................................................................... 57
4.1.9 Selecting fixtures which are in a palette or playback................................ 58
4.1.10 Attribute groups – IPCGBES-FX........................................................... 58
4.1.11 Using fixture groups .......................................................................... 59
4.1.12 Fixture Order and Fixture Layout in groups........................................... 60
4.1.13 Stepping through selected fixtures one at a time................................... 61
4.1.14 Highlighting the selected fixture with Prev/Next .................................... 62
4.1.15 Align fixtures.................................................................................... 62
4.1.16 Flip.................................................................................................. 62
4.1.17 Fan mode......................................................................................... 63
4.2 Viewing and using numerical values ......................................... 66
4.2.1 The Channel Grid window..................................................................... 66
4.3 Advanced options.................................................................. 67
4.3.1 The Fixture Tools / Menu Latch button................................................... 67
4.3.2 Lamping fixtures on and off.................................................................. 67
5. Palettes
69
5.1 Creating palettes................................................................... 70
5.1.1 Which attributes are stored in palettes................................................... 70
5.1.2 Storing a palette................................................................................. 70
5.1.3 Quick record....................................................................................... 72
5.1.4 Setting legends for palettes.................................................................. 72
5.2 Recalling palettes .................................................................. 73
5.2.1 Recalling a palette value ...................................................................... 73
5.2.2 Palette pages ..................................................................................... 74
5.2.3 Quick palettes with no fixtures selected ................................................. 74
5.2.4 Setting palettes to all fixtures in a playback ........................................... 74
5.3 Editing palettes ..................................................................... 74
5.3.1 Viewing and editing the content of palettes ............................................ 74
5.3.2 Changing the content of palettes........................................................... 75
5.3.3 Updating palettes used in a playback..................................................... 75
5.4 Copying, moving and deleting palettes .....................................76
5.4.1 Copying or moving a palette................................................................. 76
5.4.2 Deleting palettes................................................................................. 76
5.5 Timing palettes .....................................................................77
5.5.1 Fading a palette.................................................................................. 77
5.5.2 Fixture overlap when recalling palettes .................................................. 77
5.5.3 Master Time for palettes ...................................................................... 77
6. Shapes and Pixel Mapper effects 79
6.1 Creating effects..................................................................... 80
6.1.1 Creating a shape................................................................................. 80
6.1.2 Changing size and speed of a shape...................................................... 81
6.1.3 Changing the phase of a shape across multiple fixtures............................ 82
6.1.4 Creating pixel mapper effects ............................................................... 83
6.2 Editing running shapes........................................................... 85
6.2.1 Selecting which shape to edit ............................................................... 85
6.2.2 Editing a shape stored in a cue............................................................. 85
6.2.3 Changing fixture order in a shape ......................................................... 85
6.2.4 Removing or adding fixtures................................................................. 86
6.2.5 Reversing a shape............................................................................... 86
6.2.6 Deleting shapes.................................................................................. 86
6.3 Advanced options.................................................................. 86
6.3.1 Fading shape size and speed ................................................................ 86
6.4 Pixel mapper examples........................................................... 87
6.4.1 Randomising effects ............................................................................ 87
6.4.2 Randomising effects ............................................................................ 90
6.4.3 Creative use of fixture layouts .............................................................. 92
6.4.4 Other Layout Editor tools ..................................................................... 96
6.4.5 Playback Order and Priorities................................................................ 97
6.4.6 Displacement and Layer Properties.......................................................101
6.4.7 Spawn and Pre-Spool .........................................................................104
7. Cues 109
7.1 Creating a cue..................................................................... 109
TitanUniversal_Man_v5-0_TT.doc 23 September 2011
Page 9

Reference Manual Contents - Page 9
7.1.1 How the Tiger Touch works when programming.....................................109
7.1.2 Creating a cue...................................................................................110
7.1.3 Quick Build cues ................................................................................111
7.1.4 Using shapes in cues ..........................................................................111
7.1.5 Blind mode........................................................................................111
7.2 Using a cue......................................................................... 112
7.2.1 HTP and LTP......................................................................................112
7.2.2 Playing back a cue .............................................................................112
7.2.3 Changing playback pages....................................................................112
7.2.4 Releasing running playbacks................................................................113
7.3 Editing cues........................................................................ 113
7.3.1 Editing a cue by merging ....................................................................113
7.3.2 Updating stored values and palettes used in a cue .................................114
7.3.3 Playback and Cue view .......................................................................114
7.3.4 Using parts of existing cues - the Include function..................................115
7.3.5 Removing attributes from cues using “Off” ............................................116
7.4 Copying, moving, linking and deleting .................................... 117
7.4.1 Copying or moving a cue ....................................................................117
7.4.2 Deleting a cue ...................................................................................117
7.5 Cue timing.......................................................................... 118
7.5.1 Setting fade times and Overlap for a cue ..............................................118
7.5.2 Changing fixture order........................................................................120
7.5.3 Setting attribute fade times for a cue ...................................................120
7.6 Advanced options................................................................ 121
7.6.1 Release mask....................................................................................121
7.6.2 Shape size/speed on fader ..................................................................121
7.6.3 Curve...............................................................................................121
7.6.4 Handle Paging ...................................................................................121
7.6.5 Playback priority................................................................................122
7.6.6 Blind mode........................................................................................122
7.6.7 Key Profile ........................................................................................122
8. Chases 123
8.1 Creating a chase ................................................................. 123
8.1.1 Programming a chase.........................................................................123
8.1.2 Creating a chase with Quick Build ........................................................124
8.2 Playback ............................................................................ 124
8.2.1 Playing back a chase ..........................................................................124
8.2.2 Connecting a chase for control.............................................................125
8.2.3 Setting speed and crossfade for a Chase...............................................125
8.2.4 Manually controlling the steps of a chase ..............................................126
8.2.5 Changing chase direction ....................................................................126
8.2.6 Jumping to a step ..............................................................................126
8.3 Editing a chase.................................................................... 126
8.3.1 Opening a chase for editing.................................................................126
8.3.2 Editing a chase using Unfold................................................................127
8.4 Copying, moving, linking and deleting .................................... 128
8.4.1 Copying or moving a chase .................................................................128
8.4.2 Deleting a chase ................................................................................128
8.4.3 Deleting a step from a chase...............................................................128
8.5 Chase timing....................................................................... 128
8.5.1 Global timings for chases....................................................................128
8.5.2 Individual cue times in chases .............................................................130
8.5.3 Setting attribute fade times for a cue in a chase ....................................131
8.6 Advanced options................................................................ 131
8.6.1 Loop/Stop on Final Cue.......................................................................131
8.6.2 Forwards/backwards/bounce/random ...................................................131
8.6.3 Cue linking........................................................................................131
8.6.4 Renumber cues..................................................................................132
9. Cue Lists
9.1 Creating a cue list................................................................ 133
9.1.1 Programming a cue-list.......................................................................133
9.1.2 Changing legends for cues in a cue list .................................................135
9.1.3 Autoloading a playback within a cue list................................................135
9.1.4 Running a key macro from a cue list.....................................................136
9.2 Cue List playback ................................................................ 136
9.2.1 Running a cue list ..............................................................................136
9.2.2 Killing a cue list .................................................................................137
133
TitanUniversal_Man_v5-0_TT.doc 23 September 2011
Page 10

Page 10 – Reference Manual Contents
9.3 Editing cue lists................................................................... 137
9.3.1 Editing a cue list using Unfold..............................................................137
9.3.2 Using Update to change tracked cues ...................................................138
9.3.3 Editing a cue list which is running ........................................................138
9.3.4 Editing a cue list while recording..........................................................139
9.4 Copying, moving, linking and deleting .................................... 140
9.4.1 Copying or moving a cue list ...............................................................140
9.4.2 Deleting a cue list ..............................................................................140
9.4.3 Deleting a cue from a cue list ..............................................................140
9.5 Cue list timing..................................................................... 140
9.5.1 Time and fade options for Cue Lists......................................................140
9.5.2 Cue linking & Link Offset.....................................................................141
9.5.3 Individual attribute fade times.............................................................142
9.5.4 Fixture overlap ..................................................................................143
9.5.5 Running a cue list to timecode.............................................................144
9.6 Advanced options................................................................ 145
9.6.1 Release mask....................................................................................145
9.6.2 Fader mode.......................................................................................145
9.6.3 Handle Paging ...................................................................................145
9.6.4 Cue Options ......................................................................................145
9.6.5 Autoload...........................................................................................146
9.6.6 Macro Links.......................................................................................146
9.6.7 Key Profile ........................................................................................146
9.6.8 Shape Size/Shape Speed ....................................................................146
9.6.9 Tracking ...........................................................................................146
10. Running the show 147
10.1 Playback controls................................................................. 147
10.1.1 Back up the show.............................................................................147
10.1.2 Label the console .............................................................................147
10.1.3 Run mode .......................................................................................147
10.1.4 Flash and swop buttons ....................................................................147
10.1.5 Playback priority ..............................................................................147
10.1.6 Preset playbacks..............................................................................148
10.1.7 Blind mode......................................................................................148
10.1.8 Manual control during a show (“busking”) ...........................................148
10.2 Using multiple on-screen workspaces ..................................... 149
10.2.1 View menu......................................................................................149
10.3 Organising the console......................................................... 149
10.3.1 Using the Move function....................................................................149
10.4 MIDI or DMX remote triggering.............................................. 150
10.4.1 Connecting remote trigger sources .....................................................150
10.4.2 Setting up remote triggering..............................................................150
10.4.3 Classic Pearl MIDI triggers.................................................................151
11. Remote control 153
11.1 Setting up the remote.......................................................... 153
11.1.1 Network setup .................................................................................153
11.1.2 Console setup..................................................................................154
11.2 Operating the remote........................................................... 155
11.2.1 Keypad ...........................................................................................155
11.2.2 Fixture List......................................................................................156
11.2.3 Playback List ...................................................................................156
11.2.4 Settings screen................................................................................157
11.3 Troubleshooting .................................................................. 157
12. User Settings and other options 159
12.1 Configuring the Workspace ................................................... 159
12.1.1 Opening workspace windows .............................................................159
12.1.2 Selecting and positioning workspace windows......................................159
12.1.3 Saving workspaces...........................................................................159
12.1.4 Compatibility view............................................................................160
12.1.5 Configuring an external monitor.........................................................161
12.2 Key Profiles ........................................................................ 162
12.2.1 Creating and editing key profiles........................................................162
12.2.2 Selecting a key profile ......................................................................164
12.2.3 Individual Key profiles for playbacks...................................................164
12.3 The System menu ............................................................... 165
TitanUniversal_Man_v5-0_TT.doc 23 September 2011
Page 11

Reference Manual Contents - Page 11
12.3.1 Avotalk Security...............................................................................165
12.3.2 Network Settings .............................................................................165
12.3.3 User Settings...................................................................................165
12.3.4 Key Profiles .....................................................................................166
12.3.5 Wipe...............................................................................................166
12.3.6 Display Setup ..................................................................................167
12.4 DMX output mapping ........................................................... 167
12.4.1 Configuring DMX outputs...................................................................167
12.5 Curves............................................................................... 168
12.6 Upgrading the software ........................................................ 172
12.7 Recovering/reinstalling the system......................................... 172
12.7.1 Booting from USB recovery stick ........................................................173
12.7.2 Installation Instructions ....................................................................173
12.7.3 After Installation..............................................................................173
12.7.4 Front panel button mapping for BIOS..................................................174
13. Working with Fixture Personalities 175
13.1.1 Downloading fixture personalities from Avolites.................................... 175
13.1.2 Updating the personality library on the console....................................176
13.1.3 Requesting a new fixture personality ..................................................176
13.1.4 Reporting a personality bug to Avolites ...............................................176
13.1.5 In an emergency..............................................................................176
14. Networking the console 179
14.1 Controlling fixtures over a network......................................... 179
14.1.1 Setting IP address............................................................................179
14.1.2 Setting up DMX outputs ....................................................................179
14.1.3 A simple ArtNet system.....................................................................180
14.1.4 Setting up an ArtNet system..............................................................181
14.1.5 Additional ArtNet Resources...............................................................182
14.2 Connecting to a simulator with ACDI ...................................... 182
14.2.1 ACDI ..............................................................................................183
14.3 Module Setup...................................................................... 184
14.4 Using Active Fixtures with CITP ............................................. 184
14.4.1 Example CITP setup .........................................................................184
14.5 All about IP addressing......................................................... 185
14.5.1 Setting your IP address.....................................................................185
14.5.2 Subnet Masks..................................................................................186
14.5.3 Choosing an IP address and Subnet Mask............................................186
14.5.4 Automatically assigning IP addresses (DHCP).......................................187
14.5.5 Private IP address ranges..................................................................188
14.6 Repairing a Network Connection ............................................ 188
15. Using different Avolites consoles
189
15.1 The console controls ............................................................ 189
15.2 Programming features in Titan .............................................. 190
16. Release notes
193
16.1 Version 5.0......................................................................... 193
16.1.1 Upgrading from: 3.1:........................................................................193
16.1.2 Upgrading from: 4.0:........................................................................193
16.1.3 New features in v.5.0 .......................................................................193
16.1.4 Improvements in v.5.0 .....................................................................197
16.1.5 Bugs fixed in v.5.0 ...........................................................................198
16.1.6 Bugs fixed in v.4.1 ...........................................................................199
17. Glossary of terms 201
INDEX 207
TitanUniversal_Man_v5-0_TT.doc 23 September 2011
Page 12

Page 12 – Reference Manual Contents
TitanUniversal_Man_v5-0_TT.doc 23 September 2011
Page 13

1. Quick Start
This section is a quick guide on how to do most things on the Tiger
Touch. Each section has a link to take you to the appropriate manual
section for more details.
Softkeys are shown in square brackets like [This].
1.1 Patching fixtures
Press Patch, [Dimmers] or [Fixtures].
For Fixtures, fom the softkeys choose fixture manufacturer (type on
keyboard to filter the list) then fixture type, then fixture mode.
Set [DMX Line], [Address], [User Number], and [Legend]. Console
will automatically set all these if you don’t change them.
Press buttons in the Fixtures window to patch the fixture. (Section
3.1.3, p39).
To patch a number of dimmers or fixtures at once, drag over buttons
to draw a selection box on the screen. Or, set [Quantity] in the patch
menu.
1. Quick Start - Page 13
To change DMX address or line, use [Repatch Fixtures]. (Section
41).
p
Setting fixture options
Press Patch, [Edit Fixtures]
1.2 Controlling fixtures
Select fixtures for control by pressing select buttons.
Press Locate to “home” selected fixtures with lamp on. . (Section
4.1.2. p50). Hold locate and press attribute button to remove that
attribute from the locate (e.g. to locate without changing pan/tilt,
hold Locate and press Pan/Tilt).
Select attribute to control using attribute bank buttons (right hand
edge of console) , then turn the wheels to set fixture. Display shows
which attribute each wheel is controlling. (Section
Open Attribute window onscreen (
attributes from buttons. (Section
Use Palettes to store often-used colours, positions etc. for instant
recall., see next page.
Shapes (effects)
3.2,
4.1.4, p52).
View, Attribute Options) to select
4.1.5, p53).
Select fixtures. The order of fixture selection is used by shapes.
At top menu press [Shapes and Effects], [Shape Generator],
[Create]. Select attribute of shape then select a shape to run.
(Section
Or from the Shape Library window (
[Shape Library]) you can select a shape directly. Filter the list of
shapes using the attribute buttons.
TitanUniversal_Man_v5-0_TT.doc 23 September 2011
6.1.1, p80).
View, [Open Workspace Window],
Page 14

Page 14 – 1. Quick Start
Use the wheels and [Adjust Speed, Size and Phase]/[Adjust Phase,
Spread and Offset] to configure the shape.
Fixture Groups
Fixtures may be grouped for quick selection, press Group, [Record
Group], select fixtures for group, set legend using [Provide a legend],
press [Store]. Order of fixture selection is remembered for use with
shapes. (Section
4.1.11, p59).
1.3 Programming cues and chases
Cues
Set up the look to be recorded.
Press Record Cue.
Set [Record Mode] to Channel (saves only modified attributes),
Fixture (saves all attributes of modified fixtures), Stage (saves all
attributes of all fixtures with nonzero dimmer), or Quick Build (saves
palettes and playbacks when you select them).
To store, press blue Select button on playback fader, or press button
in Playbacks window. (Section
7.1.2, 110).
Chases
Press Record Chase.
Press blue Select button on a playback fader, or press button in
Playbacks window.
Set up the look for the first step, press playback select button to
store. Repeat until all steps stored.
Press Exit to finish storing chase steps. (Section
8.1.1, 123)
Fade timing
For chases, speed and fade can be set with wheels A and B when the
chase is running.
At top level menu press [Edit Times] then the select button for the
playback. Timing options are set from softkeys.
[Fixture Overlap] sets each fixture to fade in sequence (100%=all
together, 0%=fixture waits for previous one to complete).
[Attribute times] sets individual fade times for different attributes.
[Fixture order] changes sequence for shapes and Overlap. (Section
8.5, p128).
Cue Lists
Cues may be stored in a Cue List which allows a full show to be run
from a Go button. Chases can be included using Autoload.
1.4 Programming palettes
Set up the attributes to be recorded. If attribute is the same for all
fixtures of one type (e.g. colour), only one fixture need be set up and
palette will be “shared”.
Press Record Palette.
TitanUniversal_Man_v5-0_TT.doc 23 September 2011
Page 15

1. Quick Start - Page 15
Use [Set Mask] to choose attributes to record/exclude.
Press a grey palette button to store, or press a button in one of the
Colours/Positions/Gobos windows. (Section
5.1.2, p70).
To recall palette, select fixtures, select recall mask using Attribute
Bank buttons, press palette button.
To set a legend, press [Set Legend] then the palette’s button. Press
[Picture] to draw a picture legend.
Quick Record
Press an unused button in one of the windows – the button turns red
with a +. Press again to save the palette. The mask is automatically
set to match the window (e.g. Positions window is masked for only
position attributes).
Busking with palettes
To fade palettes when busking a show, select fixtures, type fade time
on the keypad then recall the palette (you have to do this each time).
If no fixtures selected, palette will recall to all applicable fixtures.
To set fixture overlap, type 0-100 then press [Set Overlap], then
recall the palette.
To set a fade time for all palettes, press Palette then [Master Time].
(Section
5.5, p77). Faded palettes do not go into the programmer so
don’t use fades when programming.
1.5 DMX / network setup
The 12 DMX lines may be routed to the 4 XLR sockets or over
Ethernet.
Switch to System mode, press [DMX Settings].
Select a Node on the left (where the DMX is going to), click the blue
arrow. On the right, select the DMX line it will be fed by. The ‘i’
buttons set properties for Nodes/Lines. (Section
To change the IP address of the console, press [Network Settings] in
System mode (Section
To change User Settings which let you personalise how the console
works, hold down Avo and select [User Settings] (Section.
165).
p
14.1.1, p179).
5.5, p167).
12.3.3,
TitanUniversal_Man_v5-0_TT.doc 23 September 2011
Page 16

Page 16 – 2. Setting up and using the console
TitanUniversal_Man_v5-0_TT.doc 23 September 2011
Page 17

2. Setting up and using the console - Page 17
2. Setting up and using the console
Welcome to the Tiger Touch from Avolites. This manual is a reference
guide to all the functions of the console.
We explain things in the order you’re most likely to use them, so we
start with how to set up the console, then look at patching lights,
controlling lights and how to program cues.
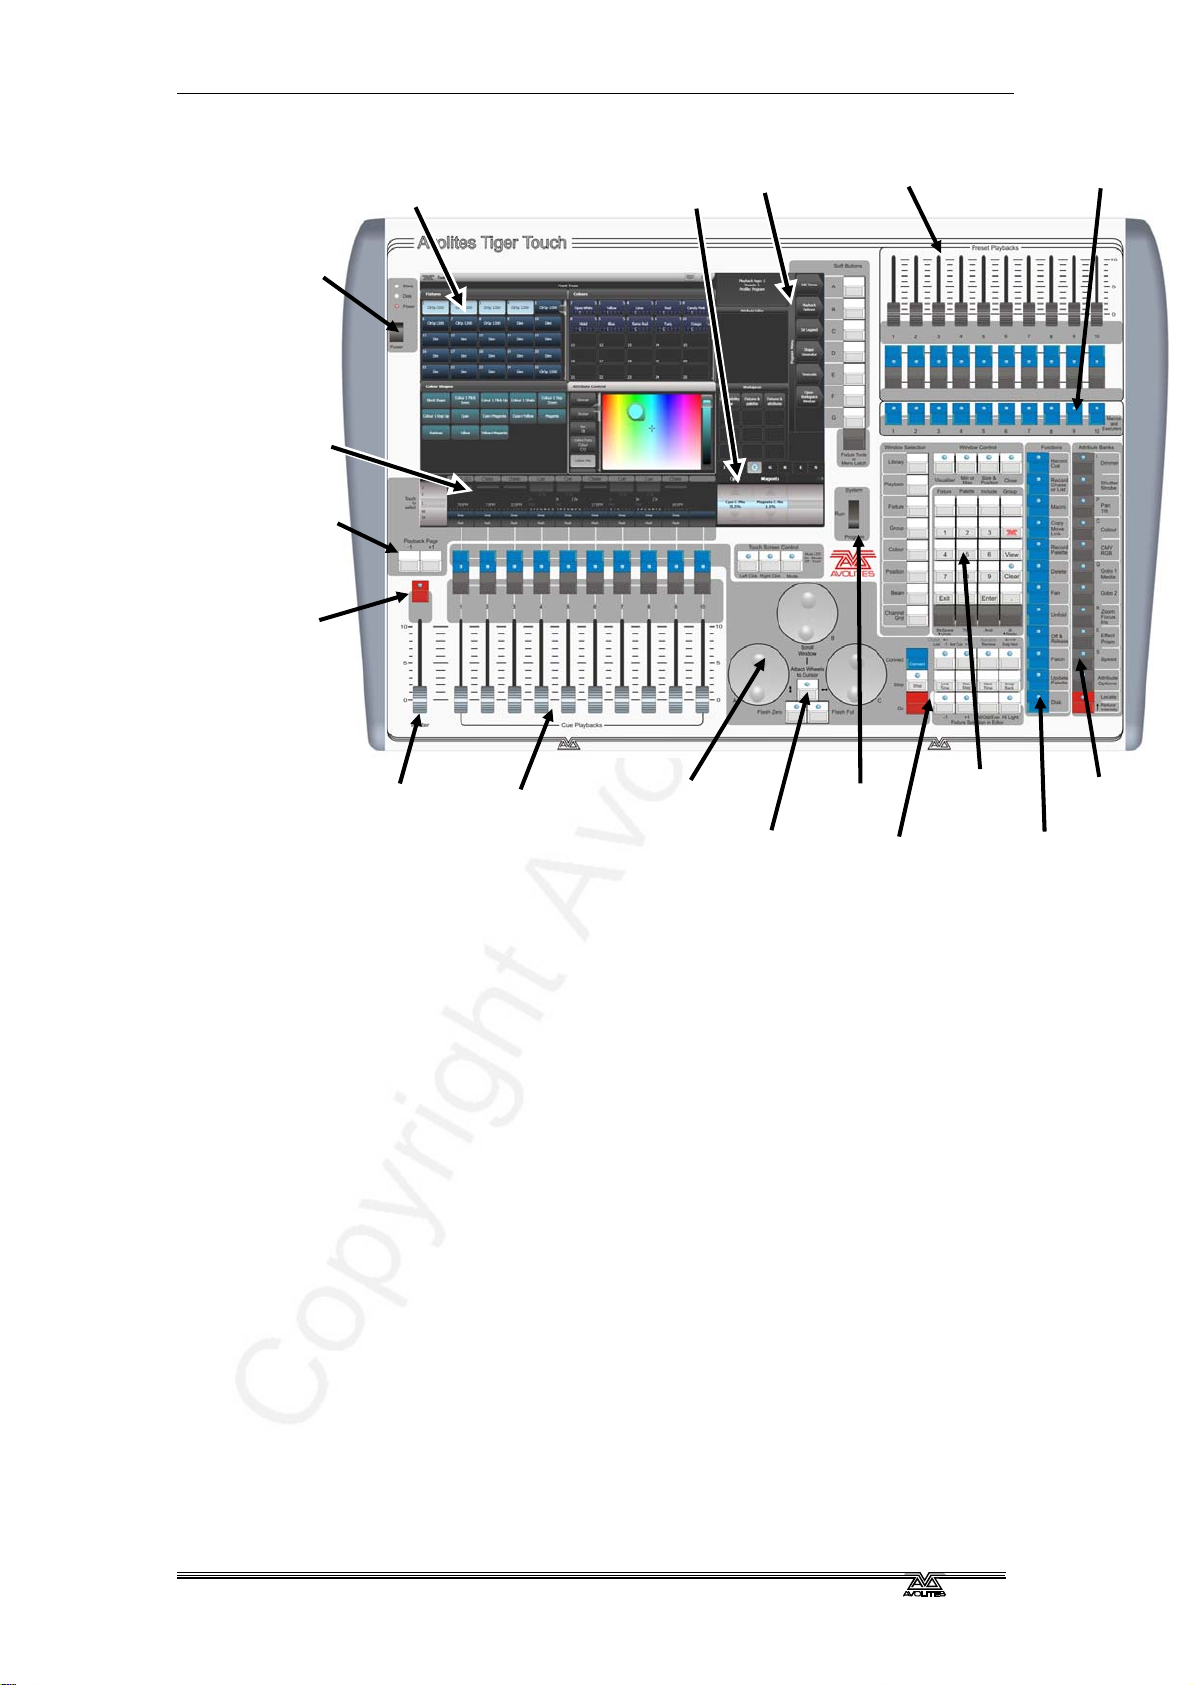
2.1 Guide to the Tiger Touch
Touch screen
Preset playbacks and macro buttons
Playback faders and master
Programming and setup controls
The Tiger Touch has four main control areas:
The Touch screen contains fixture, palette and group select buttons.
It also shows legends for the playback faders and shows the current
menu page and softkey buttons on the top right of the screen.
The Playback faders select and control cues and programs
The Preset playbacks give you additional (unpaged) playbacks and
the macro buttons allow storage of frequent key sequences.
The Programming and setup controls configure and program the
console
TitanUniversal_Man_v5-0_TT.doc 23 September 2011
Page 18
Page 18 – 2. Setting up and using the console
Power switch
Playback legends
and info
Playback page
select buttons
DBO (blackout)
button
Workspace windows with
touch buttons
System display
and menu softkeys
Attribute display
Preset playbacks
Macro buttons
Master fader
Playback faders
Control
wheels
Window scroll
button
Mode
switch
Chase control
buttons
Numeric
keypad and
controls
The main controls
The Workspace windows on the touch screen contain touch buttons
for fixtures, palettes, groups, playbacks, macros and more. You can
also set fixture attributes and show information windows.
The System display and menu area of the touch screen is the
nerve centre of the console and shows you what is going on. This part
of the display shows various screens of information depending on
what you are currently doing.
The Menu Softkeys (labelled A – G) are used to select control
options. The display next to the buttons shows wh at each one will do.
The options for each key change depending on what the console is
doing. Softkey commands are shown in the manual with square
brackets like this: [Edit Times]
The Preset Playbacks are used to store and play back cues or
chases that you need frequently. These playbacks are not changed by
the page select buttons.
The Macro Buttons store frequently used sequences of keypresses
which can be replayed with a single button press. Playbacks can also
be stored here.
Attribute
select buttons
Function
buttons
The Master fader controls the overall output of the console. You will
normally have this set at Full. The DBO button allows y o u to
blackout the whole console.
TitanUniversal_Man_v5-0_TT.doc 23 September 2011
Page 19
2. Setting up and using the console - Page 19
The Playback faders are used to store and play back cues or
chases. The Page Select buttons let you change to a different page
of playbacks. The touch screen above the faders shows information
about each playback.
The Mode switch selects Programming, Run or System modes of
operation.
The Control wheels are used to set control values (attributes) for
the fixtures, and to set chase speeds and fades. The touch screen
above the wheels shows information about the attributes being
controlled. Press the Window Scroll Button to switch the wheels
into scroll mode – this is used to move a selection box around the
screen when editing.
The Numeric keypad and other control buttons are used to enter
values and change controls on the console.
The blue Function buttons are used to carry out functions such as
storing cues, copying, saving to disk, etc. These buttons have lights
on to indicate when they are active.
The Attribute select buttons are used to select which attributes of
a fixture (e.g. colour, gobo, pan, focus) are going to be controlled
using the Control wheels. The buttons have lights on to show you
which attributes are active. The bottom (red) button allows you to
locate fixtures, which sets them to a known start position while
programming.
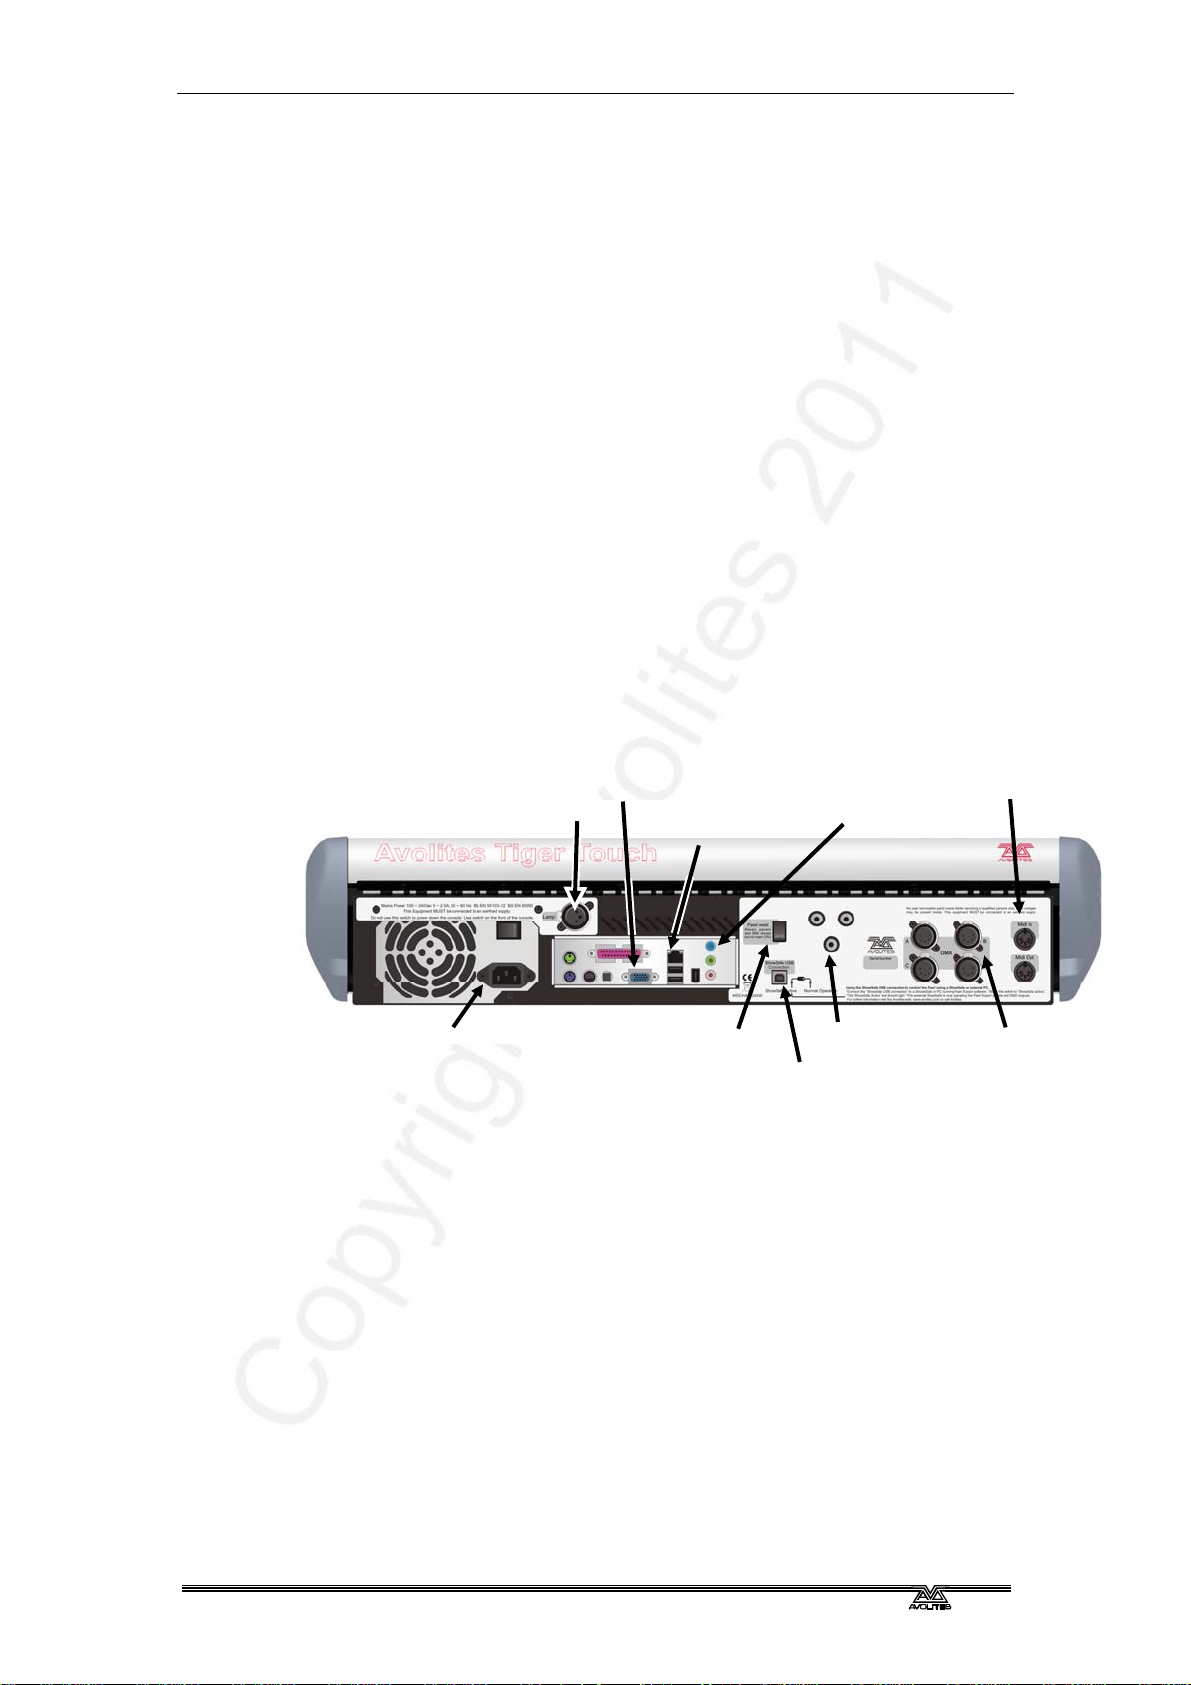
MIDI in and out
Desk lamp socket
Mains inlet
VDU socket (blue)
Ethernet socket (top)
and 2x USB
Panel reset switch
Audio in (blue)
VDU mounting
point
USB reserve socket
and switch
The back panel
All the connections required for the console are found on the back
panel. Most are self-explanatory.
The Panel reset switch may be pressed to restart the front panel
electronics if something odd happens with the switches and faders.
The main board will continue running but the DMX output will be
interrupted until the restart is completed.
The USB reserve socket and switches are for future expansion. The
switch should be set to 'Normal operation'.
DMX outputs (4)
TitanUniversal_Man_v5-0_TT.doc 23 September 2011
Page 20

Page 20 – 2. Setting up and using the console
TitanUniversal_Man_v5-0_TT.doc 23 September 2011
Page 21

2.2 Connecting up
2.2.1 Cautions
Radio transmitters may affect the operation of the
console and we recommend that they are not placed on
or above or behind the console. If you are wearing one
it is best placed in a back pocket or behind you when
attached to a belt.
2.2.2 Connecting mains power
You can safely connect the Tiger Touch to any voltage from 80 to
260V.
We recommend that you run the console from a computer UPS
(uninterruptible power supply) . If the console unexpectedly loses
power, you can lose data (up to the last Autosave) and the console
may want to check its disks on startup which can cause delays. The
UPS will protect you from most power problems and give you chance
to shut down the console normally.
2. Setting up and using the console - Page 21
2.2.3 Starting up and shutting down
The console runs a Windows-based operating system internally, so
you need to make sure it is shut down properly rather than just
turning off its power.
Start up the console by pressing and releasing the Power switch at
the left hand side of the touch screen. The console display and
external screen (if you are using one) should come alive. The console
takes about 1 min 30 seconds to start up.
Shut down the console by pressing and releasing the Power switch
again. The console will perform a controlled shutdown. Wait until the
Power light has gone off (about 30 seconds) before you disconnect
power from the console.
To carry out a Forced Shutdown of the console, if the normal shut
down does not work, hold down the power switch for 5 seconds. You
will lose any changes to your show since the last save.
Do not use the power switch on the rear of the console
to switch off the console as this would not close down
the console properly and you will lose any changes to
your show.
2.2.4 Connecting DMX lines
The console communicates with lighting fixtures using the DMX512
system. It can produce 12 universes of DMX (each 512 control
channels). It has 4 physical DMX outputs for direct connection to
fixtures and dimmers, and can also send DMX over Ethernet and
TitanUniversal_Man_v5-0_TT.doc 23 September 2011
Page 22
Page 22 – 2. Setting up and using the console
wireless Ethernet systems to allow connection to remote DMX
Ethernet nodes, media servers, and so on.
When you patch a dimmer or fixture you tell
the Tiger Touch which of
the 12 DMX universes it is on. Each universe can be configured to
come out of one or more of the 4 standard DMX outputs on the back
of the console, or over an Ethernet protocol (see section
14 on page
179.)
By default, DMX Lines 1-4 are connected to the four XLRs on the
console.
The four 5 pin XLR sockets on the console are wired like this:
Pin 1 Earth
Pin 2 Data Pin 3 Data +
Pin 4 Not used
Pin 5 Not used
Each DMX line should pass through all the fixtures to be connected on
that line one after the other and have a DMX terminator fitted at the
end (120 ohm resistor between pins 2 and 3). You should not split
the DMX lines using passive splitters (Y-splits) as this can corrupt the
data.
2.2.5 Connecting a monitor
You can optionally connect a VGA computer monitor to the console.
The monitor gives you extra screen space for workspace windows
which can be handy for showing Visualiser or other information
windows.
The external monitor is disabled by default and will show a 'disabled'
message. To enable it, switch to System mode and select [Display
Setup] then press [External Display Disconnected]. The option will
change to [External Display Connected] and the display w ill be
enabled.
If you need to change the VDU resolution or settings, touch 'Tools' at
the very top of the screen and select 'Control Panel', then 'External
Monitor', then select the option to match the resolution of your
monitor.
There are more details about setting up an external monitor,
including troubleshooting help, on page 180.
2.2.6 Other connections
You can connect an external keyboard and mouse to the pc
connectors on the rear of the console if you don’t like the touch
keyboard which pops up on the touch screen. If you are using an
external VDU you will need to connect a mouse.
The console provides MIDI connections which can be used to connect
MIDI timecode to the console for timecode-controlled cue lists.
You can connect the console to a LAN (local area network) using the
RJ45 socket on the rear. This allows you to link to a DMX- overethernet system.
TitanUniversal_Man_v5-0_TT.doc 23 September 2011
Page 23
2. Setting up and using the console - Page 23
A 3-pin XLR socket for a desk lamp is provided on the rear edge of
the console. Suitable lamps are available from Avolites. The lamps
are 12 volt, wired from pins 1 and 2 of the XLR.
2.3 Using the touch screen and monitor
The heart of the Tiger Touch is its large touch screen.
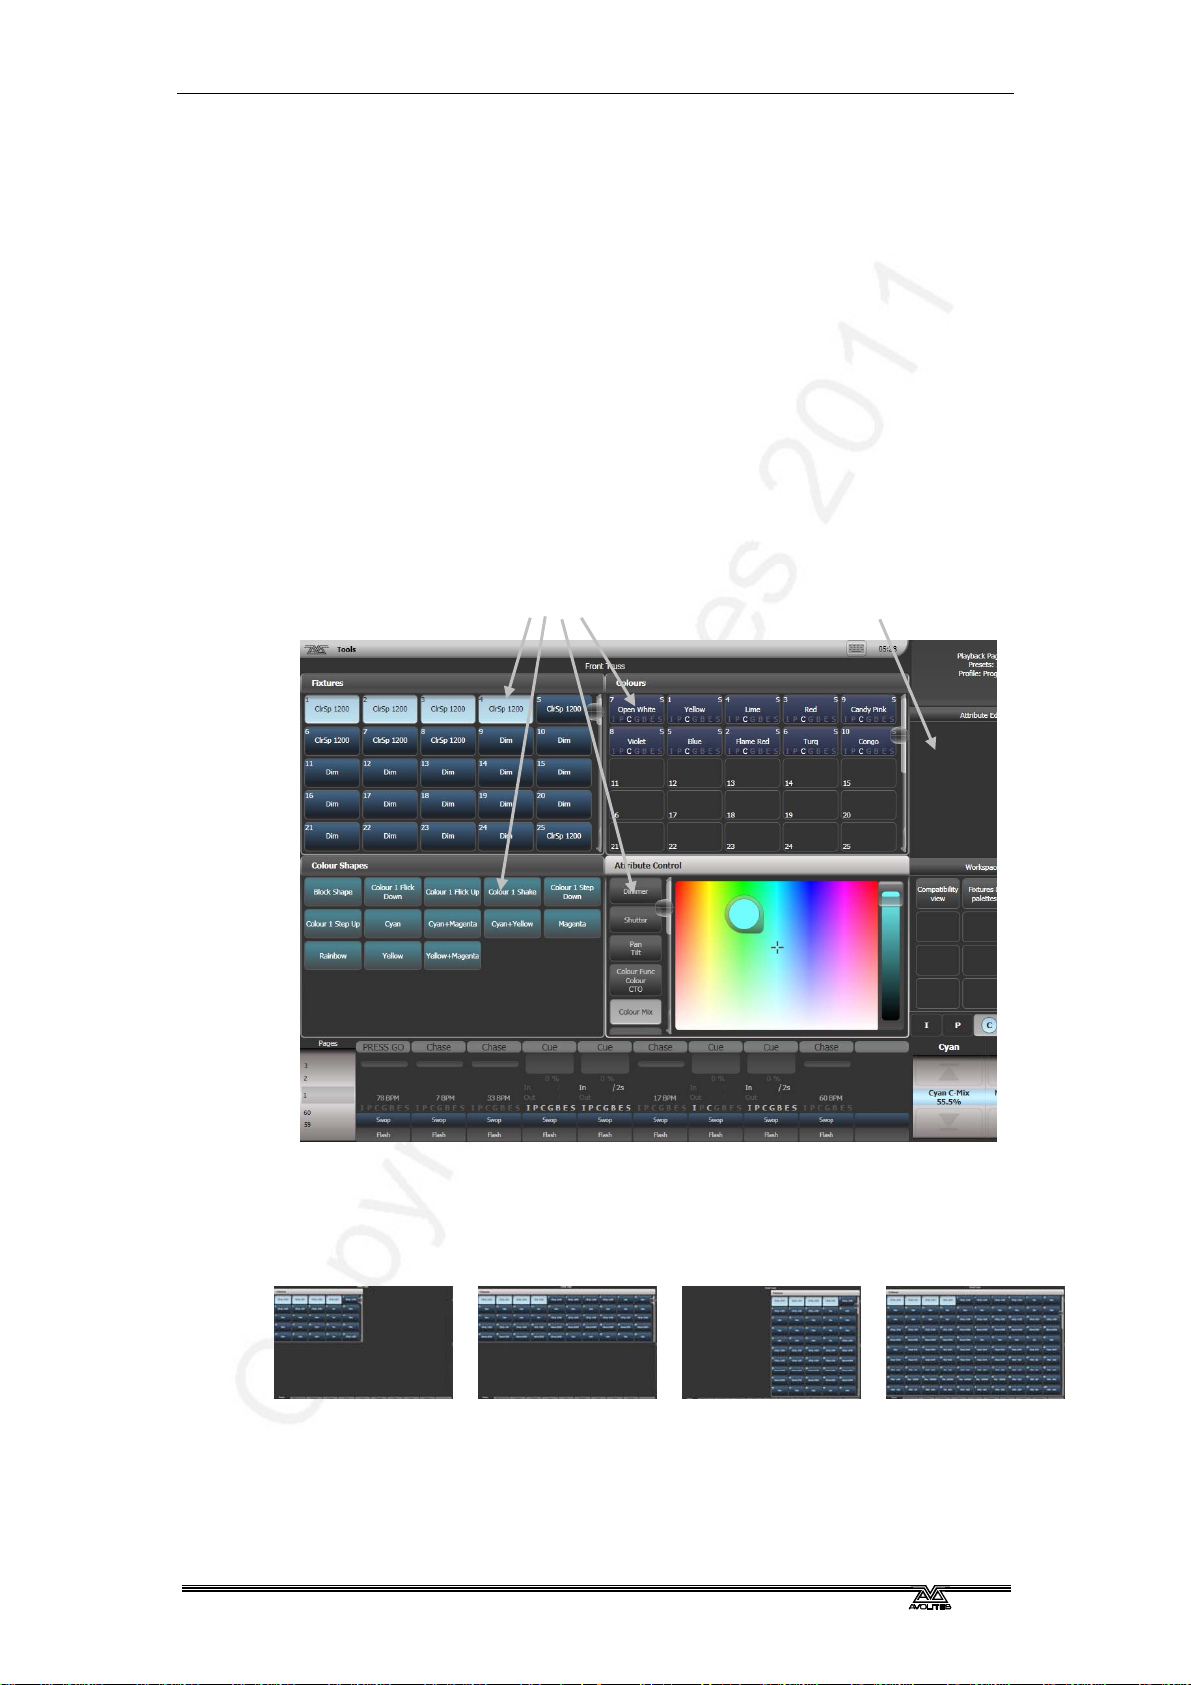
2.3.1 Workspace windows
The main area of the screen contains the workspace windows. These
contain buttons for selecting fixtures, groups, palettes, playbacks and
so on. Information windows such as Playback View and the integrated
Visualiser application can also appear as a workspace window.
4 window positions
Context buttons
Up to 4 windows can be shown on the screen in a 2x2 grid, but if you
need a larger view, you can make a window twice as big, or it can
take up the whole area. You can also move windows to the external
screen which can show a further 4 windows. Some possible window
sizes/positions are shown below.
Quarter size
Double wide
Some windows have associated control buttons, these are positioned in
the “context buttons” area on the top right of the screen.
TitanUniversal_Man_v5-0_TT.doc 23 September 2011
Double height
Maximised
Page 24
Page 24 – 2. Setting up and using the console
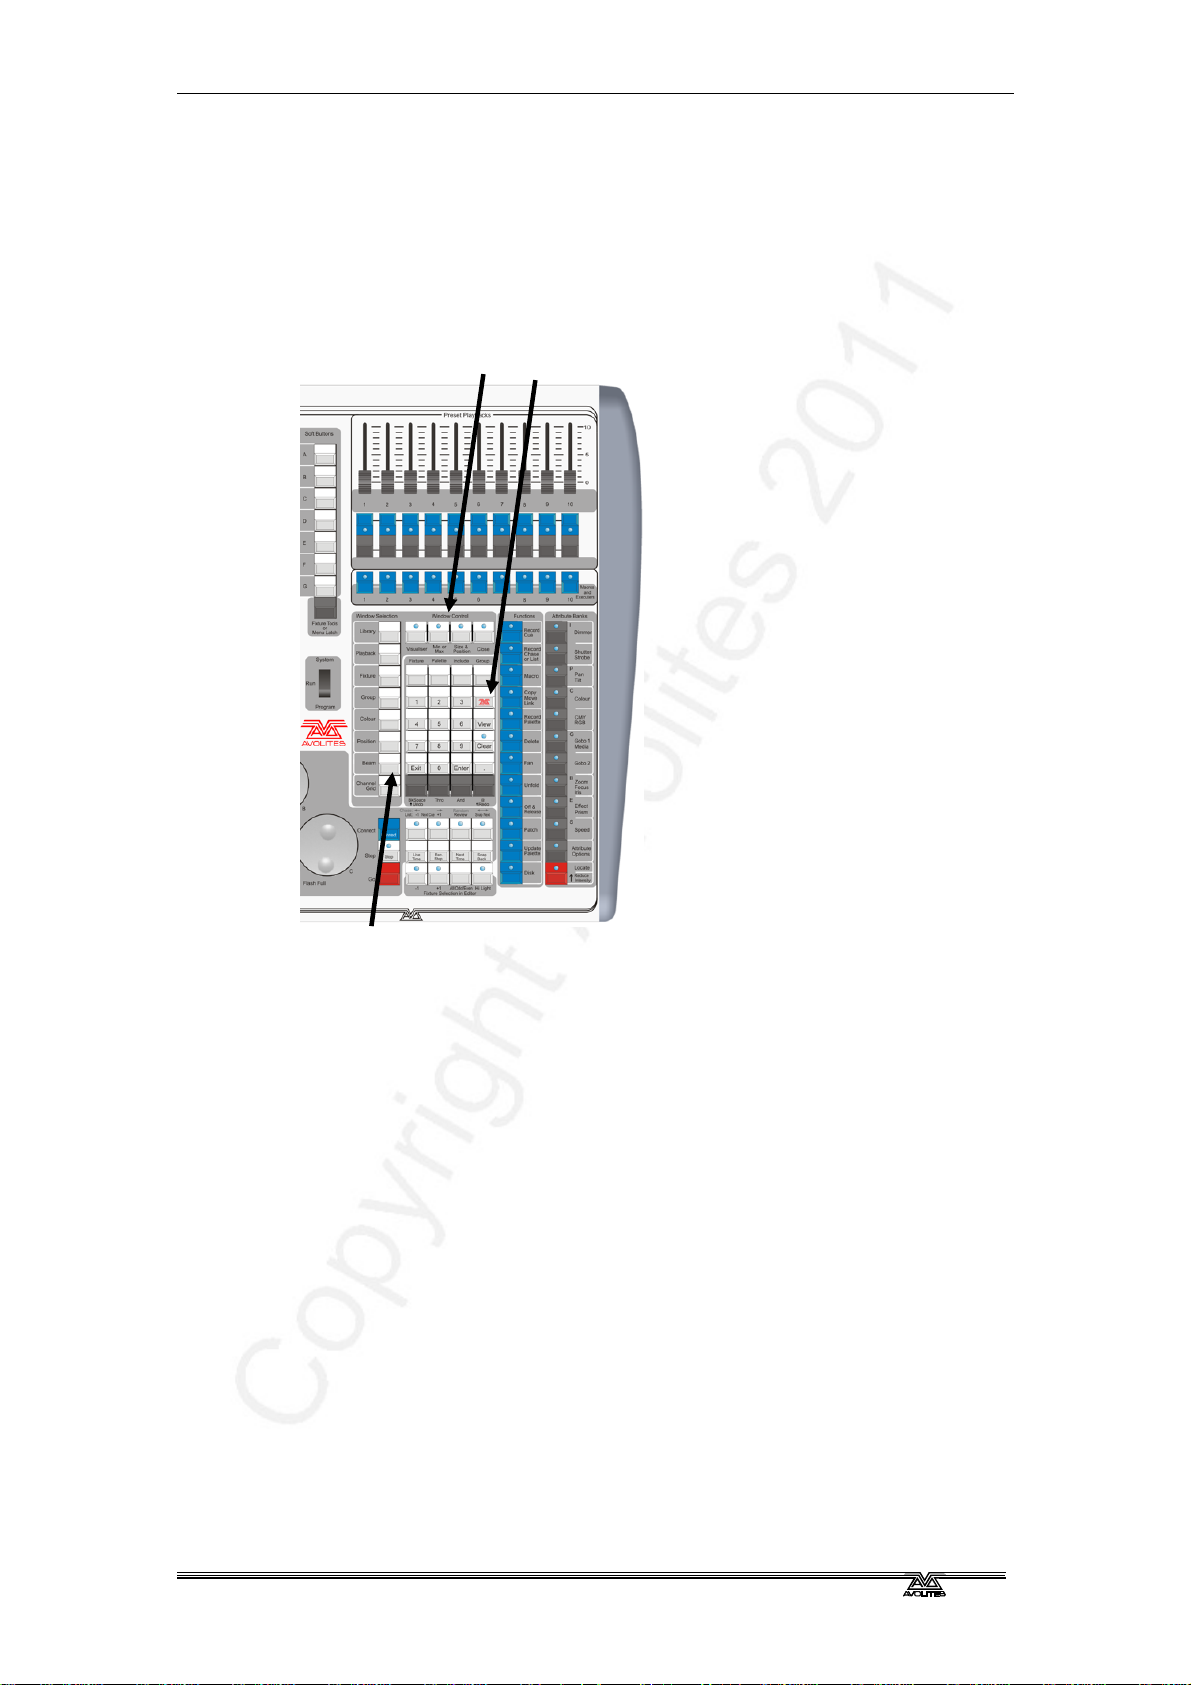
Selecting and positioning workspace windows
You select which workspace windows you want to see using the
[Open Workspace Window] menu command on the root menu. , or by
pressing the Window Selection buttons just to the right of the touch
screen.
Window control
buttons
AVO shift button
Window selection
buttons
You can change the positions and sizes of the windows by using the
Window Control buttons above the numeric keypad. The min/max
button swaps the active window between full screen and quarter size.
The size/position button moves the active window around the possible
positions. You make a window active by clicking/touching its header
bar.
You can move the active window to the external monitor by pressing
Avo and the Size/Position button, or View then [Window Options]
then [Move Screen].
Window shortcuts
Press
View then an Attribute Bank button to open the Palette window
for that attribute.
Press
Press
Press
View then Patch to open the DMX output window.
View then Connect to open the View Cue window.
View then Macro to open the Macro window.
TitanUniversal_Man_v5-0_TT.doc 23 September 2011
Page 25
2. Setting up and using the console - Page 25
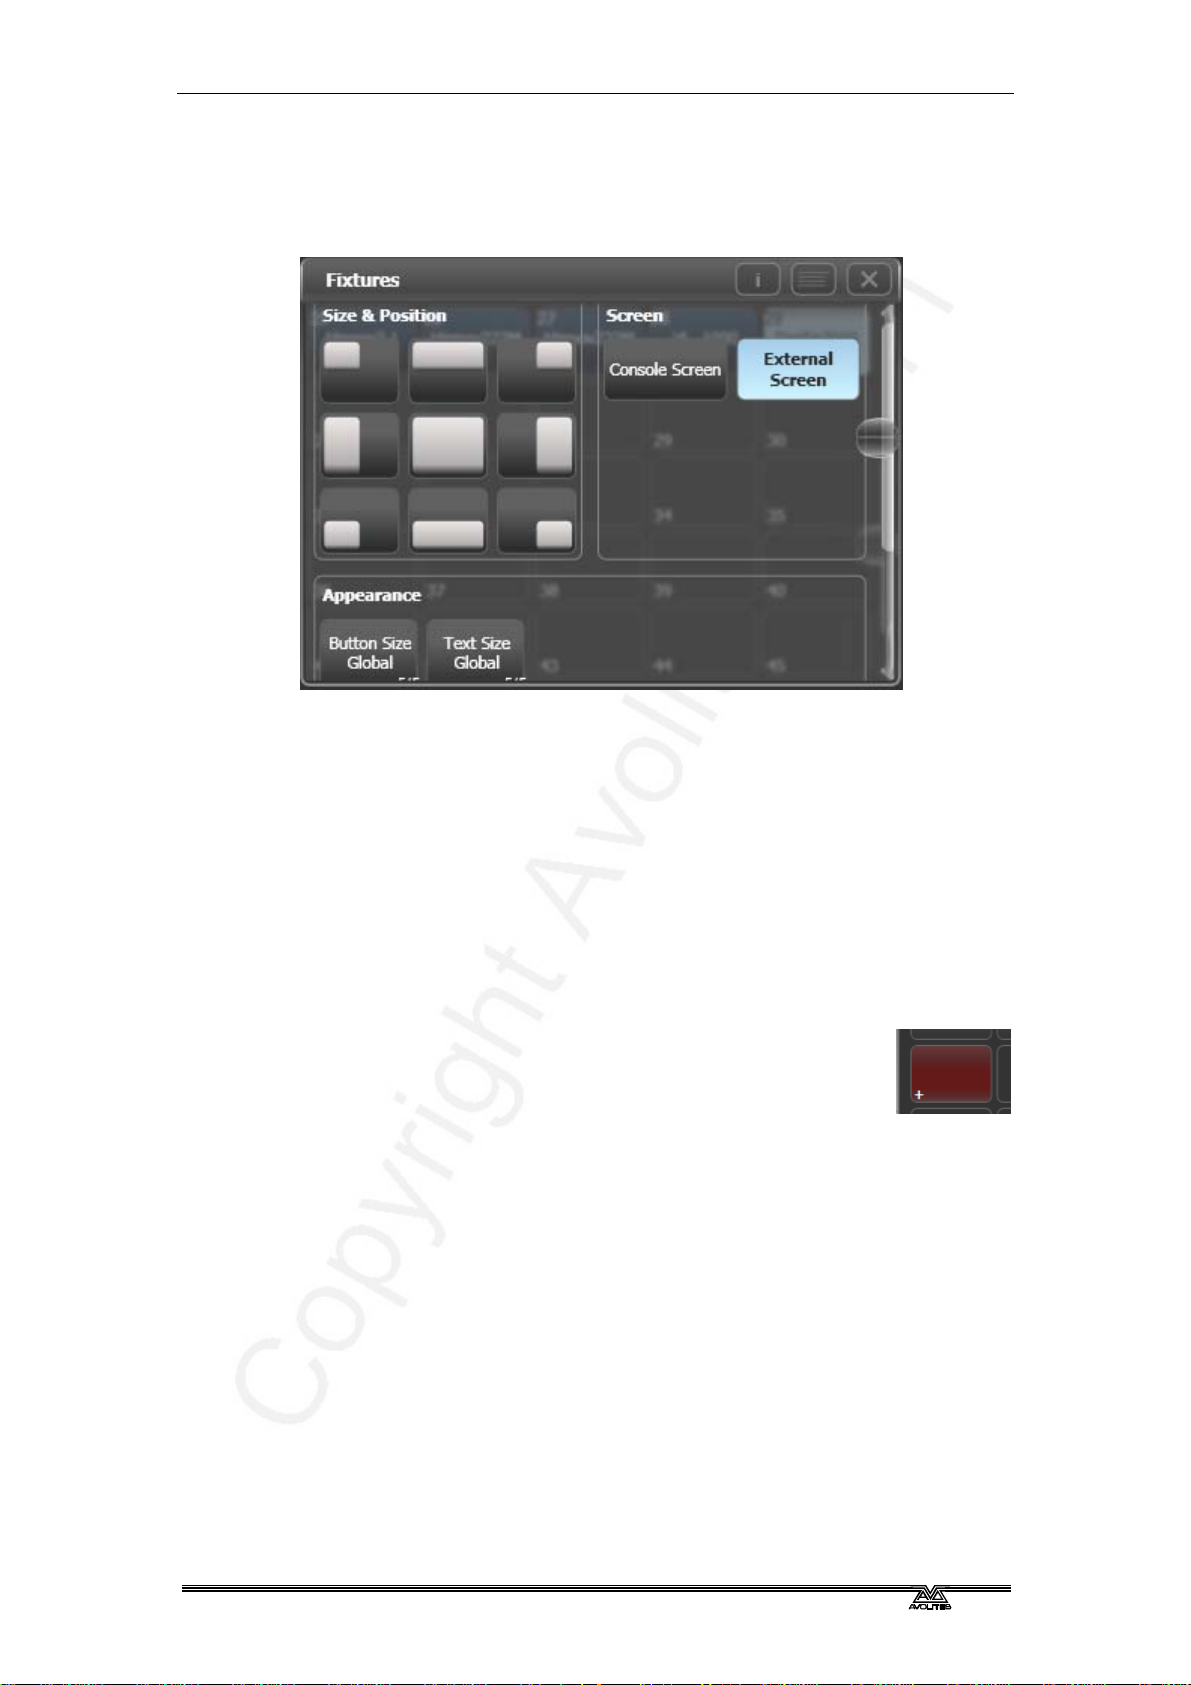
Workspace window options
You can change the window sizes and positions by clicking the small
‘i’ button in the top right corner of the window. These options also
allow you to set the button size and the text size of the window.
Saving workspaces
You can save different workspace setups to the Workspaces touch
buttons (to the left of the menu) by pressing
View then [Record
Workspace], then touching one of the Workspaces buttons. This
allows you to reconfigure the workspace at the touch of a button.
Workspaces are saved with the show.
Setting up and recording workspaces is described in more detail in
section
12.1 on page 159.
Quick record
Some windows – Groups, Workspaces, Playbacks, and
all the Palette windows - have a Quick Record function.
Set up what you want to record, then touch or click the
button once. The button will light up red with a + sign.
At this point you can enter a legend. Touch or click again to store the
item.
The Quick Record function can be disabled using Key Profiles (see
section
12.2.1 on page 162).
Legends and picture legends
All touch buttons can have legends set to remind you what they do.
In addition, you can draw picture legends on the buttons. To do this,
select [Set Legend] then press [Picture]. A drawing space will open
on the touch screen for you to draw the legend. There is also a library
of pictures to choose from including popular gobo designs.
TitanUniversal_Man_v5-0_TT.doc 23 September 2011
Page 26
Page 26 – 2. Setting up and using the console
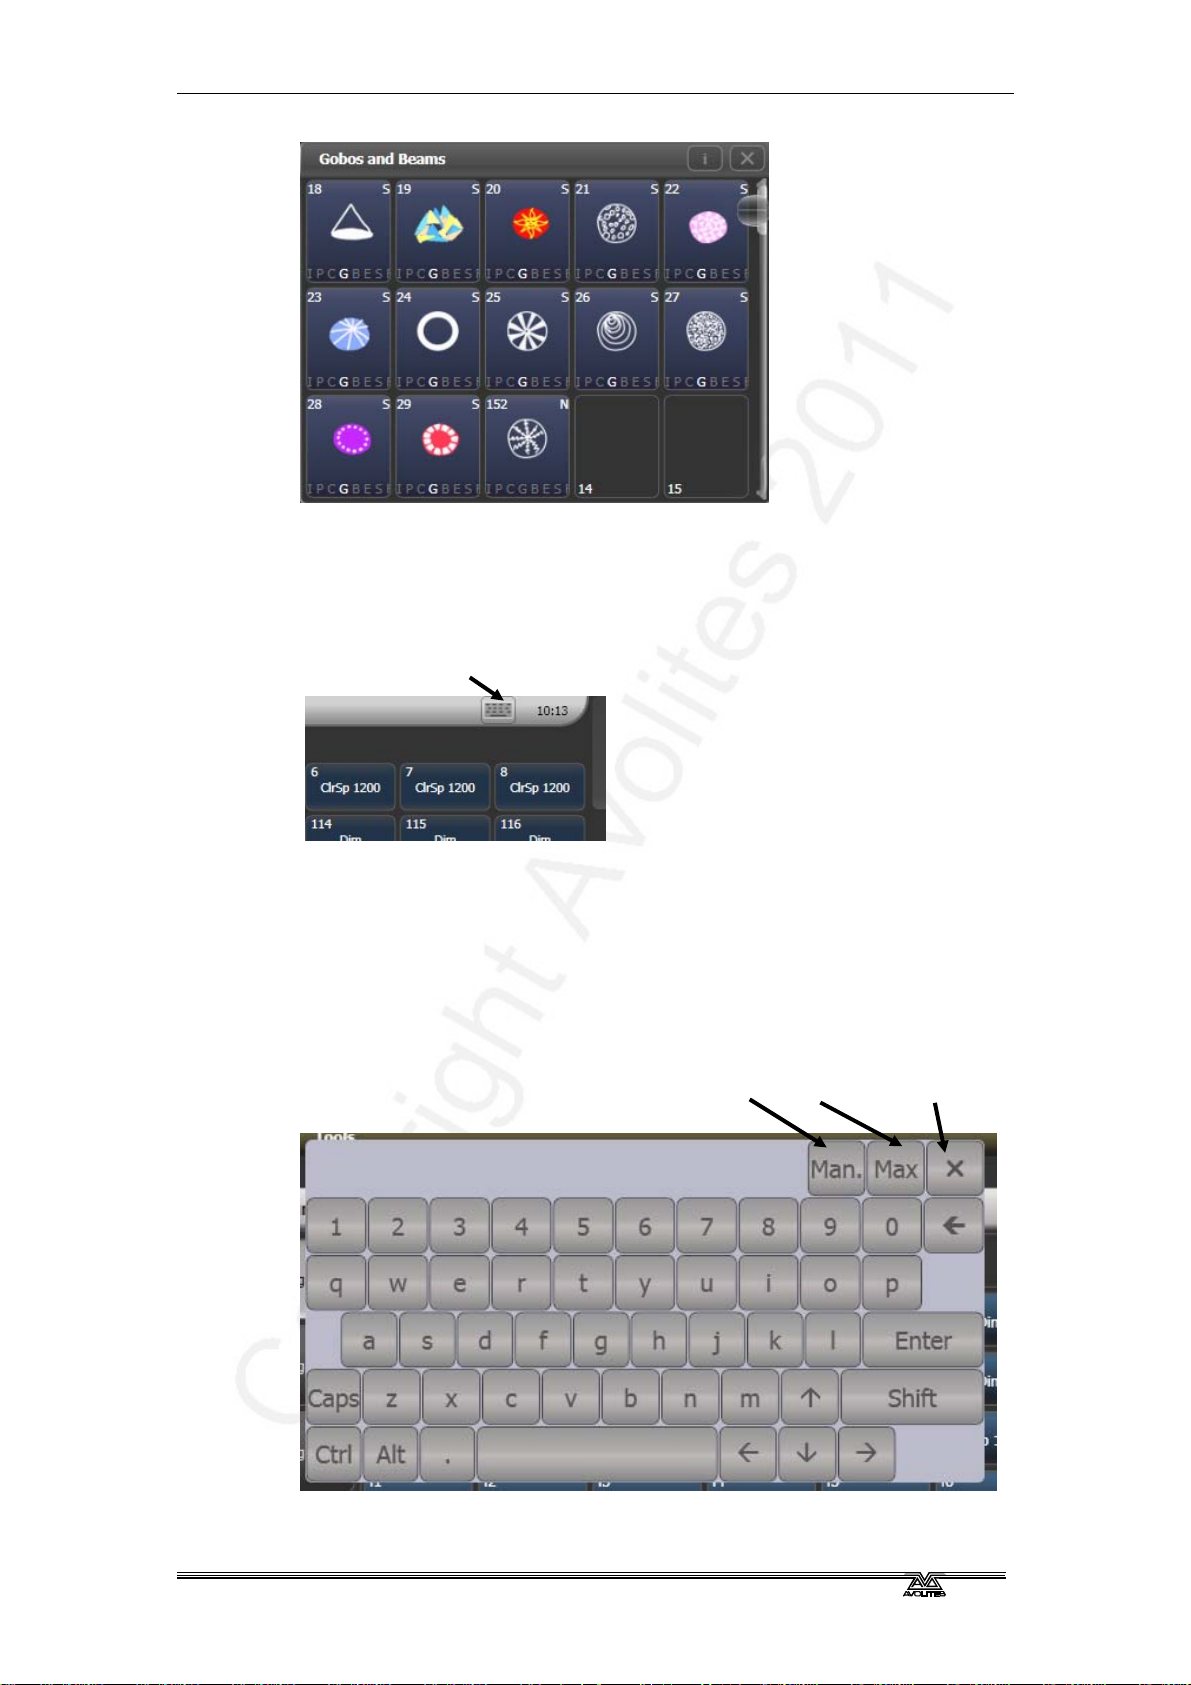
Touch Keyboard
At the right hand end of the toolbar is the keyboard popup button
which will open the touch keyboard.
Keyboard button
The touch keyboard can be switched between large and small size
using the Max/Min button and you close it using the large X button in
the top right hand corner. It can be set to pop up automatically when
text input is required, using the Man/Auto button. You can also move
it on the screen by touching and dragging the blank area of the
keyboard at the top.
The small version of the keyboard (pictured) does not have some of
the less frequently used buttons.
Manual/Auto Change size Close
TitanUniversal_Man_v5-0_TT.doc 23 September 2011
Page 27
2. Setting up and using the console - Page 27
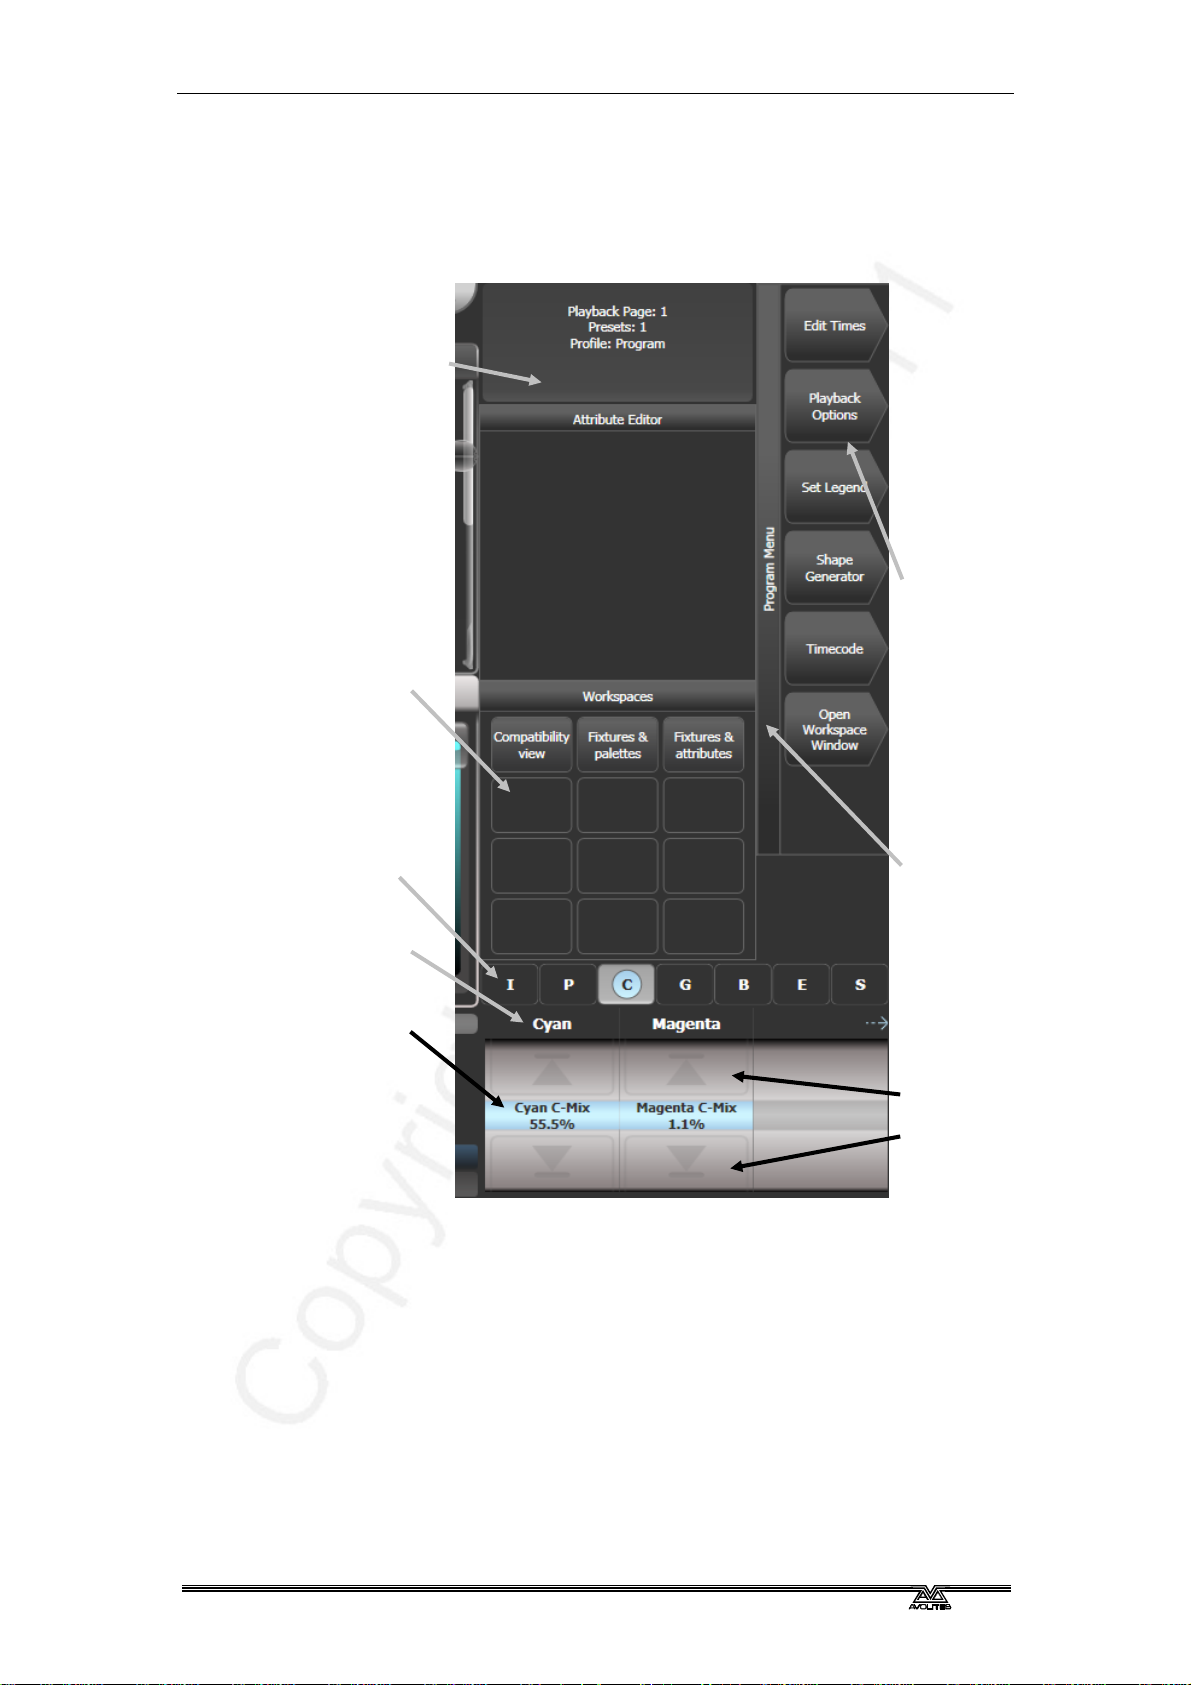
2.3.2 The menu area of the touch screen
The right hand side of the touch screen is used for the operating
menu display.
Information
window
Menu
softkeys
Workspace
selection
buttons
Attribute
groups
Wheel
attributes
Current
selection
Current
menu name
Touch to
change up
or down
Down the right hand side of the screen, the functions of the A-G
menu softkeys are listed. If there are more functions than will fit on
one screen, [Previous] and [Next] buttons are provided to page
through the functions. You can either press the real button or touch
the key on screen.
The vertical bar to the left of the softkeys shows you which menu you
are currently in. You can 'latch' the menu (so that you don’t have to
keep reselecting it) by pressing the Menu Latch button. The menu bar
turns red when latched.
At the bottom of the screen, the current function of the wheels is
shown. If fixture attributes are being set, this shows the possible
TitanUniversal_Man_v5-0_TT.doc 23 September 2011
Page 28
Page 28 – 2. Setting up and using the console
settings which are available on the fixtures. Above the roller image a
legend shows which attributes are being controlled by each wheel and
the centre of the roller shows the current attribute. If a chase is being
controlled, information about the chase is shown here.
Above this, the screen shows which attribute group (Intensity,
Position, Colour, Gobo, Beam, Effect and Special) is selected (grey
box) and which are currently modified (blue circle).
The area at the top of the screen shows instructions to the user and
information from the console.
The appearance of the softkeys varies to indicate the type of actions
available:
Action button:
console will carry
out the action
shown
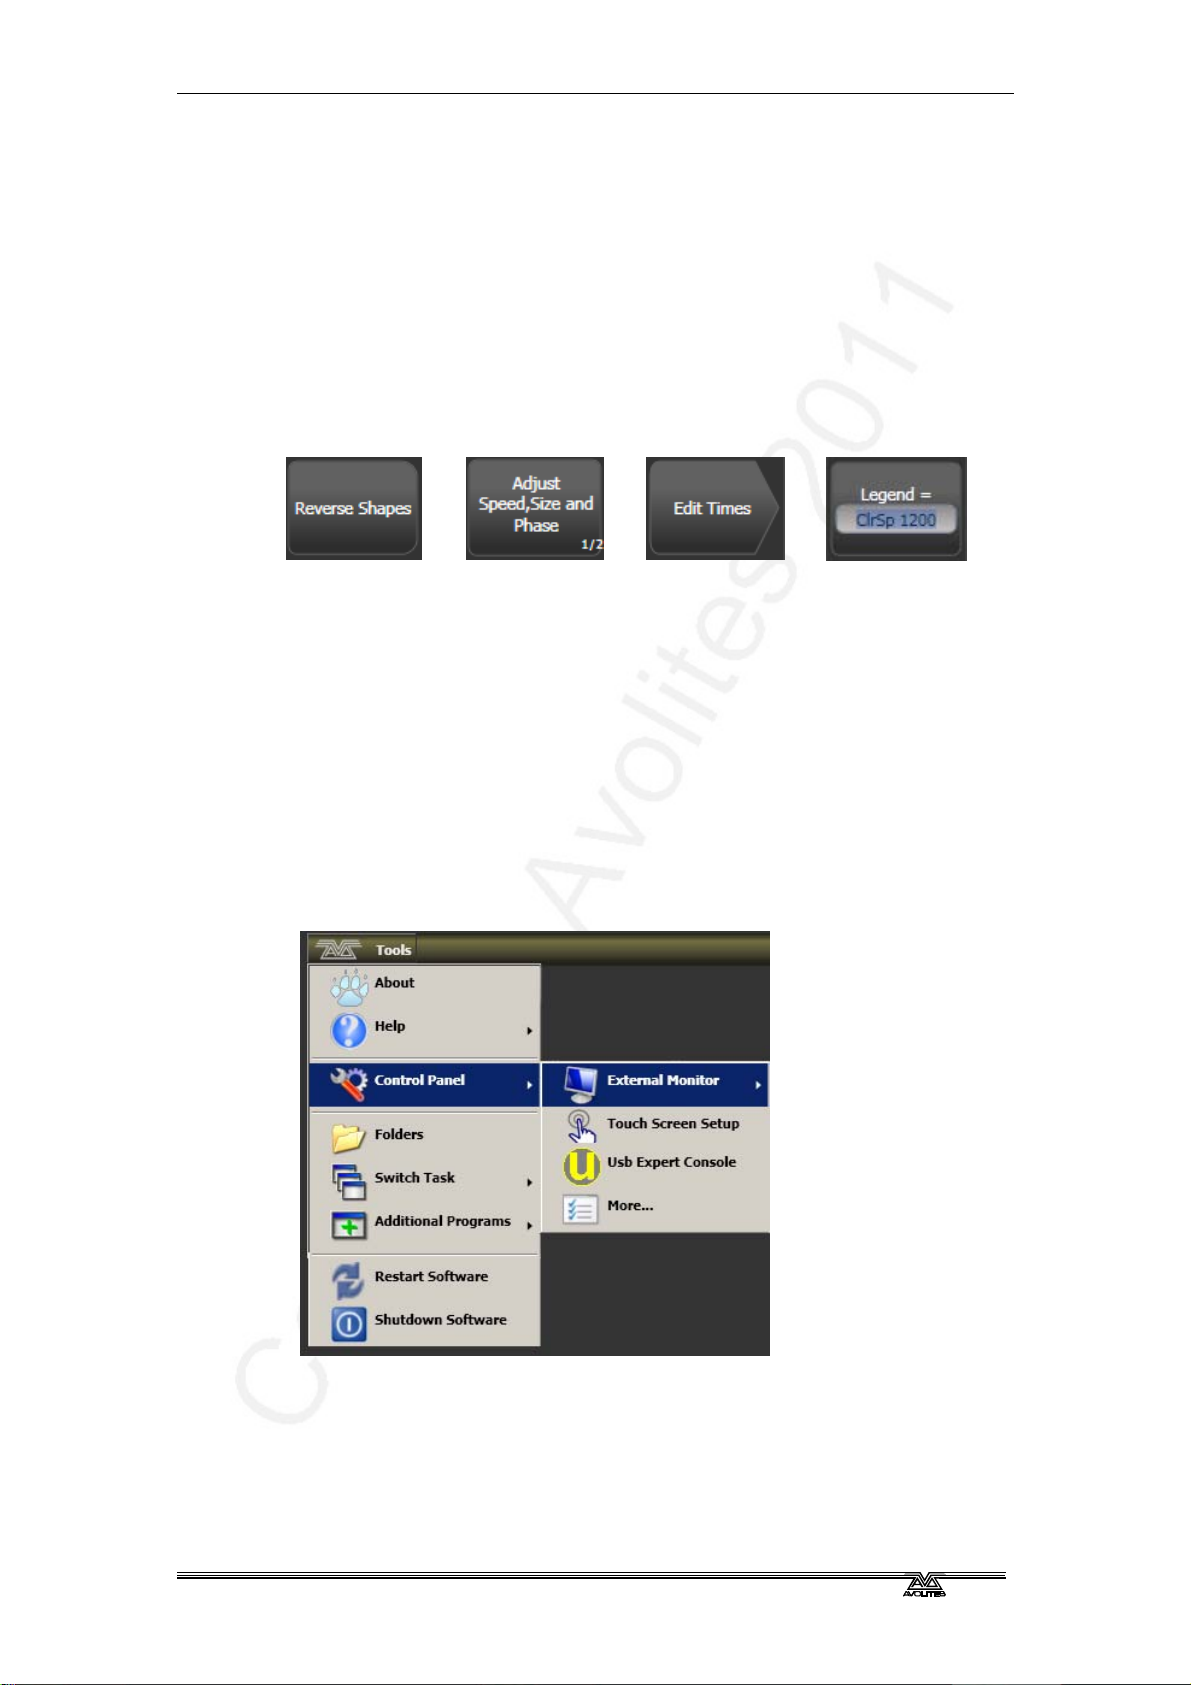
2.3.3 The toolbar
Across the very top of the screen is the toolbar. If you click/touch at
the left hand side on 'Tools', you will get a menu givin g you access to
some configuration functions.
Option button:
cycles through a
range of options
New menu
button: jumps to
a new menu
Text entry
button: press
and enter text
using the touch
keyboard
About gives you information about the software version.
Help shows you the online manual.
Control Panel opens a sub-menu allowing changes to monitor
settings and to the USB expert console which links the front panel
controls to the system. The 'More…' option opens Windows Control
Panel allowing you to change the operating system configuration.
TitanUniversal_Man_v5-0_TT.doc 23 September 2011
Page 29
2. Setting up and using the console - Page 29
Touch Screen Setup opens the setup utility for the touch screen
which among other things allows you to align the touch positions.
Usb Expert Console sets up the connection between the front panel
controls and the software. If you are having problems this can be
used to troubleshoot.
Folders opens the file explorer. You might need this when backing up
show files or when updating the operating software.
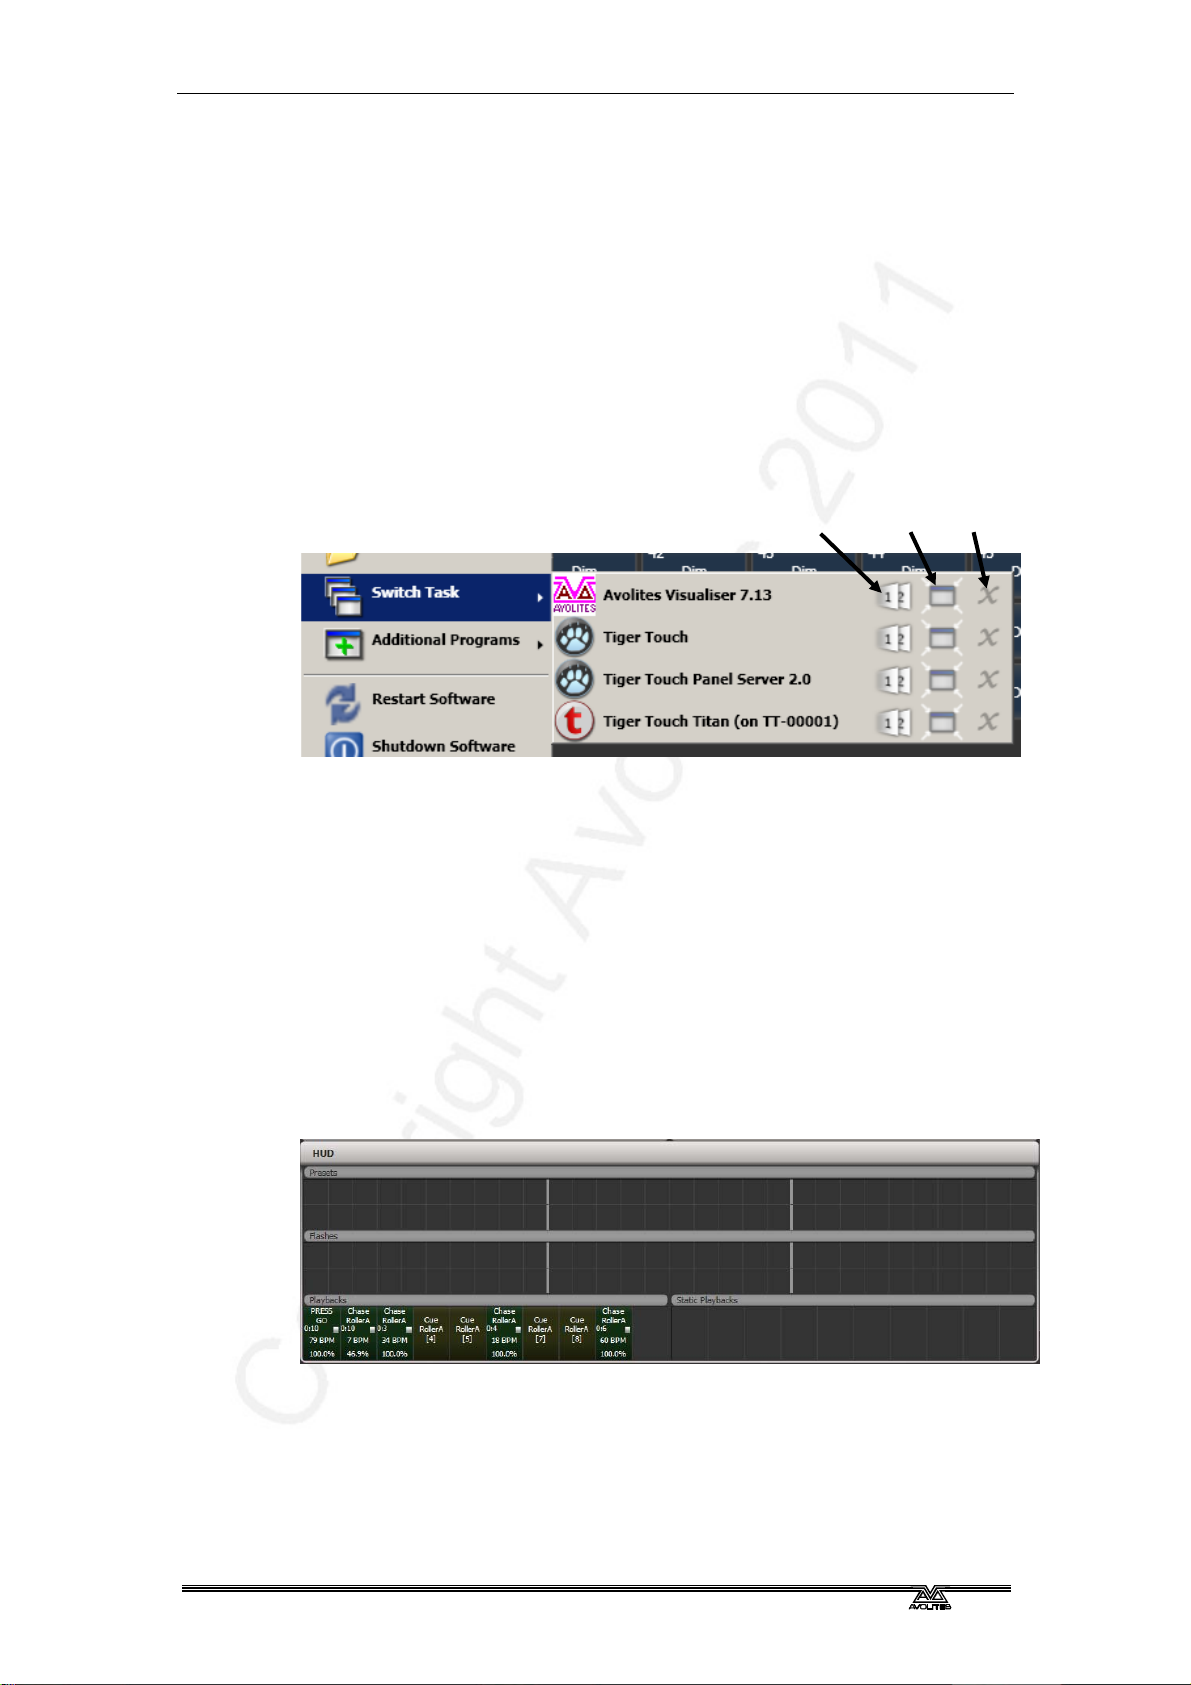
Switch Task allows you to show other programs (such as Titan, for
setting up DMX outputs) on the touch screen or move them to the
external VDU screen. Touch the Switch Screen icon to swap the
program between the touch screen and the external VDU. Touch the
Centre icon to centre the window on the screen. Touch Close to close
the program.
Switch screen Centre Close
Additional Programs allows you to run some diagnostic programs
which might help Avolites Support find problems you’re having.
Restart and Shutdown Software restarts and closes the Titan
software. You would normally only use these when upgrading the
software.
2.3.4 The Heads-Up Display (HUD)
The HUD window is shown as one of the workspace windows. Most of
the HUD information is now shown in other windows, but if you’re
used to using it you might like to hav e it displayed.
Fixtures are highlighted in dark blue if in the programmer and in light
blue if selected.
TitanUniversal_Man_v5-0_TT.doc 23 September 2011
Page 30
Page 30 – 2. Setting up and using the console
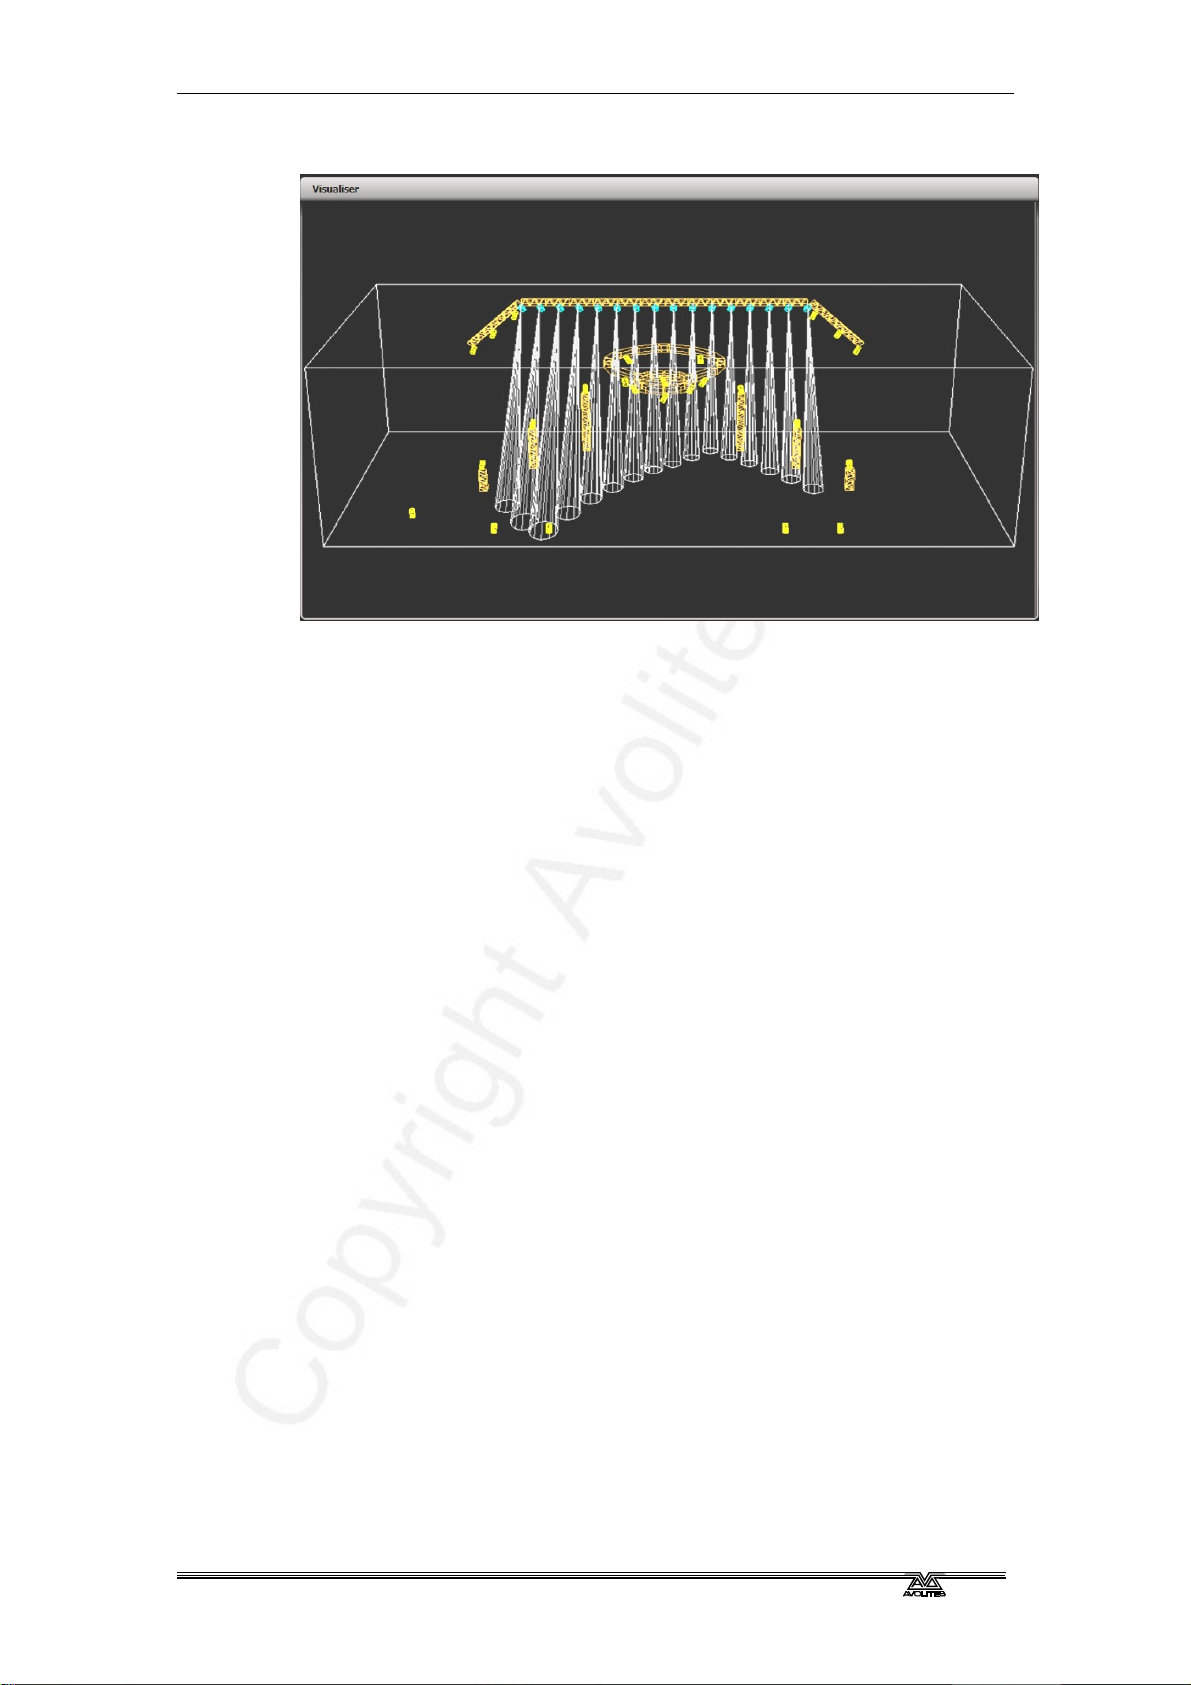
2.3.5 Visualiser
The console runs Avolites Visualiser internally. T his allows you to view
the output of the console if you can’t use the real lights, enabling you
to make changes to your show at home or in your hotel. It can also
be used in Blind mode for programming during a show.
Visualiser is shown in a workspace window, either on the touch
screen or on the external monitor. Press [Window Options] then
[Move Screen] on the View menu to move it between the touch
screen and external monitor.
Configuration buttons for Visualiser are provided in the context button
area to the left of the menu buttons.
The operation of Visualiser is not covered in this manual, please refer
to the Visualiser manual.
Auto Patch
The Auto Patch function automatically creates a Visualiser rig from
your show as you patch fixtures. When you start Visualiser, it will
open with an automatic representation of your patch.
You will see the fixtures laid out on screen with 60 fixtures in a row,
sorted by handle number.
The Visualiser will start in run mode, with the simulator t a b selected
so you can start controlling lights immediately.
Multiple dimmers patched to one handle will appear as a singe fixture
in Visualiser.
Fixture selection
When a fixture is selected on the console, it is highlight ed in blue in
Visualiser.
2.3.6 Key profiles
The console allows you to change the function of the blue select and
grey flash panel buttons. You can also change the way some of the
touch keys work. You can save your settings as a Key Profile.
Different profiles can be selected for different users or to enhance the
TitanUniversal_Man_v5-0_TT.doc 23 September 2011
Page 31

operation of the console for a particular use. See section 12.2 on
162 for details.
page
2.3.7 Undo/Redo
You can undo and redo up to 20 actions by pressing Avo shift and the
Undo or Redo buttons below the numeric keypad (on black Pearl
Expert consoles these are the Left arrow (Undo) and Right arrow
(Redo) buttons). So for example if you press Clear then wish you
hadn’t, the Undo function will restore the cons ole state.
You can use undo/redo on the following actions:
• Fixture selection
• Attribute adjustment (eg Pan, Tilt, colour changes)
• Locate
• Clear
• Keypad input
• Applying Palettes
• Group selection
2. Setting up and using the console - Page 31
• Off
• Align
• Flip
2.3.8 Key macro buttons
Lighting programming can sometimes require a repeated sequence of
button presses. You can record sequences of keypresses and play
them back with a single keypress – this is called a macro.
Macros can be stored in the 10 dedicated buttons below the Preset
Playbacks, and there is also a Macro button window which can be
shown in the workspace. The macro buttons correspond to the first
10 macros in the window.
Macro buttons
To record a macro:
1> Press the Macro button
2> Press [Record]
3> Press an empty Macro button on the panel, or an empty button
in the Macro window on the screen. Recording starts. The
Insert/Macro button flashes during recording.
TitanUniversal_Man_v5-0_TT.doc 23 September 2011
Page 32

Page 32 – 2. Setting up and using the console
4> Press the sequence of buttons you want to record.
5> Press Record Macro to finish recording.
To play back the macro, just press or touch the button where you
recorded the macro. The macro will repeat all your button presses
(with no delay or timing between the presses).
2.3.9 Keyboard shortcuts
Many features of the console can be controlled by shortcuts on the
keyboard. These are especially useful when using Titan Mobile or
Titan Simulator.
The Titan application “captures” the keyboard on start up, meaning
that if you try to use other application s at the same time they will not
receive keypresses. Pressing Break on the keyboard releases the
keyboard for other applications but disables all text entry for Titan
including the shortcut keys; changing men us will reconnect the
keyboard to Titan.
F1 Move to other screen Ctrl X Cut text
F2 Activate window Ctrl C Copy text
F3 Minimise/Maximise Ctrl V Paste text
Shift F3 Next window Ctrl A Select all text
F4 Size/Position Ctrl Z Undo
Shift F4 Move to other screen Ctrl Y Redo
F5 Close window Alt C Clear
Shift F5 Close all windows Alt R Record menu
F6 Open Playbacks window Alt A Toggle Avo (shift) menu
F7 Open Fixtures window Alt L Locate
F8 Open Groups window Alt P Patch
F9 Open Colours window
F10 Open Positions window
F11 Gobos/Beams window Alt V Open/View menu
F12 Open Channel Grid Alt G Go
Esc Exit menu Alt D Delete
Enter Enter
Alt 1 Softkey A Alt M Move
Alt 2 Softkey B Alt U Unfold
Alt 3 Softkey C Alt I Include
Alt 4 Softkey D
Alt 5 Softkey E Alt S Shape
Alt 6 Softkey F Alt T Fixture Tools/ML Menu
Alt 7 Softkey G Alt B Blind
Alt ⇑ F
Alt ⇑ P
Alt ⇑ M
Fixture Alt O Off
Palette Alt F Fan
Macro
Alt ⇑ D
Alt ⇑ S
Alt ⇑ C
Alt ⇑ R
Alt ⇑ O
Disk menu
System mode
Copy
Release
Attribute options
TitanUniversal_Man_v5-0_TT.doc 23 September 2011
Page 33

2. Setting up and using the console - Page 33
Alt ⇑ G
/ (num) Thro
* (num) @
- (num) Not
+ (num) And
Group
⇑ means shift
(num) means on the numeric keypad
2.3.10 Locking the console
You can lock the console controls to prevent people fiddling with it
while you’re not looking. Hold down Avo and press [Lock], then type
a password (numbers or letters). To unlock, enter the password
again, or restarting the console will also unlock it.
While the console is locked, all functions are disabled except the DMX
outputs and currently running playbacks.
2.4 Titan Simulator
Need to pre-program or tweak your show before you get to the
venue? No problem, just run the Titan Simulator on your PC. You can
then load your show and simulate any of the Titan consoles, using an
on-screen “virtual panel”.
Alt ⇑ L
Alt ←
Alt →
Alt ↑
Alt ↓
Latch menu
Previous fixture
Next fixture
All
Highlight
2.4.1 Installing Titan Simulator
You will need a user account with Administrator privileges to inst all or
run Titan Simulator.
Simply download and run the installer from the Avolites Dow nload
website. The first time you run Simulator you will need to license the
software with the Avolites website. For this you will need an account
set up on the Download site, which you should go and create now if
you don’t already have one.
To license the software, start Titan Simulator and choose Internet
Activation (the software will ask you for your Avolites Download user
TitanUniversal_Man_v5-0_TT.doc 23 September 2011
Page 34

Page 34 – 2. Setting up and using the console
name and password and automatically retrieve your license), or
Manual Activation (you have to copy and paste the Computer Key into
the form on the Titan Simulator webpage).
Once licensed Titan Simulator will run in 'Offline' mode which is
shown towards the top right of the screen. In Offline mode the
software will function as normal including Visualiser and Art-Net
outputs. However periodically random DMX values will be sent down
all DMX outputs, please wait for this to stop before continuing
programming.
2.4.2 Running Titan Simulator
When you start the simulator you need to select which console you
are simulating. The simulator will then open a Virtual Panel for your
chosen console and monitor windows for each of the monitor outputs.
The Tiger Touch simulator shows the touch screen
display separately from the Virtual Panel.
The Virtual Panel works exactly the same as the real panel; to hold a
button down so you can press a second button, right click it using the
mouse.
2.5 Loading and saving shows
You can save any number of different shows on a USB drive or the
console’s internal hard disk. The console will also autosave the sh ow
periodically.
Shows created on the Tiger Touch can be loaded into
any other Avolites Titan console, but not to non-Titan
consoles as the showfile format is different.
Although your show is safe on the console’s internal hard disk, it’s a
good idea to also save it to a USB pen drive which you can take with
you in case something bad happens to the console or if you want to
transfer a show to a different console. USB drives are plugged into
the rear USB sockets on the console.
Rear USB sockets
2.5.1 Manual save and load
You can save your show at any time either with its current name or
with a new name.
1> Press the Disk button.
TitanUniversal_Man_v5-0_TT.doc 23 September 2011
Page 35

2. Setting up and using the console - Page 35
2> Press [Save Show].
3> If you have a USB drive connected, use the softkeys to select
whether to save on [Removable Disk] or [Internal hard drive].
4> Enter a name for the show on the keyboard (the screen shows
a list of shows which already exist).
5> Press Enter or [Save] (or [Overwrite] if the show already
exists). The show will be saved.
6> Press Exit or [OK] to leave Disk mode.
If you save to hard drive, shows are saved in the folder ‘My
Documents/Titan Show Files’, unless you change this in the User
Settings.
The console will automatically reload the last show when it is turned
on.
If you want to load a different show:
1> Press the Disk button.
2> Press [Load Show].
3> If you have a USB drive connected, select which drive you want
to load from.
4> Available shows are listed on the softkeys; press the key to load
the show (the F and G keys show more pages). If you type the
first few letters of the show name on the touch keyboard, the
list will only include shows starting with those letters, which can
make it easier to locate the show you want.
5> Press Exit to leave Disk mode.
You can save any number of different shows on the Tiger Touch’s
internal hard disk.
2.5.2 Autosave
The console will automatically save your show to its intern al hard disk
when you shut it down. It will also autosave th e show every 30
minutes in case the console loses power. The time remaining to the
next auto save is shown on the status bar of the Titan application.
You can disable Autosave or alter the time between saves using
option [Auto Save] on the Disk menu (selected using the blue Disk
button). Softkey A enables or disables autosave and Softkey B sets
the time between saves.
We recommend that you have autosave enabled while
programming in case the console power fails, but
disable it while running a show as it can cause the
console to pause slightly at inconvenient moments.
2.5.3 Backing up existing show files to USB pen drive
If you just want to save a copy of your current show, you can use the
normal save function to save it to the USB drive instead of the hard
drive.
To copy an existing show file on the hard disk to a USB drive, first
ensure your current show is saved, then use the Disk functions to
load the existing show from hard disk, then save it to the USB drive.
Alternatively you can use the Folders command on the Tools menu.
TitanUniversal_Man_v5-0_TT.doc 23 September 2011
Page 36

Page 36 – 2. Setting up and using the console
2.6 Clearing the console
When you start a new show on the Tiger Touch it is usually a good
idea to clear the console. All programming and patching is deleted,
but user options are not changed.
1> Press the Disk button.
2> Press [New Show].
3> Press [OK] to confirm.
4> Press Exit to leave Disk mode.
• There is also an option [Wipe] in the System menu (when the
console is in System mode) which has the same function, and is
located in the same place as on other Avolites consoles.
TitanUniversal_Man_v5-0_TT.doc 23 September 2011
Page 37

3. Patching
Patching is the process where you tell the Tiger Touch
• What type of lighting units you have connected to it
• What DMX addresses they are operating at
• Which DMX line (universe) each unit is connected to (there are
12)
• Which buttons on the console you want to use to access them
(either physical buttons or touch buttons)
• Particular option settings for each fixture.
3. Patching - Page 37
Before you start rigging, use the console to work out the
DMX addresses for the fixtures in your rig. Patch them
on the console (or simulator), then press View, [Fixture
Patch] to show the addresses. This will use the DMX
channels as efficiently as possible without leaving any
gaps.
3.1 Patching new fixtures or dimmers
3.1.1 Fixture select buttons and handles
To control intelligent fixtures or dimmer channels, they must be
patched to a fixture button in the Fixtures workspace window.
If the Fixtures window is not shown, press the Fixtures button to the
right of the screen to show it, or press
window] then [Fixtures].
View then [Show workspace
Fixture buttons can be shown either in pages with Page buttons, or
you can use the scroll bar on the right to show different pages. Use
the [Pages Show/Hide] button on the right of the screen to select
between page buttons and scrolling mode. You can change the f ixture
page at any time.
TitanUniversal_Man_v5-0_TT.doc 23 September 2011
Page 38

Page 38 – 3. Patching
You can allocate fixtures and dimmers to Groups, which allows you to
quickly select a set of fixtures with one button. Groups are described
in the next chapter.
3.1.2 Patching dimmers
Each fixture button can control single or multiple dimmer channels.
1> Press Patch (one of the blue function buttons bottom right),
then [Dimmers].
2> Softkey A [DMX Line=] shows you which of the 12 DMX output
lines you are patching onto. Press A then enter a new number
(1-12) to change the line. Softkey B shows the DMX address
about to be patched. You can change this by pressing B
[Address=xx], typing in the new address on the numeric
keypad and pressing Enter.
3> To patch a single dimmer, press a Fixture Select button. To
patch a sequence of dimmers each to its own button, press
[Quantity] and set the number of dimmers then press the first
select button. Alternatively, run your finger across the buttons
on the screen. The range of dimmers will be patched to
sequential DMX addresses.
4> The Select buttons turn dark blue and show fixture details when
they are patched.
5> Repeat from step 2 for other dimmers.
• When setting the DMX address using Softkey B, you can set the
DMX line (universe) as well by entering {line}. {DMX}, for
example 2.56 will set DMX address 56 on DMX line 2.
• To see how DMX channels are patched, press
View (next to the
numeric keypad) then [Fixture Patch]. The fixture patch view is
described in section
3.2.3 on page 42.
• C [User Number = xx] allows you to set a user-defined number
for each dimmer or fixture patched, to help you identify them
later. You can also edit the User Number from the Repatch
Fixture menu.
• You can patch multiple dimmer channels to a single handle. This
can be useful if, for example, you want to control all the lights
for one area together. To do this, just press the same Fixture
Select button again when patching the new dimmer channel.
TitanUniversal_Man_v5-0_TT.doc 23 September 2011
Page 39

You can tell the dimmer channel has patched OK because the
DMX address will increase by 1.
3.1.3 Patching moving light fixtures
Moving light fixtures are more complicated to patch than dimmers
because they have more attributes to control, such as pan, tilt, colour
etc., whereas a dimmer channel just has intensity.
Avolites consoles use a “personality” system to control fixtures. This
means you don’t have to know how each fixture works, you just tell
the Tiger Touch what you want to do and it will send the right control
commands. The console has built-in personalities for most types of
fixture, which tell it what attributes are available and how to control
them. If the console does not have the personality for your fixture,
you can download further personalities from the Avolites website or
Avolites can create one for you. See section
details of how to find personalities.
1> Press Patch (one of the blue function buttons bottom right).
2> Press [Fixtures].
3. Patching - Page 39
13 on page 175 for
3> Select the correct fixture manufacturer from the softkeys
([Previous] and [Next] page through the list of manufacturers).
Or use Quick Search and type the first few letters of the
manufacturer’s name on the keyboard to find the one you want.
4> Select correct fixture from the softkeys (F and G show other
pages). You can use Quick Search here as well.
5> Select the correct fixture operating mode from the softkeys.
6> Softkey B shows the first free DMX address. Type the new
address on the numeric keypad if you want a different one.
Press A [DMX line=xx] to patch to a different DMX line, or you
TitanUniversal_Man_v5-0_TT.doc 23 September 2011
Page 40

Page 40 – 3. Patching
can enter the address as [line].[address], e.g. 2.45 would set
address 45 on line 2.
7> Press a Fixture Select button to patch the selected fixture.
8> The Select button turns dark blue and shows fixture details
when it is patched.
9> Repeat from 7 to patch more of the same fixture type. The DMX
address automatically updates so you can just keep patching by
pressing Select buttons.
• You can patch a number of fixtures in one go using the
[Quantity] button, or by running your finger across the buttons
on the screen, in the same way as for dimmers.
• You cannot patch more than one fixture onto a button. If the
button is already used, the patch will fail.
• If you are patching a fixture which uses a separate dimmer
channel, such as a VL5, you can patch the dimmer channel onto
the same handle as the moving light part of the fixture so you
can control it all together. This is called a Pending Dimmer.
• [Options], [Preset Palettes] sets whether the console will create
default colour, gobo and position palettes for the new fixture.
These are created in the Position, Colour and Beam workspaces.
• [Options], [AutoGroups] sets whether the console will
automatically create groups from the fixtures you patch. If
Enabled, a group is created for all fixtures of the same type,
and another if you patch a quantity of fixtures.
• To show the DMX address for fixtures, press
Patch].
• If a patch goes over the capacity of a DMX line, the console will
patch at the beginning of the next line. For example if you try
to patch a Mac500 at channel A510, it will actually be patched
at B1.
TitanUniversal_Man_v5-0_TT.doc 23 September 2011
View then [Fixture
Page 41

3.1.4 Visualiser Auto Patch
If you want to use Visualiser, start it by pressing the Visualiser button
above the numeric keys, or press
Window] then [Visualiser]. Visualiser will open in one of the
workspace windows with an automatic representation of your patch.
If you have another monitor connected, you can move the Visualiser
window to it by pressing View then [Window Options] then [Move
Screen], or by holding Avo and pressing Size/Position.
You will see the fixtures laid out on screen in hand le number order.
You can then use the Visualiser controls to reposition the fixtures if
you wish.
3.1.5 Sub fixtures
Some fixtures have multiple cells of control within a single fixture (for
example an RGB LED blinder). To avoid having to patch every cell as
a single fixture, you can patch the whole fixture as one “super
fixture” and each cell will then appear as a “sub fixture” . This is very
useful when laying out fixtures for use with the Pixel Mapper as it
allows you to move and rotate the fixture as a single fixture, but keep
individual control over the cells.
3. Patching - Page 41
View then [Open Workspace
To access the sub fixtures, press Unfold then the select button of the
fixture. The current page of fixtures will be replaced by select butt ons
for each individual fixture cell.
To go back to normal, press Unfold then [Exit Unfold].
The Sub fixtures feature requires an updated personality
file. If sub fixtures does not work on your fixture you
may need to obtain the latest fixture personality from
Avolites.
3.2 Changing the patch
3.2.1 Changing the DMX address of a fixture
You can re-patch a fixture to a different DMX address or a different
DMX output line. All programming is kept.
1> Press Patch (if you’re not already in Patch mode).
2> Press [Repatch Fixtures].
3> Press the Select button of the fixture you want to change.
4> To change DMX press [Address], type the new address and
press enter. If this address is already in use, a warning icon will
be shown.
5> To change the DMX output line, press [DMX Line=x] and enter
a new output line number 1-12.
6> Press Enter or [Repatch] to confirm the change.
TitanUniversal_Man_v5-0_TT.doc 23 September 2011
Page 42

Page 42 – 3. Patching
7> Repeat from step 3 if you want to change other fixtures.
• You can “Park” the fixture using [Park]. This removes the
• If the new DMX address already has another fixture or dimmer
fixture from the DMX output map, but all programming is
retained.
patched on it, the console will warn you (unless t his is disabled
in User Options, see section
12.3.3 on page 165). You can
either press [Select another DMX address] to abort the change
or [Park Conflicting Fixtures]. All programming for the parked
fixture is preserved, but you need to repatch it to a free DMX
address using the above procedure before you can use it again.
If you press [Always Park Conflicting Fixtures] t he console will
park this and any future conflicting fixtures without warning
you. (You can change this option back in the User Settings).
3.2.2 Setting legends
You can set a legend for each fixture or dimmer you’ve patched which
is displayed in the Fixture Select touch button. This can be really
useful to help you identify the fixture.
1> At the main menu press [Set Legend].
2> Press the Select button for the fixture you want to legend.
3> Type the legend on the keyboard.
4> Press Enter when you have finished.
• You can set the same legend for multiple fixtures by selecting a
group of fixtures after pressing [Set Legend].
• You can automatically allocate User Numbers for multiple
fixtures by selecting a group of fixtures, then using softkey A on
the Set Legend menu. The first fixture will have the User
Number you entered, and the other selected fixtures will be
given a number increasing by 1 for each fixture.
• You can set a legend for the current page of fixtures using the
[Set Legend] function from the main Program menu. The
legend is shown on the touch button for the page and on the
HUD.
3.2.3 View Fixture Patch
The fixture patch view allows you to see and edit how fixtures are
patched on the console.
To open the fixture patch view, press the white
the numeric keypad) followed by [Fixtu re Patch]. You will get a table
TitanUniversal_Man_v5-0_TT.doc 23 September 2011
View button (next to
Page 43

3. Patching - Page 43
on the touch screen showing all your fixtures. The list of fixtures can
be filtered by typing in a search term on the keyboard. You can also
use the wheels to scroll around the list and select different fixtures, or
touch the list or one of the fixture buttons. As you select a fixture its
button will be highlighted in red.
You can edit the selected item by pressing [Edit]. This option toggles
between [Edit] and [Search] modes.
• Please note that some values are input in the follow ing form:
-Handle Number: {Page}.{Index}
-DMX address: {Universe}.{Address}.
• You can choose which columns are displayed by pressing
[Columns] and choosing which columns to hide or show.
• You can Park a fixture by moving to its DMX address and
deleting the address using the left arrow key (or backspace on
the keyboard).
3.2.4 DMX view window
When you’re having problems getting fixtures to work it can be useful
to see the actual DMX output values coming from the console. Press
View, then [Open Workspace Window], then select [DMX].
TitanUniversal_Man_v5-0_TT.doc 23 September 2011
Page 44

Page 44 – 3. Patching
The buttons on the left let you select the different output lines from
the console. Scrolling the window to the right shows more in formation
about each DMX channel.
3.2.5 Fixture Exchange
The Fixture Exchange function enables you to repatch fixtures in your
show using alternative fixtures, retaining important elements such as
cue times, shapes and legends. This is very useful for touring shows
and venues with a high turnover of events.
For example, if you have programmed your show in a venue which
has MAC 500s and are moving to a venue with VL6s you can
exchange the MAC 500s for VL6s whilst retaining many elements of
your show.
Fixture Exchange works best if you use Palettes to create your cues.
This allows you to adjust for position differences and so on by
reprogramming a few position palettes, rather than having to
reprogram every cue. Cues recorded with absolute values will need to
be re-recorded, preferably using palettes.
TitanUniversal_Man_v5-0_TT.doc 23 September 2011
Page 45

3. Patching - Page 45
The pan, tilt and dimmer will always be preserved from one fixture
type to the next, as will times, shapes and legends for recorded
items. Links from the palettes to groups, cues, chases and cue lists
will also be preserved, so the show can be easily recreated by
updating your palettes as normal.
Fixture exchange also gives you a powerful way to re-use an existing
show with new lights, so you can give yourself a programming head
start when faced with a new fixture.
• It’s a good idea to save your show before performing major
changes such as fixture exchange. Should you change your
mind or have problems, you will easily be able to return your
show to its previous state.
1> Enter patch mode by pressing Patch.
2> Select the new fixture type you wish to use.
3> Touch the select button of the fixture which is to be exchanged.
4> The console will warn you that the fixture is in use. Press the
[Exchange Fixture] option.
5> Repeat from step 3 to exchange other fixtures with the same
type of new fixture.
After exchanging fixtures you need to update the
palettes which used those fixtures. If you have trouble
switching values off in a palette, set new values for all
the attributes in the attribute group and re-record the
palette. You should then be able to switch off an
attribute group as required.
3.2.6 Update personalities
This option allows you to update the personality for a fixture used in
your show. Normally a copy of each fixture personality in the show is
saved in the showfile, so updating the personality library on the
console does not update fixtures which are already patched.
• It’s a good idea to save your show before using Update
Personalities, then you will be able to undo any chan ges if you
change your mind or have problems.
1> Enter patch mode by pressing Patch.
2> Press [Update Personality].
3> The console shows you a list of personalities used in the show
which can be updated.
4> Press the personality you want to update.
• The new personality is loaded from the Titan/Personalities
folder.
3.3 Copying, moving and deleting fixtures
3.3.1 Copying or moving a patched fixture
Using the Copy/Move/Link button you can make a copy of an existing
fixture or move it to a new button. You cannot link fixture buttons.
You can copy or move multiple fixtures in one operation.
TitanUniversal_Man_v5-0_TT.doc 23 September 2011
Page 46

Page 46 – 3. Patching
Move is useful for tidying up the console.
1> Press the
Copy/Move/Link button.
2> Select [Copy] or [Move]. Pressing the Copy button again will
also toggle through these options.
3> Press the Select button of the fixture you want to copy/move.
You can select multiple fixtures.
4> Press the empty Select button where you want it to go.
• The Menu Latch button latches the Copy/Move/Link menu, so
you can keep copying or moving things without having to keep
pressing the Copy/Move/Link button. Press again to unlatch.
• The [Retain Layout] or [Bunch Up] option is used when copying
a group of fixtures with empty handles in the group – you can
either keep the empty handles, or bunch up the used handles
together.
• When in Copy mode, option [Copy Legends] can be changed to
[Don’t copy legends] so that the copied fixtures are given
default legends.
• When in Move mode, [Swap Items if Required] will attempt to
reposition any existing handles which are in the way of the
move. This is useful when rearranging buttons on a page which
is nearly full.
3.3.2 Using copied fixtures
Fixture copying is very useful if you need an additional fixture of a
type you’ve already patched and programmed. The new copy will
come complete with all the cues and palettes of the original fixture
you’ve copied.
The copied fixture will be “Parked” (have no DMX chan nel allocated)
and you will need to repatch it before you can use it (s ee section
3.2.1 above).
3.3.3 Deleting a patched fixture
You can delete a fixture or dimmer from a button if you patched it
accidentally or if you change your rig and want to use the button for
something else.
All programming for the fixture is also deleted. You
cannot undo deletion of a fixture or get the
programming back by repatching a fixture to the same
handle.
If you think you might need the fixtures again later,
copy them to an unused fixture page.
1> Enter Patch mode by pressing the Patch button.
2> Press the Delete button.
3> Press the Select button of the fixture you want to delete.
4> The button will light up red and the console asks for
confirmation. Press the Select button again to confirm.
• You can delete a range of fixtures in one operation.
TitanUniversal_Man_v5-0_TT.doc 23 September 2011
Page 47

3.4 Advanced options
3.4.1 Swap pan and tilt
This allows you to make the pan channel control tilt and the tilt
control pan. This can be useful for fixtures rigged in strange
orientations.
1> Press Patch.
2> Press [Edit Fixtures]
3> Press [Swap Pan and Tilt].
4> Select the fixtures to be pan-tilt swapped. Press [Pan and Tilt
…] to select either [Swapped] or [Normal] for the selected
fixtures.
5> Press Exit when finished.
3.4.2 Invert attributes
This option inverts individual attributes of fixtures. Useful if you have
a fixture which pans right when the rest pan left, saving a trip up the
rig to set fixture options, but you can invert any attribute.
3. Patching - Page 47
1> Press Patch.
2> Press [Edit Fixtures].
3> Press [Invert Attribute]
4> Select fixture(s) to be changed.
5> Select the attribute to invert from the softkeys. The display
shows [Inverted] when the attribute is inverted.
6> Press Exit to finish.
• You can change the invert on multiple fixtures by selecting
more than one, but the “Inverted” display will not show if there
is a mixture of inverted and non-inverted fixtures in the
selection.
• Some attributes cannot be inverted.
TitanUniversal_Man_v5-0_TT.doc 23 September 2011
Page 48

Page 48 – 3. Patching
3.4.3 Freeze fixtures or attributes
This option allows you to freeze individual attributes of a fixture, or to
freeze the whole fixture. Attributes or fixtures which are frozen are
not affected by playbacks or by the programmer.
1> Press Patch.
2> Press [Edit Fixtures]
3> Press [Freeze Fixture or Attribute].
4> Select the fixtures to be frozen/unfrozen.
5> Use the softkeys to select which attributes are frozen, or to
freeze the whole fixture. Frozen attributes are indicated on the
softkey.
6> Press Exit when finished.
3.4.4 Editing the personality
Sometimes you may find a fixture personality contains errors and
needs editing. You can edit personalities directly on the console.
1> Press Patch.
2> Press [Edit Fixtures]
3> Press [Edit Personality].
4> The softkeys show a list of all fixture types patched in your
show. Select the fixture type to be edited.
5> Personality Builder will open allowing you to edit the
personality.
6> When you save changes, your show will be updated with the
edited personality. Your changes are also saved to the fixture
library on the console.
• A separate user guide for Personality Builder is available from
the Avolites website.
TitanUniversal_Man_v5-0_TT.doc 23 September 2011
Page 49

4. Controlling dimmers and fixtures - Page 49
4. Controlling dimmers and fixtures
When you are programming a show, and sometimes when you are
running a show, you need to manually control the fixtures and
dimmers to set the intensity, position, colour, etc. To do this you first
select the fixtures you want to change using the select buttons, then
you set the attributes of those fixtures using the Wheels and Attribute
buttons.
4.1 Using the select buttons and wheels
4.1.1 Selecting fixtures and dimmers for control
To select the fixtures or dimmer channels that you want to control,
you use the Fixture Select buttons to select the fixtures into the
Editor. You can select fixtures or dimmers individually, or several at
once.
Scroll slider
1> Press the Select buttons for the fixtures you want. The select
button will light up pale blue for selected fixtures (they are also
shown in light blue on the HUD).
2> To select a range of fixtures, slide your finger across the touch
buttons. To select a large number of fixtures you can touch and
hold the Select button for the first fixture, then touch and hold
the Select button for the last fixture, then release the button for
the first fixture.
Here are some other things to know:
• Press Locate (at the bottom right of the console) to light up the
selected fixtures in open white and move them to a central
position. See the next section for more Locate options.
• You can deselect a fixture by pressing the select button again.
• At the top of the touch screen just above the top windows, the
console will show you which fixtures are currently selected.
• Press Clear (right of numeric keys) to deselect all fixtures and
remove all changes from the programmer. See the next section
for more Clear options.
TitanUniversal_Man_v5-0_TT.doc 23 September 2011
Page 50

Page 50 – 4. Controlling dimmers and fixtures
• Once you have changed any attribute, pressing a Select button
will deselect all fixtures and start the selection process again.
All previously selected fixtures (since you last pressed Clear)
stay in the programmer. Once a fixture has been edited, the
button shows a darker blue (also on the HUD). The picture
below shows the first two fixtures selected, with the second
three in the programmer and the others unselected.
• You can select fixtures on another page by touching one of the
page buttons to the left of the fixture buttons, if you have
'Pages' set to Show (using the context button to the left of the
menu buttons). Otherwise you can use the scroll slider to show
other pages.
• Using Key P rofiles (see section
12.2.1 on page 162) you can set
the fixture touch button to latch mode so that it turns the
fixture’s dimmer channel on (like putting a preset fader to full).
4.1.2 Setting fixtures to a start position (Locate)
The Locate button (the button on the bottom right corner of the
console) is used to put the fixture into a known position with light
coming out, so that you can start programming it.
A quick press of the button will move all selected fixtures to a central
position and reset all the attributes so that you get a white light.
However you sometimes might not want to move the fixture, and by
holding down the Locate button, you get some more options.
• You can mask off some of the Locate settings (such as only
turning the fixture on, but not changing its position or colour)
by holding down Locate and pressing [Set Mask to Exclude All].
Then (still holding Locate) turn on the Attributes you want to
change using the Attribute Bank buttons down the right hand
side. Only the lit attributes will be changed by Locate. Pressing
the Attribute Options button (just above Locate) will clear t he
mask.
Scroll slider
• Option [Auto Reset Mask] sets the mask to be automatically
reset to include everything each time Locate is pressed, or you
can toggle the option to [Remember Mask] which will keep th e
mask setting you used last time.
• Option [Clear/Don’t Clear Located Attributes] sets whether the
attributes changed by the Locate function will be saved into any
TitanUniversal_Man_v5-0_TT.doc 23 September 2011
Page 51

cues you store. If the option is set to “Clear” then the Located
attributes will not be stored in the Programmer unless you
modify them using the wheels. This is useful if for example you
want to program a cue which sets the position of fixtures, but
does not turn them on. The Locate button will light up the
fixtures for programming, but the lit state will not be stored in
any cues you save.
To quickly locate without changing pan/tilt, hold Locat e
and press the Pan/Tilt (or Position) button, then release
Locate.
To quickly locate pan/tilt only, hold Locate, press
Attribute Options (just above Locate), then press
Pan/Tilt (or Position), then release Locate.
4.1.3 Clearing selection
The Clear button (on the right of the numeric keypad) is used to
remove all changes from the Programmer and deselect all fixtures. A
quick press of the Clear button just clears everything, however if you
hold down the Clear button, then more options are available.
4. Controlling dimmers and fixtures - Page 51
• You can mask which attributes are to be cleared (for example,
leaving the pan/tilt in the programmer but clearing everything
else) by holding down Clear and pressing [Set Mask to Clear
Nothing]. Then (still holding Clear) turn on the Attributes you
want to change using the Attribute Bank buttons down the right
hand side, or press [Set Mask] and use the softkeys. Only the
lit attributes will be cleared. Pressing the Attribute Options
button will clear the mask.
• [Clear Options] opens a submenu showing some further options
(described below).
• [Clear All Fixtures/Selected Fixtures] sets whether all fixtures
will be cleared from the programmer, or if only currently
selected fixtures will be cleared. This is useful if you want to
clear specific fixtures.
• [Individual Attributes] allows you to clear individual at tributes
from the Programmer. When you press the softkey, you are
given a list of attributes in the Programmer – press the
appropriate softkey to clear that attribute.
The options in the “Clear Options” submenu are:
• [Auto Reset Mask] sets the mask to be automatically reset to
clear everything each time Clear is pressed, or you can toggle
the option to [Remember Mask] which will keep the mask
setting you used last time.
• [Leave/Zero Preset Fader Levels] is used to set whether latched
fixtures are cleared (the fixture key profile can be set to “Latch”
mode, which turns on the fixture dimmer channel when the
fixture button is touched. See section
• [Freeze current values] sets what happens to LTP (nonintensity) channels you have modified. If set to [Freeze Current
Values] the channels remain as you set them. If set to [Release
TitanUniversal_Man_v5-0_TT.doc 23 September 2011
12.2.1 on page 162.)
Page 52

Page 52 – 4. Controlling dimmers and fixtures
To Playback Values] the channels will go back to how they are
set in the current playback. For example: you have an active
playback making some lights green, then you select the lights
and change them to red. If you press Clear with this option set
to [Freeze] then the lights remain red. If the option is [Release]
the lights will go back to green.
You can use the Channel Grid window to selectively attributes from
fixtures. See section
4.2.1 on page 66.
4.1.4 Changing attributes using the wheels
“Attributes” are the functions of the fixture, like pan, tilt, colour,
dimmer, etc. You select which attributes you want to modify using
the Attribute Bank buttons and set values using the wheels. The
attributes available depend on the fixture type. Dimmer channels only
have a dimmer attribute.
Attribute bank buttons
Wheels
You can also select attributes by touching the IPCGBES buttons on
the touch screen, and modify them using the Attributes workspace
window; this is described in the next section.
Each attribute button controls several attributes, one on each wheel.
1> With some fixtures selected, press the button for the attribute
to be changed
2> Turn the wheels to set the attribute. The display above the
wheels shows which attributes are being controlled, and the
settings which are available scroll up and down as you turn the
wheels.
You can also touch the roller image on the screen to change
the attributes up or down by one. For continuously variable
controls like a dimmer, touching the roller will set the attribute
to full or zero.
TitanUniversal_Man_v5-0_TT.doc 23 September 2011
Page 53

4. Controlling dimmers and fixtures - Page 53
3> Repeat from 1 to change other attributes of the selected
fixtures.
Some other things to know about attributes:
• If an att ribute is in the programmer, it is highlighted (as shown
with the “Green” setting in the screen picture above). This
provides a quick way to see which attributes are in the
programmer.
• You can also select the attribute to be changed from the
softkeys by pressing the “Attribute Options” button.
• If the display above the wheels does not show the attribute
when you press the button, that attribute is not available on the
selected fixtures.
• If the wheel display shows a small arrow next to the legends,
this means that there are further attributes to control. Press the
Attribute button again to toggle through the attributes.
• The wheels operate in an “acceleration” mode. If you spin the
wheel fast, the fixture changes in larger steps. If you move the
wheel slowly, the fixture moves in its smallest increment.
• Holding down the Avo button while turning a wheel puts the
wheel into “Fast” mode. When in this mode, a single rotation of
the wheel changes the attribute you are controllin g over its full
range. For example, if while moving the Pan wheel you hold
down Avo the fixture will make a complete pan movement
between end stops in one rotation of the wheel.
• Some LED colour mixing fixtures have a Virtual Dimmer
function (using the Intensity wheel) which offers intensity
control by mastering the RGB levels when the fixture itself does
not provide an intensity channel.
4.1.5 Setting attributes using the touch screen
For attributes with fixed values such as gobos and fixed colour
wheels, the Attribute Editor window can be easier to work with than
the wheels. It also offers a colour picker window for fixtures with RGB
or CMY colour mixing.
TitanUniversal_Man_v5-0_TT.doc 23 September 2011
Page 54

Page 54 – 4. Controlling dimmers and fixtures
Touch here to change
Touch here to open
attribute editor
Touch here to change attribute
values up and down
Press
View then [Open Workspace Window] then [Attribute Editor] to
attribute bank
show it. As a shortcut you can also show it by touching the attribute
name text just below the IPCGBES buttons (for example Colour Func
in the above picture).
The buttons on the left of the window select the attribute to change.
The rest of the window contains buttons or controls to set the
attribute value. For attributes such as gobos and fixed colours, a
button is provided for each one, making selection a lot quicker than
scrolling through on a wheel.
When you apply an attribute, the button turns blue to show that the
attribute is in the programmer. If you touch the button again, the
attribute will be removed from the programmer.
Touching the title of each attribute (such as “Colour Func”) expands
the attribute to the full window, displaying more buttons.
For fixtures which are capable of colour mixing, you can select a
colour from an onscreen palette of colours. The slider on the right
hand side sets the intensity.
TitanUniversal_Man_v5-0_TT.doc 23 September 2011
Page 55

4. Controlling dimmers and fixtures - Page 55
For variable attributes like Dimmer, holding down th e button will
display a horizontal slider bar. You can then move your finger left or
right to change the value.
Active fixtures such as media servers will display a thumbnail of the
media clip in the button. The media server must support CITP and be
patched as an active fixture.
Fixtures which support keystoning or blades/shutters can be
controlled graphically in the attribute window. Select and drag the
corners or sides of the image to control the fixture.
TitanUniversal_Man_v5-0_TT.doc 23 September 2011
Page 56

Page 56 – 4. Controlling dimmers and fixtures
Updated personality files may be required to support the
keystone/blade functions.
4.1.6 Setting attributes from the softkeys
You can directly enter a numeric value for the attributes which are
live on the wheels. You must be at the main Program menu to do this
(keep pressing Exit until the vertical menu bar shows “Program
Menu”).
Type a number on the numeric keypad then press one of the softkeys
to set the value to the fixture. The Softkey legend will show what
effect your value is going to have (such as [Gobo 5], or [Deep Blue]).
For attributes displayed in percent, such as Dimmer, or Colour Mix,
you enter a value from 0-100 to set the percentage output. For
attributes where the output is divided up into ranges, such as colour
wheels, you enter the index of the range you want. For example to
select the 3rd colour (as displayed in the list above the wheel) you
would enter 3.
4.1.7 Selecting fixtures and dimmers by number (Channel)
In some situations, for example when programming lots of dimmers,
it can be easier to type in the dimmer channels you want to program.
The Channel menu allows you to do this for dimmers or fixtures. To
access the Channel menu, press the Channel button on the top left of
the numeric keypad. You can also simply start typing numbers on the
TitanUniversal_Man_v5-0_TT.doc 23 September 2011
Page 57

4. Controlling dimmers and fixtures - Page 57
keypad, when you press Thro, And or @ (functions of the arrow
buttons below the numeric keypad) then the Channel menu will be
shown.
Fixtures may be selected by User Number, Handle Number or DMX
Address, as set by the option on Softkey A.
For Through, And and @ you can either use the softkeys or the grey
arrow buttons below the numeric keypad.
When using the Channel menu it is helpful to latch it by pressing the
Menu Latch button.
• To select a fixture, type the number and press Enter.
• To select more than one fixture, press the [And] softkey
between each number. For example 1 And 2 And 5 Enter will
select 1, 2, 5.
• To select a range of fixtures, press [Through]. For example 1
Through 8 Enter will select 1-8.
• To miss out fixtures in a range, use [Not], for example 1
Through 4 Not 3 Enter will select 1, 2, and 4.
• The @ softkey sets a dimmer level to the selected fixtures, for
example 1 Through 8 @ 5 Enter will set 1-8 at 50%. (You can
choose whether 50% is entered as “5” or “50” in the User
Settings – see section
12.3.3 on page 165). When you press @
there are softkey options for Full, Off and +/- (increase or
decrease brightness).
• You can work with Groups using the Group button, for example
Group 1 And Group 2 Not 5 Enter will select all fixtures in group
1 and group 2 except for fixture 5.
• You can use the Locate button instead of Enter, to select
fixtures and locate them. For example 1 Through 4 Locate will
select fixtures 1 to 4 and locate them.
• When entering a command, the command line is shown on the
display. You can go back using the grey ← button and you can
abandon the line using the grey → button.
• The AND, THRO and @ functions are also provided on the arrow
buttons as printed next to the buttons.
4.1.8 Selecting using a pattern
When programming you will often want to select patterns of fixtures.
Rather than having to individually select and deselect fixtures,
Tiger Touch has an easy way of selecting odd then even fixtures in a
range of fixtures, or it can, for example, select every 4
1> Select some fixtures.
2> Press the white “All” button (below the Next Time button to the
right of the wheels).
TitanUniversal_Man_v5-0_TT.doc 23 September 2011
th
fixture.
the
Page 58

Page 58 – 4. Controlling dimmers and fixtures
3> Select a pattern from the softkeys. Your selection is modified so
you will only be controlling, say, the odd fixtures.
4> Press the white “Next” button to change the selection to the
next stage of the pattern.
5> To end the pattern selection, press All twice.
• For example, if you are programming a chase using 16 fixtures
and you want every 4
select the 16 fixtures, then press All, then D [1 in 4]. You will
see that the 1
you can create the look for those fixtures. Then press Next, and
nd
the 2
, 6th, 10th and 14th fixtures will be selected ready for
st
, 5th, 9th and 13th fixtures are now selected, and
th
fixture to do the same thing, you just
programming. After you have programmed the fourth set of
fixtures, the pattern will go back to the first position again, until
you press All twice to end.
• You can enter your own patterns using the numeric keypad and
softkeys, for example “2” A [In] “6”.
4.1.9 Selecting fixtures which are in a palette or playback
To select fixtures which are controlled by a particular palette or
playback use the Select If function.
To select fixtures used in a playback or palette, press Channel,
[Select If] then the palette or playback button.
You can also use Select If with the @ and Through buttons on the
numeric keypad to select fixtures set to a particular intensity.
@X: fixtures set to intensity X
@ Through X: fixtures with intensity 0 – X
@ X Through: fixtures with intensity X – Full
@ X Through Y: fixtures with intensity between X and Y
@@: fixtures with intensity above 0.
Intensity levels may be input as 0-9 or 00-99 depending on the User
Setting [Channel Levels Set In].
4.1.10 Attribute groups – IPCGBES-FX
To make life a bit simpler, the console groups together attributes
which have similar effects, using the letters IPCGBE S-FX.
TitanUniversal_Man_v5-0_TT.doc 23 September 2011
Page 59

4. Controlling dimmers and fixtures - Page 59
I-Intensity (dimmer, strobe shutter)
P-Position (pan, tilt)
C-Colour (colour wheel, CMY mixing)
G-Gobo (gobo wheels, gobo rotate, gobo position)
B-Beam (iris, focus, zoom, beam shaper)
E-Effects (prism)
S-Special (motor speeds)
FX-Shapes, pixel mapper
These groups are used to select which attributes you want to work
with in many of the functions on the console, particularly when you
are “masking off” certain attributes from being saved.
Above the attributes roller on the screen, the console shows you
which attribute group you are currently changing (the grey box). The
Attribute Group is also highlighted in blue if the programmer contains
any of those attributes. For example in the image above we are
currently changing Colour attributes, but Int ensity and Special
attributes have also been modified.
4.1.11 Using fixture groups
You can create groups of fixtures or dimmer channels, which can then
be quickly selected together by touching a group button (shown in
the Groups window) or typing the group number. You can, for
example, make a group for each type of fixture, or group by stage
left / stage right, etc.
Auto Groups
When patching multiple fixtures, the console automatically creates
groups for you. A fixture type group is created which contains all
fixtures of the same type (for example, [All Mac 2000]). Another
group is created each time you patch a quantity of fixtures (for
example, [4 BB4].) This function can be turned off using [Auto
Groups] in the User Settings.
TitanUniversal_Man_v5-0_TT.doc 23 September 2011
Page 60

Page 60 – 4. Controlling dimmers and fixtures
If the Groups window is not visible, you can show it by pressing View,
Group (above numeric keys).
1> Select the fixtures/dimmers you want in the group (the order in
which you select them will also be stored in the group).
2> Press the grey Group button (top right of the numeric keys).
3> Press [Record Group]
4> Use softkey A to enter a number for the group, or B [Provide a
legend] to set a legend.
5> Touch an empty Group button where you want to store the
group, or press C [Store] to store as a numbered group.
6> Press Clear then repeat from 1 to store other groups.
• You can also press the Avo button and the Group button to go
directly to the Record Group menu, or touch the button twice to
use Quick Record – on the first touch the button will turn red
with a +, on the second touch the group will be recorded.
• To select all the fixtures/dimmers in a group, just press the
button for the group.
• The order in which you originally selected the fixtures when
creating the group is also stored. This takes effect when you
use the last fixture – next fixture functions described in the
next section, and when you use Shapes, Fan mode and Fixture
Overlap functions. You can change this later, see the next
section.
• You can also recall a group by its number:
1> Press the grey Group button.
2> Type in the number of the group you want to recall.
3> Press [Recall Group].
• The Group bu tton also gives you facilities on the softkeys to edit
and delete groups.
4.1.12 Fixture Order and Fixture Layout in groups
Fixtures in a group are stored with a selection order, which is used
with Shapes, Fan, and Overlap. You can also store a 2D position
layout for fixtures, giving the actual physical location of fixtures for
use with the Pixel Mapper effects.
To change fixture order:
1> Press [Edit Times].
2> Select the group you want to edit.
3> Press [Fixture Order].
The fixtures in the group will be shown numbered in t he fixtures
window.
TitanUniversal_Man_v5-0_TT.doc 23 September 2011
Page 61

4. Controlling dimmers and fixtures - Page 61
To change the order, select [Auto Increment] to On, then select the
fixtures in the order you want. If you press a fixture twice, it will
show an X indicating that it is not part of the sequence.
To change fixture layout:
1> Press [Edit Times]
2> Select the group you want to edit.
3> Press [Edit Layout]. The Layout Editor window will open.
Initially fixtures will be all in a row. You can reposit ion the fixtures
anywhere on the screen by dragging them. Or press a fixture to
select then use the wheels to move it around the grid. You can resize
the grid by dragging the bottom or right sides.
The [Arrange Fixtures] command will automatically place the fixtures
in a rectangular block, you specify the number of rows (Height) and
columns (Width).
4.1.13 Stepping through selected fixtures one at a time
If you have selected a range of fixtures, or a group, the console has
functions to step through the selected fixtures one at a time. This can
make it easier to program a range of fixtures because you don’t have
to select each one manually.
This mode uses the Prev/Next/All/Hilight buttons to the right of the
Go button.
1> Select a range of fixtures or a group.
TitanUniversal_Man_v5-0_TT.doc 23 September 2011
Page 62

Page 62 – 4. Controlling dimmers and fixtures
2> The Prev and Next buttons will select the fixtures in the range
one at a time (in the order you selected them).
3> The ALL button will select all fixtures in the programmer
(everything which has been selected since Clear was last
pressed).
• The Hilight function can be used to highlight the output of the
selected fixture (make it brighter onstage), see the next
section.
4.1.14 Highlighting the selected fixture with Prev/Next
When stepping through a fixture selection using the Prev/Next/All
buttons, you can highlight the selected fixture on stage. This makes it
very easy to see which fixture you are controlling. The ot her fixtures
in the selection go to a dimmed “lowlight” level.
• Press the HiLight button to enable highlight mode. Press HiLight
again to disable. When you are in highlight mode, the
highlighted attribute is overridden and any changes you make
to it are not stored in the programmer (so if the highlight uses
intensity, you cannot change the intensity of the fixture).
• You can change the levels used for Highlight/Lowlight by
holding Avo then pressing HiLight, [Store Highlight State] or
[Store Lowlight State].
4.1.15 Align fixtures
You can copy attributes from one fixture to another using the Align
Fixtures function. This is very useful, for example, if you’ve
accidentally left a fixture out of a cue you can copy settings from its
neighbour.
1> Select the fixtures you want to Align.
2> At the top level menu press Fixture Tools/Menu Latch (just
below the G softkey) then [Align Fixtures].
3> Set the mask to include the attribute groups you want to copy
(using the Attribute Bank buttons on the right of the console,.or
the softkeys set options for exclude and include all attributes).
4> Touch the select button of the fixture you want to copy the
settings from.
4.1.16 Flip
Moving head fixtures can point at the same stage position from two
possible yoke positions. Sometimes to get the fixture moving the
same as other fixtures, you need to swap to the opposite yoke
position and the Flip function lets you do that.
1> Select the fixtures you want to Flip.
2> At the top level menu press Menu Latch then C [Flip Pan and
Tilt].
TitanUniversal_Man_v5-0_TT.doc 23 September 2011
Page 63

4.1.17 Fan mode
Fan mode automatically spreads out the values on a selected range of
fixtures. If used on pan and tilt, the result is spreading ou t “rays” of
light beams. The first and last fixtures of the range are affected most,
and the central fixtures are affected least. The amount of fan can be
set using the attribute wheels.
As with shapes, the order in which you select the fixtures sets how
the fan effect works. The fixtures you select f irst and last will be the
ones which change most. If you use a group to select the fixtures,
the order you selected the fixtures when you recorded the group is
used.
The fan effect, while normally used on pan or tilt attributes, can be
applied to any attribute.
4. Controlling dimmers and fixtures - Page 63
The settings used for Flip are defined in the fixture
personality. If Flip doesn’t work you may need to update
to the latest personality.
1> Select the fixtures you want to fan.
2> Press the Fan button.
3> Select the attribute you want to Fan using the attribute bank
buttons.
4> Set the amount of fan using the attribute wheels.
5> Turn off Fan by pressing the Fan button again when you have
finished.
If you have selected fixtures from multiple groups, you can choose
whether the fan effect works with or ignores the groups. For example
if you have 12 fixtures across the stage in 3 groups of 4, you may
want a fan of light beams spread evenly across the stage, or you may
want 3 groups of separately fanned light beams.
By holding down the Fan button you can select:
• [Ignore groups] All fixtures are fanned as one large group
• [Fan group as fixture] All fixtures in a group take on the same
value.
• [Fan Within group] Fan runs across individual fixtures in each
group.
Holding down the Fan button also allows you to select the Curve used
for the fan. The different curves allow you to obtain different fan
effects.
Fan mode needs to be used on at least 4 fixtures to give good effects.
If you have an odd number of fixtures, the cent ral fixture will not
change in fan mode.
Press the Fan button again to leave Fan mode. Any effects you have
set will remain in the programmer.
TitanUniversal_Man_v5-0_TT.doc 23 September 2011
Page 64

Page 64 – 4. Controlling dimmers and fixtures
It’s fairly easy to accidentally leave Fan mode turned on
and be very confused about why the wheels aren’t
working properly, so turn it off as soon as you have
completed the effect. To avoid this there is a User
Setting ‘Press and hold Fan’. If enabled, you have to
hold down the Fan button to enable Fan mode. See
section 12.3.3 on page 165.
Fan Curves
You can select different curves to use when in Fan mode. Hold down
the Fan button and select [Curve], the options are:
• Line: Traditional fan, the first and last selected fixture are
affected equally in opposite directions, the midpoint remains
unchanged. This remains most useful for pan.
• Pull Middle - The first and last selected fixture remain at the
current value, the midpoint is affected most. This is useful for
colour mixing, tilt and dimmer.
• Pull Ends - The first and last selected fixture are affected most,
the midpoint is unchanged. This is useful for colour mixing, tilt
and dimmer.
• Arrow - The first and last selected fixture are affected equally to
the midpoint fixture but in the opposite direction. This is useful
TitanUniversal_Man_v5-0_TT.doc 23 September 2011
Page 65

4. Controlling dimmers and fixtures - Page 65
for colour mixing, tilt and dimmer
.
Fan Parts
When using the Fan function you can split the fan into a number of
groups. Select all the fixtures, hold down Fan and type a number on
the numeric keypad. The Fan will divide into that nu mber of parts, for
example:
Normal (1):
2:
TitanUniversal_Man_v5-0_TT.doc 23 September 2011
Page 66

Page 66 – 4. Controlling dimmers and fixtures
3:
4.2 Viewing and using numerical values
4.2.1 The Channel Grid window
It can sometimes be useful to display and edit exactly what each
fixture is doing. The Channel Grid window allows you do to that.
Display it by pressing the white Channel Grid button to the right of
the screen, or pressing
[Channel Grid].
The window can be set to different modes using the context buttons
to the left of the menu. The modes are:
View then [Show workspace window] then
• Playbacks: shows which playback is controlling each attribute of
each fixture
• Levels: shows the output levels of each attribute. These may be
shown numerically or as range names.
• Palettes: shows which palettes are allocated to fixture attributes
• Shapes: shows which shapes are running on fixtures
• Output/Programmer: switches between the attributes on the
console output, and the attributes currently in the programmer
TitanUniversal_Man_v5-0_TT.doc 23 September 2011
Page 67

4. Controlling dimmers and fixtures - Page 67
• Highlight off/changes: if set to [Highlight changes] then
changing attributes will be highlighted.
• Narrow/Wide columns: changes the column width on the
screen.
You can select fixtures by touching the fixture names on the left of
the screen, or if you select any fixture values, the appropriate fixture
will automatically be selected.
You can clear attributes in the channel grid by selecting them (touch
or touch and drag to select multiple attributes). Then press Clear.
You can edit values by selecting one or more values in the grid, then
modify the values using the wheels, or type a new value on the
numeric keypad and press Enter.
4.3 Advanced options
4.3.1 The Fixture Tools / Menu Latch button
When the console is at the top level menu, this button opens the
Moving Light Actions menu which contains options to Locate Fixture
(same as the Locate button) and to run Macros on fixtures such as
Lamp On, Lamp Off, Reset etc. The Align Fixtures and Flip functions
as described above are also in this menu.
If another menu is loaded, the button latches the current menu. Press
Exit to get back to the top menu so that you can access the Moving
Light menu.
4.3.2 Lamping fixtures on and off
Many fixtures have a control channel which allows you to perform
functions like lamp on, lamp off, fixture reset, and so on. This can be
useful to shut down fixture lamps at the end of a show while the fans
continue to run, or to reset a fixture which has gone haywire.
The console allows you to access these functions using Fixture Macros
(not the same as keypress macros).
1> Keep pressing Exit until you are at the top level menu.
2> Select the fixtures you wish to control. Some macros will not
work across groups of fixtures from different manufacturers.
3> Press Fixture Tools/Menu Latch then [Macros].
4> The softkeys show a list of the functions available. Press the
one you want to action.
• Some macros involve timed sequences and can take up to 30
seconds to execute.
TitanUniversal_Man_v5-0_TT.doc 23 September 2011
Page 68

Page 68 – 4. Controlling dimmers and fixtures
TitanUniversal_Man_v5-0_TT.doc 23 September 2011
Page 69

5. Palettes
When programming a show you will find that you frequ ently use
certain positions, colours, etc. The console lets you store these
settings so you can recall them at the touch of a button rather than
having to find them on the wheels every time. This is very useful
when busking a show.
When you use a palette to record a cue, the console stores a
reference to the palette, rather than the actual value. This means
that if you program your cues using palettes, you can easily change
all the positions in your show just by reprogramming a few palette
entries rather than having to reprogram all the cues. This is handy if
you are touring and have to cope with different stages or truss
heights every show.
Palettes are stored and selected using buttons on the touch screen,
grouped into different windows for Colours, Positions and Gobos &
Beams. You can set a legend for each button so that you know what
you’re going to get.
5. Palettes - Page 69
If the Colours, Positions, Gobos & Beams windows are not shown,
press
View then [Open Workspace Window] then [Groups and
Palettes] to show all three windows.
TitanUniversal_Man_v5-0_TT.doc 23 September 2011
Page 70

Page 70 – 5. Palettes
5.1 Creating palettes
5.1.1 Which attributes are stored in palettes
Although each palette entry can store all attributes of a fixture, it’s
easier to operate the console if you create some palettes which only
set positions, some for colour, some for gobo and so on. The console
helps you with this by providing separate windows for Colour
palettes, Position palettes, and Gobo/Beam palettes.
When you store a palette, it will only contain what’s in the
programmer (the attributes you have changed since you last pressed
Clear). For example to create a colour palette you would just set the
colour, and not change any other attribute.
If the programmer contains more than one attribute, you can set a
mask to restrict which fixture attributes will be stored in th e palette.
Palettes may be either Shared or Normal. Shared palettes are used
where the same value is set for all fixtures of the same type – for
example when setting colours, the “Red” palette would set the same
colour values for “Red” to all MAC 2000 fixtures. Normal palettes are
used when each fixture requires its own value - for example when
programming positions, each fixture will have a different setting.
5.1.2 Storing a palette
This is how you save a palette value:
1> Press Clear to clear the programmer.
2> Select the fixtures for which you want to store palette values.
3> Using the attribute buttons and wheels, set the attributes you
want in the palette entry. You can store any or all attributes of
a fixture in each palette entry.
4> Press the Record Palette button
5> Set the palette Mask – this sets which attributes will be
recorded in the palette. Select attributes using the Attribute
Bank buttons – anything lit up will be saved. [Set Mask] and
[Record by] softkeys also control the Mask (see below).
TitanUniversal_Man_v5-0_TT.doc 23 September 2011
Page 71

5. Palettes - Page 71
6> Press an unused Palette button to store the palette. Or enter a
palette number and press [Store]
• The console will automatically set the palette as Shared or
Normal (by checking if the values to be stored are the same
across all fixtures of the same type). You can override the
setting by pressing softkey C.
• [Set Mask] allows you to specify which attribute groups will be
included in the palette. You can also use the grey Attribute
Bank buttons on the right hand edge of the console to set the
mask.
An attribute group is included when the softkey is inverted (like
the Colour group in the picture) and when the LED is lit on the
Attribute Bank button. If you use Quick Record (see next
section) the mask is automatically set by the workspace window
you save the palette in – Positions only includes P, Colours only
C and Beams includes IGBES. If you use the Record Palette
button then you need to set the mask manually.
• Press the Attribute Options button to toggle all mask groups
between Include and Exclude.
• [Record By…] allows you to control how the mask is used when
saving the palette. The options are:
[Channel in programmer] records only channels which are in
the programmer (which have been changed)
[Group in programmer] records all channels in any attribute
group which has one or more channels in the programmer. For
example if Cyan is in the programmer, all colour channel
settings will be recorded even if not in the programmer.
[Group in mask] records everything included by the mask set
on the attribute buttons
[Mixed] records by attribute group for Position and Colour but
by channel for all other controls.
TitanUniversal_Man_v5-0_TT.doc 23 September 2011
Page 72

Page 72 – 5. Palettes
• You can set a legend for the palette while you are saving it
using [Provide a legend]. See section
the palette legend.
• If you select a Palette button which is already used, the console
offers you options to [Cancel], [Replace] or [Merge] the existing
palette. [Replace] will erase the palette and save only the latest
changes you have made. [Merge] will combine your changes
with the palette. This allows you to add settings for additional
types of fixtures to a shared palette. Pressing the palette button
again will automatically merge.
5.1.3 Quick record
The palette windows allow you to quickly record a new palette. Just
touch the button where you want to record – the button will turn red
with a + sign. At this point you can enter a legend for the new palette
or change mask settings. A second press on the button will save the
palette.
5.1.4 for how to change
• When us ing Quick Record, the palette mask is automatically set
to match the window, so if you touch a button in the Position
window, the mask will be set to only store position attributes.
This does not happen if you use the Record Palette button.
Quick record also works for groups, workspaces and the playback
window.
5.1.4 Setting legends for palettes
You can enter a legend for each palette which is displayed on the
palette touch button.
1> Press [Set Legend] at the top level menu.
2> Press the palette button for the palette you want to legend.
3> Type the legend on the keyboard.
4> Press Enter when you have finished.
• On touch buttons, the palette number is shown top left. The
IPCGBES attribute groups contained in the palette are displayed
below your legend, so for example Position palettes will show a
P, colour palettes a C and so on. In the top right corner is
shown N for a Normal palette or S for Shared.
You can create a picture legend for your palette which could for
example represent the colour or gobo it will create. After pressing
[Set Legend] and the palette button, press [Picture]. The picture
editor will open.
TitanUniversal_Man_v5-0_TT.doc 23 September 2011
Page 73

5. Palettes - Page 73
The tab buttons on the top left allow you to select Keyboard entry
(legend reverts to text), Draw or Library. On the right you can choose
Pen or Eraser, set the pen/eraser size, set the colour (white in the
above picture), clear the whole picture, and Enter the legend. The Min
button top left reduces the editor to a smaller size.
If you select Library you can choose a picture from a wide range of
pre-programmed pictures. The pictures are sorted into various folders
which are listed on the left.
5.2 Recalling palettes
5.2.1 Recalling a palette value
To recall a palette value from a button, this is what you do:
1> Select the fixtures to be changed. Shared palettes can be set to
any fixture of the same type. Normal palettes will set individual
values to each fixture.
2> Press the Palette button you want to recall. The palette will be
set to the selected fixtures.
TitanUniversal_Man_v5-0_TT.doc 23 September 2011
Page 74

Page 74 – 5. Palettes
• You can make palettes fade over a time when you recall them,
see section
You can also recall a palette by its number by typing the number on
the numeric keypad.
1> Select some fixtures
2> Press the Palette button above the numeric keypad
3> Type in the number of the palette you want to recall.
4> Press Enter or [Apply Palette]
• The [Apply Palette] softkey shows the legend of the palette
which will be applied.
5.2.2 Palette pages
Each of the palette windows can either display pages of palettes, with
page buttons on the left, or a continuous scrolling w indow of palettes.
To change between pages and scrolling, touch the Pages Show/ Hide
button in the context button area to the left of the menu buttons.
using the page buttons to the left of the palette buttons.
• You can recall a palette from any page using its number as
described in the previous section.
5.5.1 below.
5.2.3 Quick palettes with no fixtures selected
If you press a palette button when no fixtures are selected, the
palette will be set to all the fixtures the palette applies t o . This is
called a Quick Palette. For example if you’ve got some colour palettes
programmed for your MAC 2000’s, pressing one of the palettes when
no MAC 2000’s are selected will set the colour to all the MAC 2000’s.
5.2.4 Setting palettes to all fixtures in a playback
You can apply a palette to all fixtures in a particular playback. Hold
the palette button and press the select button of the playback which
the palette is to apply to.
5.3 Editing palettes
5.3.1 Viewing and editing the content of palettes
You can view the contents of a palette in the Palette View window.
This lists all fixtures in the palette and the attr ibute values stored for
them.
Press
open.
View, then the palette button. T he Palette View window will
TitanUniversal_Man_v5-0_TT.doc 23 September 2011
Page 75

To edit an attribute value, touch/click on it in the window. The
softkeys will give you a list of available settings for this at tribute or
you can type in a numerical value.
There is also a [Delete] button which allows you to remove the value
from the attribute. This is the same as using the Off function.
5.3.2 Changing the content of palettes
To edit a palette entry, press the Update Palette button, select the
palette to edit (this will automatically select the fix tures used in the
palette), make the changes you want, then press the [Update Palette
x] softkey to save the changes.
5. Palettes - Page 75
The Update Palette button also allows you to change the palette name
and number.
You can also load the palette into some fixtures, modify the attributes
and record the new information back on top of the existing palette
entry. The console will give you options on the soft keys to Replace or
Merge the palettes. If you select Merge, anything you haven’t
changed will not be affected, values you have changed or added will
be amended.
• You can set the console to “Always Merge” (so it doesn’t ask
you) using option A of the User Settings (hold down the Avo
button to set these). You can also press the palette button a
second time to select the Merge option.
• You can add additional fixtures to a palette without affecting
existing ones. For example, if you have colour palettes for Mac
600s, you can add colours for your Mac 500s without affecting
any previously recorded values in the palette.
• You can remove attributes from palettes using the Off function,
see section
7.3.5 on page 116.
• When editing a palette the state of the programmer will be
preserved; when the modified palette is saved, your original
programmer contents will be restored and the programmer will
be left in the same state as when you started editing the
palette.
5.3.3 Updating palettes used in a playback
If you need to quickly update a palette during a show, for example
you fire a green cue and the Green palette used turns out to be not
quite the right colour, the Update function lets you automatically
update the palette used in the cue.
TitanUniversal_Man_v5-0_TT.doc 23 September 2011
Page 76

Page 76 – 5. Palettes
1> With the cue fired, select the fixtures and change them to the
settings you want to store (e.g. the right green colour).
2> Press Record Cue, [Update].
3> The cues and palettes which can be updated are shown on the
softkeys and all other buttons are greyed out.
4> Press the palette button (for example, Green) twice to update
that palette.
• You can also select multiple palettes to be updated by
highlighting them in the softkeys then pressing Enter to
confirm.
5.4 Copying, moving and deleting palettes
5.4.1 Copying or moving a palette
Using the Copy/Move/Link button you can make a copy of an existing
palette or move it to a new button. You can copy or move multiple
palettes in one operation. You cannot link palette buttons.
Move is useful for tidying up the console.
1> Press the
Copy/Move/Link button.
2> Select [Copy] or [Move]. Pressing the Copy/Move/Link button
again will also toggle these options.
3> Press the Select button of the palette you want to copy/move.
You can select multiple palettes.
4> Press the empty button where you want it to go.
• The Menu Latch button latches the Copy/Move/Link menu, so
you can keep copying, moving or linking things without having
to keep pressing the
Copy/Move/Link button. Press Exit to
unlatch.
• [Retain Layout] or [Bunch Up] is used when copying a group of
palettes with empty handles in the group – you can either keep
the empty handles, or bunch up the used handles together.
• When in Copy mode, option [Copy Legends] can be changed to
[Don’t copy legends] so that the copied palettes are given
default legends.
• When in Move mode, [Swap Items if Required] will attempt to
reposition any existing handles which are in the way of the
move. This is useful when rearranging buttons on a page which
is nearly full.
5.4.2 Deleting palettes
You can delete a palette entry by pressing the Delete button, then
pressing the palette select button to be deleted. Press the palette
button again to confirm the deletion. You can delete a range of
palettes in one go by running your finger along the buttons.
Other ways to delete a palette:
• Press the Update Palette button, select a palette, use the
[Delete] softkey option.
TitanUniversal_Man_v5-0_TT.doc 23 September 2011
Page 77

• Press the Palette button above the numeric keypad and use the
[Delete] option in the [Palette Utilities] menu.
• Press Delete then [Palette], type the palette number, press
Enter.
5.5 Timing palettes
5.5.1 Fading a palette
A timed palette is a very useful tool allowing easy "busking" of shows.
When a palette is recalled in this way, a time is added and the palette
fades in over that time.
1> Select some fixtures
2> Type in the fade time for the palette on the numeric keypad
3> Press a palette button to recall the palette
• You have to re-enter the time each time you recall a palette. To
use the same fade every time, set a Master Time: Press Palette,
[Master Time]. To disable Master Time set to 0.
• Palette fading can be very useful when recalling a palette live
during a show, as you can smoothly move fixtures to a new
position or change colour slowly (on colour mixing fixtures).
5. Palettes - Page 77
• Palettes applied with a fade time do not get put into the
programmer, so will not be saved in any cues; don’t use fade
times when programming. This is to ensure that when used in a
live situation, the next cue will override the palette and play
back as intended.
5.5.2 Fixture overlap when recalling palettes
You can set a Fixture Overlap when recalling a palette, which means
that the palette will be applied in sequence to each fixture in the
group. This is a very quick way to busk some amazing effects. Fixture
Overlap=100% means that all fixtures will change together. Fixture
Overlap=0% means that each fixture must complete its fade before
the next will start its fade.
1> Type in the overlap time for the palette on the numeric keypad
2> Press [Set Overlap]
3> Type in the fade time if fade is also required
4> Press a palette button to recall the palette
• You have to re-enter the overlap each time you recall a palette.
To use the same overlap every time, set a Master Overlap:
Press Palette, [Master Overlap]. To disable Master Overlap set
to 100%.
5.5.3 Master Time for palettes
Option [Master Time] on the Palette menu (press the grey Palette
button above the numeric keypad) allows you to set a default fade
time. This fade time will be used for all palettes unless you manua lly
type in a different time. This can be useful when “busking” a show
with palettes.
TitanUniversal_Man_v5-0_TT.doc 23 September 2011
Page 78

Page 78 – 5. Palettes
The [Master Overlap] option similarly sets the default Overlap for
palette recall.
You can create macro buttons to set different palette
fade times. Press Macro, Record, press a button to store
your macro on. Then press Palette, [Master Time], 3
(for 3 sec), Exit, Macro.
Repeat these steps to create a Palette Snap button (0
sec), or a 1 sec fade button, and so on.
TitanUniversal_Man_v5-0_TT.doc 23 September 2011
Page 79

6. Shapes and Pixel Mapper effects - Page 79
6. Shapes and Pixel Mapper effects
The Shape Generator in the Tiger Touch (sometimes known as an
Effects Generator on other consoles) allows you to quickly create
exciting light shows using lots of movement and changes, with the
minimum of programming.
The Pixel Mapper is used to generate animated textures using the
colour or intensity of a group of fixtures (often LED battens,
starcloths or LED web type fixtures). When viewed at a distance the
effect becomes clearly visible.
A shape is simply an automatic sequence of values which can be
applied to any attribute of a fixture. A circle shape, for example,
applied to the pan and tilt attributes, would cause the fixture to move
its beam around in a circular pattern. You can set the centre point of
the circle, the size of the circle and the speed of the circle movement.
In addition to position shapes, there are a large number of other
shapes available in
the Tiger Touch. The shapes are defined for a
particular attribute such as colour, dimmer, focus and so on. Some
shapes will not work with some fixtures; focus shapes, for example,
can produce nice “focus pull” effects on fixtures which have DMX
focusing, but will do nothing on fixtures wh ich don’t have focusing.
A further category of shapes is the Block Shape. This type of shape
blocks out other shapes, preventing them from running. For example,
if some fixtures are running a Circle shape, and then a playback is
fired which has a Block Pan/Tilt shape on some of the fixtures, those
fixtures will stop running the circle shape. This can be very useful to
modify playbacks at showtime when used with the playback priority
feature (see section
7.6.5 on page 122).
When you use a shape with more than one fixture, you can choose to
either apply the shape identically to all the fixtures, or offset them so
that the shape runs along the fixtures creating “wave” or “ballyhoo”
type effects. This is called the Phase of the shape.
TitanUniversal_Man_v5-0_TT.doc 23 September 2011
Page 80

Page 80 – 6. Shapes and Pixel Mapper effects
6.1 Creating effects
6.1.1 Creating a shape
To create a shape you simply pick the attribute of the shape from a
list on the softkeys, then choose the shape you want from the Shapes
window. Shapes are organised using the IPCGBES attribute groups,
so you can pick from a list of Dimmer shapes, or a list of Pan/Tilt
shapes, or Colour shapes, and so on. You can also pick from a list of
All Shapes.
When you create a shape, it will be applied to all selected fixtures.
1> Select the fixtures the shape is to be applied to.
2> At the main menu press [Shapes and Effects] then [Shape
Generator].
3> Press [Create] to start a new shape.
4> Press a softkey to select the attribute type to use in the shape
or press [All shapes] for a full list.
5> Press a softkey to select a shape, or touch the desired shape in
the Shapes window. You can type a search word on the
keyboard to search for a particular shape.
6> The shape will be applied to all selected fixtures.
• If you open the Shapes window, it will remain open for instant
selection of shapes (you don’t need to select [Shape
Generator]). The window will only show shapes wh ich are
possible on the selected fixtures. Pressing attribute buttons will
filter the Shapes window to show only shapes for that attribute.
Press the Dimmer attribute button to show all shapes.
TitanUniversal_Man_v5-0_TT.doc 23 September 2011
Page 81

6. Shapes and Pixel Mapper effects - Page 81
• Shapes are based on the current settings of the fixture, so a
position circle would move around the current pan-tilt position
of the fixture.
• You can change the base value of a shape (e.g. the centre of a
circle) by changing the attributes using the wheels in the usual
way. You can reduce the Size to zero (see next section) to help
you see what the base value actually is.
• You can run more than one shape at a time by repeating the
above procedure. You can run several shapes on one fixture
and the output will combine in interestin g ways.
• Press [Shapes and Effects], [Shape Generator] then [Edit] to
show what shapes are running.
• If you apply the same shape to two different groups of fixtures,
the shape will appear twice on the shape list. You can edit t he
two shapes separately to give different directions, speeds etc
(see later)
• Each shape is designed to work on a particular attribute.
Obviously if the fixtures don’t have the attribute, you will not
see any effect if you use the shape.
• Each shape has a default size and speed setting (defined in the
shape file).
When using a Rainbow colour shape, to get the full
range of colours you need to set the CMY or RGB
attributes to 50%.
6.1.2 Changing size and speed of a shape
It is easy to change the size and speed of a shape after it has first
been created. If the display above the wheels is showing Spread and
Offset rather than Size/Speed, press softkey E to select [Adjust
Speed, Size and Phase] .
TitanUniversal_Man_v5-0_TT.doc 23 September 2011
Page 82

Page 82 – 6. Shapes and Pixel Mapper effects
1> Control the speed of the shape using the left hand wheel.
2> Control the size of the shape using the middle wheel.
3> The size and speed is shown above the wheels on the display.
Other things to know about size and speed of shapes:
•
• If you have more than one shape running, the controls operate
on the most recent one. You can edit the parameters of any
shape that’s running using the Edit Shape function, see section
6.2.1.
• The minimum size is zero. This will “hide” the shape, and the
fixture will resume its previous settings. The shape is, how ever,
still active.
6.1.3 Changing the phase of a shape across multiple fixtures
Shapes get more interesting (and look more impressive) when you
apply them to multiple fixtures. You can control how a shape is
phased across several fixtures. You can also control Spread, which is
a different way of selecting the same thing.
The sequence of the shape across the fixtures is controlled by the
order in which you selected the fixtures when you created the shape..
1> Press softkey E to select [Adjust Phase, Spread and Offset]
2> Control the phase of the shape using the left hand wheel, or to
set in terms of Spread, use the middle wheel.
Phase=22.5 deg (Spread=16 fixture) Phase=0 deg
Phase=60 deg (Spread=6 fixture)
Phase=180 deg (Spread=2 fixture)
TitanUniversal_Man_v5-0_TT.doc 23 September 2011
Page 83

6. Shapes and Pixel Mapper effects - Page 83
The display above the left hand wheel shows the phase in degrees.
For example, 180 degrees repeats every 2 fixtures, 90 degrees
repeats every 4 fixtures, 60 degrees repeats every 6 fixtures, and so
on.
The Offset function allows you to set the starting phase of the shape,
when more than one shape is running. For example, if you were
running a Cyan shape and a Magenta shape to create a mix of
colours, you would probably want to start them with Cyan at full and
Magenta at zero to give the full range of colours. In this case you
would set one of the shapes to have a Phase Offset of 180 degrees.
Without the phase offset, both shapes would reach full at the same
time.
6.1.4 Creating pixel mapper effects
The Pixel Mapper works on a group of fixtures, which you have set up
using the Fixture Layout function. This tells the console where the
fixtures are physically located on the stage. The console then maps
the fixtures as pixels and uses them to output a 2D effect. See
section
4.1.12 on page 60 for details of how to layout the fixtures.
At the end of this section (Section 6.4 on page 87) there
are a number of step-by-step examples of creating
effects with the pixel mapper.
You set up the Pixel Mapper as follows.
1> Select the group of fixtures.
2> From the top level menu select [Shapes and Effects] then [Pixel
Mapper]
3> Select [Create effect]. The Pixel Mapper Editor will open with a
blank background. You can overlay your fixture layout on the
window, to help you see where your fixtures are, by clicking on
the [Fixture Overlay 50/50] context menu button.
TitanUniversal_Man_v5-0_TT.doc 23 September 2011
Page 84

Page 84 – 6. Shapes and Pixel Mapper effects
Click on the + button to add an effect, and choose a graphic element.
Then click on the + button again and choose an animation (how your
graphic element will move). The animated effect will sh ow in the
black window.
Edit the parameters of the effect by clicking the effect name on the
left hand side. Various sliders are provided to configure the effect.
Edit the colour of the effect by clicking on the Layer on the left hand
side.
Edit the way the animation moves by clicking th e animation name on
the left.
To see how the effect will look on the fixtu res, open the Pixel Mapper
preview window by pressing
Mapper Preview]. A real life view of each effect running is shown in a
button at the bottom of the screen, you can select each of these by
pressing the button.
TitanUniversal_Man_v5-0_TT.doc 23 September 2011
View, [Open Workspace Window], [Pixel
Page 85

6. Shapes and Pixel Mapper effects - Page 85
If you wish you can overlay further layers on the effect. Once you
have an effect you like, you can save it to a playback.
6.2 Editing running shapes
6.2.1 Selecting which shape to edit
If more than one shape is running in the programmer, you can select
which one is connected to the control wheels using Shape option
[Edit].
1> If you are not in the Shape menu, press [Shapes and Effects]
then [Shape Generator] at the top menu.
2> Press [Edit].
3> Press [Select shape]
4> By the softkeys is a list of the currently running shapes.
5> Press a softkey to make the shape active. The active shape is
highlighted.
6> Press Enter to get back to the Shape Generator menu.
• If you applied the same shape several times to different
fixtures, you can change each copy of the shape independently.
6.2.2 Editing a shape stored in a cue
You can only edit shapes which are in the programmer, so if you f ire
a cue with a shape in it, the shape will not show up in the list of
editable shapes. To edit the shape you need to use the Include
function (see section
programmer.
7.3.4 on page 115) to load the cue into the
6.2.3 Changing fixture order in a shape
The way a shape spreads across a number of fixtures is set by the
order in which you selected them when you create the shape. You
can change this order using the [Fixture Order] function in the [Edit]
menu. The current fixture order is shown in large green numbers on
TitanUniversal_Man_v5-0_TT.doc 23 September 2011
Page 86

Page 86 – 6. Shapes and Pixel Mapper effects
the HUD window, or in the fixture touch keys . See section 7.5.2 for
details on how to set fixture order.
6.2.4 Removing or adding fixtures
You can add or remove individual fixtures from a shape using the
[Add/Remove Fixtures] option in the [Edit] menu. All fixtures
currently included in the shape will be selected. You can select or
deselect fixtures to add or remove them from the shape.
6.2.5 Reversing a shape
You can reverse the direction of a shape by pressing [Reverse
Selected Fixtures] from the shape menu. The shape will be reversed
only on fixtures which are selected, allowing you to run the shape
forward on some fixtures and backwards on others.
6.2.6 Deleting shapes
You can delete a running shape by pressing [Delete] from the shape
menu, then pressing the softkey for the shape you want to delete.
6.3 Advanced options
6.3.1 Fading shape size and speed
When a shape is stored in a cue, you can set how the shape fades in
using the Edit Times and the Playback Option settings.
To set the shape size and/or speed from the fader position, press
[Playback Options] from the main menu then press the select button
of the playback.
Using the [Shape Size] and [Shape Speed] buttons you can set the
shape size and speed to be fixed (how you programmed them) or to
grow larger/speed up as the fader is pushed up.
When you use dimmer shapes, set the playback to
[Shape Size on Fader] so that the shape fades in
normally when you push up the fader. Otherwise the
dimmer shape will start at full brightness when the fader
passes the trigger point.
To set a fixed fade in time for the shape size, press [Edit Times] from
the top menu, then the playback select button, then set the
Delay/Fade times you want.
The Fade Mode allows you to set mode 0 (fade in), mode 1 (fade in
and out) or mode 3 (crossfade). Mode 2 links fade times to the fader
position, however we recommend you use the Playback Options listed
above to do this for shapes, and do not use Mode 2.
If a new cue is fired which controls the same attributes (for example,
a second shape controlling the same fixtures as a currently running
shape), the new shape will crossfade from the running shape.
TitanUniversal_Man_v5-0_TT.doc 23 September 2011
Page 87

6. Shapes and Pixel Mapper effects - Page 87
6.4 Pixel mapper examples
6.4.1 Randomising effects
This example shows you how to use the pixel mapper to create an
effect where random dimmer cells turn on. This effect w ill overlay
any existing intensities.
1> The fixtures you want to use need to be recorded into a group,
do this first if they are not already.
2> Adjust the layout of the fixtures in the group using [Shapes And
Effects]/[Pixel Mapper]/[Edit Group Layout]/(select group)
3> Start creating an effect by selecting the group then [Shapes
And Effects]/[Pixel Mapper]/[Create Effect]
4> In the Pixel Mapper Effect Editor window toggle the context
menu option 'Fixture Overlay' until it reads 'Fixture Overlay
50/50'. (This will allow you to see the relationship of your
fixtures to the effect as you create it.)
5> Select [Effect] and drag 'Background Opacity' slider to 0%.
(This will allow the whole effect to overlay any related
intensities.)
TitanUniversal_Man_v5-0_TT.doc 23 September 2011
Page 88

Page 88 – 6. Shapes and Pixel Mapper effects
6> Select [Layer 1], click [+] at the bottom of the screen and then
choose Circle from the elements that appear.
7> Drag the 'Zoom' slider until the circle covers approximately one
cell. You can also use the 'Width' and 'Height' sliders to turn
the circle into an oval if that helps.
Then drag the 'X' and 'Y' sliders to position the circle roughly in
the centre of your fixtures if it is not already.
8> Select [+] again and choose Displacement from the animations
that appear (this is represented as a few static blocks). (Note
that nothing changes yet.)
TitanUniversal_Man_v5-0_TT.doc 23 September 2011
Page 89

6. Shapes and Pixel Mapper effects - Page 89
9> Select [+] and this time choose Opacity animation (represented
as a block fading in).
The displacement acts on the opacity animation causing it to
appear at random locations each time it is drawn.
Drag the 'In Time' and 'Out Time' sliders to 0%. (This will cause
the effect to snap on/off instead of fade.)
Increase the 'Speed' and 'Spawn Rate' settings to make the
effect run quicker and with more circles respectively. (High
spawn rates are particularly useful for small randomised
elements like this.)
10> Record to a playback.
TitanUniversal_Man_v5-0_TT.doc 23 September 2011
Page 90

Page 90 – 6. Shapes and Pixel Mapper effects
6.4.2 Randomising effects
This example shows you how to create a diagonal white wipe with a
rotating red fan on top.
1> Select a group containing a fixture layout as described in
previous example.
2> Start creating an effect by selecting the group then [Shapes
And Effects]/[Pixel Mapper]/[Create Effect]
3> Select [Layer 1], click [+] at the bottom of the screen and then
choose Block from the elements that appear.
Drag the 'Rotation' slider to the right to angle the element at
approximately 25 degrees.
Drag the 'Width' slider to the left to make a thinner block.
Drag the 'Height' slider to the right until the block fills the
height of the entire window.
Drag the 'X' slider to the right until the block is just off the
screen.
4> Click [+] again and choose Linear Movement animation
(represented as a block moving left to right).
On the right side of the 'Direction' slider there is a compass
button. Click on this four times until the direction reads 270
degrees. (By default the animation is set to 90 degrees or left
to right. Because we placed the block on the far right of the
screen we want it to move the other way. The compass gives
shortcuts to the more common directions in 45 degree
increments.)
TitanUniversal_Man_v5-0_TT.doc 23 September 2011
Page 91

6. Shapes and Pixel Mapper effects - Page 91
Reduce 'Spawn Rate' until only one stripe is on screen the same
time. For this type of effect the value will usually need to be
quite low - approximately 0.2.
You might want to reduce 'Speed' slightly at this point. (Note
that a higher speed was initially useful for getting the correct
spawn rate above.)
5> Click on [Layer 2], select [+] and select the Swirl element
(represented by a 'fan' shape with four arms).
Increase 'Zoom' until it is as large as will fit in the screen.
Set 'Bend' to 0% for nice straight fan blade edges.
Set 'Points' to 3 (minimum) for a three bladed fan.
Set 'Thickness' to 50% for evenly sized segments.
Increase 'Border Width' to a low value so that we just have an
outline.
6> Click on [+] and add a spin animation.
Reduce the speed until it just causes a light breeze.
7> Click in the top of this layer to get the layer controls.
Click on the colour bar to open the colour picker.
Click and drag to the top left of the picker window to get a
strong red.
TitanUniversal_Man_v5-0_TT.doc 23 September 2011
Page 92

Page 92 – 6. Shapes and Pixel Mapper effects
8> Click on [Effect] at the top left to access the global controls.
Drag 'Pre Spool' to the left until it reads 0s. (This is to ensure
the wipe begins off screen where we placed it when it is fired.)
9> Record the cue.
• Note how the red fan sits on top of the white bar when they
interact. This is because the white is on a lower layer. A higher
layer number has priority over a lower number.
6.4.3 Creative use of fixture layouts
Because each fixture group can contain a different layout it is possible
to create more than one arrangement of the same fixtures for pixel
mapping.
By arranging fixtures in certain layouts you can easily achieve
complex effects.
TitanUniversal_Man_v5-0_TT.doc 23 September 2011
Page 93

6. Shapes and Pixel Mapper effects - Page 93
Example 1: Odd/Even
1> Select your fixtures.
2> Open the Selection Pattern menu by pressing the 'All' key.
3> Choose [Odd] from the softkey options. (This will select all the
odd numbered fixtures according to fixture order.)
4> Record a group.
5> Press '+1' (or 'Next') key. (This will select all the even
numbered fixtures.)
6> Merge this into the first group.
7> Open the Layout Editor. ([Shapes And Effects]/[Pixel
Mapper]/[Edit Group Layout]/(select group).)
By doing the above you should be able to see how we have quickly
created a layout where the all the odd fixtures are arranged together
on the left followed by all the even fixtures on the right.
This arrangement could be used as it is. A block element animated to
run horizontally left to right will run across all your odd fixtures
followed by all the even fixtures.
An alternative goal might be a vertical 'cascading' effect:
1> Click on the vertical resize tool and drag down until the grid is
at least twice the original height.
TitanUniversal_Man_v5-0_TT.doc 23 September 2011
Page 94

Page 94 – 6. Shapes and Pixel Mapper effects
2> Drag a marquee select across the even fixtures.
3> Drag the selected fixtures so they sit directly under the odd
fixtures.
4> Select 'Crop Grid' from the Layout Editor context menu. (This
will get rid of the unused pixels.)
Now a block element animated to run vertically from top to bottom
will run down the odd fixtures followed by the even fixtures.
TitanUniversal_Man_v5-0_TT.doc 23 September 2011
Page 95

6. Shapes and Pixel Mapper effects - Page 95
Example 2 - Pseudo random
1> Select your fixtures and create a group.
2> Open the Layout Editor.
3> Click on the vertical resize tool and drag down until the grid is
at least twice the original height.
Note that to help with creation and manipulation of larger grids
you can use the zoom control on the left-side of the window.
Clicking on the magnifying glass gives a quick shortcut to zoom
in/out.
4> Select the group again. (This will quickly select everything in
the layout.)
5> Press '+1' key. (This will select the first fixture.)
6> Use the wheel to adjust 'Position Y'.
Repeat steps 4 and 5 until all the fixtures are at different heights in
relation to one another.
If you create an effect using this group it will appear to be random.
Adjustments can be made to the layout at any time to fine-tune the
end result.
Example 3 - Angles (or 'when straight just isn't good
enough..'):
Sometimes we like to hang fixtures at artistic angles to look pretty.
By default the software assumes you have hung them vertically but
fear not - Titan has a solution:
1> Select your fixtures and create a group.
TitanUniversal_Man_v5-0_TT.doc 23 September 2011
Page 96

Page 96 – 6. Shapes and Pixel Mapper effects
2> Open the Layout Editor.
3> Select the fixture(s) that you want to angle and use the
appropriate wheel to control. (If wheels are not assigned to
control the cell layout you can toggle this on/off using the
context menu item 'Wheel Control'. Also, on the Pearl Expert
you may need to select 'Adjust Angle' and to return wheels to
controlling position select 'Adjust X,Y'.)
Note that underneath the visual representation of the fixtures the
actual cells used are shown in light grey.
If any of your fixtures have been naughty and ended up beyond the
bounds of the grid after rotating you can use context menu item
'Crop Grid' to make them behave.
6.4.4 Other Layout Editor tools
The Layout Editor’s context menu has some useful tools for laying out
fixtures quickly.
Context menu - 'Arrange Fixtures'
This is a very useful tool to quickly layout fixtures in a grid. F or
example you might have 20x Colourblocks across four towers, each
with five blocks.
1> Select the fixtures and create a group.
2> Edit the layout of this group.
3> Select 'Arrange Fixtures' from the context menu.
4> Select the [Height] softkey and type '5'. (Width will
automatically be calculated.)
5> Toggle [Crop Grid to fixtures] so that it is highlighted. (This will
make the grid adjust to fit.)
6> Toggle [Arrange in..'] to 'Columns' or 'Rows'. 'Rows' will
arrange ixtures left to right and 'Columns' will arrange top to
bottom.
7> Select [OK] to complete.
TitanUniversal_Man_v5-0_TT.doc 23 September 2011
Page 97

6. Shapes and Pixel Mapper effects - Page 97
Context menu - 'Highlight'
When enabled this will highlight selected fixtures live on stage. This
can be useful to see which fixture you are positioning in the layout.
Context menu - 'Arrange/Select Only'
When set to 'Select Only' fixtures are locked in position on the grid
and cannot be dragged around. This provides an alternative way of
selecting fixtures to edit while preventing accidental movement.
If you find you suddenly cannot move anything around this is
probably the reason!
Note that X,Y and Angle wheel control is still available.
6.4.5 Playback Order and Priorities
Suppose you wished to create a white pulsating oval on one playback
and a blue spiral on a second playback. Normally these effects would
layer differently depending on the order you fire the playbacks, but
you can use playback priorities to make them always layer the same
way
To create first effect:
1> Select a group containing a fixture layout as described in
previous example and go to [Create Effect].
2> Select [Effect] to access the global effect controls and change
'Background Opacity' to zero. (This will allow it to overlay the
other playback.)
3> Double-Click [Layer 1] (or press [+]) and choose Circle from
the elements that appear. (Double-click is a shortcut to
elements and animations.)
Reduce height to make a rugby ball (or American football if you
insist).
4> Double-click on [Circle] (or press [+]) and select the Zoom
animation.
TitanUniversal_Man_v5-0_TT.doc 23 September 2011
Page 98

Page 98 – 6. Shapes and Pixel Mapper effects
Drag 'In Time' to zero and 'Out Time' to 100%. (This will make
the effect start large and finish small. Alternatively the same
effect can be created by making 'Start Zoom' larger than 'End
Zoom'.)
Increase 'End Zoom' until the element begins by filling the
whole window.
5> Double-click on [Zoom Animation] (or press [+]) and select the
Opacity animation.
Reduce 'Spawn Rate' to zero. (This will ensure the opacity only
works on the zoom animation.)
Drag 'In Time' to zero and 'Out Time' to 100. (This will make
the effect snap on and fade out as it reduces in size. As with
zoom you can achieve much the same thing by inverting the
opacity controls instead. Using opacity values greater than
100% will create a delay before fade.)
6> Click on [Effect] again and reduce 'Master Speed' to your
preference. (Adjusting the global speed control ensures the
zoom and opacity animations are synchronised instead of
TitanUniversal_Man_v5-0_TT.doc 23 September 2011
Page 99

6. Shapes and Pixel Mapper effects - Page 99
having to manually match the individual values.)
7> Record the cue.
Next we will create the second effect:
1> Select the same group as used for the first effect and [Create
Effect]
2> Select [Effect] and change 'Background Opacity' to zero as in 3.
3> Select [Layer 1] and this time add a Spiral element.
Increase 'Zoom' so that it's nice and big.
Drag 'Thinning' until it is at 0%. (This will make the lines of the
spiral stay the same width. A negative value means the spiral
gets thinner towards the outside; a positive value means it gets
thinner towards the inside.)
Reduce 'Turns' so we can make a more bold effect. Approx. 3
should work.
Increase 'Thickness' to 50% for chunky lines.
TitanUniversal_Man_v5-0_TT.doc 23 September 2011
Page 100

Page 100 – 6. Shapes and Pixel Mapper effects
Increase 'Exponent' to around 25%. (This causes the spiral to
'expand' at a faster rate.)
4> Add a Spin animation for genuine psychedelic effect.
Adjust speed until you are unable to look away from the screen.
5> Select the Layer to show the layer controls and change the
colour to blue using the colour picker.
6> Record the cue.
Now let's look at how they interact on the playbacks:
• Fire the blue spiral effect.
TitanUniversal_Man_v5-0_TT.doc 23 September 2011
 Loading...