


Mobile Scanner
User’s Manual
Regulatory model: FF-1301S
manual-en-250-0844-E-AV110v1
Avision Inc.

User’s Manual
ii
Trademarks
Microsoft is a U.S. registered trademark of Microsoft Corporation.
Windows, Windows Vista, Windows 7 and Windows 8 are either
registered trademarks or trademarks of Microsoft Corporation in
the United States and/or other countries.
Energy Star
®
is a registered trademark of the U.S. government.
IBM, IBM PC are registered trademarks of International Business
Machines Corp.
Other brands and product names herein are trademarks or
registered trademarks of their respective holders.
Copyright
All rights reserved. No part of this publication may be
reproduced, transmitted, transcribed, stored in a retrieval
system, or translated into any language or computer language,
in any form or by any means, electronic, mechanical, magnetic,
optical, chemical, manual, or otherwise, without the prior written
permission of Avision Inc.
Material scanned by this pr oduct may be protected by
governmental laws and other re gulations, such as copyright
laws, the customer is solely respon sible f or comply ing w ith all
such laws and regulations.
Warranty
The in formation con tained in t his docu ment is su bject t o
change without notice.
Avision makes no warranty of any ki nd wi th regard to thi s
material, in cluding, but not limited to, t he implied warranties
of fitness for a particular purpose.
Avision sh all n ot be liable f or errors con tained herein or for
incidental or consequenti al damages i n connecti on wi th the
furnishing, performance, or use of this material.

User’s Manual
iii
Warning and Precautions of the lithium-ion battery
Warning:
Danger warning to prevent the possibility of the battery from
leaking, heating, explosion, please observe the following
precautions:
Don’t immerse the battery in water and seawater. Please
put it in cool and dry environment if no using.
Do not discard or leave the battery near a heat source as
fire or heater
Being charged, using the battery charger specifically for
that purpose
Don’t reverse the positive and negative terminals
Don’t connect the battery to an electrical outlet directly.
Don’t connect the positive and negative terminal directly
with metal objects such as wire. Short terminals of battery
is strictly prohibited, it may damage battery.
Do not transport and store the battery together with metal
objects such as necklaces, hairpins.
Do not strike, throw or trample the battery.
Do not directly solder the battery and pierce the battery
with a nail or other sharp object.
Do not use lithium ion battery and others different lithium
polymer battery model in mixture.
Prohibition of use of damaged cells.
Don’t bend or fold sealing edge. Don’t open or deform
folding edge. Don’t fillet the end of the folding edge.
Don’t fall, hit, bend battery body.
Battery pack designing and packing Prohibition injury
batteries.
Never disassemble the cells.
Keep the battery away from babies.
Any components contacting these two edges, they must be
insulated.

User’s Manual
iv
Caution:
Risk of explosion if battery is replaced by an incorrect type.
Dispose the battery according to local regulations.
Never place batteries or devices on or in heating devices,
such as microwave ovens, stoves, or radiators. Batteries
may explode when overheated or its performance will be
degenerate and its service life will be decreased.
Do not use it in a location where is electrostatic and
magnetic greatly, otherwise, the safety devices may be
damaged, causing hidden trouble of safety.
If the battery leaks, and the electrolyte get into the eyes.
Do not wipe eyes, instead, rinse the eyes with clean running
water, and immediately seek medical attention. Otherwise,
eyes injury can result.
If the battery gives off an odor, generates heat, becomes
discolored or deformed, or in any way appear abnormal
during use, recharging or storage, immediately remove it
from the device or battery charge and stop using it.
Avoid charging batteries for more than a week, as
overcharging may shorten battery life. Over time, unused
batteries will discharge and must be recharged before use.
Disconnect chargers from power sources when not in use.
Use batteries only for their intended purposes.
Store the battery at 0°C to 40°C.
Avoid exposing your device and batteries to very cold or
very hot temperatures. Extreme temperatures can cause
the deformation of the device and reduce the charging
capacity and life of your device and batteries.
Prevent batteries from contacting metal objects, as this can
create a connection between the + and – terminals of your
batteries and lead to temporary or permanent battery
damage.
In case the battery terminals are dirt, clean the terminals
with a dry cloth before use. Otherwise power failure or
charge failure may occur due to the poor connection with
the instrument.
Be aware discharged batteries may cause fire. Follow all
local regulations when disposing of used batteries or devices.
Never crush or puncture the battery. Avoid exposing the
battery to high external pressure, which can lead to an
internal short circuit and overheating.

User’s Manual
v
Federal Communications Commission (FCC) compliance
information statement
Part 15
This equipment has been tested and found to comply with the
limits for a Class B digital device, pursuant to Part 15 of the FCC
Rules. These limits are designed to provide reasonable
protection against harmful interference in a residential
installation. This equipment generates, uses and can radiate
radio frequency energy and, if not installed and used in
accordance with the instructions, may cause harmful
interference to radio communications.
However, there is no guarantee that interference will not occur
in a particular installation. If this equipment does cause harmful
interference to radio or television reception, which can be
determined by turning the equipment off and on, the user is
encouraged to try to correct the interference by one of the
following measures:
Reorient or relocate the receiving antenna.
Increase the separation between the equipment and
receiver.
Connect the equipment into an outlet on a circuit
different from that to which the receiver is connected.
Consult the dealer or an experienced radio/TV technician
for help.
This device complies with Part 15 of the FCC Rules. Operation is
subject to the following two conditions: (1) This device may not
cause harmful interference, and (2) this device must accept any
interference received, including interference that may cause
undesired operation.

User’s Manual
vi
European Union Regulatory Notice
Products bearing the CE marking comply with the following EU
Directives:
Low Voltage Directive 2006/95/EC
EMC Directive 2004/108/EC
Restriction of the use of certain hazardous substances (RoHS)
Directive 2011/65/EU
CE compliance of this product is valid if powered with the correct
CE-marked AC adapter provide by Avision.
This product satisfies the Class B limits of EN55022, EN55024,
safety requirements of EN 60950 and ROHS requirements of
EN50581.
*This machine is certified as Class 1 LED product.

User’s Manual
vii
Disposal of Waste Equipment by Users in Private Union
This symbol on the product or on its packaging indicates that the
product can not be disposed of with your other household waste.
Instead it should be sent to appropriate facilities for recovery
and recycling in an effort to protect human health and the
environment. Fore more information about where you can drop
off your waste equipment for recycling, please contact your local
city office, your household waste disposal service or the shop
where you purchased the product.
As an ENERGY STAR
®
Partner, Avision Inc. has
determined that this product meets the ENERGY
STAR guidelines for energy efficiency.
System Requirements
CPU: Inte l
®
Core™ 2 Duo or higher
Memory: 32 bit: 1 GB
64 bit: 2 GB
Optical Drive: DVD-ROM Drive
USB Port: USB port 2.0 (compatible with USB 1.1)
Compatible
Operating
System:
Microsoft Windows XP(SP3), Windows Vista,
Windows 7, Windows 8.x (32-bit/64-bit)

User’s Manual
viii
Table of Contents
1. Introduction.............................................. 1-1
1.1 Package Items............................................ 1-1
1.2 Front View ................................................. 1-4
1.3 Rear View .................................................. 1-6
1.4 Side View................................................... 1-6
1.5 LCD Display ............................................... 1-7
2. Scanner Installation.................................. 2-1
2.1 Precautions ................................................ 2-1
2.2 Installing the Battery ................................... 2-1
2.3 Charging the Battery ................................... 2-3
2.4 Installing the Feed Extension Plate ................ 2-4
2.5 Installing the Scanner Driver ........................ 2-6
2.6 Turning on the Power .................................. 2-7
2.7 Connecting to a Computer............................ 2-8
3. Completing Your First Scan....................... 3-1
3.1 Suitable and Unsuitable Original Types........... 3-1
3.1.1 Loading Your Document in the ADF
Paper Tray ...................................... 3-2
3.1.2 Loading Your Card............................ 3-4
3.2 Verifying Your Scanner Installation ................ 3-5
3.3 A Glance of the Scanner Properties Dialog Box 3-9
4. Using the Scanner Properties Dialog Box .. 4-1
4.1 Buttons on the Scanner Properties Dialog Box . 4-2
4.2 Showing or Hiding Tabs ............................... 4-4
4.3 The Image Tab ........................................... 4-6
4.3.1 The Image Selection Box .................. 4-7
4.3.2 Other Image Options ...................... 4-11
4.3.3 Scanning color images.................... 4-23
4.3.4 Scanning grayscale images.............. 4-23
4.3.5 Scanning B&W images .................... 4-23
4.3.6 Editing Profiles .............................. 4-24

User’s Manual
ix
4.4
The Compression Tab ................................ 4-27
4.5 The Color Dropout Tab............................... 4-29
4.5.1 Color Dropout Selection .................. 4-29
4.5.2 Other Color Dropout Options ........... 4-37
4.6 The Paper Tab .......................................... 4-39
4.6.1 Cropping....................................... 4-40
4.6.2 Other Paper Selection..................... 4-46
4.7 The Multi-Feed Detection Tab ..................... 4-52
4.8 The Preview Tab ....................................... 4-56
4.9 The Enhancement Tab ............................... 4-57
4.10 The Rotation Tab................................... 4-63
4.11 The Separation Tab ............................... 4-68
4.12 The Setting Tab .................................... 4-72
4.13 The Imprinter Tab ................................. 4-75
4.14 The Information Tab .............................. 4-79
5. Using the Buttons .....................................5-1
5.1 Installing Button Manager V2........................ 5-1
5.2 Checking the Button Configurations before
Scanning ................................................... 5-2
5.3 Scanning From One Touch of the Buttons ....... 5-4
6. Maintenance ............................................. 6-1
6.1 Clean the Scanner Glass, Separation Pad and
Rollers....................................................... 6-1
6.2 Calibrate the Scanner .................................. 6-3
6.3 Replace the Feed Roller................................ 6-6
6.4 Replace the Separation Pad ........................ 6-10
7. Troubleshooting........................................ 7-1
7.1 Clear a paper jam ....................................... 7-1
7.2 Error Conditions.......................................... 7-2
7.3 Frequently asked questions and answers ........ 7-3
7.4 Technical Service ........................................ 7-6
8. Specifications............................................ 8-1
Index ...................................................................a

User’s Manual
1-1
1. Introduction
Congratulations on your purchase of the color sheet-fed
image scanner. With this scanner, you can scan documents
from the auto document feeder increase your productivity.
Before you install and operate the new scanner, please take a
few minutes to read through this manual. It provi des proper
instructions f or y ou t o u npack, install, operate and maintain
the scanner.
1.1 Package Items
T
h
e f ollowing f igure in dicates the package contents. Please
check all the items against your checklist. If you do not
receive all t he it ems, please contact your authorized local
dealer immediately.

User’s Manual
1-2
Scanner
Carry Bag
Quick Guide
USB Cable
Calibration Sheet
Li-Ion Battery
Software CD
Cleaning Cloth
Online Registration Notice

User’s Manual
1-3
Note:
1. Only use the Li-ion Battery AP-120 made by APACK/CB-PD
(NP-120) made by City Bright included in the product. Using
other battery may damage the machine and void the
warranty.
2. Please unpack the packing carefully, and check the contents
against the checklist. If any items are missing or damaged,
please contact your dealer immediately.
3. To access more service supports, please visit our official web
site at www.avision.com to register your product.
User’s Manual
1-4
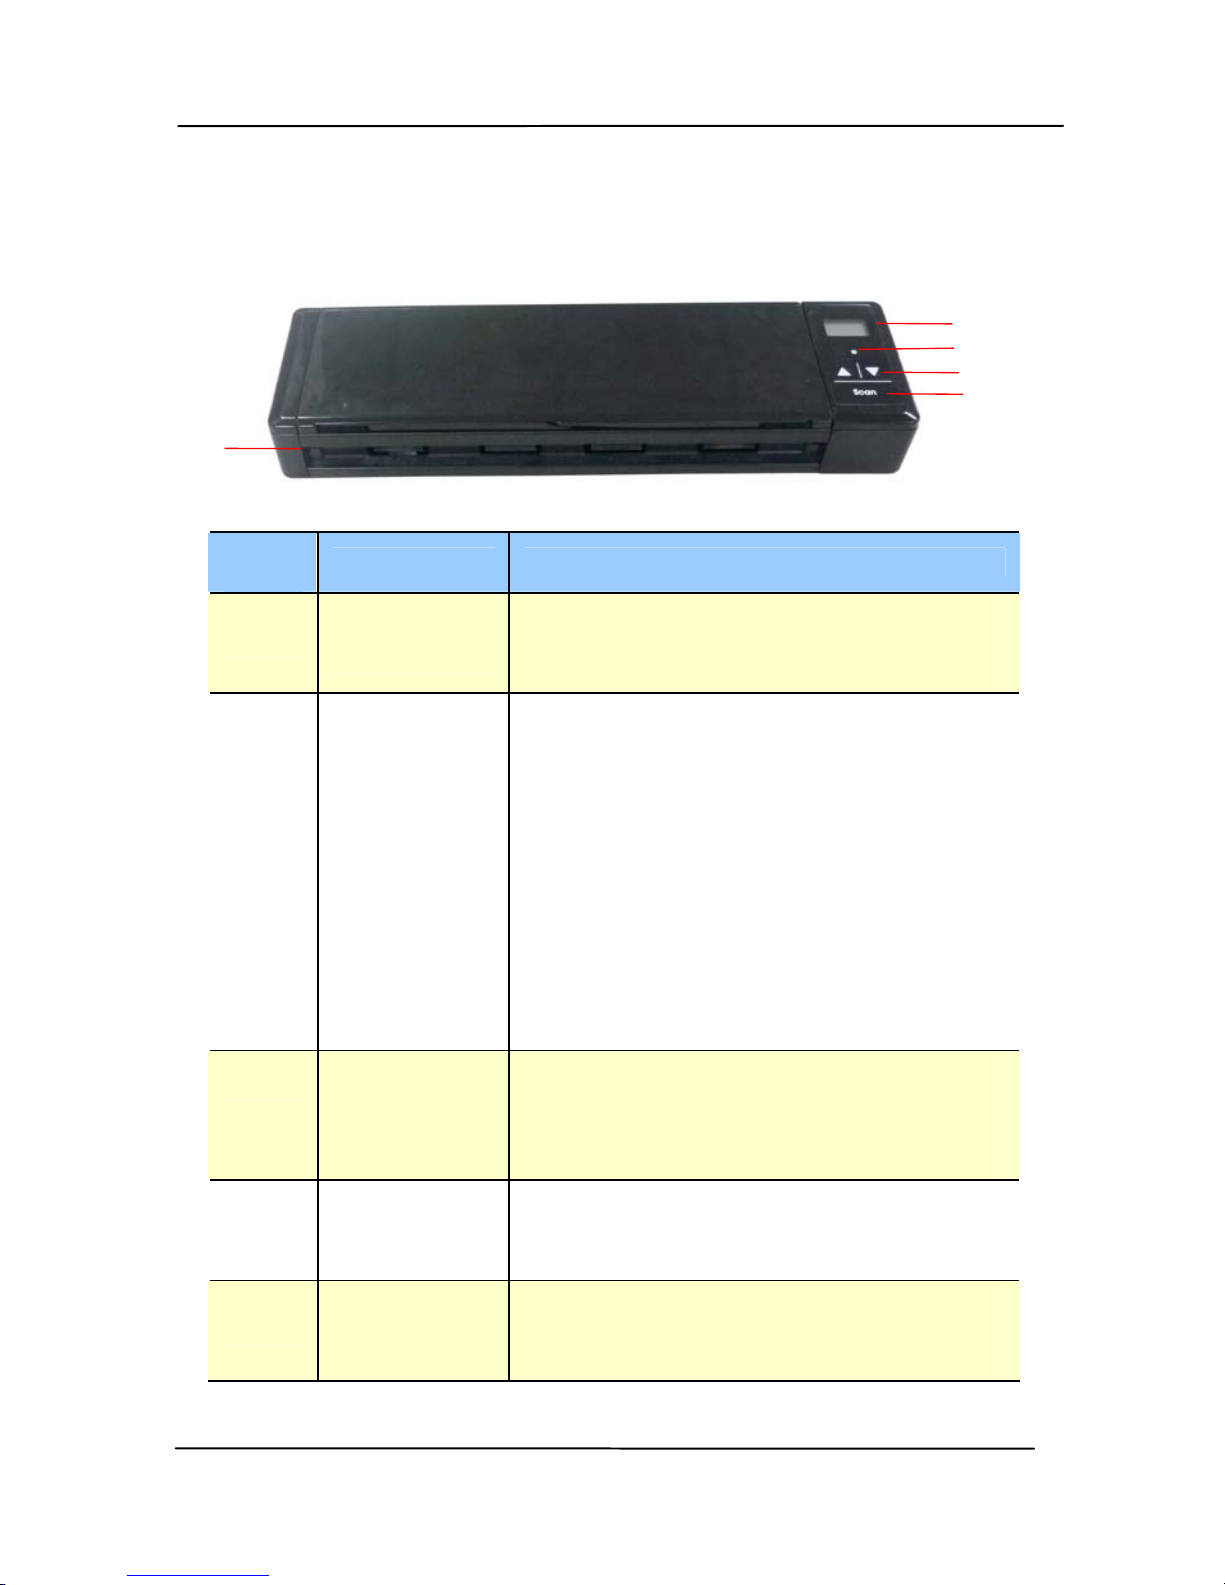
1.2 Front View
Item
Name Description
1
LCD
display
Displays the battery status and
function button via the software
application - Button Manager V2.
2
System
indicator
light
Indicates the operating/warning
status of the scanner.
Solidly lit in green color: The
power is turned on.
Flashing in red color:
Paper is jammed.
A double feed has been
detected and the scanner has
stopped.
The top unit is open.
3
Up/Down
Arrow
Used to scroll up and down to
select your function button via the
software application - Button
Manager V2.
4
Scan
Press to start a scan via the
software application - Button
Manager V2.
5
Feed tray
This tray is used for feeding
documents. Open it when scanning
documents.
1
2
3
4
5
User’s Manual
1-5
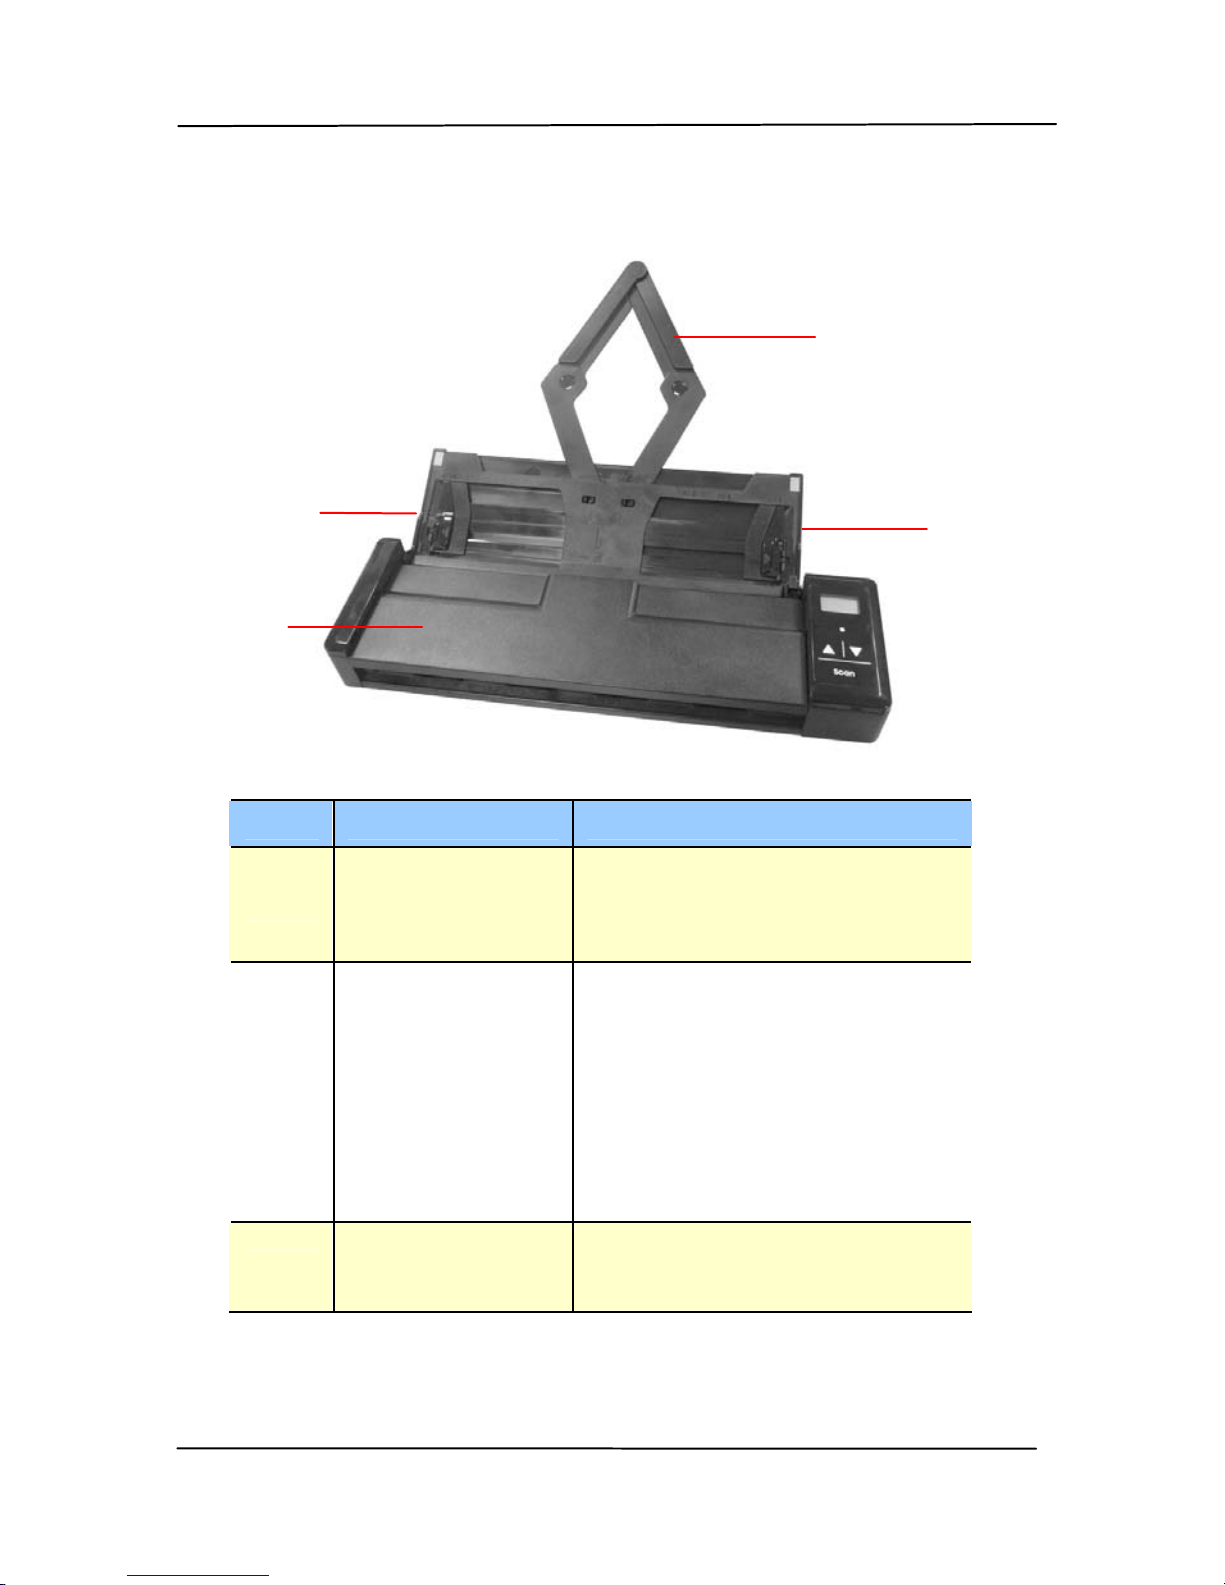
Item Name Description
1
Document
Extension
Plate
Open the plate to support
the document when
loading a long document.
2
Document
Guides
These guides ensure
documents are fed
straight. Raise the guides
when loading a document,
and then align them to the
edges of the document to
be scanned.
3
Feeder Cover
Open this when cleaning
the scanner.
1
2
2
3
User’s Manual
1-6
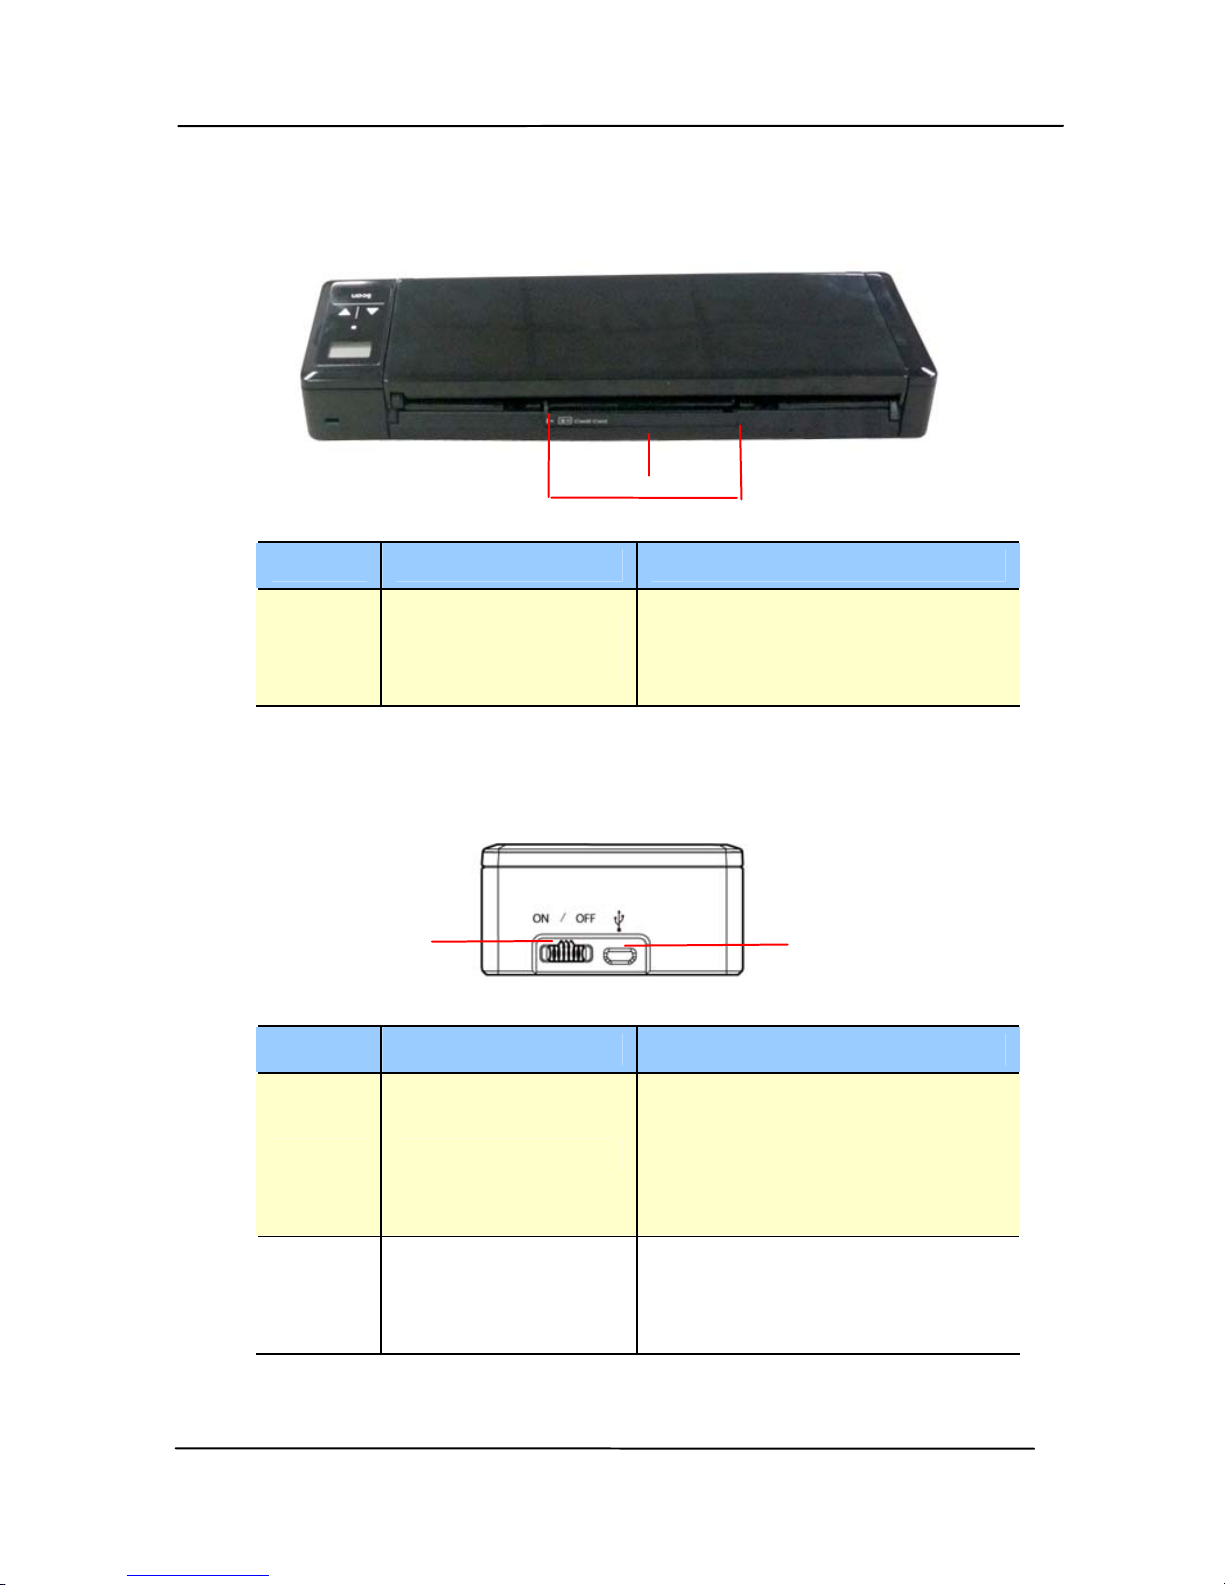
1.3 Rear View
Item Name Description
1
Plastic card
feeder
Used to insert and hold a
business card or a plastic
card.
1.4 Side View
Item Name Description
1 Power switch
Turn to the [ON] position
to power on the scanner
or turn to the [OFF]
position to power off the
scanner.
2 Micro USB port
Used to plug the micro
end of the USB cable to
connect to PC.
2
1
1
User’s Manual
1-7
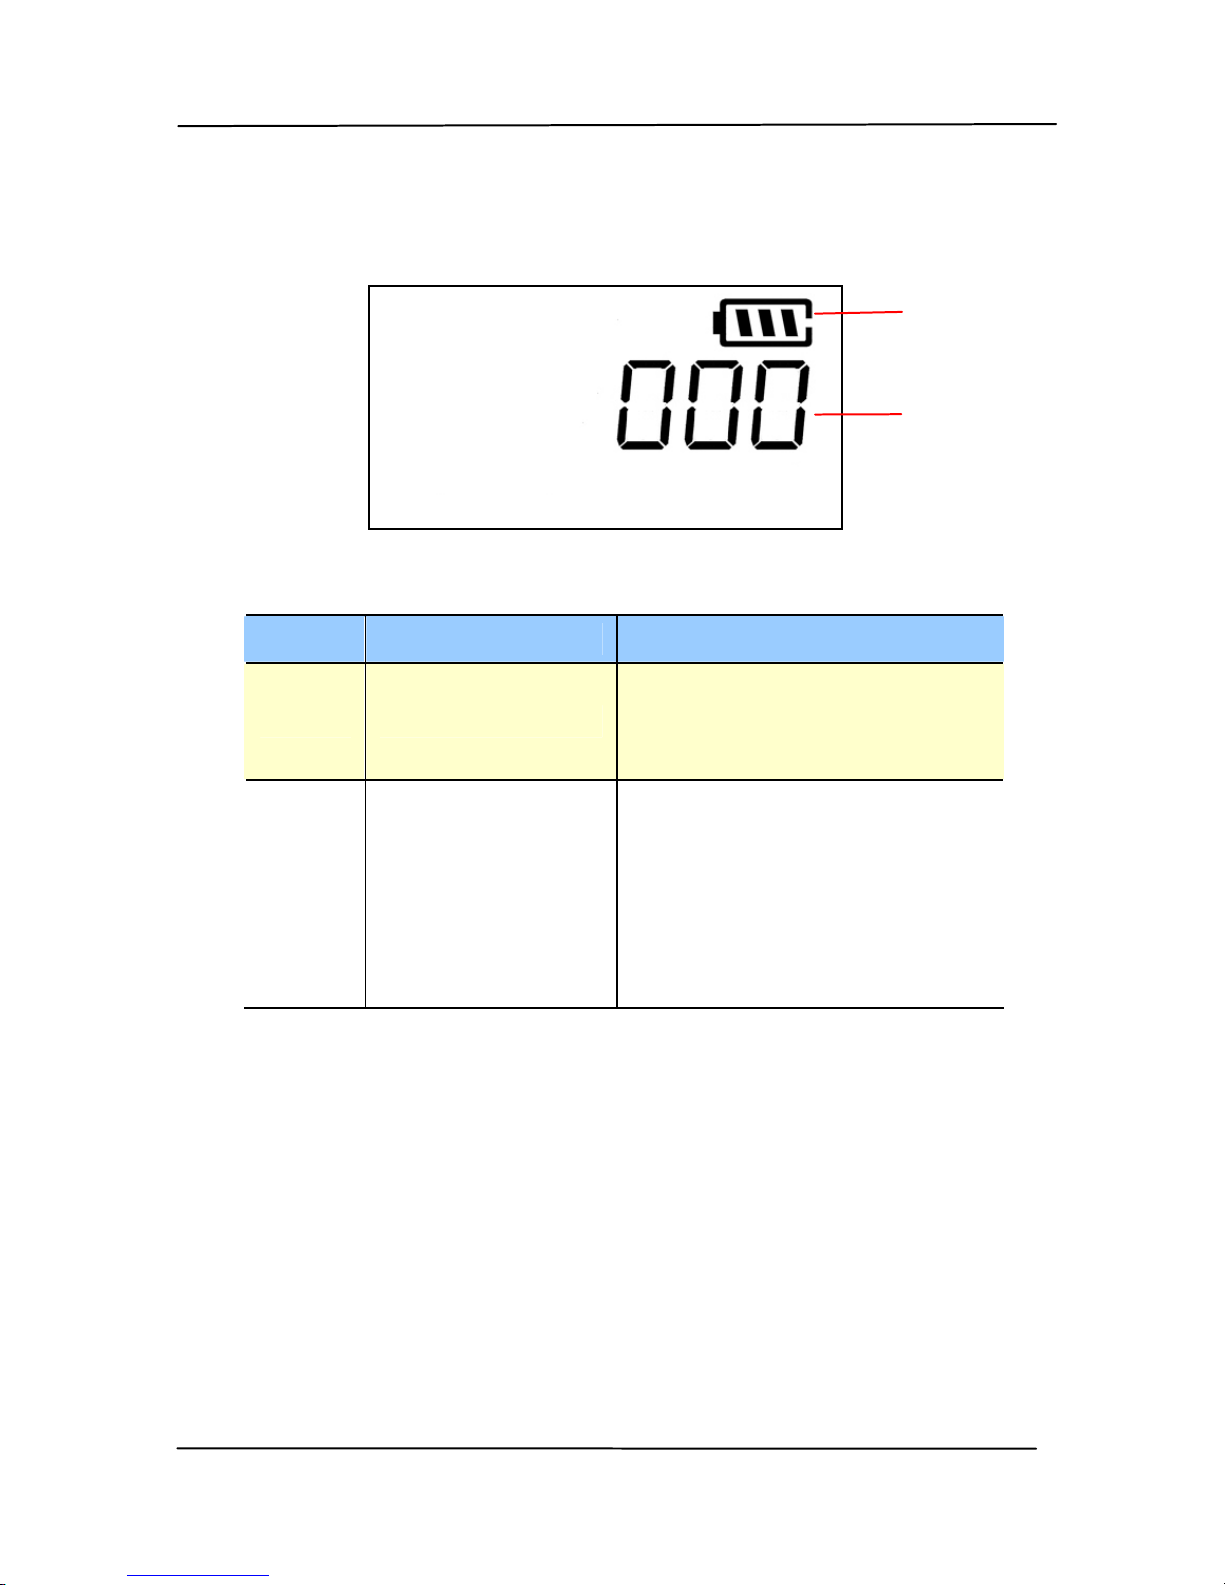
1.5 LCD Display
Item Name Description
1 Battery status
Indicates the power
status of the battery.
2
Button
Number
000: Indicates no
computer has been
connected.
001~009: Indicates the
function number via the
software application –
Button Manager V2.
1
2
User’s Manual
2-1
2. Scanner Installation
2.1 Precautions
Keep the scanner out of direct sunli
ght. Direct exposure
to the sun or excessive heat may cause damage to the
unit.
Do not install the scanner in a humid or dusty place.
Place the scanner securely on an even, flat surface.
Tilted or uneven surfaces may cause mechanical or
paper-feeding problems.
Retain the scanner box an d packing materials for
shipping purposes.
2.2 Installing the Battery
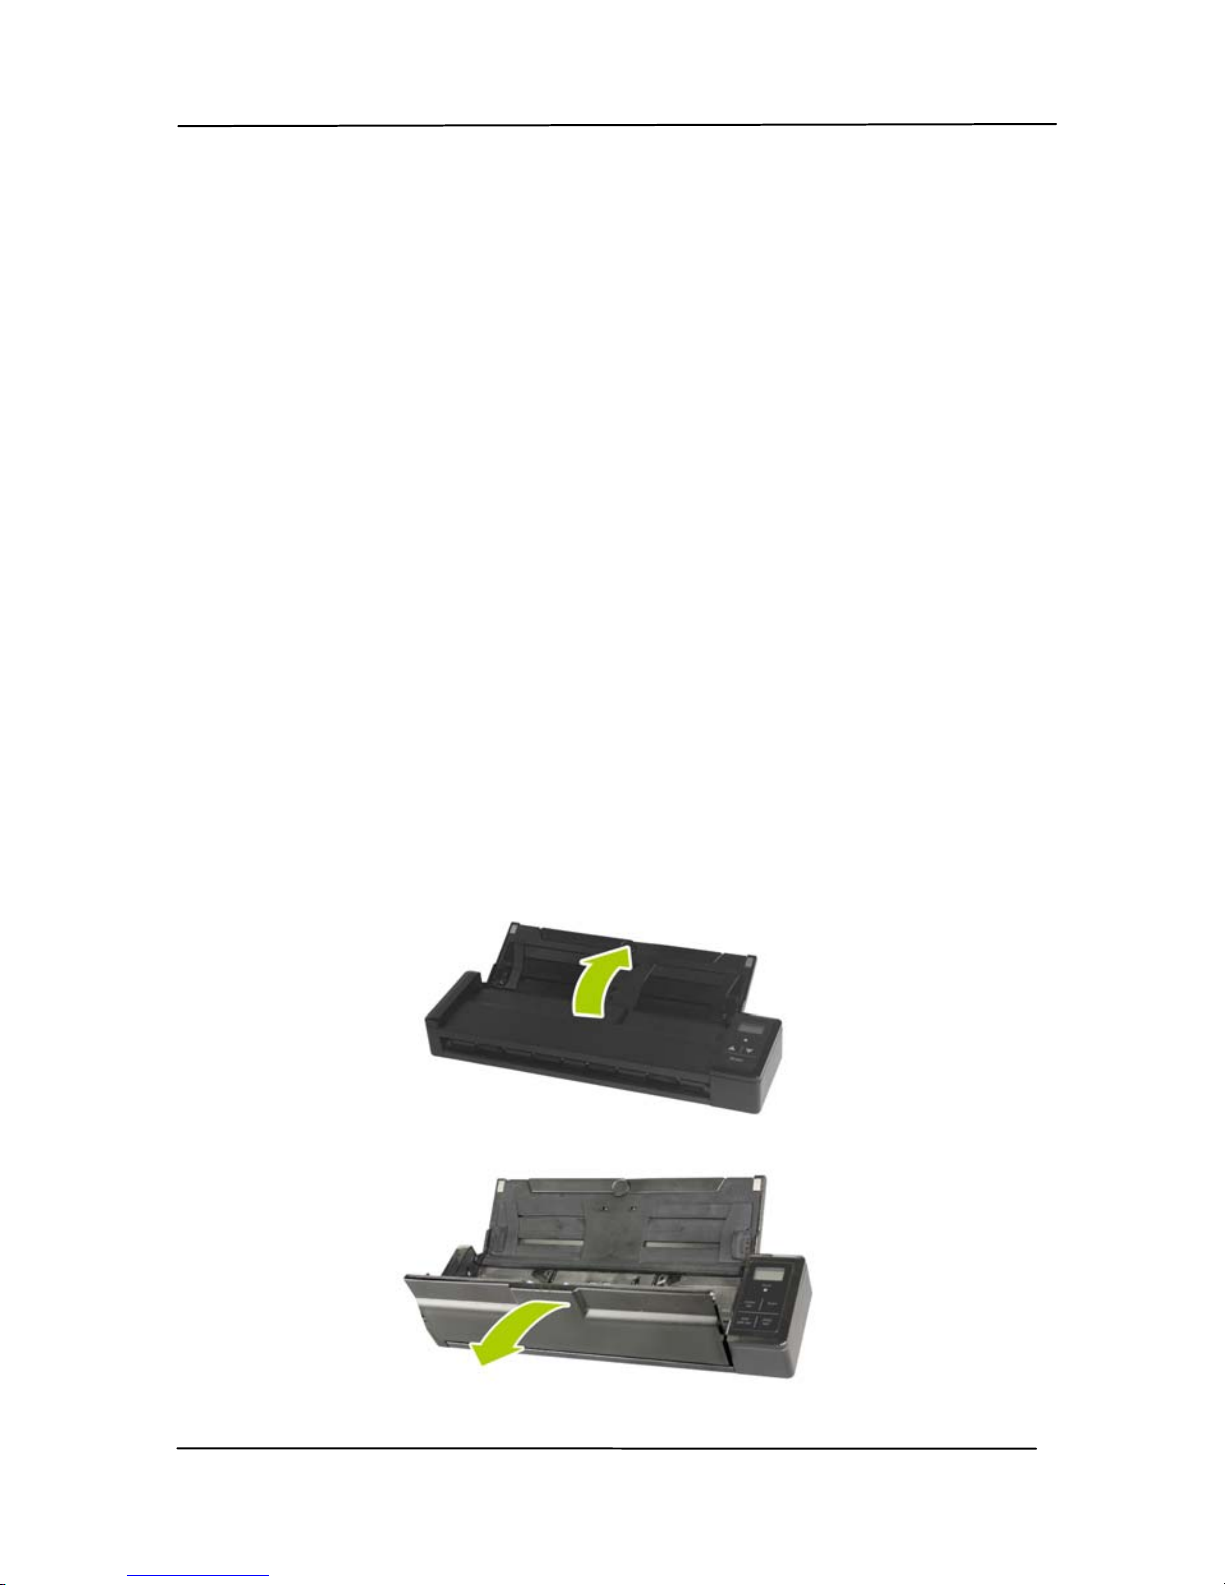
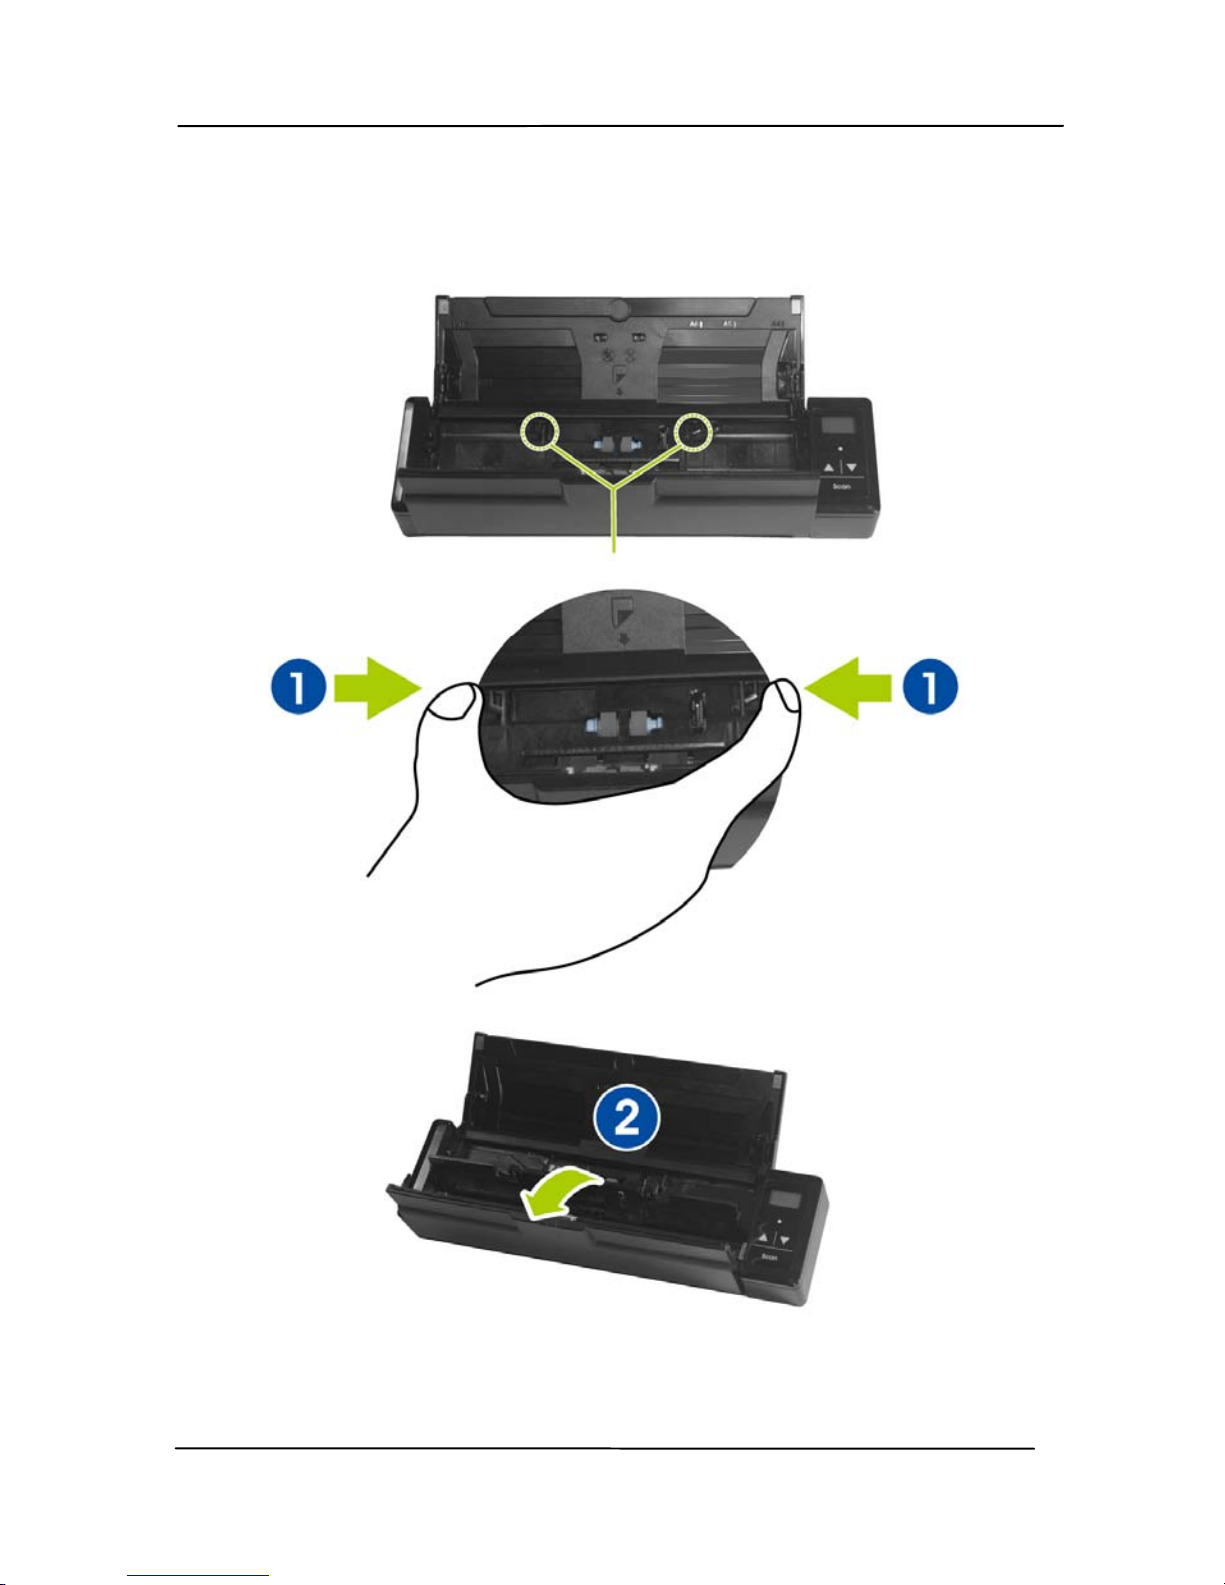
1. Open the feed tray.
2. Open the feeder cover.
User’s Manual
2-2
3. Open the battery cover.
User’s Manual
2-3
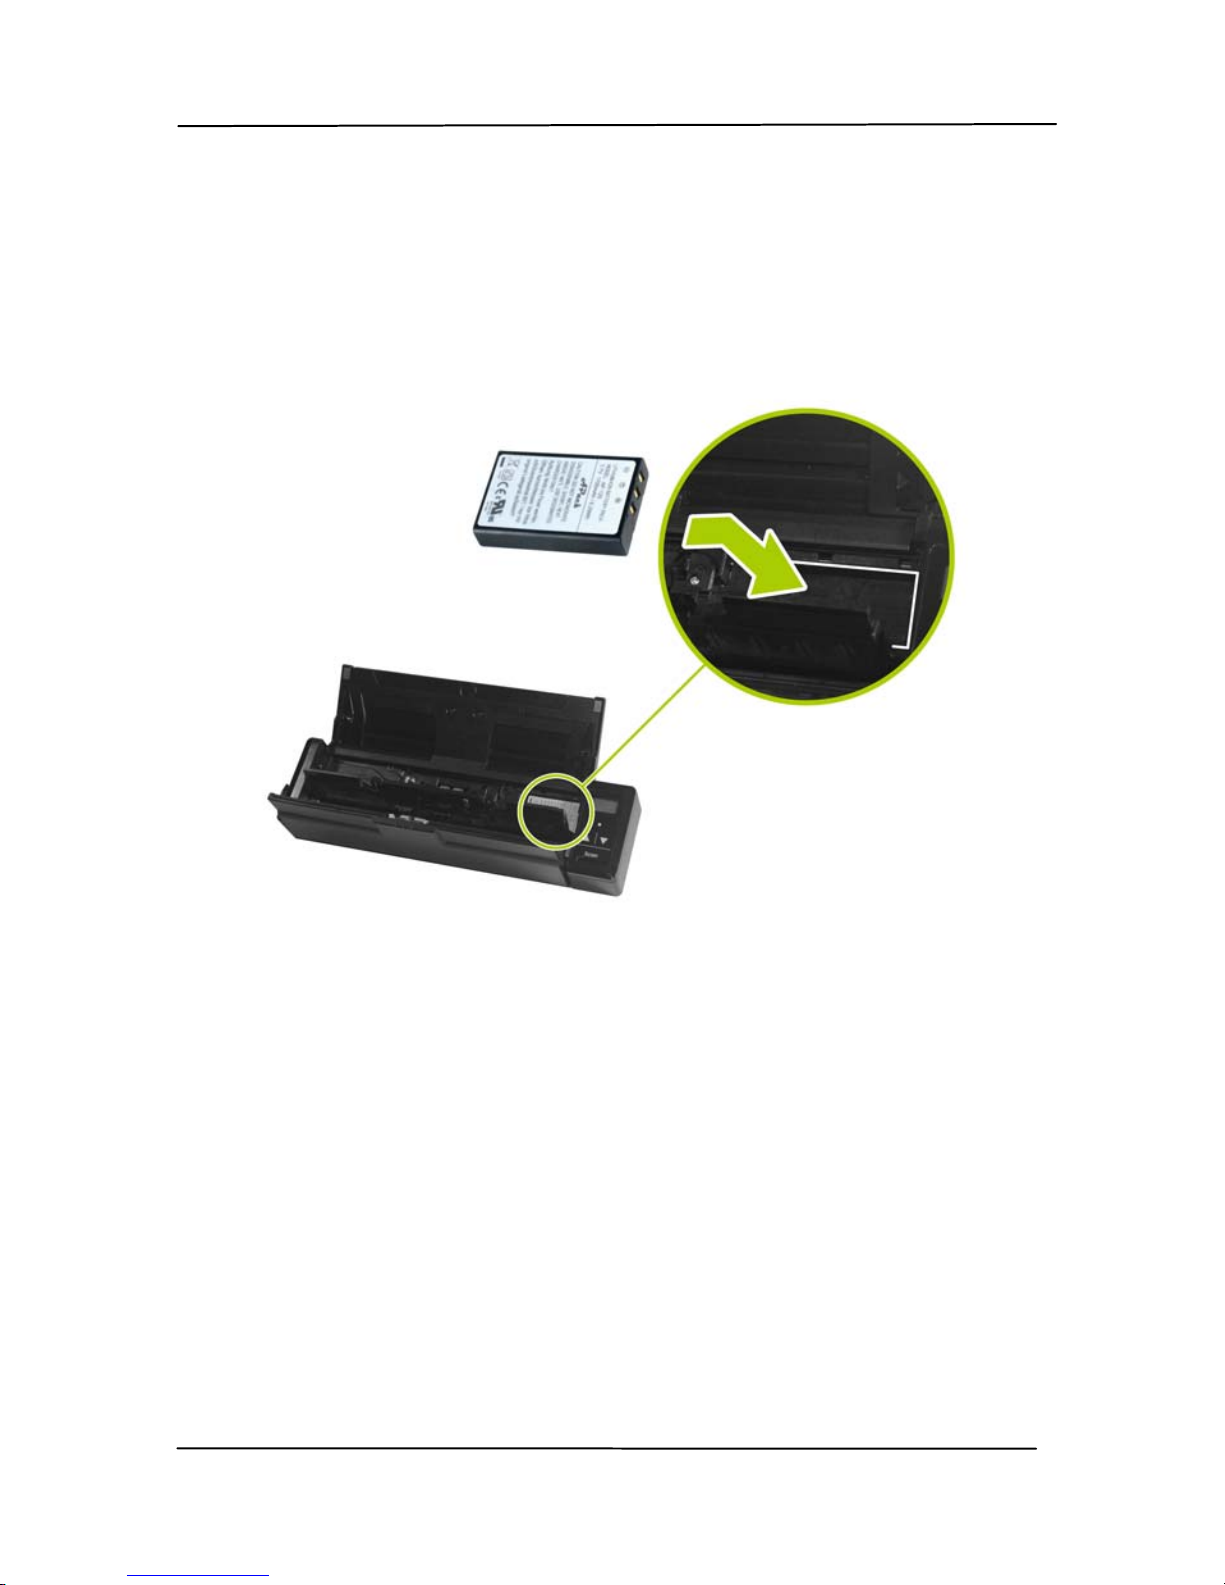
4. Load the battery into the battery container. Make sure the
battery is loaded with the correct polarity. Note the copper
strips on the battery should be touching the copper strips
on the device. Note: Please use only the supplied battery.
5. Close the battery cover and feeder cover.
2.3 Charging the Battery
1. Turn off the scanner.
2. Co
nnect the micro USB connector to the USB port of the
scanner.
3. Connect the other USB connector to the USB port on your
computer.

User’s Manual
2-4
Important:
For first-time use, please charge the battery for at least
4 hours.
While charging the battery, the blue LED light will be
solidly on. After the charging is completed, the LED light
will be extinguished.
2.4 Installing the Feed Extension Plate
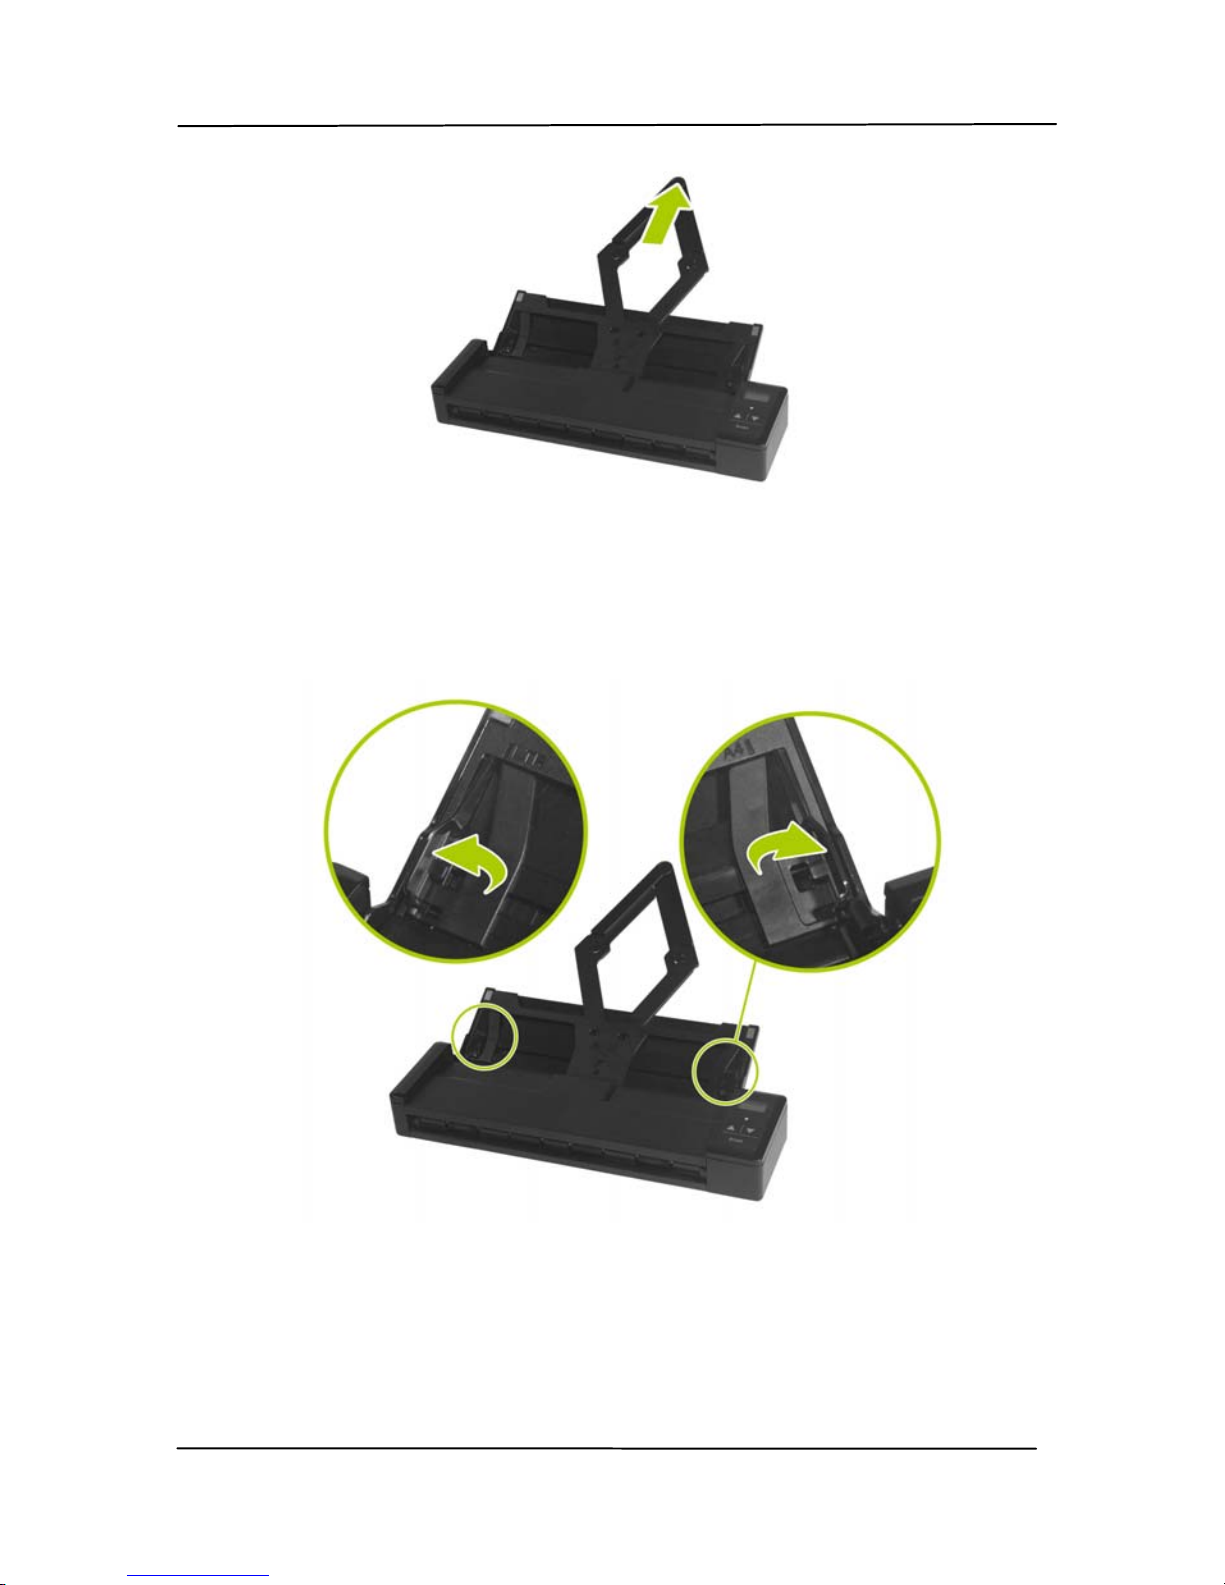
1. Open the feed tray.
2. Open the feed extension plate.
User’s Manual
2-5
3. Raise the right and left document guides to load your
document.

User’s Manual
2-6
2.5 Installing the Scanner Driver
NOTE:
1). To ensure your computer can identify the USB scanner,
please install scanner driver first before connecting the
scanner to your computer.
2). The scanner driver contains TWAIN driver. After the
installation of scanner driver is completed, this scanner
allows you to scan via a TWAIN interface. Start your
TWAIN-compliant image editing software application to
select a TWAIN interface.
1. Place the supplied CD-ROM onto your CD-ROM drive.
2. The software installation graphic appears. If not, run
“setup.exe”.

User’s Manual
2-7
Contents on the installation graphic:
Install Scanner Driver: To communicate with your
scanner, you need to install the scanner driver.
Install Button Manager V2: To use the buttons on
the scanner, you need to install Button Manager V2.
To ensure Button Manager V2 works properly, please
FIRST install scanner driver before installing the
Button Manager V2.
Install Adobe Reader: To view the user’s manuals
for the scanner and Button Manager V2, you need to
use Adobe Reader to open and view the manuals in
pdf file format. If you already have Adobe Reader
installed on your computer, you may disregard this
item.
View Manual: Click “View Manual” to view or
print the detailed user manual for the scanner and
Button Manager V2 respectively.
3. Click Install Scanner Driver t o in stall t he scan ner driv er
and t hen click Install Button Manager V2 t o in stall t he
Button Manager V2 unto your computer. If you have
installed Button M anager V2 bef ore in stalling t he scan ner
driver, you need to restart your computer.
2.6 Turning on the Power
Turn the Power Switch to the [ON] posi
ti
on to turn on the
scanner.
User’s Manual
2-8
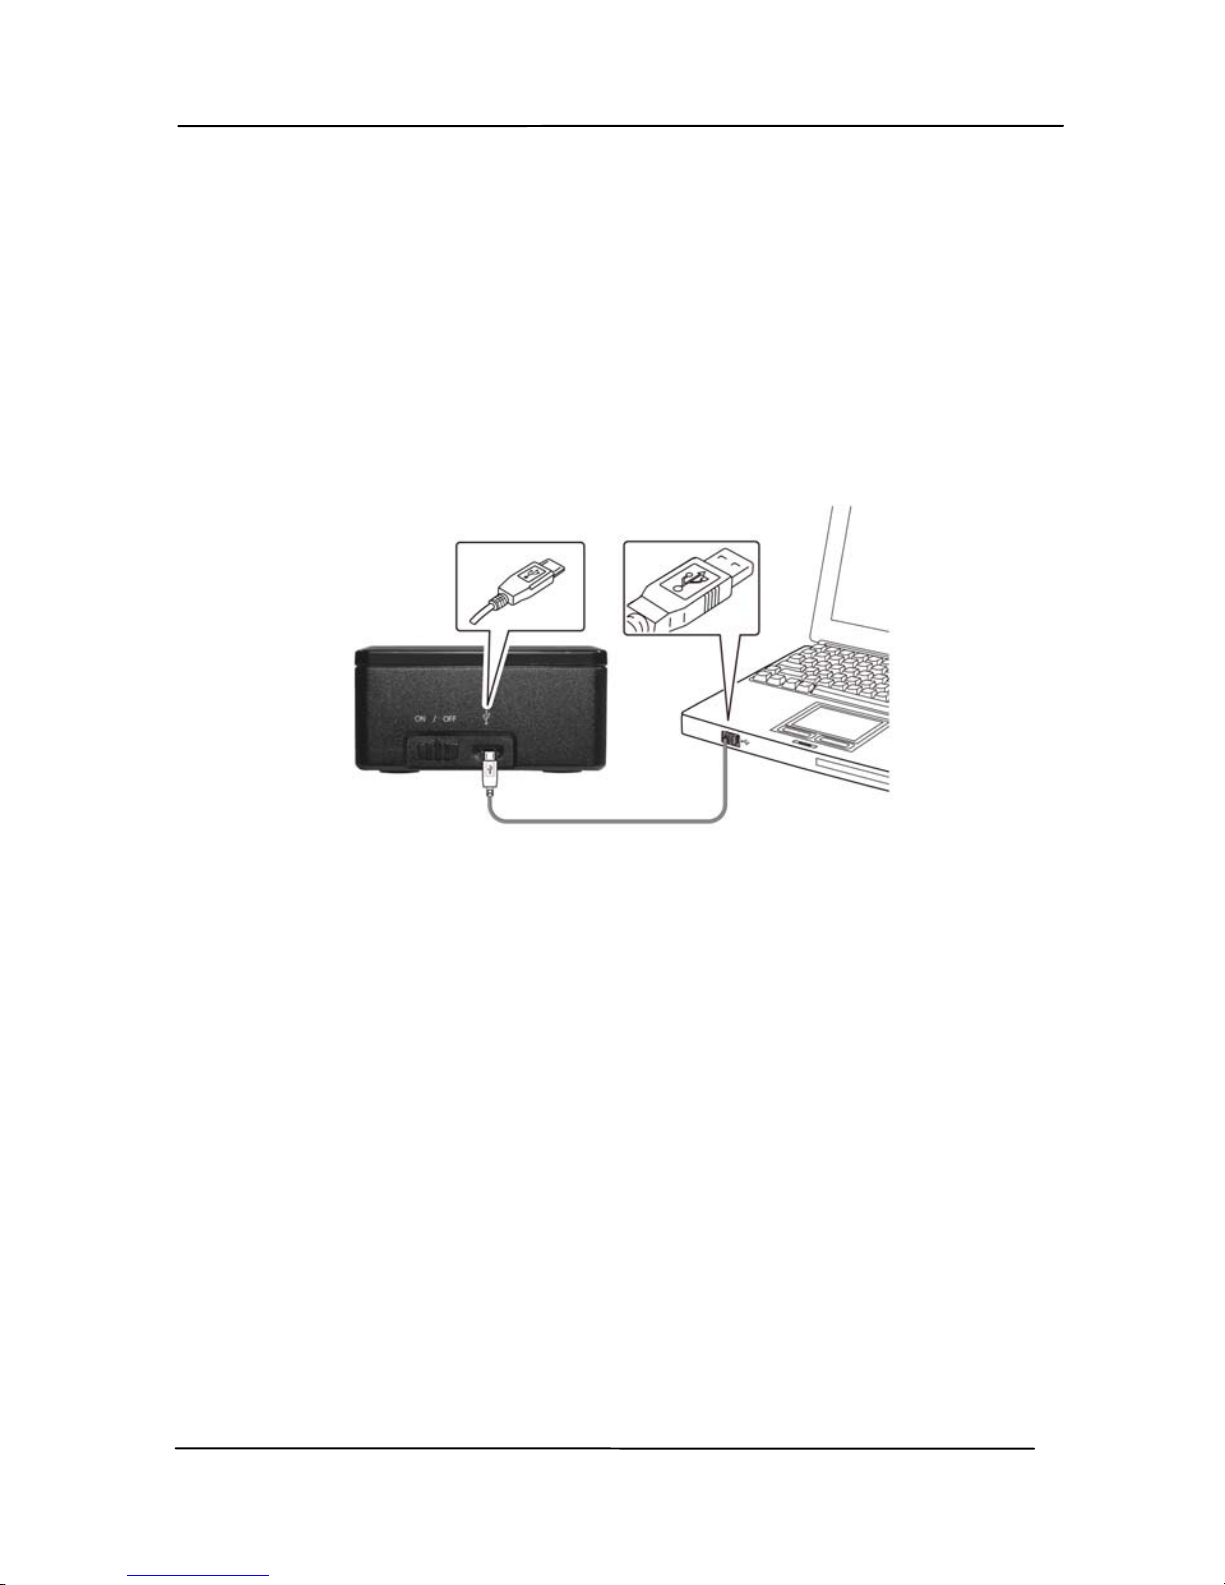
2.7 Connecting to a Computer
1. Co
nnect the micro USB connector to the USB port of the
scanner.
2. Connect the other USB connector to the USB port of your
computer. (If you are connecting to a desktop computer,
please connect to the USB port at the rear side of your
computer.)
3. The computer should detect a new USB device and prompt a
“New Hardware Found” message.
4. F ollow the on-screen instructions clicking the [Next] button.
When t he cert ification screen is prompt ed, click [Continue
Anyway] to complete the installation.
5. When the Finish dialog is prompted, click the Finish button.

User’s Manual
3-1
3. Completing Your First
Scan
3.1 Suitable and Unsuitable Original Types
Suitable Original Types
The scanner used with the feeder dock is desi
gned to obtain the
best scanning results with the following types of originals:
Photos and documents (3”x5”, 4”x6”, 5”x7”, 8.5”x14”) (76 x
127mm, 102 x 152 mm, 127 x 177 mm, 216 x 356 mm)
Business cards [standard 3.5” x 2” (88 x 50 mm) or larger]
Document weight: 60 ~ 107 g/m² (16 to 28 lb)
Long Page (216 x 916 mm) (available for 300 DPI only)
Unsuitable Original Types
Do not use the following types of originals for scanning in the
feeder dock, otherwise the feeder dock may malfunction or
cause the original to jam in the slot.
Originals thicker than 0.76 mm
Original with either side shorter than 50 mm
Originals with lots of black or dark colors
Original with dark colors surrounding the edges
Printed media (newspapers, magazines, etc
Soft and thin materials (thin paper, cloth, etc.)
Curl or wrinkle originals
Originals with staples or paper clips.
Originals that exceed acceptable size – 8.5” (width) x
14”(length) (216 x 356 mm) (in 600 dpi)

User’s Manual
3-2
3.1.1 Loading Your Document in the ADF Paper Tray
Fanning Your Document
Note:
To avoid occasional multi-feeds or paper jams, please fan
your documents and align the top edges before feeding them
into the scanner. The auto document feeder can hold up to 8
pages (75 g/m
2
, 20 lbs) at a time.
1. Hold both ends of the documents and fan them a few
times.
2. Rotate the documents by 90 degrees and fan them in the
same manner.
3. Align the edges of the docume nts in a st ep-like pat tern
(see picture below).
Step-like
Scanning
Direction
User’s Manual
3-3
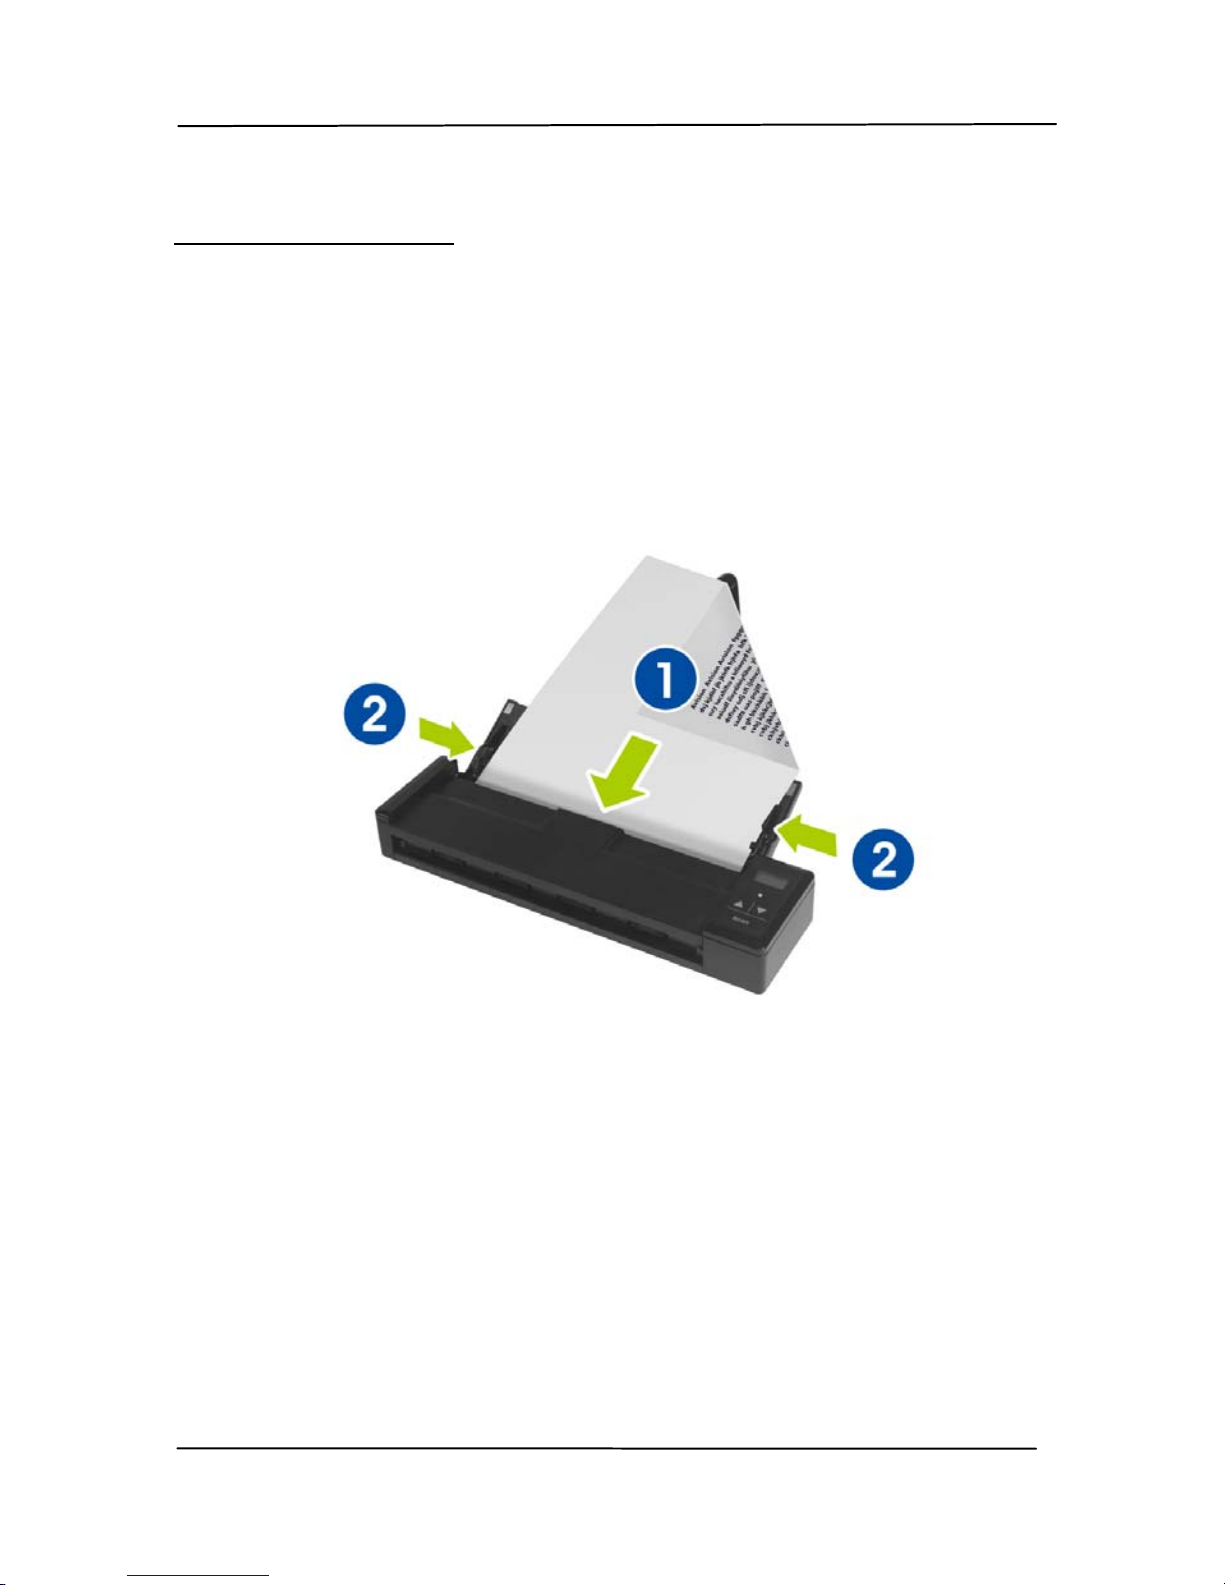
Document Feeding
1. Load the stack of document FACE DOWN with the top of
the pages pointing into the feeder. Up to 8 pages of plain
paper can be loaded at one time in the feeder.
2. Make sure the document gu ides are aligned with the
edges of the stack.
User’s Manual
3-4
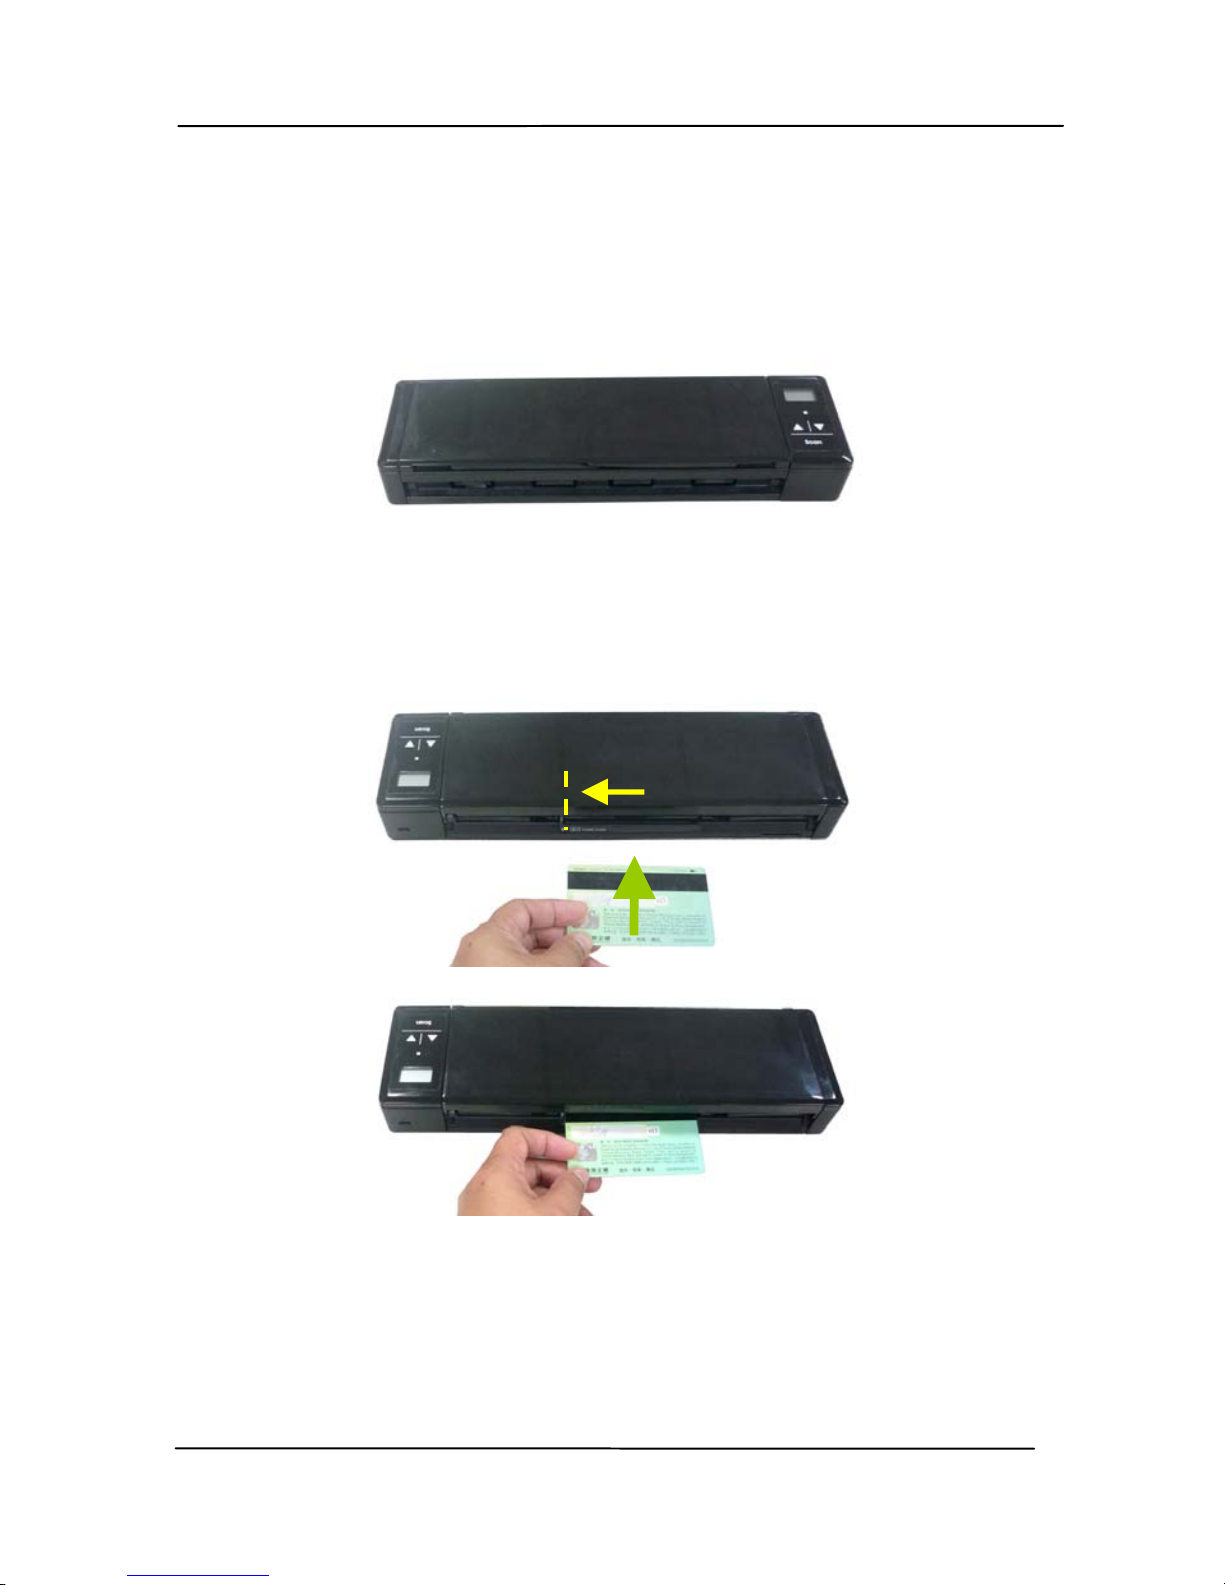
3.1.2 Loading Your Card
1. Make sure the feeder cover and paper tray are closed as
shown.
2. Insert your plastic card FACE DOWN, TOP EDGE FIRST
into the scanner’s feeding slot for cards at the back of the
scanner, align it to the left edge of the slot (
), and gently
push the card into the feeding slot (
) as indicated.
User’s Manual
3-5
3.2 Verifying Your Scanner Installation
T
o v
erify if your scanner installation is correct, Avision provides
you a useful test program called Avision Capture Tool. With this
tool, you can perform simple scans and view the captured
images. In addition, it helps you complete your scan at a rated
speed.
The following procedure describes how to verify your scanner
installation. If the installation is not correct, please review the
preceding section to check if the cable connection and scanner
driver have been successfully installed.
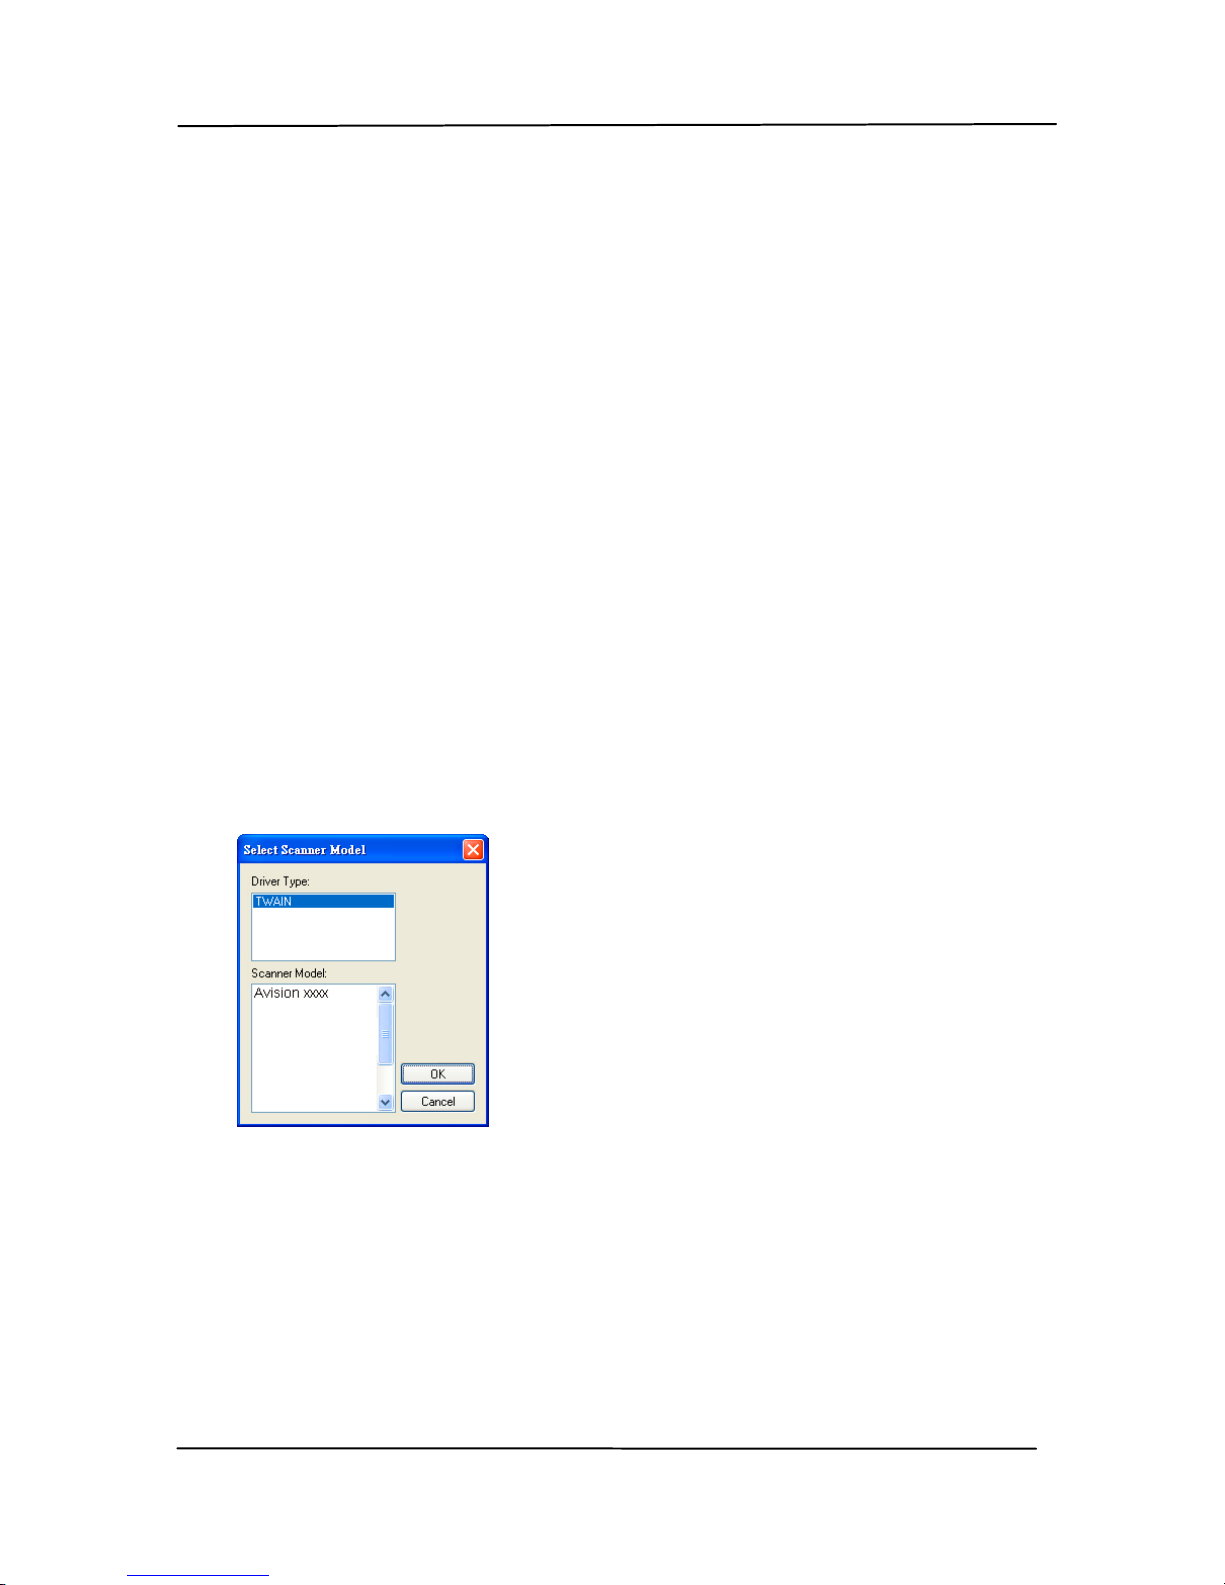
Before you begin, be sure the scanner is on.
1. Select Start>Programs>Avision xxx Scanner>Avision
Capture Tool. The Select Scanner Model dialog box will be
displayed.
2. Select your driver type and scanner model and click OK.
The following Avision Capture Tool dialog box will be
displayed.
User’s Manual
3-6
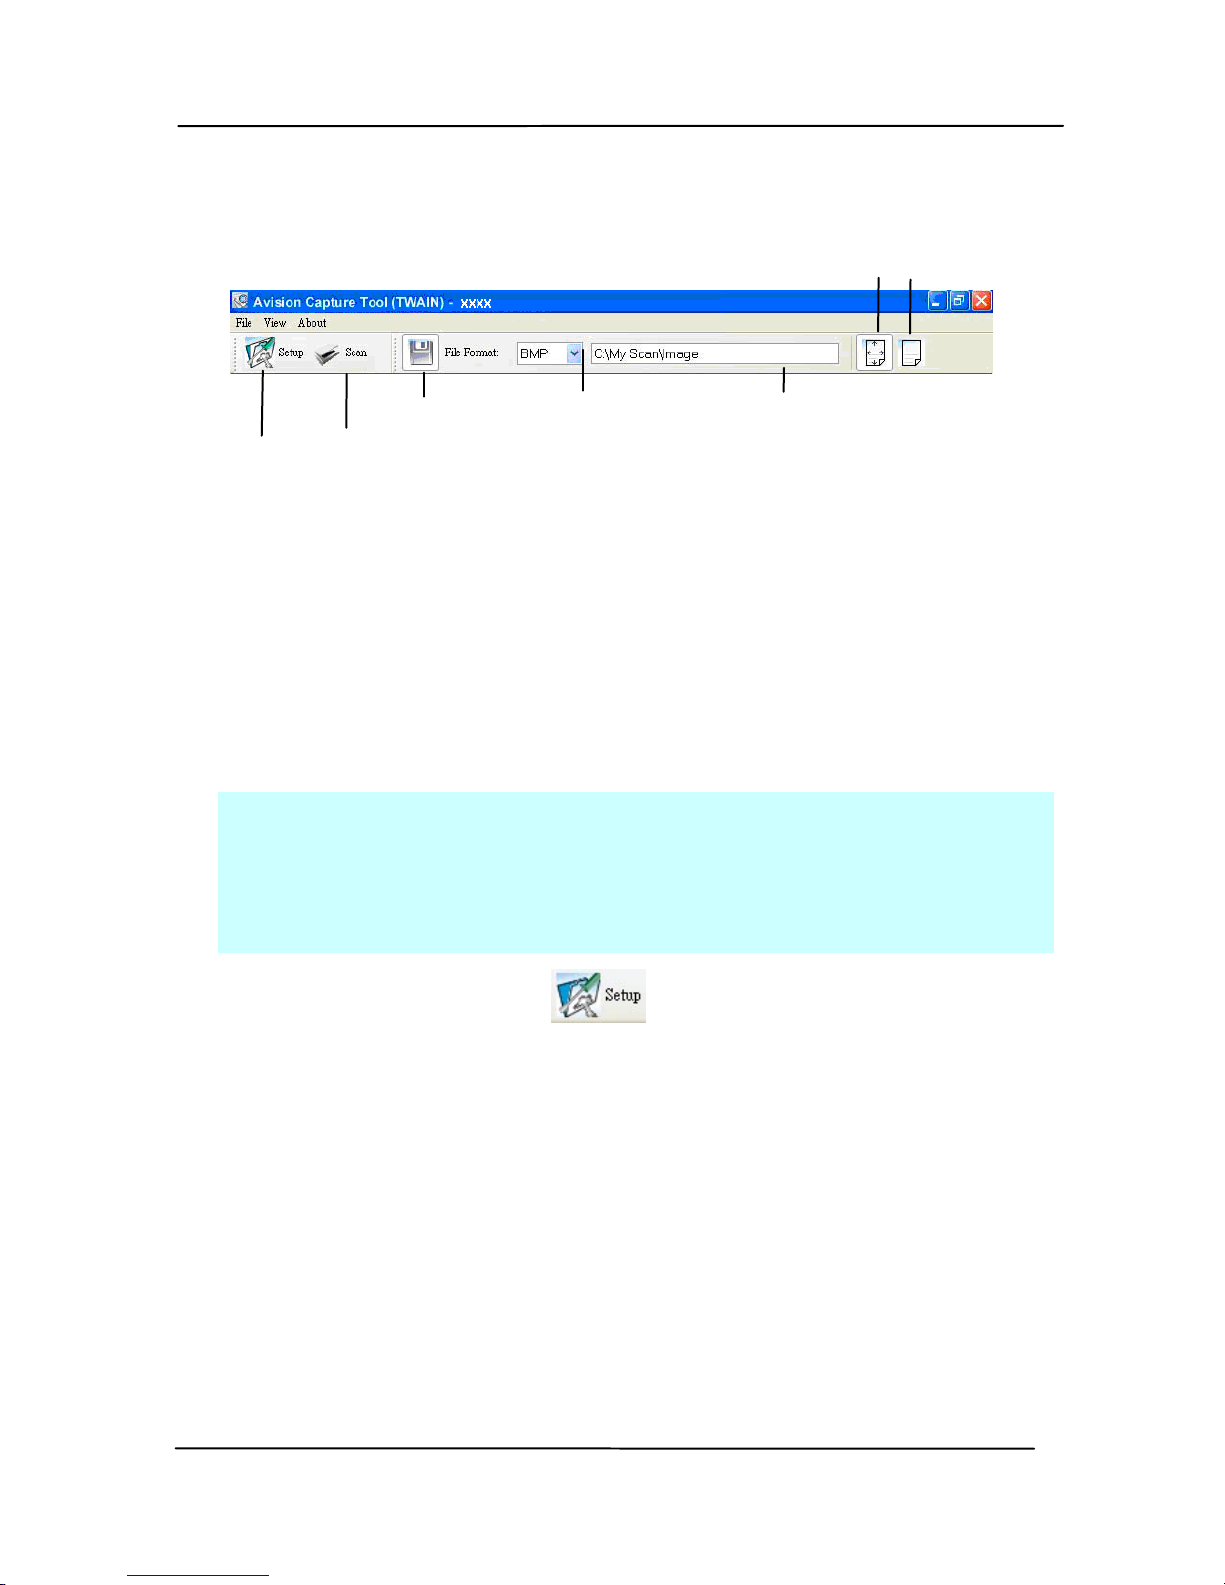
3. Choose your desired file format from the File Format drop
down list box. (Default is JPEG, other choice includes TIFF,
MTIFF, PDF, MPDF, GIF, and BMP.) The supported file
formats vary depending on your scanner model.
4. Type your desired folder name and file name in the File Path
box. (Default is C:\Documents and Settings\user Name\My
Documents\My Scan\Image.)
Note: If you do not wish to save the scanned image,
deselect the Save button since default is Save Enable. In this
case, the thumbnail view will be disabled. And therefore,
after viewing all the scanned images, only the last one will
remain on the screen.
5. Click the Setup button (
) or choose Setup from the
File menu to prompt the Scanner Properties dialog box.
Setup
Actual
Size
Fit
Page
Scan
File Format
Save File Path
 Loading...