

Page 1
User’s Manual
Page 2

Copyright
Copyright 2006 Avision Inc. All rights reserved.
Information in this document is subject to change without notice.
The software described in this document is furnished under a
license agreement or nondisclosure agreement. The software
may be used or copied only in accordance with the terms of
those agreements. No part of this publication can be
reproduced in any form or by any means without prior written
permission of Avision Inc.
Trademark
Avision is the trademarks of Avision Inc.
DjVu is a registered trademark of LizardTech Inc.
DjVu technology is protected by U.S. patent No. 6,058,214 and patent
pending.
Adobe, the Adobe logo, Adobe PDF Scan Technology and Adobe PDF
Signature are either registered trademarks or trademarks of Adobe
Systems Inc. Optical character recognition (OCR) capabilities
are provided by Image Recognition Integrated Systems.
Microsoft and Windows are registered trademarks of Microsoft
Corporation.
Other names and products mentioned in this document may be
trademarks or registered trademarks of their respective
companies.
ii
Page 3

Table of Contents
1. Installing the Button Manager .................1
2. Scanning From the Button .......................4
2.1. Checking the Button Configurations Before
Scanning...................................................... 4
2.2. The Default Button Settings ............................ 6
2.3. Scanning From A Simple Touch of the Button..... 7
2.3.1. Use of the Button Panel........................ 8
2.4 Performing Continuous Scan From the Flatbed..10
3. Configuring the Buttons.........................12
3.1. A Glance of the Button Properties Window........12
3.2. Choosing New Settings For A Button................13
3.3. Choosing a Proper File Format........................16
3.4 Adding A New Destination Application..............19
3.5 Deleting A Current Destination Application .......22
3.6 Creating A New Scan Configuration.................23
3.6.1 The Scan Settings Tab.........................23
3.6.2 The Color Dropout Tab.........................30
3.6.3 The Color Adjust Tab ...........................32
3.7 Deleting A Current Scan Configuration.............35
3.8 Selecting Options For a Button........................36
3.9 Removing a Blank Page .................................39
3.10 Setting the Power Saving Mode.......................40
3.11 Saving and Loading Profiles............................41
3.12 Solving A Problem ........................................43
Index............................................................45
iii
Page 4

1. Installing the Button Manager
System Requirements
• IBM compatible PC 586, Pentium or higher
• Microsoft Windows 2000/XP
• USB port 2.0 (compatible with USB 1.1)
• At least 100 MB of free hard disk space
• At least 128 MB of system memory
• A CD-ROM drive
Button Manager provides you an easy way to scan your
document and then link the scanned image to your designated
software application. All this can be done with a simple touch
of the button on the scanner. Installing the Button Manager is
easy. Please follow these steps:
Note:
To ensure the Button Manager work properly, please install the
Button Manager FIRST before installing the scanner driver.
1. Insert the supplied CD into your CD-ROM drive. The
following installation graphic appears. If not, please
choose the Button Manager folder and double click
“Setup.exe”.
1
Page 5
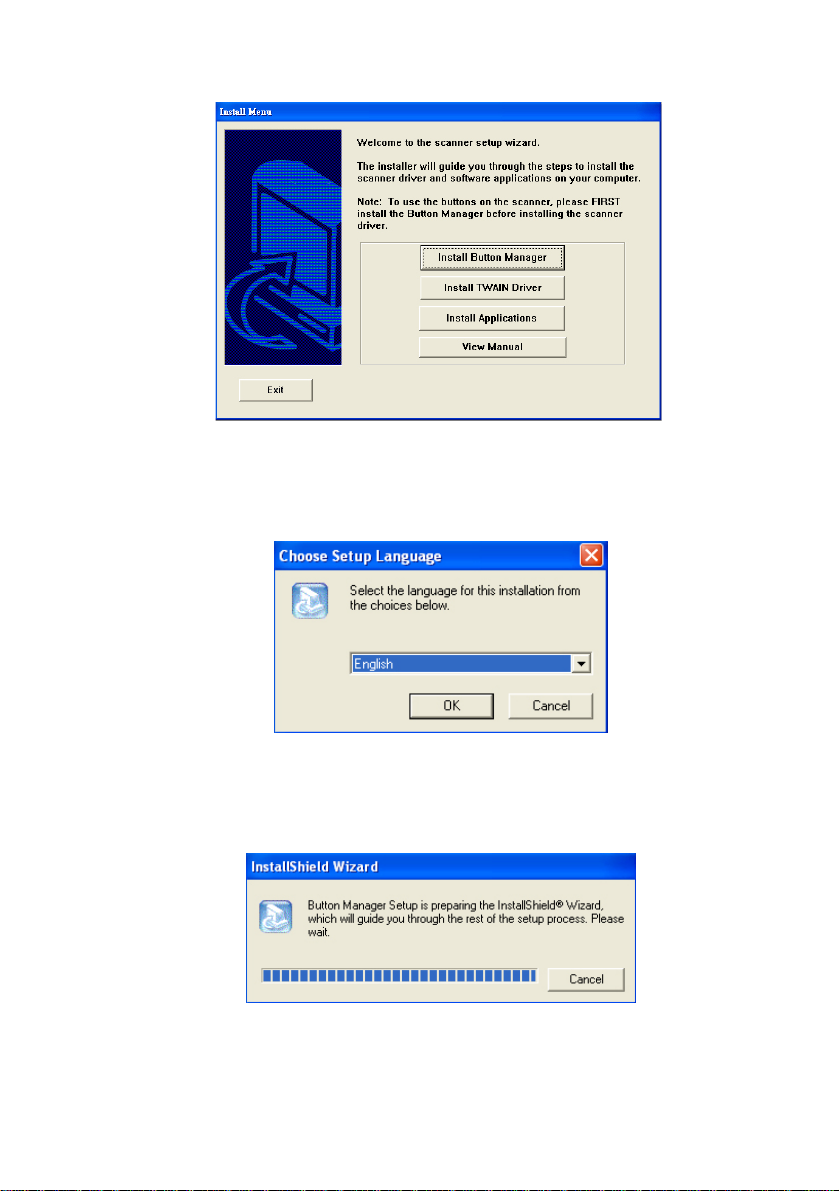
2. Click “Install Button Manager”. A language selection
window appears.
3. Choose the language you wish to install. The InstallShield
wizard appears to guide you through the rest of the
installation.
2
Page 6
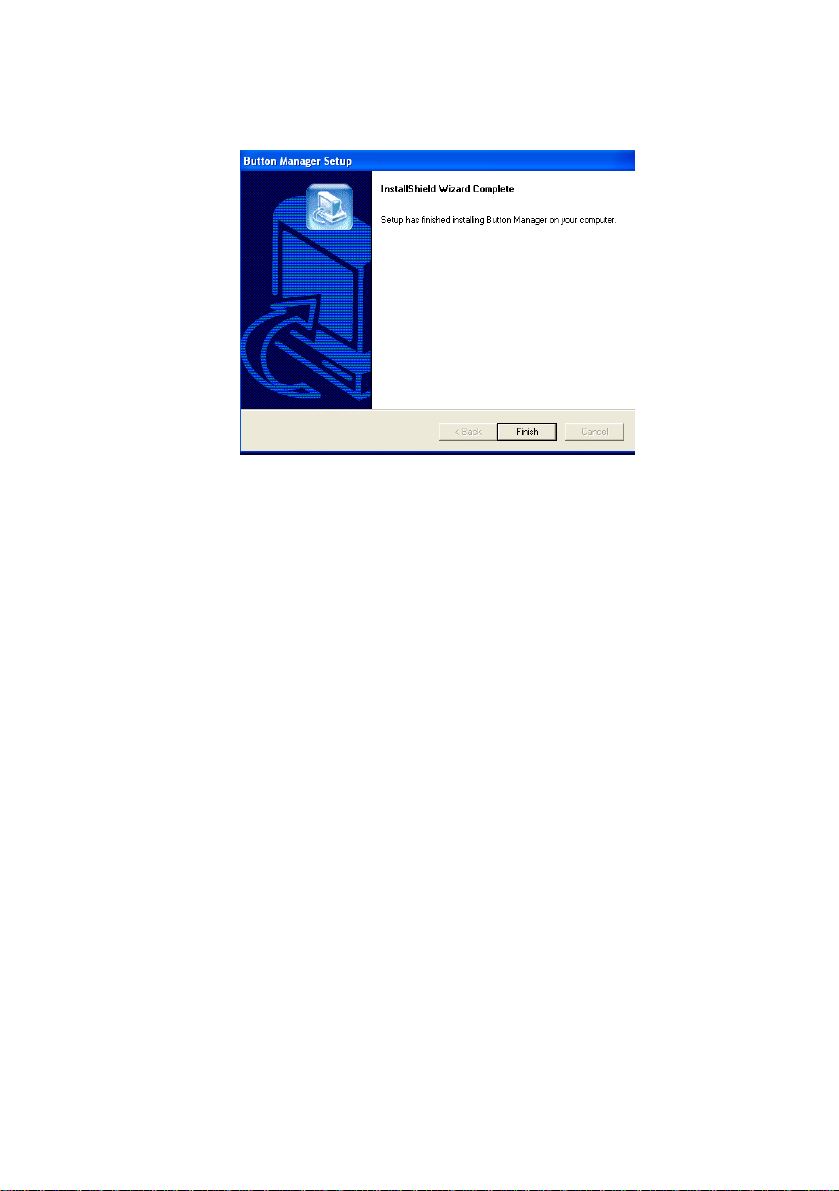
4. Click “Finish” to complete the installation.
3
Page 7
2. Scanning From the Button
T
T
Simply pressing the Scan button on the scanner, the scanned
document will be sent to your designated destination application.
Yet, before you scan, it is recommended to check the button
configurations first to ensure a proper file format and a
destination application.
2.1. Checking the Button Configurations Before
Scanning
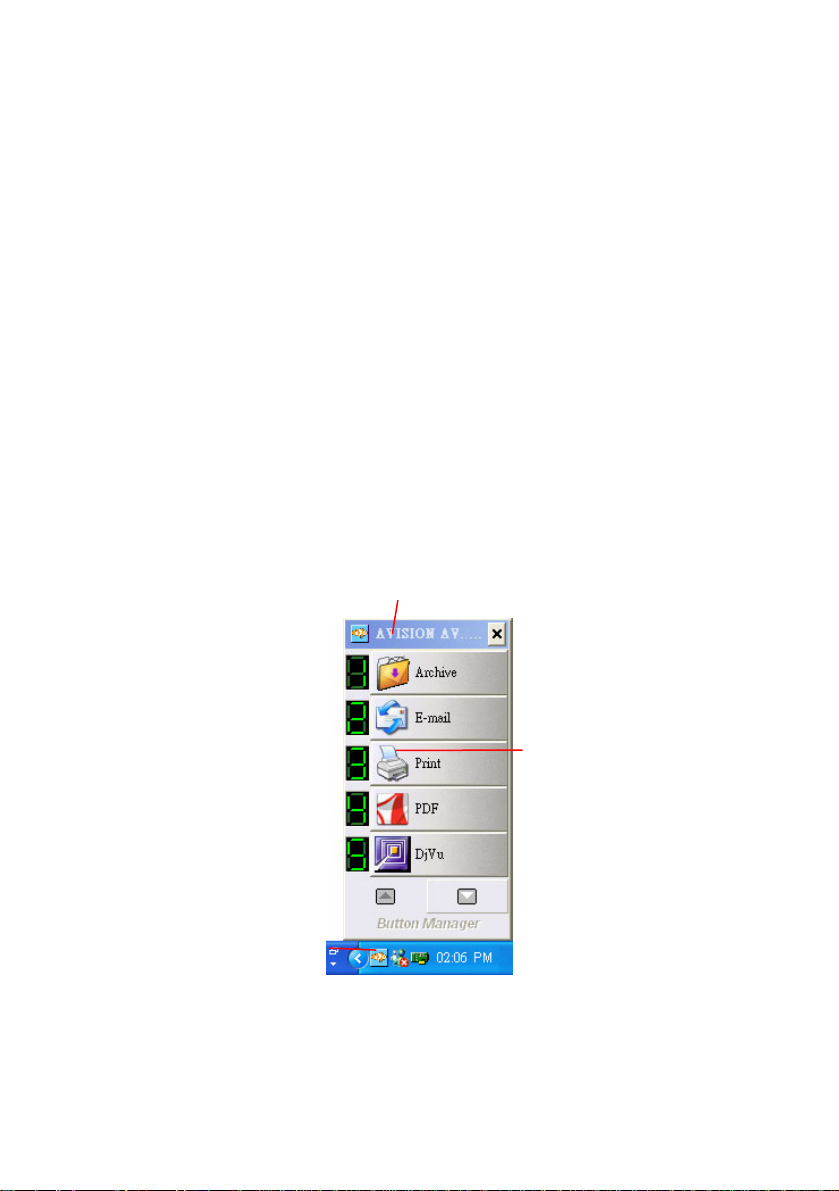
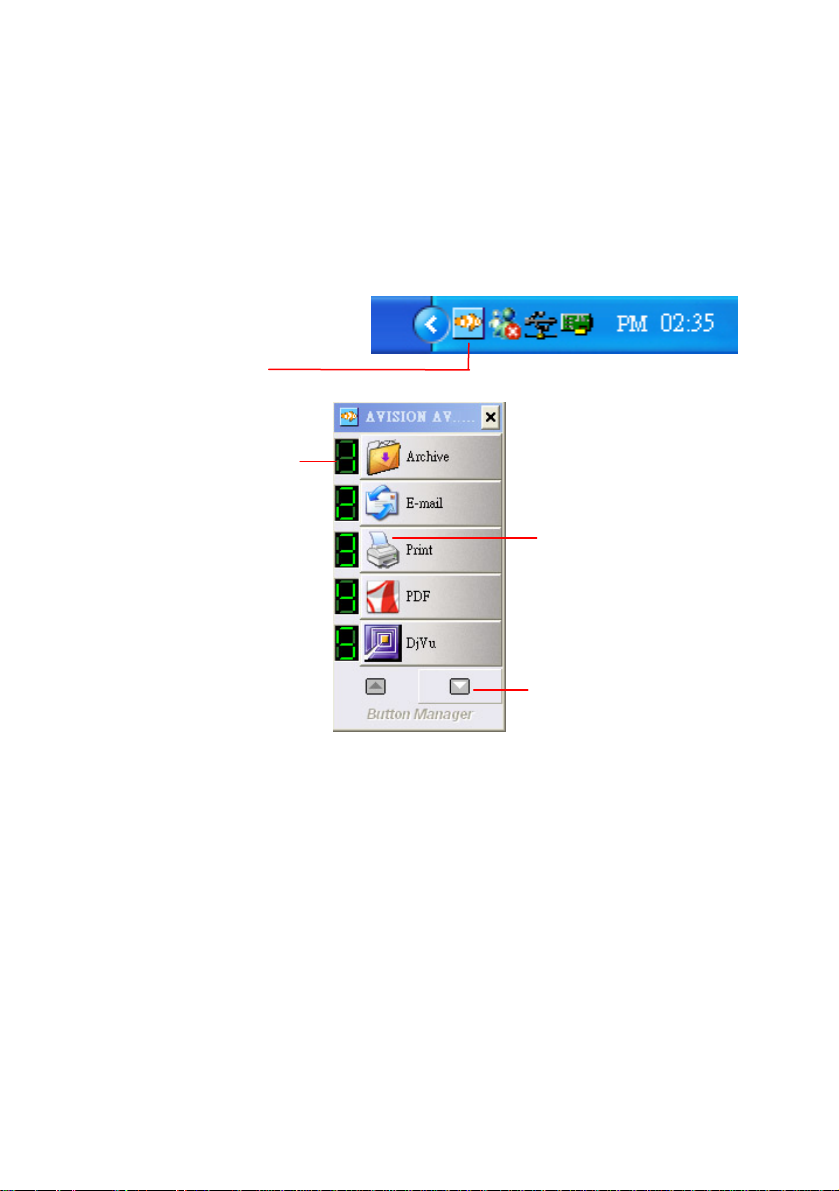
1. After the Button Manager and the scanner driver have been
successfully installed on your computer, the Button Panel
will be displayed in the Windows System Tray at the bottom
right corner of your computer screen.
his indicates the scanner model
he Function Icon
The Button
Icon
The Button Panel
4
Page 8
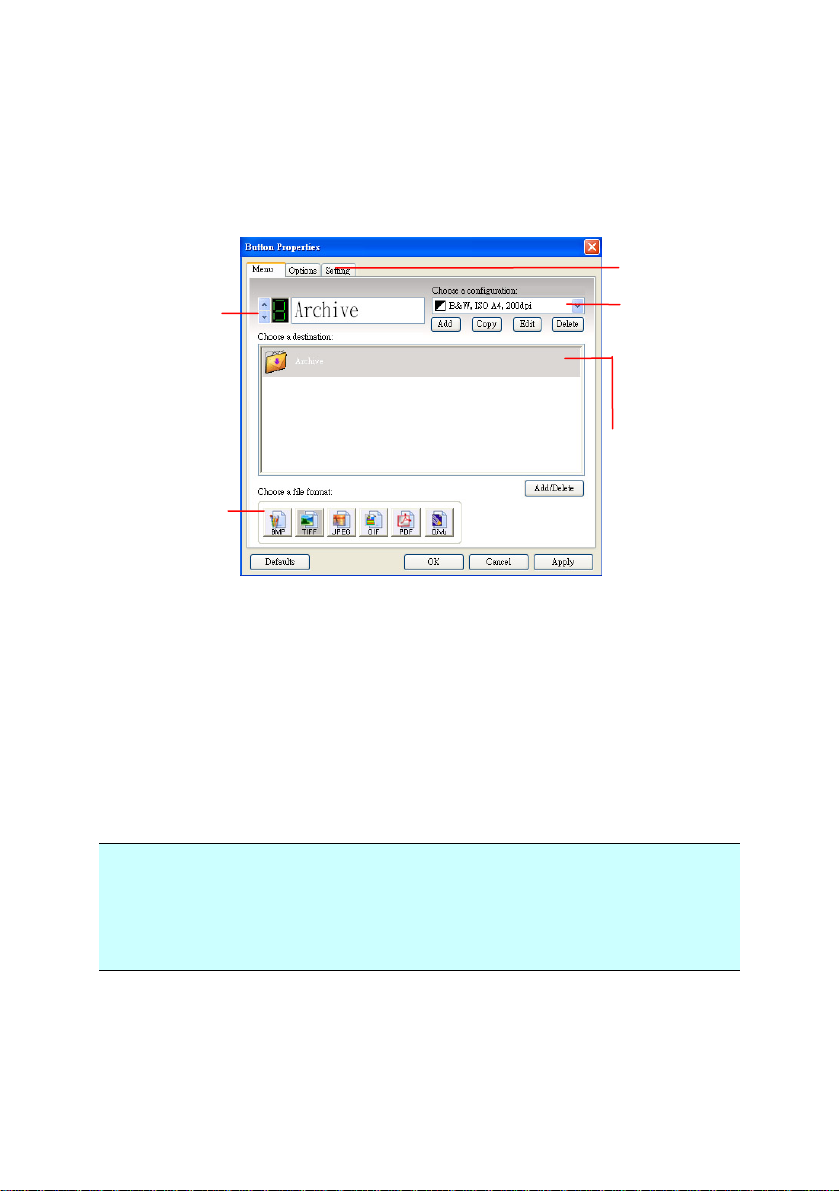
2. The Button Panel shows the first five scanning buttons.
Right-click the button (function) you wish to check, the
Button Properties window appears.
The button
number and
name.
The file format of
the scanned
image.
Click to select
options or
setting.
The scan
settings for the
selected button.
(in this case
button #1).
The destination
application. (This
is the application
that opens after
you have finished
scanning.)
The default setting is indicated in highlighted color. If you
wish to change the setting, use this window to reset the
setting for the file format, destination application, or other
scan settings. See “Configuring the Button” in the
subsequent section to reset the settings.
3. Click the OK button to leave the window.
Note:
If the Button Panel has not been displayed in the Windows
System Tra y after restarting your computer, please just turn off
and on your scanner. The Button icon will then be displayed on
the right corner of the Windows System Tray.
5
Page 9
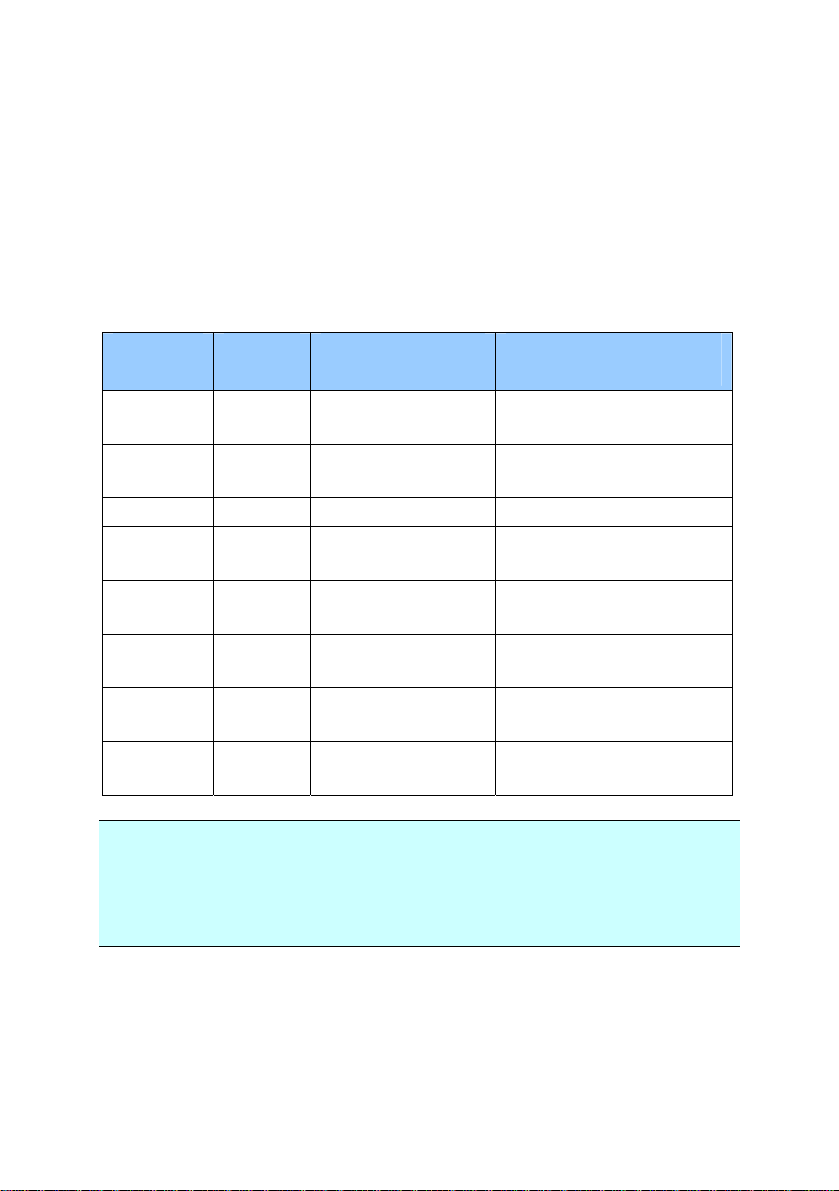
2.2. The Default Button Settings
The scanner is shipped with preconfigured button settings for
your basic scanning tasks such as scan-to-folder, scan-to-email,
and scan-to-printer. The following table shows these factory
default settings. You can change any of these settings.
Button
Number
Name Destination
Application
Preset Scan
Settings
1 Archive Folder B&W@200 dpi, A4,
TIFF
2 E-mail Microsoft
Outlook Express
Gray@200 dpi, A4,
JPEG
3 Print Printer B&W@300 dpi, A4
4 PDF Acrobat Reader B&W@200 dpi, A4,
PDF
5 DjVu Document
Express
6 Scan roxio
PhotoSuite
B&W@300dpi, A4,
DjVu
Color@100 dpi, A4,
JPEG
7 Paint Microsoft Paint Color@100 dpi, A4,
BMP
8 OCR Document
Express
B&W@300dpi, A4,
TIFF
Note:
To accurately use the default settings, you need to install the
necessary software applications such as roxio PhotoSuite or
Document Express, or Adobe Acrobat Reader before installing
the scanner driver.
6
Page 10
2.3. Scanning From A Simple Touch of the Button
1. Adjust the paper guide for the width of paper and load the
document with their tops into the automatic document
feeder.
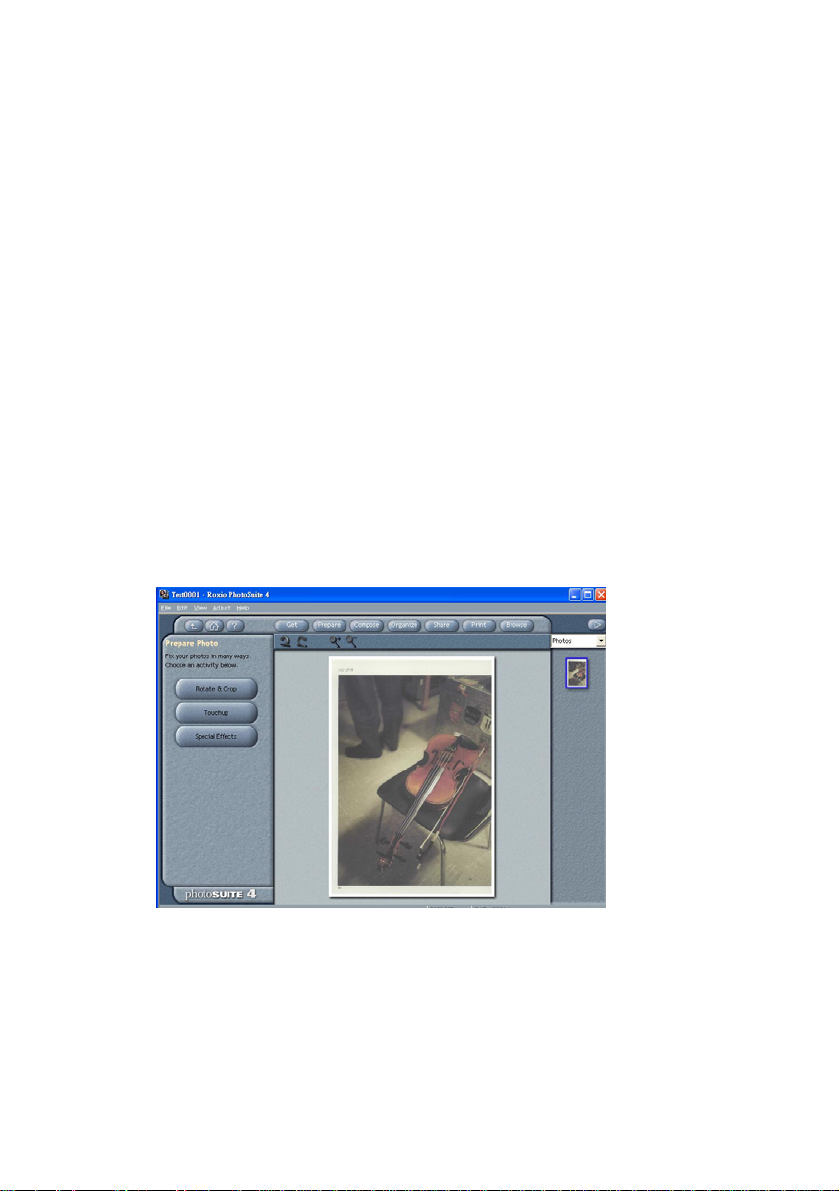
2. Check the number on the LED screen to ensure if you are
selecting the proper scan settings and destination
application. (For example, if you want to scan with button
#4, which open roxio PhotoSuite and display the scanned
image in the main window of roxio PhotoSuite, the LED
screen should show 4).
3. Press the Scan button on scanner.
4. After the scanning is finished, the roxio PhotoSuite will be
launched and the scanned image appears in the main
window of roxio PhotoSuite as below.
7
Page 11
T
2.3.1. Use of the Button Panel
Double click the Button icon in the Windows System Tra y at the
bottom right corner of the screen. This will prompt the Button
Panel.
The Button Icon
The Button
Number
This number
corresponds to
the number
shown in the
LCD screen on
the scanner.
he Function Icon
Click the arrows to
cycle through the
9 buttons.
The Button Panel
From this panel, you can check the scan configuration, start a
scan, and change the scan configuration.
1. To check the scan configuration, right click the function icon
you wish to check. This will prompt the Button Properties
window which shows the preset scan configuration.
2. To start a scan, left click the function icon you wish to scan.
The scanner begins to scan and deliver the scanned
document to your selected destination application.
8
Page 12
3. To change the scan configuration, right click the function
icon you wish to check. This will prompt the Button
Properties window which allows you to customize button
function and its configurations.
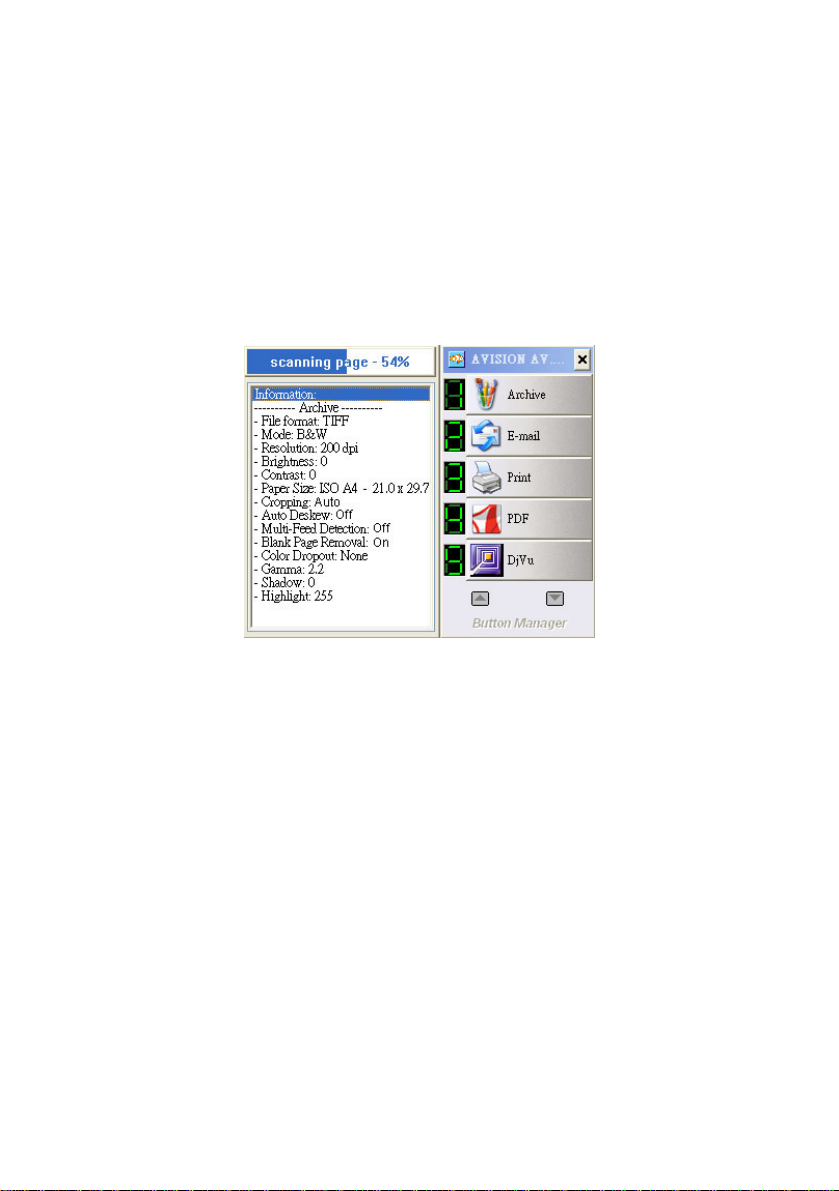
4. To see the detail s for a button, press the Scan button on the
scanner or left click the function icon. The scanning
progress bar and the details for the button appear.
The Detailed View
5. To cycle through all 9 buttons, click the arrow key to
navigate through all 9 buttons.
6. To close the Button Panel, click the close button in the
Button Panel.
9
Page 13
2.4 Performing Continuous Scan From the Flatbed
If your scanner comes with a flatbed module, Button Manager
provides you a convenient feature to perform continuous
(multi-page) scan from the flatbed. Simply inserting next page
of your document and then pressing the Scan button, your
multi-page scan from the flatbed can be completed. This
feature is particularly useful when you need to scan inside pages
of a book.
To perform continuous scan from the flatbed,
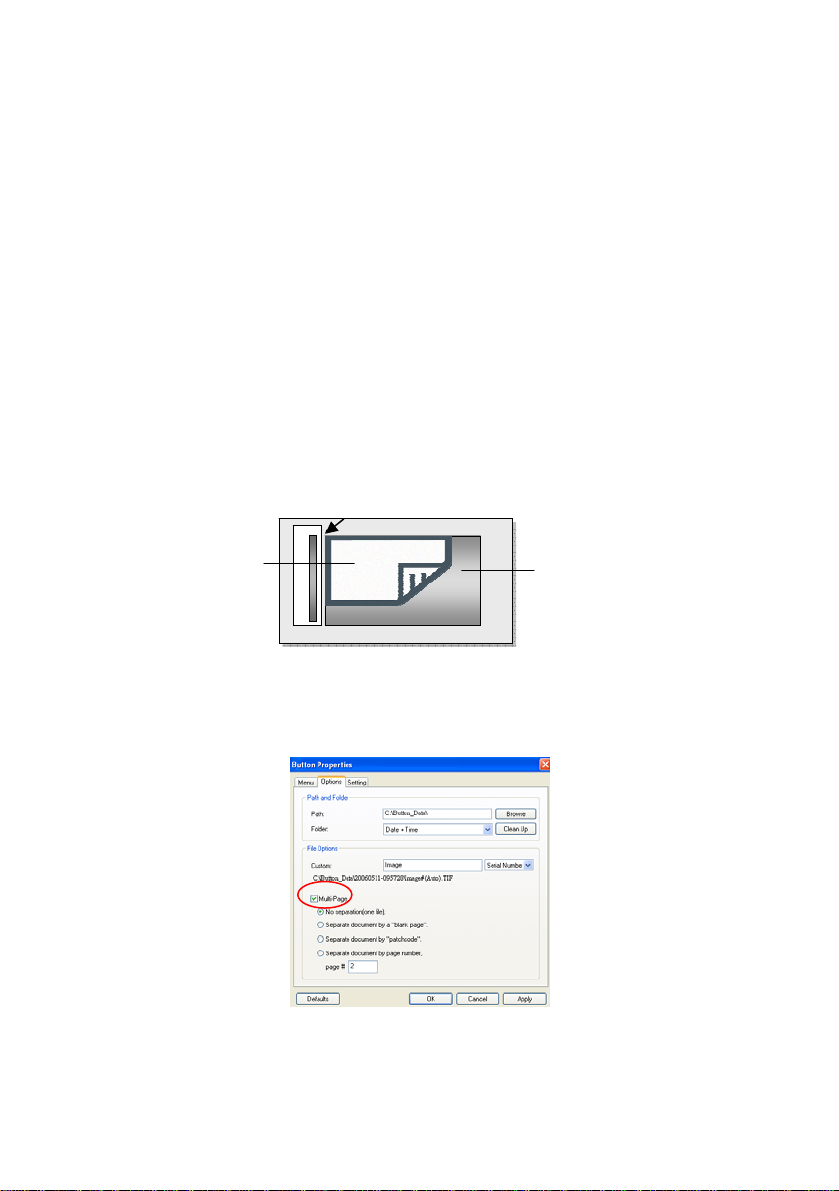
1. Open the document cover.
2. Place your document with the text facing down on the glass.
Make sure that the upper left corner of your document is
near the home position as marked by arrow.
Document
3. From the Button Properties window, choose your file
format to be PDF, TIFF, or DjVu.
4. From the Options tab in the Button Properties window,
choose “Multi-Page”.
Document
Glass
10
Page 14
5. Check if the number displayed in the LCD screen is your
favorable setting for the scanned image.
6. Press the Scan button on the scanner.
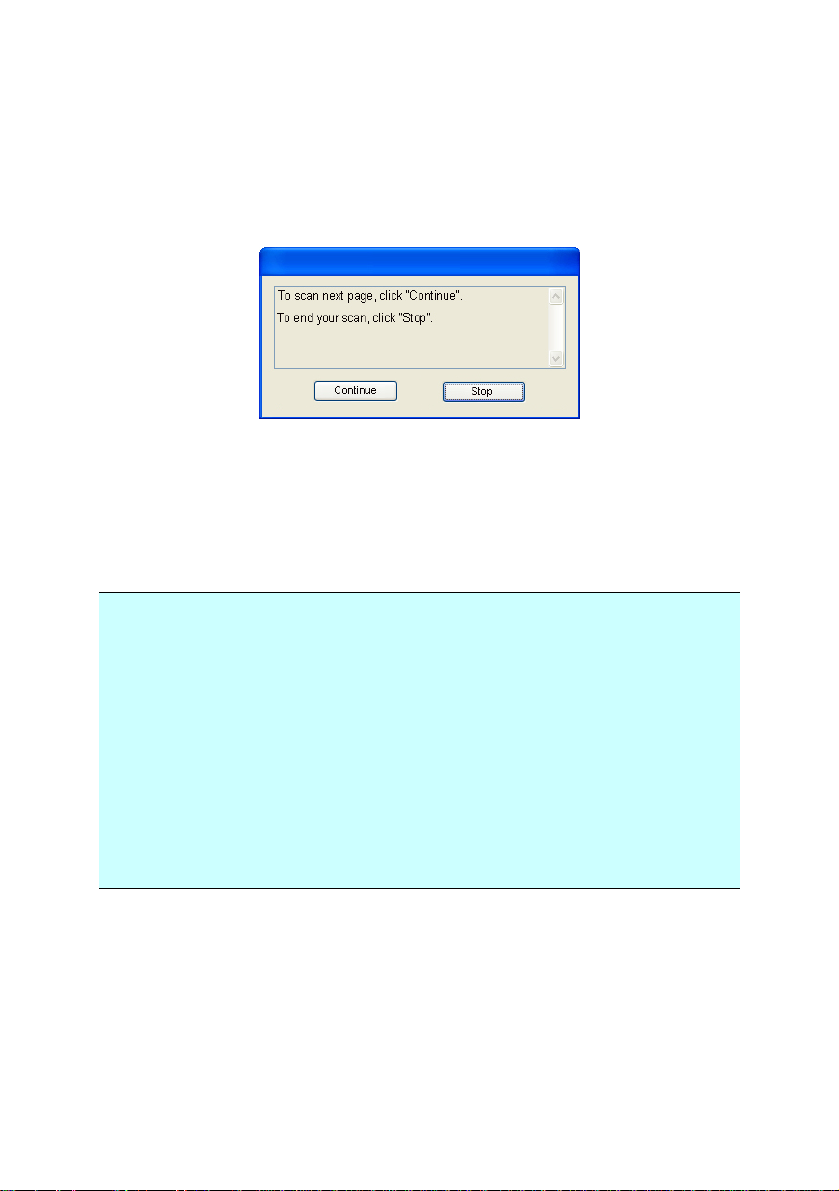
7. When the scanner completes first-page scan, a “Continue
or stop” dialog box appears.
8. Place next page of your document on the glass.
9. Choose “Continue” or simply press the Scan button on the
scanner to scan next page.
10. If your scan is completed, click “Stop” to close the dialog
box.
Note:
1. The scanner is designed to automatically set your scan
source. If your scanner is equipped with both the auto
document feeder and the flatbed, the scanner can
automatically set your scan source whenever there is
paper on the source. However, if there is paper on both
the auto document feeder and the flatbed, the scanner will
set auto document feeder to be the scan source.
2. If you choose to perform flatbed scan, the scanner can still
perform “automatic crop” and “deskew” for the scanned
image. However, the “Multi-feed Detection” and “Duplex”
functions will be disabled.
11
Page 15
3. Configuring the Buttons
The Button Manager allows you to change current button
configurations, rename destination application, or change your
destination application. The scanned image is either shown in
the main window of the specific destination application or served
as an attachment to the application.
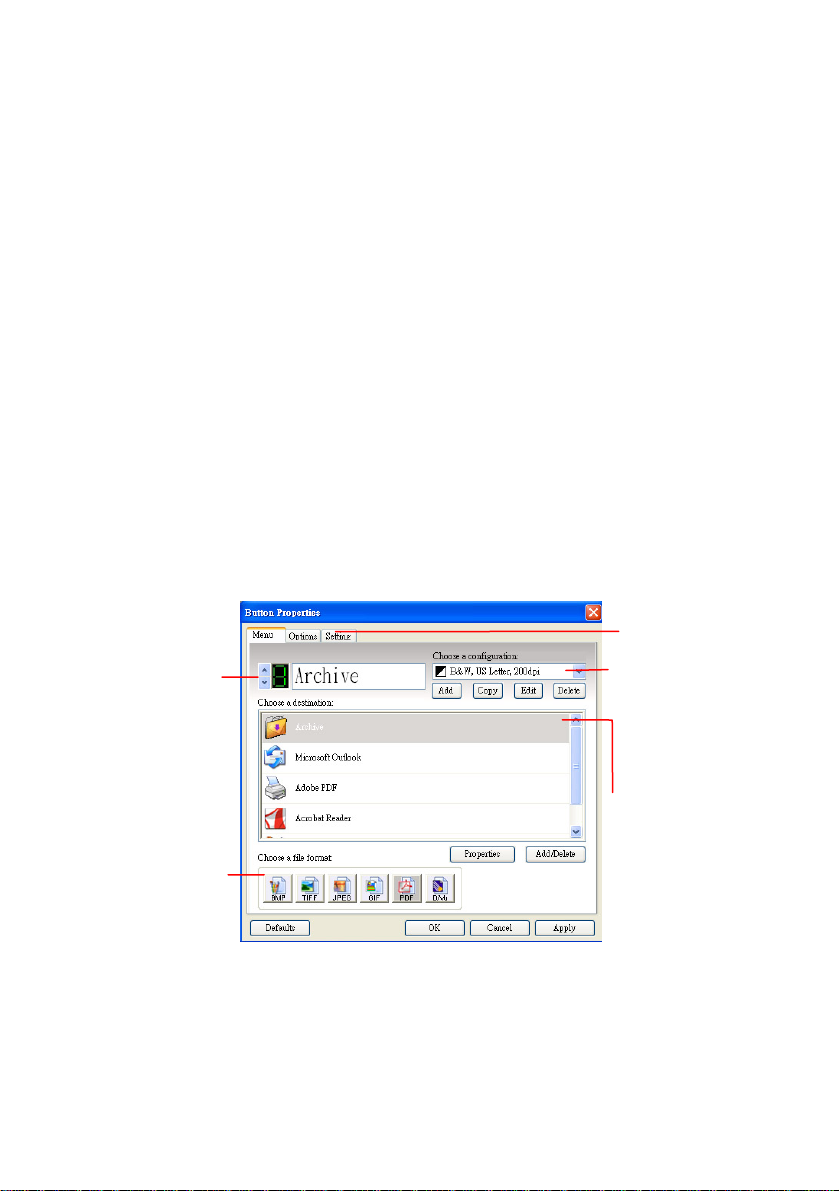
3.1. A Glance of the Button Properties Window
The Button Properties window allows you to choose new settings
for the buttons. The Button Properties window lets you select a
File Format, a Scan Configuration, a Destination Application,
and change other scan settings.
The button
number and
name.
Click to select
options or
setting.
The scan
settings for the
selected button.
(in this case
button #1).
The file format of
the scanned
image.
The destination
application. (This
is the application
that opens after
you have finished
scanning.)
12
Page 16

3.2. Choosing New Settings For A Button
For each of the nine buttons, y ou can choose a new Destinatio n
Application, Scan Configuration, and File Format.
Click the arrow
to change the
button number.
Select a file
format for the
scanned image.
Choose a scan
configuration
for the
scanned
image.
Choose a software
application as the
destination to send
the scanned
image.
To choose new settings for a button,
1. Click the Button icon (
) in the system tray at the bottom
right corner of the screen.
2. The Button panel appears and shows the first five scanning
buttons. Click the arrows to choose the button number you
want.
13
Page 17

3. Right-click the button to prompt the Button Properties
window.
4. From the Choose Destination list, select your ideal software
application to link the scanned image to.
Or you may add a new application by clicking Add/Delete to
add a new software application.
5. From the Choose Configuration list, select a scan
configuration.
14
Page 18

Or you may create a new scan configuration for the specific
software application by clicking Add to prompt the Scan
Configuration window.
6. From the Choose a File Format option, select a proper file
format supported by the software application.
7. Click OK to save and leave the window or click Apply to save
and continue to work with other features.
15
Page 19

3.3. Choosing a Proper File Format
The file format that you have selected determined the file
format for the scanned image of your document.
To select a proper file format,
From the Button Properties window, choose your ideal file
format for the specific button number. Choice includes BMP,
TIFF, GIF , PDF, and DjVu. Note that the TIFF, PDF, and DjVu file
formats support multi-page function.
BMP:
BMP is the standard Windows image format on DOS and
Windows-compatible computers. The BMP format supports RGB,
indexed-color, grayscale, and Bitmap color modes.
TIFF:
TIFF (The Tagged-Image File Format) is a flexible bitmap image
format supported by virtually all paint, image-editing, and
page-layout applications. Also, virtually all desktop scanners
can produce TIFF images.
JPEG:
JPEG (Joint Photographic Experts Group) compression provides
the best results with continuous-tone color and the smallest file
size.
PDF/Searchable PDF:
PDF(Portable Document Format) is a very popular file format
used by Adobe Acrobat. You can view PDF files using the
Acrobat Reader. Searchable PDF allows users to create PDF
files with searchable text.
16
Page 20

The Button Manager allows you to create searchable PDF with
the features of compression, character recognition, and security .
Click the PDF button to prompt the Properties button. Then
click the Properties button to open the following PDF Setting
dialog box.
• Compression:
The compression feature allows you to compress your PDF file.
Move the slider to the right or to the left to increase or decrease
the level of compression. Note the greater the compression
level, the lower image quality.
• Recognition:
OCR Engine: Check the OCR Engine box to perform the
Optical Character Recognition (OCR) function.
Language: Choose the language you wish to perform the OCR
engine. It is able to handle western languages in addition to
Japanese.
• Security:
You can set security by providing a password. Note up to 10
characters or symbols are allowed and the password is
case-sensitive.
Note:
Please keep a note of your password in case you may forget it.
17
Page 21

DjVu:
DjVu is a new image compression technology. DjVu allows the
distribution on the internet of very high resolution images of
scanned documents, digital documents, and photographs.
DjVu typically achieves compression ratios about 5 to 10 times
better than existing methods such as JPEG and GIF for color
documents, and 3 to 8 times than TIFF for black and white
documents.
The following table gives you an idea of file size v.s. file format
To scan an A4 color image in 200 dpi,
File
BMP TIFF GIF PDF JPEG DjVu
Format
File
10M 10M 1.3M 53KB 212KB 31KB
Size
18
Page 22

3.4 Adding A New Destination Application
The Button Manager allows you to add your own software
applications as a destination for your scanned image.
To add a new destination application,
1. From the Button Properties window, click Add/Delete.
The Application Manager window appears.
2. Choose Add in the Application Manager window to prompt
the Add A New Application window.
3. From the Add A New Application window, follow these
steps.
Step 1: Enter or select the path to the new application.
Step 2: Name the application. The name will be shown in the
Choose a Destination area.
Step 3: Select at least one file formats supported by the
application and click OK to complete.
19
Page 23

4. The new application will then be shown in List of All
Applications in the Application Manager window.
5. Choose the new software application and click Add to
include it to List of Applications for the Button #.
20
Page 24

Click Add to inclu de the
new application to the
specific button.
6. Click OK to return to the Button Properties window.
7. Choose the new application as your destination application
in the Button Properties window and click OK or Apply.
Then this new application will be the new destination
application for the specific button number.
21
Page 25

3.5 Deleting A Current Destination Application
1. From the Button Properties window, choose the Button
number which you want to edit and then choose
Add/Delete.
Click the arrow key to select
2. The Application Manager window appears.
the button number
2. Choose the destination application which you want to
delete and click Remove to move the application to the List
of All Applications.
3. Choose the destination application which you want to
delete and click Delete Application.
4. Click Confirm to delete the application in the Confirmation
window.
Note:
If the application is selected by other buttons, you need to move
the application for the specific button from the “Destinations for
the button” list box to the “All destinations” list box to remove
the application.
22
Page 26

3.6 Creating A New Scan Configuration
From the Button Properties window, click Add to prompt the
Scan Configuration Properties window. The Scan
Configuration Properties window consists of the Scan Settings
tab, the Color Dropout tab, and the Color Adjust tab to enha nce
your scanned image.
3.6.1 The Scan Settings Tab
The Scan Settings window consists of the following settings:
Mode: Select proper image mode for the scanned image.
Choice: B&W, Gray, and Color.
23
Page 27

Image
Description
Type
B&W Choose B&W if your original contains only
text, pencil or ink sketch.
Gray Choose Gray image if your original contains
actual shades of gray.
Color Choose Color if you wish to scan a color
image for your original in colors.
B&W Gray Color
24
Page 28
Brightness and Contrast
Brightness
Adjusts the lightness or darkness of an
image. The higher the value, the brighter
the image. Drag the slider to the right or left
to increase or decrease the brightness. The
default value is 0.
Contrast
Adjusts the range between the darkest and
the lightest shades in the image. The higher
the contrast, the bigger the different
grayscale. Drag the slider to the right or left
to increase or decrease the contrast. The
default value is 0.
Brightness: -50 Brightness: 0
(Normal)
Brightness: +50
Contrast: -50 Contrast: 0
(Normal)
25
Contrast: +50
Page 29

Resolution:
Resolution
A good control of the resolution results a good
detail of an image that scans. The resolution
is measured by dots per inch (dpi). Normally,
the greater the dpi number, the higher the
resolution and the image file size. Be aware
that greater resolution takes more time to
scan, and more disk space for the scanning
image. For your information, an A4 size color
image scanned at 300 dpi at True Color mode
consumes approximately 25 MB of disk space.
A higher resolution (usually means over 600
dpi) is only recommended when you need to
scan a small area at True Color mode.
Choose a resolution value from the drop down
list. The default value is 200 dpi. Or you may
enter your desired value by clicking the box in
the right side of the drop down list and type
your desired value.
Resolution: 75 dpi
Resolution: 150 dpi
26
Page 30

Scan Area:
Cropping allows you to capture a portion of the document
being scanned. Choice: Automatic, Fixed to
Transport, EOP (End of Page) Detection.
Options Description
Automatic Automatic adjusts the cropping window
according to different document sizes. Use
this option for batches of mixed-sized
documents.
Fixed to
Transport
EOP (End of
Page)
Detection
This feature allows you to define the area or
zone to be imaged. Use for batches of
same-sized documents. If you select this
option, you can use the arrow keys to define
the x and y offset values, width and length
to redefine your scanned area. The Display
window will show image placement as you
change the values.
This feature allows you to define the area or
zone to be imaged. Use for batches of
same-width but different length documents.
If you select this option, you can use the
arrow keys to define the x and y offset
values, width and length to redefine your
scanned area. The Display window will
show image placement as you change the
values.
27
Page 31

Automatic Deskew
Use this option to automatically deskew a document.
Note: If the skew angle is too
great, some of the image may
be cut off.
Scan Area
Choose your desired paper size with the drop-down list box. Or
you may select a custom paper size by clicking the Scan Area
box and then click Add to include in the choice.
Choice: None, US Letter- 8.5”x 11”, US Legal – 8.5” x 14”,
ISO A4 – 21 x 29.7 cm, ISO A5 – 14.8 x 21 cm, ISO A6 – 10.5
x 14.8cm, ISO A7 – 7.4 x 10/5 cm, ISO B5 – 17.6 x 25 cm, ISO
B6 – 12.5 x 17.6 cm, ISO B7 – 8.8 x 12.5 cm, JIS B5 – 18.2 x
25.7 cm, JIS B6 – 12.8 x 18.2 cm, JIS B7 – 9.1 x 12.8 cm.
Multi-Feed Detection
Multi-Feed Detection allows you to detect overlapped document
that go through the auto document feeder. Multi-Feed usually
occurs due to stapled documents, adhesives on documents, or
electrostatically charged document.
28
Page 32

Additional Length Detection
Additional Length Detection allows you to define the length of
document being multi-fed. This value indicates the additional
length exceeding your designated scan area. The Display
window will show the size of the document as you change the
value. A value of 0 indicates no additional length detection.
The Additional Length Detection is best used when scanning
same-size documents in the auto document feeder.
There are two options available if Multi-Feed is detected.
z Stop Scanning after Multi-Feed
If this is selected, the scanner will stop the feeder if
multi-feed is detected.
z Multi-Feed Alarm:
If this is selected and a wave file is added, the scanner
will produce a sound alarm if multi-feed is detected.
29
Page 33

3.6.2 The Color Dropout Tab
From the Scan Configuration Properties window, click Color
Dropout tab to prompt the Color Dropout window. If your
image contains red color watermark or background, choose the
R(Red) channel then any red watermark or background will be
removed. This feature is used to sharpen your text when using
OCR (Optical Character Recognition) software.
Note that this function supports only black & white and gray
image. Therefore, be sure to choose any black & white or gray
image type while applying this function.
Advanced Processing provides two options that can adjust
your scanned image in the best optimal result.
Filter
Threshold
This value is used to determine the color
which will be dropped out. A lower
value will drop more of the selected color
out, while a higher value will leave more
of the selected color in.
30
Page 34

Background
Level
This value will be substituted in the
grayscale image for the color being
removed. Adjust the value for both the
Filter Threshold and Background Level to
produce the best optimal result.
Original
Remove Blue
Filter Threshold:
10
Background Level:
168
31
Page 35

3.6.3 The Color Adjust Tab
Color Adjust: From the Scan Configuration Properties
window, click Adjust Color to prompt the Adjust Color window.
Adjust the color quality of the image so that it comes close to the
original.
Use ICC Profile:
The ICC profile format was defined by the International Color
Consortium (ICC) as a cross-application standard. ICC profiles
help you reproduce colors accurately across different platforms,
devices, and ICC-compliant applications.
32
Page 36

Normal
Use ICC Profile
Gamma: Adjusts the midtones of the image without
dramatically altering then lightest and the darkest areas.
When the value of gamma changes, the image changes
accordingly.
Gamma Value: 1.0
Gamma Value: 1.4
Gamma Value: 2.0
Highlight and Shadow: Highlight refers the lightest
point in a scanned image while shadow refers the darkest
point. Using Highlight and Shadow tool together allows
you to extend the range of color and reveal more details in
a gray or color image.
33
Page 37

When the value of highlight and shadow change, the image
changes accordingly.
Highlight: 255/Shadow:
0(Normal)
Highlight: 200/Shadow:0
Highlight: 210/Shadow:10
Highlight: 255/Shadow: 50
34
Page 38

3.7 Deleting A Current Scan Configuration
1. From the Button Properties window, choose the scan
configurations you want to delete.
2. Click Delete. A confirmation window appears. Chose OK
to delete or Cancel to quit.
35
Page 39

3.8 Selecting Options For a Button
From the Button Properties window, click the Options tab to
select options for a button.
Path and Folder Options
Path and
Folder
Name
36
Enter the path or click Browse to select the path
for your scanned image.
Default: Button_Data
Page 40

Folder Select the folder name to store your scanned
image. Choice includes None, Application
Name, File Format, Date, Date + Time.
For effective management, please choose one
to group your scanned image. For example, if
you choose Date + Time, your folder name will
display 2005-10-31-13-56-41. This indicates
year-month-date-hour-minute-second.
You may click the “Disk Clean Up” box to view
and delete all the scanned images.
File Name Options
File Name Choose to create your file name indicating a
Serial number, Date, Time, or Date + Time.
For example, if you choose Date + Time, your file
name will display image-2005-10-31-13-56-41.
This indicates
filename-year-month-date-hour-minute-second.
Multi-Page Options
There are three types of file formats that support multi-page
document. Be sure to select your file format to be any of the
TIF, PDF, or DjVu.
No
separation
(one file)
Choose this if you wish to create only one file
for your multi-page document.
Separate
document by
a blank page.
Choose this if you wish to separate your
multi-paged document by a blank page.
Please also refer to “Blank Page Removal”
in the Settings option.
37
Page 41

Separate
document by
“Patchcode”.
Choose this if you wish to separate you
document by “Patchcode”.
Separate
document by
page
number.
Choose this if you wish to separate the
document by a specific page number.
38
Page 42

3.9 Removing a Blank Page
From the Setting tab in the Button Properties window, check
Blank Page Removal Threshold if you wish to remove the
blank page and move the slider to the left or right to your
desired threshold.
39
Page 43

3.10 Setting the Power Saving Mode
From the Setting tab in the Button Properties window, check
Enable Energy Saving and move the slider to the right to set
the amount of time to start the energy saver after your last
action. The range is from 1 to 720 minutes. The default is 15
minutes.
40
Page 44

3.11 Saving and Loading Profiles
Button Manager allows you to save your profile (custom settings)
and load the profile in just a few seconds.
To save a profile,
1. Customize your settings. (For example, change your
resolution, file format, destination application, or other scan
settings.)
2. From the S etti ng tab in the Button Properties window, click
“Save Profiles”, a Save As dialog box appears.
3. Enter the file name of your profile and then click “Save” to
save the profile. (The default filename extension, abp, is
short for Avision Button Profile. However, you can create
your own filename extension by choosing All Files (*.*) and
then enter your file name and extension.)
41
Page 45
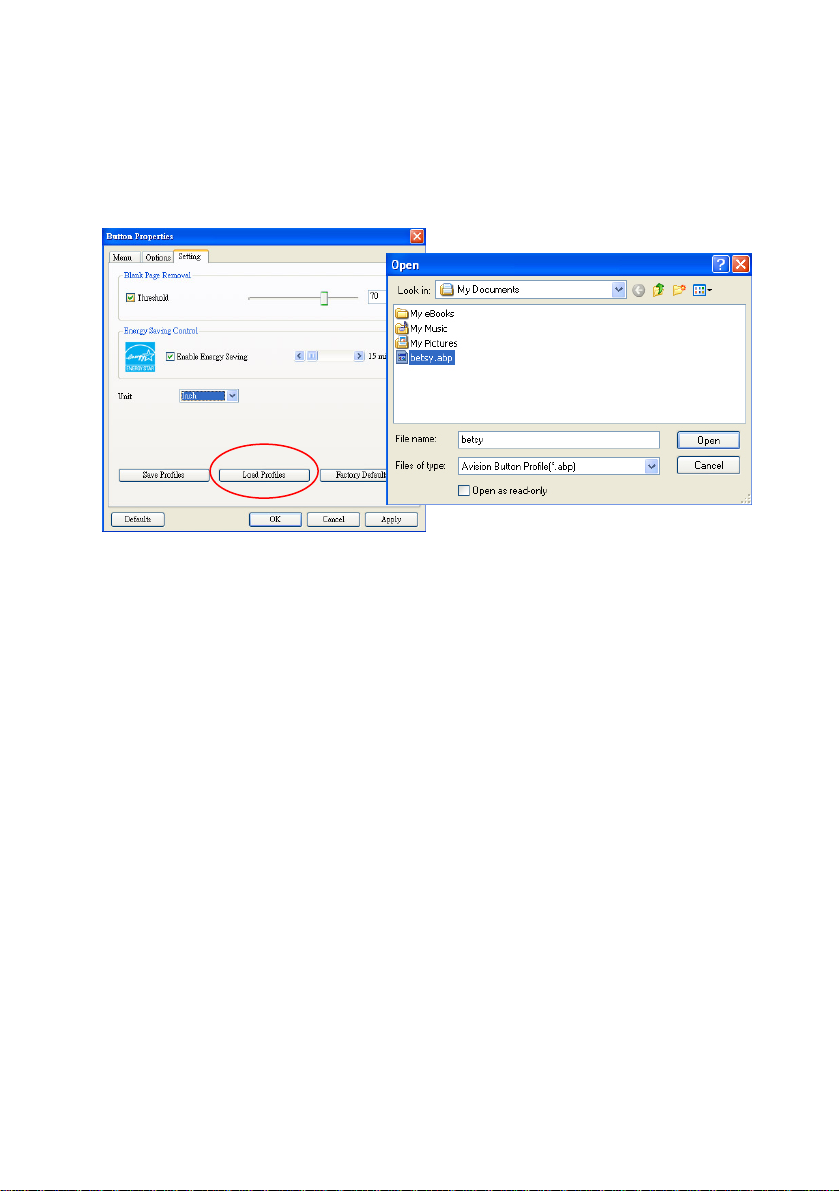
To load a profile,
1. From the S etti ng tab in the Button Properties window, click
“Load Profiles”, an Open dialog box appears.
2. Choose the profile which you want to load. (For example,
betsy.abp)
3. Click “Open” to load the profile. Your selected profile
appears on the screen.
Factory Defaults:
Click this button and your existing settings for each butto n will
be cleared and return to the factory default settings.
Defaults:
Click this button and the settings in both the Options and Setti ng
tab will return to the default value.
42
Page 46

3.12 Solving A Problem
If you encounter an error message and can not solve the
problem, you can send a report.txt file to your nearest service
center for quick trouble shooting. To send the report.txt file,
please follow these steps.
1. Right-click the button icon (
your screen. A pop-up screen appears.
2. Click “About” to prompt the Information dialog box.
) on the right bottom of
43
Page 47

3. Click the Report button. A report.txt file
(C:\Button_Report.txt) will be generated and displayed on
the screen. Please send this file to the nearest service
center for a quick trouble shooting.
The “Reset Pad Count” button」:
After scanning approximately 50,000 pages (the number
varies based on type of scanner) through the Auto
Document Feeder (ADF), the ADF pad may be worn out
and you may experience problems with document feeding.
In this case, it is highly recommended to replace the ADF
pad with a new one. (Please refer to the manual for proper
replacing procedure.) For ordering the ADF pad, please
consult your nearest dealer. After replacing the ADF pad,
click the “Reset Pad Count” button to reset the pad
count.
The “Reset Roller Count” button」:
After scanning approximately 200,000 pages (the number
varies based on type of scanner) through the ADF, the ADF
roller may be worn out and you may experience problems
with document feeding. In this case, it is highly
recommended to replace the ADF roller with a new one.
(Note the replacement of the ADF roller has to be
performed only by authorized service center. Therefore,
please return your scanner for roller replacement.) After
replacing the ADF roller, click the “Reset Roller Count”
button to reset the roller count.
44
Note:
The lifetime and the replacing procedure vary based on
type of scanner. Please consult your nearest dealer for
more details.
Page 48

Index
A
Additional Length Detection, 28
B
B&W, 24
Background Level, 30
Blank Page Removal
Threshold, 38
BMP, 16
Brightness, 25
Button Properties window, 5
C
Color, 24
Color Adjust, 31
Continuous Scan, 10
Contrast, 25
Cropping
Automatic, Fix to Transport,
27
D
Deskew, 27
DjVu, 18
G
Gray, 24
H
Highlight, 32
I
ICC profile, 31
J
JPEG, 16
M
mode
B&W, Gray, Color, 23
Multi-Feed Detection, 28
P
PDF, 16
R
E
Enable Energy Saving, 39
F
Filter Threshold, 29
Reset Pad Count, 43
Reset Roller Count, 43
Resolution, 26
S
Scan Configuration Properties
Scan Settings, Color
45
Page 49

Dropout, Color Adjust, 23
Searchable PDF
Compression, OCR, Security,
16
Shadow, 32
T
TIFF, 16
46
 Loading...