

Page 1

What’s New in Sibelius® Software
Page 2

Legal Notices
© 2016 Avid Technology, Inc., (“Avid”), all rights reserved.
This guide may not be duplicated in whole or in part without
the written consent of Avid.
003, 192 Digital I/O, 192 I/O, 96 I/O, 96i I/O, Adrenaline,
AirSpeed, ALEX, Alienbrain, AME, AniMatte, Archive,
Archive II, Assistant Station, AudioPages, AudioStation,
AutoLoop, AutoSync, Avid, Avid Active, Avid Advanced
Response, Avid DNA, Avid DNxcel, Avid DNxHD, Avid DS
Assist Station, Avid Ignite, Avid Liquid, Avid Media Engine,
Avid Media Processor, Avid MEDIArray, Avid Mojo,
Avid Remote Response, Avid Unity, Avid Unity ISIS,
Avid VideoRAID, AvidRAID, AvidShare, AVIDstripe, AVX,
Beat Detective, Beauty Without The Bandwidth,
Beyond Reality, BF Essentials, Bomb Factory, Bruno, C|24,
CaptureManager, ChromaCurve, ChromaWheel,
Cineractive Engine, Cineractive Player, Cineractive Viewer,
Color Conductor, Command|8, Control|24, Cosmonaut Voice,
CountDown, d2, d3, DAE, D-Command, D-Control, Deko,
DekoCast, D-Fi, D-fx, Digi 002, Digi 003, DigiBase,
Digidesign, Digidesign Audio Engine, Digidesign
Development Partners, Digidesign Intelligent Noise
Reduction, Digidesign TDM Bus, DigiLink, DigiMeter,
DigiPanner, DigiProNet, DigiRack, DigiSerial, DigiSnake,
DigiSystem, Digital Choreography, Digital Nonlinear
Accelerator, DigiTest, DigiTranslator, DigiWear, DINR,
DNxchange, Do More, DPP-1, D-Show, DSP Manager,
DS-StorageCalc, DV Toolkit, DVD Complete, D-Verb, Eleven,
EM, Euphonix, EUCON, EveryPhase, Expander,
ExpertRender, Fairchild, FastBreak, Fast Track, Film Cutter,
FilmScribe, Flexevent, FluidMotion, Frame Chase, FXDeko,
HD Core, HD Process, HDpack, Home-to-Hollywood,
HyperSPACE, HyperSPACE HDCAM, iKnowledge, Impact,
Improv, iNEWS, iNEWS Assign, iNEWS ControlAir, InGame,
Instantwrite, Instinct, Intelligent Content Management,
Intelligent Digital Actor Technology, IntelliRender, Intelli-Sat,
Intelli-Sat Broadcasting Recording Manager, InterFX,
Interplay, inTONE, Intraframe, iS Expander, iS9, iS18, iS23,
iS36, ISIS, IsoSync, LaunchPad, LeaderPlus, LFX, Lightning,
Link & Sync, ListSync, LKT-200, Lo-Fi, MachineControl,
Magic Mask, Make Anything Hollywood,
make manage move|media, Marquee, MassivePack,
MassivePack Pro, Maxim, Mbox, Media Composer,
MediaFlow, MediaLog, MediaMix, Media Reader,
Media Recorder, MEDIArray, MediaServer, MediaShare,
MetaFuze, MetaSync, MIDI I/O, Mix Rack, Moviestar,
MultiShell, NaturalMatch, NewsCutter, NewsView,
NewsVision, Nitris, NL3D, NLP, NSDOS, NSWIN, OMF,
OMF Interchange, OMM, OnDVD, Open Media Framework,
Open Media Management, Painterly Effects, Palladiium,
Personal Q, PET, Podcast Factory, PowerSwap, PRE,
ProControl, ProEncode, Profiler, Pro Tools, Pro Tools|HD,
Pro Tools LE, Pro Tools M-Powered, Pro Transfer,
QuickPunch, QuietDrive, Realtime Motion Synthesis,
Recti-Fi, Reel Tape Delay, Reel Tape Flanger,
Reel Tape Saturation, Reprise, Res Rocket Surfer, Reso,
RetroLoop, Reverb One, ReVibe, Revolution, rS9, rS18,
RTAS, Salesview, Sci-Fi, Scorch, ScriptSync,
SecureProductionEnvironment, Shape-to-Shape,
ShuttleCase, Sibelius, SimulPlay, SimulRecord,
Slightly Rude Compressor, Smack!, Soft SampleCell,
Soft-Clip Limiter, SoundReplacer, SPACE, SPACEShift,
SpectraGraph, SpectraMatte, SteadyGlide, Streamfactory,
Streamgenie, StreamRAID, SubCap, Sundance,
Sundance Digital, SurroundScope, Symphony, SYNC HD,
SYNC I/O, Synchronic, SynchroScope, Syntax,
TDM FlexCable, TechFlix, Tel-Ray, Thunder, TimeLiner,
Titansync, Titan, TL Aggro, TL AutoPan, TL Drum Rehab,
TL Everyphase, TL Fauxlder, TL In Tune, TL MasterMeter,
TL Metro, TL Space, TL Utilities, tools for storytellers, Transit,
TransJammer, Trillium Lane Labs, TruTouch, UnityRAID,
Vari-Fi, Video the Web Way, VideoRAID, VideoSPACE,
VTEM, Work-N-Play, Xdeck, X-Form, and XMON are either
registered trademarks or trademarks of Avid Technology, Inc.
in the United States and/or other countries.
Bonjour, the Bonjour logo, and the Bonjour symbol are
trademarks of Apple Computer, Inc.
Thunderbolt and the Thunderbolt logo are trademarks of Intel
Corporation in the U.S. and/or other countries.
This product may be protected by one or more U.S. and nonU.S. patents. Details are available at www.avid.com/patents.
Product features, specifications, system requirements, and
availability are subject to change without notice.
Guide Part Number 9329-65716-00 REV A 5/16
Page 3

Contents
Chapter 1. Introduction ........................................................ 1
New Features and Improvements in Sibelius 8.0............................... 1
New Features and Improvements in Sibelius 8.1............................... 1
New Features and Improvements in Sibelius 8.2............................... 1
New Features and Improvements in Sibelius 8.3............................... 1
System Requirements and Compatibility Information ........................... 2
Conventions Used in Sibelius Documentation ................................. 2
Chapter 2. Sibelius Subscription and Avid Application Manager ...................... 3
Sibelius Subscription .................................................... 3
Avid Application Manager ................................................ 3
Chapter 3. Surface Pro 3 and Hi Res Support ...................................... 5
Surface Pro 3 Support ................................................... 5
Windows High DPI Display Support ........................................ 10
Chapter 4. Annotation ........................................................ 11
Adding an Annotation ................................................... 11
Annotation Strokes Grouped Automatically .................................. 11
Showing and Hiding Annotations .......................................... 12
Changing the Color of an Annotation ....................................... 12
Using Annotations with Education Network Licenses .......................... 12
Chapter 5. New Features and Improvements in Sibelius 8.1 ......................... 13
Engraving Rules for Rests ............................................... 13
MP3 Export .......................................................... 15
Chapter 6. New Features and Enhancements in Sibelius 8.2......................... 17
Time Signatures Placed Before Start Repeats ............................... 17
Improved Engraving Rules for Rests ....................................... 18
Notes in Dynamic Parts can be Spelled Differently from the Score ................ 19
New Keyboard Shortcuts for Moving a Note in Time ........................... 19
What’s New in Sibelius iii
Page 4

Chapter 7. New Features and Enhancements in Sibelius 8.3......................... 25
Color Notes .......................................................... 25
Improved Rest Grouping when Moving Notes ................................ 26
Contentsiv
Page 5

Chapter 1: Introduction
New Features and Improvements in Sibelius 8.0
Subscription and Avid Application Manager
• Sibelius provides new subscription and service options
• Sibelius installs the Avid Application Manager to help manage your software updates and entitlements
Hardware Support
• Sibelius supports the Windows Surface Pro 3 including touch gesture and pen control
• Sibelius provides High DPI display support for Windows
Annotation Mode
• Annotation mode lets you draw annotations on the score with either the mouse or the pen (Windows surface
only)
New Features and Improvements in Sibelius 8.1
• New engraving rules for rests
• MP3 export
New Features and Improvements in Sibelius 8.2
• Repeat barlines appear before time signatures
• Improved engraving rules for rests in multi-voice staves
• Notes in dynamic parts can be enharmonically spelled differently from the score
• New keyboard shortcuts for moving a note (or rest or passage selection) left or right on a staff
New Features and Improvements in Sibelius 8.3
• Color noteheads with ManuScript Language
• Improved rest grouping when moving notes
Chapter 1: Introduction 1
Page 6
System Requirements and Compatibility Information
Avid can only assure compatibility and provide support for hardware and software it has tested and approved.
For complete system requirements and a list of qualified computers, operating systems, hard drives, and thirdparty devices, visit: www.avid.com/compatibility.
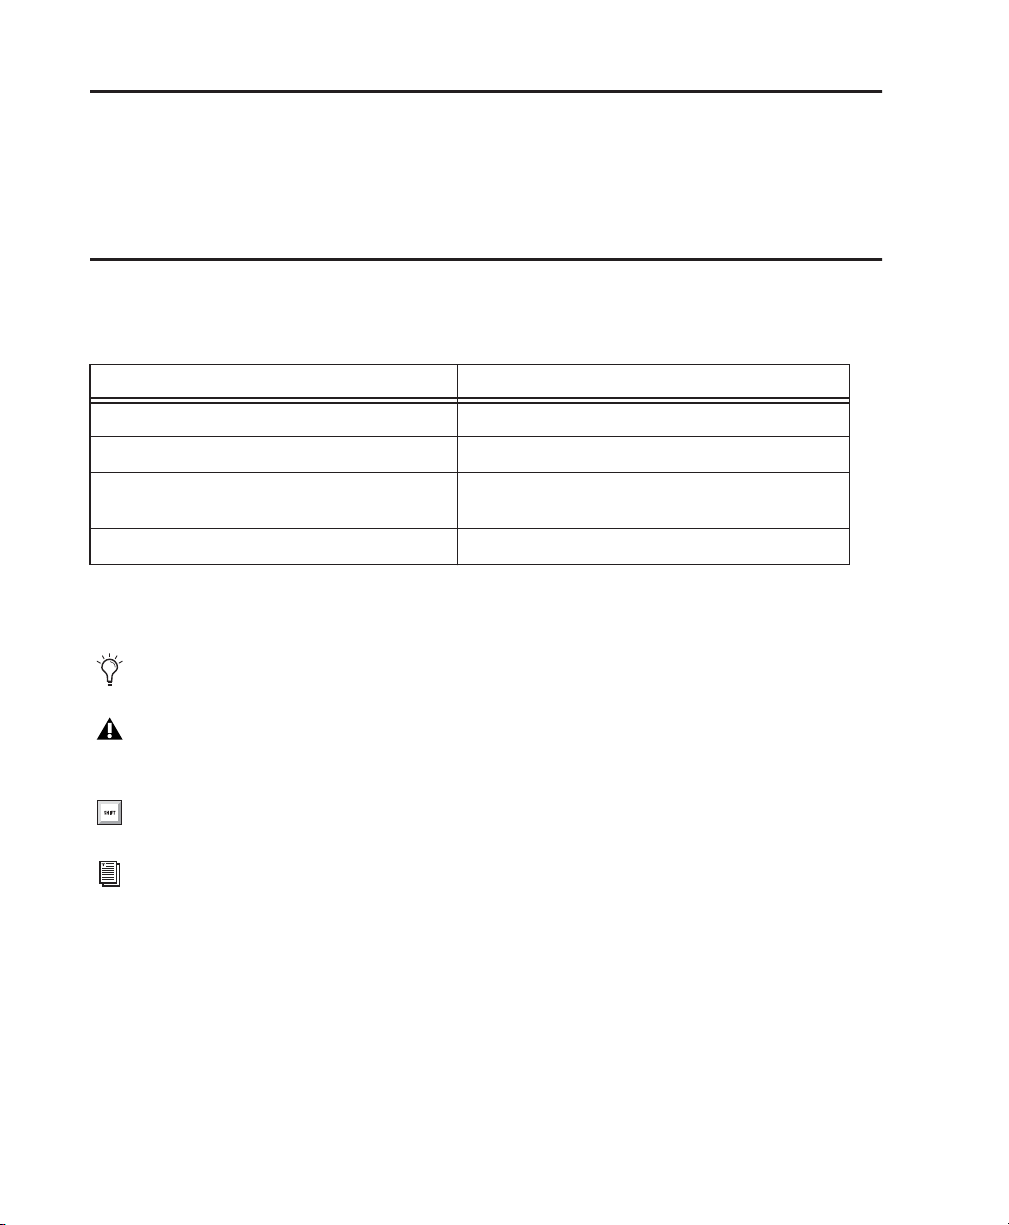
Conventions Used in Sibelius Documentation
Sibelius documentation uses the following conventions to indicate menu choices, keyboard commands, and
mouse commands:
:
Convention Action
File > Save Choose Save from the File tab
Control+N Hold down the Control key and press the N key
Control-click Hold down the Control key and click the mouse but-
ton
Right-click Click with the right mouse button
The names of Commands, Options, and Settings that appear on-screen are in a different font.
The following symbols are used to highlight important information:
User Tips are helpful hints for getting the most from your Sibelius system.
Important Notices include information that could affect data or the performance of your Sibelius
system.
Shortcuts show you useful keyboard or mouse shortcuts.
Cross References point to related sections in this guide and other Avid documentation.
What’s New in Sibelius2
Page 7

Chapter 2: Sibelius Subscription and Avid Application Manager
Sibelius Subscription
Sibelius is now available as a perpetual license, or as a monthly or annual subscription.
For more information about Sibelius purchase and subscription plans, visit the Avid website at
www.avid.com.
Avid Application Manager
When you install Sibelius, the Avid Application Manager is also installed. The Avid Application Manager is
used to manage your software and entitlements related to your myAvid account. The Avid Application Manager
helps you maintain the most current Sibelius software that you are entitled to as new versions become available.
For more information about the Avid Application Manager, see the
online through the Avid Knowledgebase).
AvidApplication Manager Guide (available
Chapter 2: Sibelius Subscription and Avid Application Manager 3
Page 8

What’s New in Sibelius4
Page 9
Chapter 3: Surface Pro 3 and Hi Res Support
Surface Pro 3 Support
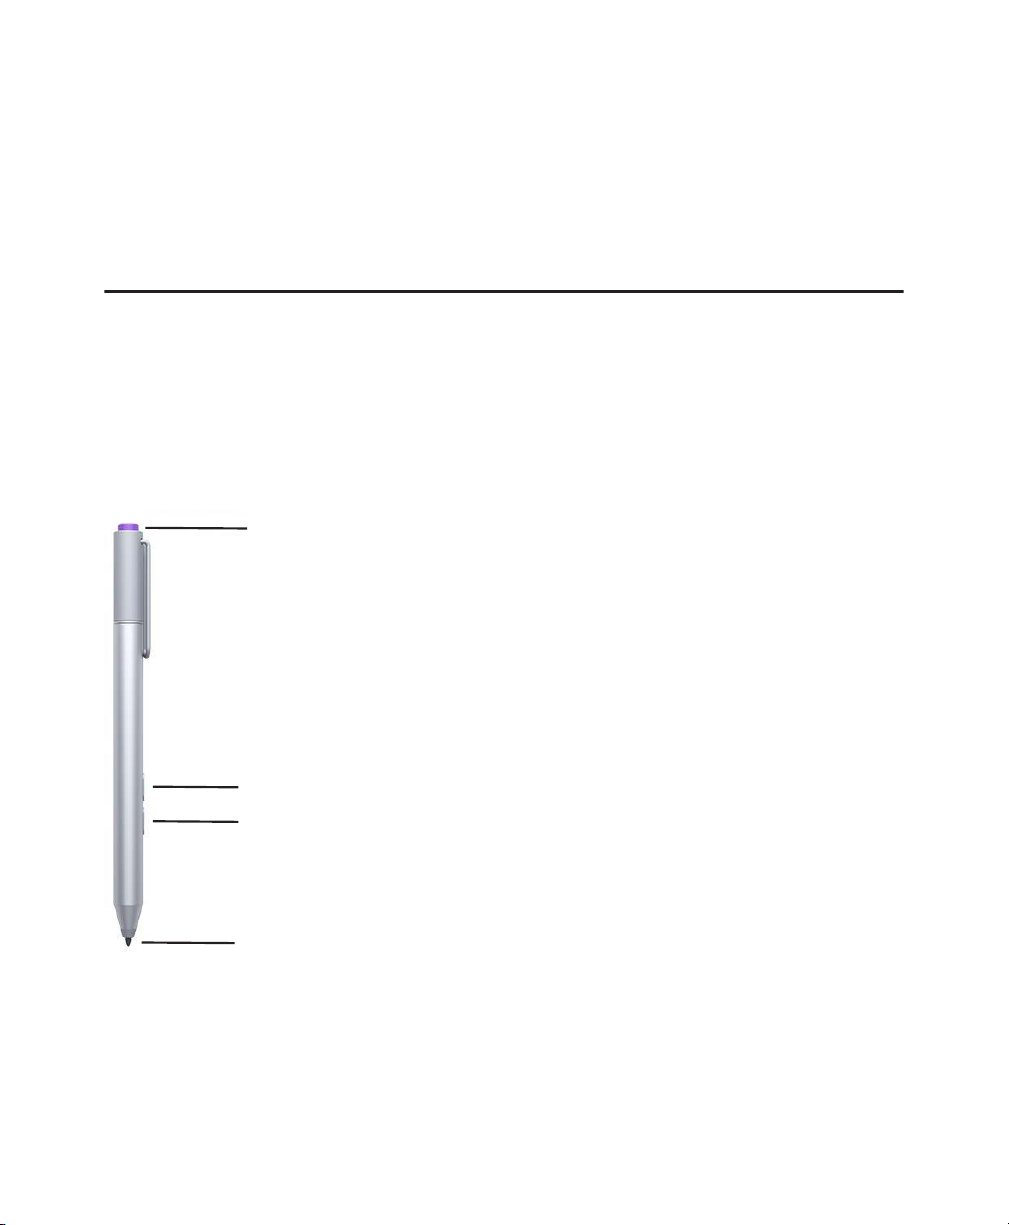
Pen Support
Beyond the typical mouse-like functionality of using the pen with Sibelius on the Surface Pro, Sibelius now supports note entry (and erasure), selection, and other editing functions with the Surface Pro 3 pen.
Pen Buttons
Top button
Right-click button
Eraser button
Tip
Pen buttons
Chapter 3: Surface Pro 3 and Hi Res Support 5
Page 10

Top Button
Sibelius cannot make use of the Top button at this time as it is hard-coded to open OneNote.
Right-Click Button
Use the Right-click button to bring up contextual menus and making selections in Sibelius.
Eraser Button
Use the Eraser button to delete notes, selections, and other objects in your score. While in Note Entry mode, use
the Eraser button to enter rests.
Tip
Use the Tip to enter notes, objects, navigate the score, and make selections.
Entering Notes with the Pen
Entering notes using the pen is a natural way to get notes onto the page.
The following workflow example demonstrates note entry with the pen:
1 Create a score with some instruments.
2 Enter note input mode by tapping Note Input > Input Notes.
3 Select the note value you want from the Keypad.
4 Begin entering notes by tapping the pen on the staff where you want to enter notes. (Sibelius automatically
rejects palm input, so you can rest your hand on the surface of the screen just like you would a piece of paper.)
5 When you have finished inputting notes, tap the erase button on the pen to exit Note Input mode. Note that
the pen must be very close to the surface for this to work.
What’s New in Sibelius6
Page 11

Because the pen is active, Sibelius is able to detect when it is in close proximity and display a ghosted note (in
gray), indicating the position of the pen relative to the notes on the staff.
Note input indication
Use the Undo and Redo buttons on the top left of the Sibelius window (using these instead of the keyboard means you don’t have to put the pen down, but of course the keyboard shortcuts work just as
well).
Sibelius can automatically adjust the position of the score as you enter notes. Chose
erences > Score Position
and select the Center Selection.
File > > Pref-
Score Navigation with your Fingers or with the Pen
Sibelius lets you use your finger to physically drag the score on the screen of the Surface. While not in Note Entry
mode, you can use the pen on empty space on the score and move it. While in Note Entry mode you can also press
the Right-click button on the pen, hold it, and drag the score on the surface.
Zooming In and Out with Touch
Sibelius now supports touch pinch and stretch to zoom on both the screen of Windows touch-screen devices and
trackpads on Mac OS X. This works regardless of what mode you are in (such as Note Input or Annotate).
Pen Calibration
Use Microsoft’s pen calibration tools to ensure accurate note entry.
To calibrate the pen for use with the Surface Pro 3 and Sibelius:
1 Tap Start.
2 Type “Calibrate” and tap Calibrate the screen for pen or touch input.
3 Tap the Setup button, and follow the on-screen instructions to calibrate the pen.
Chapter 3: Surface Pro 3 and Hi Res Support 7
Page 12

Editing with the Pen
Eraser Button Functions Like the Escape Key
Sibelius lets you use the Eraser button like the Escape (ESC) key on a keyboard by pressing it without touching
the tip of the pen to the screen. Note that the pen tip must be very close to the surface, but without touching the
tip of the pen to the surface, for this to work.
Making Selections
Sibelius lets you use the pen to make single and multiple object selections in the score.
To make a single selection:
1 Ensure that you are not in Note Entry mode.
2 Press and hold the Right-click button on the pen.
3 Drag the pen tip around the notes you want to select.
Making a selection
4 You can deselect by pressing the Eraser button on the pen.
To add to the current object selection:
1 Select an object in the score by tapping it with the pen.
2 Press and hold the Right-click button on the pen.
3 Tap on a new object.
4 Sibelius adds the new object to your selection.
To add to the current passage selection:
1 Select an object in the score by tapping it with the pen.
2 Press and hold the Right-click button on the pen.
3 Tap and drag on your score. A selection box is drawn.
4 Release the Right-click pen button. All the objects that were in your selection box are added to your selec-
tion.
What’s New in Sibelius8
Page 13

Object and Passage Selections
Sibelius has two types of selections: passage selections and object selections.
A passage selection includes a passage and all objects in that passage.
Passage selection
An object selection comprises of individual objects that are not necessarily related to one another.
Object selection
The type of selection you get depends on how you select objects, and in which order:
Object selection + object selection = object selection
Object selection + passage selection = passage selection
Passage selection + passage selection = passage selection
To select an entire staff line:
Double-tap a bar on the staff to select.
To select an entire part throughout the whole score:
Triple-tap a bar on the staff.
Erasing Objects
Sibelius lets you use the Eraser button on the pen to delete objects in the score.
To erase a single object:
1 Press and hold the Erase button on the pen, then tap on the object you want to delete.
To erase multiple objects:
1 Select multiple objects or make a passage selection.
2 Press and hold the Eraser button on the pen, then tap on any selected object or the passage selection.
Chapter 3: Surface Pro 3 and Hi Res Support 9
Page 14

Windows High DPI Display Support
Sibelius now supports Windows high density displays and pixel ratio scaling. This provides high resolution of
the Sibelius Graphical User Interface (GUI), and makes the best possible use of screen real estate on Windows
high resolution devices. High DPI support includes updated Keypad and Transport window graphics.
What’s New in Sibelius10
Page 15

Chapter 4: Annotation
Sibelius provides a new Annotation feature that lets you make note of corrections to be made on the score. This
can be especially usefully when working on shared scores or, for educators, grading scores.
Adding an Annotation
To add Annotation to the score:
1 Click (or tap) Review > Annotate.
2 Begin drawing on the score with the mouse or with the pen (Surface Pro 3 only).
3 With the pen (Surface Pro 3 only) Annotation is pressure sensitive, pressing harder draws a thicker line, press-
ing more lightly draws a thinner line.
To undo or redo an Annotations:
Use the Undo and Redo buttons on the top left corner of the Sibelius window. Sibelius undoes (or redoes) each
stroke of an Annotation.
Annotation Strokes Grouped Automatically
Sibelius automatically groups the various pen strokes that make up an annotation based on their proximity to one
another. This means that you can drag an Annotation in its entirety to any location just like you would any other
object in the score.
Chapter 4: Annotation 11
Page 16

Showing and Hiding Annotations
Annotations can be shown and hidden on a case-by-case basis or globally.
To hide or show a single Annotation:
1 Exit Annotation mode and select the Annotation that you want to hide or show.
2 Right-click the Annotation and choose Hide or Show.
To hide or show all Annotations in the score:
1 Select View tab > Invisibles.
2 Deselect or select Annotations.
Changing the Color of an Annotation
Sibelius lets you color code Annotations.
To change the color of an Annotation:
1 Draw an Annotation or select an existing Annotation.
2 Exit Annotation mode by pressing Escape or by pressing the Eraser button on the pen (Surface Pro 3 only).
3 Right-click the selected Annotation and choose Color.
4 In the Select Color dialog, select the color you want.
5 Click OK.
Using Annotations with Education Network Licenses
If you have a Network License for Sibelius, you can use Annotations to provide feedback to students over the
network. The built-in Classroom Control feature of Sibelius lets a teacher request a student’s score from the student’s computer and open it locally on the teacher’s computer. The teacher can then add Annotations to the
score (such as corrections, suggestions, and so on) and then return to the student’s computer over the network.
What’s New in Sibelius12
Page 17

Chapter 5: New Features and Improvements in Sibelius 8.1
Engraving Rules for Rests
Sibelius provides several options for the placement of rests on staves with multiple voices.
To set the Engraving Rules for rests:
1 Select the Appearance tab.
2 Click Engraving Rules.
3 In the Engraving Rules dialog, select Rests in the Engraving Rules list.
4 Configure the Engraving Rules for Rests as desired.
5 Click OK to save your changes (or Cancel to discard your changes).
Engraving Rules Options for Rests
The Engraving Rules options for rests determine the default settings for vertical placement of rests on a staff with
multiple voices.
Engraving Rules for Rests
Chapter 5: New Features and Improvements in Sibelius 8.1 13
Page 18

Rests Avoid Notes in Other Voices
Select this option to ensure that rests avoid collisions with notes in other voices on multi-voice staves.
Align Rests Vertically with Surrounding Pitches when Writing in Multiple
Voices
Select this option to vertically align rests on multi-voice staves with notes in the same voice.
Group Vertical Alignment of Rests According to Beam Group
Select this option to align the vertical placement of rests within beamed groups of notes on the staff.
Group Vertical Alignment of Rests According to Beam Groups and Bars
Select this option to align the vertical placement of rests within the bar as well as within beamed groups of notes.
Stems and beams of notes will be adjusted automatically to not collide with the vertical placement of rests.
Rests Continue in the Same Vertical Alignment Until Writing in a Single
Voice
Select this option to ensure that rests on multi-voice staves are vertically aligned until the staff changes to a single voice.
What’s New in Sibelius14
Page 19

MP3 Export
In addition to WAV and AIFF, Sibelius lets you export to MP3 using Sibelius Sounds or General MIDI, or the
current score’s playback configuration (such as with VST plug-ins). The exported MP3 uses the score information for the MP3 ID3 tags where applicable.
Export MP3 settings
To export the score or part as MP3:
1 Click the File tab.
2 Select Export. > Audio.
3 Configure the Export Audio page as desired.
4 Select Format > MP3.
5 If desired, select the Enable MP3 Surround Encoding option.
6 Set the desired Bit Rate in kbps (kilobytes per second).
7 Click Export.
Chapter 5: New Features and Improvements in Sibelius 8.1 15
Page 20

What’s New in Sibelius16
Page 21

Chapter 6: New Features and Enhancements in Sibelius 8.2
Time Signatures Placed Before Start Repeats
The procedures for creating time signatures and repeats in Sibelius 8.2 remains unchanged from lower versions.
When you create time signatures and repeats, Sibelius automatically arranges them in the correct order (see the
Sibelius Reference Guide for more details on working with time signatures and repeats). While it is unlikely to
be necessary, you can manually adjust the placement of time signatures and repeats by adjusting their offsets in
the inspector.
Time Signature and Repeat Placement in Sibelius 8.2
Where start repeats and time signatures coincide, Sibelius 8.2 places the time signature before the repeat.When
a time signature and a start repeat occur in the middle of a staff, the time signature is placed after the regular
barline, but before the start repeat. Additionally, Sibelius automatically adds a little extra space between the time
signature and the repeat to guarantee a neat layout.
Repeats with time signatures in Sibelius 8.2
Time Signature and Repeat Placement in Sibelius 8.1 and Lower
When opening scores created in lower versions of Sibelius, the original placement of time signatures and repeats
is respected. However, you can update your score by manually deleting the existing repeats and reinserting them.
Time signatures will then be correctly positioned before repeats.
Repeats with time signatures in Sibelius 8.1 and lower
Chapter 6: New Features and Enhancements in Sibelius 8.2 17
Page 22

Importing and Exporting Legacy Scores
When importing legacy scores created in lower versions of Sibelius, the original layout of time signatures and
repeats is maintained so that those scores look the same as before. If you want to update the placement of time
signatures and rests in a legacy score, simply delete and reinsert those repeats. Likewise, you can export any
scores with the new layout to a lower version of Sibelius and it will maintain the updated repeat and time signature placement.
Improved Engraving Rules for Rests
Engraving Rules for rests introduced in Sibelius 8.1 to ensure that the vertical placement of rests on staves with
more than one voice would avoid notes in other voices and interpolate their vertical placement to help guide the
eye of the performer. With Sibelius 8.2, this is improved so that when on voice in a multi-voice part
In order to guide the eye of the performer, Sibelius interpolates the position of rests between phrase groups. New
in Sibelius 8.2 is a further addition to this behavior—any gap of a bar or more of single voice writing will effectively act as a break in rest placement, preventing any interpolation.
This new behavior only affects the placement of rests if you have chosen to group rests by beam group in Engraving Rules > Rests.
When the Engraving Rule “Group vertical alignment of rests by Beam Group” option is enabled.
The following diagram illustrates how Sibelius places rests. Boxes represent phrase groups. Lines represent interpolation.
Rest positioning on a staff with two voices
Notice how the two half-note rests in voice 1 follow the slope of the phrase between the two bars. Since bar three
is an empty bar for voice, there is a break in placement by interpolation. Hence, the bar rest in bar three, voice
one, is positioned in its default spot.
What’s New in Sibelius18
Page 23

Notes in Dynamic Parts can be Spelled Differently from the Score
Sibelius lets you have different spellings of the same note between dynamic parts and the full score. This is particularly useful when working with transposing instruments, where the player (reading a transposing score) will
want to see one spelling and the conductor or the composer (reading or writing the full score in concert pitch)
might want to see another. Sibelius highlights differences in note spelling between the score and dynamic parts
by coloring any differing notes and accidentals orange. This is the same color scheme used to indicate differences
between the score and parts with other objects, such as text.
You can resolve differences between a dynamic part and the full score by selecting a note (that is spelled differently between the part and the score) and choosing
through, using the Return key, and Sibelius updates the note color accordingly as you cycle through the different
available spellings. Moving the note up or down in pitch in either the dynamic part or the full score will resolve
the difference. This way you will never end up with a differing sounding pitch between the full score and the part.
Appearance tab > Reset to score design. You can also cycle
New Keyboard Shortcuts for Moving a Note in Time
Sibelius lets you move the selected note, rest, or passage selection to the next or previous note, rest, or passage
selection using the following keyboard shortcuts: Control+Alt+Left/Right arrows (Windows) or Command+Option+Left/Right arrows (Mac).
To move a note (or rest or passage selection) to the next or previous note:
1 Select the note, rest, or passage selection you want to move.
2 Press Control+Alt+Left/Right arrows (Windows) or Command+Option+Left/Right arrows (Mac).
The selection moves by the minimum of the following:
• The duration of the adjacent note or rest.
• The duration of the selected note, rest, or passage selection.
• The duration of the rhythmic value the denominator of the time signature.
In most cases Sibelius moves the selected note or rest, or passage selection by a musically appropriate amount,
according to the current time signature and duration of the selection.
Collisions with Existing Notation
When moving a selection over existing notation Sibelius swaps the moved selection with the notation at the destination.
Chapter 6: New Features and Enhancements in Sibelius 8.2 19
Page 24

Unmovable Tuplets
Moving tuplets left or right with keyboard shortcuts is not currently supported. Attempting to move a selection
in a way that would cause a tuplet to be modified, where the tuplet is either part of your selection or adjacent to
it, Sibelius presents a warning that this action is not allowed and does not move the selection.
Example Workflows
Moving a Note (or Rest)
To move a selected note (or rest) to the right (or the left):
1 Select the note you want to move.
Selected note
2 Do one of the following:
• Press Command+Option+Right (or Left) Arrow (Mac) or Control+Alt+Right (or Left) Arrow
(Windows).
Selected note moved to the right
• Press Command+Option+Left (or Right) Arrow (Mac) or Control+Alt+Left (or Right) Arrow
(Windows) and the note moves back to its original position.
Selected note moved back to its original location
What’s New in Sibelius20
Page 25

Moving a Selection
To move a passage selection:
1 Make the passage selection that you want to move.
Passage selection
2 Do one of the following:
• Press Command+Option+Right (or Left) Arrow (Mac) or Control+Alt+Right (or Left) Arrow
(Windows).
Moved passage selection
• Press Command+Option+Left (or Right) Arrow (Mac) or Control+Alt+Left (or Right) Arrow
(Windows) and the passage selection moves back to its original position.
Moving a Selection with Multiple Voices and/or Staves
Sibelius also lets you move larger selections containing multiple voices and/or staves. Sibelius maintains the musical integrity of your selection at all times so that any important harmonic or rhythmic relationships are kept intact as you slide.
To move a passage selection including a chord on multiple staves:
1 Make the selection that you want to move.
Passage selection
Chapter 6: New Features and Enhancements in Sibelius 8.2 21
Page 26

2 Do one of the following:
• Press Command+Option+Right (or Left) Arrow (Mac) or Control+Alt+Right (or Left) Arrow
(Windows).
Moved passage selection
• Press Command+Option+Left (or Right) Arrow (Mac) or Control+Alt+Left (or Right) Arrow
(Windows) and the passage selection moves back to its original position.
Moving a Note by a Different Duration
In this example, the adjacent quarter-note rest is split into two eighth-note rests. When you move the quarter
note, it moves by an eighth note. Using the arrow keys and the keypad, in conjunction with the move note keyboard shortcuts, Sibelius lets you move the selection by any duration; and all without touching the mouse!
To move a note by a fraction (or multiple) of the beat:
1 Select the rest to the right of the note you want to move.
Selected rest
2 Use the keypad to split the rest into two eighth-note rests (press 3 on the numeric keypad).
Quarter-note rest split into two eight-note rests
3 Press the left arrow key to select the note you want to move by an eighth-note.
4 Press Command + Alt + Right (Mac), or Control + Alt + Right (Windows).
What’s New in Sibelius22
Page 27

5 The selected quarter-note moves by an eighth note.
Quarter-note moved right by an eight-note
Moving Notes in Note Input Mode
Sibelius lets you move a note without exiting Note Input mode. The note input cursor moves with the selection,
so you can quickly enter notes down without exiting Note Input mode or having to use the mouse.
To move notes while in note input mode:
1 Select Note Input mode.
2 Enter a quarter note on the first beat.
Note added in Note Entry mode
3 Enter another quarter note.
Second note added in Note Entry mode, the insert cursor moves with the new note
3. Move the second note to the right; notice that the insert cursor moves with the note and you remain in Note Entry mode.
Second note moved to the third beat
4. Continue entering notes.
Third note entered
Chapter 6: New Features and Enhancements in Sibelius 8.2 23
Page 28

What’s New in Sibelius24
Page 29

Chapter 7: New Features and Enhancements in Sibelius 8.3
Color Notes
With Sibelius 8.3, ManuScript language lets you color notes. The following Note Variables have been added:
Color
The color of this Note (read/write). The color value is in 24-bit RGB format, with bits 0–7 representing blue, bits
8–15 green, bits 16–23 red and bits 24–31 ignored. Since ManuScript has no bitwise arithmetic, these values can
be a little hard to manipulate; you may find the individual accessors for the red, green and blue components to
be more useful (see below).
ColorAlpha
The alpha channel component of the color of this Note, in the range 0–255 (read/write).
ColorRed
The red component of the color of this Note, in the range 0–255 (read/write).
ColorGreen
The green component of the color of this Note, in the range 0–255 (read/write).
ColorBlue
The blue component of the color of this Note, in the range 0–255 (read/write).
Chapter 7: New Features and Enhancements in Sibelius 8.3 25
Page 30

Improved Rest Grouping when Moving Notes
Sibelius 8.2 introduced the ability to move notes in time using keyboard shortcuts. Sibelius 8.3 improves rest
grouping when moving notes by this means. With 8.2, moving notes would leave a trail of rests that all matched
the rhythmic subdivision of the moved note. 8.3 now ensures that any rests created when moving notes in this
fashion fall into logical groupings based on the meter.
For example:
Passage before moving note
Passage after moving note in Sibelius 8.2
Passage after moving note in Sibelius 8.3
What’s New in Sibelius26
Page 31

Avid
280 N Bernardo Avenue
Mountain View, CA 94043 USA
Technical Support (USA)
Visit the Online Support Center
at www.avid.com/support
Product Information
For company and product
information, visit us on the web at
www.avid.com
 Loading...