

Page 1

Sibelius® Licence Server Guide
Page 2

Legal Notices
© 2015 Avid Technology, Inc., (“Avid”), all rights reserved.
This guide may not be duplicated in whole or in part without
the written consent of Avid.
003, 192 Digital I/O, 192 I/O, 96 I/O, 96i I/O, Adrenaline,
AirSpeed, ALEX, Alienbrain, AME, AniMatte, Archive,
Archive II, Assistant Station, AudioPages, AudioStation,
AutoLoop, AutoSync, Avid, Avid Active, Avid Advanced
Response, Avid DNA, Avid DNxcel, Avid DNxHD, Avid DS
Assist Station, Avid Ignite, Avid Liquid, Avid Media Engine,
Avid Media Processor, Avid MEDIArray, Avid Mojo,
Avid Remote Response, Avid Unity, Avid Unity ISIS,
Avid VideoRAID, AvidRAID, AvidShare, AVIDstripe, AVX,
Beat Detective, Beauty Without The Bandwidth,
Beyond Reality, BF Essentials, Bomb Factory, Bruno, C|24,
CaptureManager, ChromaCurve, ChromaWheel,
Cineractive Engine, Cineractive Player, Cineractive Viewer,
Color Conductor, Command|8, Control|24, Cosmonaut Voice,
CountDown, d2, d3, DAE, D-Command, D-Control, Deko,
DekoCast, D-Fi, D-fx, Digi 002, Digi 003, DigiBase,
Digidesign, Digidesign Audio Engine, Digidesign
Development Partners, Digidesign Intelligent Noise
Reduction, Digidesign TDM Bus, DigiLink, DigiMeter,
DigiPanner, DigiProNet, DigiRack, DigiSerial, DigiSnake,
DigiSystem, Digital Choreography, Digital Nonlinear
Accelerator, DigiTest, DigiTranslator, DigiWear, DINR,
DNxchange, Do More, DPP-1, D-Show, DSP Manager,
DS-StorageCalc, DV Toolkit, DVD Complete, D-Verb, Eleven,
EM, Euphonix, EUCON, EveryPhase, Expander,
ExpertRender, Fairchild, FastBreak, Fast Track, Film Cutter,
FilmScribe, Flexevent, FluidMotion, Frame Chase, FXDeko,
HD Core, HD Process, HDpack, Home-to-Hollywood,
HyperSPACE, HyperSPACE HDCAM, iKnowledge, Impact,
Improv, iNEWS, iNEWS Assign, iNEWS ControlAir, InGame,
Instantwrite, Instinct, Intelligent Content Management,
Intelligent Digital Actor Technology, IntelliRender, Intelli-Sat,
Intelli-Sat Broadcasting Recording Manager, InterFX,
Interplay, inTONE, Intraframe, iS Expander, iS9, iS18, iS23,
iS36, ISIS, IsoSync, LaunchPad, LeaderPlus, LFX, Lightning,
Link & Sync, ListSync, LKT-200, Lo-Fi, MachineControl,
Magic Mask, Make Anything Hollywood,
make manage move|media, Marquee, MassivePack,
MassivePack Pro, Maxim, Mbox, Media Composer,
MediaFlow, MediaLog, MediaMix, Media Reader,
Media Recorder, MEDIArray, MediaServer, MediaShare,
MetaFuze, MetaSync, MIDI I/O, Mix Rack, Moviestar,
MultiShell, NaturalMatch, NewsCutter, NewsView,
NewsVision, Nitris, NL3D, NLP, NSDOS, NSWIN, OMF,
OMF Interchange, OMM, OnDVD, Open Media Framework,
Open Media Management, Painterly Effects, Palladiium,
Personal Q, PET, Podcast Factory, PowerSwap, PRE,
ProControl, ProEncode, Profiler, Pro Tools, Pro Tools|HD,
Pro Tools LE, Pro Tools M-Powered, Pro Transfer,
QuickPunch, QuietDrive, Realtime Motion Synthesis,
Recti-Fi, Reel Tape Delay, Reel Tape Flanger,
Reel Tape Saturation, Reprise, Res Rocket Surfer, Reso,
RetroLoop, Reverb One, ReVibe, Revolution, rS9, rS18,
RTAS, Salesview, Sci-Fi, Scorch, ScriptSync,
SecureProductionEnvironment, Shape-to-Shape,
ShuttleCase, Sibelius, SimulPlay, SimulRecord,
Slightly Rude Compressor, Smack!, Soft SampleCell,
Soft-Clip Limiter, SoundReplacer, SPACE, SPACEShift,
SpectraGraph, SpectraMatte, SteadyGlide, Streamfactory,
Streamgenie, StreamRAID, SubCap, Sundance,
Sundance Digital, SurroundScope, Symphony, SYNC HD,
SYNC I/O, Synchronic, SynchroScope, Syntax,
TDM FlexCable, TechFlix, Tel-Ray, Thunder, TimeLiner,
Titansync, Titan, TL Aggro, TL AutoPan, TL Drum Rehab,
TL Everyphase, TL Fauxlder, TL In Tune, TL MasterMeter,
TL Metro, TL Space, TL Utilities, tools for storytellers, Transit,
TransJammer, Trillium Lane Labs, TruTouch, UnityRAID,
Vari-Fi, Video the Web Way, VideoRAID, VideoSPACE,
VTEM, Work-N-Play, Xdeck, X-Form, and XMON are either
registered trademarks or trademarks of Avid Technology, Inc.
in the United States and/or other countries.
Bonjour, the Bonjour logo, and the Bonjour symbol are
trademarks of Apple Computer, Inc.
Thunderbolt and the Thunderbolt logo are trademarks of Intel
Corporation in the U.S. and/or other countries.
This product may be protected by one or more U.S. and nonU.S. patents. Details are available at www.avid.com/patents.
Product features, specifications, system requirements, and
availability are subject to change without notice.
Guide Part Number 9329-65595-00 REV A 7/15
Page 3

Contents
Chapter 1. Introduction .........................................................1
Chapter 2. Installation ..........................................................3
Sibelius Server Licences ...................................................1
System Requirements and Compatibility Information ...............................2
Documentation Conventions.................................................2
Installing Sibelius Licence Server on Mac OS X...................................3
Installing Sibelius Licence Server on Windows ...................................4
Upgrading on Mac OS X....................................................4
Upgrading on Windows ....................................................5
Running Multiple Licence Servers .............................................6
Installing Sibelius on Client Computers .........................................6
Upgrading the Client Machines ...............................................8
Chapter 3. Configuration ........................................................9
Configuring the Licence Server ...............................................9
Sibelius Licence Server Control Panel.........................................10
Activating the Licence Server ...............................................11
Adding a Licence to the Licence Server........................................15
Testing the Licence Server .................................................18
Access Control .........................................................20
Setting Up Classroom Control...............................................22
Working with Clients......................................................27
Reading Logs ..........................................................29
Maintaining the Licence Server ..............................................31
Troubleshooting.........................................................33
Contents iii
Page 4

Appendix A. Starting or Stopping the Licence Server ............................... 35
Starting the Licence Server on Windows ...................................... 35
Stopping the Licence Server on Windows ...................................... 36
Starting the Licence Server on Mac OS X...................................... 36
Stopping the Licence Server on Mac OS X ..................................... 36
Appendix B. Manually Locating Licence Server Logs ............................... 37
Logging on Windows ..................................................... 37
Logging on Mac OS X .................................................... 37
Appendix C. Licence Server Error Codes ......................................... 39
Appendix D. Useful Command Line Commands ................................... 41
Useful Windows commands................................................ 41
Useful Mac OS X Terminal commands ........................................ 41
Sibelius Licence Server Guideiv
Page 5

Chapter 1: Introduction
Sibelius Server Licences
Two types of Sibelius site licence are available:
• Stand-alone site licences
• Network site licences
Sibelius Network site licences operate on a client-
server model. The client is the Sibelius program itself, which is installed on the local hard drive of
each of remote workstation on the network. The
server is the separate Licence Server program,
which is installed on a single designated server
machine networked with the remote clients.
The Licence Server authorizes the designated
number of licenced client copies to run on clients
connected to the network simultaneously. These
are known as floating licences, because they are
not tied to any particular computer on the network.
Any computer with the software installed can connect to the Licence Server, assuming the Licence
Server has seats available. It also lets you send
messages to users of the client copies, and close
copies down from the server machine.
When used with supported Avid products, the Licence Server lets you specify whether or not client
machines (such as students’ personal computers)
can temporarily move licences from the Licence
Server to their own machines so that they can run
the software even when not connected to the Licence Server. These are known as check out li-
cences, because the client (student) checks out the
licence from the Licence Server. This reduces the
number of floating licences available by one until
the client either checks it back in, or it expires, at
which point the licence is automatically returned to
the pool of floating licences so that it can be used
on a different computer.
The Licence Server itself does not have a graphical
user interface. It runs in the background, detecting
requests from client copies of Sibelius on the network. The server is configured and managed using
the Licence Server Control Panel, which you can
run either on the computer on which the Licence
Server is installed or from another workstation.
The Licence Server and Licence Server Control
Panel programs are supplied on the main Sibelius
DVD-ROM or as a separate download from your
myAvid account, but they must be installed separately from the Sibelius application itself.
Chapter 1: Introduction 1
Page 6

System Requirements and Compatibility Information
Avid can only assure compatibility and provide
support for hardware and software it has tested and
approved.
For complete system requirements and a list of
qualified computers, operating systems, hard
drives, and third-party devices, visit:
www.avid.com/compatibility
The Sibelius Licence Server and the Licence
Server Control Panel has been tested on the following operating systems:
• Windows 7 64-bit
• Windows 8 64-bit
• Mac OS X 10.9.5
• Mac OS X 10.10.3
Sibelius requires a network using the TCP/IP protocol. (Your network may use other protocols in
addition to TCP/IP, but TCP/IP must be present in
order for the Licence Server to communicate with
the client copies.) If you use a firewall on your network, ensure that port 7312 is open both for
TCP/IP and UDP traffic.
Documentation Conventions
This documentation uses the following conventions to indicate menu choices, keyboard commands, and mouse commands:
:
Convention Action
File > Save Choose Save from the
File menu
Control+N Hold down the Control
key and press the N key
Control-click Hold down the Control
key and click the mouse
button
Right-click Click with the right
mouse button
The names of Commands, Options, and Settings
that appear on-screen are in a different font.
The following symbols are used to highlight
important information:
User Tips are helpful hints for getting the
most from Sibelius.
Important Notices include information that
could affect Sibelius.
Shortcuts show you useful keyboard or mouse
shortcuts.
Cross References point to related sections in
this guide and other Avid documentation.
Sibelius Licence Server Guide2
Page 7

Chapter 2: Installation
Installing Sibelius Licence Server on Mac OS X
If you are upgrading your Licence Server from any
earlier version of Sibelius, see “Upgrading on Mac
OS X” on page 4.
Installing the Sibelius Licence
Server on the Server Computer
The Licence Server and the associated Control
Panel application should be installed to the
folder on your Mac’s system volume, and
cations
scripts are installed in the
/Library/StartupItems
folder so that the Licence Server starts automatically when your computer starts up. After installing the Sibelius Licence Server, you must restart
your computer.
It is strongly recommended that you use the default
installation locations so that all the files are installed to the correct locations. If you want to install the Licence Server to another location on your
computer, you will have to manually edit the
scripts in
tions/Sibelius Licence Server
/Library/StartupItems and /Applica-
after installation.
This is not something that inexperienced network
administrators should attempt!
Appli-
4 Locate and double-click Install Sibelius Licence
.
Server
5 Follow the on-screen instructions to continue
installation.
6 During the installation process you are given
the option of specifying a different location for
the installation from the default. However, it is
strongly recommended that you use the default
installation locations so that all the files are installed to the correct locations.
7 Once the installation is complete, click Restart.
Uninstalling the Sibelius
Licence Server
To uninstall the Licence Server:
1 Run the Terminal (/Applications/Utilities).
2 In the Finder, locate the Sibelius Licence Server
folder inside Applications folder.
3 Drag the uninstall.sh file onto the Terminal win-
dow.
4 /Applications/Sibelius\ Licence\ Server/
uninstall.sh
5 Press Return.
appears in the Terminal window.
To install the Sibelius Licence Server on Mac:
1 Make sure you are logged in as an Administra-
tor for the account where you want to install the
Sibelius Licence Server.
2 Download the Sibelius Licence Server Installer
from your online myAvid account or insert the
DVD installer into your computer disc drive.
3 Open the disc image.
6 When prompted, provide your administrator
password.
7 The Terminal posts a few messages as the Li-
cence Server is uninstalled.
8 Once the Licence Server has been uninstalled,
registration data is also removed. If you subsequently reinstall the Licence Server on the same
computer, you will have to re-register and reconfigure it.
Chapter 2: Installation 3
Page 8

Installing Sibelius Licence Server on Windows
If you are upgrading your Licence Server from any
earlier version of Sibelius, see “Upgrading on
Windows” on page 5.
Installing the Sibelius Licence
Server on the Server Computer
To install the Sibelius Licence Server on Windows:
1 Make sure you are logged in as an Administra-
tor for the account where you want to install the
Sibelius Licence Server.
2 Download the Sibelius Licence Server Installer
from your online myAvid account or insert the
DVD installer into your computer disc drive.
Depending on the specific firewall you are using,
you may not receive a notification at this point, in
which case you should now go to your firewall
control panel and open port 7312 for both TCP and
UDP traffic.
Uninstalling the Licence Server
To uninstall the Licence Server:
1 Choose Start > Control Panel, then double-click
Programs and Features.
2 In the list of installed programs, select Sibelius
Licence Server
3 Click Uninstall.
4 Follow the on-screen instructions to uninstall
the Sibelius Licence Server.
3 Locate and run LicenceServer Installer.exe.
4 Follow the on-screen instructions to continue
installation.
5 Bydefault,theLicenceServerisinstalledinthe
C:\Program Files\Avid\Sibelius Licence
folder
(or C:\Program Files (x86)\ on a 64-bit
Server
system).Youcanspecifyadifferentlocation,
though this is not recommended. If you do
specify an alternate location, ensure that the
Administratorgroup ofusershasfullreadand
writeaccess to the folder you havespecified.
6 When the Install Wizard is done, click Finish.
If you have a firewall active, you may see a window appear telling you that the Sibelius Licence
Server is trying to access the Internet: this is normal and happens when the Windows service is
started for the first time. Choose the option that this
program is safe to access the Internet.
Once the Licence Server has been uninstalled, the
registration data is also removed. If you subsequently reinstall the Licence Server on the same
computer, you will have to re-register and reconfigure it.
Upgrading on Mac OS X
To upgrade your network site licence from a previous version of Sibelius, you will need to upgrade
both the Licence Server and all the client machines.
To upgrade the Licence Server:
If you are upgrading from Sibelius 1, 2, 3, 4, or
5.0, do the following:
• Run the Terminal (
• Change to the
navigate to the folder that contains the Licence Server (
script called
cence_server)
/Applications/Utilities).
root user (sudo bash -login),
cd /usr/local/bin) and run the
stop_licence_server (./stop_li-
.
Sibelius Licence Server Guide4
Page 9

• If you have set the old version of the Licence
Server to run on start-up (for example, by
specifying that it should run in
/etc/rc.local,
you should also disable this. You can disable
the line in question by adding a
# character at
the start of the line. If you followed the instructions supplied with the previous version,
the line probably looks like this:
/usr/local/bin/start_licence_server
so edit it so that it looks like this:
# /usr/local/bin/start_licence_server
• You should also delete the old Licence Server
executable and the three associated scripts.
Again, these will normally be found in
/usr/local/bin.
If you are upgrading from Sibelius 5.1, do the
following:
• Run the Terminal (
• Type
sudo /Applications/Sibelius\ Licence\
Server/uninstall.sh
• When prompted, provide your administrator
password.
• You will see a few messages output to the
Terminal window as the Licence Server is
shut down and deleted.
If you are upgrading from Sibelius 6, do the fol-
lowing:
• Run the Terminal (
• Type
sudo /Applications/Sibelius\ 6\ Licence\
Server/uninstall.sh
• When prompted, provide your administrator
password.
• You will see a few messages output to the
Terminal window as the Licence Server is
shut down and deleted.
/Applications/Utilities).
and press Return.
/Applications/Utilities).
and press Return.
If you are upgrading from Sibelius 7 or 7.5, do
the following:
• Run the Terminal (
• Type
sudo /Applications/Sibelius\ 7\ Licence\
Server/uninstall.sh
/Applications/Utilities).
and press Return.
• When prompted, provide your administrator
password.
• You will see a few messages output to the
Terminal window as the Licence Server is
shut down and deleted.
You can now install, register, configure, and run
the Sibelius Licence Server according to the instructions in “Installing Sibelius Licence Server on
Mac OS X” on page 3.
Upgrading on Windows
To upgrade your network site licence from a previous version of Sibelius, you will need to upgrade
both the Licence Server and all the client machines.
To upgrade the Licence Server:
1 Quit the Licence Server on the computer on
which it is installed (refer to the documentation
with your version of Sibelius Licence Server for
instructions).
2 If you have the Licence Server installed as a
Windows service, uninstall it as follows:
• For Sibelius 1, 2 and 3: go to the Licence
Server console and type
• For Sibelius 4: open a command window (by
clicking
turn
Start, typing cmd and hitting Re-
), navigate to the folder that contains the
Licence Server and type:
• LicenceServerV4 –v –uninstall
uninstall
Chapter 2: Installation 5
Page 10

• For Sibelius 5.0: open a command window
(by clicking
Start, typing cmd and hitting
Return), navigate to the folder that contains
the Licence Server and type:
• LicenceServerV5 –v –uninstall
• For Sibelius 5.1 or later: uninstall
Licence Server
. This will stop and uninstall the ser-
tures
via Programs and Fea-
Sibelius
vice, and remove all the necessary files.
• For Sibelius 6: uninstall
Server
via Programs and Features. This
Sibelius 6 Licence
will stop and uninstall the service, and remove all the necessary files.
It is very important to uninstall the service in
the correct way to avoid leaving a service
that can’t be removed.
3 Delete the folder containing the old Licence
Server to avoid confusion with the later version.
Running Multiple Licence Servers
The Sibelius Licence Server can coexist with licence servers for previous versions of Sibelius between Sibelius 3 and Sibelius 7.5, and may be run
simultaneously and installed concurrently on the
same server.
If you need to do this, it is necessary that you
change the port number used by at least one of the
licence servers. It may be simplest to change the
port number used by the new Sibelius Licence
Server.
1 Temporarily stop your existing Licence Server,
consulting the documentation that was supplied
with that version of the Licence Server.
3 Change the port number used by the Sibelius Li-
cence Server, following the instructions in
“Changing the Port Used by the Licence
Server” on page 31.
4 Restart your existing Licence Server, consulting
the documentation that was supplied with that
version of the Licence Server.
When signing on a client copy for the first time to
a licence server with a different port number, the
syntax for the server IP address will be, for exam-
192.168.1.183:8989 (where 8989 is whatever
ple,
new port you have chosen).
If you want to continue running Sibelius 3 or 4,
but do not have the most up-to-date Licence
Server, visit www.sibelius.com/helpcenter/
upgrades.html#network to download the latest
version.
Installing Sibelius on Client Computers
Once you have installed and configured the Licence Server, you need to install the Sibelius client
application on each client machine you want to use
with the Licence Server. Refer to the separate Sibelius Installation Guide for complete installation
instructions.
It is essential that Sibelius or Sibelius First be
installed on the local hard disk of each client
machine.
work drive or a virtual disk.
It cannot be installed on a net-
2 Install the Sibelius Licence Server.
Sibelius Licence Server Guide6
Page 11

Number of Seats Available on
the Network
You can install on all the client computers using
the same installer; as long as all your computers
are connected on the same network via TCP/IP and
can thus see the machine running the Licence
Server, they can share the same licence.
You can install Sibelius or Sibelius Student on as
many computers as you like, but the Licence
Server will only allow as many copies as are licenced to be run simultaneously; for example, you
could install Sibelius on 30 computers, but if you
only have a licence for 10 copies, only 10 copies
will be able to run simultaneously.
Note that, regardless of how many copies you have
bought, you will only receive one Sibelius Installer. Use this installer on each machine where
you want to install Sibelius. It is valid for the appropriate number of licences purchased.
Install Sibelius on each of your client machines
following the instructions in the separate Sibelius
Installation Guide.
On Windows only, you can install Sibelius on
each client machine using a special command
that will automatically set the Licence Server
address at installation time, rather than when
running the client for the first time. For more
information, visit avid.force.com/pkb/
articles/en_US/how_to/en396971
Running for Sibelius for the First
Time
When you run each client copy of Sibelius for the
first time, it will attempt to detect the Licence
Server on the local network automatically. Ensure
that the Licence Server is running and activated before you run a client copy of Sibelius for the first
time (see “Activating the Licence Server” on
page 11).
If Sibelius is able to find the Licence Server, it will
prompt you during start-up whether you want to
connect to that Licence Server: select the Licence
Server from the list in the dialog, and click
OK.
This step only needs to be done the first time you
run Sibelius: once you have chosen a Licence
Server, Sibelius will always look for that Licence
Server every time it starts, and it will not run if the
Licence Server cannot be found.
If Sibelius is not able to find the Licence Server, a
dialog will appear telling you that Sibelius is running in trial mode, with four buttons. Click
Licence Server
to manually specify the location of
Specify
the machine running the Licence Server. You
should supply this information as an IP address
(for example,
the server name (for example,
192.168.1.100) or you can specify
server). You can
also enter the port on which the Licence Server is
running (for example,
192.168.1.100:8989), al-
though there is no need to do this unless you have
explicitly changed it when setting up the Licence
Server – see “Configuring the Licence Server” on
page 9.
This information is stored on the client computer
and does not need to be entered again.
Sibelius contacts the server over the network in order to get permission to run. If the maximum number of licenced copies has not been exceeded, it
will start up and run normally. If the maximum
number of copies has been reached, a message will
inform you of this and Sibelius will quit.
As the networked copies of Sibelius run, they remain in contact with the server, which maintains a
list of copies running. Should a client machine
crash or become disconnected for some reason, the
Licence Server will remove that copy from the list.
If a copy of Sibelius cannot contact the Licence
Server, it will quit, allowing the user to save their
work first.
Chapter 2: Installation 7
Page 12

Note About Subnet Masks
A subnet mask is used on a TCP/IP network to determine which IP addresses belong to the
individual network, or subnet. For example, a typical network uses IP addresses in the range
192.168.1.n (where n is an integer from 0–255); in
this example, the subnet mask would be
255.255.255.0, signifying that only the last digit of
the IP address of each client machine on the network may be variable. The final digit of the subnet
mask address varies according to the precise range
of the subnet: a value of 0 allows the full range of
0–255 to be used in the IP addresses of the client
machines.
In some cases, particularly where a network uses
dynamically-assigned IP addressing (via DHCP),
the subnet mask on the machine running the Sibelius Licence Server may not be correctly configured
to allow access by all client machines on the network.
The symptoms of this problem are as follows:
• Sibelius cannot find the Licence Server on the
network, but;
• It is possible to
the client machine and vice versa.
ping the server machine from
When you first run Sibelius, the splash screen
warns
NOT ACTIVATED as the program is loading
(because it has not yet been registered by the Licence Server over the network). This warning
changes to
given permission to run by the Licence Server.
Network User once the program is
If you experience the above problem, review the
subnet mask settings on both machines. If your
network uses a router to control access from one
subnet to another, the router will take precedence
over the subnet mask setting.
Upgrading the Client Machines
To upgrade each of the client machines, use the Sibelius installer and follow the instructions in the
separate Sibelius Installation Guide.
Sibelius Licence Server Guide8
Page 13

Chapter 3: Configuration
Configuring the Licence Server
Terminology
Before we get into the details of how to configure
the Licence Server, some important terms are defined here:
Server
This is the Licence Server program itself, as
opposed to a service (see below).
Service
the background performing one or more specific
tasks. Many services are started automatically
when your computer runs, or when a specific user
logs in. The Licence Server is intended to be run as
a service, meaning that it will be started automatically when the computer is started.
Licence Server States
When the Sibelius Licence Server is running, it can
be in one of four different states, which are normally passed through in order, as follows:
Installed
state.
Running the Service
cally starts the service.
A process on your computer that runs in
Simply running the installer achieves this
The installer also automati-
You can stop and restart the Licence Server at any
time using the Licence Server Control Panel; when
you restart it, it will return to the same state as when
you stopped it.
Once the Sibelius Licence Server reaches the
fourth and final state (running the server), it is
ready to use.
Running the Licence Server
Control Panel
In order to see the status of the Licence Server and
make changes to its configuration, you use the Licence Server Control Panel. You can run the Control Panel either on the same machine that the Licence Server is installed, or on another
workstation.
To run the Licence Server Control Panel:
On Mac, navigate to the Applications/Sibelius
Licence Server
Licence Server Control Panel
On Windows, choose Start > Control Panel and
then double-click Sibelius Licence Server Con-
trol Panel
Panels, choose
Sibelius Licence Server Control Panel
and double-click the Sibelius
icon.
. If you do not see the icon in Control
Programs > Avid > Sibelius >
.
Activated
You have to provide the Licence Server
with its activation information (the System ID and
Activation ID) in order to move into the final state.
Running the Server
As soon as the Licence Server
is activated, it becomes fully operational, and can
authorize client copies of Sibelius.
Chapter 3: Configuration 9
Page 14
Sibelius Licence Server Control Panel
There are six pages in the Control Panel. The options on each of these pages are discussed in detail in the
following pages.
Server Status
Shows the status of the server at a glance, and allows you to perform the essential configuration tasks: locating the server; starting and stopping the service (Windows only); starting and stopping the
server; and setting the teacher’s password for Sibelius’s Classroom Control feature.
Licences
Is where you register your Licence Server, allowing you to specify how many floating licences of
Sibelius (or Sibelius First) you can run simultaneously, and how many (if any) copies can be temporarily
checked out onto student computers disconnected from the network.
Server Options
Lets you set some more advanced properties of the server, including log verbosity (i.e. how
detailed the logs should be), how long the client time-out should be, and what port the server should run on.
You can also run some very useful diagnostics on the Licence Server from this page.
Access Control
Determines which computers can connect to the Licence Server, both for authorizing Sibelius clients and for determining which machines can be used to run the Control Panel to configure the
server.
Clients
Shows details of the clients that are currently connected to the server, and allows you to send mes-
sages to them, or close the clients down.
Log
Shows the Licence Server log file, useful for diagnostics.
Chapter 3: Configuration 10
Page 15

Activating the Licence Server
Connecting to the Licence Server
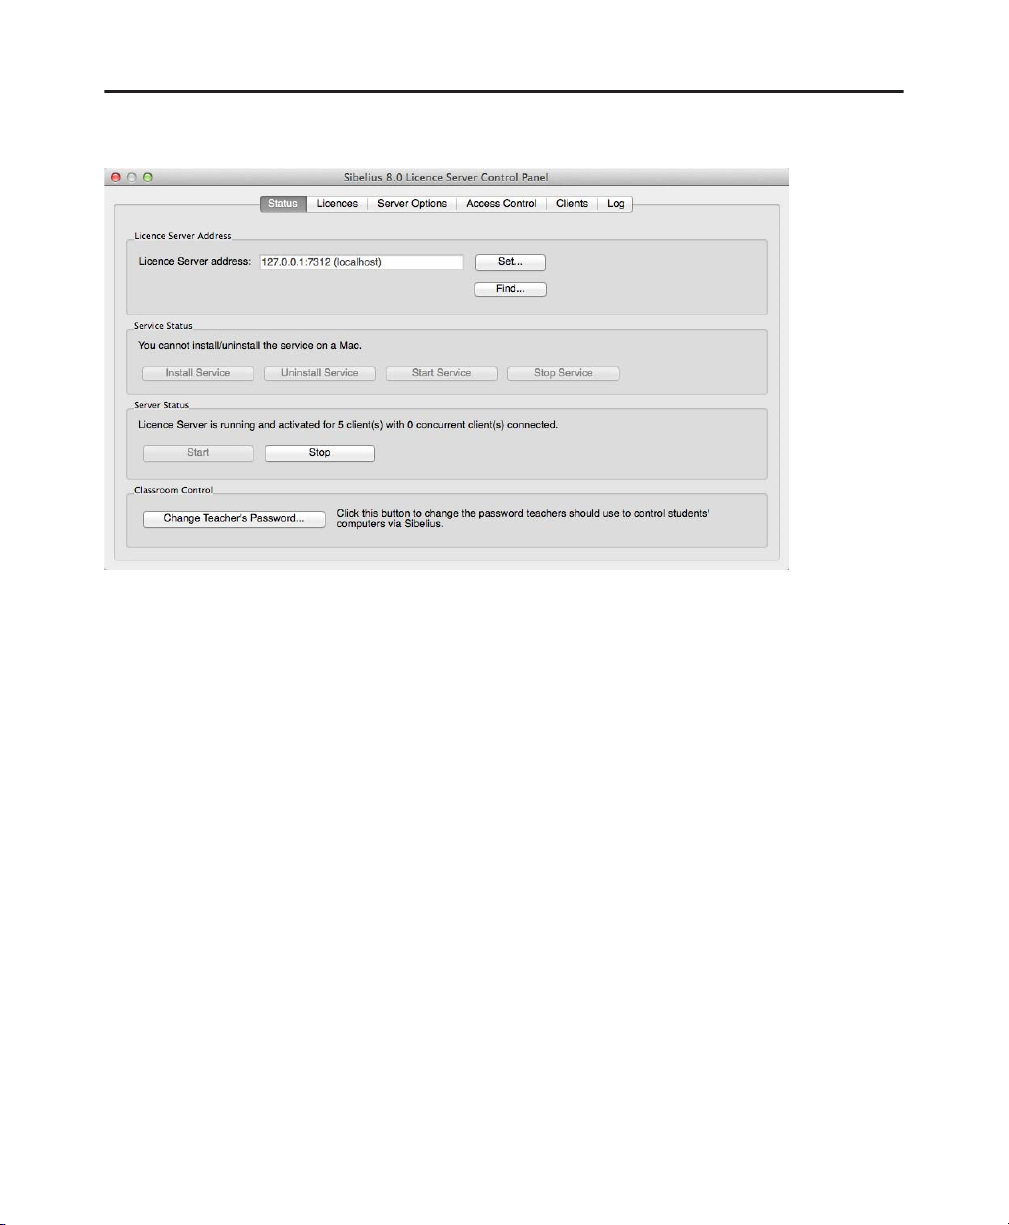
At the top of the Server Status page of the Control Panel, you can see the IP address of the Licence Server
to which the Control Panel is connected.
By default, the Control Panel assumes that the Licence Server is running on the same machine, which is represented by the special IP address
You can tell whether or not the Control Panel has successfully connected to the Licence Server by reading
the status message in the
If the Control Panel has successfully connected to the Licence Server, you will see the following status message.
Server Status group at the bottom of the page.
127.0.0.1, on the default port (7312).
If you see this message, skip down to <Reference to topic>Adding a Licence to the Licence Server on page
15.
Failed Connection
If the Control Panel is unable to connect to the Licence Server, you will see the following message for
Server Status:
Chapter 3: Configuration 11
Licence Server is not responding.
Page 16

If you encounter this message do the following:
Click the Find button at the top of the page. The Control Panel will then search your local network for
running Licence Servers. If multiple running servers are found, you will be prompted to choose which Licence Server to connect to. If, on the other hand, you are told that
, or if one or more servers appears, but not the one you expect to see. Do the following:
subnet
No Licence Servers were found on your
• Check your firewall rules. Make sure that port 7312 is open for both TCP and UDP traffic, then click
Find again.
•If
Find reports no licence servers, click Set.
The Set Licence Server Address dialog appears.
If the Licence Server is running on the same machine from which you are running the Control Panel,
make sure that
If the Licence Server is running on another machine, type the IP address of the machine.
Server is running on this machine (localhost) is enabled.
Chapter 3: Configuration 12
Page 17

If you still can’t connect, check that the Licence Server process is running by doing one of the following:
• On Windows, run the
Return). In the list of services, look for
Status is empty, then the service is not running, and you should try starting it manually – see Appendix A,
If
Services management console (choose Start, then type services.msc and press
Sibelius Licence Server and check that Status is set to Started.
“Starting or Stopping the Licence Server.”.
Chapter 3: Configuration 13
Page 18

On Mac, run Activity Monitor (/Applications/Utilities), and make sure that the Show drop-down at the
top of the window is set to
All Processes. Type licence into the Filter edit box, and you should see the
LicenceServer process listed.
If the
LicenceServer process is colored red and reads (Not Responding), do not be concerned. This is a quirk
of how the Licence Server process appears in Activity Monitor; provided the CPU usage for the process is
at a low level (for example, below 10%), chances are everything is working fine.
LicenceServer process does not appear in the list, you should try starting it manually – see
If the
Appendix A, “Starting or Stopping the Licence Server.”.
If all else fails, refer to the further troubleshooting steps in “Troubleshooting” on page 33.
Chapter 3: Configuration 14
Page 19

Adding a Licence to the Licence Server
Before any of your client computers can connect to the Licence Server, you need to add a licence and activate it. Switch to the
The
Licences page lets you add licences for multiple products. This lets you, for example, run separate li-
cences for both Sibelius and Sibelius First on the same network. Each product appears as a separate row in
Licences page.
the
Licences page.
Each column provides sepcific information about each licence.
Product
Displays the name of the licenced product. Normally this will read either Sibelius or Sibelius First,
as appropriate.
Version
System ID
Total licences
Displays the version number of the licenced product.
Displays the System ID of the licenced product.
Is the total number of seats for which your licence is activated. For example, if this reads 25,
then a total of 25 client copies can connect to the Licence Server concurrently.
Licences available
Is the number of licences that are not currently in use by clients connected to the Licence
Server.
Max. check outs
Is the total number of licences from the Total licences number that are allowed to be
checked out by students so that they can disconnect their computers from the network and continue to use
the software for a time (such as at home).
Chapter 3: Configuration 15
Page 20

Checked out now
Is the total number of licences that are currently checked out to students. Licences that
are checked out to students are not available on your network while they are checked out. For example, if
you have a 25-seat licence, and five seats are checked out to students, only 20 client computers will be able
to connect to your Licence Server until those copies are checked back in.
For more information on checking out licences, see “Checking Out Licences” on page 23.
Manage Licences with the Avid Application Manager
The Manage Licences button launches the Avid Application Manager, which is used to activate all Avid
software products.
To activate a licence for use with the Sibelius Licence Server:
1 On the Licences page, click the Manage Licences button.
2 When the Avid Application Manager launches, if you are not already logged in to your MyAvid account,
log in.
3 Click the Licensing tab.
4 Click Activate next to Sibelius Licence Server.
5 From the Select activation method pop-up menu, select either Online or Offline.
• If you select
My Products and Subscriptions), and click Activate.
der
Chapter 3: Configuration 16
Online, enter your System ID and Activation ID (available in your online MyAvid account un-
Page 21

• If you select Offline, do the following:
• Enter your
and Subscriptions
System ID and Activation ID (available in your online MyAvid account under My Products
).
• Following the on-screen instructions for receiving your licence.bin file.
• Once you have copied the licence.bin file to your computer (it can be on any connected hard drive, network drive, or removable media), click
• Click
• Click
6 Return to the Sibelius Licence Manager Control Panel and notice that the active licence is listed on the
Licence page.
Open.
Activate.
Browse to locate and select the Licence File.
:
Switch to the
Status page and you will see the following status messages near the bottom of the page.
Your Licence Server is now registered and running. You are notified of the total number of copies in your
licence (in the above example, 5 clients), and how many clients are connected at the moment (in the above
example, none).
The next step is to test client-server communication with the Licence Server using the built-in testing feature.
Chapter 3: Configuration 17
Page 22

Testing the Licence Server
Once you have registered the Licence Server, you can test client connections to the server using the Server
Options
page of the Licence Server Control Panel.
To test client connections:
1 If you have more than one product registered, select the specific product you want to test from the Prod-
uct name
2 Specify the Number of clients to simulate.
3 Click Run Test Now.
4 The Licence Server Control Panel opens the corresponding number of windows (one for each simulated
pop-up menu
client), each of which pretends to be a running client copy of Sibelius or Sibelius First.
Each window has a colored background. A green background means that the test client is running successfully. You can see a log of the communication the client has received from the server in the pane at the bottom of the test client window.
If a test client fails to connect for whatever reason, it shows a red background.
Chapter 3: Configuration 18
Page 23

To close all the test client windows, click the Close All Test Clients button in the Server Options page.
If No Test Clients Connect
If no test clients are able to connect to the Licence Server, consider the following:
• Is the Licence Server running, and if so, is it correctly activated? Check the status under
Status page of the Control Panel.
the
• Is your firewall blocking communication between the Licence Server and the test clients? Make sure that
the correct port (
7312 by default) is open for both the TCP and UDP protocols.
• Is the Licence Server prevented from accepting client connections from the IP address of the computer
you are using to test the connection? See “Access Control” on page 20.
• Consult “Troubleshooting” on page 33.
Server Status on
Chapter 3: Configuration 19
Page 24

Access Control
The Access Control page lets you set up rules about which computers on your network can connect to the
Licence Server in order to authorize client copies of Sibelius or change settings for the Licence Server itself.
Clients and Managers
The client is a computer on which Sibelius is installed, and that will connect to the Licence Server for authorization. Clients are specified by IP addresses, or ranges of IP addresses.
The manager is a computer from which it is possible to change settings for the Licence Server. As with clients, managers are specified by IP addresses.
Typically, you would need somewhat permissive access control for clients (because you may have Sibelius
installed on every computer in the school, for example) and less permissive access control for managers (for
example, only the network administrator and the teacher’s workstation should be able to change Licence
Server settings).
Allow or Block
A machine at a given IP address can connect to the Licence Server if it is set to allow, and cannot connect
to the Licence Server if it is set to
Chapter 3: Configuration 20
block.
Page 25

Setting Up Access Controls
By default, only the IP address (127.0.0.1) of the local machine is given access to the Licence Server as a
manager, but any machine (
need to configure anything in order for client machines to connect to the Licence Server.
However, you may want to specify particular ranges of IP addresses for clients and managers.
*.*.*.*) can connect to the server as a client. This means that you typically do not
If at any point you want to reset the access control settings to their defaults, click
Restore Defaults.
Specifying Ranges of IP Addresses for Clients and Managers
Local area networks usually use one of three specially designated ranges of IP addresses (10.0.0 –
10.255.255.255
, 172.16.0.0 – 172.31.255.255 or 192.168.0.0 – 192.168.255.255). If you are not sure what
range of IP addresses is used by your network, contact your network administrator before proceeding.
Normally you will want to grant client access to your whole subnet. For example, if the IP addresses of all
your clients are in the range
172.16.0.0 –172.16.1.255, you would type 172.16.*.*. However, you can spec-
ify a range of IP Address for client and manger machines.
Granting Client Access
To specify a range of IP Addresses for client access:
1 In the Access Control page, enter the starting IP Address and enter * for wild cards. An asterisk (*) means
that the Licence Server should accept any value in the range
2 Click the Allow button next to Client.
3 Click Apply to send your changes to the Licence Server.
0–255.
Blocking Client Access
To block client access to an IP address:
1 In the Access Control page, enter the IP Address.
2 Click the Block button next to Client.
3 Click Apply to send your changes to the Licence Server.
Granting Manger Access
To grant manager access:
1 In the Access Control page, enter the IP Address.
2 Click the Allow button next to Manager.
3 Click Apply to send your changes to the Licence Server.
Chapter 3: Configuration 21
Page 26

Blocking Manger Access
To block manager access:
1 In the Access Control page, enter the IP Address.
2 Click the Block button next to Manager.
3 Click Apply to send your changes to the Licence Server.
Removing Access Control Restrictions
To remove a specific access control restriction:
1 In the Access Control page, select the appropriate row in the table at the top of the page.
2 Click Delete.
Setting Up Classroom Control
Classroom Control lets you perform simple classroom management tasks directly from within Sibelius, in-
cluding sending files to student workstations, getting files from student workstations, “freezing” the client
copies of Sibelius so that you can attract the attention of the students in the classroom, and more.
Setting the Teacher Password
To ensure that only the teacher has access to the File > Teaching > Classroom Control dialog in Sibelius, set
the Teacher Password.
To set the Teacher Password:
1 In the Status page of the Licence Server Control Panel, click the Change teacher’s password button.
Chapter 3: Configuration 22
Page 27

2 Type the default password (sibelius) into the Current password field.
3 Type your new password into the New password and Confirm password fields. Make sure you keep your
password secure and try to make it difficult for students to guess.
4 Click OK.
For more information, refer to the section on Classroom Control in the Sibelius Reference Guide.
Checking Out Licences
If students at your institution have their own laptop computers that they bring to school, you may find it useful to let students check out licences for copies of Sibelius or Sibelius Student to take home with them for
some period of time (such as for the duration of a semester, over a weekend, or during a vacation).
Such a temporary licence is a check out licence, because the student “checks it out” of the Licence Server
when he or she wants to take his or her computer away from the school network, and then “checks it back
in” when he or she next connects to the school network. If the student does not check the licence back in, it
eventually expires, after which the student is no longer able to run the software on his or her computer until
it is reconnected to the school network.
When a licence is checked out from the Licence Server, the pool of available licences remaining for use on
the school network decreases by one seat for the duration of the check out period, so it is important to specify a limit to how many of the total seats in your licence can be checked out by students at one time.
You may find it useful to purchase additional seats, or a separate licence, specifically for the purpose of
checking out licences for students. You can run multiple licences on the same licence server, so you could
earmark one licence for use on the school network, and another licence for check our licences for students.
Setting Up Check Out Licences
The first step for setting up check out licences is to decide how many of the total number of seats available
with your licence should be allowed to be checked out at any one time. For example, if you have a 25 seat
licence, you may want to limit the number of check out licences to 10 copies so that there are always at least
15 seats available for use on your school computers.
By default, no licences are made available for checking out, so you must specify how many to allow.
Chapter 3: Configuration 23
Page 28

To set up check out licences:
1 In the Licences page of the Licence Server Control Panel, select the licence from which you want to al-
low check out licences.
2 Click Check Out Settings.
3 In the Check Out Settings dialog, enable the Allow option.
4 Enter the number of licences you want to allow for check out.
5 Check out licences are by their nature temporary. Specify how long licences can be used for. You can
choose between allowing licences to be checked out for a certain number of days, which is useful for allowing students to routinely check out licences for short periods (such as for the weekend), or until a particular date (allowing students to check out licences for an extended period, such as up until the end of
the semester or for the duration of the academic year). Do one of the following:
• To allow a licence to be checked out for a certain number of days, select the
in option and specify the
number of days.
• To specify a fixed expiration date, select the
dd/mm/yyyy (for example
31/07/2016 (31 July 2016).
on this date option and enter the date using the format
6 Click OK.
Max. check outs column in the table on the Licences page of the Licence Server Control Panel update
The
to reflect the number of check out licences that you have specified.
Monitoring Checked Out Licences
You can see the number of licences that are currently checked out at a glance in the Checked out now column of the
For more detailed information, view the
details of which users currently have licences checked out. The Licence Server records the user account
name and the machine name (if available), and shows when the check out licence will expire.
Chapter 3: Configuration 24
Licences page of the Licence Server Control Panel.
Clients page of the Licence Server Control Panel where you can see
Page 29

Revoking Checked Out Licences
There may be circumstances in which you need to revoke a check out licence to return that seat to the pool
of floating licences before the licence is checked back in by the student, or before the time it is set to expire.
For example, if the student’s laptop is lost or stolen, or if the student leaves the institution.
When you revoke a check out licence, it is returned immediately to the pool of floating licences, but that licence remain active on the computer on which it was checked out until it expires, at which point the client
copy of Sibelius will no longer run on the client.
To prevent abuse of this system, the number of times you can revoke check out licences is limited to the total
number of seats in your licence. If you have a 30 seat licence, you may revoke check out licences 30 times,
but once you reach this limit, you will need to contact Avid to re-activate your Licence Server to reset this
limit. At the point at which the check out licence would have expired, the record of the revocation is removed, increasing the number of available revocations by one. To help you keep track of this limit, Sibelius
will tell you how many revocations you have available when you revoke a check out licence.
To revoke a check out licence:
1 In the Clients page of the Licence Server Control Panel, select the client in the list.
2 Click the Revoke Licence button.
3 When prompted, confirm that you do indeed want to revoke the licence by clicking Yes.
The client disappears from the list, and the
Checked out now column is reduced by one on the Licences page
of the Licence Server Control Panel for that licence.
Checking Out a Licence on a Client Computer
Before they can check out a licence from the Licence Server, your students should install Sibelius on their
laptop or tablet computer. To facilitate this, copy the installer to a suitable shared location on the network
and provide a text file alongside the installer that contains the host name or IP address of the computer on
which the Sibelius Licence Server is running. Students can also install the 30-day trial version of Sibelius
available for download from the Avid website.
Once the student has Sibelius installed on his or her computer, he or she should connect to the school network and run the program as normal. After selecting the Licence Server when Sibelius starts up, the software will run connected to the Licence Server, using one of the available floating licences.
Chapter 3: Configuration 25
Page 30

To check out a licence on a client computer:
1 On the client computer, launch Sibelius.
2 Choose File > Help and select the Check Out Licence button.
3 If the Licence Server is configured to allow check out licences the student will allowed to check out a li-
cence.
The student can specify when the check out licence will expire, up to the maximum duration specified by
the Licence Server. When he or she clicks
OK, Sibelius disconnects from the Licence Server, and the student
can then disconnect from the school network. For the duration of the check out period, the student can run
Sibelius on his or her computer without reconnecting to the school network. In the last few days before the
check out licence is due to expire, the student will be warned each time he or she starts Sibelius so that work
can be planned effectively.
Once the licence has expired, the student will receive a message when he or she starts Sibelius informing
him or her that the program cannot run unless it is reconnected to the Licence Server.
Checking In a Licence
If a student wants to check a licence back in before it expires, he or she must reconnect his or her computer
to the school network, run Sibelius as usual, then choose
then tries to contact the Licence Server and return the licence to the pool of floating licences, at which point
Sibelius will once again only run on that computer when connected to the school network.
If for any reason Sibelius cannot contact the Licence Server, the student will receive a message to that effect,
and should try again later.
Chapter 3: Configuration 26
File > Help, then click Check In Licence. Sibelius
Page 31

Working with Clients
The Clients page of the Licence Server Control Panel shows real-time information about the client copies of
Sibelius currently connected to the Licence Server.
Address
Shows the IP address from which the client is connected. It is possible for multiple clients to appear to connect from the same IP address if your Licence Server is located on the opposite side of a firewall
or router from your client machines, or in other situations where your network uses Network Address Translation (NAT).
Client ID
Is a numeric identifier given to each client machine when it first connects to the Licence Server.
This identifier remains associated to that client machine as long as it is connected to the server for that session, and when the client disconnects and reconnects (e.g. because a student quits and restarts Sibelius), it
will be assigned a new identifier. Similarly, when the Licence Server is restarted, the client IDs are simply
reassigned from 1 again. (Client IDs are used by the Licence Server to ensure that it can tell each client
apart, especially when your network employs NAT.)
User name
Machine name
Time connected
Last polled
Shows the username of the account currently logged in to that particular computer.
Shows the host name of the client computer.
Shows how long each client has been connected for, in hours, minutes and seconds.
Shows when the Licence Server last polled the client and received a reply. Typically, clients
will be polled every few seconds, and only when you suffer a network outage of some kind (or when the client computer crashes) will the client not be able to respond to the Licence Server’s poll message.
Chapter 3: Configuration 27
Page 32

Licence expires
or shows
Shows the date on which the client’s checked out licence expires in the form dd/mm/yyyy,
N/A if the licence is a standard floating licence.
In addition to seeing real-time information about the clients currently connected, you can perform some
simple operations on the client machines, namely sending a message to one or more clients, closing one or
more clients, or revoking a checked out licence.
Sending Messages to Clients
If you need to send a message to one or more clients (for example, if you need to inform them that the lesson
ends in a few minutes, or that the computer lab will be closing shortly, you can do so.
To send a message to one or more clients:
1 In the Client page, select the client or clients to which you want to send a message (Shift-click to select
contiguous clients, or Command-click (Mac) or Control-click (Windows) to select non-contiguous clients from the list at the top of the dialog).
2 Click Send Message.
3 In the Send Message dialog, type your message.
4 Click OK.
Your message will appear within a few moments on the screens of each of the clients to whom you chose
to send it.
Closing Clients
To close one or more client:
1 In the Client page, select the client or clients to which you want to send a message (Shift-click to select
contiguous clients, or Command-click (Mac) or Control-click (Windows) to select non-contiguous clients from the list at the top of the dialog).
2 Click Close Selected Clients.
Within a few moments, each of the client machines will prompt the student to save their work, and then shut
down.
Chapter 3: Configuration 28
Page 33

Revoking licences
If a client has a checked out licence, and you urgently need to restore that licence to the network pool so that
it can be allocated to another client, select the client and click
a limited number of times, so use this capability sparingly. For more information, see “Checking Out Licences” on page 23.
Revoke Licence. You can only revoke licences
Reading Logs
The Logs page of the Licence Server Control Panel shows the log messages generated by the Licence
Server.
Time
Shows the timestamp at which a given event occurred.
Client Address
Either shows the IP address of the client machine, or if it is an informational message generated by the Licence Server itself, this will read
(Status).
Message
Shows the text of the message itself.
Some of the common messages you will see:
Adding client id: n (x of y): when a client first connects to the Licence Server, it is assigned client ID n,
•
and you are informed that this is copy number x of the number of concurrent copies allowed, y.
•
Client add request version: this means that a client has asked the Licence Server for authorization.
Chapter 3: Configuration 29
Page 34

• Client alive: this means that a client has been successfully authorized.
•
Poll response from client id n: this is the response of the client to the Licence Server’s poll request.
•
Poll count -1 for id n: this means that client ID n has stopped responding to the Licence Server’s poll
requests.
•
Removed client from list: this means that a client has closed.
The buttons at the bottom of the page allow you to perform various operations on the log:
Save As
technical support. Click
Clear
If you encounter problems with the Licence Server, it is very useful to send your log file to Sibelius
Save As to save a text file suitable for attaching to an email.
Empties the log. Note that this not only clears the display in the Licence Server Control Panel: it de-
letes the existing log altogether. (The log is also deleted each time you start the Licence Server.)
Refresh
Forces the display of the log file to be updated. The display is automatically updated every few sec-
onds, but if you want to force an update, you can do so.
Mark
Inserts a marker line in the log file, which can be useful when trying to diagnose what the Licence
Server is doing while it’s running.
Status
Inserts a status report message into the log, including important bits of configuration information (including the Licence Server’s IP address and port, number of registered copies, client and manager access
control lists, and so on) that can help Sibelius technical support to diagnose any problems you may encounter.
Comment
Shows a simple dialog into which you can type a comment to be inserted in the log file. You can
use this to annotate a sequence of events in the log; again, this can be very useful in helping Sibelius technical support to diagnose problems.
Log Verbosity
You can control how detailed the Licence Server logs are by adjusting the slider on the Server Options page
of the Licence Server Control Panel.
While you are configuring and testing your Licence Server, you may find it helpful to drag the slider to the
right to increase the verbosity. Once your Licence Server is running smoothly, you can safely drag the slider
back to the left in order to make the logs more concise.
Chapter 3: Configuration 30
Page 35

Maintaining the Licence Server
There are a handful of other maintenance tasks that can be performed from the Licence Server Control
Panel, described below.
Changing the Port Used by the Licence Server
The Licence Server’s default port is 7312. There is normally no need to change this, and we recommend that
you leave this setting at its default.
To change the port:
1 On the Server Options page of the Licence Server Control Panel, click Change Port.
2 In the Change Port dialog, enter the desired port number.
3 Click OK.
Changing the port after you have already set up your Licence Server can be very inconvenient, because
you need to reconfigure each client machine to use the new port afterwards.
Changing the Number of Copies in an Existing Site Licence
If you need to add more seats to your site licence at a later date, you can purchase additional Activation IDs
from your reseller or Avid to expand the size of your site licence. When you purchase additional seats, you
will receive a new entitlement certificate with a new Activation ID.
To add the additional seats:
1 In the Licences page of the Licence Server Control Panel, Click Manage Licences. The Avid Application
Manager launches.
2 On Licensing page of the Avid Application Manager, the Sibelius Licence Server application includes an
additional
3 Click the Activate link and activate as usual. After a few moments, you will be returned to the first screen,
and you will be told that activation was successful.
Chapter 3: Configuration 31
Activate link.
Page 36

4 Click Done.
When you are returned to the
Licences page of the Control Panel, the Total Licences column displays the
new total number of seats in your site licence.
To activate your Licence Server with a larger number of copies, follow the procedure described in “Activating the Licence Server” on page 11.
Unexpected Exits
In the unlikely event that a copy of Sibelius running on a client machine quits unexpectedly, or if the computer on which Sibelius is running crashes or requires a reboot, when the student runs Sibelius again, the Licence Server will attempt to identify that the same client is reconnecting and re-authorize it immediately.
However, if the Licence Server is unable to recognize the client, the student may see the error message
belius cannot run because the server already has a copy registered on this address
. In this situation, the student can wait for the designated time-out period and he or she will then be able to successfully restart Sibelius.
By default, the time-out period is three minutes, but you can change this in the
Server Options page of the
Licence Server Control Panel.
To change the Time Out period:
In the Server Options page, click and drag the slider to the right to increase the time-out period, or to the
left to reduce it.
Si-
Chapter 3: Configuration 32
Page 37

Troubleshooting
Error codes
For a complete list of the error codes that can be returned by the Licence Server, see Appendix C, “Licence
Server Error Codes.”.
Error 0005 Access Denied
If the Licence Server service in Windows fails to start automatically, you may encounter an Error 0005 Ac-
cess Denied
Server is installed has restricted access.
Licence Server is Apparently Installed Correctly but the Clients Cannot “See” the
Licence Server
• Open a Terminal window (Mac) or command window (Windows) and use ping to contact the server from
the client and vice versa to establish basic connectivity. If
traffic is able to be routed between the two machines. If
network (for example. a programmable switch) is blocking the traffic between the Licence Server and the
client. Check the logs to see if you are getting an “extra slave alive” message.
• Review your access settings using the
“Access Control” on page 20.
• This can also be caused by your firewall. Try this trick: if you are running the Control Panel on the same
machine as the Licence Server, add the server’s IP address to the list of allowed managers, then connect
to the server by IP address (or use the
way, it suggests that the firewall on your local machine is not allowing connections through on the Licence Server’s port. If you are able to test the server but other clients still can’t connect, then check the
settings of any other firewalls or routers on your network.
when you try to start it manually. This usually means that the folder in which the Licence
ping is successful in both directions, network
ping fails, it is possible that another device on the
Access Control page of the Licence Server Control Panel – see
Find button). If you are unable to connect or test the server in this
Error Message “Could not bind the IP socket to the correct port”
If you see the error message Could not bind the IP socket to the correct port when running the Licence
Server, you may be running another application on this port already. You may even be running the Licence
Server already: perhaps you are running an earlier version of the Sibelius Licence Server at the same time
as the Sibelius Licence Server, or perhaps the Licence Server has crashed and the crashed process needs to
be killed before it can be restarted.
If you legitimately have another application using the same port, you can solve this problem changing the
Licence Server’s port (see “Changing the Port Used by the Licence Server” on page 31).
Chapter 3: Configuration 33
Page 38

Client Copies of Sibelius on Mac Lose Contact with the Licence Server
Make sure that your server is not allowed to go to “sleep” as this will stop the Licence Server from responding. You should also ensure that your server does not install software updates automatically, as this will also
stop the Licence Server from responding.
Licence Server fails to test successfully
Ensure that the localhost (127.0.0.1) is included the clients allowed access control list.
Using the Log to Troubleshoot
The log can be very informative when investigating a client that fails to be authorized.
You will see
the Licence Server. For example, you will see
Bad version number if a copy of an older or newer version of Sibelius attempts to connect to
Bad version number 8 if a copy of Sibelius 8 attempts to con-
nect to the Sibelius Licence Server.
You will see
Blocked client, no copies left if a new client attempts to connect to the Licence Server, but the
Licence Server has already authorized the number of copies in your licence.
Chapter 3: Configuration 34
Page 39

Appendix A: Starting or Stopping the Licence Ser ver
Normally you should use the Licence Server Control Panel to start and stop the Licence Server. But should
you need to start or stop the Licence Server without using the Control Panel, you can do so as follows:
Starting the Licence Server on Windows
To start the Licence Server:
1 Click Start, type cmd, and press Return to open a command prompt window.
2 Navigate to the folder where you installed the Licence Server using cd:
cd "\Program Files (x86)\Avid\Sibelius Licence Server"
3 Make sure you type the line above exactly, with spaces in all the right places.
4 You will be returned to the command prompt in the above directory.
5 Type LicenceServer -install to install the service and the following response from the Licence Server is
reported.
6 You will again be returned to a command prompt.
7 Close the command prompt window.
Appendix A: Starting or Stopping the Licence Ser ver 35
Page 40

Stopping the Licence Server on Windows
To stop the Licence Server:
1 Click Start, type cmd, and press Return to open a command prompt window.
2 Navigate to the folder where you installed the Licence Server using cd:
cd "\Program Files (x86)\Avid\Sibelius Licence Server"
3 Make sure you type the line above exactly, with spaces in all the right places.
4 You will be returned to the command prompt in the above directory.
5 Type LicenceServer -uninstall to uninstall the service and the following response from the Licence
Server is reported.
6 You will again be returned to a command prompt.
7 Close the command prompt window.
Starting the Licence Server on Mac OS X
To start the Licence Server:
1 Open a Terminal window and log in as root by typing sudo bash -login.
2 Type the root password when prompted and press Return.
3 Type the following command: /sbin/SystemStarter -v start "Sibelius Licence Server Service"
Stopping the Licence Server on Mac OS X
To stop the Licence Server:
1 Open a Terminal window and log in as root by typing sudo bash -login.
2 Type the root password when prompted and press Return.
3 Type the following command: /sbin/SystemStarter -v stop "Sibelius Licence Server Service"
Sibelius Licence Server Guide36
Page 41

Appendix B: Manually Locating Licence Ser ver Logs
Normally you should view the Licence Server’s logs using the Licence Server Control Panel, but should
you need to do this manually, do so as follows.
Logging on Windows
The Licence Server creates a log file called LicenceServer.log, normally located in:
C:\Users\LocalService\AppData\Roaming\Avid\Logs
The exact location depends on your computer’s settings, so it may be necessary to search for the folder. The
logs are updated with every event.
Logging on Mac OS X
The Licence Server creates a log file in /var/log called LicenceServer.log (unless you have changed its
name and location in the
window and navigate to the
are using the default filename, type:
start_licence_server script). To see the last few entries in the log, open a Terminal
/var/log folder or the folder you have specified for the log file. Assuming you
tail -f LicenceServer.log
To quit the tail command, type Control-C.
To view the whole log, use the
less LicenceServer.log
Quit the less command by typing q.
less command:
Appendix B: Manually Locating Licence Server Logs 37
Page 42

Sibelius Licence Server Guide38
Page 43

Appendix C: Licence Server Er r or Codes
Error code Internal error message Explanation
301 ERR_LS_CANT_CONNECT_TO_SERVER The service is not yet running
302 ERR_LS_AUTH_NO_MORE_COPIES No more licences left on server
303 ERR_LS_AUTH_ALREADY_RUNNING_THIS_IP A version is already running at this address
304 ERR_LS_AUTH_DENIED Can’t authoize this client
305 ERR_LS_SHUTDOWN Server has requested that we shut down
306 ERR_LS_INCORRECT_SIB_VERSION LicenceServerisforadifferentversionofSibelius.
307 ERR_LS_OLD_LS_VERSION Using the wrong version of the Licence Server
308 ERR_LS_CLIENT_COMM_ERROR Can’t communicate with client
310 ERR_LS_NO_ACCESS No access control has been set up
311 ERR_LS_SOCKET_FAIL Can’t create or bind network sockets
312 ERR_LS_SERVICE_CANT_FIND_MODULE Can’tfind LicenceServer executableto install
as a service (Windows only)
313 ERR_LS_SERVICE_CANT_OPEN_SERVICEMAN Can’topentheservicemanager (Windowsonly)
314 ERR_LS_SERVICE_CANT_CREATE_SERVICE Can’t create the service (Windows only)
315 ERR_LS_SERVICE_CANT_START Error starting the service (Windows only)
316 ERR_LS_SERVICE_CANT_OPEN Error opening the service (Windows only)
317 ERR_LS_GENERAL_ERROR General error from the Licence Server
Appendix C: Licence Server Error Codes 39
Page 44

Sibelius Licence Server Guide40
Page 45

Appendix D: Useful Command Line Commands
Useful Windows commands
cd – change directory (the old name for folder).
cd .. – moves to the next higher directory. If you
repeat this enough times, you will get back to the
root of the hard disk.
cd \ – moves you to the root directory.
cd \directoryname – takes you to the directory
called directoryname. If you copied the Licence
Server program to a folder named
ample) then
dir – lists the contents of a directory. Use this to
check that you are in the right directory.
exit – closes a command prompt window.
To quit a running command, type
cd \LSV6 will get you there.
LSV6 (for ex-
Ctrl+C.
Useful Mac OS X Terminal commands
chmod – used to change the attributes of a file
ls -al – lists all the files in a directory with their at-
tributes
mkdir -m 775 name makes a directory called
name with full read/write access for the owner and
their group (typically the admin group), but prevents write access for other users.
tail -f logfilename will display the last 10 lines of
the log file logfilename continually; useful for
monitoring client messages.
less logfilename will display the whole log file
logfilename from beginning to end; quit by typing
q.
cd changes the current directory
pico starts the Pico text editor (if installed)
logout will log out from the current user, e.g. root.
(You can also type
./filename will run an executable or script called
filename in the current directory, provided you are
using bash or a bash-compatible shell (as suggested earlier). Once unique characters have been
typed, the
the file name for you.
To quit a running command, type
Tab key will auto-complete the rest of
Control-D.)
Control-C.
ps -a – lists running processes, which will include
the Licence Server
ps -ax – lists all running processes, including hid-
den ones.
Appendix D: Useful Command Line Commands 41
Page 46

Avid
280 N Bernardo Avenue
Mountain View, CA 94043 USA
Technical Support (USA)
Visit the Online Support Center at
www.avid.com/support
Product Information
For company and product information,
visit us on the web at www.avid.com
 Loading...