

Page 1
Reference
Page 2

Edition 5.1
September 2007
Reference written by Daniel Spreadbury, Michael Eastwood, and Ben & Jonathan Finn.
See the About Sibelius dialog for a full list of the software development team and other credits.
We would like to thank all those (too numerous to list) who have provided helpful comments and
suggestions for Sibelius and its documentation.
Please email any suggestions for improvements to this Reference to docs@sibelius.com (but please
do not use this address for suggestions or queries about the Sibelius program itself – see the separate
Latest information & technical help sheet for the correct address for your country).
Sibelius copyright © Sibelius Software, a division of Avid Technology, Inc. and its licensors 1987–
2007
Sibelius Reference copyright © Sibelius Software, a division of Avid Technology, Inc.. 1992–2007
Published by Sibelius Software, The Old Toy Factory, 20–23 City North, Fonthill Road, London
N4 3HF, UK
All rights reserved. This Reference may not be reproduced, stored in a retrieval system or transmitted in any form or by any means – electronic, record-
ing, mechanical, photocopying or otherwise – in whole or in part, without the prior written consent of the publisher. Although every care has been taken
in the preparation of this Reference, neither the publisher nor the authors can take responsibility for any loss or damage arising from any errors or omis-
sions it may contain.
Sibelius, the Sibelius logo, Scorch, Flexi-time, Espressivo, Rubato, Rhythmic feel, Arrange, ManuScript, Virtual Manuscript Paper, House Style, Sound-
Stage, Opus, Inkpen2, Helsinki, Reprise, magnetic, multicopy, Optical, Dynamic parts, SoundWorld, Panorama, the blue notes and double helix logos,
SibeliusMusic.com, SibeliusEducation.com, ‘The fastest, smartest, easiest way to write music’ and ‘99% inspiration, 1% perspiration’ are all trademarks
or registered trademarks of Sibelius Software, a division of Avid Technology, Inc.. in the USA, UK and other countries. All other trademarks are
acknowledged as the property of their respective owners.
2
Page 3

Contents
About this Reference . . . . . . . . . . . . . . . . . . . 5
1 Inputting 7
1.1 Note input . . . . . . . . . . . . . . . . . . . . . . . . .9
1.2 Keypad . . . . . . . . . . . . . . . . . . . . . . . . . .16
1.3 Flexi-time™ . . . . . . . . . . . . . . . . . . . . . . .19
1.4 Scanning . . . . . . . . . . . . . . . . . . . . . . . . .24
1.5 Guitar tab input . . . . . . . . . . . . . . . . . . .40
1.6 Selections and passages . . . . . . . . . . . .43
1.7 Input Devices . . . . . . . . . . . . . . . . . . . . .48
2 Notations 55
2.1 Accidentals . . . . . . . . . . . . . . . . . . . . . . .57
2.2 Articulations . . . . . . . . . . . . . . . . . . . . .61
2.3 Barlines . . . . . . . . . . . . . . . . . . . . . . . . . .65
2.4 Bars and bar rests . . . . . . . . . . . . . . . . .69
2.5 Beams . . . . . . . . . . . . . . . . . . . . . . . . . . .72
2.6 Brackets and braces . . . . . . . . . . . . . . . .82
2.7 Chord diagrams . . . . . . . . . . . . . . . . . . .84
2.8 Clefs . . . . . . . . . . . . . . . . . . . . . . . . . . . . .90
2.9 Color . . . . . . . . . . . . . . . . . . . . . . . . . . . .93
2.10 Cues . . . . . . . . . . . . . . . . . . . . . . . . . . . .95
2.11 Free rhythm . . . . . . . . . . . . . . . . . . . . .99
2.12 Grace notes . . . . . . . . . . . . . . . . . . . . .101
2.13 Guitar notation and tab . . . . . . . . . .103
2.14 Instruments . . . . . . . . . . . . . . . . . . . .109
2.15 Key signatures . . . . . . . . . . . . . . . . . .116
2.16 Lines . . . . . . . . . . . . . . . . . . . . . . . . . .119
2.17 Lute tablature . . . . . . . . . . . . . . . . . . .124
2.18 Manuscript paper . . . . . . . . . . . . . . .126
2.19 Multirests . . . . . . . . . . . . . . . . . . . . . .128
2.20 Noteheads . . . . . . . . . . . . . . . . . . . . . .131
2.21 Percussion . . . . . . . . . . . . . . . . . . . . .134
2.22 Slurs . . . . . . . . . . . . . . . . . . . . . . . . . .139
2.23 Staves . . . . . . . . . . . . . . . . . . . . . . . . .142
2.24 Stems and leger lines . . . . . . . . . . . . .146
2.25 Symbols . . . . . . . . . . . . . . . . . . . . . . .148
2.26 Ties . . . . . . . . . . . . . . . . . . . . . . . . . . .152
2.27 Time signatures . . . . . . . . . . . . . . . . .155
2.28 Tremolos . . . . . . . . . . . . . . . . . . . . . . .158
2.29 Triplets and other tuplets . . . . . . . . .160
2.30 Voices . . . . . . . . . . . . . . . . . . . . . . . . .164
3 Text 169
3.1 Working with text . . . . . . . . . . . . . . . .171
3.2 Common text styles . . . . . . . . . . . . . . .178
3.3 Lyrics . . . . . . . . . . . . . . . . . . . . . . . . . . 184
3.4 Chord symbols . . . . . . . . . . . . . . . . . . 194
3.5 Figured bass and Roman numerals . 199
3.6 Bar numbers . . . . . . . . . . . . . . . . . . . . 202
3.7 Page numbers . . . . . . . . . . . . . . . . . . . 209
3.8 Rehearsal marks . . . . . . . . . . . . . . . . . 213
3.9 Instrument names . . . . . . . . . . . . . . . 215
3.10 Edit Text Styles . . . . . . . . . . . . . . . . . 219
3.11 Wildcards . . . . . . . . . . . . . . . . . . . . . . 225
3.12 Font equivalents . . . . . . . . . . . . . . . . 229
4 Playback & video 231
4.1 Playback . . . . . . . . . . . . . . . . . . . . . . . . 233
4.2 Interpretation of your score . . . . . . . . 235
4.3 Mixer . . . . . . . . . . . . . . . . . . . . . . . . . . 240
4.4 Sibelius Sounds Essentials . . . . . . . . . 249
4.5 Performance . . . . . . . . . . . . . . . . . . . . 263
4.6 Repeats . . . . . . . . . . . . . . . . . . . . . . . . . 267
4.7 Live Playback . . . . . . . . . . . . . . . . . . . . 272
4.8 Playback dictionary . . . . . . . . . . . . . . 277
4.9 Video . . . . . . . . . . . . . . . . . . . . . . . . . . 287
4.10 Timecode and hit points . . . . . . . . . 292
4.11 Playback Devices . . . . . . . . . . . . . . . 297
4.12 MIDI for beginners . . . . . . . . . . . . . . 309
4.13 Virtual instruments for beginners . 312
4.14 Working with virtual instruments . 319
4.15 MIDI messages . . . . . . . . . . . . . . . . . 324
4.16 SoundWorld™ . . . . . . . . . . . . . . . . . . 332
5 Power tools 335
5.1 Arrange™ . . . . . . . . . . . . . . . . . . . . . . . 337
5.2 Edit Arrange Styles . . . . . . . . . . . . . . . 346
5.3 Display settings . . . . . . . . . . . . . . . . . . 351
5.4 Filters and Find . . . . . . . . . . . . . . . . . . 354
5.5 Focus on Staves . . . . . . . . . . . . . . . . . . 359
5.6 Hiding objects . . . . . . . . . . . . . . . . . . . 361
5.7 Highlight . . . . . . . . . . . . . . . . . . . . . . . 363
5.8 Ideas . . . . . . . . . . . . . . . . . . . . . . . . . . . 364
5.9 Menus and shortcuts . . . . . . . . . . . . . 374
5.10 Panorama . . . . . . . . . . . . . . . . . . . . . . 385
5.11 Plug-ins . . . . . . . . . . . . . . . . . . . . . . . 387
5.12 Preferences . . . . . . . . . . . . . . . . . . . . 433
5.13 Printing . . . . . . . . . . . . . . . . . . . . . . . 439
5.14 Properties . . . . . . . . . . . . . . . . . . . . . . 445
5.15 SibeliusEducation.com . . . . . . . . . . . 450
3
Page 4

Contents
5.16 SibeliusMusic.com . . . . . . . . . . . . . . 452
5.17 Transposing . . . . . . . . . . . . . . . . . . . . 454
5.18 Undo and Redo . . . . . . . . . . . . . . . . . 456
5.19 View menu . . . . . . . . . . . . . . . . . . . . 457
5.20 Window menu . . . . . . . . . . . . . . . . . 462
5.21 Worksheet Creator . . . . . . . . . . . . . . 464
5.22 Adding your own worksheets . . . . . 471
6 Dynamic parts™ 477
6.1 Working with parts . . . . . . . . . . . . . . 479
6.2 Editing parts . . . . . . . . . . . . . . . . . . . . 484
6.3 Multiple Part Appearance . . . . . . . . . 489
6.4 Extracting parts . . . . . . . . . . . . . . . . . 493
7 Layout & engraving 497
7.1 Layout and formatting . . . . . . . . . . . . 499
7.2 Music engraving . . . . . . . . . . . . . . . . . 503
7.3 Auto Layout . . . . . . . . . . . . . . . . . . . . . 508
7.4 Breaks . . . . . . . . . . . . . . . . . . . . . . . . . 512
7.5 Document Setup . . . . . . . . . . . . . . . . . 517
7.6 Attachment . . . . . . . . . . . . . . . . . . . . . 521
7.7 House Style™ . . . . . . . . . . . . . . . . . . . . 524
7.8 Note spacing . . . . . . . . . . . . . . . . . . . . 528
7.9 Staff spacing . . . . . . . . . . . . . . . . . . . . 532
7.10 Music fonts . . . . . . . . . . . . . . . . . . . . 535
7.11 Default Positions . . . . . . . . . . . . . . . 539
7.12 Edit Instruments . . . . . . . . . . . . . . . 543
7.13 Edit Lines . . . . . . . . . . . . . . . . . . . . . .553
7.14 Edit Noteheads . . . . . . . . . . . . . . . . . .555
7.15 Edit Symbols . . . . . . . . . . . . . . . . . . .557
7.16 Publishing . . . . . . . . . . . . . . . . . . . . . .559
8 Files 561
8.1 Working with files . . . . . . . . . . . . . . . .563
8.2 Sharing files . . . . . . . . . . . . . . . . . . . . .566
8.3 Splitting and joining scores . . . . . . . .568
8.4 Importing graphics . . . . . . . . . . . . . . .570
8.5 Opening MIDI files . . . . . . . . . . . . . . .572
8.6 Opening MusicXML files . . . . . . . . . .577
8.7 Opening Finale 98-2003 files . . . . . . .582
8.8 Opening SCORE files . . . . . . . . . . . . . .586
8.9 Opening Acorn Sibelius files . . . . . . .589
8.10 Opening files from previous versions 591
8.11 Exporting graphics . . . . . . . . . . . . . .593
8.12 Exporting MIDI files . . . . . . . . . . . . .599
8.13 Exporting audio files . . . . . . . . . . . . .601
8.14 Exporting Scorch web pages . . . . . .603
8.15 Exporting to previous versions . . . .608
8.16 ASCII tab files . . . . . . . . . . . . . . . . . .610
Glossary 613
Index 625
License Agreement . . . . . . . . . . . . . . . . . .650
4
Page 5
About this Reference
About this Reference
This Reference is a comprehensive guide to all of Sibelius’s features. For explanations of Sibelius’s
more basic features, and when familiarizing yourself with the program, you will probably find it
easier to refer to your Handbook, or your Upgrading to Sibelius 5 booklet if you have upgraded
from a previous version of Sibelius.
The Reference comes both on-screen, and as an optional printed book, which you can buy from
Sibelius or your country’s distributor (www.sibelius.com/buy). Both forms of the Reference are
identical.
Chapters and topics
Sibelius’s Reference is divided into seven chapters containing smaller topics. You will find a list of
all these topics in the Contents, however you will probably find the Index even more useful for
finding information on specific areas of the program. The Glossary explains musical and techni-
cal terms.
On-screen reference
To start the on-screen Reference, click the toolbar button shown on the right, or choose
Help
> Sibelius Reference (shortcut F1 or X?).
Whichever application your computer uses to view PDF files will open – on Windows this is normally Adobe Reader, and on Mac it is normally Preview – and the on-screen Reference will
appear. To navigate the on-screen Reference, you can use the bookmarks and Edit
built in to Adobe Reader and Preview.
> Find features
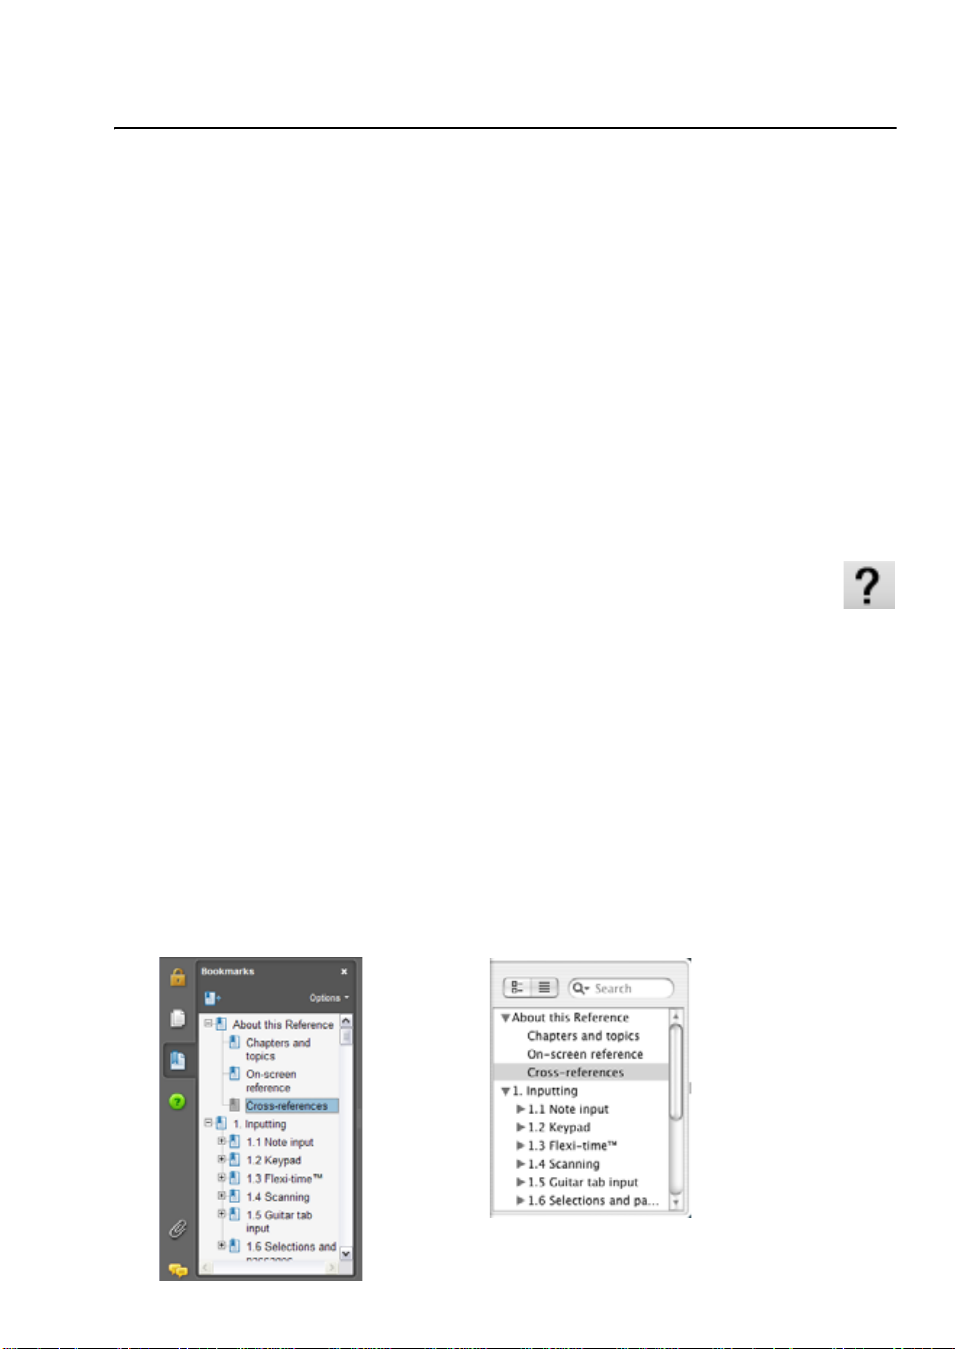
Bookmarks are like a table of contents that you can have open beside the document you’re reading, allowing you to jump to any chapter, topic, or even sub-heading in the Reference. To show
bookmarks:
* In Adobe Reader, choose View > Navigation Panels > Bookmarks; a panel like that shown
below left will appear at the left of your screen
* In Preview on Mac, choose View > Drawer; a panel like that shown below right will slide out of
the right-hand side of the window.
5
Page 6
Reference
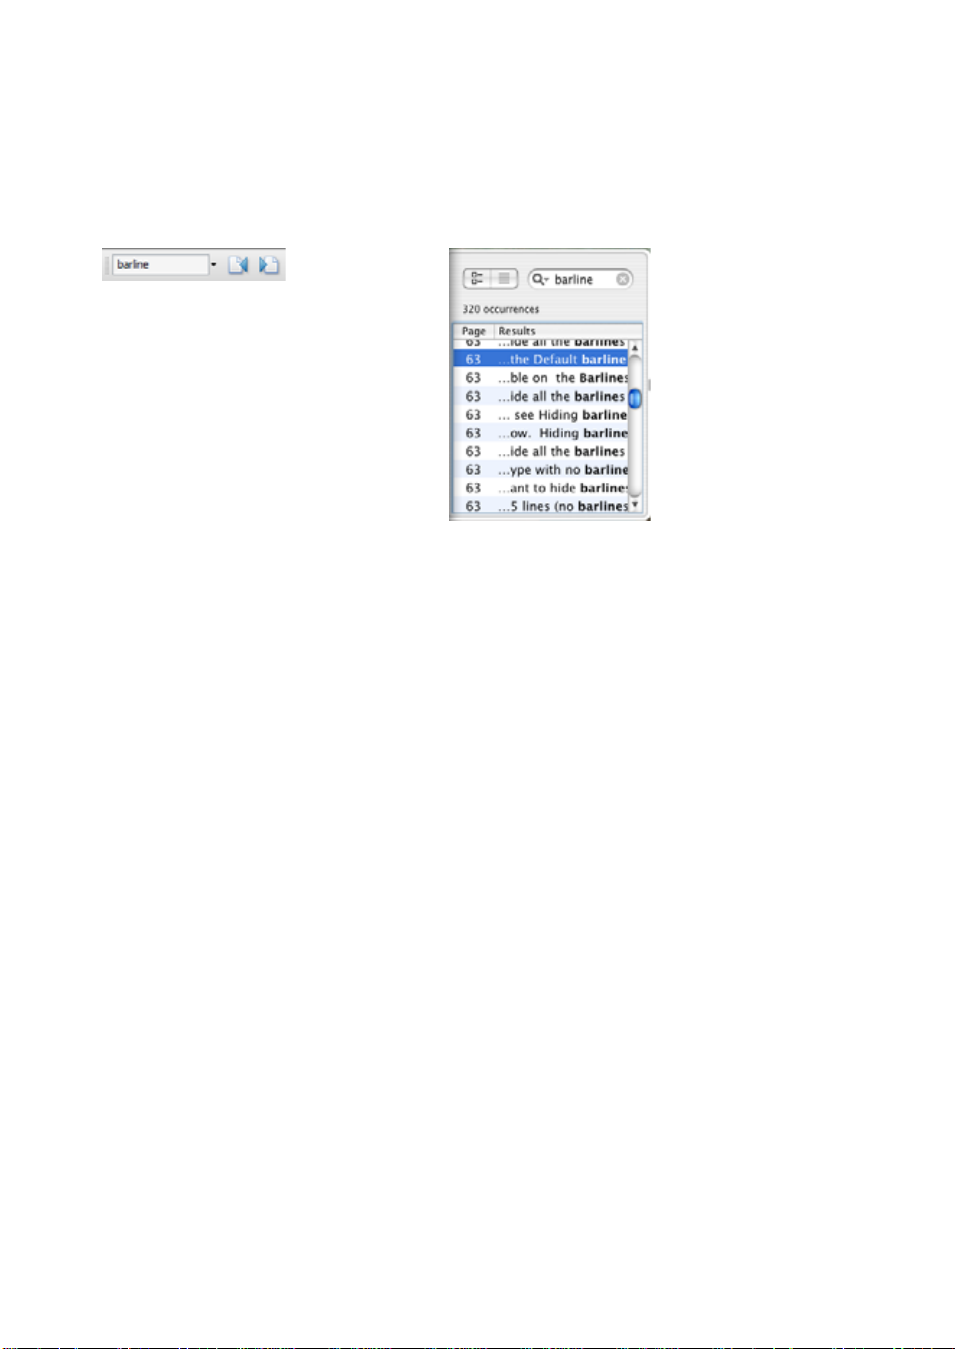
To search within the on-screen Reference, use the Edit
* In Adobe Reader, you can simply type into the Find box on the toolbar shown below left, then
> Find feature, or alternatively:
use the next and previous result buttons to skip forwards and backwards
* In Preview on Mac, you can type into the Search box in the drawer, shown below right, then
click in the list of results to skip forwards and backwards.
Cross-references
b 2.5 Beams means “see the Beams topic within chapter 2 of Reference.”
v Starting a new score means “choose Help> Tut ori al Vi de os and watch the Starting a
new score video.”
Refer to the separate Handbook for details of other typography and terminology used.
6
Page 7

1. Inputting
Inputting
Page 8

1. Inputting
8
Page 9

1.1 Note input
1.1 Note input
b 1.3Flexi-time™, 1.5 Guitar tab input, 2.1 Accidentals, 2.2 Articulations,
2.5 Beams, 2.12 Grace notes, 2.20Noteheads, 2.24Stems and leger lines,
2.28 Tremolos, 2.29 Triplets and other tuplets, 2.30 Voices, 7.8Note spacing.
v Note input, Finding your way around.
There are five ways of creating and editing notes, chords and rests:
* Mouse input – see below
* Alphabetic and step-time input – see below
* Flexi-time input – b 1.3 Flexi-time™
* Importing files from other music programs (e.g. MIDI files, Finale and SCORE files, etc.) –
b 8.5 Opening MIDI files, 8.6 Opening MusicXML files, 8.7 Opening Finale 98-
2003 files, 8.8 Opening SCORE files, 8.9 Opening Acorn Sibelius files, 8.16 ASCII
tab files
* Scanning printed music – b 1.4 Scanning.
Most of these are introduced in the Handbook. This topic is a detailed summary of mouse, step-
time and alphabetic input.
Alphabetic and step-time input
Alphabetic (computer keyboard) and step-time (MIDI keyboard) input are perhaps the most efficient ways of writing your music in Sibelius, because you can create other objects (such as time
signatures, key changes and text) as you go along.
Inputting
To start off alphabetic or step-time input:
* Select a rest (you can also select anything else, such as a text object or a line, which will start
writing notes at that point)
* Choose Notes > Input Notes (shortcut N). This makes the caret (a vertical line, colored accord-
ing to the voice in which you’re inputting) appear.
* Choose a note value from the Keypad (unless the note value you want is already selected)
* If you like, choose other markings on the Keypad:
% Accidentals from the first/fifth layout (not required for step-time input)
% Articulations from the first/fourth layout
% Ties and rhythm dots from the first/second layout (double dots are on the second layout)
% Grace notes and cue notes from the second layout
% Tremolos and beaming from the third layout
* All of these buttons stay pressed down for successive notes until you re-choose them, with the
exception of the accidentals on the first and fifth Keypad layouts. This means you can (say)
input several notes with the same articulation.
9
Page 10

1. Inputting
* You can choose buttons from more than one layout at once – they’ll all be applied to the note/
chord when you input it. (Cycle through the different Keypad layouts using the + key; F8 on
Windows and – on Mac returns you to the first layout.)
* Then input the note by:
% typing A–G or R (which repeats the previous note/chord, with any alterations made on the
Keypad); or
% playing a note/chord on your MIDI keyboard
* To input a rest of the selected note value, simply hit 0 on the F8 Keypad layout. (To continue
creating rests of the same note value, keep hitting 0.)
* To input a complete bar rest, hit 0 on the F9 Keypad layout.
* Go back to the first step to input the next note/chord.
There are some things you can do to the note you have just input and before you create the next,
which are:
* To correct a mistake, you can adjust the pitch of a note you have input afterwards with 3 or 2;
hold down Ctrl or
* To build up a chord using alphabetic input, input one note of the chord, then add further note-
X to change the pitch by an octave
heads using one of these methods:
% hold down Shift and type the letter-name of the pitch you want to add above, so to add a G#,
first type 8 on the first Keypad layout to select the sharp, then type Shift-G to add the note;
or
% type a number 1–9 (from the main keyboard, not the keypad) to add a note of that interval
above the current note, so to add a note a sixth above, type 6; Shift-1–9 adds notes below the
current note, so Shift-4 adds a note a fourth below the current note. (Usefully, this also
works for selected passages, e.g. to create octaves); or
% choose the appropriate option from the Notes> Add Pitch or Notes> Ad d Interval sub-
menus, although it’s much quicker to use the keyboard shortcuts described above
* To add a tie, hit Enter on the numeric keypad after inputting the note
* To create a tupl e t, type Ctrl+2–9 or X2–9 (or choose Create > Tuplet) after inputting the first
note of the tuplet
* To respell a note enharmonically (e.g. from a MIDI keyboard), choose Notes> Respel l Acci-
dental (shortcut Return on the main keyboard) after inputting it.
Useful keys
A number of other useful keypresses are at your fingertips when creating notes:
* If you make a mistake, hit Delete or Backspace, which deletes the note and selects the preced-
ing one.
(What exactly happens when you delete a note is subtly different depending on the context of
your music: if you delete a note, it is converted to a rest of identical duration; if you delete a rest
or a bar rest, the caret moves past it, leaving it unchanged; if you delete all the notes of a tuplet,
the tuplet bracket/number is selected – delete that, and it is replaced with a rest of the duration
of the entire tuplet.)
10
Page 11

1.1 Note input
* You c an als o us e 0/1 to move between notes and rests
* You can swap the selected note(s) into another voice by typing Alt+1/2/3/4 or z1/2/3/4; so
you could select one note of a chord in voice 1 and, say, type Alt+2 or
z2 to move it into voice
2, merging it with any notes that may already be in that voice
* To add a time signature in the course of creating notes, type T and choose it from the dialog,
then hit Return or click OK to create it at the beginning of the next bar
* To add a key change, type K and choose the required key signature from the dialog, then hit
Return or click OK to create it in your score directly after the current note
* To add text, type the usual shortcut (e.g. Ctrl+E or XE for Expression text), then type the
required text; type Esc to go back to creating notes. Text is created at its default position above
or below the staff, at the same horizontal position as the note that was selected before creating
it.
* You can also add any other object from the Create menu during note input. Symbols and chord
diagrams, for example, all appear at their default position above or below the staff at the same
horizontal position as the selected note.
For lines (especially slurs and hairpins), it’s only practical to input ones lasting for two notes
without stopping note input temporarily; this is because the right-hand end of the line needs a
note to attach to, and you typically won’t have entered that note yet. Hence it’s usually easiest to
go back and add lines after inputting a phrase or so of notes.
* Esc terminates note input (the caret disappears).
Inputting
Mouse input
Mouse input is essentially the same as step-time and alphabetic input, except that there should be
nothing selected before you start (hit Esc to deselect):
* Choose Notes > Input Notes (shortcut N); the mouse pointer changes color (typically it goes
dark blue, to denote voice 1)
* Choose a note value from the first Keypad layout; you can also choose accidentals, articulations
etc. from other Keypad layouts (see above). To create a rest, choose the rest button from the
first layout.
* As you move the pointer over the score, a gray shadow note appears, to show where the note will
be created when you click. As you move the pointer vertically over the staff, leger lines are
drawn as necessary; as you move horizontally through the bar, the shadow note snaps to the dif-
ferent beats of the bar (this behavior is configurable – see Note input options below). Use-
fully, the shadow note also shows the notehead type of the note you’re about to create.
* To input the note, simply click where you want to create it
* A caret (a vertical line) appears in the score to the right of the note you just created – if you like,
you could now start creating notes in step-time or using alphabetic input, but to continue adding notes with the mouse, simply continue clicking in the score to create more notes, changing
the note value and other properties of the note on the Keypad when necessary. To build up a
chord, simply click above or below the note you just created. If you create a note elsewhere in
the bar, then go back and click above or below an existing note to try and make a chord, Sibelius
will delete whatever was there before and create a new note at that position.
11
Page 12

1. Inputting
* If you input a long note at the start of a bar, and then add a note later in the bar, before the end
of the long note at the start of the bar, Sibelius will replace the first note with rests by default,
but can alternatively create the new note in voice 2 if you prefer – switch on Use voice 2 when
rhythms conflict on the Mouse page of File
* To input a rest, click the rest button (or type 0) on the first Keypad layout, then click in the
> Preferences (in the Sibelius menu on Mac)
score
* You don’t have to input strictly from left to right with mouse input – you can hop about the
score and click to input notes anywhere.
Re-inputting pitches
It’s often very useful to be able to change the pitches of a sequence of notes/chords without re-creating their rhythm. The main use of this is where you’re writing for several instruments that have
the same rhythm but different pitches – you can just copy one instrument’s music across, and
then re-input the pitches. You can change the pitch of individual notes using the mouse or the
2 keys, or letters A-G, or by playing a note on your MIDI keyboard, but if you want to re-input a
whole passage:
* Select a note from which you want to start re-inputting pitches (either with the mouse, or by
reaching it with the arrow keys)
* Choose Notes> Re-input Pitches (shortcut Ctrl+Shift+I or xXI)
* A dotted caret appears (rather than the normal solid line), which tells you that Sibelius will
overwrite the existing pitches, but not their rhythms
* Ty pe A–G, or play the new note (or chord) on your MIDI keyboard
* Sibelius changes the pitch of the first note, then selects the next note (skipping over any rests
and grace notes that may precede it) so you can change its pitch right away
* If you need to change the enharmonic spelling of a note after you have changed its pitch, just
choose Notes
* When re-inputting pitches using the computer keyboard you must type any accidentals and
articulations after the note-name, not before (unlike when inputting notes or editing individual
notes)
* If you don’t want to change a particular note, hit 0 on the keypad to move onto the next one
* To turn an existing note into a rest, hit 1 to select it without changing its pitch, then hit 0 on the
first Keypad layout (shortcut F8)
* To turn an existing rest into a note, use 0/1 to move onto the rest, then input the pitch you
want
* When you have finished, choose Notes > Re-input Pitches again, or hit Esc to return to editing
your music, or type N to start inputting more notes.
> Respell Accidental (shortcut Return on the main keyboard) to respell it
3/
While re-inputting pitches you can also build chords from existing notes in just the same way as
when inputting notes: select a note and either type Shift-A–G, or type 1–9 or Shift-1–9 on the
main keyboard – see Alphabetic and step-time input above.
Editing note values, accidentals, articulations, etc.
* Select a note, chord or rest (either with the mouse, or by reaching it with the arrow keys)
12
Page 13
1.1 Note input
* To change the note value, just choose the new note value on the first or second Keypad layout.
If the new note value is longer than the old one, subsequent notes will be replaced by appropriate rests; if the new note value is shorter than the old one, rests are created to pad out the original note value.
* To change other note properties, such as accidentals or articulations, just choose the appropri-
ate Keypad button, and it will instantly edit the note (e.g. click # or type 8 to make a note
sharp).
Notes
> Respell Accidental (shortcut Return on the main keyboard) respells an accidental –
only normally required after step-time/Flexi-time input or when editing a MIDI file you’ve
imported.
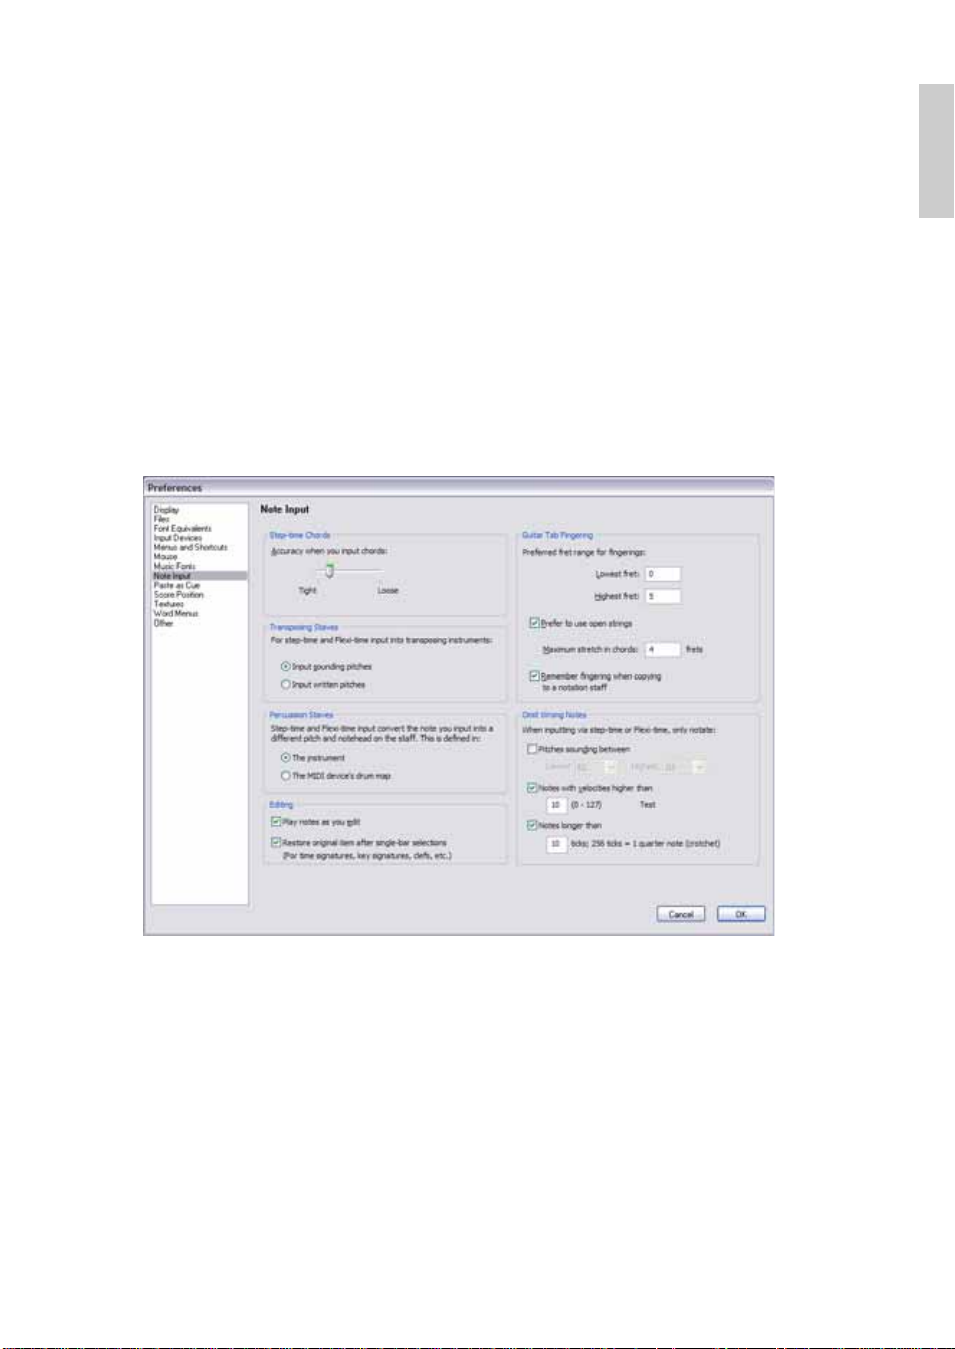
Note input options
The Note Input page of the File > Preferences dialog (in the Sibelius menu on Mac) has various
note input options:
Inputting
* Step-time Chords: this setting is for step-time input, especially via MIDI guitar, and deter-
mines how quickly or slowly you have to strum in order for Sibelius to interpret the notes you
play as a chord rather than a series of individual notes. By default the slider is set quite a long
way towards Tight, which is an appropriate setting for inputting via MIDI keyboard (where
typically chords are not particularly spread), so if you use a MIDI guitar, you should try setting
the slider further towards Loose to find the optimal position for your playing style.
* Tr a n sp o sing Staves : when using MIDI to play in music written at transposed pitch, it’s useful
to set this option to Input written pitches so you won’t have to transpose at sight; the default
is Input sounding pitches – see Transposing instruments on page 111
13
Page 14

1. Inputting
* Percussion Staves: you can input notes onto drum staves with your MIDI keyboard using
either the actual keys on your keyboard that produce the correct sound, or using the pitches
defined in the instrument definition of the chosen staff –
* The two Editing options allow you to choose whether or not Sibelius should Play notes as you
b 2.21Percussion
edit (e.g. when you input, select or edit notes), and whether or not Sibelius should Restore
original item after single-bar selections. If this option is switched off, Sibelius will only
restore the original time signature, key signature or clef at the end of a selection if it is longer
than one bar.
* For details of the guitar tab fingering options, b 1.5 Guitar tab input.
* Omit Wrong Notes: these options allow you to prevent Sibelius from notating very short, or
very high or low, or very quiet notes when inputting from a MIDI keyboard or MIDI guitar:
% Pitches between x and y: this option is switched off by default (because it would be an
inappropriate setting for other MIDI input devices, such as keyboards), but if you are inputting using a MIDI guitar, you may want to switch this option on and adjust the lower and
upper notes you actually intend to be notated. Notes outside this range are ignored.
% Notes with velocities higher than x: to avoid any very quiet notes being notated uninten-
tionally, adjust the minimum velocity. Try playing notes as softly as you can on your guitar;
when the note has a high enough velocity to pass the threshold, the little black indicator in
the dialog will light up. Set this number such that the softest note you are likely to play will be
notated.
% Notes longer than x ticks: to avoid very short notes being notated unintentionally, adjust
the minimum length. 256 ticks = 1 quarter note (crotchet), so the default value of 10 ticks is
a little shorter than a 64th note (hemidemisemiquaver). If this seems to you like the kind of
note value you never think you’d write, set this value to be higher.
Hiding notes
You may want to hide notes that nonetheless play back, e.g. a realization of an ornament. Select
the note(s) you want to hide and choose Edit
xXH). Any accidental, articulation, stem or beam associated with that note is also automatically
hidden. For more information on hiding notes,
> Hide or Show > Hide (shortcut Ctrl+Shift+H or
b 5.6Hiding objects.
Turning into rests
To turn a note, chord or passage into rests, simply hit Delete, or choose the rest button (shortcut
0) on the first Keypad layout.
The subtle difference between Delete and 0 is that when turning a passage into rests, Delete consolidates the rests (i.e. groups them into conveniently-sized larger rests or bar rests), whereas 0
just turns each note into an individual rest (which is less useful). For more information on bar
rests,
b 2.4Bars and bar rests.
If you end up with one or more bars that contain only rests of various denominations, you can
turn them back into a bar rest by selecting the bar or passage (so it is enclosed in a light blue box)
and hitting Delete.
14
Page 15

1.1 Note input
Moving rests
You can move rests up/down with the mouse or arrow keys, just like notes.
For music in one voice you shouldn’t have to adjust the vertical position of rests, as the position
Sibelius uses is absolutely standard. However, in multiple voices you should adjust the vertical
position as necessary to allow room for the other voice(s). Sibelius automatically displaces rests
up or down a bit when in multiple voices, but feel free to adjust this.
Hidden rests
If you hit Delete when a rest is selected, it becomes hidden; the gap it occupied remains, and the
music in other staves in the system is aligned as if the rest is still there. If View
is switched on (shortcut Ctrl+Alt+H or
zXH), the rest will be visible on the screen in light gray.
You can actually delete a rest altogether, by selecting a hidden rest and hitting Delete again, but
there is usually no good reason to do this.
You shouldn’t hide rests without a good reason, because it makes the length of the bar look incorrect, which can be confusing if you are careless. However, two good reasons for hiding a rest are:
* To make a voice disappear before the end of a bar or appear after the start. If you hide unwanted
rests in (say) voice 2, the music will revert to being in one voice (with stems both up and down)
–
b 2.30Voices.
* In order to replace it with a symbol or a line representing some effect that can’t be indicated
with notes. For instance, you could notate taped sound-effects in a modern score by hiding a
rest of the required length and putting a wiggly line in its place.
> Hidden Objects
Inputting
15
Page 16
1. Inputting
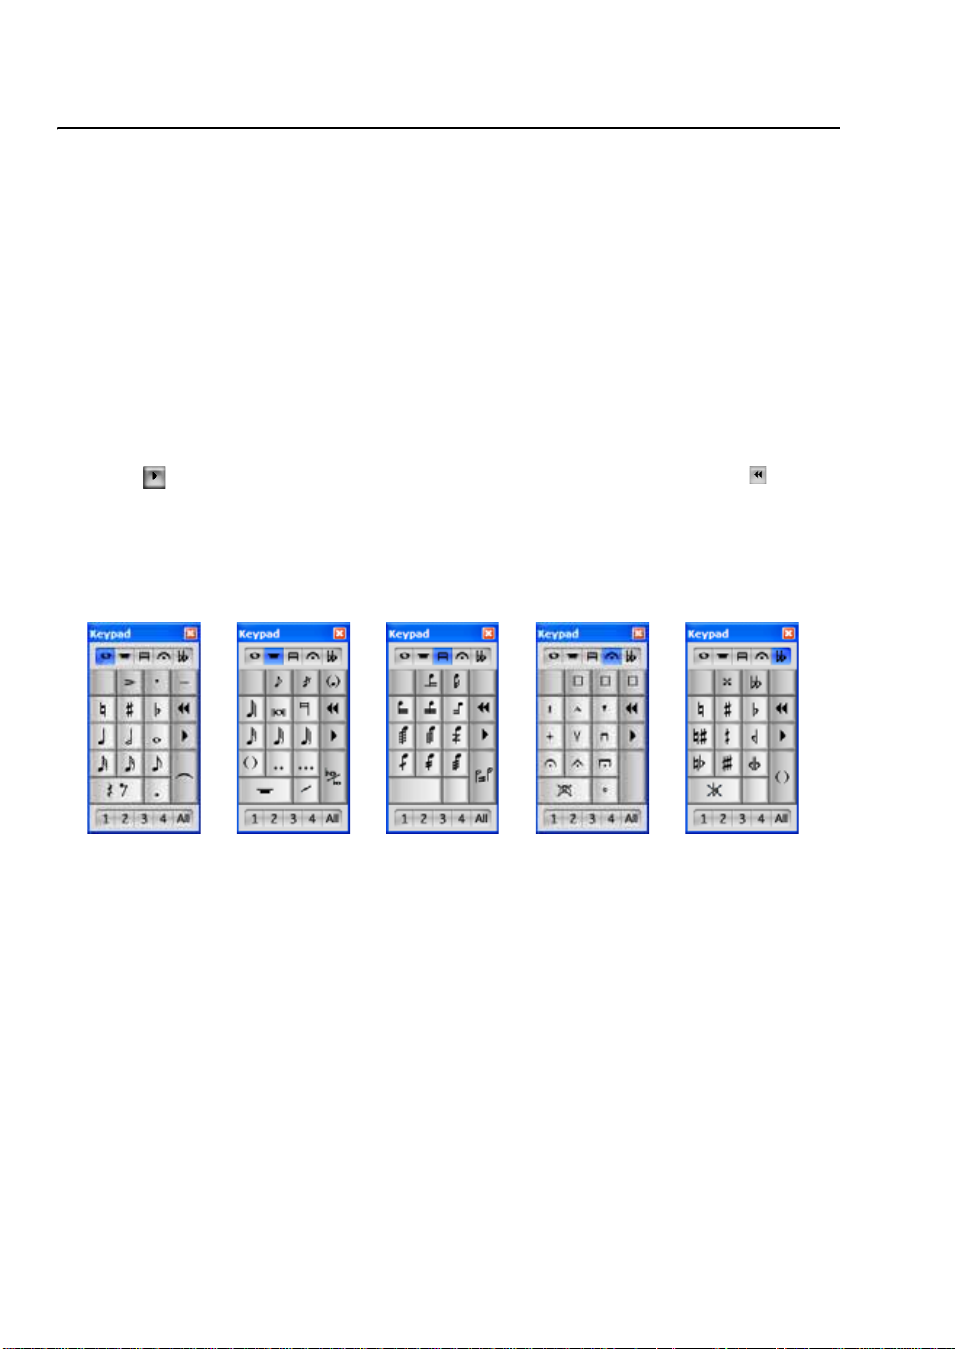
Common notes (F8)More notes (F9) Beams/tremolos (F10) Articulation (F11) Accidentals (F12)
1.2 Keypad
b 1.1Note input, 2.30 Voices, 5.14 Properties.
The Keypad mirrors on the screen the arrangement of keys on your computer’s numeric keypad.
It shows and lets you edit the characteristics of the selected note(s), chord(s) or rest(s), or of the
note you are about to create if you are using alphabetic or step-time input.
To hide or show the Keypad, c h o o s e Window
> Keypad (shortcut Ctrl+Alt+K or zXK).
Keypad la youts
The Keypad has five layouts (see below), which you can switch between as follows:
* click on the tabs at the top of the Keypad; or
* click on the Keypad to cycle through the layouts in order (shortcut +), and click to return
to the first Keypad layout (shortcut F8, also Shift-+ on Windows or – on Mac); or
* type F8–F12 to view the five Keypad layouts.
You’ll spend most of your time working with the first Keypad layout, which contains the common
note values and accidentals, but here are all five layouts, for reference:
* The first two Keypad layouts are concerned with inputting and editing notes; ties (not slurs) are
created using the Enter key on the F8 layout; cue notes are created using the Enter key on the
F9 layout. Note that the dot on the * key (/ on Mac) is a staccato articulation, and the dot on the
. (decimal point) key is a rhythm dot.
* Very short and very long note values, and double and triple rhythm dots, are created on the F9
layout –
* The third Keypad layout (shortcut F10) concerns itself with editing beams (b 2.5 Beams) and
creating tremolos and buzz rolls (
* The fourth Keypad layout (shortcut F11) is for adding articulations; notice the three blank
spaces at the top of the layout, to which you can assign your own on stem articulations –
b 2.2Articulations
* The fifth Keypad layout (shortcut F12) is for adding myriad accidentals – b 2.1Accidentals.
b 1.1Note input
b 2.28Tremolos)
16
Page 17

1.2 Keypad
The 0 key is appropriately used for “non-things” – either rests or for removing all articulations/
accidentals.
Viewing and editing note characteristics
When you select a note, the Keypad shows you the characteristics of the selection. E.g. when you
select a quarter note (crotchet) in your score, the quarter note button on the first Keypad layout
lights up. Likewise, selecting a dotted quarter note rest will make the quarter note, rest and
rhythm dot buttons on the Keypad light up.
To switch a particular Keypad characteristic on or off for the selected object, you can either:
* click the icon with the mouse; or
* hit the corresponding key on your numeric keypad.
If you are, say, looking at the first Keypad layout, and want to change the selected note into a half
note (minim), you could simply type 5 on the numeric keypad. To add a tie, you could hit Enter
on the numeric keypad, and so on. Similarly, to remove a tie, select the note on which the tie
begins and hit Enter. You can add and remove characteristics from any of the Keypad layouts in
this way – so if you wanted to add a fermata (pause) to your half note (minim), you could simply
hit F11 (to reach the fourth Keypad layout), then hit 1 on the numeric keypad to add the fermata.
If a note has characteristics that are not on the currently selected Keypad layout, the tabs for the
relevant Keypad layouts will also be illuminated in blue to show you. For example, if you are looking at the first Keypad layout and select a quarter note that has a quarter-flat and a fermata
(pause), the fourth and fifth Keypad layout tabs will also be illuminated.
Inputting
Voices
The row of buttons at the bottom of the Keypad is for specifying the voice of notes and staffattached text and lines –
b 2.30Voices.
Extra shortcuts for Keypad functions
Though there is a simple and obvious correlation between the items on the on-screen Keypad and
the numeric keypad on your computer keyboard, you can also assign additional keyboard shortcuts to specific items on the Keypad. For example, if you wanted to assign a specific shortcut to the
fermata (pause) on the fourth Keypad layout – so that you do not have to hit F11 (to switch to the
appropriate layout) followed by 1 on the numeric keypad (to add the fermata), but can instead
type a single shortcut regardless of the current Keypad layout – you can do so, as follows:
* Choose File > Preferences (in the Sibelius menu on Mac) and go to the Menus and Shortcuts
page
* Having chosen your own feature set in which to create your new shortcut, choose Keypad (F11
articulations) from the Menu or Category list
* In the Feature list, choose Fermata (pause), then click Add to add your own keyboard short-
cut.
For further help with defining your own keyboard shortcuts,
b 5.9Menus and shortcuts.
17
Page 18
1. Inputting
Accessing numeric keypad functions on a notebook (laptop)
Most notebook (laptop) computers do not have separate numeric keypads. Keypad functions can
be accessed on many notebooks by holding down a key marked Fn together with other keys on the
keyboard. This will work, but Sibelius also has some alternative shortcuts built in, which differ on
Windows and Mac
Windows: use the supplied Notebook (laptop) feature set. Instead of using the numbers on the
keypad, you can use the standard numbers on the main keyboard which will correspond to the
same numbers on the keypad. When this feature set is in use, use Shift-1 to Shift-9 to enter inter-
vals above a note –
b 5.9Menus and shortcuts.
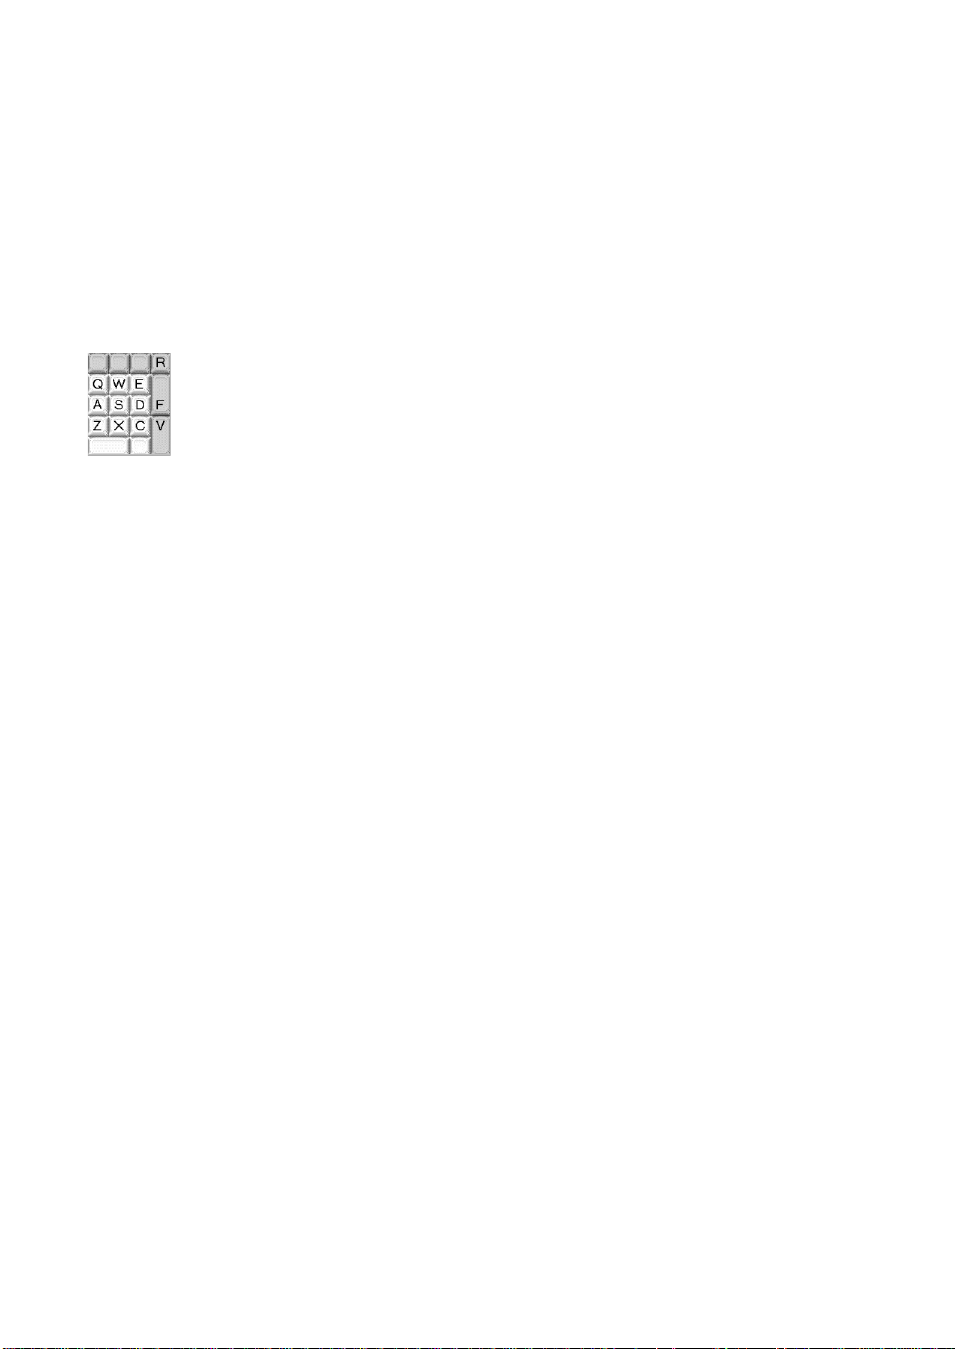
Mac: hold down z in conjunction with the keys shown in the diagram on the left to
produce the corresponding keypad keypresses. Not all Keypad buttons have alterna-
tive shortcuts; for those you will need to use the Fn key (if available), or click the Key-
pad on the screen using your mouse.
Using the Keypad on Mac OS X
By default, Mac OS X assigns the keys F9, F10 and F11 to the Exposé feature, and F12 to the
Dashboard feature, which means that you may get unexpected results when using these shortcuts
to change between different Keypad layouts in Sibelius.
Use the Dashboard and Exposé pane in System Preferences to reassign the Exposé and Dash-
board shortcuts to other function keys (e.g. F2, F3, F4 and F5).
18
Page 19
1.3 Flexi-time™
1.3 Flexi-time™
b 1.1Note input.
v Note input.
Flexi-time is Sibelius’s unique intelligent real-time MIDI input system.
Real-time input
Real-time input on other computer programs is when the program tries to work out both the pitch
and the rhythm of music played on a MIDI keyboard, and turn it into clean notation.
The big problem is rhythm: people never play rhythms quite as notated because of unconscious
rubato (variation in speed), so real-time input can easily end up with notes tied to extra 64thnotes (hemidemisemiquavers) and other ridiculous things.
A standard improvement is produced by quantization: this is where you tell a program to round
all note values to the nearest sixteenth-note (semiquaver), or whatever unit you specify. The trouble is that this only improves the situation for relatively simple music – and if you speed up or slow
down as you play, the computer will get out of time with you in any case and produce garbage.
With Flexi-time, however, Sibelius detects if you’re doing rubato and compensates accordingly. It
quantizes automatically – there’s no need to specify a quantization unit – and uses a smart algorithm that varies the quantization according to context. For instance, when you play short notes,
Sibelius will quantize with a shorter unit than when you play long notes.
Inputting
Even more usefully, thanks to its Live Playback feature, Sibelius separates the printed notation
from the nuances of your recorded performance. This means that playback of music you have
entered in Flexi-time can precisely match what you played – right down to the tiny variations in
the length and dynamic of each note – while the notation will be clear and uncluttered.
Recording with Flexi-time
* Although you can change the time signature after inputting music, we recommend
that you put the correct time signature in first, so that the metronome click indicates
beats correctly
* Click a bar, note or rest from which to start recording, or:
% If you want to record into two adjacent staves (e.g. a piano), select both staves using click then
Shift-click
% If you’re just recording from the start of a score for one instrument, you don’t need to select
anything first as it’s obvious where you’re recording from
* Click the red record button on the Playback window, or choose Notes > Flexi-time (shortcut
Ctrl+Shift+F or
* Sibelius will start ticking a metronome to count you in. It gives you one full bar of clicks (by
default) – wait for this before you start playing!
* You can adjust the recording speed by dragging the tempo slider; the tempo readout on the tool-
bar changes as you drag the slider. (If you want to record more slowly, start recording, adjust the
xXF)
19
Page 20

1. Inputting
tempo slider to the desired point, then hit Space to stop, and start recording again – Sibelius will
remember the tempo you set.)
* Start playing at the keyboard, following the click (at least approximately). As you play, the
music you’re playing will appear in notation on the screen.
If you speed up or slow down, the metronome speeds up or slows down to follow you, as long as
you’re not too violent with the tempo.
* When you’ve finished recording, hit Space to stop.
If you add more music with Flexi-time on a different staff or staves, Sibelius plays back the existing music as you record (“overdubbing”).
If you want to add another melody to the same staff, you can record into one of the other voices –
see Voices below.
Click settings
The settings for the metronome click you hear during Flexi-time recording are controlled via the
Window
from the Click button on the Notes
xXO).
By default, the click marks the first beat of the bar with a high woodblock sound, and then subsequent beats with a low woodblock. In compound time signatures such as 6/8, it also subdivides
the beat into eighth notes (quavers). For complex time signatures such as 7/8, the default behavior
is to emphasize the beginning of each beat group.
> Mixer window (shortcut Ctrl+Alt+M or M on Mac), or you can access some of them
> Flexi-time Options dialog (shortcut Ctrl+Shift+O or
For more information on these settings,
b 4.3Mixer.
Hints
* Listen to Sibelius’s countdown beats, and start in time with them! If you start too soon, or at a
different tempo from the countdown, Sibelius will not understand what you’re up to.
* If you have difficulty recording two staves of music at once, try recording them one at a time.
* Play legato (smoothly).
* If you want music to be notated with staccatos, make sure the Staccato option is switched on
in Notes
short note values with rests.
* People are often sloppy about placing notes simultaneously when playing a chord. If you spread
chords significantly, Sibelius will write out what you played literally rather than (say) adding a
vertical wiggly line.
* Sibelius can pick up changes of tempo extremely quickly – one beat faster than a human can, in
fact! However, if you make too violent a change of tempo Sibelius won’t understand what you
mean. So avoid making sudden tempo changes during recording.
If Sibelius’s beat gets out with you as you’re playing, stop and go back to the point where it got
out. If you just blunder on regardless, Sibelius may well get back in time again, but correcting
the rhythm will take far longer than just playing it in again.
> Flexi-Time Options. If this option is switched off then playing staccato will produce
20
Page 21
1.3 Flexi-time™
* If you find that Flexi-time produces complicated notation and you want to simplify it, try the
plug-ins in the Plug-ins
b 5.11Plug-ins.
> Simplify Notation folder, especially Renotate Performance –
Inputting into two instruments
You can input into two staves of different instruments if you like – such as Flute and Bassoon – so
long as they’re adjacent (and there are no staves in between that have merely been hidden from
the system in question). Just like inputting into a piano, click the upper staff, then Shift-click the
lower staff so both are selected, and start recording as normal.
Recording other MIDI data
When recording via Flexi-time, Sibelius records MIDI controller data along with the notes. For
example, if you use a sustain pedal when inputting via Flexi-time, Sibelius will notate the appropriate MIDI messages and automatically hide them in the score. Other MIDI controller data that
can be recorded include pitch bend, modulation, volume, etc.
If you would prefer these MIDI messages not to be recorded when using Flexi-time input, switch
off the appropriate options on the Notation page of the Notes
> Flexi-time Options dialog – see
Flexi-time options below.
Live Playback
By default, Sibelius plays back music you have inputted using Flexi-time using Live Playback,
which retains the nuances of your recording (specifically, the precise dynamic and timing of each
note). You can also edit this performance in complete detail. If you want to hear the music exactly
as it is notated instead, switch off Play
> Live Playback (shortcut Shift-L).
Inputting
For more information, b 4.7 Live Playback.
Flexi-time options
To change the various Flexi-time options, choose Notes> Flexi-time Options (shortcut
Ctrl+Shift+O or
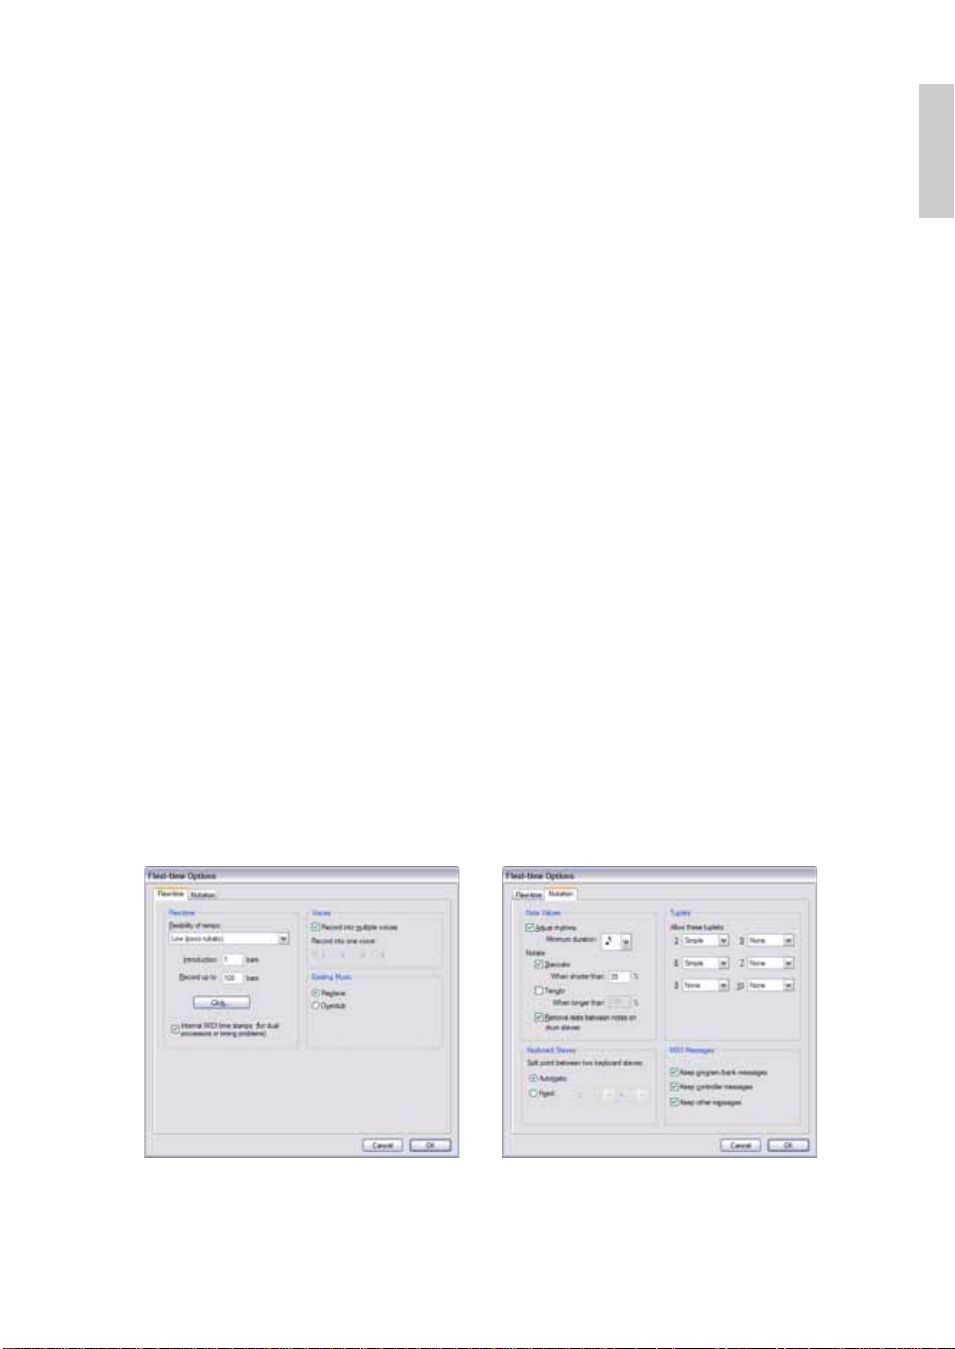
On the Flexi-time tab are the following options:
* Flexibility of tempo: controls how Sibelius follows your speed. If you’re used to playing to a
click, set this to None (non rubato), and Sibelius will keep a fixed tempo. The higher you set
xXO):
21
Page 22

1. Inputting
the flexibility, the more Sibelius is inclined to follow your tempo. If you find Sibelius seems to
be changing tempo oddly, it’s finding you hard to follow, so reduce the flexibility or set it to
None (non rubato).
* Introduction ... bars: determines how many bars introduction will be played when you start
recording
* Record up to ... bars: if there aren’t many bars left in the score for you to record into, this auto-
matically adds enough bars when you start recording
* The Click button takes you directly to the dialog that determines the behavior of the metro-
nome click during recording –
* Voices options:
% Record into one voice allows you to specify a single voice to use for your Flexi-time record-
b 4.3Mixer.
ing
% Record into multiple voices is an alternative to specifying a single voice: when switched
on, Sibelius will automatically split the music into two voices where appropriate; see Voices
below.
* Replace and Overdub control what Sibelius does if you record over a passage that already con-
tains music: if set to Replace, Sibelius will clear the existing music before notating the new
music you play; if set to Overdub, Sibelius will add the new music you record to the existing
music to make chords.
* Internal MIDI time stamps: if you have a computer with dual processors or a hyper-threading
processor, you may find that the rhythm of the notated music becomes increasingly inaccurate
as recording continues. If you encounter this problem, switch on this option (Windows only).
On the Notation tab are these options:
* Note Values options:
% Adjust rhythms makes Sibelius clean up what you’re playing. Leave this on!
% Minimum note value: this sets the shortest note value Sibelius will write. This is not a
quantization unit – Sibelius quantizes using a complex algorithm that varies with context. As
a consequence, this value isn’t enforced rigidly; it acts as a guide. If you set this to (say) quarter note (crotchet) but then play 16th notes (semiquavers), Sibelius has to notate notes
shorter than quarter notes, or you’ll end up with junk.
% Notate: these are options to notate staccato and tenuto; if you are confident of playing the
articulation exactly as you want it to be notated, switch these on. If you find lots of spurious
staccato or tenuto articulations in your score after inputting with Flexi-time, switch them off,
or adjust the When shorter/longer than thresholds (representing the percentage of the
notated note value) beyond which these articulations are notated.
% Remove rests between notes on drum staves: switched on by default. this option “joins
up” shorter notes to remove superfluous rests in drum parts.
* Keybo ard St aves: when inputting onto two staves, the split point determines which notes go
into each staff (notes on or above the split point go into the top staff, and notes below go into
the bottom staff). If you choose Automatic, Sibelius will guess where your hands are on the
keyboard at any time and assign notes to staves accordingly. Alternatively, you can specify your
22
Page 23

1.3 Flexi-time™
own Fixed split point. (Note that in Sibelius, middle C is called C4 – which may be different
from how it is described in other music programs.)
* Tuplets: for each of the tuplets listed, you can set Sibelius to detect None/Simple/Moderate/
Complex ones. A “simple” triplet (say) means one with three equal notes. For tuplets such as a
quarter note (crotchet) followed by an eighth note (quaver), use Moderate, and for tuplets with
rests or dotted rhythms, use Complex.
* MIDI Messages options:
% Keep program/bank messages adds any program and bank changes to the score using
Sibelius’s MIDI message text format. These messages are automatically hidden.
% Keep controller messages similarly adds all controller messages (such as pitch bend, sus-
tain pedal, channel volume, etc.) and hides them in the score.
% Keep other messages similarly adds any other MIDI messages to the score.
Our recommended Flexi-time options are the default values, as follows: Adjust rhythms on,
Minimum note value sixteenth-note (semiquaver), Flexibility of tempo set to Low, Staccato
and Tenuto on with thresholds of 35% and 110% respectively. For tuplets, set 3 to Simple or
Moderate, maybe 6 as well, and the others to None unless you’re into playing things like septu-
plets.
Recording transposing pitch
In the Note Input page of File > Preferences (in the Sibelius menu on Mac), switch on the Input
written pitches option if you’re recording by playing the written notes from a transposing score;
otherwise, Sibelius assumes you’re playing notes at sounding pitch.
Inputting
Spelling of accidentals
As with step-time input, Sibelius guesses how you want to “spell” black notes (e.g. as F# or Gb), but
you can alter the spelling of any note or selection of notes afterwards just by hitting Return (on
the main keyboard), or by using one of the accidental plug-ins (
b 5.11Plug-ins).
Voices
As you record, by default Sibelius splits the notes into two voices if necessary (e.g. if you play polyphonic music such as a fugue). In most cases this is desirable, but if you are inputting onto a single
staff or monophonic instrument you may prefer to force Sibelius to notate the music in a single
voice or a specified voice. You can change this setting in the Notes
(see above).
Although Sibelius generally makes good decisions about how to split the music you play into separate voices, you may need to go back and edit certain passages to make the notation more closely
fit your intentions. You could, for example, filter out the bottom note in voice 1 chords
(
b 5.4Filters and Find) and then, say, swap them into voice 2 by typing Alt+2 or z2 – see
Splitting voices in
b 2.30Voices for more details.
> Flexi-time Options dialog
23
Page 24

1. Inputting
1.4 Scanning
INTRODUCTION
PhotoScore Lite from Neuratron is a music scanning program designed to work with Sibelius –
the musical equivalent of a text OCR (optical character recognition) program.
It is a sophisticated program with many advanced features. If you intend to scan relatively complex scores such as orchestral/band music, or scores of many pages, we strongly recommend that
you start with more simple music until you are proficient with PhotoScore Lite, and then familiar-
ize yourself with the ADVANCED FEATURES section.
On-screen help
In addition to this topic, PhotoScore Lite has its own on-screen help: to access it, choose Help >
Neuratron PhotoScore Help (shortcut F1) from PhotoScore Lite’s menus.
PhotoScore Ultimate
An advanced version of PhotoScore Lite, called PhotoScore Ultimate, is available to buy separately,
with extra features and enhancements. PhotoScore Ultimate reads many more musical markings
(including tuplets, slurs, grace notes, cross-staff beaming, guitar tab, chord diagrams, repeat barlines etc.) and reads scores with more than 12 staves.
For details of PhotoScore Ultimate, choose Help
dealer or Sibelius.
> PhotoScore Ultimate, or contact your local
Scanning
Scanning text is difficult for computers to do, and has only achieved reasonable accuracy in the
last few years. Music scanning is much harder because of the more complicated range of symbols
involved, and because of the complex two-dimensional “grammar” of music.
The difficulty with scanning music or text is that by scanning a page, a computer does not “understand” it. As far as the computer is concerned, scanning a page merely presents it with a grid of
millions of black and white dots, which could be music, text, a photograph or anything else.
The process of actually reading or interpreting music, text or pictures from this grid of dots is
extremely complex and poorly understood. A large part of the human brain, containing many
millions of connections, is devoted solely to solving this “pattern recognition” problem.
Installing and uninstalling PhotoScore Lite
Refer to the separate Handbook for help with installing and uninstalling PhotoScore Lite.
Suitable originals
PhotoScore Lite is designed to read originals that:
* Are printed rather than handwritten (and use notes with an “engraved” appearance rather than
a “handwritten” appearance, e.g. from a fake book)
* Fit on your scanner (i.e. the music itself is typically no larger than Letter/A4 size, though the
paper may be slightly larger)
24
Page 25

1.4 Scanning
* Have a staff-size of at least 0.12”/3mm
* Use no more than 12 staves per page, and 2 voices per staff. (Additional staves or voices will be
omitted.)
* Are reasonably clear – for example, staff lines should be continuous and not broken or blotchy,
half note (minim) and whole-note (semibreve) noteheads and flats should have a continuous
circumference and not be broken or filled in, beams on sixteenth notes (semiquavers) and
shorter notes should have a significant white gap in between, and objects that are meant to be
separate (e.g. noteheads and their preceding accidentals) should not overlap or be blotched
together.
Music that does not match the above will probably work, but with considerably reduced accuracy.
Scanning from photocopies is not particularly recommended unless the photocopier is a particularly good one, as photocopying tends to degrade the quality of an original significantly. You may
be obliged to scan from a reduced photocopy if your original is bigger than your scanner, but you
should expect lower accuracy.
Using PhotoScore Lite without a scanner
In addition to reading music that you scan yourself using a scanner, it is possible to “read” music
without using a scanner, either by opening individual pages that you have saved as graphics files,
or by opening PDF files.
To work with graphics files, you will need each page of music stored as a separate graphics file on
your computer in .bmp (bitmap) format on Windows, or TIFF and PICT (Picture file) format on
Mac. (PhotoScore UltimatePhotoScore Ultimate can also open PDF files.)
Inputting
PhotoScore Lite can also read PDF files. Reading a PDF file may be useful if the music you want to
scan is available in PDF format from a web site, or if you want to convert a file from another music
program by producing a PDF file and then opening it in PhotoScore Lite.
Before you decide upon using PDF files as the way of converting files from another music program, check that the program doesn’t export a file format that Sibelius can read directly, e.g.
MusicXML, as this would be preferable to using PDF files.
On Windows, PhotoScore Lite requires that you have Ghostscript installed in order to open PDF
files. If you didn’t install Ghostscript when you initially installed PhotoScore Lite, you can down-
load it free from www.ghostscript.com.
Copyright music
You should be aware that if you scan someone else’s music without permission you are likely to
infringe copyright. Copyright infringement by scanning is illegal, and in any case is forbidden by
the Sibelius license agreement.
Most music states if it is copyright and who the copyright owner is. If you have a piece of music
that you want to scan and you are not sure about its copyright status, please contact the music’s
publisher, composer or arranger.
25
Page 26

1. Inputting
GETTING GOING
Like Sibelius, PhotoScore Lite functions in exactly the same way on Windows and Mac. You can
start PhotoScore Lite either by choosing File
> Scan in Sibelius’s menus, clicking the Scan icon on
the Sibelius toolbar, or by running it from the Start menu (Windows) or double-clicking its icon
(Mac). Sibelius doesn’t need to be running when you use PhotoScore Lite.
The four stages
There are four stages when using PhotoScore Lite:
* Scanning the pages or opening a PDF file. When you scan a page, PhotoScore Lite takes a “photo-
graph” of your original. Similarly, when you open a PDF file, PhotoScore Lite takes a “photograph” of it, so that it can read it in the next step.
* Reading the pages. This is the clever bit, where PhotoScore Lite “reads” the scanned pages to
work out what the notes and other markings are.
* Editing the resulting music. Here you correct any mistakes that PhotoScore Lite has made. Edit-
ing within PhotoScore Lite works in much the same way as editing music in Sibelius. Almost
any marking can be corrected or input in PhotoScore Lite, but it is only essential at this stage to
correct rhythmic mistakes – other corrections can be made after sending the score to Sibelius if
you prefer.
* Sending the music to Sibelius. This is done simply by clicking on a button. After a moment the
music pops up as a Sibelius score just as if you’d inputted it all yourself.
You can then play the music back, re-arrange it, transpose it, create parts, or print it out.
Quick start
Before we examine how to use PhotoScore Lite in detail, let’s run through the process quickly to
introduce the four stages.
The first step is either to scan some music, or to open a page you have already scanned, or to open
a PDF file:
* To scan a page, choose File > Scan pages (shortcut Ctrl+W or XW); your scanner interface will
load. Scan a page and it is added to PhotoScore’s list of scanned pages.
* To open a graphics file, choose File > Open; when prompted for the resolution the image was
scanned at, choose the appropriate setting and click OK. The graphics file is then added to the
list of scanned pages.
* To open a PDF fil e , c h o o s e File > Open PDFs. You will be prompted to choose the resolution;
normally you can leave this at the default of 300 dpi and click OK. If the PDF is password pro-
tected, you will then be prompted to provide the password.
As soon as you scan a page or open a PDF or graphics file, each page appears in the Pages pane,
which is at the left hand of the main PhotoScore Lite window. Each page first appears under
Pending Pages, and PhotoScore Lite immediately proceeds to read the pages you have added,
Reading each page will take a little while (depending on the speed of your computer) and a green
progress bar fills up behind the name of the page in the Pendi ng Pages list. As PhotoScore Lite
completes reading each page, it moves to the list below, Read Pages.
26
Page 27
1.4 Scanning
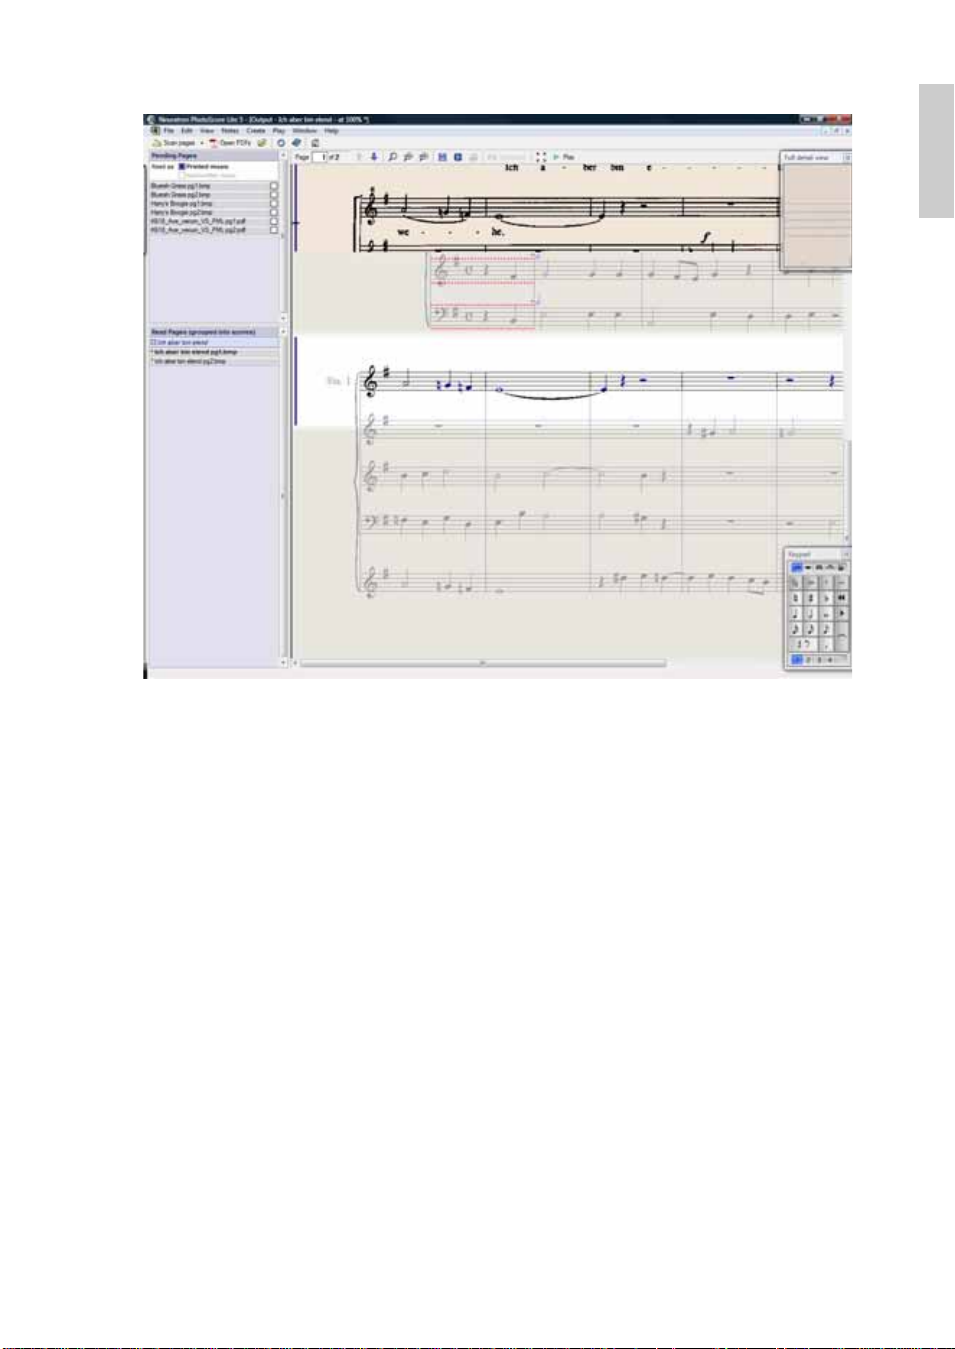
When PhotoScore Lite has finished reading the pages, the main editing window will appear:
Inputting
From this window you can edit any errors in the music.
When you are satisfied with the corrections you have made, choose File
(shortcut Ctrl+D or
XD) to send the music to Sibelius.
> Send to > Sibelius
If Sibelius is not already running, it will start up, and the Open PhotoScore File dialog will
appear, which allows you to choose various options concerning which instruments will be used in
the Sibelius score. Don’t worry about these now – just click OK. Moments later, the Sibelius score
will appear, ready for editing, just as if you had inputted it yourself.
1. SCANNING OR OPENING A PDF
Before you scan, choose File > Scanner Setup to choose whether you want to use PhotoScore’s
own scanning interface – in which case choose PhotoScore – or your scanner’s own interface – in
which case choose TWAIN (scanner default) – and click OK. By default, PhotoScore Lite will use
your scanner’s own interface, which is fine, since you are presumably familiar with the way your
scanner’s software works.
Next, measure the size (height) of staves in the page you want to scan and choose a resolution
using the following table, and scan in black & white or gray – not color:
Staff size Resolution
0.25”/6mm or more 200 dpi
0.15-0.25”/4–6mm 300 dpi
0.12-0.15”/3–4mm 400 dpi
27
Page 28

1. Inputting
Reading accuracy and speed will be considerably reduced if you scan at too low or too high a resolution. So, for example, do not scan at 400 dpi unless the staves really are small.
Usually, you can choose whether to scan in black & white or grayscale (shades of gray). Scanning
in gray produce significantly more accurate results – if the option is not available in your scanning
dialog, consult your scanner’s documentation.
Now you can scan your first page – try a page or two of simple keyboard music or something similar:
* Put the page of music (the “original”) into your scanner, face-down and with the top of the page
pointing away from you.
Put one edge of the original flush against the raised edge of the glass.
You can put the page on its side if it fits better. PhotoScore Lite will automatically rotate the
page by 90 degrees if necessary. However you should normally align the top of the page with the
left edge of the scanner to ensure it does not turn out upside down. Don’t worry though if it is
scanned upside down, as it is easy to correct later on.
If you are scanning in gray, then the page does not need to be completely straight, providing
that it is not more than 8 degrees off – PhotoScore Lite will automatically make the page level
(to within 0.1 degrees) without loss of detail. It will still be rotated if scanning in black & white,
but there will be loss of detail, and thus less accurate results.
* Choose File > Scan Pages, or click the Scan Pages button on PhotoScore Lite’s toolbar.
* After a moment, the scanner will whir into life and transfer the page to your computer. (If this
doesn’t happen, see POSSIBLE PROBLEMS below.)
* If you are scanning from a fairly thick book, gently press down the lid (or the book if easier)
during scanning to keep the page flat on the glass.
* A window will appear for you to enter a name for the page, which will be something like Score
1, Page 1 by default. You can change this to any name you like (although to avoid any unex-
pected results it should end with a number) – something like Piano p1 would do – then click
OK. Subsequent pages you scan will be automatically numbered e.g. Piano p2, and a dialog will
not appear.
* Wait a few seconds while PhotoScore Lite makes the image level, chooses the best brightness,
and locates the staves.
* PhotoScore will now be ready to scan the next page, so put the page of music in the scanner,
then click the button that tells your scanner to start scanning again, and proceed as for the first
page. If the scanning interface does not reappear, simply click the Scan Pages button again.
* Continue until you have scanned all the pages that you want to scan.
* A scan of the first page will then appear. The buff paper color indicates that you are looking at a
scanned image (a “scan”) of the original page.
Check that all the staves are highlighted in blue – this shows that PhotoScore Lite has detected
where they are.
If the page has systems of two or more staves, check also that the staves within each system are
joined at the left-hand end by a thick vertical (or near-vertical) red line.
28
Page 29

1.4 Scanning
If not all staves are blue, or not all staves within systems are joined with a red line, you can man-
ually tell PhotoScore Lite where they are (see ADVANCED FEATURES below).
(Ignore the other buttons at the top of this window, which are also explained in ADVANCED
FEATURES below.)
Scanning summarized
Once you’ve scanned a few pages you’ll rapidly get into the routine of it. The procedure can be
summarized as follows:
* Place page in scanner
* Click the scanner button or choose File > Scan Pa ges
* Choose the resolution, and whether to scan in black & white or gray
* Click Scan
* If it’s the first page, enter a name for the page (or leave the default name)
* Go on to next page.
Catalog of scanned pages
It’s important for you to understand that whenever you scan a page, PhotoScore Lite adds it to a
single list or “catalog” of scanned pages to be read later. You do not need to save scanned pages or
the catalog – it is stored on your hard disk automatically.
This means that whenever you start using PhotoScore, it still remembers any pages you scanned
previously. (You can delete pages that you no longer need to keep.)
Inputting
We’ll tell you more about the catalog later.
Hints on scanning
* If you want to read a page of music smaller than the size of your scanner, you should make sure
that only that portion is scanned.
Most scanner interfaces allow you to scan part of a page, usually by clicking a Preview button to
produce a thumbnail image, which may seem a little “blocky.” You can then adjust the required
area by dragging from the edges of the thumbnail.
Then click Scan to scan the selected area at high resolution. Every time you click Scan after
this, only the selected area will be scanned, until you change it.
* Ensure that all of the music on the page you are scanning is on the glass of the scanner.
It doesn’t matter if your original is larger than Letter/A4, so long as the music itself will fit onto
Letter/A4.
* If you are scanning a page that is smaller than Letter/A4 size, it doesn’t matter where on the
glass you position the original. However, it helps if you put the edge of the page flush against the
edge of the glass, to ensure that it’s straight.
* If you are scanning a small music book then you may be able to fit a double-page spread (two
facing pages side-by-side) on the scanner glass, but don’t try this – PhotoScore Lite can only
read one page at a time. Scan each page separately.
* For simplicity, we recommend that you scan all the pages in a piece of music before reading
them all. You are allowed to scan a page, then read it, then scan another and so on (see
29
Page 30
1. Inputting
ADVANCED FEATURES below), but we don’t suggest you try anything like this until you are
proficient with PhotoScore Lite.
2. READING
As mentioned earlier, just scanning a page simply presents the computer with a grid of millions of
black and white dots, which as far as it’s concerned could be anything from text to a photograph.
“Reading” the music is the clever bit, where PhotoScore Lite works out from the scan where and
what the notes and other markings on the page are.
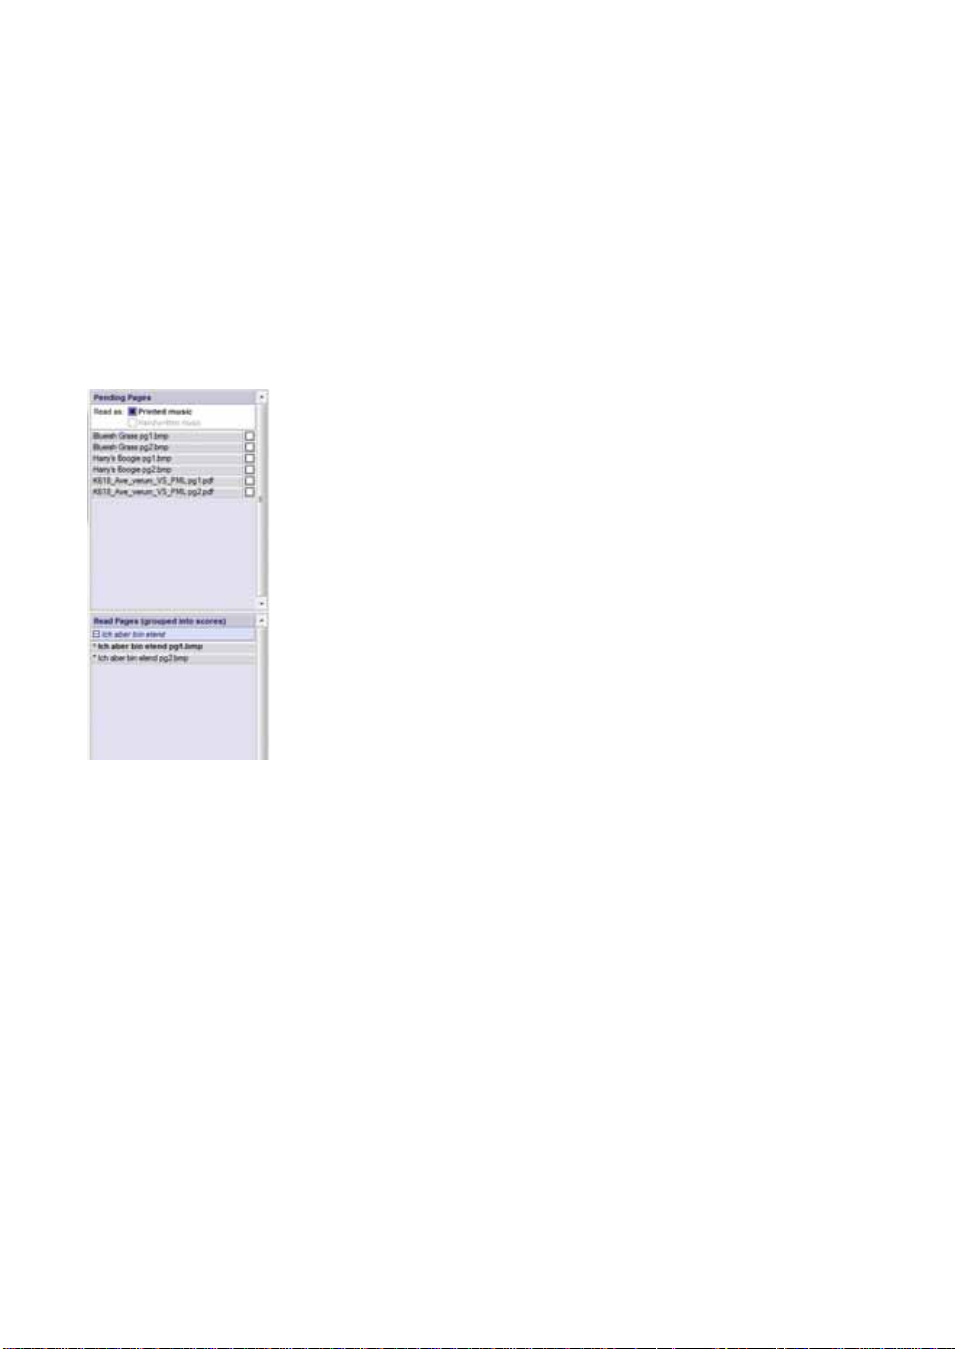
Pages Pane
On the left-hand side of the PhotoScore Lite window you should see the
pages pane, as shown here. If you can’t see this, choose View
Pages Pane.
Pages that have not yet been read appear in the upper half of the pages
pane, under the heading Pending Pages. Notice how PhotoScore Lite
helpfully shows you a thumbnail of the scanned page as you hover your
mouse pointer over its name.
When you want to read a page you have scanned, click the little check-
box at the right-hand side, which expands to say Read when you hover
your mouse pointer over it. PhotoScore Lite will start to think, and the
blue bar behind the name of the page will turn green as PhotoScore
reads the page.
> Toggle
If you accidentally scanned the pages in the wrong order, you can cor-
rect the order in the list of Pendin g Page s simply by clicking and drag-
ging the pages into the correct order.
If you just scanned in some pages or opened a PDF, however, your pages have probably already
been read by PhotoScore Lite, and so will be found in the lower half of the pages pane, under the
heading Read Page s . The pages are automatically grouped into scores; you can show and hide the
individual pages in each score by clicking the + or – button at the left-hand side. To view a page in
order to edit it, click on its name under Read Pages.
What PhotoScore Lite reads
PhotoScore Lite reads the following musical markings:
* Notes & chords (including tail direction, beams & flags), rests
* Flats, sharps and naturals
* Treble and bass clefs, key signatures, time signatures
* 5-line staves (normal and small), standard barlines, 6-line guitar tab
* The format of the page, including the page size, staff-size, margins, and where systems end.
PhotoScore Ultimate, available separately, also reads text (including lyrics, dynamics, instrument
names, fingering, etc.), a wider variety of clefs and accidentals, tuplets, guitar chord diagrams, and
30
Page 31

1.4 Scanning
various other markings such as codas, segnos, ornaments, pedal markings and repeat endings.
PhotoScore Ultimate can even read neat handwritten music!
Hints on reading
* You should not need to interrupt reading, but you can normally do so if necessary by hitting Esc
or
X., or by clicking Cancel on the progress window. PhotoScore Lite will show the part of the
page it has already read. You should delete this page by choosing Edit
> Delete page before re-
scanning or re-reading the page.
* If the computer gives a warning message while reading a page, or if a page seems to be taking a
very long time to read, see POSSIBLE PROBLEMS below.
* If you like, you can ask PhotoScore Lite to read just a single scan or a choice of scans instead of
the whole score; see ADVANCED FEATURES below.
3. EDITING
When PhotoScore Lite has finished reading the music, its interpretation of the first page pops up
in a window called the output window. Here you can edit mistakes PhotoScore Lite has made.
Inputting
Notice how the pages pane doesn’t appear in the picture above: in order to give yourself more
room to edit the music, it’s a good idea to hide it while you edit, by choosing View > Toggle Pa ges
Pane (shortcut Ctrl+E or
XE).
The top part of the window (with a buff-colored background) shows you the original page. The
Full detail view window at the top right-hand corner shows a zoomed-in portion of the original
page, according to where you point your mouse.
The large bottom part of the window (with a light gray background) shows PhotoScore Lite’s
interpretation of the first scan – that is, what PhotoScore Lite thinks the first page of the original
says. Hence this part of the window is where PhotoScore Lite’s mistakes can occur.
31
Page 32

1. Inputting
At the top left of the window it says (e.g.) Page 1 o f 2, and by clicking on the arrows you can
move through all of the pages that have been read (the output score). It makes sense to edit the
first page completely, then advance to the second page and so on until the whole output score has
been edited.
To the bottom right of the window is the Keypad, similar in function to Sibelius’s Keypad. This
can be repositioned by clicking its title bar, and dragging.
There is a Create menu at the top of the window, which is also similar in function to Sibelius’s
Create menu, though features not appropriate for PhotoScore Lite have been omitted.
What to correct
The minimum level of correction recommended before sending the output score to Sibelius is to
correct key signatures and time signatures. Other mistakes such as pitch can be corrected in Sibelius, but correcting key signatures and time signatures is much easier in PhotoScore Lite, so we
recommend you do that.
In particular, if the score you are scanning is a transposing score, you will need to correct the key
signatures of the transposed instruments – to delete a single key signature, select it and type
Ctrl+Delete or
Key Si g n at u r e (shortcut K), and Ctrl+click or X-click the staff to which you want to add the key
signature.
X-Delete. Then add the correct key signature to that staff alone: choose Create>
To correct rhythmic mistakes, add the appropriate time signature if it’s not already present:
choose Create
> Time Sign a t ure (shortcut T) and click in one of the staves to add the time signa-
ture. Once PhotoScore Lite knows the time signature, any rhythmic inaccuracies are indicated by
small red notes over the barline, showing the number of missing or extra beats. As you correct the
mistakes, these red notes disappear – and once your score is free of red notes, you can send it to
Sibelius.
Once you are more proficient with PhotoScore Lite, you can correct the music completely in PhotoScore Lite before sending it to Sibelius. The advantage of this is that you can spot errors by looking at the scanned original on the screen instead of having to refer to it on paper.
Checking for mistakes
Check for mistakes by comparing the bottom part of the window with the original scan at the top.
The top and bottom parts move about to show the region of the page the mouse is pointing at.
Avoid the temptation to compare the output page with the original music on paper – it is almost
always quicker to compare with the scan on the screen.
At the top right of the output window is the full detail view window, which shows in close-up the
part of the original that the pointer is over. Ctrl+clicking or
X-clicking on this window makes the
view larger or smaller. This window can be repositioned by clicking its title bar and dragging.
MIDI playback
Another way to check for mistakes is to have the output played back to you. Your computer will
need a MIDI device attached to make use of this feature (if you have more than one attached, the
default one will be used).
32
Page 33

1.4 Scanning
To play the whole page from the start, ensure that nothing is selected by clicking on an area of the
page with no notation. Then choose Play
> Play/Stop (shortcut space), or click the Play button
on the toolbar. Do the same to stop the music. To play from a particular point on the page, select an
object in each of the staves you want playback from. It will commence from the start of the bar
with the earliest selection.
By default, all the staves will play back with a piano sound, but you can change this: right-click
(Windows) or Control-click (Mac) the names at the start of the first system (e.g. Staff 1), choose
Instruments from the context menu, then click Rename. You will see a dialog that looks a little
like Sibelius’s Create
> Instruments dialog, from which you can choose the correct name (and
therefore the sound) used by that staff.
While the music is playing, the currently played bars will be highlighted in gray.
4. SENDING TO SIBELIUS
Once you have edited all the pages in the score, you should send them
to Sibelius. Choose File
or simply click the little icon next to the Save button at the top of
the output window.
If Sibelius isn’t already running, it will start, and the Open Photo-
Score File dialog will appear:
* This is a transposing score: switch on this option if your score
contains transposing instruments, and you will be prompted to
choose the correct instruments when you click OK
* Use default instruments: opens the file without trying to work out
which instruments are used in the score
* Choose instruments: allows the user to choose an instrument for each staff in the score from a
dialog similar to the usual Instruments dialog; choose the staff in the scanned music that you
want to replace with a Sibelius instrument, then click Add as normal. If you add an instrument
that normally uses two staves (such as a piano), this will ‘use up’ two of the staves in the leftmost list on the dialog.
* Let Sibelius choose instruments: with this option switched on, Sibelius will attempt to work
out which instruments are used in the score; it does this by checking the names of the staves
that are set in PhotoScore – if a staff’s name doesn’t match an instrument Sibelius knows, it
opens the file with the default piano sound
* Use scanned page dimensions: this option tells Sibelius to format the score according to the
page size suggested by PhotoScore. By default, the page size of the selected manuscript paper
used for importing will be used instead, but you can switch this on if you like.
* The Page size, House style and orientation (Portrait or Landscape) options determine the
document setup of the resulting score.
> Send to > Sibelius (shortcut Ctrl+D or XD),
Inputting
Once your music has been opened in Sibelius you can do anything you like to it, just as if you had
inputted it yourself – but see Multi-staff instruments below for some clarification.
33
Page 34

1. Inputting
Editing rhythmic mistakes
If you send a score from PhotoScore Lite to Sibelius which has bars that don’t “add up,” Sibelius
will lengthen bars that are too short, and shorten bars that are too long.
To do this, Sibelius compares the length of the bars with the prevailing time signature. If a bar is
too short, Sibelius simply inserts rests at the end. If a bar is too long, Sibelius shortens it by omitting one or more notes/rests at the end of the bar.
Although Sibelius adjusts the lengths of bars like this, you are strongly advised to correct faulty
rhythms in PhotoScore Lite in the first place rather than trying to fix them in Sibelius afterwards,
as it will save you extra work.
Format
Sibelius uses Make Into System and Make Into Page to ensure that the format of the music is
the same as the original. However, if the notes seem uncomfortably close together or far apart in
the end result, try changing the staff size in the Layout
Ctrl+D or
select the whole score (Ctrl+A or
XD). Alternatively, if you don’t need the format of the music to match the original,
XA) and unlock the format (Ctrl+Shift+U or xXU).
> Document Setup dialog (shortcut
Multi-staff instruments
For instruments that use two staves by default, such as a piano, you may find that it isn’t possible
to use cross-staff beaming in music you have scanned. This is because PhotoScore Lite treats all
staves as separate instruments, which means that, by default, multi-staff instruments such as keyboards will be sent to Sibelius as two separately-named staves without a brace.
When you send a PhotoScore file to Sibelius, you can use the Open PhotoScore File dialog to tell
Sibelius that, say, staves 1 and 2 are actually the right- and left-hand staves of a piano – either
choose the instruments yourself, or click Let Sibelius choose instruments.
For multi-staff instruments such as Flutes 1+2, if you want them to be written as two sub-bracketed staves with a single name, you could either import each staff as a flute and then change the
name and add a brace in Sibelius, or import both staves as a piano, and then change the name and
the sound (
b 4.3Mixer).
If your original contains instruments that have a different number of staves on different systems –
e.g. strings that are sometimes divisi – see ADVANCED FEATURES below.
Closing the output score
Once you have finished scanning a score and have sent it to Sibelius, and are satisfied with the
result, you should close the score in PhotoScore Lite before you start scanning a new one. To do
this, simply choose File
> Close Score; if the score has unsaved changes, you will be prompted to
save.
Deleting unwanted scans
PhotoScore Lite automatically saves each page you scan as a scanned image. This occupies a not
insignificant amount of hard disk space, so you should regularly delete scans that have been read.
You do not, however, have to delete the scans before scanning the next piece of music.
To delete unwanted scans:
34
Page 35

1.4 Scanning
* If the pages pane is not currently shown, choose View > Tog gle Pa ges Pa ne (shortcut Ctrl+E
or
XE)
* Click on the name of the page you want to delete; you can select more than one page at the same
time by holding down Shift and clicking elsewhere in the list. When a page is selected, the word
Remove appears to the right of its name: click Remove to delete the pages.
* PhotoScore will warn you that you are about to delete these pages: click Yes to confirm their
deletion.
POSSIBLE PROBLEMS
Scanning takes a long time
If there are no signs of scanning happening – i.e. if after clicking on the Scan or Preview button
the scanner remains silent with no lights moving or flashing – communication between the computer and the scanner has probably been interrupted.
Check that the scanner is switched on and that the cable between it and the computer is firmly
connected at both ends. If this doesn’t help, try reinstalling your TWAIN scanner driver software.
Beware that some scanners need to be switched on before the computer is turned on, otherwise
they are not detected.
Not all staves/systems are detected
If after scanning a page you find that not all staves are highlighted in blue, or the staves are not
correctly joined into systems by a thick red vertical line, this may be because:
Inputting
* The original has 13 or more staves on a page: only PhotoScore Ultimate can scan scores with
more than 12 staves.
* The original was not flat on the scanner glass: always close the lid when scanning, unless scan-
ning a thick book. It may also help if you gently press down on the scanner lid during scanning.
* The page was scanned at too low a resolution (i.e. the staves are smaller than you think): check
the staff size, alter the scanner setting accordingly, and re-scan.
* You tried scanning a double-page spread: PhotoScore Lite cannot read both pages of a double-
page spread (e.g. from a miniature score) at once. Re-scan each of the pages separately. Ensure
that the music on the facing page is completely off the glass, or not scanned – if any of it
impinges on the scan, PhotoScore Lite will not read the music correctly.
* The staves are not clear enough in the original to be detected: in this case, you can tell Photo-
Score Lite where any missing staves are located on the page – see ADVANCED FEATURES
below.
Reading takes a long time
* If the page was scanned without being flat on the glass or with the lid open: you will get a black
border around the page that may spread across and obliterate some of the music. This can make
PhotoScore Lite take an extremely long time to read the page. If this happens, interrupt reading
(see below), then re-scan the page.
35
Page 36

1. Inputting
* If not all staves were detected after scanning (i.e. some were not highlighted in blue): this can
slow reading down, see Not all staves/systems are detected above.
Music reads inaccurately
If you find music seems to be reading very inaccurately, this may be because:
* the original is of poor quality, e.g. a photocopy or an old edition;
* the original is handwritten (or uses a music font that looks handwritten): PhotoScore Lite is not
designed to read handwritten music;
* the music uses more than two voices;
* the music was scanned in black & white and was not straight enough: it is recommended that
you scan in shades of gray;
* the music was not straight enough when scanned and Make scans level was not selected in the
preferences (see ADVANCED FEATURES below);
* the music symbol designs used in the original are of a non-standard shape or size.
ADVANCED FEATURES
PhotoScore Lite has many features and options for more advanced use.
You are strongly recommended to familiarize yourself with this whole section before embarking
on any intensive scanning, such as orchestral/band scores or scores with many pages.
Choosing between scanners
In the unlikely event that you have more than one scanner connected to your computer, you can
choose between multiple scanner drivers by choosing File
> Select Scanner.
Adjusting detected staves/systems
When you scan a page, PhotoScore Lite highlights staves it detects in blue, and joins them into
systems with vertical red lines.
However, if the original is of poor quality, PhotoScore Lite may not detect some of the staves/systems, and you should tell PhotoScore Lite where they are.
The easiest method is to select the nearest blue staff (by clicking on it) and copy it by Alt+clicking
or
z-clicking over the center line of the missing staff (the horizontal position is not important).
You can create a blue staff from scratch by clicking and dragging it out with the left mouse button.
After creating the staff, ensure that it is joined to any other staves in the same system (see below).
PhotoScore Lite will automatically “clip” the staff in place, by adjusting the position and size of it,
if it finds an appropriate staff underneath. If it fails to position/size the staff correctly, scale the
image to full size (by clicking on the button at the top marked 100) and adjust it using the blue
“handles.”
* You can drag any blue staff up and down with the left mouse button. This also causes the staff to
automatically clip in place.
* You can drag the ends of blue staves around, and can even put blue staves at an angle.
36
Page 37

1.4 Scanning
* You can alter the size of any blue staff – pull the “handles” in the middle of the staff up or down.
PhotoScore Lite can read pages that have a mixture of staff-sizes, and each blue staff can have a
different size. The top circular handle allows you to change the curvature of the staff. This is
useful when scanning pages from thick books, where it is not possible to prevent the page from
being curved at the edges.
* If any scanned staff is left with no blue staff on top of it, the scanned staff and any music on it
will be ignored when the page is read. This can slow reading down, but is otherwise harmless.
* To join two adjacent staves together into the same system, click one staff so it goes red, then
Alt+click or
z-click the other staff. They will be joined near the left-hand end by a thick vertical
(or near-vertical) red line.
* To separate two joined staves into two separate systems, do exactly the same as for joining two
staves.
* PhotoScore Lite automatically guesses whether staves should be joined together or not when
you create new ones, or move existing ones.
* If you’ve messed up the blue staves and want to start again, Ctrl+double-click or X-double-
click the scan, and PhotoScore Lite will reset the blue staves to their original positions.
* When you have finished editing the staves/systems, check carefully that the staves are all joined
into systems correctly, as you cannot alter this once the page has been read.
Scan window options
If you have chosen to use PhotoScore’s scanning interface in File> Scanner Setup, there are vari-
ous further options and buttons available on the scan window:
Inputting
* The Read t his page button reads just this scan. Clicking the arrowed part of the button opens a
menu that lets you choose where in the output score to insert this page once it has been read.
* Scale produces a dialog that lets you zoom in and out of the scan. The button to the right of
Scale zooms the image to fit the main window; 50 zooms to 50%; 100 zooms to 100%.
* Upside down quickly rotates the image by 180 degrees, in case it was scanned the wrong way
up.
* Re-scan re-scans the page.
* On side quickly rotates the image by 90 degrees, in case it was scanned on its side.
Omitted staves
In scores for many instruments, particularly orchestral scores, unused staves are often omitted.
If you replace the default instrument names (e.g. “Staff 1”) at the start with proper names, then on
subsequent systems PhotoScore Lite will allocate instruments to staves in order from the top
down. Hence, if the original page omits an instrument from one system, then in the output window some of the staves will have the wrong names. To correct a name in this situation, Right-click
or Control-click over the existing instrument name against the staff in question, and choose the
correct instrument from the list of current instruments.
On any system that has staves omitted you will probably have to correct several instrument names
like this. Do it with care, otherwise confusion will arise.
37
Page 38

1. Inputting
Multi-staff instruments
For multi-staff instruments such as keyboards and divided wind and strings, PhotoScore Lite
treats each staff as a separately-named instrument.
If the number of staves for a multi-staff instrument varies at all in the original, e.g. where strings
are divisi, then to avoid any confusion between the staves it’s best to give them slightly different
names, e.g. Viol a a and Vi o l a b. You can change the names back once the score has been sent to
Sibelius.
Wherever any of the instrument’s staves are omitted, follow Omitted staves (above).
N.B. If the number of staves for the instrument increases (say from 1 to 2) during the score, and
the second staff has not occurred before, treat it by following Instruments/staves intro-
duced after the start (below).
Instruments/staves introduced after the start
Some scores include instruments or staves that are not shown on the first system.
When this happens, on the system where the instrument/staff is first introduced you should do
the following:
* First, correct the names of each of the other staves:
Right-click (Windows) or Control-click (Mac) each name, and choose the correct name from
the list of current instruments
* Then tell PhotoScore Lite the name of the newly-introduced instrument/staff
* Point over whatever name it has filled in (which may say e.g. Staff 5, or the name of an omitted
instrument). Right-click (Windows) or Control-click (Mac), click New , and click a name from
the list of instruments displayed (similar to Sibelius’s Instruments dialog.) If you want a non-
standard name, you can edit the name at the bottom.
You must do this with care – or else a lot of confusion can arise.
Small staves
In the output window, small staves are displayed at full size to make them legible, but they are
indicated by the following symbol at the end of the staff:
Other preferences
The File > Preferences dialog contains various other options, as follows.
On the Scanning page:
% Automatic scanning and Scan more quickly are only available in PhotoScore Ultimate
% PhotoScore: with this selected, PhotoScore uses its own simple scanning interface
% TWAIN (scanner default): when chosen, the standard TWAIN interface (that works with
all scanning programs) will be used when you choose File
% Select TWAIN scanner allows you to choose which scanning device PhotoScore should use
38
> Scan pages
Page 39

1.4 Scanning
% Make scans level: with this switched on, PhotoScore Lite will work out how rotated a scan
is, and then rotate it so that the staves are level. It is recommended that this is left selected.
% Read pages after scanning/opening is only available in PhotoScore Ultimate.
* On the Reading page, most options are disabled (since they are only available in PhotoScore
Ultimate). The only option you can switch on or off is Ties, Slurs an d Hairpin s, which is partly
enabled, because PhotoScore Lite can only read ties.
* On the Editing page:
% Automatic page margins: creates suitable page margins on each page
% Attach scanned staff panel to current staff: on the output window, this puts the original
scan just above the highlighted staff instead of at the top of the window. This means you have
to move your eyes less when comparing the output with the original, but the effect can be
confusing.
% Drag paper by: allows you to choose whether you drag the paper either by clicking and
dragging, or Holding Shift and dragging (in a similar way to the options in the Mouse
page of Sibelius’s File
* On the Advanced page:
% MIDI playback device allows you to choose which of your computer’s playback devices
> Preferences dialog).
PhotoScore should use for playback
% System playback properties launches your operating system’s sound and audio device
properties dialog, allowing you to choose your playback and recording devices for audio, and
your preferred playback device for MIDI
% Skin design: allows you to change the appearance of PhotoScore to match either Sibelius or
its sister program, G7
% Display splash screen at start-up: allows you to switch off the PhotoScore Lite splash
screen when you run the program
% Auto-save to backup file every n minutes: automatically backs up your score regularly at
the time interval specified.
Inputting
If you change any of these options, they will remain as the new default settings each time use you
PhotoScore until you change them again.
39
Page 40

1. Inputting
1.5 Guitar tab input
b 2.7Chord diagrams, 2.13 Gui tar notation and tab , 2.17 Lute tablature.
This topic explains how to input tab directly using your computer’s keyboard, a MIDI guitar, or by
converting existing notation into tab. If you want to input tab in another way, by:
* importing a MIDI file, b 8.5 Opening MIDI files;
* importing an ASCII tab file, b 8.16 ASCII tab files ;
* scanning printed music, b 1.4 Scanning.
Sibelius automatically writes music as notation or as tab in any tuning. It doesn’t have to “do”
anything to convert between them – it treats tab just as a different way of displaying the underlying music. This means that with Sibelius you can do pretty much anything with tab that you can
do with notation – you can play it back, transpose it, copy it (onto tab or notation staves) and so
on.
This also means you can input music in tab and turn it into notation, or input it into notation and
turn it into tab, or even change standard guitar tab to a different string tuning, or to bass guitar,
mandolin, banjo or dobro. Or sitar. Or bass theorbo.
Creating a tab instrument
Guitar and other fret instruments are available from the Create> Instruments dialog (shortcut I)
with a tab staff created automatically. On the dialog they are called e.g. Guitar [tab].
Alternatively, you can turn a notation staff into a tab staff using an instrument change: choose
Create
at the very start of the score.
> Other> Instrument Change, choose the tab instrument you want to use, and then click
Turning notation into tab or tab into notation
Often you will want to have two staves – a notation staff and a tab staff, both showing the same
music – or you may want to turn notation into tab or vice versa. This is done simply by copying
the music between the staves.
* Create two guitars, one with notation and one with tab, or just use the Guitar + Tab manu-
script paper
* Input all of the music onto (say) the notation staff
* Select all of this music as a passage by triple-clicking the notation staff
* Copy it onto the tab staff by Alt+clicking or z-clicking onto the first bar. It will all turn magi-
cally into tab:
* You can then edit the tab staff to, for example, move some of the notes onto different strings.
40
Page 41

1.5 Guitar tab input
You can also do this the other way around – input the tab, then copy it to the notation staff. Then
if you don’t need both staves (and just wanted to convert between notation and tab) you can
delete the original one.
On a notation staff, a guitar is written one octave higher than it sounds; this means that if you
copy music from another staff (e.g. for a non-transposing instrument like a piano), it will appear
an octave higher on the guitar staff, but it will play back at the same pitch.
Inputting tab
Inputting tab using your computer’s keyboard is very simple, and the basics can be summed up in
just a few points:
* Select the bar in which you want to start inputting, then choose Notes > Input Notes (shortcut
N)
* The caret (a small vertical line) appears, showing you which string you’re on
* Choose the length of the note you want to input using the Keypad window, or by typing the cor-
responding key on your keyboard’s numeric keypad
* Use the 3 and 2 keys to move up and down the strings, and 0 and 1 to move back and forth in
the bar
* To input a note, type the fret number using the number keys on the main keyboard (not the
numeric keypad).
* To create quarter-tones on a tab staff, create the note as normal and then (with the note
selected) type =. A quarter-tone appears on a tab staff as a fret number followed by .5. To create
quarter-tones on a notation staff, use the appropriate accidental from the fifth Keypad layout.
Inputting
You can change the default note value used when moving around the bar using the
in the Mouse page of the File
> Preferences dialog (in the Sibelius menu on Mac); change
0 and 1 keys
Rhythmic positions to snap to to whatever note value you prefer. Switch off the Snap in guitar
tab input option if you’d rather the
0 and 1 keys simply move you the same distance as the cur-
rently selected note value on the Keypad, unless there’s an existing note between the current caret
position and the next, in which case that note will be selected.
Notes out of range
When copying music between staves – e.g. from a 6-string guitar tab staff to a 4-string bass guitar
tab staff, or from a notation staff to a guitar tab staff – some notes may be unplayable. In this case
a red question mark (?) will appear on the tab staff, to show you that you’ll need to correct this
chord yourself.
Guitar tab fingering options
When Sibelius creates tab for you – when you copy from a notation staff to a tab staff, copy from
one tab staff to another with a different tuning, input from a MIDI keyboard or guitar, or import a
MIDI file – it automatically tries to produce the most playable fingering.
The Guitar Tab Fingering section of the Note Input page on File
menu on Mac) allows you to specify the preferred range of frets that you would like Sibelius to use
when it works out fingerings. You can specify the lowest and highest frets that Sibelius should
> Preferences (in the Sibelius
41
Page 42

1. Inputting
attempt to use, whether or not it should try and use open strings where possible, and the number
of frets you can stretch when playing chords.
These options are not obeyed in all cases; they are merely recommendations. For example, if you
switch off the Prefer to use open strings option but then Sibelius needs to create a note that can
only be played using an open string, Sibelius will finger that note as an open string rather than not
write it at all.
Sibelius will not rewrite all the existing tab in your score if you make a change in this dialog. But if
you do want to apply new settings to existing tab, simply use Notes
> Res et Gui tar Tab Finger-
ing (see below).
Resetting tab fingering
You can reset the fingering of a tab staff to your preferred ranges at any time. Simply select the
passage in which you want the fingering reset and choose Notes
> Reset Tab Fingering.
For example, if you decide that a particular passage would be more comfortably played around the
fifth fret rather than at the nut, you could set new preferences in the Note Input page of File
Preferences (in the Sibelius menu on Mac, see above), then apply those preferences to that passage by choosing Notes
> Reset Guitar Tab Fingering.
When does Sibelius automatically reset tab fingering?
Generally speaking, fingering is retained if you are copying within the same staff, or to another
staff with the same tuning. If you copy music to a notation staff or to a tab staff with a different
tuning, Sibelius will recalculate the fingering for you based on the settings in the Note Input page
of File
> Preferences (in the Sibelius menu on Mac).
However, in the specific case of scores that consist of a notation and tab staff only (i.e. different
representations of the same music), it is useful to retain the fingering information when copying
between these staves as you may be copying back and forth between them repeatedly. In this case,
you should switch on the Remember fingering when copying to a notation staff option in the
Note Input page of the File
> Preferences dialog (in the Sibelius menu on Mac).
Using a MIDI guitar
Sibelius allows you to input from a MIDI guitar that supports multiple MIDI channels –
b 1.7Input Devices.
>
42
Page 43

1.6 Selections and passages
1.6 Selections and passages
b 5.4Filters and Find.
v Selecting and copying.
When objects in the score are selected, they go colored, which shows that you can do things to
them using the mouse and keyboard. Most operations in Sibelius involve selections.
There are three main kinds of selection:
* a single selection, where just one object is selected
* a multiple selection, where several separate objects are selected
* a selected passage, where a continuous stretch of music is selected, shown with a light blue box
(“staff passage”) or purple double-box (“system passage”) round it.
You can do pretty much the same things to all three kinds of selection. The main difference is how
you select the objects in the first place.
Additionally, you can select a rectangle of music in order to export it as graphics –
b 8.11Exporting graphics.
Selection colors
When an object is selected, it changes color to show that it’s selected:
* Notes and staff-attached text and lines are colored according to the voice(s) to which they
belong (voice 1 is dark blue, voice 2 is green, voice 3 is orange, and voice 4 is pink). If an object
belongs to more than one voice, or all voices, it is colored light blue.
* Various other staff objects, e.g. symbols, clefs, instrument changes, etc., apply to all voices and
so are also colored light blue.
* System objects (e.g. system text, lines and symbols, time signatures, key signatures, etc.) are
colored purple when selected.
Inputting
Single selections
To make a single selection, click an object – it’s as simple as that.
* You can also select an object without using the mouse – with nothing selected, hit Tab to select
the first object on the top staff on the page
* You can select the next object on the staff using the arrow keys or Tab (to select the previous
item, type Shift-Tab)
* If you want to select a particular notehead in a chord, use Alt+3/2 or z3/2 to select the next
notehead above or below the currently selected one
* If there are no chords, Al t +3/2 or z3/2 selects the note at the nearest rhythmic position on
the staff above or below
* You can also move between the different parts of lines using Alt+0/1 or z0/1 –
b 2.16Lines and b 2.22 Slurs.
* Another way of making a single selection is to use the Edit > Find (shortcut Ctrl+F or XF) fea-
ture –
b 5.4Filters and Find.
43
Page 44

1. Inputting
If you have trouble selecting an object with the mouse, because there’s another object very close
that you keep selecting instead: first, hit Tab (or Shift-Tab) to move the selection to the object
you want to select, or zoom in very close and try selecting it again; if this fails, move the other
object out of the way temporarily.
Multiple selections
* Click an object, then Ctrl+click or X-click one or more other objects to add them to the selec-
tion. Ctrl+click or
* Alternatively, Shift-click or X-click on the paper and drag the light gray box around the objects
you want to select (sometimes called a “marquee” or “lasso” selection). If you drag across a
whole staff, you’ll get a selected passage instead. You can then add/remove objects from the
selection using Ctrl+click or
setting in the File
you to select a passage simply by clicking and dragging (without holding down Shift or
* With multiple text selections, you can also extend a single selection by choosing Edit> Select>
Select More (type Ctrl+Shift+A or xXA), which selects all similar text objects (i.e. in the
same style) attached to the same staff within that system. This is a quick way of selecting a
whole row of, say, chord symbols, lyrics, fingerings or expression marks.
* If you have a single note of a chord selected, Edit > Select> Select More selects all the notes in
that chord; similarly, if you have a single note, rest or a whole chord selected, Edit
Select More will select the whole bar.
* You can also use filters to make a multiple selection – b 5.4 Filters and Find.
X-click an object again if you want to remove it from the selection.
X-click. If you use this function a lot, changing the Drag Paper
> Preferences> General dialog (in the Sibelius menu on Mac OS X) allows
> Select >
X).
Multiple selections are mainly useful for objects other than notes, chords and rests – e.g. to delete
several articulations or bits of text.
Selected passages
A “passage” is a continuous stretch of music – of any length from a couple of notes to the whole
score, and for any number of staves from one to a complete orchestra. You can think of it as a
“rectangle” of music – though this rectangle can run between systems and pages, and you can
even include non-adjacent staves in a passage.
In contrast to multiple selections, selected passages are mainly useful for doing things to several
notes, chords and rests.
There are two kinds of passages: normally, passages are surrounded by a single light blue box and
can include any combination of staves in your score; system passages, by contrast, are surrounded
by a purple double-box and include all the staves in your score.
To select a p a s s a g e b y cl i c k i n g :
* Click the note/chord/rest at one corner (e.g. the top left-hand corner) of the “rectangle” you
want to select. If you’re selecting from the start of a bar, it’s quicker just to click an empty part of
the bar.
* Shift-click the note/chord/rest at the opposite (e.g. bottom right-hand corner) of the “rectan-
gle.” Again, if you’re selecting to the end of a bar, just click an empty part of the bar.
44
Page 45

1.6 Selections and passages
* All selected objects will go colored and a light blue box will appear around the selection. The
selection will also appear on the Navigator, which is useful for viewing passages that span multiple pages.
* To add further staves to the selection, hold down Ctrl or X and click further staves; this can be
used to add non-adjacent staves to the selection
* You can also exclude certain staves from a passage selection by holding down Ctrl or X and
clicking in turn on the staves you want to remove from the selection.
You can also make a passage selection using the Edit
Ctrl+Alt+A or
zXA). This is useful if you know you want to select, say, the first 16 bars of a
> Select> Select Bars dialog (shortcut
score, or want to select from the current position to the end of the score. The Make system
selection option will make the resulting passage selection into a system passage.
To select a system passage, do the same but start by
bar, then hold
Ctrl
or X as you click on other notes/chords/rests in other staves to extend the pas-
Ctrl
+clicking
or X-clicking a blank part of a
sage.
Naturally, you can also select a passage using just the keyboard:
* With a note selected, type Shift-0/1 to extend the selection horizontally a note at a time, or
Ctrl+Shift+
0/1 or xX0/1 to extend it a bar at a time. This is similar to word processors (as
are various other uses of the arrow keys).
* To select multiple staves, type Shift-3/2 to include another staff in the passage
* To turn the current selection into a system passage, choose Edit > Select > Select System Pas-
sage (shortcut Shift+Alt+A or
xzA).
Inputting
To select a passage by dragging the mouse: hold down Shift or
X and drag out a rectangle starting
from above the top staff at the start of the desired passage and finishing below the bottom staff at
the end. This is only practical for short passages.
Quick cases
There are various ways to select certain types of passage quickly:
* Clicking an empty part of a bar selects that bar on one staff (e.g. to copy a bar)
* Double-clicking an empty part of a bar selects that staff for the duration of the system (e.g. to
copy those bars)
* Triple-clicking an empty part of a bar selects that staff throughout the score (e.g. to delete a
whole instrument)
* After single-, double- or triple-clicking, you can Shift-click another staff to add all staves in
between to the selection, or (as before) add or remove individual staves using Ctrl+click or
click
* If you hold Ctrl or X while single-, double- or triple-clicking initially, a system passage is
selected (enclosed in a purple double-box)
* You can even select the entire score at once by choosing Edit> Select> Select All (shortcut
Ctrl+A or
of the whole score, or for selecting particular types of object throughout the score (see below).
XA). This is particularly useful for transposing the whole score, altering the format
X-
45
Page 46

1. Inputting
(If you think hard about it, Edit
> Select> Select All does the same as Ctrl+triple-click or X-
triple-click. See?)
What can you do with multiple selections and selected passages?
You can do virtually anything to a multiple selection or selected passage that you can do to a single note, and more; for example:
* Copy it elsewhere with Alt+click or z-click – very, very handy for arranging or orchestrating.
(Copying overwrites unless you select a passage of bars with Ctrl or
* Delete it – just hit Delete. If the passage was selected with Ctrl or X (and so had a double-box
round it), the bars themselves will be deleted too.
* Repeat it with R – see Repeating selections below
* Transpose it, either using the Transpose dialog (b 5.17 Transposing) to transpose by a spe-
cific interval, or diatonically by step using the
* Produce chords by adding notes above or below – type 1–9 to add an interval above, or Shift-
3 /2 keys. Ctrl+3/2 or X3/2 shift by an octave.
1–9 to add an interval below (but not the latter if you’re using the Notebook (laptop) feature set
–
b 5.9Menus and shortcuts)
* Play it back by choosing Play> Move Playback Line to Selection or hitting Y, then click on
the play button in the Playback window or hit Space
* Arrange the music for a different combination of instruments, “explode” the passage onto a
larger number of staves, or “reduce” it onto a smaller number –
* Run a plug-in to check, edit or add things to the selection – b 5.11 Plug-ins
* Add articulations to all notes/chords using the first or fourth Keypad layout
* Reset the note spacing to default by choosing La yout> Reset Note Spacing (shortcut
Ctrl+Shift+N or
xXN).
X, in which case it inserts)
b 5.1Arrange™
Multicopying
Multicopying allows you quickly to copy a single selection, multiple selection or passage several
times either horizontally (along the same staff), vertically (onto more than one staff), or both at
once.
Multicopying a single object
You can copy a single object, such as a note or some text, vertically across any number of staves.
This is perhaps most useful for copying dynamic markings (e.g. mf ) across multiple staves at
once:
* Select a single object and choose Edit > Copy (shortcut Ctrl+C or XC) to copy it to the clip-
board
* Select a passage in one or more staves and choose Edit> Paste (shortcut Ctrl+V or XV) to copy
the item to the start of the passage only, one copy on each staff.
Multicopy ing a multiple selection
As an extension of the above, you can select more than one object and copy them vertically across
any number of staves. This is particularly useful for copying a row of dynamics:
46
Page 47

1.6 Selections and passages
* Make a multiple selection – Ctrl+click or X-click the objects you want to copy or select them
with a filter (e.g. Edit
> Filter > Dynamics), then choose Edit> Copy (shortcut Ctrl+C or XC) to
copy them to the clipboard
* Select a passage in one or more staves and choose Edit > Paste (shortcut Ctrl+V or XV) to copy
the selection to the start of the passage only, one copy for every staff, with relative distances
between the original objects retained in the new copies. If hidden staves are included in the destination passage, multicopy will copy onto the hidden staves too.
Multicopying a passage
* Select a passage in one or more staves and choose Edit> Copy (shortcut Ctrl+C or XC) to copy
it to the clipboard
* Select another passage and choose Edit > Paste (shortcut Ctrl+V or XV) to fill the new passage
with multiple copies of the original passage. The new passage is filled in the following way:
% Horizontally: if the destination passage is longer than the original, a whole number of copies
is pasted into the new passage (with any leftover bars at the end left unchanged). If the destination passage is shorter than the original, only one copy is made.
% Ve rt i ca l ly : if the destination passage contains more staves than the original, a whole number
of copies is made from the top downwards (with any leftover staves at the bottom left
unchanged). If the destination passage has fewer staves than the original, only one copy is
made.
Beware that multicopying overwrites the original contents of the destination passage, and copies
onto any hidden staves that are included in the destination passage.
Inputting
Repeating selections
You c an al so us e Edit > Repeat (shortcut R) to make multiple copies of any selection, as follows:
* Select a note, chord, passage, multiple selection, line, text object, symbol, chord diagram,
imported graphic, instrument change, clef, key signature or barline and type R.
* The selected object(s) are repeated once to the right; to repeat again, keep hitting R.
47
Page 48

1. Inputting
1.7 Input Devices
b 1.1Note input, 1.3 Flexi-time™.
If you have a MIDI keyboard or other external input device connected to your computer, you can
use step-time and Flexi-time input. For information about setting up your computer for MIDI
input,
b MIDI setup for Windows and MIDI setup for Mac in the Handbook.
Choosing input devices
The Input Devices page of File > Preferences (in the Sibelius menu on Mac) has options affect-
ing MIDI input:
The table at the top lists any MIDI input devices you have. The options are as follows:
* Use: if the checkbox in this column is switched on, Sibelius will accept input from this device; if
switched off, Sibelius will ignore any input from this device. By default, the Use checkbox is
switched on for all input devices.
* Device Name: this column tells you the input device’s name. If your MIDI port is provided by
a soundcard or external MIDI interface, you will normally see the name of the MIDI port itself
(e.g. MIDISpor t USB 2x2 A or SB Live! MIDI Out) rather than the name of any device con-
nected to the MIDI port or interface. If your MIDI device connects to your computer directly
(e.g. via USB), you will probably see the actual name of the MIDI device (e.g. M-Audio Oxygen
8) instead.
* Type: this shows what type of device this is. When clicked, a drop-down menu appears, allow-
ing you to choose either Keyboard (the default) or Guitar. If you choose Guitar, then the MIDI
Guitar Channels controls below the table are enabled – see MIDI guitars below.
48
Page 49

1.7 Input Devices
* Input Map: this allows you to specify exactly what kind of keyboard a particular device is. This
is useful because many keyboards have additional knobs, faders and buttons on them that can
be used in Sibelius – see Input maps below.
Try playing notes on your keyboard (or other MIDI input device) while the dialog is open. If
everything is working as it should, the little black indicator marked Test should light up green as
you play. If the indicator doesn’t light up, check your MIDI connections and ensure that you have
the correct input device selected (if more than one is present).
You should switch on the MIDI Thru checkbox if and only if your keyboard has no built-in sounds
– this option makes Sibelius reproduce notes played on your keyboard using your soundcard or
other playback device.
Use low-latency MIDI input allows Sibelius to take advantage of the advanced capabilities of
your input device’s drivers in order to provide low-latency input. This option should be left
switched on unless you encounter glitches while using step-time or Flexi-time input.
Echo notes when in background determines whether Sibelius should continue to play back
notes played on your MIDI keyboard when the application is not in focus (e.g. when you are using
another program on your computer). This option is switched on by default, and only has any
effect if MIDI thru is also switched on.
Finding new input devices
If you connect an external MIDI input device, such as a keyboard or control surface, to your computer while Sibelius is running, it may not automatically become available for input. To refresh
the list of available input devices, click Find New Input Devices on the Input Devices page.
Inputting
Not all devices report their presence correctly to your computer’s operating system, so if your
device doesn’t appear after clicking this button, save your work and quit Sibelius, then restart the
program, making sure your MIDI input device is switched on before you run Sibelius.
Problems with MIDI input
If MIDI input doesn’t seem to work, check that MIDI OUT on the keyboard is connected to MIDI
IN on your computer, and (if your keyboard has built-in sounds) MIDI IN on your keyboard is
connected to MIDI OUT on your computer – not MIDI OUT to MIDI OUT and MIDI IN to MIDI
IN. If your computer has two MIDI IN sockets, also try connecting the keyboard to the other MIDI
IN socket instead.
Input maps
If your MIDI keyboard has a plethora of buttons, knobs and faders in addition to the usual pianostyle keys, you can use them with Sibelius, e.g. to control the faders in the Mixer, to control playback, and so on.
Simply choose the most appropriate item listed under Input Map in the box at the top of the
Input Devices page. By default, try MIDI keyboard, which will work with many MIDI keyboards,
or if you have one of the specific keyboards listed there, choose the input map for that keyboard
instead.
Input maps for many of the most popular M-Audio keyboards are included, as follows:
49
Page 50

1. Inputting
Axiom 25:
Set your Axiom 25 to its default Program. The eight knobs above the keyboard are mapped to the
faders in the Mixer for the first eight staves in your score, and the transport buttons below the
LCD display are mapped to the corresponding functions of the Playback window.
Axiom 49 + 61:
Set your Axiom 49 or Axiom 61 to its default program. By default, the first eight faders above the
keyboard are mapped to the faders in the Mixer for the first eight staves, but you can switch them
to control the virtual instrument output faders by issuing a program change to program 2. The
ninth fader is always mapped to the master volume control. The buttons below the faders solo the
corresponding staff or virtual instrument. The rotary controls to the right of the faders control
pan for the first eight staves in the Mixer. The transport buttons below the LCD display are
mapped to the corresponding functions of the Playback window.
Keystation Pro 88:
Set your Keystation Pro 88 to use Preset 7. The transport buttons above the modulation and pitch
bend wheels to the left of the keyboard are mapped to the corresponding functions of the Playback
window. Button 9 on the keyboard to the right of the LCD display hides and shows the Mixer window. By default, the first eight faders above the keyboard are mapped to the faders in the Mixer
for the first eight staves, but you can switch them to control the virtual instrument output faders
50
Page 51

1.7 Input Devices
by issuing a program change to program 2. The ninth fader is always mapped to the master volume control. The buttons below the faders solo the corresponding staff or virtual instrument. The
bottom row of rotary controls to the left of the faders control the pan settings for the first eight
staves; the middle row controls pan for staves 9–16.
MK-425c:
Set your MK-425c to its default program. The eight rotary controls above the keyboard adjust the
volume of the first eight staves in the Mixer, and the buttons numbered 1–8 to the left of the keyboard solo the corresponding staff.
MK-449 + 461:
Inputting
Set your MK-449 or MK-461 to its default program. By default, the first eight faders above the
keyboard are mapped to the faders in the Mixer for the first eight staves, but you can switch them
to control the virtual instrument output faders by issuing a program change to program 11 (send
a program change to program 10 to switch back to controlling staff volume). The ninth fader is
always mapped to the master volume control. The buttons to the left of the faders solo the corresponding staff or virtual instrument. The rotary controls to the right of the faders control the pan
settings for the first eight staves.
Oxygen 8:
51
Page 52

1. Inputting
Set your Oxygen 8 to its default program. The rotary controls above the keyboard are mapped to
the faders in the Mixer for the first eight staves. The transport buttons below the rotary controls
are mapped to the corresponding functions of the Playback window.
Oxygen 49 + 61:
Set your Oxygen 49 or Oxygen 61 to its default program. By default, the first eight faders above the
keyboard are mapped to the faders in the Mixer for the first eight staves, but you can switch them
to control the virtual instrument output faders by issuing a program change to program 2 (send a
program change to program 1 to switch back to controlling staff volume). The ninth fader is
always mapped to the master volume control. The buttons below the faders solo the corresponding staff or virtual instrument. The rotary controls to the right of the faders control the pan settings for the first eight staves. The transport buttons below the rotary controls are mapped to the
corresponding functions of the Playback window.
UC-33:
Set your UC-33 to its default program. By default, the first eight faders are mapped to the faders in
the Mixer for the first eight staves, but you can switch them to control the virtual instrument output faders by issuing a program change to program 2 (send a program change to program 1 to
switch back to controlling staff volume). The ninth fader is always mapped to the master volume
control. The buttons labeled 1–8 to the right of the faders solo the corresponding staff or virtual
instrument. The rotary controls in the bottom row above the faders control the pan settings for the
first eight staves. The middle row controls the volume settings for staves 9–16, and the top row
controls the pan settings for staves 9–16. The transport buttons at the bottom right-hand corner
of the surface are mapped to the corresponding functions of the Playback window.
Additional input maps are available from the online Help Center, which you can visit by choosing
Help
> Help Center.
52
Page 53

1.7 Input Devices
MIDI guitars
If you are using a MIDI guitar, Sibelius allows you to assign each MIDI channel to a string so that
fingerings will automatically appear on the correct string of a tab staff. You can also set up various
filters to eliminate “noise” being treated as notes.
If you have a guitar with a hexaphonic pick-up (such as the Roland GK-2A or GK-3) and a guitar
MIDI interface (such as the Axon AX100, Roland GR-33 or GI-20, etc.), Sibelius can write notes
played on a particular string on the correct string in tab, whether you play in using Flexi-time or
step-time input.
To tell Sibelius that you are using a MIDI guitar that outputs each string on a separate channel, set
Type to Guitar for the appropriate item in the list of input devices. If your MIDI guitar outputs
everything you play on a single channel, leave Type set to Keyboard. Note: when Type is set to
Guitar, the options under Guitar Tab Fingering on the Note Input page of File
(in the Sibelius menu on Mac) have no effect during input (though they are still used when you
e.g. copy music from one staff to another).
Then:
* Set the Number of strings as appropriate
* Set the MIDI channel of highest pitched string, if necessary. Sibelius assumes that the strings
of your MIDI guitar are numbered sequentially; if they are not, consult the documentation for
your guitar MIDI interface, and set its options appropriately.
You may also wish to set some of the options under Omit Wrong Notes, described in detail in
Note input options on page 13. One of the traditional problems of inputting using a MIDI gui-
tar is that the software accurately renders every note detected by the MIDI pick-up: even if you are
able to play cleanly, it’s common for very short or quiet notes that you had not intended to play to
appear in the score; similarly, MIDI pick-ups occasionally detect high or low harmonics and
notate these as very high or very low notes. Sibelius lets you tailor the sensitivity of its notation to
your playing style. (You may also find these options useful for input devices other than a MIDI
guitar.)
> Preferences
Inputting
For more details on MIDI input (from a keyboard or guitar), see the Handbook or
input and
b 1.3Flexi-time™.
b 1.1Note
Tips for successful MIDI guitar input
Sibelius accurately transcribes anything you play, exactly as you play it. However, a few factors
can contribute to imprecise transcription. While Sibelius itself can filter out notes with a low
velocity (see Note input options on page 13), it’s also a good idea to ensure that your MIDI con-
verter sensitivity settings are set fairly low when using a MIDI guitar; incidental string scrapes,
ghost notes and other anomalies appear when the sensitivity settings are too high.
String buzz against tall frets or a poorly adjusted setup will confuse the MIDI converter and produce errant notes, so make sure to have your guitar adjusted by an experienced technician if your
guitar exhibits symptoms of bad fret buzz.
On your MIDI guitar interface, experiment with the different picking modes. Both Roland and
Axon support the option for pick-style (plectrum) and finger-style input via an internal setting.
53
Page 54

1. Inputting
Make sure to experiment with these settings, as some players find that finger-style input is more
accurate even when using a pick, and vice-versa.
Sibelius does not notate pitch bend information, slides or string bends on input. You can create
them in your score later, but when you enter notes, play cleanly, without vibrato, slides or bends,
to ensure accurate notation.
One last note: flatwound strings consistently produce the cleanest notation into Sibelius.
54
Page 55

2. Notations
Notations
Page 56

2. Notations
56
Page 57

2.1 Accidentals
b 1.1Note input.
2.1 Accidentals
Creating an accidental with a note
When you create a note using mouse or keystrokes, you can give it an accidental at the same time
by choosing one from the first or fifth Keypad layout (shortcuts F8/F12) before putting the note
into the score. (You can also add articulations, rhythm dots, tremolos and non-standard beaming
from the Keypad at the same time.)
Accidentals are automatically created when you input from a MIDI keyboard.
Adding accidentals to existing notes
Select the note(s) in question, then choose an accidental from the first or fifth Keypad layout.
To add accidentals to all the notes in a chord at once, double-click one of the notes in the chord
and then choose an accidental.
Removing particular accidentals
* Select the note(s) in question, then choose the accidental from the Keypad again, to switch it off
* Alternatively, the slow and fiddly way is to select the accidental(s) with the mouse (taking care
not to select the associated note(s) at the same time), then hit Delete.
Removing lots of accidentals
Select the notes in question, then, from the fifth Keypad layout (shortcut F12),
choose the 0 key on the numeric keypad or the corresponding button shown on
the right.
Notations
Hiding accidentals
In some situations (such as in passages that use cross-staff beaming – b 2.5 Beams) you may
want to hide an accidental rather than delete it (i.e. you want it to sound as if it has an accidental,
but the accidental should not appear on the page).
To do this, select the accidental itself (not the notehead), and choose Edit
(shortcut Ctrl+Shift+H or
xXH). For more details, b 5.6Hiding objects.
> Hide or Show > Hide
Accidentals in parentheses
Accidentals are sometimes written in parentheses (round brackets) to show that they are cautionary or editorial. To add parentheses to an accidental on a selected note (or group of notes), choose
the parentheses button from the fifth Keypad layout (shortcut F12).
A plug-in called Add Cautionary Accidentals is supplied with Sibelius that checks your score
and adds cautionary accidentals as necessary –
Editorial accidentals are sometimes written in square brackets. To notate these, type the brackets
as Technique text. (Advanced users: if you need to use square-bracketed accidentals frequently,
you can easily create new symbols for common accidentals in brackets, or modify the parenthesized accidentals, which are already available as symbols.)
b 5.11Plug-ins.
57
Page 58

2. Notations
Double accidentals
Double accidentals are used in
obscure keys such as G# minor
in order to avoid using too
many naturals. For instance,
the sixth note of Db minor is
Bbb, which means the same as
A.
The symbols §b and b# are
occasionally used instead of b
and # when canceling a dou-
ble-flat or sharp earlier in the
bar.
Small accidentals
Accidentals automatically go small on cue notes and grace notes. But if you want a small acciden-
tal on a normal-sized note, create the accidental from the Create
> Symbol dialog and choose
Cue size or Grace note size before clicking OK. Beware that accidental symbols will not auto-
matically play back or transpose.
Double accidentals and quarter-tones
Obtain these from the fifth Keypad layout just like normal accidentals.
Quarter-tones transpose automatically – try transposing E quarter-flat up a major 7th in your
head; the answer’s overleaf. (Then write out the scale of E quarter-flat melodic minor.) What’s
more, Sibelius will respell quarter-tones (see below).
A plug-in to make quarter-tones play back called Quarter-tone Playback is included with Sibel-
ius – see Playback of microtonal accidentals below.
Other microtones
You can obtain and design further microtones using symbols, but
these will not automatically play back or transpose. You can change
the design of the symbols by editing them – for instance, if you prefer
your quarter-tone flats to be filled in in black, replace the backwards-
flat in the fourth column in the House Style
with a filled-in backwards-flat character – see Changing existing
symbols in
b 7.15Edit Symbols for more details.
> Edit Symbol s dialog
To “respell” notes enharmonically (e.g. from F# to Gb), select the note(s) and choose Notes
Respell Accidental (shortcut Return on the main keyboard).
This feature respells a double accidental (e.g. Bbb) as a natural (A) but not vice versa, as you’re
much more likely to want to eliminate double accidentals than to introduce them. Obscurely, it
even respells quarter-tones. (Most quarter-tones can be written in three ways, e.g. C quarter-sharp
is the same as D three-quarters flat and B three-quarters sharp.)
Sibelius also includes two plug-ins for respelling accidentals called Respell Flats as Sharps and
Respell Sharps as Flats –
Simplifying accidentals
If you transpose your music or add a new key signature to existing music, you may end up with
lots of unwanted accidentals. Use the Plug-ins
fix this for you –
In the none-too-likely eventuality that your score contains double accidentals that you want to
eliminate, simply select the whole score (choose Edit
XA), then from the Notes> Transpose dialog (shortcut Shift-T) transpose it up by a Major/Per-
58
“Spelling” of accidentals
When inputting from MIDI (Flexi-time, step-time or MIDI file), Sibelius guesses whether to spell black notes as a sharp or flat, based on
the key signature and context.
>
b 5.11Plug-ins.
> Accidentals > Simplify Accidentals plug-in to
b 5.11Plug-ins
> Select > Select All, shortcut Ctrl+A or
Page 59

2.1 Accidentals
fect Un is o n with Double sharps/flats switched off. All double accidentals will then be replaced
with simpler equivalents.
Adding accidentals to notes
Sibelius comes with two plug-ins that allow you to quickly add accidentals to all the notes in a
selection. To add accidentals to every note that doesn’t “fit” in the current key signature, choose
Plug-ins
> Accidentals > Add Accidentals to All Sharp and Flat notes. This would, for exam-
ple, add an accidental to every Bb in C major and to every C natural in E major. You can also add
accidentals to, literally, every note in a selection by choosing Plug-ins
> Accidentals> Add Acci-
dentals to All Notes.
Altered unisons
“Altered unisons” are two noteheads in a chord with the same pitch but different accidentals, e.g.
Gb and G#.
Some composers such as Messiaen notate this as two noteheads side-by-side
preceded by two accidentals, rather like the interval of a second (see left-hand
picture). Create this notation in the obvious way: create a chord with two note-
heads of the same pitch, then add an accidental to each as normal.
Other composers add the second notehead on a diagonal stem called a “stalk” (see right-hand picture). To write this, add the stalked notehead using one of the stalk symbols provided on the
Create
notehead will not transpose or play back, as it is a symbol.)
> Symbol dialog (shortcut Z). (However, the disadvantage of this notation is that the extra
Notations
Typing accidentals in text
You might want to add accidentals into text objects in your score – for example, if you wanted the
title to include the key of the piece.
To type accidentals in text, type Ctrl or
accidental on the first Keypad layout (shortcut F8), e.g. Ctrl+8 or
Ctrl+9 or
X9 a flat sign. Note that Num Lock must be switched on in order for this to work.
X and the numeric keypad key that corresponds to the
X8 produces a sharp sign, and
Alternatively, just right-click (Windows) or Control-click (Mac) and choose the accidental from
the word menu.
Moving accidentals
Accidentals are automatically positioned. For instance, if you add an accidental to a chord that
already has some, the accidentals will shift positions if necessary to avoid colliding.
In the unlikely event that you want to move an accidental, just drag it horizontally with the
mouse, or nudge it by typing Shift+Alt+
Ctrl+Shift+Alt+
0/1 or xzX0/1.
If you need accidentals above the staff (e.g. for ficta) then you can use a symbol from the Create>
Symbol dialog, or if you want the ficta to play back, use the Add Ficta Above Note plug-in –
b 5.11Plug-ins.
0/1 or xz0/1. To move in large steps, use
59
Page 60

2. Notations
Playback of microtonal accidentals
Most playback devices provide a pitch bend function that can alter a note according to 32 equal
divisions of a half-step (semitone), most easily accessed via Plug-ins
Playback.
To alter the tuning of a note, first add a quarter-tone accidental. Repeat as necessary, then select
the passage you want to retune (make sure to include the next note in normal tuning, so that the
MIDI pitch bend will return to zero). Choose Plug-ins
> Playback > Quarter-tone Playback, and
click OK twice.
Now the notes you want to retune have an invisible MIDI pitch bend command attached to them
(these invisible commands appear in gray if you switch on View
the pitch by a quarter-tone: ~B0,80. ~B0,64 returns the affected staff to normal tuning. You can
edit this pitch bend command to apply values other than a quarter-tone by double-clicking it, and
changing it as follows:
* ~B0,64 = normal tuning
* ~B0,80 = quarter-tone sharp
* ~B0,96 = half-step (semitone) sharp
* ~B0,48 = quarter-tone flat, etc.
Each increment is approximately 3 cents, a cent being 1/100th of a half-step (semitone). Therefore, if you want a pitch, say, 15 cents flat, you can edit the pitch bend command to be 5 less (15/3)
than 64: ~B0,59. (Lowering the third of a major triad by this amount will create a more harmoni-
ous chord.) If you’re not using quarter-tones as such and don’t want the quarter-tone accidental,
you may now delete it and the pitch bend MIDI message will remain.
> Playback > Quarter-tone
> Hidden Objects) that raises
Note that, due to the nature of MIDI channels, only one pitch bend command is possible at a time
per instrument, so that different notes in a chord cannot be retuned by different amounts. If you
attempt to attach different pitch bends to two different notes in a chord, the plug-in will mark the
chord with an X to alert you to the failure to achieve your desired pitch bend.
For more details about the plug-in, see Quarter-tone Playback on page 416. For more infor-
mation about MIDI pitch bend messages, see Pitc h bend on page 327.
Engraving Rules options
In the even more unlikely event that you want to change the spacing between or around acciden-
tals throughout a score, there are excitingly obscure options for this available on the Accidentals
and Dots and Clefs and Key Signatures pages of the House Style
(shortcut Ctrl+Shift+E or
(Answer to transposing question: D quarter-sharp. We’ll leave the scale for you to work out.)
xXE).
60
> Engraving Rules dialog
Page 61

2.2 Articulations
Unusual articulation marks
You may not be familiar with the following articulation marks:
Staccatissimo (very short)
Marcato
Medium pause
Short pause
Up-bow (for stringed instruments)
Down-bow
Harmonic, open hi-hat
Closed hi-hat (percussion), muted
or hand-stopped (brass), left-hand
pizzicato (strings), trill (some
Baroque music)
2.2 Articulations
b 1.1Note input.
v Addi ng marking s.
Articulations are symbols above or below a note, chord or rest that indicate a playing technique,
such as staccato, accent and down-bow. You can create and delete articulations in much the same
way as accidentals.
Creating articulations with a note
When you create a note, you can create articulations with it at
the same time by choosing one or more articulations from the
first or fourth Keypad layout before putting the note into the
score. (You can also add accidentals, ties, rhythm dots, special
noteheads, tremolos and non-standard beaming from the Keypad at the same time.)
Adding articulations to existing notes
To add articulations to a selected note or notes, simply choose
the articulation(s) from the first or fourth Keypad layout.
Notations
Removing particular articulations
* Select the note(s) in question, then choose the articulation(s) from the Keypad, to switch them
off.
* Alternatively, the slow and fiddly way is to select the articulation(s) with the mouse (taking care
not to select the associated note(s) at the same time), then hit Delete.
* To remove all articulations at once, choose the note(s) in question, then choose
the fourth Keypad layout (shortcut F11) and hit 0 or click the corresponding
button shown on the right.
Moving articulations
Articulations are automatically positioned. For instance, if you add an articulation to a note that
already has one, they will shift positions to remain in the correct order and allow room for the new
one.
Occasionally you might want to move an articulation. For example, an articulation is sometimes
put at the “wrong” end if all articulations in the vicinity are at that end; so if there are six notes
with staccatos, five of which have the staccato above the note, you can move the remaining staccato
above the note to follow the pattern even if it should otherwise go below.
To move an articulation, select it and then:
When adding articulations to a chord, it doesn’t matter which
of the noteheads is selected, as articulations apply to all notes
in a chord.
61
Page 62

2. Notations
Custom Articulation 1
Custom Articulation 2
Custom Articulation 3
* choose Edit > Flip (shortcut X) to flip it to the other side of the note, or
* use the arrow keys (or drag with the mouse) to move the articulation vertically. (As usual,
Ctrl+
3/2 or X3/2 moves in larger steps.)
When you flip or move articulations, the operation applies to all articulations attached to a note,
and cannot be applied to one articulation individually. (Should you need to do this, delete the
articulation you want to use and create a new one as a symbol. Beware that articulations created as
symbols have no effect in playback.)
If you wish to reposition articulations throughout the score, see Engraving Rules options
below.
Copying articulations
When you copy a note or chord with Alt+click or z-click or Edit> Repeat (shortcut R), the articulations are copied too, which saves time. You can also use the Plug-ins
> Notes and Rests >
Copy Articulations and Slurs plug-in to copy patterns of articulations from one passage to
another without affecting the notes themselves –
b 5.11Plug-ins for more information.
Articulations on rests
The three types of fermata (pause) are the only articulations you can add to a rest, because the
others don’t make a lot of sense.
In the unlikely event that you should want some other articulation on a rest, obtain it using a symbol. (For instance, in scores by Stockhausen and other contemporary composers, accents on rests
have occasionally been sighted, which apparently represent the sharp intake of breath induced by
unexpected syncopation.)
When you add a fermata to a bar rest, it applies to all staves, and as a result is copied to all staves
(and any instrumental parts).
Custom articulations
If you want to change the appearance of articulations, edit them in the House Style >
Edit Symbols dialog – b 7.15 Edit Symbols.
There are three unused spaces on the fourth Keypad layout to which you can assign further artic-
ulations if desired, corresponding to three spaces in the Articulations rows of the House Style
Edit Symbols dialog:
Which empty slot you use affects the order in which your new articulation will stack when combined with other articulations; articulation 1 will go nearest the notehead, and 3 goes furtheest
from the notehead. As you can see from the image above, you must define an “above” and “below”
62
>
Page 63

2.2 Articulations
symbol for every articulation, though in most cases these are actually the same symbol instead of
inverted versions.
Having defined your three custom articulations, be aware that the buttons on the fourth Keypad
layout won’t update to show your new symbols, and that custom articulations are only available in
the score in which you redefined them; to make them available in other scores, export the house
style (
b 7.7House Style™).
Keyboard shortcuts
Though all of the articulations can be accessed via the standard keyboard shortcuts for the Keypad, it is also possible to assign extra shortcuts to individual articulations –
b 1.2Keypad.
Fermatas (pauses) on barlines
You might want to place a fermata (pause) above or below a barline; to do this, simply create it
from the Create
> Symbol dialog (shortcut Z), setting it to attach to System. This creates a sys-
tem symbol that will appears in all parts.
Articulations above the staff
In music for some instruments – for instance, percussion and singers – it is preferable to have
articulations always above the staff. Sibelius does this automatically for certain instruments,
although you can still flip articulations with Edit
If you need to force articulations to appear above the staff for another instrument, switch on the
option Always position articulations above the staff on the General tab of the Staff Type
dialog (accessible from the Edit Instrument dialog –
> Flip (shortcut X).
b 7.12Edit Instruments).
Notations
Engraving Rules options
The Articulations page of the House Style > Engraving Rules dialog (shortcut Ctrl+Shift+E or
xXE) has various fascinating options:
63
Page 64

2. Notations
Always above: normally, articulations go below most notes which have stems up. This option is
for jazz and session musicians, who usually prefer articulations to go above as this makes them
more visible.
Allowed in staff: most publishers draw staccatos and tenutos in the staff, some draw harmonics,
a few draw accents. We wouldn’t recommend putting other articulations in the staff as they
wouldn’t fit between two staff lines and so would be illegible.
The Position of articulation when near the stem options are:
* Center staccatos on stem: this, the default position, positions any articulations that are at the
stem end of the note automatically: it centers the articulations on the stem if the nearest articulation is a staccato, staccatissimo or wedge. If the articulations are at the notehead end, they are
positioned as normal.
* Half-center staccatos on stem: this option is identical to Center staccatos on stem, except
that it centers the articulations halfway between the stem and the middle of the notehead, if the
nearest articulation to the stem is a staccato, staccatissimo or wedge
* Cent er al l on s tem: fairly obviously makes articulations center on the stem rather than the
notehead when at the stem end
* Center all on notehead: makes articulations at the stem end centered on the notehead, to one
side of the stem.
The Vertical position options are:
* spaces from notehead: when articulations go at the notehead end of a note/chord, this is the
distance of the nearest articulation. If the articulation is forced outside the staff it will be further
away than this.
* spaces from stem: the corresponding distance when articulations go at the stem end
* spaces between articulations: determines, funnily enough, the distance between articula-
tions when more than one is attached to a note.
You can also control the distance above the staff of fermatas on bar rests by adjusting the Ferma-
tas (pauses) on bar rests option.
64
Page 65

2.3 Barlines
NormalDoubleStart repeat
(winged)
End repeat
(winged)
DashedInvisibleBetween
staves
Tick
Short
Final
Double barlines
Double barlines are used to
denote new sections.
A double barline usually
appears at a key signature
change, but not at a time signature change or to coincide with
rehearsal marks (unless these
occur at the beginning of a new
section).
2.3 Barlines
Sibelius supports a wide variety of barlines, suitable for various kinds of music, which you can put
at the end or in the middle of a bar.:
Barlines at the end of bars
You don’t need to put normal barlines at the end of bars into the score: just add bars, and barlines
appear after every bar.
Notations
You can move barlines by dragging them left and right, or using the
larger steps). This changes the gap after the last note/rest.
You can’t delete a barline in order to join two bars together; instead, you should normally double
the length of the time signature (or create an irregular bar) to fit the music into one bar. Similarly,
to split a bar into two, you should normally shorten the time signature instead of trying to draw a
new barline.
Other barlines
These include double barlines, dotted barlines, repeat barlines, early
music barlines, and so on. To create one, select the note after which
you want the barline to appear, then choose the type of barline you
want from Create
with the mouse if you hit Esc to deselect everything before you create
the barline you want.
When putting a barline in the middle of a bar, input the music in the
bar first; then add the barline between two specific notes or rests. (If
you inputted the barline first, it wouldn’t be clear exactly where in the
bar it was meant to go.) The barline may attach to the bar too close to the following note; if this
happens, select the barline and change the X parameter on the General panel of the Properties
window to change its offset.
If a barline occurs in the middle of a bar that has a bar rest in it, then in the interests of good notation you should split the bar rest into separate rests on either side of the barline.
It’s common to split a bar between systems at a double barline or repeat barlines (e.g. at the end of
a line of a hymn). To do this in Sibelius, create two shorter (irregular) bars and use a system break
to split them between systems –
You can copy, drag and delete barlines; deleting any of these other barlines at the end of a bar (even
an invisible barline) turns it back into a normal barline.
b 2.4Bars and bar rests and 7.4 Breaks.
> Barline. Alternatively, you can place the barline
0/1 keys (with Ctrl or X for
65
Page 66

2. Notations
tied across the barline
dotted quarter note (crotchet)
1 bar
1 bar
1 bar
Final double barline
When you start a new score you are given a final double barline at the end, but you can delete it if
you don’t want it.
You’re entirely permitted to put more than one final double barline into a score, for instance if it
consists of more than one movement, song or piece.
Repeat barlines
Create start and end repeat barlines in the same way as other special barlines. To create 1st and
2nd endings (1st-/2nd-time bars),
If you want to create winged repeat barlines, common in handwritten and jazz music, switch on
Wings on repeat barlines on the Barlines page of the House Style
To create a double-repeat barline, which goes between two repeated sections,
put an End repeat barline at the end of the first bar and a Start repeat at the start of the second
bar. You can drag the two repeat barlines further apart or closer together if you really want to.
b 2.16Lines.
> Engraving Rules dialog.
Early music barlines
Sibelius includes barlines suitable for preparing editions of early music. In vocal music predating
the convention of time signatures, one method used by editors to help present-day performers
understand the metrical divisions of the music is to add barlines between the staves (sometimes
called mensurstriche).
To use these barlines in your score, set the Default barline type to Between Staves on the Bar-
lines page of the House Style
Some editors prefer the convention that the music should behave as if the barlines are present,
with notes over barlines being tied (as shown below on the left), and others prefer the opposite
convention, with the music written as if there are no barlines at all (as shown below on the right):
Sibelius automatically ties notes across barlines, so your music will, by default, look like the lefthand example above. If you prefer the other convention, use irregular bars where appropriate to
create a single bar of twice the normal length (
in the correct place yourself.
You can also create Tick and Short barlines, which are useful for notating plainsong:
66
> Engraving Rules dialog (shortcut Ctrl+Shift+E or xXE).
b 2.4Bars and bar rests), then add the barline
Page 67

2.3 Barlines
Barline joins
For clarity, staves are normally
joined by barlines to group similar
instruments together. These groups
often, but by no means always,
reflect the way staves are grouped
with brackets (
b 2.6 Brackets and
braces
).
In orchestral scores, staves with the
woodwind, brass, percussion and
string sections are normally joined
by barlines but separated from adjacent sections.
Vocal staves are never joined to each
other, nor to other instruments.
Staves for the same keyboard instrument are joined together but separated from adjacent instruments.
When a score uses just a few instruments (such as a wind quintet), an
unbroken barline is used to avoid
looking fussy.
These barlines are most useful in passages of music for a single instrument (or voice), but you can
use them in music for multiple instruments if you want.
Designing your own barlines
While it is not possible to design new kinds of barlines that will appear in the Create> Barline
menu, it is possible to modify the appearance of normal barlines on an instrument by instrument
basis, using the House Style
> Edit Instruments dialog – b 7.12Edit Instruments.
Barline joins
Sibelius automatically joins staves into groups of similar instruments with barlines (see box). However, you may want to change
this, as follows:
* Preferably find a point in the score where there are no hidden
staves, so you can check all barline joins at once
* Click carefully at the top or bottom of a normal barline (you
can’t use special barlines to change barline joins) in the score; a
purple square “handle” will appear
* Drag the handle up or down the system to extend or contract
the barline. This affects every system in the score simultaneously.
* You’ll find that by extending or contracting the barlines down
the system you can reorganize the way staves are joined by barlines any way you like.
Notations
switched on (shortcut Ctrl+Alt+H or
The main use of an invisible barline is to notate a bar split between two systems (see Split bars
below). Because the bars on either side are still really separate, there are three inevitable sideeffects: some rhythms can’t run over the invisible barline (you may have to use tied notes); bar
numbering will apparently get a bar out after the barline (but you can correct this with a bar number change –
So use invisible barlines with care.
If you want to hide all the barlines in your score, change the Default barline type to Invisible on
the Barlines page of the House Style
If you want to hide all the barlines in, say, a single staff, or all the staves belonging to an instrumen-
tal family, see Hiding barlines on some staves only below.
Hiding barlines on some staves only
To hide all the barlines in an instrumental family (where the staves are all joined by a continuous
barline), click the top or bottom of the barline so that the purple handle appears, then hit Delete.
Invisible barlines
You can hide a barline at the end of a bar by replacing it with an
“invisible” barline from the Create
barline appears light gray when View
zXH), but disappears when this option is switched off.
b 3.6Bar numbers); and bar rests will appear as two bar rests, one on either side.
> Engraving Rules dialog (shortcut Ctrl+Shift+E or xXE).
> Barline menu. The invisible
> Hidden Objects is
67
Page 68

2. Notations
To restore barlines to those staves, click the top or bottom of the barline on an adjacent staff, and
drag it across the staves with no barlines.
To hide all the barlines in a particular staff, define a new instrument with no barlines
(
b 7.12Edit Instruments):
* Select a bar in the staff in which you want to hide the barlines
* Choose House Style> Edit Instruments
* You should see that the instrument in question is selected in the dialog; click New Instrument,
and click Yes when prompted if you’re sure you want to proceed
* In the New Instrument dialog that appears, change the Name in dialogs to something that
you’ll remember, then click Edit Staff Type
* On the General tab, switch off the Barlines option, then click OK
* Click OK in the New Instrument dialog and make sure that your new instrument is in a suit-
able ensemble so that you can find it.
* If you want no barlines in a particular staff throughout the whole score, make sure nothing is
selected, then choose Create
> Other> Instrument Change, choose your new instrument, click
OK, then click at the start of the staff on the first page, to the left of the initial barline.
* If you want no barlines to appear for a particular passage, select the bar at which you want the
change to occur, then Create
> Other > Instrument Change, choose your new instrument, and
click OK.
Initial barlines on single-staff systems
In lead sheets, it’s customary for initial barlines to be drawn at the start of each system, even
though normally initial barlines only appear where there are two or more staves in the system. To
make an initial barline appear on single-staff systems, switch on Barline at start of single staves
on the Barlines page of the House Style
> Engraving Rules dialog.
Split bars
It is sometimes desirable to split a bar into two halves, the first half at the end of one system and
the second at the start of the next system. To do this, use Plug-ins
b 5.11Plug-ins.
> Other > Split Bar –
Because split bars are still really two bars separated by an invisible barline, they have the same
three drawbacks as invisible barlines (see above).
Engraving Rules options
The options on the Barlines page of the House Style > Engraving Rules dialog (shortcut
Ctrl+Shift+E or
designs, which is useful for scores where you want most or all barlines to be invisible, or dashed, or
in between the staves, etc.
You can also choose whether or not to use winged repeat barlines and adjust the thickness of barlines and the separation of double barlines, should you be struck by an irrepressible urge to do this.
xXE) allow you to change the default barline in your score to any of the other
68
Page 69

2.4 Bars and bar rests
2.4 Bars and bar rests
b 1.1Note input, 2.19 Multirests. To copy or delete several bars at once,
b 1.6Selections and passages.
v Layout and House Style.
Adding bars to the end of the score
Choose Create> Bar > At End (shortcut Ctrl+B or XB) to add a single bar to the end of the score.
To add lots of bars, hold Ctrl+B or
XB down and, after a short delay, it will “auto-repeat.”
Adding bars in the middle of a score
Choose Create> Bar> Single (shortcut Ctrl+Shift+B or xXB), then click in the score where you
want to create the bar.
Create
the selected object.
Alternatively, select the point in your score where you want to add more bars, choose Create
Bar > Other (shortcut Alt+B or zB); type in the Number of bars you want, click OK, and Sibelius creates the bars. If you had nothing selected when you chose Create
pointer will change color to show it is “loaded” with the empty bars, and you can click in your
score to place them.
> Bar > Single with a note, rest, or other object selected adds a bar after the one containing
> Bar > Other, the mouse
Changing the length of bars
To change the length of bars because you are changing the time signature they are in
b 2.27Time signatures.
To change the length of an individual bar (i.e. create/delete notes from it) while retaining the
music:
Notations
>
* Create an irregular bar of the desired length (see below), just before or after the bar in question
* Copy across the music you want to keep, as a passage (b 1.6 Selections and passages)
* Delete the original bar.
Deleting a bar entirely
To delete a bar, simply select it, then choose Edit > Delete Bars (shortcut Ctrl+Delete or XDelete). This deletes everything in the bar and removes the bar itself. You can delete several bars
at once by selecting them as a system passage first –
b 1.6Selections and passages.
Deleting a bar in one staff
* Click an empty part of the bar, which ends up with a light blue box around it
* Hit Delete to turn it into a bar rest. This also deletes other objects in the bar attached to that
staff (e.g. text).
You can delete the contents of several bars at once, or a bar in several staves, by selecting the bars
and hitting Delete –
b 1.6Selections and passages.
69
Page 70

2. Notations
Whole-note rest
Bar rest
Creating a bar rest in one voice
* Select a note or rest in the bar
* Hit N to make the note input caret appear
* Go to the second Keypad layout (shortcut F9)
* Choose the voice you want the bar rest to go in, using the buttons at the bottom of the keypad
(shortcut Alt+1-4 or
* Choose the bar rest button (shortcut 0).
This can be used either to create a bar rest in a voice that didn’t previously exist, or to turn notes
back into a bar rest in one voice only. However, this only deletes notes or rests and leaves other
objects alone. If you want to delete text, lines and other objects too, select the bar and hit Delete.
Beware that a bar rest is not the same as a whole-note (semibreve) rest. Bar rests are centered,
while whole-note rests go at the left of the bar, in the same place a whole-note itself would go, as
shown below:
z1-4)
Deleting a bar rest symbol
Select the bar rest symbol and hit Delete. If the music was in two voices, this will turn it back into
one voice. If the music was in one voice, the bar becomes blank. Blank bars are useful if you want
to put something else in the bar, such as a funny symbol.
If you want blank bars throughout a score, as in some contemporary music, see Repeat bars and
double whole note (breve)/blank bar rests below.
Creating irregular bars
An irregular bar is one that is not the length specified by the previous time signature. Pick-up
(upbeat) bars are a common example. To create an irregular bar:
* Choose Create> Bar> Other (shortcut Alt+B or zB)
* In the dialog that appears, click Irregular
* From the drop-down menu, choose one or more note values adding up to the length you want,
or type them on the numeric keypad (with Num Lock on)
* You c an al so sp eci f y a Number of bars if you want several irregular bars of the same length
* Click OK
* Click in the score where you want to create the bar(s).
Pick-up (upbeat) bars
Scores often start with a short bar, known as a pick-up bar (upbeat bar) or anacrusis. These are
most easily created at the same time as creating the time signature (
Sibelius will automatically show the correct number of beats within the pick-up bar as rests, and
b 2.27Time signatures).
70
Page 71

2.4 Bars and bar rests
will divide the rests it creates according to the time signature’s Beam and Rest Groups. If you
need to add a pick-up (upbeat) bar after creating the time signature:
* First make sure nothing is selected by hitting Esc.
* Choose Create > Bar> Other
*
Create a bar of the suitable length and click at the start of the score to put it before the first full
bar.
* Select the time signature in the first full bar and hit Delete, answering No when asked if you
want to rewrite the following bars.
* Create the time signature again at the start of the new pick-up bar, making sure to switch off
Rewrite bars up to next time signature (
* Finally, use Create > Other > Bar Number Change to create a bar number change to bar 0 at
the start of your pick-up bar (
b 3.6Bar numbers).
b 2.27Time signatures).
Changing a bar rest’s width
Just move the barline at the end.
Repeat bars and double whole note (breve)/blank bar rests
To change a bar rest symbol to a repeat bar, double whole note (breve) bar rest or blank (missing)
bar rest: select the bar rest symbol and choose the design you want from the Bars panel of the
Properties window, or alternatively use the keyboard shortcuts Shift-+/– to choose between the
various symbols. You can change bar rests down all staves at once by first selecting the bar with
Ctrl+click or
X-click.
Notations
If you want blank bar rests throughout the score, switch off Show bar rests on the Bar rests page
of the House Style
To make repeat bars play back,
> Engraving Rules dialog (shortcut Ctrl+Shift+E or xXE).
b 4.6Repeats.
Moving a bar rest symbol
(Only really required when using two or more voices.)
Simply select the bar rest symbol and type
3 or 2. Sibelius won’t let you move a bar rest left or
right because – let’s face it – it’s not all that useful.
If you type Ctrl+
3/2 or X3/2 the bar rest moves by one and a half spaces, which is the right dis-
tance for the slightly larger guitar tab staves.
Split bars
It is sometimes desirable to split a bar into two halves, the first half at the end of one system and
the second at the start of the next system. To do this, use Plug-ins
b 5.11Plug-ins.
> Other > Split Bar –
71
Page 72

2. Notations
2.5 Beams
Beams are the thick lines used to join short notes into groups. Sibelius beams notes together into
groups for you automatically, though you may sometimes want to adjust beaming yourself.
You can adjust beaming in many bars at once, or change it on a note-by-note basis if you want,
including special notations such as cross-staff beaming.
Beam groups
Sibelius chooses sensible default beam groups for each time signature you create in your score,
but depending on musical context you may prefer different groups. You can change the beam
groups both for new time signatures you create, and for existing passages of music.
* To change the beam groups for a new time signature, choose Create> Ti me S ig na tu re (short-
cut T), select the time signature you want to create, and click Beam and Rest Groups.
* To change the beam groups for an existing passage of music, see Re setting beam grou ps
below.
In either case, you will see a dialog with the following options:
You can edit the beam groups for different note values independently. Beam groups are represented by the number of notes in each group, separated by commas, and they must add up to the
number listed alongside the box in the Total in Bar column.
72
Page 73

2.5 Beams
primary beams
secondary beams
For example, in the time signature 4/4 you could set the Group 8ths (quavers) as option as fol-
lows:
4,4
As you edit the beam groups for one note value, shorter note values often inherit the same beam
groups (except in 4/4 when eighth notes are set to beam in two groups of four, which is a special
case – see below). This means that eighth note beam groups of (say) 5,2,1 would produce sixteenth note beam groups of 10,4,2.
If you wish, you can override this behavior by setting the other options on the dialog, namely
Group 16ths (semiquavers) differently and Group 32nds (demisemiquavers) differently.
Again, you must ensure that the beam groups add up to the Total in Bar number alongside. Using
our 4/4 example again, here are a few of the possibilities:
Group 8ths (quavers) as:
4,4 2,2,2,2 5,2,1
Group 16ths (semiquavers) differently:
8,8 5,3,1,4,3 4,6,3,3
2,2,2,2
5,2,1
Notations
For any given time signature with a denominator larger than 8 (e.g. 9/16, 15/32, etc.) the longest
note value you can adjust is the note value represented by the denominator (e.g. in 9/16 you cannot adjust eighth note (quaver) beam groups – they will always be beamed in pairs by default; in
15/32 you cannot adjust 16th note (semiquaver) groups either; these will always follow the eighth
note beam groups).
Primary and secondary beams
The primary beam is the one furthest from the noteheads; secondary beams are any other beams,
e.g.
Notes grouped by secondary beams (which we’ll call “sub-groups”) should always indicate the
rhythm as clearly as possible; this is achieved by splitting the sub-groups according to the smaller
units of the beat. In simple time signatures, sub-groups typically occur every two eighth notes
(quavers), and in compound time signatures, sub-groups often occur every three eighth notes.
Sibelius handles all of this complexity for you, but allows you to define sub-groups in the Beam
and Rest Groups and Reset Beam Groups dialogs if necessary.
73
Page 74

2. Notations
To define sub- g r oups, sw i tch on Subdivide their secondary beams for 16th notes (semiqua-
vers) and/or 32nd notes (demisemiquavers), and type the sub-groups separated by commas, mak-
ing sure that they add up to the number under Total in Bar. For example, in 6/8 you could
subdivide 16th note secondary beam groups as follows:
Group 8ths (quavers) as:
3,3
Subdivide their secondary beams:
2,2,2,2,2,2
Sibelius only allows primary beams to be an eighth note (quaver) beam, i.e. a single beam. In
some situations you may want 16th note (semiquaver) primary beams; in this case, add the extra
beam using the line provided in the Create
> Line dialog (b 2.16Lines).
Resetting beam groups
To regroup notes with beams, simply select the notes as a passage, then choose Notes > Reset
Beam Groups; a dialog will appear. If you want to reset the beam groups to Sibelius’s defaults for
the prevailing time signature, simply click OK without making any changes. If you want to regroup
the notes according to your own preferences, change the settings in the dialog (see 2.5Beam
groups above for details), and click OK.
The settings you choose in the Notes
> Reset B eam Groups dialog do not persist in the score
after you apply them; if you edit the note values of the notes in bars you have reset, the beam
groups will be reset to the groups specified in the prevailing time signature. If necessary, you can
create a new time signature with the desired beam groups, click Yes when asked if you want the
following bars rewritten, and then delete it after you finish inputting and editing (this time
answering No when asked if you want the following bars rewritten).
Reusing beam groups
If you set up the beam groups for a time signature (e.g. 7/8) when creating it, those groupings will
persist for all subsequent bars up to the next time signature change. But other 7/8 time signatures
elsewhere in the same score will not necessarily have the same beam groups – setting up beam
groups only affects that one time signature. However, if you want other 7/8 time signatures elsewhere in the same score to use the same beam groups, just copy the time signature. If you want
some 7/8 bars to use one beam grouping (e.g. 2+2+3) and others to use another (e.g. 3+2+2), create two 7/8 time signatures with the different groupings, then copy them to the relevant bars or
passages, input the music, and then delete any superfluous time signatures (choosing No when
asked if you want to the music to be rewritten).
74
Page 75

2.5 Beams
Beam from and to rests
Beam over rests
Editing beams
To adjust beaming in individual places, rather than setting them throughout the score or in a pas-
sage, you can use the buttons on the third Keypad layout (shortcut F10). Simply select the note(s)
or grace note(s) you want to adjust, then choose the appropriate button.
Breaks the beam from the previous note
Joins to the previous and next notes
Ends the current beam (i.e. breaks the beam from the next note)
Separates the note from those on either side
Joins to the previous note with just a single (primary) beam.
Beams across rests
Sibelius can automatically beam across rests, both within a beam group and at either end, if
required. When creating a time signature, or resetting the beaming of an existing passage, use the
following options in the Beam and Rest Groups dialog:
Notations
* Beam from and to rests allows a beamed group to start and/or end with a rest
* Beam over rests means that rests won’t break a beam group if they fall within the defined
grouping.
Some examples of these options in action:
If rests in the middle of a beamed group collide with the beam, you have the option of either moving the rest (by selecting it and typing
angles below. If a rest at the start or end of a beamed group collides with the beam, hide the rest
(select it and type Ctrl+Shift+H or
then position as required (
In modern scores, beamed rests sometimes have “stemlets”, which are short stems extending
from the beam to the rest (or stopping just short of the rest). Sibelius does not currently support
stemlets automatically, but if you need them, you can create a good approximation by defining a
new silent notehead type in which you replace the notehead symbols with rest symbols, and use
this notehead type instead of rests –
b 2.25Symbols).
3/2) or adjusting the height of the beam – see 2.5Beam
xXH), and insert an appropriate rest symbol, which you can
b 7.14Edit Noteheads.
75
Page 76

2. Notations
p
ma marc., accompagnando
3 3
3
Beams across barlines, system and page breaks
To make a note beam to the note before the previous barline, select the note at the start of the bar,
choose the third Keypad layout (shortcut F10) and hit 8 on the numeric keypad.
If a beam over a barline happens to fall at a system or page break, Sibelius allows the beam to continue across the break, as in this example below from the bass clarinet part of Stravinsky’s
Petrouchka:
To make a beam continue across a barline, including a system or page break, use the F10 Keypad
layout to set the last note at the end of the system or page to Start of beam (shortcut 7 on the
keypad) or Middle of beam (shortcut 8 on the keypad), and the first note of the note on the following system to Middle of beam (shortcut 8 on the keypad) or End of beam (shortcut 9 on the
keypad).
If you need to adjust the angle of the beam, move the handle of the rightmost note’s stem in the
beam group before the break, and the stem’s handle of the note at the rightmost end of the beam
after the break. When you are not using Optical beam positions (see 2.5 Engraving Rules
options below), adjusting the stem length of notes at the beginning of the beam will also have an
affect on the slant of the beam. If a cross-staff beam is grouped to only one note after the break, its
beam will be horizontal.
Beaming tuplets
If a tuplet falls within a beam group, it typically breaks the beam on either side, in order to keep
the rhythm as clear as possible. The option Separate tuplets from adjacent notes in the Beam
and Rest Groups dialog, switched on by default, controls this behavior. Consider this case:
The beam grouping on the left (Sibelius’s default) is much clearer than the grouping on the right,
which has Separate tuplets from adjacent notes switched off.
Beaming eighth notes (quavers) in 4s
By default, Sibelius beams eighth notes (quavers) in fours in simple duple (e.g. 2/4, 4/4, 2/2) time
signatures. Four consecutive eighth notes that fall within beat divisions will be beamed together,
but Sibelius will automatically break the beam groups if the rhythm within the group changes, e.g.
76
Page 77

2.5 Beams
If you want to change this behavior, define new beam groups (e.g. set the Group 8ths (quavers)
as option to 2,2,2,2 etc.) when creating the time signature, or when you choose Notes
> Reset
Beam Groups to reset the beaming of an existing passage. In addition, Sibelius does not apply
this rule when the Beam over rests option is switched on.
Beam angles
Occasionally you may want to adjust a beam’s angle or position, either to prevent it hitting a grace
note or other obstacle, or because you are a music engraver and have your own views on where
beams should go. If you want to adjust many beams, it’s better to adjust the Engraving Rules for
beams (see Engraving Rules options below) so you can control beam angles en masse.
To move a beam, zoom in close on it so you can see what you’re doing, and simply drag either end
up or down with the mouse. When you drag the left-hand end, you alter the height of both ends of
the beam, and when you drag the right-hand end, you alter the angle. Instead of dragging with the
mouse, you can type
3 or 2. Ctrl+3/2 or X3/2 moves the beam by 0.25 spaces. You can also
make quick adjustments to the angle of a beam by selecting the beam itself and dragging up and
down; this does the same as dragging the left-hand end of the beam.
To set a beam back to its normal position, choose Notes
> Reset Stems and Beam Positions,
which you can also do to a selected passage or multiple selection.
Adjusting a beam’s angle is exactly the same thing as adjusting the lengths of the stems the beam
is attached to.
Level beams
In some music (e.g. for percussion) it is customary for beams to always be flat, and never drawn at
an angle. Sibelius always produces level beams on percussion staves by default, but if you want to
use this convention on other instruments, edit the instrument in question using House Style
Edit Inst ruments. In the Edit In strument dialog, click Edit Staff Type and switch on Beams
always horizontal on the Notes and Rests page –
b 7.12Edit Instruments.
Notations
>
Reversing beams
To move a beam from above a group of notes to below it – that is, to flip the stem-directions of all
the notes along the beam – select any note in the group (just one note will do) and flip it by choos-
ing Edit
> Flip (shortcut X); b 2.24Stems and leger lines if you’re not clear how. To restore
the stem direction, flip the same note back, or select the group of notes and choose Notes
Stems and Beam Positions.
If Edit
> Flip doesn’t seem to work on a beamed note, select all the notes along the beam and
choose Notes
> Reset Stems and Beam Positions. Then flip just the first note.
Flipping fractional beams
Occasionally a fractional beam (also called a “flag”) in a beamed group of notes will end up pointing leftwards when you want it to point right, or vice versa. To flip it the other way, select the note,
and on the Notes panel of the Window
> Properties window switch on Flip fractional beam.
> Reset
77
Page 78

2. Notations
Cross-staff beams
Music for keyboard instruments often contains beamed notes flowing between the hands, like
this:
To obtain this result:
* Input all of the music onto the staff that uses most of the music that crosses between the hands
– in this case, the top staff:
* Select the notes that should cross over to the bottom staff (preferably as a multiple selection) –
in this case, the B and Gs with leger lines
* Cross them to the staff below by choosing Notes> Cross-Staff Notes> Move Down a Staff
(shortcut Ctrl+Shift+
Unsurprisingly, Notes> Cross-Staff Notes > Move Up a Staff (shortcut Ctrl+Shift+3 or
xX3) crosses notes to the staff above.
* You can put beams above both staves (as in the first beamed group in the first picture above) or
between the staves (as in the last beamed group) simply by flipping the directions of the stems
as appropriate by choosing Edit
Don’t do this by dragging the stems to the other side of the notes – this won’t have the effect you
intended!
* In the first picture above, the last three low notes in the left hand were also flipped to avoid col-
liding with the notes crossing from the right hand.
2 or xX2).
> Flip (shortcut X).
78
Note also that:
* Notes do not have to have beams to be crossed to an adjacent staff – the B in our example is a
quarter note (crotchet). You can even cross rests over.
* Notes can only cross over to another staff in the same instrument.
* You can beam across three staves by inputting the notes onto the middle staff, then crossing
notes to the staves above and below. (It is not necessary for any notes to remain on the middle
staff!)
* Notes crossing onto another staff do not affect that staff ’s voices at all. A staff can even have four
voices plus further notes crossing onto it from adjacent staves!
Page 79

2.5 Beams
* Notes are in many respects treated as being on the original staff – for example, if you transpose
a passage on the original staff, then any notes that were crossed from that staff will also transpose.
* In some circumstances you may encounter redundant accidentals when you cross notes to
another staff. Simply select the accidentals and hide them to solve this problem –
b 2.1Accidentals.
Beams between notes on the same staff
In older scores, particularly for violin music, if a group of notes is very low, then
very high (or vice versa), you will sometimes see the beam running through the
middle of the notes, with some stems pointing up and some pointing down, as
shown on the left.
To achieve this in Sibelius, input the notes as usual, then select the beam, which will either be
above or below the beamed group, and drag it (or use the arrow keys) to move the whole beam up
or down such that it is between the notes. To adjust the angle of the beam, select the right-hand
end of the beam and drag it with the mouse or nudge it with
3/2.
Chords split between staves
It is common in keyboard music to split the notes of some chords between the two staves:
To achieve this, write each note of the split chord onto the staff it
appears on, using a suitable voice; for example, in the case illustrated, put the treble notes of the split chords into voice 2 on the
upper staff, and the bass notes in voice 1 on the lower staff. Then
use Edit
lower staff downward. Finally, drag the end of each stem in the
right hand downwards so that it meets the stem of the left-hand note.
> Flip (shortcut X) to point the stems of the notes on the
Notations
In the case of chords using notes shorter than a quarter note (crotchet), hide the flags or beams by
selecting them and typing Ctrl+Shift+H or
essary using Edit
> Flip, to meet the rest of the chord.
xXH, then extend their stems, flipping them if nec-
Feathered beams
In contemporary music, extra beams sometimes “splay out” from a single
beam to indicate an accelerando. Using nested tuplets (
other tuplets) it is possible to create feathered beams that look and play
back correctly. For example, to notate the example shown on the left:
* Create the first note as an eighth (quaver)
* Ty pe Ctrl+3 or X3 to create a triplet
* Input the second note of the triplet, then type Ctrl+3 or X3 to create another triplet, which is
automatically nested inside the first one.
* Input the second note of the nested tuplet, then type Ctrl+3 or X3 again to create another
nested tuplet. Don’t worry that the tuplet numbers and brackets look a bit of a mess.
* When you have input all the notes, select the bar and open the Notes panel of the Properties
window
b 2.29Tr iplets and
79
Page 80

2. Notations
* Set the left-hand combo box at the bottom of the panel to None, and the right-hand combo box
to No bracket
* Each of the notes will now have a flag, so select each of them and choose Edit> Hid e or Show >
Hide (shortcut Ctrl+Shift+H or xXH) to hide them – see 2.5 Hiding beams, flags and
tails below
* Now draw in the extra beams using the beam line from the Create> Line dialog (shortcut L). It
helps to zoom in close so you can see more clearly what you are doing.
It is also possible to create feathered ritenutos and figures with more or fewer notes than this
using this basic procedure.
Hiding beams, flags and tails
To hide any beam, select it (not the note) and choose Edit > Hide or Show > Hide (shortcut
Ctrl+Shift+H or
Hidden Objects is switched on (shortcut Ctrl+Alt+H or zXH), and invisible if it is switched off.
You can also hide flags and tails, e.g. on single eighth notes (quavers), in the same way: select the
flag or tail and choose Edit
dotted eighth note (quaver) followed by a sixteenth note (semiquaver)), you can even hide the flag
independently of the main beam.
Hiding, say, the beam on a pair of eighth notes (quavers) doesn’t actually turn them into quarter
notes (crotchets) – it just makes them look like quarter notes!
xXH). As with other objects, hidden beams are displayed in light gray if View >
> Hide or Show> Hide. If you have beamed notes with flags (say, a
Engraving Rules options
The Beams and Stems page of House Style> Engraving Rules allows you to control the posi-
tions of beams and also their appearance, as follows:
Beam Positions
Most of the Beam Positions options only apply if Optical beam positions is switched on.
(Switching off Optical beam positions will make beams appear as they did in Sibelius 3 and ear-
lier, which are generally not as good.)
Where the interval between the first and last notes of a beam is no more than an octave, you can
specify an “ideal” angle for each interval under Default slant per interval. For some beams this
angle has to be adjusted because beams are not allowed to appear in certain positions, such as in
between two staff lines. Also when two notes are very close together, producing a steep beam, the
angle may have to be reduced to the value specified in Maximum beam gradient: Up to an 8ve,
1 in n.
Maximum beam gradient: 1 in n controls the angle for intervals greater than an octave. The
beam follows the angle between the first and last noteheads, as long as it is no steeper than this
value.
If notes in the middle of a beam curve towards the beam, producing a concave shape, it is normal
for the beam to be horizontal. You can control this using Horizontal if middle notes intrude by
n spaces (which specifies the distance a note must protrude through an imaginary line between
the first and last notes to make the beam horizontal).
80
Page 81

2.5 Beams
Avoid simple wedges prevents some cases of “wedges” in groups of eighth notes (quavers).
These are white triangles whose three sides are a beam, a stem and a staff line, and are believed to
look irritating by some music engravers. Other engravers are very unconcerned about them: to
avoid wedges, the stems have to be lengthened, which to some eyes is worse than the wedges
themselves. Therefore this option is truly optional.
The stem lengths specified in Default beamed stem length are typically less than for normal
notes (and will be shortened further for very high or low notes). However, this is offset by the fact
that stems are lengthened again if necessary to move the beam to a good position. You can further
control stem lengths using Minimum length n spaces at the bottom of the page, which affects
both beamed and unbeamed notes.
Cross-staff beams are always horizontal by default (assuming Optical beam positions is on),
and go in between two staves. If you want cross-staff beams to go at an angle you should drag
them on a case-by-case basis.
Beam Appearance
The options under Beam Appearance are self-explanatory, controlling the thickness and separa-
tion of the beam lines, and whether groups of beamed notes should be allowed to begin with a
rest.
Perhaps most notable is the French beams option, where the stems of the notes in
the beamed group only touch the innermost beam, as shown on the right. This
convention is used particularly in music published in France (hence the name).
Notations
81
Page 82

2. Notations
Brackets and braces
Normally, instruments of the same
family (e.g. woodwind, brass, percussion) are bracketed together. Percussion instruments and solo instruments
are not normally bracketed.
Instruments divided onto two or more
staves, such as divisi strings, are joined
by a sub-bracket (a thin bracket to the
left of the normal one). Sub-brackets
are also sometimes used to group similar instruments, e.g. Flute and Piccolo,
Violin I and II. In older orchestral
scores, curly braces are sometimes used
instead of sub-brackets, particularly to
group horns.
Keyboard staves are joined with a
brace, but an organ pedal staff is not
braced to the organ manuals.
Small groups of instruments are usually not bracketed at all.
Instruments bracketed, sub-bracketed
or braced together normally also have
their staves joined by barlines.
2.6 Brackets and braces
Brackets and braces are used at the left-hand side of systems to group similar instruments
together. Sibelius chooses where they go by default, but you can change it if you like.
Moving brackets and braces
You can adjust which staves in a score are bracketed or braced
together:
* Preferably find a point in the score where there are no hid-
den staves, so you can see all brackets and braces at once
* Click on the end of an existing bracket, sub-bracket or brace,
so it turns purple
* Drag it up or down to extend or contract it
* To remove a selected bracket, sub-bracket or brace, simply
hit Delete.
Adding a bracket, sub-bracket or brace
* From the Create > Other > Bracket or Brace menu, click
Bracket, Sub-bracket or Brace
* Click to the left of a staff to put the bracket, sub-bracket or
brace there
* Click and drag the top or bottom of it to extend it onto other
staves.
hide one staff of a piano part, so that only one staff is visible, Sibelius hides the brace; similarly, if
you hide all but one of a bracketed group of staves in one or more systems, Sibelius hides the
bracket.
If you need to hide a bracket or brace in another situation (e.g. perhaps in a cut-away score), select
the bar after the brace you want to hide, then open the Bars panel of the Properties window and
switch off Brackets. For more information on properties of objects,
Placing braces mid-system
Occasionally in keyboard music (particularly organ music) it is necessary to show a brace in the
middle of a system. This may also be necessary in “cut-away” scores (see Staves with gaps in
on page 145), where a braced instrument is introduced halfway across a page.
If you need a brace to appear mid-system:
* Select the bar after whose initial barline you want the brace to appear
82
Hiding a bracket or brace
Sibelius automatically hides brackets and braces if there is no
barline at the left-hand side of the system. For example, if you
b 5.14Properties.
Page 83

2.6 Brackets and braces
* Open the Bars panel of Properties, and increase Gap before bar very slightly with the arrows
(e.g. to 0.03 or 0.06) until a brace appears. (This effectively creates a divided system, like a
coda, but with a minuscule gap.)
* Then in the same Properties panel switch off Initial barline and Clefs.
You will probably need to move the first note of the bar following the brace left to close the gap
where the clefs would have gone: move it as far left as it will go, then with the note still selected
decrease X in the General panel of Properties until it is correctly positioned (similarly for any
note/rest at the start of the bar in the left hand). Then drag the second note leftwards until the gap
between the first two notes is normal.
Note, however, that this method also causes brackets and braces to be restated for any other staves
that appear at this point, which may not be desirable in a cut-away score. You can change this by
defining a new instrument with the Bracket option (on the General page of the Edit Staff Type
dialog, accessed from Edit Instrument) switched off; then apply an instrument change to the
other staves that appear at this point. For further details,
b 7.12Edit Instruments.
Style of brackets and braces
Various reassuringly obscure options can be found on the Brackets page of the House Style >
Engraving Rules dialog (shortcut Ctrl+Shift+E or xXE), which allow you to adjust the thickness
and position of brackets, sub-brackets and braces. These options are self-explanatory, except that
the Draw as brace option for sub-brackets is for the old-fashioned style in which (for example)
Violin I and II are joined by a brace rather than a sub-bracket.
If you are using Sibelius’s Helsinki font, you will notice its brace is slightly thicker and more curvaceous than Opus’s.
To create a bracket without hooks, used occasionally by composers such as Penderecki, modify a
suitable bracket in the House Style
to create this manually in your score – it won’t automatically appear at the start of every system.
> Edi t Lines dialog; simply set the Cap to None. You’ll have
Notations
Braces are drawn by scaling a { symbol, found in the General row of the Create
> Symbol dialog.
To change the brace design, substitute a brace character from a different music or text font
(
b 2.25Symbols). Some printers can’t print the brace as a stretched symbol; if you find that
you can only print braces with the Substitute Braces option in the File
> Print dialog switched on,
then your printer suffers from this limitation and you will not be able to change the design of
braces in Sibelius.
83
Page 84

2. Notations
2.7 Chord diagrams
b 3.4Chord symbols.
Chord diagrams (sometimes known as chord boxes, fretboard grids, guitar frames, and so on) illus-
trate how to play a particular chord on a guitar or other fretted instrument, by showing which fingers need to be on which fret on each string. They are usually accompanied by text chord symbols,
which Sibelius can include for you.
Creating chord diagrams
To create a chord diagram above the selected note, choose Create > Chord Diagram (shortcut
Shift-K) to get this dialog:
* The Choose a Chord Diagram options at the left-hand side of the dialog allow you to set the
following:
% Chord is the key of the chord you want to use
% The middle list determines the kind of chord, e.g. major, minor, augmented, diminished, etc.
% Bass is the bass note of the chord. By default, it’s set to the same pitch as Chord, but you can
change it if you are writing, say, a G chord with a B as the bottom note.
% The large white rectangle shows you the available chords based on the settings chosen in the
dialog
% Show fingering text displays the fingerings required to play a particular chord below each
string in the chord diagram. The option will not be available if no fingering has been speci-
fied. See Adding fingering t ext below for more information.
% Show chord symbol adds a text chord symbol above the chord diagram.
% Clicking Edit or New allows you to edit the selected chord diagram or create a new one
which isn’t listed. See Editing and sa ving chord diagrams below for more details.
* The Chords Listed options at the right-hand side of the dialog allow you to specify which chord
diagrams appear in the left-hand side of the dialog:
% Instrument: set this option to the tuning of the guitar you are writing chord diagrams for
% Chords used in this score displays any chord diagrams already used in the score that
match the options currently chosen in the dialog
84
Page 85

2.7 Chord diagrams
% Common chords (standard tuning) shows chord diagrams from a built-in selection for
standard 6-string guitar tuning, chosen for their ease of playing; generally, three different
fingerings are provided for each chord type: one at (or close to) the nut, one at around the
fifth fret, and one at around the ninth fret.
% All chords tells Sibelius to automatically calculate all the possible fingerings for a given
chord. Note that the shapes generated will be governed by the Max. stretch setting (see
below). If you are using a special guitar tuning, switching on this option will provide you
with a wide selection of playable shapes for a particular chord, which you can then add to a
library.
% Max. stretch n frets determines the maximum distance between the lowest and highest
frets that can be fingered for automatically generated chord diagrams. See Maximum
stretch below for more details.
% The Chords in library options determine whether Sibelius should display chords from a
custom chord diagram library. See Chord diagram libraries below for more details.
You can switch on several of the checkboxes at once to list all of their chords together at the lefthand side of the dialog.
When you select one of the chord diagrams at the left-hand side and click OK, the diagram will be
created above the selected note. If you didn’t have a note selected before you opened the dialog,
the mouse pointer will change color to show that it’s “loaded” with a chord diagram – just click on
the page where you want it to go.
Notations
Maximum stretch
For the automatically generated chord shapes, you can specify the maximum distance that your
fingers can stretch by setting the Max. stretch option to the desired number of frets.
Copying, editing and deleting chord diagrams
Chord diagrams can of course be copied, moved and deleted in the usual ways. Once created in
your score, you can edit a chord diagram simply by double-clicking it.
You can also cycle through different fingerings for a selected chord without going back into the
dialog: simply click the diagram once so that it is selected, then choose Edit
gram (shortcut Ctrl+Shift+K or
xXK) repeatedly to cycle through different fingerings, from the
choice specified by the Chords Listed options you last chose in the Create
log.
> Change Chord Dia-
> Chord Diagram dia-
85
Page 86

2. Notations
Editing and saving chord diagrams
If you want to edit a chord diagram shown in the Chord Diagram
dialog, select it with the mouse and click the Edit button. If you want
to create a new chord diagram from scratch, click the New button. In
both cases, you’ll see the dialog shown on the left.
* To place a dot on a string, simply click where you want the dot to
appear
* To specify that the string should be open or unplayed, click above
the top line of the frame to switch between the O and X symbols
* To draw a barré, click and drag across the strings you want to be
barréd
* To set the fret number at the top right of the diagram, click the
arrows to the right of the window.
* To set a different chord symbol than the provided default, switch on Use custom chord sym-
bol and type the desired chord symbol; see Chord symbols below for more details.
* To specify how the chord diagram should be fingered, enter the fingering into the Fingering
text box; see Adding fingering text below for more details.
When you are happy with the chord diagram, click OK to return to the Chord Diagram dialog.
If you want to use your edited or new diagram in other scores in future, you should save it into a
chord diagram library, which happens automatically when you click OK (as long as you have a
suitable library chosen in the drop-down next to the Add to library checkbox).
Adding fingering text
To add fingering text to a chord diagram, use the Edit Chord Diagram dialog, as described
above. Simply type the desired text in the Fingering text box, as follows:
* Each string may show a single character as its fingering text
* You can type any alphanumeric character (i.e. numbers 0-9 and letters A-Z, either upper or
lower case)
* Type a hyphen (-) for any string that does not have a fingering.
As you type, the preview window shows how the fingering will appear in the score (though the
characters in the preview window are larger in relation to the size of the chord diagram than they
will appear in the score). So for the example shown above, you should type -1342-.
86
Page 87

2.7 Chord diagrams
Appearance of fingering text
The appearance of chord diagram fingering text is specified on the Guitar page of the House
Style
> Engraving Rules dialog:
Notations
* Draw fingering text determines whether the fingering text should be drawn Below diagram
(the default) or Above diagram. When fingering text is drawn above the diagram, it is drawn
in line with the O and X symbols. Fingering text takes precedence over the O and X symbols, so
if both a fingering and an O or X should appear over the same string, the fingering text will be
displayed.
* Finge ri n g text n spaces from diagram determines the distance from the bottom or top of the
chord diagram that the fingering text will be drawn (the default is 0.5 spaces). If fingering text is
set to display above the diagram, this parameter also changes the distance of the O and X symbols from the frame, to ensure that the fingering text appears in line with the symbols.
To change the font, style (e.g. bold, italic) and point size of the text used for fingerings, choose
House Style
> Edit Text Style and edit the Chord diagram fingering text style.
Chord diagram libraries
Libraries make working with chord diagrams very quick. For example, if you always use a specific
set of fingerings for your chords (e.g. jazz voicings, or very simple fingerings for your guitar students), you can set up a library containing just those chords. This makes it much quicker to find
the diagrams you want, and once you’ve set up a library, you can use it in every score you write.
You can even send your library to a friend, or add libraries that others have created.
To create a library, c h o o se New Chord Diagram Library... from the drop-down menu in the
main Create
to type in a name – make it something memorable like Jazz chords or Easy voicings – then click
OK.
> Chord Diagram dialog or the Edit Chord Diagram dialog. You will be prompted
87
Page 88

2. Notations
To add a chord to your library, simply select it in the white rectangle at the left of the dialog, and
click Add to Library. (If no library is chosen next to the Chords in library option on the right of
the dialog, you’ll be prompted to choose or create one.)
To use a chord from a library, switch on Chords in library, choose the appropriate library from
the drop-down, and the chords will be listed at the left-hand side of the dialog.
To remove a chord from your library, make sure Chords in library is switched on (it’s probably a
good idea to switch off the other three options so only the chords in your library are shown), then
choose the chord you want to remove and click Delete from library.
If you want to share your chord diagram library with somebody, or want to install a library sent to
you by another user, libraries are stored in the Chord Shapes folder inside Sibelius’s application
data folder (see User-editable files in
b 8.1Working with files). Chord library files have
the extension .scl.
Chord symbols
In most cases, you won’t need to change the chord symbol above a chord diagram from the default
that Sibelius gives you, but if you want to use a different naming convention, there are two
approaches:
* If you want to change the chord symbol for each type of chord diagram in the score (e.g. major,
minor, sus4, etc.) so that every new chord diagram you create uses your preferred chord symbol, you can define the default chord symbol as part of the house style of the score you’re working on.
* On the other hand, if you just want to change the chord symbol above a single chord diagram
(for some special purpose, e.g. creating a very unusual chord such as Cb major), you can create a
custom chord symbol for that individual chord diagram.
To change the chord symbol for each chord diagram type:
* Choose the Guitar page of House Style> Engraving Rules (shortcut Ctrl+Shift+E or xXE)
* Click Edit Chord Symbols
* In the dialog that appears, choose the Chord type, and edit the Chord Symbol accordingly
* When you’ve finished, click OK.
This will also change the chord symbols in any chord diagrams you’ve already created (but won’t
affect any text chord symbols which aren’t part of chord diagrams). If you want to transfer these
chord symbol settings to another score, export the house style from this score and import it into
another one (you can choose to import only the Chord symbols in chord diagrams house style
element if you wish) –
b 7.7House Style™.
Alternatively, to change the chord symbol for an individual chord diagram:
* In the Create> Chord Diagram dialog, select the chord diagram whose chord symbol you want
to change, and click Edit (or click New to create a new chord diagram based on the selected
one)
* Switch on Use custom chord symbol and type the desired new name, then click OK.
88
Page 89

2.7 Chord diagrams
Be aware that chord symbols above chord diagrams are drawn using the Chord symbols text
style, so characters such as b and # in the dialogs for defining custom chord symbols will translate
into proper musical symbols such as b and # when you create a chord diagram –
b 3.4Chord
symbols.
Whether you edit the chord symbols globally in the house style or individually on single chord
diagrams, the custom chord symbols are never stored in a chord diagram library (because you
may wish to use the same library in a variety of projects that require different naming conventions). In particular, for individual custom chord symbols, the way to reuse the custom chord
symbol is to create the chord diagram in your score, and then to create it again, switch on the
Chords used in this score option in the Create
> Chord Diagram dialog, and choose the chord
from the left-hand side of the dialog.
Making chord diagrams play back
Chord diagrams themselves don’t play back, but once you’ve added them to your score, you can
use Plug-ins
from them –
> Composing Tools > Realize Chord Symbols to generate a simple accompaniment
b 5.11Plug-ins.
Unrecognized chord diagrams
When opening scores created in earlier versions of Sibelius that contain chord diagrams, you may
see a message informing you that some chord diagrams in the score could not be recognized,
which means that the chord diagram isn’t one of the standard ones Sibelius knows about. Unrecognized chord diagrams are colored red in the score so you can find them easily.
Notations
You may choose to double-click the chord diagram to edit it and match it yourself to one of the
default types, or you may choose to leave well alone. The main reason you may want to edit an
unrecognized chord diagram is so that Sibelius knows how to transpose it if you transpose the
score. In either case, if you want to make the chord diagram black again, select it and choose
Layout
> Reset Design (shortcut Ctrl+Shift+D or xXD).
Engraving Rules options
In addition to the chord symbol and fingering text options mentioned above, the Guitar page of
the House Style
ling the design of chord diagrams.
> Engraving Rules dialog contains numerous self-explanatory options control-
89
Page 90

2. Notations
2.8 Clefs
v Adding markings.
The clefs at the start of every system are drawn automatically by Sibelius. It puts in the standard
clefs for you when you create instruments. You only need to think about clefs if you want to
change them.
Creating clef changes
* If you want the clef to change mid-bar, input the music for
the bar where the clef change is to go, so you can create it
between the right notes
* Select the note or rest before the place where you want the
clef to go, choose Create
click the clef you want from the bewildering list provided.
(The most common clefs are at the top.)
* You can tell Sibelius to use a different clef when Notes>
Tr a nsposi n g Score is switched on, which is useful for some
transposing instruments (e.g. low brass and wind instru-
ments); to do this, switch on the Transposed clef option
and choose the clef to use
* The Draw on subsequent staves option, as its name sug-
gests, draws the new clef on all subsequent systems; switching this off is useful for special kinds of music such as lead sheets, but normally you should leave
it switched on
* Click OK and the clef is created in your score. All the music after the clef will shift up or down to
ensure that it sounds the same as before.
> Clef (shortcut Q for “qlef”), and
You can also input a clef change with the mouse. Make sure that nothing is selected in your score
(hit Esc), choose the clef you want from the Create
clef to go and click. For instance, to change the clef of an entire instrument, put the clef you’ve
chosen on top of the existing clef at the very start of the score.
You can copy clef changes (e.g. with Alt+click or
at the start of staves.
> Clef dialog, then point where you want the
z-click), though you can’t copy the full-size clefs
Moving clefs
If you drag a clef change around, you’ll see that Sibelius automatically shifts the music up or down
as the clef passes over it to keep the notes sounding the same.
Try this out – create a clef change somewhere, then drag it left and right along the staff, or up and
down onto other staves, and watch the music instantly leap around. When you have nothing better to do, this can provide hours of harmless (if rather limited) enjoyment.
90
Page 91

Available clefs
Clefs
Deleting clefs
Clef changes can be removed with Delete. If the clef you want to delete changes at the start of a
system, delete the clef change that appears at the end of the previous system. (That’s because – if
you think about it – the small clef on the end of the previous system is the actual change point; the
big clef on the next system is really no more than the standard indication of what the current clef
is.)
For unpitched percussion instruments you may want to use the “blank clef” (the one that consists
of a bit of empty staff). Although this just makes the staff start with a gap instead of a clef, you
position the blank clef just like any other clef instead of trying to delete the clef that’s already there.
Once you have put a blank clef change somewhere, you can’t select it and delete it – there’s nothing
there to select. Instead, put a different clef on top and hit Delete.
Hiding clefs at the start of a system
If you want a clef to appear on
the first system but not on
subsequent systems – for
example, if you’re working on
a lead sheet – simply switch
off Draw on subsequent
systems when you create the
clef; don’t try and delete the
clef at the beginning of each
system!
If you don’t want clefs to
appear at all on a particular
staff, select all the bars in that
staff, then switch off the Clefs
checkbox on the Bars panel of
the Properties window
(
b 5.14Properties).
2.8 Clefs
Notations
Hiding cautionary clef changes
If a score contains several
movements or songs, you may want to change clef at the start of one section without a cautionary
clef appearing at the end of the previous section. To do this, select the cautionary clef, and choose
Edit
> Hide or Show> Hide (shortcut Ctrl+Shift+H or xXH).
For more information about hiding objects,
b 5.6Hiding objects.
Octave clefs
Some people write (say) piccolo with a normal treble clef, some with an “8” above (particularly in
avant garde scores) – this is a matter of taste. A real-life piccolo playing music with a “treble 8” clef
91
Page 92

2. Notations
would not sound an octave higher than a piccolo playing the same music with a plain treble clef –
they sound at exactly the same pitch. In other words, the “8” is just a hint or reminder to the reader
that this is a transposing instrument.
Therefore in Sibelius clefs with or without “8s” (or “15s”) on them are all precisely equivalent. The
fact that a piccolo sounds an octave higher than a flute playing the same notes is an attribute of the
instrument, not of the clef (after all, they could both be playing from a plain treble clef). This is
indicated in Sibelius by the fact that a piccolo has a transposition change by default, namely it
transposes up an octave both in a non-transposing score and in a transposing score. You can create
a transposing instrument like this yourself using House Style
> Edit Instruments (b 7.12 Edit
Instruments).
A tenor voice “instrument” in Sibelius is similar – it has a transposition change to make it transpose down an octave both in a non-transposing score and in a transposing score. The “treble 8”
clef for a tenor is again just a hint to the reader – it’s an alternative to a plain treble clef and has no
direct effect on the sounding pitch of the notes.
Engraving Rules options
The Clefs and Key Signatures page of the House Style > Engraving Rules dialog (shortcut
Ctrl+Shift+E or
width, should you be so inclined.
The Cue note size option on the Notes and Tremolos page of the dialog also determines the
size of clef changes (compared with full size clefs).
xXE) allows you to change the Gap before initial clef and the Initial clef
92
Page 93

2.9 Color
b 5.7Highlight.
v Color and importing graphics.
Sibelius allows you to color most objects in your scores. This is very useful for producing more
eye-catching scores – for example, you might want to color all the tempo directions or rehearsal
marks a particular color to make them stand out for the conductor or performers – and also has
educational applications: you could use different colors to differentiate between different fingerings or chord diagrams, or color each pitch on a notation staff differently to help students learn to
read music.
How to color an object
Changing the color of an object is simple:
* Select the object (or objects) you want to color
* Choose Edit > Color (shortcut Ctrl+J or XJ)
* A standard color picker dialog appears: choose the color you want and click OK.
To color another object the same color as the last color you applied, select the object and choose
Edit
> Reapply Color (shortcut Ctrl+Shift+J or xXJ).
2.9 Color
Notations
You can color objects individually, or a whole bunch of selected objects at once. For example, to
change the color of all the notes in a bar, select the bar so that it’s surrounded by a single light blue
box, then choose Edit
the lyrics in your song and color them all at once.
> Color. You can also use filters (b 5.4Filters and Find) to select, say, all
Resetting an object’s color
To reset the color of an object to black, select it and choose Layout> Reset Design (shortcut
Ctrl+Shift+D or
xXD).
Viewing notes in color
Whether you can see notes whose color you have changed depends on the option you have chosen
in the View
switched on, all notes will be colored according to this option, and not according to any individual
colors you have chosen. User-chosen colors are only visible if either None or Notes Out of
Range are switched on.
> Note Colors submenu. If you have either Pitch Spectrum or Voice Colors
b 5.19View menu.
Printing in color
You can print your score in full color if desired – simply ensure that the Print in color option in
the File
print in shades of gray. If this option is switched off, all colored objects will be printed in black –
b 5.13Printing.
> Print dialog is switched on. If you have a black-and-white printer, colored objects will
93
Page 94

2. Notations
Which objects can be colored?
With a few exceptions, you can change the color of anything you can select, including notes, lines,
text, chord diagrams, symbols, and more.
When coloring notes, the following constituent parts are drawn in the same color as the notehead
itself: accidentals; articulations; rhythm dots; brackets; and ties.
The following parts ignore the chosen color of the notehead and are always drawn in black:
beams; leger lines; stems; acciaccatura slash; tremolos; and flags/hooks.
Which objects cannot be colored?
* Individual noteheads in chords (if you color one notehead of a chord, all the other noteheads
will be colored the same)
* Instrument names to the left of the system
* Bar numbers (although you can color bar number changes if you want)
* Initial clefs at the start of systems (although you can color clef changes if you want)
* Initial key signatures at the start of systems (although you can color key signature changes)
* Note names denoting the tuning of tab staves at the start of systems
* Normal barlines (although you can color special barlines, such as repeat, double and final bar-
lines)
* Staff lines.
Storing colors in the Windows color picker
If you want to retain a number of colors so you can re-use them later, you can store them in the
Custom colors section of the color picker. This is not as straightforward as it may seem, as the
new color is always stored as the first custom color (which overwrites your new color on the right
side of the dialog) unless you’ve previously selected a custom color.
If you want to go through a score looking for several colors you’ve already used and add them to
the custom colors list:
* Select the object that uses the color you want to store
* Choose Edit> Color (shortcut Ctrl+J)
* Ty pe Alt+C to select the first custom color
* Use the arrow keys to move the focus to the custom color slot in which you want to store the
object color
* Click Add to custom colors.
Storing colors in the Mac color picker
To add a custom color on Mac:
* Select the object that uses the color you want to store
* Choose Edit> Color (shortcut XJ)
* Click and hold down the left mouse button in the box showing the color of the object at the top
of the dialog
* Drag the mouse down into one of the custom color boxes at the bottom of the dialog.
94
Page 95

2.10 Cues
b 2.12Grace notes, b 6.1Working with parts.
2.10 Cues
Cue notes are small notes commonly used for one of two purposes. In instrumental parts, cue passages are included to help the player keep track of where they are, and are not meant to be played.
Cue passages can also indicate optional music, for example a harmonica solo might be cued in a
clarinet part with an indication to “play if no harmonica is available.”
Don’t confuse cue notes with grace notes (
space in the bar, and play back like normal notes. Because a cue can contain grace notes or special
noteheads, any note – whether it’s a normal note, special notehead or even a grace note – can be
made cue-size. Rests, bar rests and other objects such as text, lines and symbols can also be cuesize.
The other chief uses for small notes are for writing optional keyboard accompaniments in choral
and instrumental music, and the solo part on a keyboard accompaniment, but in these cases you
should not use cue notes. Instead it looks better if you make the relevant staves small, which will
make all the notes and other objects on it small too –
The size of cue notes is proportional to the staff size – normally cue notes go on a normal-size
staff, but if you put cue notes on a small staff they will go even smaller. You can even put cue grace
notes on a small staff, to get really, really tiny notes.
b 2.12Grace notes): cue notes occupy rhythmic
b 2.23Staves.
Paste as Cue
It only takes a moment to create a cue passage using Edit> Paste as Cue:
* Make sure you are looking at the full score rather than one of the dynamic parts. Although you
can use Edit
score, so that you can see the staff you are taking material from, and paste the cue into multiple
instruments at the same time
* Copy the music you want to use as a cue to the clipboard by selecting it, then choosing Edit>
Copy (shortcut Ctrl+C or XC)
* Select the bar rest or rest in the staff or staves on which you want the cue to appear, then choose
Edit
> Pas te as Cue (shortcut Ctrl+Shift+Alt+V or xzXV). If you select more than one staff,
Sibelius will paste the cue onto all the selected staves using multicopy (
passages).
> Paste as Cue in a dynamic part, it’s much more convenient to use it in the full
b 1.6Selections and
Notations
That’s all there is to it! A number of useful things are done for you when pasting a cue passage:
* The copied music is pasted into the first unused voice, with all the notes and other markings
made cue-size
* The cue is hidden in the full score but is shown in the parts (though if you want to, you can tell
Sibelius to show the cue in the full score as well – see Paste as Cue pref erences below)
95
Page 96

2. Notations
* Any awkward transpositions (e.g. cueing a clarinet in A on a horn in F staff ) are taken care of,
and either if necessary a suitable clef or an octave line is added to ensure the cue is easily read-
able, according to your preferences – see Paste as Cue preferences below
* The name of the cued instrument is written above the cue, using the Instrument name (cues)
staff text style (which you can edit if you want to change its appearance or default position –
b 3.10Edit Text Styles)
* If the staff type (e.g. number of lines) of the cued instrument and the destination staff don’t
match, appropriate instrument changes are created at the start and end of the cue
* Particular markings (such as lyrics, dynamics, slurs and hairpins) are automatically included or
excluded, according to your preferences – see Paste as Cue preferences below
* Any instrument changes in the source passage are automatically excluded
* The cue notes are set not to play back (by automatically switching off the Play on pass check-
boxes in the Playback panel of Properties – see When to play back notes on page 270)
* Suitable bar rests are added in an unused voice in both the full score and the parts, so that they
look correct (though if you want to, you can tell Sibelius not to add bar rests in the parts – see
Paste as Cue preferences below).
About the only thing Sibelius doesn’t do is decide which instrument you should use for the cue,
although it can even suggest where cues should be added – read on.
Suggest Cue Locations plug-in
When preparing parts for performance, one of the more time-consuming aspects is determining
where cues would be most useful to the performers. You may want to add cues after a certain
number of bars’ rest, or after a certain length of time. Plug-ins
> Other > Suggest Cue Locations
can do this for you – see Suggest Cue Locations on page 414.
Check Cues plug-in
Any edits you make to the music in your score after cueing the parts may potentially lead to errors
in the cues, because Sibelius doesn’t automatically update the cue passages if the source staves
from which they take their material are subsequently edited. However, a handy plug-in is
included that can check cues against the music from which they are taken and warn you if it finds
any disparities; simply select the passage in question and choose Plug-ins
> Proof-reading>
Check Cues – see Check Cues on page 419 for more details.
Paste as Cue preferences
Various options for determining exactly what happens when you do Edit > Paste as Cue are
found on the Past e as Cu e page of File
below.
The Pitch of Cue options provide three alternatives for how Sibelius should resolve differences in
range between the source and destination staves:
* Change clef if necessary adds a clef at the start of the pasted cue, if the clefs used by the
source and destination staves don’t match. So if you paste a cue from, say, a cello staff onto a
flute staff, Sibelius will create a bass clef at the start of the cue and restore the treble clef at the
end. Note that these clef changes are only visible in the part.
> Preferences (in the Sibelius menu on Mac), as shown
96
Page 97

2.10 Cues
* Add octave line if necessary adds an octave line (up to two octaves up or down, i.e. 8va,
15ma, 8vb or 15mb) over the pasted cue if Sibelius has to transpose the cue by one or more
octaves to ensure that it fits comfortably on the staff.
* Neither will simply paste the cue into the clef of the destination staff without transposing the
music by octaves.
The Copy into Cue options allow you to choose
whether or not Sibelius should include Slurs, Articu-
lations, Dynamics, Lyrics and Technique text in the
pasted cue.
It’s conventional for cue passages in parts to show bar
rests in addition to the cue notes, as an extra visual
indicator to the player that the notes are for informational purposes only, and not to be played. However,
in some kinds of music, including jazz, it’s common
for cues simply to be written in smaller notes without
adding bar rests. Show bar rests with cue (in parts)
allows you to choose which of these conventions to follow: when switched on (the default), the part’s original
bar rests are shown in addition to the cue notes; when
switched off, only the cue notes themselves are shown.
Notations
Again, in some kinds of music, commonly jazz, you sometimes see the word “Play” written after
the cue, to remind the performer that she should now start playing again. Write ‘Play’ a f ter cue,
switched off by default, does this. It is most useful if you switch off Show bar rests with cue (in
parts).
In most kinds of music it’s conventional for cues to be shown only in the parts, so Hide cues in
full score is switched on by default. However, scores in some fields of music, such as musical the-
ater, usually show cues in the full score, so switching this option off is useful in those situations.
Be aware that changing the options here will not affect cues you have already pasted; they only
affect cues you subsequently create using Edit
> Paste as Cue.
Creating cue notes, rests and other objects
If you need to make a note, rest, line, symbol or staff text object cue-size yourself, select it
and then choose the cue-size button shown on the right (shortcut Enter) from the second
Keypad layout (shortcut Enter). When creating notes with mouse and keystrokes or step-
time, notes continue to be cue notes until you switch the button off again.
If you want to make a passage of music cue-sized, simply select the passage and choose the same
keypad button from the second Keypad layout. You can make cue notes and cue-size rests normal
size again by re-choosing the cue note button in the same way.
You cannot make system text, system symbols or system lines cue-size, as these are never
included in cue passages (since they already occur in all parts).
97
Page 98

2. Notations
The General panel of Properties also includes a Cue-sized checkbox, which works the same way
as the cue-size button.
Engraving Rules options
The Notes and Tremolos page of the House Style > Engraving Rules dialog (shortcut
Ctrl+Shift+E or xXE) lets you modify the size of grace and cue notes relative to normal notes.
Grace notes are normally a bit smaller than cue notes (60% of full size instead of 75%).
Big notes
In the unlikely event that you want extra-large notes on normal staves (a notation used occasion-
ally by Stockhausen to denote loud notes) and don’t also need cue-sized notes, set Cue note size
on the Notes and Tremolos page of the House Style
and input the big notes as cue notes.
> Engraving Rules dialog to, say, 130%,
98
Page 99

2.11 Free rhythm
2.11 Free rhythm
Music in free rhythm means that there are no time signatures (as in recitative, some avant garde
music, or plainchant), or else the current time signature is ignored (as in a cadenza). Sometimes
several instruments can play free rhythms at different speeds so that the notes don’t even line up,
as in aleatory music.
Normal free rhythm
For free rhythm in just one instrument, or in several where the rhythms align, create irregular
bars of appropriate lengths (choose Create
put the music.
Depending on the type of music, you can input the music in one long bar or in several shorter bars
with invisible barlines. The latter has the advantage that the music can split at any of the invisible
barlines, which will be required for a long cadenza that wouldn’t fit on one system. The downside
is that the extra bars will upset the bar numbering, though you can correct this by putting an
appropriate bar number change at the end (
Independent free rhythms
Sometimes instruments play completely independent rhythms at the same time, like this:
> Bar> Other, shortcut Alt+B or zB) into which to
b 3.6Bar numbers).
Notations
Notate this in the same way as described above, but choose one of the staves as the “fundamental”
rhythm and input it first. Then add the other rhythms, but change their apparent speed using
tuplets with a suitable ratio – i.e. choose None and switch off the Bracket in the Create> Tuplet
dialog (or change it retrospectively from the Notes panel of the Properties window). For example,
in the music above the first three notes on the lower staff are in a hidden triplet, so as to fit against
the first two notes on the upper staff.
Sibelius will even play back the rhythms correctly, as if it were reading the spatial notation.
Music with multiple simultaneous time signatures
...or with barlines in different places on different staves: b 2.27 Time signatur es.
Plainchant
To write plainchant, use irregular bars (choose Create> Bar> Other, shortcut Alt+B or zB) of
appropriate lengths, and use stemless notes –
book.
b Choir in the How to section of the Hand-
Recitative
Use irregular bars (choose Create > Bar> Other, shortcut Alt +B or zB) of appropriate lengths.
For help on lyrics in recitative,
b 3.3Lyrics.
99
Page 100

2. Notations
Cadenzas
Here are a couple of approaches to creating cadenzas in Sibelius. It is helpful if you calculate the
length of your cadenza (in terms of note values) before you start to input it:
* Create an irregular bar, or a series of them, using Create> Bar > Other (shortcut Alt+B or zB).
Remember that each bar you create can be no longer than one system, so you may need to create multiple bars with invisible barlines in between. You can specify the exact duration of the
bar(s), as complex as you like, and fill them with music as normal. You should avoid deleting
(hiding) any unwanted rests if possible, as they will have an effect on note spacing even if they
are hidden.
* If you need to have regular (measured) bars of music and free rhythm simultaneously, see Inde-
pendent free rhythms above.
100
 Loading...