

Page 1

Avid S1 Guide
Installation and Overview
Page 2

Legal Notices
© 2019 Avid Technology, Inc., (“Avid”), all rights reserved. This guide may not be duplicated in whole or in part without the written consent of Avid.
For a current and complete list of Avid trademarks visit: http://www.avid.com/legal/trademarks-and-other-notices
Bonjour, the Bonjour logo, and the Bonjour symbol are trademarks of Apple Computer, Inc.
Thunderbolt and the Thunderbolt logo are trademarks of Intel Corporation in the U.S. and/or other countries.
This product may be protected by one or more U.S. and non-U.S. patents. Details are available at www.avid.com/patents.
Product features, specifications, system requirements, and availability are subject to change without notice.
Guide Part Number 9329-66103-00 REV A 12/19
Page 3
Safety Compliance
Safety Statement: (Model #: 9100-65814)
This equipment has been tested to comply with USA, Canadian, EU and International safety certification standards: UL 60950-1 2nd edition, CAN/CSA C22.2 No.
60950-1-07; 2nd edition, EN 60950-1:2006 /A11, /A1, /A12, /A2, IEC 60950-1:2005/A1, /A2, UL 62368-1, Second Edition, CAN/CSA 62368-1-14, EN 62368-1:2014 /A11
and IEC 62368-1:2014 (Second Edition)
Avid Technology Inc., has been authorized to apply the appropriate NRTL mark on its compliant equipment.
Power Safety Input Rating
Avid S1: 12Vdc, 2.8A
Warn ing
Important Safety Instructions
1) Read these instructions.
2) Keep these instructions.
3) Heed all warnings.
4) Follow all instructions.
5) Do not use this equipment near water.
6) Clean only with dry cloth.
7) Do not block any ventilation openings. Install in accordance with the manufacturer's instructions.
8) Do not install near any heat sources such as radiators, heat registers, stoves, or other equipment (including amplifiers) that produce heat.
9) Only use attachments/accessories specified by the manufacturer.
10) Only perform the services explicitly described in the install and or user manual. For services or procedures not outlined in the install or user manual, speak with authorized service personnel.
11) Refer all servicing to qualified service personnel. Servicing is required when the equipment has been damaged in any way, such as power-supply cord or plug is damaged, liquid has been spilled or objects have fallen into the equipment, the equipment has been exposed to rain or moisture, does not operate normally, or has been
dropped.
12) For products that are a Mains powered device:
The power inlet is the main disconnect device and should remain accessible. Disconnect the power cord before servicing the unit.
Protect power cords from being walked on or pinched particularly at plugs, convenience receptacles, and the point where they exit from the equipment.
Unplug this equipment during lightning storms or when unused for long periods of time.
Warning! To reduce the risk of fire or electric shock, do not expose this equipment to rain or moisture.
Do not defeat the safety purpose of the polarized or grounding-type plug. A polarized plug has two blades with one wider than the other. A grounding type plug
has two blades and a third grounding prong. The wide blade or the third prong are provided for your safety. If the provided plug does not fit into your outlet, consult an
electrician for replacement of the obsolete outlet.
This unit may be provided with a power supply cord set suitable for 120V AC input only (for U.S.A.and Canada). For other than U.S.A. and Canada, a qualified person
must provide for use with this unit, an appropriate, approved power supply cord set which is in compliance with the end use country requirements and has a minimum
cross-sectional area of 1.0mm2.
13) For products containing a lithium battery:
Warning! Danger of explosion if battery is incorrectly replaced. Replace only with the same or equivalent type.
14) For products with a power switch:
It should remain accessible after installation.
15) The equipment shall be used at a maximum ambient temperature of 40° C and maximum altitude of 2000m.
16) For products with an operator-accessible fuse:
CAUTION: For continued protection against risk of fire, replace only with same type and rating of fuse.
ATTENTION: Pour ne pas compromettre la protection contre les risques d'in- cendie, remplacer par un fusible de même type et de même caractéristiques nom- inales.
17) For products that are not rack-mountable: Use only with a cart, stand, tripod, bracket, or table specified by the manufacturer, or sold with the equipment. When a cart
is used, use caution when moving the cart/equipment combination to avoid injury from tip-over.
Page 4

Contents
Introduction . . . . . . . . . . . . . . . . . . . . . . . . . . . . . . . . . . . . . . . . . . . . . . . . . . . . . . . . . . . . . . . . . . . . . . . . . . . . . . . . . . . . . . 1
What’s Included . . . . . . . . . . . . . . . . . . . . . . . . . . . . . . . . . . . . . . . . . . . . . . . . . . . . . . . . . . . . . . . . . . . . . . . . . . . . . 2
Optional Equipment . . . . . . . . . . . . . . . . . . . . . . . . . . . . . . . . . . . . . . . . . . . . . . . . . . . . . . . . . . . . . . . . . . . . . . . . . . 2
System Requirements and Compatibility . . . . . . . . . . . . . . . . . . . . . . . . . . . . . . . . . . . . . . . . . . . . . . . . . . . . . . . . . 2
Activation . . . . . . . . . . . . . . . . . . . . . . . . . . . . . . . . . . . . . . . . . . . . . . . . . . . . . . . . . . . . . . . . . . . . . . . . . . . . . . . . . . 2
About This Guide . . . . . . . . . . . . . . . . . . . . . . . . . . . . . . . . . . . . . . . . . . . . . . . . . . . . . . . . . . . . . . . . . . . . . . . . . . . . 3
Hardware Switches on S1 Control Surface . . . . . . . . . . . . . . . . . . . . . . . . . . . . . . . . . . . . . . . . . . . . . . . . . . . . . . . . 4
How to Use this PDF Guide . . . . . . . . . . . . . . . . . . . . . . . . . . . . . . . . . . . . . . . . . . . . . . . . . . . . . . . . . . . . . . . . . . . . 5
Resources. . . . . . . . . . . . . . . . . . . . . . . . . . . . . . . . . . . . . . . . . . . . . . . . . . . . . . . . . . . . . . . . . . . . . . . . . . . . . . . . . . 5
Installation and Setup . . . . . . . . . . . . . . . . . . . . . . . . . . . . . . . . . . . . . . . . . . . . . . . . . . . . . . . . . . . . . . . . . . . . . . . . . . . . . 6
Unpacking S1 . . . . . . . . . . . . . . . . . . . . . . . . . . . . . . . . . . . . . . . . . . . . . . . . . . . . . . . . . . . . . . . . . . . . . . . . . . . . . . . 6
Connecting S1 . . . . . . . . . . . . . . . . . . . . . . . . . . . . . . . . . . . . . . . . . . . . . . . . . . . . . . . . . . . . . . . . . . . . . . . . . . . . . . 7
Installing EuControl Software . . . . . . . . . . . . . . . . . . . . . . . . . . . . . . . . . . . . . . . . . . . . . . . . . . . . . . . . . . . . . . . . . . 9
Create Your Surface in EuControl Settings . . . . . . . . . . . . . . . . . . . . . . . . . . . . . . . . . . . . . . . . . . . . . . . . . . . . . . 11
Installing and Connecting Avid Control . . . . . . . . . . . . . . . . . . . . . . . . . . . . . . . . . . . . . . . . . . . . . . . . . . . . . . . . . 17
Connecting a Footswitch . . . . . . . . . . . . . . . . . . . . . . . . . . . . . . . . . . . . . . . . . . . . . . . . . . . . . . . . . . . . . . . . . . . . . 18
Enabling EUCON in Pro Tools . . . . . . . . . . . . . . . . . . . . . . . . . . . . . . . . . . . . . . . . . . . . . . . . . . . . . . . . . . . . . . . . . 18
Confirming EUCON . . . . . . . . . . . . . . . . . . . . . . . . . . . . . . . . . . . . . . . . . . . . . . . . . . . . . . . . . . . . . . . . . . . . . . . . . 19
Powering-On Your System After Initial Setup. . . . . . . . . . . . . . . . . . . . . . . . . . . . . . . . . . . . . . . . . . . . . . . . . . . . . 19
Connecting a Second Workstation . . . . . . . . . . . . . . . . . . . . . . . . . . . . . . . . . . . . . . . . . . . . . . . . . . . . . . . . . . . . . 20
How to Proceed . . . . . . . . . . . . . . . . . . . . . . . . . . . . . . . . . . . . . . . . . . . . . . . . . . . . . . . . . . . . . . . . . . . . . . . . . . . . 21
S1 Surface Controls Overview . . . . . . . . . . . . . . . . . . . . . . . . . . . . . . . . . . . . . . . . . . . . . . . . . . . . . . . . . . . . . . . . . . . . 22
Surface SHIFT. . . . . . . . . . . . . . . . . . . . . . . . . . . . . . . . . . . . . . . . . . . . . . . . . . . . . . . . . . . . . . . . . . . . . . . . . . . . . . 22
Channel Strips . . . . . . . . . . . . . . . . . . . . . . . . . . . . . . . . . . . . . . . . . . . . . . . . . . . . . . . . . . . . . . . . . . . . . . . . . . . . . 23
Channel Strip Displays. . . . . . . . . . . . . . . . . . . . . . . . . . . . . . . . . . . . . . . . . . . . . . . . . . . . . . . . . . . . . . . . . . . . . . . 25
Assignable Channel Encoders . . . . . . . . . . . . . . . . . . . . . . . . . . . . . . . . . . . . . . . . . . . . . . . . . . . . . . . . . . . . . . . . 26
Channel Encoder Assignment Switches. . . . . . . . . . . . . . . . . . . . . . . . . . . . . . . . . . . . . . . . . . . . . . . . . . . . . . . . . 28
Fader Banking Controls. . . . . . . . . . . . . . . . . . . . . . . . . . . . . . . . . . . . . . . . . . . . . . . . . . . . . . . . . . . . . . . . . . . . . . 30
Track Color Switches (Modifiers and User 1–4) . . . . . . . . . . . . . . . . . . . . . . . . . . . . . . . . . . . . . . . . . . . . . . . . . . . 31
Appendix A. Specifications. . . . . . . . . . . . . . . . . . . . . . . . . . . . . . . . . . . . . . . . . . . . . . . . . . . . . . . . . . . . . . . . . . . . . . . . . . 32
Mechanical . . . . . . . . . . . . . . . . . . . . . . . . . . . . . . . . . . . . . . . . . . . . . . . . . . . . . . . . . . . . . . . . . . . . . . . . . . . . . . . . 32
Environmental . . . . . . . . . . . . . . . . . . . . . . . . . . . . . . . . . . . . . . . . . . . . . . . . . . . . . . . . . . . . . . . . . . . . . . . . . . . . . 32
Dimensions. . . . . . . . . . . . . . . . . . . . . . . . . . . . . . . . . . . . . . . . . . . . . . . . . . . . . . . . . . . . . . . . . . . . . . . . . . . . . . . . 33
Test Mode . . . . . . . . . . . . . . . . . . . . . . . . . . . . . . . . . . . . . . . . . . . . . . . . . . . . . . . . . . . . . . . . . . . . . . . . . . . . . . . . . 33
Appendix B. Compliance. . . . . . . . . . . . . . . . . . . . . . . . . . . . . . . . . . . . . . . . . . . . . . . . . . . . . . . . . . . . . . . . . . . . . . . . . . . . 34
Environmental Compliance . . . . . . . . . . . . . . . . . . . . . . . . . . . . . . . . . . . . . . . . . . . . . . . . . . . . . . . . . . . . . . . . . . . 34
EMC (Electromagnetic Compliance) . . . . . . . . . . . . . . . . . . . . . . . . . . . . . . . . . . . . . . . . . . . . . . . . . . . . . . . . . . . . 35
Avid S1 Guide iv
Page 5
Introduction
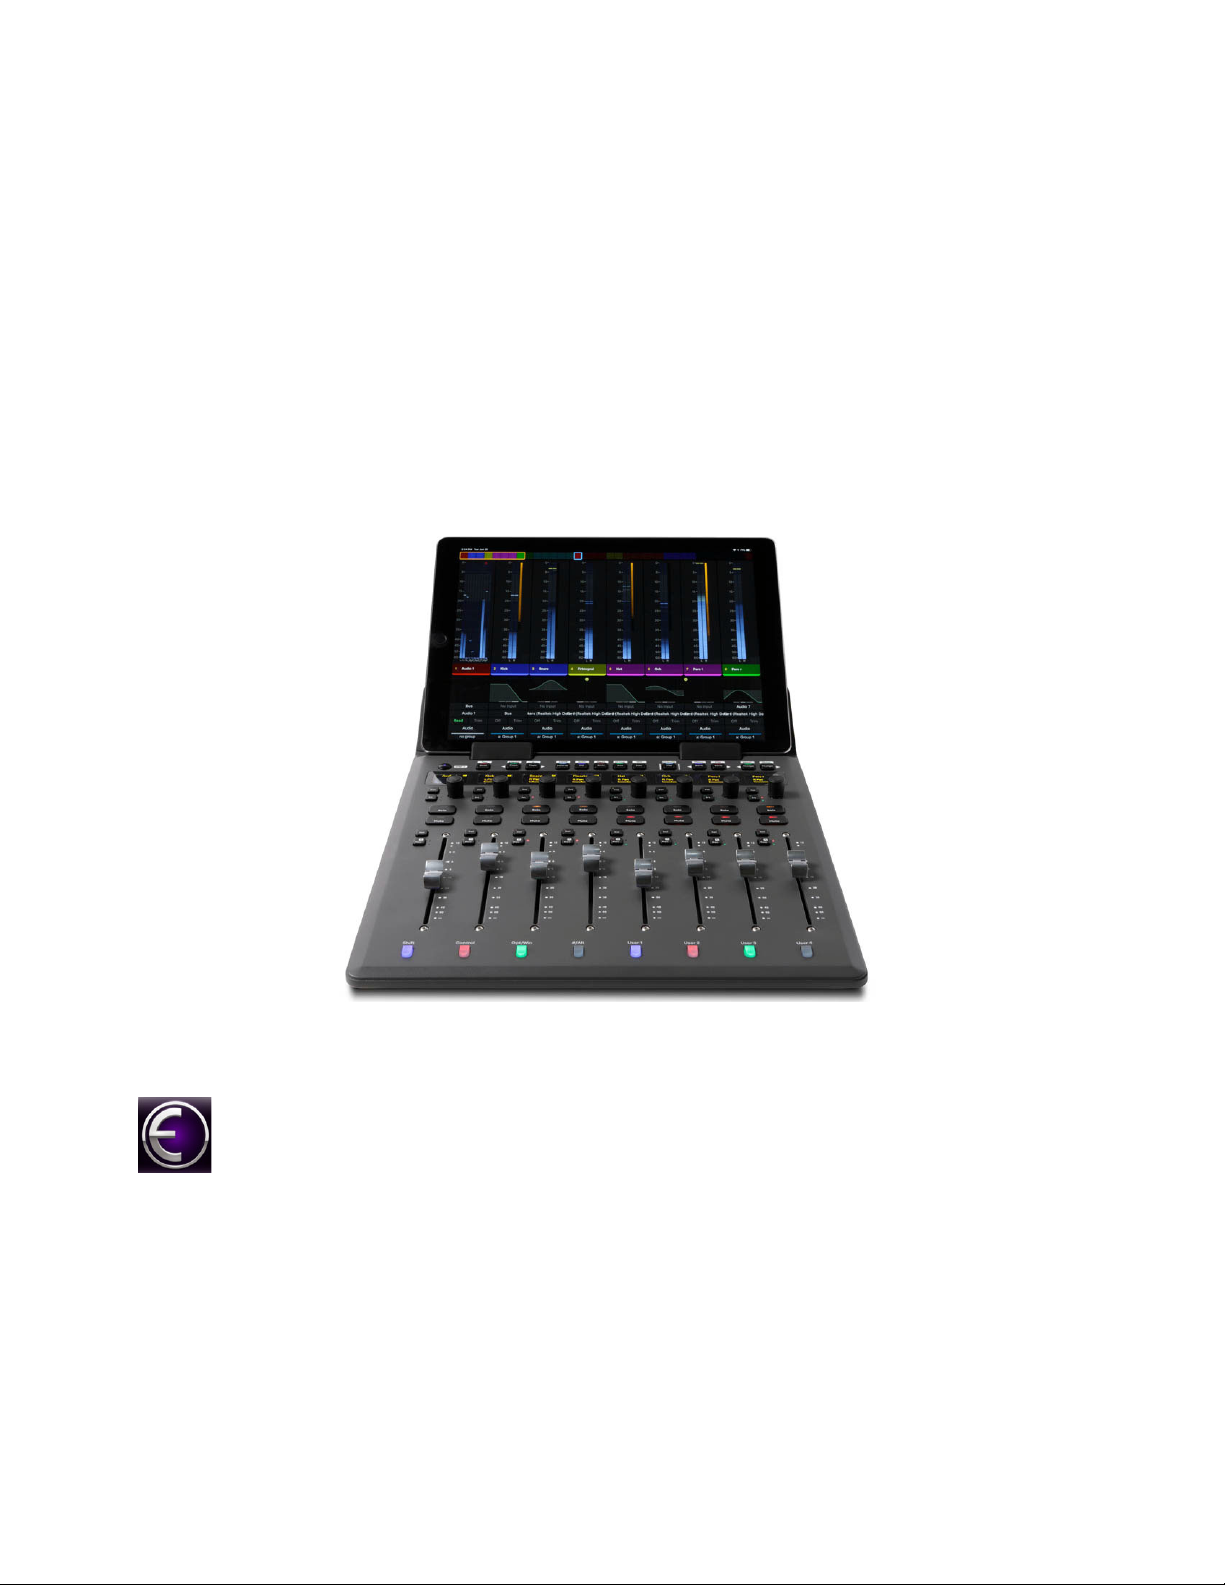
Welcome to the Avid S1 studio controller from Avid®. The S1 uses Avid’s high-speed EUCONTM (Extended User Control) protocol
to enable fully integrated control of Pro Tools
nection. Up to four S1s can be used simultaneously.
This guide shows how to install the S1 and EuControl software, and provides an overview of the control surface.
After installing the S1 control surface and EuControl software, see the Using EuControl Surfaces.pdf for instructions on how to use
S1 and other Avid media controllers to record, edit, and mix in Pro Tools. Thanks to the EUCON protocol, most steps for Pro Tools
are also applicable in other EUCON-aware applications from our development partners, including Logic Pro X, Cubase, Nuendo,
Pyramix and more (see the EUCON Application Setup.pdf to learn how to set up EuControl communication with these applications).
®
and other EUCON-compatible audio and video applications via an Ethernet con-
EuControl Software
EuControl lets your workstation computer find, link, and communicate with the S1 via the EUCON protocol.
EuControl also lets you set preferences for and customize the controls on your S1. EuControl software must be installed on the workstation computer before you can use the S1 with your application. You can also control applications on a secondary workstation computer by installing the separate EUCON Workstation software.
Introduction 1
Page 6

What’s Included
• S1 control surface
• Power adapter with IEC cable (multiple cables are included for different regions)
• S1 Link plate
• Cat5e (350 MHz) Ethernet crossover cable
• Welcome pack, which includes the EuControl software Activation Card, S1 Welcome card, Health and Safety Guide
Additional Recommended Items
Although it can be used standalone, you will get the most out of the S1 by using it with one or more supported iOS or Android
tablets (not included).
Optional Equipment
• A standard Ethernet router or switch (for control surface functionality only)
System Requirements and Compatibility
Avid can only assure compatibility and provide support for hardware and software it has tested and approved. For compatibility information and other resources, visit:
http://avid.force.com/pkb/articles/compatibility/EuControl-Compatibility
For S1, visit:
https://www.avid.com/s1reqs
S1
Up to four S1s can be used simultaneously with one Dock, allowing up to five supported iOS or Android tablets running the
Avid Control app.
S1 can be used with Artist Transport and Artist Color, but cannot be used with S3 or legacy Artist Mix or Artist Control.
Activation
If you have not already, use the included Activation card to activate your purchase, in order to download the latest EuControl software and additional documentation.
Introduction 2
Page 7

About This Guide
This guide shows how to install S1 and EuControl software, and provides an overview of the S1 control surface.
For workflow examples that show how to use S1 with Pro Tools and other EUCON-compatible applications, see the Using EuCo-
ntrol Surrfaces.pdf. .
For applications that only support MackieControl, see the EUCON Application Setup Guide.pdf..
Conventions Used in This Guide
All of our guides use the following conventions to indicate menu choices and key commands:
Convention Action
File > Save Choose Save from the File menu
Control+N Hold down the Control key and press the N key
Control-click Hold down the Control key and click the mouse button
Right-click Click with the right mouse button
The names of Commands, Options, and Settings that appear on-screen are in a different font.
The following symbols are used to highlight important information:
User Tips are helpful hints for getting the most from your system.
Important Notices include information that could affect your data or the performance of your system.
Shortcuts show you useful keyboard or mouse shortcuts.
Cross References point to related sections in this guide and other Avid guides.
Introduction 3
Page 8
Hardware Switches on S1 Control Surface
Back Page Page Inserts EQ DYN Aux Pan BankFlip Bank Nudge Nudge
Top Config X Input
Instr
HEAT Group Mix Channel Home End Mixer Close
Shift Control Opt/Win #/Alt User 1 User 2 User 3 User 4
Sel
Rec
Sel
Rec
Sel
Rec
Sel
Rec
Sel
Rec
Sel
Rec
Sel
Rec
Sel
Rec
Solo
Mute
Solo
Mute
Solo
Mute
Solo
Mute
Solo
Mute
Solo
Mute
Solo
Mute
Solo
Mute
Sel
In
Sel
In
Sel
In
Sel
In
Sel
In
Sel
In
Sel
In
Sel
In
Shift
Surface SHIFT
(Modifier)
The names of switches on the control surface are in bold, such as Sel. The Surface SHIFT switch on the S1 is indicated by bold
text, in all-caps to distinguish it from references to the
puter keyboard.
Shift Modifier switch below fader strip 1, and the Shift key on your com-
Surface SHIFT (upper left) and SHIFT switches (lower left)
Accessing Secondary Functions Using Surface SHIFT
The Surface SHIFT switches on the S1 are used in conjunction with other switches to access a secondary layer of functions. The
secondary functions of some switches are highlighted in gray above the primary function (such as
is the secondary function). Other switches have secondary functions that are not labeled on the surface. Read this guide to learn how
to access all secondary functions.
The following terminology is used to describe
Example:
is written as
• “Press and hold the
• “Press
Surface SHIFT + Bank/Home”
Momentary or Latching SHIFT
By default, the Surface SHIFT switch operates in momentary behavior (active only while pressed and held down).
You can change this to operate in Latching behavior (pressing toggles the state on or off) in the Preferences tab of
tings
.
Introduction 4
Surface SHIFT switch then press the Bank/Home switch”
Surface SHIFT functions.:
< Bank/Home, where Home
EuControl Set-
Page 9

How to Use this PDF Guide
These are some useful features of this PDF:
• The Bookmarks on the left serve as a continuously visible table of contents. Click a + symbol to expand that heading to show
subheadings. Click the – symbol to collapse a subheading. Click on a subject heading to jump to that page.
• The Table of Contents provides active links to their pages. Select the hand cursor, allow it to hover over the heading until it
turns into a finger. Then click to locate to that subject and page.
• Any text entry in
•Select
Find from the Edit menu to search for a subject.
blue is an active link. Click on the link to go to that section.
Resources
The Avid website (www.avid.com) is your best online source for information to help you get the most out of your Avid system.
The following are just a few of the services and features available.
Account Activation and Product Registration
Activate your product to access downloads in your Avid account (or quickly create an account if you don’t have one). Register your
purchase online, download software, updates, documentation, and other resources.
https://www.avid.com/account
Support and Downloads
Contact Avid Customer Success (technical support); download software updates and the latest online manuals; browse the Compatibility documents for system requirements; search the online Knowledge Base or join the worldwide Avid user community on
the User Conference.
www.avid.com/S1-Support
Products and Developers
Learn about Avid products; download demo software or learn about our Development Partners and their plug-ins, applications, and
hardware.
https://www.avid.com/Products/index.html
http://avid.force.com/pkb/articles/how_to/EUCON-Application-Setup
Get Started Fast Video Tutorials
Watch video tutorials for Dock, S3, and other EuControl products on YouTube:
Get Started Fast with Pro Tools | S3 and Dock
You can find more videos, including the latest workflow tutorials, on the Avid website. Go to www.avid.com, view Products and
select Pro Mixing. Follow the links for your controller and check the Learn and Support listings for video resources.
Introduction 5
Page 10
Installation and Setup
This chapter shows how to get your S1 set up as a studio controller, and consists of the following steps:
Unpacking S1
•
• Connecting S1
• Installing EuControl Software
• Enabling EUCON in Pro Tools
• Confirming EUCON
Unpacking S1
1 Open the S1 box and find the white Welcome/Start Here envelope.
• You will use the included Activation card to activate your S1 and download EuControl software later in the installation procedure.
2 Remove the cardboard tray holding your S1 accessories (Ethernet cable, Link plate (for joining two S1s together), power
adapter, and power cables).
• Identify the IEC power cable appropriate for your location.
• Set the IEC cable, Ethernet cable, power adapter, and Link plate aside.
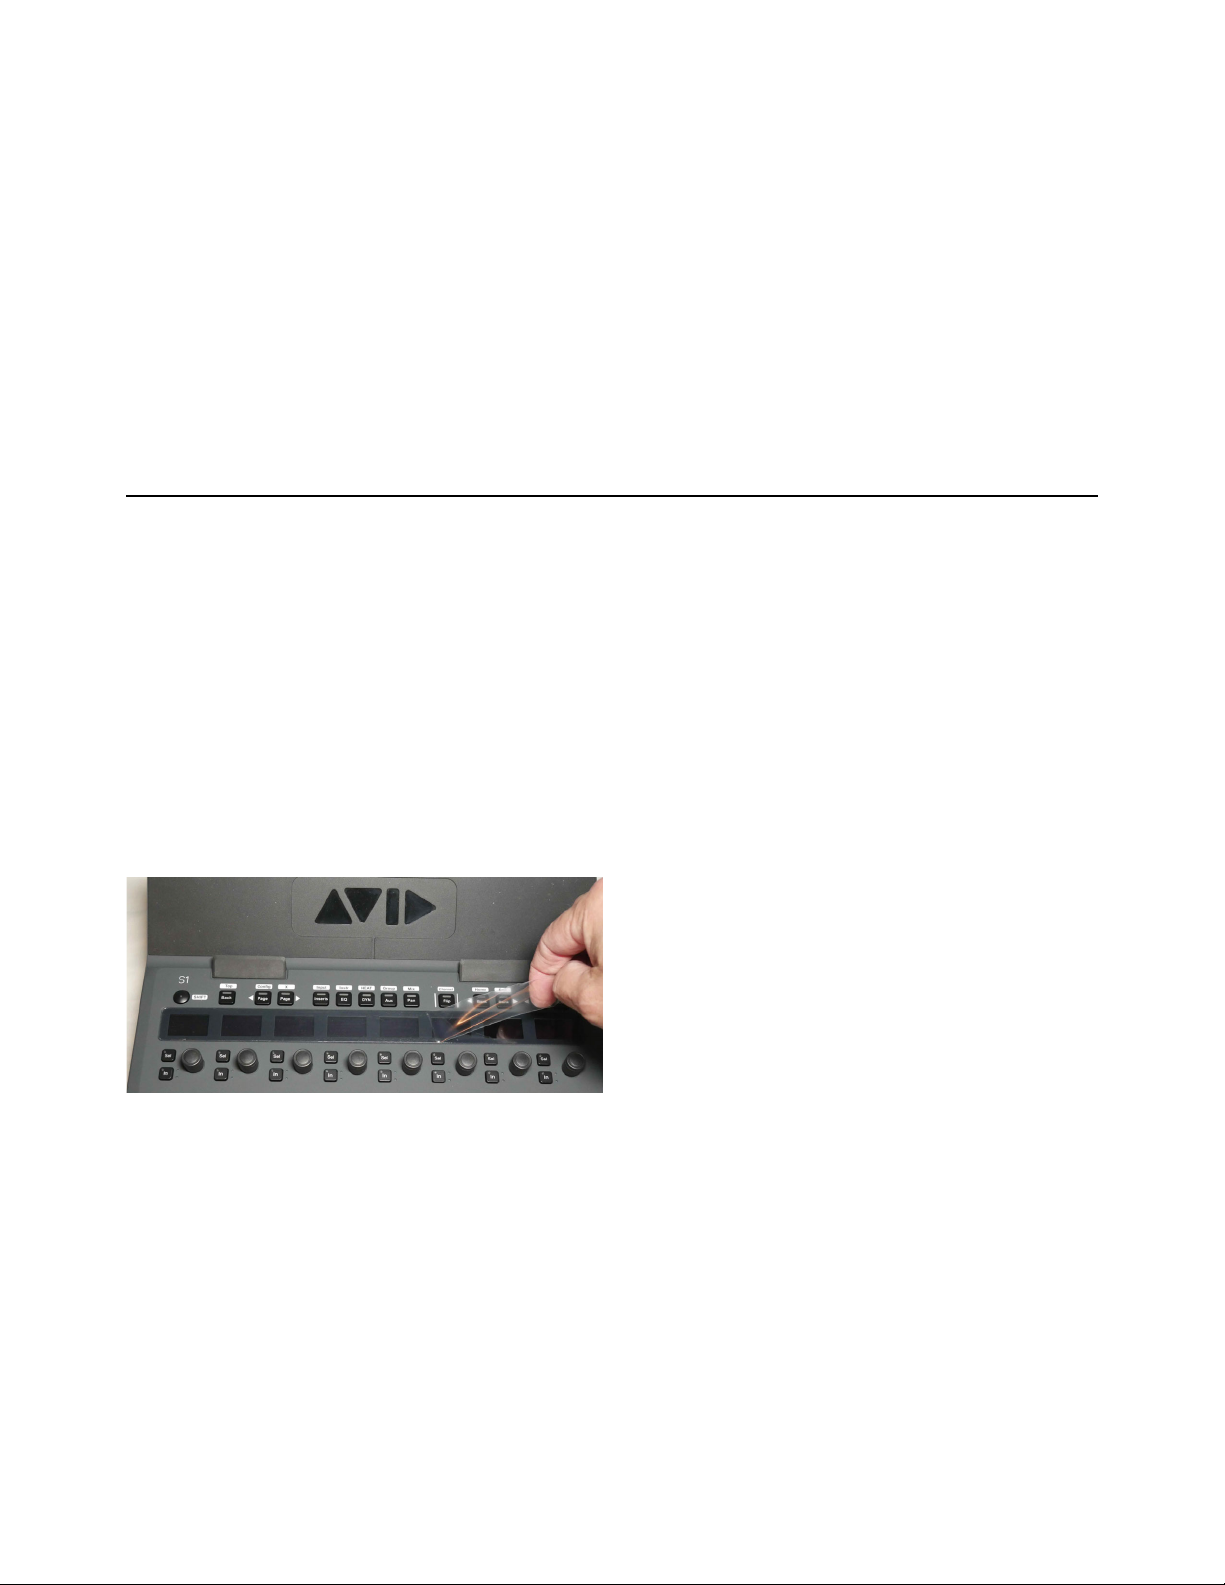
3 Carefully remove the S1 its packaging.
• Remove the protective tape across the fader strips (this tape holds the faders in place during transportation, but must be removed).
• Remove the protective film from the displays across the top of the fader strips.
Removing protective film from the displays
Installation and Setup 6
Page 11
Connecting S1
First connect power, then connect your S1 to your workstation computer (the computer running Pro Tools or other DAW).
To connect your S1 to your workstation computer:
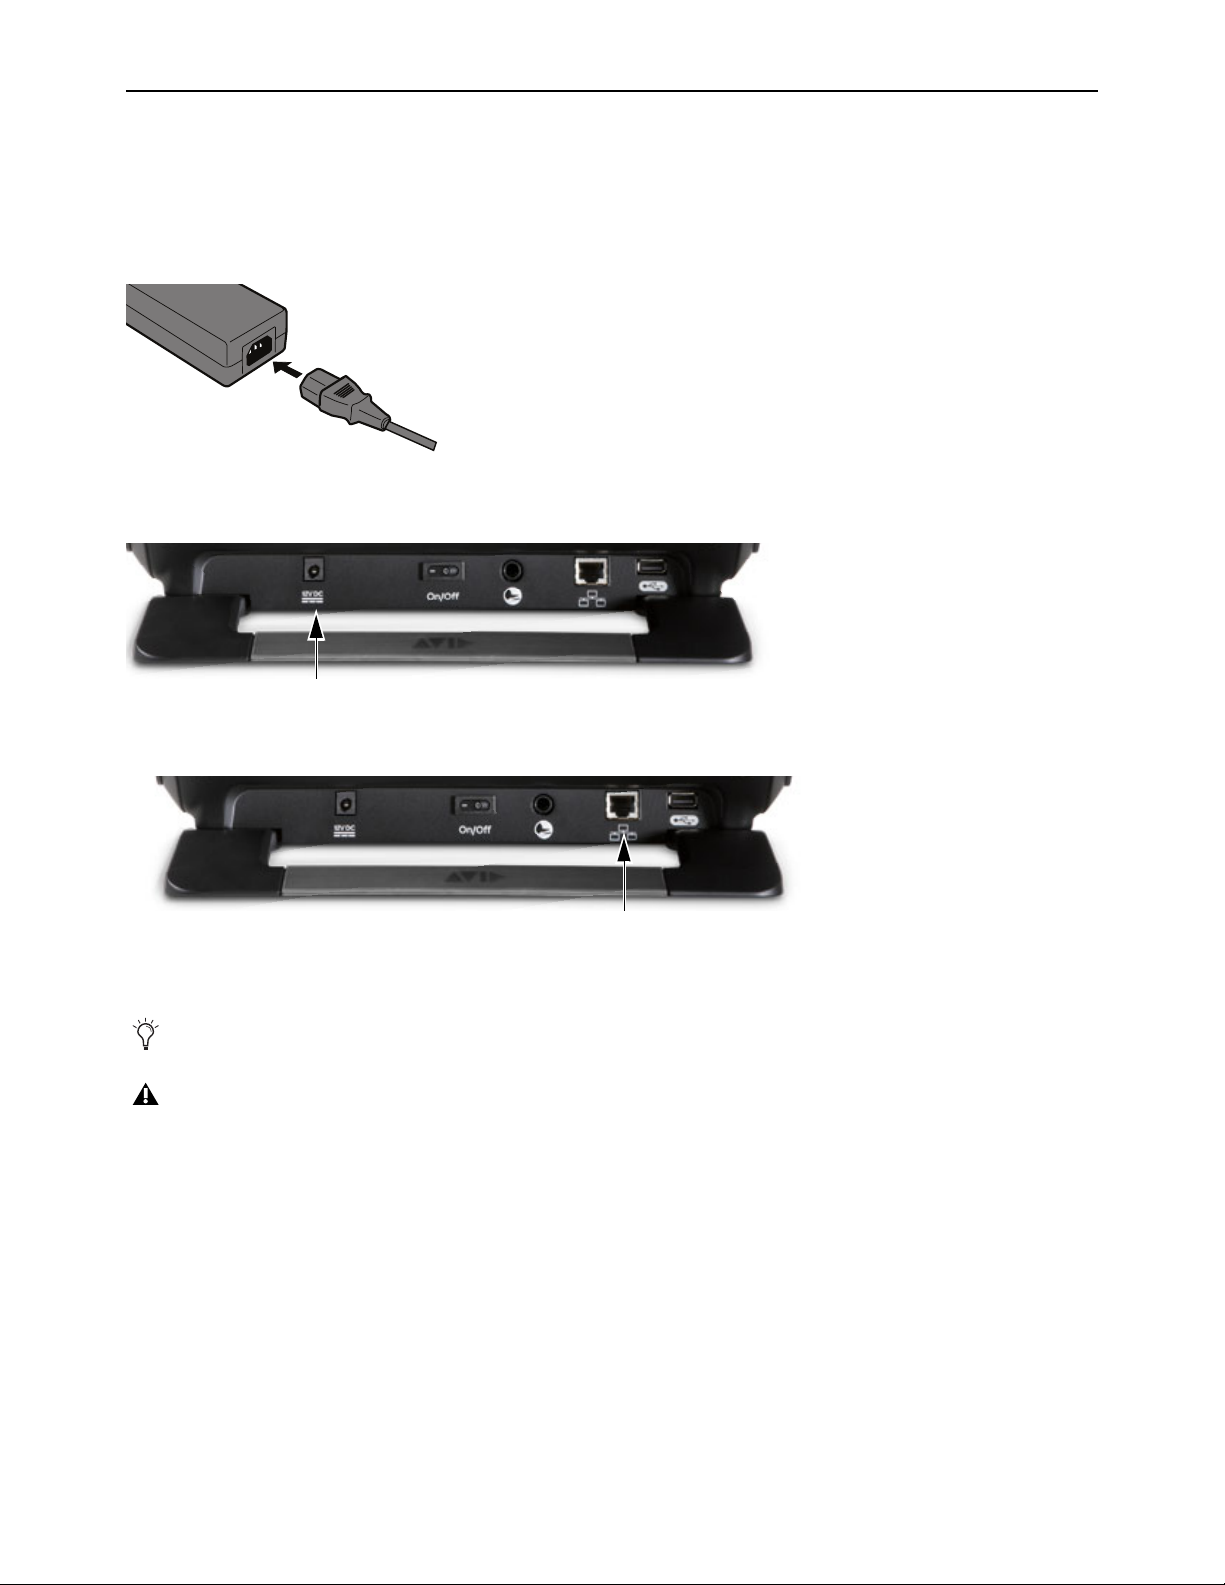
1 Plug one end of the AC power cord appropriate for your location into the power adapter and the other into a power outlet. Make
sure the AC power cord is pushed all the way into the adapter.
Connecting an AC cable to the power adapter
2 Connect the DC output cable from the power adapter to the DC In jack on the back panel.
DC In jack
3 Connect one end of an Ethernet cable into the Ethernet port on the back panel of the S1.
Ethernet port
4 Connect the other end of the Ethernet cable to an available Ethernet port on your computer, or to the computer’s Thunderbolt
port using an Ethernet-to-Thunderbolt adapter.
An Ethernet-to-USB adapter may also be used.
S1 cannot connect to your workstation computer using a wireless connection. A hard-wired network connection is required.
• If you want to connect the S1 to a local area network, or to connect additional S1 units and/or an Avid Dock, connect the Ethernet cable to an Ethernet router or switch, and make sure the router or switch is powered on before powering on the S1.
5 If you are connecting to a Mac with two Ethernet ports, we recommend you use Ethernet 1 rather than Ethernet 2. However, if
you want to use Ethernet 2, do the following on your computer:
• On the workstation computer, go to
• Click the
Network Interface pop-up menu and choose Ethernet 2.
System Preferences > EUCON.
Installation and Setup 7
Page 12
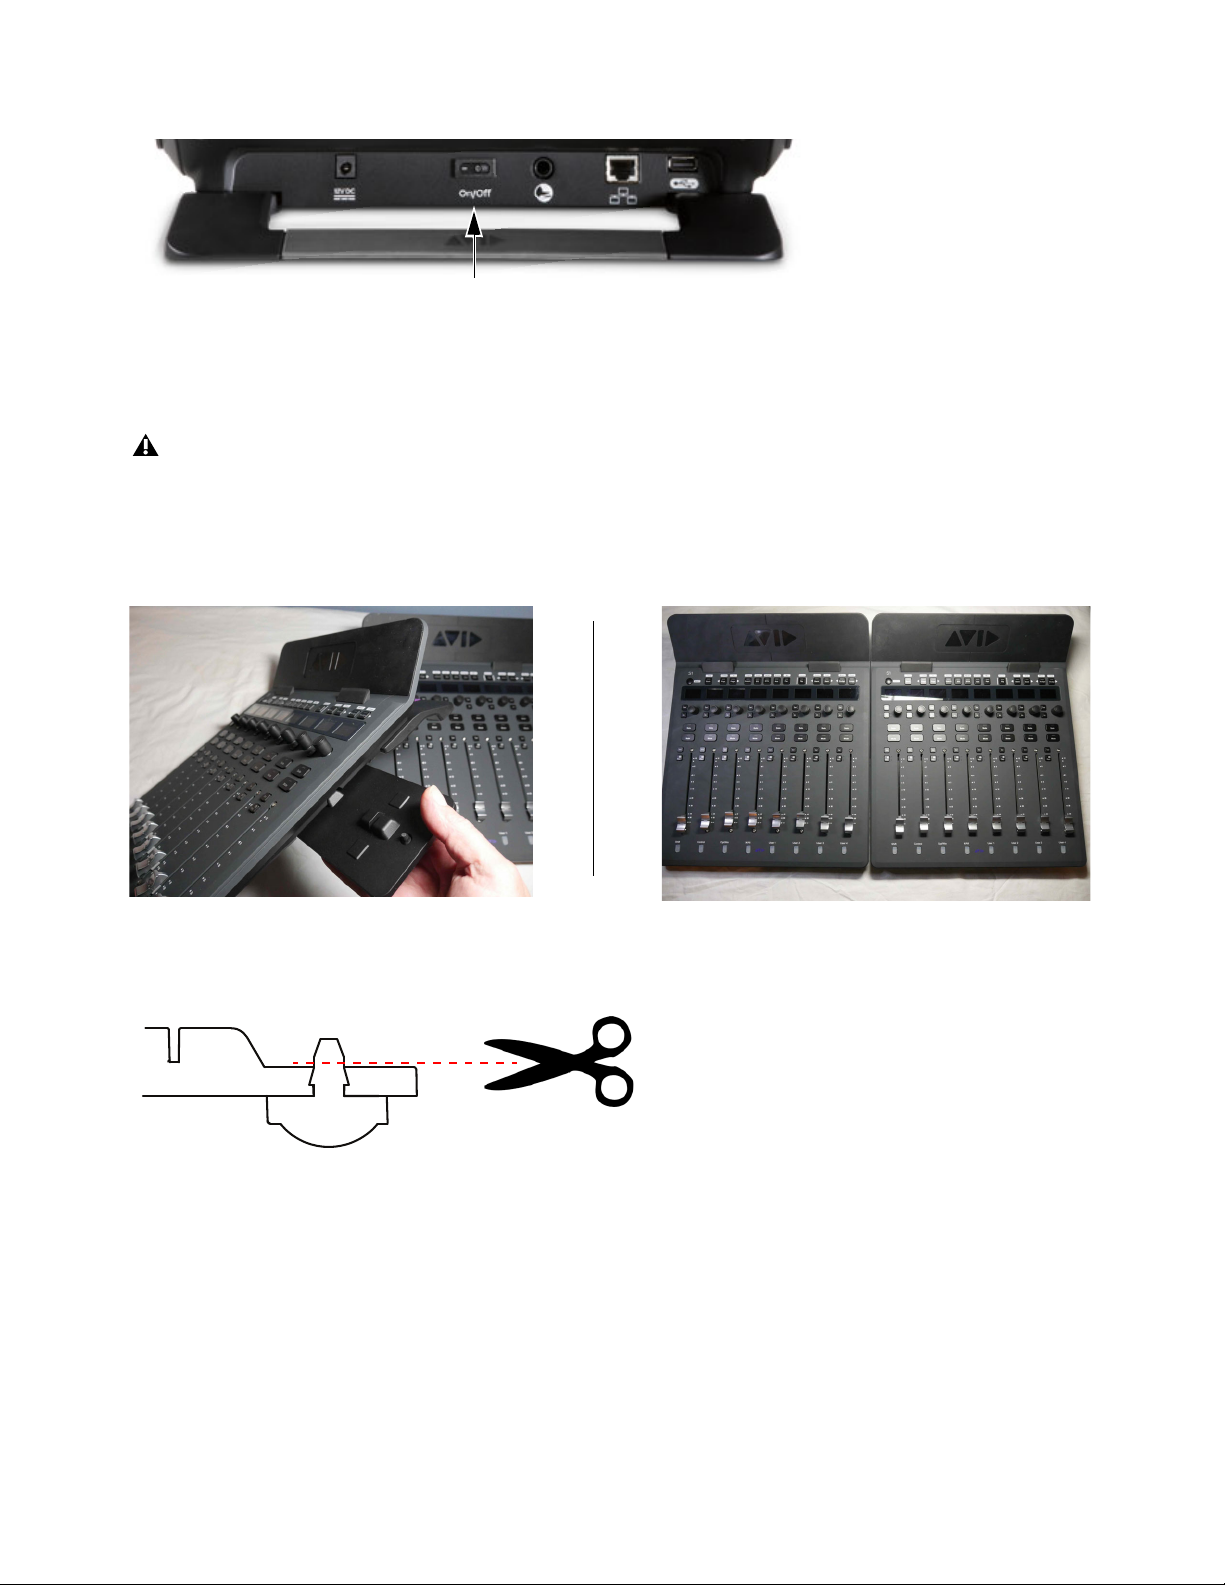
6 Press the power switch on the back of the S1 to the “on” position. The faders jump and the LEDs blink during initialization.
Power switch
Joining Multiple S1s
The S1chassis includes small magnets along each side to hold multiple units together. Place two S1s next to each other and the
built-in magnets will hold them together.
Do not place magnetic media such as audio tapes directly on S1. While the built-in S1 magnets are not strong enough to affect
other studio equipment they can affect audio tapes or other media if left directly on top of or against the sides of the S1.
If a more rigid solution is required, clip the included S1 Link plate to the underside of one unit (both ends of the Link plate are also
magnetic), being sure to orient it correctly as shown below. Then set the other S1 onto the Link plate.
Do not attempt to lift or move the S1s when linked as this can cause damage to the link and/or the S1 units.
Attaching a Link plate (shown at left) and two S1s linked
If your configuration includes a Dock you can link it to an S1 using the same S1 Link plate. Simply snip off the top of the rubber
foot on the side of the Link plate you want to attach to the Dock as shown below.
Snip or cut foot at red line to link S1 to a Dock
7 Proceed to Installing EuControl Software.
Installation and Setup 8
Page 13

Installing EuControl Software
S1 Activation Card
123ABC123ABC 123ABC###
Installing EUCON Workstation software
Next, install the latest version of EuControl software onto your workstation computer. An Internet connection is required to download EuControl.
Activate!
If you have not already done so, follow the instructions on the included Avid S1 Activation card to activate S1. Doing so makes EuControl software, documentation, and other software available in your
Avid account.
Install Software
To install EuControl software:
1 Visit www.avid.com/account and log into your Avid account (or create an account if you don’t al-
ready have one) to download the
computer’s platform (Mac or Windows). If you do not see EuControl software in your account go
avid.com/redemption and click on EuControl.
to
2 When download is complete, locate the EUCON_WorkstationUnifiedInstall on your computer and double-click it to mount it
(DMG on Mac) or uncompress it (ZIP for Windows), then launch the installer.
3 Follow the on-screen prompts until the Installer list is displayed (as shown below). For a description of each option, select it
(Mac) or hover the mouse over it (Windows only).
4 Select each option you want to install:
• To only install EuControl, select
• If you have already installed EuControl on your primary workstation and
now want to install onto an additional, external workstation, select
CON Workstation
. (See also Connecting a Second Workstation).
EUCON_WorkstationUnifiedInstall installer for your workstation
S1/S3/Dock/Control/Artist Series.
EU-
5 Click Continue (Mac) or Next (Windows), then click Install.
When reminded that a restart is required, click Continue Installation (Mac)
Yes (Windows).
or
6 When installation is complete click Restart.
After your computer restarts, EuControl software launches automatically
and is running when its icon (which is unlit until the Control app is connected) appears in the Menu bar (Mac) or the System tray (Windows).
On 10.14/”Mojave” (only) you might need to add Pro Tools and EuControl to the Privacy list in System Settings.
Unlit EuControl icons on Mac (left) and Windows (right)
7 If the lit EuControl icon does not appear, do any of the following:
3– Add to add S1 manually.
•See
• Click the unlit EuControl icon and choose
Restart EUCON Applications.
• Shut down S1 and your computer, then turn them on (S1 first, then the workstation computer).
www.avid.com/S1 Support for the most current troubleshooting information.
•See
8 Proceed to Updating S1 Firmware.
Installation and Setup 9
Page 14

To uninstall items:
1 Launch the installer. Items that are currently installed are selected (checked) and indicated as Installed.
2 Do the following:
• To uninstall a specific component, make sure it is not selected (no check mark).
• To uninstall all EUCON applications, select
• To uninstall all User Preferences, select
3 Click Continue (Mac) or Next (Windows).
Uninstall all applications.
Uninstall User Preferences (your appsets will not be removed).
AutoLaunch Settings
You can enable or disable auto-launch for EuControl, WSControl, and/or XMON using the new AutoLaunch selector.
To configure AutoLaunch:
1 Make sure EuControl or WSControl is installed, then do the following:
Mac
Click on the EuControl or WSControl icon in the menu bar.
Windows
EuControl Auto-launch Apps selector (Mac shown)
2 From the Auto-launch Apps sub-menu, choose any of the following (you can enable more than one):
Right-click on the EuControl or WSControl icon in the System Tray at the bottom of the screen.
EuControl (for S1, S3, Dock, Control, and Artist Series)
•
WSControl (for S4 and S6)
•
•MTRX
•XMON
3 Proceed to Create Your Surface in EuControl Settings
Installation and Setup 10
Page 15

Create Your Surface in EuControl Settings
EuControl can be configured to launch automatically upon starting your computer (use the Auto-Launch Apps choices in the EuControl menu). EuControl is responsible for finding, linking, and communicating with all Avid media controllers on the network.
You can use the different tabs in the EuControl Settings window to manage surfaces, pair surfaces with tablets, connect to workstations, and more.
First Time Startup
The first time your computer starts up after installing EuControl software you will be guided through the initial configuration steps.
Check Firmware
Create Surface
Settings. Click
A dialog appears reminding you to check and update firmware on hardware units. Click OK to proceed.
Next, the Create Surface dialog is shown that describes how to configure your surface arrangement in EuControl
OK to proceed to the Surfaces tab in EuControl Settings.
You can also access EuControl Settings at any time.
To open the EuControl Settings window:
1 Do following:
• On macOS, click the EuControl icon on the taskbar and select
• On Windows, double-click the EuControl icon in the system tray and select
EuControl Settings.
EuControl Settings. If you don't see the EuCo-
ntrol icon, it could be automatically hidden by Windows. Click on the small white arrow to show hidden icons, then double-click the EuControl icon.
2 Go to the Surfaces tab to manage connected (attached) controllers.
Using the Surfaces Tab to Add and Manage Controllers
After installing EuControl for the first time, or whenever you need to manage controllers, use the Surfaces tab to add and arrange
control surfaces and/or Avid Control tablets.
To connect a single controller to EuControl:
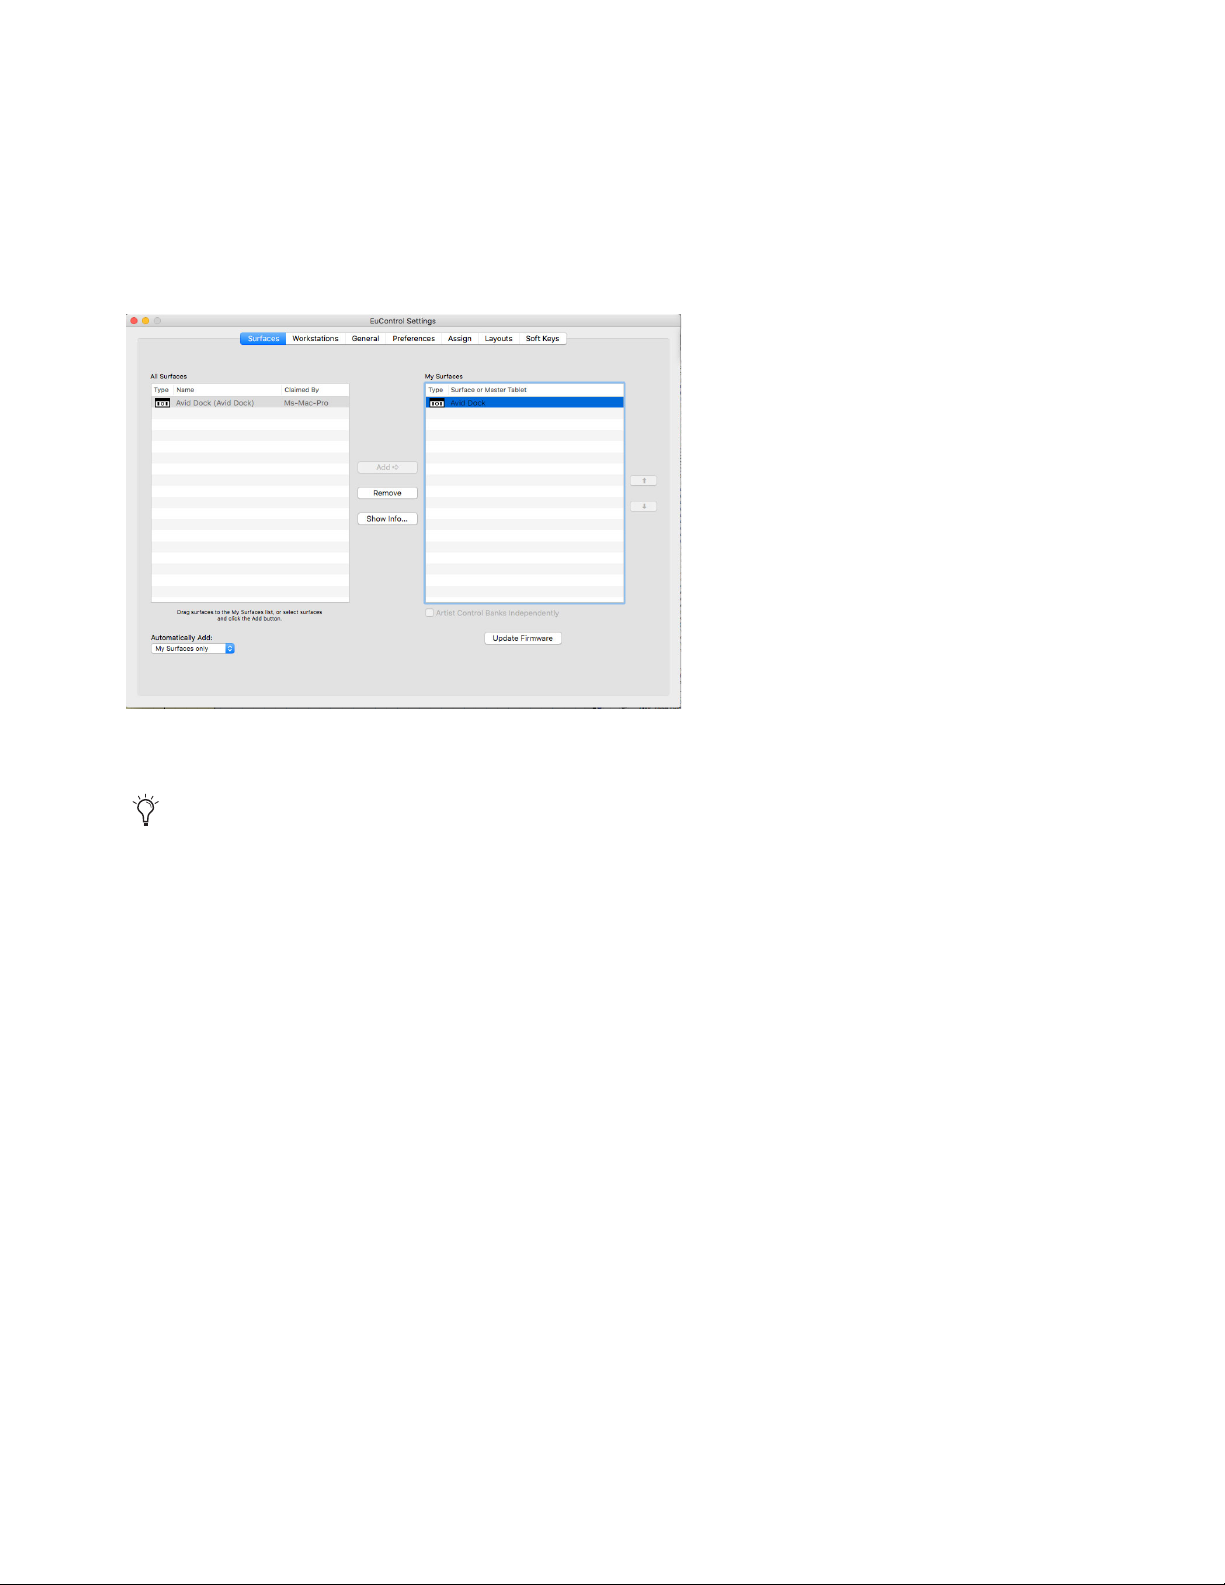
1 Select the controller in the All Surfaces list and click Add. Or drag the controller from All Surfaces and drop into My Surfaces.
Surfaces tab showing an Avid Control selected in All Surfaces to be added to My Surfaces
The controller appears in the
Surfaces tab showing Avid Control in My Surfaces
Surface or Master Tablet column in My Surfaces.
The controller is now communicating with EuControl software.
2 Repeat to add additional controllers, if any (see next).
Installation and Setup 11
Page 16

To arrange multiple S1s:
The order (top-to-bottom) that surfaces are listed in My Surfaces determines the order of fader strips (1–n, left-to-right). For ex-
ample, if you add two S1s the top-most S1 will default to tracks 1–8 and the lower S1 to tracks 9–16.
• To reorder controllers, select one in
To enter a custom name for a controller:
To give a controller a custom name, double-click it in My Surfaces and enter a new name.
My Surfaces and use the up/down arrow buttons located to the right of My Surfaces.
In previous versions of EuControl software the Surfaces tab included the “Automatically Add” menu. This menu has been removed to better support multiple tablets and Control apps.
Configuring Avid Control with Other Control Surfaces
Beginning with EuControl 19.12 you can use more than one Avid Control app simultaneously as long as there is a corresponding
Avid S1 in the
When a Dock and one S1 is present, up to two Avid Control apps can be used. For each additional S1 in the
other Control app can be added, up to the maximums listed below.
The following table shows maximum combinations and configurations.
Dock S1 S3 Control app
# of units # of units # of units Maximum # of tablets Control app Modes
1x 1x
My Surfaces list. For example, when only a Dock and/or S3 is present, only one Avid Control app can be used.
My Surfaces list an-
Master
1x 1x 1x
1x 1x
1x 1x 2x
1x 2x 3x
1x 3x 4x
1x 4x 5x
4x 4x
Master
1x Master or 1x Hybrid
1x Master + 1x Meters
1x Master + 2x Meters
1x Master + 3x Meters
1x Master + 4x Meters
1x Master or Hybrid + 3x Meters
Control App Master, Hybrid, and Meters Modes
The Control app can be used in Master, Hybrid, or Meters modes.
Master
The Control app is not linked to any control surface and provides all views. Meters view is independent of, and does not
follow, control surface banking. When using the Control app by itself, or with only a Dock and/or S3, the app functions in Master
mode. There can only be one Master tablet.
Hybrid (Master + Meters)
The Control app is linked to an S1 and all Control app views are available, but Meters view follows the
S1 to which it is linked. There can only be one Hybrid tablet, or one Master tablet.
Meters
The Control app is linked to an S1 and provides Meters view only, which follows (banks with) the S1 to which it is linked.
To use the Control app in Meters mode there must be at least one S1, and one other Control app already configured as a Master or
Hybrid tablet. Each additional Meters tablet requires a corresponding S1.
You designate tablets for Master, Meters, or Hybrid modes using the
Installation and Setup 12
My Surfaces list in EuControl Settings.
Page 17

Master Tablet Designation
Master
Hybrid
Master
Meters
To add a Control app as a Master tablet:
1 Make sure no other Control app/tablets are already in the Surfaces and Master Tablet column of the My Surfaces list.
2 Select a Control app in All Surfaces and click Add. Or drag it from All Surfaces to an empty row in My Surface (but not on top
of any S1s). If you select multiple units in All Surfaces and add them simultaneously, only one Control app will be added (as a
Master). In
Surfaces tab showing an Avid S1 and unlinked Avid Control app (Master mode)
My Surfaces, Master or Hybrid apps are shown in bold.
That Control app becomes a Master, provides all views, and Meters view does not follow control surface banking.
Hybrid Tablet Designation
To designate a Control app as a Hybrid tablet:
1 Make sure an S1, but no other Control app/tablets, are already in the Surfaces and Master Tablet column of My Surfaces.
2 Drag a Control app from All Surfaces and drop it on top of the same row as an S1 in My Surfaces.
Surfaces tab showing a Control app linked to an S1 (Hybrid mode)
That Control app becomes a Hybrid, provides all views, and Meters view displays 8 strips that follow S1 banking.
Meters Tablet Designation
To designate one Master and one Meters tablet:
1 Make sure an S1, but no other Control app/tablets, are already in the Surfaces and Master Tablet column of My Surfaces.
2 Drag a Control app from All Surfaces and drop it on top of the same row as an S1. This Control app becomes a Hybrid.
3 Drag another available Control app from All Surfaces to an empty row in My Surface (but not on top of any S1s).
Surfaces tab showing a linked S1 and Control app (Meters mode) and a second Control app (Master mode)
• The most recently added Control app becomes a Master and provides all views.
• The originally added Control app (linked as a Hybrid to the S1 in step 2) changes to a Meters app.
Installation and Setup 13
Page 18

To designate one Hybrid and one or more Meters tablets:
Hybrid
Meters
Meters
1 2
3
4
5
6
1 Add at least two S1s to My Surfaces.
2 Drag a Control app from All Surfaces and drop it on top of the same row as an S1. This Control app becomes a Hybrid.
3 Drag another Control app from All Surfaces and drop it on top of a row for a different S1 to designate it as a Meters app.
Surfaces tab showing a linked S1 and Control app (Meters mode) and a second Control app (Master mode)
4 Repeat step 3 to add additional Control apps as Meters apps to other S1s, if any.
To unpair a Control app/tablet from an S1:
Select the S1 row in My Surfaces and click Remove.
To reassign tablets and S1s, do the following in the My Surfaces list:
To link a Control app to a different S1, drag the app onto the new S1.
To reassign a Hybrid or Meters tablet to be a Master, drag the Hybrid or Master app from the Linked Tablet column and drop it
onto an empty row
Guidelines
• If there are no other tablets in the My Surfaces list, dragging a tablet onto an S1 will always make that tablet a Hybrid.
• A Hybrid tablet’s Meters view follows banking on the S1 to which it is linked.
• If an S1 has a tablet linked in Hybrid mode, and a second tablet is added to the
My Surfaces list as a Master, the originally
linked Hybrid tablet becomes an S1 Meters tablet.
• If there are two S1 units (but no Dock) the first tablet dragged on top of an S1 becomes a Hybrid. Dragging another tablet onto
the other S1 adds that tablet as a Meters tablet, leaving the previously added tablet as a Hybrid.
Overview of the Surfaces Tab
The Surfaces tab in EuControl Settings shows all EUCON controllers on your network and those connected to your instance of EuControl. Use the
manage Control app Master/Meters/Hybrid designation.
Surfaces tab to add and connect surfaces, arrange them in the desired order, pair S1s with Control app tablets and
Surfaces tab showing the Avid Control app in All Surfaces (at left) and added to the My Surfaces list (at right)
Installation and Setup 14
Page 19

The Surfaces tab provides the following lists and controls.
1– All Surfaces
All Surfaces shows all Avid media controllers on the network. A device shown in light gray is already connected either to your own
or another instance of EuControl running on a different workstation. In both cases, it is not selectable.
2– My Surfaces
My Surfaces shows the media controllers connected to your instance of EuControl. The Type column shows an icon for each de-
vice. The
Surface or Master Tablet column shows the name of the device, and for tablets indicates whether Avid Control is func-
tioning in Master, Meters, or Hybrid mode. The top-to-bottom order corresponds to the left-to-right order of the surfaces, respectively. The leftmost surface is assigned to fader strip 1. Use the up and down arrow buttons (located to the right of
My Surfaces)
to reorder the list. Each media controller can be renamed by double-clicking the existing name and typing a new name.
3– Add
Click Add to add the selected All Surfaces entry to My Surfaces. This connects the selected Avid media controller to your instance
of EuControl. You can also click and drag an Avid media controller from All Surfaces to My Surfaces.
Add is disabled if all media
controllers in All Surfaces are connected to any instance of EuControl.
4– Remove
Click Remove to remove the selected surface from My Surfaces and make it available to other instances of EuControl.
Remove is disabled if no surface is selected.
5– Show Info
Select a unit in All Surfaces or My Surfaces and click Show Info to see the name of the device (and currently linked Control app,
if any), hardware and software information, or troubleshooting suggestions.
6 – Update Firmware
Click Update Firmware to check and, if necessary, update firmware on the hardware control surface currently selected in
My Surfaces. This setting does not apply to Avid Control.
Select a single media controller in the My Surfaces list. Click
Update Firmware to update that unit’s firmware. If a dialog displays
a message that the firmware is up to date, no further action is necessary. Repeat for any additional hardware controllers.
The firmware is embedded in EuControl so an Internet connection is not required.
Follow the instructions in the EuControl dialog box.
• The media controllers must be plugged into a working power source.
• Do not power off any media controllers during the update or attempt to interrupt the update.
• The status for each media controller being updated is displayed on that device as well as in the EuControl dialog.
Artist Control Banks Independently
(Artist Control Only)
This option is only available when an Artist Control is selected in the My Surfaces list. When enabled, each Artist Series unit can
bank independently of each other. In applications that support it, this lets you configure one unit for dedicated control of output busses, for example.
In previous versions of EuControl software the Surfaces tab included the “Automatically Add” menu. This menu has been removed to better support multiple tablets and Control apps.
.
Installation and Setup 15
Page 20
Updating S1 Firmware
After installing EuControl, make sure your S1 is running the latest firmware. The firmware is provided within EuControl, so an Internet connection is not required.
To update S1 firmware:
1 Click (Mac) or double-click (Windows) the EuControl icon and select EuControl Settings.
2 If necessary, click Surfaces to display the Surfaces tab.
Surfaces tab (Dock shown)
3 Click Avid S1 in the My Surfaces list so it is highlighted.
If S1 does not appear in the My Surfaces list, add it manually. See 3– Add.
4 Click Update Firmware. If the Update Firmware dialog shows a message that the surface is up to date, no further action is nec-
essary.
5 If the firmware needs to be updated, follow the instructions in the Update Firmware dialog box to proceed, and make sure to ob-
serve the following guidelines when updating firmware:
• Ensure that S1 is connected to a trustworthy power source.
• Do not power off the S1 during the update or attempt to interrupt the update.
The status of the firmware update is shown on the S13 displays as well as in the EuControl dialog.
6 Click Done when the firmware update is complete.
7 Repeat for any additional S1 or other Avid control surfaces, selecting and then updating their firmware one unit at a time.
8 Proceed to Enabling EUCON in Pro Tools.
Installation and Setup 16
Page 21
Installing and Connecting Avid Control
Before proceeding, make sure of all of the following:
• All your tablets are running the most recent version of the Avid Control app (previously known as Pro Tools | Control)
• All Control app/tablets appear in the
See the Avid Audio Control Guide.pdf for instructions on installing and connecting the app.
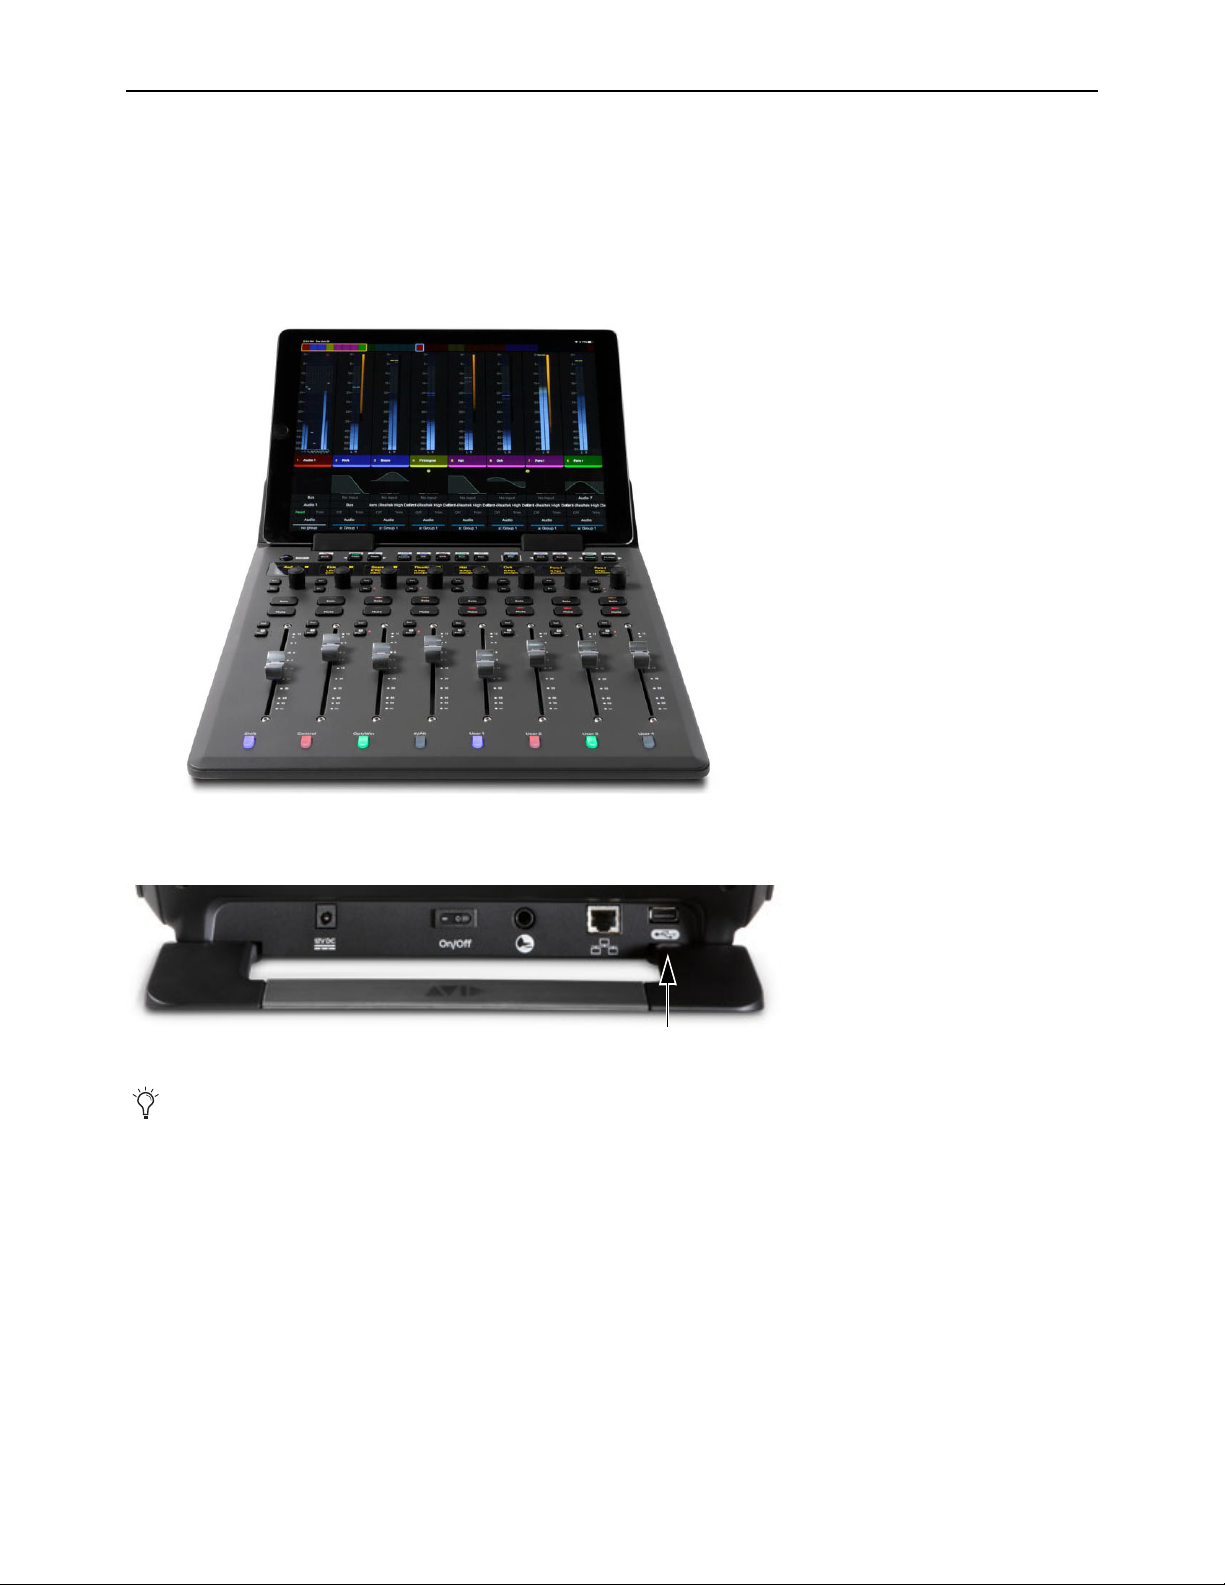
Place each Avid Control tablet in a stand built into the S1. The Control app supports both landscape and portrait views.
My Surfaces list in EuControl
Tablet installed on S1
To keep your tablet charged, connect its charging cable to the USB port on the back of the Dock.
USB charging port on the back of S1
The back panel USB port is for charging and powering your tablet, only. Data communication with EuControl requires a Wi-Fi
connection, Apple Camera Connection Kit and adapters (for iOS), or Samsung Galaxy Tab A SM-T590 USB 3.1 Type C to RJ45
Ethernet Adapter (or equivalent, for Android). For more information, see the Avid Audio Control Guide.pdf.
Installation and Setup 17
Page 22
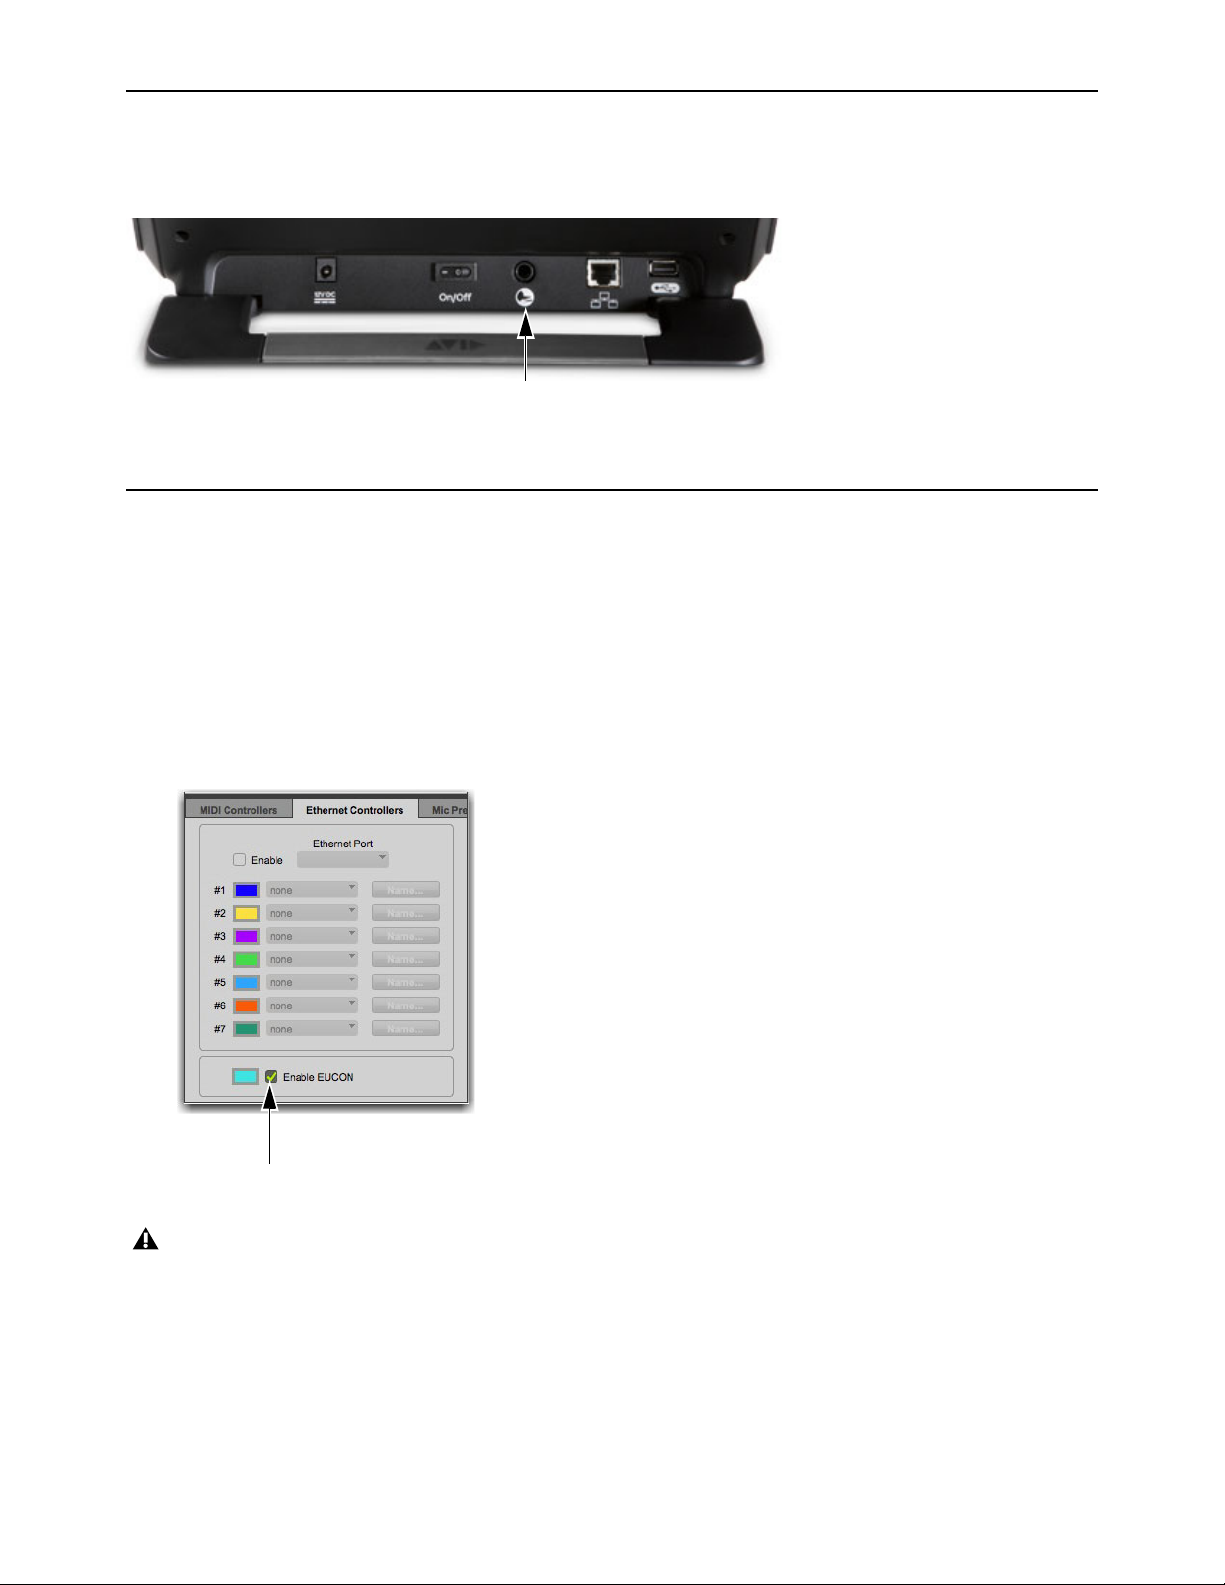
Connecting a Footswitch
The S1 has a 1/4-inch footswitch input on the back panel, which can be configured in EuControl Settings to control punch in and
out of recording in your DAW, or for engaging talkback.
Footswitch input on the back of S1
For more information on configuring the footswitch, see the Using EuControl Surfaces.pdf.
Enabling EUCON in Pro Tools
When you first connect an Avid media controller you must enable EUCON in Pro Tools. EUCON subsequently remains enabled
in Pro Tools unless you disable it. To enable EUCON in other DAWs, see the documentation provided by the manufacturer, as well
as the EUCON Application Setup Guide.pdf.
To enable EuControl in Pro Tools:
1 Launch Pro Tools. If the Quick Start dialog appears, close it.
2 Choose Setup > Peripherals, and click the Ethernet Controllers tab.
3 Select Enable EUCON.
Enable EUCON check box
While Pro Tools is connected to a EUCON surface do not uncheck to disable and re-check to enable without a complete restart
of all components (surfaces and Pro Tools computer) after disabling and before re-enabling.
4 Click OK. You do not need to configure any other Ethernet Controllers settings. These settings do not apply to EUCON.
Pro Tools scans your system until it identifies attached EUCON-compatible hardware. When Pro Tools finishes scanning your
system, your controllers are ready to use with Pro Tools.
5 Proceed to Confirming EUCON.
Installation and Setup 18
Page 23
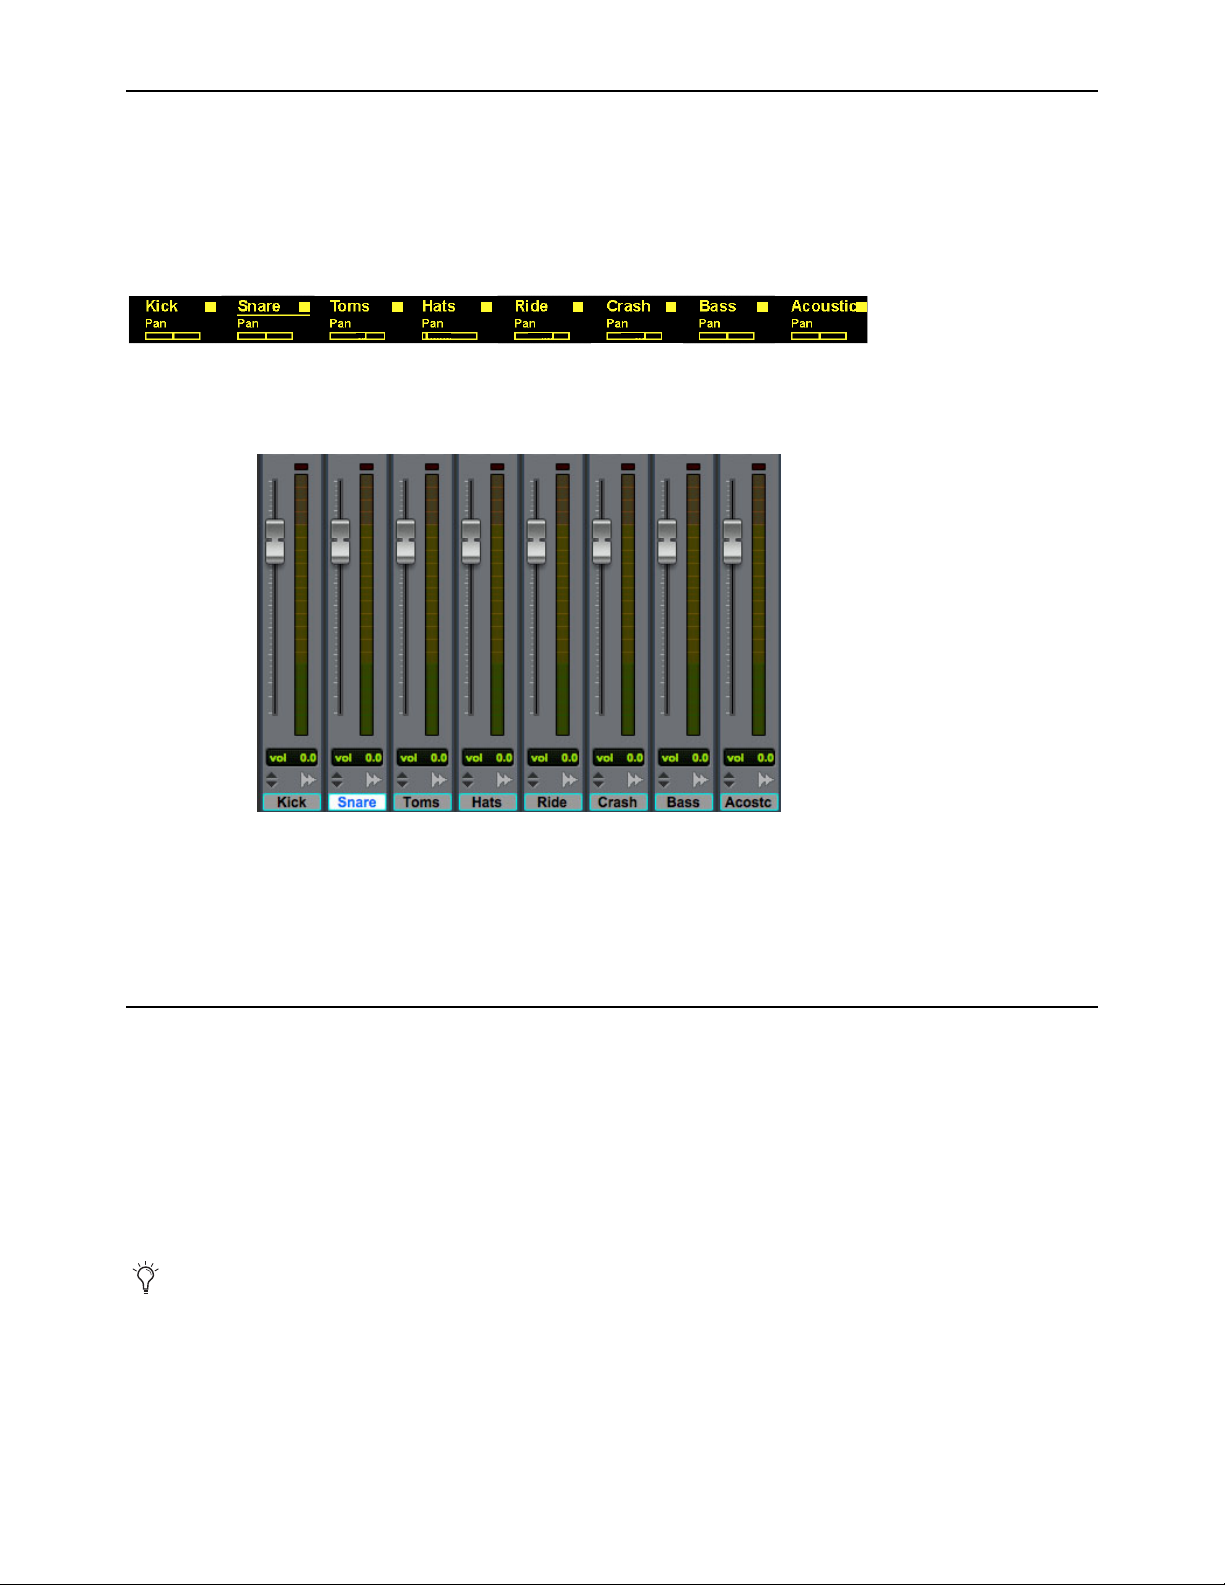
Confirming EUCON
rrrr rrrr
1 2 3 4 5 6 7 8
To confirm installation and communication:
1 Make sure you have enabled EUCON.
2 Open a session if one is not already open.
3 Verify that the channel strip displays above the fader strips show the track names for the first 8 tracks in the Pro Tools session.
Channel Encoder displays showing track names (first eight tracks shown)
4 In the Pro Tools Mix window, verify that the names of the tracks currently banked to the channel strips on S1 are highlighted
with blue-green borders.
Pro Tools Mix window showing tracks currently banked to the S1 channel strips
5 Proceed to any of the following:
• For instructions on using your S3 after initial installation, see
• To connect a second workstation computer, go to
• To connect a footswitch, go to
How to Proceed.
Connecting a Second Workstation.
Powering-On Your System After Initial Setup.
Powering-On Your System After Initial Setup
After the initial installation and setup, your system must be powered on in a specific order, as follows:
1 If connecting to a router, connect all S1s and other Avid control surfaces to the router, connect the router to the workstation com-
puter, and power on the router.
2 If connecting directly, connect S1 to the workstation computer.
3 Power on the S1.
4 Once S1 is finished initializing, power on the workstation computer.
If the S1 is not recognized by EuControl on your workstation computer (for example, because you powered S1 on after powering on the workstation computer), click the unlit EuControl icon in the menu bar (Mac) or System tray (Win) and choose
Restart EUCON Applications...to relaunch EuControl and re-initiate the connection.
Installation and Setup 19
Page 24
Connecting a Second Workstation
The S1 can control applications running on a second computer that is connected to the same network as the primary EuControl
computer, referred to in this guide as a workstation. If EuControl is running on the same workstation as all your audio/video applications you can skip these instructions.
To be able to control a second workstation:
1 Quit (Mac) or Exit (Windows) Pro Tools and any other EUCON applications running on any of your workstations.
2 Transfer the EUCON_WorkstationUnifiedInstall onto the second computer. After downloading, make sure the installer is
mounted (DMG on Mac) or uncompressed (ZIP for Windows).
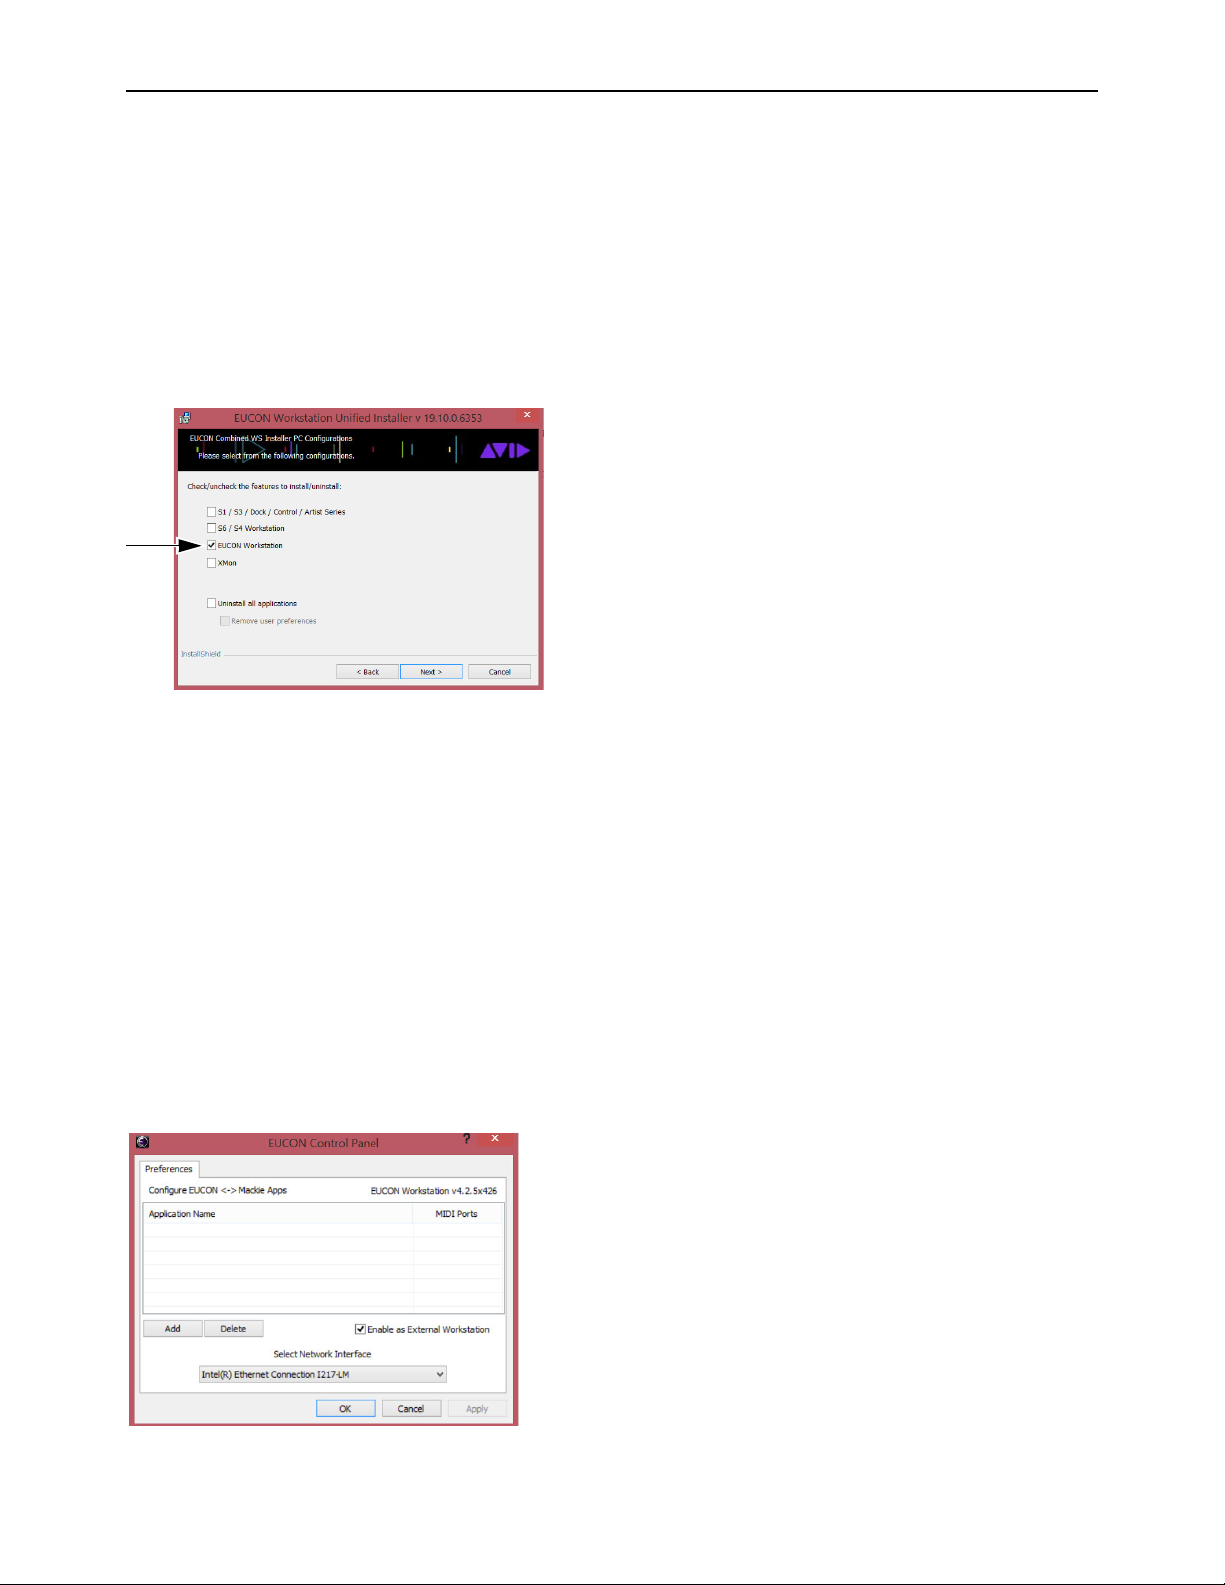
3 Double-click the Install EUCON Workstation Unified installer, then select the EUCON Workstation option and click Next.
EUCON Workstation selected in EUCON Combined Installer
4 Follow the instructions on-screen to complete the installation.
5 When installation has finished, go to Spotlight (Mac) or Search (Windows), and type “MC Client” to locate the application, then
launch MC Client.
6 On the primary workstation, do each of the following:
• Open EuControl Settings, go to the
Workstations tab, and click to enable Enable External Workstations. Follow the prompt
and wait until EUCON applications restart. You must also manually relaunch your DAW.
• Go to System Preferences > EUCON (Mac) or Control Panel > EUCON (Windows).
• Click the
7 On the secondary workstation, do each of the following:
Network Interface selector and choose the port used for your EUCON network connection (such as Ethernet 1).
• Go to System Preferences > EUCON (Mac) or Control Panel > EUCON (Windows).
• Make sure the
• If it is not already enabled, click to enable
Network Interface selector shows the correct network port for your EUCON connection.
Enable as External Workstation. Follow the prompt and wait until EUCON ap-
plications restart. You must also manually relaunch your DAW.
EUCON Control Panel, Enable as External Workstation
Installation and Setup 20
Page 25

8 Open the EuControl Settings window by doing either of the following:
• On Mac, click the EuControl icon on the taskbar and select
• On Windows, double-click the EuControl icon in the system tray and select
EuControl Settings.
EuControl Settings. If you don't see the EuCo-
ntrol icon, it could be automatically hidden by Windows. Click on the small white arrow to show hidden icons, then double-click the EuControl icon.
9 In EuControl Settings, go to the Workstations tab.
10 Select your secondary workstation in the All Workstations list, then click Add to add it to the My Workstations list.
You can switch between workstations by doing either of the following:
• Dock, S3, or Artist Series media controllers only: Press the
plication/Workstation
• All surfaces and Control app: In the
stations list and click
.
Workstations tab of EuControl Settings, select the desired workstation in the My Work-
Attach. If you are using the Control app without any other Artist Series controllers, you must use this
Workstation switch. For example, on the S3 press SHIFT+Ap-
method to switch workstations.
How to Proceed
See S1 Surface Controls Overview to become familiar with the different sections, controls, and displays on the S1.
For operational information and workflow examples, see the Using EuControl Surfaces.pdf.
Installation and Setup 21
Page 26

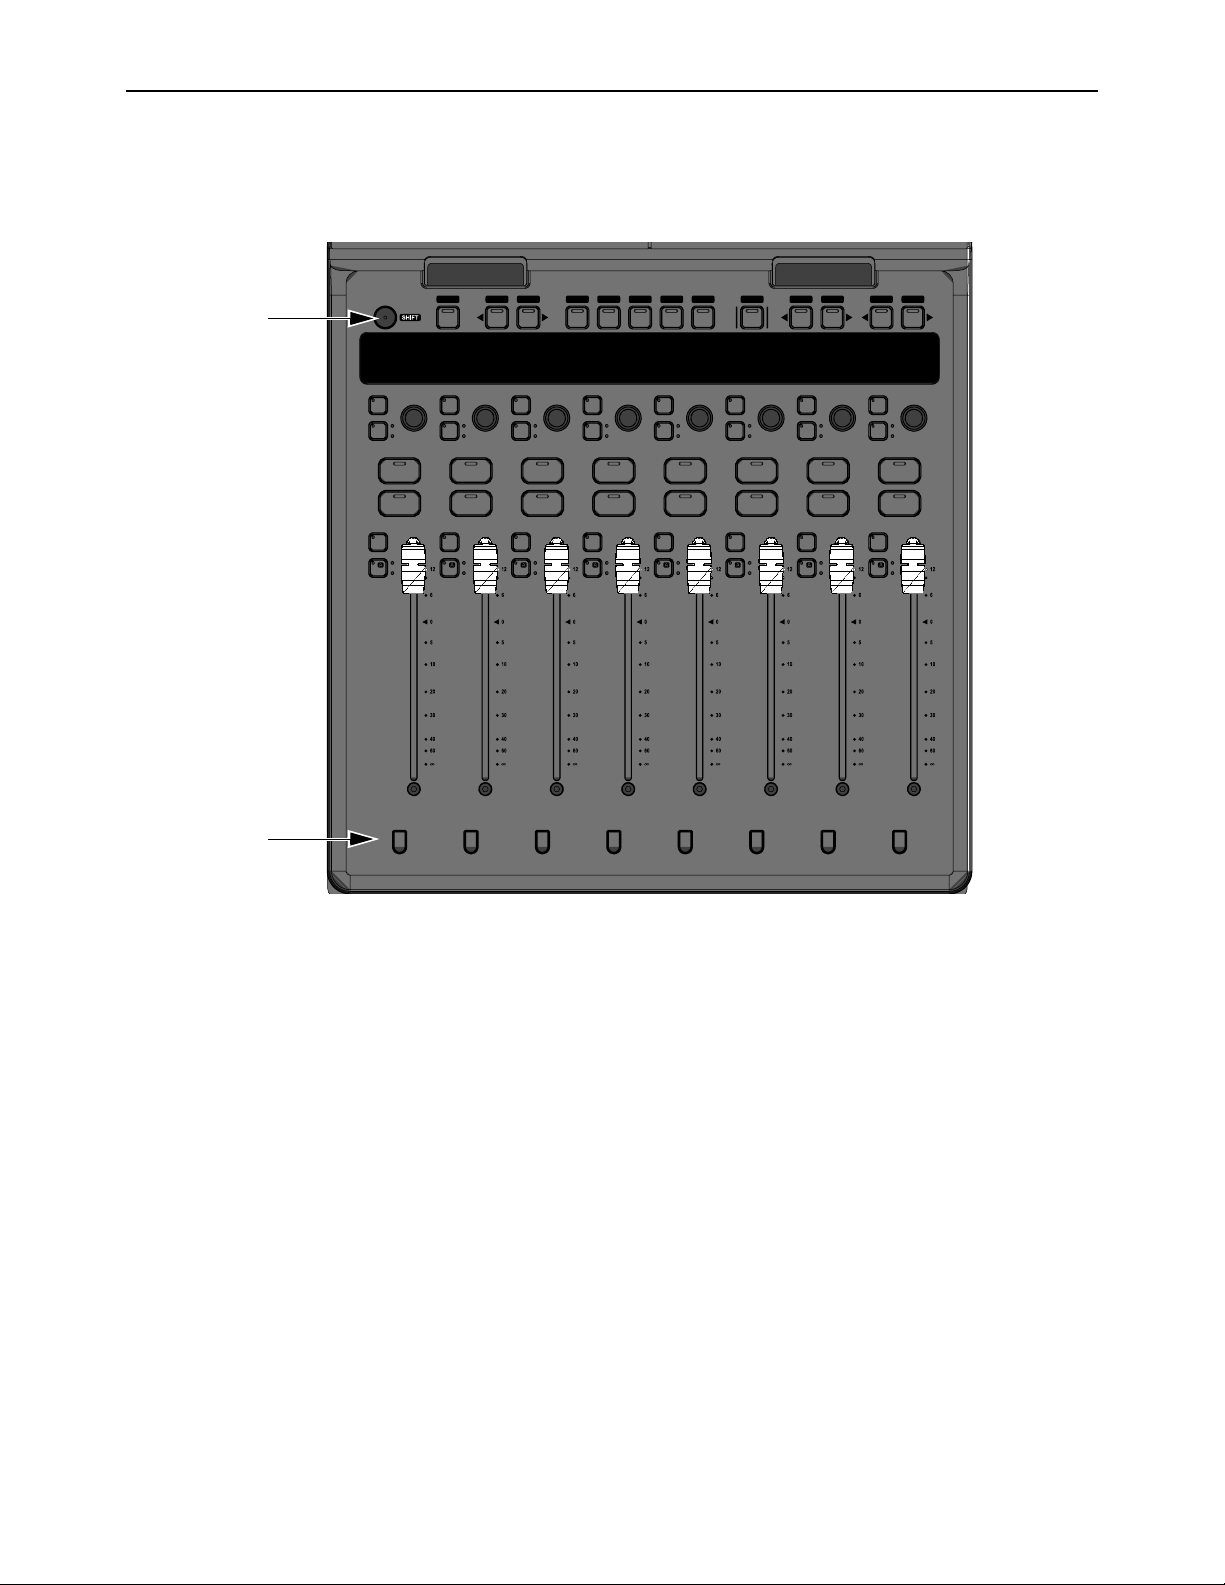
S1 Surface Controls Overview
3
4
5
7
1 6
2
This section provides an overview of the surface controls on the S1. For workflow examples that show how to use the S1 in combination with other control surfaces, the Control app, and/or Pro Tools, see the Using EuControl Surfaces.pdf.
S1 top panel
1 – Surface SHIFT
2 – Channel Strips
3 – Channel Strip Displays
4 – Assignable Channel Encoders
5 – Channel Encoder Assignment Switches
6 – Fader Banking Controls
7 – Track Color Switches (Modifiers and User 1–4)
Surface SHIFT
Channel Navigation Switches
Surface SHIFT is used in conjunction with other switches to access secondary functions shown above switches.
S1 Surface Controls Overview 22
Page 27

Channel Strips
S1 provides 8 channel strips, each with a display, an Assignable Channel Encoder (each with its own encoder
Sel and In switches), automation indicator LEDs, a Solo switch, a Mute switch, a 100mm motorized touch-sen-
sitive fader, a channel select (
ter.
Channel Strip Display
See Channel Strip Displays.
Assignable Channel Encoder
See Assignable Channel Encoders.
Solo
The Solo switch lights yellow when that track is soloed.
Mute
The track is muted (off) when the strip Mute switch is lit red, and is on (unmuted) when not lit.
Fader
The fader controls the level for the track assigned to the channel strip, or the parameter assigned to the Channel
Encoder if Flip is engaged. It is motorized so it reflects changes made in the application, such as automation. It
is also touch sensitive, which some applications use for automation.
Sel) switch, a record engage (Rec)/Automation Mode (A) switch, and a level me-
When the Select by Touch General preference is selected in the EuControl Settings application, touching a
fader selects that track in the application and attentions it on that strip. This is the same as pressing the fader
Sel
switch.
Channel Sel and Rec Switches
Each channel strip features a channel Sel, a channel Rec switch, and an automation mode switch (A), which operate as follows:
Sel
Selects that track in the application, and attentions it for editing in the Channel Encoders (see Basic Channel Encoder Use).
A line under the track name in a channel strip display indicates the track is attentioned.
.
In Pro Tools and other applications, multiple tracks can be selected, but only one channel can be attentioned. In this case, the attentioned track is the last one selected.
Rec
Record-enables a track in the application.
• In Pro Tools, the
is in progress.
• Pressing a lit
A (Surface SHIFT + Rec/A)
right-hand corner of the channel strip display or on-screen.
.
You can swap the primary and SHIFT functions of the REC/A switch in the General tab of EuControl Settings. For more information, see the Using EuControl Surfaces.pdf.
Rec switch flashes red to indicate that track is enabled (armed) for recording, and is lit solid when recording
Rec switch disables that track for recording.
Changes the automation mode for a track.The desired automation mode appears in the bottom
S1 Surface Controls Overview 23
Page 28

Automation Indicator LEDs
Next to each strip Rec/A switch, and next to each knob In switch, are a pair of automation indicator LEDs.
Track (left) and parameter/knob (right) Automation indicator LEDs
With each pair, the upper red LED and the lower green LED indicate automation status as shown in the following table.
0 =
unlit
1 =
lit
* =
flashes
Automation Mode Red LED Green LED
Off 0 0
Read 0 1
Touch 1 0
Latch 1 0
Touch/Latch 1 0
Write 1 0
Preview 0 *
Off + Trim 0 1
Read + Trim 0 1
Touch + Trim 1 1
Latch + Trim 1 1
Touch/Latch + Trim 1 1
Write + Trim 1 1
The red LED flashes while writing automation. The green LED flashes in Preview mode.
S1 Surface Controls Overview 24
Page 29

Channel Strip Displays
Kick
Pan
1
Snare
Pan
2
rt
1
2 3
4
5 6
7
<mode>
At the top of each channel strip is an OLED (organic light emitting diode) display. Each display shows track information as follows:
Channel strip display in Normal Mode
1 – Meter
2 – Track Name
ter releasing the fader it reverts to showing the track name.
3 – Track Number
4 – Parameter Name
coder is touched, it shows the value of the parameter. After releasing the encoder it reverts to showing the parameter name.
5 – Encoder Position
6 – Automation Mode
Automation Modes and Displayed Indication
Mode Display
Off (blank)
Read r
Touch t
Latch l
Touch-Latch tl
Write W
Trim
Shows clip, peak, and normal values. It can show mono, stereo, or surround tracks.
Shows the track name as it appears in the application. When a fader is touched, it shows the value of the fader. Af-
Shows the track number relative to its position in the application.
Shows the name of the parameter currently assigned to the corresponding Channel Encoder. When an en-
Shows the relative setting of the control for the currently assigned parameter.
Shows the track’s current automation mode setting, as follows:
Not all applications support all the modes listed above.
7 – Attention Indicator
Encoders apply to the attentioned track.
Display Sleep
To preserve display life, the channel displays enter sleep mode when not in use. This can be set in EuControl Settings (see the Using
EuControl Surfaces.pdf for information on
S1 Surface Controls Overview 25
Indicates that the corresponding track is the attentioned track. Any parameters adjusted using the Channel
OLED Screen Saver Time).
Page 30

Assignable Channel Encoders
Kick
Pan
1
Snare
Pan
2
Hats
Pan
3
rrr
Hats
LF Gain
3
Snare
2
Kick
LF Q
1
r r r
Each channel strip has one touch-sensitive, continuously rotating encoder for adjusting parameters as assigned by the Channel Encoder Assignment switches (see
used to access sub-menus. Each encoder also has corresponding
• A Channel Encoder
coder. For example, engaging the
• A Channel Encoder
Channel Encoder Modes
The Channel Encoders operate in either Normal Mode or Channel Mode. The channel displays shows the current channel mode.
Normal Mode
In Normal Mode, each Channel Encoder controls the same parameter for every track on the channel strips. A line appears under the
attentioned track’s name in the display.
Channel displays in Normal Mode, showing “Snare” as the attentioned track
Channel Mode
Channel Encoder Assignment Switches). Each encoder can also be pressed, which is typically
Sel and In switches.
Sel switch assigns a secondary function of the displayed parameter to the corresponding Channel En-
Sel switch for an encoder controlling EQ frequency assigns Q (bandwidth) to that encoder.
In switch toggles two-state parameters, such as turning an individual EQ Band on/off.
In Channel Mode, the 8 Channel Encoders control up to 8 different parameters for the attentioned track. In Channel Mode parameter names and value are highlight in each channel display. For the attentioned track, track name as well as parameter and value are
highlighted.
Channel displays in Channel Mode, showing “Kick” as the attentioned track
Channel Mode is useful for editing EQs and plug-ins that have many parameters.
S1 Surface Controls Overview 26
Page 31

Basic Channel Encoder Use
1
3
2 2
When S1 is first powered on, the Channel Encoders are in Normal Mode and Pan is assigned to the Channel Encoders by default.
Each Channel Encoder controls pan for its corresponding track on the strip.
To quickly access pan control on the Channel Encoders in Normal Mode:
Press the Pan Channel Encoder Assignment switch.
To enable Channel Mode (see the figure below):
1 Press a Channel Sel switch to attention that track.
2 Press Surface SHIFT + Flip/Chan.
3 Press the channel Encoder Assignment switch for the desired function such as Inserts or EQ.
Remember, for functions listed above each switch such as Input, Inst, HEAT, Group, or Mix, hold Surface SHIFT while pressing
its switch.
Enabling Channel Mode: Select a track (1), press Surface SHIFT + Flip/Chan (2), then select a function (3)
The encoder displays show parameters for the selected function.
4 To exit Channel Mode, press Shift + Flip again.
Pressing the EQ Channel Encoder Assign Switch automatically enables Channel Mode as well.
S1 Surface Controls Overview 27
Page 32
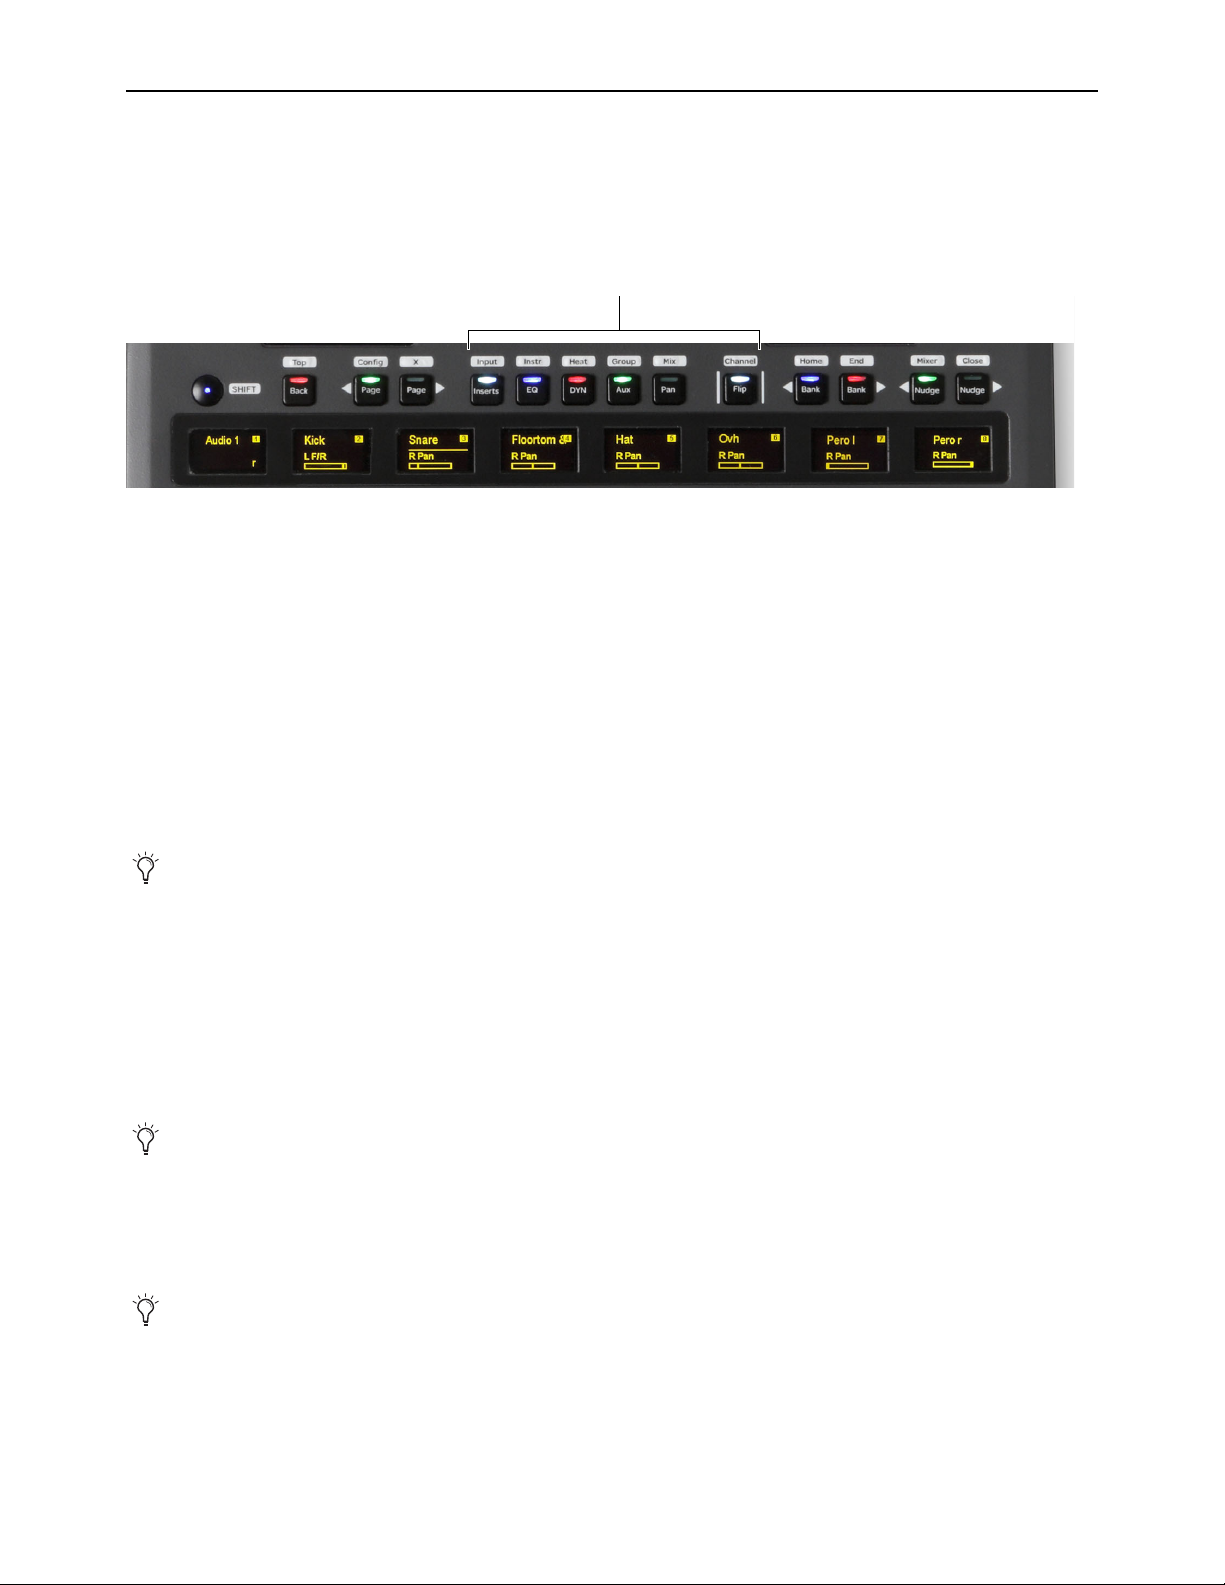
Channel Encoder Assignment Switches
The Channel Encoder Assignment switches assign sets of adjustable parameters, called Knob Sets, to the Channel Encoders. A
Knob Set is an array of controls used by EuControl-compatible applications to control plug-ins, EQs, dynamics, aux sends, and
other functions using the controls on the S1. Some of these Knob Sets also have sub-menus.
One of the switches is always selected, and the associated parameters are assigned to the Channel Encoders until another Channel
Encoder Assignment switch is pressed. When S1 is first powered on,
Channel Encoder Assign switches (showing all switches lit to indicate primary LED colors)
The labels above each Channel Encoder Assignment switch indicate secondary parameters that can be assigned to the Channel Encoders. The text in white on the switch represents a switch’s primary function, and the text in black above the switch represents a
switch’s secondary function. Secondary functions are accessed by pressing and holding the
the desired Encoder Assign (or other) switch.
The following switches are provided:
Input
Assigns hardware input parameters such as input routing, mic gains, phantom power, and other application-specific param-
eters to the Channel Encoders.
Pan is selected by default.
Surface SHIFT switch then pressing
Inserts
rently banked tracks the first insert slot (
Assigns the top-level Insert Knob Set to the Channel Encoders. When Insert is pressed, in each channel display for all cur-
a) is shown, or a plug-in is shown if one is inserted. Pressing a Channel Encoder under the
display showing the plug-in you want to adjust enables Channel Mode on the Channel Encoders, and the Knob Set for the selected
plug-in is assigned to the 8 Channel Encoders for editing.
In the Insert Knob Set, parameters are mapped to the Channel Encoders according to the manufacturer’s specifications. Parameter mapping can vary between plug-ins, even of the same type.
Press the Page > Channel Encoder Navigation switch to access the next plug-in. Press < Page to access the previous plug-in.
Press the Back Channel Encoder Navigation Switch to return to the Channel Encoders to the top-level Inserts Knob Set. Or, you
can simply press another Channel Encoder Assignment switch to navigate directly to another Knob Set.
Instr
Assigns the top-level Instrument Knob Set to the Channel Encoders (when an Instrument plug-in is present).
EQ
Assigns the top-level EQ Knob Set to the Channel Encoders. Operation is similar to the Inserts Knob Set, except only the first
inserted EQ plug-in on the channel is displayed and accessed.
In the EQ Knob Set, parameter mappings to the Channel Encoders are standardized across EQ plug-ins. For example, high
band gain controls for two EQ plug-ins from different manufacturers appear on the same encoder.
HEAT (Pro Tools Only)
DYN
Assigns the top-level Dynamics Knob Set to the Channel Encoders. Operation is similar to the Inserts Knob Set, except only
Assigns the top-level HEAT knob set (when HEAT is available).
the first inserted Dynamics plug-in on the channel is displayed and accessed.
In the Dyn Knob Set, parameter mappings to the Channel Encoders are standardized across dynamics plug-ins. For example,
the threshold controls for two compressor plug-ins from different manufacturers appear on the same encoder.
S1 Surface Controls Overview 28
Page 33
Group
Pan
Kick
1
rw
Displays the Group Knob Set to configure group or control group (VCA) membership.
In Normal Mode, the first group is displayed, and pressing the Page > Channel Encoder Navigation switch displays the next
group if applicable.
In Channel Mode, up to 8 groups for the currently selected channel can be accessed at once.
Aux
Assigns sends on the Channel Encoders.
In Normal Mode, the first send is displayed, and pressing the Page > Channel Encoder Navigation switch assigns the next set
of sends to the encoders.
In Channel Mode, up to 8 sends for the currently selected channel can be accessed at once.
Mix (Surface SHIFT + Pan/Mix)
Pan
Displays the Pan Knob Set to configure stereo or surround panning. Pan controls are not available for tracks with mono or no
Displays the Mix Knob Set to configure track output routing.
output path assignments.
Channel (Surface SHIFT + Flip/Channel)
Channel Mode (lit yellow
Channel switch). In Normal Mode, the attentioned track name is underlined to show which track’s pa-
Toggles the Channel Encoders between Normal Mode (unlit Channel switch) and
rameters will be expanded in Channel Mode. The switch LED lights yellow when Channel mode is engaged, and orange when both
Channel and Flip modes are engaged.
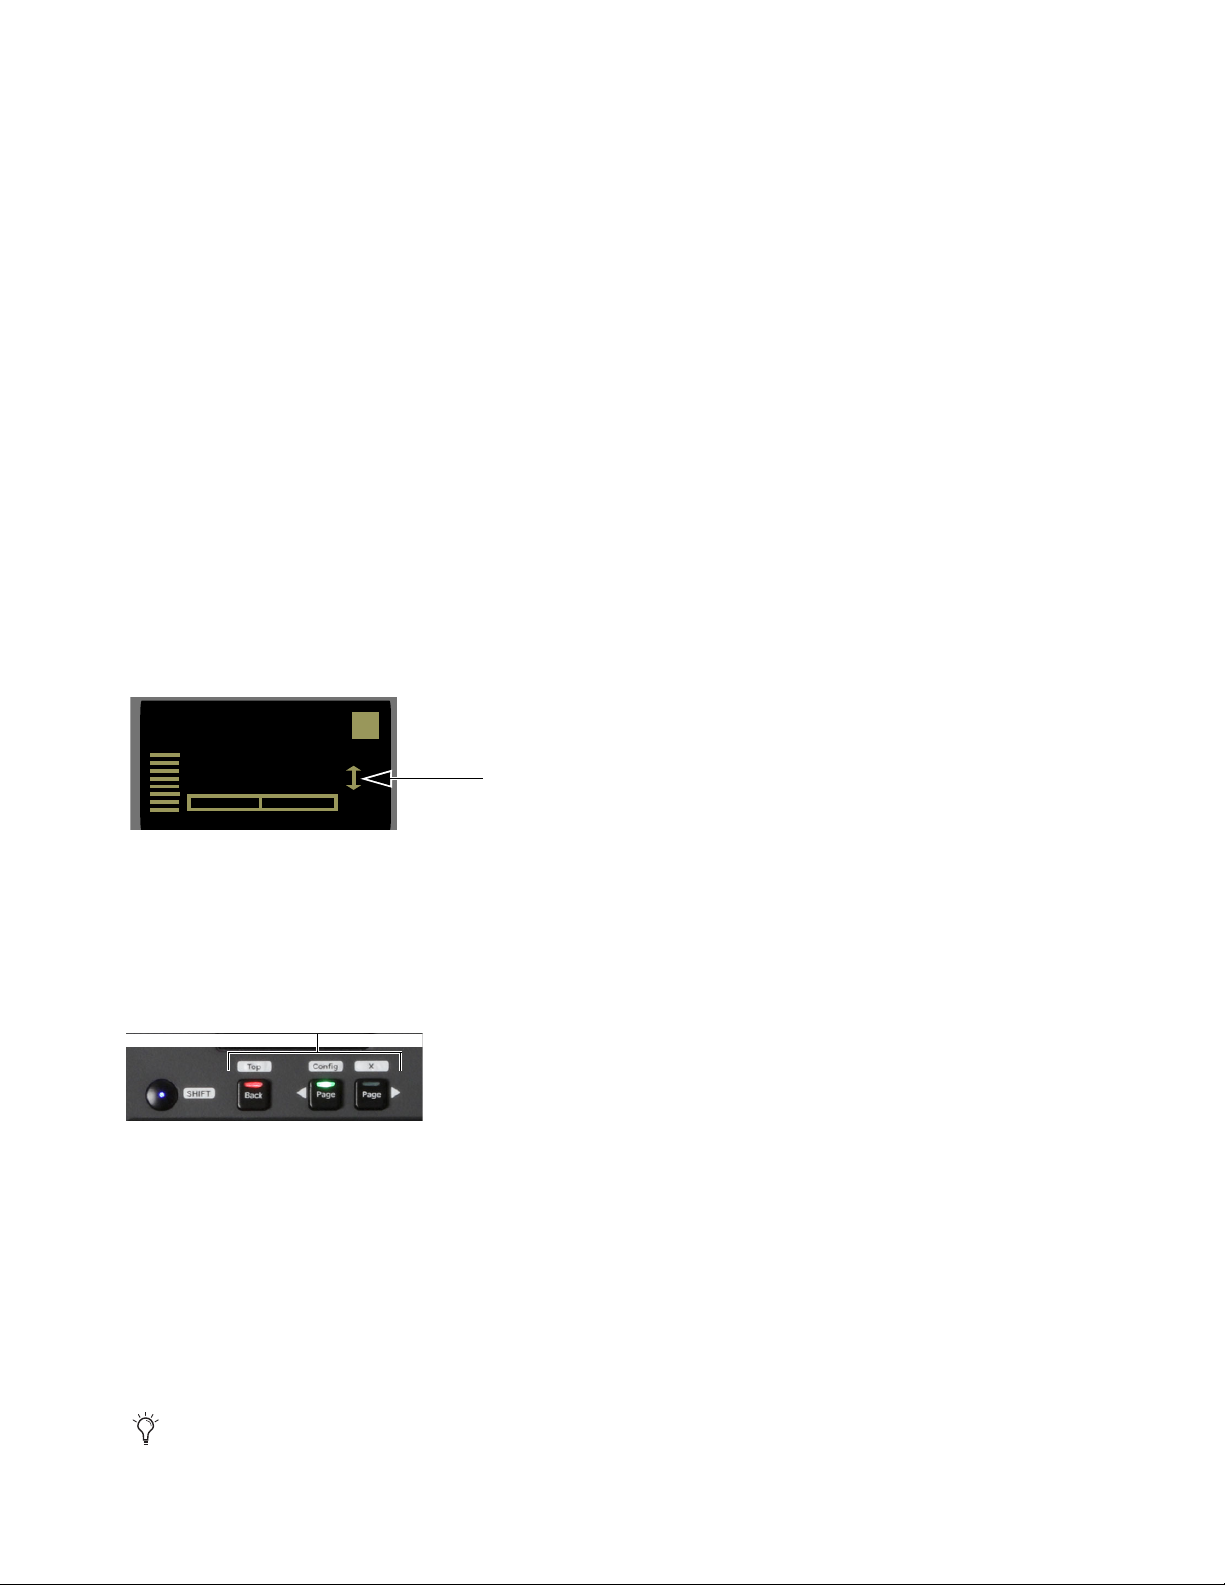
Flip
Toggles what is currently assigned to the knobs (such as pan or send parameters) to the faders. A vertical double arrow appears
in the channel strip display when the faders and knobs are flipped. Press
Flip again to toggle the faders and knobs back to normal.
You can use Flip mode with Aux sends, for example, to quickly set up headphone mixes using the faders. (The Dock does not follow Flip.)
Flip indicator in OLED display
The switch LED lights green when Flip is engaged, and orange when both Channel and Flip modes are engaged.
Channel Encoder Navigation Switches
Since a Knob Set may have more parameters than encoders, use Back/Top, <Page/Config, and Page>switches to navigate
through available parameters.
Channel Navigation Switches
Back
Returns to the previous Knob Set. Press Back repeatedly to back out of all sub-menus and display the top of the current Knob
Set.
Top
Returns to the top-level Knob Set.
Config
< Page, Page >
ous or next set to go to. For example, if Send A is assigned to the Channel Encoders, pressing the lit yellow
to the Channel Encoders. In addition,
Enters Config mode, from which you can insert plug-ins and assign sends.
Assigns the previous or next set of parameters to the Channel Encoders. The switches light when there is a previ-
Page > assigns Send B
< Page lights orange if there is a previous page and Config mode is enabled, and lights green
if Config mode is enabled but there is no previous page.
The X switch is not yet implemented.
S1 Surface Controls Overview 29
Page 34
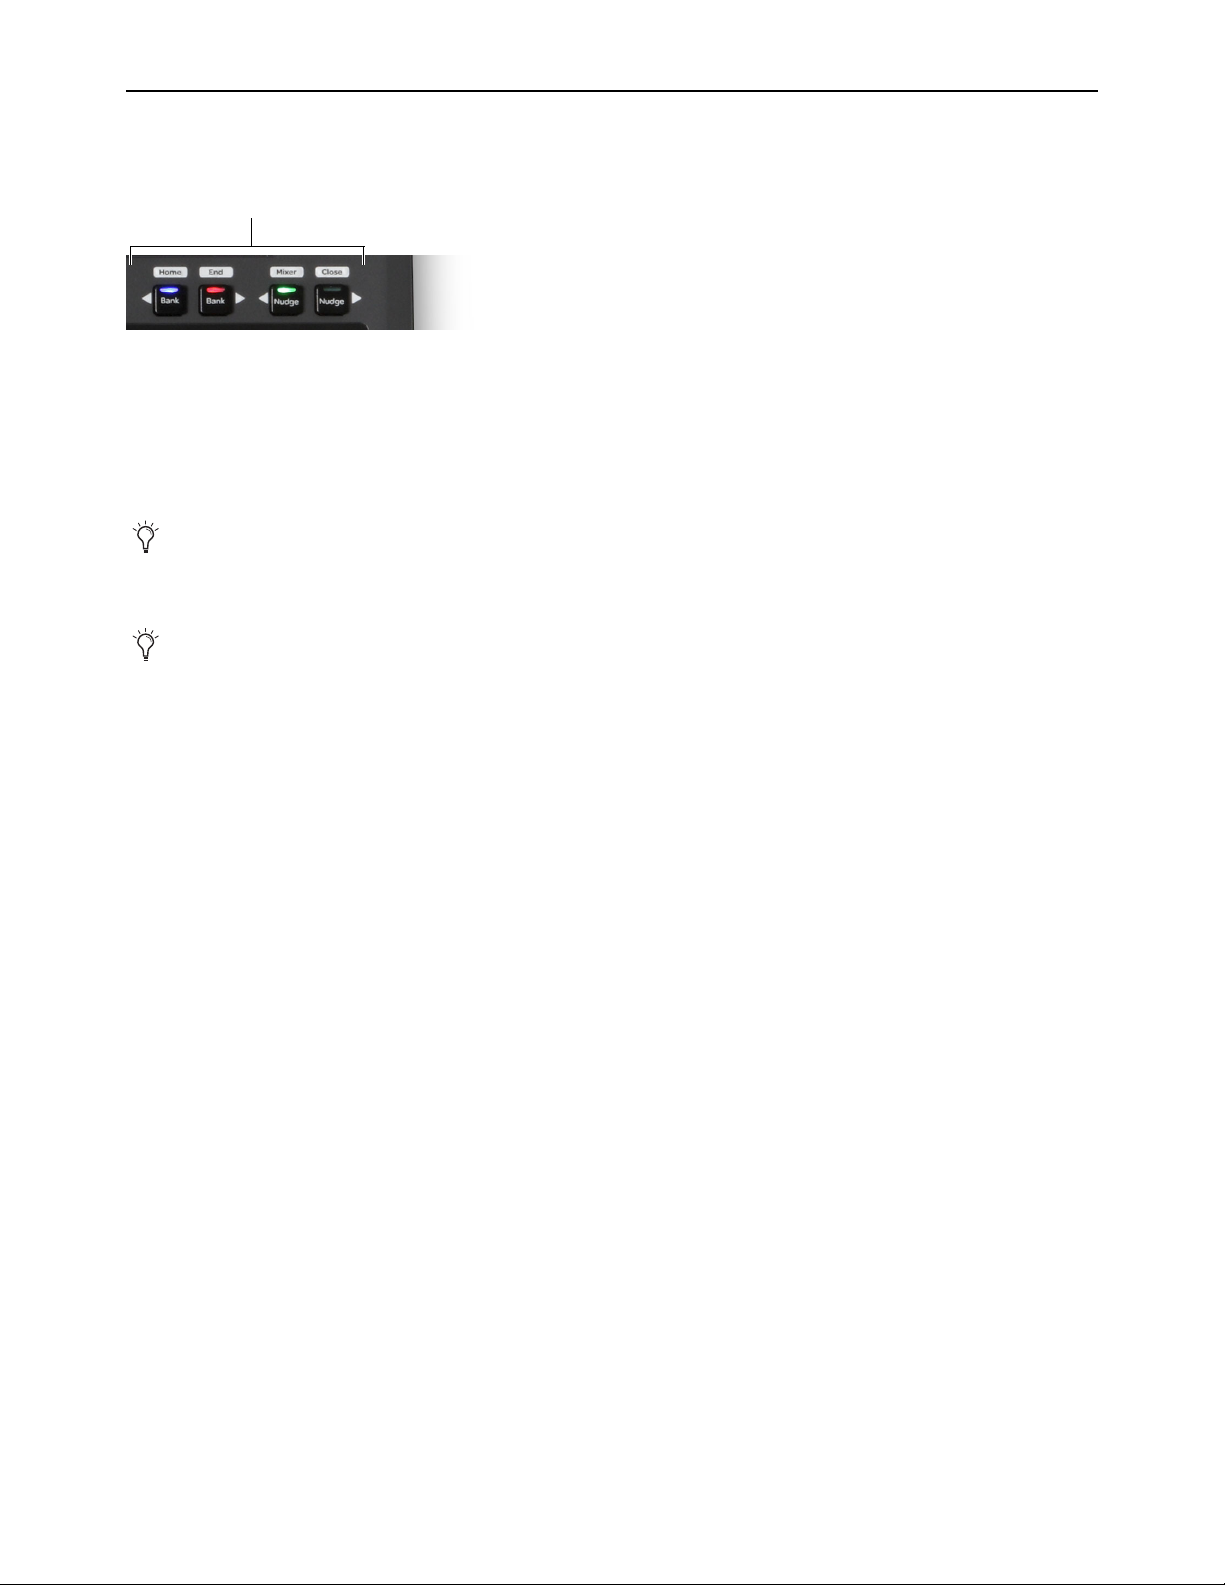
Fader Banking Controls
Bank tracks to the channel strips using the Bank and Nudge switches. Home and End are shortcuts to the first and last banks, re-
spectively.
Fader Navigation controls
Bank and Nudge
The Bank and Nudge switches change which tracks are assigned to the channel strips, as follows:
< Bank
Pressing the switch
Banks 8 tracks to the left. If tracks 17–24 were banked to strips 1–8, pressing < Bank banks tracks 9–16 to strips 1–8.
again does nothing because the first bank is already shown.
EuControl provides “bank stop” which prevents the Bank switches from banking beyond the first or last track. The Nudge
switches, however, do let you navigate beyond the first or last track.
Bank >
Banks 8 tracks to the right. If tracks 1–8 were banked to strips 1–8, tracks 9–16 are now banked to strips 1–8.
On S3 (only), its Bank and Nudge switches are also used to spill VCAs in Multi-Master mode. For more information, see the
Using EuControl Surfaces.pdf.
< Nudge
1–8 to strips 1–8. Pressing
Nudge >
Banks tracks one track to the left. If tracks 2–9 were banked to channel strips 1–8, pressing < Nudge once banks tracks
< Nudge again banks tracks 1–7 to strips 2–8.
Banks tracks one track to the right. If pressed once while tracks 1–8 were banked to channel strips 1–8, tracks 2–9 are
banked to strips 1–8.
Bank and Nudge Pro Tools
The S1 Bank and Nudge switches can also bank the Mix and/or Edit windows in Pro Tools. To have Pro Tools follow S1 banking,
in Pro Tools go to
Selection
and/or Mix Window Follows Bank Selection.
Setup > Preferences, open the Mixing tab, and in the Controllers section enable Edit Window Follows Bank
Home and End
Home (Surface SHIFT + < Bank/Home)
Banks tracks 1–16 to the channel strips.
End (Surface SHIFT + Bank >/End)
Banks the last set of tracks to the strips.
Mixer and Close
Not all applications support these switches.
Mixer (Surface SHIFT+ < Nudge/Mixer)
Close (Surface SHIFT + Nudge >/Close)
S1 Surface Controls Overview 30
Toggles Mix and Edit windows in Pro Tools.
Closes any open window in the application.
Page 35
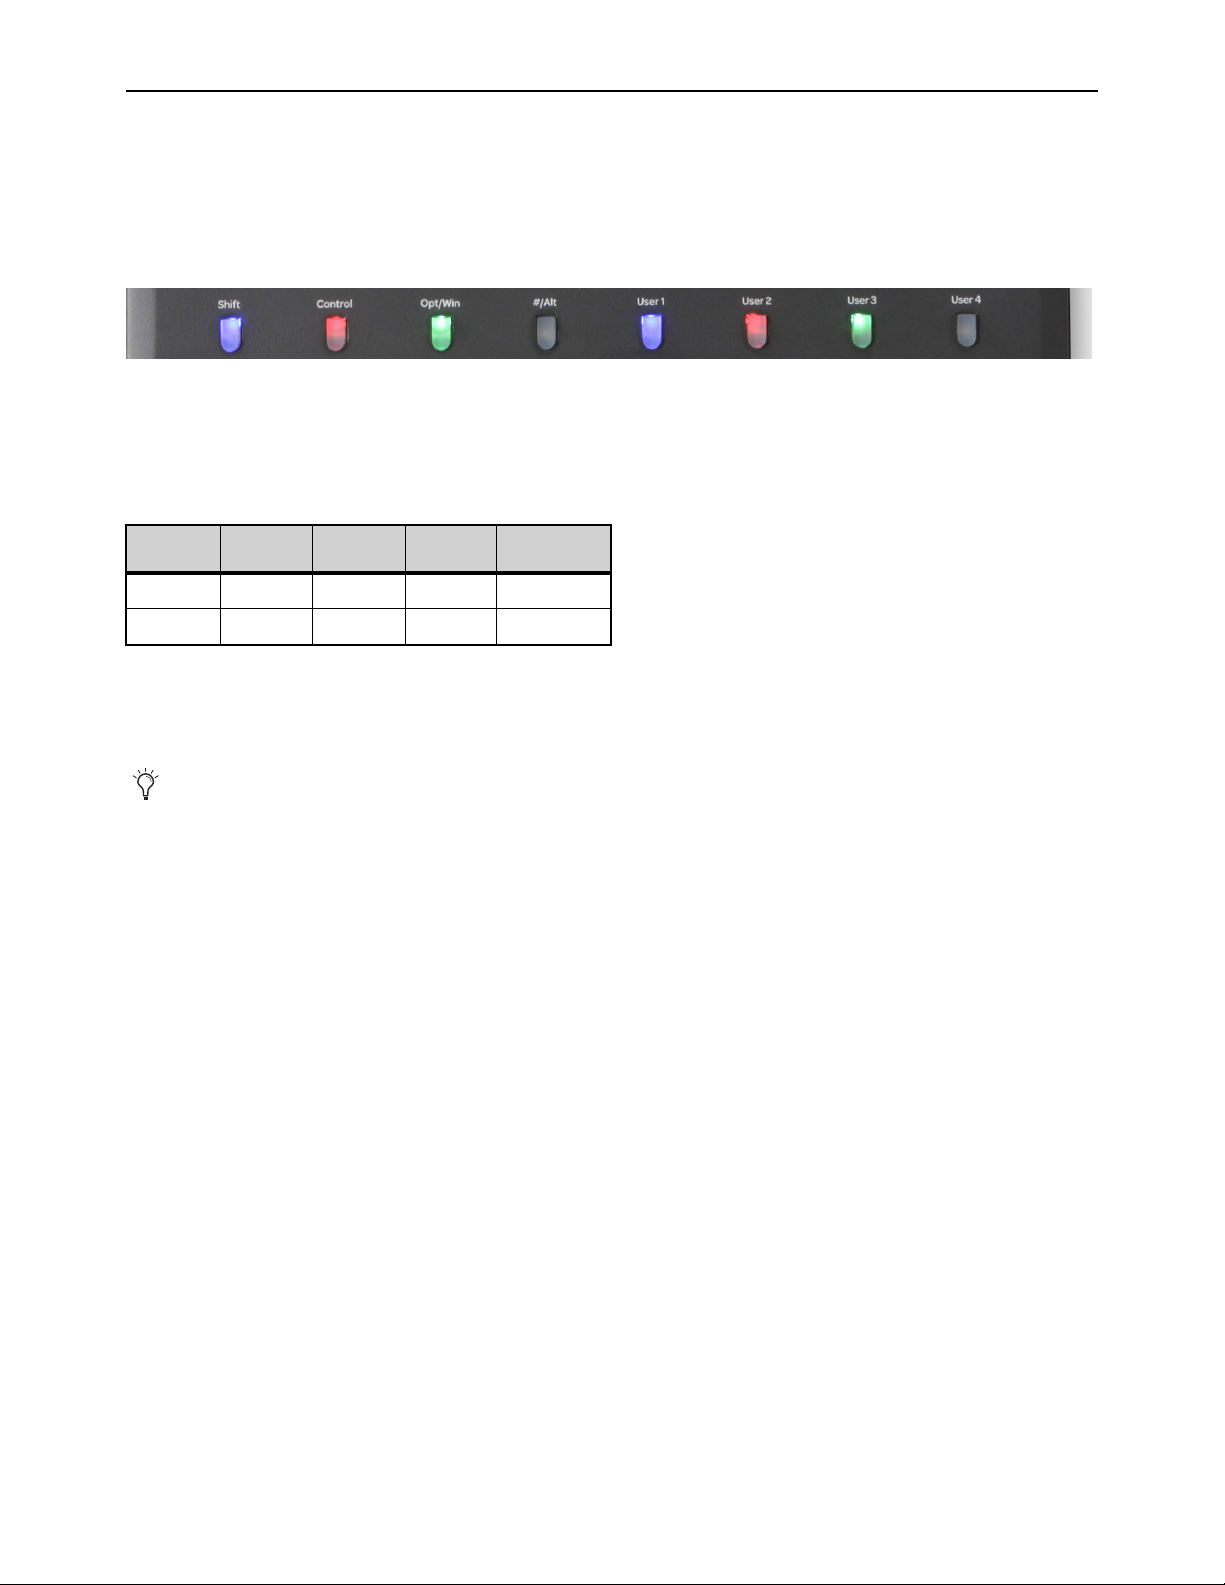
Track Color Switches (Modifiers and User 1–4)
Track Color switches at the bottom of each fader strip show the assigned track colors for tracks banked to the surface. On each S1,
the four left switches provide Modifier functionality, and the four right switches provide customizable User switches.
By default, the Surface SHIFT layer recalls Layouts 1–8.
All 8 switches can be customized in the Soft Key Editor of EuControl Settings.
Track Color switches
Modifier Switches
The Modifier switches duplicate the function of the computer keyboard modifiers. Note that multiple keys can be held down together. The table lists each key’s function for Mac and Windows.
Track Color / Modifier Key functions for Mac and Windows
Shift Control Opt/Win
Mac Shift Control Option Command
Windows Shift Ctrl Win Alt
User Switches
Command/
Alt
All 8 Track Color switches are customizable. Use the Soft Keys tab in EuControl Settings to assign your own EUCON, page, key,
or surface commands to these switches.
In the default Pro Tools Soft Keys, hold Surface SHIFT and press a Track Color switch 1–8 to recall Layouts 1–8.
For complete information on Soft Keys and other features within EuControl Settings, see the Using EuControl Surfaces.pdf.
S1 Surface Controls Overview 31
Page 36
Appendix A: Specifications
All specifications subject to change.
Module:
Avid S1
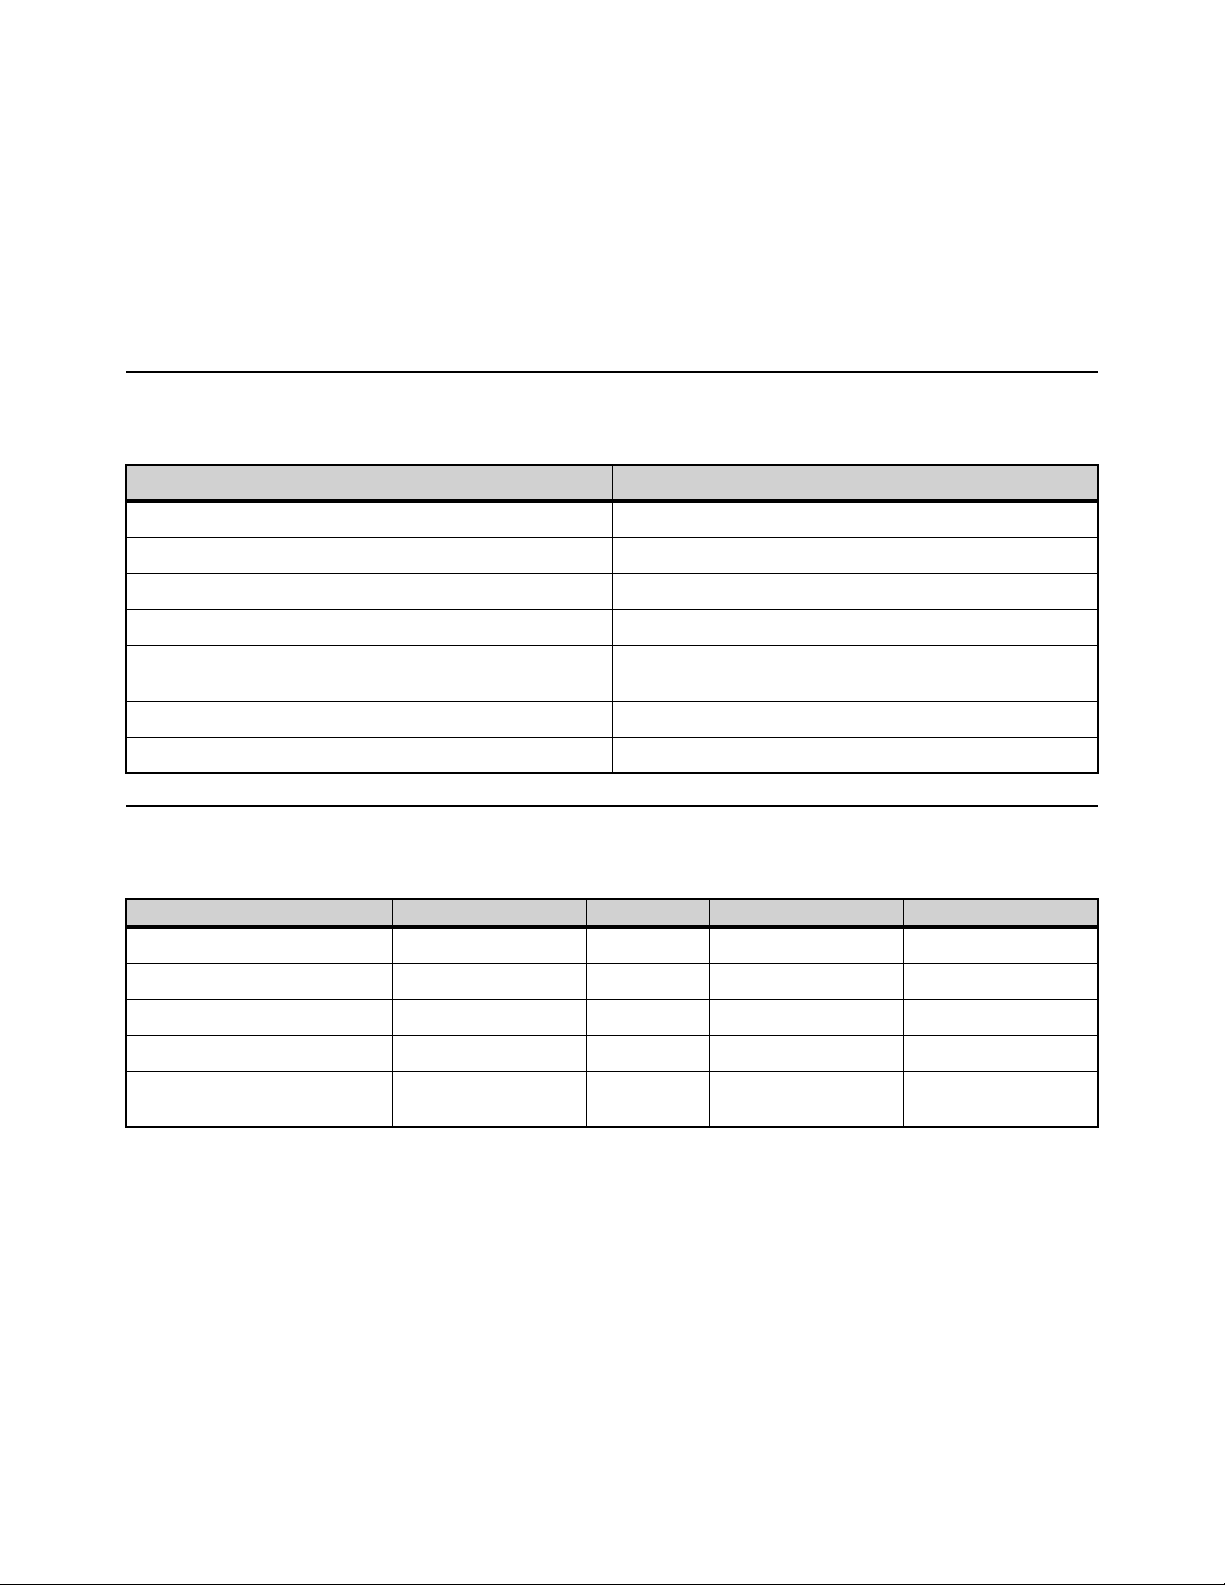
Mechanical
Avid S1 Mechanical Specifications
Parameter Specification
Height (front) 1.3 in (33 mm)
Height (rear) 4.1 inches (103 mm)
Width 12.4 in (316 mm)
Depth 14.9 in (377 mm)
Weight 4.17 lbs
Power Requirements 2.8 A
Ethernet Port 1000-BaseT (Gigabit) Ethernet RJ-45
1.89 kg
Environmental
Avid S1 Environmental Specifications
Parameter Specification Limit Units Condition/Comment
Storage Temperature –18 to +60 deg C deg C 0 to +140 deg F
Operating Temperature +4 to +40 deg C deg C +40 to +104 deg F
Storage humidity range 5 to 95 % Non-condensing
Operating Humidity Range 20 to 80 % Non-condensing
Continuous Vibration (Storage
only: non-powered transportation)
Appendix A: Specifications 32
1 g RMS Random spectrum
Page 37
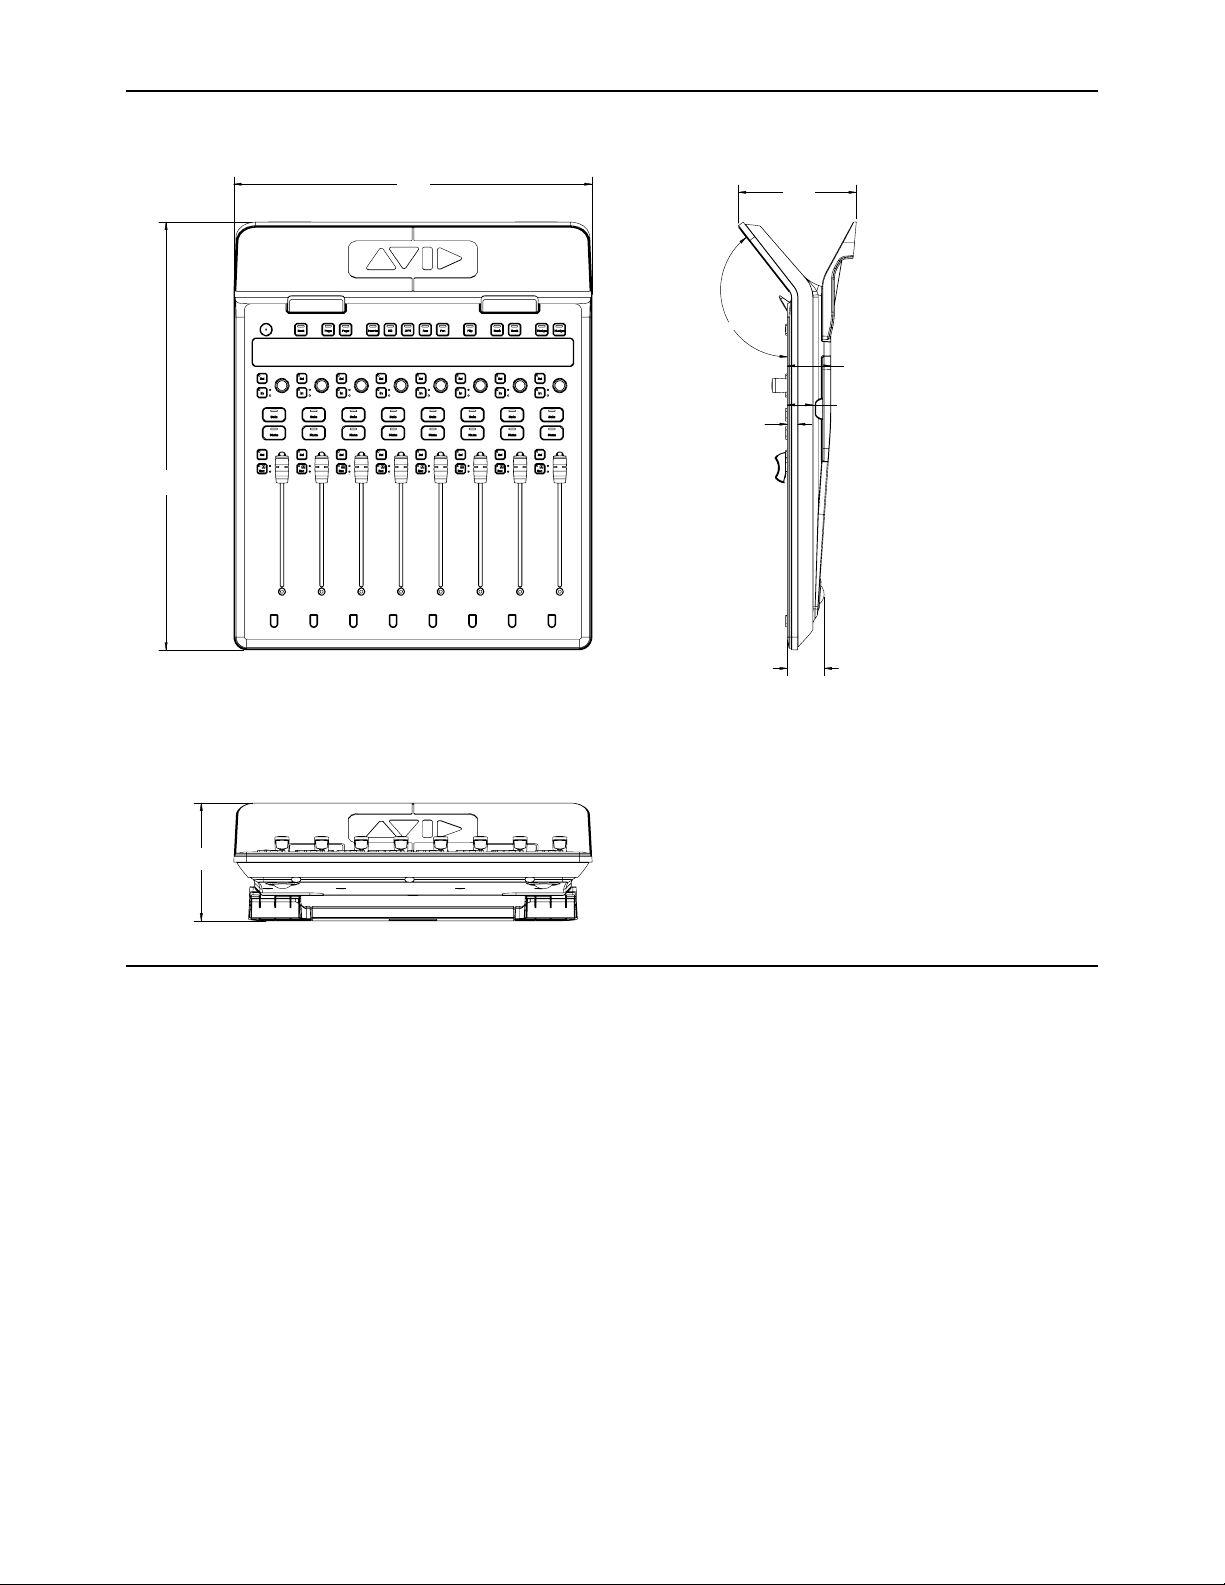
Dimensions
[12.4]
316.1
[14.9]
377.4
[4.1]
103.9
142°
[1.5]
38.5
[.9]
22.5
[.4]
9.0
[1.3]
32.5
[4.1]
103.9
Test Mode
The Avid S1 has a self-test mode that lets you test the fader, LEDs and knob touch-sensitivity. This self-test mode is similar to
“Vegas Mode” on other control surfaces.
To enable Test Mode on the S1:
1 Power the S1 off.
2 Press and hold down < Bank + Bank > + Nudge > simultaneously while powering the S1 back on.
On the S1, all LEDs light and cycle through their color range.
• Press any switch and you will see all LEDs change to the Yellow/White range.
• Test the touch-sensitivity of the knobs. Tapping a knob will switch the LEDs to the Yellow/White color range.
• Rotate the top-left knob to change the speed of the fader cycle.
• Touching the fader will cause it to stop cycling.
Note that not every LED will light up with certain colors.
Appendix A: Specifications 33
Page 38

Appendix B: Compliance
WARNING
Model Name: Avid S1 Model #: 9100-65814
Environmental Compliance
Disposal of Waste Equipment by Users in the European Union
This symbol on the product or its packaging indicates that this product must not be disposed of with other waste. Instead, it is your responsibility to dispose of your
waste equipment by handing it over to a designated collection point for the recycling of waste electrical and electronic equipment. The separate collection and recycling of your waste equipment at the time of disposal will help conserve natural resources and ensure that it is recycled in a manner that protects human health
and the environment. For more information about where you can drop off your waste equipment for recycling, please contact your local city recycling office or the
dealer from whom you purchased the product.
Proposition 65 Warning
This product can expose you to chemicals including Pb and Pb compounds, which is known to the State of California to cause cancer and birth
defects or other reproductive harm. For more information go to www.P65Warnings.ca.gov.
Perchlorate Notice
This product may contain a lithium coin battery. The State of California requires the following disclosure statement: “Perchlorate Material – special handling may apply, See www.dtsc.ca.gov/hazardous waste/perchlorate.”
Recycling Notice
Appendix B: Compliance 34
Page 39

EMC (Electromagnetic Compliance)
Avid declares that this product complies with the following standards regulating emissions and immunity:
• FCC Part 15 Class B
• CAN ICES-003 Class B
• EN 55032 Class B
• AS/NZS CISPR 32 Class B
• CISPR 32 Class B
• EN 61000-3-2
• EN 61000-3-3
• EN 55103-2, Class E2, E3 and E4
• EN55024
FCC Compliance for United States
Radio and Television Interference
Communication Statement
NOTE: This equipment has been tested and found to comply with the limits for
a Class B digital device, pursuant to Part 15 of the FCC Rules. These limits are
designed to provide reasonable protection against harmful interference in a residential installation. This equipment generates, uses, and can radiate radio frequency energy and, if not installed and used in accordance with the instructions,
may cause harmful interference to radio communications. However, there is no
guarantee that interference will not occur in a particular installation. If this equipment does cause harmful interference to radio or television reception, which can
be determined by turning the equipment off and on, the user is encouraged to try
and correct the interference by one or more of the following measures:
• Reorient or locate the receiving antenna.
• Increase the separation between the equipment and receiver.
• Connect the equipment into an outlet on a circuit different from that to
which the receiver is connected.
• Consult the dealer or an experienced radio/TV technician for help.
Any modifications to the unit, unless expressly approved by Avid, could void the
user's authority to operate the equipment.
Australian Compliance
Canada ICES-003 Compliance
This Class B digital apparatus meets all requirements of the Canadian Interference-Causing Equipment Regulations.
Cet appareil numérique de la classe B respecte toutes les exigences du Règlement sur le material brouilleur du Canada.
Korea Class B EMC Compliance
이 기기는 가정용 (B 급 ) 전자파적합기기로서 주 로 가정에서 사용하는 것을 목적으로 하며 , 모 든 지역에서 사용할 수 있습니다 .
Japan VCCI B Compliance
CE Compliance
(EMC, Safety and RoHS)
Avid is authorized to apply the CE (Conformite Europenne) mark on this compliant equipment thereby declaring conformity to EMC Directive 2014/30/EU, Low Volt-
age Directive 2014/35/EU and RoHS Directive 2011/65/EC.
Appendix B: Compliance 35
Page 40

Technical Support (USA)
Visit the Online Support Center
at
www.avid.com/support
Product Information
For company and product information,
visit us on the web at
www.avid.com
 Loading...