

Page 1

Avid® Media Composer® v2018.4
New in Media Composer v2018.4
The following are new with this release:
New Features
The following table describes What’s New for the current editor release.
Feature Description For More Info
New in Media Composer v2018.4
What’s New for
Media Composer Models Avid has introduced new models of Media
Composer.
Generating iXML Metadata
When Creating WAV
Media
Timeline Clip Notes
Window Representative
Frame
Timeline Clip Notes Quick
Find
Customizing Timeline
Views
Setting Pre-roll for
ScriptSync and PhraseFind
Adjusting Font and Font
Size in the Timeline Clip
Notes Window
New Script Lock Icons New script lock icons help you when working
Color Adapters Listed in
the Effect Editor.
WAV media generated using Audio Export,
as well as managed media in OMF (Wave)
format, will include iXML metadata.
You can now display a representative frame
in the Timeline Clip Notes window.
You can search for text in the Timeline Clip
Notes window.
You have more control when customizing
Timeline Views.
You can enter a pre-roll value when searching
in the Find Window and the Script Window.
You can change the font and font size in the
Timeline Clip Notes Windows.
in a shared script.
Color adapters are now listed in the Effect
Editor.
See New Models of Media
Composer.
See Media Composer Generates
iXML Metadata When Creating
WAV Media.
See Timeline Clip Notes Window
Representative Frame.
See Searching for Text in the
Timeline Clip Notes Window.
See Customizing Timeline Views.
See Setting Pre-Roll for Script
Window and PhraseFind
See Setting Pre-Roll for Script
Window and PhraseFind
See Refreshing Locked Scripts
See Color Adapters Listed in the
Effect Editor.
Updates to the Marker
Window.
Run Length Encoding for
Alpha
Performing an Insert Edit to
an Exported Sequence
A number of updates have been included with
the Markers Window.
You to choose to import an alpha channel as
either Uncompressed or as Run Length
Endcoded (RLE).
You can perform an insert edit on an OP1a
MXF exported sequence.
1
See Updates to the Markers
Window.
See Run Length Encoding for
Alpha on Import
See Performing an Insert Edit to
an Exported Sequence
Page 2
New in Media Composer v2018.4
New Models of Media Composer
This release of Media Composer v2018.4 introduces new models of Media Composer. Media
Composer model options now include Media Composer | First, Media Composer,
Media Composer | Ultimate, and Media Composer Perpetual. For details on the features provided in
the different Media Composer models see https://www.avid.com/media-composer/comparison.
Media Composer Generates iXML Metadata When Creating WAV Media
WAV media generated using Audio Export, as well as managed media in OMF (Wave) format, will
include iXML metadata that follows the iXML standard as published by Gallery UK and commonly
used in audio field recorders. Included in the iXML are certain audio-relevant bin columns, such as
scene and take information, markers, track names, and a SMPTE standard unique media identifier.
This data can be used by downstream applications. Pro Tools, for example, will bring in the Scene,
Take, and Track Name information.
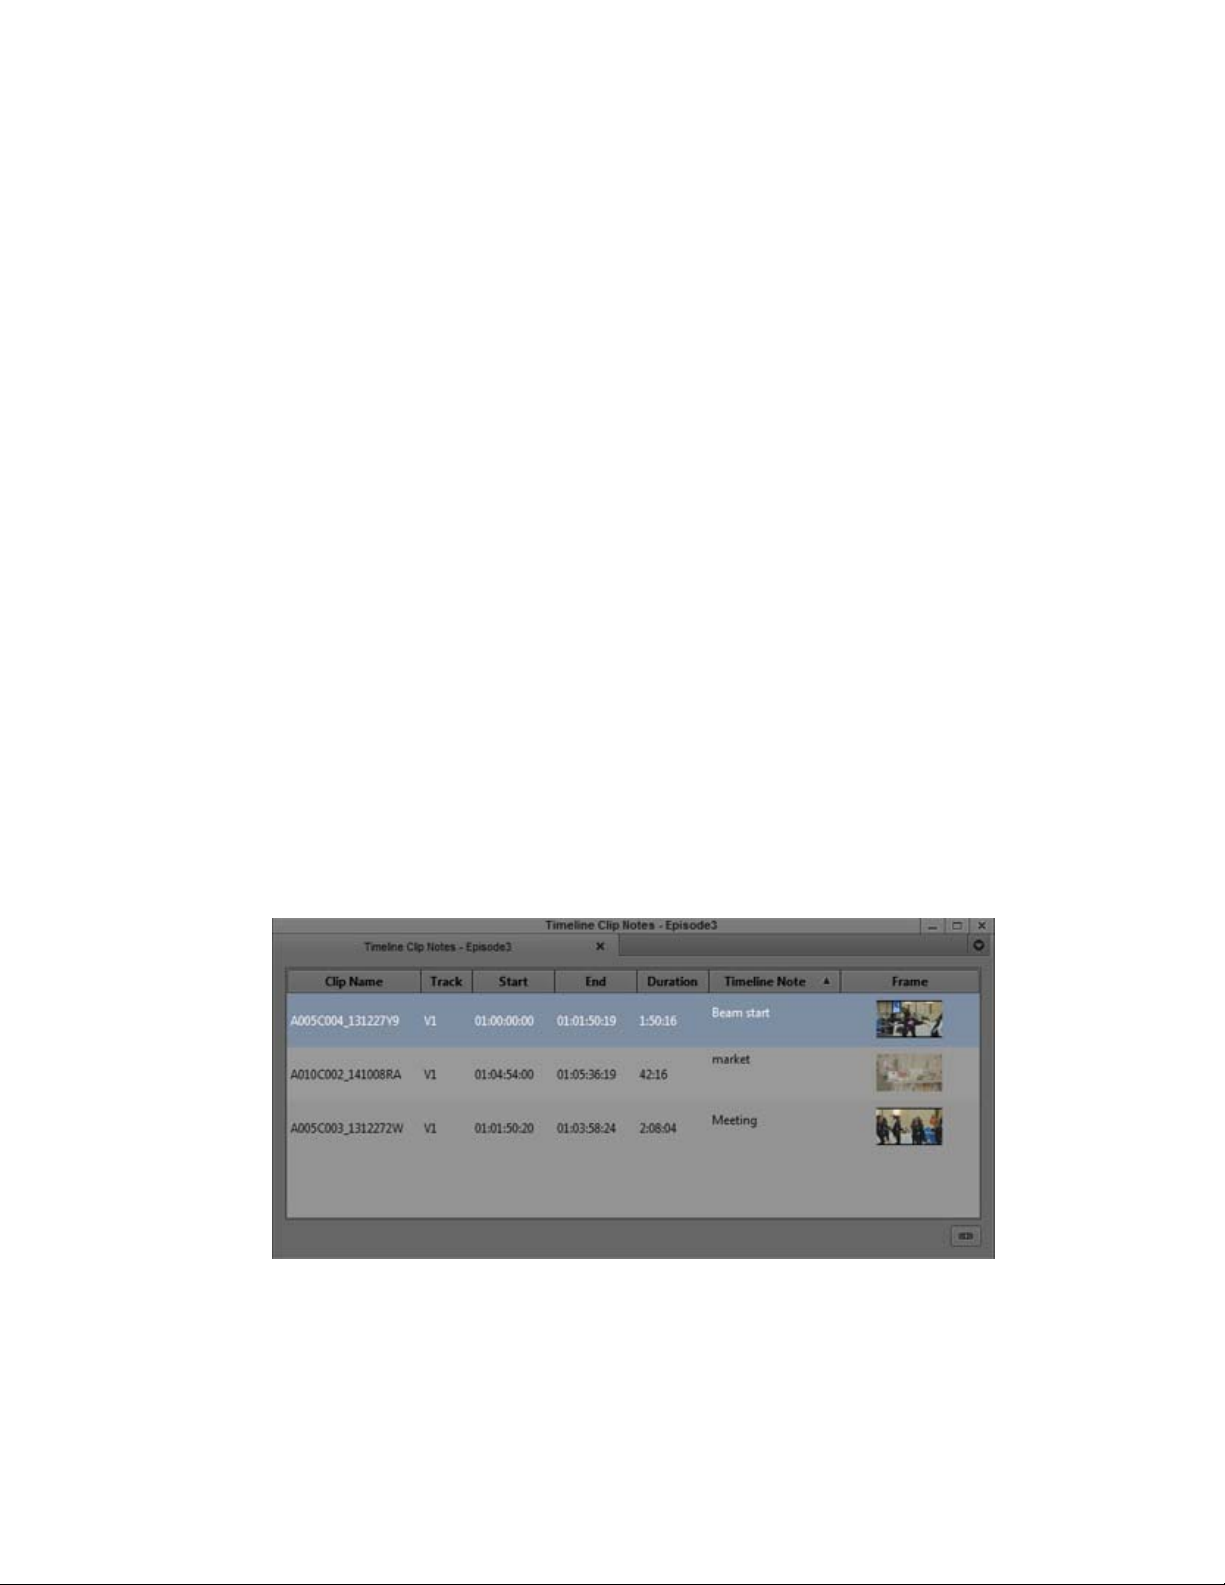
Timeline Clip Notes Window Representative Frame
You can display a representative frame in the Timeline Clip Notes window.
To display a representative frame in the Timeline Clip Notes window:
1. Select the sequence in the Timeline.
2. Select Tools > Timeline Clip Notes.
The Timeline clip notes for the selected sequence appear in the window.
3. Right-click in the Timeline Clip Notes window and select Choose Columns.
4. Select Frame.
5. Click OK.
A representative frame of the clip appears in the Timeline Clip Notes window.
Do one of the following to enlarge or reduce the image:
t Right-click and select Enlarge Frame or Reduce Frame.
t Type Ctrl+L or Ctrl+K.
t From the edit menu, choose Enlarge Frame or Reduce Frame.
2
Page 3
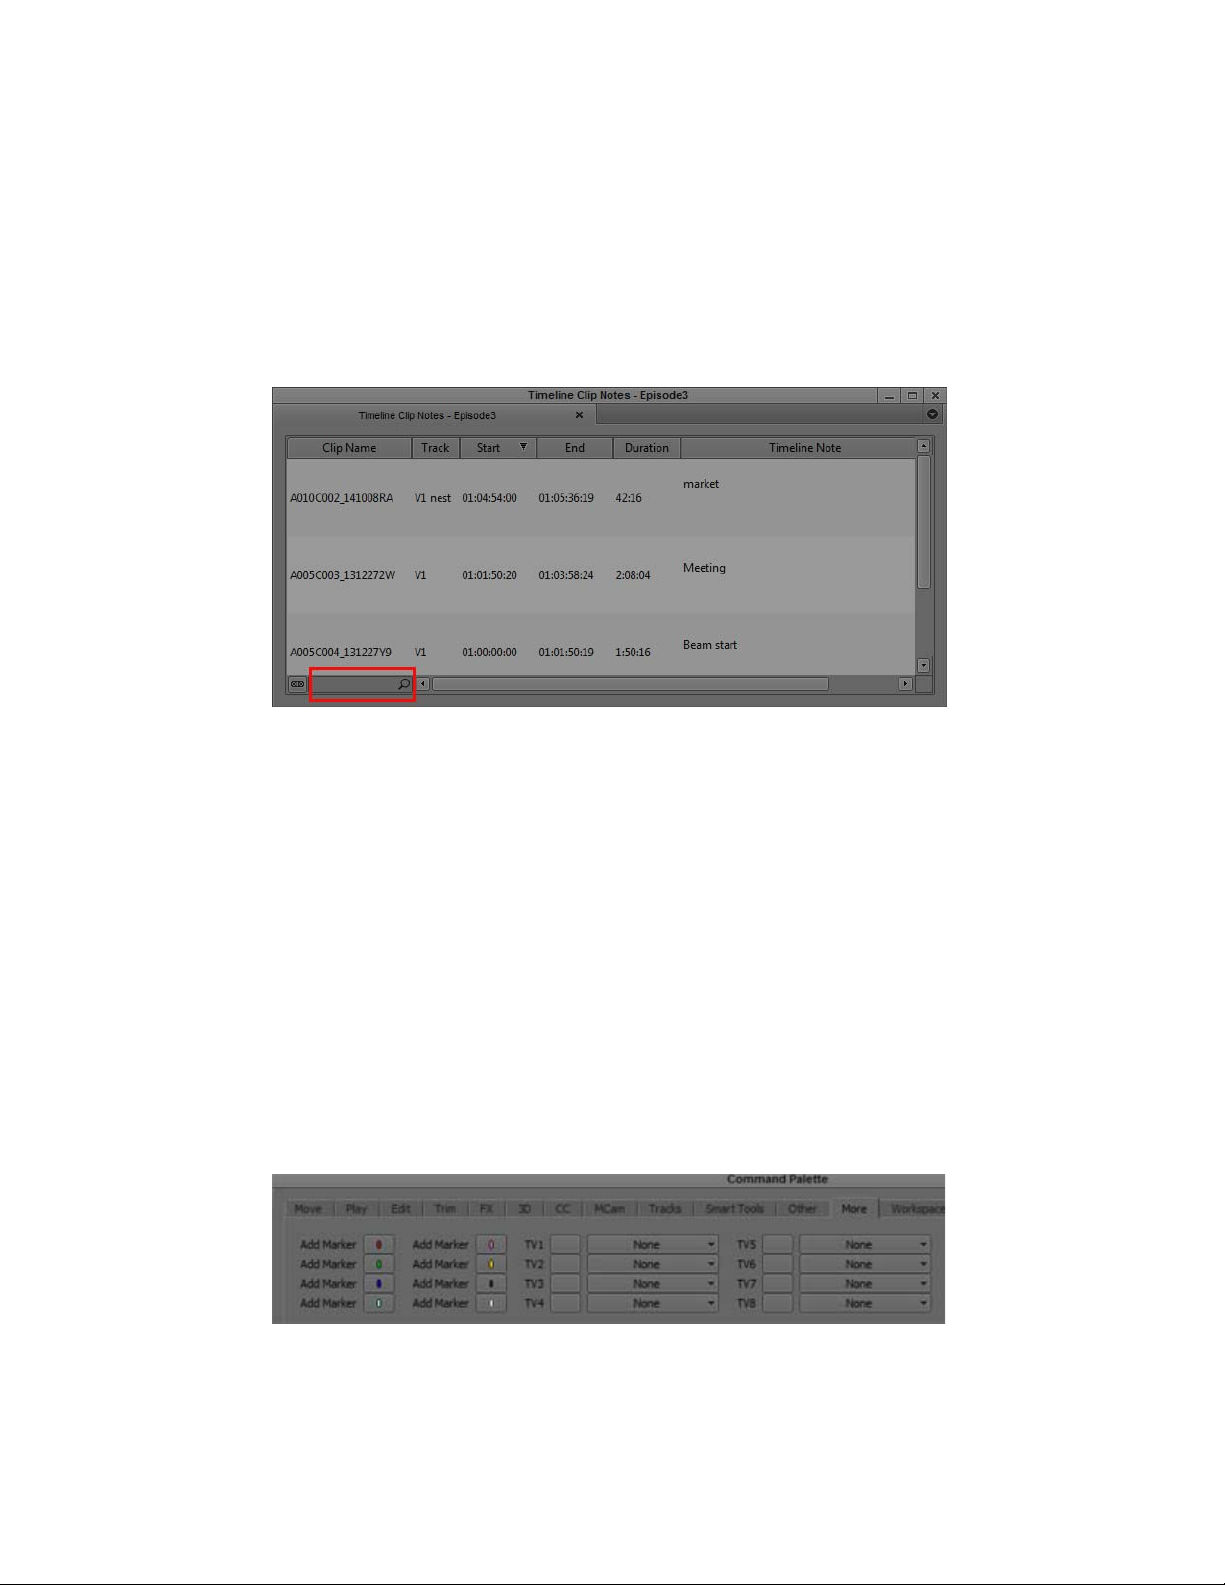
Searching for Text in the Timeline Clip Notes Window
The Timeline Quick Find field allows you to enter text that you can search for in the Timeline Clip
Notes Windows.
To search for text in the Timeline Clip Notes Window:
1. With the sequence loaded in the Timeline, select Tools > Timeline Clip Notes to open the
Timeline Clip Notes window.
2. Click the Quick Find field.
New in Media Composer v2018.4
3. Enter the text you want to search for in the text field.
The window displays any clips that include the text entered in the find field in any column.
Customizing Timeline Views
With this release, you can have more control when customizing Timeline Views and you can then
map the views to buttons on the user interface or keyboard.
To customize Timeline Views:
1. Make sure you have some Timeline Views created by clicking the View Menu button at the
bottom of the Timeline, selecting Save As and typing a name for the view, and clicking OK. See
“Managing Custom Timeline Views” in the Help for details. (These views will be available when
mapping views to Timeline View buttons in the Command Palette.)
2. Select Tools > Command Palette.
3. Click the More tab.
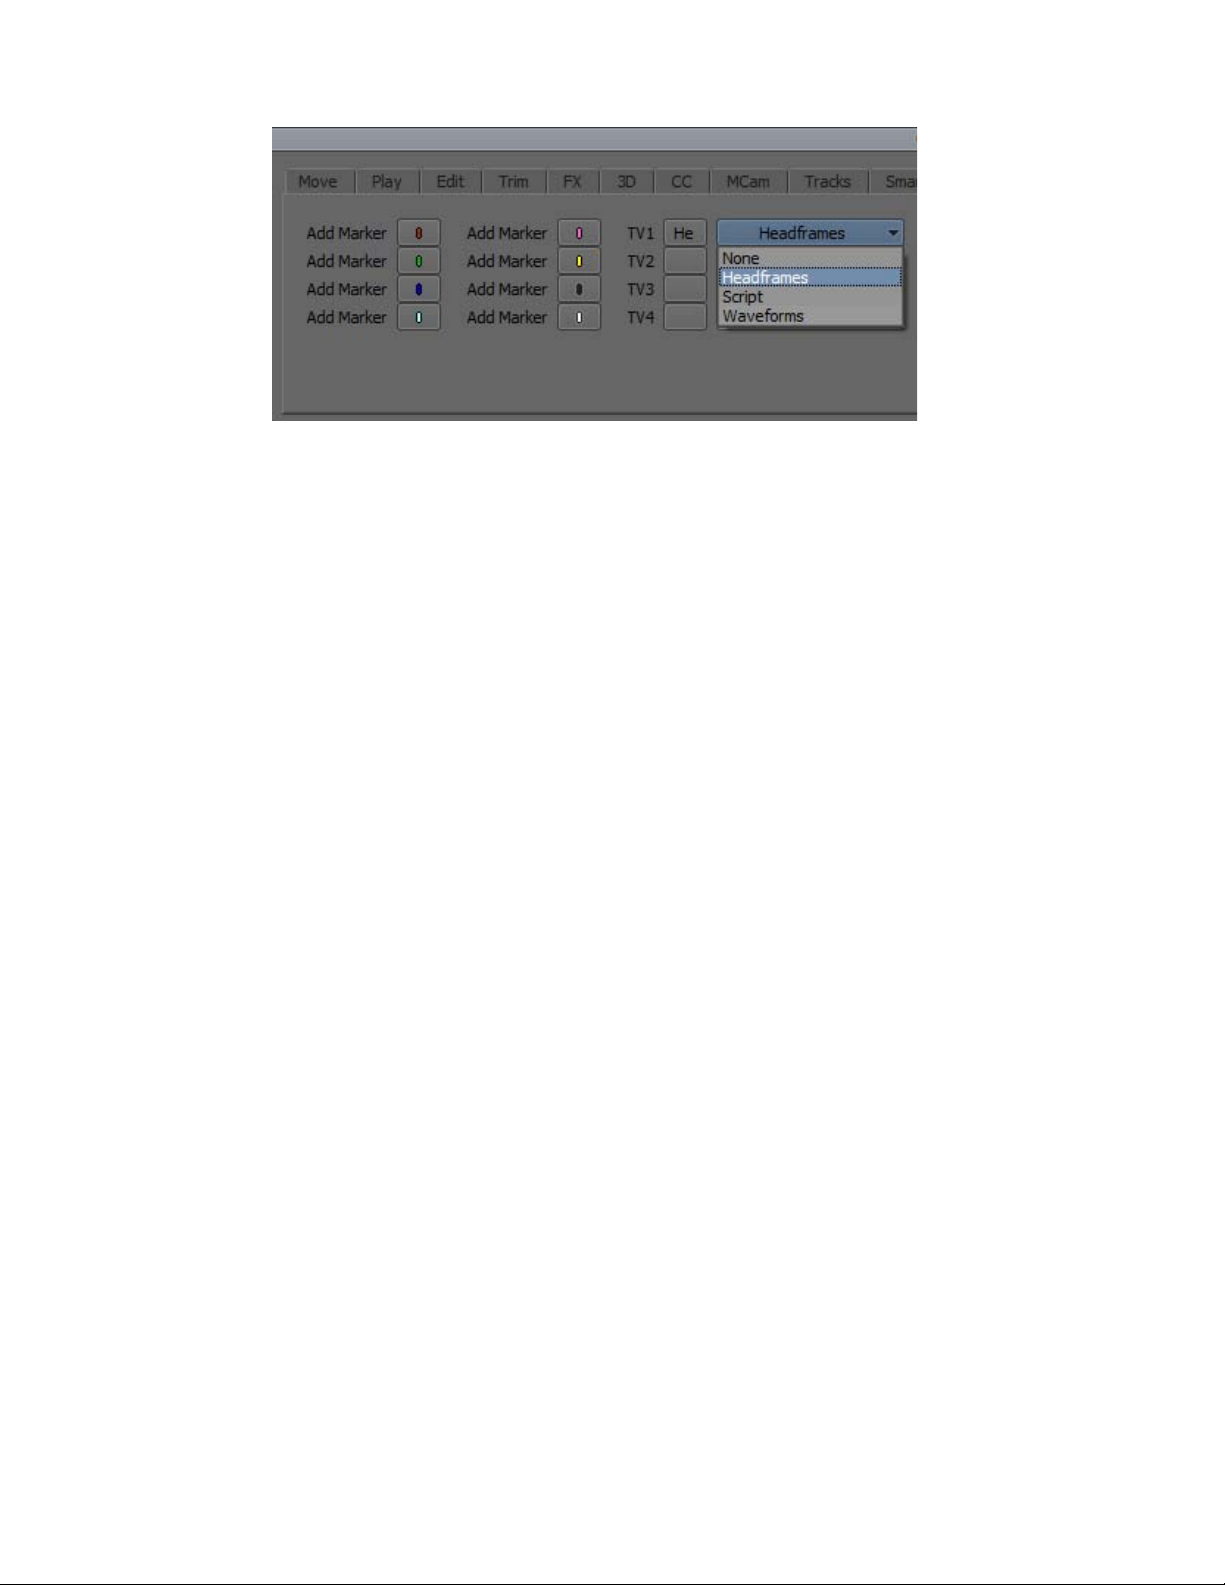
4. From the Timeline View pulldown menu, select the view you want assigned to the Timeline
View (TV) button.
3
Page 4
New in Media Composer v2018.4
5. Continue assigning different Timeline Views to the TV buttons.
6. Select Button to Button Reassignment.
7. Click a Timeline button and drag the button to another location (for example, the Timeline
toolbar) or the Keyboard setting.
8. The Timeline button appears in the new location.
9. Click OK.
Setting Pre-Roll for Script Window and PhraseFind
When you playback a result from the Find Window or access a mark from the Script Window, you
can set a pre-roll if you want to hear a few moments before the actual match to the word that has been
phonetically indexed.
To set the Pre-Roll for the Script Window:
1. Click the Settings tab in the Project window.
2. Double-click Script.
The Script Settings Window opens.
4
Page 5
3. Enter a value in the Pre-Roll (seconds) field.
New in Media Composer v2018.4
4. Click OK.
The pre-roll is included when you access the script mark.
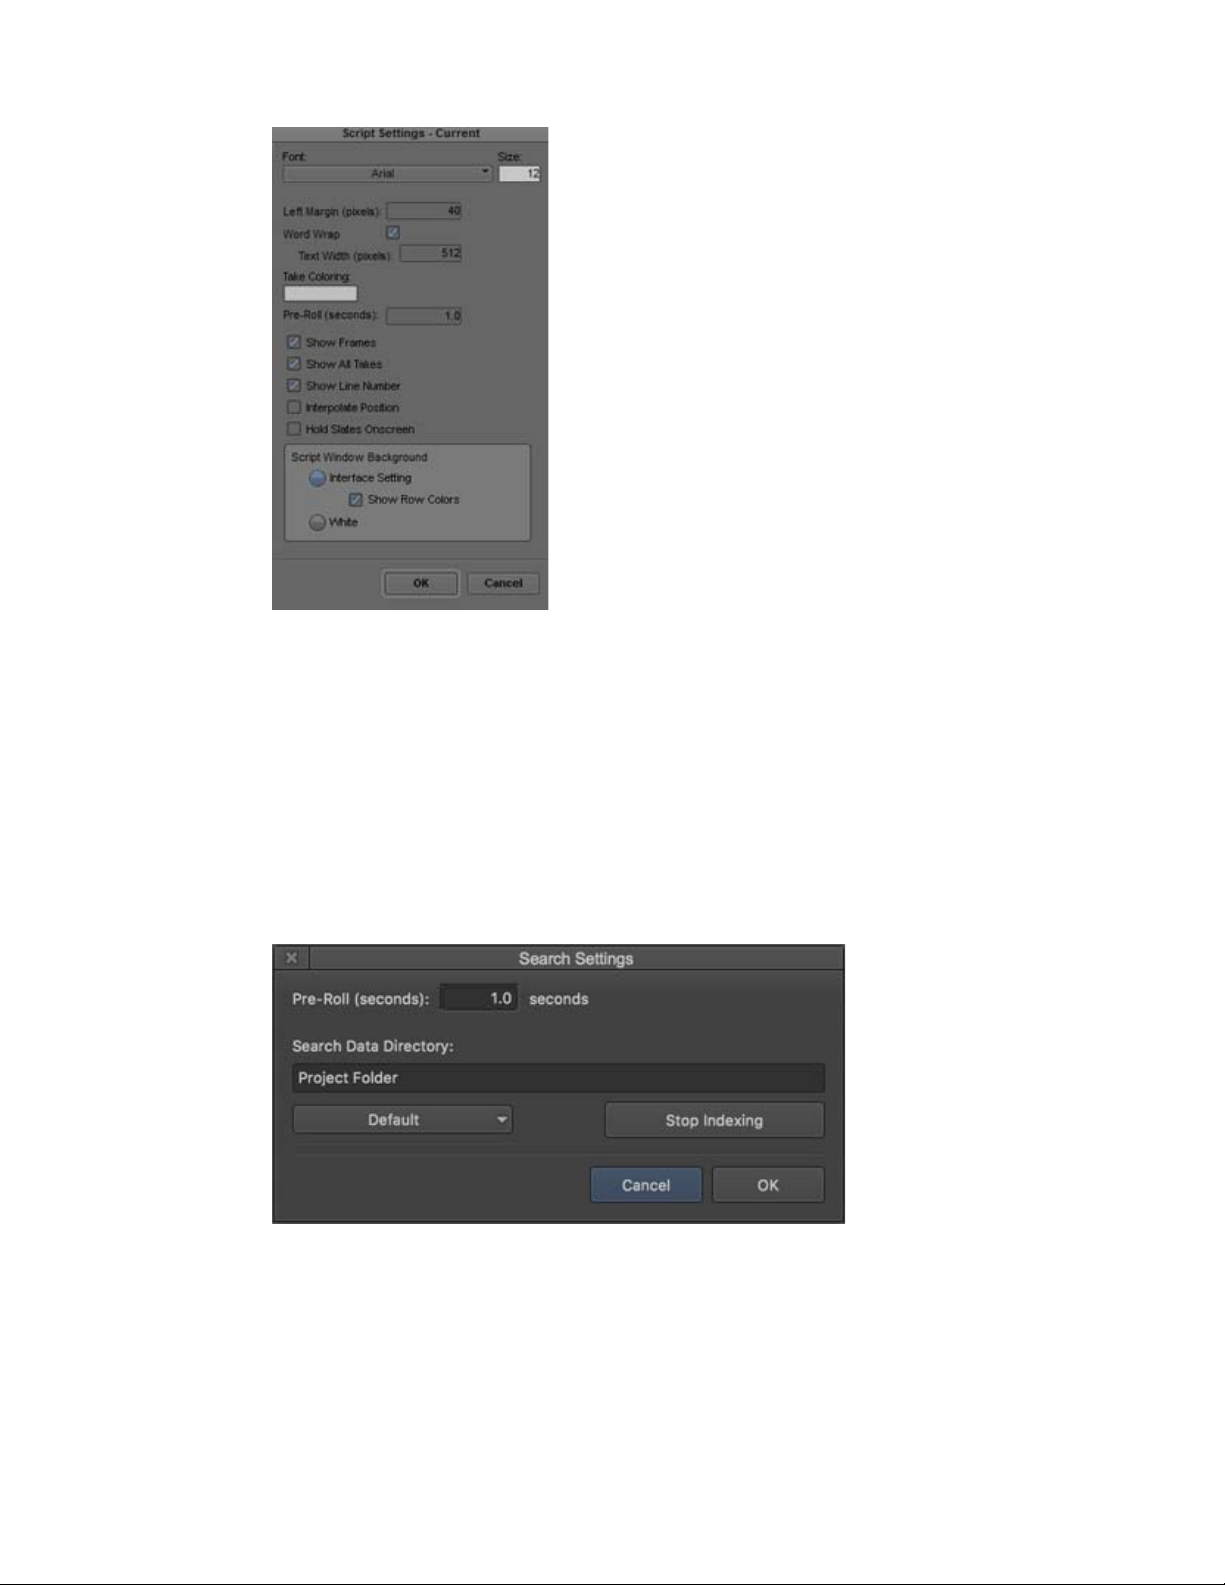
To set the Pre-Roll for PhraseFind:
1. Press Ctrl+F (Windows) or Cmd+F (Macintosh), or select Edit > Find.
The Find window opens.
2. Click the Settings icon (gear) at bottom left of the Find window.
The Search Settings Window opens.
3. Enter a value in the Pre-Roll (seconds) field.
4. Click OK.
Perform a PhraseFind search (see “Using PhraseFind” in the Help.) Double click on the result.
The position bar will move according to the Pre-Roll setting.
5
Page 6

New in Media Composer v2018.4
Setting Font and Font Size in the Timeline Clip Notes Window
You can change the font and adjust the font size for the Timeline Clip Notes window.
To change the font and font size of the Timeline Clip Notes window:
1. Select Tools > Timeline Clip Notes.
2. Do one of the following:
t Select Windows > Set Font.
t Right click in the Timeline Clip Notes window and select Set Font.
t Select Set Font from the Timeline Clip Notes window Fast menu.
3. Select the Font and enter the Font size you want to appear in the Timeline Clip Notes window.
4. Click OK.
The Timeline Clip Notes window displays the applicable font and font size.
Refreshing Locked Scripts
Your Avid editing application uses a locking mechanism to help you keep track of who is currently
working in a shared script. Only one user can edit the script, but multiple users can read the script
This release includes two new script lock icon colors and status updates in the script titles to help you
see the status of the Avid shared scripts.
This feature will only be enabled when the Project is stored on an Avid NEXIS or Avid ISIS
n
workspace.
A new script lock icon color (yellow) has been added that indicates the owner of the shared script has
made changes to the script. You will also notice that the script title provides a status in parentheses
indicating that the locked script has been modified. If you click the yellow icon, the script refreshes
and the new refreshed script displays the updated content and returns the icon red.
A new script lock icon color (blue) has been added that indicates that the owner of the shared script
lock has released the lock and the script is now available for read/write. If you click the blue icon,
you now control the script and the icon turns green. You can make changes in the script until you
release the lock or close the script.
You can release the lock by Alt + clicking the green icon.
n
6
Page 7

New in Media Composer v2018.4
In addition, a Cancel option has been added to the dialog when you choose to close a locked script.
• Save Script As - choose if you want to save the script including any changes as a new script.
• Don’t Save - choose if you do not want to save any changes you might have made.
• Cancel - choose if you want to keep the locked script open and then decide where to save any
script changes.
Color Adapters Listed in the Effect Editor
With this release, when editing in the Timeline, color adapters applied to clips are listed in the Effect
Editor. This makes it easier to see which color adapter has been applied to clips. Previous releases
simply displayed “Color Adapter” in the Effect Editor.
You can not edit the Color Adapters listed in the Effect Editor. You must make changes in the Source
n
Settings and then refresh the Color Adapters in the Timeline.
7
Page 8

New in Media Composer v2018.4
Updates to the Markers Window
The Markers Window updates include the following:
• Rearrange, hide, resize columns.
• Setting Font and Font Size
• Quick Find
Moving, Hiding and Resizing Columns in the Marker Window
You can move, hide and resize columns in the Marker Window.
To move a column in the Marker Window:
1. With the Marker Window open, click the heading of the column that you want to move.
The column is highlighted.
2. Drag the column to the position you want, and release the mouse button.
A bounding outline of the column guides you as you drag it. The column appears in the new
position, and columns to the right move to make room.
To hide a column:
1. Do one of the following to hide a column:
t Right-click a column heading and select Hide Column.
t Right-click a column heading, select Choose Columns, and deselect the column in the list.
The column disappears from the view, and surrounding columns close to fill the space.
8
Page 9

To enlarge or reduce the size a the Marker Window column:
1. Click the border of a column’s heading, and drag it to the right or the left to resize it.
Setting Font and Font Size in the Markers Window
You can change the font and adjust the font size for the Markers window.
To change the font and font size of the Markers window:
1. Select Tools > Markers
2. Do one of the following:
t Select Windows > Set Font.
t Right click in the Markers window and select Set Font.
t Select Set Font from the Markers window Fast menu.
3. Select the Font and enter the Font size you want to appear in the window.
4. Click OK.
The Markers window displays the applicable font and font size.
Using Quick Find in the Markers Window
New in Media Composer v2018.4
You can search for text in the Markers window.
To search for text in the Markers window:
1. Select Tools > Markers
2. Click the Quick Find field.
3. Enter the text you want to search for in the text field.
The window displays any markers that include the text entered in the find field in any column.
The “Quick Find” command on the Command Palette will set focus to the Quick Find Field if
the Marker Tool window is active.
Column configuration and chosen font are stored with the Marker Tool settings. These are stored in
n
the project's setting.
9
Page 10

Run Length Encoding for Alpha on Import
This release allows you to choose to import an alpha channel as either Uncompressed or as Run
Length Endcoded (RLE). RLE is used to reduce storage size and bandwidth during playback. (RLE)
is a form of lossless data compression where runs of data are stored as a single data value and count.
The default is Uncompressed. Access the Project Window Import Settings to select RLE
compression.
Important: If you import alpha with Run Length Encoded (RLE), you cannot bring that file back to a
n
Media Composer version prior to Media Composer v2018.4.
Run Length Encoded (RLE) is not supported in SD projects.
n
New in Media Composer v2018.4
Setting Pre-Roll for Script Window and PhraseFind
When you playback a result from the Find Window, you can set a pre-roll if you want to hear a few
moments before the actual match to the word that has been phonetically indexed.
To set the Pre-Roll for PhraseFind:
1. Press Ctrl+F (Windows) or Cmd+F (Macintosh), or select Edit > Find.
The Find window opens.
2. Click the Settings icon (gear) at bottom left of the Find window.
The Search Settings Window opens.
3. Enter a value in the Pre-Roll (seconds) field.
4. Click OK.
10
Page 11

Perform a PhraseFind search. Double click on the result. The position bar will move according to
the Pre-Roll setting.
Performing an Insert Edit to an Exported Sequence
With this release, you can perform a file-based insert edit to an already exported sequence. This is
helpful if you only want to replace a portion of a sequence without having to rerender the entire
sequence. You can only perform the insert edit on a sequence that has been exported as an OP1a
MXF using the Avid Media Processor Plug-in.
Note the following limitations:
• File based Insert Edit is supported in 1080i/59.94 and 3840x2160p/59.94 project types
• The Sequence must have 8 Mono Tracks of Audio. Stereo is not supported.
• 3840x2160p/59.94 project types are supported with XAVC-I
• 1080i/59.94 projects are supported with AVC-I and XAVC-I
To perform an insert edit to an exported sequence:
1. Select your sequence and export it as OP1a MXF using the Avid Media Processor plug-in.
New in Media Composer v2018.4
2. Click OK.
3. Load the sequence in the Timeline.
4. Make your changes.
11
Page 12

New in Media Composer v2018.4
5. Place a mark In/Out and/or spanned markers around the sections to be replaced.
6. Select File > Output > AMA File Export.
7. Click Insert Edit.
Once you select Insert Edit, the dialog will change to prompt you to set a path for the file to be
selected for the insert.
Selecting the file will fill in the path and file details.
8. Select OK.
9. When prompted, select In and Out marks, or spanned markers.
The requested portion of the sequence will be replaced.
12
Page 13

New in Media Composer v2018.4
Legal Notices
Product specifications are subject to change without notice and do not represent a commitment on the part of Avid Technology, Inc.
This product is subject to the terms and conditions of a software license agreement provided with the software. The product may only be
used in accordance with the license agreement.
This product may be protected by one or more U.S. and non-U.S patents. Details are available at www.avid.com/patents.
This document is protected under copyright law. An authorized licensee of Avid Media Composer may reproduce this publication for the
licensee’s own use in learning how to use the software. This document may not be reproduced or distributed, in whole or in part, for
commercial purposes, such as selling copies of this document or providing support or educational services to others. This document is
supplied as a guide for Avid Media Composer. Reasonable care has been taken in preparing the information it contains. However, this
document may contain omissions, technical inaccuracies, or typographical errors. Avid Technology, Inc. does not accept responsibility of
any kind for customers’ losses due to the use of this document. Product specifications are subject to change without notice.
Copyright © 2018 Avid Technology, Inc. and its licensors. All rights reserved.
The following disclaimer is required by Apple Computer, Inc.:
APPLE COMPUTER, INC. MAKES NO WARRANTIES WHATSOEVER, EITHER EXPRESS OR IMPLIED, REGARDING THIS
PRODUCT, INCLUDING WARRANTIES WITH RESPECT TO ITS MERCHANTABILITY OR ITS FITNESS FOR ANY PARTICULAR
PURPOSE. THE EXCLUSION OF IMPLIED WARRANTIES IS NOT PERMITTED BY SOME STATES. THE ABOVE EXCLUSION MAY
NOT APPLY TO YOU. THIS WARRANTY PROVIDES YOU WITH SPECIFIC LEGAL RIGHTS. THERE MAY BE OTHER RIGHTS THAT
YOU MAY HAVE WHICH VARY FROM STATE TO STATE.
The following disclaimer is required by Sam Leffler and Silicon Graphics, Inc. for the use of their TIFF library:
Copyright © 1988–1997 Sam Leffler
Copyright © 1991–1997 Silicon Graphics, Inc.
Permission to use, copy, modify, distribute, and sell this software [i.e., the TIFF library] and its documentation for any purpose is hereby
granted without fee, provided that (i) the above copyright notices and this permission notice appear in all copies of the software and
related documentation, and (ii) the names of Sam Leffler and Silicon Graphics may not be used in any advertising or publicity relating to
the software without the specific, prior written permission of Sam Leffler and Silicon Graphics.
THE SOFTWARE IS PROVIDED “AS-IS” AND WITHOUT WARRANTY OF ANY KIND, EXPRESS, IMPLIED OR OTHERWISE,
INCLUDING WITHOUT LIMITATION, ANY WARRANTY OF MERCHANTABILITY OR FITNESS FOR A PARTICULAR PURPOSE.
IN NO EVENT SHALL SAM LEFFLER OR SILICON GRAPHICS BE LIABLE FOR ANY SPECIAL, INCIDENTAL, INDIRECT OR
CONSEQUENTIAL DAMAGES OF ANY KIND, OR ANY DAMAGES WHATSOEVER RESULTING FROM LOSS OF USE, DATA OR
PROFITS, WHETHER OR NOT ADVISED OF THE POSSIBILITY OF DAMAGE, AND ON ANY THEORY OF LIABILITY, ARISING OUT
OF OR IN CONNECTION WITH THE USE OR PERFORMANCE OF THIS SOFTWARE.
The following disclaimer is required by the Independent JPEG Group:
This software is based in part on the work of the Independent JPEG Group.
This Software may contain components licensed under the following conditions:
Copyright (c) 1989 The Regents of the University of California. All rights reserved.
Redistribution and use in source and binary forms are permitted provided that the above copyright notice and this paragraph are
duplicated in all such forms and that any documentation, advertising materials, and other materials related to such distribution and use
acknowledge that the software was developed by the University of California, Berkeley. The name of the University may not be used to
endorse or promote products derived from this software without specific prior written permission. THIS SOFTWARE IS PROVIDED ``AS
IS'' AND WITHOUT ANY EXPRESS OR IMPLIED WARRANTIES, INCLUDING, WITHOUT LIMITATION, THE IMPLIED WARRANTIES
OF MERCHANTABILITY AND FITNESS FOR A PARTICULAR PURPOSE.
Copyright (C) 1989, 1991 by Jef Poskanzer.
Permission to use, copy, modify, and distribute this software and its documentation for any purpose and without fee is hereby granted,
provided that the above copyright notice appear in all copies and that both that copyright notice and this permission notice appear in
supporting documentation. This software is provided " as is" without express or implied warranty.
Copyright 1995, Trinity College Computing Center. Written by David Chappell.
Permission to use, copy, modify, and distribute this software and its documentation for any purpose and without fee is hereby granted,
provided that the above copyright notice appear in all copies and that both that copyright notice and this permission notice appear in
supporting documentation. This software is provided " as is" without express or implied warranty.
Copyright 1996 Daniel Dardailler.
Permission to use, copy, modify, distribute, and sell this software for any purpose is hereby granted without fee, provided that the above
copyright notice appear in all copies and that both that copyright notice and this permission notice appear in supporting documentation,
and that the name of Daniel Dardailler not be used in advertising or publicity pertaining to distribution of the software without specific,
written prior permission. Daniel Dardailler makes no representations about the suitability of this software for any purpose. It is provided " as
is" without express or implied warranty.
Modifications Copyright 1999 Matt Koss, under the same license as above.
Copyright (c) 1991 by AT&T.
13
Page 14

New in Media Composer v2018.4
Permission to use, copy, modify, and distribute this software for any purpose without fee is hereby granted, provided that this entire notice
is included in all copies of any software which is or includes a copy or modification of this software and in all copies of the supporting
documentation for such software.
THIS SOFTWARE IS BEING PROVIDED " AS IS" , WITHOUT ANY EXPRESS OR IMPLIED WARRANTY. IN PARTICULAR, NEITHER
THE AUTHOR NOR AT&T MAKES ANY REPRESENTATION OR WARRANTY OF ANY KIND CONCERNING THE MERCHANTABILITY
OF THIS SOFTWARE OR ITS FITNESS FOR ANY PARTICULAR PURPOSE.
This product includes software developed by the University of California, Berkeley and its contributors.
The following disclaimer is required by Paradigm Matrix:
Portions of this software licensed from Paradigm Matrix.
The following disclaimer is required by Ray Sauers Associates, Inc.:
“Install-It” is licensed from Ray Sauers Associates, Inc. End-User is prohibited from taking any action to derive a source code equivalent of
“Install-It,” including by reverse assembly or reverse compilation, Ray Sauers Associates, Inc. shall in no event be liable for any damages
resulting from reseller’s failure to perform reseller’s obligation; or any damages arising from use or operation of reseller’s products or the
software; or any other damages, including but not limited to, incidental, direct, indirect, special or consequential Damages including lost
profits, or damages resulting from loss of use or inability to use reseller’s products or the software for any reason including copyright or
patent infringement, or lost data, even if Ray Sauers Associates has been advised, knew or should have known of the possibility of such
damages.
The following disclaimer is required by Videomedia, Inc.:
“Videomedia, Inc. makes no warranties whatsoever, either express or implied, regarding this product, including warranties with respect to
its merchantability or its fitness for any particular purpose.”
“This software contains V-LAN ver. 3.0 Command Protocols which communicate with V-LAN ver. 3.0 products developed by Videomedia,
Inc. and V-LAN ver. 3.0 compatible products developed by third parties under license from Videomedia, Inc. Use of this software will allow
“frame accurate” editing control of applicable videotape recorder decks, videodisc recorders/players and the like.”
The following disclaimer is required by Altura Software, Inc. for the use of its Mac2Win software and Sample Source
Code:
©1993–1998 Altura Software, Inc.
The following disclaimer is required by Ultimatte Corporation:
Certain real-time compositing capabilities are provided under a license of such technology from Ultimatte Corporation and are subject to
copyright protection.
The following disclaimer is required by 3Prong.com Inc.:
Certain waveform and vector monitoring capabilities are provided under a license from 3Prong.com Inc.
The following disclaimer is required by Interplay Entertainment Corp.:
The “Interplay” name is used with the permission of Interplay Entertainment Corp., which bears no responsibility for Avid products.
This product includes portions of the Alloy Look & Feel software from Incors GmbH.
This product includes software developed by the Apache Software Foundation (http://www.apache.org/).
© DevelopMentor
This product may include the JCifs library, for which the following notice applies:
JCifs © Copyright 2004, The JCIFS Project, is licensed under LGPL (http://jcifs.samba.org/). See the LGPL.txt file in the Third Party
Software directory on the installation CD.
Avid Interplay contains components licensed from LavanTech. These components may only be used as part of and in connection with Avid
Interplay.
Attn. Government User(s). Restricted Rights Legend
U.S. GOVERNMENT RESTRICTED RIGHTS. This Software and its documentation are “commercial computer software” or “commercial
computer software documentation.” In the event that such Software or documentation is acquired by or on behalf of a unit or agency of the
U.S. Government, all rights with respect to this Software and documentation are subject to the terms of the License Agreement, pursuant
to FAR §12.212(a) and/or DFARS §227.7202-1(a), as applicable.
Trademarks
Avid, the Avid Logo, Avid Everywhere, Avid DNXHD, Avid DNXHR, Avid Nexis, AirSpeed, Eleven, EUCON, Interplay, iNEWS, ISIS, Mbox,
MediaCentral, Media Composer, NewsCutter, Pro Tools, ProSet and RealSet, Maestro, PlayMaker, Sibelius, Symphony, and all related
product names and logos, are registered or unregistered trademarks of Avid Technology, Inc. in the United States and/or other countries.
The Interplay name is used with the permission of the Interplay Entertainment Corp. which bears no responsibility for Avid products. All
other trademarks are the property of their respective owners. For a full list of Avid trademarks, see: http://www.avid.com/US/about-avid/
legal-notices/trademarks.
Adobe and Photoshop are either registered trademarks or trademarks of Adobe Systems Incorporated in the United States and/or other
countries. Apple and Macintosh are trademarks of Apple Computer, Inc., registered in the U.S. and other countries. Windows is either a
registered trademark or trademark of Microsoft Corporation in the United States and/or other countries. All other trademarks contained
herein are the property of their respective owners.
What’s New for Media Composer v2018.4 • Created 4/4/18
14
 Loading...