

Page 1
Complete Production Toolkit
Version 1.0
Page 2

Legal Notices
This guide is copyrighted ©2008 by Digidesign, a division of
Avid Technology, Inc. (hereafter “Digidesign”), with all rights
reserved. Under copyright laws, this guide may not be
duplicated in whole or in part without the written consent of
Digidesign.
003, 96 I/O, 96i I/O, 192 Digital I/O, 192 I/O, 888|24 I/O,
882|20 I/O, 1622 I/O, 24-Bit ADAT Bridge I/O, AudioSuite,
Avid, Avid DNA, Avid Mojo, Avid Unity, Avid Unity ISIS,
Avid Xpress, AVoption, Axiom, Beat Detective, Bomb Factory,
Bruno, C|24, Command|8, Control|24, D-Command, D-Control,
D-Fi, D-fx, D-Show, D-Verb, DAE, Digi 002, DigiBase,
DigiDelivery, Digidesign, Digidesign Audio Engine, Digidesign
Intelligent Noise Reduction, Digidesign TDM Bus, DigiDrive,
DigiRack, DigiTest, DigiTranslator, DINR, D-Show, DV Toolkit,
EditPack, Eleven, HD Core, HD Process, Hybrid, Impact,
Interplay, LoFi, M-Audio, MachineControl, Maxim, Mbox,
MediaComposer, MIDI I/O, MIX, MultiShell, Nitris, OMF,
OMF Interchange, PRE, ProControl, Pro Tools M-Powered,
Pro Tools, Pro Tools|HD, Pro Tools LE, QuickPunch, Recti-Fi,
Reel Tape, Reso, Reverb One, ReVibe, RTAS, Sibelius,
Smack!, SoundReplacer, Sound Designer II, Strike, Structure,
SYNC HD, SYNC I/O, Synchronic, TL Aggro, TL AutoPan, TL
Drum Rehab, TL Everyphase, TL Fauxlder, TL In Tune, TL
MasterMeter, TL Metro, TL Space, TL Utilities, Transfuser,
Trillium Lane Labs, Vari-Fi Velvet, X-Form, and XMON are
trademarks or registered trademarks of Digidesign and/or Avid
Technology, Inc. Xpand! is Registered in the U.S. Patent and
Trademark Office. All other trademarks are the property of their
respective owners.
Product features, specifications, system requirements, and
availability are subject to change without notice.
Guide Part Number 9329-59260-00 REV A 11/08
Documentation Feedback
At Digidesign, we're always looking for ways to improve our
documentation. If you have comments, corrections, or
suggestions regarding our documentation, email us at
techpubs@digidesign.com.
Page 3

contents
Chapter 1. Introduction . . . . . . . . . . . . . . . . . . . . . . . . . . . . . . . . . . . . . . . . . . . . . . . . . . . . . . 1
Complete Production Toolkit Overview. . . . . . . . . . . . . . . . . . . . . . . . . . . . . . . . . . . . . . . . . . 1
System Requirements and Compatibility . . . . . . . . . . . . . . . . . . . . . . . . . . . . . . . . . . . . . . . . 3
Contents of the Boxed Version of Complete Production Toolkit . . . . . . . . . . . . . . . . . . . . . . . . 3
Register Complete Production Toolkit for Pro Tools LE . . . . . . . . . . . . . . . . . . . . . . . . . . . . . . 3
Conventions Used in This Guide . . . . . . . . . . . . . . . . . . . . . . . . . . . . . . . . . . . . . . . . . . . . . . 4
About www.digidesign.com . . . . . . . . . . . . . . . . . . . . . . . . . . . . . . . . . . . . . . . . . . . . . . . . . 4
Chapter 2. Installation . . . . . . . . . . . . . . . . . . . . . . . . . . . . . . . . . . . . . . . . . . . . . . . . . . . . . . . 5
Installing Complete Production Toolkit . . . . . . . . . . . . . . . . . . . . . . . . . . . . . . . . . . . . . . . . . 5
Authorizing Complete Production Toolkit Option . . . . . . . . . . . . . . . . . . . . . . . . . . . . . . . . . . . 6
Removing Toolkit Options and Plug-ins . . . . . . . . . . . . . . . . . . . . . . . . . . . . . . . . . . . . . . . . . 7
Chapter 3. Session and Track Features . . . . . . . . . . . . . . . . . . . . . . . . . . . . . . . . . . . . . . . . 9
Increased Voice and Track Counts. . . . . . . . . . . . . . . . . . . . . . . . . . . . . . . . . . . . . . . . . . . . . 9
Import Session Data Enhancements . . . . . . . . . . . . . . . . . . . . . . . . . . . . . . . . . . . . . . . . . . 11
DigiTranslator 2.0 Features . . . . . . . . . . . . . . . . . . . . . . . . . . . . . . . . . . . . . . . . . . . . . . . . 14
MP3 Export Option . . . . . . . . . . . . . . . . . . . . . . . . . . . . . . . . . . . . . . . . . . . . . . . . . . . . . . 15
Session Interchange Between Pro Tools HD and Pro Tools LE with Complete Production Toolkit 16
Chapter 4. DigiBase Pro. . . . . . . . . . . . . . . . . . . . . . . . . . . . . . . . . . . . . . . . . . . . . . . . . . . . . 19
Searching for Multiple Criteria Simultaneously in DigiBase Browsers . . . . . . . . . . . . . . . . . . . 19
DigiBase Pro Catalogs . . . . . . . . . . . . . . . . . . . . . . . . . . . . . . . . . . . . . . . . . . . . . . . . . . . . 20
Contents iii
Page 4

Chapter 5. Editing Features . . . . . . . . . . . . . . . . . . . . . . . . . . . . . . . . . . . . . . . . . . . . . . . . . 25
Continuous Scrolling During Playback. . . . . . . . . . . . . . . . . . . . . . . . . . . . . . . . . . . . . . . . . 25
The Scrub Trimmer Tool . . . . . . . . . . . . . . . . . . . . . . . . . . . . . . . . . . . . . . . . . . . . . . . . . . 25
Replacing Audio Regions. . . . . . . . . . . . . . . . . . . . . . . . . . . . . . . . . . . . . . . . . . . . . . . . . . 26
TCE (Time Compression and Expansion) Edit To Timeline Selection . . . . . . . . . . . . . . . . . . . . 29
Expanding Alternate Channels to New Playlists or Tracks . . . . . . . . . . . . . . . . . . . . . . . . . . . 30
Chapter 6. Beat Detective Features. . . . . . . . . . . . . . . . . . . . . . . . . . . . . . . . . . . . . . . . . . 33
Separating Multiple Tracks . . . . . . . . . . . . . . . . . . . . . . . . . . . . . . . . . . . . . . . . . . . . . . . . 33
Detection (Normal) and Collection Mode. . . . . . . . . . . . . . . . . . . . . . . . . . . . . . . . . . . . . . . 34
Chapter 7. Mixing and Automation Features . . . . . . . . . . . . . . . . . . . . . . . . . . . . . . . . . . 37
Creating Snapshot Automation . . . . . . . . . . . . . . . . . . . . . . . . . . . . . . . . . . . . . . . . . . . . . 37
Glide Automation . . . . . . . . . . . . . . . . . . . . . . . . . . . . . . . . . . . . . . . . . . . . . . . . . . . . . . . 40
Chapter 8. Surround Features . . . . . . . . . . . . . . . . . . . . . . . . . . . . . . . . . . . . . . . . . . . . . . . 43
Pro Tools Audio Connections for 5.1 Mixing . . . . . . . . . . . . . . . . . . . . . . . . . . . . . . . . . . . . 43
Configuring Pro Tools for Multichannel Sessions . . . . . . . . . . . . . . . . . . . . . . . . . . . . . . . . . 44
Default I/O Selectors in I/O Setup . . . . . . . . . . . . . . . . . . . . . . . . . . . . . . . . . . . . . . . . . . . 48
5.1 Track Layouts, Routing, and Metering . . . . . . . . . . . . . . . . . . . . . . . . . . . . . . . . . . . . . . 49
Routing Audio for Surround Mixing. . . . . . . . . . . . . . . . . . . . . . . . . . . . . . . . . . . . . . . . . . . 49
Multichannel Audio Tracks . . . . . . . . . . . . . . . . . . . . . . . . . . . . . . . . . . . . . . . . . . . . . . . . 49
Multichannel Signal Routing . . . . . . . . . . . . . . . . . . . . . . . . . . . . . . . . . . . . . . . . . . . . . . . 52
Paths in Surround Mixes . . . . . . . . . . . . . . . . . . . . . . . . . . . . . . . . . . . . . . . . . . . . . . . . . . 55
Example Paths and Signal Routing for a Surround Mix . . . . . . . . . . . . . . . . . . . . . . . . . . . . . 57
Introduction to Pro Tools Surround Panning . . . . . . . . . . . . . . . . . . . . . . . . . . . . . . . . . . . . 61
Output Windows. . . . . . . . . . . . . . . . . . . . . . . . . . . . . . . . . . . . . . . . . . . . . . . . . . . . . . . . 62
Standard Controls. . . . . . . . . . . . . . . . . . . . . . . . . . . . . . . . . . . . . . . . . . . . . . . . . . . . . . . 63
Surround Panner Controls . . . . . . . . . . . . . . . . . . . . . . . . . . . . . . . . . . . . . . . . . . . . . . . . . 64
Panning Modes . . . . . . . . . . . . . . . . . . . . . . . . . . . . . . . . . . . . . . . . . . . . . . . . . . . . . . . . 67
Divergence and Center Percentage . . . . . . . . . . . . . . . . . . . . . . . . . . . . . . . . . . . . . . . . . . 70
LFE Faders in Multichannel Panners . . . . . . . . . . . . . . . . . . . . . . . . . . . . . . . . . . . . . . . . . . 72
Pan Playlists . . . . . . . . . . . . . . . . . . . . . . . . . . . . . . . . . . . . . . . . . . . . . . . . . . . . . . . . . . 72
Surround Scope Plug-in. . . . . . . . . . . . . . . . . . . . . . . . . . . . . . . . . . . . . . . . . . . . . . . . . . . 73
Complete Production Toolkit Guideiv
Page 5

Chapter 9. Time Code and Synchronization Features . . . . . . . . . . . . . . . . . . . . . . . . . . . 75
Timebase Rulers . . . . . . . . . . . . . . . . . . . . . . . . . . . . . . . . . . . . . . . . . . . . . . . . . . . . . . . . 75
Secondary Time Code Ruler . . . . . . . . . . . . . . . . . . . . . . . . . . . . . . . . . . . . . . . . . . . . . . . . 76
Selecting Time Code and Time Code 2 Rates . . . . . . . . . . . . . . . . . . . . . . . . . . . . . . . . . . . . 76
Selecting Feet+Frame Rate . . . . . . . . . . . . . . . . . . . . . . . . . . . . . . . . . . . . . . . . . . . . . . . . 76
Redefining Time Code Position . . . . . . . . . . . . . . . . . . . . . . . . . . . . . . . . . . . . . . . . . . . . . . 77
Redefining Current Feet+Frames Position . . . . . . . . . . . . . . . . . . . . . . . . . . . . . . . . . . . . . . 77
Use Subframes Option . . . . . . . . . . . . . . . . . . . . . . . . . . . . . . . . . . . . . . . . . . . . . . . . . . . . 78
Pull Up and Pull Down Commands . . . . . . . . . . . . . . . . . . . . . . . . . . . . . . . . . . . . . . . . . . . 78
Chapter 10. Video Features. . . . . . . . . . . . . . . . . . . . . . . . . . . . . . . . . . . . . . . . . . . . . . . . . . 81
Video Track Support . . . . . . . . . . . . . . . . . . . . . . . . . . . . . . . . . . . . . . . . . . . . . . . . . . . . . 81
Support for Video Import Options . . . . . . . . . . . . . . . . . . . . . . . . . . . . . . . . . . . . . . . . . . . . 81
Video Regions. . . . . . . . . . . . . . . . . . . . . . . . . . . . . . . . . . . . . . . . . . . . . . . . . . . . . . . . . . 82
General Video Editing . . . . . . . . . . . . . . . . . . . . . . . . . . . . . . . . . . . . . . . . . . . . . . . . . . . . 83
Video Region Groups . . . . . . . . . . . . . . . . . . . . . . . . . . . . . . . . . . . . . . . . . . . . . . . . . . . . . 85
Browsing Video in the Video Universe Window . . . . . . . . . . . . . . . . . . . . . . . . . . . . . . . . . . . 85
Chapter 11. Included Plug-ins. . . . . . . . . . . . . . . . . . . . . . . . . . . . . . . . . . . . . . . . . . . . . . . . 89
DINR LE . . . . . . . . . . . . . . . . . . . . . . . . . . . . . . . . . . . . . . . . . . . . . . . . . . . . . . . . . . . . . . 89
Eleven LE . . . . . . . . . . . . . . . . . . . . . . . . . . . . . . . . . . . . . . . . . . . . . . . . . . . . . . . . . . . . . 89
Hybrid Synthesizer . . . . . . . . . . . . . . . . . . . . . . . . . . . . . . . . . . . . . . . . . . . . . . . . . . . . . . . 89
SoundCode Stereo. . . . . . . . . . . . . . . . . . . . . . . . . . . . . . . . . . . . . . . . . . . . . . . . . . . . . . . 90
Smack! LE Compressor . . . . . . . . . . . . . . . . . . . . . . . . . . . . . . . . . . . . . . . . . . . . . . . . . . . 90
Structure LE . . . . . . . . . . . . . . . . . . . . . . . . . . . . . . . . . . . . . . . . . . . . . . . . . . . . . . . . . . . 90
TL Space Native . . . . . . . . . . . . . . . . . . . . . . . . . . . . . . . . . . . . . . . . . . . . . . . . . . . . . . . . 90
X-Form . . . . . . . . . . . . . . . . . . . . . . . . . . . . . . . . . . . . . . . . . . . . . . . . . . . . . . . . . . . . . . . 90
Index . . . . . . . . . . . . . . . . . . . . . . . . . . . . . . . . . . . . . . . . . . . . . . . . . . . . . . . . . . . . . . . . . . . . . 91
Contents v
Page 6

Complete Production Toolkit Guidevi
Page 7

chapter 1
Introduction
Complete Production Toolkit for Pro Tools LE®
provides additional features, plug-ins, and software options for music creation and post production. Complete Production Toolkit provides
increased voice and track counts, and surround
mixing capabilities that are equal to
Pro Tools HD. Additionally, it includes the full
contents of DV Toolkit
tion Toolkit 2.
™
2 and Music Produc-
For information on standard Pro Tools LE
features, refer to the
Guide
(Help > Pro Tools Reference Guide).
Pro Tools Reference
Complete Production Toolkit Overview
Complete Production Toolkit enables the following features in Pro Tools LE:
• Session and track features:
• Up to 128 mono or 64 stereo audio tracks of
simultaneous playback or recording
• Ability to use QuickPunch
tracks
• Up to 64 Instrument tracks
• 128 internal busses
• Import Session Data options (Destination
Track Names, Time Code Mapping, Find
Matching Tracks, Session Data to Import,
Track Playlist)
™
on up to 64
• Enabling of all DigiTranslator
for importing and exporting AAF and
®
OMF
format
• MP3 export option (for bounce recording
or exporting a region as an MP3 file)
• Improved session interchange between
Pro Tools HD and Pro Tools LE
• DigiBase
• Catalog browsers
• The ability to search on multiple criteria si-
•Editing features:
• Continuous Scroll
• Scrub Trim tool
• Replace Region command
• TCE Edit to Timeline Selection command
• Selection of alternate field recorder audio
• Expanding alternate field recorder chan-
• 1/2 frame grid and nudge
•Beat Detective
• Ability to apply Beat Detective across mul-
• Collection Mode
• Mixing and Automation features:
• Snapshot automation for writing or trim-
• Glide Automation commands
™
Pro, including support for:
multaneously in DigiBase browsers
channels in the Pro Tools Timeline
nels to new tracks
™
features:
tiple tracks
ming automation data
™
2.0 features
Chapter 1: Introduction 1
Page 8

• Surround mixing up to 7.1 with 003®, 003
Rack, 003 Rack+, Digi 002
Rack, and up to 5.1 with Mbox
®
, and Digi 002
®
2 Pro
With Complete Production Toolkit, you can
open surround sessions on any Pro Tools LE
system. Use the Neyrinck SoundCode
™
Stereo down mixer plug-in for monitoring surround sessions in stereo with Pro Tools LE
interfaces that have fewer than six outputs.
Additional Software
Complete Production Toolkit includes additional software for working with Pro Tools:
DINR (Digidesign Intelligent Noise Reduction™)
LE Plug-in For reducing noise in audio.
DigiTranslator 2.0 Software Option For exchang-
ing audio and video files, and sequences with
other AAF and OMF-compatible applications.
• Time code and synchronization features:
• Timebase rulers (Time Code, Time Code 2,
and Feet+Frames)
• Time Code Rate selector
• Feet+Frame Rate selector
• Current Time Code Position command
• Current Feet+Frames Position command
• Use Subframes option
• Audio Rate Pull Up and Pull Down
• Video Rate Pull Up and Pull Down
• Video features:
• Support for multiple video tracks on the
Timeline, multiple QuickTime movies per
track, and multiple playlists per track
• Support for adding and editing multiple
video regions
• General video editing
• Video region groups
• Support for Video Import Options
• Video Universe window
Eleven LE Plug-in For use as a guitar amp and
speaker emulation.
Hybrid Synthesizer Plug-in For use as a virtual instrument in your Pro Tools sessions.
Neyrinck SoundCode Stereo For monitoring up
to 7.1 surround sessions (down mixed to stereo)
with all LE interfaces including 2 channel interfaces (such as the Mbox 2 Micro). This plug-in
also lets you quickly and easily create stereo
mixes from up to 7.1 surround sessions.
Smack! LE Compressor Plug-in For applying
compression to your audio.
Structure LE Plug-in For use as a virtual instrument in your Pro Tools sessions.
TL Space Native Convolution Reverb Plug-in For
applying convolution reverb to your audio.
X-Form Plug-in For high-quality time compression and expansion, and formant corrected
pitch-shifting (based on the Radius
®
algorithm
from iZotope).
Complete Production Toolkit Guide2
Page 9

System Requirements and Compatibility
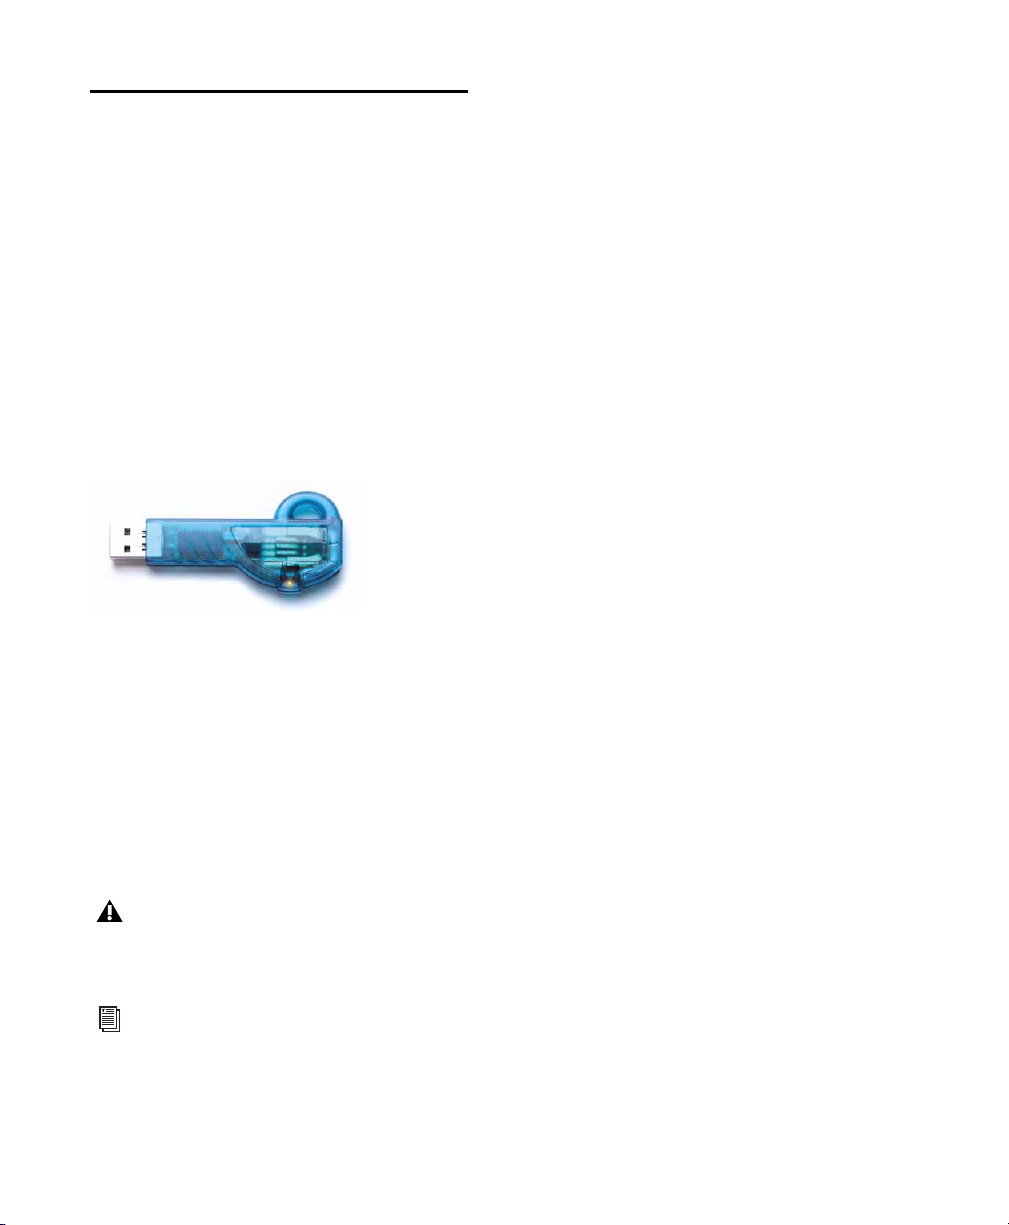
To use Complete Production Toolkit, you need:
An iLok USB Smart Key (an iLok.com account
is also required for managing iLok licenses)
– and –
A Digidesign-qualified Pro Tools LE system
®
Digidesign
provide support for hardware and software it has
tested and approved.
For complete system requirements and a list of
Digidesign-qualified computers, operating systems, hard drives, and third-party devices, refer
to the latest information on the Digidesign website:
www.digidesign.com/compatibility
can only assure compatibility and
Contents of the Boxed Version of Complete Production Toolkit
The Complete Production Toolkit package contains the following components:
• Complete Production Toolkit Installer disc
• Activation Card, with Activation Code and instructions for authorizing Complete Production Toolkit software components using an
iLok USB Smart Key (not supplied)
Register Complete Production Toolkit for Pro Tools LE
If you purchased the Complete Production Toolkit software option from the DigiStore
(www.digidesign.com) using Internet Activation, you are automatically registered.
If you purchased a boxed version of the Complete Production Toolkit option, you will be automatically registered when you authorize your
software (see “Authorizing Complete Production Toolkit Option” on page 6).
Registered users receive periodic software update
and upgrade notices.
For information on technical support, visit the
Digidesign website (www.digidesign.com).
Chapter 1: Introduction 3
Page 10
Conventions Used in This Guide
All Digidesign guides use the following conventions to indicate menu choices and key commands:
:
Convention Action
File > Save Choose Save from the
File menu
Control+N Hold down the Control
Control-click Hold down the Control
Right-click Click with the right
The names of Commands, Options, and Settings
that appear on-screen are in a different font.
The following symbols are used to highlight important information:
User Tips are helpful hints for getting the
most from your Pro Tools system.
key and press the N key
key and click the mouse
button
mouse button
About www.digidesign.com
The Digidesign website (www.digidesign.com) is
your best online source for information to help
you get the most out of your Pro Tools system.
The following are just a few of the services and
features available.
Product Registration Register your purchase online.
Support and Downloads Contact Digidesign
Technical Support or Customer Service; download software updates and the latest online
manuals; browse the Compatibility documents
for system requirements; search the online Answerbase; or join the worldwide Pro Tools community on the Digidesign User Conference.
Training and Education Study on your own using
courses available online or find out how you can
learn in a classroom setting at a certified
Pro Tools training center.
Products and Developers Learn about Digidesign
products; download demo software or learn
about our Development Partners and their plugins, applications, and hardware.
Important Notices include information that
could affect your Pro Tools session data or
the performance of your Pro Tools system.
Shortcuts show you useful keyboard or
mouse shortcuts.
Cross References point to related sections in
this guide or other Digidesign Guides.
Complete Production Toolkit Guide4
News and Events Get the latest news from
Digidesign or sign up for a Pro Tools demo.
Pro Tools Accelerated Videos Watch the series of
free tutorial videos. Accelerated Videos are designed to help you get up and running with
Pro Tools and its plug-ins quickly.
Page 11

chapter 2
Installation
Installing Complete Production Toolkit
A Digidesign-qualified version of
Pro Tools LE must be installed before you
install your toolkit and authorize its software components.
To install Complete Production Toolkit:
1 Do one of the following:
• Download the installer for your computer
platform from the Digidesign website
(www.digidesign.com). After downloading,
make sure the installer is uncompressed
(.ZIP on Windows or .SIT on Mac).
– or –
• Insert the Installer disc for your version of
Pro Tools into your computer.
2 Locate and double-click the Complete Produc-
tion Toolkit installer icon:
• Install Complete Production Toolkit (Mac)
– or –
• Complete Production Toolkit.exe (Windows)
The installer process installs Complete Production Toolkit features, as well as any of the following optional components that you choose to
install:
•DINR
• DigiTranslator 2.0
•Eleven
•Hybrid
• MP3 Export option
• Neyrinck SoundCode Stereo
• Smack!
• Structure
•TL Space
•X-Form
5 Each software component (including Com-
plete Production Toolkit) must be authorized before it can be used. See “Authorizing Complete
Production Toolkit Option” on page 6.
™
LE
™
™
™
™
LE
LE
®
LE
™
Native
If you launch Pro Tools without authorizing a Complete Production Toolkit software
component, you will be prompted to authorize it.
3 Follow the on-screen instructions to complete
the installation.
4 When installation is complete, click Quit
(Mac) or Finish (Windows).
Chapter 2: Installation 5
Page 12
Authorizing Complete Production Toolkit Option
Complete Production Toolkit and its additional
software components must be authorized before
they can be used in Pro Tools.
Complete Production Toolkit and Additional Software Components
Each Complete Production Toolkit component
must be authorized before it can be used in
Pro Tools. Authorization includes activating
your software licenses online, then transferring
your licenses to an iLok USB Smart Key (iLok).
iLok USB Smart Key
The iLok is similar to a dongle, but unlike a dongle, it is designed to securely authorize multiple
software applications from a variety of software
developers.
This key can hold over 100 licenses (or authorizations) for all of your iLok-enabled software.
Once an iLok is authorized for a given piece of
software, you can use the iLok to authorize that
software on any computer.
The iLok USB Smart Key is not supplied
with the Complete Production Toolkit package, and must be purchased separately.
The following Complete Production Toolkit
software components must be authorized before
they can be used in Pro Tools LE:
• Complete Production Toolkit (includes
Pro Tools features)
•DINR LE
• DigiTranslator
•Eleven LE
•Hybrid
• MP3 Export option
• Neyrinck SoundCode Stereo
• Smack! LE
• Structure LE
•TL Space Native
•X-Form
Authorizing Download Versions of Complete Production Toolkit
If you purchased a download version of Complete Production Toolkit from the DigiStore
(www.digidesign.com), authorize the plug-in by
downloading licenses from iLok.com to an iLok.
Authorizing Boxed Versions of Complete Toolkit
If you purchased a boxed version of Complete
Production Toolkit, it comes with an Activation
Code (on the included Activation Card). You
will need this code to authorize Complete Production Toolkit and the included plug-ins.
For additional information about iLok technology and licenses, see the electronic PDF
of the iLok Usage Guide.
Complete Production Toolkit Guide6
Page 13

To authorize Complete Production Toolkit using an
Activation Code:
1 If you do not have an existing iLok.com ac-
count, visit www.iLok.com and sign up for an
iLok.com account.
2 Transfer the license for your toolkit option
an d plug-in s t o y our iLok.com a cc ount by doin g
the following:
• Visit http://secure.digidesign.com/
activation.
– and –
• Input your Activation Code (listed on your
Activation Card) and then your iLok.com
Us er ID . Your iLok. com Us er ID is the name
you create for your iLok.com account.
3 Transfer the licenses from your iLok.com ac-
count to your iLok USB Smart Key by doing the
following:
• Insert the iLok into an available USB port
on your computer.
• Go to www.iLok.com and log in.
• Follow the on-screen instructions for transferring your licences to your iLok.
Removing Toolkit Options and Plug-ins
Complete Production Toolkit and all of its optional software components can be removed
from your system.
Uninstalling Complete Production Toolkit Components
Mac
To remove Complete Production Toolkit on Mac:
1 Locate and open the Pro Tools folder (Applica-
tions/Digidesign/Pro Tools).
2 Drag the following components to the Trash:
• Complete Production Toolkit.bundle
•OMF.bundle
3 Locate and open the Codecs folder (Applica-
tions/Digidesign/Pro Tools/Codecs).
4 Drag the MP3 folder (containing MP3.bundle)
to the Trash.
4 Launch Pro Tools.
5 If you have any installed unauthorized plug-
ins or software options, you are prompted to authorize them. Follow the on-screen instructions
to complete the authorization process.
5 Locate and open the Plug-ins folder on your
Startup drive (Library/Application Support
/Digidesign/Plug-ins).
6 Drag the following plug-ins to the Trash:
•DINR LE.dpm
•Eleven LE
• Hybrid Synthesizer
• Neyrinck SoundCode Stereo
• Smack LE Compressor
• Structure LE
•TL Space
•X-Form
7 Empty the Trash.
Chapter 2: Installation 7
Page 14

To remove the TL Space Native impulse response
library:
1 Locate the TL Space Impulse Responses folder
(Library/Application Support/Trillium Lane/TL
Space).
2 Drag it to the Trash and empty the Trash.
Windows Vista
To remove Complete Production Toolkit on
Windows Vista:
1 Choose Start > Control Panel.
2 Double-click Programs and Features.
3 From the list of currently installed applica-
tions, select Digidesign Complete Production
Toolkit.
4 Click Uninstall.
5 Follow the on-screen instructions to remove
the Complete Production Toolkit option.
Windows XP
To remove Complete Production Toolkit on
Windows XP:
1 Choose Start > Control Panel.
2 Double-click Add or Remove Programs.
3 From the Currently installed programs list, se-
lect Digidesign Complete Production Toolkit.
4 Follow the on-screen instructions.
5 When removal is complete, close the Add or
Remove Programs window.
Complete Production Toolkit Guide8
Page 15

chapter 3
Session and Track Features
Complete Production Toolkit enables additional
session and track features in Pro Tools LE. It also
includes support for the MP3 export option.
Increased Voice and Track Counts
For more information on working with
Pro Tools sessions and tracks, see the
Pro Tools Reference Guide.
Support for Up to 128 Voices
Complete Production Toolkit lets you play or
record up to 128 voices simultaneously at 44.1
or 48 kHz and up t o 96 voices at 88.1 or 96 kHz.
Each channel of an audio track uses a single
voice.
For example, at 44.1 or 48 kHz, you can have up
to:
•128 mono tracks
– or –
• 64 stereo tracks
– or –
• 21 5.1 tracks
– or –
• Any combination of mono, stereo, and surround tracks that do not require more that
128 voices for all audio channels
Higher track counts are only supported with
multiple hard drives and faster Digidesign-qualified systems. Visit the Digidesign website for
more information (www.digidesign.com).
Chapter 3: Session and Track Features 9
Page 16
Track Priority and Dynamic Voicing
Tracks do not play back when they are inactive or their voice assignment is set to Off.
When working with more than 128 voices (at
44.1 or 48 kHz), you can play back audio on a
track that would use voice number 129 and
higher by changing the higher track’s priority,
as follows:
• Make a lower numbered track inactive
(click the Track Name and select Track >
Make Inactive) to free up its voice.
• Set the voice assignment in a lower numbered track to Off (click the Voice selector
and select Off).
•Drag the Track Name button of the higher
numbered track to the left (Mix window) or
upwards (in the Edit window or Track List)
until it is in the range of the maximum
number of voiced audio tracks allowed by
your system. The previous last voiced audio
track will now be out of range and its voice
assignment will change to Off.
Support for Up to 64 QuickPunch Tracks
With Complete Production Toolkit, up to 64
mono or stereo audio tracks at 44.1 or 48 kHz,
and up to 48 tracks at 88.1 or 96 kHz can be simultaneously recorded with QuickPunch.
Additional Enhanced Session and Track Features
In addition to the increased audio track count
(using up to 128 voices), Pro Tools LE with the
Complete Production Toolkit option includes
the following:
• Support for up to 64 Instrument tracks
• Support for up to 128 internal buses
• Display of up to 256 tracks (128 voiceable)—tracks in excess the 128 voice limit
are set to inactive
• Support for up to 21, 5.1 tracks (for more
information about surround mixing and
monitoring in Pro Tools LE with the Complete Production Toolkit option, see
Chapter 8, “Surround Features”).
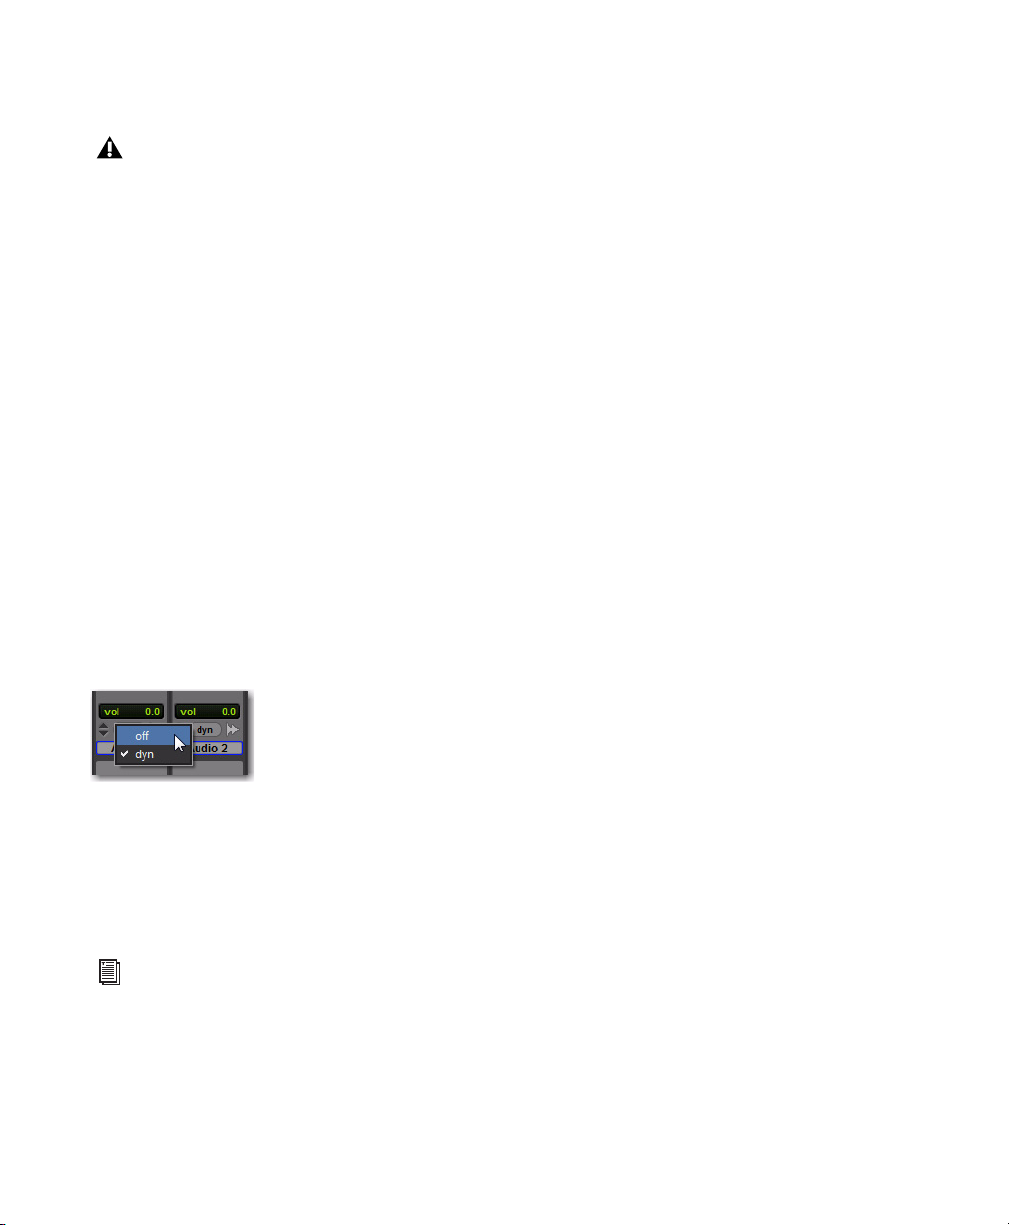
Setting a track voice assignment to Off
For the track that was originally higher numbered than the total allowed number of voiced
audio tracks, its voice assignment was set to Off.
When bringing it into the range of total allowed
voiced tracks, it automatically resets to DYN.
For more information on track priority and
voice assignments, see the Pro Tools Reference Guide.
Complete Production Toolkit Guide10
Page 17

Import Session Data Enhancements
This section provides information on Import
Session Data features that Complete Production
Toolkit adds to Pro Tools LE systems.
With Complete Production Toolkit, the Import
Session Data dialog lets you view the properties
of a session, select which tracks to import, and
choose which attributes of those tracks you
want to import into the current session.
sion from which you are importing starts at
10:00:00:00, you can reset the start time code to
00:01:00:00, to avoid placing files 9 hours and
59 minutes from the start of your session.
Destination Track Names (Operation/Destination Track Pop-Up Menus)
For each source track, there is a corresponding
Operation/Destination Track pop-up menu that
lists options for importing the track and available destination tracks in the current session.
Time Code Mapping Options
With Complete Production Toolkit, you can
specify where the imported tracks are placed in
the current session. Times are indicated in time
code.
From the Import Session Data dialog, the following Time Code Mapping Options are available:
Maintain Absolute Time Code Values This option places tracks at the locations where they
were located in the source session. For example,
if the current session starts at 00:01:00:00, and
the session from which you are importing starts
at 10:00:00:00, the earliest imported tracks can
appear in your session is 9 hours and 59 minutes
after the start of the session.
Maintain Relative Time Code Values This option
places tracks at the same offset from session start
as they had in the source session. For example, if
the source session starts at 01:00:00:00 and contains a track that starts at 01:01:00:00, and the
current session start is 02:00:00:00, the track will
be placed at 02:01:00:00 in the current session.
Map Start Time Code To This option places
tracks relative to their original session start time
(with Complete Production Toolkit, times are
expressed in hh:mm:ss:ff). For example, if the
current session starts at 00:01:00:00, and the ses-
The names of available destination tracks in the
current session are listed at the bottom of the
pop-up menu. Imported playlists and all attributes selected in the Session Data to Import
will be placed in the destination track you
choose.
Only destination tracks that match the track
type (audio, Instrument, MIDI, Auxiliary Input,
or Master Fader) and the channel format (mono
or stereo) of the source track appear in the popup menu.
Find Matching Tracks
If you are importing playlists from source tracks
with the same name as destination tracks in the
current session, click Find Matching Tracks to
automatically match the track names. Tracks
must have the same name, track type, and channel format to be automatically matched.
Session Data to Import
The Session Data to Import menu is where you
select which attributes of the selected tracks you
want to import into the current session.
The selected attributes are applied to all tracks
that you choose to import into the current session.
Chapter 3: Session and Track Features 11
Page 18

Replacing Track Attributes
When you import an attribute of the source
track into an existing track in the current session, it replaces the corresponding attribute in
the destination track. If you choose not to import an attribute of the source track, the corresponding attribute in the destination track is retained.
Replacing Track Path Names
When you import a track’s input, output, send
output or hardware insert assignments, any custom path names and I/O configurations from
the source session are imported into the track,
but they are not imported into the I/O Setup.
Use the Import Session button in the I/O Setup
dialog to import I/O configurations into the I/O
Setup.
For information on importing I/O configurations into I/O Setup, see the Pro Tools Reference Guide.
Selecting Track Attributes to Import
You can select All, None, or any combination of
the listed attributes to import.
The following attributes are available to import:
All Imports all of the source track’s playlists, according to the Track Playlist Option setting, and
all of the attributes in the Session Data to Import
list.
None Imports only the source track’s main playlist, according to the Track Playlist Option setting, and no other attributes of the source track.
Alternate Playlists Imports all of the source
track’s alternate playlists. The alternate playlists
appear in the destination track’s playlist pop-up
menu.
Regions and Media Imports all of the audio files
or regions in the source track, and places them
in the Region List.
Volume Automation and Setting Imports the
source track’s Volume fader setting and any automation data on the track’s Volume Automation playlist. The Volume fader setting and any
Volume automation data in the destination
track are replaced.
Pan Automation and Setting Imports the source
track’s Pan Slider settings and any automation
data on the track’s Pan Automation playlist. The
Pan Slider setting and any Pan automation data
in the destination track are replaced.
Mute Automation and Setting Imports the source
track’s Mute setting and any automation data
on the track’s Mute Automation playlist. The
Mute setting and any Mute automation data in
the destination track are replaced.
Main Output Assignments Imports the source
track’s channel output assignments, including
any multiple output assignments. The channel
output assignments in the destination track are
replaced.
Send Output Assignments Imports the source
track’s send output assignments. Any Send output assignments in the destination track are replaced.
Plug-in Assignments Imports the source track’s
plug-in assignments. Any plug-ins in the destination track are removed, and their associated
settings and automation are lost.
If the source track uses a plug-in that is not available on the destination system, it appears in the
destination track and is made inactive.
Complete Production Toolkit Guide12
Page 19

Plug-in Settings and Automation When the
source track’s plug-in assignments are imported,
this option imports the track’s plug-in settings
and any automation data associated with the
plug-ins. If no plug-in assignments are imported, this option has no effect.
Hardware Insert Assignments Imports the source
track’s hardware Insert assignments. Any Insert
assignments in the destination track are replaced.
Input Assignments Imports the source track’s
channel input assignment. The Input assignment in the destination track is replaced.
Side-Chain Assignments When the source track’s
plug-in assignments are imported, this option
imports any side-chain assignments associated
with the plug-ins. If no plug-in assignments are
imported, this option has no effect.
Track Playlist Options
You can select from the following options to
control how the main playlist from each source
track is imported to the destination track in the
current session.
Import Main Playlists — Replacing Destination
Main Playlists Imports the main playlist from
the source track. When you overlay the playlist
into an existing track, the main playlist in the
destination track is deleted and replaced with
the imported playlist.
If you select the above option and import all
of the source track’s attributes, this is equivalent
to importing the entire track.
If you select the above option and do not im-
port any of the source track’s attributes, you replace the audio playlists while keeping your
current mixer settings.
I/O Labels (Path Names) Imports the source
track’s path names.
Track Active State Imports the active/inactive
state of the source track from the source session.
Track Comments Imports the track comments
associated with the source track. Any comments
in the destination track are replaced.
Record Safe/Solo Safe Settings Imports the
record safe and solo safe settings of the source
track from the source session. Any record safe or
solo safe settings in the destination track are replaced.
Track View Settings Imports the track height
and playlist view of the source track from the
source session.
Mix/Edit Groups: Imports track group assignments from the source session.
Import Main Playlists—Overlaying New with Existing, Trimming Existing Regions Imports the main
playlist from the source track. When you import
the playlist into an existing track, any existing
playlist data that overlaps data imported from
the source track is trimmed and replaced with
the imported data. Any playlist data in the destination track that does not overlap remains in
the destination track.
Chapter 3: Session and Track Features 13
Page 20

Do Not Import Main Playlists—Leaving Destination Playlists Intact Does not import the main
playlist from the source track. No audio is imported; only the attributes selected in the Session Data to Import list are imported to the selected tracks.
If you select the above option and import all
of the source track’s input, output, send, insert
and plug-in attributes, this is equivalent to importing a “channel strip.”
Import Tempo/Meter Map Imports the meter
and tempo maps, as they appear in the Tempo
and Meter Conductor rulers, from the source
session. Any Tempo or Meter events in the destination session are replaced.
Import Marker/Memory Locations
Imports markers and Memory Locations as they
appear in the Marker ruler, from the source session. Any markers and Memory Locations in the
destination session are retained. Imported
marker and Memory Locations are assigned the
next available Marker/Memory Location numbers.
DigiTranslator 2.0 Features
Importing AAF and OMF Sequences
With the DigiTranslator 2.0 option (included
with Complete Production Toolkit), Pro Tools
lets you open AAF and OMF sequences as new
Pro Tools sessions or you can import AAF and
OMF sequences into existing Pro Tools sessions.
Pro Tools cannot play MXF audio or video
files embedded within an AAF sequence.
For more information on opening and importing AAF and OMF sequences using the
DigiTranslator 2.0 option, see the DigiTranslator 2.0 Guide.
Exporting Pro Tools Tracks as AAF or OMF Sequences
With the DigiTranslator 2.0 option (included
with Complete Production Toolkit), Pro Tools
lets you export individual tracks in AAF or OMF
format. Use the Export Selected Tracks as
AAF/OMF command.
Pro Tools with DigiTranslator 2.0 does not
support AAF files with embedded media.
For more information on exporting selected
tracks from Pro Tools sessions as AAF and
OMF sequences using the DigiTranslator
2.0 option, see the DigiTranslator 2.0
Guide.
Complete Production Toolkit Guide14
Page 21
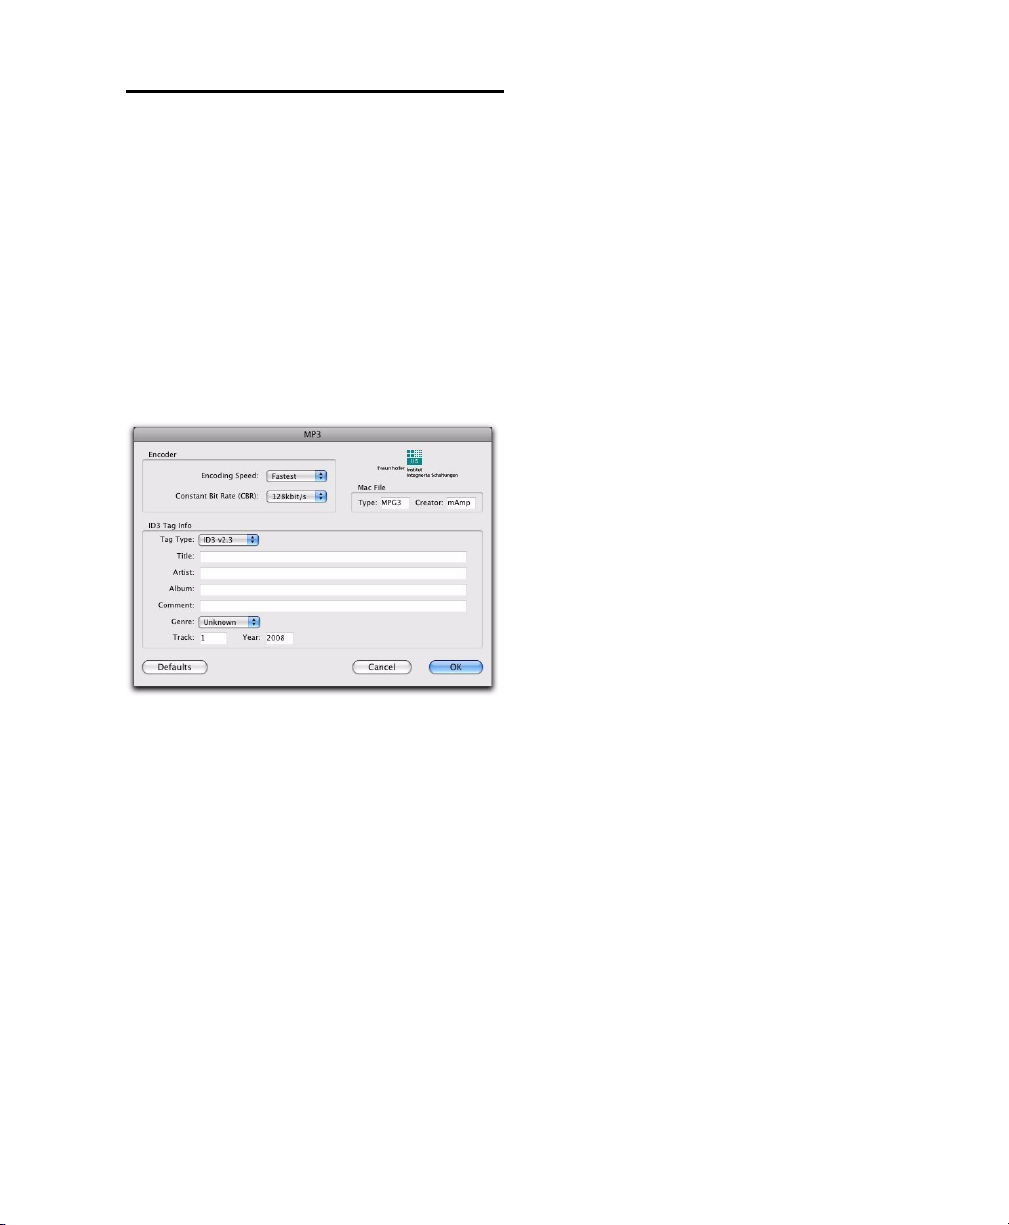
MP3 Export Option
When you export or bounce to MP3 format, you
can set the following options:
With Complete Production Toolkit, the MP3 file
type is available when using Bounce to Disk or
exporting a region as a new audio file.
MPEG-1 Layer 3 (MP3)
The MPEG-1 Layer 3 compression format (MP3)
is used for streaming and downloading audio
over the Internet, and for playback on portable
devices. The MP3 Export Option is required to
use this file type.
MP3 Export Options
When you select this format, the Resolution popup menu in the Pro Tools Output Options dialog is unavailable. The resolution is set by the
encoder.
The sample rate chosen is given to the codec as
a base sample rate for operations. The actual
sample rate of the resulting file is determined in
the MP3 Encoder Options dialog. For example, if
a base sample rate of 48000 Hz is chosen, the
MP3 Encoder Options dialog will allow output
streams in 48, 24, or 12 kHz, depending on encoding quality.
Encoder Settings
Encoder Speed Determines the audio quality of
the bounced file. There are two options: Highest
Quality and Fastest Encoding Time.
The Highest Quality option can take up to five
times longer to process audio than the Fastest
Encoding option, so you should use it only when
the highest fidelity is essential and you have the
time to devote to the encoding process.
Constant Bit Rate (CBR) Encodes the file at a
single bit rate that you choose from the Constant
Bit Rate (CBR) pop-up menu. Because the bit rate
is fixed, the quality of the encoded audio will
vary depending on the nature of the material being compressed. The 128 kbit/s option is generally best for streaming over the Internet, since it
has predictable bandwidth requirements.
ID3 Tag Info Settings
ID3 Tag Type The ID3 tag stores data about the
encoded audio file that is used by MP3 players to
display information about the file. Pro Tools
supports three versions of this tag, in order to
provide backward compatibility with older MP3
players:
• ID3 v1.0: Appears at the end of a streaming
MP3 file, so that tag information is only displayed after software streaming is finished.
• ID3 v1.1: Same as version 1.0, but adds track
number information to the tag.
• ID3 v2.3: Appears at the front of a streaming
MP3 file, so that tag information is displayed
when streaming begins.
Chapter 3: Session and Track Features 15
Page 22

While ID3 v2.3 is the current standard
MP3 format, not all MP3 players support
ID3 v2.3. Contact the developer of your
player software for compatibility information.
Title/Artist/Album/Comment Type the title, artist, and other information for the MP3 file. This
information is displayed by many MP3 players.
Genre Choose a genre for the file. This information is displayed by many MP3 players, and can
appear in searchable catalogs and databases.
Tra ck Num be r If you select ID3 tag type v1.1 or
v2.3, you can enter a CD track number for the
file. This information is displayed by many MP3
players.
Year Enter a year for the file. This information is
displayed by many MP3 players.
Mac File Settings
Mac File Type and Creator If you expect your file
to be used on a Mac, you can enter the Mac file
type and creator. This will allow users to doubleclick the file to open their MP3 player.
Default Button
To restore all settings in this dialog to their default values, click Defaults.
Session Interchange Between Pro Tools HD and Pro Tools LE with Complete Production Toolkit
The Complete Production Toolkit option provides improved session interchange between
Pro Tools|HD systems and Pro Tools LE systems.
For more information on sharing sessions,
see the Pro Tools Reference Guide.
When opening a Pro Tools HD session in
Pro Tools LE with Complete Production Toolkit,
the following occurs:
Tracks
• Any audio tracks that exceed the 128 voice
limit, as well any inactive tracks, are set to
voice off.
• Any Auxiliary Input tracks beyond 128 are
made inactive.
• Any Instrument tracks beyond 64 are made
inactive.
• TDM plug-ins with RTAS
converted; those without equivalents are
made inactive. When subsequently opening
the session in Pro Tools HD, any plug-ins that
were converted to RTAS will be converted
back to TDM if possible.
• Multichannel surround tracks are maintained.
• Unavailable input and output paths are made
inactive.
• Any Delay Compensation settings are removed. When subsequently opening the session in Pro Tools HD, the original Delay
Compensation settings are restored.
®
equivalents are
Complete Production Toolkit Guide16
Page 23
• VCA Master tracks are hidden and any VCA
Active
Inactive
automation is automatically coalesced. When
subsequently opening the session in Pro Tools
HD, VCA tracks remain hidden and will need
to be manually shown.
Groups
• Mix Groups keep only Main Volume information.
• Mix/Edit Groups keep only Main Volume and
Automation Mode information.
• Automation overflow information for
grouped controls is be preserved.
• Group behavior of Solos, Mutes, Send Levels,
Send Mutes is be preserved.
• Solo Mode and Solo Latch settings are
dropped.
To reconfigure a session that was created with
audio output paths that exceed the available audio
outputs of your Pro Tools LE audio interface for
stereo monitoring:
1 After opening the session, choose Setup > I/O
and click the Output tab.
2 Make sure the audio output paths that are un-
available with your Pro Tools LE audio interface
are set to Inactive by deselecting the Active/Inactive control for the path. Inactive tracks that
were assigned to the path display in italics in the
track path selectors.
I/O Setup
If your Pro Tools LE audio interface has a sufficient number of outputs, the I/O Setup is maintained. If not, a warning is posted when opening
the session and you will need to manually reconfigure the I/O Setup.
Active/inactive Output path settings in I/O setup
3 Click the Bus tab and, if necessary, create a
new surround format bus (such as 5.1).
4 Click OK to save your changes and close the
I/O Setup dialog.
5 Route any track outputs or sends that were as-
signed to the surround audio path to the new
surround bus path.
6 Create a new Auxiliary Input track with the
desired surround channel format (such as 5.1).
7 Set the Input path for the Auxiliary Input
track to the corresponding surround bus.
8 Insert the SoundCode Stereo (surround chan-
nel format to stereo) plug-in on the Auxiliary Input track. The channel width of the track
changes to stereo.
9 Set the output path of the Auxiliary Input
track to the main stereo outputs of your audio
interface for monitoring.
Chapter 3: Session and Track Features 17
Page 24

Complete Production Toolkit Guide18
Page 25
chapter 4
Search
Pane
Search icon
Selected
Volume
DigiBase Pro
Complete Production Toolkit enables DigiBase
Pro in Pro Tools LE.
For information on DigiBase, see the
Pro Tools Reference Guide.
With DigiBase Pro, you can:
• Search on any combination of file metadata simultaneously.
• Create and share custom Catalog browsers
(Catalogs) that reference files wherever
they are stored.
• View, search, and import files from Catalogs even if they are on offline volumes.
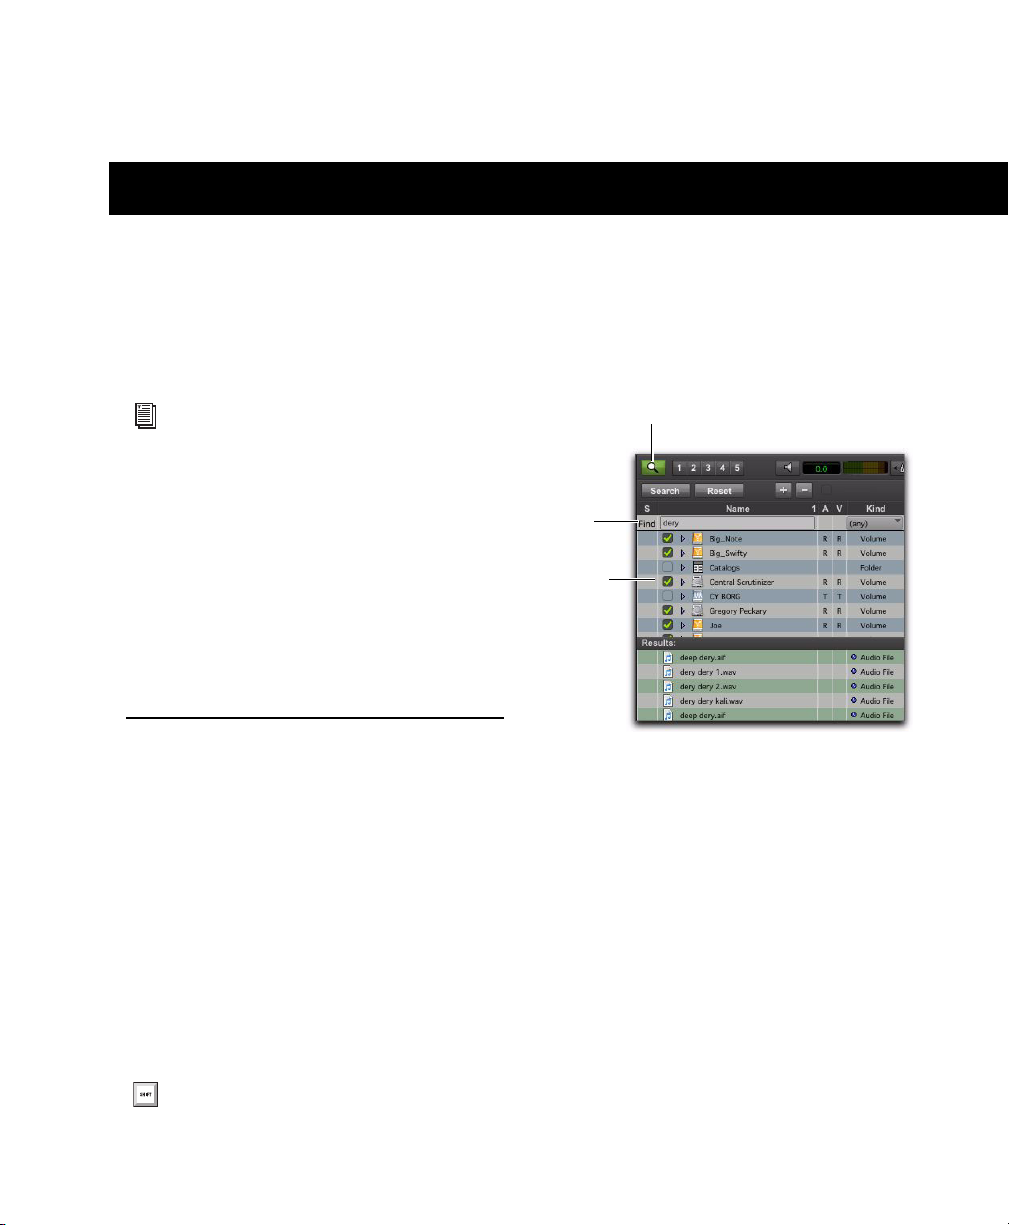
Searching for Multiple Criteria Simultaneously in DigiBase Browsers
Use DigiBase to find files by name, modification
date, and kind. With DigiBase Pro, you can
search multiple criteria simultaneously, and
search on any criteria.
3 If in the Workspace browser, select volumes or
folders to search.
Search icon and Search pane
4 Enter text into the File Name field to search by
name, or enter a date, or select a kind from the
Kind pop-up menu.
5 Choose additional search criteria as needed.
Press Tab to move to the next available search
field, or Shift+Tab to move to the previous.
To start a search:
1 Open any browser.
2 Click the Search icon to display the Search
pane.
You can also start a search by pressing Control+F (Windows) or Command+F (Mac).
6 Click the Search button, or press Enter (Win-
dows) or Return (Mac).
Chapter 4: DigiBase Pro 19
Page 26
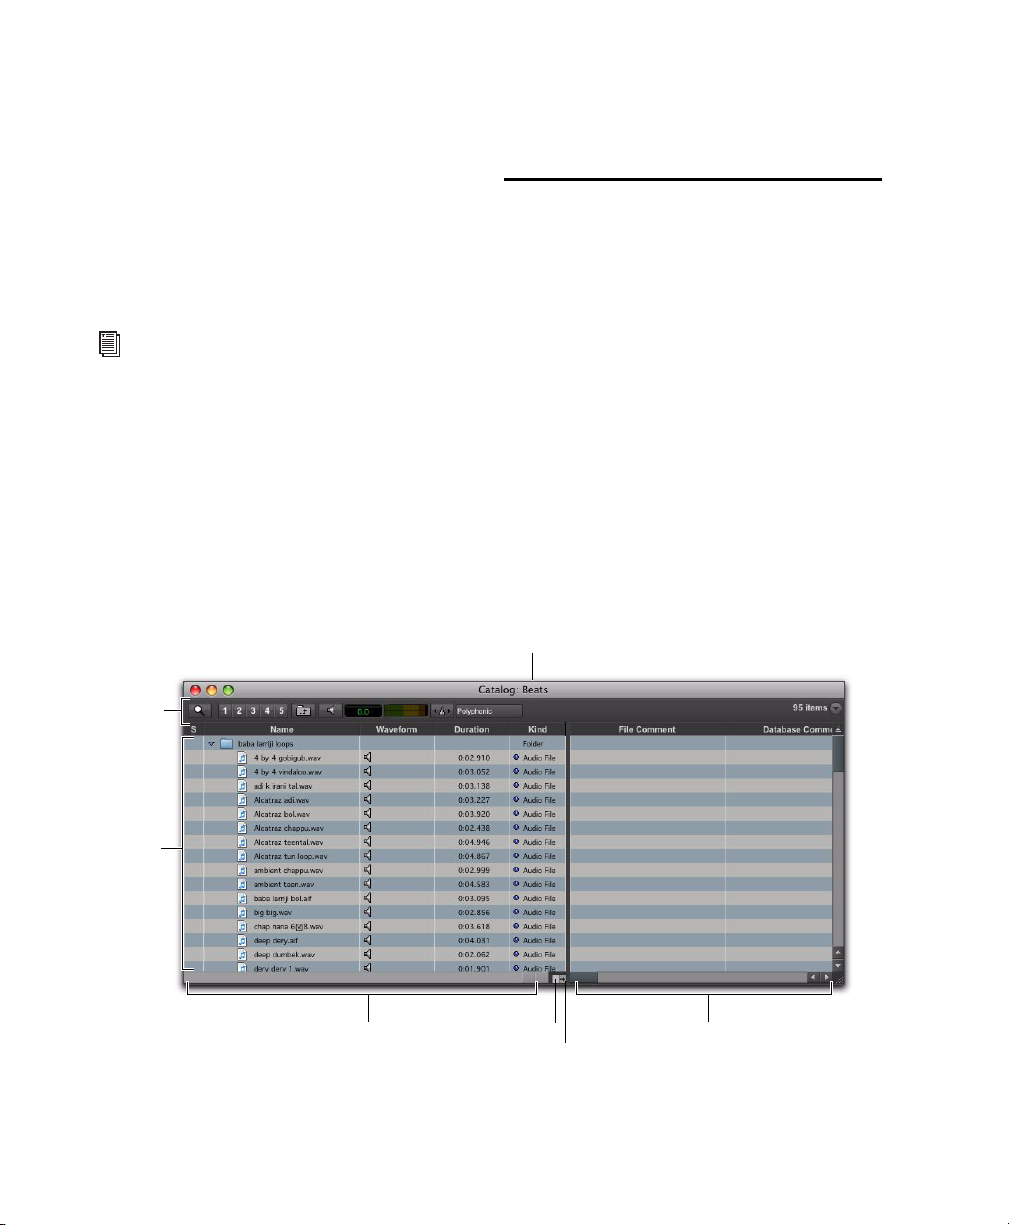
Searching begins, indicated by the spinning ar-
Catalog name
Menu and
toolbar
Items List
Fixed pane
Scrolling pane
Pane split
Show/Hide
rows in the toolbar, and by the Search button
changing to Stop. The Results List (at the bottom of the browser) fills with items that match
the search criteria. Items can be selected and auditioned as they are found.
7 Click the Stop button at any time to stop the
search, and keep the list of files already found (if
any).
For detailed information on DigiBase
search functions, see the Pro Tools Reference Guide.
Saving Search Results as a Catalog
To save the results of your search as a Catalog:
1 Choose Edit > Select All, or press Control+A
(Windows) or Command+A (Mac), to select all
items in the Items List.
2 From the Browser menu, choose Create Cata-
log.
DigiBase Pro Catalogs
Catalogs are available with DigiBase Pro, which
is included with Complete Production Toolkit
(see Figure 1).
While Volume browsers are designed to be an
accurate representation of the file structure on a
given volume, Catalogs are similar to having a
Favorites folder, and serve as a way to collect
and organize frequently used items regardless of
where they are stored.
Figure 1. Catalog browser
Complete Production Toolkit Guide20
Page 27
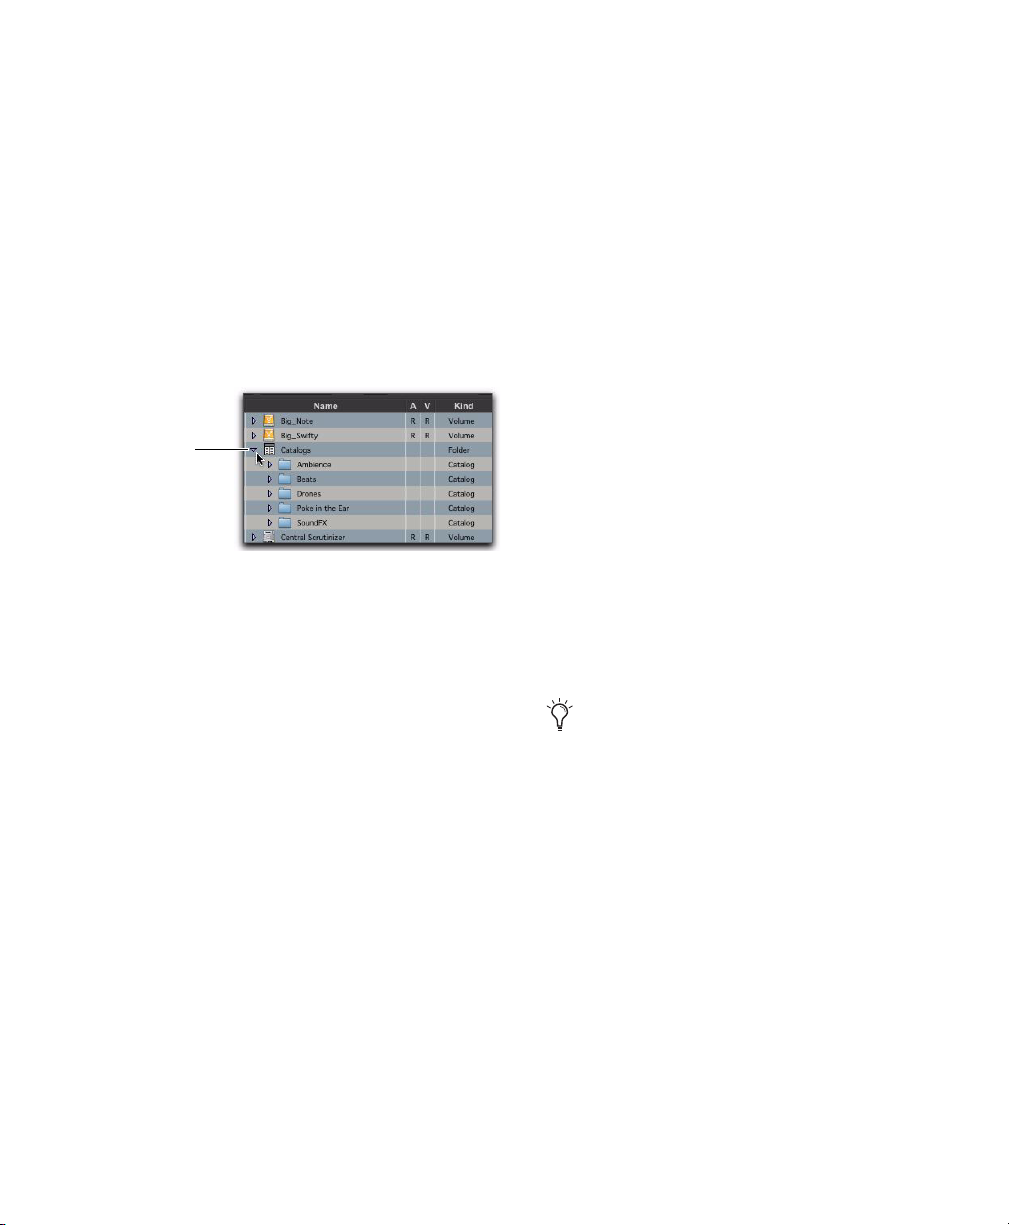
A Catalog is analogous to a folder full of aliases
Catalogs
or shortcuts. Placing a file in a Catalog does not
create a copy of the file, and does not change
where the file is stored. Rather, it stores a reference (or alias) to the file so that it can be found
and manipulated without having to search for
its physical location.
Clip names can only be edited in a Catalog. Editing the Clip name does not affect the actual
file; however, if you add the same file to a new
Catalog, it retains its original Clip Name. When
you drag a file from a Catalog into a session, the
edited Clip Name is what appears in the Timeline and Region List.
Opening a Catalog Browser
Catalogs are displayed in the Workspace
browser.
Catalogs item in the Workspace
To open a Catalog browser:
1 Open the Workspace browser.
2 Click the Catalogs Expand/Collapse icon.
3 Do one of the following:
• Click the Expand/Collapse icon for the desired Catalog to view its contents in the
Wor ksp ace .
– or –
• Double-click the Catalog name to open it
in its own browser window.
Clip Names in Catalogs
Clip Names are the names that appear in the
Timeline and Region List when a file is imported
into a session.
For most files, the Clip name is the same as the
file name. For OMF Files, the Clip Name is the
name that appears in the Avid
®
bin.
If the Clip Name is longer than 32 characters,
Pro Tools truncates the name automatically
when imported into the session.
Comments and Catalogs
Catalogs provide commands for managing OS 9
Finder comments, Database comments, and
Clip Names.
Database Comments in a Catalog are stored in
the Catalog database. Database Comments,
which can be up to 256 characters in length, are
searchable, cross-platform, and editable.
Copy OS 9 Finder Comment to Database Comments (Mac Only) Copies an item’s OS 9 Finder
comments to its Database comments.
OS 9 Finder comments (from the OS 9 Get
Info window) are not supported in OS X Get
Info windows. Use the Copy OS 9 Finder
Comment to Database Comments command to utilize any OS 9 Finder comments
stored with your media.
Copy OS X Finder Comment to Database Comments (Mac Only) Copies an item’s OS X Finder
comments to its Database comments.
Copy Database Comments to Clip Names Copies
an item’s Database comments to Clip Name.
Copy File Comments to Clip Names Copies an
item’s File Comments to Clip Name.
Chapter 4: DigiBase Pro 21
Page 28

Creating Catalogs
Renaming a Catalog
Catalogs can be added to the Workspace as new,
empty Catalogs, or you can select items first and
then save a Catalog of all selected items.
To create a new, empty Catalog:
1 Open the Workspace browser.
2 Choose New Catalog from the browser menu.
3 Enter a unique name and click OK.
To catalog a selection of items:
1 Open any browser (including an existing Cat-
alog).
2 Select the items you want to include in the
new Catalog.
3 Choose Create Catalog from Selection from the
Browser menu.
A new, fully indexed Catalog database of the selected items is created.
Creating Catalogs of Folders
Catalogs can be renamed at any time.
To rename a Catalog:
1 Click the Catalog item in the Workspace
browser until its name highlights.
2 Enter a new name for the Catalog.
Modifying Catalogs
To add items to a Catalog, do one of the following:
Open the Catalog and drop new items from
another browser.
– or –
Click the main Catalogs icon in the Work-
space, to expand your view of all existing Catalogs, then drop items onto any Catalog.
To add a folder to a Catalog:
1 Open the Catalog.
2 Choose Create Folder from the Browser menu.
To create a Catalog of an entire folder and all its
contents:
1 Open the Workspace browser, if not already
open.
2 Drag and drop a single folder onto the Catalog
icon in the Workspace browser.
Pro Tools first indexes the folder, then a fully indexed Catalog is created, with the same name as
the dropped folder.
Complete Production Toolkit Guide22
To delete items from a Catalog:
1 Select the items.
2 Press the Delete key, or choose Delete Selected
from the Browser menu. A warning dialog appears.
3 In the warning dialog, do one of the follow-
ing:
• Click Cancel to cancel the delete operation.
• Click Delete Files to delete aliases and associated files from disk.
• Click Delete Aliases to delete only the
aliases and not the associated files.
This operation cannot be undone.
Page 29

Consolidating Files with Catalogs
Catalogs are excellent tools for consolidating
files from a variety of sources.
For example, create a Catalog named “Thumps”
and fill it with sound effects from three different
volumes. You can then drag the Catalog from
the Workspace browser to another volume, and
a folder named “Thumps” is created on that volume. All of the files referenced by the Catalog
are automatically copied to the volume. Folders
and sub-folders, if any, and their contents are
included in the copy.
Updating Catalogs
Since a Catalog database is not linked to any particular volume, there is a limit to the abilities of
the Update Index command. When Update Data-
base for Selected is selected from the Browser
menu in a Catalog, Pro Tools searches for the
items represented by the aliases in the Catalog
and updates the following information:
Metadata Metadata for all files found online, including File comments, are updated.
Deleting Catalogs
To delete a Catalog:
1 Select one or more Catalogs in the Workspace
browser.
2 Press the Delete key, or choose Delete Selected
from the Browser menu. A warning dialog appears.
3 In the warning dialog, do one of the follow-
ing:
• Click Cancel to cancel the delete operation.
• Click Delete Files to delete aliases and associated files from disk.
• Click Delete Aliases to delete only the
aliases and not the associated files.
This operation cannot be undone.
Importing Catalog Items
You can import online and offline items from
Catalogs into the current session.
Importing Online Items from a Catalog
Database Comments Database Comments are
not updated, because they are unique to each
Catalog and are not part of the file’s metadata.
Relinking Catalog Items
If files are ever missing from a Catalog, use the
Relink window to locate, copy, and relink files.
For more information, see the Pro Tools Reference
Guide.
Dragging and dropping audio files to the
Pro Tools Region List and Timeline is identical
to dragging and dropping from Volume browsers.
Chapter 4: DigiBase Pro 23
Page 30

Importing Offline Items from a Catalog
With Catalogs, it is possible to search and import files that are offline. For example, if you
have a music cue that you know you want to
use, but it resides on a CD-ROM or other unmounted volume, you can spot the file from a
Catalog to the session Timeline, and it is automatically imported into the session when the
volume is mounted.
The first step is to add files to a Catalog (files
must be online to be added to a Catalog). Once
added to a Catalog, if the items are taken offline
they are listed in italicized text.
Offline files can be dropped from a Catalog to
the Timeline just like online files. When you
drop the files, a dialog appears asking if you
want to relink the files or skip relinking. Click
Skip All to load all the items as offline files (in the
Timeline, their regions appear in light blue). In
the Project browser, these items are listed in the
Render Sources folder, to ensure that Pro Tools
remembers that these items need to be relinked.
Whenever the volume containing the offline
items is mounted, Pro Tools automatically starts
to import the files, in the background. This is
true even if you have saved the session, quit,
and relaunched Pro Tools.
Once the items are completely imported, they
appear as online items in the Timeline, Region
List, and in the Project browser.
If the offline items match the session sample
rate, bit depth, and file format, no conversion is
necessary. As long as the volume is playable, the
items become playable in the session as soon as
the volume is mounted.
If the volume is unsuitable for playback, you are
informed that some items must be copied to
suitable volumes first.
Complete Production Toolkit Guide24
Page 31
chapter 5
Editing Features
Complete Production Toolkit enables additional
editing features in Pro Tools LE.
For information on editing in Pro Tools, see
the Pro Tools Reference Guide.
Continuous Scrolling During Playback
When this scrolling option is selected, the Edit
and MIDI Editor window contents scroll continuously past the playback cursor, which remains
in the center of the window. With this option,
playback is always based on the Timeline selection. Continuous Scrolling During Playback uses
host processing power, so use this option with
Pro Tools LE with Complete Production Toolkit
only when absolutely necessary.
Half-Screen Edit Window
When the Scrolling option is set to Continuous, a
half-screen appears at the far left of the Edit window (before the beginning of the session) when
the Playhead is at the beginning of the session.
Half-screen for Center Playhead Scrolling option
The Scrub Trimmer Tool
The Scrub Trimmer tool is a convenient tool for
auditioning material (on up to two tracks) to
find a trim point. You can drag in a track to hear
the audio information, then trim at a specific location by releasing the mouse button.
Chapter 5: Editing Features 25
Page 32

This action creates a new region. Note that the
Scrub Trimmer tool changes into a “right trim”
or “left trim” shape as it is placed over the right
or left side of a region. To reverse the direction
of the Scrub Trimmer tool, press Alt (Windows)
or Option (Mac) before you click the region.
Scrub Trimmer tool over a region
Scrub playback speed and direction vary with
controller movement. Scrubbed audio is routed
through the track signal path, so you hear any
effects in the signal path.
To scrub trim a track:
1 Do one of the following:
• Click the Trimmer tool pop-up menu and
select Scrub.
– or –
• Right-click on any track and select Tools >
Trimmer Tools > Scrub.
The tool changes to a speaker with a bracket.
2 Drag within a track to the left or right. Audio
from a scrubbed track is routed through the
track signal path, including any TDM effects.
When you locate the trim point, release the
mouse button to trim the region.
To scrub trim two tracks, click with the Scrub
Trimmer tool between two adjacent tracks and
drag.
To scrub with finer resolution (without having
to zoom in), press Control (Windows) or Command (Mac) while scrubbing.
Replacing Audio Regions
Use the Replace Region function to replace multiple instances of an audio region in a playlist
with another region. This is useful in post production if you use a sound effect, room noise, or
atmosphere region many times in a session, and
later decide to replace one or all of the original
regions with a different region.
This is also useful in music production if you
want to replace a certain loop or sample (for example, a drum beat) with a new one. You can
use this compositionally, if you know the tempo
of a section or session, to create a scratch piece
with “rough” regions of the correct length, and
later replace them with “final” regions of the
same length.
To replace regions by dragging and dropping:
1 Select a region in a track’s playlist that you
want to replace. The selection can extend beyond the region’s end point, to include material
from the replacement region that is longer than
the original region.
2 Control-Shift-drag (Windows) or Command-
Shift-drag (Mac) the replacement region from
the Region List to the selected region. The Replace Region dialog opens.
Control-Shift-drag (Windows) or Command-Shift-drag (Mac) any region from the
Region List to any unselected region on a
track to open the Replace Region dialog
without first making a selection.
3 Configure the Replace Region dialog (see “Re-
place Region Dialog” on page 27).
4 Click OK.
Complete Production Toolkit Guide26
Page 33

Replace Region Dialog
Replace Region dialog
The following options are available in the Replace Region dialog:
Replace: Original Region Only Replaces only the
selected region with the replacement region
dragged from the Region List.
Replace: All Instances of the Original Region Replaces all instances of the selected region that fit
the On criteria with the replacement region
from the Region List.
• On This Track: replaces regions that fit the
Match criteria and are on the same track as
the original region.
• On All Tracks: replaces regions that fit the
Match criteria for all tracks in the session.
• On Within the Selection: replaces regions
that fit the Match criteria within the current selection.
Replace: All Regions That Match Original Region’s Replaces all regions that fit the Match cri-
teria and the On criteria with the replacement
region from the Region List.
• Start Position: replaces all regions that have
the same original start time as the selected
region. This includes regions that may have
been auto-created when trimming end
points.
• End Position: replaces all regions that have
the same original end time as the selected
region. This includes regions that may have
been auto-created when trimming start
points.
• Name: replaces all regions that come from
the same audio file and have been renamed
to the same name
• On This Track: replaces regions that fit the
Match criteria and are on the same track as
the original region.
• On All Tracks: replaces regions that fit the
Match criteria for all tracks in the session.
• On Within the Selection: replaces regions
that fit the Match criteria within the current selection.
Chapter 5: Editing Features 27
Page 34

Region matching uses all specified Match criteria. For example, if you select Start Position and
End Position, all regions from the same original
audio file as your selection with the same original start and end times will be replaced.
Fit Region Using The: Original Region Length If
the replacement region is smaller than the original region, the region is placed in the playlist
and any remaining audio from the original region is removed.
If the replacement region is larger than the selection, it is placed in the playlist and trimmed
to fit within the length of the original region.
Fit Region Using The: Original Selection
Length When the playlist selection extends be-
yond the original region, the replacement region (if larger than the original region) is
trimmed to fit within the selection.
Fit Region Using The: Replacement Region
Length The replacement region is placed in its
entirety, regardless of the length of the original
region or selection.
Replacing Regions from the Region List
The Replace Regions command is also available
in the Region List menu. To use this command,
make sure there is a region selected in a track
and a different (replacement) region selected in
the Region List.
To replace regions using the Region List menu:
1 Select a region in a track to be replaced.
2 Do one of the following:
• Right-click the desired replacement region
in the Region List and choose Replace Regions from the pop-up menu.
• Select the desired replacement region in
the Region List and choose Replace Regions
from the Region List menu. (If the Region
List Selection Follows Edit Selection preference is enabled, Control-click (Windows)
or Command-click (Mac) the selected region to deselect it, then Control-click
(Windows) or Command-click (Mac) the
desired replacement region to select it, and
then choose Replace Regions from the Region List menu.)
3 Configure the Replace Region dialog (see “Re-
place Region Dialog” on page 27).
4 Click OK.
Replace Region and Multichannel Tracks
The Replace Region command supports dragging multichannel regions from the Region List
to multichannel tracks, provided they are the
same channel format. For example, you can replace a selected stereo region in a stereo audio
track with another stereo region from the Region List. However, you cannot replace it with
two mono audio regions. Additionally, you cannot replace regions in multiple mono tracks
with multichannel regions.
Complete Production Toolkit Guide28
Page 35

TCE (Time Compression and Expansion) Edit To Timeline Selection
When the Edit and Timeline selections are unlinked, you can compress or expand an audio selection to fit the Timeline selection. On audio
tracks, TCE Edit to Timeline Selection uses the TCE
AudioSuite
preferences. On Elastic Audio–enabled tracks,
TCE Edit To Timeline Selection uses the track’s selected Elastic Audio plug-in.
To fit an Edit selection to the Timeline:
1 Deselect Options > Link Timeline and Edit Selec-
tion.
2 With the Selector tool, select the audio mate-
rial to be compressed or expanded.
3 In any Timebase ruler, select the time range
where you want to fit the audio material.
™
Plug-in selected in the Processing
Fitting an Audio Region to an Edit Selection
Regions can be dragged from the Region List to
fit within an Edit selection. The dragged region
is compressed or expanded to fit within the selection. On audio tracks, fitting an audio region
to the Edit selection uses the TCE AudioSuite
Plug-in selected in the Processing preferences.
On Elastic Audio–enabled tracks, it uses the
track’s selected Elastic Audio plug-in.
To fit an audio region to an Edit selection:
1 With the Selector tool, make an Edit selection
in an audio track.
2 Control-Alt-drag (Windows) or Command-
Option-drag (Mac) the region from the Region
List to the track with the selection. The start of
the region is positioned at the selection start,
and the region is compressed or expanded to
match the length of the selection.
4 Choose Edit > TCE Edit to Timeline Selection.
The Edit selection is compressed or expanded to
the length of the Timeline selection.
TCE Edit to Timeline Selection on Multiple Tracks and Channels
The TCE Edit to Timeline command can be used
on multichannel selections, and selections
across multiple tracks. All regions are compressed or expanded equally by the same percentage value, based on Edit selection range.
This ensures that the rhythmic relationship between the different channels or tracks is maintained.
Fit to Selection on Multiple Tracks and Channels
The Fit to Selection command supports dragging
multiple regions from the Region List to multiple tracks, or multichannel tracks.
However, all dragged regions are compressed or
expanded equally by the same percentage value,
based on length of the region last clicked before
dragging.
Chapter 5: Editing Features 29
Page 36

Expanding Alternate Channels to New Playlists or Tracks
When working with a mono region that is part
of a multichannel recording imported from a
field recorder, you can expand that region (or a
selected portion of it) to new playlists that reflect its matching alternate channels while preserving any edits or fades.
For detailed information on working with
multichannel recordings made with field recorders, see the Field Recorder Workflow
Guide.
Conditions for Alternate Channel Availability
An alternate channel is available to replace the
original channel (represented by the region or
portion of a region selected on the Timeline) if
all of the following are true:
• Both channels are part of a multichannel
part of a recording made simultaneously
on one or more field recorders.
• Certain metadata matches between the
original channel and the alternate channel.
• The metadata embedded during shooting
and recording has been preserved prior to
import into Pro Tools.
With multichannel recordings from one or
more field recorders, both channels must overlap at least once between their start time code
and end time code positions, and must also
meet one of the following conditions:
• Matching Scene and Take
• Matching Shoot Date (applies only if Scene
and Take contain any information for both
channels)
• Matching Tape name
• Matching Sound Roll name
• Alternate channel Sound Roll name
matches current channel Tape name
• Alternate channel Tape name matches current channel Sound Roll name
Expanding Channels to New Playlists
To expand alternate channels to new playlists:
1 In the Timeline, do one of the following:
• To expand only a portion of the regions on
the track, make a selection that includes or
overlaps any number of regions on a track,
and Right-click (Windows or Mac) or Control-click (Mac) the selection.
– or –
• To expand all of the regions on the track,
Right-click (Windows or Mac) or Controlclick (Mac) the track name.
2 Choose the Expand to New Playlists pop-up
menu, and select one of the following methods
by which to expand alternate channels for the
selection to new tracks:
• By Channel Name
• By Channel Number
• By Channel Name and Number
• By Time Code Only
Complete Production Toolkit Guide30
Page 37

If alternate channels are available, Pro Tools expands them to new playlists (including the
channel represented in the original track) according to the selected option.
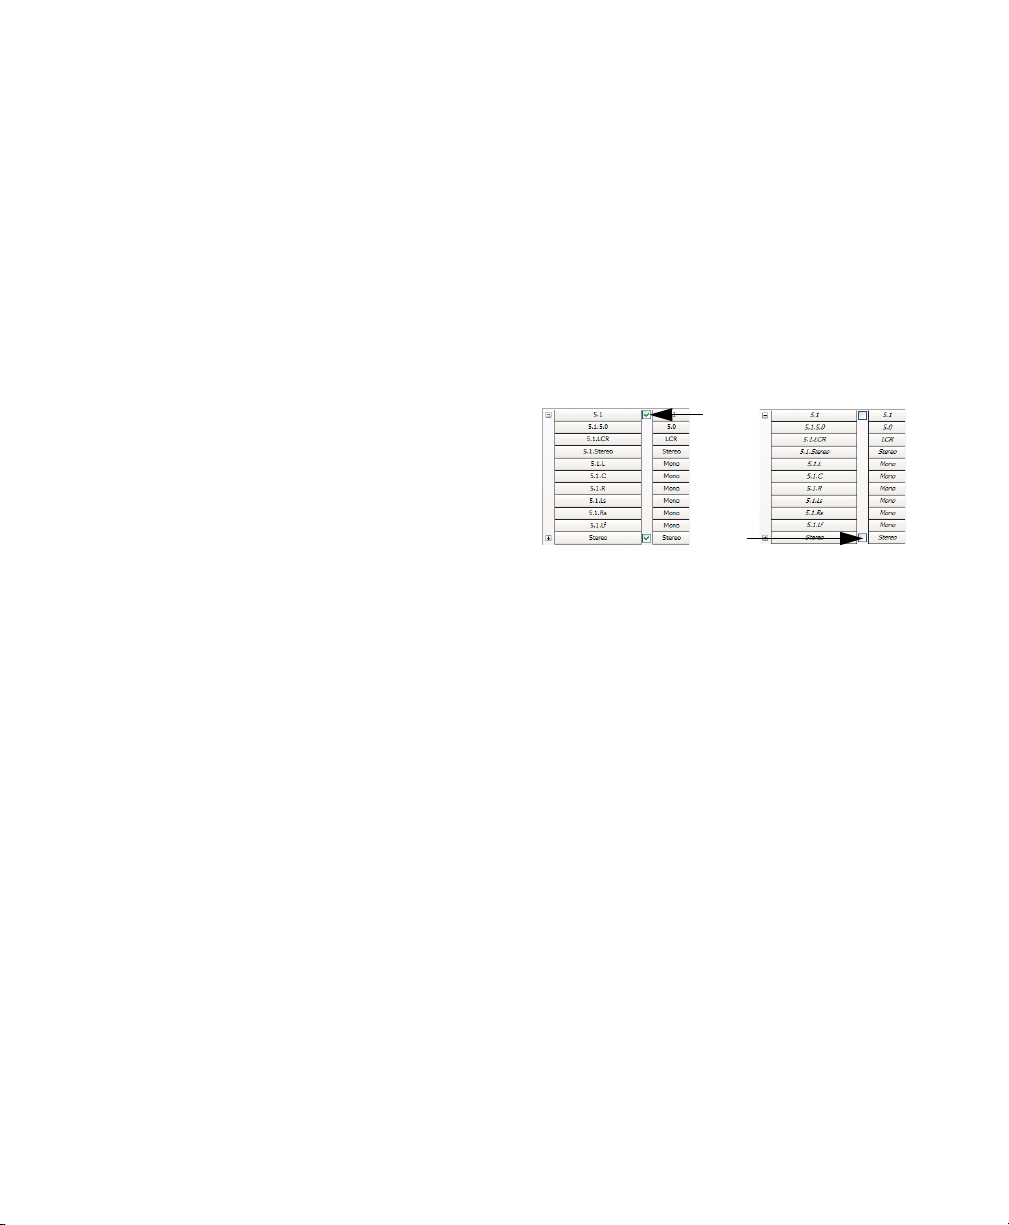
Expanding Channels to New Tracks
To expand alternate channels to new tracks:
1 In the Timeline, do one of the following:
• To expand only a portion of the regions on
the track, make a selection that includes or
overlaps any number of regions on a track,
and Right-click (Windows or Mac) or Control-click (Mac) the selection.
– or –
• To expand all of the regions on the track,
Right-click (Windows or Mac) or Controlclick (Mac) the track name.
2 Choose the Expand Channels to New Tracks
pop-up menu, and select one of the following
methods by which to expand alternate channels
for the selection to new tracks:
• By Channel Name
• By Channel Number
• By Channel Name and Number
• By Time Code Only
If alternate channels are available, Pro Tools expands them to new tracks (including the channel represented in the original track) according
to the chosen parameters.
It is not possible to rename files encoded
with XML metadata. The file extension will
always be .A1 and .A2 (even for stereo
files). Also, it is not possible to rename files
with a .L/.R suffix. As a result, Pro Tools
does not always recognize these channels as
a stereo pair.
Expanding Channels by Time Code Only
The Expand To New Tracks By Time Code Only
command lets you expand an entire track or
only selected regions to new playlists on the
same track or to new separate tracks, thus revealing all other regions recorded at the same time
code location, regardless of channel name or
number. This is especially useful when expanding edited guide tracks to original source audio
that was recorded while referenced to time code,
but where channel names or numbers were not
written to the audio files.
Example Workflow: Working with a Guide Track for
Live Concert Videos
1 Multitrack audio is recorded in Pro Tools
while chasing time code. A mono or stereo mix
is recorded simultaneously as a guide track for
the video editor.
2 The picture and audio guide tracks are edited
in a video editing application.
3 The edited audio guide tracks are exported
from the video editor as an AAF (or OMF) sequence, including handles of at least 2 frames.
4 The AAF (or OMF) sequence is imported into
Pro Tools as a new session. The original source
audio files and unedited guide track are also imported into the session.
5 The original unedited guide track is relinked
to the session (see “Relinking the Original
Unedited Guide Track” on page 32).
6 The Pro Tools editor Right-clicks the name of
the guide track and selects Expand Channels to
New Tracks > By Time Code Only. The original
source tracks expand to new tracks with edits
and fades that match the guide track.
Chapter 5: Editing Features 31
Page 38

Relinking the Original Unedited Guide Track
After importing the AAF (or OMF) sequence and
original source audio files into the session, it is
recommended that you relink the edited guide
track to the original unedited source audio.
To relink the original unedited guide track:
1 Open the Project Browser for the session and
open the Audio Files folder.
2 Right-click the edited guide track audio file in
the browser and choose Relink Selected.
3 In the upper pane of the Relink window, nav-
igate to the original unedited guide track audio
file that was recorded in Pro Tools.
If the original unedited file is not available,
you can relink to any of the source audio
files as long as they have the same start and
end times as the guide track.
4 In the Select Files To Relink pane, select the
edited guide track file.
5 Drag the original unedited guide track audio
file into the Candidates pane. If a dialog appears
stating that one or more files are shorter than
the media file you are trying to relink, click Yes
to select it for relinking anyway.
6 Check the box to the left of the file in the Can-
didates pane so that the Link icon appears.
7 Click Commit Links at the top of the Relink
window and then close the Relink window.
8 You can now Right-click the name of the guide
track and select Expand To New Tracks > By Time
Code Only. All expanded tracks should be syn-
chronous with the guide track.
Complete Production Toolkit Guide32
Page 39

chapter 6
Beat Detective Features
Complete Production Toolkit enables additional
Beat Detective features for working in Pro Tools.
For more information about other Beat Detective features, see the Pro Tools Reference
Guide.
Separating Multiple Tracks
You can use beat triggers from a single track, or
subset of tracks, to separate a group of tracks.
In the following example, the defined selection
is a drum loop consisting of two bars of 5/4. The
kick, snare, hi-hat, and overhead microphones
are recorded to separate tracks.
Analyzing the loop’s kick drum track, with Detection Resolution set to Beats, Beat Detective
places beat triggers at the transients on beats 1
and 4 (see Figure 2).
Extending the selection to the snare, hi-hat, and
overhead microphones tracks, and then performing the separation, results in separated regions in each of the drum tracks at the same location, based on the beat triggers from the kick
drum track (see Figure 3).
Figure 3. Kick drum, snare, hi-hat, and overhead
microphones tracks
The separated regions can then be conformed as
a group.
Figure 2. Kick drum track
You can also utilize Collection mode when
working with multiple tracks. Collection mode
lets you analyze and detect triggers on tracks individually, and if you choose, add only the
Chapter 6: Beat Detective Features 33
Page 40

unique triggers from the current track to the
overall collection. For more information, see
“Detection (Normal) and Collection Mode” on
page 34.
Detection (Normal) and Collection Mode
In some instances, it may be difficult for Beat
Detective to successfully analyze multiple tracks
with the same Detection settings. With Beat Detective’s Collection mode, you can collect a set
of beat triggers from different tracks, each with
different Detection settings, and use the collection of triggers to generate Bar|Beat Markers or
DigiGroove templates, or separate new regions.
Collection mode is the only way to analyze and
create beat triggers on one track, and apply
them to another track.
This method of selectively adding beat triggers
from separate analysis passes on different tracks,
until you get only the triggers you want, is potentially much more effective than manually deleting, inserting, or adjusting incorrect or false
triggers.
the selection to the other drum tracks and separate them, the regions from the kick, snare, and
tom tracks will be cut slightly late (see Figure 4
below).
Figure 4. Overhead mics generate late beat triggers
Using Collection mode, you can analyze each
drum track separately, one at a time, optimizing
the Detection settings for each track until you
get the triggers you want. The triggers for each
track can be added successively to the collection, or you can choose to collect only the
unique triggers from a track. The collection of
triggers that results can then be used to generate
Bar|Beat Markers or a DigiGroove template, or
separate new regions.
Using Collection Mode
Drum Tracks and Collection Mode
Suppose you have drum tracks for kick, snare,
hi-hat, and overhead mics. If you analyze a selection across all of the tracks, you may get
many false triggers when you raise the Sensitivity slider high enough to capture the hi-hat material (coming mainly from the tracks for the
overhead mics).
However, if you analyze only the track for the
overhead mics, the resulting beat triggers are
slightly later than the material on the other
tracks (since it will take more time for the sound
to reach the overhead mics). If you then extend
Complete Production Toolkit Guide34
Collection mode is available in Bar|Beat Marker
Generation, Groove Template Extraction, or Region Separation mode (audio only), and is accessed by clicking the Collection Mode button
in the Detection section.
Beat Detective, Collection mode options
Page 41

To use Collection mode:
1 In the Edit window, make an audio selection
on a single track. Make sure the selection’s start
and end points fall cleanly on the beat.
2 In the Beat Detective window, select one of
the following modes:
• Bar|Beat Marker Generation
• Groove Template Extraction
• Region Separation (audio only)
3 Define or capture the selection.
4 Configure the Detection options so the selec-
tion’s peak transients are accurately detected.
5 Click the Collection Mode button.
6 In the Detection (Collection Mode) section,
click Add to add all the current beat triggers to
the collection.
7 Click the Normal Mode button and move the
selection to the next track you want to analyze.
Make sure to keep the selection range constant
for each track.
Press Start+P (Windows) or Control+P
(Mac) to move the selection up, or
Start+Semicolon (Windows) or Control+Semicolon (Mac) to move the selection
down.
10 Do one of the following:
• In the Detection (Collection Mode) section, click Add Unique Triggers to add only
the unique triggers from the track to the collection.
• Click Add All to add all triggers to the collection.
• Click Clear All to clear all triggers from the
collection.
Each new set of triggers added to the collection
appears in a different color. If successive triggers
in the collection are located closely together (for
example, because of microphone leakage), Beat
Detective keeps only the earlier triggers (see
Figure 5 on page 36).
11 Repeat steps 7–10 for each additional track
you are analyzing.
The beat triggers stored in the Collection mode
are saved with sessions. Therefore, when a session is opened later, the previous collection material is still there (until it is cleared).
12 Once the desired beat triggers have been
added to the collection, you can use them to
generate Bar|Beat Markers or a groove template,
or separate regions. However, this must be done
from the Collection Mode section (when the
triggers are displayed in multiple colors).
With Commands Keyboard Focus enabled,
press “P” to move the selection up, or Semicolon (;) to move the selection down. Hold
down the Shift key to retain and add to the
current selection. (See the Pro Tools Reference Guide for information on enabling
Commands Keyboard Focus.)
8 Configure the Detection options so the selec-
tion’s peak transients are accurately detected.
9 Click the Collection Mode button again.
To separate regions across multiple tracks,
make sure to extend the selection to any additional tracks before separating.
Chapter 6: Beat Detective Features 35
Page 42
Figure 5. Overhead mic track displaying a collection of beat triggers containing unique triggers generated from the
1. Beat triggers
detected in Kick track
added to collection
2. Unique beat triggers
detected in Snare track
added to collection
3. Unique beat triggers
detected in Hi-hat track
added to collection
4.Collected beat triggers
applied to Overhead
microphones track
kick, snare, and hi-hat tracks
Complete Production Toolkit Guide36
Page 43

chapter 7
Mixing and Automation Features
Complete Production Toolkit enables additional
mixing and automation features in Pro Tools LE.
For more information on mixing and working with automation in Pro Tools, see the
Pro Tools Reference Guide.
Creating Snapshot Automation
Pro Tools lets you write automation data values
for multiple parameters in a single step. You can
write snapshot automation in two ways:
To a Selection Automation data is written to the
Timeline selection (as well as the Edit selection if
linked). Anchor breakpoints are placed just before and after the selection so that data outside
the selection is not affected.
To a Cursor Location Automation data is written
at the insertion point. After the insertion point,
the automation ramps to the next breakpoint
value, or if no breakpoints exist, remains at the
newly written value for the remainder of the session.
For MIDI automation, the Write To, Trim
To, and Glide To commands only apply to
MIDI Volume, MIDI Pan, and MIDI Mute.
MIDI parameters cannot use the Write To
commands.
To write snapshot automation:
1 In the Automation window, make sure that
the parameters you want to edit are write-enabled. Deselect any parameters whose automation you want to preserve.
2 In the Edit window, click the Track View selec-
tor to show the automation you want to edit.
3 Write a breakpoint in the playlist if none cur-
rently exists, as follows:
• Place the cursor in the playlist (or make an
Edit selection), then choose Control+F or
ward Slash (/) (Windows) or Command+F
or ward Slash (/) (Mac).
– or –
• Select the Grabber tool and click anywhere
in the playlist.
4 Do one of the following:
• Select an area in the track’s playlist (or
within multiple tracks) where you want to
apply the automation.
– or –
• Place the cursor at an Edit insertion point.
5 Adjust the controls you want to automate.
You can also change a plug-in preset.
Chapter 7: Mixing and Automation Features 37
Page 44

6 Choose Edit > Automation and do one of the
following:
• To write the current value to only the currently displayed automation parameter,
choose Write to Current.
– or –
• To write the current settings for all automation parameters enabled in the Automation
window, choose Write to All Enabled.
Adding Snapshot Automation to Empty Automation Playlists
When you use a Write Automation command on
an automation playlist with no previously written automation data, the selected value is written to the entire playlist and not just the selected area.
This is because a playlist with no automation
data contains only a single automation breakpoint that corresponds to the current position of
the control for the parameter. The position of
the breakpoint is updated whenever the parameter value is changed.
If you do not want the Write Automation com-
mand to write the selected automation value to
the entire playlist, you can:
• Anchor the automation data by placing the
cursor at the end of the session (or any other
end point) and choosing Write to Current.
– or –
• Click with any Grabber tool on each side of
the selection.
This lets the Write Automation command write
only to the selected area.
Writing Snapshot Automation over Existing Automation Data
When you move the playback cursor, the automated controls in Pro Tools update to reflect the
automation data that is already on the track. To
keep the settings you have made for a snapshot,
you can suspend automation parameters to prevent them from updating.
To write snapshot automation over existing data:
1 In the Automation window, make sure that
the automation parameters you want to edit are
write-enabled. Deselect any parameters whose
automation you want to preserve.
2 Adjust the controls for the parameters you
want to automate.
3 Click the Automation Mode selector and se-
lect Off mode for the tracks where you want to
apply the automation.
4 With the Selector, select the range where you
want to apply the automation.
5 Choose Edit > Automation and select one of the
following from the submenu:
• To write the current value to only the automation parameter currently displayed in
the Edit window, choose Write to Current.
– or –
• To write the current settings for all automation parameters enabled in the Automation
window, choose Write to All Enabled.
6 Click the Automation Mode selector and se-
lect Read mode for the tracks you want to play
back with automation.
Complete Production Toolkit Guide38
Page 45

Capturing Automation and Applying it Elsewhere
The Write Automation commands can also be
used to capture automation states at specific locations in a track and apply them to other locations in the track.
To capture and apply automation:
1 In the Automation window, make sure that
the automation parameters you want to edit are
write-enabled. Deselect any parameters whose
automation you want to preserve.
2 Click the Automation Mode selector and se-
lect Read mode for the tracks that have automation you want to capture.
3 Ensure that Options > Link Timeline and Edit Se-
lection is selected.
4 With the Selector tool, select the location
where you want to capture automation. All automated controls update to reflect the automation at that location. (If you make a selection,
the controls update to reflect the automation at
the beginning of the selection.)
5 In each track you want to apply the captured
automation, click the track’s Automation Mode
selector and set the Automation mode to Off.
6 With the Selector tool, select the location
where you want to apply the automation.
7 Enable the automation parameters previously
suspended.
8 Choose Edit > Automation and select one of the
following from the submenu:
• To write the current value to only the automation parameter currently displayed in
the Edit window, choose Write To Current.
– or –
• To write the current settings for all automation parameters enabled in the Automation
Enable window, choose Write To All Enabled.
9 Click the Automation Mode selector and se-
lect Read mode for the tracks you want to play
back with automation.
Snapshot Automation and Trimming of Automation Data
Pro Tools lets you use trim values as snapshots
and apply the relative changes (delta values) to
the selected automation by using the Trim Automation command. This works in much the same
way as the Write Automation command, except
that it writes delta values instead of absolute values to automation data.
You can use trim values in writing snapshot automation to any automatable parameter.
To create a snapshot of relative changes in
automation data:
1 In the Automation window, make sure that
the automation parameters you want to edit are
write-enabled. Deselect any parameters whose
automation you want to preserve.
2 Select the area of the track you want to edit.
All automated controls update to reflect the automation at the beginning of the selection.
3 Move the controls for the parameter up or
down by the amount you want to change the
data.
Chapter 7: Mixing and Automation Features 39
Page 46

4 Choose Edit > Automation and do one of the
following:
• To write the current delta value to only the
currently displayed automation parameter,
choose Trim to Current.
– or –
• To write the current delta value for all automation parameters enabled in the Automation window, choose Trim to All Enabled.
Glide Automation
The Glide Automation commands let you manually create an automation transition (or glide)
from an existing automation value to a new one,
over a selected area.
When gliding multiple parameters at the
same time, such as with the Surround Panner or plug-ins, use the Edit > Automation >
Glide to All Enabled option.
For MIDI automation, Glide To commands
only apply to MIDI Volume, MIDI Pan, and
MIDI Mute. MIDI parameters cannot use
the Write To commands.
To apply a Glide Automation to the current
automation parameter type:
1 In the Automation window, make sure the au-
tomation type is write-enabled.
2 Click the Track View selector to choose the au-
tomation type you want to automate.
3 Drag with the Selector tool in the track to se-
lect the area you want to write the glide to.
4 Change the automation parameter to the
value you want at the end of the selection. For
example, to glide automation volume to –Infinity, move the Volume fader to –Infinity.
5 Choose Edit > Automation > Glide to Current.
You can also press Alt+Forward Slash (/)
(Windows) or Option+Forward Slash (/)
(Mac).
To do a Glide Automation to all current enabled
parameters:
1 In the Automation window, make sure the au-
tomation types are write-enabled.
2 In each track you want to automate, click the
Track View selector and select from the pop-up
menu the automation type you want to automate.
3 With the Selector tool, drag horizontally to in-
clude all the tracks you want to automate in a selection (drag vertically to define the time range).
4 In each track you want to automate, change
the automation parameter to the value you
want at the end of the selection.
5 Choose Edit > Automation > Glide to All Enabled.
You can also press Alt+Shift+Forward Slash
(/) (Windows) or Option+Shift+Forward
Slash (/) (Mac).
Complete Production Toolkit Guide40
Page 47

Glide Automation Considerations
When Glide Automation is applied to automation data, it behaves as follows:
• When a selection is made, automation breakpoints are written at the start and end points
of the Glide Automation. The automation
value at the start of the selection is the start
point of the Glide Automation and the end of
the selection is the end point of the Glide Automation. The Glide Automation that is created between the two is based on the length of
the selection and the end value that is selected.
• If automation breakpoints follow the selection, they are not changed, but the value selected for the end of the selection is written
from the end point up until the next breakpoint.
• If no automation breakpoints follow the selection, the value selected for the end of the selection is written to the end of the track.
• If no selection is made, a breakpoint is written
to the current location, and the value selected
for the Glide Automation is written to the
next breakpoint.
Chapter 7: Mixing and Automation Features 41
Page 48

Complete Production Toolkit Guide42
Page 49

chapter 8
Surround Features
Pro Tools LE with Complete Production Toolkit
supports surround mixing. Pro Tools supports
mixing in the following multichannel (greater
than stereo) formats: LCR, Quad, LCRS, 5.0, 5.1,
6.0, 6.1 and 7.1.
Pro Tools LE with the Complete Production
Toolkit option and 003, 003 Rack, 003 Rack+,
Digi 002, or Digi 002 Rack can monitor mixing
in surround up to 7.1.
Pro Tools LE with the Complete Production
Toolkit option and Mbox 2 Pro can monitor
mixing in surround up to 5.1.
With Complete Production Toolkit, you can
open surround sessions on any Pro Tools LE system. Use the Neyrinck SoundCode Stereo down
mixer plug-in for monitoring surround sessions
in stereo with Pro Tools LE interfaces that have
fewer than six outputs. For more information,
see the SoundCode Stereo Guide.
Low Latency Monitoring is unavailable in
surround sessions.
For information on fundamental surround
concepts, see the Pro Tools Sync & Surround
Concepts Guide.
Pro Tools Audio Connections for 5.1 Mixing
While all 5.1 mixing formats provide the same
speaker arrangement, there are three primary
standards in use for the track layout of the individual channels that comprise the 5.1-format
multichannel mix.
In the following table, it is assumed that surround channels are mapped to outputs 1–6 of a
Pro Tools audio interface. Use channels 7–8 to
monitor a stereo mix for a stereo version, or for
cue mixes and monitoring.
Table 1. Track Layouts for 5.1 Formats
Formats Track Layout
123456
Film
(Pro Tools
default)
or C24
SMPTE/ITU
for Dolby
Digital (AC3) or
Control|24
DTS
or ProControl
LCRLsRsLFE
LRCLFELsRs
LRLsRsCLFE
Chapter 8: Surround Features 43
Page 50

To connect your audio interfaces for 5.1 format
mixing and monitoring:
1 Determine the 5.1 format and track layout
you want to use.
2 Connect the output channels of your audio
interface to the corresponding input channels of
your monitoring system according to the assignments listed in Table 1 on page 43.
If you use a Digidesign control surface, see
its guide for more information.
Configuring Pro Tools for Multichannel Sessions
Configuring Pro Tools and sessions for multichannel mixing can be done in any (or all) of
the ways described in this section.
New Sessions
You can create a new session and choose a surround mix I/O Settings file as the default
I/O Setup. See “New Sessions and I/O Settings”
on page 44.
Remixing Sessions in Surround (Importing
Multichannel I/O Setups)
Custom Multichannel Paths
You can customize and redefine existing paths
in the I/O Setup dialog. For more information,
see “Custom Multichannel Paths” on page 46.
Importing Session Data
By using the Import Session Data command
(File > Import > Session Data), you can import
tracks and media from other sessions plus their
associated paths and track assignments. After
importing session data, you can use the
I/O Setup dialog to configure main and subpaths for the requirements of the session.
For more information, see the Pro Tools Reference
Guide.
New Sessions and I/O Settings
When you create a new session, you can specify
a surround format that you want to use as your
I/O Setup. Default path configurations are provided as I/O Settings files, for stereo and surround mixing.
Once you create the new session, you can create
and import tracks, import audio, and assign signal routing to set up your mix.
By creating or importing a surround mix I/O Settings file in the I/O Setup dialog, multichannel
paths can be made available in any stereo (or
other format) session. You can then reassign
track routing from the original stereo paths to
multichannel paths. Inactive and active paths
simplify reassignment. See “Importing Multichannel I/O Setups” on page 46.
Complete Production Toolkit Guide44
Page 51

To create a new session for multichannel mixing:
1 Choose File > New Session.
2 Select the Create Blank Session option.
3 Select the Audio File Type, Sample Rate, and Bit
Depth as desired.
New Session dialog, 5.1 Film Mix I/O setting selected
4 From the I/O Settings menu, select one of the
following options:
• 5.1 Film Mix
• SMPTE/ITU
• DTS/ProControl Monitoring
5 Click OK.
6 In the Save dialog, name the session, navigate
to the location where you want to save the new
session, and click Save.
The surround presets preconfigure the I/O Setup
dialog for the new session with default 5.1 format main and sub-paths for outputs and busses.
Standard 5.1 format (film) output paths
Surround Mix Settings Files
The surround mix I/O Settings provide output
and bus paths for three specific track layout
standards in the new session. (For information
on inputs and insert paths, see “Default Input
and Insert Paths with 5.1 Settings” on page 46.)
Settings Files and Track Layouts
5.1 Settings Track Layout
Film (Pro Tools Standard, and
C24 Monitoring)
SMPTE/ITU
(Control|24 Monitoring)
DTS (ProControl Monitoring) L R Ls Rs C LFE
Chapter 8: Surround Features 45
L C R Ls Rs LFE
L R C LFE Ls Rs
Page 52

All three 5.1 format I/O Settings (Film,
SMPTE/ITU, or DTS) provide the following default output and bus paths for the new session:
Default 5.1 Output Paths
• One 5.1 main output path, with sub-paths
for 5.0 (no LFE), LCR, Left/Right (stereo),
and Center (mono).
– and –
• One stereo main path with two mono subpaths.
Default 5.1 Bus Paths
• One 5.1 main bus path, with sub-paths for
5.0 (no LFE), left/right (stereo), LCR, and
center (mono).
– and –
• One stereo main path with two mono subpaths.
Default Input and Insert Paths with 5.1 Settings
The 5.1 Mix settings files provide default stereo
main paths and mono sub-paths for inputs and
inserts. If you need multichannel input paths or
inserts, you can create them in the I/O Setup dialog (see “Custom Multichannel Paths” on
page 46).
Importing Multichannel I/O Setups
The I/O Setup dialog can import and export settings files. Importing I/O Setup settings files is
useful when you want to remix a stereo session
in surround. You can also use this feature to prepare a session for transfer to a different Pro Tools
system, or to simply save and exchange
I/O Settings.
To import a multichannel I/O Setup settings file:
1 Choose Setup > I/O.
2 Click Import Settings.
3 Select the settings file (.pio) to import and
click Open.
4 If the current session has existing path defini-
tions that do not match those in the imported
settings file, Pro Tools asks whether you want to
delete the existing paths or retain them and add
the imported settings to your session.
• Click No to add new paths to your current I/O
Setup configuration.
• Click Yes to replace your current I/O Setup
configuration with the imported settings.
5 Click OK to close the I/O Setup.
Exporting I/O Settings
Exporting I/O Setup settings files lets you build a
library of multichannel setups for different
projects.
To export an I/O Setup settings file:
1 Choose Setup > I/O.
2 Click Export Settings.
3 Name and Save your current I/O Settings.
Custom Multichannel Paths
The I/O Setup dialog lets you create and customize signal paths for any supported multichannel
mixing format.
Multichannel paths and sub-paths are mapped
to inputs, outputs or internal busses in the
Channel Grid. When you select a preset 5.1
I/O Settings file, default layout for the corresponding multichannel format paths you create
will match the selected format’s track layout.
Complete Production Toolkit Guide46
Page 53

In addition, the I/O Setup dialog, like the Main
page of the Hardware Setup dialog, provides
controls for routing the physical inputs and outputs on your audio interface to available inputs
and outputs in Pro Tools.
When creating 5.1 format paths, you can
specify the default track layout. See “Default Path Order for 5.1 Tracks” on
page 48.
Remapping Channels
The I/O Setup dialog and its Channel Grid also
let you remap channels. This is especially useful
to route channels within a multichannel path,
without having to repatch your audio interfaces.
You can remap paths to any required configuration, limited only by your systems resources,
and the I/O Setup dialog requirements for channel overlapping and naming.
See also “Example Paths and Signal Routing for a Surround Mix” on page 57.
Example LCRS Setup
The following example shows one possible way
to configure the I/O Setup dialog to mix in
4-channel LCRS format, with a 003.
2 Click New Path.
3 Select LCRS from the Path Format selector.
4 Name the path LCRS.
5 In the Channel Grid, click in the box below
the first (left-most) audio interface channel for
the path. Pro Tools automatically fills up the adjacent units to the right. If you click in the LCRS
row under channel 1, the LCRS path will be
mapped across channels 1–4.
6 Select the new LCRS path and click New Sub-
Path.
7 Name the new sub-path LCR and select LCR as
the Path format. Click in channel 1 in the LCR
row to map the path.
8 Select the LCRS path, click New Sub-Path, and
create a stereo sub-path for front Left and front
Right.
9 Select the LCRS path, click New Sub-Path, and
create a mono sub-path for the Center channel.
10 Select the LCRS path, click New Sub-Path, and
create a mono sub-path for the Surround channel.
11 Click OK to close the I/O Setup.
5.1 Tracks, Formats, Mapping, and Metering
Example LCRS output main and sub-paths
For additional I/O Setup information, see
the Pro Tools Reference Guide.
To define an LCRS path:
1 Choose Setup > I/O, and click the Output tab.
Path definitions in I/O Setup determine how audio is routed through, and metered on, your audio interfaces.
Pro Tools internal (on-screen) metering of 5.1
format paths always follows the Film track layout:
L C R Ls Rs LFE
Chapter 8: Surround Features 47
Page 54

Pro Tools track layout of 5.1 format audio tracks
Default Path Order
I/O Setup Options
in the Edit window also conforms to the Film
layout (arranged top to bottom). See the illustration “5.1 Track Layouts, Routing, and Metering”
on page 49
In the I/O Setup dialog, you can route these signals out of your audio interfaces according to
any track layout (such as DTS or SMPTE/ITU).
To re-map channels in a path:
Click and drag a channel to a new valid loca-
tion in the Grid. Other channel assignments will
move (shuffle) to accommodate dragged channels.
.
Default Path Order Selects the default track layout (or, path order) for new 5.1 format (sixchannel) paths.
Controller Meter Path Selects the path that will
be shown in Digidesign control surface output
meters. See “5.1 Tracks, Formats, Mapping, and
Metering” on page 47 for more information.
Audition Paths Selects the monitoring path for
previewing audio in the Region List, Import Audio dialogs, and DigiBase. Only outputs on your
primary interface can be used as your Audition
path.
New Track Default Output Selects the default
output path for all new tracks, for each supported track format.
Default I/O Selectors in I/O Setup
The Output page of the I/O Setup dialog provides selectors for setting I/O defaults in your
multichannel sessions.
Default selectors in the I/O Setup dialog
The New Track Default Output can be set to
bus paths, as well as output paths.
Default Path Order for 5.1 Tracks
You can specify the default track layout for all
new 5.1 format paths you create.
To choose a new default 5.1-format path order
(track layout):
1 Choose Setup > I/O.
2 Click the Output tab.
3 Use the 5.1 Default Path Order setting to select
the track layout you want (Film, SMPTE/ITU, or
DTS/ProControl Monitoring.
Complete Production Toolkit Guide48
Page 55

5.1 Track Layouts, Routing, and Metering
Channel Map in I/O Setup5.1 Format
Film
SMPTE/ITU
DTS
L C R Ls Rs LFE
(Control|24 Monitoring)
L R Ls Rs C LFE
L C R Ls Rs LFE
Track Meters Tracks
L C R Ls Rs LFE
(top to bottom)
same
L C R Ls Rs LFE
same
same
same
L C R Ls Rs LFE
(left to right)
L C R Ls Rs LFE
(Pro Tools Standard,
(ProControl Monitoring)
L C R Ls Rs LFE
L R C LFE Ls Rs
L R Ls Rs C LFE
L R C LFE Ls Rs
and C24)
Figure 6. Track layout of different 5.1 formats
Routing Audio for Surround Mixing
Surround sessions typically include a combination of mono, stereo, and multichannel audio,
Auxiliary Input, Master Fader, and Instrument
tracks, and inserts and busses.
Once the appropriate I/O Setup has been imported or configured, audio, Auxiliary Input,
Master Fader, and Instrument tracks can be
mixed in multichannel for surround using
Pro Tools mixing features.
Multichannel I/O and signal routing is determined by the paths defined in the I/O Setup dialog.
If you want independent volume, mute, and
solo controls for surround monitoring, you
may want to invest in external surround
monitoring hardware such as Digidesign
™
C|24
.
Multichannel Audio Tracks
Multichannel audio tracks contain an individual channel for each signal in the track (for example, a 5.1 track would have six channels for
left, center, right, left surround, right surround,
and LFE).
Chapter 8: Surround Features 49
Page 56

Multichannel audio tracks can be:
• Recorded directly into Pro Tools, using multiple microphones or microphone arrays, or
routed to appropriate multichannel Pro Tools
Input paths
• Imported from other Pro Tools sessions
• Edited, processed, and mixed in combination
with mono and stereo tracks
5.1 format multichannel audio track
5.1 format audio files and tracks conform to the
Film track layout standard. Regardless of path
mapping in the I/O Setup dialog, all 5.1 format
audio tracks and meters follow the Film standard track layout:
LCRLsRsLFE
Multichannel audio tracks are not required to
mix in multichannel formats. Mono, stereo, and
all supported track formats can be mixed using
Pro Tools track outputs and sends (see “Multichannel Signal Routing” on page 52).
Placing Audio in Multichannel Tracks
You can drag audio files and regions from DigiBase browsers, the Region List, Windows Explorer, or Mac Finder, or from other tracks, to
place them in multichannel audio tracks.
To do so, the number of channels being dragged
must match the destination track format. For
example, you can only drag a stereo pair or two
mono regions onto a stereo audio track. Similarly, you can only place audio into an LCR track
when you have selected three regions. With 5.1
tracks, you must select six mono files or regions.
When dragged into a multichannel track,
audio files are placed from top to bottom in
the exact order that they appear in the Region List or playlist from which they came
(Top to Bottom must be selected for in the
Region List menu > Timeline Drop Order).
For this reason, you may want to rename
audio files before dragging them, so that
they are placed in the preferred order. Rename them so that sorting them By Region
Name in the Region List results in the preferred order. (For example, with a 5.1-format track, you can rename the audio tracks
so that the arrangement of the tracks corresponds to L, C, R, Ls, Rs, and LFE.)
Solo, Mute, and Gain in Multichannel Tracks and Paths
Stereo and multichannel tracks consist of multiple audio signals, linked together. By default,
multichannel tracks are linked and are controlled by a single channel fader, and solo and
mute switches.
For discrete control of signals, multichannel
tracks can be converted into individual mono
tracks. For discrete level and phase adjustment,
you can insert and unlink a multi-mono Trim
plug-in. Both of these techniques are explained
below.
Once converted to mono, multichannel
tracks cannot be relinked into their original
multichannel format. However, a multichannel track can be reassembled by dragging the corresponding number of mono
files (with the appropriate file suffixes) into
a multichannel track, although some automation data may be lost. As an alternative,
record the submix of the mono tracks to disk
on a multichannel track.
Complete Production Toolkit Guide50
Page 57

To convert a multichannel track into discrete
mono tracks:
1 Select the multichannel track.
2 Choose Track > Split Into Mono.
To have discrete control of gain on individual
channels of a multichannel track:
1 Insert a multi-mono Trim plug-in on the mul-
tichannel track.
2 Unlink the Trim plug-in by clicking the Link
icon so that it is unlit.
3 Use the Channel selector to display the con-
trols for a channel, and adjust the gain.
See “Linking and Unlinking Controls on
Multi-Mono Plug-ins” on page 54 for more
information.
Track and Output Formats
When you create new tracks, you specify mono,
stereo, or a supported multichannel format for
the new tracks.
Changing Format
Changing the output format for a given track
has several effects:
• The panner that appears in the track will
change to reflect the new output format.
• It may be necessary for one or more pan related automation playlists to be created or deleted.
Because changing the output format has these
effects, a warning dialog appears whenever you
change the output format of a track to a format
of fewer channels. Specifically, this will occur
whenever automation playlists will have to be
deleted.
Multiple Output Assignments and Track Format
When a track is assigned to more than one path
of differing formats, the main output for that
track will match the format of the assigned path
with the greatest number of channels.
Multiple Outputs and Automation Playlists
In the Mix and Edit windows, the track format
of a track’s output is always visible by the number of track meters contained in its fader strip
(for example, a single meter for mono tracks, a
pair of meters for stereo tracks, and six meters
for 5.1 tracks).
Assigning track output determines the format of
that output. For example, a mono track always
has a single track meter, even when assigned to
a stereo output path. If that same mono track is
assigned to a 5.1 output path, it's output will be
split among those six output channels, depending on the position of its panner.
When a track has multiple output assignments,
Pro Tools sorts panning data appropriately for
each assigned path. For example, if you assign a
mono track to a stereo path and a 5.1 path simultaneously, that track will have a 5.1 panner
in the Mix or Edit window. When you pan the
track, Pro Tools interprets the 5.1 panning
moves into stereo panning moves.
This provides a type of parallel mixing. You can
create a variety of mixes of differing formats all
at the same time by routing your elements to
multiple paths.
Control-Start-click (Windows) or Command-Control-click (Mac) any control in an
Output window to show its automation
playlist in the Edit window and view any
pan automation.
Chapter 8: Surround Features 51
Page 58
Multichannel Signal Routing
This channel’s output path
is multichannel, so the
track provides a multichannel panner
This channel’s main
output path is mono
(“Center music”). It
has a multichannel
send providing a multichannel panner
Multichannel send panner
Mono meter
Mono output format
To mix in a multichannel format, tracks are assigned to multichannel paths.
Additional output assignments can be added by
Start-clicking (Windows) or Control-clicking
(Mac) the Selector tool and assigning another
path.
Tracks can be mixed in surround using the following two methods:
• By setting a track main output to a multichannel path.
• By assigning a multichannel send to route audio to a multichannel path.
Multichannel Sends
All track formats, including mono and stereo, let
you assign one or more multichannel sends.
This provides a multichannel panner in the
Sends View. Sends are also useful to bus tracks
for multichannel plug-in processing.
Figure 7 shows a mono audio track with a 5.1
(6-channel) send (View > Sends A–E > Send A).
Two different ways to configure tracks for multichannel
mixing
Multichannel Track Outputs
Tracks can be routed to multichannel output or
bus paths using the track’s Output Path selector.
This provides a multichannel panner and meter
in the Mix and Edit window I/O View.
Complete Production Toolkit Guide52
Figure 7. A mono audio track with a mono output
format and a multichannel send
Page 59

Pro Tools bussing and submixing features are
available for all channel formats, from
mono/stereo through 8-channel. For examples
of multichannel monitoring, effects processing,
and bussing, see “Mixing with Paths and SubPaths” on page 55. For mono and stereo mix examples, see the Pro Tools Reference Guide.
Multichannel Auxiliary Inputs and Master Faders
A multichannel Auxiliary Input or Master Fader
is used as a return for the multichannel bus.
Sends are useful when you need to create an additional, independent mix simultaneously (perhaps of a distinct format), requiring dedicated
fader, mute, solo, and automation controls.
You can assign Master Faders to main and subpaths. Main paths must match the format of the
Master Fader, and only one Master Fader can be
active and assigned to any single (active) main
or sub-path. A Master Fader cannot be assigned
to a sub-path if its associated main path is already assigned on another Master Fader.
Multichannel Instrument Tracks
Multichannel tracks can be used to monitor and
route multichannel instrument plug-ins or multichannel external MIDI instruments.
Mono, Multi-Mono and Multichannel Plug-ins
Plug-ins can be used in mono, multi-mono, or
multichannel formats.
For information about mono, stereo, and monoin/stereo-out plug-ins, see the Pro Tools Reference
Guide.
Multi-Mono Plug-ins Are designed for use on stereo or greater-than-stereo multichannel tracks.
Multi-mono plug-ins are useful, or required, in
the following situations:
• When a plug-in does not involve multichannel correlated processing (for example, when
applying EQ to select sides of a multichannel
signal)
• When you need to adjust signals within the
multichannel track independently
• When a plug-in does not support multichannel formats
When a multi-mono plug-in is first inserted on a
multichannel track, the plug-in controls are
linked. You can unlink them for independent
adjustment. See “Linking and Unlinking Controls on Multi-Mono Plug-ins” on page 54 for
more information.
Multi-mono plugs-ins can also be inserted on
stereo tracks, to apply unlinked plug-ins on the
left and right channels.
Chapter 8: Surround Features 53
Page 60

Multichannel Plug-ins Are designed for use on
Channel selector
Link Enable buttons
Master Link button
stereo and multichannel tracks that require correlated processing, including stereo and multichannel limiting, compression, and similar effects.
Linking and Unlinking Controls on MultiMono Plug-ins
When a multi-mono plug-in is used on a multichannel track of more than two channels, the
controls are normally linked. Adjusting the
Gain control on one channel, for example, will
adjust it for all channels.
If necessary, you can unlink plug-in controls on
specific channels of a track and edit them independently. You can also selectively link the controls of specific channels.
For example, to apply equal filter cutoffs to the
Ls and Rs (surround) channels in a 5.1 mix, you
could link enable just those channels in an unlinked, multi-mono EQ plug-in. Adjusting the
controls in the plug-in window for either channel (Ls or Rs) adjusts the other, linked channel
as well.
Master Link Button When enabled, links the
controls on all channels of a multi-mono plugin so that they can be adjusted in tandem.
Link Enable Buttons Let you selectively link the
controls of specific channels of a multi-mono
plug-in. Each square represents a speaker channel. The Master Link button must be disabled to
use the Link Enable buttons.
To unlink controls on a multi-mono plug-in:
Deselect the Master Link button. It is lit when
linked, unlit when unlinked.
To access controls for a specific channel:
Select the channel from the Channel selector.
To open a plug-in window for all channels of a
multi-mono plug-in:
Alt-click (Windows) or Option-click (Mac) the
Channel selector.
To link the controls of specific channels:
1 Deselect the Master Link button if it is not al-
ready deselected.
Channel selector and Link controls
Channel Selector Accesses a specific channel
within a multichannel track for plug-in parameter editing. This menu appears only on multimono plug-ins inserted on tracks with more
than two channels.
Complete Production Toolkit Guide54
2 Click the Link Enable buttons for the channels
whose controls you want to link.
For more information on using plug-ins, see
the Pro Tools Reference Guide.
Page 61

Paths in Surround Mixes
Because Pro Tools provides a flexible routing
and submixing environment, you can maximize
your system’s available resources by first identifying the elements that you want to pan dynamically and those that can be placed in certain
channels only (see “Mixing with Paths and SubPaths” on page 55).
Once you have identified these elements in your
session, you can use a combination of main and
sub-path assignments, and multichannel panning.
When to Assign Multichannel Outputs
Assign 5.1 paths only to those tracks that need
to be panned to all six channels.
For example, a sound effects track with a jet flyover should be assigned a 5.1 path to be able to
fly the sound from front-to-back. In a music
mix, you can fly a solo instrument or make a
synth pad swirl around the room as a special effect.
Elements that need to be heard in all speakers simultaneously can also be assigned to the multichannel output, whether or not they require active panning in the sound field.
Mixing with Paths and Sub-Paths
It is rare that every track needs to be “flown” (actively panned in between more than a pair of
speakers). In most situations, certain elements
are placed in certain speakers and remain there,
providing the foundation for a mix.
Figure 8 on page 56 illustrates an example of
how panning and signal routing can be combined in a multichannel mix. The following sections describe how to organize your session and
signal routing to maximize the available resources.
See “Extending Stereo Mixing Conventions
to Surround Mixing” on page 58 for related
information.
When to Use Sub-Paths
To help simplify large sessions, use sub-paths
to route static (or, stationary) elements directly
to the output channel or channels.
For example, film dialog is often mixed to the
center channel to anchor this essential sound element to the picture. Instead of assigning a sixchannel panner to dialog tracks and panning
the tracks to the center speaker only, you can
route the dialog track’s main output to a mono
(Center) sub-path.
Chapter 8: Surround Features 55
Page 62
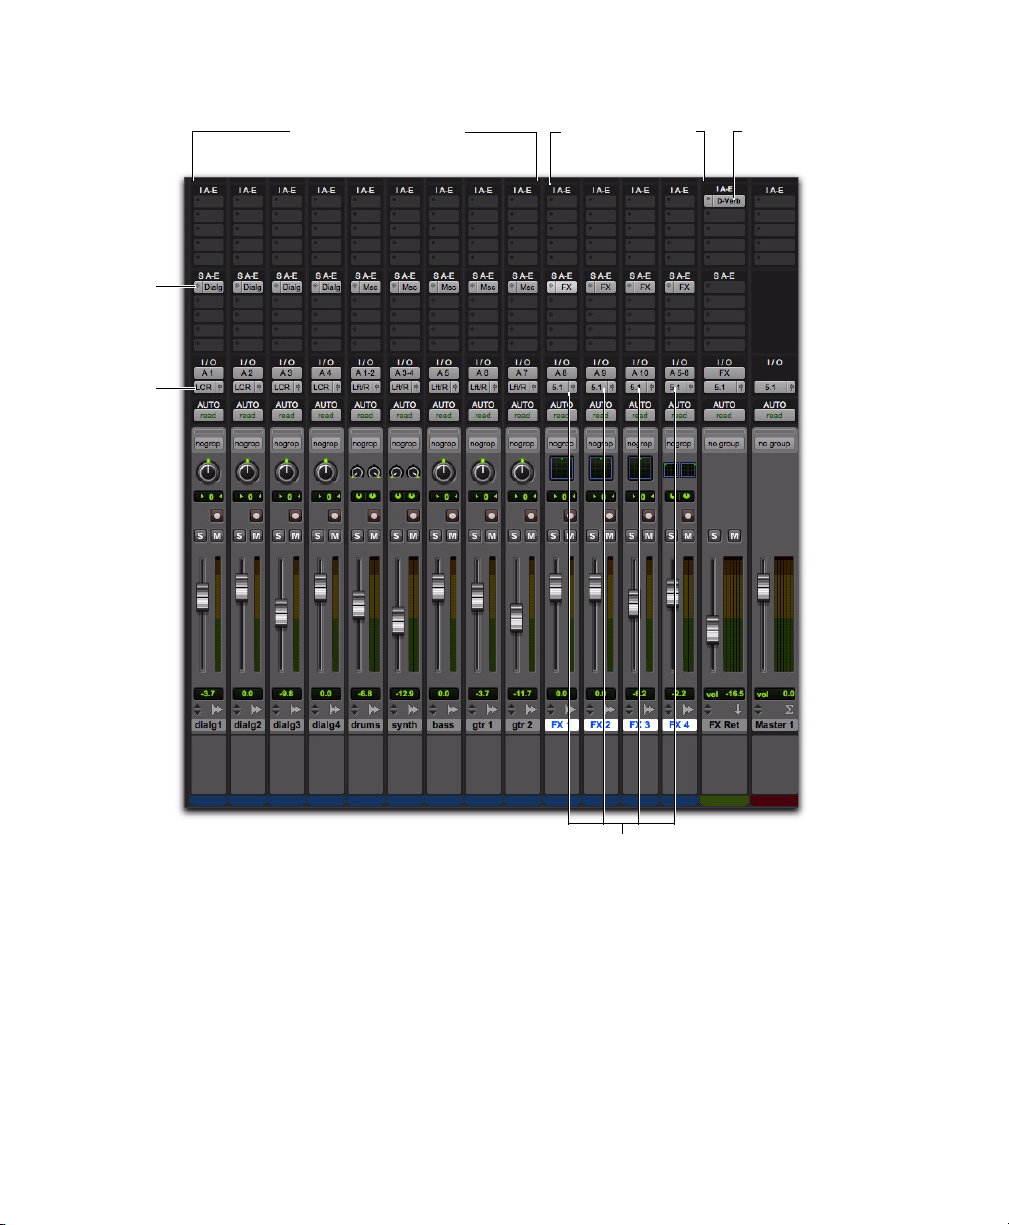
Effect bus
routing
Outputs to
sub-paths
Outputs to main 5.1 path for surround panning
Tracks routed to main
5.1 surround path
Tracks routed to subpaths
Auxiliary Input
routed to main
5.1 surround path
Figure 8. Using signal routing and sub-paths to mix in surround
Complete Production Toolkit Guide56
Page 63
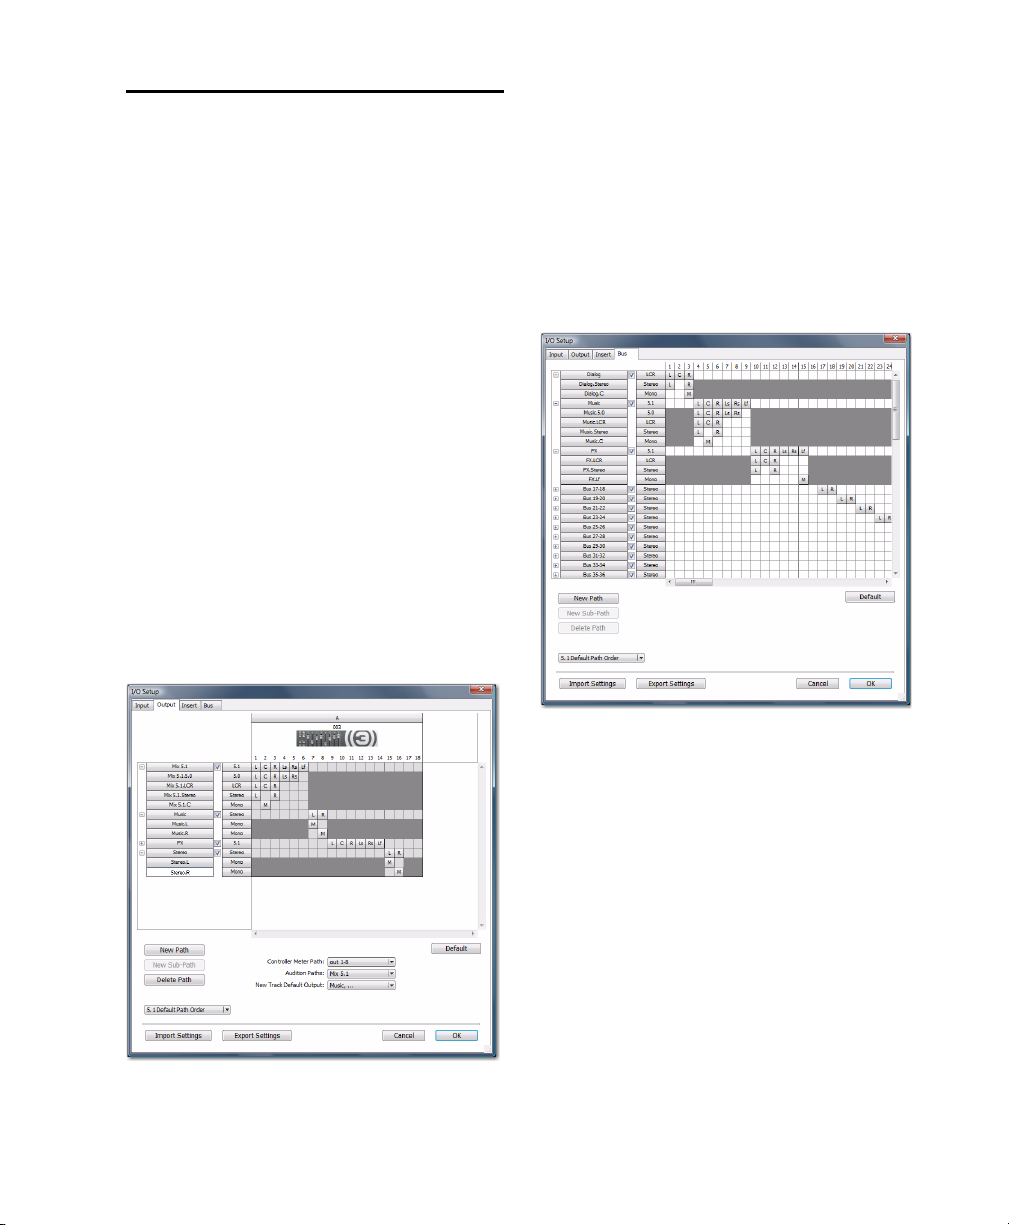
Example Paths and Signal Routing for a Surround Mix
The examples that follow show how Auxiliary
Inputs, Master Faders, and other Pro Tools signal routing features can be used for stem mixes,
submixes, and similar project needs.
Sub-paths have been defined for Mix, Music,
and FX main output paths.
Additional stereo output paths, with mono subpaths, have also been defined for the remaining
channels.
Example Bus Paths
In these examples, music and effects are being
mixed for a trailer, in 5.1 surround. Separate
stem mixes (for music and for effects) are to be
mastered to 8-track MDM.
Example Multichannel Paths
Signal routing is the key element in any
Pro Tools surround session. Signal routing is
configured and defined in the I/O Setup dialog.
Example Output Paths
Figure 9 shows output paths defined in the I/O
Setup dialog of an example session that was created a 003.
Figure 10 shows example bus paths.
Figure 10. I/O Setup, example bus paths
An LCR format path (“Dialog”) and two 5.1 format paths (“Music” and “FX”) have been defined, each with several sub-paths.
Figure 9. I/O Setup, example output paths
Chapter 8: Surround Features 57
Page 64

Example Sub-Paths
Sub-paths let you route to selective channels
within the multichannel surround output. In
Figure 11, the Mix 5.1 bus has several sub-paths
that show this.
Extending Stereo Mixing Conventions to
Surround Mixing
Stereo mixing sets the precedent for active and
static panning, and surround mixing can benefit from the same basic principles.
Panning a sound back-and-forth between the
left and right speakers is best used as a special effect. In a typical music mix, the basic tracks are
placed in the stereo sound field and remain
there.
Figure 11. I/O Setup, example sub-paths
5.0 Sub-Path The 5.0 path is a 5-channel subpath. Use this type of sub-path routing to conserve mixing resources with tracks you want to
keep out of the LFE channel.
LFE Path A custom LFE sub-path (“Lf”) has been
added to provide a discrete mono path for the
LFE channel.
Signal Routing Examples
The following examples show how main and
sub-paths can be used, using an example session
consisting of a 5.1 main mix, with music and effects stems (or submixes).
Submix Stem Examples
Figure 12 on page 59 shows a routing configuration for an effects submix. Two tracks are routed
to stereo bus sub-paths, while others are assigned to an LCR and a mono bus sub-path. Two
tracks (one mono, one stereo) are assigned to
multichannel busses for surround panning. A
5.1 Auxiliary Input assigned to the FX main bus
path serves as a submixer.
Surround mixes can become incoherent if too
many elements are continuously moving, For
special effects, some tracks can be panned dy-
namically, bouncing between speakers or sweeping from one side to the other.
Figure 13 on page 59 shows a routing configuration for music tracks.
Complete Production Toolkit Guide58
Page 65
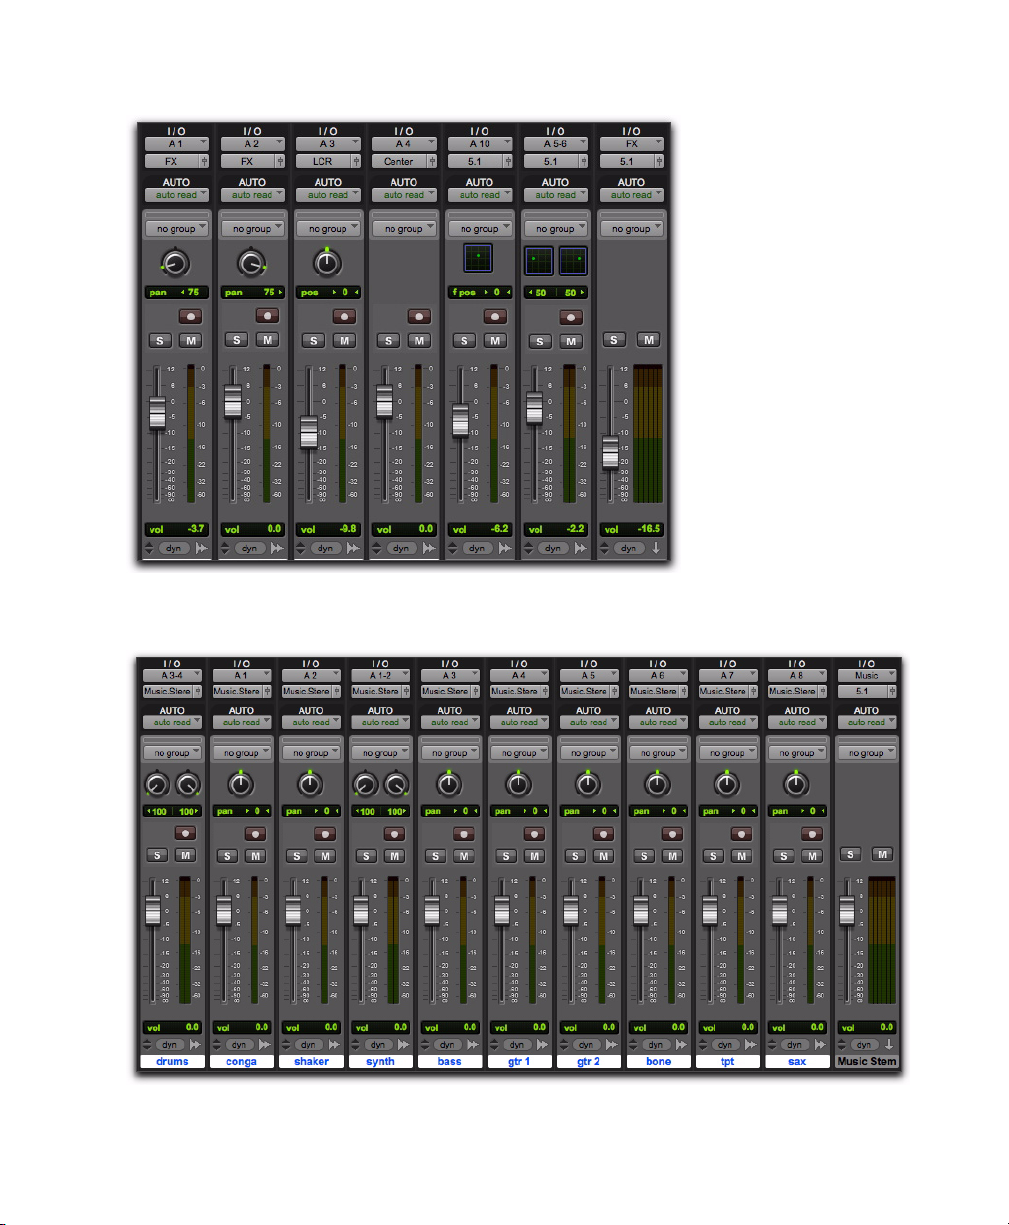
Figure 12. FX stem
Figure 13. Music stem
Chapter 8: Surround Features 59
Page 66

Most of the music tracks in this example are
LFE fader
routed to the front left/right channels, using a
stereo sub-path. A 5.1 Auxiliary Input controls
the bus and stem output.
Multiple Output Assignments
Multiple output assignments make it possible to
configure a number of multi-format mixes. For
example, you can assign an additional stereo
output to tracks and create a stereo mix at the
same time as a 5.1 mix.
LFE Examples
LFE tracks and other audio can contribute to the
LFE output in two ways:
• Using the LFE fader in Output windows. This
LFE signal is post-fader.
– or –
• Using a custom sub-path to route channels
discretely.
Figure 14 shows a channel Output window,
sending and metering to the LFE channel.
Figure 14. LFE contribution from a stereo output
Using the LFE fader, you can add any amount of
any multichannel path to the overall LFE output. In the above example, the track’s Center
percentage has been turned off, and the LFE
fader has been raised to route it to the LFE channel.
Complete Production Toolkit Guide60
Page 67

Main output
to mono
LFE channel
Figure 15 shows how a “traditional” LFE track
can be routed to only the LFE channel. This example uses a custom-defined LFE sub-path to
the FX main bus path.
Figure 15. Discrete LFE routing
LFE faders can follow Mix and Edit Groups.
For instructions on how to create a subpath, see “Custom Multichannel Paths” on
page 46.
LFE and Filtering
Pro Tools applies no filtering to LFE signals.
Some delivery requirements may require filtering for the LFE track. For more information, see
the Pro Tools Sync & Surround Concepts Guide.
Introduction to Pro Tools Surround Panning
There are four different track panning methods
available:
• In the Edit window, using the reduced-height
Panner Grid in the I/O View
• In the Mix window, using the reduced-height
Panner Grid
• In the Output window, using the full-size
Panner Grid
• Through pan automation editing
Control surfaces provide additional panning options. Refer to the documentation for your control surface for more information.
Mix and Edit Window Panner Grids
In the Mix and Edit window, multichannel Panner Grids are displayed on tracks that have multichannel track or send output assignments.
To pan from the Mix or Edit window:
1 To pan in the Edit window, make sure I/O
View is being shown (View > Edit Window > I/O).
Panner Grids are always displayed in Mix window tracks that support panning.
2 Begin playback.
3 Click and drag on the appropriate multichan-
nel track’s Panner Grid in the Mix or Edit windows.
Chapter 8: Surround Features 61
Page 68

Panning in the Track Grid
Click and drag to pan
The Pan Location cursor follows your movements as long as you hold down the mouse button. Movements are scaled so that, once you
click to “grab” the Pan Location cursor, you do
not need to limit your movements to the small
Track Grid area.
Output Windows
Output windows provide panning controls
(called panners), as well as standard Pro Tools
controls, for tracks of all mix formats (from 3channel LCR through 8-channel 7.1).
For information on Output window standard
controls, see “Standard Controls” on page 63.
For information on Output window panning
controls, see “Surround Panner Controls” on
page 64.
Some of the features of Output windows include:
• X/Y (joystick-style) panning
• 3-Knob panning
• Full Divergence and Center Percentage
control
• AutoGlide
• LFE feed
• Multichannel meters
• Pro Tools target window support
Pan Location Cursor Color while Automating
The Pan Location cursor is green when the track
is in Automation Read mode, red in an Automation Touch, Latch, Touch/Latch, or Write
modes, and yellow in Automation Off (or Automation Suspend) mode.
In Trim mode, the Volume fader and LFE fader
are yellow.
Output windows provide additional features
and controls (and a much larger Grid). For details, see “Output Windows” on page 62.
Complete Production Toolkit Guide62
Multiple panners can be opened simultaneously, or a single window can display the current panner.
Page 69

To open an Output window:
Track selector
Output selector
Path selector
Target icon
Show meters
Automation Safe
Click the Output Window button (it’s the
small fader at the right edge of the Output selector for a track in the Mix or Edit window (I/O
View).
Opening a multichannel Output window
Standard Controls
All Output windows provide standard Pro Tools
controls for routing, path assignment and other
track features. These controls are located at the
top of all Output, Send, Insert, and Plug-in windows. Some controls are specific to the type of
window.
Panner Control section
Track Fader, Solo, Mute, and Auto
All Output windows provide track volume and
mute controls. You can adjust and automate
track volume, or mute, directly using these controls. The larger fader and Mute button are
equivalent to those in the Pro Tools Mix window.
Chapter 8: Surround Features 63
Page 70

Surround Panner Controls
X/Y Grid
LFE fader
Track fader and meter
Posit ion
(knob panners)
Divergence
Pan Location
cursor
Panning Mode button
Track Automation.
Solo, and Mute
Center %
Click to show meters
Snap Pan to Speaker icons
When assigned to tracks or paths with four or more channels, the Output window provides an X/Y
Grid for surround panning. The speakers associated with the panner’s multichannel format are displayed in their relative positions outside the Panner Grid. These speakers are also used as Snap Pan to
Speaker controls.
This section identifies all the controls and features found in Pro Tools multichannel panners.
Figure 16. Output window with a 5.1-format multichannel panner
Complete Production Toolkit Guide64
Page 71

The X/Y Grid and Pan Location
X/Y grid
Pan Location
cursor
X/Y mode icon
Cursor
The X/Y Grid is where multichannel panning
information is input and displayed. You can input pan information using X/Y mode, 3-Knob
mode, or by entering numeric values in the Position data fields. You can also edit pan automation graphically in the Edit window.
Panning Mode Button
This button, located below the X/Y Grid, provides access to Surround panning modes (see
“Panning Modes” on page 67).
Panner Mode button set to X/Y mode
Position Controls
The Position controls let you set the positions of
the panner.
X/Y Grid and Pan Location cursor
Multichannel panners default to X/Y mode. In
X/Y mode, the track’s current pan position is
represented by a green dot. This dot is the Pan
Location cursor, and its color indicates track automation status using standard Pro Tools colors:
Green The track is in automation Read mode.
Red The track is in automation Write, Touch,
Latch, or Touch/Latch mode.
Yellow The track is in automation Off mode (or
Automation Suspend) mode.
Position and Center % controls
Front Displays and controls the current front Xaxis (left/right) position of the panner.
Rear Displays and controls the current rear Xaxis (left/right) position of the panner. In default X/Y Panning mode, Rear is linked to Front
position and cannot be controlled independently.
F/R (Front/Rear) Displays and controls the current Y-axis position of the panner.
Center % Control
Center % controls how much of the signal is
routed to the center speaker. This lets you mix a
track to the front with a phantom center (0%
Center value) or to three-channel (LCR) when
panning front.
Chapter 8: Surround Features 65
Page 72

Divergence Controls
Link
Front/Rear Inverse
Front Inverse
Rear Inverse
Divergence determines the width of the panned
signal with respect to neighboring speakers. (For
more information, see the Pro Tools Sync & Sur-
round Concepts Guide). There are three Divergence controls:
Front, Rear, and F/R Divergence Provide separate, automatable divergence control over front
speakers, rear speakers, and between front/rear,
respectively.
Divergence controls
For examples of how divergence settings affect output panning, see “Divergence and
Center Percentage” on page 70.
Snap Pan to Speaker Icons
The Snap Pan to Speaker icons let you force the
panner to the speaker’s location. For example,
clicking on the upper left speaker moves the Pan
Location cursor to the upper left corner of the
X/Y Grid.
The LFE fader determines how much of the current track’s signal will be routed to the LFE channel. LFE faders in Track and Send windows can
follow groups. The Pro Tools LFE channel is always full-bandwidth. For more information on
how to use the LFE fader, see “LFE Faders in Multichannel Panners” on page 72.
Multichannel Panner Linking
Stereo tracks with multichannel outputs provide
left and right multichannel panners. The Output window provides controls to link the left
and right channels for precise panning.
When you create a stereo track that is routed to
a multichannel output, the following pan linkage controls are active by default:
• Link (links Left and Right pan controls)
• Front Inverse (inverts Left and Right pan
control linkage across front)
• Rear Inverse (inverts Left and Right pan
control linkage across rear)
The Front/Rear Inverse pan control is unlinked
by default.
LFE Fader
The LFE fader is only available in “.1” surround
formats (5.1, 6.1, and 7.1).
LFE fader
Complete Production Toolkit Guide66
Stereo multichannel panner controls showing default
linking
Page 73
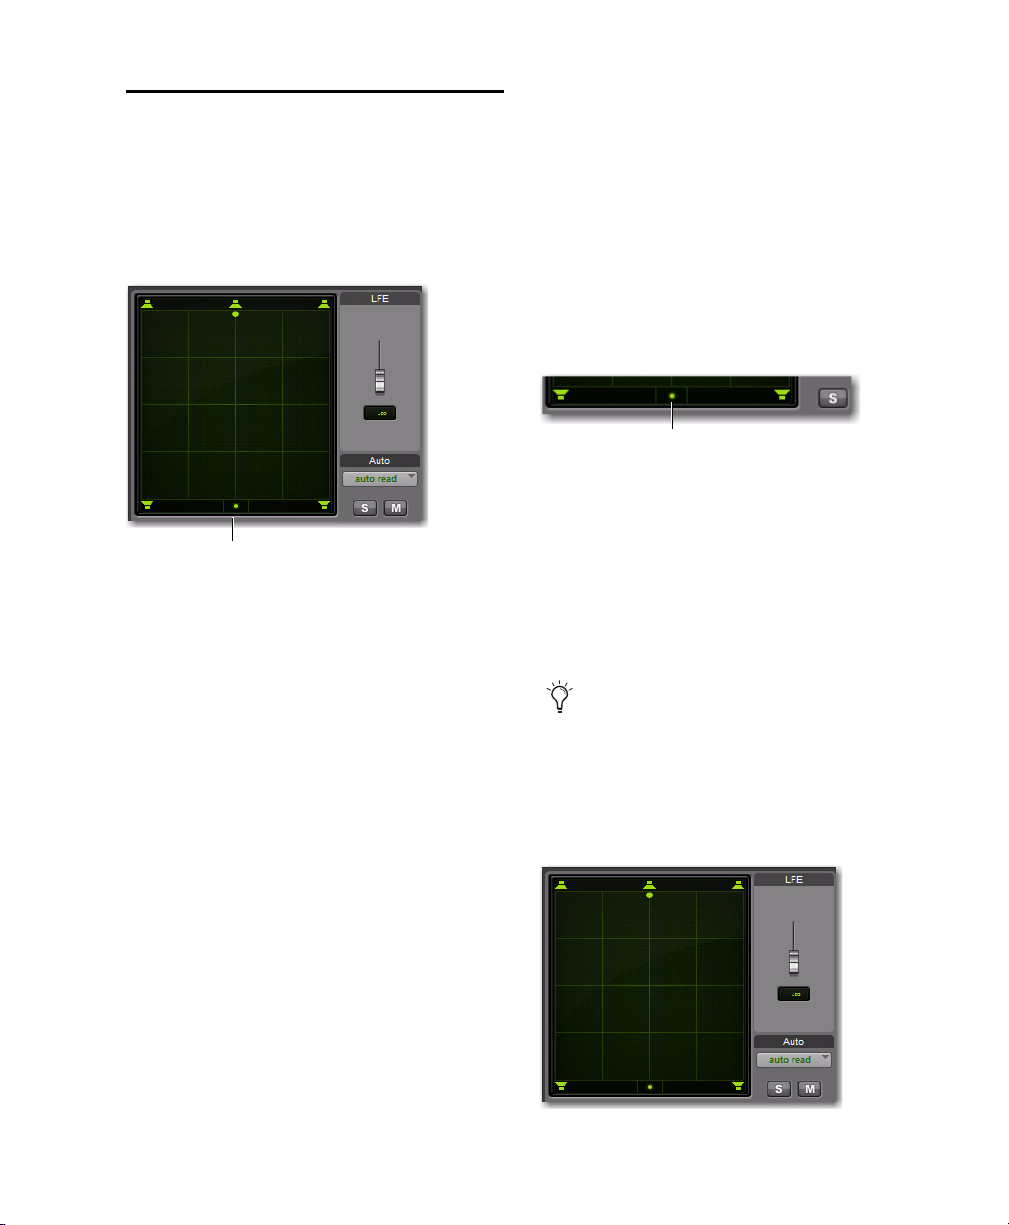
Panning Modes
Panning Mode button
X/Y mode icon
The Panning Mode button provides access to
four panning modes: X/Y mode, Divergence Editing, 3-Knob mode, and AutoGlide mode. Panning controls can be automated in all four
modes.
Panning Mode button (X/Y mode shown)
Panning Modes
X/Y Mode Joystick-style panning by dragging
the Pan Location cursor within the X/Y Speaker
Grid. See “X/Y Panning” on page 67 for more information.
3-Knob Mode Point-to-point panning, between
pairs of speakers. See “3-Knob Panning” on
page 68 for more information.
To enable a Panning Mode:
Click on the Panning Mode button in the Sur-
round Panner until the desired mode icon is displayed.
X/Y Panning
To pan in X/Y mode:
1 Click on the Panning Mode button until the
X/Y mode icon is displayed.
Panner Mode button set to X/Y mode
2 Drag the Pan Location cursor, or click any-
where in the Grid and drag to pan the track. The
location of the Pan Location cursor determines
the pan position of the signal. For example, to
pan something to the left rear speaker, move the
Pan Location cursor to the lower-left corner of
the Grid.
It is not necessary to click exactly on the Pan
Location cursor. Clicking anywhere in the
Grid will move the Pan Location cursor relative to where you click or take over with a
hardware panner. Panning does not jump to
the click position.
Divergence Editing The divergence X/Y Grid can
be dragged to resize the divergence boundaries.
See “Divergence Editing Mode” on page 71.
AutoGlide Mode Point-to-point panning from
the Pan Location cursor to a new destination
over a specified AutoGlide Time. See “AutoGlide
Mode” on page 69 for more information.
X/Y Panning
Chapter 8: Surround Features 67
Page 74
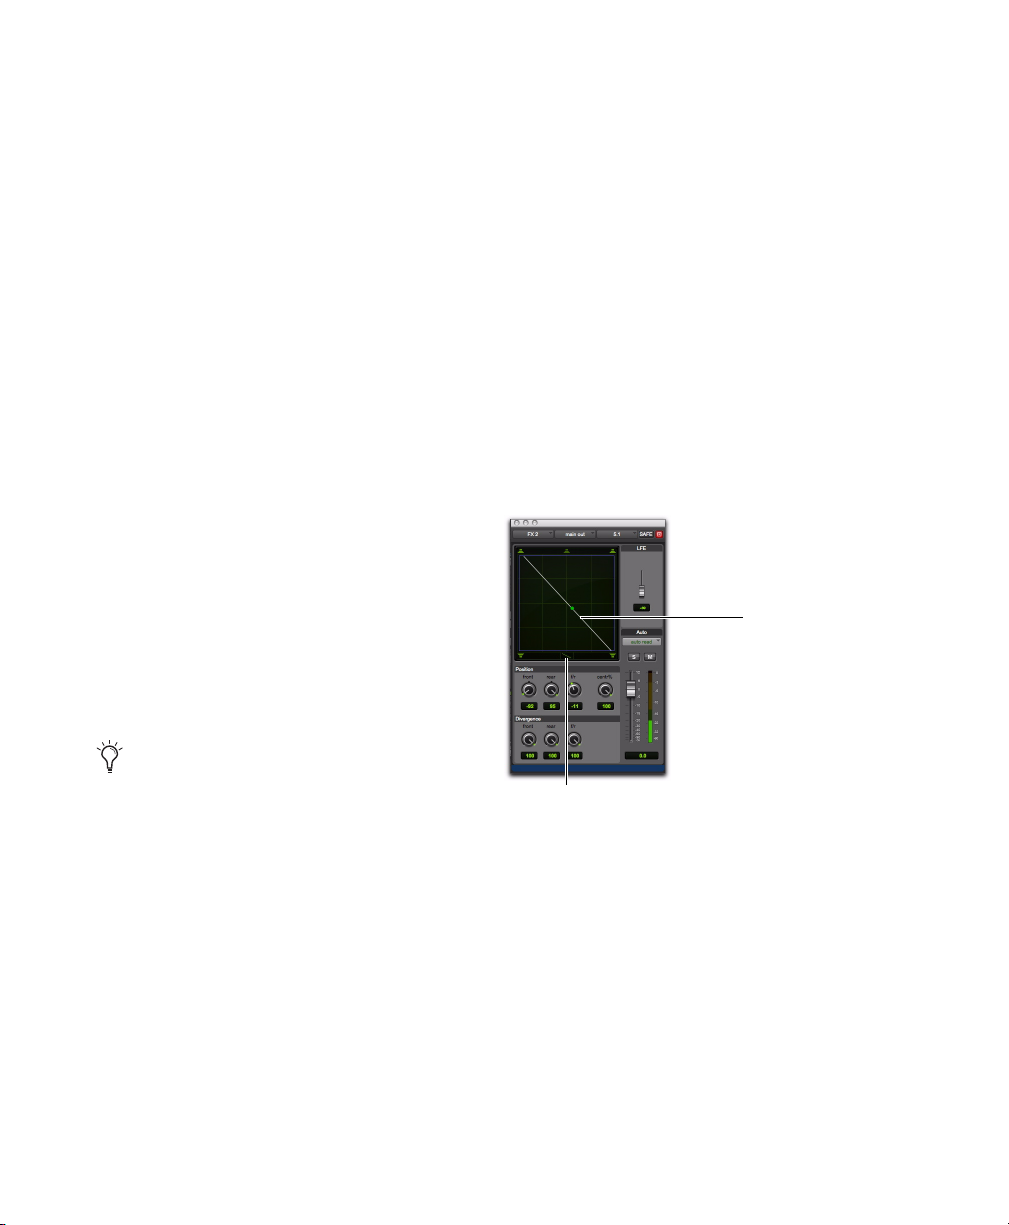
To snap the Pan Location cursor to a location in
3-Knob trajectory
3-Knob mode
the Grid:
Control-Shift-click (Windows) or Command-
Shift-click (Mac) at the desired location in the
X/Y Grid.
Grid Options and Shortcuts
Fine-Adjust Mode Hold down the Control key
(Windows) or Command key (Mac) for fine adjustment of all Panner controls.
Constraining to X or Y Movement Shift-drag the
Pan Location cursor to constrain its movement
to the X or Y direction.
Reset to Default Alt-click (Windows) or Optionclick (Mac) in the Panner Grid to reset all controls to their default position.
Snap Pan to Speaker Click one of the Snap Pan
to Speaker icons to force the panner to that
speaker location.
Display Automation in Edit Window ControlStart-click (Windows) or Command-Controlclick (Mac) a control to display that control’s
playlist in the Edit window.
3-Knob Panning
Pro Tools provides 3-Knob mode as an additional way to input pan moves.
3-Knob mode lets you:
• Pan in straight lines, moving the Pan Location
cursor using the Position rotary knobs with
full movement of front, rear, and front-rear
position.
– and –
• Pan discretely between pairs of speakers.
For example, when panning front-left to rearright in 3-Knob mode, audio will be heard from
just those two speakers (assuming full divergence is in effect).
All Pan controls can be automated, including pan position and divergence.
Complete Production Toolkit Guide68
Panning and metering in 3-Knob mode
By comparison, in X/Y mode a diagonal pan
may result in audio being heard in some or all
channels.
The difference is that 3-Knob mode pans discretely between the front and rear position of
the panning trajectory, while X/Y mode panning
takes place in the full 360° Panning Grid. Divergence and Center Percentage are variable in
both Panning modes.
Page 75
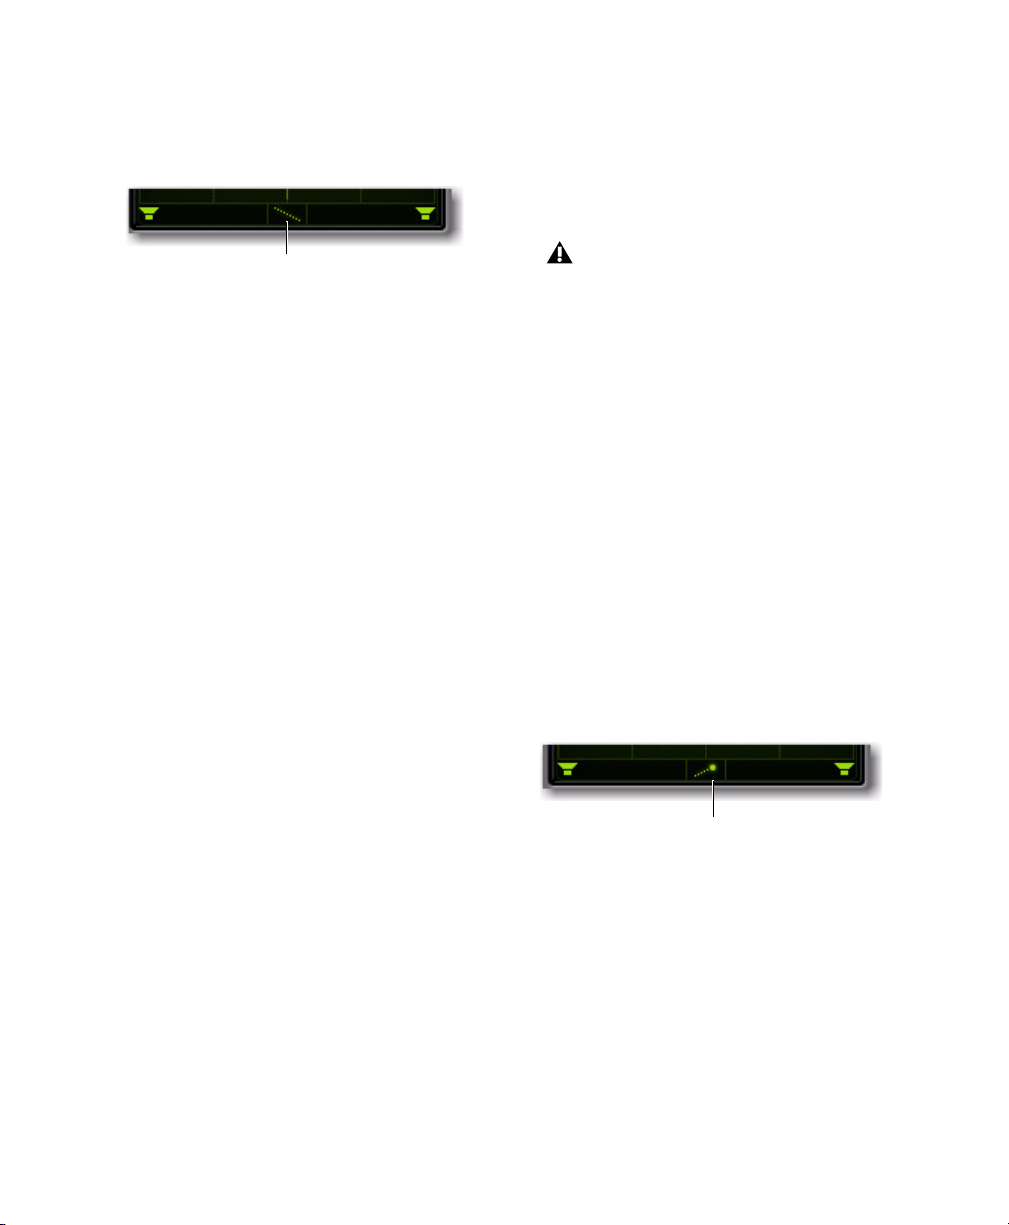
To enable 3-Knob Panning mode:
3-Knob mode icon
AutoGlide mode icon
Click on the Panning Mode button until the
3-Knob mode icon is displayed.
Panner Mode button set to 3-Knob mode
AutoGlide Mode
AutoGlide mode lets you quickly write Surround
Panner automation by clicking new locations in
the Surround Panner window, instead of manually moving the Surround Panner controls.
When writing automation in AutoGlide
mode, the Pan Location cursor cannot be
dragged from its location.
The panner trajectory line appears across the
Grid, extending from the front (X-axis) to the
rear (Y-axis).
To pan in 3-Knob mode:
1 Adjust the Front and Rear Position knobs to
set the trajectory line.
2 Rotate the Front/Rear Position knob to pan
along the trajectory. The Pan Location cursor is
constrained to the white trajectory line.
To change the 3-Knob trajectory angles, do one of
the following:
Drag either end point (Front or Rear) of the
trajectory line.
– or –
Adjust the Front or Rear Position controls.
To change the current trajectory position (left-toright) and retain its current angles:
Drag the trajectory line (not its end points) to
a new position.
The time it takes to glide from point to point
(from the Pan Location cursor to the new destination) is called the AutoGlide Time. This time
is set in the Mixing Preferences page and has a
range of 10 msec to 10000 msec (10 seconds).
To set the AutoGlide Time
1 Choose Setup > Preferences and click the Mix-
ing tab.
2 Set the AutoGlide Time in the Automation sec-
tion.
To do an AutoGlide automation pass:
1 Click the Panning Mode button until the
AutoGlide mode icon is displayed.
Panner Mode button set to AutoGlide mode
The Panning Mode button displays a slanted
dotted line that ends with a filled in dot (representing a cursor) at its top right corner.
2 In the Mix or Edit window, click the Automa-
tion Mode selector and select an Automation
mode for the track you want to automate.
3 Press Play to begin playback.
Chapter 8: Surround Features 69
Page 76

4 Set a new destination for the cursor by doing
AutoGlide mode
Snap Pan to
Speaker icons
Pan Location
cursor
Divergence display
Divergence controls
one of the following:
• Click a Snap Pan to Speaker icon to glide to
its speaker location.
– or –
• Click in the pan window to glide to a specific location in the X/Y Grid.
Panning Mode button (AutoGlide mode shown)
The Pan Location cursor will begin to move towards the new destination in the time it takes to
travel the AutoGlide Time. When the new destination point is reached, a new breakpoint will
be written at the new location.
Divergence and Center Percentage
The Divergence and Center Percentage controls
range from 0 to 100, and can be automated.
They are especially useful for ensuring audibility
and coverage in large venues, and to increase
clarity of voices.
Front Divergence Controls divergence between
front speakers (X-axis only).
Rear Divergence Controls divergence between
the rear speakers (X-axis only).
Front/Rear Divergence Controls divergence between front and rear (the Y-axis).
Center % (Percentage) Determines whether
there is a discrete center image, a completely
phantom center image, or a variable amount in
between.
Divergence
In the Panner Grid, the current divergence values are displayed using a purple outline.
5 Repeat the previous step if you want to write
additional panning moves.
6 Stop the transport when finished.
Complete Production Toolkit Guide70
Divergence display and controls
Page 77

By default, Pro Tools surround panners are
Front
Divergence
Pan Location
cursor
Divergence Editing icon
100% or fully divergent, meaning that a signal
that is panned completely to one speaker will
only be audible in that speaker.
Lower divergence settings result in a progressively wider source signal. When Divergence is
less than 100%, tracks will be routed to neighboring speakers to some degree, even when the
Pan Location cursor is positioned next to a single speaker.
Front Divergence at less than 100% for wider panning
To adjust divergence:
Adjust the Front, Rear, and Front/Rear Diver-
gence controls as necessary.
Divergence Editing Mode
To adjust divergence graphically:
1 Click on the Panning Mode button until the
Divergence Editing icon is displayed.
Panner Mode button set to Divergence Editing
2 Drag in the Grid to resize the divergence
boundaries.
Center % (Percentage)
Center Percentage controls whether there is a
discrete center channel for the track or a phantom center channel.
Center Percentage Example
In film and video production, the center channel often contains dialog. To enhance the clarity
of dialog, it is often beneficial to keep elements
such as music out of the center speaker. By reducing the Center Percentage on music tracks,
music panned to the front of the sound field can
be panned to only the left and right speakers,
forcing them to have a variable phantom center
image.
In Divergence Editing mode, you can adjust the
divergence boundaries by dragging directly in
the Divergence Grid.
To adjust Center Percentage:
Adjust the Center Percentage knob as appro-
priate.
Chapter 8: Surround Features 71
Page 78
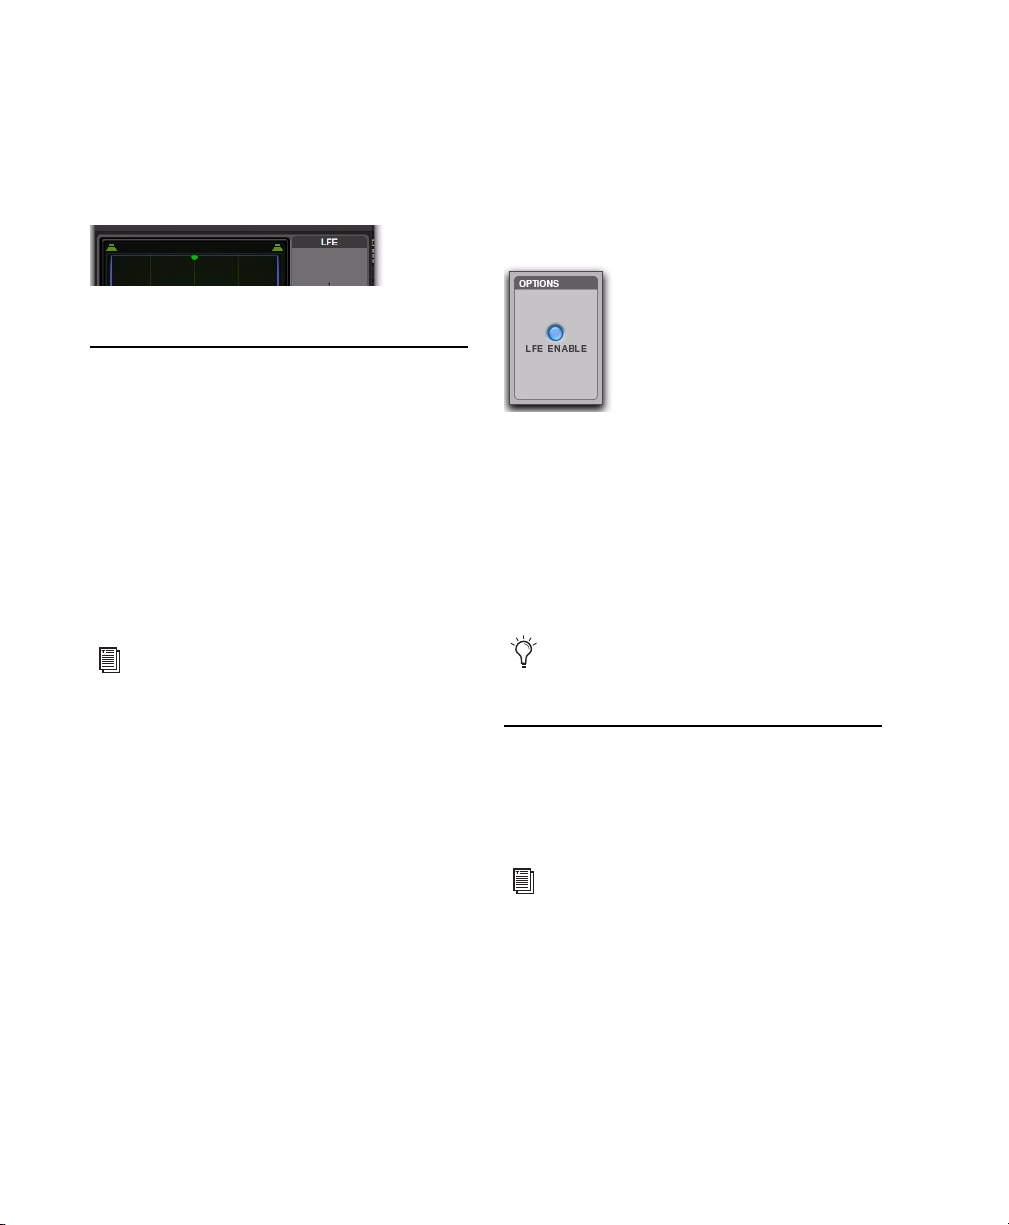
As you reduce the Center Percentage value, the
center speaker at the top of the Grid becomes
less visible. At 0, the center speaker is completely invisible, reflecting the setting for fully
phantom center.
Center % set to 0 (no center speaker shown)
LFE Faders in Multichannel Panners
The LFE fader controls how much of the track is
sent to LFE. LFE faders are only available when a
track is assigned to a path whose format supports LFE (5.1, 6.1, or 7.1).
To mix to the LFE channel:
Adjust the LFE fader in any “.1” surround for-
mat Output window.
For general information about LFE, sub
channels, and related topics, see the
Pro Tools Sync & Surround Concepts Guide.
LFE Enable
Some multichannel plug-ins, including the multichannel DigiRack Dynamics III Compressor/Limiter, provide LFE Enable. This lets you
enable or bypass processing of the LFE channel
if present.
LFE Enable in the multichannel DigiRack Dynamics III
Compressor/Limiter
To process the LFE channel in a multichannel plugin:
Click to enable LFE Enable in supporting mul-
tichannel plug-ins. LFE Enable is highlighted
when LFE processing is enabled, and unhighlighted when LFE processing is bypassed.
When LFE Enable is unavailable, try using
the multi-mono version of the plug-in.
LFE Faders and Groups
Track and send LFE faders can follow Mix and
Edit Groups by being enabled in the Group Attributes page in either the Create Groups or
Modify Groups dialog. LFE faders can be assigned to follow groups as a global attribute or
on a group by group basis.
Complete Production Toolkit Guide72
Pan Playlists
Multichannel panners have an automation
playlist for each position and divergence control.
Pan automation can be drawn, edited, cut,
copied, and pasted from the Edit window.
For more information, see the Pro Tools
Reference Guide.
Page 79

Surround Scope Plug-in
The Surround Scope plug-in provides a 360°
meter for metering multichannel paths during
mixing.
5.1 Format Track Layouts
All 5.1-format meters (including those displayed
in the Surround Scope meter, on tracks, and in
Output windows and their Path Meter Views)
are always arranged in the following order:
L C R Ls Rs LFE
For more information on Pro Tools metering, see “5.1 Tracks, Formats, Mapping,
and Metering” on page 47.
To use the Surround Scope Plug-in:
On a multichannel Master Fader, click an In-
sert button and select Multichannel TDM plug-in >
Sound Field > Surround Scope.
Surround Scope displays output levels in both a
360° Grid, and in traditional LED meters.
For detailed information on Surround
Scope, refer to the Digidesign Plug-ins
Guide.
Chapter 8: Surround Features 73
Page 80

Complete Production Toolkit Guide74
Page 81

chapter 9
Time Code and Synchronization Features
Complete Production Toolkit enables various
time code and synchronization features for
working with audio, film, video, or digital video
in Pro Tools LE.
For more information on working in
Pro Tools with time code and synchronization, see the Pro Tools Reference Guide.
Timebase Rulers
Complete Production Toolkit adds three additional Timebase rulers to Pro Tools LE sessions:
Time Code, Time Code 2, and Feet+Frames. In
Pro Tools LE with the Complete Production
Toolkit option, you can spot audio to Time
Code or Feet+Frames.
For information on other Timebase rulers,
see the Pro Tools Reference Guide.
To add one of these rulers to the Timebase ruler:
Do one of the following:
• Select View > Rulers > Time Code.
• Select View > Rulers > Time Code 2.
• Select View > Rulers > Feet+Frame.
Time Code Displays the Time Scale in SMPTE
frames. The Time Code Rate and Session Start
time are set from the Session Setup window. The
Time Code Time Scale is absolute based on the
frame rate.
Pro Tools supports the following frame rates:
• 23.976 FPS
•24 FPS
•25 FPS
• 29.97 FPS
• 29.97 FPS Drop
•30 FPS
•30 FPS Drop
Secondary Time Code Ruler A secondary time
code ruler, labeled Time Code 2, lets you reference video frame rates in the Timeline that are
different from the session Time Code rate. However, you cannot Spot to the Time Code 2 ruler
and it cannot be set as the Main Time Scale. The
secondary time code ruler can be set to show
any Pro Tools supported frame rate. The Time
Code 2 ruler can also display the additional following frame rates:
•50 FPS
• 59.94 FPS
• 59.94 FPS Drop
•60 FPS
•60 FPS Drop
Feet+Frames Displays the Time Scale in feet and
frames for referencing audio-for-film projects.
The Feet+Frames time display is based on the 35
millimeter film format. The Feet+Frames Time
Scale is absolute based on the frame rate.
Chapter 9: Time Code and Synchronization Features 75
Page 82

Secondary Time Code Ruler
Pro Tools LE with the Complete Production
Toolkit option provides an additional Timebase
ruler, labeled Time Code 2. This secondary time
code ruler lets you re-reference video frame rates
in the Timeline that are different from the session time code rate.
The Time Code 2 ruler can be set to show any of
the following rates:
• 23.976 FPS
• 24 FPS
• 25 FPS
• 29.97 FPS
• 29.97 FPS Drop
• 30 FPS
• 30 FPS Drop
• 50 FPS
• 59.94 FPS
• 59.94 FPS Drop
• 60 FPS
• 60 FPS Drop
The Time Code 2 ruler cannot be set to the Main
Ruler in Pro Tools.
Selecting Time Code and Time Code 2 Rates
The Time Code Rate and Time Code 2 Rate for
the session can be set in the Session Setup window with the Time Code Rate and Time Code
Rate 2 selectors. The Time Code ruler displays
the Time Scale in SMPTE frames (hours:minutes:seconds:frames).
Pro Tools supports the following rates and formats: 23.976 fps, 24 fps, 25 fps, 29.97 fps NonDrop, 29.97 fps Drop, 30 fps Non-Drop, and
30 fps Drop. In addition, Complete Production
Toolkit supports audio pull up and pull down
(see “Pull Up and Pull Down Commands” on
page 78).
See the Pro Tools Reference Guide for more
information on time code and synchronization.
Selecting Feet+Frame Rate
The Feet+Frame Rate for the session can be set in
the Session Setup window with the Feet+Frame
Rate selector. Supported rates are 23.976, 24,
and 25 fps.
Half-Frame Nudge/Grid
Pro Tools provides an additional grid resolution
of 1/2 Frame to allow for easy alignment of material when referencing a high-definition (HD)
frame rate on the secondary time code
(Time Code 2) ruler.
Complete Production Toolkit Guide76
Set this rate to match the rate of the film projector, or the video if the film projector speed is
taken into account.
Page 83

Redefining Time Code Position
Redefining a Time Code Position
Use the Current Time Code Position command to
redefine the current time code position and session start time. By creating an insertion point
(or selection), and then entering the new time
code position for that location, the session start
time will be recalculated based on the new, relative Time Code location.
To set the Main Time Scale to SMPTE Time Code,
do one of the following:
Choose View > Rulers > Time Code.
– or –
Click the Main Counter selector in the Edit
window and select Time Code.
Pro Tools displays time code values in the currently selected SMPTE frame rate.
Sub Counter and Sub Time Scale Display
To redefine a current Time Code code position:
1 With the Selector tool, click in a track (or
make a selection) where you want to redefine
the position.
If your insertion or selection is not on a grid
boundary, it will round to the closest
boundary.
2 Choose Setup > Current Time Code Position.
3 Enter a new SMPTE frame number in the dia-
log to correspond to the time code shown in the
dialog.
4 Click OK.
Displaying Time in SMPTE Frames
In Pro Tools, you can set the Main Time Scale to
Time Code (SMPTE) and this will be displayed in
the Main Counter. Though Pro Tools will still
synchronize to incoming SMPTE time code if
the Time Scale is displayed in Bars|Beats, Minutes:Seconds, or Feet.Frames, it is usually more
useful to use SMPTE time code as your reference.
You can display a Sub Time Scale in the Sub
Counter. For example, if the Main Time Scale is
set to Time Code, and you want to compare
SMPTE time to “wall clock,” when you are using
29.97 Non-Drop frame rate, click the Sub
Counter selector and select Min:Secs as the Sub
Time Scale.
Redefining Current Feet+Frames Position
Use the Current Feet+Frames command to redefine the Feet+Frames position at the current insertion point. The session start time is recalculated based on the new, relative Feet+Frames
location.
Typically, this command is used for integrating
test tones, pre-roll, Academy leader, and similar
pre-program material into Pro Tools sessions.
Redefining Feet+Frames does not redefine the
session start time.
Chapter 9: Time Code and Synchronization Features 77
Page 84

To set a relative frame position for a session
(Feet+Frames):
1 With the Selector tool, click in a track (or
make a selection) where you want to redefine
the position.
If your insertion or selection is not on a grid
boundary, it will round to the closest
boundary.
2 Choose Setup > Current Feet+Frames Position.
3 Enter a Feet+Frame position to correspond to
the time code shown in the dialog.
4 Click OK.
Use Subframes Option
When spotting or shifting material in Pro Tools,
or using the Go To dialog, enable the Use Subframes option for greater precision.
Pull Up and Pull Down Commands
Use Audio Rate Pull Up/Down and Video Rate
Pull Up/Down for audio layback to film or
video, or when recording audio for film or
video. See the Pro Tools Reference Guide for more
information.
When using Audio Rate Pull Up/Down,
Complete Production Toolkit does not automatically adjust the Pro Tools sample rate
clock during playback or recording. To synchronize to your external device, or to do a
real-time transfer, you must manually adjust your external (S/PDIF or Optical) clock
device according to the pull factors that are
being used.
When using a video I/O (such as the Avid
®
Mojo
) as the S/PDIF clock source, Audio
Rate Pull Up/Pull Down is not supported.
Audio Rate Pull Up/Down Applies pull up or pull
down factors to session audio record and playback. The Audio Rate Pull Up/Down pop-up
menu is located in the Session Setup window.
Shift dialog with the Use Subframes option enabled
A subframe is 1/100th of a frame. The Use Subframes option enables you to use these smaller
units for greater accuracy. When enabled, this
command adds a decimal and two decimal
places of additional time for subframes in
SMPTE and Feet+Frames–based fields in the
Spot, Shift, and Go To dialogs.
Complete Production Toolkit Guide78
Video Rate Pull Up/Down Lets you change the
frame rate of video playback independently
from the audio pull-ups (if any). The Video Pull
Up/Down pop-up menu is located below the Audio Rate Pull Up/Down pop-up menu in the Session Setup window. Choices are determined by
the file format of the video clip, as well as its
frame rate.
Audio Pull Down Factors and QuickTime Movies
Audio “pulls” are an industry standard method
of adjusting the speed of audio playback to line
up with off-speed picture.
Page 85

In normal industry standard workflows, when
audio is pulled down, video and time code
maintain their current speed, and only the audio and MIDI are pulled down, in relationship
to the video and time code.
For example, when 24 frame film to 29.97 NTSC
video transfers are made, it is necessary to slow
the film playback speed during the transfer process by 0.1%.
In order to make the same speed change for production audio to match the speed of this new
slower picture, Pro Tools audio needs to also be
“pulled down” by 0.1%.
To slow audio in Pro Tools, the audio can either
be sample rate converted on import or the incoming word clock sample rate source must be
“pulled down” by 0.1% (resulting in a 48,000 Hz
session speed to be pulled down to play in real
time at 47,952 Hz). The pull down setting in
Pro Tools adjusts the visual representation of regions on the timeline to equal the word clock
pull up/down change.
When the clock is reset to the non-pulled down
sample rate, the audio plays at the original film
speed.
MIDI is always pulled in line with audio
pulls.
Complete Production Toolkit for Pro Tools LE
offers limited pull capabilities, primarily for
Pro Tools HD users who have a secondary
Pro Tools LE system that they use to perform
smaller tasks or for remote work.
Since Complete Production Toolkit for
Pro Tools LE does not have any means to adjust
the Pro Tools sample clock, it instead simulates
the audio/video pull relationship by pulling up
the video instead of pulling down the audio.
This maintains the proper video/audio speed relationship when using the fixed Pro Tools internal clock. The audio sample clock is not pulled
down, so the digital outputs are not outputting
a pulled down sample clock.
If you are using an external clocking source
(such as S/PDIF or ADAT Optical), Pro Tools audio and MIDI are resolved to the digital input’s
clock speed. If you select audio pull down, the
audio still doesn’t pull down in Pro Tools LE;
the video still pulls up to maintain the proper relationship, and the actual Pro Tools sample rate
is now dependent on the digital clock source.
However, if the incoming digital clock speed is
pulled down, Pro Tools audio and MIDI will run
at a pulled down rate, and the video will play
back at its normal speed.
When pull down is selected in Complete Production Toolkit for Pro Tools LE, the following
occurs:
• If the external clock is not pulled down, the
actual sample rate of Pro Tools LE audio
and MIDI is not pulled down, but the video
is pulled up.
• If the external clock is pulled down, the actual sample rate of Pro Tools LE audio and
MIDI is pulled down, and the video plays at
its original non-pulled speed.
Although Complete Production Toolkit for
Pro Tools LE offers some pull down options, it
does not have the ability to adjust the internal
sample clock the same way Pro Tools|HD systems do in tandem with the Digidesign
SYNC I/O peripheral.
Chapter 9: Time Code and Synchronization Features 79
Page 86

Complete Production Toolkit Guide80
Page 87

chapter 10
Video Features
Complete Production Toolkit enables additional
session and track features (including DigiBase
Pro) for working with video in Pro Tools LE.
For more information on working with
Pro Tools sessions and tracks, see the
Pro Tools Reference Guide.
Video Track Support
Complete Production Toolkit adds the following video track support to Pro Tools LE:
• Multiple video tracks in the Timeline
• Multiple QuickTime movies on individual
video tracks
• Multiple playlists for video tracks
Multiple Video Tracks in the Timeline
You can add multiple video tracks to the Timeline, but only one video track can be played back
at a time. This track is known as the main video
track.
Multiple Video Track Playlists
Playlists provide an easy way of changing back
and forth between alternate versions of a video
track.
You can perform all of the same operations with
video playlists as you can with audio playlists,
including:
• Duplicating a playlist
• Creating a playlist
• Assigning a playlist to another video track
• Renaming a playlist
• Deleting a playlist
Multiple Codecs on an Individual Video Track
A single video track can contain video regions
compressed with different video codecs of the
same type of video. For example, you can add
QuickTime files that were compressed using
multiple codecs to the same video track.
However, once the first video file has been
added to a session, all additional video files
added to the Timeline must have the same video
frame rate as the first video file.
Support for Video Import Options
Complete Production Toolkit adds the following options to Pro Tools LE when using the
Video Import Options dialog to import video
into Pro Tools:
Chapter 10: Video Features 81
Page 88

Destination Section
Video region icon
Region List Imports the video file directly into
the Region List, where it will be available to drag
and drop into Pro Tools.
Additional Video Import Options
Gaps Between Regions When you import more
than one video file into a track, they will be
shuffled together by default. This option lets
you indicate the number of seconds by which
each video clip will be separated when imported
into the video track.
Bypassing the Video Import Options Dialog
To bypass the Video Import Options dialog when
importing video into Pro Tools:
Alt-drag (Windows) or Option-drag (Mac) one
or more video files from a DigiBase browser into
the Region List.
Video Regions
You can create video regions that function in
much the same way as audio regions.
Video region as displayed in Frames View in the
Timeline
A video region is a segment of video data, and
can be a portion of video or an entire video file.
In Pro Tools, video regions are created from
QuickTime, Windows Media, or Avid video files,
and can be arranged in corresponding video
track playlists. Video regions can also be
grouped, looped, and color coded.
Just like audio regions, video regions display in
Pro Tools in the Region List or the Timeline.
Dragging Video Files from the Region List to the Timeline
You can add video files to the Timeline by dragging and dropping directly from the Region List
to a video track.
To add video files to a video track by dragging
them from the Region List:
1 Select one or more video files in the Region
List.
2 In any Edit mode, drag the selected video files
to a blank area in the Timeline (to create a new
video track) or an existing video track (to place it
within that track).
Complete Production Toolkit Guide82
Video Regions in the Region List
A video region displays in the Region List with a
small video icon next to its name.
Video region as displayed in the Region List
Page 89

Showing or Hiding Video Regions in the Region List
The Region List menu provides commands that
let you show or hide video regions in the Region
List.
To show or hide video regions in the Region List:
1 In the Edit window, click the Region List
menu, and choose Show.
Playing and Selecting Video Track Material
• Selecting within video frame boundaries
• Selecting and editing across multiple Video
and audio tracks
• Link or unlink track and Edit selections
•Auto-scroll video tracks
• Loop playback
• Video Universe window
2 Select the Video option to show or hide video
regions.
General Video Editing
Most editing operations that are available for audio regions can also be applied to video regions.
This section describes all available video editing
operations. Unless noted, the procedure for each
video editing operation is the same as its audio
editing counterpart.
Basic Video Editing Features
• Nondestructive editing
• Display of region names, region times, and
other data in playlists
• Multiple video playlists
•Multiple Undo
• Video regions and video region groups in
Region List
• All Edit modes
• All Edit Tools (except for Time Compression Expansion and Pencil tools)
Working with Regions and Selections
• Capture regions
• Separate regions and Separate Grabber Tool
• Region overlap and underlap
• All trimming commands except for TCE
• Heal separated regions
• Place, align, slide, shuffle, and spot regions
•Sync points
• Nudging (quantized to frame boundaries)
• Shift command (moving track material back
or forward in time by a specified amount)
• Quantize Region to Grid (rounds to nearest
video frame)
• Replace Region command
• Cut, Copy, Paste, and Clear commands
• Special Cut, Copy, Paste, and Clear commands
• Repeat to fill selection
• Editing across multiple tracks
• Duplicate command
• Repeat command
•Region groups
• Region looping
Chapter 10: Video Features 83
Page 90

Managing Regions
before
after
•Insert space
• Compact Selected (nothing happens to the
video, and at least one audio track must be selected)
• All naming and displaying of region commands
Editing Caveats
The following caveats apply to video editing in
Pro Tools:
• MPEG-2 video in the Timeline cannot be edited.
• If you create and enable a track group containing audio and video tracks—and any audio
track has region boundaries that do not line
up with video frame boundaries— you cannot
tab through those region boundaries.
General Editing Operations Not Applicable to Video Regions
Selecting and Editing Across Multiple Audio and Video Tracks
You can create a selection across multiple audio
and video tracks, and cut, copy, or paste audio
and video simultaneously.
The following editing operations are applicable
to audio regions, but are not applicable to video
regions:
•Fades
• Mute/unmute regions
• AudioSuite plug-ins
• Waveform Repair with the Pencil tool
• Strip silence
• Consolidate regions
Complete Production Toolkit Guide84
Selecting and editing across multiple tracks (Slip mode
shown)
Audio and video that is selected and cut, copied,
or pasted follow the current Edit mode.
Page 91

Selecting within Video Frame Boundaries
Pro Tools does not let you select, play back, or
edit a partial video frame. The following rules
apply when selecting or editing video:
• When you make a selection in a video track,
the selection boundaries follow the current
Grid setting but round to the nearest video
frame boundary, as follows:
• If the selection includes more than half of a
video frame, the full video frame is included within the selection.
• If the selection includes less than half of a
video frame, that video frame is not included in a video selection.
• When you paste a selection containing video
to a video track, the insertion point automatically aligns with the closest video frame
boundary.
To insert space into a video track:
1 Make a selection in a track or tracks. The
length of the selection determines the duration
of the space inserted.
2 Choose Edit > Insert Silence.
Video Region Groups
You can include video regions within region
groups for the following operations:
• Creating region groups
• Creating multitrack region groups (including audio tracks)
• Editing region groups
• Creating fades and crossfades for audio files
in region groups
• Importing and exporting region group files
When you paste audio and video simultaneously, this video frame re-alignment may
result in the audio not being positioned exactly where you placed it. A warning dialog
displays when this occurs.
Using the Insert Silence Command to Insert Space in Video Tracks
The Insert Silence command lets you make a selection on a track (or tracks) and insert precisely
that amount of space. You can also select across
video and audio tracks, and use the Insert Silence command to insert audio silence and
space simultaneously.
In Shuffle mode, all video data on the track is
shuffled later in the track by an amount equal to
the selection. In Slip, Grid, or Spot mode, the In-
sert Silence command works just like the Edit >
Clear command.
Browsing Video in the Video Universe Window
The Video Universe, lets you view, navigate,
zoom, and select video regions on the main
video track.
The Video Universe window displays the center
video frame of each video region in the main
video track. Video frames are ordered sequentially according to their order in the Timeline,
and the colored strip under each frame represents the color coding for that region.
Chapter 10: Video Features 85
Page 92

To display the Video Universe window:
1 Make sure the Video Online button in the
main video track is set to online status (blue).
2 Choose Window > Video Universe.
Video Universe with video frames representing video
regions on the main video track
Increasing or Decreasing the Size of Video Frames
To use the Video Universe window to zoom video
regions in the Edit window:
1 Move the cursor over the top half of any video
frame until it becomes a zoom tool.
2 Do one of the following:
• To move the beginning of a video region to
the far left of the Timeline while maintaining the current zoom resolution in the Edit
window, click the video frame representing
the region once.
• To zoom in on a video region so that it fills
the entire Edit window, double-click the
video frame representing the region.
• To zoom a range of selected regions so that
they fill the Edit window, click and drag on
the video frames that represent the regions.
To increase or decrease the size of video frames in
the Video Universe window:
Right-click (Windows or Mac) or Control-click
(Mac) anywhere in the Universe, and select Increase or Decrease.
Selecting Zoom Resolutions in the Video Universe
When you move the cursor over the top half of
a video frame in the Video Universe, it displays
and behaves as a zoom tool. This tool lets you
zoom in on one or more video regions to fill the
entire Edit window display.
Video frame with zoom tool
Selecting Ranges in the Video Universe
When you move the cursor over the bottom half
of a video frame in the Video Universe, it displays and behaves as a selector tool. This tool
lets you select ranges within one or more video
regions in the Edit window.
Video frame with selector tool
Complete Production Toolkit Guide86
Page 93

To use the Video Universe window to select ranges
in video regions in the Edit window:
1 Move the cursor over the bottom half of any
video frame until it becomes a selector tool.
2 Do one of the following:
• To place the cursor at the beginning of a
video region, click the video frame representing the video region.
• To select an entire video region from start
to end, double-click the video frame representing that region.
• To select one or more entire regions from
start to end, drag the video frames representing the video regions.
If the Edit window does not display the selected video regions, it will automatically
scroll to show the beginning of the selection.
Selecting Zoom Resolutions and Ranges Simultaneously in the Video Universe
When you move the cursor over a video frame
in the Video Universe while pressing Alt (Windows) or Option (Mac), the cursor appears as a
selector tool. This tool lets you zoom and select
ranges simultaneously.
To use the Video Universe window to select and
zoom simultaneously in the Edit window:
1 Move the cursor over any area of any video
frame in the Video Universe window until it becomes a selector or zoom tool.
2 To select a range of video regions while simul-
taneously zooming to fill the Edit window, Altdrag (Windows) or Option-drag (Mac) multiple
video frames.
Chapter 10: Video Features 87
Page 94

Complete Production Toolkit Guide88
Page 95

chapter 11
Included Plug-ins
Complete Production Toolkit includes the following plug-ins:
•DINR LE
•Eleven LE
•Hybrid
• SoundCode Stereo
•Smack! LE
• Structure LE
•TL Space Native
•X-Form
DINR LE
The LE version of Digidesign Intelligent Noise
Reduction (DINR) is included with the Complete Production Toolkit option. DINR LE provides broadband and narrowband noise reduction for suppressing such unwanted elements as
tape hiss, air conditioner rumble, and microphone preamp noise.
Eleven LE
The Eleven LE guitar amplifier plug-in gives you
stunning guitar amplifier, cabinet, and microphone models of the “best of the best” vintage
and contemporary gear.
For more information, refer to the Digidesign Eleven Plug-in Guide.
Hybrid Synthesizer
The Hybrid synthesizer plug-in, developed by
Digidesign’s Advanced Instrument Research
(A.I.R.) group, combines the warmth of legendary analog synthesizers with the powerful features included in popular digital synthesizers.
Hybrid features a sample-accurate synthesis engine with 23 filter modes with true saturation,
plus endless modulation and performance capabilities.
For more information, refer to the Digidesign Plug-ins Guide.
For more information, refer to the Hybrid
Plug-in Guide.
Chapter 11: Included Plug-ins 89
Page 96

SoundCode Stereo
TL Space Native
The Neyrinck SoundCode Stereo plug-in is an
RTAS plug-in that down mixes a surround mix
to a stereo mix for Pro Tools HD and Pro Tools
LE surround compatible systems. The plug-in
supports all Pro Tools surround formats (LCR,
LCRS, Quad, 5.0, 5.1, 6.0, 6.1, 7.0, and 7.1).
For more information, refer to the SoundCode Stereo Guide.
Smack! LE Compressor
The Smack! LE compressor plug-in features three
compression modes and unique compression ratios to get your desired compression sound.
For more information, refer to the Digidesign Plug-ins Guide.
Structure LE
Structure LE, developed by Digidesign’s Advanced Instrument Research (A.I.R.) group, is an
RTAS virtual instrument plug-in that adds the
flexibility and power of an advanced sample
player to any Pro Tools system.
TL Space Native is a powerful convolution reverb for post production and music applications. The TL Space package includes a comprehensive library of high-quality sampled reverb
spaces and effects, from large concert halls to
dense plate reverbs.
For more information, refer to the TL Labs
Plug-ins Guide.
X-Form
The X-Form AudioSuite plug-in is based on the
Radius® algorithm from iZotope and provides
the high quality time compression and expansion for music production, sound design, and
audio loop applications. Use it to manipulate
audio loops for tempo matching or to change
vocal tracks for formant correct pitch shifting.
For more information, refer to the Digidesign Plug-ins Guide.
For more information, refer to the Structure
LE Guide.
Complete Production Toolkit Guide90
Page 97

index
Numerics
3-knob panning 68
5.0 paths in 5.1 mixes 58
5.1 formats in Pro Tools 47
A
AAF file format 14
Activation Code 7
Add Unique Triggers 35
alternate channels
Expand to New Playlists 30
Audio Rate Pull Up/Down 78
audio regions
fitting to an Edit selection 29
audio tracks
5.1 format 43
and Output format 51
and surround sessions 49
placing audio in multichannel tracks 50
AutoGlide mode 69
AutoGlide Time preference 69
automation
and multichannel pan 72
and multiple output assignments 51
capturing and applying elsewhere 39
snapshot 37
B
Beat Detective
Collection Mode 34
with multiple tracks 33
boxed version 3
bussing
multichannel sends 53
surround examples 57
C
Catalogs
Clip Name 21
Center % (Percentage) 70
Center % in Output window 71
Channel selector
for multi-mono plug-ins 54
Collection Mode, Beat Detective 34
Complete Production Toolkit
features 1
installing 5
system requirements 3
uninstalling 7
consolidating media 23
Continuous Scroll with Playhead option
and half-screen 25
Continuous Scrolling During Playback option 25
and half-screen 25
Continuous Scrolling option 25
Current Feet+Frames command 77
Current Time Code Position command 77
D
DigiBase Pro 19
Catalogs 21
consolidating with 23
creating 22
opening 22
Clip Name 21
saving a search as a Catalog 20
Digidesign Intelligent Noise Reduction (DINR) 89
DigiTranslator 2.0 option 14
DINR LE 89
discrete signal control 50
divergence
drawing 71
using 70
Index 91
Page 98

E
Edit menu
TCE Edit to Timeline Selection command 29
Trim Automation to All Enabled command 40
Trim Automation to Current command 40
Write Automation commands 38, 39
Edit window
half-screen 25
Expand Channels to New Playlists 30
Export Selected Tracks as OMF/AAF command 14
exporting
AAF files 14
OMFI files 14
F
Feet+Frame Rate 76
Feet+Frames
redefining position 77
Feet.Frames Time Scale 75
field recorder
expanding alternate channels to new playlists
30
file formats (audio)
MP3 15
File menu
Export Selected Tracks as OMF/AAF command
14
files
Clip Name 21
Find Matching Tracks option 11
Front Divergence 70
Front/Rear Divergence 70
G
Glide Automation commands 40
grid panners in Mix and Edit 61
guide conventions 4
H
half-screen 25
I
I/O Setup
and surround sessions 44
importing for surround 46
surround mix examples 57
import
Session Data 11
importing
multichannel I/O Settings 46
offline items from Catalogs 24
tempo and meter map 14
installation 5
Instrument tracks
and surround mixing 53
L
LCRS path examples 47
LFE
enable in plug-ins 72
example sub-path 58
examples of discrete versus contribution 60
faders 72
Link Enable buttons
in multi-mono plug-ins 54
linking
multi-mono plug-ins 54
stereo panners 66
M
Main Time Scale 77
Master Faders
multichannel 53
Master Link button
in multi-mono plug-ins 54
meter map
importing 14
meters
SurroundScope plug-in 73
MP3 file format 15
MP3 Export Option 15
MPEG-1 Layer 3 15
multichannel plug-ins 54
multichannel tracks
replacing regions in 28
multi-mono
plug-in Channel selector 54
plug-ins 53
multiple tracks
and Beat Detective 33
fitting audio regions to Edit selection 29
Complete Production Toolkit Guide92
Page 99

O
OMF file format 14
OMFI file format 14
Output Window button 63
outputs
default 5.1 paths and sub-paths 46
format and tracks 51
to multichannel paths 52
P
package contents 3
panning
3-knob 68
fine-adjust mode 68
grids 61
guidelines 58
linked stereo 66
multichannel automation playlists 72
take over in grid 67
trajectory 69
X/Y mode 67
parallel mixing 51
paths
creating multichannel 46
for surround 55
sub-path surround examples 58
plug-ins
and surround mixing 53
Channel selector for multi-mono 54
for surround 54
linking 54
multi-mono 53
R
Rear Divergence 70
redefining
Feet+Frames position 77
time code position 77
regions
replacing 26
Render Sources 24
Replace Region command 26
and multichannel tracks 28
Replace Region dialog 27
requirements 3
Ruler View options
Feet.Frames Time Scale 75
Time Code Time Scale 75
S
Scrolling options
Continuous 25
Continuous Scrolling During Playback 25
Scrub Trim tool 25
scrubbing
with Scrub Trim tool 26
Secondary Time Code Ruler 75
sends
and multichannel mixing 52
multichannel 52
Session Data to Import menu 12
sessions
creating for surround mixing 44
signal routing
basics for surround 52
surround examples 58
Snap Pan to Speaker icons 66
snapshot automation 37
adding to empty automation playlists 38
and trim values 39
writing over existing automation 38
Split Into Mono Track command 51
Spot dialog
Use Subframes option 78
stereo tracks
replacing regions in 28
Sub Time Scale 77
subframes 78
sub-paths
examples for surround 55
Index 93
Page 100

surround
and sends 52
basic signal routing 52
center percentage (%) 71
configuring Pro Tools 49
configuring Pro Tools and sessions 44
discrete level, solo, mute 50
example 5.1 format paths 47
importing I/O Settings 46
pan playlists and automation 72
panning grids 61
settings files 44
using paths 55
using sub-paths, examples 55
SurroundScope 73
T
take over (surround pan) 67
TCE Edit to Timeline command 29
tempo map
importing 14
time code
redefining position 77
Time Code 2 ruler 75, 76
Time Code Mapping options 11
Time Code Time Scale 75
Time Compression/Expansion plug-in 29
Time Scale
Feet.Frames 75
Main 77
Sub 77
Time Code 75
Timebase rulers 75
Time Code 2 75
TL Space Native 90
Track menu
Split Into Mono command 51
tracks
5.1 format track layout 50
and surround 49
converting multichannel tracks into mono
tracks 51
trajectory panning 69
Trim Automation commands 40
Trim to All Enabled 40
Trim to Current 40
Trim to All Enabled Automation command 40
Trim to Current Automation command 40
Trim tools
Scrub Trim tool 25
trimming
regions with Scrub Trim tool 26
U
unlinking plug-in controls 54
Use Subframes option 78
V
video
Import Options 81
tracks 81
Video Rate Pull Up/Down 78
Video Universe window 85
W
website 4
Write 39
Write Automation commands 38, 39
writing
snapshot automation 37
Complete Production Toolkit Guide94
 Loading...