

Page 1
DarkCrystal HD Capture Station
/
AVerTV USB HD DVR
C874
English
Français
Español
Quick Guide
Page 2

Page 3

FCC NOTICE (Class B)
This device complies with Part 15 of the FCC Rules. Operation is subject to the following
two conditions: (1) this device may not cause harmful interference, and (2) this device must
operation.
Federal Communications Commission Statement
NOTE- This equipment has been tested and found to comply with the limits for a Class B digital device,
pursuant to Part 15 of the FCC Rules. These limits are designed to provide reasonable protection against
harmful interference in a residential installation. This equipment generates, uses and can radiate radio
frequency energy and, if not installed and used in accordance with the instructions, may cause harmful
interference to radio communications. However, there is no guarantee that interference will not occur in a
particular installation. If this equipment does cause harmful interference to radio or television reception,
which can be determined by tuning the equipment off and on, the user is encouraged to try to correct the
interference by one or more of the following measures:
‧ Reorient or relocate the receiving antenna.
‧ Increase the separation between the equipment and receiver.
‧ Connect the equipment into an outlet on a circuit different from that to which the receiver is connected.
‧ Consult the dealer or an experienced radio/television technician for help.
CAUTION ON MODIFICATIONS
To comply with the limits for the Class B digital device, pursuant to Part 15 of the FCC Rules, this devi ce
must be installed in computer equipment certified to comply with the Class B limits. All cables used to
connect the computer and peripherals must be shielded and grounded. Operation with non-certi fied
computers or non-shielded cables may result in interference to radio or television reception.
Changes and modifications not expressly approved by the manufacturer could void the user’s authority to
operate this equipment.
accept any interference received, including interference that may cause undesired
Page 4
European Community Compliance Statement
Disclaimer
All the screen shots in this documentation are only example images. The images may vary
depending on the product and software version. Information presented in this documentation
has been carefully checked for reliability; however, no responsibility is assumed for
inaccuracies. The information contained in this documentation is subject to change without
notice.
Copyright
©2011 by AVerMedia Technologies, Inc. All rights reserved.
No part of this document may be reproduced or transmitted in any form, or by any means
without the prior written permission of AVerMedia Technologies Inc. AVerMedia Technologies
Inc. reserves the right to modify its models, including their characteristics, specifications,
accessories and any other information stated herein without notice. The official printout of any
information shall prevail should there be any discrepancy between the information contained
herein and the information contained in that printout.
"AVerMedia" is a trademark (or registered trademark) of AVerMedia Technologies, Inc. Other
trademarks used herein for description purpose only belong to each of their companies.
THE MARK OF CROSSED-OUT WHEELED BIN INDICATES THAT THIS PRODUCT MUST
NOT BE DISPOSED OF WITH YOUR OTHER HOUSEHOLD WASTE. INSTEAD, YOU NEED
TO DISPOSE OF THE WASTE EQUIPMENT BY HANDING IT OVER TO A DESIGNATED
COLLECTION POINT FOR THE RECYCLING OF WASTE ELECTRICAL AND ELECTRONIC
EQUIPMENT. FOR MORE INFORMATION ABOUT WHERE TO DROP OFF YOUR WASTE
EQUIPMENT FOR RECYCLING, PLEASE CONTACT YOUR HOUSEHOLD WASTE DISPOSAL
SERVICE OR THE SHOP WHERE YOU PURCHASED THE PRODUCT.
Class B
This product is herewith confirmed to comply with the requirements set
out in the Council Directives on the Approximation of the laws of the
Member States relating to Electromagnetic Compatibility Directive
2004/108/EC.
Safety- Low Voltage Directive 2006/95/EC
ErP Directive- 2009/125/EC
Page 5

SAFETY Information
• Read Instructions - All the safety and operating instructions should be read when connecting and
operating your TV Tuner to help ensure your own personal safety and to protect your product from
potential damage.
• Retain Instr uctions - The safety and operating instructions should be retained for future reference.
• Heed Warnings - All warnings on the product and the operating instructions should be adhered to.
• Grounding - For continued protection against risk of electric shock and fire, this accessory should be
installed only to the products (such as, computer) equipped with a three-wire grounding plug, a plug
having a third (grounding) pin. This plug will only fit into a grounding-type power outlet. This is a safety
feature. If you are unable to insert the plug into the outlet, contact your electrician to replace the
obsolete outlet. Do not defeat the safety purpose of the grounding-type plug.
• Lightning - For added protection for this product during a lightning storm, or when it is left unattended
and unused for long periods of time, unplug the host system (Ex. computer) from the wall power outlet,
and disconnect the antenna or cable system. This will prevent damage to the product due to lightning
and power-line surges.
• Never insert anything metallic into the T V Tuner openings. Doing so may create the danger of electric shock.
• Openings in the TV Tuner cabinet are provided for ventilation. To prevent overheating, these openings
should not be blocked or covered. Avoid using the TV Tuner on a bed, sofa, rug, or other soft surface,
as doing so may block the ventilation openings in the cabinet. If you place the TV Tuner in a bookcase
or an enclosed space, be sure to provide adequate ventilation and air flow.
• Power Lines - An outside antenna system should not be located in the vicinity of overhead power
lines or other light or power circuits, or where it can fall into such power lines or circuits.
• Antenna Installation - When installing an outside antenna system, extreme care should be taken to
keep it from touching such power lines or circuits, as contact with them may be fatal.
• Outdoor Antenna Grounding - If an outside antenna is connected to the product, be sure that the
antenna system is grounded so as to provide some protection against voltage surges and built up
static charges. Article 810.21 of the National Electric Code, ANSI/NFPA No.70, provides information
with regard to proper grounding of the mast and supporting structure, grounding of the lead-in wire to
the antenna discharge unit, size of grounding conductors, location of antenna-discharge unit,
connection of grounding electrodes, and requirements for the grounding electrode.
• NOTE to CATV System Installer-This reminder is provided to call the CATV systems installer's
attention to Section 820.93 of the National Electric Code, ANSI/NFPA 70:2005 (for US/Canada) and/or
EN60728-11:2005 standard (for Europe), which provide guidelines for proper grounding and, in
particular, specify that the Coaxial cable shield shall be connected to the grounding system of the
building, as close to the point of cable entry as practical.
Page 6
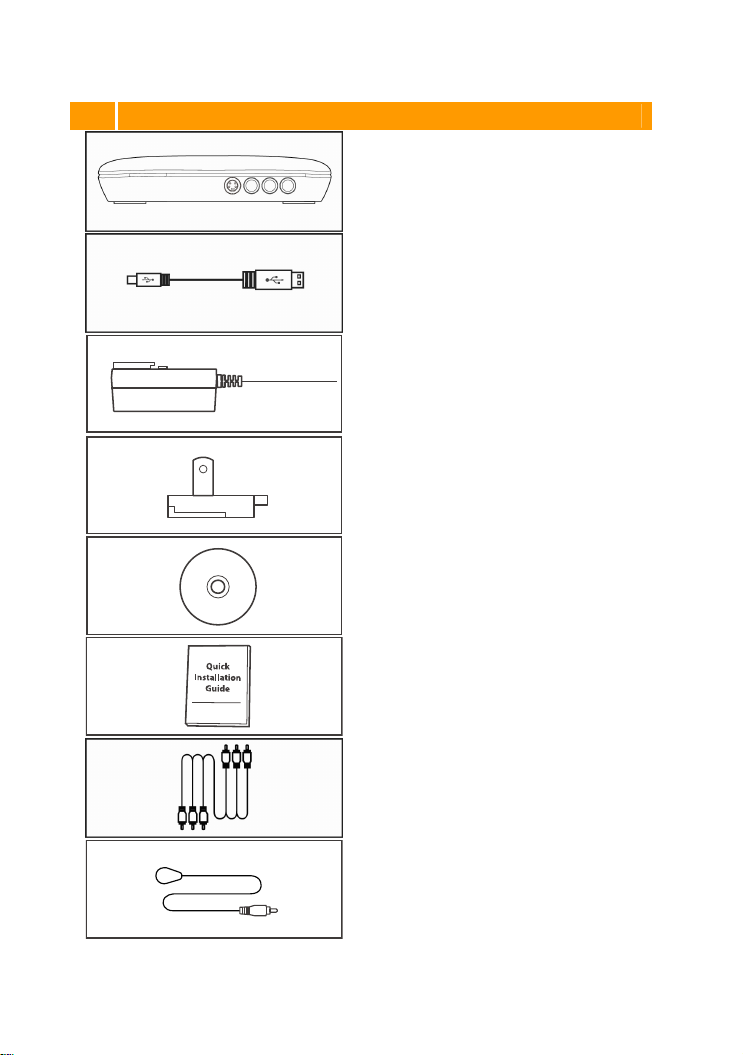
1 Package Contents
AVerMedia DarkCrystal HD Capture Station/AVerTV USB HD DVR
USB Cable
Power Adapter
Power Adapter Outlet Module
Installation CD
Quick Installation Guide
Component Video & Stereo Audio Cable
IR Blaster Cable
ENG-1
Page 7
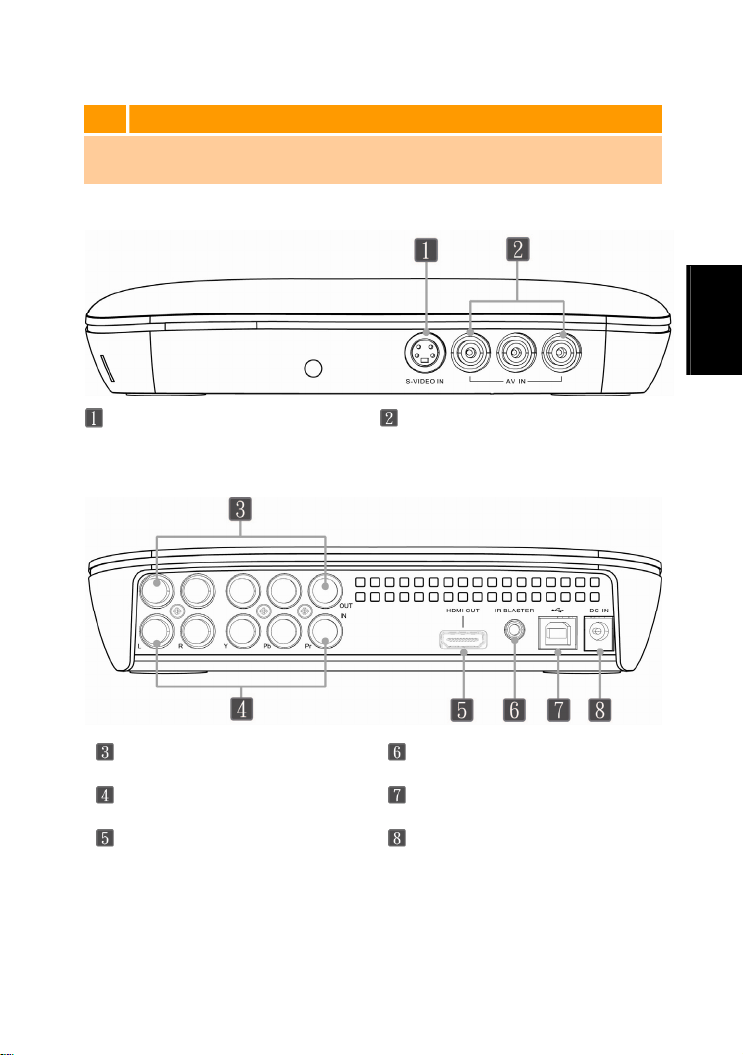
2 Hardware Installation
2.1 AVerMedia DarkCrystal HD Capture Station/AVerTV USB HD DVR Hardware Overview
2.1.1 Connection Ports
S-Video Input
Composite Video/ Left & Right Stereo Audio Input
English
Component Video / Left & Right
tput
Audio Ou
Component Video / Left & Right
Audio Input
HDMI Output
IR Blaster Port
USB Port (Type B)
Power Adapter Port
ENG-2
Page 8
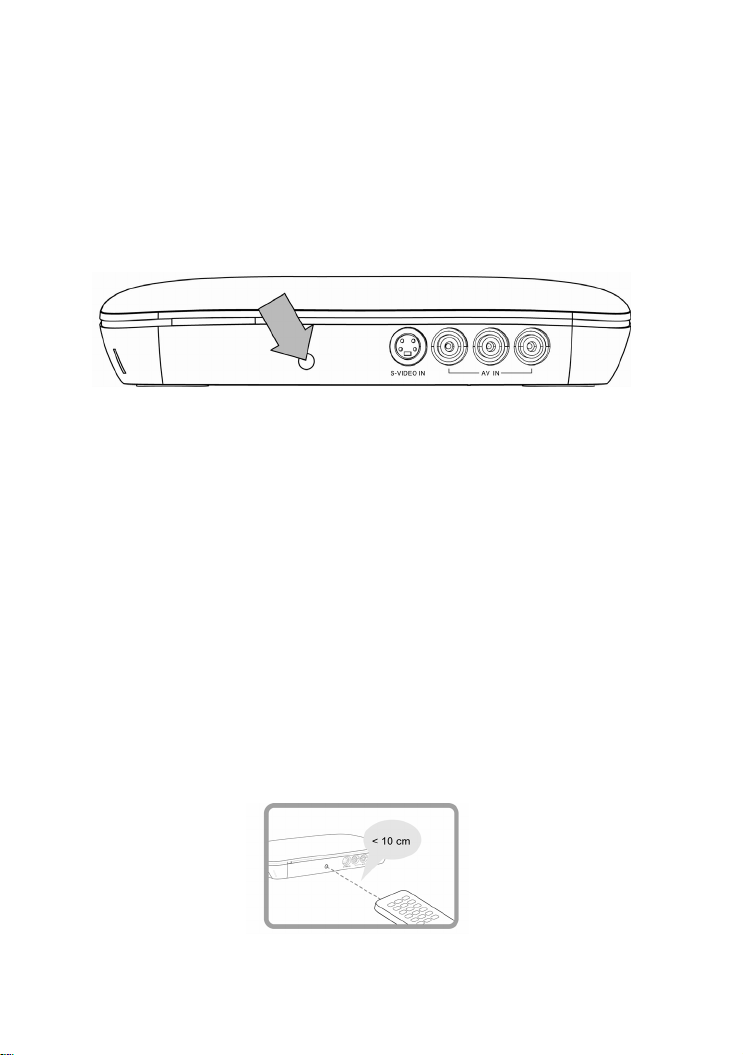
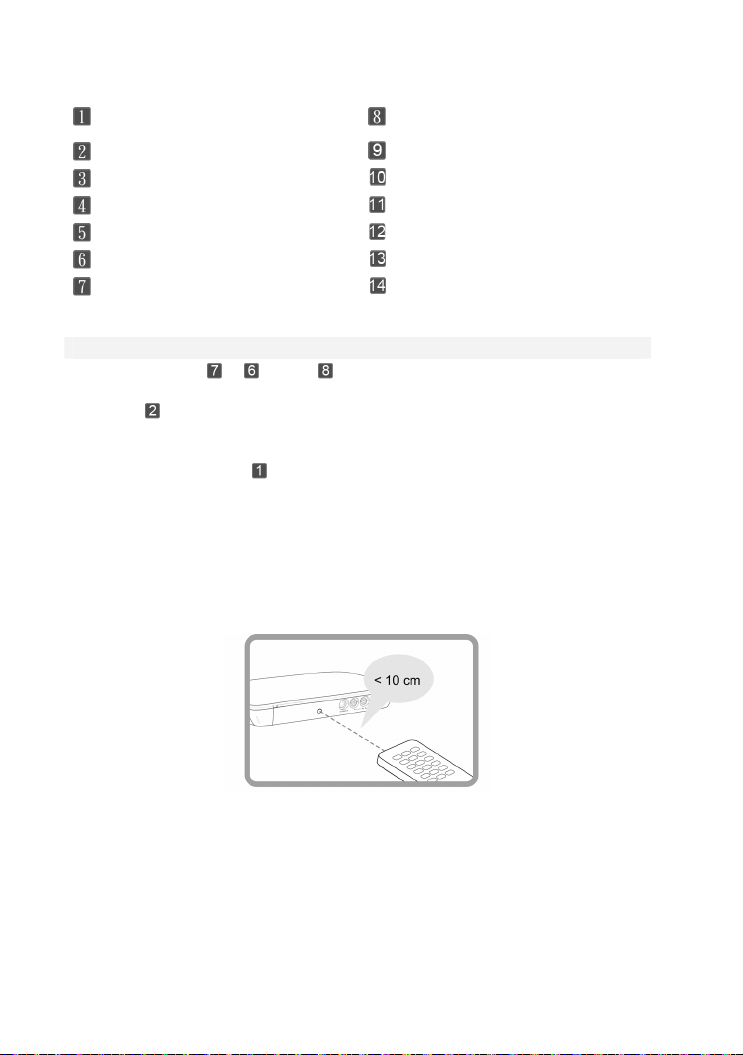
2.1.2 Infrared Sensor (for IR Learning)
Connect the AVerMedia DarkCrystal HD Capture Station/AVerTV USB HD DVR to a
set-top box, and you can use the built-in IR Learning function of the AVerMedia DarkCrystal
HD Capture Station/AVerTV USB HD DVR and the remote control of your set-top box to
have AVerMedia DarkCrystal HD Capture Station/AVerTV USB HD DVR memorize the
command signals of your set-top box and then control over it, arrange recording schedules
via the provided application.
•
Plug the IR blaster cable in to the IR blaster port on the AVerMedia DarkCrystal HD
Capture Station/AVerTV USB HD DVR. Position the IR Blaster transmitter in front of the
set-top box IR sensor window. Please refer to the set-top box user manual on where the IR
sensor is located.
• To have the AVerMedia DarkCrystal HD Capture Station/AVerTV USB HD DVR
IR-Learned the command signals of the connected set-top box and arrange recording
schedules, please install AVerMedia Scheduler for ArcSoft TotalMedia Extreme or
AV erM ed ia Plug-in for Windows Media Center.
• IR Learning works only when you directly point your set-top box remote control at
the infrared sensor of the AVerMedia DarkCrystal HD Capture Station/AVerTV
USB HD DVR at a close distance less than 10 cm (<5"). For better IR Learning
performance, please place both of them on a flat surface.
• During the IR Learning process, please be noted that you use the remote control
of your set-top box to pair with the AVerMedia DarkCrystal HD Capture
Station/AVerTV USB HD DVR.
ENG-3
Page 9
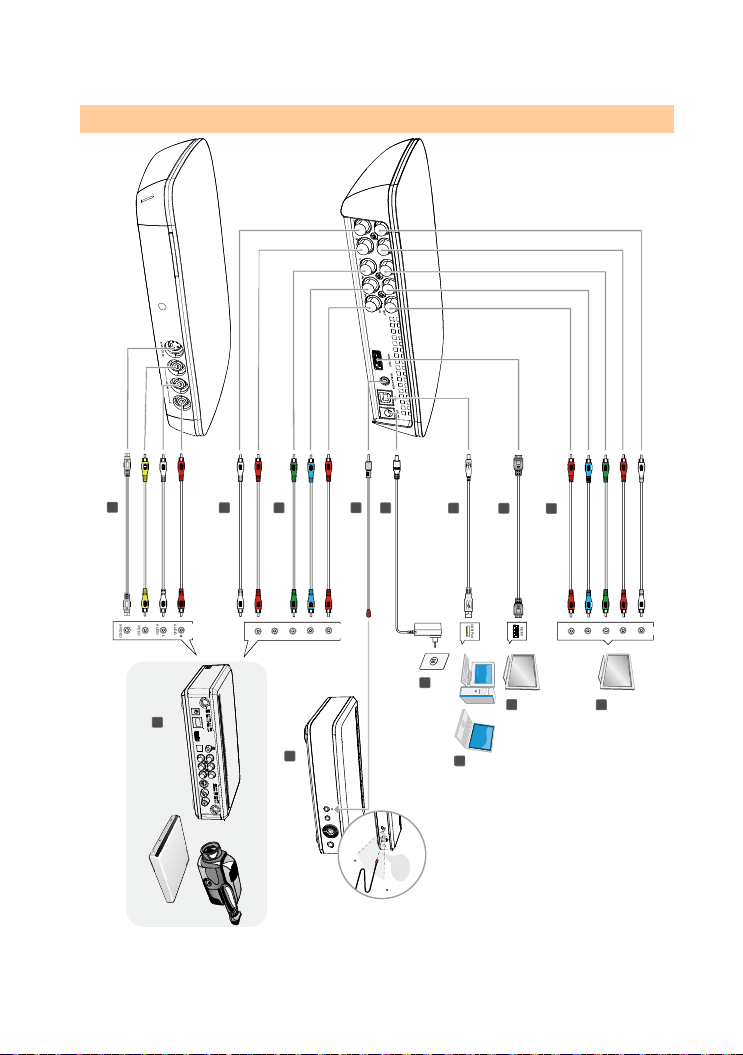
2.2 Making Hardware Connections
8
Composite Cable
(not supplied)
S-VIDEO
AUDIO
VIDEO
7
6
RCA Audio Cable
(not supplied)
O
AUDIO
U
T
L
R
Compoent Cable
(not supplied)
AUDIO
AUDIO
Y
R
L
5
4
IR Blaster Cable
Power Adapter& Plug
O
Pb
Pr
U
T
3
2
1
HDMI Cable
(not supplied)
USB Cable
USBPort
2.0
Component Video
& StereoA udioCable
AUDIO
HDMI
AUDIO
Pb
Pr
IN
Y
L
R
12
Wall Outl et
14
Set-top Box (Back)
Camcorder
VCR/VCD/DVD player
(not supplied)
13
Set-top Box (Front)
(not supplied)
30
<20cm
30
10
TV / LCD Monitor
9
TV
11
PC / Laptop
ENG-4
Page 10
Component Video & Stereo Audio Cable
HDMI Cable Output to TV TV
USB Cable connects to PC TV / LCD Monitor
Power Adapter & Plug PC / Laptop
IR Blaster Cable Wall Outlet
Component Cable Set-top Box (Front)
RCA Audio Cable Set-top Box (Back) / Camcorder /
Note
z
Choose either
to your set-top box.
z
Use as the output connection cable to your TV or LCD monitor only when you want
to playback the programs recorded on your PC/ Laptop with your
DarkCrystal HD Capture Station/AVerTV USB HD DVR
z
It is necessary to use
Learning
simultaneously watch one program when the other is being recorded.
z
During the IR Learning process, please be noted that you use the remote control of
your set-top box to pair with the
Station/AVerTV USB HD DVR
+
(HD) or (SD) as the input connection cable, one at a time,
as the output connection cable to your TV during the
process. Otherwise, use these connections optionally or when you want to
AVerMedia DarkCrystal HD Capture
.
Composite Cable
VCR/VCD/DVD player
.
AVerMedia
IR
ENG-5
Page 11

3 Installing Driver
1. Make sure all connections are firm,
secure and correct.
2. Boot up your PC.
3. Place the Installation CD into the
CD-ROM drive.
4. Click Install Driver to install the
driver for AVerMedia DarkCrystal
HD Capture Station/AVerTV USB
HD DVR.
Note: To see if the driver was installed successfully, check if the AVerMedia DarkCrystal HD
Capture Station/AVerTV USB HD DVR appears under Computer -> Manage -> Computer
Management -> System Tools -> Device Manager -> Sound, video and game
controllers.
4 Installing and Setting up the Applications
The AVerMedia DarkCrystal HD Capture Station/AVerTV USB HD DVR comes with a major
recording application: ArcSoft TotalMedia Extreme and a schedule recording plug-in for
Windows Media Center. Accompanied with the IR Learning function, not only can you use
Windows Media Center or Arcsoft TotalMedia Extreme to instant record the ongoing airing
programs, but also arrange recording schedules when you are away.
For W
indows Media Center u
complete the installation and the setups for the AVerMedia Plug-in and Windows Media
Center.
For Arcsoft TotalMedia Extreme u
complete the installation and the setups for Arcsoft TotalMedia Extreme and the AVe rM e di a
Scheduler.
4.1 Windows Media Center Users
4.1.1 Installing AVerMedia Plug-in
sers, please follow the steps in section 4.1.1 – 4.1.4 to
sers, please follow the steps in section 4.2.1 – 4.2.3 to
1. Click Install AVerMedia Plug-in to launch the
AVerMedia Plug-in Installshield Wizard.
Follow the on-screen instructions to continue.
ENG-6
Page 12
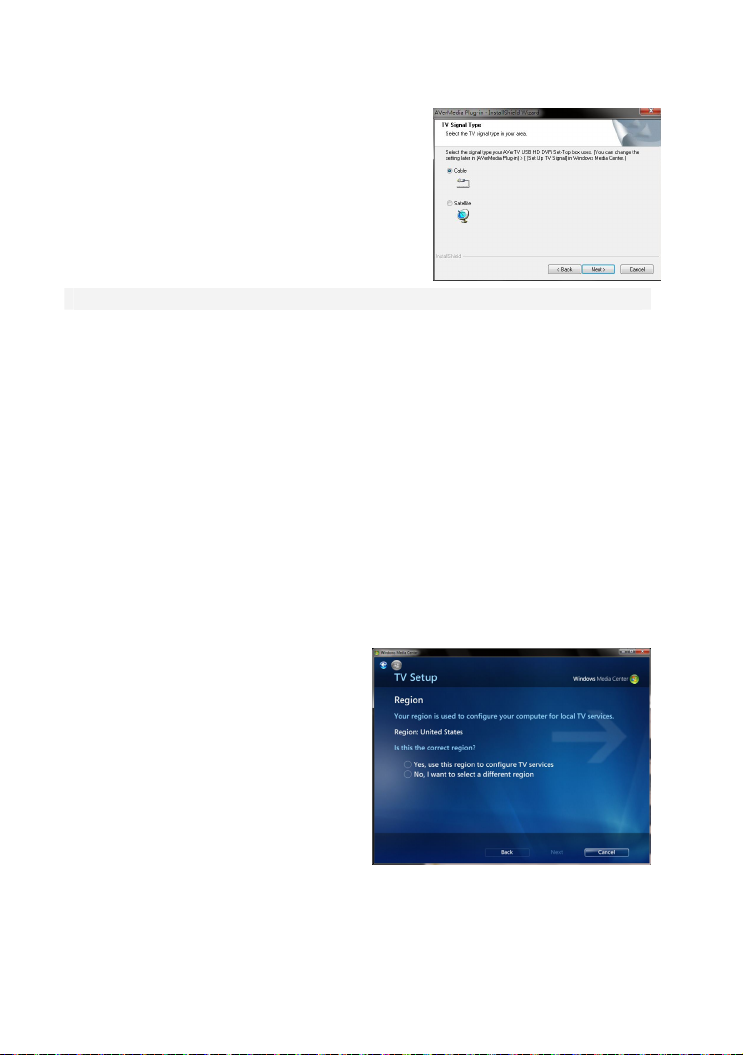
2. Select the signal type your set-top box uses. Click Next to continue.
3. Click Fi
nish
to exit when installation completes.
Note
z
You can change the setting of the TV signal type later in the
Windows Media Center -> Task
z
To check if the applications were installed successfully, find
under
Service
z
If the driver and the
AVerMedia Plug-in
including TV
Computer Management
AVerMedia Plug-in
appears in the start menu of the
Signal Type
->
Settings
->
Services and Applications
is installed successfully, a new category
&
Set up for Signal Quality
-> TV ->
TV Signal
Windows Media Center
.
TV Signal Type
->
AVerMedia MCE Support
under
Set Up TV Signal
->
Services
,
.
4.1.2 Activating and Setting up Windows Media Center and AVerMedia Plug-in
For first time users of TV watching via Wi
ndows Media Center, please follow the steps below
to 4.1.4 to complete the TV signal setup first.
For users who already completed the TV signal setup, please start from section 4.1
.3 To Set
up TV Signal Type via AVerMedia Plug-in.
1. Go to Task -> Settings -> TV -> TV Signal -> Set Up TV Signal.
2. Follow the on-screen instructions to
ct the r
sele
egion where your local TV
service is provided and enter the zip
code for TV Program Guide listing
downloads.
.
ENG-7
Page 13
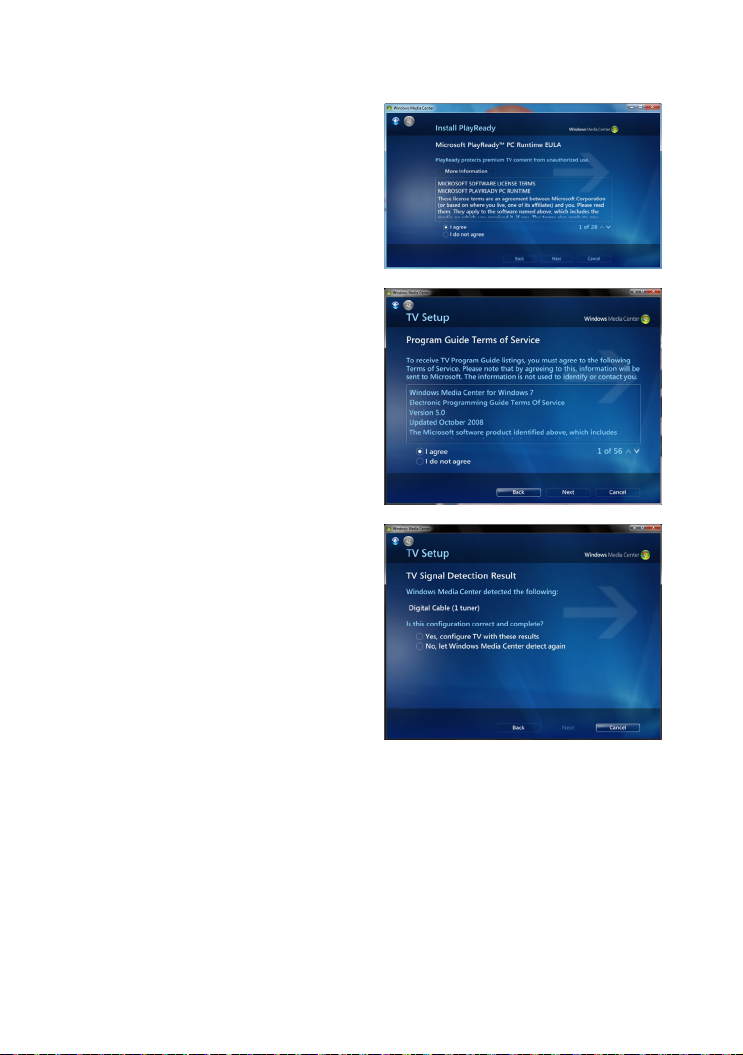
Note: For first time users, installation of
PlayReady is required for TV watching in
Windows Media Center.
Select I agre
agreement to the terms of service of
PlayReady and Next to start the
installation.
e to confirm your
3. Select I agre
agreement to the terms of service of
Program Guide Terms of Service
and click Next to start downloading
TV Program Guide.
4. Check to confirm if you want to use
the detec
Windows Media Center detect
again. If yes, click Next to continue.
e to confirm your
ted TV tuner or have
ENG-8
Page 14
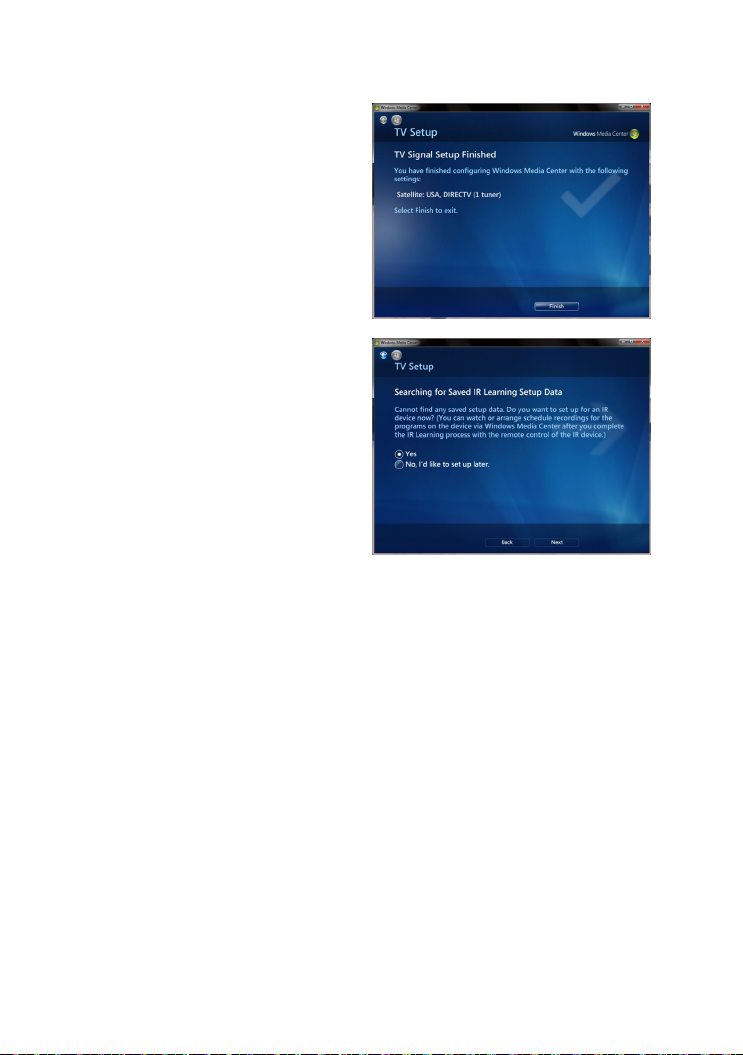
5. Click Finish to exit the TV Signal
Setup page and the previously
installed AVerMedia Plug-in will
directs you to the IR Learning setup
data search page.
6. Check to confirm if you want to start
Note: For in
or managing an existing IR Learning
setup data, please refer to Section 6
Using or Managing an Existing IR
Learning Data.
*Please make sure you have Internet access during download.
earning process right away.
the IR L
If yes, please refer to section 5 IR
ning to continue the process.
Lear
forma
tion on the setup of using
ENG-9
Page 15
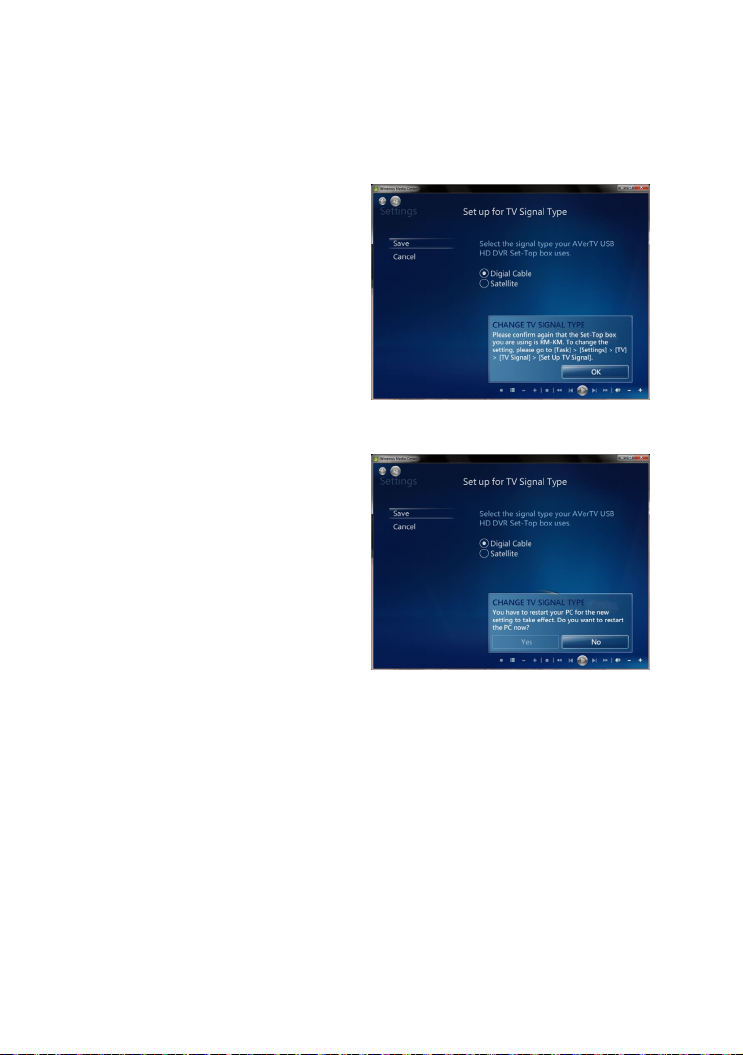
4.1.3 To Set up TV Signal Type via AVerMedia Plug-in
1. Go to Windows Media Center ->
AVerMedia Plug-in -> TV Signal
Type enter the setup page, select
the signal type your set-top box
uses and click OK to continue.
Note:
Any change of the TV signal type,
making
it different from that you set up in
Set Up TV Signal via Windows Media
Center in the previous step, restarting
the PC is required for this new setting to
take effect.
2. Click Ye
new effects to take effect.
Or
Click No to
Plug-in TV Signal Type settings
and the new setting would take
effect next time when you restart
your PC.
to restart your PC for the
s
it the AVe rM ed i a
ex
ENG-10
Page 16

4.1.4 To set up TV Signal Quality via AVerMedia Plug-in
1. Go to Windows Media Center ->
AVerMedia Plug-in -> Set up
Signal Quality to enter the setup
page.
2. Modify the values for video and
audio qua
lity
to your liking.
ENG-11
Page 17
4.2 ArcSoft TotalMedia Extreme Users
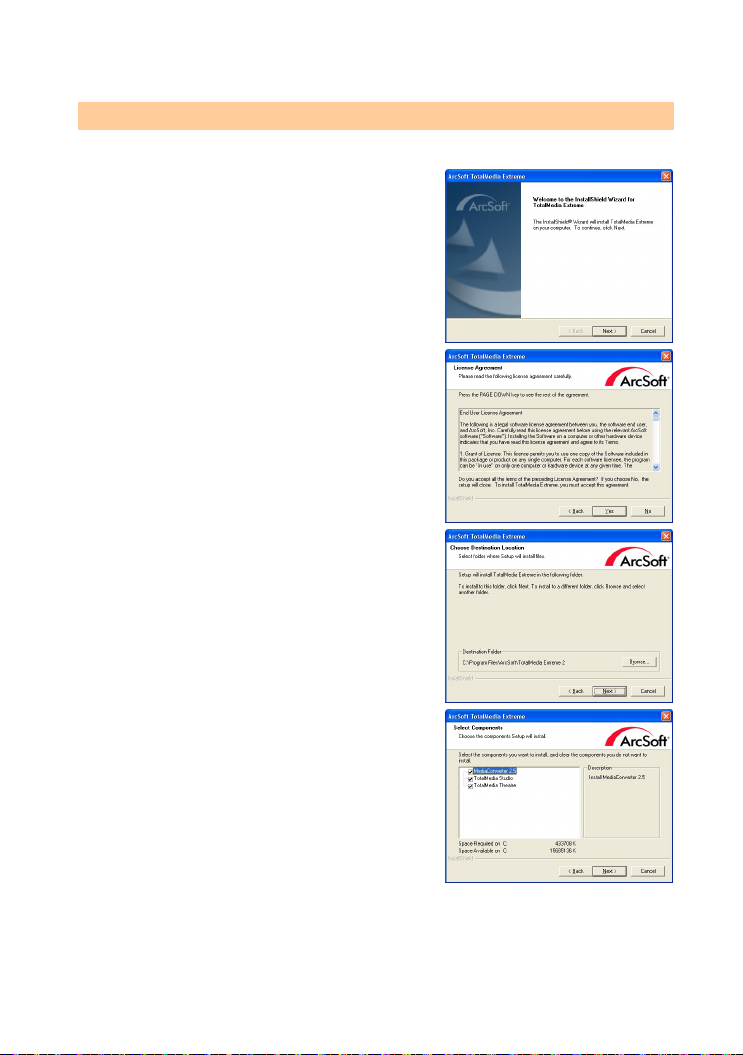
4.2.1. In Installing ArcSoft TotalMedia Extreme and AVerMedia Scheduler
1. When the Inst
click Next to continue.
2. Click Yes to confirm your agreement to the ArcSoft TotalMedia Extreme License Agreement.
3. To change to a different destination folder, click Browse, and click Next to continue.
allShield® Wizard appears,
4. Check to select the components you want
to install, and click Next to continue.
ENG-12
Page 18
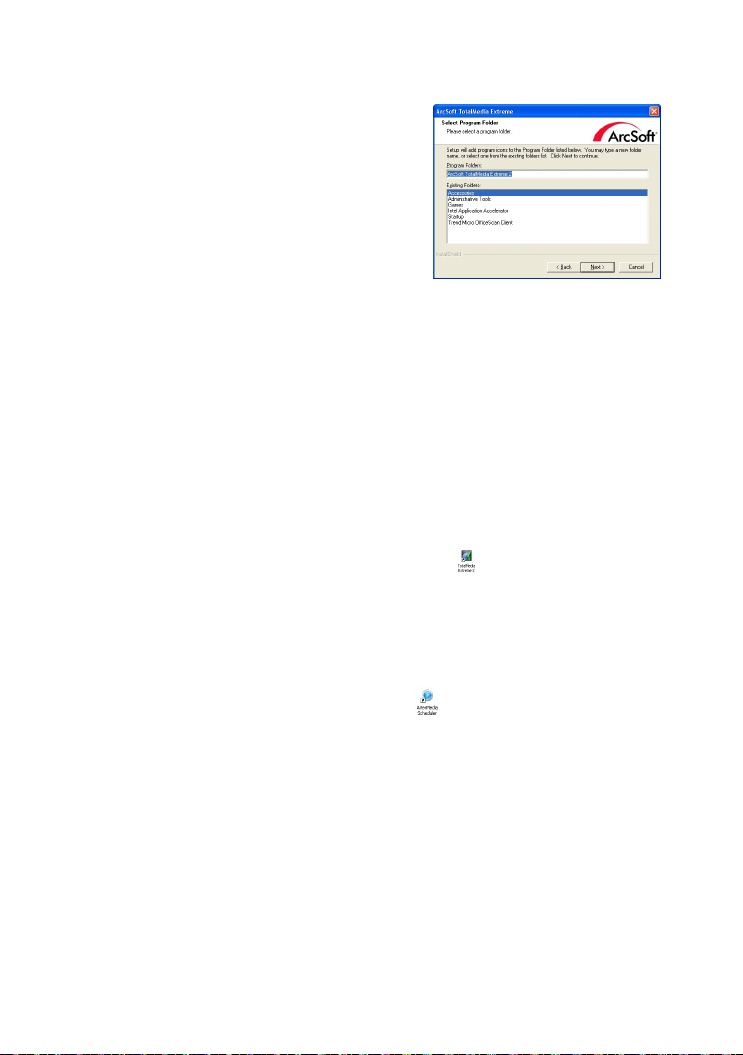
5. Select a program folder and click Next to begin the installation.
Note
z
To use schedule recording function via
the
AVerMedia Scheduler
main installation screen to begin. Follow the on-screen instructions to continue. Click
to exit when installation completes.
Finish
z
You need to restart your PC to make the installation and settings take effects.
z
For more instructions on how to use
files provided in the application.
Help
4.2.2 To Activate and set up ArcSoft TotalMedia Extreme
z Double-click on the
Or
Go to
z
4. 2.3 To Activate AVerMedia Scheduler:
z Double-click on the
Or
z Go to
Or
z Right click on the
corner of the screen.
Start
St
a
Æ
Æ
rt
Programs
Programs
is required. Click
cSoft TotalMedia Extreme
Ar
Æ
ArcSoft TotalMedia Extreme 3Æ TotalMedia Extreme 2
AVerM
edia Scheduler
Æ
AVerMedia Scheduler
AVerMedia Scheduler
ArcSoft TotalMedia Extreme,
Install AVerMedia Scheduler
ArcSoft TotalMedia Extreme
, please refer to the
icon on the desktop.
icon on the desktop.
Æ
AVerMedia Scheduler
launcher located on the lower right
installation of
on the
.
.
Note : If there is no IR Learning setup data saved when you first activate the AV
Scheduler, the IR Learning Wizard will start up automatically. Please refer to the
instructions in section 5 IR Learning.
ENG-13
e rM ed ia
Page 19

5 IR Learning
To schedule record either via
completion of the IR Learning process is required.
The
erMedia DarkCrystal HD Capture Station/AVerTV USB HD DVR
AV
the infrared command sequence from your set-top box remote control, turns on the set-top
box, switches channels on a satellite or cable set-top box by transmitting signals to the box
via an IR blaster cable and record programs according to the schedules you arrange when
you are away.
Windows Media Center
5.1 IR Learning for the First Time
or via the
AVerMedia Scheduler
then recognizes
, the
Follow the steps below to continue the auto-prompted
Media Center
setup or when you activating the
AVerMedia Scheduler
1. Follow the on-screen instructions to ensure
all devices are connected via cables
accordingly, plug the IR blaster cable into the
USB port on the
Capture Station/AVerTV USB HD DVR, place
the IR blaster transmitter at a close distance
near the IR sensor of the set-top box, and
power on all connected devices.
AVerMedia DarkCrystal HD
2. Use your remote control of your cable/satellite
TV set-top box and follow the on-screen
instructions to complete the IR Learning
process. Click Next to continue.
IR Learning Wizard
for the first time.
during
Windows
ENG-14
Page 20

3. Enter a name for the set-top box of this IR
Learning in the blank field.
4. Check to select how the TV channel shows
the channel number.
5. Check to select the maximum channel
number digits of all available channels.
6. Check to select the preferred confirmation for
channel switch.
ENG-15
Page 21

7. Make sure the operation distance between
the set-top box remote control and the
AVerMedia DarkCrystal HD Capture
Station/AVerTV USB HD DVR is within the
recommended range.
8. Follow the on-screen instructions and press
each corresponding key on the remote
control to complete the pairing task.
*Each key learning repeats once, and an “O”
appears each time
successful. The check sign indicates the
completion of the IR Learning of the specific
key.
when the lear
ning is
9. Use the on-screen keypad to complete the
assigned task and see if all commands are
responded correctly.
10. Use the on-screen keypad to complete the
assigned task and see if all commands are
responded correctly.
ENG-16
Page 22

11. Select the preferred interval between each
key pressed from the drop-down list.
12. Now the IR Learning is done. Select the “Create
a recording schedule now!” option if you want to
use schedule recording function right away.
Click Finish to close this wizard.
ENG-17
Page 23

Using, Deleting or Adding an Existing IR Learning
6
Data
6.1 Using an Existing IR Learning Setup Data
1. Click +/- on the right to select the IR
device. Cli
ck Next to continue.
2. Check to select the
type. Click Next to continue.
3. Follow the instructions in section 5 IR
Lear
ng to complete the process.
ni
A/V input connection
6.2 Deleting an Existing IR Learning Setup Data
1. Right-click the A
on the system status bar and select
Device Manager.
2. Check the box on the left of the unwanted IR
Lear
ning setup data and click
it.
* To call up the IR Learning Wizard, click on the upper left of the Device Manager box.
erMedia Scheduler icon
V
to delete
6.3 Calling up the IR Learning Wizard
1. Go to Start -> AVerMedia Scheduler -> IR Learning
Or
2. Activate Devi
ce Manager and click on the upper left of the window.
ENG-18
Page 24

1 Contenu de l’emballage
Station de capture AVerMedia DarkCrystal HD/AVerTV USB HD DVR
Câble USB
Adaptateur secteur
Module de prise pour la source d’alimentation
CD d’installation
Guide d’installation rapide
Câble composant vidéo et audio stéréo
Câble Émetteur IR
FRA-1
Page 25

2 Installation du matériel
2.1 Aperçu général sur le matériel de la station de capture AVerMedia
DarkCrystal HD/AVerTV USB HD DVR
2.1.1 Ports de connexion
Entrée S-vidéo Entrée composite vidéo et audio
stéréo gauche et droite
Français
Sortie composant vidéo et audio gauche et droite
Entrée composant vidéo et audio gauche et droite
Sortie HDMI Port de la source d’alimentation
FRA-2
Port émetteur IR Port USB (Type B)
secteur
Page 26

2.1.2 Capteur infrarouge (pour l’apprentissage IR)
Branchez la station de capture AVerMedia DarkCrystal HD/AVerTV USB HD DVR à un
décodeur, et vous pourrez utiliser la fonction intégrée d’apprentissage IR de la station de
capture AVerMedia DarkCrystal HD/AVerTV USB HD DVR ainsi que la télécommande de
votre décodeur afin que la station de capture AVerMedia DarkCrystal HD/AVerTV USB HD
DVR mémorise les signaux de la télécommande de votre décodeur et puisse donc le maîtriser,
et organiser des enregistrements planifiés à travers l’application fournie.
Branchez le câble de l’émetteur IR dans le port d’émetteur IR de la station de capture
•
de l’AVerMedia DarkCrystal HD/AVerTV USB HD DVR Placez l’émetteur IR en face
de la fenêtre de réception IR du décodeur. Voyez le mode d’emploi du décodeur pour
savoir où se trouve le capteur IR.
• Pour que la station de capture AVerMedia DarkCrystal HD/AVerTV USB HD DVR
« apprenne » via IR les signaux de la télécommande de votre décodeur et puisse organiser
des enregistrements planifiés, installez le planificateur d'AVerMedia pour ArcSoft
TotalMedia Extreme, ou bien AVerMedia Plug-in pour Windows Media Center.
• L’apprentissage IR ne fonctionne que si vous pointez directement la télécommande du
décodeur vers le capteur infrarouge de la station de capture AVerMedia DarkCrystal
HD/AVerTV USB HD DVR à une distance inférieure à 10 cm environ (4 à 5 pouces).
Pour que l’apprentissage IR fonctionne au mieux, posez les deux télécommandes
sur une surface plane.
• Pendant le processus d’apprentissage IR, vous allez « mettre d’accord » la
télécommande de votre décodeur avec la station de capture AVerMedia
DarkCrystal HD/AVerTV USB HD DVR.
FRA-3
Page 27

2.2 Branchements du matériel
8
Composite Cable
(not supplied)
S-VIDEO
AUDIO
VIDEO
7
6
RCA Audio Cable
(not supplied)
O
AUDIO
U
T
L
R
Compoent Cable
(not supplied)
AUDIO
AUDIO
Y
R
L
5
4
IR Blaster Cable
Power Adapter& Plug
O
Pb
Pr
U
T
3
2
1
HDMI Cable
(not supplied)
USB Cable
USBPort
2.0
Component Video
& StereoA udioCable
AUDIO
HDMI
AUDIO
Pb
Pr
IN
Y
L
R
12
Wall Outl et
14
Set-top Box (Back)
Camcorder
VCR/VCD/DVD player
(not supplied)
13
Set-top Box (Front)
(not supplied)
30
<20cm
30
10
TV / LCD Monitor
9
TV
11
PC / Laptop
FRA-4
Page 28

Câble composant vidéo et audio stéréo
Sortie du câble HDMI vers TV TV
Câble USB de connexion à l’ordinateur
Prise de l’adaptateur secteur Ordinateur de table / portable Câble Émetteur IR Prise murale secteur Câble composant Décodeur (vue frontale) Câble audio (prise RCA) Décodeur (vue arrière) / Caméscope /
NB :
z
Choisissez un câble de connexion d’entrée + (HD) ou (SD), un seul à la fois,
pour votre décodeur.
z
N’utilisez le câble de connexion de sortie vers la TV ou le moniteur LCD que si vous
voulez lire des émissions enregistrées dans votre ordinateur à l’aide de votre
capture
z
Pour le processus d’
vers la TV. Autrement, vous pouvez utiliser ces connexions optionnellement lorsque
vous voulez regarder une émission pendant qu’une autre est en cours
d’enregistrement.
z
Pendant le processus d’apprentissage IR, vous allez « mettre d’accord » la
télécommande de votre décodeur avec la
DarkCrystal HD/AVerTV USB HD DVR
AVerMedia DarkCrystal HD/AVerTV USB HD DVR
apprentissage IR
Câble composite
Écran TV /LCD
Lecteur VCR/ VCD/ DVD
.
, il faut utiliser le câble de connexion de sortie
station de capture AVerMedia
.
station de
FRA-5
Page 29

3 Installation du logiciel pilote
1. Assurez-vous que tous les
branchements tiennent bien et qu’il
n’y ait pas d’erreurs.
2. Démarrez votre ordinateur.
3. Mettez le CD d’installation dans le
lecteur CD-ROM.
4. Cliquez sur Install Driver (installation
du pilote) pour installer le logiciel
pilote de la station de capture
AVerMedia DarkCrystal HD/AVerTV
USB HD DVR
NB : Pour vérifier que le logiciel ait été installé avec succès, voyez si la station de capture
AVerMedia DarkCrystal HD/AVerTV USB HD DVR apparaît bien sous Poste de travail ->
Gérer -> Gestion de l’ordinateur -> Outils système -> Gestionnaire de périphériques ->
Contrôleurs son, vidéo et jeu.
4 Installation et configuration des applications
La station de capture AVerMedia DarkCrystal HD /AVerTV USB HD DVR est fournie avec
une puissante application d’enregistrement : ArcSoft TotalMedia Extreme et un plug-in
d’enregistrement planifié pour Windows Media Center. En disposant aussi de la fonction
apprentissage IR, vous pouvez non seulement utiliser Windows Media Center ou Arcsoft
TotalMedia Extreme pour enregistrer à l’instant des émissions en cours, mais aussi planifier
des enregistrements à effectuer en votre absence.
Les utilisateurs de Wi
4.1.4 pour effectuer l’installation et la configuration pour AVerMedia Plug-in et Windows
Media Center.
Les utilisateurs d’Ar
à 4.2.3 pour effectuer l’installation et la configuration pour Arcsoft TotalMedia Extreme et le
planificateur AVerMedia Scheduler.
ndows Media Center devront suivre les pas des paragraphes 4.1.1 à
csoft TotalMedia Extreme devront suivre les pas des paragraphes 4.2.1
FRA-6
Page 30

4.1 Utilisateurs de Windows Media Center
4.1.1 Installation du plug-in AVerMedia
1. Cliquez sur Install (installer)
AVerMedia Plug-in pour lancer
l’assistant d’installation d’AVerMedia
Plug-in. Pour continuer, suivez les
instructions qui s’affichent sur l’écran.
2. Sélectionnez le type de signal utilisé par
votre décodeur. Appuyez sur Next
(suivant) pour continuer.
3. Cliquez sur Finish (terminer) lorsque
l’installation est achevée.
NB :
z
Vous pouvez changer le paramétrage du type de signal TV plus tard, dans
(type de signal TV) sous
Type
TV -> Signal TV -> Paramétrage du signal TV.
z
Pour vérifier que les applications se soient installées avec succès, trouvez
MCE Support Service
Services.
z
Si le logiciel pilote et le plug-in AVerMedia se sont installés avec succès, une
nouvelle catégorie de plug-in AVerMedia s’affiche dans le menu Démarrer de
Windows Media Center, comprenant le type de signal TV et la configuration de
qualité du signal.
Windows Media Center -> Tâche -> Configuration ->
sous
Gestion de l’ordinateur
->
Services et applications
FRA-7
TV Signal
AVe r Me di a
->
Page 31

4.1.2 Activation et configuration de Windows Media Center et du plug-in
rMe di a
AVe
suivre les instructions ci-aprés jusqu’au paragraphe 4.1.4 pour effectuer d’abord la
configuration du signal TV.
Quant aux usagers qui ont déjà complété la configuration du signal TV, ils doivent commencer au paragraphe 4.1.3 Configuration du signal TV via le plug-in AVerMedia.
Si vous êtes un nouvel usager de la TV via Windows Media Center, veuillez
1.
Aller à la tâche -> Paramétrage -> TV -> Signal TV -> Configuration du signal TV.
2. Suivez les instructions qui s’affichent
sur l’écran pour sélectionner la région
fournissant votre service TV local, et
saisissez le code postal pour le
téléchargement des listes du guide
des programmes TV.
Observation:
Pour les nouveaux utilisateurs, il est
ssa
ire d’installer PlayReady pour
néce
regarder la TV sous Windows Media
Center.
Sélectionnez « J’accepte » pour confirmer votre accord sur les conditions de service de PlayReady, puis « Suivant » pour lancer l’installation.
3. Sélectionnez « J’accepte » pour
confirmer votre accord sur les
conditions de service du Guide des
Programmes puis « Suivant » pour
lancer le téléchargement du guide
des programmes TV .
FRA-8
Page 32

4. Cochez pour confirmer si vous
souhaitez utiliser le syntoniseur TV
détecté, ou si vous voulez que
Windows Media center fasse une
nouvelle recherche. Si c’est
« Oui », cliquez sur Suivant pour
continuer.
5. Cliquez sur Te rmi ne r pour quitter la
page de configuration du signal
TV, et le plug-in AVerMedia
préalablement installé vous redirigera
vers la page de recherche des
données pour la configuration de
l’apprentissage IR.
6. Cochez pour confirmer si vous voulez
lancer tout de suite le processus
d’apprentissage IR.
Si oui, voyez la section 5
pprentissage IR) pour continuer le
(A
processus.
Observation : Po
le paramétrage de l’utilisation ou de la
gestion de données de configuration d’un
apprentissage IR déjà existant, voyez la
section 6 (Utilisation ou gestion des
données d’un apprentissage IR déjà
existant).
ur des informations sur
*Assurez-vous d’avoir accès à Internet pendant le téléchargement.
FRA-9
Page 33

4.1.3 Configuration du type de signal TV via le plug-in AVerMedia
1. Allez à Windows Media Center ->
Plug-in AVerMedia -> Type de
signal TV, entrez à la page de
configuration, sélectionnez le type
de signal utilisé par votre décodeur
et cliquez sur OK pour continuer.
Observation : Un redémarrage de l’ordinateur est nécessaire pour la prise d’effet de tout
changement dans le type de signal modifiant votre configuration faite via Windows
Media Center au pas précédent.
2. Cliquez sur Oui pour redémarrer
votre ordinateur afin que les
nouvelles modifications prennent
effet.
Ou bien :
Cliquez sur Non pour qui
configuration du type de signal TV
du plug-in AVerMedia ; la nouvelle
configuration prendra effet la
prochaine fois que vous
redémarrerez l’ordinateur.
4.1.3 Configuration de la qualité du signal TV via le plug-in AVerMedia
tter la
1. Allez à Windows Media Center ->
Plug-in AVerMedia ->
Configuration de la qualité du
signal pour entrer à la page de
configuration.
2. Modification à votre goût des valeurs
de qualité vidéo et audio.
FRA-10
Page 34

4.2 Utilisateurs d’ArcSoft TotalMedia Extreme
4.2.1. Installation d’ArcSoft TotalMedia Extreme et du planificateur
d’AverMedia.
1. Lorsque l’assistant d’installation
Insta
sur Suivant pour continuer.
2. Cliquez sur Oui pour confirmer votre
acceptation de l’accord de licence
d’ArcSoft TotalMedia Extreme.
3. Pour changer le dossier de destination,
cliquez sur Rechercher, puis cliquez sur
Suivant pour continuer.
llShield
®
Wizard s’affiche, cliquez
4. Cochez pour sélectionner les composants
que vous souhaitez installer, puis cliquez
sur Suivant pour continuer.
FRA-11
Page 35

5. Sélectionnez un dossier programme et cliquez sur Suivant pour démarrer l’installation.
NB :
z
Pour utiliser la fonction
faut installer le planificateur d’
Installer le planificateur AVerMedia
continuer, suivez les instructions qui s’affichent sur l’écran. Cliquez sur
(terminer) lorsque l’installation est achevée.
z
Vous devrez redémarrer votre ordinateur pour que l’installation et les paramètres
introduits prennent effet.
z
Pour tout complément d’information sur la manière d’utiliser
Extreme,
4.2.2 Activation et configuration d’ArcSoft TotalMedia Extreme
z Double-cliquez sur l’icône
bureau.
Ou bien :
z Allez à
4.2.3 Pour ac ti ve r le planificateur d’AVerMedia :
z Double-cliquez sur l’icône
Ou bien : z Allez à
Ou bien :
z Cliquez du bouton droit sur le lanceur du
Extreme 2
trouve dans votre bureau.
d’AVerMedia
situé au coin inférieur droit de l'écran.
consultez les fichiers d’
Démarrer
Æ
.
Démarrer
Æ
.
enregistrement planifié
AVerMedia Scheduler.
Aide
d’
ArcSoft TotalMedia Extreme
du planificateur d’
Æ
ArcSoft TotalMedia Extreme 3Æ TotalMedia
Programmes
Programmes
Æ
Planificateur d’AVerMedia
via
ArcSoft TotalMedia Extreme,
Pour commencer,
sur l’écran principal d’installation. Pour
présents dans l’application.
ArcSoft TotalMedia Extreme
planificateur AVerMedia
ArcSoft TotalMedia
qui se trouve dans votre
cliquez sur
Finish
Æ
Planificateur
il
qui se
qui est
Observation : S’il
lors de la première activation du planificateur d’AVe rM ed i a, l’assistant de l’apprentissage
IR démarrera automatiquement. Voyez les instructions de la section 5 (Apprentissage IR).
n’y a pas de données de configuration d’apprentissage IR d’enregistrées
FRA-12
Page 36

5 Apprentissage IR
Pour planifier l'enregistrement, que ce soit via
d’
AVerMedia
La
station de capture AVerMedia DarkCrystal HD/AVerTV USB HD DVR
la séquence de la commande infrarouge de la télécommande de votre décodeur, allumera le
décodeur, changera de chaîne dans un décodeur par satellite ou par câble en envoyant des
signaux au décodeur à travers un câble émetteur d’IR et enregistrera des émissions en votre
absence selon votre planification.
, il faut effectuer le processus d’apprentissage IR.
Windows Media Center
5.1 Premier apprentissage IR
ou via le
planificateur
reconnaîtra alors
Suivez les pas ci-après pour suivre le guidage automatique de
pendant la configuration de
IR
planificateur d’AVerMedia
Windows Media Center
pour la première fois.
ou lorsque vous activez le
1. Suivez les instructions de l’écran pour vous
assurer que tous les périphériques sont
correctement branchés à l’aide de câbles,
branchez le câble de l’émetteur IR dans le
port USB de la station de capture
DarkCrystal HD Capture Station/AVerTV USB
HD DVR, placez l’émetteur IR très près du
capteur IR du décodeur, et allumez tous les
périphériques qui sont branchés.
AVer Me dia
2. Utilisez la télécommande de votre décodeur
câble ou satellite, et suivez les instructions de
l’écran pour compléter le processus
d’apprentissage IR. Appuyez sur Next
(suivant) pour continuer.
l'assistant d’apprentissage
FRA-13
Page 37

3. Saisissez un nom pour le décodeur de cet
apprentissage IR dans le champ qui apparaît
en blanc.
4. Cochez pour sélectionner la manière dont
s’affiche le n
o
de la chaîne.
5. Cochez pour sélectionner le nombre maximal
de chiffres des n
chaînes disponibles.
os
de chaîne de toutes les
6. Cochez pour sélectionner votre manière
préférée de confirmer les changements de
chaîne.
FRA-14
Page 38

7. Assurez-vous que la distance entre la
télécommande du décodeur et la station de
capture AVerMedia DarkCrystal HD/AVerTV
USB HD DVR se trouve dans la plage
recommandée.
8. Suivez les instructions sur l’écran et appuyez
sur chacune des touches correspondantes de
la télécommande pour compléter
l’alignement.
L'apprentissage de chaque touche se répète
une fois et un « O » s'af
l’apprentissage a eu lieu avec succès. Le
signe V indique la bonne fin de
l’apprentissage IR pour chacune des touches.
fiche lorsque
9. Utilisez le clavier virtuel de l’écran pour
achever la tâche assignée et vérifier que
toutes les commandes répondent
correctement.
10. Utilisez le clavier virtuel de l’écran pour
achever la tâche assignée et vérifier que
toutes les commandes répondent
correctement.
FRA-15
Page 39

11. Sélectionnez dans la liste déroulante
l’intervalle préféré entre chaque pression sur
une touche.
12. L’apprentissage IR est terminé. Sélectionnez
l’option « créer une planification
d’enregistrement maintenant » si vous voulez
utiliser tout de suite la fonction d’enregistrement
planifié. Cliquez sur « Ter mine r » pour fermer
cet assistant.
6
6.1 Utilisation de données de configuration d’apprentissage IR existantes
1. Cliquez à droite sur +/– pour sélectionner
Utilisation, effacement ou ajout à des données d’apprentissage IR existantes
le périphérique IR. Appuyez sur Next
(suivant) pour continuer.
2. Cochez pour sélectionner le type de
connexion A/V. Appuyez sur Next
(suivant) pour continuer.
3. Suivez les instructions de la section 5
(Apprentissage IR) pour compléter le
processus.
FRA-16
Page 40

6,2 Effacement de données de configuration d’apprentissage IR existantes
1. Cliquez du bouton droit sur l’icône du
planificateur d’AVerMedia dans la barre
d’état système et sélectionnez Gestionnaire
de périphériques.
2. Cochez la case qui se trouve à gauche des
données de configuration d’Apprentissage
IR non voulues, et cliquez sur
effacer.
* Pour appeler l’assistant d’Apprentissage IR,
cliquez sur
de dialogue du gestionnaire de
périphériques.
6.3 Pour appeler l’assistant de l’apprentissage IR
1. Allez à Démarrer -> Planificateur d’AVerMedia -> Apprentissage IR
Ou bien :
2. Activez le gestionnaire de périphériques et cliquez sur en haut à gauche de la
fenêtre.
pour les
en haut à gauche de la boîte
FRA-17
Page 41

Page 42

1 Contenido del paquete
AVerMedia DarkCrystal HD Capture Station/AVerTV USB HD DVR
Cable USB
Adaptador de corriente
Módulo de salida del adaptador de corriente
CD de instalación
Guía de instalación rápida
Cable de video componente y sonido estereofónico
Cable del emisor de rayos infrarrojos
ESN-1
Page 43

2 Instalación del Hardware
2.1 AVerMedia DarkCrystal HD Capture Station/AVerTV USB HD DVR Vistazo del Hardware
2.1.1 Puertos de conexión
Entrada de S-Video
Video compuesto/ Entrada de sonido
estereofónico izquierda y derecha
Español
Video componente / Salida de
zquierda y derecha
sonido i
Video componente / Entrada de
zquierda y derecha
sonido i
Salida HDMI
Puerto del emisor de rayos infrarrojos
Puerto USB (Tipo B)
Puerto del adaptador de corriente
ESN-2
Page 44

2.1.2 Sensor de rayos infrarrojos (para reconocimiento)
Conecte la AVerMedia DarkCrystal HD Capture Station/AVerTV USB HD DVR a un
decodificador, y puede utilizar la función integrada de reconocimiento de rayos infrarrojos de
la AVerMedia DarkCrystal HD Capture Station/AVerTV USB HD DVR y el control remoto
de su decodificador de la AVerMedia DarkCrystal HD Capture Station/AVerTV USB HD
DVR para memorizar las señales de comando de su decodificador y controlarla, organizar
programaciones mediante la aplicación dada.
Conecte el cable del emisor de rayos infrarrojos en el puerto respectivo en la AV er M ed i a
•
DarkCrystal HD Capture Station/AVerTV USB HD DVR. Coloque el transmisor del emisor
de rayos infrarrojos en el frente de la ventana del sensor de rayos infrarrojos del
decodificador. Por favor consulte el manual del usuario del decodificador para ver dónde se
encuentra dicho sensor.
• Para que la AVerMedia DarkCrystal HD Capture Station/AVerTV USB HD DVR IR
reconozca las señales de comando del decodificador conectado y organizar
programaciones, por favor, instale AVerMedia Scheduler para ArcSoft TotalMedia Extreme o
el plugin de AVerMedia para Windows Media Center.
• El reconocimiento de rayos infrarrojos sólo funciona cuando usted apunta
directamente el control remoto del decodificador al sensor de rayos infrarrojos de
la AVerMedia DarkCrystal HD Capture Station/AVerTV USB HD DVR a una
corta distancia inferior a 10 cm (< 5"). Para un mejor rendimiento en el
reconocimiento, colóquelos sobre una superficie plana.
• Durante el proceso de reconocimiento de rayos infrarrojos, por favor, sepa que
utiliza el control remoto del decodificador para conectarse con la AVerMedia
DarkCrystal HD Capture Station/AVerTV USB HD DVR.
ESN-3
Page 45

2.2 Realización de conexiones de Hardware
8
Composite Cable
(not supplied)
S-VIDEO
AUDIO
VIDEO
7
6
RCA Audio Cable
(not supplied)
O
AUDIO
U
T
L
R
Compoent Cable
(not supplied)
AUDIO
AUDIO
Y
R
L
5
4
IR Blaster Cable
Power Adapter& Plug
O
Pb
Pr
U
T
3
2
1
HDMI Cable
(not supplied)
USB Cable
USBPort
2.0
Component Video
& StereoA udioCable
AUDIO
HDMI
AUDIO
Pb
Pr
IN
Y
L
R
12
Wall Outl et
14
Set-top Box (Back)
Camcorder
VCR/VCD/DVD player
(not supplied)
13
Set-top Box (Front)
(not supplied)
30
<20cm
30
10
TV / LCD Monitor
9
TV
11
PC / Laptop
ESN-4
Page 46

Cable de video componente y sonido estereofónico
Salida de cable HDMI al televisor Te le v is o r El cable USB se conecta a la PC Televisor / Monitor LCD Adaptador de corriente y enchufe PC / Computadora de escritorio Cable del emisor de rayos infrarrojos Salida de la pared Cable componente Decodificador (Frente) Cable de sonido RCA Decodificador (Atrás) / Videocámara /
Nota
z
Escoja ya sea + (HD) r (SD) como el cable de conexión de entrada, uno a la
vez para el decodificador.
z
Utilice como el cable de conexión de salida a su televisor o monitor LCD monitor
sólo cuando quiere reproducir los programas grabados en su PC/ Computadora
portátil con su
z
Es necesario usar como el cable de conexión de salida a su televisor durante el
proceso de reconocimiento de aprendizaje de rayos infrarrojos. De lo contrario, utilice
estas conexiones opcionalmente o cuando desea presenciar simultáneamente un
programa cuando el otro está siendo grabado.
z
Durante el proceso de reconocimiento de rayos infrarrojos, por favor, sepa que utiliza
el control remoto del decodificador para conectarse con la
Capture Station/AVerTV USB HD DVR
AVerMedia DarkCrystal HD Capture Station/AVerTV USB HD DVR
Cable compuesto
Reproductor de VCR/VCD/DVD
.
AVerMedia DarkCrystal HD
.
ESN-5
Page 47

3 Instalación del controlador
1. Asegúrese de que todas las
conexiones sean firmes, seguras y
correctas.
2. Reinicie su PC.
3. Coloque el CD de instalación CD en
la unidad de CD-ROM.
4. Haga clic en Install Driver para
instalar el controlador para
AVerMedia DarkCrystal HD
Capture Station/AVerTV USB HD
DVR.
Nota: Para ver si el controlador se instaló con éxito, verifique si la AVerMedia DarkCrystal
HD Capture Station/AVerTV USB HD DVR aparece bajo Computer -> Manage ->
Computer Management -> System Tools -> Device Manager -> Sound, video and game
controllers.
4 Instalación y configuración de las aplicaciones
La AVerMedia DarkCrystal HD Capture Station/AVerTV USB HD DVR viene con una
aplicación de grabación principal: ArcSoft TotalMedia Extreme y un plugin de programación
para Windows Media Center. Acompañado con la function IR Learning, no solo puede usar
Windows Media Center o Arcsoft TotalMedia Extreme para grabar instantáneamente
programas continuos sino también organizar programaciones cuando usted está ausente.
Para los usuarios de Wi
4.1.4 para completar la instalación y las configuraciones para la AVerMedia Plug-in y
Windows Media Center.
ndows Media Center, por favor siga los pasos en la sección 4.1.1 –
Para los usuarios de Arcsoft TotalMedia Extreme, por favor siga los pasos en la sección
4.2.1 – 4.2.3 para completar la instalación y las configuraciones para Arcsoft TotalMedia
Extreme y el AVerMedia Scheduler.
ESN-6
Page 48

4.1 Usuarios de Windows Media Center
4.1.1 Instalación del plugin de AVerMedia
1. Haga clic en Install AVerMedia Plug-in para
iniciar el AVerMedia Plug-in Installshield
Wizard. Siga las instrucciones que aparecen en
pantalla para continuar.
2. Seleccione el tipo de señal que utiliza el decodificador. Haga clic en Next para continuar.
3. Haga clic en Fi
instalación.
n
ish para salir cuando termine la
Nota
z
Puede cambiar la configuración en el tipo de señal de televisión después en
bajo
Type
TV Signal.
z
Para comprobar si se instalaron con éxito las aplicaciones, encuentre
Support Service
Services
z
Si el controlador y el plugin de AVerMedia se instalaron correctamente,
aparecerá una nueva categoría AVerMedia Plug-in en el menú de inicio del
Windows Media Center, incluso TV Signal Type y Set up for Signal Quality.
Windows Media Center -> Task -> Settings -> TV -> TV Signal -> Set Up
bajo
.
Computer Management
->
Services and Applications
TV Signal
AVerMedia MCE
->
ESN-7
Page 49

4.1.2 Activación y configuración de Windows Media Center y el plugin de AVe rM ed ia
Para los usuarios de primera vez que ven televisión mediante Wi
los pasos abajo de 4.1.4 para primero completar la configuración de la señal de televisión.
Para los usuarios que ya terminaron de configurar la señal de televisión, comiencen desde la
sección 4.1.3 Para configurar un tipo de señal de televisión mediante el plugin de
AVerMedian.
1. Vaya a Task -> Settings -> TV -> TV
2. Siga las instrucciones que
gnal -> Se
Si
arecen
ap
seleccionar la región donde se
ofrece el servicio de televisión
local e introduzca el código postal
para descargar las guías de
programas de televisión.
t Up TV Signal.
en pantalla para
ndows Media Center, siga
Nota: Para los usuarios por primera vez,
se requiere
para ver televisión en Windows Media
Center.
3. Seleccione “I agree” para
la instalación de PlayReady
Seleccione “I agree” para confirmar su acuerdo con los términos de servicio de PlayReady y Next para iniciar la instalación.
confir
mar su acuerdo con los
términos de "Program Guide
Terms of Service" y haga clic en
Next para iniciar la descarga de la
Guía de programación de
televisión.
ESN-8
Page 50

4. Compruebe para confirmar si desea usar el sintonizador de TV detectado o que Windows Media Center lo detecte de nuevo. Si es Sí, haga clic en Next para continuar.
5. Haga clic en Finish para salir de la
página de confi
de televisión y el plugin de
AVerMedia instalado previamente
lo dirigirá a la página de búsqueda
de datos de configuración de
Reconocimiento de rayos
infrarrojos.
6. Compruebe para confirmar si
desea iniciar el proceso de
econocimiento de rayos
r
infrarrojos de inmediato.
Si es Sí, por favor consulte la
Sección 2 de
rayos infrarrojos para continuar
con el proceso.
Nota: Para obtener más información
sobre la confi
manejo de datos de configuración
existente de reconocimiento de rayos
infrarrojos, por favor consulte la
Sección 6 Uso o manejo de datos
existentes de reconocimiento de rayos
infrarrojos.
* Por favor, asegúrese de tener acceso a Internet durante la descarga.
guración de señal
reconocimiento de
guración del uso o
ESN-9
Page 51

4.1.3 Para configurar el tipo de señal de televisión mediante el plugin de AVerMedia
1. Vaya a Windows Media Center ->
AVerMedia Plug-in -> entre a la
página de configuración TV
Signal Type, seleccione el tipo
de señal que el decodificador
usa y haga clic en OK para
continuar.
Nota: Cualquier ca
configura en Set Up TV Signal mediante Windows Media Center en el paso previo, se
requiere reiniciar para que esta nueva configuración surta efecto.
2. Haga clic en Yes para reiniciar
su PC
configuración surta efecto.
O
Haga clic en No para salir de las
configur
AVerMedia Plug-in TV Signal
Type y la nueva configuración
surtirá efecto la próxima vez que
reinicie la PC.
4.1.4 Para configurar la calidad de señal
AverMedia
1. Vaya a Windows Media Center ->
AVerMedia Plug-in -> Set up
Signal Quality para entrar a la
página de configuración.
2. Modificar los valores de calidad
de soni
mbio al tipo de señal de televisión, haciéndola diferente de la que
para que la nueva
aciones de
do
y video a su gusto.
televisión mediante el plugin de
de
ESN-10
Page 52

4.2 Usuarios de ArcSoft TotalMedia Extreme
4.2.1. Al instalar ArcSoft TotalMedia Extreme y AVerMedia Scheduler
1. Cuando aparezca Inst
haga clic en Next para continuar.
2. Haga clic en Yes para confirmar su
acuerdo para ArcSoft TotalMedia
Extreme License Agreement.
3. Para cambiar a una carpeta de destino
diferente, haga clic en Browse, y haga
clic en Next para continuar.
allShield® Wizard,
4. Marque para seleccionar los
componentes que quiera instalar, y haga
clic en Next para continuar.
ESN-11
Page 53

5. Seleccione una carpeta de programa y haga clic en Next para comenzar la instalación.
Nota
z
Para usar la función
requiere la instalación del AVerMedia Scheduler. Haga clic en Install AVe r Me di a
Scheduler
instrucciones que aparecen en pantalla para continuar. Haga clic en
cuando termine la instalación.
z
Necesita reiniciar la PC para que surtan efecto la instalación y las configuraciones.
z
Para más instrucciones sobre cómo usar
consulte los archivos
4.2.2 Para activar y configurar ArcSoft TotalMedia Extreme
z Haga doble clic en el icono
schedule recording
en la pantalla de instalación principal para comenzar. Siga las
mediante
ArcSoft TotalMedia Extreme, se
proporcionados en la aplicación.
Help
de
ArcSoft TotalMedia Extreme
ArcSoft TotalMedia Extreme
en el escritorio.
z Vaya a
4.2.3 Para activar AVerMedia Scheduler:
z Haga doble clic en el icono
z Vaya a
z Haga clic con el botón derecho en el iniciador de
situado en la esquina inferior derecha de la pantalla.
Æ
Start
Programs ÆArcSoft TotalMedia Extreme 3ÆTotalMedia Extreme 2
en el escritorio.
Æ
AVerMedia Scheduler
V
erMedia Scheduler
A
Start
Æ
Programs
de AVerMedia Scheduler
Æ
VerMedia Scheduler
A
Finish
, por favor
para salir
.
.
Nota: Si no hay datos de configuración de reconocimiento de r
guardados cuando active primero el AVerMedia Scheduler, el asistente de
reconocimiento de rayos infrarrojos se iniciará automáticamente. Consulte las
instrucciones de la Sección 5 Reconocimiento de rayos infrarrojos.
ayos infrarrojos
ESN-12
Page 54

5 Reconocimiento de rayos infrarrojos
Para programar una grabación ya sea mediante
AVerMedia Scheduler
infrarrojos.
El
secuencia de comandos de rayos infrarrojos del control remoto del decodificador, se
enciende el decodificador, cambia los canales en el decodificador de televisión por satélite o
cable al transmitir señales al decodificador mediante un cable emisor de rayos infrarrojos y
graba programas según los programas que usted organice cuando esté ausente.
AVerMedia DarkCrystal HD Capture Station/AVerTV USB HD DVR
, se requiere la terminación del proceso de reconocimiento de rayos
Windows Media Center
5.1 Reconocimiento de rayos infrarrojos por primera vez
o mediante el
luego reconoce la
Siga los pasos abajo para continuar con
Windows Media Center
1. Siga las instrucciones que aparecen en pantalla
para garantizar que todos los dispositivos están
conectados mediante cables como
corresponde, conecte el cable emisor de rayos
infrarrojos al puerto USB del AVerMedia
DarkCrystal HD Capture Station o AVerTV
USB HD DVR, coloque el transmisor del emisor
de rayos infrarrojos a una distancia cercana al
sensor de rayos infrarrojos del decodificador, y
encienda todos los dispositivos conectados.
2. Utilice el control remoto del decodificador de
televi
sión por cable o satélite y siga las
instrucciones que aparecen en pantalla para
completar el proceso de reconocimiento. Haga
clic en Next para continuar.
o cuando usted active el
IR Learning Wizard
AVerMedia Scheduler
durante la configuración de
por primera vez.
ESN-13
Page 55

3. Introduzca un nombre para el decodificador de este reconocimiento de rayos infrarrojos en el campo en blanco.
4. Marque para seleccionar cómo el canal de televisión muestra el número de canal.
5. Marque para seleccionar el número máximo
de dígitos de un canal de todos los canales
disponibl
6. Marque para seleccionar la confirmación preferida para el cambio de canal.
es.
ESN-14
Page 56

7. Asegúrese de que la distancia de operación
entre el control remoto del decodificador y el
AVerMedia DarkCrystal HD Capture Station o
AVerTV USB HD DVR esté dentro del rango
recomendado.
8. Siga las instrucciones que aparecen en pantalla y pulse cada tecla correspondiente del control remoto para completar la tarea de apareamiento.
*Cada reconocimiento de tecla se repite una
vez
aparecerá una "O" cada vez que el
y
reconocimiento se realice con éxito. El signo
de gancho indica la finalización del
reconocimiento de rayos infrarrojos de la
tecla específica.
9. Use el teclado en pantalla para completar la tarea asignada y vea si todos los comandos se respondieron correctamente.
10. Use el teclado en pantalla para completar la tarea asignada y vea si todos los comandos se respondieron correctamente.
ESN-15
Page 57

11. Seleccione el intervalo preferido entre cada tecla que se pulsa de la lista desplegable.
12. Ahora se ha realizado el reconocimiento de rayos infrarrojos. Seleccione la opción “Create a recording schedule now!” si desea usar la función de programación de inmediato. Haga clic en Finish para cerrar este asistente.
Uso o eliminación o adición de datos existentes de
6
reconocimiento de rayos infrarrojos
6.1 Uso de datos existentes de configuración de reconocimiento de rayos
infrarrojos
1. Haga clic en +/- a la derecha para
selecci
onar el dispositivo de
reconocimiento de rayos infrarrojos. Haga
clic en Next para continuar.
2. Marque para elegir el tipo de conexión
de entrada de A/V
continuar.
3. Siga las instrucciones en sección 5 Reconocimiento de rayos infrarrojos para completar el proceso.
. Haga clic en Next para
ESN-16
Page 58

6.2 Eliminación de datos existentes de configuración de reconocimiento de rayos infrarrojos
1. Haga clic con el botón derecho en el icono
de AVerMedia Scheduler en la barra de
estado del sistema y seleccione Device
Manager.
2. Marque la casilla a la izquierda de los datos
de configura
Reconocimiento de rayos infrarrojos y
haga clic en
* Para llamar al As
de rayos infrarrojos, haga clic en
esquina superior izquierda del cuadro
Device Manager.
ción no deseados de
para eliminarlo.
istente de reconocimiento
en la
6.3 Llamada del Asistente de reconocimiento de rayos infrarrojos
1. Vaya a Start -> AVerMedia Scheduler -> IR Learning
O
2. Active Device Manager y haga clic en
ventana.
en la esquina superior izquierda de la
ESN-17
Page 59

Page 60

Model No.: C874
P/N 300AC874-DPE
Made in Taiwan
 Loading...