

Page 1

P/N 300AAB3V
Made in Taiwan
AVerTV DVB-T USB2.0
ENG
DEU
FRA
ITA
NLD
ESN
PTG
Quick Installation Guide
Schnellinstallationsanleitung
Guide d’installation Rapide
Guida di installazione Rapida
Snelle Installatiehandleiding
Guía de Instalación Rápida
Guia de Instalação Rápida
www.avermedia.com
Page 2
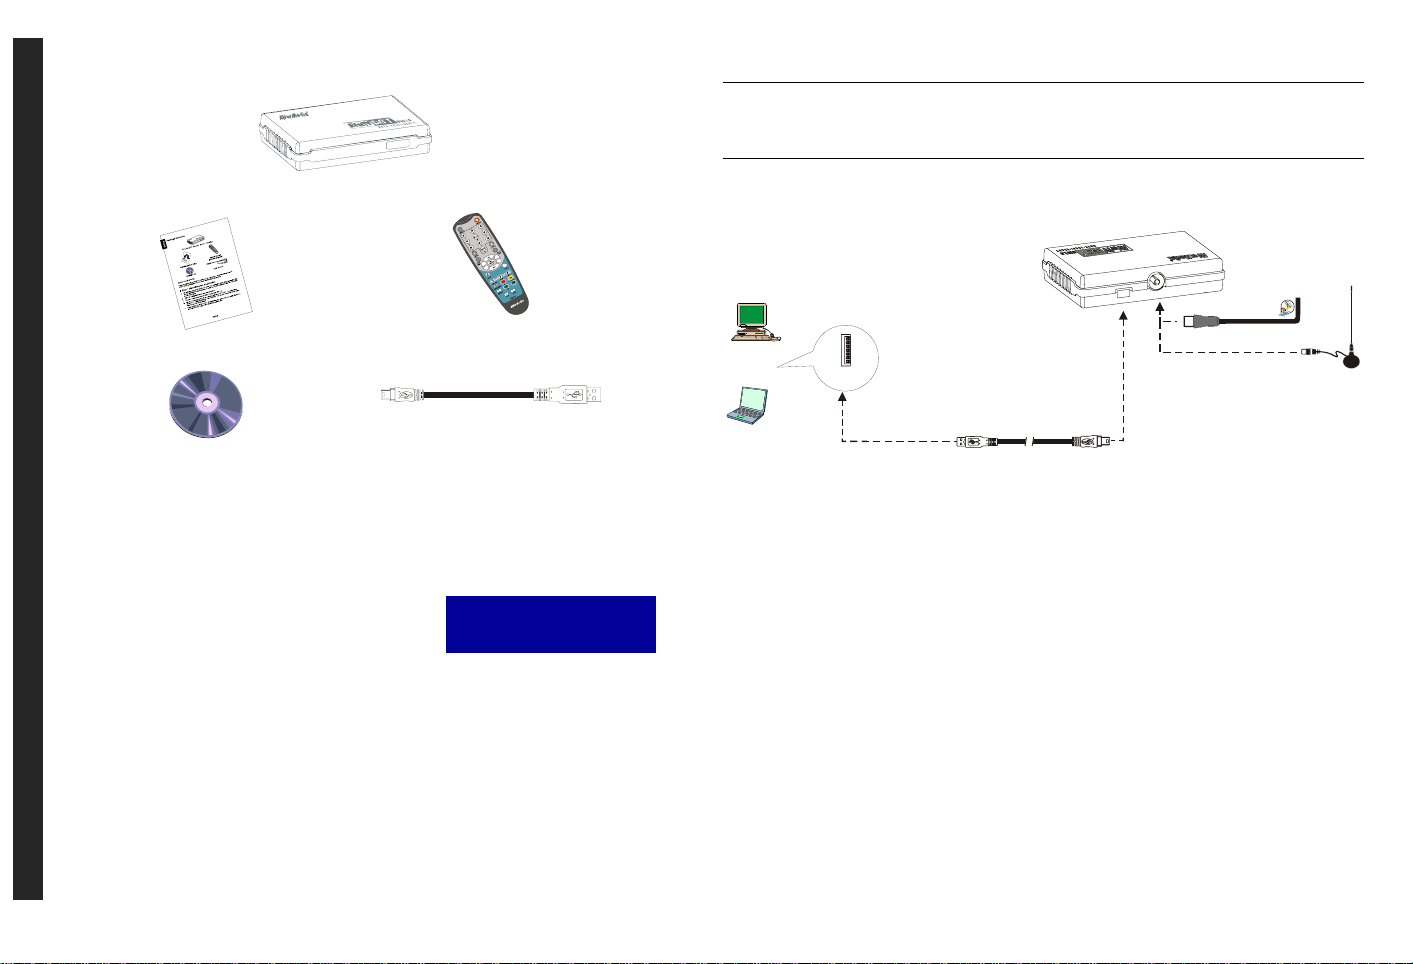
Package Contents
English
AVerMedia® AVerTV DVB-T USB2.0
English English English English English
Quick Installation Guide
Installation CD
Remote Control
(Batteries Included)
USB Cable
System Requirements
System requirements are described in detail on the package box. Before installing AVerTV
DVB-T USB2.0, verify that your PC meets the described requirements.
‧Step 1 : Installing the Application
For Windows XP operating system users, this would install
both the application and the drivers at the same time. You
may run the AverTV DVB-T USB 2.0 application upon
connecting the unit to you PC (see Step 2).
1. Place the installation CD into the CD-ROM. The installation screen of the application will
appear. If the screen doesn’t appear, go to MY Computer and double-click the “CD-ROM”
to start the program.
2. Click TV Utility Software to start the installation.
3. When the “License Agreement” dialog box appears, click Yes.
4. Choose Complete to install all the software, including DVB-T USB 2.0 Application,
DirectX 9.0, and Acrobat Reader and click Next. You can also choose Custom to select
the software you want to install.
5. After installing the DVB-T USB 2.0 Application, the system will then install DirextX 9.0
and Acrobat Reader, just follow the on-screen instruction.
► Please note, this product only
supports Windows 2000 and
Windows XP
6. In the “InstallShield Wizard Complete” dialog box, if you are instructed to restart your
computer, select Yes.
Then click Finish to complete the installation.
NOTE:
If DirectX 9.0 or above is not installed in your system, usually the installation CD will automatically
install it during the process of installation. Make sure your system has DirectX 9.0 or above installed so
that the TV software utility can function properly.
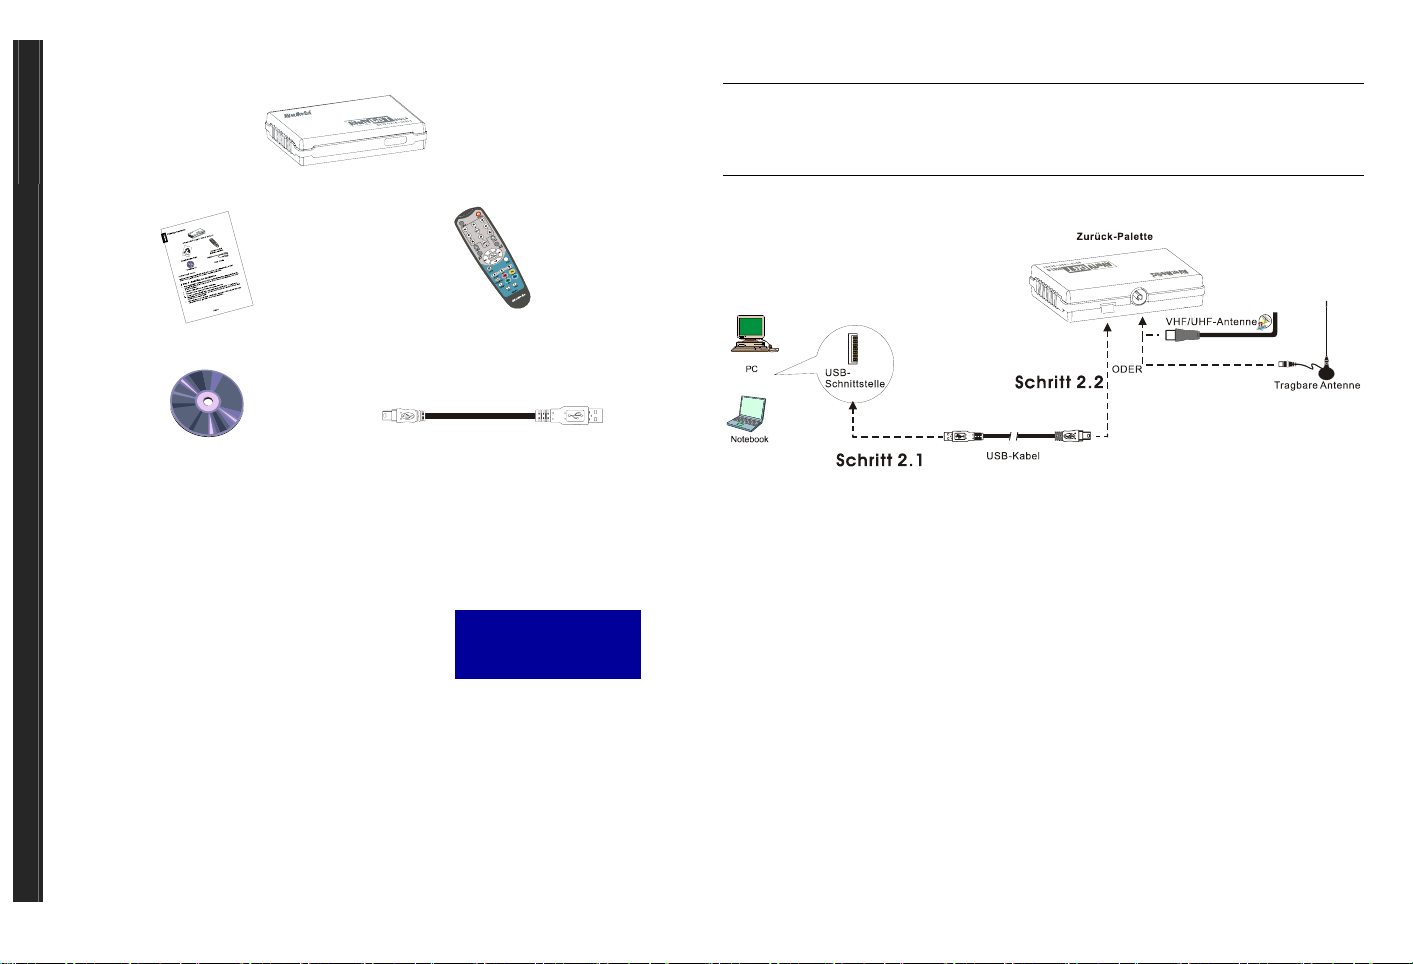
‧Step 2 : Making t he Connection
Back Pannel
VHF/ UHF Antenna
OR
PC
USB Port
STEP 2.2
Portable Antenna
Notebook
STEP 2.1
USB Cable
‧Step 3 : Installing Drivers in Windows 2000
For Windows 2000, users need to follow the instructions below to complete installing drivers.
1. When the “Found New Hardware Wizard” dialog box appears, click Cancel.
2. If a warning message about Digital Signature Not Found appears, click Yes.
3. You may be asked to restart the computer again, simply click Yes.
Uninstalling Application and Drivers
To remove the software and drivers, simply choose Start→Programs→AVerTV DVB-T USB2.0→
Uninstaller→”Remove AP and Driver”→Next→OK→ Finish.
ENG-1
ENG-2
Page 3
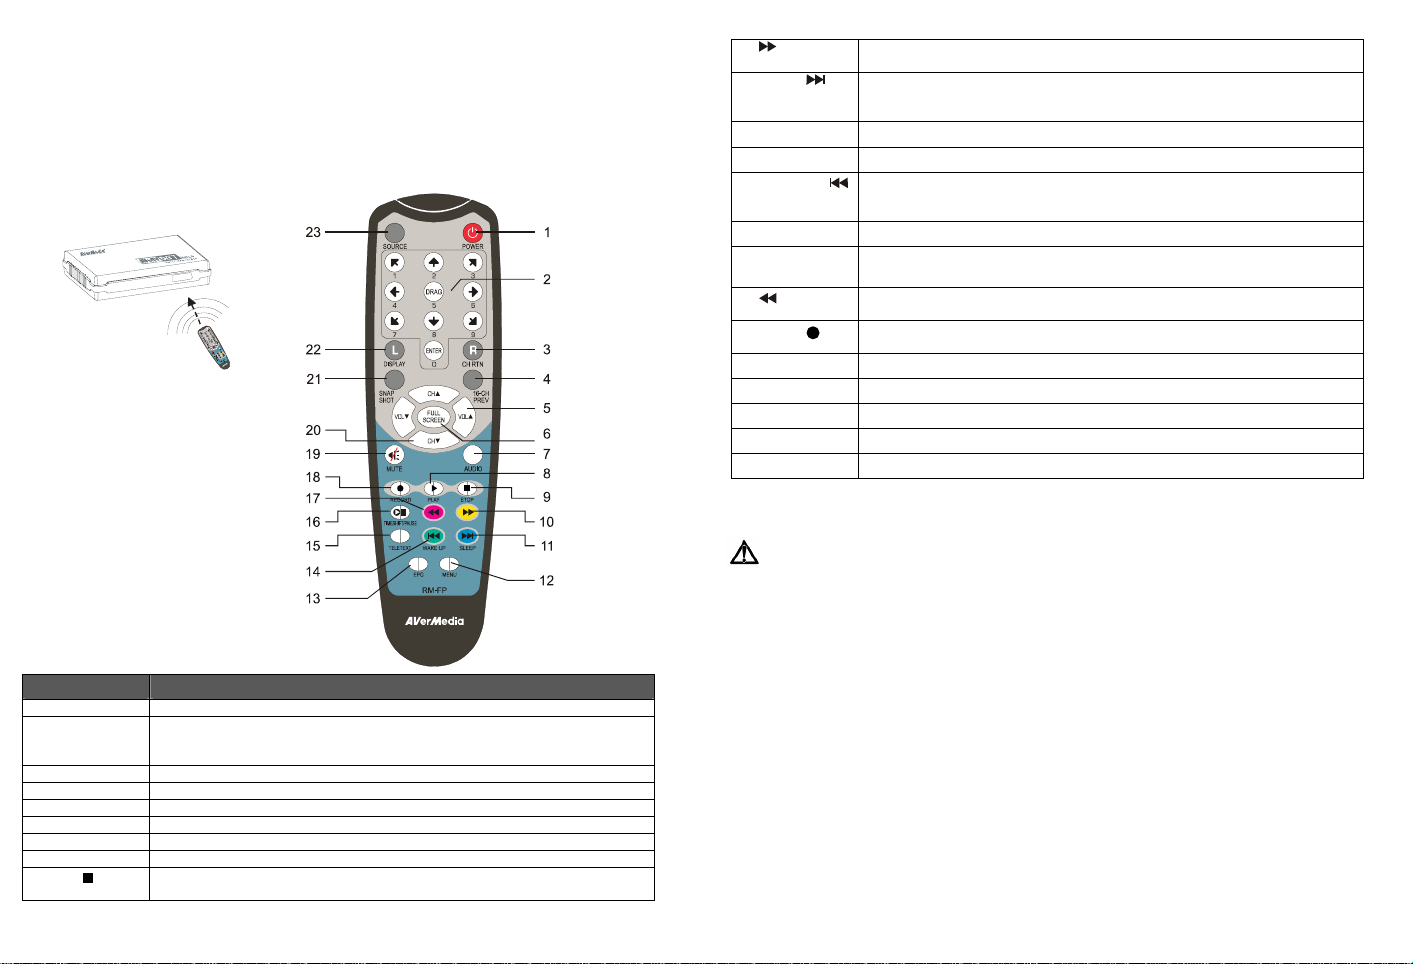
Remote Control
After installing drivers and applications, you can use remote control to turn on/off the programs, select
channels, adjust volume and so on. In addition, the remote control can function as a Remote Mouse by
using the arrow keys (←↑→↓) to control the mouse pointer when the software is closed.
Remote Control Buttons
Front Pannel
Remote Con trol
Button Description
1. Power Turn on/off the application
2. Numeric Buttons − Select a TV channel.
3. CH RTN Go to the previously selected channel.
4. 16-CH PREV 16-channel Preview.
5. VOL▲/▼ Increase/decrease the volume.
6. FULL SCREEN Display TV or video in full screen.
7. AUDIO Switch between available languages.
8. PLAY ► Play the last recorded or played file.
9. STOP
− Under the 16-channel preview mode, use↑↓← → to highlight the intended
channel.
− End the Playback or recording.
− End the Time Shift mode and return to real-time TV or Radio mode.
ENG-3
10. (Forward) − Advance the playback.
11. SLEEP
12. MENU
13. EPG
14. WAKE UP
15. TELETEXT
16. TIME SHIFT /
PAUSE
17. (Rewind)
18. Record
19. MUTE
20. CH ▲/▼
21. SNAPSHOT
22. DISPLAY
23. Source
− Jump to the teletext page of the corresponding color according to this button.
− Go to the next file in the playlist.
− Set the time to put your computer in Standby or Hibernate mode.
− Jump to the teletext page of the corresponding color according to this button.
Show up the Control Panel.
Launch the Electronic Programme Guide.
− Go to the previous file in the playlist.
− Set the time to bring your computer out of Standby or Hibernate mode.
− Jump to the teletext page of the corresponding color according to this button.
Launch the Teletext application.
− Freeze the playback.
− Switch from real-time TV or Radio to Time Shift mode.
− Rewind the playback.
− Jump to the teletext page of the corresponding color according to this button.
Switch to DVR mode and record the current program or video into your hard
drive.
Turn on/off the sound.
Go up or down to the next active channel.
Capture the on-screen image to a bitmap file.
Display information.
Turn on the TV or Radio mode.
Battery Safety Information :
- Store the batteries in a cool dry place.
- Do not dispose of used batteries in domestic waste. Dispose of batteries at special collection
points or return to point of sale if applies.
- Remove the batteries during long periods of non-use. Always remove exhausted batteries
from the remote control. Battery leakage and corrosion can damage this remote control,
dispose of batteries safely.
- Do not mix old and new batteries.
- Do not mix different types of batteries: alkaline, standard (carbon-zinc) or rechargeable
(nickel-cadmium).
- Do not dispose of batteries in a fire. The batteries may explode or leak.
- Never short circuit the battery terminals.
ENG-4
Page 4
Packungsinhalt
Deutsch
Deutsch Deutsch Deutsch Deutsch Deutsch
Schnellinstallationsanleitung
AVerMedia® AVerTV DVB-T USB2.0
Fernbedienung
(einschließlich Batterien)
6. Wählen Sie im Dialogfeld “InstallShield-Assistent beendet” auf Ja, wenn Sie aufgefordert werden,
den Rechner neu zu starten. Klicken Sie dann auf Beenden, um mit der Installation fortzufahren.
HINWEIS:
Falls DirectX 9.0 oder eine neuere Version nicht in Ihrem System installiert ist, wird dieses Programm
in der Regel während des Installationsvorgangs automatisch von der Installations-CD aus installiert.
Stellen Sie sicher, dass in Ihrem System DirectX 9.0 oder eine neuere Version installiert ist, so dass die
TV-Software-Utility korrekt funktionieren kann.
‧Schritt 2: Herstellen de r Verbindung
Installations-CD
USB-Kabel
Systemvoraussetzungen
Systemvoraussetzungen sind auf dem Verpackungskarton angegeben. Bevor Sie AVerTV DVBT USB2.0 installieren, stellen Sie sicher, dass Ihr PC die angegebenen Voraussetzungen erfüllt.
‧Schritt 1: Installation der Anwendung
Unter Windows XP werden die Anwendung und die Treiber
gleichzeitig installiert. Sie können die Anwendung AverTV
DVB-T USB 2.0 aufrufen, sobald Sie das Gerät an Ihren PC
angeschlossen haben (siehe Schritt 2).
1. Geben Sie die Installations-CD in das CD-ROM-
Laufwerk ein. Es erscheint der Installationsbildschirm der Anwendung. Falls der Bildschirm
nicht erscheint, gehen Sie nach Arbeitsplatz und doppelklicken Sie auf das "CD-ROMLaufwerk", um es aufzurufen.
2. Klicken Sie auf die TV Utility Software, um mit der Installation zu beginnen.
3. Wenn das Dialogfeld für die “Lizenzvereinbarung” erscheint, klicken Sie auf Ja.
4. Wählen Sie Komplett, um die gesamte Software zu installieren, einschließlich der
Anwendung DVB-T USB 2.0, DirectX 9.0 und Acrobat Reader, und klicken Sie auf
Weiter. Sie können auch Benutzerdefiniert wählen, um die Software auszuwählen, die Sie
installieren möchten.
5. Nach Installation der Anwendung DVB-T USB 2.0 installiert das System DirextX 9.0 und
Acrobat Reader. Folgen Sie einfach den Anweisungen auf dem Bildschirm.
DEU-1
► Denken Sie bitte daran,
dass dieses produkt nur
Windows 2000 und
Windows XP unterstützt.
‧Schritt 3: Installation von Treibern unterWindows 2000
Unter Windows 2000 muss wie folgt vorgegangen werden, um die Treiber erfolgreich zu installieren.
1. Sobald die Dialogbox “Neuer Installationsassistent gefunden” erscheint, klicken Sie auf
Abbrechen.
2. Falls die Digitale Signatur nicht gefunden erscheint, klicken Sie auf Ja.
3. Wenn Sie zum Neustart des Computers aufgefordert werden, klicken Sie auf Ja.
Deinstallation von Anwendung und Treibern
Wenn Sie die Software und Treiber entfernen möchten, wählen Sie einfach Start →Programme →AVerTV
DVB-T USB2.0 →Uninstaller → AP und Treiber entfernen →Weiter →OK →Fertigstellen.
Fernbedienung
Nach Installation der Treiber und Anwendungen können Sie die Fernbedienung verwenden, um
Programme ein- und auszuschalten, Sender auszuwählen, die Lautstärke zu regeln usw. Darüber
hinaus können Sie die Fernbediung als Fern-Maus verwenden. Benutzen Sie hierfür die Pfeiltasten
(←↑→↓!"#), um den Mauszeiger zu steuern, wenn die Software geschlossen ist.
DEU-2
Page 5
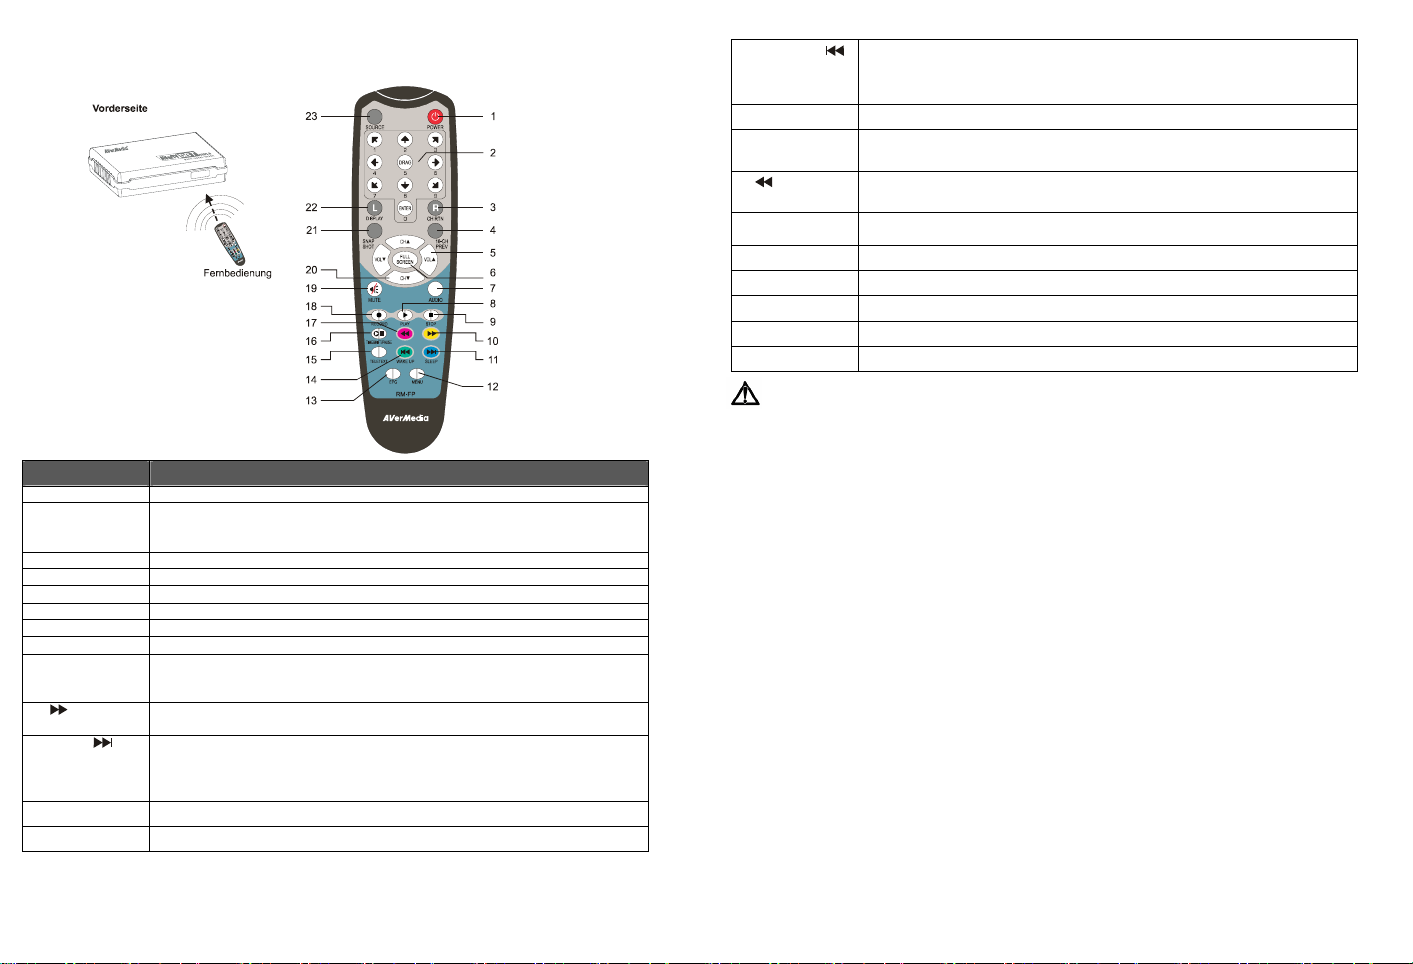
Fernbedienungstasten
14.WAKE UP
15.TELETEXT
16. TIME SHIFT /
PAUSE
17.
(Zurückspulen)
18 ● (Aufnahme)
19 MUTE
20 CH ▲/▼
21 SNAPSHOT
22 DISPLAY
23 Source
− Gehen Sie zur vorherigen Datei in der Wiedergabeliste.
− Setzten Sie die Zeit wann der Computer aus dem Stand By- oder Hibernate
Modus aufwachen soll.
− Springen Sie zur Teletextseite der entsprechenden Farbe dieser Schaltfläche.
Starten Sie die Teletext-Anwendung.
− Halten Sie die Wiedergabe an.
− Wechseln Sie vom Echtzeit-TV- oder Radio- zum TimeShift-Modus.
− Spulen Sie die Wiedergabe zurück.
− Springen Sie zur Teletextseite der entsprechenden Farbe dieser Schaltfläche.
Wechseln Sie zum DVR-Modus und nehmen Sie das aktuelle Programm oder
Video auf Ihre Festplatte auf.
Schalten Sie den Ton ein/aus.
Gehen Sie zum nächsten aktiven Sender herauf oder herunter.
Nehm Sie das Bild auf dem Bildschirm als eine Bitmap-Datei auf.
Zeigt die Informationen an.
Wechseln zwischem dem TV- oder Radio-Modus.
DER SICHERE UMGANG MIT BATTERIEN
Taste Beschreibung
1.Power Anwendung ein-/ausschalten
2. Zifferntasten − Wählen Sie einen TV-Sender.
3.CH RTN Gehen Sie zum zuvor ausgewählten Sender zurück.
4.16-CH PREV 16-Sender-Vorschau.
5. VOL▲/▼ Erhöhen/Verringern Sie die Lautstärke.
6. FULL SCREEN Zeigen Sie TV- oder Video-Vollbildschirm an.
7. AUDIO Wechseln Sie zwischen den verfügbaren Sprachen.
8. ► (Wiedergabe) Geben Sie die zuletzt aufgenommene oder wiedergegebene Datei wieder.
9. ■ (Stopp) − Beenden Sie die Wiedergabe oder Aufnahme.
10. (Vor) − Spulen Sie die Wiedergabe vor.
11. SLEEP
12. MENU
13.EPG
− Während Sie sich im 16-Sender-Vorschaumodus befinden, verwenden Sie
↑↓← →, um den gewünschten Sender auszuwählen.
− Beenden Sie den TimeShift-Modus und kehren Sie zum Echtzeit-TV- oder
Radio-Modus zurück
− Springen Sie zur Teletextseite der entsprechenden Farbe dieser Schaltfläche.
− Gehen Sie zur nächsten Datei in der Wiedergabeliste.
− Setzen Sie die Zeit wann der Computer in den Stand By- oder Hibernate
Modus gehen soll.
− Springen Sie zur Teletextseite der entsprechenden Farbe dieser Schaltfläche.
Rufen Sie das Bedienungsfeld auf.
Starten Sie den elektronischen Programmführer.
DEU-3
Achtung! Im Lieferumfang befinden sich Batterien. Batterien gehören nicht in den Hausmüll. Sie
werden vom Hersteller, Händler oder deren Beauftragten kostenlos zurückgenommen, um sie einer
Verwertung bzw. Entsorgung zuzuführen.
Wenn Sie Fragen zur Entsorgung haben, wenden Sie sich bitte an Ihre Verkaufsstelle oder an
unseren Service.
Batterien können brennbare Stoffe enthalten. Bei unsachgemäßer Behandlung können Batterien
auslaufen, sich stark erhitzen, entzünden oder gar explodieren, was Schäden für Ihr Gerät und
ihre Gesundheit zur Folge haben könnte.
Bitte befolgen Sie unbedingt folgende Hinweise:
- Vermeiden Sie Hitze und werfen Sie die Batterien nicht ins Feuer.
- Zerlegen oder verformen Sie die Batterien nicht. Ihre Hände oder Finger könnten verletzt
werden oder Batterieflüssigkeit könnte in Ihre Augen oder auf Ihre Haut gelangen. Sollte
dies passieren, spülen Sie die entsprechenden Stellen mit einer großen Menge klaren Wassers
und informieren Sie umgehend Ihren Arzt.
- Vermeiden Sie starke Stöße und Erschütterungen.
- Entfernen Sie die Batterie aus der Fernbedienung, wenn dieses über einen längeren Zeitraum
nicht benutzt wird.
DEU-4
Page 6

Contenu de l’emballage
Français
AVerMedia® AVerTV DVB-T USB2.0
Français Français Français Français Français
Guide d’installation rapide
Cédérom d’installation
6. Dans la boîte de dialogue “Assistant InstallShield terminé”, s’il vous est demandé de
redémarrer l’ordinateur , sélectionnez Oui. Puis cliquez sur Terminer pour achever
l’installation.
REMARQUE:
Si DirectX 9.0 ou supérieur n’est pas installé sur votre système, le cédérom l’installera
automatiquement pendant le processus d’installation. Assurez-vous que votre système possède DirectX
9.0 ou supérieur installé pour que le logiciel utilitaire de télévision puisse fonctionner correctement.
‧Etape 2: Effe ctuer la con nexion
Télécommande
(Piles comprises)
Câble USB
Configuration système requise
La configuration système requise est décrite en détails sur la boîte de l’emballage. Avant
d’installer AVerTV DVB-T USB2.0, vérifiez que votre ordinateur possède la configuration
requise donnée.
‧Etape 1: Installation de l’Application
Pour les utilisateurs de Windows XP, Il faudrait
installer les drivers et l’application en même
temps.You pourriez lancer l’application d’AverTV
DVB-T USB 2.0 en reliant le boîtier au PC (voir Etape
2)
1. Placez le cédérom d’installation dans le lecteur de CD-ROM. L’écran d’installation de
l’application apparaît. Si l’écran n’apparaissait pas, allez à Poste de Travail et doublecliquez sur “CD-ROM” pour démarrer le programme.
2. Cliquez sur Logiciel Utilitaire Télévision pour démarrer l’installation.
3. Lorsque la boîte de dialogue “Accord de licence” apparaît, cliquez sur Oui.
4. Choisissez Complet pour installer tout le logiciel, y compris l’application DVB-T USB 2.0,
DirectX 9.0, et Acrobat Reader puis cliquez sur Suivant. Vous pouvez aussi choisir
Personnalisé pour sélectionner les logiciels à installer.
5. Après avoir installé l’application DVB-T USB 2.0, le système installera DirextX 9.0 et
Acrobat Reader. Suivez simplement les instructions données à l’écran.
FRA-1
► Remarquez que ce produit NE
prend en charge que les
systèmes d’exploitation
Windows 2000 et Windows XP.
‧Etape 3: Installation des pilot es sous W indows 2000
Pour Windows 2000, les utilisateurs ont besoin de suivre les instructions ci-dessous pour compléter
l’installation des drivers
1. Lorsque la boîte de dialogue “Nouveau Matériel Détecté” apparaît, cliquez sur Annuler.
2. Si un message d’avertissement concernant la signature numérique qui n’a pas été trouvée
apparaissait, cliquez sur Oui.
3. Vous pourriez être invité à redémarrer l’ordinateur, cliquez simplement sur Oui.
Désinstallation de l’application et des pilotes
Pour supprimer le logiciel et les pilotes, choisissez simplement Démarrer →Programmes →AVerTV DVB-T
USB2.0 →Désinstalleur → Supprimer AP et Pilote →Suivant →OK →Terminer.
Télécommande
Après avoir installé les pilotes et les applications, vous pouvez utiliser la télécommande pour
activer/désactiver les programmes, sélectionner les chaînes, ajuster le volume, etc. De plus, la
télécommande peut aussi fonctionner comme souris distante en utilisant les touches fléches
(←↑→↓!"#) pour contrôler le pointeur de la souris lorsque le logiciel est fermé.
FRA-2
Page 7

Boutons de la télécommande
Bouton Description
1. Power Activer/Désactiver l’application
2. Boutons
numériques
3. CH RTN Aller à la chaîne précédemment sélectionnée.
4. 16-CH PREV Aperçu 16 chaînes.
5. VOL▲/▼ Augmenter/Diminuer le volume.
6. FULL SCREEN Affichage de la télévision ou de la vidéo en plein écran.
7. AUDIO Basculer entre les langues disponibles.
8. ► (Lecture) Lecture du dernier fichier enregistré ou lu.
9. ■ (Arrêt) − Terminer la lecture ou l’enregistrement.
10. (Avance) − Avancer la lecture.
11. SLEEP − Aller au fichier suivant de la liste de lecture.
− Sélectionner une chaîne de télévision.
− Sous le mode d’aperçu 16 chaînes, utilisez ↑↓← → pour mettre la chaîne
souhaitée en surbrillance.
− Terminer le mode Déplacement Temporel et retourner en mode Télévision ou
Radio en temps réel.
− Passer à la page télétexte de la couleur correspondante selon ce bouton.
− Réglez l’heure pour mettre votre ordinateur en mode veille partielle ou
prolongée.
− Passer à la page télétexte de la couleur correspondante selon ce bouton.
12. MENU
13. EPG
14. WAKE UP
15. TELETEXT
16. TIME SHIFT/
PAUSE
17. (Retour)
18. ● (Enregistrer)
19. MUTE
20. CH ▲/▼
21. SNAPSHOT
22. DISPLAY
23. Source
Afficher la fenêtre de Panneau de Contrôl.
Lancer le Guide des programmes électronique.
− Aller au fichier précédent de la liste de lecture.
− Réglez l’heure pour sortir votre ordinateur du mode veille partielle ou
prolongée.
− Passer à la page télétexte de la couleur correspondante selon ce bouton.
Lancer l’application Télétexte.
− Figer la lecture
− Basculer du mode Télévision ou Radio en temps réel vers le mode Déplacement
temporel.
− Retour de la lecture.
− Passer à la page télétexte de la couleur correspondante selon ce bouton.
Basculer en mode DVR et enregistrer le programme ou la vidéo courante sur
votre disque dur.
Activer/Désactiver le son.
Monter ou descendre vers la chaîne active suivante.
Capturer l’image à l’écran vers un fichier bitmap.
Afficher les informations.
Activer le mode Télévision ou Radio.
Informations sur la sécurité des piles :
- Stockez les piles dans un endroit frais et sec.
- Ne jetez pas les piles avec les ordures ménagères. Mettez les piles au rebut dans les points de
récupération des piles ou, éventuellement, ramenez-les chez le détaillant.
- En cas de non utilisation prolongée, sortez les piles. Sortez toujours les piles épuisées de la
télécommande. Les fuites des piles et la corrosion risqueraient d'endommager la
télécommande, mettez les piles au rebut en toute sécurité.
- Ne pas mélanger piles usagées et neuves.
- Ne pas mélanger des piles de types différents : alcaline, standard (carbone-zinc) ou
rechargeables (nickel-cadmium).
- Ne pas jeter les piles au feu. Les piles risquent d'exploser ou de fuir.
- Ne jamais court-circuiter les terminaux des piles.
FRA-3
FRA-4
Page 8

Contenuto della confezione
Italiano
AVerMedia® AVerTV DVB-T USB2.0
Italiano Italiano Italiano Italiano Italiano
Guida di installazione rapida
CD di installazione
Telecomando
(Batterie incluse)
Cavo USB
Requisiti di sistema
I requisiti di sistema sono descritti dettagliatamente nella scatola della confezione. Prima di
installare AVerTV DVB-T USB2.0, verificare che il computer soddisfi i requisiti necessari.
‧Fase 1: Installazione dell’appl icazione
Per gli utenti con sistema operativo Windows XP, questo
installerà sia l’applicazione che i driver contemporaneamente.
È possibile eseguire l’applicazione AverTV DVB-T USB 2.0 al
momento della connessione dell’unità al PC (vedere Fase 2.)
1. Inserire il CD di installazione nell’unità CD-ROM. Verrà visualizzata la finestra di
installazione dell’applicazione. Se la finestra non viene visualizzata, posizionarsi su
Risorse del computer e fare doppio clic su “CD-ROM” per avviare il programma.
2. Fare clic su TV Utility Software per avviare il processo di installazione.
3. Quando viene visualizzata la finestra di dialogo “Contratto di licenza”, scegliere Sì.
4. Scegliere Completa per installare tutti i programmi, tra cui DVB-T USB 2.0 Application,
DirectX 9.0 e Acrobat Reader, quindi fare clic su Avanti. Per installare solo i programmi
desiderati, scegliere Personalizzata.
5. Dopo l’installazione di DVB-T USB 2.0 Application, verranno installati DirextX 9.0 e
Acrobat Reader. Seguire le istruzioni sullo schermo.
► Questo prodotto supporta
solo Windows 2000 e
Windows XP.
6. Se nella finestra di dialogo “Installazione guidata InstallShield completata” viene chiesto di
riavviare il computer, scegliere Sì. Fare clic su Fine per completare l’installazione.
NOTA:
Generalmente DirectX 9.0 o le versioni successive vengono installati automaticamente durante il
processo di installazione se non vengono trovati sul computer. Per il corretto funzionamento dell’utilità
software TV, accertarsi che sul sistema sia installato DirectX 9.0 o versione successiva.
‧Fase 2: Cr eazione di u na connession e
Fase 2.2
Fase 2.1
‧Fase 3: Installazione dei driver W indows 2000
Per Windows 2000, gli utenti devono seguire le istruzioni in basso per completare l’installazione dei
driver.
1. Quando appare la finestra di dialogo “Installazione guidata nuovo hardware”, cliccare su Annulla.
2. Se viene visualizzato un messaggio di avviso sul Firma digitale non trovata, fare clic su Sì.
3. Potrebbe venire richiesto di avviare nuovamente il computer, semplicemente cliccando Sì.
Rimozione dell’applicazione e dei driver
Per rimuovere il software e i driver, scegliere Start →Programmi →AVerTV DVB-T USB2.0 →
Programma di disinstallazione → Rimuovi AP e Driver →Avanti → OK →Fine.
Telecomando
Dopo aver installato i driver e le applicazioni, è possibile utilizzare il telecomando per attivare o
disattivare i programmi, selezionare i canali, regolare il volume e così via. Il telecomando può
fungere anche da mouse remoto. A questo scopo, utilizzare i tasti freccia (←↑→↓!"#) per
controllare il puntatore del mouse quando viene chiuso il software.
ITA-1
ITA-2
Page 9

Pulsanti del telecomando
Pulsante Descrizione
1. Power Attivazione/Disattivazione dell’applicazione
2. Pulsanti
numerici
3. CH RTN Va al canale precedentemente selezionato.
4. 16-CH PREV Anteprima a 16 canali.
5. VOL▲/▼ Aumenta o diminuisce il volume.
6. FULL SCREEN Visualizza i programmi televisivi o il video a schermo intero.
7. AUDIO Attiva le lingue disponibili.
8. ► (Riproduci) Riproduce l’ultimo file riprodotto o registrato.
9. ■ (Interrompi) − Termina la riproduzione o la registrazione.
10.
(Avanzamento
rapido)
11. SLEEP − Va al file successivo nella sequenza.
− Seleziona un canale TV.
− In modalità di anteprima a 16 canali, utilizzare ↑↓← → per evidenziare il
canale desiderato.
− Disattiva la modalità Differita e torna alla modalità Radio o TV in tempo reale.
− Avanza la riproduzione.
− Passa alla pagina teletext del colore corrispondente al pulsante.
− Imposta il tempo che deve trascorrere prima che il computer entri in modalità
Standby (Standby) o Iberna (Hibernate).
− Passa alla pagina teletext del colore corrispondente al pulsante.
12. MENU
13. EPG
14. WAKE UP
15. TELETEXT
16. TIME SHIFT
/PAUSE
17.
(Riavvogimento
rapido)
18 ● (Registra)
19 MUTE
20 CH ▲/▼
21 SNAPSHOT
22 DISPLAY
23 Source
Mostra la finestra Configurazione.
Avvia la Guida ai programmi elettronica.
− Torna al file precedente nella sequenza.
− Imposta il tempo che deve trascorrere prima che il computer esca dalla
modalità Standby (Standby) o Iberna (Hibernate).
− Passa alla pagina teletext del colore corrispondente al pulsante.
Avvia l’applicazione Teletext.
− Sospende la riproduzione
− Passa dalla modalità Radio o TV in tempo reale alla modalità Differita.
− Riavvolge la riproduzione.
− Passa dalla modalità Radio o TV in tempo reale alla modalità Differita.
Attiva la modalità DVR per registrare il programma o il video corrente nell’unità
disco rigido.
Attiva/Disattiva l’audio.
Passa al canale attivo successivo verso l’alto o verso il basso.
Cattura l’immagine su schermo in un file bitmap.
Visualizza le informazioni.
Attiva la modalità Radio o TV.
ITA-3
ITA-4
Page 10

Nederlands
Inhoud van de verpakking
Nederlands Nederlands Nederlands Nederlands Nederlands
Snelle installatiehandleiding
AVerMedia® AVerTV DVB-T USB2.0
Installatie CD
6. In het dialoogvenster “InstallShield Wizard Compleet” selecteert u Ja wanneer u de instructie
ziet uw computer opnieuw op te starten. Klik vervolgens op Voltooien om de installatie te
voltooien.
OPMERKING:
Wanneer DirectX 9.0 of hoger niet geïnstalleerd is op uw systeem, installeert de installatie-CD dit
automatisch tijdens het installeren. Zorg dat op uw systeem DirectX 9.0 of hoger is geïnstalleerd zodat
de TV software utility correct kan functioneren.
‧Stap 2: Ve rbinding maken
Afstandsbediening
(inclusief batterijen)
USB kabel
Systeemvereisten
De systeemvereisten zijn gedetailleerd beschreven op de doos. Voordat u AVerTV DVBT USB2.0 installeert, controleert u of uw PC voldoet aan de beschreven vereisten.
‧Stap 1: Het inst alleren van de toepassing
Voor gebruikers van Windows XP, zal deze tegelijkertijd
de applicatie en de drivers installeren. U kunt de AverTV
DVB-T USB 2.0 applicatie na het aansluiten van het
apparaat op de PC gebruiken (Zie stap 2).
1. Plaats de installatie-CD in het CD-ROM station. Het
installatiescherm van de toepassing verschijnt. Wanneer het scherm niet verschint, gaat u
naar Mijn Computer, en dubbelklikt u op de “CD-ROM” om de toepassing te starten.
2. Klik op TV Utility Software om de installatie te starten.
3. Wanneer het dialoogvenster “Licentieovereenkomst” verschijnt, klikt u op Ja.
4. Kies Compleet om alle software te installeren, inclusief de DVB-T USB 2.0 toepassing,
DirectX 9.0, en Acrobat Reader en klik op Volgende. U kunt ook Aangepast kiezen om de
software te selecteren die u wilt installeren.
5. Na het installeren van de DVB-T USB 2.0 toepassing, installeert het systeem DirextX 9.0
en Acrobat Reader, u hoeft slechts de instructies op het scherm te volgen.
NLD-1
► Let op dat dit product
alleen ondersteuning
biedt voor Windows
2000 en Windows XP.
‧Stap 3: Stu urprogramma’s inst alleren in W indows 2000
Voor Windows 2000, kunnen gebruikers de instructies hieronder volgen om de drivers te
installeren.
1. Wanneer de “Nieuwe Hardware Gevonden Wizard” dialoog venster verschijnt, klik dan op
Annuleren.
2. Indien een waarschuwing verschijnt over het ontbreken van een Digitale Handtekeing, klikt u op
Ja.
3. Het kan zijn dat u gevraagd wordt om de PC opnieuw op te starten. Klik op Ja.
Toepassing en stuurpro gramma’s verw ijderen
Om software en stuurprogramma’s te verwijderen, kiest u Start →Programma’s →AVerTV DVB-T
USB2.0 →Verwijderen →Toepassing en stuurprogramma verwijderen →Volgende → OK →
Voltooien.
Afstandsbediening
Na het installeren van stuurprogramma en toepassingen, kunt u de afstandsbediening gebruiken om
de programma’s aan/uit te schakelen, kanalen te selecteren, volume te wijzigen, enzovoort.
Daarnaast kunt u de afstandsbediening gebruiken als een Draadloze Muis door de pijltoetsen
(←↑→↓! " # ) te gebruiken om de muisaanwijzer te bewegen wanneer de DVB-T software
utility is afgesloten.
NLD-2
Page 11

Toetsen Afstandsbediening
Toets Beschrijving
1. Power Schakelt de toepassing aan/uit
2. Numerieke
toetsen
3. CH RTN Ga naar het vorige geselecteerde kanaal.
4. 16-CH PREV 16-kanaals voorbeeld.
5. VOL▲/▼ Zet het volume harder/zachter.
6. FULL SCREEN Geeft TV of video weer op het volledige scherm.
7. AUDIO Schakelt tussen beschikbare talen.
8. ► (Afspelen) Speel het laatst opgenomen of afgespeelde bestand af.
9. ■ (Stop) − Stop het afspelen of opnemen.
10. (Vooruit) − Spoel het afspelen vooruit.
11. SLEEP − Ga naar het volgende bestand in de afspeellijst.
12. MENU
13. EPG
− Selecteer een TV kanaal.
− Gebruik ↑↓← → in de 16-kanaals voorbeeldmodus om het gewenste kanaal te
markeren.
− Stop de modus Time Shift en ga terug naar real-time TV of Radio modus.
− Springt naar de teletekstpagina met de kleur die overeenkomt met de kleur van
deze toets.
− Stel de tijd in waarop uw PC in de Standby of Hibernate mode moet komen.
− Springt naar de teletekstpagina met de kleur die overeenkomt met de kleur van
deze toets.
Open de Control Panel.
Open de Electronische Programmagids.
14. WAKE UP
15. TELETEXT
16. TIME SHIFT /
PAUSE
17.
(Terugspoelen)
18. ● (Opnemen)
19. MUTE
20. CH ▲/▼
21. SNAPSHOT
22. DISPLAY
23. Source
− Ga naar het vorig bestand in de afspeellijst.
− Stel de tijd in waarop uw PC uit de Standby of Hibernate mode moet komen.
− Springt naar de teletekstpagina met de kleur die overeenkomt met de kleur van
deze toets.
Opent de Teletekst toepassing.
− Pauzeert het afspelen
− Schakel van real-time TV of Radio naar Time Shift modus.
− Spoel het afspelen terug.
− Springt naar de teletekstpagina met de kleur die overeenkomt met de kleur van
deze toets.
Schakel naar DVR modus en neem het huidige programma of video op, op de
harde schijf.
Schakelt het geluid aan/uit.
Ga omhoog of omlaag naar het volgende actieve kanaal.
Leg het beeld op het scherm vast in een bitmap bestand.
Weergave-informatie.
Zet de TV of Radio modus aan.
NLD-3
NLD-4
Page 12

Contenido del paquete
Español
AVerMedia® AVerTV DVB-T USB2.0
Español Español Español Español Español
Guía de instalación rápida
6. Si fuera instruido para reiniciar la computadora, seleccione Sí en el cuadro de diálogo
“Asistente InstallShield Completo”. Luego, haga clic en Finalizar para completar la
instalación.
NOTA:
Si DirectX 9.0 o más reciente no está instalado en su sistema, por lo general el CD de instalación lo
instalará automáticamente durante el proceso de instalación. Asegúrese de que el sistema tiene DirectX
9.0 o más reciente para que la utilidad de software para TV pueda funcionar de manera apropiada.
‧Paso 2: Cómo hacer la conexión
Control remoto
(pilas incluidas)
CD de instalación
Cable USB
Requisitos del sistema
Los requisitos del sistema están descritos en detalle en el paquete de embalaje. Antes de instalar
AVerTV DVB-T USB 2.0, verifique si su PC cumple los requisitos descritos.
‧Paso 1: Insta lación de la ap licación
Para usuarios de Windows XP, este procedimiento instalará el
controlador y la aplicación al mismo tiempo. Podrá ejecutar la
aplicación AVerTV DVB-T USB2.0 una vez que conecte la
unidad a su PC (Paso 2).
1. Inserte el CD de instalación en la unidad de CD-ROM La
pantalla de instalación de la aplicación aparecerá. Si la pantalla no aparece, vaya a Mi PC y
haga doble clic en "CD-ROM" para iniciar el programa.
2. Haga clic en el software de la utilidad de la TV para iniciar la instalación.
3. Cuando aparezca el cuadro de diálogo “Contrato de Licencia” haga clic en Sí.
4. Elija Completo para instalar el software completo: aplicación DVB-T USB 2.0, DirectX 9.0
y Acrobat Reader y haga clic en Siguiente. Puede también elegir Personalizar para
seleccionar el software que desea instalar.
5. Instalada la aplicación DVB-T USB 2.0, el sistema instalará DirextX 9.0 y Acrobat
Reader, basta con seguir la instrucción en la pantalla.
ESN-1
► Tenga en cuenta que
este producto sólo es
compatible con
Windows 2000 y XP.
‧Paso 3: Cómo insta lar los controladores en W indows 2000
En Windows 2000, necesitará seguir las instrucciones para completar el proceso de instalación de los
controladores.
1. Cuando aparezca el asistente de “Nuevo Hardware Encontrado” haga clic en cancelar.
2. Si aparece un mensaje acerca de que no se ha encontrado la firma digital, haga clic en Sí.
3. Es posible que se le solicite reiniciar el PC, cuando esto ocurra haga clic en Sí.
Para desinstalar la aplicación y los controladores
Para quitar el software y los controladores, simplemente elija Inicio →Programas →AVerTV DVB-T
USB2.0 →Desinstalar → ”Quitar AP y Controlador” →Siguiente →Aceptar →Finalizar.
Control remoto
Después de instalar los controladores y las aplicaciones, use el control remoto para encender /
apagar los programas, seleccionar canales, ajustar el volumen, etc. Además, el control remoto
puede funcionar como un ratón remoto usando las teclas de flecha (←↑→↓!"#) para
controlar el puntero del ratón cuando el software esté cerrado.
ESN-2
Page 13

Botones del control remoto
Panel frontal
Control remoto
Botón Descripción
1.Power Encender/apagar la aplicación
2. Botones
numéricos
3.CH RTN Ir al canal seleccionado anteriormente.
4.16-CH PREV Vista previa de 16 canales.
5. VOL▲/▼ Aumentar/disminuir el volumen.
6. FULL SCREEN Mostrar TV o vídeo en pantalla completa.
7. AUDIO Alternar entre los idiomas disponibles.
8. ► (Reproducir) Reproducir el último archivo grabado o reproducido.
9. ■ (Detener) − Terminar la reproducción o la grabación.
10. (Avanzar) − Avanzar la reproducción.
11. SLEEP − Va al archivo siguiente en la lista de reproducción.
− Seleccionan un canal de TV.
− Bajo el modo de vista previa de 16 canales, use ↑↓← → para resaltar el canal
deseado.
− Finalizar el modo Time Shift y volver al modo TV o radio en tiempo real.
− Saltar a la página de teletexto del color correspondiente a este botón.
− Establece el tiempo necesario para que su ordenador entre en modo Suspensión
o Hibernación.
− Salta a la página de teletexto del color correspondiente a este botón.
ESN-3
12. MENU
13.EPG
14. WAKE UP
15. TELETEXT
16. TIME SHIFT
/PAUSE
17. (Retroceder)
18 ● (Grabar)
19 MUTE
20 CH ▲/▼
21 SNAPSHOT
22 DISPLAY
23 Source
Mostrar la ventana panel de control de la aplicación
Iniciar la Guía de programa electrónica.
− Va al archivo anterior en la lista de reproducción.
− Establece el tiempo necesario para finalizar el estado de Suspensión o
Hibernación de su ordenador.
− Salta a la página de teletexto del color correspondiente a este botón.
Inicia la aplicación de teletexto.
− Congela la reproducción
− Alterna entre los modos TV o radio en tiempo real y Time Shift
− Retrocede la reproducción.
− Salta a la página de teletexto del color correspondiente a este botón.
Alterna al modo DVR y graba el programa o el vídeo actual en el disco duro.
Activa o desactiva el sonido.
Va al canal activo anterior o siguiente.
Captura la imagen en la pantalla a un archivo de mapa de bits.
Muestra la información.
Enciende el modo TV o Radio
Información acerca de la seguridad de las pilas:
- Almacene las pilas en un lugar fresco y seco.
- No tire las pilas usadas junto a los desperdicios domésticos. Tire las pilas en lugares
especiales acondicionados para ello o devuélvalas al lugar donde las compró si procede.
- Quite las pilas en periodos largos en los que no utilice el mando a distancia. Quite siempre
las pilas gastadas del mando a distancia. Si las pilas gotean y la corrosión puede dañar el
mando a distancia, guárdelas en lugar seguro.
- No mezcle pilas viejas y nuevas
- No mezcle diferentes tipos de pilas: alcalinas, estándar (carbono-zinc) o recargables (níquel-
cadmio).
- No tire las pilas al fuego. Las pilas podrías explotar o derramar líquidos.
- Nunca haga cortocircuitos en los terminales de las pilas.
ESN-4
Page 14

Português
Conteúdo do pacote
Português Português Português Português Português
Guia de instalação rápida
Cd de instalação
AVerMedia® AVerTV DVB-T USB2.0
Controle remoto
(Pilhas incluídas)
Cabo USB
6. Na caixa de diálogo “InstallShield Wizard Complete” (Assistente do InstallShield concluído),
se for solicitado a reiniciar seu computador, selecione Sim. Em seguida clique em Concluir
para finalizar a instalação.
OBSERVAÇÃO:
Se o DirectX 9.0 ou superior não estiver instalado em seu sistema, normalmente o CD de instalação o
fará automaticamente durante processo de instalação. Certifique-se de que seu sistema tenha o DirectX
9.0 ou superior instalado para que o software utilitário de TV possa funcionar corretamente.
‧Etapa 2: Conexão
Requisitos do sistema
Os requisitos do sistema estão descritos em detalhes na embalagem. Antes de instalar o AVerTV
DVB-T USB2.0, verifique se seu computador atende aos requisitos indicados.
‧Etapa 1: Instalação do aplicativo
Para os utilizadores do sistema operativo Windows XP, isto
instala a aplicação e os controladores ao mesmo tempo. Pode
executar a aplicação AverTV DVB-T USB 2.0 após ligação da
unidade ao PC (consulte a etapa 2).
1. Coloque o CD de instalação no CD-ROM. A tela de
instalação do aplicativo aparece. Se a tela não aparecer, entre em Meu computador e clique
duas vezes em "CD_ROM" para iniciar o programa.
2. Clique em Software utilitário de TV para iniciar a instalação.
3. Quando a caixa de diálogo “License Agreement” (Contrato de Licença) aparecer, clique em
Sim.
4. Selecione Concluir para instalar todos os softwares, incluindo o aplicativo DVB-T USB
2.0, o DirectX 9.0 e Acrobat Reader e clique em Avançar. Você também pode selecionar
Personalizar para selecionar os softwares que deseja instalar.
5. Após instalar o aplicativo DVB-T USB 2.0, o sistema instalará o DirextX 9.0 e o Acrobat
Reader. Basta seguir as instruções na tela.
PTG-1
► Observe que este produto
tem suporte somente
para Windows 2000 e
Windows XP.
‧Etapa 3: Instalação de drivers no Windows 2 000
No que toca ao Windows 2000, é necessário seguir as instruções seguintes para concluir a instalação
dos controladores.
1. Quando a caixa de diálogo “Assistente de novo hardware encontrado” aparecer, clique em
Cancelar.
2. Se um aviso sobre Assinatura Digital não Encontrada aparecer, clique em Sim.
3. Pode ser-lhe pedido para reiniciar o computador, clique em Sim.
Desinstalação do aplicativo e dos drivers
Para remover o software e os drivers, basta selecionar Iniciar →Programas →AVerTV DVB-T
USB2.0 →Desinstalar → Remove AP and Driver →Avançar →OK → Concluir.
Controle remoto
Após a instalação dos drivers e aplicativos, você pode usar o controle remoto para abrir e fechar os
programas, selecionar canais, ajustar o volume e assim por diante. Além disso, o controle remoto
pode funcionar como um mouse remoto usando-se as teclas de seta (←↑→↓!"#) para
controlar o ponteiro do mouse quando o software estiver fechado.
PTG-2
Page 15

Botões do controle remoto
Botão Descrição
1.Power Liga e desliga o aplicativo.
2. Botões
numéricos
3.CH RTN Ir ao canal selecionado anteriormente.
4.16-CH PREV Visualização de 16 canais.
5. VOL▲/▼ Aumenta ou diminui o volume.
6. FULL SCREEN Exibir TV ou vídeo em tela inteira.
7. AUDIO Alternar entre os línguas disponíveis.
8. ► (Reproduzir) Reproduz o último arquivo reproduzido ou gravado.
9. ■ (Parar) − Para a reprodução ou a gravação.
10. (Avançar) − Avança a reprodução.
− Selecionar um canal de TV.
− No modo de visualização de 16 canais, use as teclas ↑↓← → para realçar o
canal desejado.
− Para o modo Time Shift e retorna ao modo TV ou rádio em tempo real.
− Salta para a página de tele-texto da cor correspondente de acordo com esse
botão.
11. SLEEP
12. MENU
13.EPG
14. WAKE UP
15.TELETEXT
16. TIME SHIFT
/PAUSE
17. (Retroceder)
18 ● (Gravar)
19 MUTE
20 CH ▲/▼
21 SNAPSHOT
22 DISPLAY
23 Source
− Ir ao próximo arquivo da lista de reprodução.
− Regula o tempo para colocar o computador no modo de reserva ou modo de
hibernação.
− Salta para a página de tele-texto da cor correspondente de acordo com esse
botão.
Abre a janela do Painel de Controlo.
Inicia o Guia Eletrônico de Programação.
− Ir ao arquivo anterior da lista de reprodução.
− Regula o tempo para retirar o computador do modo de reserva ou de
hibernação.
− Salta para a página de tele-texto da cor correspondente de acordo com esse
botão.
Inicia o aplicativo de tele-texto.
− Congela a reprodução.
− Alterna de TV ou rádio em tempo real para o modo Time Shift.
− Retrocede a reprodução.
− Salta para a página de tele-texto da cor correspondente de acordo com esse
botão.
Alterna para o modo DVR e grava o programa ou vídeo atual em seu disco rígido.
Liga e desliga o som.
Sobe ou desce para o próximo canal ativo.
Captura a imagem da tela em um arquivo de bitmap.
Exibe informações.
Liga ou desliga o modo TV ou rádio.
Informação de segurança relativa às pilhas:
- Guarde as pilhas num local fresco e seco.
- Não deposite as pilhas gastas juntamente com o lixo doméstico. Deposite as pilhas nos
pontos de recolha próprios para o efeito ou entregue-as nos pontos de venda, se for o caso.
- Retire as pilhas quando se prevejam períodos longos de não utilização. Retire sempre as
pilhas gastas do comando a distância. O derramamento e a corrosão das pilhas poderão
danificar o comando a distância.
- Não misture pilhas novas com pilhas já gastas.
- Não misture tipos de pilhas diferentes: alcalinas, standard (carvão-zinco) ou recarregáveis
(níquel-cádmio).
- Não lance as pilhas nas chamas, pois poderão ocorrer explosões ou derramamentos.
- Nunca provoque curto-circuitos nos terminais da pilha.
PTG-3
PTG-4
 Loading...