

Page 1

Part No. P0993475 03
March 17, 2004
Business Communications
Manager
NetVision Phone
Administrator Guide
Page 2

2
Copyright © 2004 Nortel Networks
All rights reserved.
The information in this document is subject to change without noti ce. The statements, configurati ons, technical data, and
recommendations in this document are believed to be accurate and reliable, but are presented without express or implied
warranty. Users must take full responsibility for their applications of any products specified in this document. The
information in this document is proprietary to Nortel Networks NA Inc.
Trademarks
NORT EL NETWORKS is a trademark of Nortel Networks.
Microsoft, MS, MS-DOS, Windows, and W indows NT are re gistered tr ademarks of Mi crosoft Corporation.
Symbol, Spe ctrum24, and NetVision are re gistered trademarks of Sym bol Technologie s, Inc.
All other trademarks and registered trademarks are the property of th eir respective owners.
P0993475 03
Page 3

Chapter 1
Installing NetVision telephones 7
NetVision connectivity 7
Access points 7
Keycodes 7
Handset and call functions 8
DHCP 8
Gathering system information before you start 8
Identifying the handset to the system 9
Using the Nortel NVPA tool to configure handsets 9
Before you start 10
Configuring handsets 10
Adding user records and features 12
Identifying the handset and downloading the record 13
Identifying the handset to the Nortel NVPA tool 13
Updating handset firmware 15
Downloading configurations to the handset 16
Setting up the handset 16
Downloading the handset configuration through the serial cable 16
Checking or updating your NVPA software version 17
3
Appendix A
Configuring feature codes for NetVision 19
NetVision menu feature types 19
Indexed features 19
Supported features 20
DTMF features 22
Examples of DTMF code configurations 23
NetVision Features tab configuration 23
Finding the correct Feature list 24
Determining values for the FtrBCM.txt file 24
Editing the FtrBCM.txt file 26
Customizing features for users 27
NetVision Phone Administrator Guide
Page 4

4
Figures
Figure 1 General required parameters 10
Figure 2 Hold key programming 10
Figure 3 PIN verification 11
Figure 4 Optional settings 11
Figure 5 Adding Users 12
Figure 6 NVPA default Features list 13
Figure 7 Connecting to a handset 14
Figure 8 Checking the Phone List entry for the handset 14
Figure 9 Selecting a handset for firmware download 15
Figure 10 Downloading new firmware to a handset 15
Figure 11 Downloading the configuration to a handset 16
Figure 12 Checking NVPA version 17
Figure 13 NVPA Feature screen 19
Figure 14 FtrBCM.txt file layout 26
P0993475 03
Page 5

Tables
Table 1 Indexed features, supported 20
Table 2 Digit string special dialing characters 22
Table 3 FtrBCM.txt values and descriptions 24
5
NetVision Phone Administrator Guide
Page 6

6
P0993475 03
Page 7

Chapter 1
Installing NetVision telephones
This document describes how to use the Nortel version of the NetVision Phone Administrator
(NVPA) software to c onfigure the featu res for Symbol* NetVision wireless IP telephone handsets.
You download this software from the Symbol web sit e and install it on your local computer. You
must also obtain a special serial cable to connect between your computer and the handset to allow
the configuratio n you cr eate in t he NVPA to pass to the ha ndset, and f or the han dset infor matio n to
pass to the NVPA. Refer to “Gatherin g syste m informati on before you start” on page 8 for Symbol
website informati on.
NetVis ion connecti v it y
NetVision and NetVision Data wir eless IP telephones connect to the Business Communications
Manager over a LAN through the Business Communications Manager LAN or WAN card. The
Business Communication Manager sees the se telephones as IP telephones, which means that the
DN records are ass igned from the digital r ange rather than the Companion or ISDN range of DNs.
The NetVision handsets use the default codecs set up for IP trunks.
7
Note: NetVisi on handsets experience communications proble ms if your system has NAT
between the handset inter net connection and the published address of the Business
Communications Manager LAN. For this reason, this configuration is NOT supported.
From within the system, the handset s can make and receive calls from any tr unk typ e supported by
the system, which can include voice over IP (VoIP), digital and analog trunks. The handset DN
record determines which lines the handset can access.
The handset can communicate with any other type of telephone supported by the Business
Communications Manager syst em.
Access poin ts
Instructions abo ut installing the access point are provide d with the access point equipment, which
is sold and installed separ ately. The access point is set up with an identification co de (ESS ID)
which is entered into the handset either through a configur ation download or manually th rou gh the
dialpad, to allow the handset to access the system through that access point. All a ccess points in
the same system have the same ESS ID to facilitate the roaming feature.
Keycodes
Before setting up NetVision te lephones, you must ensure that keycodes have been entered for
sufficient numbers of IP telephone s. For information on entering keycodes, see the Keycode
Installation Guide .
NetVision Phone Administrator Guide
Page 8

8 Chapter 1 Installing NetVision telephones
Handset and call functions
Symbol supplies a handset user gui de which describes the features on the NetVision handset and
how to use them to perform basic functions.
The Business Communications Manager NetVision Feature Card explains how to use the handset
to access features on the Busines s Communications Manager syste m and provides some quick tips
for basic call functions.
DHCP
If you are registering the NetVision handsets on a Business Communications Manager running
DHCP, ensure that you first specify a list of static IP addresses for all the NetVision handsets you
want to register.
Gathering system information before you start
Ensure the following is complete , or the information is on hand before you start configur ing your
NetVision telephone s:
1. You have obtained the Symbol NetVision serial cable, which is
used to transfer configuration information between the computer,
where the NVPA is installed, and the handset.
2. You have downloaded the Nortel NVPA to your computer.
http://www.symbol.com/services/downloads/nvfirmware2.html
or
• Under the Administrator Software heading, click on the
Nortel_ x.x.x.exe
* Uninstall the existing version of NVPA on your computer before
you install any new versions of the tool.
3. You have obtained the IP address of the subnet gateway for the
handset (Business Communicati ons Manager IP address).
4. You have obtained the subnet mask for the handset subnet, if
required.
5. If the system to which the handsets will register is running DHCP,
you have entered a static IP list for all the handsets.
firmware link .
Purchase cab le fro m Sym b ol at
<http://symbol.com>
(part number: 25-20528-01)
Download the NetVision Phone
Administrator software*
Note: The screens shown in this
document are from NVPA
version 4.
Default IP gateway field
Subnet Mask field
6. You know the IP address of the Published LAN/WAN interface of
the Business Communications Manager.
7. You know the Name and Password that will be assigned to the
handsets.
P0993475 03
Node IP address field
H.323 record and
Nortel NVPA records
Page 9

Chapter 1 Installing NetVision telephones 9
8. Decide which features you want to add to the handset menu.
NVPA tool: Refer to “NetVisi on menu feature types” on page 19 if
you want to change the default lists.
9. The access point is installed and you have obtained the ESS ID. IEEE802 ESS field
10.You know the IP address for each handset. Phone List tab
11.You know the version of firmware that you need to download to
the handset.
Some examples:
• NetVision FH (2MB) phone - NF_F N_XXXXXX.B IN
• Dataphone FH (2MB) phone - DF_FNW_XXXXXX.BIN
• NetVision DS (11MB) phone - ND_FN_XXXXXX.BIN
• Dataphone DS (11MB) phone - DD_FN_XXXXXX.BIN
• NetVision II DS (11 Mbit) phone - QD_FH_XXXX.BIN
where XXXXXX is the version number
DTMF features/Index feat ures
Features tab
Download tab,
BIN File to download field
Identifying the handset to the system
The H.323 Terminals records are define d in the Unified Manager within the Business
Communications Manager. The information you enter into these records identify the handsets to
the Business Communication s Manager system. Each handset is provided with a unique record.
From the informa tion cont ained in the re cords, t he Busi ness C ommunications M anager determine s
which handsets will be allowed to connect to the system. The Name and Password fields of this
record and the NVPA record for the handset must be exactly the same or the handset will not be
allowed to connect to the Busines s Communications Manager system.
Using the Nortel NVPA tool to configure handsets
Use the Nortel NVPA tool to create the configuration file for the handset to use to connect to the
system and to identify itself to the Business Communications Manager. This tool includes a page
for defining what features appear on the handset feature menu. For a description about how to
define feature menu items, ref er to Appendix A, “Configuring feature codes for NetVision,” on
page 19.
The process for conf iguri ng an NVPA record a nd downlo ading it t o the ha ndset are inc lu ded under
these headings:
• “Configuring handse ts” on page 10
• “Adding user records and featur e s” on page 12
• “Identifying the handset to the Nortel NVPA tool” on page 13
• “Updating handset firmware” on page 15
• “Downloading configurations to the handset” on page 16
NetVision Phone Administrator Guide
Page 10
10 Chapter 1 Installing NetVision telephones
Before yo u start
Before you can accomplish this procedure you need to ensure that you have the PC-to-handset
cable on hand, and that you have downloaded the latest NVPA application from the Symbol
website. Refer to items 1 and 2 in “ Gathering system information before you start” on page 8.
Configuring handsets
This procedure pr ovides in format ion about what m ust be ente red i nto the appli cati on to ensur e that
the handsets work with the Business Communi cations Manager.
1 Open the NVPA application.
2 Ensure you select the correct site (Active site) or create a new site recor d.
3 Ensure the settings on the Site Data tab are correct. If not, make changes, as appropriate.
Refer to the figures on the following pa ges.
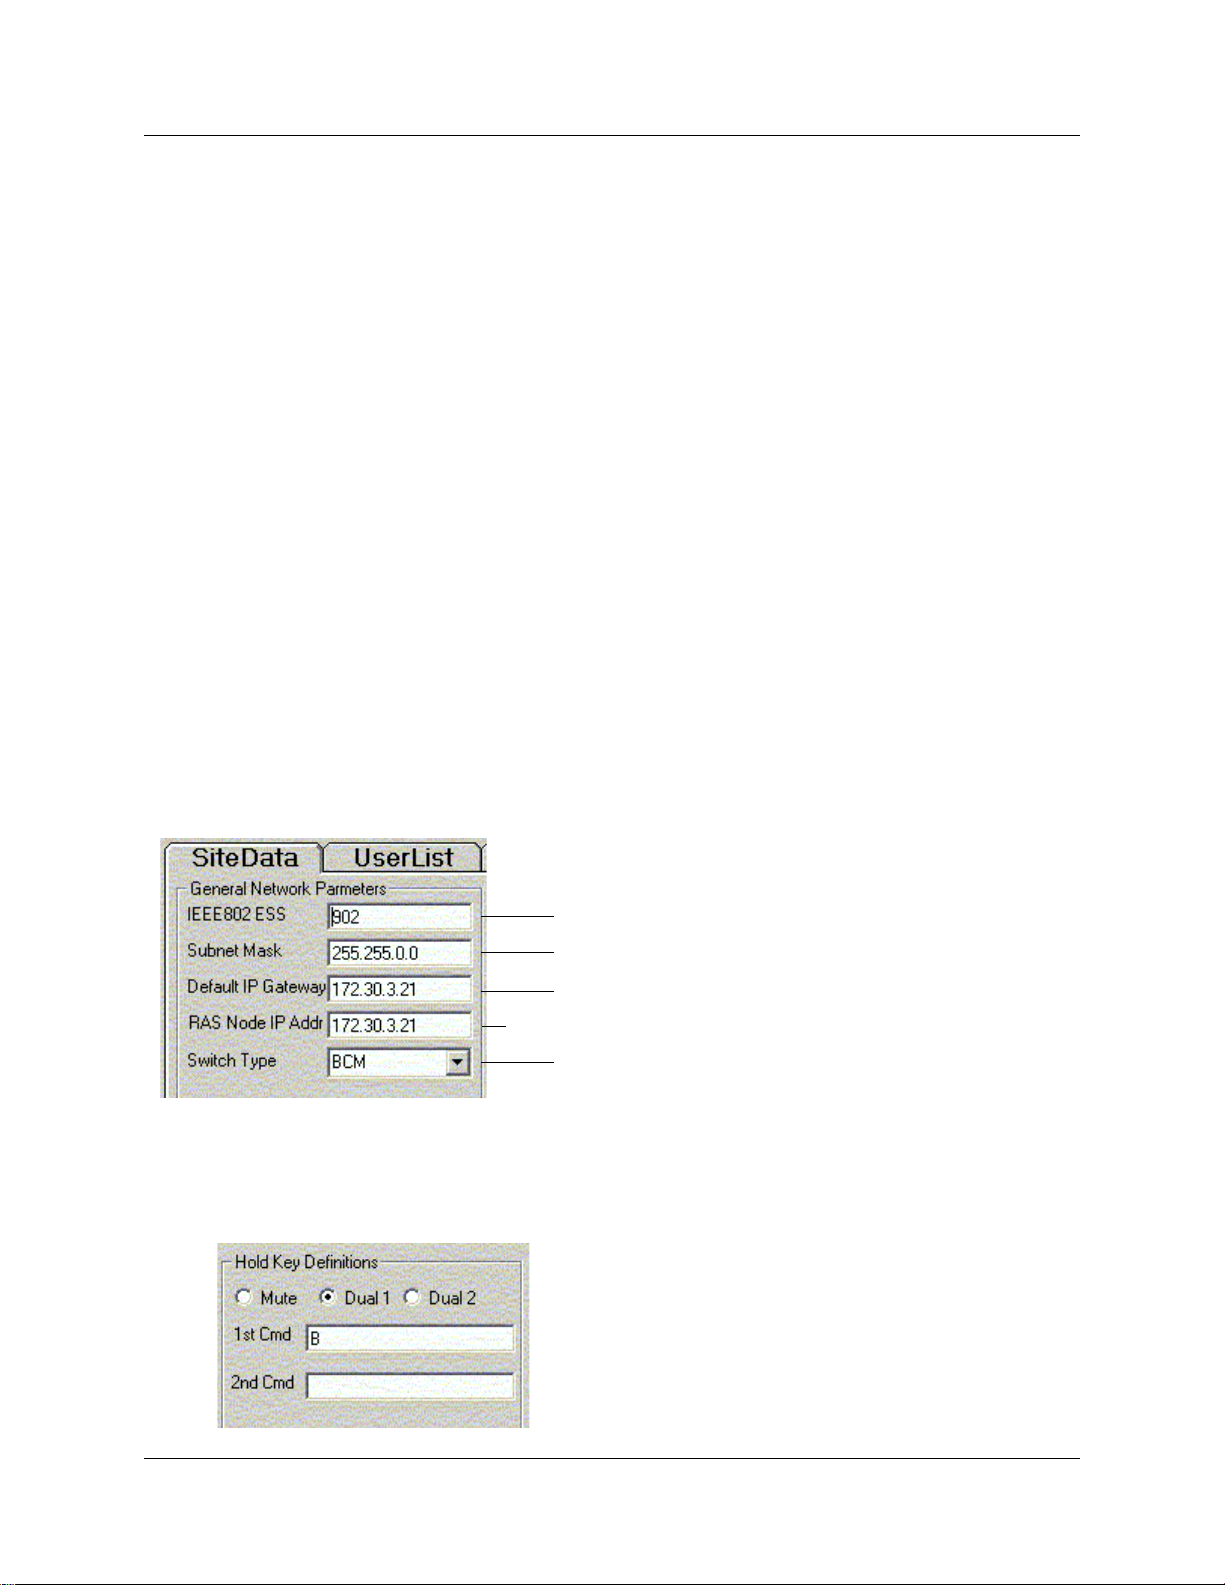
Required settings:
— General fields: Ensure the four fields indicated in the following figure have the
correct parameters. The RAS node IP address is the Published IP address for your
Business Communications Manag er.
Figure 1 General required parameters
Published IP address of Business Communications Manager
—In the Ho ld Key Defin i tio ns box, select Dual 1, and set 1st Cmd to B.
Refer to the following figure .
Figure 2 Hold key programming
Access Point ID code
Subnet mask for handset
IP address of subnet gateway
Site gateway. (always set to BCM)
P0993475 03
Page 11

Chapter 1 Installing NetVision telephones 11
—In the Pin Verification box, select External. Refer to the following figure.
Figure 3 PIN verification
Optional features: The settings shown in the following figure are unique to your
requirements. Change the defaults to suit your system requirements.
Figure 4 Optional settings
Inactive features: The information in the following boxes does not apply to Business
Communications Manager progr amming, unless otherwise noted.
• Extended Services Protoc ol
• Short Messaging Services
• Airbeam Parameters
• Ext. Verification
4 Under the Tools menu, click Imp ort F ea tu res.
Note: A new site defaults to the M1 feature set. Therefore, after you create a new site, change
the switch type to BCM. Then select Tools, Import Features to update the features list
(Features ta b).
NetVision Phone Administrator Guide
Page 12

12 Chapter 1 Installing NetVision telephones
Adding user records and features
After you set up the Site Data paramet ers, enter user records for the handse ts you are configuring,
then define the features for each handset.
1 Click on the User List tab.
2 In the fields at the bottom of the screen, enter a record for each handset you are adding. Refer
to the following figure.
Note: The information you enter fo r the User Name, PIN and User Extension must be the
same as what you enter ed into the Unif ied Mana ger H.323 Termina ls re cord Name, Password
and DN fields.
Figure 5 Adding Users
3 Click on the Features tab. Refer to the following figure.
4 In the fields on the Feature s page you will note that the Shortcut Numbers and Phone set field
entries are filled out. These features are obtained from the default feature file that
automatically loa ds when you choose the BCM switch type. Refer to “Indexed features” on
page 19.
If any DTMF features are on the page, and are selected, enter the DTMF string for the feature
in the DTMF St ring field if it is not already there. Refe r to “DTMF features” on page 22.
P0993475 03
Page 13

Chapter 1 Installing NetVision telephones 13
Figure 6 NVPA default Features list
Note: These features must match Business Communications Manager capabilities.
Gateway Type, from the Site Data page, determines the default entries in this table.
For information about changing the list of Features on the Features tab, refer to Appendix A,
“Configuring feature codes for NetVision,” on page 19. This section also includes a
description of the difference between Inde xed features and DTMF features, and provides a list
of supported feature s and their codes.
5 You are now ready to identify the handsets to the Nortel NVPA and to download the firmware
and the configurati on into the handsets. Refer to “Identifying the handset to the Nortel NVPA
tool” on page 13.
Identifying the handset and downloading the record
After you add all the user files and feature inf ormation, you are ready to identify the handset to the
Nortel NVPA tool, download the correct firmware, and, then, download the configuration file.
Ident ifying the handset to the Nortel NVPA tool
Follow these steps to identif y the handset to the Nortel NVPA tool.
Note: For these procedures, the NVPA tool is running on your computer and the
Download tab is selected.
1 Ensure the handset is turned off.
2 Attach the serial cable from your computer to the handset.
3 Turn the handset on.
4 On the NVPA Download screen, shown in the figure below, do the following:
NetVision Phone Administrator Guide
Page 14

14 Chapter 1 Installing NetVision telephones
a Ensure that the correct Com Port is selected .
b C lick the Query New Phone button.
Figure 7 Connecting to a handset
5 Immediately press the key on the handset.
The application uploads ide ntification data from the handse t. The messag e line above the
Com Port box will indicate the status of the process.
When the upload is complete, you will notice additional information entered into the
Download tab and the Phone List tab fields.
6 Click the Phone List tab.
7 In the fields at the bottom of the window, enter the information that identifies the handset.
Refer to the following figure .
a IP address for the handset.
b Ph one Mode to Personal.
c User Name that matches the name you entered in the H.323 Terminals record in the
Unified Manager.
Figure 8 Checking the Phone List entry for the handset
8 Click Change to save any updates.
9 Continue with the next secti on.
P0993475 03
Page 15

Updating handset firmware
Use this procedure to update fir mware on your new NetVision handsets.
1 Unplug the seri al cab le fro m the ha nds e t.
2 Turn the handset off. (Press and hold .)
3 Attach the serial cable from your computer to the handset.
4 On the Nortel NVPA application, do the following:
a Click the Download tab. Refer to the following figure.
Figure 9 Selecting a handset for firmware download
Chapter 1 Installing NetVision telephones 15
b S elect the listing for the handset at the top of the screen or click the Query New Phone
button at the bottom of the screen.
c At the bottom of the screen, in the BIN file to Download field, select the new firmware
file.
In the following figure, this is XD_FH_04XXXX.BIN.
Figure 10 Downloading new firmware to a handset
XD_FH_04XXXX.BIN
5 Set up the handset, press and hold the 1 and * keys. At the same time, press and momentar ily
hold .
Note: For detailed descriptions about using the handset menus and troubleshooting error
messages, refer to the NetVision Phone Te lephone Start Kit Installation Guide , available from
Symbol.
6 On the Nortel NVPA Download screen, click on Download.BIN to the phone.
The firmware download begins. When the process completes, the display indicates that the
File Transfer OK.
7 When the firmware is successful ly downloaded, you can download the Nortel NVPA
configuration to the handset. Refer to the next section.
NetVision Phone Administrator Guide
Page 16

16 Chapter 1 Installing NetVision telephones
Downloading configur ations to the handset
Ensure the correct firmware is in the handset before you attempt to download the Nortel NVPA
configuration.
Setting up the handset
If your handset is still att ached to your computer with the serial cable, skip the se steps, and go to
the next section:
1 Turn the handset off. (Press and hold .)
2 Attach the serial cable from your computer to the handset.
3 Turn the handset back on.
Downloading the handset configuration through the serial cable
When you have your computer and handset correctly hooked up, you are ready to download the
configuration.
1 Open the Nortel NVPA application and click the Download tab.
2 At the bottom of the screen, under Phone to Download, select the handset to which your
computer is attached or click the Q uery New Phone button to select it.
3 On the Nortel NVPA Download screen, click Download profile to the phone.
Refer to the following figure.
Figure 11 Downloading the configuration to a handset
4 Press the key on the handset.
The application downloads the configuration file to the handset . The message line on the
Nortel NVPA screen indicates the status of the process. When the download is complete, the
handset connects to the Busine ss Communications Manager, and prompts you to enter the
password (PIN).
5 Enter the PIN and allow the telephone to connec t.
P0993475 03
Page 17

Chapter 1 Installing NetVision telephones 17
If you get an error message, you may be out of range of the access point. Move closer and try
again. If you still cannot connect, check all the settings in both the Nortel NVPA tool and the
Unified Manager H.323 Terminals record.
Checking or updating your NVPA software version
If you are not sure if you have the latest NVPA application, you can go to the Symbol website
given in “Gathe ring sy stem i nformation b efor e you s tart” on page 8 or yo u can look unde r the Help
menu item in your application, if it is version 1.2.0 or greater. Refer to the following figure.
Figure 12 Checking NVPA version
In your NVPA application, click on Help and
select About
This will open the dialog box shown below.
Click on the website
to access current
NVPA information.
Note: If you upgrade your version of NVPA, remember to uninstall the existing version
on your computer before you instal l the new version.
NetVision Phone Administrator Guide
Page 18

18 Chapter 1 Installing NetVision telephones
P0993475 03
Page 19

Appendix A
Configuring feature codes for NetVision
This appendix describes how Business Communications Manager features can be programmed
onto the NetVision handset feature display menu by changing the FtrBCM.txt file that the
NetVision Phone Admini strator (NVPA) uses to populate the Features t ab. The application comes
with a default set of features. This process is only necessary if you want to de lete existing featur es
from the default list and add new ones. The list co ntains a maximum of 10 features.
• The first part of this chapter describes the two different types of features and how they are
used.
• The second section, “NetVision Features tab configuration” on page 23, describes how to
change the FtrBCM.txt file and update it to your NVPA application.
NetVision menu feature types
19
The Nortel NVPA use two types of features: Index ed featur es and DTMF features.
Indexed features
Indexed features are pr edef ined within the Business Communications Manager in a master list
numbered from 0 to 255.
For the Nortel NVPA, the index code for each selected feature is entered into the Phone Set fields.
Refer to Figure 13.
Figure 13 NVPA Feature screen
On Model #: NP-4046-300
handsets, 0 corresponds to the
programmable button which is
labeled HOLD on other types of
NetVision handsets.
NetVision Phone Administrator Guide
Page 20

20 Configuring feature codes for NetVision
When the feature is activated on the handset, the index number is sent to the Business
Communication Manager, where the system interprets the number as the request ed feature.
Suppor ted features
Table 1 lists the index codes and DTMF strings for the Busine ss Communications Manager
features tha t are supp orted on the NetVisi on ha ndset. The NetVision handse t FCT menu s upports a
maximum of 10 features.
• The Nortel NVPA stores the list of features for the FCT menu in Ft rBCM.txt. You can use the
values on this table to change that list. Refer to “Determining values for the FtrBCM.txt file”
on page 24.
Table 1 Indexed features, supported
Feature Name Type Index # Feature
code
FEATURE Key 1 1 F (Indexed features)
DTMF features: A (during call) or * (initiated call string)
Call Center Agent
login
Call Center Agent
Make Busy
Call Forward 1 14 4 Send calls to another telephone in your system.
Call Park 1 74 74 Allows user to park a call on the system by assigning it
Call Pickup Directed
Call Pickup - Group 1 75 75 Answer a call ringing on another telephone within the
Class of Service 1 68 68 Access the system from a remote location, or use to
Conference Call 1 13 3 Set up 3-way conversation.
DN Query 0 20 *0 Query the directory number of the telephone.
Do Not Disturb 0 85 85 Prevent calls from coming in to the handset. (toggle
Hold/Unhold call 1 99 B Hold or unhold a call. Use to retrieve call if END used
Language - English 0 131 *501 Pick language display for Business Communications
Language - French 0 132 *502
Language - Spanish 0 133 *503
Last # Redial 1 15 5 Redial the last external number you dialed.
0 104 904 Login and receive calls as a Call Center agent.
0 108 908 Temporarily stop receiving calls from the Call Center
1 76 76 Answer any ringing telephone.
Description
system.
Hunt Group calls override all Call Forward features. A
Hunt Group extension can be a Call Forward
destination. Implemented as a toggle feature for
NetVision telephones. User can also press #4 to cancel
the feature.
a Call Park Code. The call can be retrieved at any other
telephone by entering the Call Park code.
same pickup group
change dialing filters on the line.
feature)
and the link is dropped.
Manager prompts. Note: Handset-generated prompts
are English-only.
P0993475 03
Page 21

Table 1 Indexed features, supported (Continued)
Configuring feature codes for NetVision 21
Feature Name Type Index # Feature
code
Line Pool 1 64 64 Enter line pool access code to dial through Business
Link 1 71 71 Host signaling code
Message - Cancel 1 31 #1 Send and receive messages from other system
Messages - Send 1 11 1
Messages - View 1 65 65
Off-hook 1 98 ~ provides dial tone or answers a ringing call after
Page 1 60 60 Send Page announcements to specific groups.
Page - Combined 1 63 63
Page - External 1 62 62
Page - Internal 1 61 61
Priority Call 1 69 69 Transmit priority call to another telephone in the
Privacy 83 Change privacy setting for an external line assigned to
Speed dial - Make 1 10 0 Use system speed dial codes.
System Wide Call
Appearances
Time 0 103 803 Briefly displays the date and time when on a call, or
Transfer 1 70 70 Transfer calls to another telephone, either inside or
Trunk Answer 1 100 800 Answer an external call that is ringing on a line in a
Voice Call - make 1 66 66 Make a voice call to another telephone.
VM leave msg 1 180 980 Provides all voice mail functions that are available to
VM access 1 181 981
VM Spare 1 182 982
VM Spare 1 183 983
VM Call Fwd 0 184 984
1 221 to
236
220
237
238
*521 to
*536
*520
*537
*538
Description
Communications Manager line pool.
devices.
pressing END or powering on, or taking a conference
call off hold if the handset is the master.
Note: The NetVision handset cannot receive page
announcements.
system. Note: Handset cannot receive Priority calls.
the handset.
Answer calls or put calls on Hold by selecting the
SWCA feature.
Find an available SWCA key to park a call.
Find the oldest SWCA call.
Find the newest SWCA call.
when feature status message is on the display of an
idle telephone.
outside the system. Press #70 on handset to cancel
feature.
Ringing Service schedule from any telephone in the
system. Note: Does not work for a private line.
Note: NetVision receives voice calls as a ringing call.
the system.
NetVision Phone Administrator Guide
Page 22

22 Configuring feature codes for NetVision
Table 1 Indexed features, supported (Continued)
Feature Name Type Index # Feature
code
VM DN query 0 185 985
VM Transfer 1 186 986
VM intercept 1 187 987
VM Directory 1 188 988
VM Call Record 1 189 989
DTMF features
Most Business Communications Manager features are available as Index feat ures. However, the
DTMF capability allows for additional features and special progr amming, such as combining a
code to initiate a call, and then sending a featu re req ues t. Thes e cod es are ent ere d in the DTMF
string field on the NVPA Feat ures scr een.
DTMF features act in the same way that memory butt ons do. As well, they can be configur ed to be
used on an idle line or during a call. When the feature is acti vated on an idle li ne, a call is initia ted,
and then the featu re sequence is sent to the Bus iness Communications Manager. When the feature
is activated during an act ive call, the feature sequence is sent dire ctly to the Business
Communications Manager and rela te s to the current call. In either case, the Busi ness
Communications Manager processes the feature sequence as if the user had presse d the handset
keys to activate a feature.
Description
Special characte rs used in the digit string define how the telephone interpr ets the string. Refer to
Table 2.
Table 2 Digit string special dialing characters
{} initiates a call on an idle line (brackets enclose call coding)
If a feature with this code is entered during a call, these are ignored, and the feature is
sent for the curren t call.
The system interprets these characters as activating the Featur e call, which is equivalent
to pressing the Feature button on other system telephones.
*
used to start features that init ia te cal ls, when there is no current ac tive cal l. E xamp l e:
{*4}
A
used to start features during calls already in progress. Example: A71.
B use to activate Hold for an active call
# • when connected to an analog line, enables DTMF (tones) dialing. This allows
someone using a pulse mode analog line to conne ct to a far end device, then turn on
tones to control the device.
• immediately after the feat u re call t o tur n off a feature:
⁄£°?
! inserts a flash-h ook signal (analog lines)
, inserts a one-half -second pause
P0993475 03
Page 23

Configuring feature codes for NetVision 23
Table 2 Digit string special dialing characters (Continued)
$ inserts the DN of the current logged-on user
]
acts as an key
Examples of DTMF code configurations
• Initiating a call: If the feature code you enter is expressed as {*<feature code>}, the
system will initiate a call and then send the characters entered in <feature code>. The
Business Communications Manag er interprets the * at the front of the feature code string as
the feature activation code when the * is the first digit of a new call.
The *<feature code> string can include any of these characters: 0 to 9, # and *.
Examples:
{221} initiates a call to extension 221.
{*4} initiates a call, then sends the feature code 4 (Call Forward) to the Business
Communi ca tio ns Manag e r. The user then ent ers the D N whe re the call is to b e forw ard e d.
When the call is complete, the user presses on the handset.
• Initiating features while on a call: If the code you enter for the feature is expressed as
A<feature code>, the system interprets this as a feature that is activated during a call. The
Business Communications Manag er interprets the A as the Feature key. The <feature
string can include these char acte rs: 0 to 9, #, *, A, B, C, D, and !.
code>
Examples:
A74 activates the Call Park feature during an active call.
A71, when invoked during a call, signals the Business Communications Manager to send a
Link/Flash during a call.
• Combining the feature s:
{*4221}] initiates a call a nd invokes Call Forward, then automatically dials 221. The square
bracket auto ma tica l ly en ds the call .
NetVision Features tab configuration
The Features tab on the Nortel NVPA tool define s the contents of the NetVision handset displa y
menu that appears when the user presses or on the handset. The NVPA comes with a
default set of features.
Nortel NVPA uses the Gateway Type setting, on the Site Data tab, to determine which set of
default configuration files to use. When the Gateway Type is set to BCM, Nortel NVPA uses
FtrBCM.txt to build the Features Tab feature list.
To change the contents of the Features tab, you can edit FtrBCM.txt.
NetVision Phone Administrator Guide
Page 24

24 Configuring feature codes for NetVision
The FtrBCM.txt file specifies the feature type , f eature description , a nd feature label. The file does
not specify the feature inde x or DTMF digits, nor does it specify the shortcut number, which
means you need to enter this information on the Feature tab after you invoke this file.
Finding the correct Feature list
When a new site is created, Gateway Type, on the Site Data tab, is set to Meridian-1 by default.
Therefore, the featur e list will populate from FtrMer1C.txt.
Use these step s to cha nge a site to ref er to a Bus i nes s Com mu ni ca tio n s Man ag e r:
1 Change the value in Gateway Type to BCM.
2 Select Tools, Import Features.
This will cause the feature list to be reloaded from FtrBCM.txt.
3 Click on the Features tab and enter the values f or, Shortcut number, Phone Set and DTMF
digits.
Determining values for the FtrBCM.txt file
If you want to change the default featur e list, you can edit the FtrBCM.t xt file. The structure of the
FtrBCM.txt file, and how to edit it, are described below.
Table 1 on page 20 provides the settings for each suppo rted feature.
The FtrBCM.txt file has a simple format which defines one feature per line, a version line, and a
syntax for defining lines as comments. Refer to Figure 14 on page 26 and Table 3.
Table 3 FtrBCM.txt values and descriptions
Feature definition synta x: "Feature description","Feature label",type;
Command Values Description
“Feature description” “<name of feature>” 32-character string that displays on the Feature tab
“Feature label” “<name of feature>” 10-character string that displays on the NetVision phone
handset <FCT> menu. (NetVision tele phone display is 10
chars by two lines.)
P0993475 03
Page 25

Configuring feature codes for NetVision 25
Table 3 FtrBCM.txt values and descriptions (Continued)
type 0, 1 or 2 • 0 — feature can be invoked while telephone is idle or
on a call. The feature does not start a call.
• 1 — an indexed feature that initiates a call prior to
sending the feature index.
Additional user input via the keypad can only be
transmitted to the Busin ess Communications Manager
while the phone is “off hook”.
Users manually release the call when the activity is
completed.
If the feature is selected during a call, the index is sent
in the context of the current call.
Some features, suc h as Voice Ca ll, r equire the phone to
go off hook before being activated.
Features that requi res additional data entry, such as
Call Forward, must also initiate a call.
Also refer to “Indexed features” on page 19.
• 2 — DTMF feature, or memory di aler. Memor y diale rs
have a special s yntax to spec ify whe ther or not to make
a call and special characters to identify the digits as a
feature code as well a s other spe cial functi ons. Refer to
“DTMF features” on page 22.
Example: Adding Call Forward All Calls:
“Call Forward All Calls”,”Frwd All”,1;
• The first two parameters of the feature line are enclosed in quotes.
• The last parameter is a sing le digit - 0, 1 or 2 - which specifies the type of feature.
• Each line is terminated with a semicolon.
• No leading spaces are allowed, nor are spaces allowed between parameters. Spaces are allowed in the
feature description and feature label, since they are enclosed in quotes.
NetVision Phone Administrator Guide
Page 26

26 Configuring feature codes for NetVision
Figure 14 FtrBCM.txt file layout
// this is a comment line
// The version line appears on the Features tab in NVPA.
// It must start with #BCM but is otherwise not formatted.
// The next line is the version line:
#BCM Default Features v0.00
// The next line defines the syntax for a feature definition:
//"Feature description","Feature label",type;
//”Feature key”, “FEATURE”,1;
"Feature Key","FEATURE",1;
"Call Transfer","Transfer",0;
"Conference Call","Conference",0;
"Call Park","Park",0;
"Do Not Disturb","DND",0;
"Call Forward All Calls","Call Fwd",1;
"Page","Page",2;
"Voice Mail","Voice Mail",2;
"System Speed Dial","Speed Dial",2;
Editing the FtrBCM.txt file
Follow these steps to edit the file .
1 Access
2 Add, change, or delete the feature informa tion in the file. Refer to “Determining values for the
FtrBCM.txt file” on page 24.
3 Save the file.
4 Open the Nortel NVPA a nd update the feature list for the si te(s). Refer to “Finding the correct
Feature list” on page 24.
5 Under Tools, selec t Import Features.
New or changed entries will not be select ed and will have no Shortcut number, Phone Set value
or DTMF string.
FtrBCM.txt on the computer where you installed Norte l NVPA.
P0993475 03
Page 27

Configuring feature codes for NetVision 27
Customizing features for u sers
If you want different feature lists for different types of users:
1 Define a new site for each type of user.
2 Create a version of the FtrBCM.txt file for each new site (user type). Refer to “Editing the
FtrBCM.txt file” on page 26.
3 Create a new site.
4 Copy the appropriate version to FtrBCM.txt
5 Follow the steps in “Finding the cor rect Feature list” on page 24.
6 Go to the Features tab and populate the fields for the desired features.
7 Enter new users on the site.
NetVision Phone Administrator Guide
Page 28

28 Configuring feature codes for NetVision
P0993475 03
Page 29

Index
29
Symbols
! inserts flash-hook signal 22
{} initiates call in DTMF stri ng 22
A
access point, ESS ID 9, 10
active site 12
analog tele phone, dialing codes 22
answer mode 11
B
before you start
NetVision 8
BIN file to Download 15
Business Communications Manager
Published LAN interfa ce 8
C
Call Center
Agent login 20
Agent Make Busy 20
Call Forward 20
Call Forward All Calls 12
Call Park 12, 20
Call Pickup
direct ed 2 0
group 20
Call Transfer 12
Class of Service 20
Client Install button 8
com port 14
Conference Call 12, 20
Conference call 20
D
DN inquiry 20
DNs
DTMF string 22
Use Extension 12
Do Not Disturb 12, 20
documention, supporting 8
download
firmware, NetVision 15
Nortel NVPA configurat ion 16
Download .BIM to phone 15
Download profile to the phone 16
DTMF features
configuring strings 22
Nortel NVPA page 12
DTMF string
add current DN 22
enables d ialing, turns off f eature 22
end call code 22
flash-hook signal 22
pause code 22
sample configurations 23
special codes 22
E
enable concurrent vibrate 11
enable silence su ppression 11
end call, DTMF string code 22
extension, NetVision (also see DNs) 12
F
Feature description 24
Featu re ke y
DTMF string special codes 22
indexed features 12, 20
Feature label 24
feature site, gateway type 24
features
activate featu re menu 22
customizing for users 27
default, gateway type 13
definition syntax, FtrBCM.txt 24
DTMF features 22
handset menu 8
import NetVision feature file, NetVision 10
import NetVision features 10
NetVis ion Nortel NVPA 12
NetVision, configuring 19
Nortel NVPA page 23
sample DTMF strings 23
turns off feature in DTMF string 22
firmware
BIN file to download 15
download, NetVision 15
NetVision Phone Administrator Guide
Page 30

30 Index
flash-hook signa l, DTMF string code 22
FtrBCM.txt 24
G
gateway
NetVision IP address 8
subnet, NetVision 10
type determines fe ature set 24
type, NetVision 10
Gateway Type 13
Group Pickup 20
H
H.323 devices
NetVision 7
H.323 terminals r ec ord
connecting 16
name 14
handset
download firmware 15
download Nortel NVPA configuration 16
identifying ha ndset to Nortel NVPA 13
IP address 14
hold key definitions 10
I
Import features 10
indexed features
Nortel NVPA page 12
programming 19
Installation
NetVision telephones 7
NetVision, bef ore you s tart 8
IP address
handset 8
NetVision handset 14
subnet gateway 10
subnet gateway, NetVision 8
IP telephones
installing 7
keycode 7
NetVision, connecting 16
IP wireless. keycode 7
K
keycodes
NetVision 7
L
language 20
Last Number Redial 20
LCD contrast 11
line pool
supported feature 20
Link 20
M
Meridian 1
NetVision active site 10
Messages 20
N
name
NetVisio n 8
NetVision, Nortel NVPA 14
NetVision
access point ESS ID 9
active site 10
adding users 12
before you start 8
BIN file to download 15
com port 14
configuring features 19
connectivity 7
customizing features for users 27
Download .BIN to phone 15
download firmware 15
download Nortel NVPA configuration 16
DTMF features 22
DTMF string codes 22
features to be added 8
General settings 10
handset IP address 8, 14
hold key definitions 10
identifying the handset 14
indexed features 19
installing 7–??
Nortel NVPA configurat ion 10
Nortel NVPA features page 12
Nortel NVPA tool 8
Nortel NVPA, inactive feat ures 11
password 8
Phone Preferences 11
Pin verification 11
PIN, connecting 16
Published LAN IP address 8
sample DTMF feature strings 23
serial cable 8
P0993475 03
Page 31

Index 31
site gateway 10
subnet gateway 8
supporting documentation 8
NetVision Phone Administrator, see Nortel NVPA
Node IP address 8
Nortel NVPA
adding users 12
BIN file to download 15
configuring features 19
download configuration to handset 16
download firmware to handset 15
download tool 8
DTMF features 22
DTMF string codes 22
features page 12
features tab 23
general settings 10
handset IP address 14
identifying the handset 13
inactive features 11
indexed features 19
node IP address 8
phone mode 14
Phone Preferences 11
user name 14
users, custom izing features 27
using 10
R
ring mode 11
ring volume 11
S
serial cable, NetVision 8
shortcut number 12
silence suppression
enable, NetVision 11
site
data 10
gateway 10
special codes, DTMF string 22
Speed dial 20
speed dial
init ia te 21
subnet mask
NetVisio n 8
NetVision handset 10
SWCA
supported feature 21
system speed dial 12
T
P
Page 12, 20
page
supported feature s 21
password
NetVision 8
pause, DTMF string code 22
phone mode 14
phone preferences, NetVision 11
Phone set 12
Phone to Download 16
PIN
connecting t o the s ystem 16
Nortel NVPA 12
verification 11
play volume 11
priority call 21
privacy, invoke 21
Q
Time 21
Transfer
supported feature 21
transfer
NetVision supported featu r e 20
Trunk answer 21
type, feature 24
U
Unified Manager
Client Install 8
Nortel NVPA download 8
user list 12
user name 12, 14
V
voice call
supported feature 21
voice mail 12, 20
supported features 21
Query New Phone 14
NetVision Phone Administrator Guide
Page 32

32 Index
W
wireless IP 7
P0993475 03
 Loading...