

Page 1

Part No. P0935737 05
Multimedia Call Center
Set Up and Operation Guide
Page 2

2
Multimedia Call Center Set Up and
Operation Guide
Copyright © 2002 Nortel Networks
All rights reserved. 2002.
The information in this document is subject to change without n ot ice. The statements, confi gurations, technical data , and
recommendations in this document are believed to be acc urate and reliable, but are presented without express or implied
warranty. Users must take full responsibility for their app lications of a ny products spec ified in this doc ument. The info rmation in
this document is proprietary to Nortel Networks NA Inc.
The software described in this document is furnished under a license agreement and may be used only in accordance with the
terms of that license. The software license agreement is included in this document.
Trademarks
NORTEL NETWORKS is a trademark of Nortel Networks.
Microsoft, MS, MS-DOS, Windows, and Windo w s NT are registered trademarks of Microsoft Co r poration.
All other trademarks and registered trademarks are the property of their respective owners.
P0935737 05
Page 3

Contents
Chapter 1
About Multimedia Call Center. . . . . . . . . . . . . . . . . . . . . . . . . . . . . . . . . . . . . 5
Overview of Multimedia Call Center . . . . . . . . . . . . . . . . . . . . . . . . . . . . . . . . . . . . . . . 5
How Multimedia Call Center works for callers . . . . . . . . . . . . . . . . . . . . . . . . . . . . . . . . 6
The Multimedia Call Center caller interface . . . . . . . . . . . . . . . . . . . . . . . . . . . . . . 6
How Multimedia Call Center works for agents . . . . . . . . . . . . . . . . . . . . . . . . . . . . . . . . 7
The Multimedia Call Center agent interface . . . . . . . . . . . . . . . . . . . . . . . . . . . . . . 7
Multimedia Call Center call types . . . . . . . . . . . . . . . . . . . . . . . . . . . . . . . . . . . . . . . . . 8
PSTN voice and data calls . . . . . . . . . . . . . . . . . . . . . . . . . . . . . . . . . . . . . . . . . . . 8
Data only call . . . . . . . . . . . . . . . . . . . . . . . . . . . . . . . . . . . . . . . . . . . . . . . . . . . . . . 9
Requirements for using CallPilot Manager to set up Multimedia Call Center . . . . . . . 10
How to get help . . . . . . . . . . . . . . . . . . . . . . . . . . . . . . . . . . . . . . . . . . . . . . . . . . . . . . 11
Chapter 2
Setting up Mu l timedia Call Ce n te r . . . . . . . . . . . . . . . . . . . . . . . . . . . . . . . . 13
3
How an agent-centric PSTN voice and data call works . . . . . . . . . . . . . . . . . . 8
How a data only call works . . . . . . . . . . . . . . . . . . . . . . . . . . . . . . . . . . . . . . . . 9
Creating a user account for Multimedia Call Center . . . . . . . . . . . . . . . . . . . . . . . . . . 13
Enabling a Software Authorization Code . . . . . . . . . . . . . . . . . . . . . . . . . . . . . . . . . . . 14
Setting Multimedia Call Center parameters . . . . . . . . . . . . . . . . . . . . . . . . . . . . . . . . . 16
Assigning routing to Multimedia Call Center calls . . . . . . . . . . . . . . . . . . . . . . . . . . . . 19
How Multimedia Call Center calls work with Routing Tables . . . . . . . . . . . . . . . . . 19
Routing Multimedia Call Center calls using the CLID/DNIS table . . . . . . . . . . . . . . . . 20
Assigning a callback route for Multimedia Call Center . . . . . . . . . . . . . . . . . . . . . . . . 24
Configuring outdialing using PRI lines . . . . . . . . . . . . . . . . . . . . . . . . . . . . . . . . . . . . . 26
Assigning an outgoing line to a line pool . . . . . . . . . . . . . . . . . . . . . . . . . . . . . . . . . . . 33
Creating a Multimedia Call Center dial plan . . . . . . . . . . . . . . . . . . . . . . . . . . . . . . . . 35
An example of a dial plan that restricts calls based on their country . . . . . . . . . . 35
Setting the Maximum Outcalling Channels . . . . . . . . . . . . . . . . . . . . . . . . . . . . . . . . . 38
Configuring the Dialing Translation Table . . . . . . . . . . . . . . . . . . . . . . . . . . . . . . . . . . 39
Chapter 3
Multimedia Call Center agents . . . . . . . . . . . . . . . . . . . . . . . . . . . . . . . . . . . 41
Enabling Multimedia Call Center agents . . . . . . . . . . . . . . . . . . . . . . . . . . . . . . . . . . . 41
Adding Multimedia Call Center agents to Call Center . . . . . . . . . . . . . . . . . . . . . . . . . 42
Adding more than one agent . . . . . . . . . . . . . . . . . . . . . . . . . . . . . . . . . . . . . . . . . . . . 45
Accepted Call Types . . . . . . . . . . . . . . . . . . . . . . . . . . . . . . . . . . . . . . . . . . . . . . . 46
Installing Multimedia Call Center software on an agent’s computer . . . . . . . . . . . . . . 47
Requirements for agents using Multimedia Call Center . . . . . . . . . . . . . . . . . . . . 47
To install Multimedia Call Center software on an agent’s computer . . . . . . . . . . . 47
Configuring Multimedia Call Center on a Windows 95 system . . . . . . . . . . . . . . . 48
Multimedia Call Center Set Up and Operation Guide
Page 4

4 Contents
Configuring an agent's server settings . . . . . . . . . . . . . . . . . . . . . . . . . . . . . . . . . . . . 49
Configuring an agent’s browser settings . . . . . . . . . . . . . . . . . . . . . . . . . . . . . . . . . . . 50
Configuring an agent’s name . . . . . . . . . . . . . . . . . . . . . . . . . . . . . . . . . . . . . . . . . . . . 51
Using Follow-me browsing . . . . . . . . . . . . . . . . . . . . . . . . . . . . . . . . . . . . . . . . . . . . . . 51
Chapter 4
Multimedia Call Center messages . . . . . . . . . . . . . . . . . . . . . . . . . . . . . . . . 53
Call setup messages . . . . . . . . . . . . . . . . . . . . . . . . . . . . . . . . . . . . . . . . . . . . . . . . . . 54
Status and error messages . . . . . . . . . . . . . . . . . . . . . . . . . . . . . . . . . . . . . . . . . . . . . 56
Web refresh message . . . . . . . . . . . . . . . . . . . . . . . . . . . . . . . . . . . . . . . . . . . . . . . . . 60
Recording Multimedia Call Center announcements . . . . . . . . . . . . . . . . . . . . . . . . . . 61
Downloading web pages and viewing web page lists . . . . . . . . . . . . . . . . . . . . . . . . . 62
Customizing web pages . . . . . . . . . . . . . . . . . . . . . . . . . . . . . . . . . . . . . . . . . . . . . . . 65
Uploading or deleting web pages . . . . . . . . . . . . . . . . . . . . . . . . . . . . . . . . . . . . . . . . 66
Creating and distributing web page lists . . . . . . . . . . . . . . . . . . . . . . . . . . . . . . . . . . . 68
Call setup page for first-time callers . . . . . . . . . . . . . . . . . . . . . . . . . . . . . . . . . . . 54
Call setup page for subsequent callers . . . . . . . . . . . . . . . . . . . . . . . . . . . . . . . . . 55
Multimedia Call Center unavailable message . . . . . . . . . . . . . . . . . . . . . . . . . . . . 56
No agents logged on message . . . . . . . . . . . . . . . . . . . . . . . . . . . . . . . . . . . . . . . 56
Bad calling preferences message . . . . . . . . . . . . . . . . . . . . . . . . . . . . . . . . . . . . . 57
Choose how to connect message . . . . . . . . . . . . . . . . . . . . . . . . . . . . . . . . . . . . . 57
Session completed message . . . . . . . . . . . . . . . . . . . . . . . . . . . . . . . . . . . . . . . . 58
User busy message . . . . . . . . . . . . . . . . . . . . . . . . . . . . . . . . . . . . . . . . . . . . . . . 58
Lines busy message . . . . . . . . . . . . . . . . . . . . . . . . . . . . . . . . . . . . . . . . . . . . . . . 58
Make call failed message . . . . . . . . . . . . . . . . . . . . . . . . . . . . . . . . . . . . . . . . . . . 59
Preferences message . . . . . . . . . . . . . . . . . . . . . . . . . . . . . . . . . . . . . . . . . . . . . . 59
No answer message . . . . . . . . . . . . . . . . . . . . . . . . . . . . . . . . . . . . . . . . . . . . . . . 59
Connected message . . . . . . . . . . . . . . . . . . . . . . . . . . . . . . . . . . . . . . . . . . . . . . . 60
Call transferred message . . . . . . . . . . . . . . . . . . . . . . . . . . . . . . . . . . . . . . . . . . . 60
Overviews of downloading, customizing and uploading pages . . . . . . . . . . . . . . . 65
Chapter 5
Viewing reports, active calls and log files. . . . . . . . . . . . . . . . . . . . . . . . . . 69
Summary call report - all calls . . . . . . . . . . . . . . . . . . . . . . . . . . . . . . . . . . . . . . . . . . . 69
Summary call report by skillset . . . . . . . . . . . . . . . . . . . . . . . . . . . . . . . . . . . . . . . . . . 70
Detail call report - all calls . . . . . . . . . . . . . . . . . . . . . . . . . . . . . . . . . . . . . . . . . . . . . . 71
Detail call report by skillset . . . . . . . . . . . . . . . . . . . . . . . . . . . . . . . . . . . . . . . . . . . . . 72
Generating Multimedia Call Center reports . . . . . . . . . . . . . . . . . . . . . . . . . . . . . . . . . 73
Monitoring active calls . . . . . . . . . . . . . . . . . . . . . . . . . . . . . . . . . . . . . . . . . . . . . . . . . 75
Viewing log files . . . . . . . . . . . . . . . . . . . . . . . . . . . . . . . . . . . . . . . . . . . . . . . . . . . . . . 77
Index . . . . . . . . . . . . . . . . . . . . . . . . . . . . . . . . . . . . . . . . . . . . . . . . . . . . . . . . 81
P0935737 05
Page 5

Chapter 1
About Multimedia Call Center
This guide assists a Call Center administrator with installing and configuring Multimedia Call
Center for Nortel Networks Business Communications Manager 3.0.
This guide assumes that you are familiar with using Unified Manager and CallPilot Manager. For
more information, refer to the Business Communications Manager 3.0 Programming Operations
Guide and the CallPilot Manager Set Up and Operations Guide.
In this document the server that Multimedia Call Center is installed on is referred to as
“voicebutton.<domain>”
where:
• <domain> is the domain name of the business, for example nortelnetworks.com
• “voicebutton” is the host name of the server within the domain.
The server is usually called “voicebutton”, although any unique hostname within the domain is
acceptable.
5
Overview of Multimedia Call Center
With Multimedia Call Center agents and callers can have multimedia calls that include:
• speaking over a Public Switched Telephone Network (PSTN) voice connection
• text chatting
• exchanging and viewing web pages
• viewing screen captures sent by an agent
Multimedia Call Center Set Up and Operation Guide
Page 6

6 Chapter 1 About Multimedia Call Center
How Multimedia Call Center works for callers
When callers on a website click a voice button html image the “Call setup page for first-time
callers” on page 54 appears for first-time callers.
In the call setup page callers specify their calling preferences. Callers can access the media types
based on their needs and resources. Callers with separate data and PSTN voice lines can have a
PSTN voice call while they view, receive or even send web pages to agents. For information on
Multimedia C all Center call types see “Multimedia Call Center call types” on page 8.
After a caller specifies their prefer enc es, t h e vo ic e but ton call enters the Call Cent er . Based on the
rules created by the Call Center Administrator, the request for an agent is sent to the appropriate
skillset. If an agent is not immediately available, the caller can receive periodic html messages
(web refresh). The Call Center Administrator programs the se messages. The messa ges can thank
callers for t heir inter est, infor m th em that ther e are no agent s curr en tly a vaila ble, and t ell them t hat
they will be connected to the first av ailable agent.
When the call is answered by an agent, th e “The Mu lt imedia Call Center caller interface” on page
6 appears in the caller’s web browser.
The Multimedia Call Center caller interface
The caller interface has two windows. The first window lets the caller control the progress of the
call. The second window displays Multimedia Call Center messages and the web pages that an
agent sends to the caller.
Opens the text chat interface
Opens the
preferences
page
Ends the call
Displays the agent’s name
Sends the web
page specified
in the Send
Page box to
the agent
P0935737 05
Page 7

Chapter 1 About Multimedia Call Center 7
How Multimedia Call Center works for agents
Depending on the call preferences the caller has requested in the call setup page, the agent can
have a browser-only, or a voice and browser call with the caller. The agent can use follow-me
browsing to show the caller a sequence of web pages. The agent can also push pages or screen
captures to the caller.
For a phone and browser call, the agent must answer the phone, and then the agent interface and
browser window appears on the agent’ s computer . For a browse r-onl y call, the agent interf ace and
browser window appears right away, so the agent cannot decline this type of call. The agent’s
browser window shows th e web page that the cal l er ori g i nal ly clicked to start the Multimedia Call
Center call.
The Multimedia Call Center agent interface
The Multimedia Call Center agent interface has two windows. The first window lets an agent
control the progress of the call. The second window displays the Multimedia Call Center web
pages that the agent sends to a caller, or that a caller sends to them.
Initiates a
text chat
with the
caller
Opens
Help
Ends the
browser
session
Takes a screen
capture of a
web page,
window,
desktop, etc.
Blocks
a caller
Contains a
preset list of
web pages
Controls whether
web pages
clicked by the
agent are sent to
the caller
Shows the url of
the web page
the caller clicked
the voice button
on
Shows the name
and phone
number the caller
specified in the
Call Setup page
Displays in the
second window
the web page the
caller clicked the
voice button on
Multimedia Call Center Set Up and Operation Guide
Page 8

8 Chapter 1 About Multimedia Call Center
Multimedia Call Center call types
Callers with a PSTN voice connection and a data connection, and callers with only a data
connection can have a multimedia session with a Multimedia Call Center agent.
PSTN voice and data calls
PSTN voice and data calls use agent-centric routing.
Agent-centric call
After a caller clicks voice button the C all Cen ter pho nes the c aller w hen an
agent is available. The Call Center then connects the call to the agent.
How an agent-centric PST N voice and data call works
For this type of call, the cal ler has a separat e PSTN voice an d inter net conne ction , and is not using
their telephone.
1 The caller clicks the voice button icon on a web page.
2 The call setup page “Call setup page for first-time callers” on page 54 appears for first-time
callers. If the caller is not a first-time caller, step 4 occurs.
3 In this example the caller enters their phone number, name and area code. The caller can
specify that their call is:
• by browser only (a text chat with an agent)
• by phone and browser (a PSTN voice call and text chat with an agent)
4 A request for an agent is sent over the IP network to the call center.
5 While the caller is waiting web refresh html pages are displayed in their browser that
correspond to the announcement they would hear if they were on a PSTN voice call. A new
web page can be pushed for every Call Center announcement.
6 When a Multimedia Call Center agent becomes available, the caller's phone rings.
7 The caller answers the call.
8 The Call Center routes the PSTN voice portion of the call to the Multimedia Call Center agent.
The agent's set rings and displays “www” to signify that the call is a voice button call.
9 The agent answers the call on their set and the agent’s and the caller's audio path are
connected, and the agent and caller's web pages are synchronized. “The Multimed ia Call
Center agent interface” on page 7 appears in the agent’s browser and the “The Multimedia
Call Center c aller interface” on page 6 a ppears in the caller’s browser.
10 The agent pushes appropriate web pages to the caller. The agent can have a text chat session
with the caller. Text chat is controlled by the monitor parameter.
P0935737 05
Page 9

Chapter 1 About Multimedia Call Center 9
Data only call
For this type of call, the caller needs an Internet connection. A data only call can include text chat
and pushed web pages.
How a data only call works
1 The caller clicks the voice button icon on a web page.
2 While the caller is waiting web refresh html pages are displayed in their browser that
correspond to the announcement they would hear if they were on a PSTN voice call. A new
web page can be pushed for every Call Center announcement along with information such as
the number of age nts in t he sk ills et an d the numbe r of call s in the skil lset . For a fu ll list of CGI
parameters see the Multimedia Call Center Web Develo per Guide.
3 When a Multimedia Call Center agent is availabl e “The Multimedia Call Center agent
interface” on page 7 appears in the agent’s browser and notifies the agent that they have a call.
4 “The Multim edia Call Center caller interface” on page 6 appears in the caller’s browser.
5 The agent pushes appropriate web pages to the caller. The agent can have a text chat session
with the caller.
Multimedia Call Center Set Up and Operation Guide
Page 10

10 Chapter 1 About Multimedia Call Center
Requirements for using CallPilot Manager to set up Multimedia Call Center
You set up Multimedia Call Center using CallPilot Manager, the web-based administration tool.
You access CallPilot Manager on a web browser from a computer on your network.
System requirements
Before you use CallPi lot Manager to set up Multi medi a Ca ll Center, you must have your Bu siness
Communications Manager 3.0 system configured and Call Center installed. For how to enable a
software authorization code, refer t o “Enabling a Software Authorization Code” on page 14.
Computer requirements
The computer you use to run CallPilot Manager must have:
• WinNT or Windows workstation running P133 or later CPU (or compatible)
• 64 MB RAM, 10 MB disk space
• Minimum screen resolution of 1024 X 768 pixels
Browser requirements
To use CallPilot Manager you must have:
• Java Virtual Machine 5.0 (build 5.0.0.3188 or later)
• either Microsoft Internet Explorer 4.0 or later, or Netscape Communicator 4.0.5 or later, but
not Netscape 6.0
If you use Netscape Communicator, set these parameters:
• Enable Java: on
• Cached document comparison: every time
• If you use Netscape Communicator version 4.77 and not all the Call Center settings shown in
this guide appear in your br owser, refr esh the browse r by clickin g the View menu and clicking
Reload. If you still cannot view the settings, upgrade your browser.
If you use Microsoft Internet Explorer, set these parameters:
• Check for newer versions: every visit to the page
• Java JIT c ompiler enabled: on
For more information about these settings, refer to your web browser online Help.
For more information about using CallPilot Manager or Nortel Networks Call Center, refer to the
CallPilot Manager Set Up and Operation Guide and the Nortel Networks Call Center Set Up and
Operation Guide.
P0935737 05
Page 11

How to get help
USA and Canada
Authorized Distributors - Technical Support
Telephone:
1-800-4NORTEL (1-800-466-7835)
If you already have a PIN Code, you can enter Express Routing Code (ERC) 196#.
If you do not yet have a PIN Code, or for general questions and first line support, you can enter
ERC 338#.
Website:
http://www.nortelnetworks.com/support
email:
naitas@nortelnetworks.com
Presales Support (CSAN)
Telephone:
1-800-4NORTEL (1-800-466-7835)
Use Express Routing Code (ERC) 1063#
Chapter 1 About Multimedia Call Center 11
EMEA (Europe, Middle East, Africa)
Technical Support
Telephone:
00800 800 89009
Fax:
44-191-555-7980
email:
emeahelp@nortelnetworks.com
CALA (Caribbean & Latin America)
Technical Support
Telephone:
1-954-858-7777
email:
csrmgmt@nortelnetworks.com
APAC (Asia Pacific)
Technical Support
Telephone:
+61 388664627
Fax:
+61 388664644
email:
asia_support@nortelnetworks.com
Multimedia Call Center Set Up and Operation Guide
Page 12

12 Chapter 1 About Multimedia Call Center
P0935737 05
Page 13

Chapter 2
Setting up Multimedia Call Center
Setting up Multimedia Call Center involves:
• Creating a user account for Multimedia Call Center
• Enabling a Software Authorization Code
• Setting Multimedia Call Center parameters
• Assigning routing to Multimedia Call Center calls
• How Multime dia Call Center calls work with Routing Tables
• Routing Multimedia Ca ll Center calls using the CL ID/DNIS table
• Assigning a callback route for Multimedia Call Center
• Configuring outdialing using PRI lines
• Assigning an outgoing line to a line pool
• Creating a Multimedia Call Center dial plan
• An example of a dial plan that restricts calls based on their country
• Setting the Maximum Outcalling Channels
• Configuring the Dialing Translation Table
13
Creating a user account for Multimedia Call Center
You have the option of creating user accounts that let several people have access to Multimedia
Call Center settings. A user account lets users access their information, but not anyone else’s.
For example, if you have a Web Developer who creates custom web pages for your business, you
can create a user account for them. This gives them their own user ID and password that gives
them access to certain tasks, for example, downloading and uploading web pages, and viewing
web page lists. Another exa mple is ABC Computer s has wee kly spec ials and wants to updat e thei r
information weekly. You can create a user account for ABC Computers that lets anyone who has
the user ID update their web pages.
For information on creating user accounts, refer to the Business Communications Manager 3.0
Programming Operations Guide.
Multimedia Call Center Set Up and Operation Guide
Page 14
14 Chapter 2 Setting up Multimedia Call Center
Enabling a Software Authorization Code
You enable Multimedia Call Center by enabling the Multimedia Call Center software
authorization code on the Business Communications Manager 3.0 Unified Manager. Before you
enable Multimedia Call Center you must have Call Center installed on your system.
To enable the Multimedia Call Center software authorization code
1 Point your web browser to the URL
http://voicebutton.<domain>:6800
where <domain> is the domain name of Business Communications Manager 3.0.
The Business Communications Manager 3.0 Unified Manager screen appears.
2 Click the Configure button.
The Login screen appears.
3 In the User ID box type your user ID.
4 In the Password box type your password.
5 Click the Login button.
The Unified Manager screen appears.
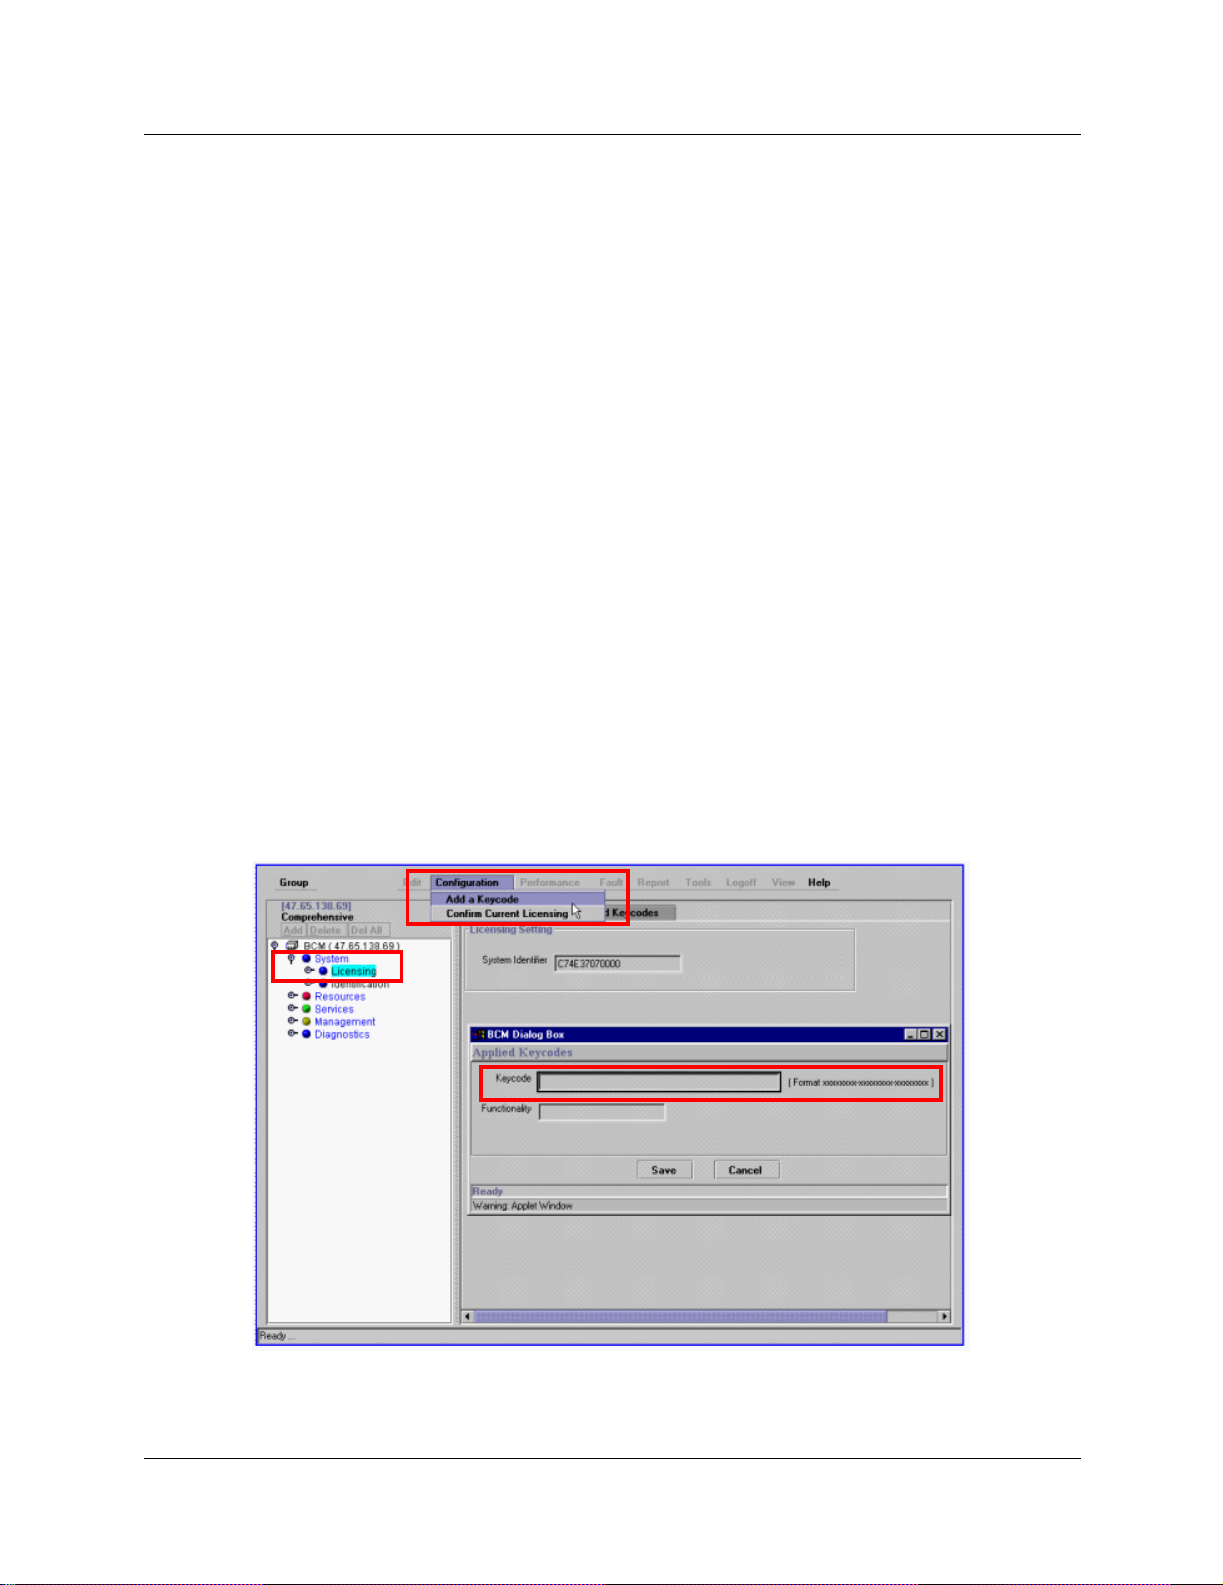
6 Click the System key.
7 Click the Licensing heading.
The Licensing Setting screen appears.
8 On the Configuration menu click Add a Keycode.
The Applied Keycodes screen appears.
P0935737 05
Page 15

Chapter 2 Setting up Multimedia Call Center 15
9 In the Keycode box type the number of the keycode you want to enable.
10 Click the Save button.
11 Do not log off Business Communications Manager 3.0.
Go to “Setting Mult imedia Call Ce nter parameters” on page 16.
Multimedia Call Center Set Up and Operation Guide
Page 16

16 Chapter 2 Setting up Multimedia Call Center
Setting Multimedia Call Center parameters
You must set the system name, public host name, signature, and how long the log files are kept.
To set Multimedia Call Center parameters
1 On the Unified Manager, click the Services key.
2 Click the Multimedia Call Center heading.
The Summary screen appears.
3 On the Tools menu click Multimedia Call Center Admin.
The Enter Network Password dialog box appears.
4 In the User Name box type your user name.
5 In the Password box type your password.
P0935737 05
Page 17
Chapter 2 Setting up Multimedia Call Center 17
6 Click the OK button.
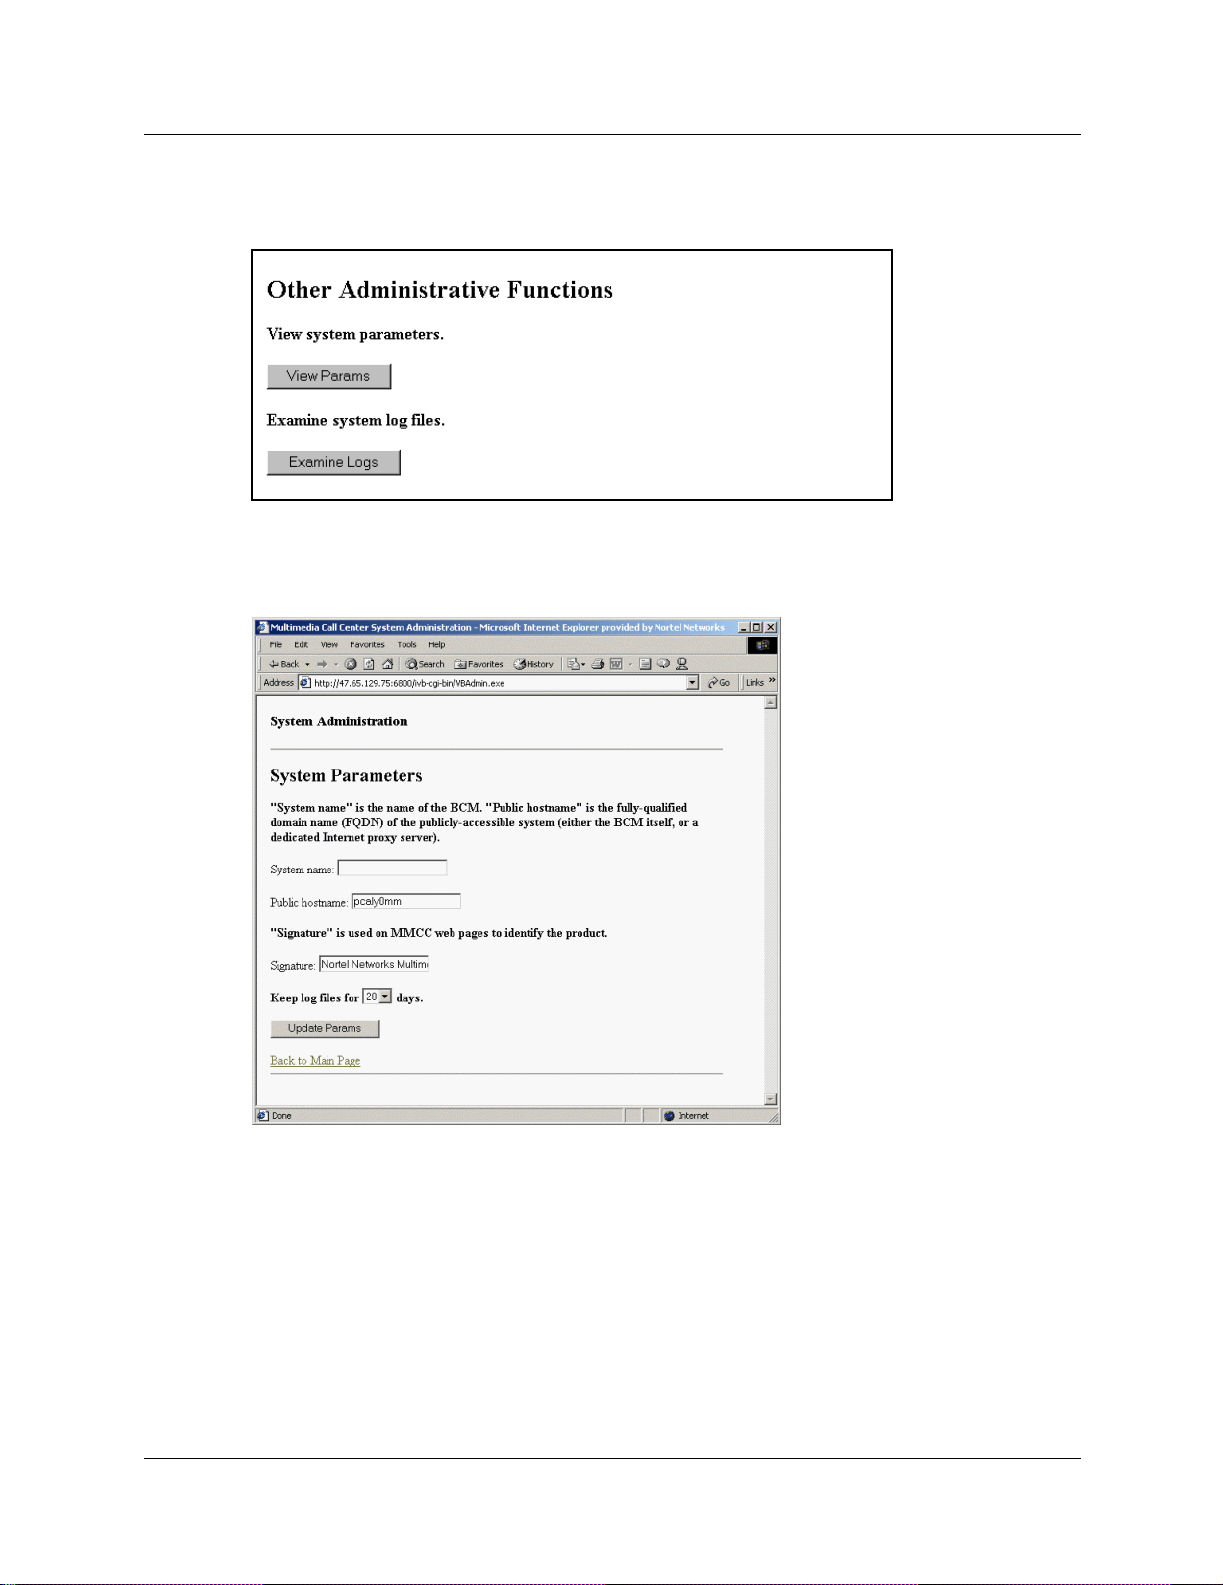
The System Administration page appears.
7 Under the Other Administrative Functions heading, click the View Params button.
The System Paramet ers page appears.
8 In the System name box type the host name of your Business Communications 3.0 system.
9 In the Public host name box type th e appropriate publi c host name for your s yst em. Ask your
network administrator how your system is set up.
• If you have no firewall, or you use Busin ess Communications Manager 3.0 as the fir ewall,
enter the external IP address of your Business Communications Manager system.
• If you use a dedicated firewall/proxy server, enter its external IP address.
10 In the Signature box enter the signatur e you want to use. The sign ature is a tag that a ppears on
Unified Man ager pages for Multimedia Call Center. The default signature is Nortel Ne tworks
Multimedia Call Center. You can change the signature.
Multimedia Call Center Set Up and Operation Guide
Page 18
18 Chapter 2 Setting up Multimedia Call Center
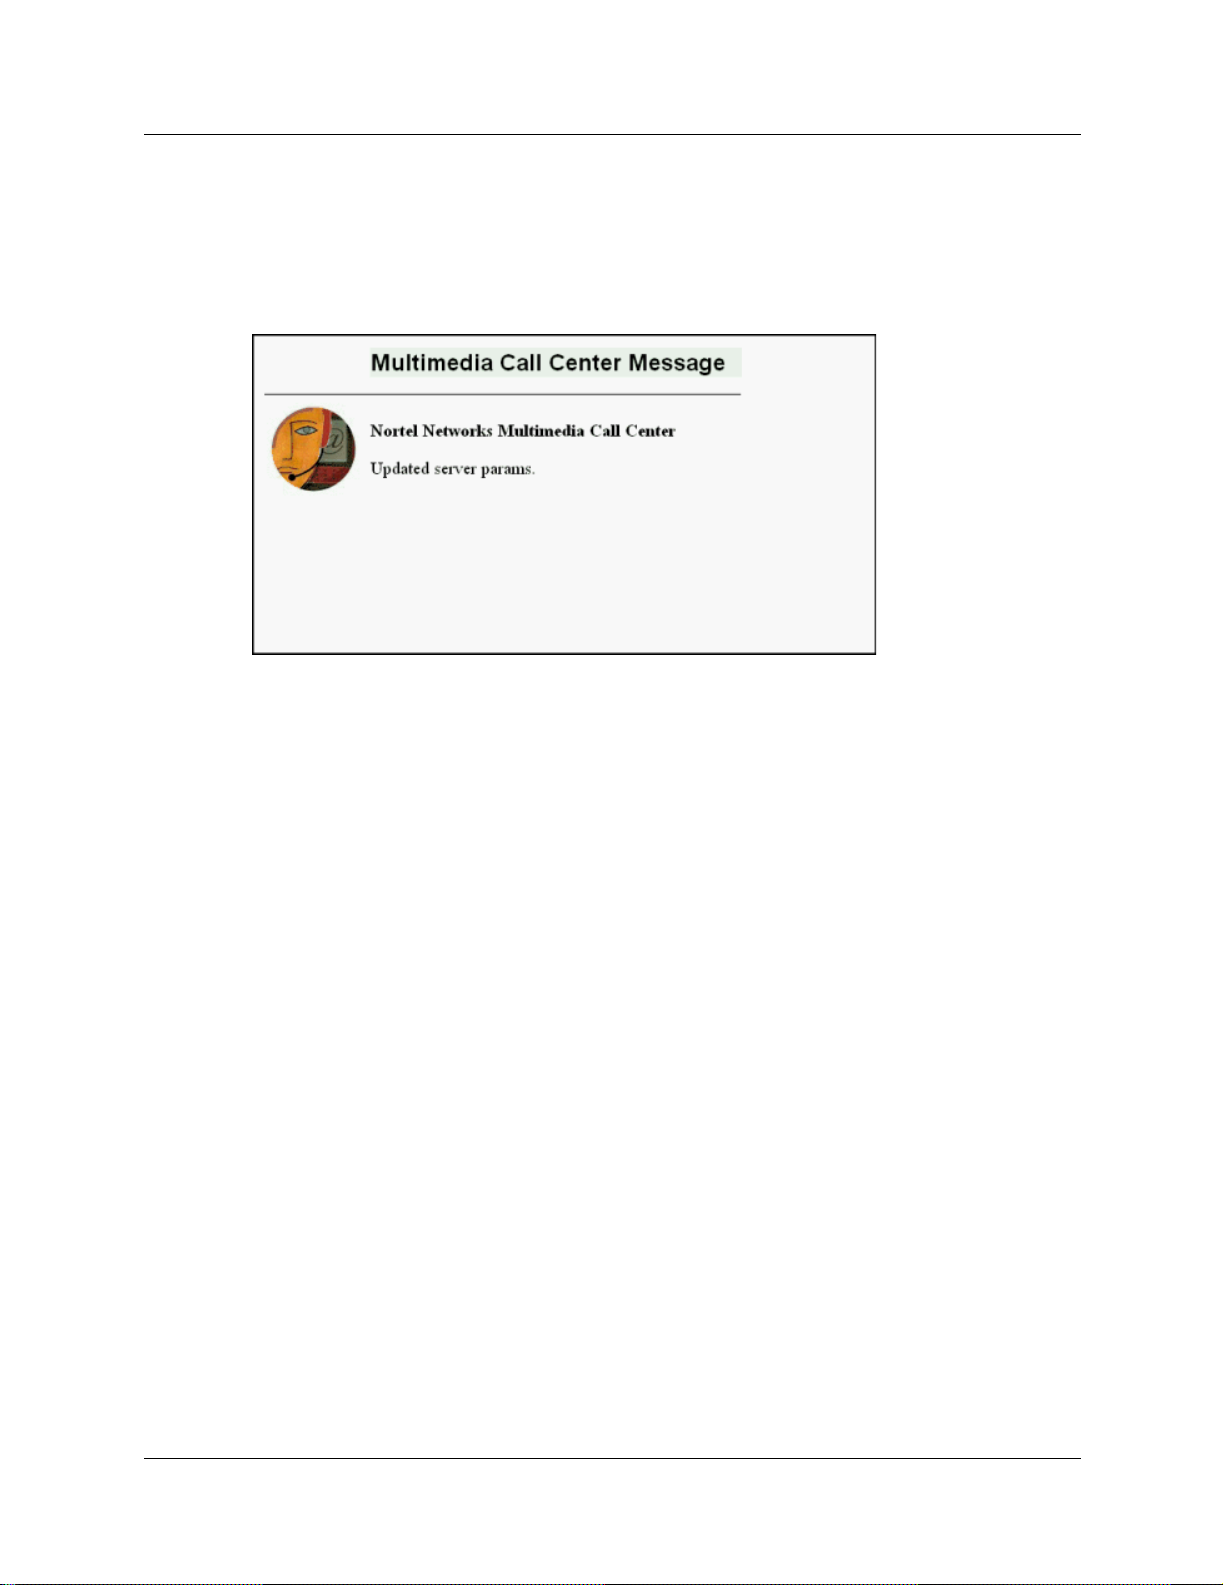
11 From the Keep log file s for list box, select how long you want to kee p log files. The defaul t is
20 days.
12 Click the Update Params button.
A message appears that the parameters are updated.
13 Do not log off Business Communications Manager 3.0.
Go to “Assigning routing to Multimedia Call Center calls” on page 19.
P0935737 05
Page 19
Chapter 2 Setting up Multimedia Call Center 19
Assigning routing to Multimedia Call Center calls
You must assign how Multimedia Call Center calls are routed. The standard method of assigning
call routing is to specify the initial skillset in the web link that is used to initiate the call. See the
Multimedia Call Center Web Developer Guide for details. You specify the skillsets to be used to
the web developer, who in cludes this information on the customized web pages for your company.
If you use Professional Call Center, you can also use the callback number information for a
Multimedia Call Center Call, to move the call to an other skillset or change the call’s priority
within the skillset. The callback number is processed by the CLID column .
Note: The skillset defined in the html tag is used unless there is an overriding rule in the
CLID/DNIS table.
How Multimedia Call Center calls work with Routing Tables
When you set up your Call Center, you create Day and Night Routing Tables for each skillset. To
route Multimedia Call Center calls effectively, you must understand how routing steps affect
Multimedia Call Center calls. For example, you can set up the Night Routing Table so that when
your Call Center is closed, Multimedia Call Center calls will transfer to a mailbox or another
number.
Before a Multimedia Call Center call is connected to an agent, these Intelligent Overflo w actions
disconnect the call in the caller’s browser and display a message to the caller:
• transfer t o Skillset mailbox
• transfer t o external or i nternal DN
• transfer to Automated Attendant
• transfer to Operator
Before a Multimedia Call Center call is connected to an agent, these actions route the call as
expected:
• Overflow to other skillsets
• Move to another skillset
• Change priority of call
For information abou t s ett i ng up Day and Night Routing Tables, refer to the Nortel Net w ork s Cal l
Center Set Up and Operation Guide.
Multimedia Call Center Set Up and Operation Guide
Page 20

20 Chapter 2 Setting up Multimedia Call Center
Routing Multimedia Call Center calls using the CLID/DNIS table
If you do not want to use a CLID/DNIS table, continue with “Assigning a callback route for
Multimedia Call Center” on page 24.
1 On the Unified Manager, click the Services key.
2 Click the Voice Mail heading.
The Summary screen appears.
3 On the Tools menu click CallPilot Manager Admin.
The Administration Login screen appears.
4 In the Password box type your system administrator password.
P0935737 05
Page 21
5 Click the Submit button.
The CallPilo t Manager scr een appears.
Chapter 2 Setting up Multimedia Call Center 21
6 Click the Call Center heading.
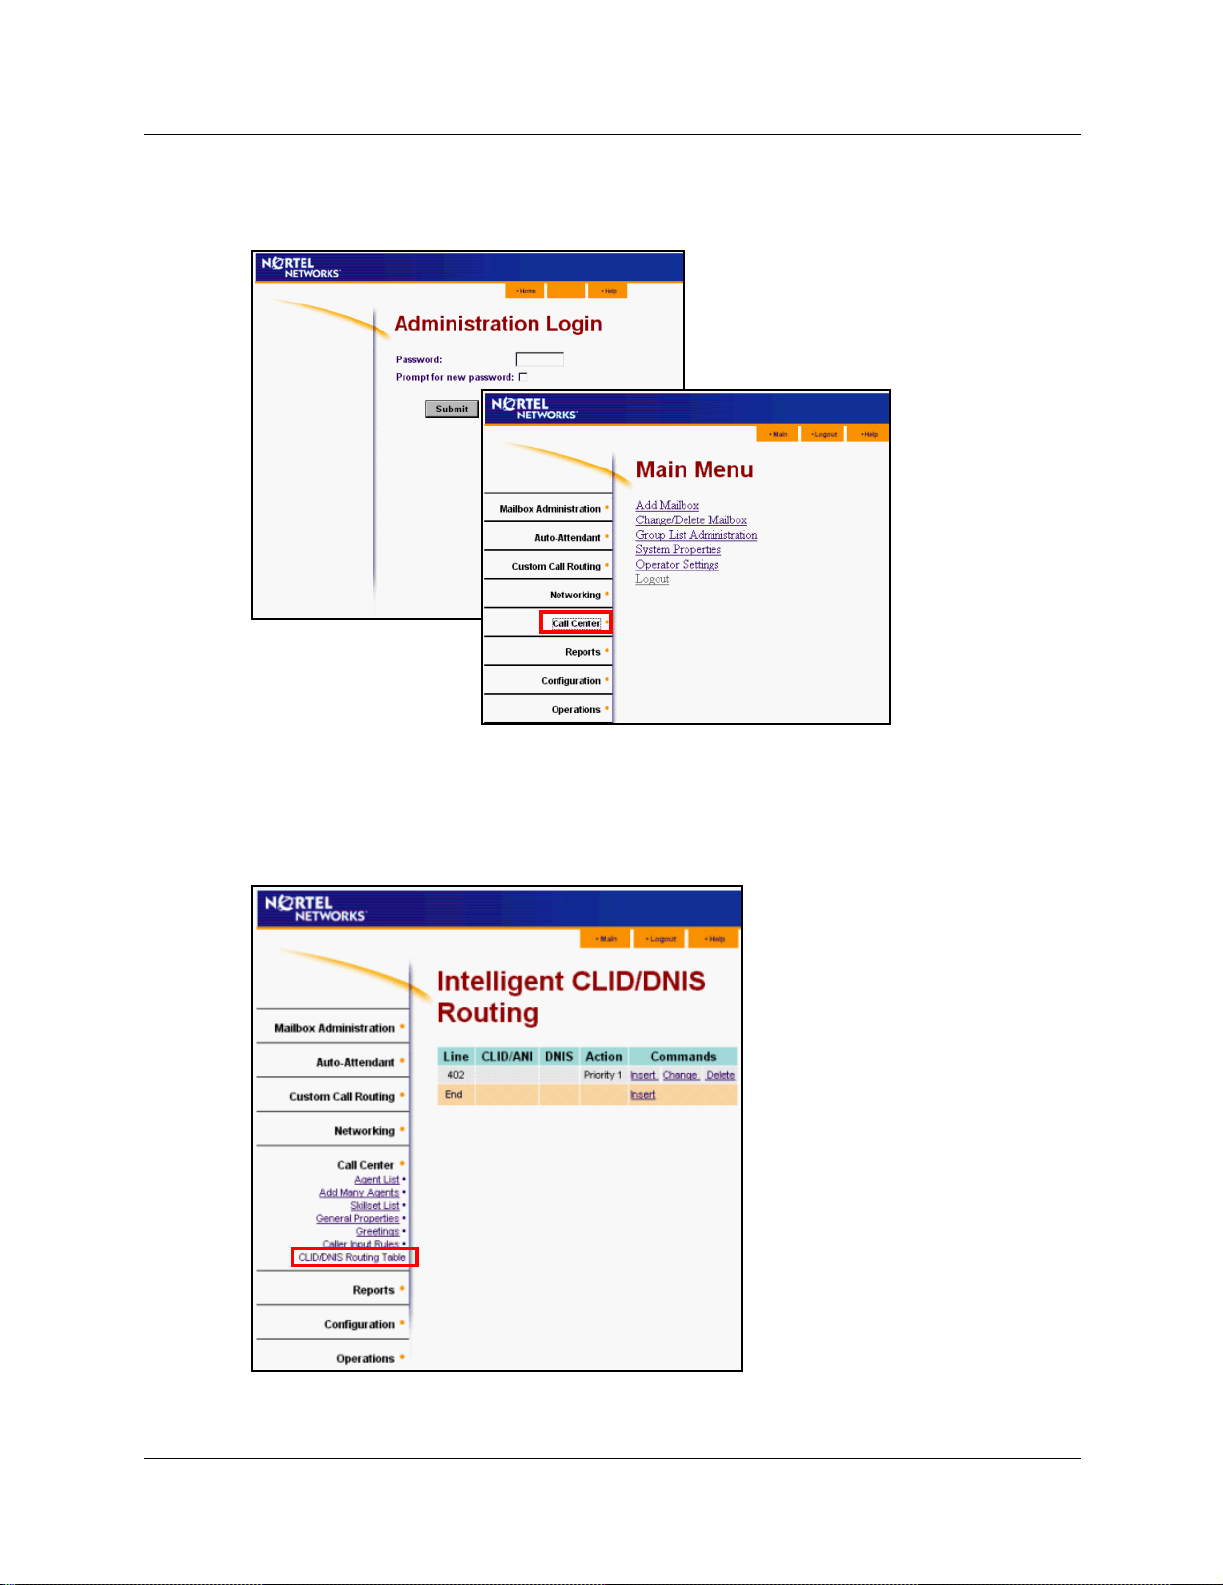
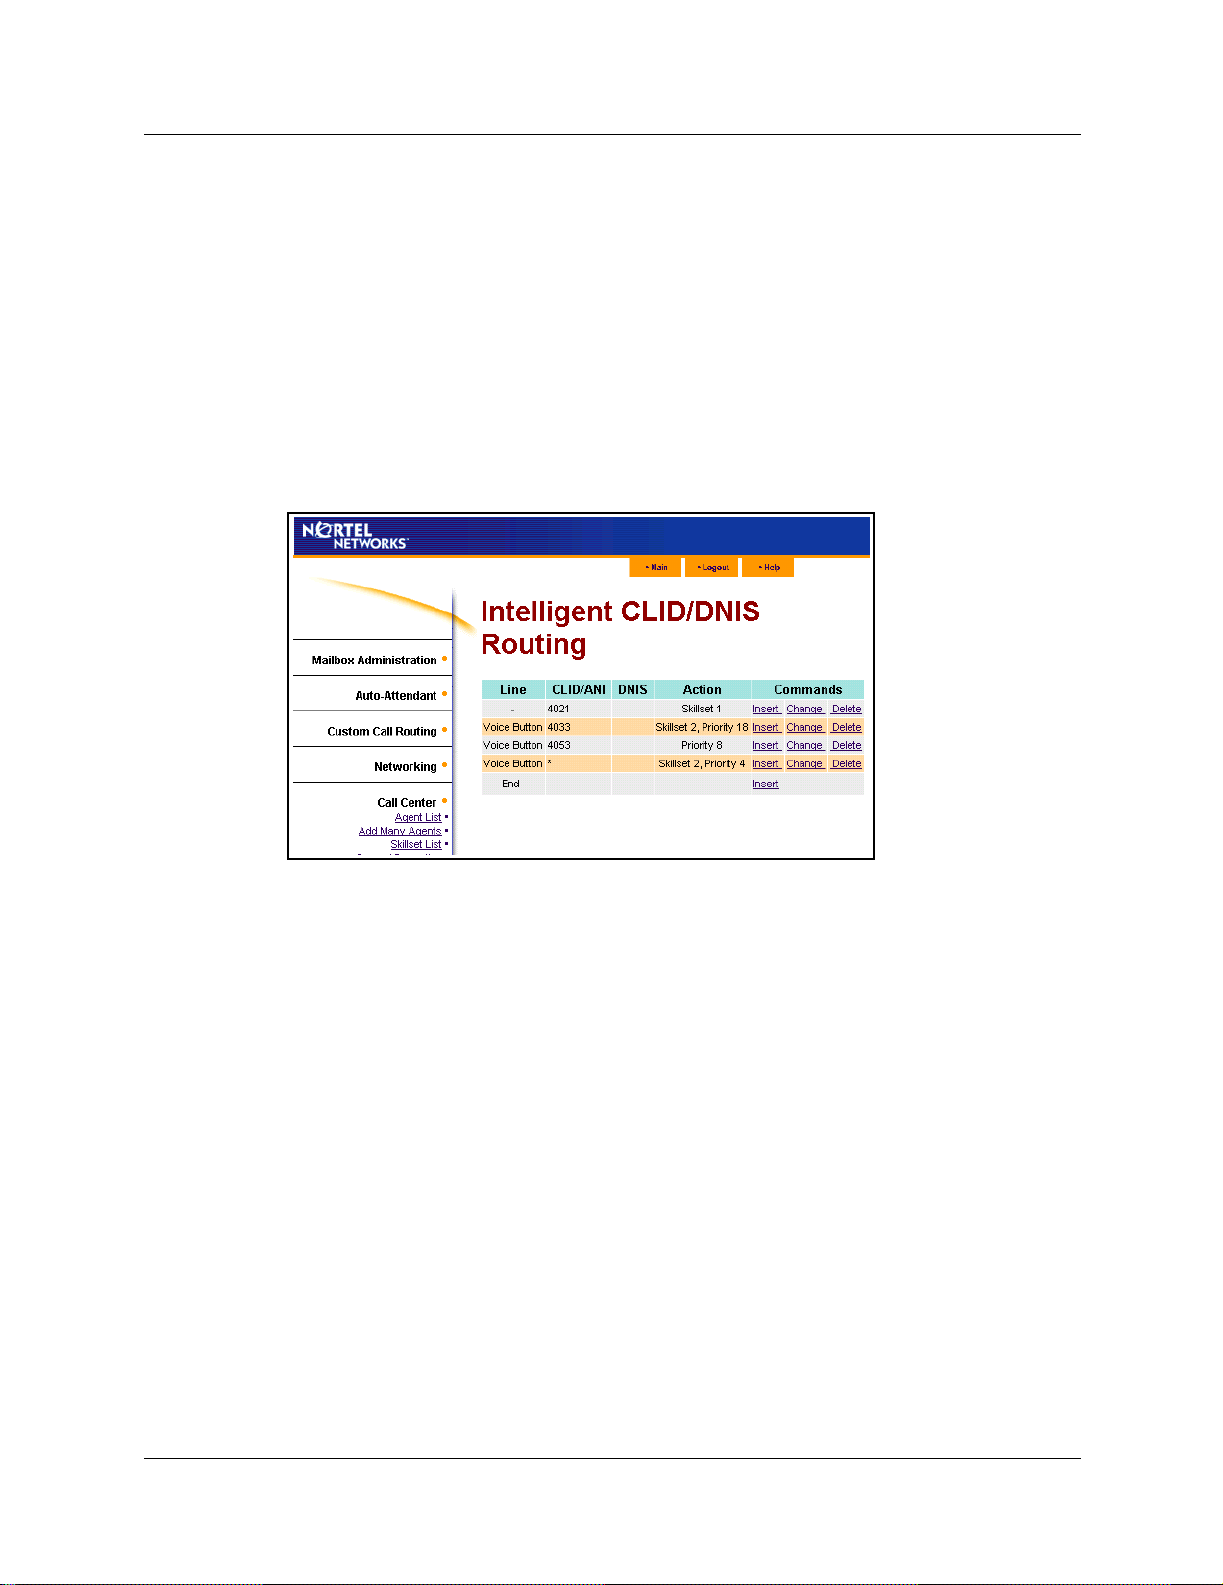
7 Click the CLID/DNIS Routing Table link.
The Intelligent CLID/DNIS Routing page appears.
Multimedia Call Center Set Up and Operation Guide
Page 22

22 Chapter 2 Setting up Multimedia Call Center
8 Click the Insert link to assign how Multimedia Call Center calls are routed.
The CLID/DNIS Setup page appears.
P0935737 05
Page 23
Chapter 2 Setting up Multimedia Call Center 23
9 Select how you want Multimedia Call Center calls to be routed:
• If you want Intelligent CLID/DNIS routing to apply to Multimedia Call Center calls,
select the Voice Butt on check box and do not enter information in the Line or DNIS
boxes.
• Select the action and call priority.
•Click the Submit button.
The Intelligent CLID/DNIS Routing page appears.
The routing rule you created appears in this table.
The CLID/DN IS Routing table below shows three examples of Multimedia Call Center
rules.
• In the first Multimedia Call Center rule, Multimedia Call Center calls with a CLID or ANI
of 4033 are routed to skillset 2 and given a priority of 18.
• In the second Multimedia C all Center rule, Multimedia Call Center ca lls with a CLID or
ANI of 4053 change to a priority 8.
• In the third Multimedia Call Center ru le, Multimed ia Call Center calls that do not match
the other ru les shown in this table are routed to skillset 2 and given a priority of 4.
You can use the wildc ar d ch ara ct er ( * ) for Multimedia Call Center rul es. For example, if
you want to program all Multimedia Call Center calls from a specific area code such as
403 to have a high priority and go to skillset 1, select Voice Button, enter 403* and select
priority 1 and skillset 1.
10 Do not log off CallPilot Manager.
Go to “Assigning a callback route for Multimedia Call Center” on page 24 and assign a
callback route.
Multimedia Call Center Set Up and Operation Guide
Page 24
24 Chapter 2 Setting up Multimedia Call Center
Assigning a callback route for Multimedia Call Center
A callback route must be set up for Call Cente r to connect to the caller’s phone. You can pr ogr am
the callback route on a per skil lset basi s by programmi ng the skillse t mailbox , or on a system-wide
basis by using the system administration mailbox. The callback route is determined as follows:
• If you program a skillset to have a callback route associated with it, Multimedia Call Center
uses the callback route that you have programmed.
• If you do not program a skillset to have a callback route, but you program the system
administration mailbox to have a callback route associated with it, Multimedia Call Center
uses the callback route that you have programmed.
• If you do not program a skillset or the system administrator mailbox to have a callback route,
Multimedia Call Center uses Pool A.
To assign a callback route for a skillset or the System Administrator
mailbox
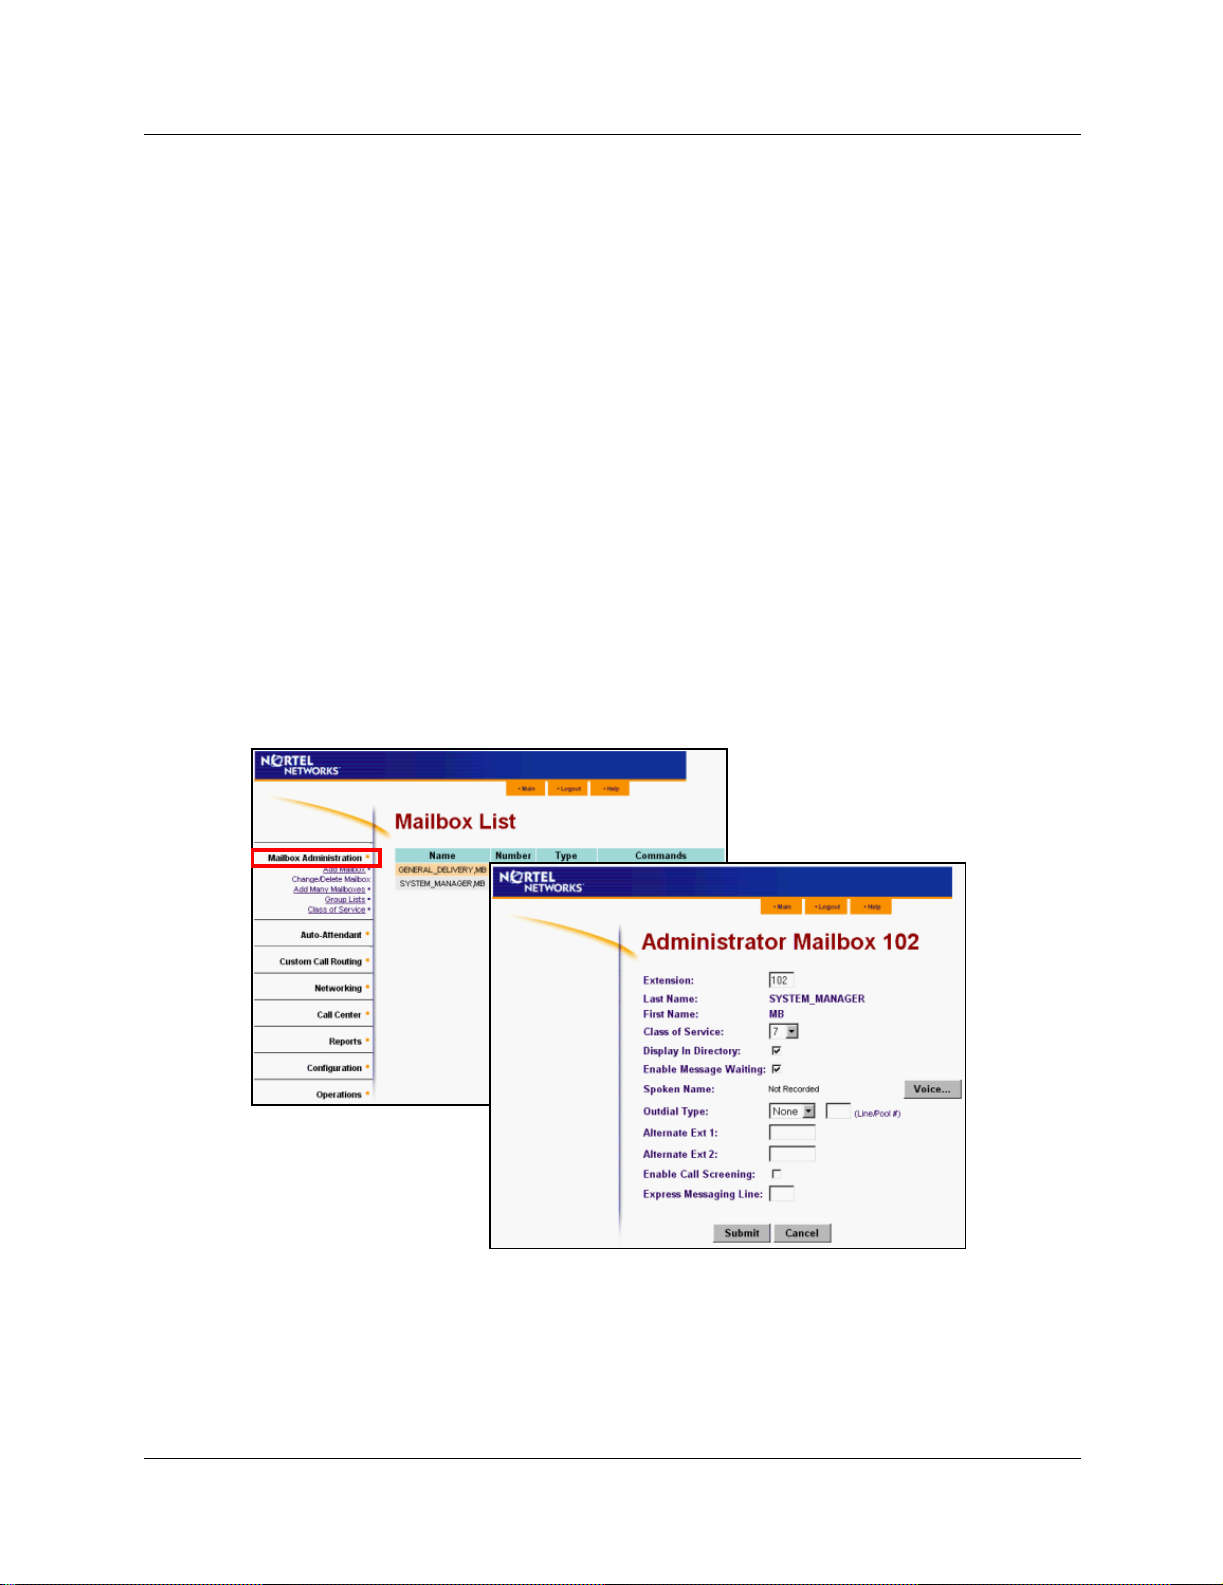
1 On CallPilot Manager, click the Mailbox Admi ni str ati on heading.
The Mailbox List page appears.
2 Click the Change link for the mailbox that you want to assign a callback route to, either the
system administrator mailbox or the skillset mailbox.
P0935737 05
Page 25

Chapter 2 Setting up Multimedia Call Center 25
3 Select an Outdial Type.
If you are not sure of which outdial type to select, ask your System Administrator.
• If you select Pool, enter a number between 1 (for Pool A) and 15 (for Pool O). Make sure
that this Poo l has lines ass igned to it. Refer to “Assigning an outgoing line to a line pool”
on page 33.
• If your system uses PRI lines for outdialing, select Route as the outdial type. Ask your
System Administrator what the PRI routing code is.
If you use PRI lines, you must also:
a make sure the routing table is set up correctly.
Refer to “Configuring outdialing using PRI lines” on page 26.
b create whatever calling restrictions you need, including the routing code.
Refer to “Creating a Multimedia Call Center dial plan” on page 35.
c configure the Dialing Translation Table.
Refer to “Configuring the Dialing Translation Table” on page 39.
4 Do not log off.
If you use PRI lines, go to “Assigning an outgoing line to a line pool” on page 33.
If you use a line pool, go to “Configuring outdialing using PRI lines” on page 26.
Multimedia Call Center Set Up and Operation Guide
Page 26

26 Chapter 2 Setting up Multimedia Call Center
Configuring outdialing using PRI lines
If you use Primary Rate Interface (PRI) lines, you must configure the outdialing for your Call
Center. If you don’t, go to “Assigning an outgoing line to a line pool” on page 33.
1 On Unified Manager, click the Resources key and click the Media Bay Modules key.
2 Click the Bus key for the module number of your PRI Media Bay Module.
Ask your System Administrator or Installer for the module number of your PRI Media Bay
Module. For information about di pswitch config urati on refe r to the Busi ness Communi catio ns
Manager 3.0 Installation and Maintenance Guide.
3 Click the Modules on Bus key and click the Module 1 heading.
4 Record the Low line/loop assignment that is shown. You will need this for step 7.
5 Make sure that the protoco l is set to be compatible with your PRI s ervice provider.
6 On the Configuration menu click Disable, and then click Enable.
7 Click the Services key, click the Telephony Services key, click the Lines key, click the
Physical lines key, click the All physical lines key and click the key for the Low line/loop
number that you recorded in step 4, (in this example Line 211).
P0935737 05
Page 27

Chapter 2 Setting up Multimedia Call Center 27
8 Click the Trunk/line data heading.
Verify that the line type is a PRI Pool.
Record the Pool letter. You need this for the “Use Pool” value in the routing table.
Multimedia Call Center Set Up and Operation Guide
Page 28

28 Chapter 2 Setting up Multimedia Call Center
9 Scroll down to the Call routing key a nd click it. Click the Routes heading and click the Add
button.
The BCM Dialog Box appears.
10 In the Route box, type a route number. In this example route 002 is shown.
11 Click the Save button.
P0935737 05
Page 29

Chapter 2 Setting up Multimedia Call Center 29
12 Click the Routes key and select Route you created.
From the Use pool list box select Pool PRI-A.
From the DN type list box select Public.
Multimedia Call Center Set Up and Operation Guide
Page 30

30 Chapter 2 Setting up Multimedia Call Center
13 To configure destinati on codes , click t he Destination codes heading and click the Add button.
The BCM Dialog box appears.
14 In the Destination code box type the destination code you want to use.
In this example 8A is sho wn. (A re presents any). This means that any di aled number t hat start s
with 8 uses PRI-A, that is, routing code 8 uses Pool PRI-A.
15 Click the Destination Codes key and click the key for the destination code you c re at ed. Cl ic k
the Schedules key and click the Normal heading.
16 In the Use route box change the route number to 002.
17 Configure the absorb length. From the Absorb length list box select an absorb length.
Set the abs orb length so that the routing code is not actuall y dialed.
P0935737 05
Page 31

Chapter 2 Setting up Multimedia Call Center 31
In this example, 8A is the destination code, with an absorb length of 1. This means that the 8 is
absorbed, and only the digits after it are dialed out on the PRI line.
18 Now configure the pu blic DN length. This is th e length o f digit s after the prefix that agen ts ca n
dial. Click the General settings key, click the Dialing plan key, click the Public Network
Multimedia Call Center Set Up and Operation Guide
Page 32

32 Chapter 2 Setting up Multimedia Call Center
key, click the Public DN lengths key and from the list select the prefix that selects PRI for
outdialing. In this example the prefix is the number 8 and the DN length is 10 digits.
19 Log off Unified Manager.
Do not Assign an outgoing line to a line pool.
Go to “Creating a Multimedia Call Center dial plan” on page 35.
P0935737 05
Page 33

Chapter 2 Setting up Multimedia Call Center 33
Assigning an outgoing line to a line pool
You must assign an outgoing line to a line pool so that Multimedia Call Center accepts callback
calls. In thi s exa m ple , a line is assi gne d to Pool A. You d o not ne ed to do this pr ocedure if you use
PRI lines.
To assign an outgoing line to a line pool
1 On a telset, enter Featu re 985 to display the Voicemail DN.
2 On the Unified Manager screen, click the Services key.
3 Click the Telephony Services key.
4 Click the System DNs key.
5 Click the All System DNs key.
6 Click the key for the Voicemail DN.
7 Click the Line access heading.
8 From the Prime Line list box select Pool A.
9 Click the General Settings key.
10 Click the Access Codes key.
11 Click the Line pool codes key.
12 Click the Pool A heading.
The Pool A screen appears.
Multimedia Call Center Set Up and Operation Guide
Page 34

34 Chapter 2 Setting up Multimedia Call Center
13 Make sure that Access code is set to 9.
14 Click the Lines key and clic k the key for the number of the line you want to use for outdial ing.
15 Click the Trunk/line data heading.
16 In the Line type list box make sure that Pool A is selected.
Do not log off. Go to “Creating a Multimedia Call Center dial plan” on page 35.
P0935737 05
Page 35

Chapter 2 Setting up Multimedia Call Center 35
Creating a Multimedia Call Center dial plan
You can create a callback dial plan that restricts Multimedia Call Center from calling certain
numbers. When you create a dial plan you add restrictions to the DNs that Business
Communications Manager 3.0 uses for callback. This limits where MMCC will accept calls from,
for example you can create a restriction that lim its calls to local calls fr om your service area.
You can add restrictions to skillset and the Voicemail DNs. You can display DNs by entering
Feature 985 on a set.
Note: If you add a restriction to the Voicemail DN you also restrict all outcalling calls,
including external transfers from CCR Trees, Off-premise Message Notification and
Outbound Transfers.
An example of a dial plan that restricts calls based on their country
Bridgestone computers sells computers in the United States and Canada, and has different
information for prices and shipping depending on the country.
The Call Center administrator sets up restrictions for the U.S. and Ca nada skillsets. When a caller
in the U.S. clicks the voice button and enters their phone number, the restrictions for the US
skillset recognize the caller’s U.S. area code, and calls back telephone numbers within the US.
To add a restriction to the Business Communications Manager system
1 Click the Services key.
2 Click the Telephony Services key.
3 Click the Restriction filt ers key.
4 Click the key for the filter you want to add a restriction to.
Multimedia Call Center Set Up and Operation Guide
Page 36

36 Chapter 2 Setting up Multimedia Call Center
5 Right-click the Restrictions heading and click Add.
The Add Restrictions dialog box appears.
6 In the Digits box, type the digits you want to restrict.
If your outdial type is Route, enter the routing code before you add the digits you want to
restrict. For exa mple, i f your rout ing code i s 8 and you want t o restr ict numbers t hat begi n with
403, enter 8403.
7 Click the Save button.
8 Click the Services key.
9 Click the Telephony Services key.
10 Click the System DNs key.
11 Click the All system DNs key.
12 Click the key for the Voice Mail DN or the DN of the skillset you want to add a restriction to.
13 Click the Restrictions ke y.
14 Click the Set Restrictions key.
15 Click the Schedules key.
16 Click the Normal heading.
P0935737 05
Page 37

Chapter 2 Setting up Multimedia Call Center 37
17 In the Use filter box type the filter number. The default restrict ion filter is 00.
For more information on programming dialing plans and filters refer to the “Configuring
Business Communications Manager 3.0 Services" section of the Business Communi cat ion s
Manager 3.0 Programming Operations Guide.
18 Do not log off. Go to “Setting the Maximum Outcalling Channels” on page 38.
Multimedia Call Center Set Up and Operation Guide
Page 38

38 Chapter 2 Setting up Multimedia Call Center
Setting the Maximum Outcalling Channels
When you install Multimedia Call Center on your system, set the Maximum Outcalling Channels
to a value higher t han 1. The defau lt number of voice channels assigned for outc alling i s 1. Also, to
ensure that the Outcalling Channels do not consume all the available voice channels, set the
minimum number of voice ports t o a number highe r than the Outca lling Chann els. For infor mation
on how to change the minimum number of voice ports refer to the MSC Configuration chapter of
the Business Communications Manager 3.0 Programming Operations Guide.
If you do not set the Maximum Outcalling Channel s to higher th an one, caller s see the “Line s b usy
message” on page 58.
1 On CallPilot Manager, click the Configuration heading.
2 Click the System Properties link.
The System Properties page appears.
3 In the Max Outcalling Channels box type a value higher than 1.
4 Click the Submit button.
5 You can log off CallPilot Manager and return to Unified Manager. Do not log off Unified
Manager. Go to “Configuring the Dialing Translation Table” on page 39.
P0935737 05
Page 39

Chapter 2 Setting up Multimedia Call Center 39
Configuring the Dialing Translation Table
If your outdiali ng ty pe i s r out e, configure the Dialing Tr an sla ti on Table to add your routing prefix
to the callb ack numbers.
1 Click the Services key and click the Voice Mail heading.
The CallPilo t Manager scr een appears.
2 On the Tools menu click Call Pilot Manager Admin.
The CallPilot Manager Administration Login page appears.
3 In the Password box enter the CallPilot Manager password and click the Submit button.
4 Set up Dialing Translation Tables so that when Call Center dials a callback number, it first
dials the routing code to access the PRI pool. Call Center can use callers’ phone numbers as
entered.
Click the Configuration heading and click the Dialing Translation Table link.
The Dialing Translation Table page appears.
Multimedia Call Center Set Up and Operation Guide
Page 40

40 Chapter 2 Setting up Multimedia Call Center
5 Click the Add button.
The Dialing Translation Setup page appears.
6 In the Input Value box enter the number you want to translate.
In the Output Value box enter what you want to translate the number to.
In this example, the number 4 is translated to 84. This means that when a Multimedia Call
Center callers enters a number that starts with 4, Call Center automatically adds the prefix 8.
7 Click the Submit button.
P0935737 05
Page 41

Chapter 3
Multimedia Call Center agents
Setting up Multimedia Call Center agents involves:
• Enabling Multimedia Call Center agents
• Adding Multimedia Call Center agents to Call Center
• Adding more than one agent
• Installing Multimedia Call Center soft ware on an agen t’s computer
• Configuring an agent's server settings
• Configuring an agent’s name
Enabling Multimedia Call Center agents
With the Nortel Networks Multimedia Call Center Software Authorization Code you can enable
all your Call Center agents as Multimedia Call Center agents. If you need more agents, you can
purchase additi onal ag ent Sof tware Authorization Co des that enable an add it io nal 1, 4, 8, 16 or 32
agents.
41
To enable Multimedia Call Center agents
1 Follow the steps in “Enabling a Software Authorization Code” on page 14 to apply the C all
Center Agent Software Authorization Code for the number of agents you want to enable.
2 Do not log off Business Communications Manager 3.0.
Follow the steps in “Adding Multimedia Call Center agents to Call Center” on page 42 to add
Multimedia Call Center agents to Call Center.
Multimedia Call Center Set Up and Operation Guide
Page 42

42 Chapter 3 Multimedia Call Center agents
Adding Multimedia Call Center agents to Call Center
To add Multimedia Call Center agents to Call Center
1 On the Unified Manager, click the Services key.
2 Click the Voice Mail heading.
The Voice Mail screen appears.
3 On the Tools menu click CallPilot Manager Admin.
The Administration Login screen appears.
4 In the Password box type the system administrator password.
5 Click the Submit button.
The CallPilot Manager Main page appears.
P0935737 05
Page 43

Chapter 3 Multimedia Call Center agents 43
6 Click the Call Center heading.
7 Click the Agent List link.
The Agent List page appears.
Multimedia Call Center Set Up and Operation Guide
Page 44

44 Chapter 3 Multimedia Call Center agents
8 Add a new Multimedia Call Center agent to the Call Center or change a Call Center agent’s
settings:
• If the agent has been added to Call Center and you want to enable them as a Multimedia
Call Center agent, click the Change link for the agent.
The Change Agent page appears.
• If the agent has not been added to Call Center and you want to add a new agent as a
Multimedia Call Center agent, click the Add button.
The Add Agent page appears.
9 From the Accepted Call Types list box select whether the agent takes voice button calls or
Call Center and voice button calls. See “Accepted Call Types” on page 46 more information.
•Select Voice Button if you want the agent to take voice button calls.
•Select Both if you want the agent to take voice button and Call Center calls.
10 Click the Submit button.
P0935737 05
Page 45

Adding more than one agent
You can save time by adding more than one agent at a time. When you add multiple agents, the
agents have the default agent name and parameters.
To add more than one agent
1 Start CallPilot Manager.
2 Click the Call Center heading.
3 Click the Add Many Agents link.
The Add Many Agents page appears.
Chapter 3 Multimedia Call Center agents 45
4 In the From box type the lowest agent ID number of the agents you want to create.
5 In the To box type the highest agent ID number of the agents you want to create.
The Agent ID numbers you enter must be between 1 and 250.
6 Select the Supervisor check box if you want the agents to have Supervisor status.
7 Select the Automatic Answer check box if you want calls to be force-delivered to the agents.
8 From the Missed Call Option list box select Make Not Ready (Return to Skillset) or
Automatic Logout.
9 From the Accepted Call Types list box select whether the agent takes voice button calls or
Call Center and voice button calls. See “Accepted Call Types” on page 46 more information.
• Select Voice Button if you want the agent to take voice button calls.
• Select Both if you want the agent to take voice button and Call Center calls.
10 Click the Submit button.
Note: Any agents who have an agent ID number that is between the numbers you enter
in the From and To boxes are not changed. These agents are not included in the number
of agents added.
Multimedia Call Center Set Up and Operation Guide
Page 46

46 Chapter 3 Multimedia Call Center agents
Accepted Call Types
The Accepted Call Types parameter determines what type of calls are routed to an agent. This
parameter also determines whether an agent must log onto a telephone, Mu lt im edi a Ca ll Cen ter or
both.
This table shows what capabilities agents have depending on their Accepted Call Types and what
they are logged onto.
Type of calls
you can
receive
Voice
Multimedia
Call Center
Both
Are you logged
onto a
telephone?
No Not permitted No --
YES Not permitted YES --
No No - No No
No YES - No YES
YES No - No No
YES YES - YES YES
No No No No No
No YES No No No
YES No No No No
YES YES YES YES YES
Are you logged
onto Multimedia
Call Center?
Can you have
voice calls?
Can you have
phone and
browser
Multimedia Call
Center calls?
Can you have
browser only
Multimedia
Call Center
calls?
P0935737 05
Page 47

Chapter 3 Multimedia Call Center agents 47
Installing Multimedia Call Center software on an agent’s computer
You must in stall and configure the Mu ltimedia Call Center software on the computer of each
Multimedia Call Center agent.
Requirements for age nt s usin g Mu lt im e dia Call Cente r
To use Multimedia Call Center, agents must have:
• Internet Explorer 5.5 with SP 2, or a later version of Internet Explorer
• any of these operat ing sys te ms : Windows 95B, Wi ndows 98S E, Windows NT4 SP5 (or later) ,
Windows 2000, Windows ME or Windows XP
• a Pentium II processor at 233MHz, minimum (Pentium III at 500MHz or higher
recommended)
• 64 MB of RAM, minimum (128 MB or higher recommended)
• 30 MB of free hard drive space
• a network card and an Internet connection
To install Multimedia Call Center software on an agent’s computer
1 On the agent’s computer, point the web browser to the URL
http://voicebutton.<domain>:6800
where <domain> is the domain name of Business Communications Manager 3.0.
The Business Communications Manager 3.0 Unified Manager screen appears.
2 Click the Install Clients button.
The Download Client Applications page appears.
Multimedia Call Center Set Up and Operation Guide
Page 48

48 Chapter 3 Multimedia Call Center agents
3 In the left fr ame, under the Call Center Applications heading, click the Mult i me dia Ca ll
Center link.
Note: You must install Java Runtime Environment (JRE) before you download
Multimedia C all Center to the agent’s c omputer.
4 Click the http://javasoft.com link and download JRE.
The File Download dialog box appears.
5 Click the Save this program to disk option and then click the OK button.
The Save As dialog box appears.
6 Navigate to where you want to download the file to and click the Save button.
7 Locate the downloaded file and double-click the icon to install Java Runtime Environment.
8 On the Download Desktop Applications p age, c lick the Downl oad Multimedia Cal l Center
button.
The File Download dialog box appears.
9 Select the option to save the program or run it, and then click the OK button.
The Save As dialog box appears.
10 Navigate to where you want to download the file to and click the Save button.
11 Locate the downloaded file and double-click it to unzip it and install the A gent Notifi cation
software on the agent’s computer. We recommend you install the software in C:\Program
Files\Nortel Networks \Voice Button Agent Notification.
Configuring Multimedia Call Center on a Windows 95 system
Download this patch for each Multimedia Call Center agent who uses the Windows 95 operating
system on their computer.
To download the patch
This patch upgrades the agent’s WinSock32 to version 4.10.1656.
1 On the agent’s computer point the web browser to the Microsoft website at
http://www.microsoft.com
2 Search for Windows Socket 2 Update.
3 Download the patch and follow the installation instructions.
P0935737 05
Page 49
Chapter 3 Multimedia Call Center agents 49
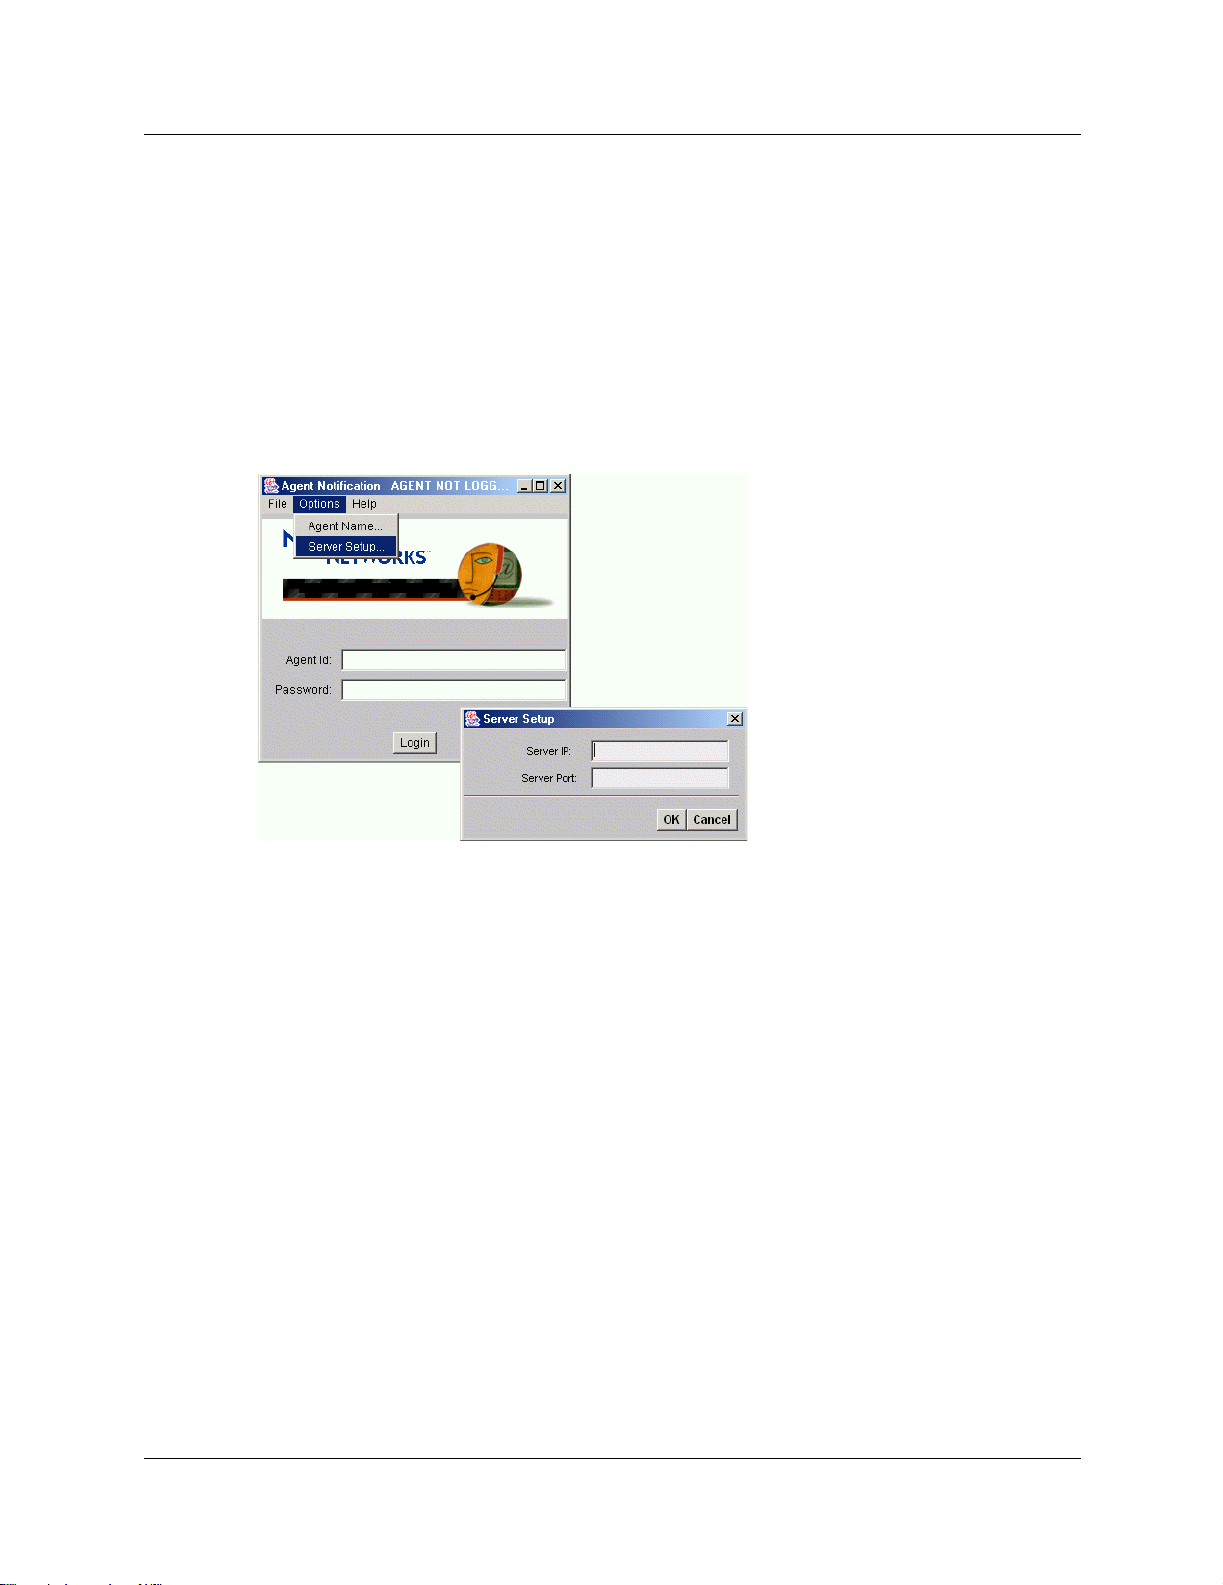
Configuring an agent's server settings
To configure an agent’s server settings
1 To start the Multimedia Call Center software on the agent’s computer, click the Start button,
point to Programs, point to Nortel Networks, point to Multimedia Call Center and click
Agent Notification.
The Agent Login/Logout dialog box appears.
2 On the Options menu click Server Setup.
The Server Setup dialog box appears.
3 In the Server IP box type the IP address of the voice button server.
4 In the Server Port box type the port number.
The default port number is 6800.
5 Click the OK button.
Multimedia Call Center Set Up and Operation Guide
Page 50

50 Chapter 3 Multimedia Call Center agents
Configuring an agent’s browser settings
1 On the agent’s computer, start Internet Explorer.
2 On the Tools menu click Internet Options.
The Internet Options dialog box appears.
3 Click the Advanced tab.
4 Under the Java (Sun) option, clear the Use Java setting.
P0935737 05
Page 51

Configuring an agent’s name
Either you or the agent can enter the agent name that is displayed to callers.
1 To start the Multimedia Call Center software on the agent’s computer, click the Start button,
point to Programs, point to Nortel Networks, point to Multimedia Call Center and click
Agent Notification.
The Agent Login/Logout dialog box appears.
2 On the Options menu click Agent Name.
The Agent Preferences dialog box appears.
Chapter 3 Multimedia Call Center agents 51
3 In the Agent Name box type the agent name that will be displayed to callers.
4 Click the OK button.
Using Follow-me browsing
Follow-me browsing does not work with embedded Flash animations. If an agents clicks a Flash
button, the image that is sent to the agent is not displayed to the caller.
Tell agents that if the page they are sending to the caller contains Flash animations, they must tell
the caller to display the page by, for example, clicking the Next button, or telling them what to
click on the page to display the next page.
Multimedia Call Center Set Up and Operation Guide
Page 52

52 Chapter 3 Multimedia Call Center agents
P0935737 05
Page 53

Chapter 4
Multimedia Call Center messages
Multimedia Call Center messages are messages that are se nt from a business’ web s ite to caller s,
who are customers, contacts, or surfers that have contacted the business.
These messages assist customers in making contact with the business, give customers choices in
the type of media they use to contact the business, and provide updates about the prog ress of their
call.
You or your web developer can:
• customize the default Mu ltimedia Call Center message templates
• create lists of web pages that Multimedia Call Center agents push to callers
• create interfaces, which are sets of web page s specific to topics, suc h as sales and service
department, or languages, such as French, Spanish and German
For information about:
• default Multimedia C all Center m essages see:
• “Call setup messages” on page 54
• “Status and error messages” on page 56
• “Web refresh message” on page 60
53
• downloading message te mplates see “Download ing web pages a nd viewing web pa ge lists” on
page 62
• customizing messages see “Customizing web pages” on page 65
• uploading web pages see “Uploading or deleting web pages” on page 66
• creating and distributing lists of web pages see “Creating and distributing web page lists” on
page 68
• creating custom interfaces refer to the Multimedia Call Center Web Developer Guide
Multimedia Call Center Set Up and Operation Guide
Page 54

54 Chapter 4 Multimedia Call Center messages
Call setup messages
“Call set up page for first-time callers” on page 54 shows the interface for first-time callers.
“Call setup page for subsequent callers” on page 55 shows the interface for subsequent callers.
Call setup page for first-time callers
First-time callers see this html form when they click the voice button icon on an html
page.Subsequent callers see this page if the voicebutton icon or Multimedia Call Center link
includes the do_setup=on parameter. For information about the do_setup=on parameter refer to
“Call preferences - the setup command” in the Multimedia Call Center Web Developer Guide.
CallSetup.html
P0935737 05
Page 55

Chapter 4 Multimedia Call Center messages 55
Call setup page for subsequent callers
Callers see this html form if they click the preferences link. Callers can click the preferences link
from the applet interface or a web page.
Preferences.html
Multimedia Call Center Set Up and Operation Guide
Page 56

56 Chapter 4 Multimedia Call Center messages
Status and error messages
During a call, a caller can see one or more of these status and error messages. Multimedia Call
Center displays these messages by creating an instance of the HTML template file called
MSG.html.
Multimedia Call Center unavailable message
Callers see this message if they click the voice button while Business Communications Manager
3.0 is not operational.
MSG.html
No agents logged on message
Callers see this message if there are no Multimedia Call Center agents logged on.
MSG.html
P0935737 05
Page 57

Chapter 4 Multimedia Call Center messages 57
Bad calling preferences message
Callers see this message if the phone number they enter in the call setup page is improperly
formatted, or if Multimed ia Call Center does not provide service to their calling area.
MSG.html
Choose how to connect message
Callers see this message if they do not specify their connection preferences in the call setup page.
MSG.html
Multimedia Call Center Set Up and Operation Guide
Page 58

58 Chapter 4 Multimedia Call Center messages
Session completed message
Callers see this message after they click the Hangup button on the caller interface.
MSG.html
User busy message
Callers see this messag e if their call cannot be completed because their phone line is busy.
MSG.html
Lines busy message
Callers see this message if their call cannot be completed because Business Communications
Manager 3.0 has no availabl e phone lines. Set the Maximum Outc alling Channels to mor e than one
so that phone lin es are avail able. For more inf ormation r efer to “How Multimedia Call Center calls
work with Routing Tables” on page 19.
MSG.html
P0935737 05
Page 59

Chapter 4 Multimedia Call Center messages 59
Make call failed message
Callers see this mess age i f the ir call c annot b e conne cted becaus e ther e is a proble m with t he voi ce
button server.
MSG.html
Preferences message
Callers see this message after they enter their calling preferences in the call setup page.
MSG.html
No answer message
Callers see this message if they do not answer their phone.
MSG.html
Multimedia Call Center Set Up and Operation Guide
Page 60

60 Chapter 4 Multimedia Call Center messages
Connected message
Callers see this message when they connect to an agent.
MSG.html
Call transferred message
Callers see this message when Multimedia Call Center or an agent transfers the voice call.
MSG.html
Web refresh message
Callers see this message while they are waiting for a Multimedia Call Center agent to become
available. You or your web developer can create variations of this message to assure callers that
their call is important, and all agents are still busy.
REFRESH.html
P0935737 05
Page 61

Chapter 4 Multimedia Call Center messages 61
Recording Multimedia Call Cente r announcements
When you record announcements for Multimedia Call Center, record announcements that
correspond to the web refresh messages. This way, callers hear a voice announcement while they
view a related message.
You record C all Center messages usin g CallPilot Manager. For information on recording Call
Center announcements see the Call Center Set Up and Operation Guide.
Multimedia Call Center Set Up and Operation Guide
Page 62

62 Chapter 4 Multimedia Call Center messages
Downloading web pages and viewing web page lists
If you want to cust omize a Multi media Cal l Cent er pa ge, downl oad i t to your c omputer, cu stomize
it, and then upload it to Business Communications Manager 3.0. You can also view the lists of
Multimedia Call Center files that are on your system.
To download web pages or view lists of pages
1 Point your web browser to the URL
http://voicebutton.<domain>:6800
where <domain> is the domain name of Business Communications Manager 3.0.
The Business Communications Manager 3.0 Unified Manager screen appears.
2 Click the Configure button.
The Login screen appears.
3 In the User ID box type your user ID.
4 In the Password box type your password.
5 Click the Login button.
The Unified Manager screen appears.
6 Click the Services key.
7 Click the Multimedia Call Center heading.
8 On the Tools menu click Multimedia Call Center Admin.
The Enter Network Password dialog box appears.
9 In the User Name box type your user name.
P0935737 05
Page 63

10 In the Password box type your password.
11 Click the OK button.
The System Administration page appears.
Chapter 4 Multimedia Call Center messages 63
Multimedia Call Center Set Up and Operation Guide
Page 64

64 Chapter 4 Multimedia Call Center messages
12 Under the Customize heading, click the View/Download Files button to generate a list of the
files.
The list appears in a new browser page. The default sub-folder contains the set of default web
page templates and text substitutions. Other sub-folders are created when you upload
customized web pages.
13 To view a list of web pages, click the link for the list you want to view
or
to download the default web pages if you want to customize Multimedia Call Center web
pages, click the default link. In this example, we clicked the default link.
The list of default Multimedia Call Center web pages appears.
14 To download a file, right-click the link, click Save As and save the file to your computer.
You can change the filename if you want to.
P0935737 05
Page 65

Customizing web pages
You or your web developer can customize web pages and upload them to Business
Communications Manager 3.0. You can customize the default Multimedia Call Center web pages
or create your own.
Note: Do not directly edit web pages.
Do not change the location of the Multimedia Call Center default files on Business
Communications Manager 3.0.
To customize web pages
1 Download the web page or web page list you want to customize to your computer. Refer to
“Downloading web pages and viewing web page lists” on page 62.
2 Customize the file or list of files.
3 Upload the customize d f il es to Business Communications Ma nage r 3 . 0 us ing the procedure in
“Uploading or deleting web pages” on page 66.
Chapter 4 Multimedia Call Center messages 65
Overviews of downloading, customizing and uploading pages
An overview of customizing an MSG.html file for the ABC Computer Company
1 Download the MSG.html template from Business Communications Manager 3.0 to your
desktop. Refer to “Downloading web pages and viewing web page lists” on page 62.
2 Customize the MSG.html file.
3 Save the new cust omize d file in your loc al directory. Save the new file with a new name, such
as abc_msg.html.
4 Log on to Business Communications Manager 3.0 using the ABC Computer Company User
ID and password. For more information about user accounts see “Creating a user account for
Multimedia Call Center” on page 13.
5 Upload the fi le. Refer to “Uploading or deleting web pages” on page 66.
An overview of uploading Spanish-language status and error messages
1 Download the msg.html and msg.txt template files from Business Communications Manager
to your desktop and customize them. Refer to “Downloading web page s and viewing web page
lists” on page 62.
2 Upload the files using th e procedure in “Uploading or deleting web pages” on page 66:
•In the Interface name text box type spanish.
•In the Remote file na me text box type msg.html.
•In the Local file text box type the local path to the customized msg.html file, or use the
Browse button to help you locate the file on your desktop.
•Click the Add File button.
Multimedia Call Center Set Up and Operation Guide
Page 66

66 Chapter 4 Multimedia Call Center messages
Uploading or deleting web pages
After you customize Multimedia Call Center web pages, use this procedure to upload them to
Business Communication s Manager 3 .0. You c an als o use thi s proc edure t o dele te any cu stomiz ed
files that are outdated , misnamed, or misfiled.
To upload or delete customized files
1 Point your web browser to the URL
http://voicebutton.<domain>:6800
where <domain> is the domain name of Business Communications Manager 3.0.
The Business Communications Manager 3.0 Unified Manager screen appears.
2 Click the Configure button.
The Login screen appears.
3 In the User ID box type your user ID.
4 In the Password box type your password.
5 Click the Login button.
The Unified Manager screen appears.
6 Click the Services key.
7 Click the Multimedia Call Center heading.
8 On the Tools menu click Multimedia Call Center Admin.
The Enter Network Password dialog box appears.
9 In the User Name box type your user name.
10 In the Password box type your password.
11 Click the OK button.
The System Administration page appears.
P0935737 05
Page 67

Chapter 4 Multimedia Call Center messages 67
12 To upload files:
a In the Interface name box type the folder name you want to save the file in. Either enter
the name of an existing folder, or type a new name. If you type a new name, a new folder
is created. The folder name is used as the interface parameter in links from your web site
to Multimedia Call Center. For more information on creating web links se e chapter 3,
“Integrating Multimedia Call Center with a website” in the Multimedia Call Center Web
Developer Guide.
b In the Remote File name box enter the name of the file, for example,
LaunchMonitor.html.
c Click the Browse button and browse to the location of the file you customized, for
example, ABCLaunch.html, or enter the path name of the file in the Local file box.
d Click the Add File button.
To delete files:
a In the Interface name box type the folder name you want to delete the file from.
b In the Remote File name box enter the name of the file, for example,
LaunchMonitor.html.
c Click the Delete File button.
To upload graphics such as .gifs or .jpegs, or other media such as .wav files or animated gifs:
a In the Interface name box type media.
b In the Remote file name box enter the name that you want to save the file as.
c Click the Browse button and browse to the location of the file, or enter the path name of
the file in the Local File box.
d Press the Add File button and check in the file list that the file is uploaded.
When you include the uploa ded media on a web pa ge, use the re lative pa th “/ivb-me dia” to refer to
uploaded media files. For example, if you upload the file “logo.jpg” to the media interface, in a
custom HTML files reference the file by including a tag such as
<IMG SRC="/ivb-media/logo.jpg" ...>.
Multimedia Call Center Set Up and Operation Guide
Page 68

68 Chapter 4 Multimedia Call Center messages
Creating and distributing web page lists
You or your web developer can create bookmarked lists of web pages that agents can push to
callers.
After you create a web page list, export it in a shared directory on your network and notify the
Multimedia Call Center agents to import the list.
Note: You must use Internet Explorer for the web page lists you create and distribute.
Netscape is not supported.
To create a list of web pages
1 In your browser, create a folder for the new list of web pages. Create a folder name that is easy
to identify.
2 Browse to the pages you want to bookmark.
3 Bookmark each page, and save each bookmark in the folder you created.
4 To start the Import/Export Wizard, on the File menu click Import and Export.
5 Save the folder you created to a network drive.
6 Send an email to the agents that they s hould i mport the n ew folde r int o t heir F avorit es. In your
email tell the Multimedia Call Center agents where the web page list is located on the network.
Be sure to include th e lo cat ion of the folder in your message. You can set up an addre ss list of
agents so you can notify all the agents with one email.
Whenever you create or update a web page list, notify the ag ent s to c opy th e li st to their computer.
P0935737 05
Page 69
Chapter 5
Viewing reports, active calls and log files
There are four report s y ou can ge nerat e that show the Multimedi a Call Center acti vity on Business
Communications Manager 3.0:
Report Contains
69
Summary call report - all calls
Summary call report by
skillset
Detail call report - all calls a detailed list of all calls made over a specified time
Detail call report by skillset a detailed list of all calls made by all skillsets over a specified time
Note: Active calls and calls waiting in skillsets are not included in reports.
To see all calls, including Multimedia Call Center calls waiting in skillsets, press
Feature 909 on a Business Communications Series terminal.
Browser Only calls are not shown when you use Feature 909.
a summary of call statistics over a specified time
a summary of call statistics for all skillsets over a specified time
Summary call report - all calls
The Summary call report for all calls shows:
• total number of Multimedia Call Center calls completed
• total number of text calls completed
• total number of calls ("transactions")
• total time of all calls
• average time per call
Multimedia Call Center Set Up and Operation Guide
Page 70

70 Chapter 5 Viewing reports, active calls and log files
An example of a Summary call report for all calls
Summary call report by skillset
The Summary call repo rt by skil ls et s hows th e inf orma tion in t he Sum mary call rep ort f or a ll c all s,
and the information by sk illset.
An example of a Summary call report by skillset
P0935737 05
Page 71

Detail call report - all calls
The Detail call report fo r all calls show s the information in the Summary call report for all calls,
and a detailed list of each call completed during the time period of the report. For each call, the
report shows:
• Time - the time and date the call started
• Duration - the duration of the call
• Request from - the caller's phone number
• Received by - the agent's phone number
• Group - the skillset
An example of a Detail call report for all calls
Chapter 5 Viewing reports, active calls and log files 71
Multimedia Call Center Set Up and Operation Guide
Page 72

72 Chapter 5 Viewing reports, active calls and log files
Detail call report by skillset
The Detail call report by skillset shows the information in the Detail call report for all calls and
summarizes the information by skillset.
Example of a Detail call report by skillset
P0935737 05
Page 73

Chapter 5 Viewing reports, active calls and log files 73
Generating Multimedia Call Center reports
Note: Generating reports can put an additional load on Business Communications
Manager 3.0. Avoid generating reports during periods of peak activity. If possible,
generate reports after hours.
To generate a Multimedia Call Center report
1 Point your web browser to the URL
http://voicebutton.<domain>:6800
where <domain> is the domain name of Business Communications Manager 3.0.
The Business Communications Manager 3.0 Unified Manager screen appears.
2 Click the Configure button.
The Login screen appears.
3 In the User ID box type your user ID.
4 In the Password box type your password.
5 Click the Login button.
The Unified Manager screen appears.
6 Click the Services key.
7 Click the Multimedia Call Center heading.
The Summary screen appears.
Multimedia Call Center Set Up and Operation Guide
Page 74

74 Chapter 5 Viewing reports, active calls and log files
8 On the Tools menu click Multimedia Call Center Admin.
The Enter Network Password dialog box appears.
9 In the User Name box type your user name.
10 In the Password box type your password.
11 Click the OK button.
The System Administration page appears.
12 Under the Reporting heading, select the type of report you want to generate:
• Summary Call Report - All Calls
• Detail Call Report - All Calls
• Summary Call Report By Skillset
• Detail Call Report By Skillset
13 From the View Report list box, select the time period for the report:
• today - includes calls completed on the current day up to the time the report is generated
• current reporting period - includes calls made since the last time the reporting period
14 Press the View Report button to genera te the report.
15 If you want to archive the file used to generate the reports, click the Archive Reporting
button. A message appears that asks you to confirm your request. Click the OK button.
The report is stored in BC M/Program Files/Nortel Networks/Voice Bu tton/System .
P0935737 05
was archived
Page 75

Monitoring active calls
You can monitor active Multimedia Call Center calls.
To monitor active calls
1 Point your web browser to the URL
http://voicebutton.<domain>:6800
where <domain> is the domain name of Business Communications Manager 3.0.
The Business Communications Manager 3.0 Unified Manager screen appears.
2 Click the Configure button.
The Login screen appears.
3 In the User ID box type your user ID.
4 In the Password box type your password.
5 Click the Login button.
The Unified Manager screen appears.
6 Click the Services key.
7 Click the Multimedia Call Center heading.
The Summary screen appears.
Chapter 5 Viewing reports, active calls and log files 75
8 On the Tools menu click Multimedia Call Center Admin.
The Enter Network Password dialog box appears.
9 In the User Name box type your user name.
Multimedia Call Center Set Up and Operation Guide
Page 76

76 Chapter 5 Viewing reports, active calls and log files
10 In the Password box type your password.
11 Click the OK button.
The System Administration page appears.
12 Under the Reporting heading, click the Active Calls button.
A report of all the current ly ac tive Multimedia Call Cent er ca ll s appears in a separate window.
P0935737 05
Page 77

Viewing log files
Log files are automatically generated daily by Multimedia Call Center. You can use log files to
diagnose system problems. The log files include all activity that occurs with its CGI interface and
its telephony server.
On days with no Multimedia Call Cente r activi ty, CGI log files ar e not genera ted, and blank mslog
and vwlog files are generated.
Multimedia Call Center Log files are generated in C:\Program Files\Nort el Networks\ Voice
Button\logs.
The logs ar e named:
• cgilog_YYYY_MM_DD.txt: log file of CGI activity
• nslog_YYYY_MM_DD.txt: log file of NSACD service
• vwlog_YYYY_MM_DD.txt: log file of VBServer service
where YYY Y is a 4-digit year
MM is a 1- or 2-digit month
DD is a 1- or 2-digit day
Chapter 5 Viewing reports, active calls and log files 77
The Call Center log file is generated in D:\st\stlog.out.
To view a log file
1 Point your web browser to the URL
http://voicebutton.<domain>:6800
where <domain> is the domain name of Business Communications Manager 3.0.
The Business Communications Manager 3.0 Unified Manager screen appears.
2 Click the Configure button.
The Login screen appears.
3 In the User ID box type your user ID.
4 In the Password box type your password.
5 Click the Login button.
The Unified Manager screen appears.
6 Click the Services key.
Multimedia Call Center Set Up and Operation Guide
Page 78

78 Chapter 5 Viewing reports, active calls and log files
7 Click the Multimedia Call Center heading.
The Summary screen appears.
8 On the Tools menu click Multimedia Call Center Admin.
The Enter Network Password dialog box appears.
9 In the User Name box type your user name.
10 In the Password box type your password.
11 Click the OK button.
The System Administration page appears.
P0935737 05
Page 79

12 Click the Examine Logs button.
The Examine Logs screen appears.
13 Select the log file you want to view:
Chapter 5 Viewing reports, active calls and log files 79
•Click the view log button to view the log you select.
•Click the analyze log button to see a summary for the log you select.
14 If you want to archive the log and reset the statistics, click the archive r eporting button.
A message appears that asks you to confirm the reset.
15 Click the OK button.
Multimedia Call Center Set Up and Operation Guide
Page 80

80 Chapter 5 Viewing reports, active calls and log files
P0935737 05
Page 81

Index
81
A
Adding multiple agents to Call Center 45
Agent
Accepted Call Types 46
adding multiple agents to Call Center 45
name 51
server settings 49
software, installing 47
Agent browser settings 50
Agents
adding to Call Center 42
enabling 41
Announcements
Call Center 61
recording 61
B
Bookmarks
creating and distributing 68
exporting 68
Browser settings, agent 50
Busy phone line message 58
C
Call failed message 59
Call preferences incorrectly formatted message 57
Call types
agent-centric 8, 19
caller-centric 8
voice and data 8
Caller preferences page 55
Caller preferences, Call setup page 6
CallPilot Manager
browser requirements 10
computer requirements 10
system requirements 10
Calls, routing 20
CallSetup message 54
Choose how to connect message 57
Connected message 60
D
Detail call report (all calls) 71
Detail call report (by skillset) 72
Dial plan
about 35
example 35
F
Favorites
creating and distributing 68
exporting 68
First-time callers message 54
Flash animations 51
Follow-me browsing 51
H
Help, support and technical 11
I
IP address 49
J
Java settings 50
L
Lines busy message 58
Lines, routing Multimedia Call Center calls 20
Log files
about 77
viewing 77
M
Messages
announcements 61
busy phone line 58
call failed 59
call preferences incorrectly formatted 57
Call Setup page 54
call transferred 60
CallSetup 54
choose how to connect 57
connected 60
customizing 65
deleting 68
downloading 62
first-time callers 54
lines busy 58
Multimedia Call Center unavailable 56
no agents logged on 56
no answer 59
no phone lines available 58
Multimedia Call Center Set Up and Operation Guide
Page 82

82 Index
Preferences 55
preferences saved 59
refresh 60
server down 56, 59
session com pl eted 58
subsequent callers 55
uploading 66
user busy 58
viewing 62
web refresh 60
Multimedia Call Center
agent 41, 42, 49
agent interface 7
agent name 51
agent software 47
Call setup page 6
call types 8
caller interface 6
installing 14
IP address 49
overview 5
port address 49
reports
Detail call report (all calls) 71
Detail call report (by skillset) 72
Summary call report (all calls) 69
Summary call report (by skillset) 70
reports, generating 73
setting up 13
software authorization code 14
Multimedia Call Center calls
assigning outgoing li ne 33
CLID/DNIS routing 19
enabling call-back 33
Intelligent Overflow rules 19
routing 19
Multimedia Call Center unavailable message 56
N
No agents logged on message 56
No answer message 59
No phone lines available message 58
O
Outdialing using PRI lines 26
P
Preferences, caller 55
PRI lines 26
R
Refresh message 60
Reports
Detail call report (all calls) 71
Detail call report (by skillset) 72
generating 73
Summary call report (all calls) 69
Summary call report (by skillset) 70
S
Saved preferences message 59
Server down message 56, 59
Session completed message 58
Software code 14
installing 41
Subsequent callers message 55
Summary call report (all calls) 69
Summary call report (by skillset) 70
Support 11
T
Technical support 11
Troubleshooting, browser 10
U
User busy message 58
W
Web page lists
about 68
creating and distributing 68
deleting 68
downloading 62
exporting 68
naming 68
uploading 66
viewing 62
Web pages
customization example 65
customizing 65
Web refresh message 60
Phone line busy message 58
Port address 49
Preferences saved message 59
P0935737 05
 Loading...