

Page 1

Installing and Maintaining the Avaya E159
and E169 IP Media Stations
Release 1.1
February 2015
Page 2

©
2015 Avaya Inc.
All Rights Reserved.
Notice
While reasonable efforts have been made to ensure that the
information in this document is complete and accurate at the time of
printing, Avaya assumes no liability for any errors. Avaya reserves
the right to make changes and corrections to the information in this
document without the obligation to notify any person or organization
of such changes.
Documentation disclaimer
“Documentation” means information published by Avaya in varying
mediums which may include product information, operating
instructions and performance specifications that Avaya may generally
make available to users of its products and Hosted Services.
Documentation does not include marketing materials. Avaya shall not
be responsible for any modifications, additions, or deletions to the
original published version of documentation unless such
modifications, additions, or deletions were performed by Avaya. End
User agrees to indemnify and hold harmless Avaya, Avaya's agents,
servants and employees against all claims, lawsuits, demands and
judgments arising out of, or in connection with, subsequent
modifications, additions or deletions to this documentation, to the
extent made by End User.
Link disclaimer
Avaya is not responsible for the contents or reliability of any linked
websites referenced within this site or documentation provided by
Avaya. Avaya is not responsible for the accuracy of any information,
statement or content provided on these sites and does not
necessarily endorse the products, services, or information described
or offered within them. Avaya does not guarantee that these links will
work all the time and has no control over the availability of the linked
pages.
Warranty
Avaya provides a limited warranty on Avaya hardware and software.
Refer to your sales agreement to establish the terms of the limited
warranty. In addition, Avaya’s standard warranty language, as well as
information regarding support for this product while under warranty is
available to Avaya customers and other parties through the Avaya
Support website:
http://support.avaya.com or such successor site as
designated by Avaya. Please note that if You acquired the product(s)
from an authorized Avaya Channel Partner outside of the United
States and Canada, the warranty is provided to You by said Avaya
Channel Partner and not by Avaya.
Licenses
THE SOFTWARE LICENSE TERMS AVAILABLE ON THE AVAYA
WEBSITE,
HTTP://SUPPORT.AVAYA.COM/LICENSEINFO OR
SUCH SUCCESSOR SITE AS DESIGNATED BY AVAYA, ARE
APPLICABLE TO ANYONE WHO DOWNLOADS, USES AND/OR
INSTALLS AVAYA SOFTWARE, PURCHASED FROM AVAYA INC.,
ANY AVAYA AFFILIATE, OR AN AVAYA CHANNEL PARTNER (AS
APPLICABLE) UNDER A COMMERCIAL AGREEMENT WITH
AVAYA OR AN AVAYA CHANNEL PARTNER. UNLESS
OTHERWISE AGREED TO BY AVAYA IN WRITING, AVAYA DOES
NOT EXTEND THIS LICENSE IF THE SOFTWARE WAS
OBTAINED FROM ANYONE OTHER THAN AVAYA, AN AVAYA
AFFILIATE OR AN AVAYA CHANNEL PARTNER; AVAYA
RESERVES THE RIGHT TO TAKE LEGAL ACTION AGAINST YOU
AND ANYONE ELSE USING OR SELLING THE SOFTWARE
WITHOUT A LICENSE. BY INSTALLING, DOWNLOADING OR
USING THE SOFTWARE, OR AUTHORIZING OTHERS TO DO SO,
YOU, ON BEHALF OF YOURSELF AND THE ENTITY FOR WHOM
YOU ARE INSTALLING, DOWNLOADING OR USING THE
SOFTWARE (HEREINAFTER REFERRED TO
INTERCHANGEABLY AS “YOU” AND “END USER”), AGREE TO
THESE TERMS AND CONDITIONS AND CREATE A BINDING
CONTRACT BETWEEN YOU AND AVAYA INC. OR THE
APPLICABLE AVAYA AFFILIATE (“AVAYA”).
Avaya grants You a license within the scope of the license types
described below, with the exception of Heritage Nortel Software, for
which the scope of the license is detailed below. Where the order
documentation does not expressly identify a license type, the
applicable license will be a Designated System License. The
applicable number of licenses and units of capacity for which the
license is granted will be one (1), unless a different number of
licenses or units of capacity is specified in the documentation or other
materials available to You. “Software” means computer programs in
object code, provided by Avaya or an Avaya Channel Partner,
whether as stand-alone products, pre-installed on hardware products,
and any upgrades, updates, patches, bug fixes, or modified versions
thereto. “Designated Processor” means a single stand-alone
computing device. “Server” means a Designated Processor that
hosts a software application to be accessed by multiple users.
“Instance” means a single copy of the Software executing at a
particular time: (i) on one physical machine; or (ii) on one deployed
software virtual machine (“VM”) or similar deployment.
License types
Designated System(s) License (DS). End User may install and use
each copy or an Instance of the Software only on a number of
Designated Processors up to the number indicated in the order.
Avaya may require the Designated Processor(s) to be identified in
the order by type, serial number, feature key, Instance, location or
other specific designation, or to be provided by End User to Avaya
through electronic means established by Avaya specifically for this
purpose.
Shrinkwrap License (SR). You may install and use the Software in
accordance with the terms and conditions of the applicable license
agreements, such as “shrinkwrap” or “clickthrough” license
accompanying or applicable to the Software (“Shrinkwrap License”).
Copyright
Except where expressly stated otherwise, no use should be made of
materials on this site, the Documentation, Software, Hosted Service,
or hardware provided by Avaya. All content on this site, the
documentation, Hosted Service, and the product provided by Avaya
including the selection, arrangement and design of the content is
owned either by Avaya or its licensors and is protected by copyright
and other intellectual property laws including the sui generis rights
relating to the protection of databases. You may not modify, copy,
reproduce, republish, upload, post, transmit or distribute in any way
any content, in whole or in part, including any code and software
unless expressly authorized by Avaya. Unauthorized reproduction,
transmission, dissemination, storage, and or use without the express
written consent of Avaya can be a criminal, as well as a civil offense
under the applicable law.
Third Party Components
“Third Party Components” mean certain software programs or
portions thereof included in the Software or Hosted Service may
contain software (including open source software) distributed under
third party agreements (“Third Party Components”), which contain
terms regarding the rights to use certain portions of the Software
(“Third Party Terms”). As required, information regarding distributed
Linux OS source code (for those products that have distributed Linux
OS source code) and identifying the copyright holders of the Third
Party Components and the Third Party Terms that apply is available
in the products, Documentation or on Avaya’s website at:
http://
support.avaya.com/Copyright or such successor site as designated
by Avaya. You agree to the Third Party Terms for any such Third
Party Components.
Preventing Toll Fraud
“Toll Fraud” is the unauthorized use of your telecommunications
system by an unauthorized party (for example, a person who is not a
corporate employee, agent, subcontractor, or is not working on your
company's behalf). Be aware that there can be a risk of Toll Fraud
associated with your system and that, if Toll Fraud occurs, it can
result in substantial additional charges for your telecommunications
services.
Avaya Toll Fraud intervention
If You suspect that You are being victimized by Toll Fraud and You
need technical assistance or support, call Technical Service Center
Toll Fraud Intervention Hotline at +1-800-643-2353 for the United
States and Canada. For additional support telephone numbers, see
the Avaya Support website:
http://support.avaya.com or such
successor site as designated by Avaya. Suspected security
vulnerabilities with Avaya products should be reported to Avaya by
sending mail to: securityalerts@avaya.com.
Page 3

U.S. Federal Communications Commission (FCC) Compliance
Statement
The changes or modifications not expressly approved by the party
responsible for compliance could void the user’s authority to operate
the equipment. To comply with the FCC RF exposure compliance
requirements, this device and its antenna must not be co-located or
operating to conjunction with any other antenna or transmitter. This
device complies with part 15 of the FCC Rules. Operation is subject
to the following two conditions:
1. This device may not cause harmful interference, and
2. This device must accept any interference received,
including interferences that may cause undesired
operation.
Note:
This equipment has been tested and found to comply with the
limits for a Class B digital device, pursuant to part 15 of the
FCC Rules. These limits are designated to provide reasonable
protection against harmful interferences in a residential
installation. This equipment generates, uses and can radiate
radio frequency energy and, if not installed and used in
accordance with the instructions, may cause harmful
interference to radio communications. However, there is no
guarantee that interference will not occur in a particular
installation. If this equipment does cause harmful interferences
to radio or television reception, which can be determined by
turning the equipment off and on, the user is encouraged to try
to correct the interference by one or more of the following
measures:
• Reorient or relocate the receiving antenna.
• Increase the separation between the equipment and
receiver.
• Connect the equipment into an outlet on a circuit
different from that to which the receiver is connected.
• Consult the dealer or an experienced radio/TV
technician for help.
FCC Radiation Exposure Statement
This equipment complies with FCC radiation exposure limits set forth
for an uncontrolled environment . This equipment should be installed
and operated with minimum distance of 8 in or 20 cm between the
radiator and your body. This transmitter must not be co-located or
operating in conjunction with any other antenna or transmitter.
Industry Canada (IC) Warning
This device complies with Industry Canada licence-exempt RSS
standard(s). Operation is subject to the following two conditions:
1. This device may not cause interference, and
2. This device must accept any interference, including
interference that may cause undesired operation of the
device.
Le présent appareil est conforme aux CNR d'Industrie Canada
applicables aux appareils radio exempts de licence. L'exploitation est
autorisée aux deux conditions suivantes:
1. L'appareil ne doit pas produire de brouillage, et
2. L'utilisateur de l'appareil doit accepter tout brouillage
radioélectrique subi, même si le brouillage est susceptible
d'en compromettre le fonctionnement.
Under Industry Canada regulations, this radio transmitter may only
operate using an antenna of a type and maximum (or lesser) gain
approved for the transmitter by Industry Canada. To reduce potential
radio interference to other users, the antenna type and its gain
should be so chosen that the equivalent isotropically radiated power
(EIRP) is not more than that necessary for successful
communication.
Conformément à la réglementation d'Industrie Canada, le présent
émetteur radio peut fonctionner avec une antenne d'un type et d'un
gain maximal (ou inférieur) approuvé pour l'émetteur par Industrie
Canada. Dans le but de réduire les risques de brouillage
radioélectrique à l'intention des autres utilisateurs, il faut choisir le
type d'antenne et son gain de sorte que la puissance isotrope
rayonnée équivalente ne dépasse pas l'intensité nécessaire à
l'établissement d'une communication satisfaisante.
México
La operación de este equipo está sujeta a las siguientes dos
condiciones: (1) es posible que este equipo o dispositivo no cause
interferencia perjudicial y (2) este equipo o dispositivo debe aceptar
cualquier interferencia, incluyendo la que pueda causar su operación
no deseada.
Downloading Documentation
For the most current versions of Documentation, see the Avaya
Support website:
designated by Avaya.
Contact Avaya Support
See the Avaya Support website:
or Hosted Service notices and articles, or to report a problem with
your Avaya product or Hosted Service. For a list of support telephone
numbers and contact addresses, go to the Avaya Support website:
http://support.avaya.com (or such successor site as designated by
Avaya), scroll to the bottom of the page, and select Contact Avaya
Support.
Trademarks
The trademarks, logos and service marks (“Marks”) displayed in this
site, the Documentation, Hosted Service(s), and product(s) provided
by Avaya are the registered or unregistered Marks of Avaya, its
affiliates, or other third parties. Users are not permitted to use such
Marks without prior written consent from Avaya or such third party
which may own the Mark. Nothing contained in this site, the
Documentation, Hosted Service(s) and product(s) should be
construed as granting, by implication, estoppel, or otherwise, any
license or right in and to the Marks without the express written
permission of Avaya or the applicable third party.
Avaya is a registered trademark of Avaya Inc.
Aura is a registered trademark of Avaya Inc.
Flare is a registered trademark of Avaya Inc.
one-X is a registered trademark of Avaya Inc.
All non-Avaya trademarks are the property of their respective owners.
Linux® is the registered trademark of Linus Torvalds in the U.S. and
other countries.
http://support.avaya.com, or such successor site as
http://support.avaya.com for product
Page 4

Contents
Chapter 1: Introduction............................................................................................................ 6
Purpose.................................................................................................................................. 6
Intended audience................................................................................................................... 6
Document changes since last issue.......................................................................................... 6
Related resources................................................................................................................... 6
Related documentation...................................................................................................... 6
Finding documents on the Avaya Support website............................................................... 7
Viewing Avaya Mentor videos............................................................................................. 8
Support.................................................................................................................................. 8
Using the Avaya InSite Knowledge Base............................................................................. 8
Chapter 2: Overview............................................................................................................... 10
The Avaya E159 and E169 Media Stations.............................................................................. 10
Product compatibility.............................................................................................................. 13
General specifications........................................................................................................... 15
Connectivity specifications..................................................................................................... 15
Port matrix............................................................................................................................ 16
Supported codecs................................................................................................................. 17
Safety guidelines................................................................................................................... 17
Chapter 3: Administration...................................................................................................... 18
Administration overview......................................................................................................... 18
Avaya Aura® administration.................................................................................................... 19
Avaya Aura® Session Border Controller and Avaya Session Border Controller for Enterprise
administration....................................................................................................................... 20
Avaya IP Office administration................................................................................................ 21
Dialing plan administration..................................................................................................... 22
Upgrade script file................................................................................................................. 24
Settings file options............................................................................................................... 25
Advanced provisioning options............................................................................................... 31
Media station app parameter descriptions............................................................................... 31
Chapter 4: Initial setup and connectivity.............................................................................. 36
Preparing the media station for installation.............................................................................. 36
Media station rear panel connectors and controls..................................................................... 39
Connectivity.......................................................................................................................... 39
E159 connectivity............................................................................................................ 39
E169 connectivity............................................................................................................ 45
Setting up the media station app............................................................................................. 54
Downloading the media station app.................................................................................. 54
Connecting smart devices with Bluetooth pairing................................................................ 55
Connecting the media station to a smart device as a USB accessory................................... 56
4 Installing and Maintaining the Avaya E159 and E169 IP Media Stations February 2015
Comments? infodev@avaya.com
Page 5

Contents
Registering the media station app and signing in the first time............................................. 56
Media station registration................................................................................................. 57
Chapter 5: Maintenance......................................................................................................... 59
Updating the media station app.............................................................................................. 59
Updating the media station firmware....................................................................................... 59
Removing and replacing a cable sleeve.................................................................................. 60
Chapter 6: Troubleshooting................................................................................................... 61
Frequently Asked Questions................................................................................................... 61
Removing Bluetooth connections and subscriptions................................................................. 63
Reverting the media station to the previous version of firmware................................................ 64
Resetting the media station to factory defaults......................................................................... 65
Media station app freezes when docking and undocking a smart device.................................... 66
The media station app displays the Not Connected (Network) message..................................... 66
Resolving a Not Connected (Network) message................................................................ 66
February 2015 Installing and Maintaining the Avaya E159 and E169 IP Media Stations 5
Comments? infodev@avaya.com
Page 6

Chapter 1: Introduction
Purpose
This document provides installation, configuration, initial administration, and basic maintenance
checklists and procedures.
Intended audience
This document is intended for people who install and configure a verified reference configuration at
a customer site.
Document changes since last issue
The following changes were made to this document since the last issue:
• Added Federal Communications Commission (FCC) and Industry Canada (IC) statements.
• Added information about the 1.1 release for the Avaya E169 IP Media Station.
• Added information about the Avaya E159 IP Media Station, which is new with Release 1.1.
• Updated the list of telephony servers, operating systems, and smart devices supported with
Release 1.1.
Related resources
Related documentation
See the following related documents at
http://support.avaya.com.
6 Installing and Maintaining the Avaya E159 and E169 IP Media Stations February 2015
Comments? infodev@avaya.com
Page 7
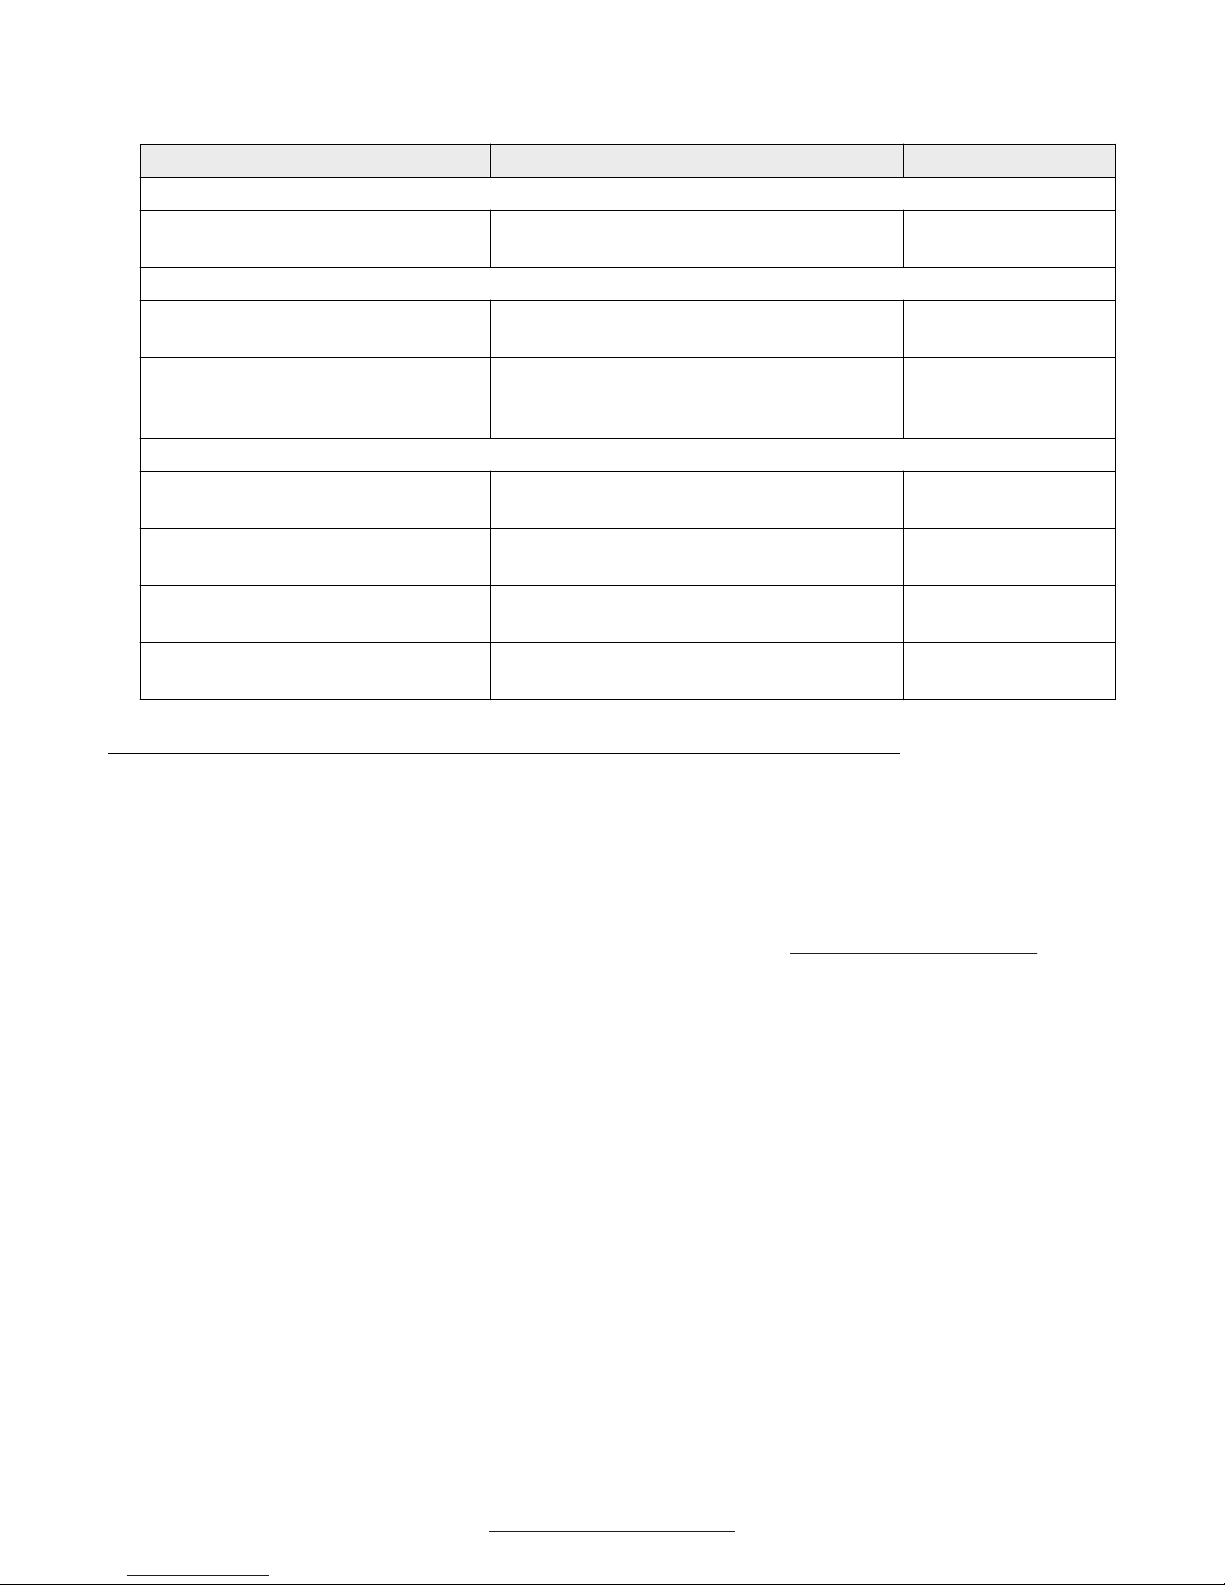
Related resources
Title Use this document to: Audience
Overview
Avaya E159 and E169 IP Media
Station Overview and Specification
Implementing
Installing and Maintaining the Avaya
E159 and E169 IP Media Station
Administering Avaya
9601/9608/9608G/9611G/9621G/
9641G IP Deskphones SIP
Using
Using the Avaya E159 IP Media
Station
Avaya E159 IP Media Station Quick
Reference
Using the Avaya E169 IP Media
Station
Avaya E169 IP Media Station Quick
Reference
Get an understanding of the product and the
features available to users.
Learn how to install, administer, and
maintain the product.
Learn how to administer 9600-series
deskphones, which is similar to how you
administer the media stations.
Learn how to install, use, and maintain the
product.
Learn how to install, use, and maintain the
product.
Learn how to install, use, and maintain the
product.
Learn how to use the key features of the
product.
Purchasers,
implementers, users
Implementers,
system administrators
Implementers,
system administrators
Users
Users
Users
Users
Finding documents on the Avaya Support website
About this task
Use this procedure to find product documentation on the Avaya Support website.
Procedure
1. Use a browser to navigate to the Avaya Support website at http://support.avaya.com/.
2. At the top of the screen, enter your username and password and click Login.
3. Click Documents.
4. In the Enter Your Product Here search box, type the product name and then select the
product from the drop-down list.
5. If there is more than one release, select the appropriate release number from the Choose
Release drop-down list.
6. Use the Content Type filter on the left to select the type of document you are looking for, or
click Select All to see a list of all available documents.
For example, if you are looking for user guides, select User Guides in the Content Type
filter. Only documents in the selected category will appear in the list of documents.
7. Click Enter.
February 2015 Installing and Maintaining the Avaya E159 and E169 IP Media Stations 7
Comments? infodev@avaya.com
Page 8

Introduction
Viewing Avaya Mentor videos
Avaya Mentor videos provide technical content on how to install, configure, and troubleshoot Avaya
products.
About this task
Videos are available on the Avaya Support website, listed under the video document type, and on
the Avaya-run channel on YouTube.
Procedure
• To find videos on the Avaya Support website, go to
of the following actions:
- In Search, type Avaya Mentor Videos to see a list of the available videos.
- In Search, type the product name. On the Search Results page, select Video in the
Content Type column on the left.
• To find the Avaya Mentor videos on YouTube, go to
perform one of the following actions:
- Enter a key word or key words in the Search Channel to search for a specific product or
topic.
- Scroll down Playlists, and click the name of a topic to see the available list of videos posted
on the website.
Note:
Videos are not available for all products.
http://support.avaya.com and perform one
www.youtube.com/AvayaMentor and
Support
Go to the Avaya Support website at http://support.avaya.com for the most up-to-date
documentation, product notices, and knowledge articles. You can also search for release notes,
downloads, and resolutions to issues. Use the online service request system to create a service
request. Chat with live agents to get answers to questions, or request an agent to connect you to a
support team if an issue requires additional expertise.
Related Links
Using the Avaya InSite Knowledge Base on page 8
Using the Avaya InSite Knowledge Base
The Avaya InSite Knowledge Base is a Web-based search engine that provides:
• Up-to-date troubleshooting procedures and technical tips
8 Installing and Maintaining the Avaya E159 and E169 IP Media Stations February 2015
Comments? infodev@avaya.com
Page 9

Support
• Information about service packs
• Access to customer and technical documentation
• Information about training and certification programs
• Links to other pertinent information
If you are an authorized Avaya Partner or a current Avaya customer with a support contract, you can
access the Knowledge Base at no extra cost. You must have a login account and a valid Sold-To
number.
Use the Avaya InSite Knowledge Base to look up potential solutions to problems.
1. Go to
2. Log on to the Avaya website with a valid Avaya User ID and password.
The Support page appears.
3. Enter the product in The InSite Knowledge Base text box.
4. Click the red arrow to obtain the Search Results.
5. Select relevant articles.
Related Links
Support on page 8
http://www.avaya.com/support.
February 2015 Installing and Maintaining the Avaya E159 and E169 IP Media Stations 9
Comments? infodev@avaya.com
Page 10

Chapter 2: Overview
The Avaya E159 and E169 Media Stations
The Avaya IP Media Stations are VoIP SIP deskphones with which you can use your smart device
on your enterprise telephony system. The media stations provide:
• A standalone SIP deskphone on your enterprise system
• Two functional line appearances that provide options to hold calls, make or receive second
calls, transfer calls, and set up a three-way conference call
• A charging station for your smart device
• A high-quality Bluetooth-enabled speakerphone
• The capability to make and receive calls through a SIP line or through the smart device cellular
network
• Gigabit Ethernet connectivity with an internal switch for connecting a computer through the
media station
10 Installing and Maintaining the Avaya E159 and E169 IP Media Stations February 2015
Comments? infodev@avaya.com
Page 11

The Avaya E159 and E169 Media Stations
Bring Your Own Device (BYOD)
The media station supports the most popular iOS and Android smart devices that enterprise workers
use. The media station facilitates enterprise-grade integration with the following telephony servers
and related products:
• Avaya Aura® Release 6.2 FP3 and later
• IP Office Release 9.0.3 and later
• IP Office Release 9.1
• Avaya Aura® Session Border Controller Release 6.0.x and later
• Avaya Session Border Controller for Enterprise Release 6.3 and later
The media station app can route calls over the enterprise SIP network of the telephony server or
over the wireless network of the cellular carrier. Whether the calls route over SIP or the wireless
network, the media station speakerphone or wired handset provides unmatched audio quality.
Bluetooth
You can connect your smart device to the media station using Bluetooth to provide a high-quality
speakerphone when making calls on your device. You can also use Bluetooth for playing audio
streams from your device. As with all Bluetooth devices, audio quality can vary based on the quality
of the Bluetooth signal from the smart device.
Important:
You can pair many smart devices with a media station, but only one can be active at a time.
High-quality sound
The Avaya E169 IP Media Station speakerphone and microphones provide unmatched sound
quality. The media station has six broadband speakers, four digital microphones, and one passive
radiator. This unique and innovative acoustic design uses the speakerphone in hands-free mode
with unequaled quality. You can use the media station for large conference calls or listen to your
music or podcasts.
These innovative technologies improve performance by using wide-band or high definition codec G.
722. Conventional telephony encodes speech at bandwidths ranging from 300 Hz to 3400 Hz. As a
result, the media station only transmits the most essential part of the human voice. The media
station encodes the human voice using bandwidths ranging to 8 kHz. These bandwidths also pick
up voice harmonics: the natural quality of the human voice, a sense of the physical presence of the
speaker, and the space around the person.
You can discern every nuance of the human voice. The media station reduces nasal sounds and
you can discern similar sounding consonants such as S and F. You no longer need to repeat as
your conferences are now crystal clear and stress-free.
Power to charge your smart devices
The media station uses Power over Ethernet (PoE) and an optional AC power adapter. The power
adapter has four snap-in connectors that are compatible with sockets used in several countries and
regions. With this power arrangement, you can charge your smart devices when you connect your
devices to the media station. Smart devices charge more quickly when using the media station AC
adapter than when using only PoE.
February 2015 Installing and Maintaining the Avaya E159 and E169 IP Media Stations 11
Comments? infodev@avaya.com
Page 12

Overview
Note:
Some smart devices require more charging power than the media station provides. Your smart
device might charge slower than when connected to the native AC power adapter of the device.
If the device does not charge well enough when connected to the media station, you must
charge the device using the native AC power adapter.
Core telephony features
• Two functional line appearances
• Hold and resume
• Attended transfer
• Three-way conference
• Switch between two active calls
• Message waiting indicator and voice mail dial access button
• Mute and unmute the microphone on the media station base and handset
• Volume control
Using Avaya softphone apps with the media station
Avaya supports a growing number of softphone applications for both iOS and Android platforms.
Avaya Flare® Communicator for iPad Devices and Avaya Communicator for Android are examples
of Avaya softphone apps.
If you are already a user of such an app, you can use this app with the media station in the following
way:
• Create a Bluetooth pairing between the app and the media station.
• Connect your smart device over Bluetooth or USB to use the media station as an audio device.
Interactions with other Avaya apps
Avaya recommends that you only use one Avaya app at a time because of interactions between the
apps.
The media station operates as a Bluetooth speakerphone for Avaya Flare® Communicator for iPad
Devices, Avaya one-X® Communicator, and other Avaya mobile apps. The media station does not
support native call control of those apps.
When the media station detects another logged on app, the media station logs out as an active
registered station and functions as a Bluetooth speakerphone. You must manually register the
media station. See the following scenario for this interaction:
1. You have an iPhone with the Avaya Media Station and Avaya one-X® Mobile apps installed.
2. You connect the device to the media station with the Avaya Media Station app and you sign
on with extension 1234.
3. The Avaya one-X® Mobile app attempts to register with the same extension.
4. The media station signs out from extension 1234 and the Avaya Media Station app opens on
the smart device.
5. You sign in again to extension 1234 using the Avaya Media Station app.
12 Installing and Maintaining the Avaya E159 and E169 IP Media Stations February 2015
Comments? infodev@avaya.com
Page 13

Product compatibility
When you have Avaya EC500 administered on a smartphone that you register with the media
station, Avaya recommends that you disable Avaya EC500. If you do not disable Avaya EC500, the
following might occur:
• You receive a SIP call on the media station at the same time you receive a cellular network call
on your smartphone.
• If you try to answer the SIP call by pressing the Call/Volume button or picking up the handset,
you connect to the cellular network call.
• This interaction occurs because the default smartphone app of iOS and Android devices put
focus on the cellular call. This means that you cannot answer the SIP call when you also
enable Avaya EC500 on the smartphone.
Sharing the same extension on softphone apps and the media station (Avaya Aura
®
only)
If you log on to the same extension on both your softphone app and the media station app, you will
see the following behavior:
• When your smart device disconnects from the media station, the two endpoints operate
independently and have a Multiple Device Access (MDA) relationship between them.
• When you connect your smart device to the media station with USB or Bluetooth, the media
station automatically logs out, or unregisters, the registered extension. The message Prevent
Dual App on both the handset and media station app.
• When you disconnect the smart device from the media station, the media station automatically
logs on, or registers, with the previously provisioned extension.
Product compatibility
The media station operates on the most popular Avaya telephony servers, supports a wide array of
smart devices, and supports a select set of USB headsets (E169 only).
Important:
Avaya does not support any other combinations of operating systems, smart devices, and
headsets on the media station. Check the media station support site regularly for updates to the
product compatibility with new operating systems, smart devices, and headsets.
Telephony servers and related products
The media station operates with the following telephony servers and related products:
• Avaya Aura® Release 6.2 FP3 and later
• Avaya IP Office Release 9.0.3 and Release 9.1
• Avaya Aura® Session Border Controller Release 6.0.x and later
• Avaya Session Border Controller for Enterprise Release 6.3 and later
Operating systems and smart devices
The media station supports the following operating systems and smart devices:
February 2015 Installing and Maintaining the Avaya E159 and E169 IP Media Stations 13
Comments? infodev@avaya.com
Page 14
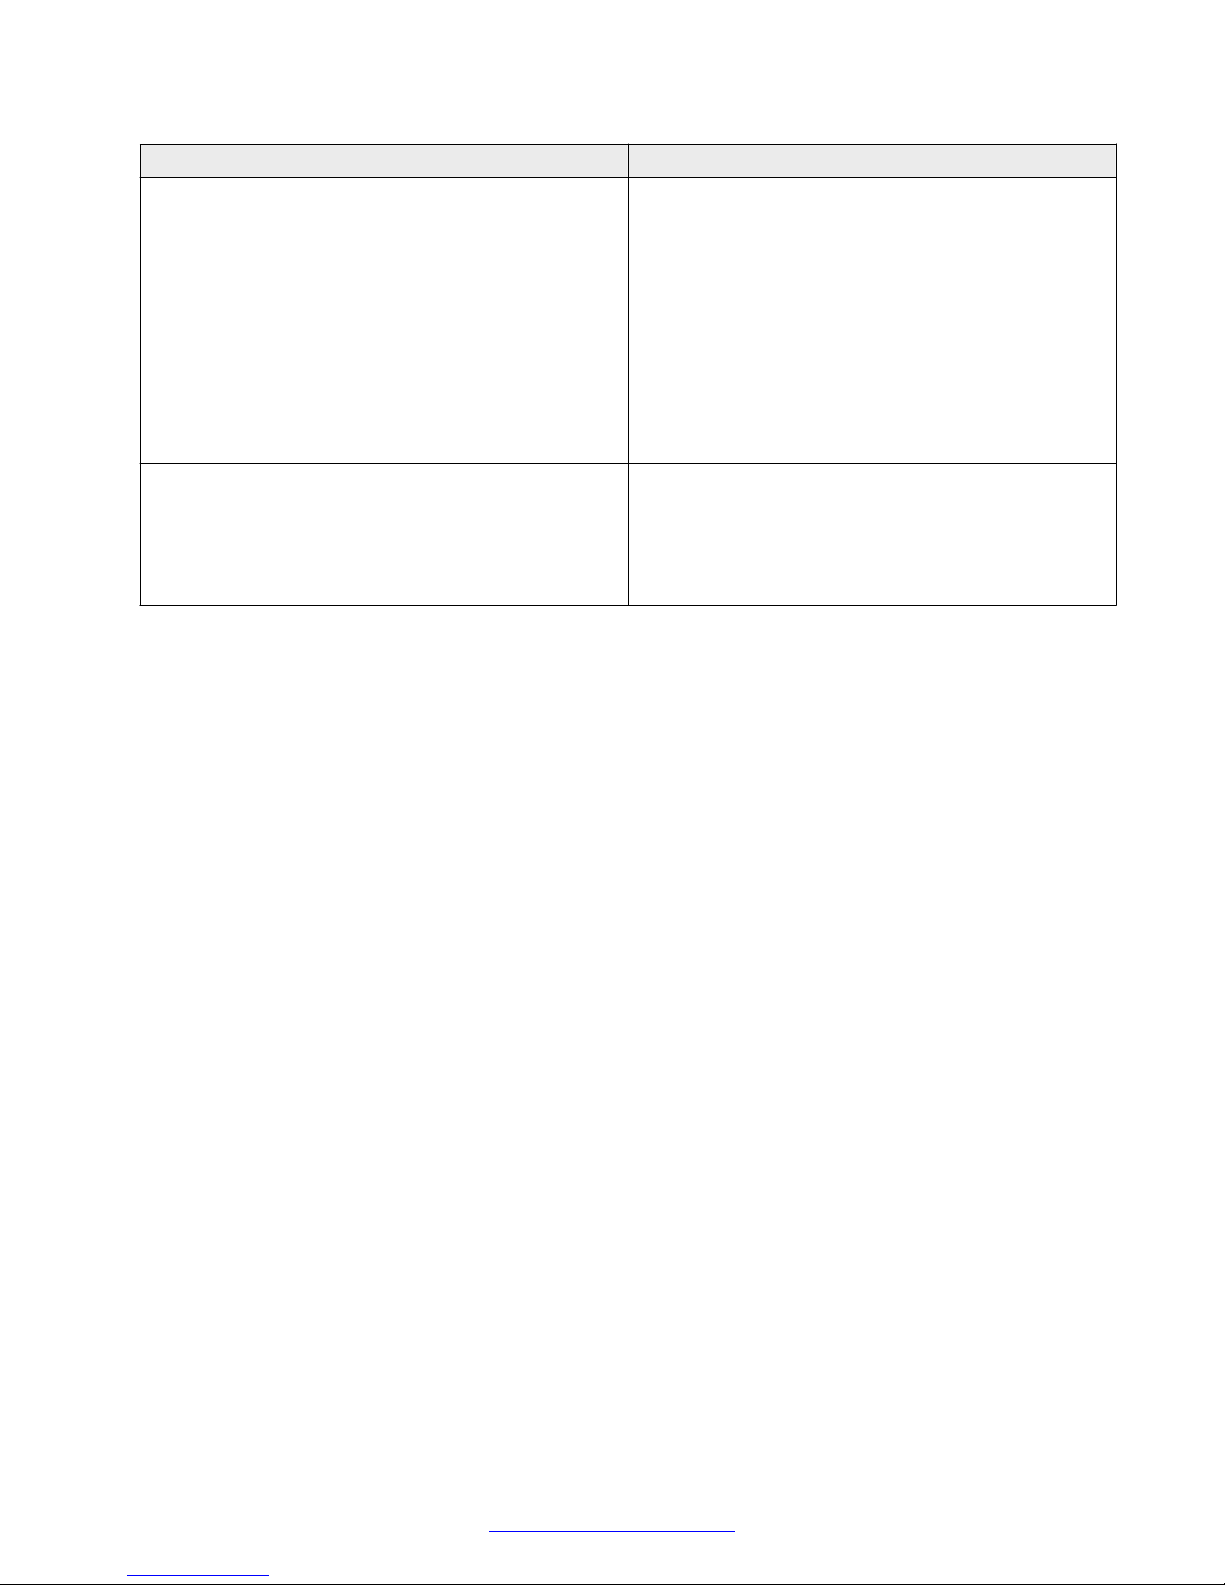
Overview
Operating systems Smart devices
iOS Version 6.x.x
• iPhone 5s
iOS Version 7.x.x
iOS Version 8.x.x
Android Version 4.1.x–4.3.x, aka Jelly Bean
Android Version 4.4.x, aka Kit Kat
• iPhone 5c
• iPhone 5
• iPhone 4s
• iPhone 4
• iPad 2 or later with or without Retina Display
• iPad Air
• iPad Mini
• Samsung S3
• Samsung S4
• Samsung Note 3
• Samsung Tab 3
Headsets
The Avaya E169 IP Media Station is compatible with the following headsets:
• Jabra 9460 USB Headset
• Jabra 9470 USB Headset
Languages
Using the International (iOS) and Language (Android) options on your smart device, the media
station user interface supports the following languages:
• Simplified Chinese
• English
• French
• German
• Italian
• Japanese
• Korean
• Brazilian Portuguese
• Russian
• Latin Spanish
14 Installing and Maintaining the Avaya E159 and E169 IP Media Stations February 2015
Comments? infodev@avaya.com
Page 15

General specifications
Warning:
Use the proper AC adapter for your media station. The E169 AC adapter is 12 V and the E159
AC adapter is 5 V. If you use the wrong AC adapter, you will damage the media station.
E159 specifications
• Line Protocol: Session Initiation Protocol (SIP)
• Power Supply: 100-240 V / 5 V 3A AC adapter
• 802.3at Power over Ethernet (PoE), 48 V DC at 0.2 A
• Dimensions: 7.1 x 6 x 1 in., 18 x 15.25 x 2.5 cm (media station); 7 x 2 x 0.78 in., 17.5 x 5 x 2
cm (handset)
• Weight: 2.2 lbs; 1 kg
• Operating temperature: 32° – 95° F, 0° – 35° C
• Operating humidity: 10% – 90%
E169 specifications
General specifications
• Line Protocol: Session Initiation Protocol (SIP)
• Power Supply: 100-240 V / 12 V 3A AC adapter
• 802.3at Power over Ethernet (PoE), 48 V DC at 0.2 A
• Dimensions: 11.4 x 4.5 x 2 in., 29 x 11.5 x 5 cm (media station); 7 x 2 x 0.78 in., 17.8 x 5 x 2
cm (handset)
• Weight: 5.5 lbs; 2.5 kg
• Operating temperature: 32° – 95° F, 0° – 35° C
• Operating humidity: 10% – 90%
Connectivity specifications
• Bluetooth® v2.1 +EDR with audio profiles HFP and A2DP
• Two 1 Gbps Ethernet ports: one LAN port and one personal computer port
The LAN port provides network connectivity for the media station. The personal computer port
is for connecting your computer to the LAN by way of a built-in LAN switch in the media station.
If the network connection provides 802.3at Power over Ethernet (PoE) support, the media
station can operate without the AC power adapter. 802.3at supports Class 4 devices and
guarantees power output of 30 W with a minimum output of about 15.4 W. PoE provides power
enough to charge many supported smart devices.
• USB 2.0 ports
February 2015 Installing and Maintaining the Avaya E159 and E169 IP Media Stations 15
Comments? infodev@avaya.com
Page 16
Overview
• One 3.5 mm headset jack (E169 only: this release does not support the headset jack)
• One AC power adapter port
The USB port provides connectivity for your smart device. The E169 has a second USB port to
connect the USB handset. You can connect a USB headset to one of the USB ports on the
E169 under the following conditions:
- If you connect your smart device by Bluetooth without a USB cable.
- If you choose to not use the USB handset.
Note:
Some smart devices require more charging power than the media station provides. Your
smart device might charge slower than when connected to the smart device AC power
adapter. If the device does not charge well enough when connected to the media station,
you must charge it using the smart device AC power adapter. Smart devices charge more
quickly when using the media station AC adapter than when using only PoE.
You can use the following USB headsets with the E169:
- Jabra 9460 USB Headset
- Jabra 9470 USB Headset
The media station comes with a 100–240 V switching power supply that has localized outlet
connectors.
• USB cables for smart devices
The media station comes with three USB cables that fit many smart devices:
- Apple Lightning cable
- Apple 30–pin cable
- Micro-USB cable
For devices that use a different USB cable, you must provide your own USB cable to charge
your device on the media station. If you do not need to charge your device on the media
station, you can connect to the media station using Bluetooth and not use a USB cable.
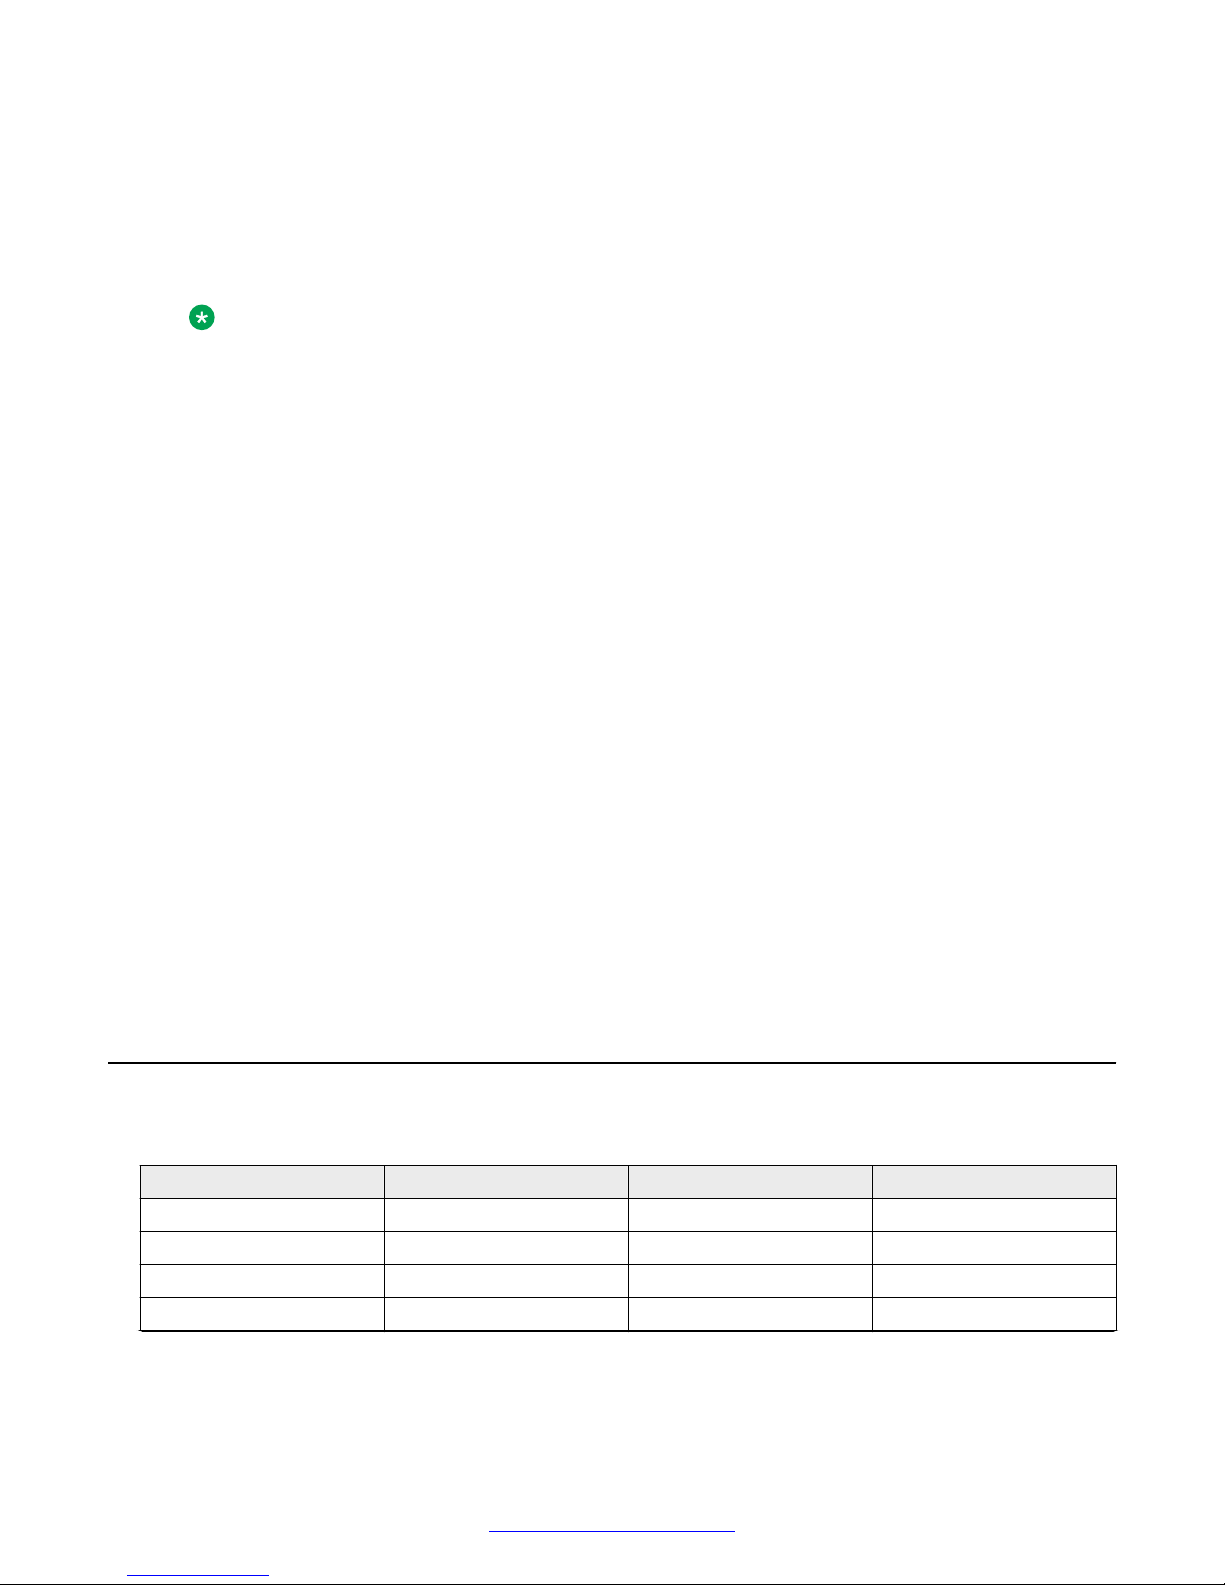
Port matrix
The following table lists the ports used by the media station.
Local Port Destination Port Purpose Transport Protocol
32768-61000 22 SSH TCP
67, 68 66, 67 DHCP UDP
32768-61000 53 DNS UDP
32768-61000 80 HTTP TCP
Table continues…
16 Installing and Maintaining the Avaya E159 and E169 IP Media Stations February 2015
Comments? infodev@avaya.com
Page 17
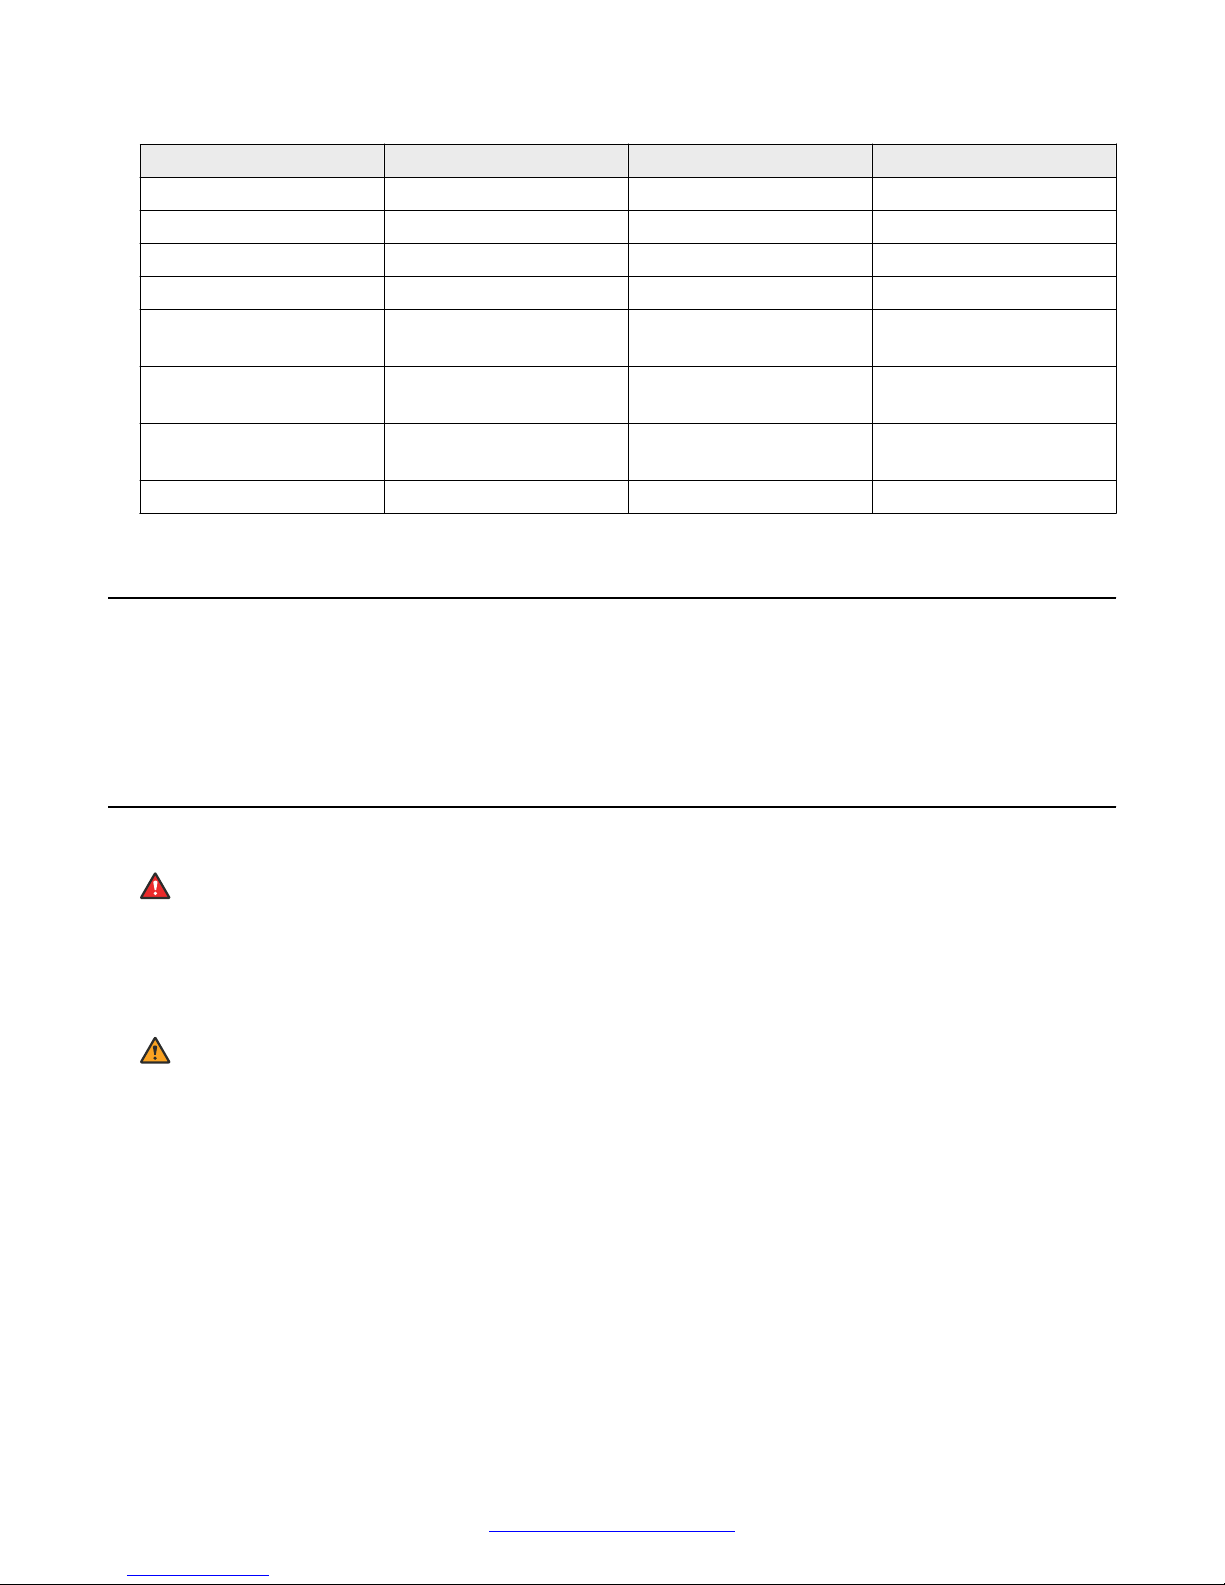
Supported codecs
Local Port Destination Port Purpose Transport Protocol
32768-61000 443 HTTPS TCP
123 123 NTP UDP
32768-61000 161 SNMP UDP
32768-61000 514 Syslog UDP
Variable Configurable, with default
of 5060
Variable Configurable, with default
of 5060
Variable Configurable, with default
of 5061
32768-61000 Variable RTP UDP
SIP Signaling TCP
SIP Signaling UDP
SIP Signaling TLS
Supported codecs
• Narrowband: G.711a–64K, G.711µ–64K, G.729a–8K
• Wideband: G.722–64K
Safety guidelines
Danger:
The E159 handset uses internal magnets to control going off-hook and on-hook. These magnets
can attract small pieces of metal that might cause personal injury if rubbed across your hand or
face while using the handset. Ensure that you keep small pieces of metal away from the
handset.
Warning:
Use the proper AC adapter for your media station. The E169 AC adapter is 12 V and the E159
AC adapter is 5 V. If you use the wrong AC adapter, you will damage the media station.
• Do not open the base, handset, or charger.
• Ensure that no liquid comes into contact with the product.
• Do not expose the device to excessive smoke, dust, mechanical vibration, or shock.
• Use only the cables, adapters, and batteries supplied.
• Put the media station near an accessible electrical outlet.
• Do not expose the device to excessive heat, for example, in direct sunlight or near heating
equipment.
February 2015 Installing and Maintaining the Avaya E159 and E169 IP Media Stations 17
Comments? infodev@avaya.com
Page 18

Chapter 3: Administration
Administration overview
Administration of a media station is similar to that done on the Avaya 9600 series IP deskphones.
The media stations consume upgrade files, settings files, and firmware files hosted on HTTP or
HTTPS Web servers. Both Avaya Aura® and IP Office 9.1 have Web servers that provide this
service automatically.
Supporting documentation
Because the administration of a media station is similar to that done with 9600 series IP
deskphones, use the following documents if you need more details about administering IP
deskphones:
• Administering Avaya one-X® Deskphone SIP for 9620/9620C/9620L/9630/9630G/9640/9640G/
9650/9650C IP deskphones
• Avaya one-X™ Deskphone SIP Installation and Maintenance Guide
• Administering Avaya 9601/9608/9608G/9611G/9621G/9641G IP Deskphones SIP
• Installing and Maintaining Avaya 9601/9608/9608G/9611G/9621G/9641G IP Deskphones SIP
Downloading support files
With the media station product, you can download the following support files from the Avaya support
http://support.avaya.com:
site,
• Upgrade script file template
• Settings file template
• Current firmware update file
Use the template files to set your administration parameters for the media station.
Upgrade script file
When shipped from the factory, the media station might not contain the latest firmware. When you
plug in the media station the first time, it attempts to contact an HTTP file server so that it can
download the latest version of firmware.
Use the upgrade script file to identify the location of the firmware file for doing a firmware update.
When you receive a new version of firmware from Avaya, put the firmware on the HTTP file server
and the media station updates automatically.
In addition to putting the file on the HTTP file server, you can also set the Alternative Provisioning
URL option on the app. The Alternative Provisioning URL directs the app to find the upgrade file at a
different location.
18 Installing and Maintaining the Avaya E159 and E169 IP Media Stations February 2015
Comments? infodev@avaya.com
Page 19

Avaya Aura® administration
You must name the upgrade script file E1x9MSUpgrade.txt.
Settings file
Use the settings file to set the parameters required to administer the media station app. The user
should only have to enter a telephone number and password to open the media station app. The
upgrade script file references the settings file.
See
Upgrade script file on page 24 for more information.
Advanced provisioning options
The media station app supports alternative methods to administer the media station parameters:
• The Alternative Provisioning URL option lets you set an alternate location from where you can
download the settings file.
• The Provisioning Group option lets you set a special provisioning group for a settings file.
Advanced provisioning options on page 31 for more information.
See
Avaya Aura® administration
You can administer media stations to work with Avaya Aura® Release 6.2 FP3 and later.
General requirements
Consider the following requirements when administering the media station on Avaya Aura®:
• Administer SIP lines on Avaya Aura® Communication Manager systems using Avaya Aura
System Manager and the native Communication Manager administration. Administer SIP lines
for the media stations similar to any other SIP lines. If the user is not already using a SIP
deskphone, administer the SIP line as an Avaya 9630 SIP deskphone.
• Administer Multiple Device Access (MDA) for the media station. MDA has limitations with the
media station, but Avaya recommends using MDA. For example, the media station cannot pick
up a call that is active on another MDA device.
• The media station supports up to two line appearances regardless of how many line
appearances are administered for the SIP line.
• The media station supports SIP signaling protocol using TCP or TLS.
• The media station cannot use any feature buttons administered on the SIP line.
• Each media station consumes a basic foundation SIP license seat the same as other SIP
stations. The media station does not require a mobility suite port license.
Limitations
The following scenarios do not support a media station:
• The media station is in an Avaya Aura® centralized branch deployment model.
®
• The user is an Avaya Aura® user gaining features from the core Communication Manager
system.
• The role of IP Office provides survivable telephony features for an Avaya Aura® system.
February 2015 Installing and Maintaining the Avaya E159 and E169 IP Media Stations 19
Comments? infodev@avaya.com
Page 20

Administration
The media stations do not support the LLDP feature.
Document reference
See Administering Avaya 9601/9608/9608G/9611G/9621G/9641G IP Deskphones SIP or
Administering Avaya one-X® Deskphone SIP for 9620/9620C/ 9620L/9630/9630G/9640/9640G/
9650/9650C IP deskphones for more information about administering SIP lines.
Avaya Aura® Session Border Controller and Avaya
Session Border Controller for Enterprise administration
You can administer media stations to work with Avaya Aura® Session Border Controller Release
6.0.x and later and Avaya Session Border Controller for Enterprise Release 6.3 and later.
General requirements
Consider the following when administering the media station on Avaya Aura® Session Border
Controller (SBC) or Avaya Session Border Controller for Enterprise products:
• Administer SIP lines for the media stations similar to any other SIP lines. If the user is not
already using a SIP deskphone, administer the SIP line as an Avaya 9630 SIP deskphone.
• Administer Multiple Device Access (MDA) for the media station. MDA has limitations with the
media station, but Avaya recommends using MDA. For example, the media station cannot pick
up a call that is active on another MDA device.
• The media station supports up to two line appearances regardless of how many line
appearances are administered for the SIP line.
• The media station supports SIP signaling protocol using TCP or TLS.
• Enable the SRTP option when connecting media stations to Avaya Aura® Session Border
Controller or Avaya Session Border Controller for Enterprise.
• The media stations support Avaya Session Border Controller for Enterprise and Remote
Worker.
• The media station cannot use any feature buttons administered on the SIP line.
• Each media station consumes a basic foundation SIP license seat the same as other SIP
stations. The media station does not require a mobility suite port license.
Limitations
The media stations do not support the LLDP feature.
Document reference
See Administering Avaya 9601/9608/9608G/9611G/9621G/9641G IP Deskphones SIP or
Administering Avaya one-X® Deskphone SIP for 9620/9620C/ 9620L/9630/9630G/9640/9640G/
9650/9650C IP deskphones for more information about administering SIP lines.
20 Installing and Maintaining the Avaya E159 and E169 IP Media Stations February 2015
Comments? infodev@avaya.com
Page 21

Avaya IP Office administration
Avaya IP Office administration
You can administer media stations to work with Avaya IP Office Version 9.0.3 and 9.1.
General requirements
Consider the following requirements when administering the media station on IP Office:
• With IP Office Version 9.0.3, must manually create and edit the settings files and upgrade
script file. You must upload these files and the firmware binary file to the IP Office system. You
can store the media station upgrade file, settings file, and firmware upgrade script on the builtin IP Office HTTP server, but not the firmware binary file.
• With IP Office Version 9.1, the system generates the settings files and upgrade script. You can
store the media station upgrade file, settings file, firmware upgrade script, and the binary
firmware file on the built-in IP Office HTTP server.
• When creating an extension for a media station user, select SIP Extension.
• IP Office requires the G.711 codec. The G.722 codec is optional.
• TCP is the recommended SIP signaling protocol. Optionally, you can use UDP.
• IP Office supports Avaya Session Border Controller for Enterprise and Remote Worker.
• Each media station consumes an Avaya IP Endpoints license seat the same as other Avaya
SIP endpoints.
Limitations
Consider the following limitations when administering the media station on IP Office:
• With IP Office Version 9.0.3, you must store the media station binary firmware image on a
separate HTTP server. See the media station release notes for more information.
• The media station does not support TLS or SRTP.
• You must connect the media station using the Avaya IP Endpoints license, not a third-party
Endpoints license.
• Directory information is unavailable from the system.
IP Office does not support media stations in the following scenario:
• The media station is in a centralized branch deployment model.
• The user is an Avaya Aura® user gaining features from the core Communication Manager
system.
• The role of IP Office provides survivable telephony features.
Document reference
See Administering Avaya 9601/9608/9608G/9611G/9621G/9641G IP Deskphones SIP or
Administering Avaya one-X® Deskphone SIP for 9620/9620C/ 9620L/9630/9630G/9640/9640G/
9650/9650C IP deskphones for more information about administering SIP lines.
February 2015 Installing and Maintaining the Avaya E159 and E169 IP Media Stations 21
Comments? infodev@avaya.com
Page 22

Administration
Dialing plan administration
How dialing plans work
The deployment of a dialing plan for SIP calls in an enterprise consists of rules for telephony servers
and rules for endpoints. The combination of the dialing plan rules affects how users make SIP calls
to users within the enterprise and to users outside the enterprise. The dialing plans used for SIP
calls do not apply for calls made on the user’s cellular network.
On an endpoint, the endpoint uses dialing rules that control automatic addition or automatic deletion
of dialed digits based on options set on the endpoint. For example, if a dialed number matches a
specific pattern, the rules add some digits and delete some digits.
As one of several dialing plan methods, Avaya telephony servers often use the E.164 ITU-T
international public telecommunication numbering plan recommendation. E.164 telephone numbers
use the following pattern:
+CountryCode-NationalDestinationCode-SubscriberNumber
For example, the pattern +1-202-5551212 is an E.164 telephone number in the United States.
A telephony server configured to support E.164 ensures that calling the same number reaches the
same destination, regardless from where you make the call. For example, the user should not need
to know the specific prefix digit or international code when making the call from different locations.
You can blend E.164 support with other dialing plan methods such as direct extension calling. The
telephony server identifies an E.164 telephone number, determines that the number is actually a
local enterprise telephone number, and will not apply the dialing rules.
How the media station interacts with the enterprise dialing plan
Similar to any other enterprise endpoint, the telephony server processes calls made from the media
station and might apply the dialing plan rules. This section describes rules and options for the media
station that makes it easier for users to dial calls using the native contacts on smartphones.
Smartphone users create contacts on their devices that work with their cellular network. Users do
not take into account how a telephony server might process those numbers using rules defined on
the telephony server. You must administer the enterprise telephony server so that the user's
contacts work whether the users are dialing over the enterprise network or over the cellular network.
For example, a user might have an international prefix included as part of a contact's telephone
number. You must instruct the user to administer the media station app so that the call routes when
made over the enterprise telephony server or the user's cellular network.
Recommended dialing plan setup
Depending on your local enterprise dialing plan, dialing plans have too many variables to define a
single recommendation that works for all installations and users. Here are several suggestions to
help you administer the enterprise telephony server and media station app so that the dialing plan
works in most scenarios.
Important:
Other configuration schemes and rules are available and the system administrator must decide
how to configure the enterprise telephony server.
22 Installing and Maintaining the Avaya E159 and E169 IP Media Stations February 2015
Comments? infodev@avaya.com
Page 23

Dialing plan administration
For international calls:
• Administer dialing rules the enterprise telephony server to support the E.164 dialing plan. Use
the Avaya Aura® and Avaya IP Office documentation to administer E.164.
• Instruct media station users to adopt the E.164 scheme for their international contacts. The
user might need to manually change some contacts on their smart device.
For domestic in-country calls, administer the enterprise telephony server dialing plan to support
dialing domestic numbers the same way done from a mobile device.
For enterprise premises calls, administer the enterprise telephony server dialing plan so that users
can dial other enterprise users by specifying the extension number only. Using a dialing plan for
local enterprise users allows faster calling to enterprise contacts. Ensure that a user can reach the
endpoint using an associated domestic or E.164 number.
Dialing plan options on the media station
The media station app has three options to define how the media station dials telephone numbers.
Users can dial telephone numbers manually or by using Contacts on a smart device.
Prefix: Defines the digit or digits added to a dialed string. A prefix is commonly used to gain access
to the public switched telephone network. For example, many telephony servers use the digit 9 to
gain access to a public switched network.
Numbering Plan: Defines the country numbering plan used for all calls. The media station app
supports 203 different country numbering plans. The media station app selects the default
numbering plan based on the locale of the smart device.
Converts '+': Defines whether the media station app converts dialed telephone numbers.
• If disabled, the media station app does not convert the telephone number. The telephony
server must manage the dialing plan.
• If enabled, the media station app converts the dialed numbers based on the country numbering
plan and the telephone number entered.
Telephone number conversion examples
The following tables show examples how the telephony server converts telephone numbers using
different conversion techniques. The E.164 rules control the conversions marked E.164. The
Landlines rules are local to certain countries where mobile telephone and landline telephone
numbers have different dial plans.
United States Numbering Plan Examples
Dialed Telephone Number
+33 1 23 45 67 89 E.164 +33123456789
011 33 1 23 45 67 89 E.164 +33123456789
+33 1 23 45 67 89 Landline 01133123456789
011 33 1 23 45 67 89 Landline 01133123456789
312 555 1212 E.164 +13125551212
1 312 555 1212 E.164 +13125551212
555-1212 Not converted 5551212
Conversion Method Transmitted Telephone Number
February 2015 Installing and Maintaining the Avaya E159 and E169 IP Media Stations 23
Table continues…
Comments? infodev@avaya.com
Page 24

Administration
Dialed Telephone Number Conversion Method Transmitted Telephone Number
312 555 1212 Landline 13125551212
1 312 555 1212 Landline 13125551212
555-1212 Not converted 5551212
France Numbering Plan Examples
Dialed Telephone Number Conversion Method Transmitted Telephone Number
+33 1 23 45 67 89 E.164 +33123456789
00 33 1 23 45 67 89 E.164 +33123456789
01 23 45 67 89 E.164 +33123456789
+33 1 23 45 67 89 Landline 0123456789
00 33 1 23 45 67 89 Landline 0123456789
01 23 45 67 89 Landline 0123456789
+1 312 555 1212 E.164 +13125551212
00 1 312 555 1212 E.164 +13125551212
+1 312 555 1212 Landline 0013125551212
00 1 312 555 1212 Landline 0013125551212
Upgrade script file
The upgrade script file uses the settings file to download parameters to the media station. You also
use the upgrade script file to make firmware upgrades available to media station users. Put the
script file on the same server as the settings file.
The media station uses DHCP options 242 and 43 to determine the location of upgrade and settings
files. Option 242 takes priority over option 43, but mixes both options if values differ between option
242 and 43.
For consistency, name the settings files E159settings.txt and E169settings.txt. If you
want a single file, name it E1x9settings.txt.
If you do create separate settings files, you can create “if” clauses in the upgrade script file to select
different settings and firmware files. The following is an example of how you can select a different
settings file and a different firmware file:
IF $MODEL SEQ E169 GOTO E169FW
IF $MODEL SEQ E159 GOTO E159FW
GOTO END
# E169FW
SET APPNAME E169_8_13_0.bin
GET E169settings.txt
GOTO END
# E159FW
24 Installing and Maintaining the Avaya E159 and E169 IP Media Stations February 2015
Comments? infodev@avaya.com
Page 25

Settings file options
SET APPNAME E159_8_13_0.bin
GET E159settings.txt
# END
Upgrade script files follow the same syntax as the Avaya 9600-series IP deskphone script files. For
more information about upgrade script files, see Administering Avaya 9601/9608/9608G/9611G/
9621G/9641G IP Deskphones SIP or Administering Avaya one-X® Deskphone SIP for 9620/9620C/
9620L/9630/9630G/9640/9640G/ 9650/9650C IP deskphones.
Name the upgrade script file E1x9MSUpgrade.txt.
Important:
The firmware update feature is for development purposes only and is not normally used in a
production environment.
Install the upgrade script file on the customer’s HTTP server. The media station parameter DHCP IP
Address identifies the server where it looks for the upgrade script file. The option for this in the
settings file is HTTPSRVR. You can also control this location from the Alternative Provisioning
URL option on the media station app. The APPNAME option in the upgrade script file identifies the
name of the firmware upgrade file. For example, the binary firmware file is named
E169_7_20_19.bin and the app displays 7.20.19–avaya.
The DOCK_FW_INTERVAL parameter in the settings file defines how often the media station
checks for new firmware. When the interval passes, the media station polls the upgrade script file to
download and install new firmware. This only occurs when a user is no longer on an active call. The
installation occurs automatically and the media station reboots in about 90 seconds.
Settings file options
You use a settings file to define and upload administration parameters required by the media
station. The settings file you use is similar to the one you use on Avaya 9600 series and 4600 series
IP deskphones, but you must use a distinct settings file for the media stations. You cannot use the
same settings file you use with other IP deskphones. When a media station uploads the
administration parameters from the settings file, the user only has to enter a telephone number and
password to register the media station app.
The media station uses DHCP options 242 and 43 to determine the location of upgrade and settings
files. Option 242 takes priority over option 43, but mixes both options if values differ between option
242 and 43.
Unlike the 9600 deskphones, when the media station parses a settings file parameter with a value of
none or a default value, the media station does not revert to the default setting if the parameter is no
longer present. A best practice is to include all settings file parameters, not commented, in the
settings file.
February 2015 Installing and Maintaining the Avaya E159 and E169 IP Media Stations 25
Comments? infodev@avaya.com
Page 26

Administration
When administering parameters in the settings file, enter a null parameter as a pair of double
quotation marks. You cannot have a parameter with no value. For example, you must put the null
value in a pair of double quotation marks:
SET L2QVLAN ""
Settings file parameters common with 9600 deskphones
Parameter name Default
Description and value range
value
CONTROLLER_SEARCH_INTERVAL16 The time in seconds that the media station waits to
complete the maintenance check for monitored controllers.
Valid values are 4–3600 seconds.
DNSSRVR 0.0.0.0 Text string containing the IP address of zero or more DNS
servers. Enter the IP addresses, in dotted-decimal format,
separated by commas with no intervening spaces. Valid
values are 0–255 ASCII characters, including commas.
DSCPAUD 46 Differentiated Services Code Point (DSCP) for audio.
Values range from 0–63.
DSCPSIG 34 DSCP for signaling. Values range from 0–63.
HTTPSRVR 0.0.0.0 A list of IP addresses or DNS names of HTTP file servers
used to download upgrade script files, settings files, and
firmware.
L2Q Controls 802.1Q tagging mode:
• 0 = auto
• 1 = on
• 2 = off
L2QVLAN 802.1Q VLAN Identifier. Valid values are 0–4094. Null ("")
is not a valid value and the value cannot contain spaces.
This parameter is preserved in RAM which survives reset
and is stored to flash (as L2QVLAN_INIT) only on
successful registration. This value initializes from
L2QVLAN_INIT after power-up. This value will not initialize
from L2QVLAN_INIT after reset, but can be modified using
the ADDR craft procedure.
LOGSRVR Syslog server IP or DNS address. 0–255 characters: zero
or one IP Addresses in dotted decimal or DNS name
format.
MSGNUM Voice mail system telephone number dialed when the user
presses the Voice Mail button on the media station or
taps the You have a message prompt on the media
station app.
OUTBOUND_SUBSCRIPTION_RE
QUEST_DURATION
26 Installing and Maintaining the Avaya E159 and E169 IP Media Stations February 2015
For Avaya IP Office, the default voice mail system number
is *17.
86400 Number of seconds used in initial SUBSCRIBE messages.
This is the suggested duration value of the deskphone,
Comments? infodev@avaya.com
Page 27

Settings file options
Parameter name Default
Description and value range
value
which might be lowered by the server, depending on the
server configuration. Range is 60–31536000 seconds,
which equals one year. The default value is equal to 1
day. The maximum value represents one year.
PHNEMERGNUM The emergency number dialed when the media station is
unregistered. The number is your local emergency
services number, for example, 911. The user makes an
emergency call by pressing the green Call button on the
E169 handset or the Call/Volume button on the E159.
Important:
Avaya IP Office does not support the
PHNEMERGNUM option and the emergency calling
feature.
RECOVERYREGISTERWAIT 60 Reactive monitoring interval in seconds for failover. Valid
values are 10–36000.
SIP_CONTROLLER_LIST Null The list of SIP proxy or registrar server IP or DNS
addresses. Servers used to address SIP registrations and
signaling, if operating in proxy mode.
The syntax of the option is host[:port]
[;transport=xxx]:
• host is an IP address in dotted decimal format or DNS
name.
• port is the optional port number. If not specified, the
default port value is 5060 for UDP and TCP or 5061 for
TLS.
• transport is the optional transport type, tls, tcp, or
udp. If not specified, the default value is TLS.
The first element of this parameter (if applicable) has the
highest precedence within the parameter. This parameter
can have 0 to 255 characters indicating zero or more IP
addresses in dotted decimal or DNS name format.
Separate IP addresses with commas and no intervening
spaces.
When operating in an Avaya Aura® environment,
SIP_CONTROLLER_LIST is also used to access the
Personal Profile Manager (PPM).
For IP Office, set the option to SET
SIP_CONTROLLER_LIST <IP Office IP Address>:
5060;transport=tcp. These settings assume that the
SIP registrar on the IP Office has TCP enabled. This is the
default and can be checked in the Manager System >
February 2015 Installing and Maintaining the Avaya E159 and E169 IP Media Stations 27
Comments? infodev@avaya.com
Page 28

Administration
Parameter name Default
Description and value range
value
LAN1 > VOIP tab in the SIP Registrar section where it
shows Layer 4 Protocols.
This parameter is the list of Configured Controllers for
failover logic. When this parameter has multiple IP
Addresses, the ordering of the list defines the priority of
the controllers for selection during failover. The first
element of the list is the highest priority. The last element
is the lowest priority.IP Office does not support failover.
For Avaya Aura®, do not change the port through the
CRAFT menu or through System Manager when logged in
to a deskphone. In both cases, the deskphone
reestablishes a link to Session Manager, which can lead to
unpredictable issues. For example, signaling issues where
you can make calls through the deskphone, but cannot
receive calls. To change the port, logout from the
deskphone, then change the port as required and log in to
the deskphone again.
SIPDOMAIN Null SIP domain name for registration. Valid values are 0–255
characters, a string representing the domain name.
For Avaya Aura®, you must use a SIP domain name as
defined with Session Manager. You cannot use an IP
address.
For IP Office, you can use the IP address of the IP Office
server. If the IP Office system is part of a DNS network,
use that network’s domain name.
SNMPADD Null Text string containing zero or more allowable source IP
Addresses for SNMP queries, in dotted decimal or DNS
format. Separate IP addresses with commas, with up to
255 total ASCII characters including commas and no
intervening spaces.
SNMPSTRING Null Text string containing the SNMP community name string.
Range is 0–32 ASCII characters, no spaces.
SYSLOG_MODE disabled Type of messages sent. Valid values: disabled, errors,
event, full.
TCP_KEEP_ALIVE_INTERVAL 10 Time interval in seconds after which TCP keep-alive
packets are retransmitted. The interval is started by the
system TCP stack (when TCP keep-alive is enabled with
specified time intervals). Values are 0–60 seconds.
TCP_KEEP_ALIVE_STATUS 1 Specifies whether the media station sends TCP keep-alive
messages. Values are:
• 0 = TCP keep-alive messages not sent
• 1 = TCP keep-alive messages sent
28 Installing and Maintaining the Avaya E159 and E169 IP Media Stations February 2015
Comments? infodev@avaya.com
Page 29

Settings file options
Parameter name Default
Description and value range
value
TCP_KEEP_ALIVE_TIME 10 The time interval in seconds the media station sends a
TCP keep-alive message. The system TCP stack controls
the time. The timer restarts after application level data (for
example, a SIP message) is sent over the socket. When
the system is idle, this keep-alive time expires and results
in sending a TCP ACK (keep-alive) packet. Valid values
are 0–3600 seconds. A value of 0 disables the timer.
TRUSTCERTS Set a trusted certificate by either using the Connected
Smart Device application or by downloading it through the
settings file. The TRUSTCERTS parameter specifies a list
of names of downloaded files that contain copies of CA
certificates (in PEM format), saved in non-volatile memory,
and used by the media station to authenticate received
identity certificates. The list can contain up to 255
characters. Separate the values with commas without
intervening spaces. If you set a certificate using the smart
device, it concatenates with, but does not replace, the list
of certificates already provisioned.
USE_MEDIA_ENCRYPTION 0 Enables media encryption on the device.
• 0 = Disabled
• 1 = Enabled
Enable USE_MEDIA_ENCRYPTION when you use the
media station on an SBC connection.
Settings file media station parameters
Parameter name
DOCK_ADMIN_MENU_KEY Defines the character sequence to enter in the app dial
DOCK_APP_BUNDLEID avaya Controls which media station app version is appropriate
Default
value
Description and value range
pad to activate the craft administration mode menu. You
cannot enter the sequence using the handset or the
dialpad on the media station. Contact services to get the
key sequence. The sequence cannot end with the #
character.
for the device. You can choose between a GA version or a
trial version.
If the user is using the wrong version, the app notifies the
user of the incompatibility. The user must remove the
current version of the app and reinstall the correct version
of the app.
Valid values are:
February 2015 Installing and Maintaining the Avaya E159 and E169 IP Media Stations 29
• avaya: the GA version of the app
Comments? infodev@avaya.com
Page 30

Administration
Parameter name Default
Description and value range
value
• avaya-cfe: the trial version of the app
DOCK_AUTOMATIC_UNREGISTR
ATION_TIMER
-1 Controls if and when the media station unregisters from
the telephony server. Unregistration occurs when you
disconnect a smart device from a USB or Bluetooth
connection.
• -1: Media station remains registered after the smart
device disconnects
• 0: Media station unregisters immediately after the smart
device disconnects
• 1–720: Media station remains registered for
administered number of minutes after the smart device
disconnects
DOCK_FW_INTERVAL 1440 (24
hours)
Controls how often the media station checks for new
settings, firmware, and trusted certificates. Valid values
are 0–10080 minutes. A setting of 0 means the media
station never checks for updates. The trusted certificate is
downloaded when the interval occurs even if the certificate
is not new.
DOCK_HIDDEN_MENUS Null Controls the Settings menus users see on the media
station app. Valid values are:
• ADVANCED_SIP: Hides the advanced SIP options
• GLOBAL_VOIP: Hides the SIP trunking wizard
• NETWORK: Hides the capability to edit network options
DOCK_MANAGEMENT_SERVER Null Defines an alternate URL to use for upgrading the
firmware without using the APPNAME parameter. The
URL must have the full path to the binary firmware.
DOCK_REVERSE_SSH_SECRET_
SEQUENCE
Null Defines the character sequence to enter on the handset or
base dial pad to activate the reverse SSH feature. The
sequence cannot end with the # character.
DOCK_REVERSE_SSH_SERVER Null Defines a URL for a server where you install the reverse
SSH package.
DOCK_SSH_ALLOWED 0 Enables (1) or disables (0) an inbound SSH connection to
the media station.
DOCK_SSH_CLIENT_ACTIVATION
_CODE
Null Defines the character sequence to enter on the handset or
base dial pad to activate SSH.
DOCK_SSH_IDLE_TIMEOUT 0 The number of minutes that an SSH connection can
remain inactive before the SSH connection ends. Valid
values are 0 (no timeout) and 1 to unlimited number of
minutes.
30 Installing and Maintaining the Avaya E159 and E169 IP Media Stations February 2015
Comments? infodev@avaya.com
Page 31

Advanced provisioning options
Advanced provisioning options
The media station app supports alternative methods to administer the media station parameters:
• Alternative Provisioning URL
• Provisioning Group
Alternative Provisioning URL
The Alternative Provisioning URL is the DNS name or IP address of an HTTP server on the
customer network. This server hosts the upgrade script file, the settings files, and the firmware for
the media station. The Alternative Provisioning URL overrides whatever HTTP server the media
station learns about at boot time from option 242 in DHCP scope. The URL can include directories if
needed.
The path to the Alternative Provisioning URL option depends on the operating system:
• Android: Settings > Avaya Media Station > Advanced Parameters > Alternative
Provisioning URL
• iOS: Settings > Avaya Media Station > Network > Advanced Parameters > Alternative
Provisioning URL
Provisioning Group
The Provisioning Group option allows you to create a special setting to control provisioning options
for a group of one or more media stations. For example, media station users registered on Avaya
Aura® Session Border Controller or Avaya Session Border Controller for Enterprise might need
different options than those connected on Session Manager. The Provisioning Group option allows
you to set different options for each group of users.
For example, you can add an “if” clause in the upgrade script file or settings file to specify a
provisioning group:
IF $GROUP SEQ 973 GOTO GA
For more information about the GROUP parameter, see Administering Avaya 9601/9608/9608G/
9611G/9621G/9641G IP Deskphones SIP or Administering Avaya one-X® Deskphone SIP for
9620/9620C/ 9620L/9630/9630G/9640/9640G/ 9650/9650C IP deskphones.
The path to the Provisioning Group option depends on the operating system:
• Android: Settings > Avaya Media Station > Advanced Parameters > Provisioning Group
• \iOS: Settings > Avaya Media Station > Network > Advanced Parameters > Provisioning
Group
Media station app parameter descriptions
You must administer parameters on a smart device to make a connection with the media station.
The media station app has other optional parameters that control sounds, Bluetooth connections,
and app parameters. The basic account setup parameters are similar whether you are connecting to
an Avaya Aura® Communication Manager system with Avaya Aura® Session Manager or an Avaya
February 2015 Installing and Maintaining the Avaya E159 and E169 IP Media Stations 31
Comments? infodev@avaya.com
Page 32

Administration
IP Office system. Users do not need to administer most parameters. You must determine which
parameters you require for your particular installation.
For media station users, a settings file automatically sets these options. You can have users
manually enter these parameters, but a settings file applies parameters more completely and
accurately. Using a settings file means that user only has to enter a telephone number and
password.
Settings > Account Setup > Add SIP Account
Name Description
Username Enter your telephone number on the telephony server.
Password Enter the password for your telephone number on the telephony server.
For Avaya IP Office, use the Telephony Login Code, not the User
Password option.
Domain Set the Domain parameter using the SIPDOMAIN parameter in the
settings file.
If not administered in the settings file, enter the company’s SIP domain
name administered on Avaya Aura® System Manager, for example,
mycompany.com. This domain name might be different from the
company’s regular DNS domain name.
Advanced Parameters
Name
Voicemail Enter the telephone number for your voice mail system.
MWI Enabled Turn this option on to enable notification of waiting voice mails.
Prefix Defines the digit or digits added to a dialed string. You use a prefix to gain
Numbering Plan Defines the country numbering plan used for all calls. The media station
Converts ‘+’ Defines whether the media station app converts dialed telephone numbers.
Display Name Not used with Avaya servers.
Description
For Avaya IP Office, the default voice mail system number is *17.
Note:
The Voicemail parameter displays under the Advanced Parameters
when you add a new account. After you add a new account, it
displays with Username, Password, and Domain.
access to the public switched telephone network. For example, many
telephony servers use the digit 9 to gain access to a public switched
network.
app supports 203 different country numbering plans. The default plan is the
United States numbering plan.
If disabled, the app does not convert the telephone number. The telephony
server must manage the dialing plan. If enabled, the system converts the
dialed numbers based on the country numbering plan and the telephone
number entered.
32 Installing and Maintaining the Avaya E159 and E169 IP Media Stations February 2015
Comments? infodev@avaya.com
Page 33

Media station app parameter descriptions
Name Description
Auth. Username Not used with Avaya servers.
Proxy Enter the proxy address for the telephony server.
For Session Manager, enter one of the following:
• The IP address of the Session Managersystem on your intranet.
• The IP address of the Session Border Controller when connecting over
the Internet.
For IP Office, enter the IP address or FQDN of the IP Office server.
Note:
When you set the proxy using a settings file, information about the
SIP transport method and port number often display with this option.
You can change those parameters within the Proxy option, but you
can also set them using the SIP Transport and Port options.
Registrar Not used with Avaya servers.
Auto Update NAT Not used with Avaya servers.
DNS SRV Not used with Avaya servers.
RTP Port Start Not used with Avaya servers.
STUN Not used with Avaya servers.
— STUN Server Not used with Avaya servers.
SIP Registration Controls settings for SIP registration. You can leave these at the default
values.
— Registration timeout The default value is 300.
— Session timer The default value is 1800.
— Min Session expiration The default value is 90.
— Auto. Unregistration
The default value is -1.
Timer
SIP Signaling Enables access to SIP signaling options.
— SIP Transport The SIP Transport options are UDP, TCP, or TLS. The telephony server
administrator defines the transport options used for the installation.
— UDP Port, TCP Port, or
TLS Port
SRTP Settings Controls settings for Secure Real-time Transport Protocol (SRTP).
SRTP Enables SRTP.
— Encrypt Audio Defines whether the audio stream is encrypted.
February 2015 Installing and Maintaining the Avaya E159 and E169 IP Media Stations 33
The recommended value is TCP.
You can manually set the port number or let the system automatically
select a port number. The telephony server administrator defines the port
used for the installation.
For Avaya IP Office, the recommended value is 5060.
Enable this option for Session Border Controller.
Comments? infodev@avaya.com
Page 34

Administration
Name Description
For Avaya Aura®, set this option to Mandatory.
— SRTP require secure SIP Defines whether SRTP requires a secure SIP connection.
For Avaya Aura®, set this option to TLS.
Encrypt RTCP Defines whether RTCP is encrypted. For Avaya Aura®, this must be
unchecked to enable SRTP.
TLS Settings Do not change TLS Settings without guidance from Avaya support.
— CA Certificate Do not change TLS Settings without guidance from Avaya support.
— Client Certificate Do not change TLS Settings without guidance from Avaya support.
— Client Private Key Do not change TLS Settings without guidance from Avaya support.
— Verify TLS Server Cert Do not change TLS Settings without guidance from Avaya support.
— Verify TLS Client Cert Do not change TLS Settings without guidance from Avaya support.
QOS Configuration Controls the layer 3 QOS DSCP tag values.
— Signaling The default value is 34.
— Audio The default value is 46.
Settings > Sounds
Name Description
Ringtone type Sets the ring tone for the media station.
Ring Volume Sets the default ringing volume for the media station.
Alerts Volume Sets the default volume for alerts from the media station app.
Music Volume Sets the default volume for music apps.
Hearing Aid Mode Enables special software that is compatible when using the handset with
hearing aids.
Settings > Bluetooth — iOS only
Name
Wireless iAP Set permanently to On.
Hands-Free Profile
A2DP Controls whether you can stream audio from a smart device to the media
Status Shows the current status of Bluetooth pairing between the smart device
Start pairing Enables pairing with your device over Bluetooth. The media station plays
Disconnect Disconnects your Bluetooth pairing. The media station plays the message
Description
station.
Starting with iOS 7.1, turn off A2DP if you do not want to play audio
streams from a smart device to the media station.
and the media station.
the message “Pairing mode: Connecting your device” followed by 2-pitch
tone when connected.
“Pairing mode stopped.”
34 Installing and Maintaining the Avaya E159 and E169 IP Media Stations February 2015
Comments? infodev@avaya.com
Page 35

Media station app parameter descriptions
Settings > Application
Name Description
Recent calls (iOS only) Enables the feature that shows a list of your most recent calls.
Note:
Apple iPads do not display the most recent calls. Android devices
always display the most recent calls.
Version Displays the version of the app.
Settings > Avaya Media Station
Name Description
Firmware Version Displays the current firm ware version.
Firmware Status Displays whether the firmware is up-to-date.
Check Update Allows you to check for and download firmware updates.
Network Displays the DHCP or Static networking information for the media station.
VLAN Allows you to enable VLAN service.
VLAN id
Advanced Parameters
— Alternative Provisioning
URL
— Provisioning Group Allows you to set a special provisioning group for a settings file.
HW Address Displays the mac address of the media station hardware.
Factory Defaults Resets the media station to factory defaults. If you reset the media station,
Allows you to set an alternative location where you can download the
settings file.
you must readminister your options.
Settings > Licenses
Name
Application Displays the license information for the Media Station app.
Avaya Media Station Displays the license information for the Media Station.
February 2015 Installing and Maintaining the Avaya E159 and E169 IP Media Stations 35
Description
Comments? infodev@avaya.com
Page 36

Chapter 4: Initial setup and connectivity
Preparing the media station for installation
Procedure
1. Remove the parts from the shipping box. Confirm that you have all parts shown in the
following table.
E159 Parts
E159 media station base
E159 handset
E159 handset cord
5 V AC adapter and adapter plugs:
• Type A — USA, Canada, Mexico, and Japan
• Type C — Europe, South America, and Asia
• Type G — United Kingdom, Ireland, Malta, Malaysia, and Singapore
• Type I — Australia, New Zealand, China, and Argentina
Table continues…
36 Installing and Maintaining the Avaya E159 and E169 IP Media Stations February 2015
Comments? infodev@avaya.com
Page 37

Preparing the media station for installation
Warning:
Use the proper AC adapter for your media station. The E169 AC
adapter is 12 V and the E159 AC adapter is 5 V. If you use the
wrong AC adapter, you will damage the media station.
Apple Lightning, Apple 30-pin, and generic micro USB cables
(packaged with the docking cradles)
Note:
The Apple 30-pin cable is incompatible with Android devices. You
must provide your own Android 30-pin cable.
E159 cable sleeves for the Apple Lightning, Apple 30-pin, and generic
micro USB cables (packaged with the USB cables)
Note:
Some Android 30-pin cables might not fit in the cable sleeve. In
this case, connect your cable to the back of the media station.
Route the USB cable through the slot in the media station and set
your smart device in the cradle. You can also set your smart
device on your desk instead of setting it in the cradle.
Ethernet cable
E169 Parts
E169 media station base
E169 handset
E169 handset cradle (packaged with the docking cradles and USB
cables)
Table continues…
February 2015 Installing and Maintaining the Avaya E159 and E169 IP Media Stations 37
Comments? infodev@avaya.com
Page 38

Initial setup and connectivity
12 V AC adapter and adapter plugs
• Type A — USA, Canada, Mexico, and Japan
• Type C — Europe, South America, and Asia
• Type G — United Kingdom, Ireland, Malta, Malaysia, and Singapore
• Type I — Australia, New Zealand, China, and Argentina
Warning:
Use the proper AC adapter for your media station. The E169 AC
adapter is 12 V and the E159 AC adapter is 5 V. If you use the
wrong AC adapter, you will damage the media station.
Apple Lightning, Apple 30-pin, and generic micro USB cables
(packaged with the docking cradles and handset cradle)
Note:
The Apple 30-pin cable is incompatible with Android devices. You
must provide your own Android 30-pin cable.
E169 cable sleeves for the Apple Lightning, Apple 30-pin, and generic
micro USB cables (packaged with the USB cables and handset cradle)
Note:
Some Android 30-pin cables might not fit in the cable sleeve. In
this case, connect your cable to the back of the media station and
set your smart device on your desk.
E169 docking cradles for the Apple Lightning, Apple 30-pin, and
generic micro USB cables (packaged with the USB cables and handset
cradle)
E169 tablet bracket
Ethernet cable
2. Remove any transparent protective film or packing materials from the parts.
38 Installing and Maintaining the Avaya E159 and E169 IP Media Stations February 2015
Comments? infodev@avaya.com
Page 39

Media station rear panel connectors and controls
Media station rear panel connectors and controls
Icon Name Description
AC Power Input The connector where you connect the AC power adapter.
USB Connector (2) The connectors where you connect USB devices.
Connectivity
Computer Ethernet
Port
Ethernet Port The connector where you connect the media station to the
Handset The connector where you connect the E159 handset.
Headset The E169 connector where you connect a headset. Not
Power The E169 power button.
The Ethernet connector where you connect a computer.
network.
supported in Release 1.1.
E159 connectivity
Positioning the media station
Procedure
Put the media station near the network socket and AC power socket, if you require the AC power
adapter.
For the best sound quality and microphone performance, avoid putting any objects within 8 inches
or 20 centimeters of the media station. Comply with this requirement on all sides of the media
station, especially the front of the media station.
February 2015 Installing and Maintaining the Avaya E159 and E169 IP Media Stations 39
Comments? infodev@avaya.com
Page 40

Initial setup and connectivity
Connecting the USB cable
Before you begin
Determine the USB cable that your smart device requires:
• Apple Lightning
• Apple 30-pin
• Generic micro USB
Note:
If none of the USB cables provided with the media station fit your smart device, you must use
the USB cable that came with your smart device. You might not be able to use the cable sleeve
or the docking cradle when you use another USB cable.
Procedure
1. If using a smart device that you plan to dock on the media station, insert the cable for your
smart device in the matching cable sleeve.
2. Adjust the depth of the cable in the cable sleeve to best fit your smart device.
40 Installing and Maintaining the Avaya E159 and E169 IP Media Stations February 2015
Comments? infodev@avaya.com
Page 41

Connectivity
3. Slide the rear part of cradle to widen the space for the cable sleeve. Route the USB end of
the cable through the slot, inserting the cable sleeve into the slot.
4. Plug the USB cable into the USB port on the rear of the media station.
February 2015 Installing and Maintaining the Avaya E159 and E169 IP Media Stations 41
Comments? infodev@avaya.com
Page 42

Initial setup and connectivity
Connecting the handset
Procedure
1. Plug one end of the handset cord into the handset.
2. Plug one other end of the handset cord into the RJ11 port under the base.
42 Installing and Maintaining the Avaya E159 and E169 IP Media Stations February 2015
Comments? infodev@avaya.com
Page 43

3. Route the handset cord through the slot on the side of the base.
Connecting to your network
Before you begin
Get a CAT 5 Ethernet cable long enough to reach your Ethernet socket.
Procedure
Connectivity
1. Plug one end of an Ethernet cable into the LAN connector at the back of the media station.
Plug the other end into the Ethernet network socket.
2. Optional. Plug one end of an Ethernet cable into the computer connector at the back of the
media station. Plug the other end into the Ethernet connector on your PC. This connection
provides a convenient way to connect your computer to your network.
You can view network connectivity status using the app under Avaya Media Station >
Network.
February 2015 Installing and Maintaining the Avaya E159 and E169 IP Media Stations 43
Comments? infodev@avaya.com
Page 44

Initial setup and connectivity
Connecting to AC power
About this task
This task is optional if you install the media station on a PoE network switch.
Procedure
1. Install the proper AC adapter plug type onto the AC adapter.
2. Plug the AC power adapter into the AC input connector on the rear of the media station and
into a wall mount socket.
Connecting a smart device
Procedure
1. Route the USB, network, and AC power cables under the media station.
44 Installing and Maintaining the Avaya E159 and E169 IP Media Stations February 2015
Comments? infodev@avaya.com
Page 45

Connectivity
2. Dock the smart device on the media station. Adjust the cradle to hold your smart device
securely.
If the media station app is installed on the smart device, the app opens when you dock the
smart device. Otherwise, the smart device starts charging.
E169 connectivity
Positioning the media station
Procedure
Put the media station near the network socket and AC power socket, if you require the AC power
adapter.
For the best sound quality and microphone performance, avoid putting any objects within 8 inches
or 20 centimeters of the media station. Comply with this requirement on all sides of the media
station, especially the front of the media station.
Connecting a smartphone
Before you begin
Determine the USB cable that your smartphone requires:
• Apple Lightning
• Apple 30-pin
• Generic micro USB
February 2015 Installing and Maintaining the Avaya E159 and E169 IP Media Stations 45
Comments? infodev@avaya.com
Page 46

Initial setup and connectivity
Note:
If none of the USB cables provided with the media station fit your smartphone, you must use the
USB cable that came with your smartphone. You might not be able to use the cable sleeve or
the docking cradle when you use another USB cable.
Procedure
1. If using a smartphone that you plan to dock on the media station, assemble the cable that
your device uses to the required cable sleeve.
• For devices that use an Apple Lightning cable, insert the cable as shown in the figure with
the side that has the raised key on the connector facing up. Slide the connector into the
sleeve. The connector will not slide into the sleeve if you have the raised key facing down.
• For devices that use an Apple 30-pin cable, insert the cable as shown in the figure with
the side that has the raised key on the connector facing up. Slide the connector into the
sleeve. The connector will not slide into the sleeve if you have the raised key facing down.
• For devices that use a micro USB cable, insert the cable as shown in the figure with the
shorter-width side of the connector facing up. Slide the cable into the sleeve.
46 Installing and Maintaining the Avaya E159 and E169 IP Media Stations February 2015
Comments? infodev@avaya.com
Page 47

2. Insert the cable sleeve into the slot from the top of the media station.
Warning:
Ensure that you insert the sleeve as shown in the following diagram. If you insert the
sleeve the wrong way, the sleeve might get stuck in the media station.
Connectivity
February 2015 Installing and Maintaining the Avaya E159 and E169 IP Media Stations 47
Comments? infodev@avaya.com
Page 48

Initial setup and connectivity
3. Route the USB cable under the media station and through the cable channels as shown in
the following diagram.
48 Installing and Maintaining the Avaya E159 and E169 IP Media Stations February 2015
Comments? infodev@avaya.com
Page 49

Connectivity
4. Plug the USB cable into the left USB port on the rear of the media station.
5. Insert the docking cradle into the base that matches the USB cable that you are using. If
your smartphone has a case that does not fit in the cradle, do not install the cradle or take
the case off the smartphone.
February 2015 Installing and Maintaining the Avaya E159 and E169 IP Media Stations 49
Comments? infodev@avaya.com
Page 50

Initial setup and connectivity
6. Plug your smartphone into the media station.
Important:
If your smartphone does not fit on the media station docking cradle, use the USB cable
that came with your smartphone. Plug your smartphone into the USB port on the rear of
the media station.
Connecting a tablet
Before you begin
Get the USB cable that came with your tablet.
About this task
Caution:
While connecting and installing your tablet, maintain a firm grip so that the tablet does not
accidentally fall off the tablet bracket. When the tablet is on the bracket, the tablet is secure
enough for normal use.
Tip:
To remove the tablet bracket, ensure that the power button is in the on position .
50 Installing and Maintaining the Avaya E159 and E169 IP Media Stations February 2015
Comments? infodev@avaya.com
Page 51

Procedure
1. Install the tablet bracket by gently rotating the bracket into position until you feel the bracket
snap into position.
Important:
If you cannot push the power button or the bracket is not slanted, you did not install the
bracket in the correct position. When removing the tablet bracket, grasp the bracket from
the corners and gently rotate the bracket up and away from the media station. If you try
to pull the tablet bracket straight out, you might damage the bracket.
Connectivity
2. Perform one of the following actions:
• To install a tablet in a position where the USB cable power connector is pointing down into
the bracket, route the USB cable through the tablet bracket and set the tablet on the
bracket.
• To install a tablet in a position where the USB power connector is not pointing down into
the bracket, connect the USB cable of the device to the tablet and set the tablet in position
on the bracket. This position is also useful if you plan to hold the tablet by hand on
occasion.
February 2015 Installing and Maintaining the Avaya E159 and E169 IP Media Stations 51
Comments? infodev@avaya.com
Page 52

Initial setup and connectivity
3. Plug the USB cable into the left USB port on the rear of the media station.
Connecting the handset
Procedure
1. Plug the handset cable into the right USB port on the rear of the media station. Route the
cable through the channels under the media station.
2. Put the handset cradle on top of the media station. Put the handset in the handset cradle.
Position the cradle so that the magnets secure the holder on the media station.
Note:
If more convenient for you, you can put the handset cradle and handset on any location
on your desk. Regardless of placement, the handset must rest in the handset cradle.
52 Installing and Maintaining the Avaya E159 and E169 IP Media Stations February 2015
Comments? infodev@avaya.com
Page 53

Important:
For the media station to recognize whether the handset is either on-hook or off-hook,
you must use the handset cradle. If you misplace the handset cradle, you cannot use the
handset and you must disconnect the handset until you get a new cradle. Contact Avaya
support personnel to order a replacement cradle.
Connecting to your network
Before you begin
Get a CAT 5 Ethernet cable long enough to reach your Ethernet socket.
Connectivity
Procedure
1. Plug one end of an Ethernet cable into the LAN connector at the back of the media station.
Plug the other end into the Ethernet network socket.
2. Optional. Plug one end of an Ethernet cable into the computer connector at the back of the
media station. Plug the other end into the Ethernet connector on your PC. This connection
provides a convenient way to connect your computer to your network.
You can view network connectivity status using the app under Avaya Media Station >
Network.
February 2015 Installing and Maintaining the Avaya E159 and E169 IP Media Stations 53
Comments? infodev@avaya.com
Page 54

Initial setup and connectivity
Connecting to AC power
About this task
This task is optional if you install the media station on a PoE network switch.
Procedure
1. Install the proper AC adapter plug type onto the AC adapter.
2. Plug the AC power adapter into the AC input connector on the rear of the media station and
into a wall mount socket.
Setting up the media station app
Downloading the media station app
You must download and install the media station app to fully support SIP line functionality on the
media station. Other telephony applications can only use the media station as a Bluetooth
speakerphone and cannot use the SIP capabilities of the Avaya telephony server.
To learn more about the app, go to the following websites:
• Apple App Store
• Google Play Store
Procedure
1. From your smart device, navigate to the Apple App Store or the Google Play Store.
2. Search for avaya.
3. Select the Avaya Media Station app.
4. Tap FREE.
The icon changes to INSTALL.
5. Tap INSTALL.
54 Installing and Maintaining the Avaya E159 and E169 IP Media Stations February 2015
Comments? infodev@avaya.com
Page 55

Setting up the media station app
The media station app downloads and installs on your smart device.
Connecting smart devices with Bluetooth pairing
About this task
You must pair the smart device with the media station to create a logical connection with the media
station app and the media station. If you do not make a logical pairing using Bluetooth, you must
physically connect the smart device to the media station with a USB cable. See
media station to a smart device as a USB accessory on page 56 for more information.
Connecting a smart device to the media station with Bluetooth is a one-time procedure. After pairing
the first time, future connections happen automatically until you permanently remove the connection.
When you enable Bluetooth on the smart device, a connection occurs when the smart device is
within range of the media station.
Important:
You can connect only one device at a time using Bluetooth.
Before you begin
Connecting the
Download and install the media station app as described in Downloading the media station app on
page 54.
Procedure
1. For an iOS device, perform the following steps:
a. Enable Bluetooth on your smart device.
b. Connect your device to the media station using either the dock on top of the media
station or a USB cable.
The media station beeps, plays the message “Pairing mode: connecting your device,”
and the media station app opens. You hear a beep and the Bluetooth icon on the smart
device shows an active connection.
2. On an Android device, perform the following steps:
a. Put the media station into pairing mode by pressing and holding the Call/Volume button
on the media station until you hear a single click.
After you release the button, the media station plays the message “Pairing mode:
waiting for connection.”
b. Enable Bluetooth on your smart device.
The smart device starts searching for the media station.
c. When the smart device detects and displays the media station, tap the media station
displayed on the smart device to initiate the pairing.
You hear a beep and the Bluetooth icon on the smart device shows an active
connection.
February 2015 Installing and Maintaining the Avaya E159 and E169 IP Media Stations 55
Comments? infodev@avaya.com
Page 56

Initial setup and connectivity
Connecting the media station to a smart device as a USB
accessory
About this task
Connecting the media station to a smart device as a USB accessory is a one-time procedure. On
Android devices, you must administer options on the smart device to remember the media station.
After connecting the first time, future connections happen automatically until you permanently
remove the connection.
If you do not also pair the smart device using Bluetooth, you might lose the connection when you
unplug the smart device from the media station.
Important:
You can connect only one device at a time using USB.
Before you begin
Download and install the media station app as described in Downloading the media station app on
page 54.
Procedure
1. On an iOS device, connect your device to the media station using either the dock on top of
the media station or a USB cable.
The media station app opens.
2. On an Android device, perform the following steps:
a. Connect your device to the media station using either the dock on top of the media
station or a USB cable.
The smart device displays a dialog box asking if you want to remember the media
station as a USB accessory.
b. Tap the check box to remember the media station and tap OK.
The smart device displays a dialog box asking if you want to open the media station app
when connected to the media station.
c. Tap the check box to always open the media station app and tap OK.
The media station app opens.
Registering the media station app and signing in the first time
To make the app work with the media station, you must enter your credentials in the app to register
with the media station. After you sign in the first time, subsequent use of the app only requires that
you pair the device using Bluetooth. If you manually sign out from the app, you must manually sign
in the next time you register the app with the media station.
56 Installing and Maintaining the Avaya E159 and E169 IP Media Stations February 2015
Comments? infodev@avaya.com
Page 57

Setting up the media station app
Procedure
1. Open the media station app.
2. Tap Settings > Account Setup > Add SIP Account.
3. Enter the following user credentials as provided to you by your system administrator:
• Username
• Password
• Domain, if requested
4. After entering the user credentials, tap Sign In.
The smart device displays the Settings screen.
5. Tap the smart device Home button.
If sign in is successful, the app displays a green check mark. On some devices, the app also
displays your telephone number and the status message Available. For devices that only
show a green check mark, you can tap the check mark to display the account telephone
number.
Important:
Before you make calls using the media station, ensure that the media station app is
registered with the telephony server. The green check mark indicates that the media
station app is registered.
Media station registration
When you sign in with the media station app, the media station remains logged on until one of the
following happens:
• You sign out of the media station app and the media station unregistration timer expires, if
administered.
Important:
Even if you sign out of the media station app, the media station continues to ring on
incoming mobile cellular calls. The media station is also the default Bluetooth audio device
for the smart device if the Bluetooth connection is active.
• Another Avaya app on the same smart device registers using the same extension.
• You turn off the media station.
When the system administrator does not administer automatic unregistration, the media station
remains logged on even under the following conditions:
• The smart device is no longer docked with the media station.
• You turn off the smart device.
• The smart device is not within Bluetooth range of the media station.
February 2015 Installing and Maintaining the Avaya E159 and E169 IP Media Stations 57
Comments? infodev@avaya.com
Page 58

Initial setup and connectivity
When the system administrator does administer automatic unregistration, you can temporarily sign
out and disconnect the app from your media station. The smart device saves your options and you
can sign back in at anytime.
Important:
When you sign out of the app, you cannot dial any calls using the media station. To make a call
to an emergency number such as 911, you must press the green Call button on the E159 USB
handset or the Call/Volume button on the E159 media station. Pressing the button
automatically dials the number administered with the PHNEMERGNUM option in the settings
file. You can also make emergency calls using the cellular service on your smartphone.
Important:
Avaya IP Office does not support the PHNEMERGNUM option and the emergency calling
feature.
58 Installing and Maintaining the Avaya E159 and E169 IP Media Stations February 2015
Comments? infodev@avaya.com
Page 59

Chapter 5: Maintenance
Updating the media station app
Avaya releases regular updates to the media station app. Update the media station app when
prompted by your smart device.
About this task
Depending on your smart device, some apps update automatically. Some smart devices require you
to manually install the update. If your smart device automatically updates your apps, you do not
need to perform any action. If you must manually update your apps, follow this procedure.
Procedure
1. From your smart device, navigate to the Apple App store or the Google Play store.
2. Search for avaya.
3. Select the Avaya Media Station app.
4. Tap UPDATE.
The icon changes to INSTALL.
5. Tap INSTALL.
The media station app downloads and installs on your smart device.
Updating the media station firmware
Avaya releases regular updates to the media station firmware. The customer’s system administrator
downloads the firmware from the Avaya support site. If the administrator decides to release the new
firmware to users, the system administratior puts the firmware on the HTTP file server. The
administrator can also control release of the new firmware by using the GROUP settings file
parameter.
The media station checks for new firmware regularly. By default, the media station checks for new
firmware every 24 hours. You do not have to manually check for updates, but you can use this
procedure to check for updates. If an update is available, the app automatically downloads and
installs the update.
February 2015 Installing and Maintaining the Avaya E159 and E169 IP Media Stations 59
Comments? infodev@avaya.com
Page 60

Maintenance
Before you begin
Disconnect from any active calls before you update the media station firmware.
Procedure
1. Open the media station app.
2. Tap Settings > Avaya Media Station.
The app displays the media station options.
3. Under FIRMWARE, tap Check Update.
The media station app checks for an update. If an update exists, the app downloads and
installs the new firmware to the media station. During the download and update, the
Settings icon changes to a spinning circle and the app displays a progress bar.
Removing and replacing a cable sleeve
Use this procedure to remove and replace a cable sleeve when you change the smartphone you are
using.
Before you begin
Disconnect your smartphone from the media station, turn off the media station, and disconnect all
cables from the media station.
Procedure
1. Turn the media station upsidedown.
2. Bend the cable sleeve latch to release the cable sleeve from the media station base.
3. Push the cable sleeve out of the media station base.
4. Replace the cable sleeve and USB cable.
60 Installing and Maintaining the Avaya E159 and E169 IP Media Stations February 2015
Comments? infodev@avaya.com
Page 61

Chapter 6: Troubleshooting
Frequently Asked Questions
In which direction must I put the cable sleeve in the slot?
To correctly attach your smartphone, you must insert the cable sleeve in the slot in the proper
direction. Insert the cable sleeve with the cable sleeve latch facing the back of the media station.
See the following diagram.
How do I reverse a cable sleeve if I inserted the sleeve the wrong way?
From the bottom of the media station, bend the cable sleeve latch and push the cable sleeve out of
the media station. You might need to use a tool such as needle-nose pliers to push the cable sleeve
out of the media station. Guide the cable sleeve out of the media station from the top of the media
station. When the cable sleeve is out of the media station, turn the sleeve around 180° and reinsert
the cable sleeve the proper way.
What smart devices are compatible with the media station?
Product compatibility on page 13.
See
February 2015 Installing and Maintaining the Avaya E159 and E169 IP Media Stations 61
Comments? infodev@avaya.com
Page 62

Troubleshooting
Does the media station operate over a wireless Internet connection?
No, the media station does not support wireless Internet connections.
How can I find my SIP user name and password?
Contact your Avaya telephony server administrator.
How do I make a Bluetooth connection?
See Connecting smart devices with Bluetooth pairing on page 55.
I lost one of my cable sleeves. How can I get a replacement?
Contact your system administrator. Your system administrator can order a replacement accessory
kit. Use order code 700508212 for the E159 and 700508211 for the E169.
Can I receive a SIP call on my smartphone as if it came from the cellular network?
No, this operation is not possible.
Can I use the # character in my dialing string?
Yes, you can use the octothorpe (#) character as part of the dial string using the dialpad or in a
stored number. The octothorpe character does not signify the end of the dial string to initiate the call.
Can I transfer a SIP call on the media station to my mobile smartphone to continue
the call?
No, this operation is not possible.
Can I hang up on a conference call and let the other two parties remain on the call?
No. When the user who initiated the conference call ends the call, the other two parties are dropped
from the call.
Can I manually transfer a cellular call on my mobile smartphone to the media station
to continue the call?
No, this operation is not possible. However, if you are on a cellular call and you become within
Bluetooth range of the media station, the audio automatically transfers from your call to the media
station.
Why do I hear a busy tone before hanging up on a call?
If the person on the other end of call hangs up before you hang up, the hang up signal causes the
busy tone to sound for a brief moment. This is normal operation with the media station.
What can I do with the computer Ethernet port?
The computer Ethernet port provides a switched Ethernet connection for your computer.
Can I listen to music that is on my smart device over the media station
speakerphone?
Yes. Use the audio streaming features of your smart device.
Can I connect the media station to the PC port on my 96x1 IP deskphone?
No, the PC port on a 96x1 IP deskphone does not provide a dedicated Ethernet connection. The
media station requires a provisioned network connection using a physical Ethernet jack.
62 Installing and Maintaining the Avaya E159 and E169 IP Media Stations February 2015
Comments? infodev@avaya.com
Page 63

Removing Bluetooth connections and subscriptions
Can I pick up an active call on another Multiple Device Access (MDA) device from the
media station?
No, this operation is not possible.
Will the media station app interfere with other Avaya telephone apps?
Remember the following product interactions when using the media station app with Avaya apps
such as Avaya one-X® Mobile and Avaya Communicator:
• Avaya one-X® Mobile and Avaya Communicator do not have native support for managing the
media station. The apps can use the media station as a Bluetooth speakerphone.
• In the speakerphone mode, the media station operates as any other Bluetooth speakerphone.
• The calls are not handled over the SIP line, but the wireless carrier of the smartphone.
• Got Audio quality might be poorer because the call is not routed over the SIP line.
Removing Bluetooth connections and subscriptions
About this task
You can remove a Bluetooth connection in either of the following ways:
• Using the media station app (iOS only)
• Using the media station Call/Volume button
You can remove a Bluetooth subscription in either of the following ways:
• Using the media station Call/Volume button
• Using the smart device Settings menu.
If you are having problems getting a smart device to connect with the media station, remove the
connection before trying to connect again.
Depending on how you remove the Bluetooth connection, you might have to use your smart device
Bluetooth menu to disconnect the media station.
Procedure
Removing connections
1. Using the media station app (iOS only), perform the following actions:
a. Select Settings > Bluetooth.
b. Confirm that the status shows paired.
c. Tap Disconnect.
The system removes the Bluetooth connection.
February 2015 Installing and Maintaining the Avaya E159 and E169 IP Media Stations 63
Comments? infodev@avaya.com
Page 64

Troubleshooting
2. Using the media station Call/Volume button, press and hold the Call/Volume button until
you hear two clicks.
The media station plays the message “Disconnecting,” followed by a high-to-low tone sound.
Removing subscriptions
3. Using the media station Call/Volume button, press and hold the Call/Volume button until
you hear three clicks.
The media station plays the message “Clearing all subscriptions.”
4. Using the smart device, perform the following actions:
a. Select Settings > Bluetooth.
b. Tap the Info icon.
c. Tap Forget this Device.
Note:
If you remove the connection using the media station app menu, you must
disconnect and reconnect the cable because the pairing does not happen
automatically. You must go to Settings > Bluetooth and tap Start Pairing.
The system removes the Bluetooth subscription.
Reverting the media station to the previous version of
firmware
About this task
Use this task to revert the media station to the previous version of firmware. Do this only when
directed by support personnel to troubleshoot problems with the media station.
Procedure
1. Turn off the media station.
2. Press and hold the Call/Volume button.
3. Turn on the media station.
4. When the Mute icon flashes, release the Call/Volume button.
5. Turn the Call/Volume button about three clicks to the right.
Verify that the Mute icon is flashing one time for every three flashes of the Voice Mail icon.
6. If the Voice Mail icon is not flashing three times, turn the Call/Volume button to the right or
left until the Voice Mail icon flashes three times for every one time that the Mute icon
flashes.
7. Push the Call/Volume button one time.
64 Installing and Maintaining the Avaya E159 and E169 IP Media Stations February 2015
Comments? infodev@avaya.com
Page 65

Resetting the media station to factory defaults
The media station restarts with the previous version of firmware.
Resetting the media station to factory defaults
About this task
Use this task to reset the media station to the factory defaults. Do this only when directed by support
personnel to troubleshoot problems with the media station.
To reset the media station to factory defaults, you can perform one of the following procedures:
• Use an option on the media station app. Try this method first.
• Perform a series of button pushes on the media station hardware. Use this method only if the
media station app is not working or cannot reset the media station.
Caution:
When you reset the media station to factory defaults, you lose all your SIP account settings.
You must readminister your account settings after the media station resets.
Procedure
1. Perform the following actions to reset your media station using the media station app:
a. Open Settings > Avaya Media Station.
b. Tap Factory Defaults.
The app displays a message asking whether you want to restore your media station to
factory defaults.
c. Tap Yes to start the reset. Tap No to cancel the reset.
2. Perform the following actions to reset your media station using button pushes on the media
station:
a. Turn off the media station or remove power by unplugging the AC adapter.
b. Press and hold the Call/Volume button.
c. Turn on the media station or plug in the AC adapter.
d. When the Mute icon flashes or the display shows System Check, release the Call/
Volume button.
e. Turn the Call/Volume button about one click to the right.
Do one of the following actions:
• On the E159, confirm that the display shows Factory Reset.
• On the E169, verify that the Mute and Voice Mail icons are flashing one time each. If
the Voice Mail icon is flashing more than once, turn the Call/Volume button counter
to the right or left until you see the Voice Mail icon flash one time.
f. Push the Call/Volume button one time.
February 2015 Installing and Maintaining the Avaya E159 and E169 IP Media Stations 65
Comments? infodev@avaya.com
Page 66

Troubleshooting
Next steps
The media station resets to factory defaults.
Readminister your account settings as described in
the first time on page 56.
Registering the media station app and signing in
Media station app freezes when docking and undocking a
smart device
Condition
While on an active call, or when idle and displaying the media station app, the media station app
display freezes when you dock or undock the smart device.
Solution
After finishing your active call, perform one of the following solutions:
• Stop and restart the media station app.
• Reboot the smart device and restart the media station app.
The media station app displays the Not Connected
(Network) message
Error code
Problem description
The media station is disconnected from the network.
Related Links
Resolving a Not Connected (Network) message on page 66
Resolving a Not Connected (Network) message
Procedure
1. Restart your smart device.
2. Turn the media station power off and on.
3. If the condition persists, open the media station app.
4. Open Settings > Avaya Media Station > Network.
Not Connected (Network)
66 Installing and Maintaining the Avaya E159 and E169 IP Media Stations February 2015
Comments? infodev@avaya.com
Page 67

The media station app displays the Not Connected (Network) message
5. Confirm that the media station has an IP address. If the app does not display an IP address,
you might have to reset the media station to factory defaults. Contact your system
administrator for support.
Related Links
The media station app displays the Not Connected (Network) message on page 66
February 2015 Installing and Maintaining the Avaya E159 and E169 IP Media Stations 67
Comments? infodev@avaya.com
Page 68

Index
A
AC power ............................................................................. 15
administration ................................................................
administration overview ....................................................... 18
alternative provisioning URL ................................................31
Android Beta program ..........................................................13
Avaya Aura administration ...................................................19
19–21
B
Bluetooth pairing ..................................................................55
button descriptions ...............................................................39
C
codecs ................................................................................. 17
compatibility ......................................................................... 13
connecting
tablet .............................................................................50
connecting power to the media station .......................... 44, 54
connecting smart devices .............................................. 55, 56
connecting the handset ..................................................42, 52
connecting the media station ................................... 40, 44, 45
connecting your network to the media station ............... 43, 53
connectivity ..........................................................................
15
headset compatibility ...........................................................
headset connections ............................................................15
13
I
InSite Knowledge Base ..........................................................8
interoperability .....................................................................
IP Office administration ........................................................21
13
L
line protocol ......................................................................... 15
M
Made for Apple program ...................................................... 13
media station, connecting ........................................ 40, 44, 45
media station, connecting power ...................................
media station, connecting to your network .................... 43, 53
media station, preparing ...................................................... 36
media station app freezes ....................................................66
media station buttons ...........................................................
media station overview ........................................................ 10
44, 54
39
N
D
dialing plan ...........................................................................
dimensions ...........................................................................
documentation ....................................................................... 6
document changes ................................................................ 6
downloading apps ................................................................54
22
15
E
emergency calling ................................................................57
environmental specifications ................................................15
Ethernet connections ...........................................................
15
F
factory defaults ....................................................................
FAQs ....................................................................................
features ................................................................................10
65
61
H
handset, connecting .......................................................
hardware supply ..................................................................
42, 52
17
narrowband ..........................................................................17
Not Connected (Network) .................................................... 66
Not Connected (Network) message .....................................66
O
operating temperature ......................................................... 17
P
parameter definitions ........................................................... 31
port matrix ............................................................................16
positioning media station ............................................... 39, 45
preparing the media station ................................................. 36
previous version of firmware ................................................64
provisioning group ...............................................................
31
R
rear panel connectors ..........................................................
rear panel controls ...............................................................
registering a device ..............................................................56
registration ........................................................................... 57
remove cable sleeve ............................................................60
removing Bluetooth connection ........................................... 63
39
39
68 Installing and Maintaining the Avaya E159 and E169 IP Media Stations February 2015
Comments? infodev@avaya.com
Page 69

replace cable sleeve ............................................................ 60
resetting the media station ...................................................65
reverting the media station .................................................. 64
S
safety guidelines .................................................................. 17
Session Border Controller administration ............................ 20
setting registration parameters ............................................ 56
settings file ...........................................................................
signing in ..............................................................................57
signing out ........................................................................... 57
specifications .......................................................................
storage guidelines ................................................................17
support ...................................................................................8
25
15
T
tablet, connecting .................................................................50
temperature, operating and storage .................................... 17
U
Index
updating
media station app ......................................................... 59
media station firmware ................................................. 59
upgrade script file ................................................................ 24
USB accessory .................................................................... 56
USB connections ................................................................. 15
V
videos .................................................................................... 8
W
weight .................................................................................. 15
wideband ............................................................................. 17
February 2015 Installing and Maintaining the Avaya E159 and E169 IP Media Stations 69
Comments? infodev@avaya.com
 Loading...