

Page 1

Business Communications Manager
Data Migration Manager
User Guide
Document Revision Number: 01.00
Document Status: Issue
Issue Date: 10-11-2009
© 2009 Nortel
All rights reserved.
Page 2

Data Migration Manager
Table of Contents
TABLE OF CONTENTS ..........................................................................................................................................................2
LIST OF FIGURES...................................................................................................................................................................4
LIST OF TABLES.....................................................................................................................................................................5
1.0 DOCUMENT INFORMATION.........................................................................................................................................6
1.1 REVISIONS ......................................................................................................................................................................... 6
1.2 ORGANIZATION..................................................................................................................................................................6
2.0 DATA MIGRATION MANAGER OVERVIEW ............................................................................................................. 7
2.1 INTRODUCTION ..................................................................................................................................................................7
2.2 WHAT IS DMM?................................................................................................................................................................7
2.3 THE DMM MIGRATION PROCEDURE ................................................................................................................................. 8
3.0 DMM REQUIREMENTS AND INSTALLATION.......................................................................................................... 9
3.1 SYSTEM REQUIREMENTS.................................................................................................................................................... 9
3.2 OBTAINING DMM..............................................................................................................................................................9
3.3 INTERIM INSTALLATION PROCEDURE DURING TRIALS ...................................................................................................... 10
4.0 PRE-DMM SYSTEM PREPARATION/EXAMINATION ...........................................................................................11
4.1 COMPATIBILITY DETERMINATION.................................................................................................................................... 11
4.2 PREPARING THE SOURCE ..................................................................................................................................................11
4.2.1 S/W Version............................................................................................................................................................. 11
4.2.2 Source System Not In Use and Off-line ...................................................................................................................11
4.2.3 Physical System Organization................................................................................................................................. 11
4.3 PREPARING THE TARGET................................................................................................................................................... 12
4.3.1 S/W Version............................................................................................................................................................. 12
4.3.2 Target System Not In Use and Off-line....................................................................................................................12
4.3.3 IP Address (where applicable)................................................................................................................................ 12
4.3.4 Keycodes..................................................................................................................................................................12
5.0 USING DMM – DETAILED WALKTHROUGH ..........................................................................................................13
5.1 STARTING DMM.............................................................................................................................................................. 13
5.2 EXTRACTING DATA FROM A SOURCE SYSTEM.................................................................................................................. 13
5.2.1 Saving the Extract Report [optional] ......................................................................................................................15
5.2.2 Saving Extracted DMM Data [optional].................................................................................................................15
5.2.3 Retrieving Saved DMM Data ..................................................................................................................................16
5.3 PREPARING TO APPLY DATA TO A TARGET SYSTEM ......................................................................................................... 18
5.3.1 The Data Preparation Wizard.................................................................................................................................19
5.3.1.1 Source and Target Hardware Configuration Considerations............................................................................................... 23
5.4 APPLY DATA TO TARGET ..................................................................................................................................................26
6.0 USING DMM – 5 STEP QUICKSTART......................................................................................................................... 28
7.0 DMM EXCEPTIONS OR LIMITATIONS..................................................................................................................... 29
7.1 BCM 4.0 (200/400) TO BCM 5.0 (450 CHASSIS).............................................................................................................. 29
Document Status: Issue Business Communications Manager Revision: 01.00
Data Migration Manager Page 2 of 36
Page 3

Data Migration Manager
7.1.1 IP Sets Must be Re-registered to DNs on the Target............................................................................................... 29
7.1.2 Line Numbers on CTM8/GATM8/8x16 MBMs Will Change...................................................................................29
7.1.3 Some Programming Migration May Fail if “Hardware-Less” DNs are Referenced..............................................29
7.1.4 Call Forward All Calls Programming Not Migrated.............................................................................................. 29
7.1.5 Doorphone Programming Not Migrated................................................................................................................. 29
7.1.6 Internal CAP Assignment Not Migrated.................................................................................................................. 29
7.1.7 MBMs may Stop Functioning on Source After Extract............................................................................................30
7.1.8 Voice Mail Messages Not Migrated if Keycode(s) Not Present ..............................................................................30
7.1.9 Default VM Password on the Source May Change ................................................................................................. 30
7.1.10 Log Management and Backup Schedule Not Migrated .........................................................................................30
7.1.11 VM Mailbox Passwords on Target Set to Default ................................................................................................. 30
7.1.12 Only Mailbox Prompts and Recorded Name Migrated .........................................................................................30
7.1.13 Call Centre Agent Passwords on Target Set to Default ........................................................................................30
7.1.14 Fax Custom Cover Page Not Migrated ................................................................................................................. 30
7.1.15 Contact Center Reporting Server Password Not Migrated ................................................................................... 30
7.1.16 IVR Configuration and Applications Not Migrated...............................................................................................31
7.1.17 Starting CCR Feature Code Can Not Be 900........................................................................................................ 31
7.1.18 Obsolete Data Services Configuration Data Not Migrated...................................................................................31
7.1.19 All User Account Passwords on Target Reset to System Default (PlsChgMe!) ....................................................31
8.0 DMM SUPPORT ...............................................................................................................................................................32
8.1 THE DMM FORUM...........................................................................................................................................................32
8.2 REPORTING A PROBLEM................................................................................................................................................... 32
9.0 GLOSSARY .......................................................................................................................................................................34
APPENDIX A - SYSTEM REQUIREMENTS AND COMPATIBILITY.......................................................................... 35
A.1 MINIMUM SOFTWARE VERSIONS ....................................................................................................................................35
A.2 BCM 4.0 TO BCM 5.0 HARDWARE CONFIGURATION COMPATIBILITY ........................................................................... 35
A.3 BCM 4.0 TO BCM 5.0 CAPACITY COMPATIBILITY .........................................................................................................36
Document Status: Issue Business Communications Manager Revision: 01.00
Data Migration Manager 3 of 36
Page 4

Data Migration Manager
List of Figures
Figure 1 - Depiction of a DMM Extract from a BCM 400 source .......................................................................................8
Figure 2 - The DMM Data Preparation Windows ................................................................................................................8
Figure 3 - Depiction of a DMM Apply to a BCM 450 (4 MBM) target...............................................................................8
Figure 4 - The BCM Application Launcher - DMM ...........................................................................................................9
Figure 5 - DMM installation folder ....................................................................................................................................10
Figure 6 - Example H/W Configuration on a BCM 4.0......................................................................................................11
Figure 7 - DMM Keycode Conflict Report ........................................................................................................................12
Figure 8 - DMM Home Window ........................................................................................................................................13
Figure 9 - DMM Select System Type.................................................................................................................................13
Figure 10 - DMM Select Component Data to Extract .....................................................................................................13
Figure 11 - DMM Specify source Location.....................................................................................................................14
Figure 12 - DMM Extraction Process 1...........................................................................................................................14
Figure 13 - DMM Extraction Process 2...........................................................................................................................14
Figure 14 - DMM Extraction Completion Report............................................................................................................15
Figure 15 - DMM Save Extraction Report.......................................................................................................................15
Figure 16 - DMM Home Window ...................................................................................................................................15
Figure 17 - DMM Save Extracted Data ...........................................................................................................................16
Figure 18 - DMM Extracted Data Saved .........................................................................................................................16
Figure 19 - DMM File Open............................................................................................................................................16
Figure 20 - DMM Replace Current Data? .......................................................................................................................17
Figure 21 - DMM Load Data Location Request..............................................................................................................17
Figure 22 - DMM Browse to Data Location....................................................................................................................17
Figure 23 - DMM Load Data Location............................................................................................................................17
Figure 24 - DMM Prompt to Save Existing Data ............................................................................................................18
Figure 25 - DMM Load Data Result Summary ...............................................................................................................18
Figure 26 - DMM Home Window ...................................................................................................................................18
Figure 27 - Starting the Data Preparation Wizard............................................................................................................19
Figure 28 - Data Preparation Wizard Status ....................................................................................................................19
Figure 29 - Data Preparation Wizard Select target BCM ................................................................................................ 19
Figure 30 - Data Preparation Wizard Select Device Type...............................................................................................20
Figure 31 - Data Preparation Wizard target BCM Type Selection Report ......................................................................20
Figure 32 - Data Preparation Wizard target BCM Valid .................................................................................................20
Figure 33 - Data Preparation Wizard Configure target MBMs .......................................................................................21
Figure 34 - Data Preparation Wizard Configure target MBMs Fields with N/A.............................................................21
Figure 35 - Data Preparation Wizard Configure target MBMs Fields with New DIPs ...................................................22
Figure 36 - Data Preparation Wizard Configure target MBMs Fields with Added MBM ..............................................22
Figure 37 - Data Preparation Wizard Configure target MBMs Report ...........................................................................23
Figure 38 - Data Preparation Wizard Select Default Mailbox Password.........................................................................23
Figure 39 - Data Preparation Wizard Configure Default Mailbox Password ..................................................................24
Figure 40 - Data Preparation Wizard Configure Changed Mailbox Password ................................................................24
Figure 41 - Data Preparation Wizard Configure Mailbox Password Report....................................................................24
Figure 42 - Data Preparation Wizard All data Prepared ..................................................................................................25
Figure 43 - DMM Home Window ...................................................................................................................................26
Figure 44 - Select the source of Data to Apply................................................................................................................26
Figure 45 - Enter Address of target to Apply To............................................................................................................. 26
Figure 46 - IP/Lan Conflict Warning...............................................................................................................................27
Figure 47 - Apply in Progress..........................................................................................................................................27
Figure 48 - Apply Completion Report .............................................................................................................................27
Figure 49 - The DMM Forum..........................................................................................................................................32
Figure 50 - DMM Customer Report (CR) Template .......................................................................................................32
Document Status: Issue Business Communications Manager Revision: 01.00
Data Migration Manager Page 4 of 36
Page 5

Data Migration Manager
List of Tables
Table 1 - User Guide Revisions............................................................................................................................................. 6
Table 2 - DMM Migration Paths Currently Supported..........................................................................................................7
Table 3 - Glossary of Terms ................................................................................................................................................34
Table 4 - BCM 4.0 source System Minimum S/W+ Patch Version Requirements.............................................................35
Table 5 - BCM 5.0 target System Minimum S/W+ Patch Version Requirements ..............................................................35
Table 6 - BCM 4.0 to BCM 5.0 Hardware Configuration Considerations ..........................................................................35
Table 7 - BCM 4.0 to BCM 5.0 Capacity Considerations...................................................................................................36
Document Status: Issue Business Communications Manager Revision: 01.00
Data Migration Manager 5 of 36
Page 6
Data Migration Manager
1.0 Document Information
1.1 Revisions
Table 1 - User Guide Revisions
Issue Change Summary Author(s) Date
Issue
1.0
Draft
00.03
Issue released post iPor review. Karl Blomquist 10-11-2009
Draft released for iPor review. Karl Blomquist 06-11-2009
1.2 Organization
This document is a User Guide for the Nortel SMB Data Migration Manager (DMM) tool.
This document includes:
- An overview of DMM (Section 2)
- A description of the requirements and how to run DMM (Section 3)
- A list of pre-DMM source and target system examinations and/or adjustments (Section 4)
- A detailed illustrated DMM use guide – step by step (Section 5)
- A Quickstart DMM guide – 1 page, 5 steps (Section 6)
- A detailed list of DMM exceptions and/or limitations per system type (Section 7)
- A guide to getting DMM support (Section 8)
- A glossary of terms (Section 9)
- A detailed set of per system type requirements and compatibility details (Appendix A)
Many sections in the document are preceded by “summary points”. For example,
⇒ Obtained from target BCM’s Application Launcher
These points serve as “refresher” cues or highlights regarding what information the section presents in detail.
Document Status: Issue Business Communications Manager Revision: 01.00
Data Migration Manager Page 6 of 36
Page 7

Data Migration Manager
2.0 Data Migration Manager Overview
2.1 Introduction
⇒ Quickstart? See Section 6.0
If the reader is already familiar with installing and using the Data Migration Manager (DMM) then you may
prefer to skip to Section 6.0 for the Quickstart guide to using DMM. If you have not used DMM before, it is
highly recommended that you review this guide in its entirety before you attempt to use DMM.
2.2 What Is DMM?
⇒ Time saving tool to migrate, configuration and user data from one system type to another system type for which there is no traditional upgrade
The Business Communications Manager (BCM) Data Migration Manager is a standalone desktop tool developed
to facilitate the best-effort migration of system OA&M, configuration, and end-user data between Nortel SMB
platforms. The tool’s primary objective is to handle telephony and unified messaging migration thus eliminating
repetitive, error prone, and time consuming manual configuration setup. In some situations not all system data can
be automatically migrated using DMM, so the installer may have certain manual steps to perform after using the
tool.
To summarize, the DMM tool is used to extract data from one Nortel SMB platform source (e.g., a BCM 4.0) and
then convert that data to equivalent data that can be applied to another Nortel SMB platform target (e.g., BCM
5.0).
The table below lists the current Nortel SMB product to BCM migration paths that DMM supports as of
December 2009.
Table 2 - DMM Migration Paths Currently Supported
Nortel SMB
Platform source
BCM 200/400/1000
chassis
Release 4.0
Future revisions of the DMM tool are planned to support additional source and target combinations (e.g., Norstar
to BCM).
Nortel SMB
BCM target
BCM 450 (2 or 4
MBM chassis)
Release 5.0
Additional Information
• Initial release of the DMM tool.
• Because of the platform differences the data from BCM 4.0 needs
to be extracted and converted before it is compatible and can be
applied to the BCM 5.0 platform.
• Across these platforms the use of DMM can save the BCM 450 5.0
installer many hours (in some cases 10+) over the course of the
entire 4.0 to 5.0 h/w and s/w upgrade process.
• The Unified Messaging keycode is required on both the source and
the target platforms to perform Voice Mail message migration
extract and apply process.
Document Status: Issue Business Communications Manager Revision: 01.00
Data Migration Manager 7 of 36
Page 8
Data Migration Manager
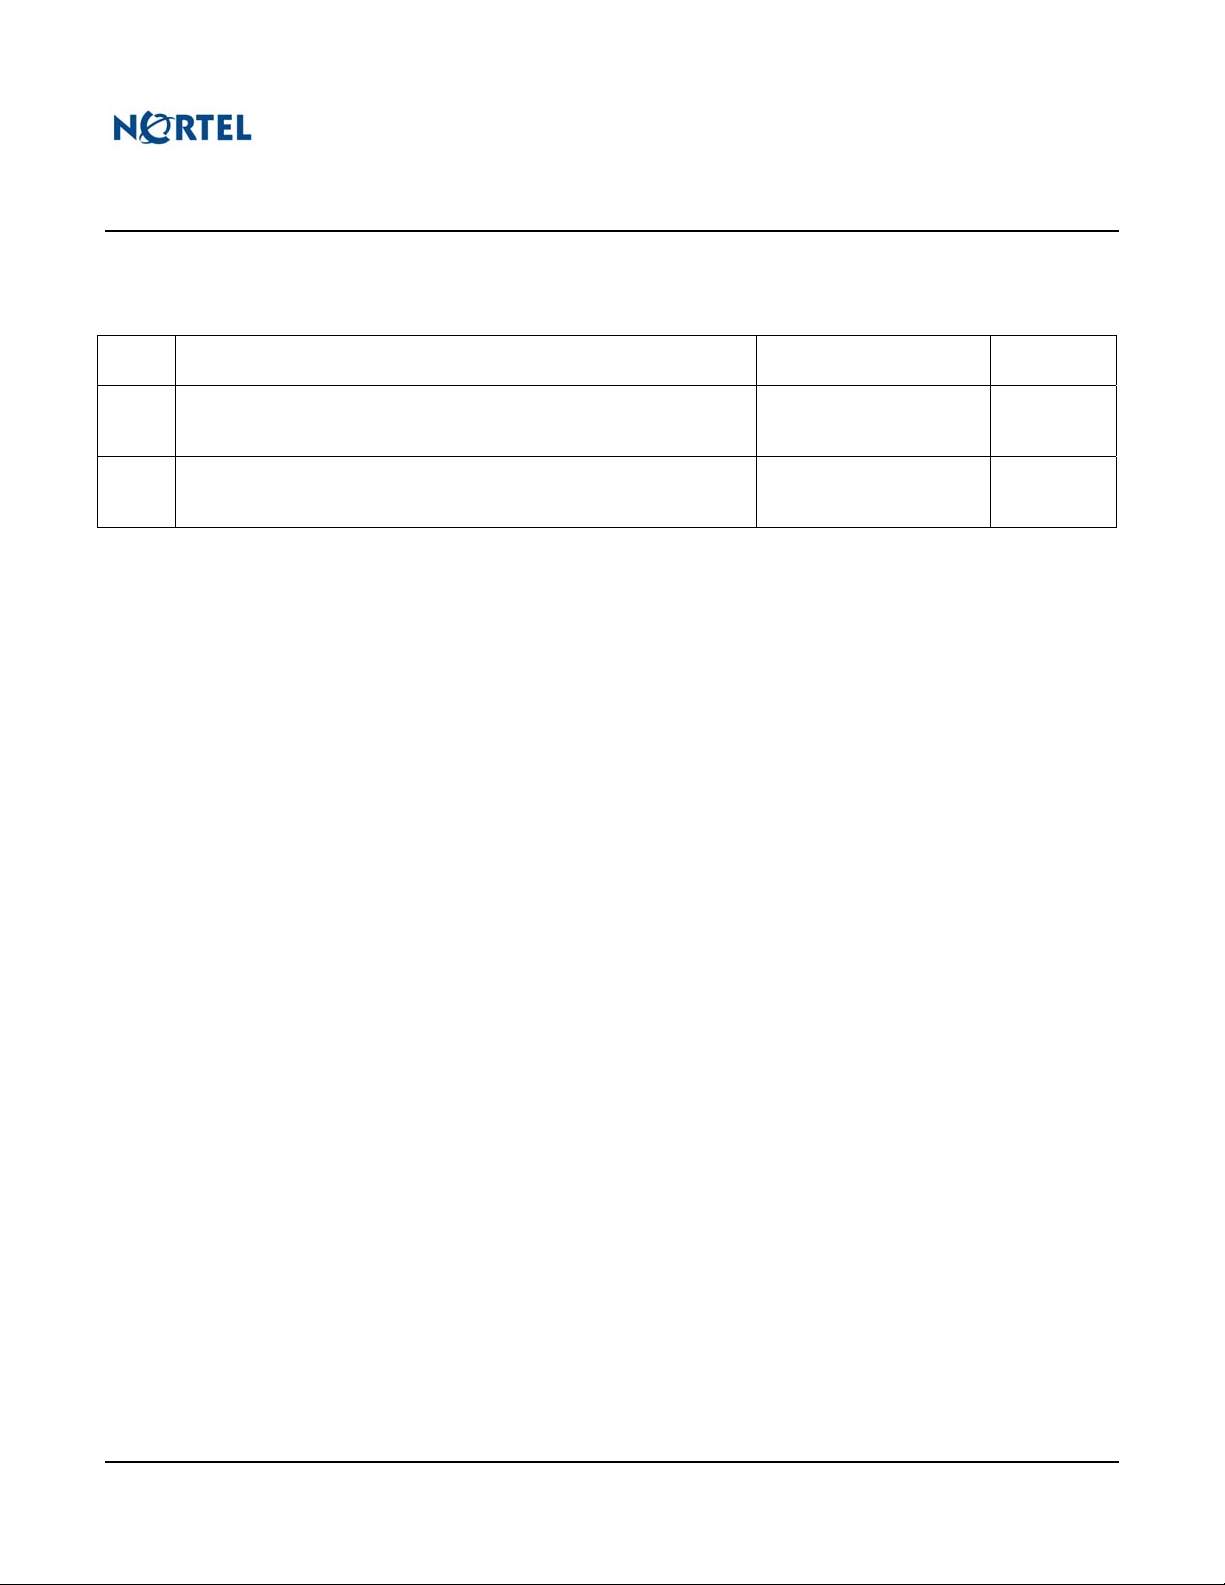
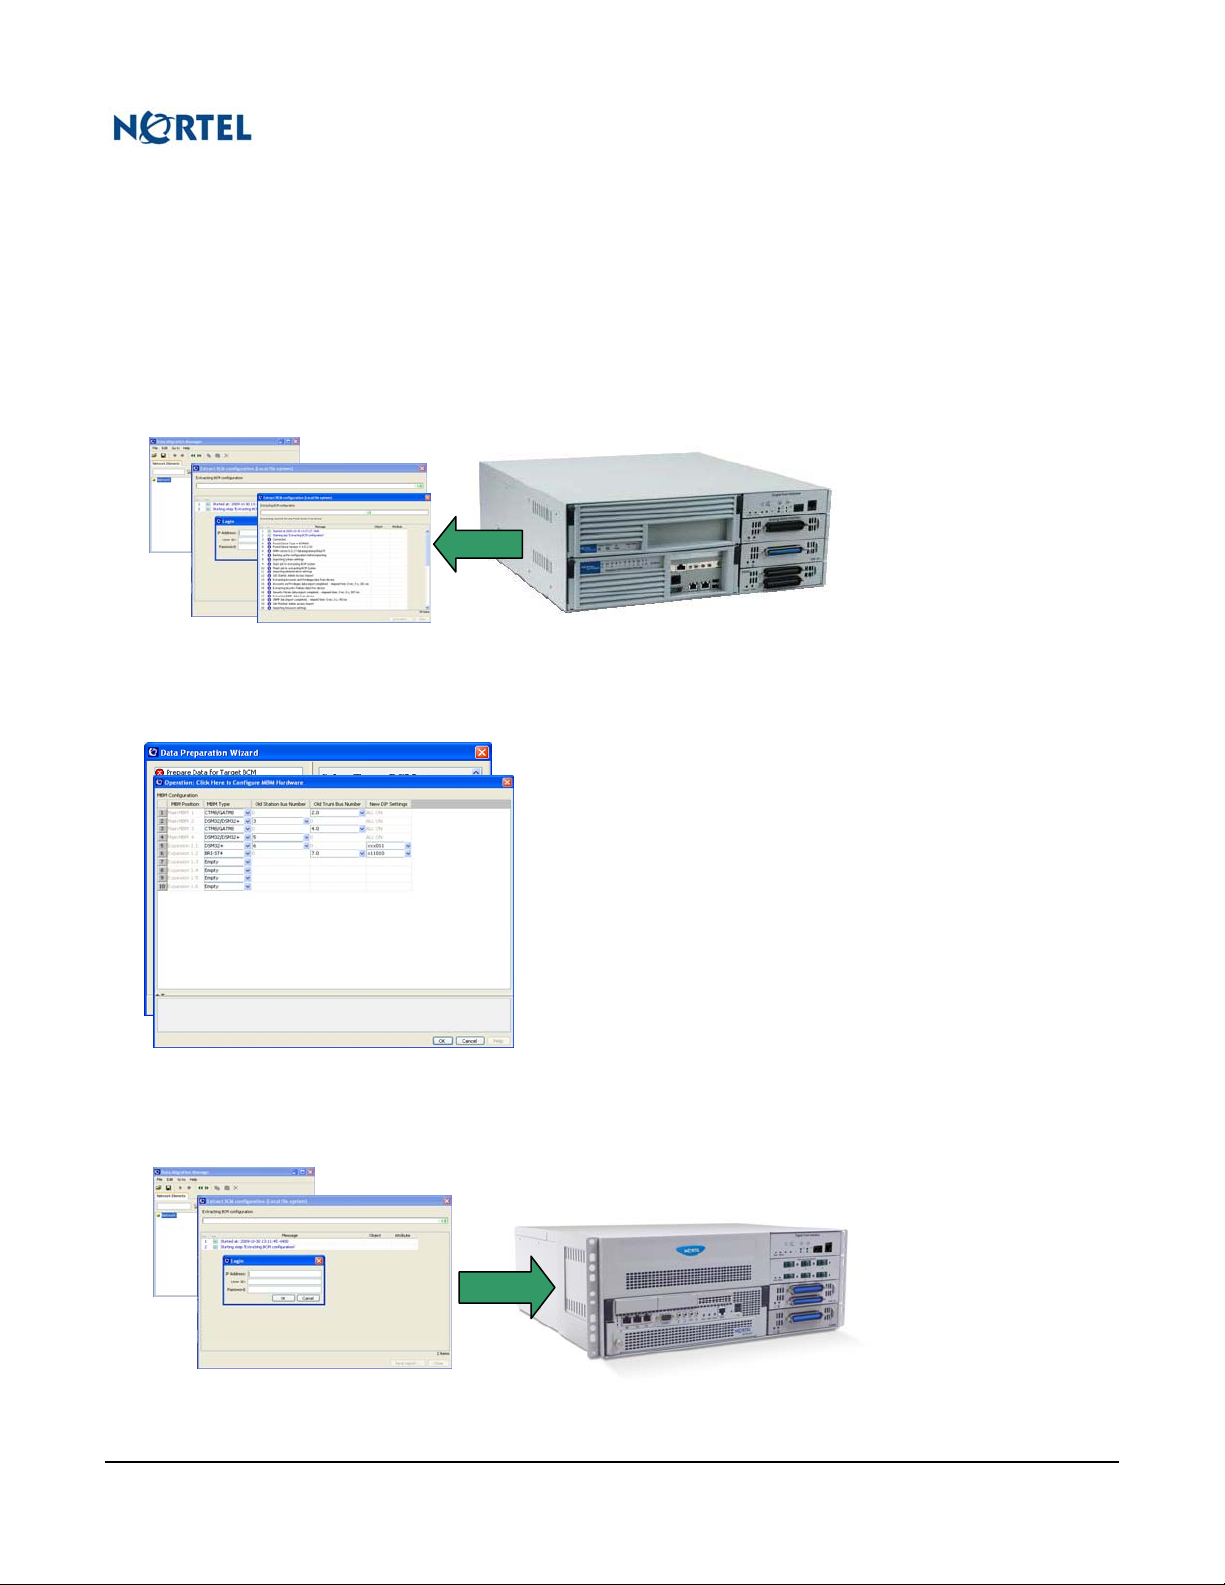
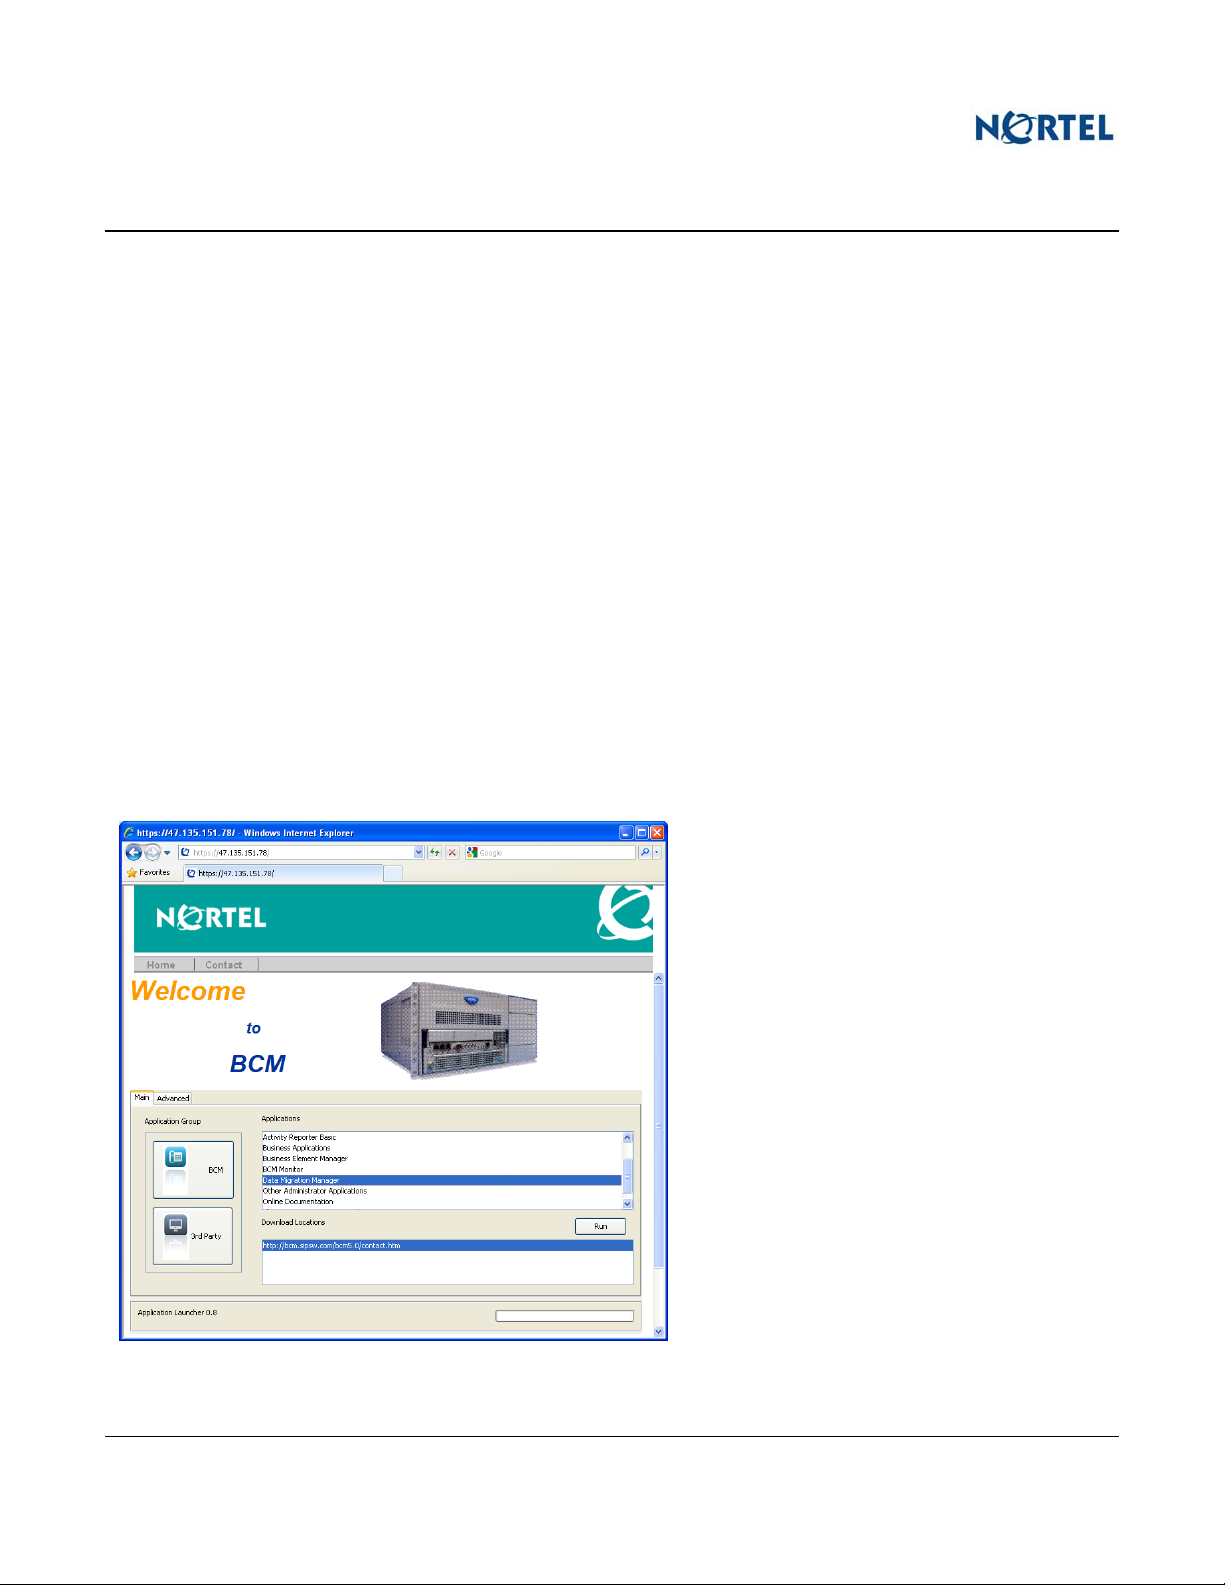
2.3 The DMM Migration Procedure
⇒ 1. Extract Data from source
⇒ 2. Prepare Data
⇒ 3. Apply to target
As illustrated below, the DMM Migration procedure has three major steps. In addition, to the data migration
procedure, the physical setup of the new target system with cabling, terminals, licensing and network setup is
required. DMM system migration is intended as an off-line maintenance activity.
Extract data from the source platform.
1.
1
Figure 1 - Depiction of a DMM Extract from a BCM 400 source
Prepare the Extracted Data
2.
2
Figure 2 - The DMM Data Preparation Windows
Apply the Data to a target BCM platform
3.
3
Figure 3 - Depiction of a DMM Apply to a BCM 450 (4 MBM) target
Document Status: Issue Business Communications Manager Revision: 01.00
Data Migration Manager Page 8 of 36
Page 9
Data Migration Manager
3.0 DMM Requirements and Installation
3.1 System Requirements
⇒ Windows PC
⇒ 175MB disk space for local install
⇒ 100 MB disk space for each extract/apply data set
The DMM application can be run on a Microsoft Windows XP SP2, Microsoft Windows Vista, and Microsoft
Windows 7 desktop platform and requires at least 175MB of disk space to install.
Consideration should also be given to additional disk space for saving extracted data from source platforms (an
additional 100MB of free disk space per source platform is recommended).
The desktop PC that is used to run the DMM tool must have network LAN access to the source device to perform
a data extraction. Similarly, network access to the target device must be available to perform an apply operation.
To avoid networking issues, if the source device IP address is reused for the target device, then disconnect the
source device from the network prior to performing the apply operation (another approach is to use the OAM port
connection on the target device to avoid LAN address contention).
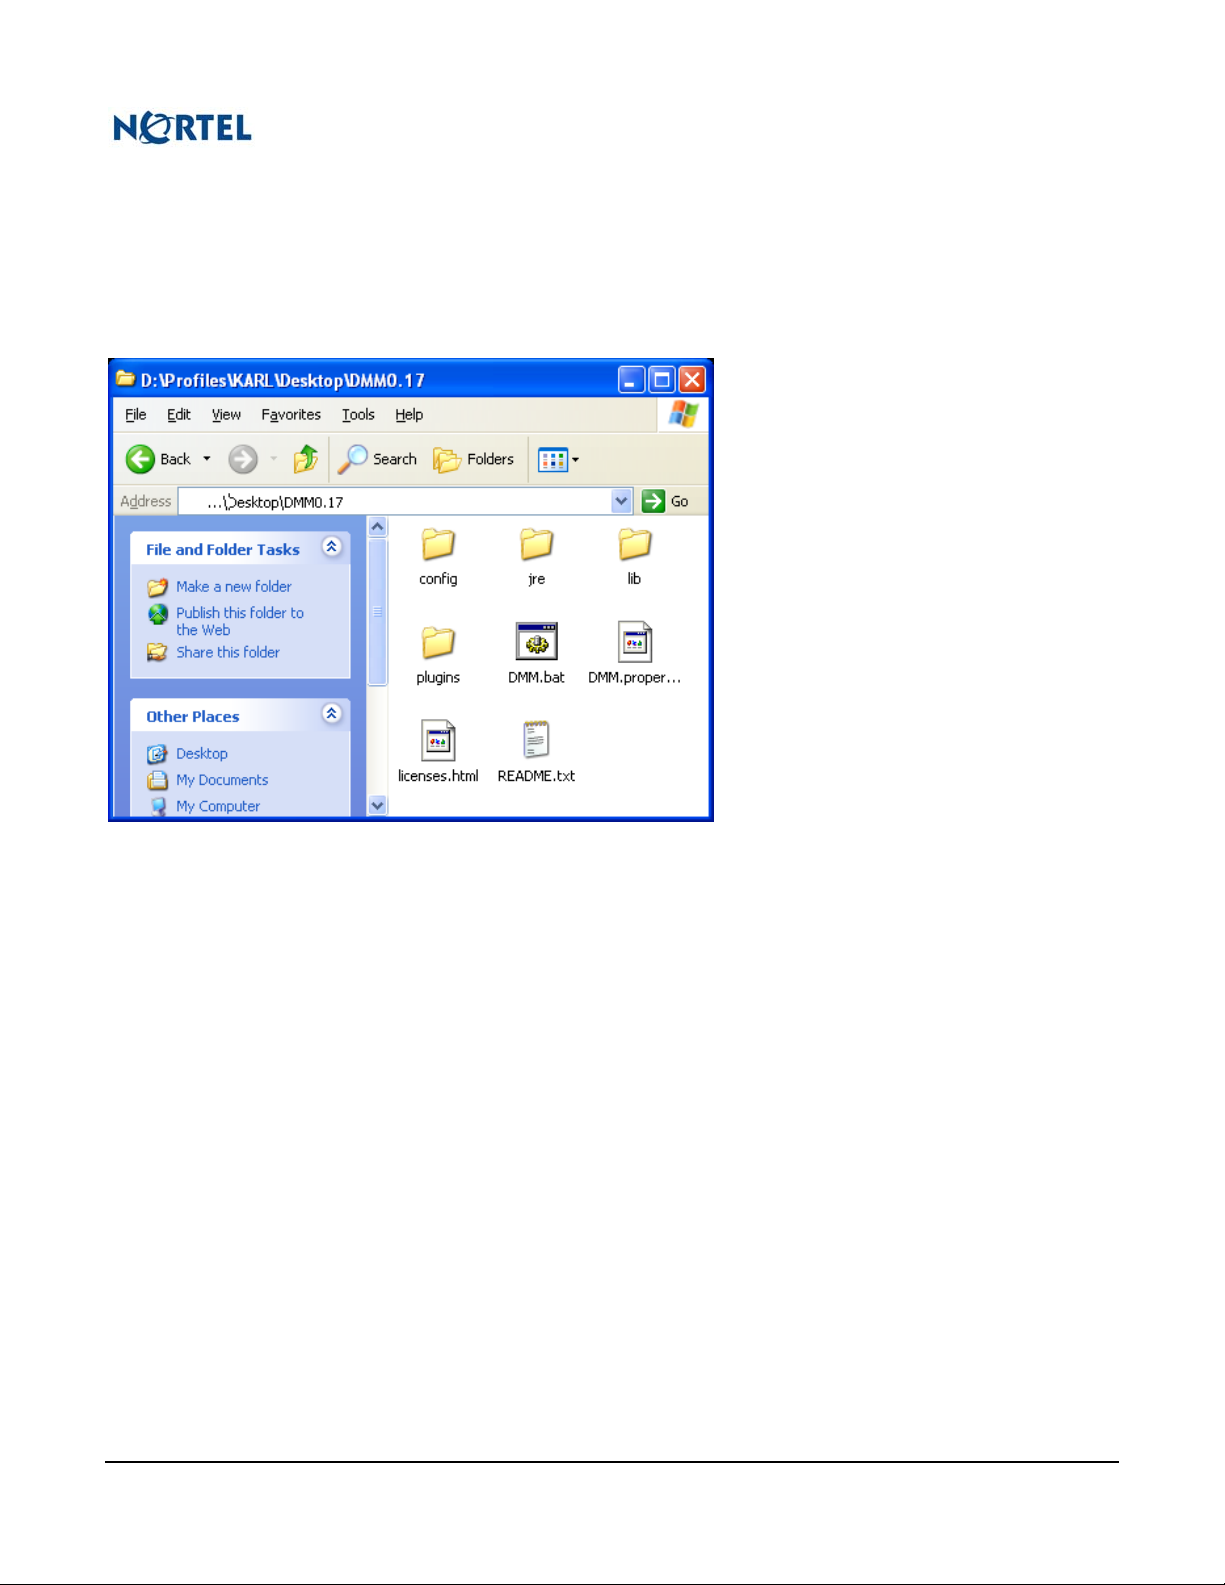
3.2 Obtaining DMM
⇒ Obtained through target BCM’s Application Launcher
DMM is accessible through the target BCM’s Application launcher which automatically checks for updated
versions of the DMM application from the hosting server. The DMM will get installed on your desktop PC and
can either be invoked from the Application Launcher screen or from a desktop shortcut. .
Figure 4 - The BCM Application Launcher - DMM
Document Status: Issue Business Communications Manager Revision: 01.00
Data Migration Manager 9 of 36
Page 10
Data Migration Manager
3.3 Interim Installation procedure during trials
⇒ Unzip or execute the self-extracting file onto Windows PC – DMM.bat is starting point
DMM may be released as a single .zip file or as a self-extracting .exe file.
Unzip or execute the self-extracting file to a location of your choice on the Windows PC.
Unzipping/extracting the DMM tool creates a folder that looks similar to:
Figure 5 - DMM installation folder
Optionally a shortcut can be created to the DMM tool startup “DMM.bat” in the root of the folder that you
unzipped/extracted the DMM tool. “DMM.bat” is the starting point for the DMM tool.
Document Status: Issue Business Communications Manager Revision: 01.00
Data Migration Manager Page 10 of 36
Page 11
Data Migration Manager
4.0 Pre-DMM System Preparation/Examination
Before using the DMM tool both the source and target systems must be verified to have a suitable version and
configuration for DMM compatibility.
4.1 Compatibility Determination
⇒ Check source to target Compatibility (e.g., no FEM) – Appendix A.
Although DMM supports a given source platform, there may be certain configuration aspects of that source
platform that will render DMM incapable of accurate data extraction.
For a detailed list of unsupported system configurations, see Appendix A – System Compatibility. Determine if
there are any unsupported aspects of the intended source system before attempting to use DMM.
4.2 Preparing the Source
4.2.1 S/W Version
⇒ Up to date s/w version on source – Appendix A.
The source system must be updated to a minimum DMM supported software version and/or smart update (SU).
For a detailed list of supported source system software versions see Appendix A – System Compatibility.
Determine if the intended source system meets the software version requirements. If not, apply the required
software updates before using DMM.
4.2.2 Source System Not In Use and Off-line
⇒ Ensure source not currently in use
Although extracting data from the source system is not a destructive operation, the source system should not be a
live or in-use system during the extract process. A backup of the source system will be performed before the
extract begins and a restore operation will be performed upon the completion of the extract. Because of these
operations services to end-users of the source system will be interrupted for a period of time.
4.2.3 Physical System Organization
⇒ Determine physical configuration of source (e.g., MBM locations, split?)
Note the source system’s physical device (MBMs, cards) locations in its main chassis and on any optional
expansion chassis.
Figure 6 - Example H/W Configuration on a BCM 4.0
Document Status: Issue Business Communications Manager Revision: 01.00
Data Migration Manager 11 of 36
Page 12

Data Migration Manager
4.3 Preparing the Target
4.3.1 S/W Version
⇒ Up to date s/w version on target – Appendix A
The target system must be updated to the latest approved DMM supported software version and/or SU.
For a detailed list of supported target system software versions see Appendix A – System Compatibility.
Determine if the intended target system meets the software version requirements. If not, apply the required
software updates before using DMM.
4.3.2 Target System Not In Use and Off-line
⇒ Ensure target not currently in use
Applying data to the target system is a destructive operation, thus the target system can not be a live, in-use
system during the apply process.
4.3.3 IP Address (where applicable)
⇒ Check LAN connections
If the Data Services component’s configuration is selected to be migrated, then as part of the apply operation the
target’s LAN IP addresses will be changed to match that of the source system (if applicable). Because of this, it
is recommended that the source and target system not be connected simultaneously on the same LAN during the
apply process.
The connection to the target system for the purposes of DMM apply can be made via either the Customer LAN or
OAM LAN interface.
4.3.4 Keycodes
⇒ Apply Required Keycodes on target to match source licensing
It is recommended to apply the necessary Keycodes to the target system to enable at least the same set of services
and/or resources that existed on the source system. If Keycodes are not applied to the target system prior to
applying then some data may not be migrated.
Note that DMM will perform a comparison of Keycode equivalence on the source and target systems and if
issues are found DMM will notify the user and give an option to continue or cancel the operation(s).
Figure 7 - DMM Keycode Conflict Report
Recall that on certain platforms (see Table 2) source and/or target Unified Messaging keycodes are required to
perform Voice Mail message migration.
Document Status: Issue Business Communications Manager Revision: 01.00
Data Migration Manager Page 12 of 36
Page 13

Data Migration Manager
5.0 Using DMM – Detailed Walkthrough
5.1 Starting DMM
If using Application Launcher then double click on the DMM application in the list of applications. If using an
application desktop shortcut, double click on the icon or for the interim release, double click on DMM.bat in the
install folder. DMM starts and presents its home window:
Figure 8 - DMM Home Window
5.2 Extracting Data from a Source System
To extract data from a source system click on the icon. A new window will open:
Figure 9 - DMM Select System Type
Choose the source system type and click on Next to see a list of this system’s data sets that can be extracted:
Figure 10 - DMM Select Component Data to Extract
Document Status: Issue Business Communications Manager Revision: 01.00
Data Migration Manager 13 of 36
Page 14

Data Migration Manager
Select what major components of the source system you wish to extract data from (the default is all). Click on
the Start button to be prompted for the system’s address and access information. Note that not all platforms
support individual selection options because there may be some inherent dependencies between the
components.
Figure 11 - DMM Specify source Location
Enter the source system’s IP address along with the system’s administration user-id and password. Click OK.
DMM will now proceed with the extracting of data from the source system. The remainder of this extract
process is unattended. Note that at the beginning of this process the source system’s data will be backed up and
then at the end of the process it will be restored.
This process can take from 20 minutes to 45 minutes on average depending on the amount of data on the source
system. For systems with extremely large amounts of voice-message data it will take a longer time relative to the
volume of messages to be extracted.
Figure 12 - DMM Extraction Process 1
Figure 13 - DMM Extraction Process 2
Document Status: Issue Business Communications Manager Revision: 01.00
Data Migration Manager Page 14 of 36
Page 15

Data Migration Manager
Upon completion, DMM will display a notification that provides an overview of the extract results:
Figure 14 - DMM Extraction Completion Report
5.2.1 Saving the Extract Report [optional]
The report created during the extract process can be saved in a folder. Click on “Save Report” and a window
will pop up prompting for a location and name to save the report (in html format).
Figure 15 - DMM Save Extraction Report
5.2.2 Saving Extracted DMM Data [optional]
If it is intended to migrate this data to multiple systems, or if it is necessary to return to the DMM process at a
later time for the apply portion, DMM can save the extracted data into a folder on the desktop PC. Although not
mandatory, this is a recommended step.
At the DMM home window level
Figure 16 - DMM Home Window
Document Status: Issue Business Communications Manager Revision: 01.00
Data Migration Manager 15 of 36
Page 16

Data Migration Manager
click on the save icon
or choose File / Save from the pull-down menus. DMM will prompt for a location to
save the extracted data to:
Figure 17 - DMM Save Extracted Data
Click the “Save” button when you have located the folder and defined the file name, DMM will save the extracted
data, showing the following progress window:
Figure 18 - DMM Extracted Data Saved
Note that this single saved .xcm file does not contain all of the data to be migrated. There are other parts of the
source system’s data that are stored in the DMM installation folder under the user/data sub-folders. This data
will need to remain where it is if it is to be retrieved at a later time.
5.2.3 Retrieving Saved DMM Data
If there is a requirement to load previously saved data (e.g., to perform an apply) click on the icon or select
F
ile / Open in the DMM home window:
Figure 19 - DMM File Open
Document Status: Issue Business Communications Manager Revision: 01.00
Data Migration Manager Page 16 of 36
Page 17

Data Migration Manager
If there is currently data loaded in the DMM session DMM will prompt with a window to verify the current data
is to be replaced with the saved data being loaded. Click “Next” to continue.
Figure 20 - DMM Replace Current Data?
DMM will prompt with a request for the data location and file name to be loaded. Enter the path and name and
click on “Next”,
extract:
Figure 21 - DMM Load Data Location Request
or alternatively, the user may browse for a saved data set:
extract.xcm
extract.xcm
Figure 22 - DMM Browse to Data Location
extract.xcm
Figure 23 - DMM Load Data Location
Document Status: Issue Business Communications Manager Revision: 01.00
Data Migration Manager 17 of 36
Page 18

Data Migration Manager
After a valid path and name has been entered, and “Next” is clicked, DMM will give the user one more chance to
save the existing data set if one exists. Select your choice and then click the “Start” button.
Figure 24 - DMM Prompt to Save Existing Data
DMM will load the saved data set and present a summary of the load operation:
extract.xcm’
Figure 25 - DMM Load Data Result Summary
5.3 Preparing to Apply Data to a target System
Applying data to a target system can be performed immediately after an extract has been performed, or after a
saved data set has been loaded into DMM. However, first the extracted data must be “prepared” using additional
information regarding the source and target system configuration. DMM presents a list of the loaded data sets as
sub-nodes under the Network node on the DMM home window. If a sub-node is not visible, double-click the
Network node to expand the sub-node list:
Figure 26 - DMM Home Window
Next click on the sub-node data set applied to a target system.
Document Status: Issue Business Communications Manager Revision: 01.00
Data Migration Manager Page 18 of 36
Page 19

Data Migration Manager
Figure 27 - Starting the Data Preparation Wizard
Note the presentation of the “Data Preparation Wizard”. This wizard provides the steps for preparing the loaded
data set to be applied to a target system. Click on the “Data Preparation Wizard” link to start data preparation.
5.3.1 The Data Preparation Wizard
There are three main steps in data preparation. The first is selecting the type of the target.
Figure 28 - Data Preparation Wizard Status
Click on the “Select target BCM” link and note the following window:
Figure 29 - Data Preparation Wizard Select target BCM
Document Status: Issue Business Communications Manager Revision: 01.00
Data Migration Manager 19 of 36
Page 20

Data Migration Manager
Either the current target type will be displayed, or the indication that no target type is yet selected. Click on the
“Click Here to Select target BCM Type” link to choose the target type.
Use the pull-down menu presented to choose the appropriate target system type and then click “OK”.
Figure 30 - Data Preparation Wizard Select Device Type
DMM will run a short preparation process based on the selected target type:
Figure 31 - Data Preparation Wizard target BCM Type Selection Report
Click “Close” then the process is completed. The data preparation window will now indicate that a valid target
is prepared:
Figure 32 - Data Preparation Wizard target BCM Valid
Document Status: Issue Business Communications Manager Revision: 01.00
Data Migration Manager Page 20 of 36
Page 21

Data Migration Manager
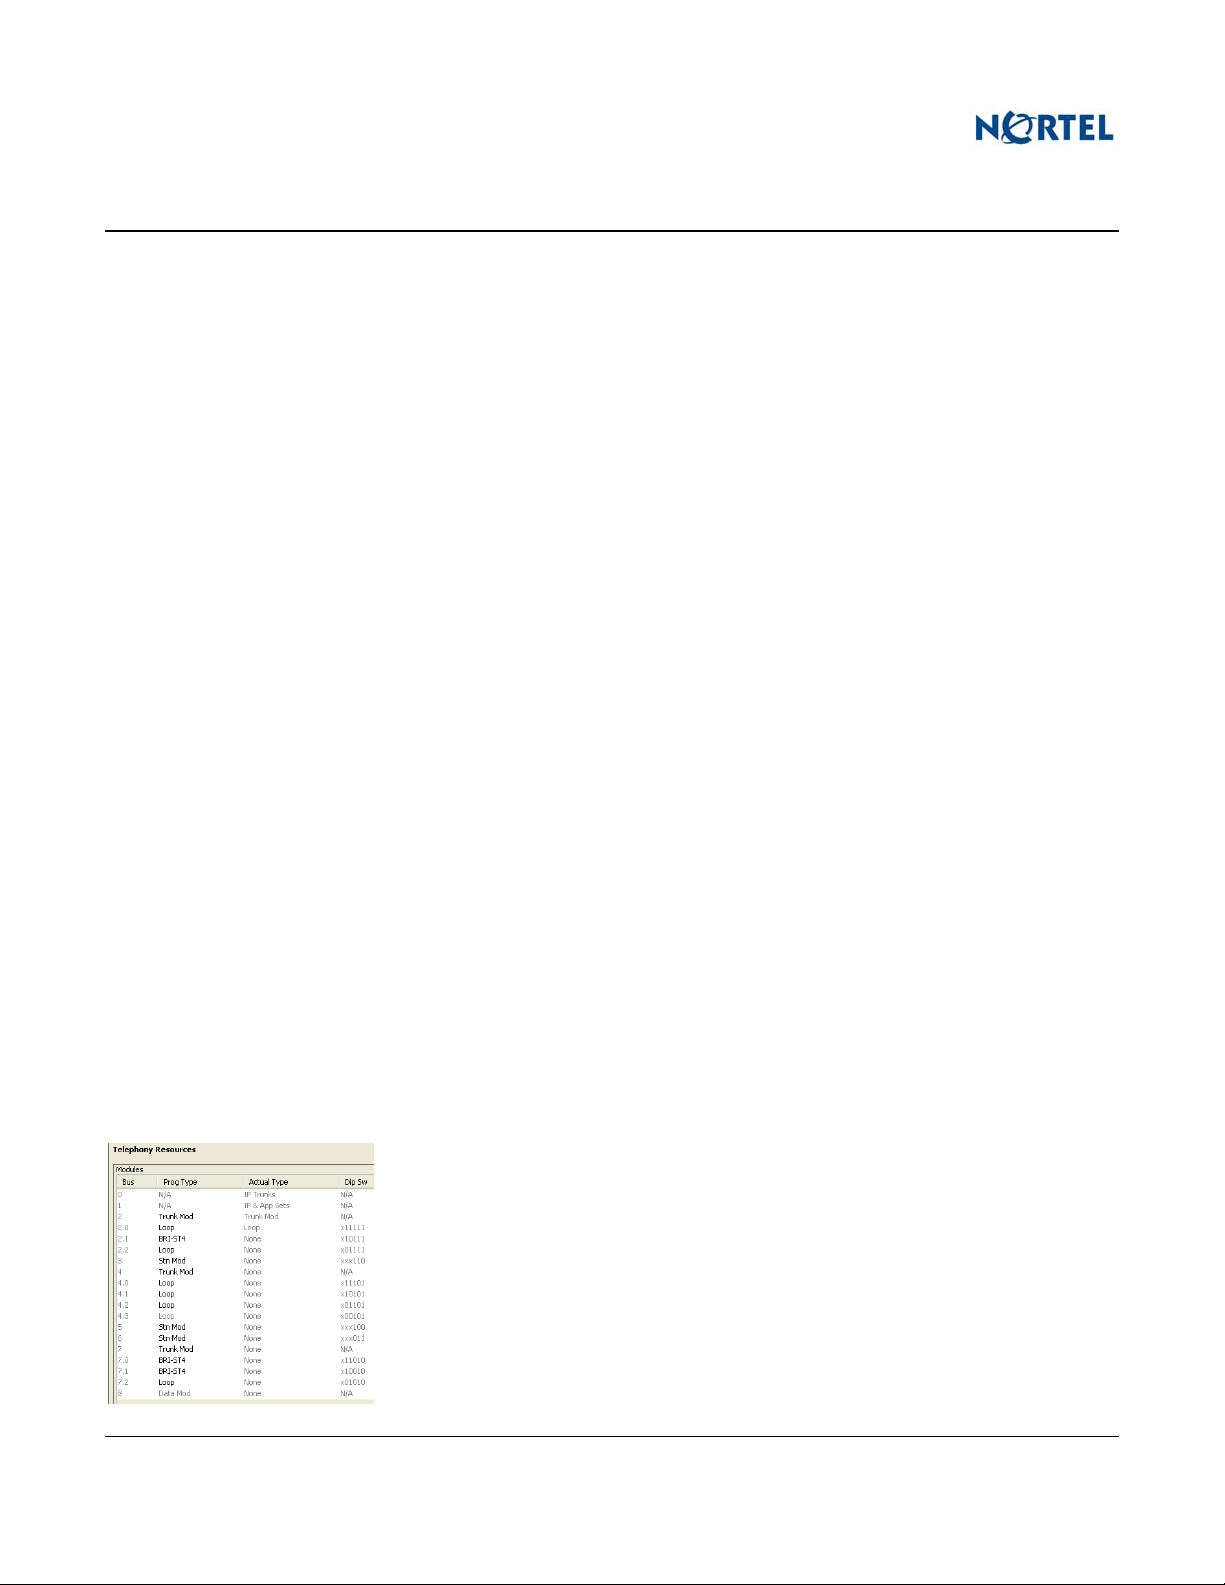
The next step is to configure the hardware (MBMs) on the target. To properly perform this step, detailed
knowledge of the source system’s hardware placement is required and if applicable, the DIP settings. In
addition, knowledge of the planned location of the hardware and, if applicable, associated DIP settings on the
target system is required.
Click on the “Configure target MBMs” action in the “Data Preparation Wizard” home window. Click on the
“Click Here to Configure MBM Hardware” link to choose start the MBM hardware configuration wizard.
Figure 33 - Data Preparation Wizard Configure target MBMs
The MBM Hardware configuration window describes the source system’s hardware, and where on the source
system each piece of hardware was located. DMM makes a “best–effort” attempt at identifying all source
system hardware and associated locations, however it is possible in certain instances for DMM to misunderstand a
source system’s hardware configuration. It is important for the user to check the MBM hardware
configuration presented by DMM and if necessary make adjustments (including possible additions or
deletions) to ensure the hardware declaration matches the source system.
Once this step is completed it cannot be repeated. When the target MBM configuration is chosen and finalized
(green) the loaded data associated is modified to fit that declared MBM configuration. Attempting to modify the
MBM configuration additional times will result in invalid data. If it becomes necessary to change the MBM
configuration again then the source data must be reloaded and the Data Preparation Wizard must be re-run.
The following examples illustrate this process for a BCM 4.0 to BCM 5.0 migration in progress.
Figure 34 - Data Preparation Wizard Configure target MBMs Fields with N/A
Document Status: Issue Business Communications Manager Revision: 01.00
Data Migration Manager 21 of 36
Page 22

Data Migration Manager
This window also defines where on the target system the hardware will reside and what associated DIP settings
(if any) must be set on the hardware for proper operation in the target system.
In some cases DMM may be unable to determine one or more data values for hardware components. In these
cases it will indicate an N/A entry in pink (see above example window). For these fields the DMM user must
modify the relevant value(s) to reflect the actual value on the source system or the actual value intended for the
target system, whichever is applicable.
An example of modifying DIP settings for hardware on the target (row 6).
Figure 35 - Data Preparation Wizard Configure target MBMs Fields with New DIPs
Another example - adding modules that DMM did not initially present (row 7).
Figure 36 - Data Preparation Wizard Configure target MBMs Fields with Added MBM
Document Status: Issue Business Communications Manager Revision: 01.00
Data Migration Manager Page 22 of 36
Page 23

Data Migration Manager
5.3.1.1 Source and Target Hardware Configuration Considerations
There may be differing requirements or restrictions on the target system compared to the source system regarding
hardware or capacity configurations. For example, some hardware that co-existed on the same bus on the source
may no longer be allowed to co-exist on the same bus on the target. In these situations the DMM user may have
to modify or declare additional configuration data to ensure conflicts are resolved.
A list of source to target migration hardware configuration issues to be considered is presented in Appendix A.3.
When the MBM hardware configuration declaration is satisfactory click the “OK” button and DMM will proceed
to prepare the data set based on the declared hardware. A summary of this preparation and its impacts will be
presented in a window.
Figure 37 - Data Preparation Wizard Configure target MBMs Report
After viewing and/or saving this summary click on “Close” to return to the “Data Preparation Wizard” home
window. At this stage, the Configure Target MBMs sub-node should be green. Do not attempt to perform the
Configure Target MBMs step again – doing so will corrupt the current data migration in progress.
Figure 38 - Data Preparation Wizard Select Default Mailbox Password
Document Status: Issue Business Communications Manager Revision: 01.00
Data Migration Manager 23 of 36
Page 24

Data Migration Manager
The final step in this example illustration is to enter a new default Mailbox password for the target system. Click
on “Enter New Default Mailbox Password” and then click on the “Click Here to input Default Mailbox Password”
link. A new window will be presented showing the current Default Mailbox Password.
Figure 39 - Data Preparation Wizard Configure Default Mailbox Password
If it is necessary to change this password click inside the password field and enter a new value. DMM will
validate the value entered.
Figure 40 - Data Preparation Wizard Configure Changed Mailbox Password
Click the “OK” button to continue. Preparation results of the Default Mailbox password are shown.
Figure 41 - Data Preparation Wizard Configure Mailbox Password Report
Click “Close” to return to the home window for the “Data Preparation Wizard”.
Document Status: Issue Business Communications Manager Revision: 01.00
Data Migration Manager Page 24 of 36
Page 25

Data Migration Manager
Figure 42 - Data Preparation Wizard All data Prepared
Once all the necessary steps of the Data Preparation Wizard are successfully completed click “Close” to return to
the DMM home window where all the sub-nodes should now be green.
Document Status: Issue Business Communications Manager Revision: 01.00
Data Migration Manager 25 of 36
Page 26

Data Migration Manager
5.4 Apply Data to target
After data is extracted or loaded and then prepared for a target, that data can be applied to the target.
Figure 43 - DMM Home Window
To begin the apply to a target system press the icon. DMM will prompt the user with a window to select
what source system is to be used for the apply.
Figure 44 - Select the source of Data to Apply
Select the source system and click on “Start”. DMM will then prompt for information about what target system
the data is to be applied to.
Figure 45 - Enter Address of target to Apply To
Document Status: Issue Business Communications Manager Revision: 01.00
Data Migration Manager Page 26 of 36
Page 27

Data Migration Manager
If DMM detects that the source and destination are not on the same subnet it will not alter the main LAN
configuration of the target to match the source. This is to prevent possible loss of communication with the
target. A confirmation dialog box will be shown if this is the case. It will be the responsibility of the
administrator to alter the target’s LAN configuration information after the DMM migration is complete.
Figure 46 - IP/Lan Conflict Warning
The unattended Apply operation will begin. The process may take 45-90 minutes depending on the size of the
data set to be migrated from the source to the target. In rare extreme cases (e.g., a large volume of voice-mail
messages) the unattended Apply operation could take several hours.
Figure 47 - Apply in Progress
Upon completion of the Apply, DMM will present a summary report of the Apply results.
Figure 48 - Apply Completion Report
This report may be saved using the same method as described previously.
It is recommended that the DMM user examine the report results to determine what, if any, data elements were
altered or not-transferred to the target. Some amount of manual post-DMM adjustments to the target may
be necessary.
Document Status: Issue Business Communications Manager Revision: 01.00
Data Migration Manager 27 of 36
Page 28

Data Migration Manager
6.0 Using DMM – 5 Step Quickstart
1. Verify source and target compatibility and configuration issues and adjust accordingly (Appendix A) (5
minutes attended) – see section 4.0. Review section 7.0 of this document for known exceptions or
limitations.
2. Extract
a. Requires source IP address, administration user-id and password
b. Choose what aspects to extract (default all) (2 minutes attended)
c. Perform the extract (20-40 minutes unattended)
d. Optionally save extracted data to a file (1 minute attended)
3. Prepare loaded data (5 minutes attended) - see section 6.6 and A.3
a. Select target system type
b. Declare MBM hardware
c. Default Mailbox password
4. Apply
a. Requires target IP address, administration user-id and password
b. Choose the source system whose data you wish to use
c. Choose the target system (IP, user, password) to apply the data to
data from source – see section 6.2
i. source hardware type and bus
ii. target DIPs
to start migrating data to target (2 minutes attended) – see section 6.7
d. Resolve any LAN configuration issue(s) if presented.
e. Start the Apply operation
f. Apply will run until complete (Unattended operation approximately 30-60 minutes)
i. The operation may take longer if large amounts numbers of voice-mail data are being
migrated.
5. Perform any necessary remaining OA&M on the target to reach maximum migration result (5-30 minutes
attended). Review section 7.0 again for known exceptions or limitations.
Total attended time, approximately 20-50 minutes.
Total unattended time, approximately 45-90 minutes.
Document Status: Issue Business Communications Manager Revision: 01.00
Data Migration Manager Page 28 of 36
Page 29

Data Migration Manager
7.0 DMM Exceptions or Limitations
In many cases DMM will be able to effect a 100% migration of data from the source to the target. However,
there are some identified configurations for which DMM can not migrate 100% of the data from source to target.
For each DMM supported source/target migration path this section describes any limitations or configuration
issues that may prevent DMM from achieving a 100% migration result.
It is recommended that Appendix A – System Compatibility be consulted to ensure that all source/target
compatibility requirements have been met and understood before attempting to use DMM.
7.1 BCM 4.0 (200/400) to BCM 5.0 (450 chassis)
7.1.1 IP Sets Must be Re-registered to DNs on the Target
DMM migration to BCM5.0 will transfer the IP DNs and their programming, but the registration of the physical
IP Sets to their respective DNs will need to be performed as a post-DMM step.
7.1.2 Line Numbers on CTM8/GATM8/8x16 MBMs Will Change
On the target BCM5.0 system there will not be a 4 line gap in the line numbering between the first set of 4 lines
and the second set of 4 lines on an 8 line MBM. The second set of 4 lines on the MBM will be numbered
contiguously from the first set of 4 lines.
This means that the second set of 4 lines on every 8 line MBM will have different line numbers on the target as
compared to the original source system.
7.1.3 Some Programming Migration May Fail if “Hardware-Less” DNs are Referenced
On a BCM4.0 source DNs that reside on a bus for which a “Stn Mod” is not the “Prog Type” will not be recreated on a target BCM5.0 system. As a result, if on the source BCM4.0 system there were such DNs
referenced in programming (e.g., as prime set, control set, direct dial set, etc.) then the attempt to migrate that
programming onto the BCM5.0 system will fail because those DNs will not exist on the BCM5.0 system.
7.1.4 Call Forward All Calls Programming Not Migrated
If a DN on the source system is programmed to Call Forward All Calls to another destination this programming
will not be migrated to the target system. This configuration must be performed manually post-DMM migration.
7.1.5 Doorphone Programming Not Migrated
No Doorphone programming of any type will be migrated from the source to the target. This configuration must
be performed manually post-DMM migration.
7.1.6 Internal CAP Assignment Not Migrated
DMM will not currently migrate CAP / DN assignments. This programming must be performed manually postDMM migration.
Document Status: Issue Business Communications Manager Revision: 01.00
Data Migration Manager 29 of 36
Page 30

Data Migration Manager
7.1.7 MBMs may Stop Functioning on Source After Extract
DMM will recommend that the source system be rebooted after an extraction completes. If this is not done it is
possible, but not probable, that one or more MBMs may stop functioning until a BCM reboot is done.
7.1.8 Voice Mail Messages Not Migrated if Keycode(s) Not Present
DMM migration to BCM5.0 will not transfer VM messages to the target if there is insufficient licensing on the
target to activate the target’s VM system. To ensure VM messages get transferred apply the appropriate
Keycode(s) to the target before the DMM Apply process.
7.1.9 Default VM Password on the Source May Change
During the Extract process DMM will perform a backup of the source system. During extraction DMM will
modify the default VM password on the source system per the Default Mailbox Password the DMM user chose
during the extraction setup. As the final step in extraction DMM will restore the backed up data onto the source
system. If this entire extraction process is interrupted in mid-operation it may happen that the source system’s
default VM password remains as the modified value.
7.1.10 Log Management and Backup Schedule Not Migrated
This service is expected to be provided in a future (TBD) version of DMM. This configuration must be performed
manually post-DMM migration.
7.1.11 VM Mailbox Passwords on Target Set to Default
All mailbox passwords for the target BCM5.0 will be set to whatever the user has specified as the default
password during the Data Preparation Wizard step.
7.1.12 Only Mailbox Prompts and Recorded Name Migrated
Only a mailbox’s primary and secondary prompt and the recorded name will be migrated. All other mailbox
specific configuration (i.e., configuration that cannot be accessed via mailbox manager) will not be migrated. This
configuration must be performed manually post-DMM migration.
7.1.13 Call Centre Agent Passwords on Target Set to Default
All call centre agent passwords for the target BCM5.0 system are reset to the default value 0000 (4 zeros).
7.1.14 Fax Custom Cover Page Not Migrated
Fax Settings->Custom Cover Page is neither extracted nor applied. This configuration must be performed
manually post-DMM migration.
7.1.15 Contact Center Reporting Server Password Not Migrated
Contact Center Properties->CC Reporting Server Password is neither extracted nor applied. This configuration
must be performed manually post-DMM migration.
Document Status: Issue Business Communications Manager Revision: 01.00
Data Migration Manager Page 30 of 36
Page 31

Data Migration Manager
7.1.16 IVR Configuration and Applications Not Migrated
All IVR data is neither extracted nor applied. This configuration must be performed manually post-DMM
migration.
7.1.17 Starting CCR Feature Code Can Not Be 900
On BCM 4.0 in the 'Auto-Attendant Properties->Starting CCR feature Code' property a value of 900 is a valid.
However, this value is not a valid value for BCM5.5.
If the value for this property in BCM 4.0 is 900, a blank value will be entered in this field for BCM 5.0. A new
value should be chosen for the BCM 5.0 post-DMM migration.
7.1.18 Obsolete Data Services Configuration Data Not Migrated
The following data services configuration elements are not migrated because they do not apply to a BCM 5.0
system:
Because these configuration elements do not exist on any BCM 5.0 platform they do not need to be considered
post-DMM migration.
• IPSec VPN
• NAT and Filters
• DNS
• Web Caching
• RIP / OSPF
• WAN Interfaces
7.1.19 All User Account Passwords on Target Reset to System Default (PlsChgMe!)
All access and administration accounts migrated to the target will have their password reset to the BCM 5.0
default password “PlsChgMe!”. The “Change Password On Login” flag will be set so when users log in to the
target they will be automatically
prompted for a new password.
Document Status: Issue Business Communications Manager Revision: 01.00
Data Migration Manager 31 of 36
Page 32

Data Migration Manager
8.0 DMM Support
DMM is a free for use tool provided by Nortel. DMM support may not include the traditional support methods
provided to Nortel products, but there are support resources for DMM available.
8.1 The DMM Forum
http://bcm.sipsw.com/ (Nortel BCM Forums) is a publically accessible informal support and discussion forum.
Within this forum is a Data Migration Manager sub-forum.
Figure 49 - The DMM Forum
This forum would be the place to start looking for advice on DMM or for posting your own questions or advice to
others.
DMM’s developers are continuously monitoring this forum and when/where possible will provide support to
DMM-related issues. Content in the forum may also be used to continuously improve the DMM tool.
8.2 Reporting a Problem
If you have access to Nortel’s Customer Report (CR) system, and a concern you have about DMM is not
addressed on the forum, you may raise a CR for DMM. The example below illustrates the CR data required for
a DMM CR. Text after any ** is not to be entered in a CR – this is additional CR guidance information only.
Figure 50 - DMM Customer Report (CR) Template
Document Status: Issue Business Communications Manager Revision: 01.00
Data Migration Manager Page 32 of 36
Page 33

Data Migration Manager
Note that you can determine the version of DMM you are using via the Help / About pull-down command.
Please attach the following data to a raised CR (where applicable):
- The saved .xcm file of the source data extracted before the Data Preparation Wizard is run
- The saved Extract and/or Apply report .html file(s)
- The source h/w configuration information and a screenshot of the source/target hardware, bus, DIP
configuration panel declared.
- DMM logs:
o they will be found in the "logs" folder in the folder where DMM is installed
o if using Application Launcher to run DMM; the logs directory will found in the <User Profile
Directory>/.bcm/DMM
- Run-time logs from the post-Apply target BCM – collected using Element Manager
Document Status: Issue Business Communications Manager Revision: 01.00
Data Migration Manager 33 of 36
Page 34

Data Migration Manager
9.0 Glossary
The following is a list of terms and acronyms used in this document.
Table 3 - Glossary of Terms
Acronym Full term
AA Auto-Attendant
Apply Program OA&M configuration on & transfer user data (voice msgs, prompts) to a
target system
BCM Business Communications Manager
DMM Data Migration Manager – Graphical Windows PC Tool for migrating configuration and
user data from one Nortel SMB platform to a Nortel SMB BCM platform
EM Element Manager – Graphical Windows PC Tool for BCM OA&M
Extract Collect OA&M configuration & user data (voice msgs, prompts) from a source system
LAN Local Area Network
PC Personal Computer
Source
SU Smart Update – a collection of software updates for a BCM
Target
VM Voice-Mail
The original system DMM is migrating data from
The destination system DMM is migrating data to
Document Status: Issue Business Communications Manager Revision: 01.00
Data Migration Manager Page 34 of 36
Page 35

Data Migration Manager
Appendix A - System Requirements and Compatibility
For each of the supported source systems that DMM supports there may be certain configuration requirements or
non-supported configuration aspects.
A.1 Minimum Software Versions
Table 4 - BCM 4.0 source System Minimum S/W+ Patch Version Requirements
Nortel SMB Platform S/W Version and Patch
BCM 200/400
BCM 4.0 GA
+
SU Oct 2009 - BCM.R400.SU.System.024-200910-1.0-1.0.zip
Table 5 - BCM 5.0 target System Minimum S/W+ Patch Version Requirements
Nortel SMB Platform S/W Version and Patch
BCM 450 (2 or 4 MBM chassis)
BCM 5.0 GA
+
SU Nov 2009 - BCM450.R500.SU.System-001.200911
A.2 BCM 4.0 to BCM 5.0 Hardware Configuration Compatibility
The following table highlights how particular configuration aspects of a BCM 4.0 system will impact migration to
a BCM 5.0 system.
Table 6 - BCM 4.0 to BCM 5.0 Hardware Configuration Considerations
BCM 4.0 Configured
Option
FEM DMM does not support FEM migration to BCM 5.0. Using DMM on this source
BCM 5.0 Compatibility Impact
system will result in the equivalent MBMs being declared on the target system.
Co-Existing (same bus)
BRI and Loop devices
5/3 Bus Split In this case the 7th bus on the BCM 4.0 system is “virtual” hardware declared for
Migration to BCM 5.0 will result in a requirement to split the BRI device(s) and
the Loop device(s) onto unique buses on the 5.0. MBM Hardware declaration
must declare the BRI and Loop devices to be destined for buses on the 5.0
system such that there are no BRI and Loop devices co-existing on the same
bus (regardless of slot offset).
additional IP Set DNs to exist.
Do NOT place a DSM32+ MBM hardware declaration on bus 7 in the MBM
Hardware window. This entry must be left blank (set to Empty) in order for the
associated IP Set DNs to be properly migrated to the target system.
Document Status: Issue Business Communications Manager Revision: 01.00
Data Migration Manager 35 of 36
Page 36

Data Migration Manager
A.3 BCM 4.0 to BCM 5.0 Capacity Compatibility
The following table highlights how particular capacity configuration aspects of a BCM 4.0 system will impact
migration to a BCM 5.0 system.
Table 7 - BCM 4.0 to BCM 5.0 Capacity Considerations
Configured Option Compatibility Impact
Greater than 130 lines
configured.
Migration to BCM 5.0 will result in a reduction of line count to 130 or less.
DMM will drop reduce IP Trunk line count first, and if necessary continue by
removing DTM interfaces from the source’s data until 130 or fewer lines exist to
be applied to the target.
Document Status: Issue Business Communications Manager Revision: 01.00
Data Migration Manager Page 36 of 36
 Loading...