

Page 1

NN40110-305 3.0
September 10, 2010
Avaya
Digital Mobility Pre-Configured Bundle
Quick Setup Guide
Page 2

2
Digital Mobility Pre-Configured Bundle
Quick Setup Guide
Before You Begin
This quick guide provides all the necessary information for a successful installation of the Avaya Pre-configured
Digital Mobility Bundle. With this pre-configured bundle in your hand, you will save a lot of time used on the
system installation. When following this guide, you should count on an installation time of only 30 minutes for the
small bundle and only 45 minutes for the large bundle. This guide assumes the following:
• that Norstar/BCM is installed and is working correctly
• that the installer knows how to set up Norstar/BCM
• that any building cabling has been pulled to the place where the base stations are to be placed, and that cables
for the digital station interface to the Norstar or BCM is in place
For more information on the installation and configuration of the Avaya Digital Mobility System not covered by
this quick guide, please refer to Avaya Digital Mobility System Installation and Configuration guide (N0000623
Rev. 1.5).
Note: To determine location of the base stations refer to the above mentioned installation guide and to the Avaya
Digital Mobility Deployment Guide (NN40110-304 Rev. 1.2).
Hardware Summary
Please remove all boxes from the master container and verify that all parts are included in the shipment before
continuing with this guide. Inside the master container you will find several boxes containing:
Small Pre-configured Bundle Large Pre-configured Bundle
1 pcs. DMC080 1 pcs. DMC320
1 pcs. Base Station 2 pcs. Base Station
2 pcs. 7439 or 7449 Handset 6 pcs. 7439 or 7449 Handset
2 pcs. Belt Clip 6 pcs. Belt Clip
2 pcs. Charger 6 pcs. Charger
2 pcs. Power Adapter for the
charger
6 pcs. Power Adapter for the charger
1 pcs. Cable for Base Station (2 m
long, RJ45 one end, RJ11 other
end)
Avaya Digital Mobility Pre-Configured Bundle - Quick Setup Guide - NN40110-305 3.0
2 pcs. Cable for Base Station (2 m
long, RJ45 one end, RJ11other end
Page 3

3
DMC080
DMC320
Base Station
1.
3.
5.
2.
1. 7439 Handset
2. 7449 Handset
3. Belt clip
4.
4. Charger
6.
5. Two meter long base station cable (RJ45 one end,
RJ11 the other end).
Note: Can be used to connect DMC to a single base
station or between the DMC and building wiring
closet
6. Power adapter for the charger.
Avaya Digital Mobility Pre-Configured Bundle - Quick Setup Guide - NN40110-305 3.0
Page 4

DMC Hardware Mounting (Optional)
Holes no. 1
Holes no. 2
4
Mount the wall mount bracket to the wall using three 10 x 2.5 cm (1
inch) round-head wood screws.
Install the screws in the three holes labelled “1” or the three holes
labelled “2”.
Note: The DMC Wallmount Bracket is optional.
Base Station Mounting
Screw
Cable
hole
Screw
Press the DMC against the wall mount bracket and slide the module
down until it clicks in place.
Pull the cable through the wall bracket and mount the wall bracket
on the wall using the screws accompanying the base station.
Do not fasten the screws completely to allow for adjustments of the
wire length when connecting the wire to the base station.
Connect the plug to the rear of the base station
Avaya Digital Mobility Pre-Configured Bundle - Quick Setup Guide - NN40110-305 3.0
Page 5

5
Click the base station to the wall bracket.
When the mounting of the hardware is complete, you can start wiring the base station to the DMC.
Wiring the Base Station to the DMC
Connect the base station cable to the DMC.
Connect the digital station ports to the DMC.
Connect the AC power source to the DMC.
Note: To add more base stations, please refer to Avaya Digital Mobility System Installation and Configuration
guide (N0000623 Rev. 1.2)
Note: The supplied base station cable should only be used to connect one base station and only if the location of
the base station is within the cable length of the DMC. Otherwise the supplied cables can be used to connect the
DMC to the building wiring, for example at a patch panel or bix bloc.
DMC - RJ45 Connection Diagram
DMC080 - RJ45 Connector
Base Station Pin
5-41
2-12
DMC320 - RJ45 Connector 1
Base Station Pin
5-41
2-12
6-33
8-74
DMC320 - RJ45 Connector 2
Base Station Pin
5-45
2-16
6-37
8-78
Avaya Digital Mobility Pre-Configured Bundle - Quick Setup Guide - NN40110-305 3.0
Page 6

6
Cable Delay Measurement
After wiring the base station the first time, you must measure the cable delay in order to synchronize the base
station . The synchronization ensures seamless handover. The master handset is used for this task, and the whole
process will last for about three minutes.
Press
MENU . Go to EXT. SERVICE by pressing >.
OK (✓). Go to CONFIG. DMC by pressing >.
Press
Press
OK( ✓). Go to CABLE DELAY by pressing >.
OK( ✓). Go to MEASURE ALLby pressing >.
Press
OK( ✓).
Press
While measuring the cable delay, the handset display is dimmed.
The system will restart automatically after the cable delay measurement has been completed.
Note: The system is rebooted and all calls are dropped. When restarting after a cable delay measurement, reliable system performance will be achieved after a couple of minutes.
Avaya Digital Mobility Pre-Configured Bundle - Quick Setup Guide - NN40110-305 3.0
Page 7
7
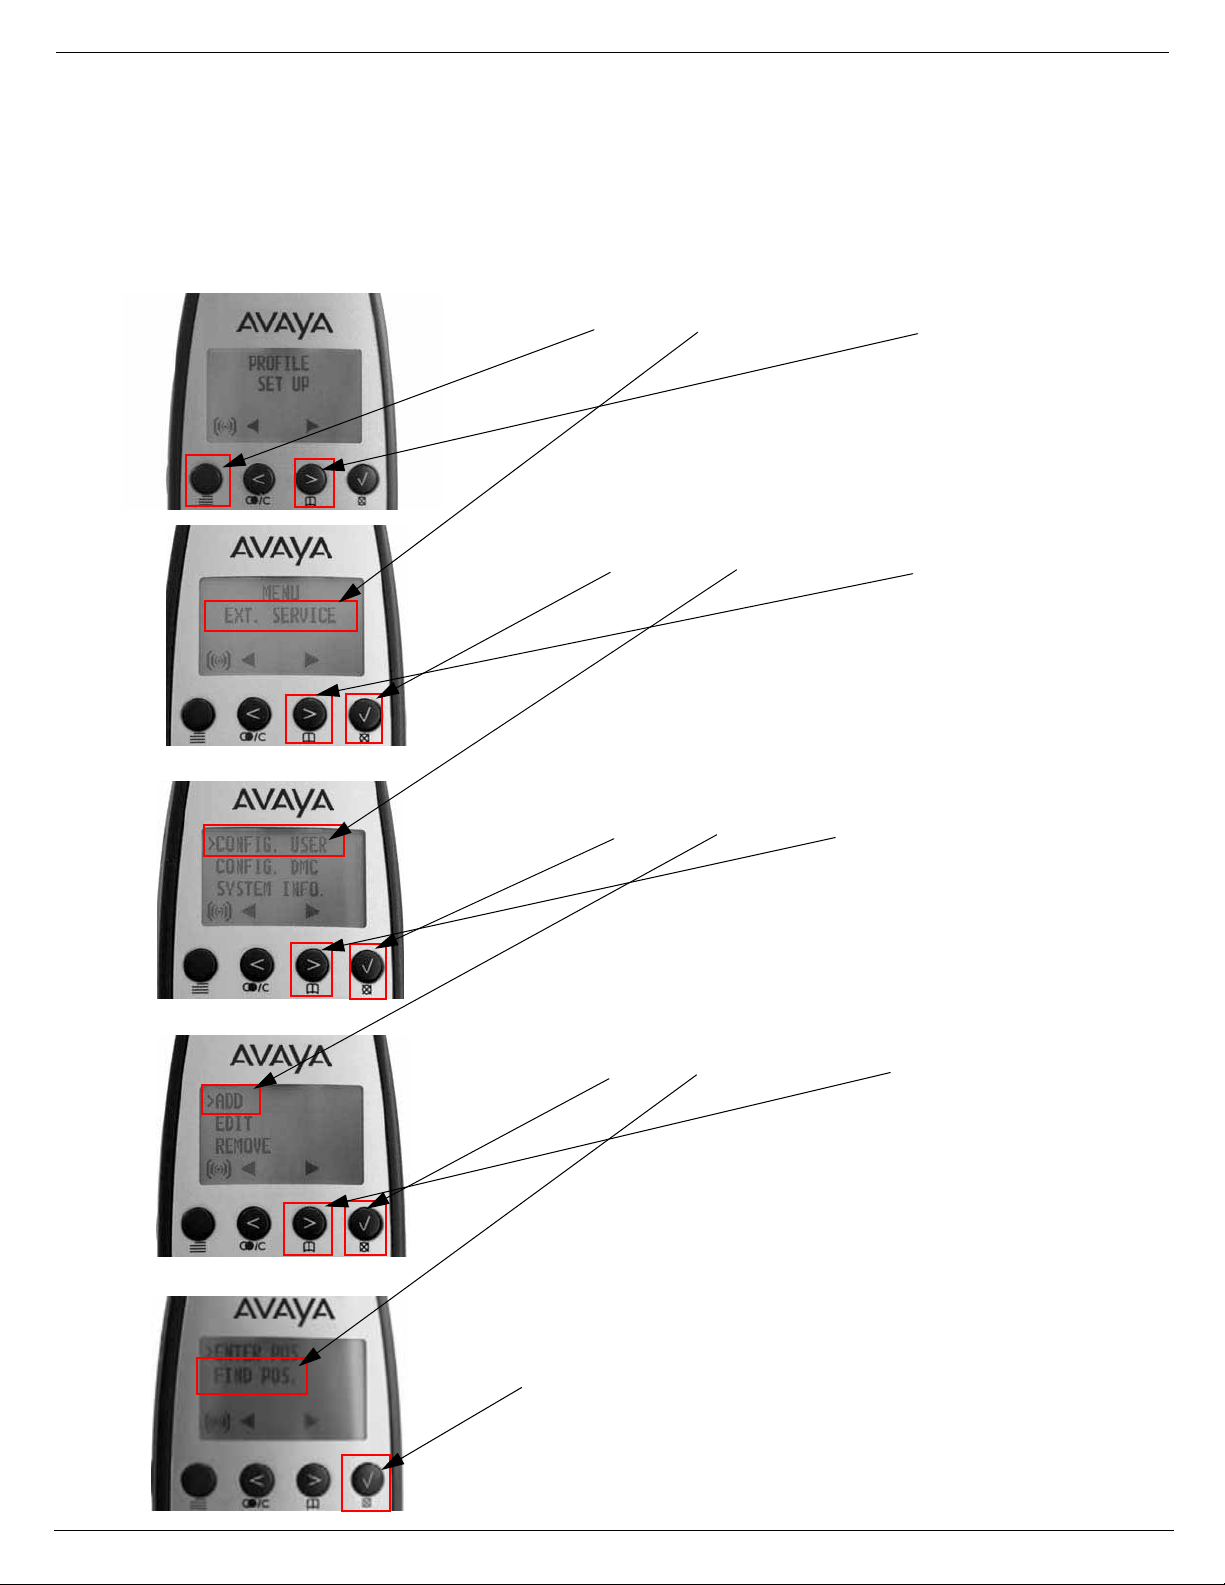
Registration of Additional Handsets to Existing System Using Master Handset
You must register and subscribe additional handsets before you can use them. When registering you use the master handset, and when subscribing you use each registered handset. Please note that all handsets are delivered as master handsets.
To disable this capability on selected handsets using the master handset, please refer to chapter 9 (Handset Management:
Changing Special Rights) of the Avaya Digital Mobility System Installation and Configuration guide. The registration
process will last for about 1 minute for each handset. Please go through the following registration steps:
Press MENU . Go to EXT. SERVICE by pressing >.
OK (✓). Go to CONFIG. USER by pressing >.
Press
OK( ✓). Go to ADD by pressing >.
Press
OK( ✓). Go to FIND POS. by pressing >.
Press
All positions and directory numbers of the system can now be displayed using the < > keys. Find the wanted positions.
Press
OK( ✓). IPEI appears in the display. Type the serial no. of the
handset.
Avaya Digital Mobility Pre-Configured Bundle - Quick Setup Guide - NN40110-305 3.0
Page 8

8
The IPEI serial number is found on the label behind the battery pack.
Alternatively, press *99984*/OK on the handset to be registered. The
serial number is now shown in the display.
Press
OK( ✓). AC appears in the display.
Press
OK( ✓). Go to NO SPEC. RIGHTS by pressing >.
OK( ✓). Go to PRIMA or SECOND by pressing >.
Press
Secondary is only and option if the handset is being registered on a
linked system.
Press
OK(✓).
PRIMA Ch. No. appears in the display. Type the TCM loop number of
the chosen Primary or Secondary DMC, and then press
OK(✓).
SUCC. appears in the display, and the registration has succeeded.
To register another handset, press
OK( ✓) and repeat the above men-
tioned steps.
Press
MENU to exit.
Avaya Digital Mobility Pre-Configured Bundle - Quick Setup Guide - NN40110-305 3.0
Page 9

9
Subscribing Additional Handsets Using Actual Handset
Subscription of handsets requires the use of each registered handset. Please note that the DMC is set to allow
subscription. To turn this off using the master handset please refer to chapter 7 (Configuring the DMC:
Configuring the DMC through the Master Handset: Subscription Setting) of the Avaya Digital Mobility System
Installation and Configuration guide. The subscription process will last for about 30 seconds for each handset.
Please go through the following subscription steps:
Press MENU . Go to MENU LOGIN by pressing >.
OK ( ✓). Go to SUBSCRIPTION CREATE by pressing >.
Press
OK ( ✓). The handset searches for the serial no. of the system.
Press
Use the < > keys to scroll between the IDs systems if there is more
than one system available. During subscription, the handset
searches for free positions and performs subscription on the first
free position.
As soon as the correct serial no. of the system appears in the display, press
OK ( ✓).
The serial number is located on the label on the rear of the DMC.
Enter the AC (Authentication Code: The AC is a customer-defined
optional subscription pin code of a maximum of eight digits) using
the keyboard, and press
OK ( ✓) .
An antenna symbol appears on the display to indicate a successful
subscription. If not, the subscription has failed and the procedure
must be carried out again.
Avaya Digital Mobility Pre-Configured Bundle - Quick Setup Guide - NN40110-305 3.0
Page 10

10
How to get help
This section explains how to get help for Avaya products and services.
Getting Help from the Avaya Web Site
The best way to get technical support for Avaya products is from the Avaya Technical Support Web site:
http://support.avaya.com
This site provides quick access to software, documentation, bulletins, and tools to address issues with Avaya
products. More specifically, the site enables you to:
• download software, documentation, and product bulletins
• search the Technical Support Web site and the Avaya Knowledge Base for answers to technical issues
• sign up for automatic notification of new software and documentation for Avaya equipment
• open and manage technical support cases
Getting Help over the Phone from an Avaya Solutions Center
If you don’t find the information you require on the Avaya Support Web site, and have an Avaya support contract,
you can also get help over the phone from an Avaya Solutions Center.
Contact Avaya Support at +1-866-462-8292.
Getting Help through an Avaya Distributor or Reseller
If you purchased a service contract for your Avaya product from a distributor or authorized reseller, contact the
technical support staff for that distributor or reseller.
Avaya Digital Mobility Pre-Configured Bundle - Quick Setup Guide - NN40110-305 3.0
14184604-HD, ED3
 Loading...