

Page 1

DEFINITY® Business Communications
System and GuestWorks™
server
Issue 3.0
Console Quick Reference
Lucent Technologies —
formerly the communications
systems and technology
units of AT&T
555-231-735
Comcode 107883233
Issue 2
April 1997
Page 2

Copyright 1997, Lucent Technologies
All Rights Reserved
Printed in U.S.A.
Notice
Every effort was made to ensure that the information in this book was
complete and accurate at the time of printing. However, information is
subject to change.
Your Responsibility for Your System’s Security
Toll fraud is the unauthorized use of your telecommunications system by
an unauthorized party, for example, persons other than your company’s
employees, agents, subcontractors, or persons working on your company’s behalf. Note that there may be a risk of toll fraud associated with
your telecommunications system and, if toll fraud occurs, it can result in
substantial additional charges for your telecommunications services.
Y ou and your system manager are responsible for the security of your
system, such as programming and configuring your equipment to prevent unauthorized use. The system manager is also responsible for reading all installation, instruction, and system administration documents
provided with this product in order to fully understand the features that
can introduce risk of toll fraud and the steps that can be taken to reduce
that risk. Lucent Technologies does not warrant that this product is
immune from or will prevent unauthorized use of common-carrier telecommunication services or facilities accessed through or connected to it.
Lucent Technologies will not be responsible for any charges that result
from such unauthorized use.
Lucent Technologies Fraud Intervention
If you suspect that you are being victimized by toll fraud and you need
technical support or assistance, call the Lucent Technologies National
Customer Care Center support line at 1-800-643-2353. Outside the continental United States, contact your local Lucent Technologies authorized representative.
Federal Communications Commission Statement
Part 15: Class A Statement. This equipment has been tested and found
to comply with the limits for a Class A digital de vice, pursuant t o P art 15
of the FCC Rules. These limits are designed to provide reasonable protection against harmful interference whe n the equipment is operated in a
commercial environment. This equipment generates, uses, and can radiate radio frequency energy and, if not installed and used in accordance
with the instruction manual, may cause harmful interference to radio
communications. Operation of this equipment in a residential area is
likely to cause harmful interference, in which case the user will be
required to correct the interference at his own expense.
Part 68: Network Registration Number. This equipment is registered
with the FCC in accordance with Part 68 of the FCC Rules. It is identified by FCC registration number AS593M-13283-MF-E, ringer equivalence 3.0A.
Canadian Department of Co mmunications (DOC)
Interference Information
This digital apparatus does not exceed the Class A limits for radio noise
emissions set out in the radio interference regulations of the Canadian
Department of Communications.
Tradem arks
DEFINITY is a registered trademark of Lucent Technologies.
GuestWorks is a trademark of Lucent Technologies.
Ordering Information
Write or Call:
Lucent Technologies BCS Publications Center
P . O. Box 4100, Crawfordsville, IN 47933
Voice 1-800-457-1235 Intl Voice +1-317-361-5353
Fax 1-800-457-1764 Intl Fax +1-317-361-5355
Order: Document No. 555-231-735
For more information about Lucent Technologies documents, refer to the
section entitled “Related Documents” in “About This Document.”
Product Support
To receiv e support on your product, call 1-800-242-2121. Outside the
continental United States, contact your local Lucent Technologies authorized representative.
European Union Declaration of Conformity
Lucent Technologies Business Communications Systems declares that
DEFINITY equipment specified in this document conforms to the referenced European Union (EU) Directives listed below:
Single-Carrier Cabinet (SCC), AC Powered with 25 Hz ring generator
EMC Directive 89/336/EEC
Low Voltage Directive 73/23/EEC
Comments
To comment on this document, return the comment form .
Lucent Technologies Web Page
The World Wide Web home page for Lucent Technologies is
http://www.lucent.com
Acknowledgment
This document was prepared jointly by the Lucent Technologies Customer Training & Information Products Organization and the BCS Product Documentation Development group, Bell Laboratories, Denver, CO
80234-2703.
Comcode 107883233
Issue 2, April 1997
The “CE” mark affixed to
the equipment means that it
conforms to the above
Directives.
Page 3

Contents
■ About This Document 1
■ Basic Operation 5
■ Feature Operation 27
Reasons for Reissue 1
Assumptions 2
Conventions 2
Related Documents 4
Console Layout 5
Status Lamps 9
Call Purpose Indicators 10
Administrable Features 12
Activate the Console 13
Deactivate the Console 13
Answer Calls 14
Make Calls 15
Forced Release 18
Split Calls 19
Split Swap 20
Auto Start and Don’t Split 24
Class of Restriction 25
Night Service 26
Attendant Backup 27
Busy Verification 29
Call Forwarding 30
Call Park 32
Issue 2 April 1997
i
Page 4

Contents
Conference 33
Crisis Alert 34
Emergency Access to Attendant 36
Hold 37
Integrated Directory 38
Intrusion 40
Loudspeaker Paging 42
Override 44
Recall 46
Serial Calling 47
Transfer 49
Trunk Identification 52
Issue 2 April 1997
ii
Page 5

Console Operations
About This Document
This document contains basic telephony procedures for using the DEFINITY®
Business Communications System and GuestWorks
console. These procedures are done by the attendants or front desk personnel.
All office staff personnel that operate the attendant console or do console
operations at a backup voice terminal should be familiar with these procedures.
If you need extra copies of this document, contact your dealer or order more
copies as described on the inside cover of this document.
™ server
Reasons for Reissue
attendant
This document replaces the
(555-231-735, Issue 1), that was used on Issue 2.0 and earlier systems. This
document is backward compatible with Issue 2.0 and earlier systems, and is
reissued for the following reasons:
■ The hospitality operations have been moved to
Hospitality Operations
■ Additional standard features are now documented here, such as Call
Park, Display Class of Restriction, Busy Verification, and Trunk
Identification.
■ New features have been added, such as Attendant Crisis Alert and Split
Swap.
GuestWorks™ server Console Operations
GuestWorks™ server
, (555-231-741).
Issue 2 April 1997
,
1
Page 6

Assumptions
Assumptions
It is assumed throughout this document that the hotel staff is familiar with the
basic operation of telephones, voice terminals, and attendant consoles. If your
staff has access to a multimedia personal computer, there is training available
on CD-ROM for basic console and voice terminal operations.
Conventions
The following conventions are used in this document:
■ Buttons you press on the console are shown as follows:
Release
The buttons shown in this document use label designations provided by
Lucent T echnologies. Since the button labels can be customized for each
site, some button labeling may have different designations.
Some button labels on the console, such as , span two lines.
Because of line spacing in this document, they are shown across one line
of text, such as .
Serial Call
Serial
Call
■ The term “dial keypad” refers to the touch-tone keypad where you dial
(enter) telephone numbers and feature access codes.
■ When referring to lamps, the reference is to one of two types of lamps
found on the attendant console: the status lamps next to the dial keypad
and the lamps associated with feature and trunk buttons. The status
lamps next to the dial keypad have fixed meanings. Those lamps are
shown as follows:
Position Available
Lamps associated with feature and trunk buttons are identified by their
button label (such as ).
2
Issue 2 April 1997
Normal Mode
Page 7

About This Document
■ Messages appearing on the display are shown as follows:
a= CONFERENCE 2 rc
When the display examples show a value within “arrows” (< >), this
represents a variable that will differ for each example.
■ The term “attendant console” signifies the Model 302B, 302C, or PC
console that is usually found at the front desk. The term “backup voice
terminal” signifies either a Model 8410D or Model 8434 voice terminal
with attendant-type feature buttons. Other multiappearance voice
terminals can be used, but the preferred models are the 8410D
and 8434.
■ When a procedure refers to a “room number,” the procedure is referring
to the extension number of the room. The two numbers are not always
the same.
■ You will hear the following tones during normal operation:
— Dial tone — a steady tone you hear when you select an idle call
appearance.
— Ringback tone — the normal ringing tone you hear after you dial a
guest room or outside number.
— Busy tone — a slow on-off-on-off tone you hear when the person
you are calling is busy.
— Reorder tone — a fast on-off-on-off tone you hear when calling
facilities are not available or are out of order.
— Confirmation tone — a three-burst tone you hear after
successfully using a feature access code.
— Intercept tone — a high-to-low tone you hear when a call or
feature access code is not accepted.
Issue 2 April 1997
3
Page 8

Related Documents
■ The following table lists the features described in this document. Ask your
administrator for these codes and write them down in this table.
Answer Back (for Call Park)
Call Forwarding - All Calls
Activation
Deactivation
Call Forwarding - Busy/Don’t Answer
Activation
Deactivation
Call Park
Trunk Answer Any Station (used
from the backup voice terminals)
Related Documents
Feature Feature Access Code
■ 555-230-700 —
■ 555-230-795 —
■ 555-231-207 —
■ 555-231-741 —
■ 555-231-777 —
Reference
■ 555-231-780 —
Reference
■ 555-231-783 —
Reference
■ 555-231-801 —
GuestWorks™ server Issue 3.0 Documents
4
Issue 2 April 1997
DEFINITY® Console Operations
PC Console Quick Reference User’s Guide
GuestWorks™ server Issue 3.0 Feature Descriptions
GuestWorks™ server Issue 3.0 Hospitality Operations
GuestWorks™ server 8403 Voice Terminal Quick
GuestWorks™ server 8410 Voice Terminal Quick
GuestWorks™ server 8434 Voice Terminal Quick
DEFINITY® Business Communications System and
(CD)
Page 9

Basic Operation
Basic Operation
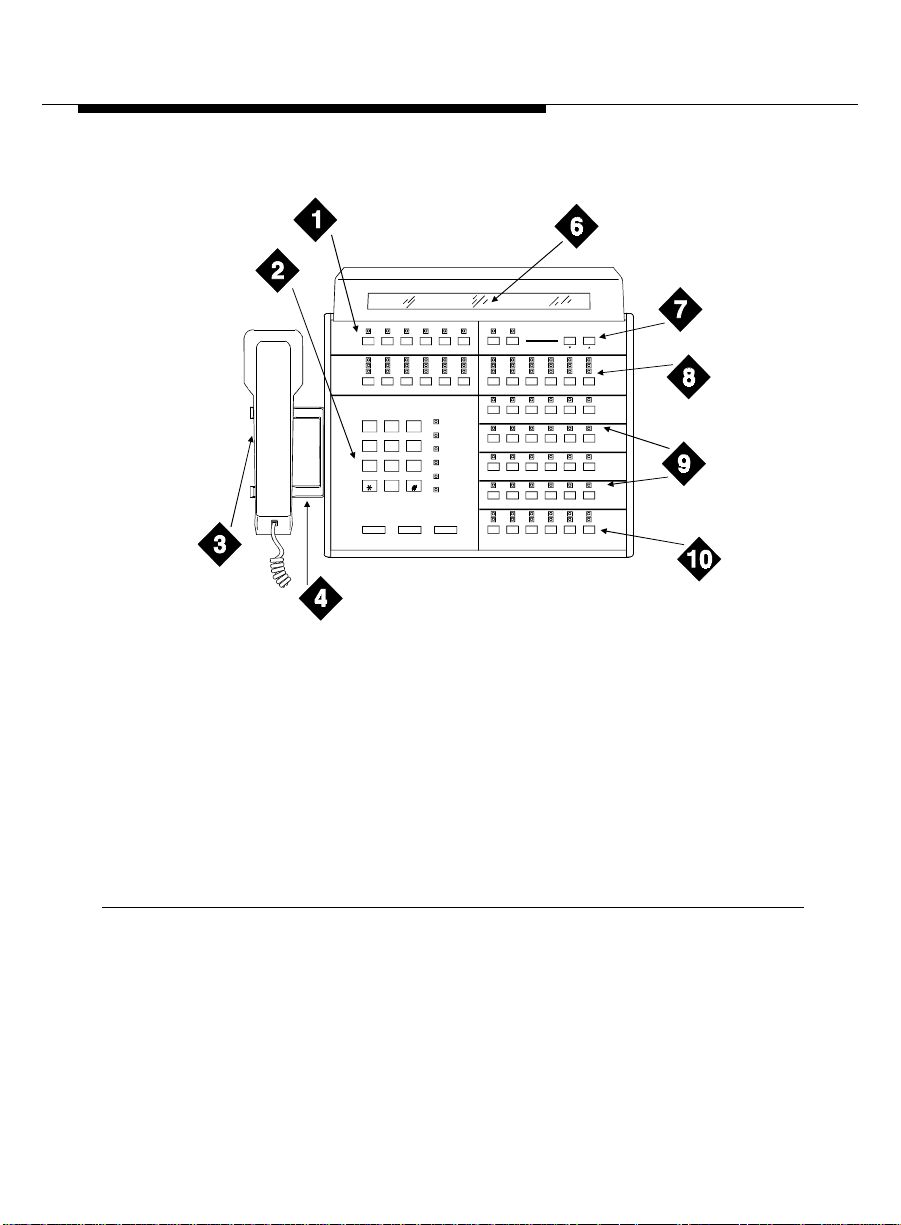
Console Layout
The Attendant Consoles and DXS Selector Console are shown in Figure 1,
Figure 2, and Figure 3.
1) Display Buttons 6) Display
2) Call Processing Area 7) Ringer Volume
3) Handset 8) Trunk Group Select
4) Handset Cradle 9) Feature Buttons
5) Lamp Test Switch 10) Call Appearance
Figure 1. Model 302B Attendant Console
Buttons
Buttons
Issue 2 April 1997
5
Page 10
Console Layout
Ringer
Select Volume
Date
CallsWaiting
CallsWaiting
Warning
Individual
CallsWaiting
Alarm
AlarmR eported
Position
Available
Time
Control
Warning
Busy
Forced
Release
Split Hold
Night Pos
Busy
Control
Warning
Busy
DEF
ABC
3
1
2
GHI
MNO
JKL
4
6
5
PRQS
WXYZ
TUV
7
9
8
0
Cancel Start Release
1) Display Buttons 6) Display
2) Call Processing Area 7) Ringer Volume
3) Handset 8) Trunk Group Select
4) Handset Cradle 9) Feature Buttons
Figure 2. Model 302C Attendant Console
abcde
f
pha302cPDH 042497
Buttons
10) Call Appearance
Buttons
6
Issue 2 April 1997
Page 11
Basic Operation
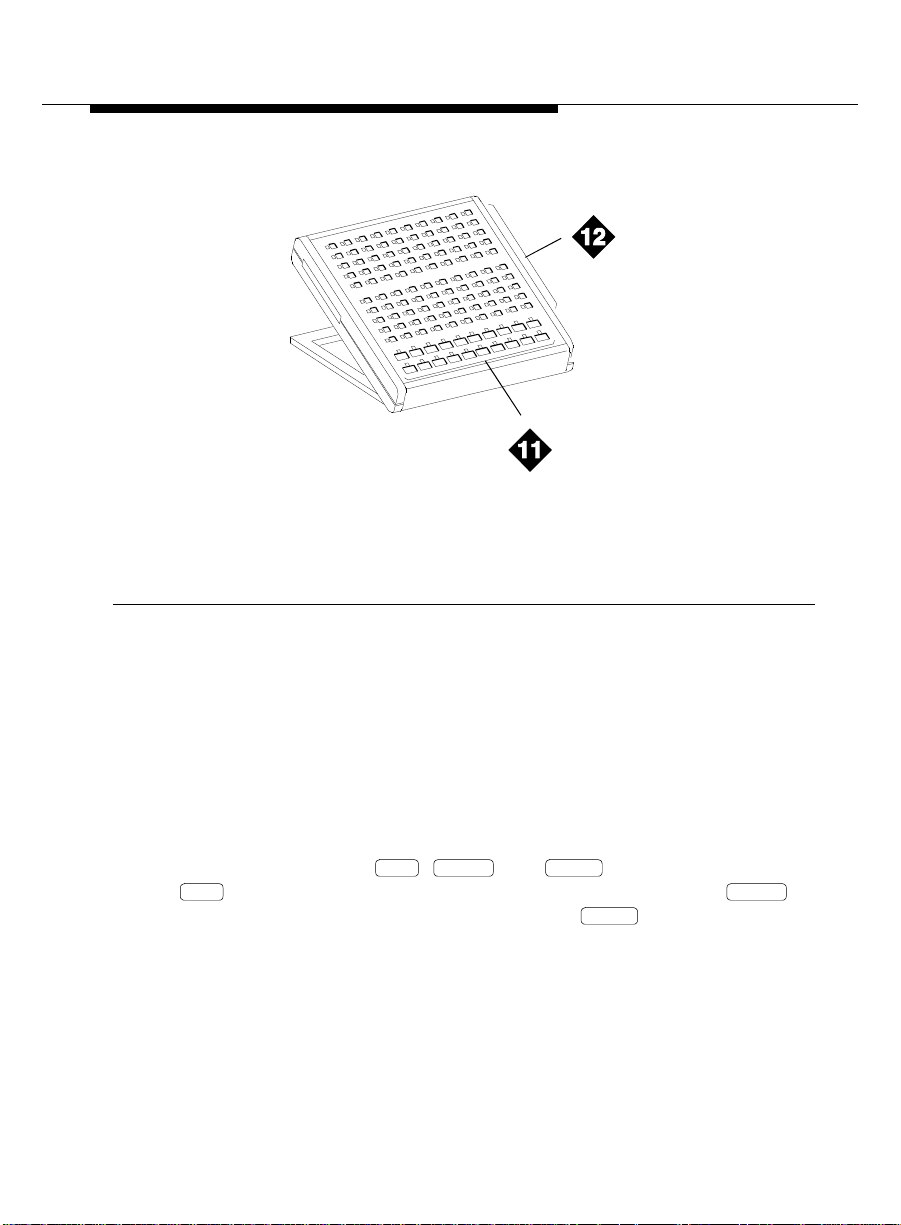
11) DXS Hundreds Group
Select Buttons
12) DXS/BLF Buttons
Figure 3. DXS Selector Console
The following list items correspond with the callouts shown in Figure 1, Figure 2,
and Figure 3. All the feature buttons, trunk access buttons, and display buttons
are on this console. The DXS Selector Console allows you to dial a room
number and view the busy, occupied, and maid status for each room
1. Display Buttons — These eight buttons are used to control access to the
alphanumeric display.
2. Call Processing Area — This area consists of the dial keypad, some fixed
status lamps, and the , , and buttons. You use the
Start Cancel
button to get an idle call appearance to place a call, the
Start Cancel
button to cancel a dialing instruction, and the button to end a call.
Release
Release
3. Handset — This is a standard handset with coiled cord and a dual-prong,
phone-plug connector. The handset can be unplugged from the console
and replaced with an amplified headset that also uses a dual-prong,
phone-plug connector.
Issue 2 April 1997
7
Page 12

Console Layout
7000
4. Handset Cradle — This is where you place the handset when it is not in
use. If you use a headset, the handset cradle can be removed from the
console.
5. Lamp Test Switch — This is a switch under the front panel of the
Model 302B console that allows you to test the console lamps. The test
starts when you press the switch and stops when you release the switch.
On the Model 302C console, you must simultaneously press and hold the
Pos Busy Volume Up
starts when you press the buttons and stops when you release the
buttons.
6. Display — This is a single-line, 40-character, alphanumeric display that
shows call progress and feature usage information.
7. Ringer Volume — This controls the ringer volume for incoming calls.
Incoming emergency calls (Page 34 and Page 36) ring at a louder fixed
volume that you cannot control.
and buttons to test the console lamps. The test
NOTE:
Always check your ringer volume to make sure it is set at an
audible level. If the console should experience a power outage, the
volume level is reset to the lowest setting.
8. Trunk Group Select Buttons — These 12 buttons are assigned with trunk
access codes that allow access to outside lines.
9. Feature Buttons — These 24 buttons are used to access features such
as Do Not Disturb and Automatic Wakeup.
10. Call Appearance Buttons — These six call appearance buttons are used
to select a call appearance and are labeled through . Pressing one
of them is similar to pressing the button, but you can specify which
Start
a
f
appearance you want.
11. DXS Hundreds Group Select Buttons — These buttons on the DXS
selector console are assigned the first digit or the first two digits of each
group of 100 rooms. For example, if you have rooms numbered from
7000 to 7099, there will be a button labeled .
8
Issue 2 April 1997
Page 13

Basic Operation
12. DXS/BLF Buttons — These are known as the direct extension
select/busy lamp field (DXS/BLF) buttons. They are used with the
hundreds group select buttons to place calls to guest rooms and to
determine the status of guest rooms.
Status Lamps
The buttons on th e console have status lamps associated with their use. These
status lamps come on, go off, or flash as you use the console features. When
the lamps come on, the feature is active. When the lamps go off, the feature is
inactive. When the lamps flash three times, you have pressed the wrong button
or you cannot access the feature at this time.
There are also some status lamps not directly associated with buttons, and they
are located next to the dial keypad.
Calls Waiting
■
Calls Waiting Warning
■
waiting in queue limit has been reached. When this happens, the backup
voice terminals are alerted. The queue limit is an administrable value.
— This lamp lights when there is one call in the queue.
— This lamp lights when the attendant calls
Individual Calls Waiting
■
— This lamp lights when a call is made to the
console’s individual extension number and the call is in queue to be
answered.
Alarm
■
— This lamp lights when the server has detected a failure. Follow
local procedures if this lamp is lit.
Alarm Reported
■
— This lamp lights when an alarm prompts the server
to dial up the remote maintenance center, report the alarm, and the
maintenance center acknowledges the alarm. For some installations, this
remote alarm reporting is not available.
Position Available
■
— This lamp lights when the console is available to
handle a call.
Issue 2 April 1997
9
Page 14

Call Purpose Indicators
The trunk group select buttons have three status lamps associated with each
button.
Control
■
— This lamp is on if the trunk group has controlled restrictions
administered.
Warning
■
— This lamp is on when some trunks are busy. Select an
alternate trunk group if possible, or use this group if necessary.
Busy
■
— This lamp is on when all the trunks in a trunk group are busy.
You must select another trunk group or try again later.
Call Purpose Indicators
The following is a list of call purpose indicators that are displayed when calls are
redirected to the attendant console or to a backup voice terminal:
b or B — Busy. Indicates that the called guest is busy and the call is
■
redirected by Call Coverage.
co — Controlled Outward Restriction Call. Indicates that a guest
■
attempted to make an outgoing call, but the room has Outward
Restriction applied.
cs — Controlled Station-to-Station Restriction Call. Indicates that a guest
■
attempted to make a call to another guest room, but the room has
Station-to-Station Restriction applied.
ct — Controlled Termination Restriction Call. Indicates that a guest or an
■
outside caller attempted to make a call to a guest room, but the called
room has Termination Restriction applied.
d — Don’t Answer or Cover. Indicates that the guest did not answer the
■
telephone, and the call is redirected to the attendant through Call
Coverage.
f — Call Forwarding. Indicates that a call has been redirected using Call
■
Forwarding.
ic — Intercept Treatment. Indicates that an incoming call has been
■
redirected as a result of intercept treatment.
10
Issue 2 April 1997
Page 15

Basic Operation
ld — Direct Inward Dialing (DID) Listed Directory Number (LDN) Call.
■
Indicates that an incoming call came in on the LDN over a DID trunk.
rc — Recall Call. Indicates that a call being held on the console is
■
requesting more help.
rt — Return Call. Indicates that a call transferred to another telephone or
■
parked at an extension was not answered, and has returned to the
console for processing.
s — Send All Calls. Indicates that a call was redirected because the
■
called party used Send All Calls.
sc — Serial Call. Indicates a recall to the console when an outside caller
■
is making a series of calls to different guests at the hotel.
tc — T runk Control. Indicates that a guest attempted to place a call using
■
a trunk that has controlled access.
Issue 2 April 1997
11
Page 16

Administrable Features
Administrable Features
Some of the features on the attendant console are
administrable
, which means
that you may or may not be able to use the feature, depending on whether the
server is administered for that feature. The administrable features include the
following:
■ Attendant Lockout — If Attendant Lockout is on, you cannot reenter a
conference call.
■ Attendant Auto Start — If Attendant Auto Start is on, you do not have to
press the button or a call appearance button to make a call. See
Start
Page 24 for an explanation of Auto Start.
■ Attendant Tone — If Attendant Tone is off, you will not hear busy tones,
dial tones, or ringback tones for internal calls.
■ Auto Answer — If Auto Answer is on, incoming calls are answered
automatically, which means that you do not have to press a call
appearance button. This feature can be used only when you are using a
headset.
■ Display Languages — The display can show messages in four different
languages: U.S. English, French, Italian, and Spanish. This is an
administrable option.
12
Issue 2 April 1997
Page 17

Basic Operation
Activate the Console
To use the attendant console, you must first activate the console by doing the
following:
1. Plug in the handset or the headset on either side of the console.
2. If the lamp is on, press the button.
Night Night
■ The lamp goes off.
■ The
Night
Positi on Available
lamp goes on.
Deactivate the Console
If you do not want anyone using the attendant console after hours, do the
following to deactivate the attendant console:
1. Unplug the handset or the headset.
■ All lamps on the console go off.
Issue 2 April 1997
13
Page 18

Answer Calls
Answer Calls
To answer calls from guest rooms or from callers outside of the hotel, do the
following:
1. A call comes in to the console:
■ You hear a 1-burst repetitive ring.
■ The guest name (if available) and room number are displayed. If
this is a call from outside your hotel, incoming trunk information is
displayed.
■ The
■ A call appearance lamp flashes.
Position Available
lamp goes off.
2. Press the call appearance button where the lamp is flashing.
■ The ringing stops.
■ The call appearance lamp stops flashing, but remains on.
■ You are connected to the calling person.
3. To end the call, press the button.
■ You are disconnected from the call.
■ The call appearance lamp goes off.
■ The display goes blank.
■ The
■ The console returns to the normal operating mode.
Position Available
Release
lamp goes on.
14
Issue 2 April 1997
Page 19

Basic Operation
Make Calls
You can make calls to rooms using the normal dial keypad or using the DXS
selector console. To make outside calls, you can use the normal dial keypad or
the trunk group select buttons.
To make calls to rooms using the selector console, do the following (use room
number 7062 as an example):
1. At the selector console, press the hundreds group select button that is
marked . This button controls all rooms that start with 70.
7000
2. Press the button in the DXS/BLF button field.
■ A call appearance lamp goes on.
■ The
■ You hear a ringback tone.
■ The display shows the dialed number.
■ The ringback tone stops when the called party answers.
3. To end the call, press the button.
■ You are disconnected from the call.
■ The call appearance lamp goes off.
■ The display goes blank.
■ The
■ The console returns to the normal operating mode.
62
Positi on Available
Release
Positi on Available
lamp goes off.
lamp goes on.
NOTE:
Before the call completes, you can press the or
button to end the call attempt. If you press , you get another
dial tone. If you press , the console returns to the normal
Release
operating mode.
Cancel
Cancel
Release
Issue 2 April 1997
15
Page 20

Make Calls
To make calls to rooms not using the selector console, do the following:
1. Press the button or an idle call appearance button.
■ You hear a dial tone.
■ The call appearance lamp goes on.
■ The
Start
Position Available
lamp goes off.
2. Dial the room number.
■ You hear a ringback tone.
■ The display shows the dialed number.
■ The ringback tone stops when the called party answers.
3. To end the call, press the button.
■ You are disconnected from the call.
■ The call appearance lamp goes off.
■ The display goes blank.
■ The
■ The console returns to the normal operating mode.
Position Available
Release
lamp goes on.
NOTE:
Before the call completes, you can press the or
button to end the call attempt. If you press , you get another
dial tone. If you press , the console returns to the normal
Release
Cancel
Cancel
operating mode.
Release
16
Issue 2 April 1997
Page 21

Basic Operation
Making a call to an outside number requires an outgoing trunk. You can access
an outgoing trunk in two different ways:
■ You can make a call to an outside number by dialing a code for the
or
Automatic Route Selection feature or a specific trunk group,
■ You can make a call to an outside number by pressing the trunk group
select button for the desired trunk.
NOTE:
Trunk group select buttons are not available at some locations. If
the trunk group select buttons are not administered, dial the trunk
access codes using the dial keypad.
To make a call to an outside number, do the following:
1. Do one of the following:
a. Press the button or an idle call appearance button.
■ You hear a dial tone.
■ The call appearance lamp goes on.
■ The
Start
Positi on Available
lamp goes off.
b. Press a trunk group select button. Continue with Step 3.
■ The call appearance lamp goes on.
■ The
■ The trunk group select
Positi on Available
lamp goes off.
Busy
lamp goes on.
2. Dial the trunk access code or dial the Automatic Route Selection feature
access code.
Issue 2 April 1997
17
Page 22

Forced Re lease
Cancel
3. Listen for the call progress tones. If you hear:
■ Dial tone, this is a valid trunk access code. Continue with Step 4.
■ Busy or reorder tone, this indicates that there are no outgoing
■ Intercept tone, this is an invalid code. Press the button and
4. Dial the outside number, and listen for call progress tones. If you hear:
■ Ringback tone and the call is answered, go to Step 5. If the call is
■ Busy tone or intercept tone, the call cannot be completed as
trunks available. Press the button and redial, or press the
Release
button and try again later.
redial, or press the button and try again later.
Release
not answered, press the button and redial, or press the
Release
button and try again later.
dialed; press the button and redial, or press the
Cancel
Cancel
Cancel
Release
button and try again later.
5. To end the call, press the button.
■ You are disconnected from the call.
■ The call appearance lamp goes off.
■ The display goes blank.
■ The
■ The console returns to the normal operating mode.
Position Available
Release
lamp goes on.
Forced Release
While making calls and answering calls, you can get in a situation where you
cannot cancel or release a call. If this happens, use the button.
This will disconnect you from the current call and return the console to normal
operating mode. Use this feature only when necessary.
18
Issue 2 April 1997
Forced Release
Page 23

Basic Operation
Split Calls
You can temporarily disconnect from a call, make a call to another person, and
split
then connect the two people together. You must always
transfer an incoming call to a guest room or to an outside number. Splitting
allows you to do the following:
■ Either talk with the second person to announce the waiting call, or drop
out of the call before the second person answers.
■ Connect the two calls together.
■ Join the calling and called parties in a 3-way connection from which you
can later drop out.
■ Return to the split calling person if the called person does not answer or
does not want to accept the call.
This feature is automatically activated after you answer an incoming call, if you
do any of the following:
■ Dial a room number using the DXS Selector Console.
a call in order to
■ Press the button, and then dial a number (for example, a room
Start
number, a trunk access code, or the Automatic Route Selection feature
access code).
■ Press a trunk group select button.
Issue 2 April 1997
19
Page 24

Split Swap
While the calling person is split from the console, the lamp is on. The split
condition is canceled, and the lamp goes off when you do one of the
Split
Split
following:
■ Press the button to connect the split person to the called person
Release
and disconnect the console.
■ Press the button to establish a 3-way connection with you, the
Split
calling person, and the called person.
■ Press the button to cancel the outgoing call attempt, and
Cancel
reconnect to the calling person.
The steps for activating and canceling the split condition are given in "Transfer"
on Page 49.
Split Swap
Split Swap allows the attendant to alternate between active and split calls. This
operation may be useful when the attendant may need to transfer a call, but first
must talk with each party before completing the transfer. This operation is done
using the button.
Split Swap
!
SECURITY ALERT:
The Split Swap operation can involve transferring calls per the
callers requests. See “Transfer” on Page 49 for more information
concerning security issues.
To use the Split Swap feature, do the following:
1. While active on a call, pr ess the button.
■ You hear a dial tone.
Split
20
Issue 2 April 1997
■ The lamp goes on.
Start
Page 25

Basic Operation
Split Swap
2. Dial the number for the person to whom you may transfer the call.
■ You hear a ringback tone.
■ The display shows the number you are calling.
3. After the person answers, press the button to alternate
between the original call and the new call.
■ The lamp goes on and will stay on as long as you
Split Swap
alternate between calls.
4. Use
one
of the following steps, a, b, c, or d, to complete the call.
a. T o set up a 3-way connection, press the button.
■ You and the other two callers are connected.
■ The lamp goes on.
■ The display shows a conference call in progress.
■ The lamp goes off and the button can no longer
Split
Split Swap
Split
be used for this call.
To drop out of the 3-way connection, press .
■ You are disconnected from the call.
■ The lamp goes off.
■ The call appearance lamp goes off.
■ The display goes blank.
■ The
■ The console returns to the normal operating mode.
Split
Positi on Available
lamp goes on.
Release
Issue 2 April 1997
21
Page 26

Split Swap
Cancel
b. To transfer the call, press the button (this joins all three
parties together), followed by the button.
■ You are disconnected from the call.
■ The lamp goes off.
■ The call appearance lamp goes off.
■ The display goes blank.
■ The
■ The console returns to the normal operating mode.
Split
Position Available
c. While alternating between calls using the button, you
Split
Release
lamp goes on.
Split Swap
may want to disconnect one of the calls. Press the button
when you are connected with the caller you wish to disconnect.
■ The active call is disconnected.
■ The console is connected to the other caller.
■ The lamp goes off.
To disconnect the caller, press .
■ You are disconnected from the call.
■ The call appearance lamp goes off.
■ The display goes blank.
Split Swap
Release
22
Issue 2 April 1997
■ The
■ The console returns to the normal operating mode.
Position Available
lamp goes on.
Page 27

Basic Operation
d. While alternating between calls using the button, you
may want to place one of the calls on hold. Press the
Split Swap
Hold
button when you are connected with the caller you wish to place
on hold.
■ The
■ The call appearance lamp goes off.
■ The active call is placed on hold.
■ The console is connected to the other caller.
■ The lamp goes off.
To disconnect the caller, press .
■ You are disconnected from the call.
■ The call appearance lamp goes off.
■ The display goes blank.
■ The
■ The console returns to the normal operating mode.
On Hold
Split Swap
lamp at the call appearance button goes on.
Positi on Available
Release
lamp goes on.
Issue 2 April 1997
23
Page 28

Auto Start and Don’t Split
Auto Start and Don’t Split
Auto Start is an administrable feature that allows you to initiate a phone call by
pressing any button on the dial keypad. If you are on an active call and you dial
digits on the keypad, the console automatically splits the call and begins dialing
the next call. When the Auto Start feature is enabled, the button is
Start
disabled.
To disable the Auto Start feature, use the Don’t Split feature. This allows the
server to send the digits you dial to the other end. Use the Don’t Split feature if
you need to send touch-tone digits to the far end to pick up answering machine
messages when Auto Start is administered.
Auto Start
To use the Auto Start feature, do the following:
1. To extend (transfer) an active call to another guest room, begin dialing
the digits of the other room number.
■ The active call is automatically split away from the console.
2. Press the button to transfer the call.
Release
Don’t Split
To use the Don’t Split feature, do the following:
1. Press the button to send touch tones on an active call.
2. Dial the keypad digits for the call.
3. Press again to cancel the Don’t Split feature.
24
Issue 2 April 1997
■ The call remains active.
■ The touch tones are sent to the far end.
Don’t Split
Don’t Split
Page 29

Basic Operation
Class (COR)
Class of Restriction
When guests request that you place long-distance or even local calls, you
should check their assigned class of restriction (COR) before you complete the
call. If they are not restricted from certain calls, you may complete the call for
them.
To check on a guest’s COR, do the following:
1. While on an active call, press the button.
■ The lamp goes on.
■ The display shows the guest’s COR value (a two-digit code) and a
Class (COR)
four-character restriction identifier, such as:
a=01 NONE
The COR call restriction identifiers are the following:
■ ORIG — Origination restriction; calls of any type are not allowed
from that extension.
■ OTWD — Outward Restriction; calls to numbers outside of the
property are not allowed from that extension.
■ TOLL — Toll Restriction; toll calls are not allowed from that
extension.
■ NONE — No restrictions are active for that extension.
2. Follow local procedures for handling calls from restricted extensions.
Issue 2 April 1997
25
Page 30

Night Service
Night
Night Service
The Night Service feature prevents calls from terminating at the attendant
console. Calls to the attendant console enter the attendant call waiting queue
and can be answered from the backup voice terminals or by hotel staff at other
voice terminals using the Trunk Answer Any Station feature (see Page 27).
To activate Night Service, do the following:
1. Press the button on the console or the button on the backup
Night Night
voice terminal (only one backup voice terminal can have a button).
■ The lamp goes on at the console and at the backup voice
■ The
Night
terminal that has the button.
Position Available
Night
lamp goes off.
To cancel Night Service (go into day mode), do the following:
1. Press the button at the console or at the backup voice terminal that
has a button.
■ The lamp goes off at the console and at the backup voice
■ The
Night
Night
Night
terminal that has a button.
Position Available
Night
lamp goes on.
26
Issue 2 April 1997
Page 31

Feature Operation
Feature Operation
This section contains user operation for features used from an attendant
console or from a backup voice terminal.
Attendant Backup
The Attendant Backup feature allows you to access most attendant console
features from one or more specially-administered multiappearance voice
terminals. The recommended voice terminals are the Lucent Technologies
Model 8410 and Model 8434. When calls terminate at the attendant console
during normal operation, users at the backup voice terminals can answer
overflow calls by pressing a button or dialing a feature access code. You can
then process the calls as if you are at the attendant console. Procedures for
basic feature operation are documented in the quick reference guides for each
voice terminal.
NOTE:
The Attendant Backup features cannot be used from guest rooms
administered as “client” rooms even if they have a multiappearance voice
terminal.
When the attendant console is in day mode (the lamp is off), you cannot
Night
answer overflow calls at the backup voice terminals until the number of calls
waiting in the attendant queue has reached an administered threshold. Until the
threshold is reached, the only indication the backup voice terminals receive
about calls waiting in queue is when the and the lamps
go on. You can press the button to see how long the call has been
Queue Time
waiting, but you cannot answer the call. The lamp starts flashing
Queue Calls Queue Time
Queue Time
when the time in queue warning level has been reached (this is usually set for
15 seconds). When the calls waiting in queue threshold has been reached, the
backup voice terminals will beep every 10 seconds as long as the number of
calls waiting stays above the threshold. You can then answer calls using the
Trunk Answer Any Station (TAAS) feature access code _____ or an automatic
dialing button administered with that feature access code.
Issue 2 April 1997
27
Page 32

Attendant Backup
When the attendant console is in night mode (the lamp is on), all calls to
Night
the attendant console immediately beep at the backup voice terminals and the
Queue Calls Queue Time
and the lamps go on. You can then answer calls using
the TAAS feature access code _____ or an automatic dialing button
administered with that feature access code.
The following is a typical scenario for answering overflow attendant console
calls from a backup voice terminal:
1. The Calls Waiting In Queue threshold is reached.
■ The backup voice terminals beep and will beep every 10 seconds
until the calls in queue go below the threshold or you shut the
ringer off by pressing the Ringer Cutoff button.
■ The lamp starts flashing.
■ If calls remain in the queue for 15 seconds, the lamp
Queue Calls
Queue Time
starts flashing.
2. Press either the or button.
■ The display shows how long the calls have been waiting in queue
Queue Calls Queue Time
and how may calls are in queue:
OPERATOR Qtime 00:24 calls:5
3. To answer the first call in queue, dial the Trunk Answer Any Station
feature access code _____ or press the automatic dialing button
administered with that feature access code.
4. When finished with the call, hang up.
In addition to answering overflow calls, you can use the backup voice terminals
to handle guest requests such as wakeup calls. To do this, the following feature
buttons must be administered on the backup voice terminal(s):
■ Automatic Wakeup
■ Check-In
■ Check-Out
28
Issue 2 April 1997
Page 33

Feature Operation
■ Do Not Disturb Extension
■ Night Service (a button can be assigned on only one backup voice
Night
terminal)
■ Busy indicators for the attendant console and the other backup voice
terminals.
Busy Verification
The Busy Verification feature allows attendants and backup voice terminal users
to make test calls to see if a trunk is actually busy or out of service.
To use the Busy Verification feature, do the following:
1. At the attendant console or a backup voice terminal, press the
Busy Verify
2. Dial the trunk access code followed by a specific trunk number (such as,
01, 02, and so on). One of the following occurs:
■ If the trunk is busy with an active call, you are bridged onto the
■ If the trunk is out of service, the busy verification is denied. You will
button.
active call. All parties on the active call receive a warning tone
(2-second burst of 440 Hz tone) to let them know that you are
bridging onto the call. A half-second burst of warning tone repeats
every 15 seconds, as long as you remain on the call.
hear reorder tone.
■ If the trunk is idle and it is an outgoing trunk, you will hear dial
tone. You can make a call on that trunk to verify that it is in working
order. If the trunk is an incoming trunk, you hear a confirmation
tone which indicates that the trunk is available for use.
3. Press to end the call from the attendant console, or go on-hook
Release
from a backup voice terminal.
Issue 2 April 1997
29
Page 34

Call Forwarding
Call Forwarding
There are two Call Forwarding features you can activate and cancel for any
guest room: Call Forwarding - All Calls, and Call Forwarding - Busy/Don’t
Answer . Call Forwarding - All Calls causes calls to a guest room to be forwarded
immediately to a different telephone number. Call Forwarding - Busy/Don’t
Answer causes calls to a guest room to be forwarded to a different telephone
number only if no one answers or if the line is busy. This feature is used when
the guest will be at someone else’s room or off-site and the guest wants the
calls redirected.
!
SECURITY ALERT:
Call Forwarding - All Calls, and Call Forwarding - Busy/Don’t Answer are not
recommended for use to extend calls to “out of hotel” sites due to the potential
for toll fraud. Reliable call disconnect from your local service provider's central
switching office may not always be possible, thus, allowing dial tone to be
returned to the caller and toll fraud to occur.
To activate Call Forwarding - All Calls, or Call Forwarding - Busy/Don’t Answer
for a guest room, do the following:
1. Press the button or an idle call appearance button.
2. Dial the Call Forwarding - All Calls activation feature access code _____
or the Call Forwarding - Busy/Don’t Answer activation feature access
code _____.
3. Dial the room number of the guest who wants his or her calls forwarded.
30
Issue 2 April 1997
Start
■ You hear a dial tone.
■ The call appearance lamp goes on.
■ The
■ You hear a dial tone.
■ You hear a dial tone.
Position Available
lamp goes off.
Page 35

Feature Operation
4. Dial the number to which you want to forward calls (the forwarded-to
number). Listen for call-progress tones:
■ Confirmation tone — Call Forwarding is activated.
■ Intercept tone — The feature cannot be activated because of
restrictions assigned to the forwarding number or the forwarded-to
number.
5. Press .
Release
■ The call appearance lamp goes off.
■ The display goes blank.
■ The
■ The Call Forwarding feature is now activated.
■ The console returns to the normal operating mode.
Positi on Available
lamp goes on.
To cancel the Call Forwarding - All Calls, or Call Forwarding - Busy/Don’t
Answer feature for a guest room:
1. Press the button or an idle call appearance button.
■ You hear a dial tone.
■ The call appearance lamp goes on.
■ The
Start
Positi on Available
lamp goes off.
2. Dial the Call Forwarding deactivation feature access code _____.
■ You hear a dial tone.
3. Dial the room number for which the feature is being deactivated (the
forwarding extension).
■ You hear a confirmation tone. This indicates that the feature is
deactivated.
■ The call appearance lamp goes off.
■ The display goes blank.
Issue 2 April 1997
31
Page 36

Call Park
Call Park
■ The
■ The console returns to the normal operating mode.
Position Available
lamp goes on.
Call Park
The Call Park feature allows you to put a call on hold and then retrieve the call
from any other voice terminal within the system. Calls can be parked using the
attendant console or any voice terminal that does not have a “client room” COS.
To use Call Park from the attendant console, do the following:
1. While on an active call, press the button.
■ You hear a dial tone.
■ The lamp goes on.
Split
2. Dial the Call Park feature access code _____, or press the
button.
■ You hear a dial tone.
3. Dial one of the administered Call Park extensions. These extensions are
designated for use for parking calls only.
■ You hear a confirmation tone.
4. Press .
Release
Start
To pick up a parked call, do the following:
1. Dial the Answer Back feature access code _____ at the attendant
console or from any voice terminal or telephone that does not have the
“client room” COS.
■ You hear a dial tone.
2. Dial the extension number where the call was parked.
■ You are connected to the parked call.
32
Issue 2 April 1997
Page 37

Feature Operation
Conference
The Conference feature allows you to set up a conference call for up to six
parties.
To use the Attendant Conference feature, do the following:
1. While on an active call, press the button.
■ You hear a dial tone.
■ The lamp goes on.
Split
Start
2. Call the person you want to add to the conference.
■ You hear a ringback tone.
3. After contacting the new person, press the button.
■ All parties, including the console, are connected together.
■ The lamp goes off.
Split
Split
4. To add more parties to the conference, repeat Steps 1, 2, and 3.
NOTE:
If you cannot reach one of the called parties, press the
Cancel
button to end the attempt and rejoin the existing conference.
You can remain on the conference call, press to place the call on hold, or
Release
press to drop off the call.
Hold
Issue 2 April 1997
33
Page 38

Crisis Alert
Crisis Alert
The Crisis Alert feature provides a visual, audible, and printed record when
guests or hotel staff place a call to the local emergency service agency. This
gives hotel personnel the ability to assist emergency personnel when they arrive
at the hotel by identifying where the call came from and when the call was
made.
Other than the emergency call, which can be placed from any telephone on the
server, all user operation occurs at the attendant console.
1. Someone dials the emergency services access code (for example, 911)
from a telephone on the server.
■ The call is routed to the local emergency service agency . The call
does not route to the attendant console.
E= <Name> <Ext No.> EMERGENCY
2. If you are currently on an active call, you may want to place that call on
hold so you can process the emergency notification.
3. Press the button once.
34
Issue 2 April 1997
■ The
Position Available
lamp goes off and the lamp
Pos Busy
goes on. This prevents new incoming calls from interrupting this
emergency notification. All new incoming calls are queued and
can be answered after the emergency notification is processed.
■ The lamp flashes.
■ The special emergency alerting tone starts.
■ The following is displayed at the attendant console:
■ The call information is logged in the server and is printed on the
Crisis Alert
journal/schedule printer (if administered).
Crisis Alert
■ The alerting tone stops.
Page 39

Feature Operation
4. Write down the emergency information displayed on the console. Follow
your local procedures for handling emergencies. Even though the
console is set to “position busy,” y ou can place calls to assist with the
emergency.
5. Press the button a second time.
■ The lamp stops flashing, but remains on.
6. When you are finished handling the emergency, press the
Crisis Alert
Crisis Alert
Crisis Alert
button a third time.
■ The lamp goes off.
■ The display goes blank.
7. Press the button.
■ The lamp goes off.
■ The
Crisis Alert
Pos Busy
Pos Busy
Positi on Available
lamp goes on.
8. You can now process other incoming calls.
Issue 2 April 1997
35
Page 40

Emergency Access to Attendant
Emergency Access to Attendant
The server is administered to provide guests an emergency access to the
attendant by either taking the handset off-hook or by dialing a feature access
code. It works as follows:
1. A guest in a room takes the handset off-hook or dials the feature access
code.
■ If the guest took the handset off-hook, the call automatically rings
at the attendant console after a predetermined amount of time
(usually 10 seconds after dial tone times out). The call rings at the
console with a louder-than-normal volume. If the guest dialed the
feature access code, the call rings immediately at the attendant
console.
■ The following is displayed:
a= EXT<ext> Ext<ext> 00 in EMRG Q
2. Follow your local procedures for handling emergencies.
NOTE:
Even if the attendant console is in night service, the call still rings at the
attendant console, but it can be answered at the backup voice terminal
with Trunk Answer Any Station, or from a designated emergency
redirection voice terminal.
36
Issue 2 April 1997
Page 41

Feature Operation
Hold
Hold
You can place callers on hold to answer other calls or to find information for the
caller. You can have a call on hold at each of the six call appearances.
To place a call on hold, do the following:
1. While on an active call, press the button.
■ The
■ The call appearance lamp goes off.
■ The display goes blank.
■ The
■ The console returns to the normal operating mode.
On Hold
lamp at the call appearance button goes on.
Positi on Available
lamp goes on.
To return to a held call, do the following:
1. Press the call appearance button where the call is held.
■ The
■ The call appearance lamp goes on.
■ The
■ The person who was on hold is reconnected to the console.
■ The person’s name (if available) and room number are displayed.
On Hold
lamp at the call appearance button goes off.
Positi on Available
lamp goes off.
Issue 2 April 1997
37
Page 42

Integrated Directory
2. To end the call, press the button.
■ You are disconnected from the call.
■ The call appearance lamp goes off.
■ The display goes blank.
■ The
■ The console returns to the normal operating mode.
Position Available
Release
lamp goes on.
NOTE:
When the
On Hold
lamp flashes, it indicates that the hold time has
expired. When this happens, the console also beeps to indicate
that a call needs attention. Press the call appearance button and
answer the call.
Integrated Direc tor y
The Integrated Directory feature allows you to find guest room numbers listed in
the server’s on-line directory. The directory contains an alphabetical listing of
names and numbers for both guests and employees.
NOTE:
This f ea t ur e is available on ly whe n t h e na me s ar e e n t er ed v ia t h e P MS o r
through server administration.
To search for a guest’s room number, do the following:
1. Press .
38
Issue 2 April 1997
Integ Dirctry
■ The lamp goes on.
Integ Dirctry
Page 43

Feature Operation
Call
Normal Mode
2. Dial the keypad digits that correspond to the letters used to spell the
name of the person you want to locate. Y ou can use either of the formats
listed below:
■ Last name, first name (for example,
instead of the comma)
■ Single name of an organization or group (for example,
housekeeping
).
Grimaldi, Damian
; use
*
NOTE:
When you dial the keypad digit for the first letter of a name, the first
name that matches that letter displays on the console or display
telephone. You can either continue to dial keypad digits to spell the
rest of the name, or you can use the button to scroll down the
Next
alphabetical list of names in the directory.
3. If you enter a name that is not found in the directory, the display tells you
that no corresponding name was found.
4. When the desired name is displayed, press to call that person.
5. To search for another name, press again.
Integ Dirctry
6. T o exit the Integrated Directory, press the button.
The following special conditions apply when you use the keypad digits with the
Integrated Directory feature:
■ Use for a space and a comma.
■ Use for the letter Q (some keypads are not labeled with this letter).
*
7
■ Use for the letter Z (some keypads are not labeled with this letter).
9
Issue 2 April 1997
39
Page 44

Intrusion
Intrusion
The Intrusion feature enables you to interrupt a guest’s call to deliver an urgent
message or telephone call.
To interrupt a guest to deliver an urgent message, do the following:
1. Press the button or an idle call appearance button.
■ You hear a dial tone.
■ The call appearance lamp goes on.
■ The
Start
Position Available
lamp goes off.
2. Dial the guest’s room number.
■ You hear ringback tone, busy tone, or Call Waiting tone.
3. If you hear a busy tone or a Call Waiting tone, press the button.
■ The lamp goes on.
■ You are connected to the guest’s call.
■ The people on the call may hear an intrusion tone, depending on
Intrusn
Intrusn
how the server is administered.
4. Relay the message to the guest.
5. Press the button.
■ You are disconnected from the call.
■ The call appearance lamp goes off.
■ The lamp goes off.
■ The display goes blank.
Release
Intrusn
40
Issue 2 April 1997
■ The
■ The console returns to the normal operating mode.
Position Available
lamp goes on.
Page 45

Feature Operation
To interrupt a guest to transfer a call, do the following:
1. Transfer the call to the guest’s room number as described in the
Transfer
section on Page 49.
2. If you hear a busy tone or a Call Waiting tone, press the button.
■ You are connected to the call.
■ The people on the call may hear an intrusion tone, depending on
Intrusn
how the server is administered.
3. Announce the incoming call.
4. Pr es s the button.
■ If the called station is analog, the calling person is put on Call
Release
Waiting until the called person picks up the call.
■ If the called station is multiappearance, the calling person is
connected to an idle appearance where the called person may
pick up the call.
■ You are disconnected from the call.
■ The call appearance lamp goes off.
■ The display goes blank.
■ The
■ The console returns to the normal operating mode.
Positi on Available
lamp goes on.
NOTE:
You cannot use the Attendant Intrusion feature if:
■ A station is on a conference call with the maximum number of conference
parties.
■ There is one call already waiting for the called person.
■ A call is established with Data Privacy activated.
■ A station in a call is administered with Data Restriction.
Issue 2 April 1997
41
Page 46

Loudspeaker Paging
■ An attendant attempts to intrude on a call on a station that is a forward-to
point of another station.
■ An attendant attempts to intrude on a busy station, where the station is
talking to another attendant.
Loudspeaker Pagin g
The Loudspeaker Paging feature allows you to access loudspeaker paging
equipment. Nine paging zones and a paging zone to activate all paging zones at
the same time can be provided. Attendants can page individuals by pressing
Page 1 Page 9 Page All
code (the trunk access code that is administered for the equipment installed for
each paging zone). An allowable paging time limit is administered on the
system. If the administered time limit expires while an announcement is being
made, the call is disconnected and intercept tone is heard.
You can combine Loudspeaker Paging with the Call Park feature (see Page 32)
to connect a caller with a paged party. The paged party can retrieve the call by
dialing the Answer Back feature access code and the parked extension.
through or , if provided, or by dialing an access
To use Loudspeaker Paging with paging buttons, do the following:
1. Press an idle paging zone button. If the desired paging zone is already in
use (the associated lamp is on), select another zone or wait for that zone
to become idle (the associated lamp is off).
■ The lamp for the selected paging zone goes on.
■ If is selected, all paging zone lamps go on.
Page All
2. Speak into the handset to make the announcement.
■ The announcement was heard in the selected zone(s). If the
announcement lasted too long, you will hear intercept tone;
release the button and try again.
3. Press .
42
Issue 2 April 1997
Release
Page 47

Feature Operation
To use Loudspeaker Paging with trunk access codes, do the following:
1. Press the button or an idle call appearance button.
■ You hear a dial tone.
■ The call appearance lamp goes on.
■ The
Start
Positi on Available
lamp goes off.
2. Dial the trunk access code for the zone you wish to page.
■ If you hear confirmation tone, continue with Step 3.
■ If you hear busy tone, the zone is not available; press and
try again later.
3. Speak into the handset to make the announcement.
■ The announcement was heard in the selected zone(s). If the
announcement lasted too long, you will hear intercept tone; try
again with a shorter announcement.
4. Press .
Release
Cancel
Issue 2 April 1997
43
Page 48

Override
Override
The Attendant Override of Diversion feature allows you to bypass these
features:
■ Call Forwarding
When the attendant calls a guest that has Call Forwarding active, the call
rings at the guest’s telephone and is not forwarded.
■ Call Coverage
When the attendant calls a guest that has an assigned Call Coverage
path, the call rings at the guest’s telephone and does not follow the Call
Coverage path.
■ Send All Calls
When the attendant calls a guest that has Send All Calls active, the call
rings at the guest’s telephone and is not forwarded to the Send All Calls
destination.
To activate the Attendant Override of Diversion feature, do the following:
1. Press the button or an idle call appearance button.
2. Press the button.
44
Issue 2 April 1997
Start
■ You hear a dial tone.
■ The call appearance lamp goes on.
■ The
■ The lamp goes on.
Position Available
Ovrride
Ovrride
lamp goes off.
NOTE:
To cancel an override before you place a call, press the
Ovrride
button again.
Page 49

Feature Operation
3. Dial the room number.
■ You hear a ringback tone.
■ The display shows the dialed number.
■ The lamp goes off.
4. To end the call, press the button.
■ You are disconnected from the call.
■ The call appearance lamp goes off.
■ The display goes blank.
■ The
■ The console returns to the normal operating mode.
Ovrride
Release
Positi on Available
lamp goes on.
Issue 2 April 1997
45
Page 50

Recall
Recall
The Attendant Recall feature allows callers, who are part of a conference or
two-party call being held on the console, to recall the attendant for assistance.
You should treat this as you would treat any other incoming call. Users at
single-line analog telephones must press the button or flash the
switchhook to recall the attendant. Users at multiappearance voice terminals
must press the or button to recall the attendant.
Conf Transfer
To use the Attendant Recall feature, do the following:
1. When someone requests assistance:
■ The display, such as the following, indicates that a user is
requesting assistance:
a= CONFERENCE 2 rc
Recall
2. To answer the recall, press the call appearance button where the
Hold
3. To end the call, press the button.
46
Issue 2 April 1997
■ The
■ The
Position Available
On Hold
lamp at a call appearance button flashes.
lamp goes off.
lamp is flashing.
■ The
■ The call appearance lamp goes on.
■ The ringing stops.
■ You are disconnected from the call.
■ The call appearance lamp goes off.
■ The display goes blank.
■ The
■ The console returns to the normal operating mode.
On Hold
lamp goes off.
Release
Position Available
lamp goes on.
On
Page 51

Feature Operation
Serial Calling
The Serial Calling feature allows incoming trunk calls that you have transferred
to a guest room to automatically recall the console after the guest hangs up. You
can then transfer the call to another guest room.
To use the Serial Calling feature, do the following:
1. Answer the call the same way you would answer any other incoming call.
2. Press the button.
■ The lamp goes on.
3. Press the button.
■ You hear a dial tone.
■ The lamp goes off.
■ The lamp goes on.
Serial Call
Serial Call
Start
Serial Call
Split
4. Dial the number for the person to whom you want to transfer the call.
■ You hear a ringback tone.
■ The display shows the room number you are calling.
5. Press the button as soon as the call starts ringing.
■ The calling person is connected to the ringing phone line.
■ You are disconnected from the call.
■ The lamp goes off.
■ The call appearance lamp goes off.
■ The display goes blank.
■ The
■ The console returns to the normal operating mode.
Release
Split
Positi on Available
lamp goes on.
Issue 2 April 1997
47
Page 52

Serial Calling
6. When the called person hangs up on the calling person, the calling
person is automatically routed back to the console.
■ You hear a 1-burst repetitive ring.
■ The display identifies the incoming call as a serial call:
a= co to front desk sc
■ The
■ The call appearance lamp flashes.
Position Available
lamp goes off.
7. Answer the recall.
■ You are reconnected to the caller.
■ The call appearance lamp stops flashing, but remains on.
■ The lamp goes on.
Serial Call
8. Transfer the caller to the next person by repeating Steps 3 through 5.
The Serial Call feature remains activated until the trunk drops from the switch or
you cancel the feature manually by pressing the button.
Serial Call
48
Issue 2 April 1997
Page 53

Feature Operation
Transfer
!
SECURITY ALERT:
Social Engineering — “Social Engineering” is a con game that hackers
frequently use. It is sometimes referred to as “Operator Deceit.” The success
of this con requires gullibility or laxity on the part of the operator or employee,
of which the hacker takes full advantage. For example, hackers call an
employee, claim to have the wrong extension number, and ask to be
transferred back to the operator. To the operator, the call appears to be an
internal call. The hacker then asks for an outside line. Often, because
operators are not trained about toll fraud, they will connect the hacker to an
outside line. Another example of social engineering is when a hacker calls the
operator and pretends to be a telephone maintenance repair person. They
make statements such as: “This is Lucent Technologies testing your lines.
Please transfer me to 900 or 9#,” or “I need to verify your DID number range.”
An untrained operator may provide the requested transfer or information,
giving the hacker more ammunition with which to crack your system.
You can transfer calls to a guest room or to an outside number. Some of the
reasons to transfer a call include the following:
■ A person on an incoming call (from outside the hotel) wants to be
connected to a guest at the hotel.
■ A guest calling the attendant wants to be connected to a guest in another
room.
■ A guest wants to be connected to a number outside the hotel.
■ A person on an incoming call from outside of the hotel wants to be
connected to another number outside the hotel, on another trunk.
Issue 2 April 1997
49
Page 54

Transfer
To transfer a call, do the following:
1. Answer the incoming call. Tell the calling person that you are going to
transfer their call.
2. Press the button.
■ You hear a dial tone.
■ The lamp goes on.
Start
Split
3. Dial the number for the person to whom you want to transfer the call.
■ You hear a ringback tone.
■ The display shows the room number you are calling.
4. Use
one
of the following steps, a, b, c, or d, to complete the call.
a. To transfer the call, press the button as soon as the call
Release
starts ringing.
■ The calling person is connected to the ringing phone line.
■ You are disconnected from the call.
■ The lamp goes off.
■ The call appearance lamp goes off.
■ The display goes blank.
■ The
■ The console returns to the normal operating mode.
Split
Position Available
lamp goes on.
b. If you want to announce the call, wait for the called person to
answer. If the called person accepts the call, press the
Release
button.
50
Issue 2 April 1997
■ The calling person is connected to the called person.
■ You are disconnected from the call.
■ The lamp goes off.
■ The call appearance lamp goes off.
Split
Page 55

Feature Operation
Cancel
■ The display goes blank.
■ The
■ The console returns to the normal operating mode.
Positi on Available
lamp goes on.
c. If the called person does not want to talk to the calling person,
does not answer, or the number is busy, press the button.
■ The outgoing call is ca nceled.
■ The call progress tone stops.
■ The console is connected to the original call.
■ The lamp goes off.
Split
Explain to the calling person that the called person is not available.
Take a message, or ask the calling person to try again later. Then
press the button.
d. To set up a 3-way connection, press the button before or
Release
■ You are disconnected from the call.
■ The lamp goes off.
■ The call appearance lamp goes off.
■ The display goes blank.
■ The
■ The console returns to the normal operating mode.
Split
Positi on Available
lamp goes on.
Split
after the called person answers.
■ The console, calling person, and called person are
connected together.
■ The lamp goes off.
To drop out of the 3-way connection, press .
■ You are disconnected from the call.
■ The lamp goes off.
Split
Release
Split
Issue 2 April 1997
51
Page 56

Trunk Identification
■ The call appearance lamp goes off.
■ The display goes blank.
■ The
■ The console returns to the normal operating mode.
Position Available
lamp goes on.
Trunk Identification
The Trunk Identification feature allows you to use the attendant console or a
backup voice terminal to identify a specific trunk being used on any trunk call,
incoming or outgoing. This can help you find faulty or noisy trunks so you can
report them to your local telephone company, thus providing better service to
your guests.
To use the T runk Identification feature from the attendant console or from a
backup voice terminal, do the following:
1. While on a trunk call where you are experiencing a bad connection, press
Trunk ID
the button.
■ The display shows a number sequence. The first number is the
trunk access code, and the second number is the trunk
identification number. Write down the trunk information.
2. Continue with your call.
Give this information to your administrator to determine which physical trunk is
connected to that trunk group. Relay this information to your local telephone
company to report bad trunks.
52
Issue 2 April 1997
Page 57

Index
Numerics
302B Attendant Console
302C Attendant Console
A
About This Document
Activate the Console
Administrable Features
Alarms
Answer Calls
Assumptions
Attendant Auto Start
Attendant Backup
Attendant Crisis Alert
Attendant Lockout
Auto Answer
Auto Start
9
,
,
,
,
24
,
2
12
14
,
,
,
27
,
,
12
,
B
Basic Operation
Busy Verification
Button Layout
5
,
29
,
5
,
12
13
,
34
D
5
,
6
,
1
12
Deactivate the Console
Directory
Display Languages
Don’t Split
38
,
24
,
13
,
12
,
E
Emergency Access to Attendant
36
,
F
Feature Access Codes
Forced Release
,
18
4
,
H
Hold
37
,
I
C
Call Forwarding
Call Offer
Call Park
Call Purpose Indicato rs
Class of Restriction
Conference
Conventions
Crisis Alert
,
,
30
,
40
32
,
33
,
2
,
34
,
25
Integrated Directory
Intrusion
40
,
38
,
L
10
,
Lamp Test
Languages
Layout
Loudspeaker Paging
8
,
12
,
5
,
Issue 2 April 1997
42
,
53
Page 58

Index
M
Make Calls
15
,
N
Night Service
26
,
O
Override
44
,
P
Paging
42
,
R
Reasons for Reissue
Recall
Related Documents
Release
46
,
18
,
T
Test Switch
Transfer
Trunk Group Select Button
Trunk Identification
1
,
4
,
8
,
49
,
17
,
52
,
S
Security
Selector Console
Serial Calling
Split Calls
Split Swap
Status Lamps
54
49
,
,
19
,
20
,
,
Issue 2 April 1997
, 7,
47
9
15
 Loading...