

Avaya BCM Norstar to IP Office Phone Convergence, BCM Norstar to IP Office Phone User Manual
Page 1

BCM/Norstar to IP Office Phone
Convergence Handbook
Issue 1.2
October 2012
Page 2

©
2012 Avaya Inc.
All Rights Reserved.
Notice
While reasonable efforts have been made to ensure that the
information in this document is complete and accurate at the time of
printing, Avaya assumes no liability for any errors. Avaya reserves the
right to make changes and corrections to the information in this
document without the obligation to notify any person or organization of
such changes.
Documentation disclaimer
“Documentation” means information published by Avaya in varying
mediums which may include product information, operating instructions
and performance specifications that Avaya generally makes available
to users of its products. Documentation does not include marketing
materials. Avaya shall not be responsible for any modifications,
additions, or deletions to the original published version of
documentation unless such modifications, additions, or deletions were
performed by Avaya. End User agrees to indemnify and hold harmless
Avaya, Avaya's agents, servants and employees against all claims,
lawsuits, demands and judgments arising out of, or in connection with,
subsequent modifications, additions or deletions to this documentation,
to the extent made by End User.
Link disclaimer
Avaya is not responsible for the contents or reliability of any linked
websites referenced within this site or documentation provided by
Avaya. Avaya is not responsible for the accuracy of any information,
statement or content provided on these sites and does not necessarily
endorse the products, services, or information described or offered
within them. Avaya does not guarantee that these links will work all the
time and has no control over the availability of the linked pages.
Warranty
Avaya provides a limited warranty on its hardware and Software
(“Product(s)”). Refer to your sales agreement to establish the terms of
the limited warranty. In addition, Avaya’s standard warranty language,
as well as information regarding support for this Product while under
warranty is available to Avaya customers and other parties through the
Avaya Support website:
you acquired the Product(s) from an authorized Avaya reseller outside
of the United States and Canada, the warranty is provided to you by
said Avaya reseller and not by Avaya. “Software” means computer
programs in object code, provided by Avaya or an Avaya Channel
Partner, whether as stand-alone products or pre-installed on hardware
products, and any upgrades, updates, bug fixes, or modified versions
thereto.
Licenses
THE SOFTWARE LICENSE TERMS AVAILABLE ON THE AVAYA
WEBSITE,
APPLICABLE TO ANYONE WHO DOWNLOADS, USES AND/OR
INSTALLS AVAYA SOFTWARE, PURCHASED FROM AVAYA INC.,
ANY AVAYA AFFILIATE, OR AN AUTHORIZED AVAYA RESELLER
(AS APPLICABLE) UNDER A COMMERCIAL AGREEMENT WITH
AVAYA OR AN AUTHORIZED AVAYA RESELLER. UNLESS
OTHERWISE AGREED TO BY AVAYA IN WRITING, AVAYA DOES
NOT EXTEND THIS LICENSE IF THE SOFTWARE WAS OBTAINED
FROM ANYONE OTHER THAN A V A Y A, AN A V A Y A AFFILIA TE OR AN
AVAYA AUTHORIZED RESELLER; AVAYA RESERVES THE RIGHT
TO TAKE LEGAL ACTION AGAINST YOU AND ANYONE ELSE
USING OR SELLING THE SOFTWARE WITHOUT A LICENSE. BY
INSTALLING, DOWNLOADING OR USING THE SOFTWARE, OR
AUTHORIZING OTHERS TO DO SO, YOU, ON BEHALF OF
YOURSELF AND THE ENTITY FOR WHOM YOU ARE INSTALLING,
DOWNLOADING OR USING THE SOFTWARE (HEREINAFTER
REFERRED TO INTERCHANGEABL Y AS “YOU” AND “END USER”),
AGREE TO THESE TERMS AND CONDITIONS AND CREATE A
BINDING CONTRACT BETWEEN YOU AND AVAYA INC. OR THE
APPLICABLE AVAYA AFFILIATE (“AVAYA”).
HTTP://SUPPORT.AVAYA.COM/LICENSEINFO/ ARE
http://support.avaya.com. Please note that if
Avaya grants you a license within the scope of the license types
described below, with the exception of Heritage Nortel Software, for
which the scope of the license is detailed below. Where the order
documentation does not expressly identify a license type, the
applicable license will be a Designated System License. The applicable
number of licenses and units of capacity for which the license is granted
will be one (1), unless a different number of licenses or units of capacity
is specified in the documentation or other materials available to you.
“Designated Processor” means a single stand-alone computing device.
“Server” means a Designated Processor that hosts a software
application to be accessed by multiple users.
License types
Designated System(s) License (DS). End User may install and use
each copy of the Software only on a number of Designated Processors
up to the number indicated in the order. Avaya may require the
Designated Processor(s) to be identified in the order by type, serial
number, feature key, location or other specific designation, or to be
provided by End User to Avaya through electronic means established
by Avaya specifically for this purpose.
Concurrent User License (CU). End User may install and use the
Software on multiple Designated Processors or one or more servers,
so long as only the licensed number of Units are accessing and using
the Software at any given time. A “Unit” means the unit on which Avaya,
at its sole discretion, bases the pricing of its licenses and can be,
without limitation, an agent, port or user, an e-mail or voice mail account
in the name of a person or corporate function (e.g., webmaster or
helpdesk), or a directory entry in the administrative database utilized
by the Software that permits one user to interface with the Software.
Units may be linked to a specific, identified Server.
Database License (DL). End User may install and use each copy of the
Software on one Server or on multiple Servers provided that each of
the Servers on which the Software is installed communicates with no
more than a single instance of the same database.
CPU License (CP). End User may install and use each copy of the
Software on a number of Servers up to the number indicated in the
order provided that the performance capacity of the Server(s) does not
exceed the performance capacity specified for the Software. End User
may not re-install or operate the Software on Server(s) with a larger
performance capacity without Avaya’ s prior consent and payment of an
upgrade fee.
Named User License (NU). You may: (i) install and use the Software
on a single Designated Processor or Server per authorized Named
User (defined below); or (ii) install and use the Software on a Server so
long as only authorized Named Users access and use the Software.
“Named User”, means a user or device that has been expressly
authorized by Avaya to access and use the Software. At Avaya’s sole
discretion, a “Named User” may be, without limitation, designated by
name, corporate function (e.g., webmaster or helpdesk), an e-mail or
voice mail account in the name of a person or corporate function, or a
directory entry in the administrative database utilized by the Software
that permits one user to interface with the Software.
Shrinkwrap License (SR). You may install and use the Software in
accordance with the terms and conditions of the applicable license
agreements, such as “shrinkwrap” or “clickthrough” license
accompanying or applicable to the Software (“Shrinkwrap License”).
Copyright
Except where expressly stated otherwise, no use should be made of
materials on this site, the Documentation, Software, or hardware
provided by Avaya. All content on this site, the documentation and the
Product provided by Avaya including the selection, arrangement and
design of the content is owned either by Avaya or its licensors and is
protected by copyright and other intellectual property laws including the
sui generis rights relating to the protection of databases. You may not
modify, copy, reproduce, republish, upload, post, transmit or distribute
in any way any content, in whole or in part, including any code and
software unless expressly authorized by Avaya. Unauthorized
reproduction, transmission, dissemination, storage, and or use without
2 BCM/Norstar to IP Office Phone Convergence Handbook October 2012
Comments? infodev@avaya.com
Page 3

the express written consent of Avaya can be a criminal, as well as a
civil offense under the applicable law.
Third-party components
Certain software programs or portions thereof included in the Software
may contain software (including open source software) distributed
under third party agreements (“Third Party Components”), which may
contain terms that expand or limit rights to use certain portions of the
Software (“Third Party Terms”). Information regarding distributed Linux
OS source code (for those product that have distributed Linux OS
source code) and identifying the copyright holders of the Third Party
Components and the Third Party Terms that apply is available in the
Documentation or on Avaya’s website at:
Copyright. Y ou agree to the Third Party Terms for any such Third Party
Components.
Preventing Toll Fraud
“T oll fraud” is the unauthorized use of your telecommunications system
by an unauthorized party (for example, a person who is not a corporate
employee, agent, subcontractor, or is not working on your company's
behalf). Be aware that there can be a risk of Toll Fraud associated with
your system and that, if Toll Fraud occurs, it can result in substantial
additional charges for your telecommunications services.
Avaya Toll Fraud Intervention
If you suspect that you are being victimized by T oll Fraud and you need
technical assistance or support, call Technical Service Center Toll
Fraud Intervention Hotline at +1-800-643-2353 for the United States
and Canada. For additional support telephone numbers, see the Avaya
Support website:
vulnerabilities with Avaya products should be reported to Avaya by
sending mail to: securityalerts@avaya.com.
Trademarks
The trademarks, logos and service marks (“Marks”) displayed in this
site, the Documentation and Product(s) provided by Avaya are the
registered or unregistered Marks of Avaya, its affiliates, or other third
parties. Users are not permitted to use such Marks without prior written
consent from Avaya or such third party which may own the Mark.
Nothing contained in this site, the Documentation and Product(s)
should be construed as granting, by implication, estoppel, or otherwise,
any license or right in and to the Marks without the express written
permission of Avaya or the applicable third party.
Avaya is a registered trademark of Avaya Inc.
All non-Avaya trademarks are the property of their respective owners,
and “Linux” is a registered trademark of Linus Torvalds.
Downloading Documentation
For the most current versions of Documentation, see the Avaya
Support website:
Contact Avaya Support
See the Avaya Support website:
notices and articles, or to report a problem with your Avaya product.
For a list of support telephone numbers and contact addresses, go to
the Avaya Support website: http://support.avaya.com, scroll to the
bottom of the page, and select Contact Avaya Support.
http://support.avaya.com. Suspected security
http://support.avaya.com.
http://support.avaya.com for product
http://support.avaya.com/
BCM/Norstar to IP Office Phone Convergence Handbook October 2012 3
Page 4

4 BCM/Norstar to IP Office Phone Convergence Handbook October 2012
Comments? infodev@avaya.com
Page 5

Contents
Chapter 1: Engineering overview......................................................................................
Supported hardware..................................................................................................................................
Supported BCM and Norstar phones........................................................................................................
Digital phones...................................................................................................................................
IP phones.........................................................................................................................................
Wireless phones...............................................................................................................................
List of BCM and Norstar phones supported on IP Office..................................................................
Using M7000 and T7000 Series phones on IP Office...............................................................................
Idle display and call functionality......................................................................................................
Default button programming.............................................................................................................
Programming buttons.......................................................................................................................
Call transfer......................................................................................................................................
Conference.......................................................................................................................................
Call forward......................................................................................................................................
Call park and page...........................................................................................................................
Directory and speed dials.................................................................................................................
Voicemail..........................................................................................................................................
Message Waiting Indicator...............................................................................................................
Hold call............................................................................................................................................
Other................................................................................................................................................
Using 1100 and 1200 Series phones on IP Office....................................................................................
Idle display and call functionality......................................................................................................
Line Appearances and Intercom keys..............................................................................................
Programming buttons.......................................................................................................................
Conference.......................................................................................................................................
Call forward......................................................................................................................................
Call park and page...........................................................................................................................
Directory and speed dials.................................................................................................................
Voicemail..........................................................................................................................................
Features and feature codes......................................................................................................................
Key feature differences.....................................................................................................................
Data Migration Manager overview............................................................................................................
Voicemail overview....................................................................................................................................
Interoperability...........................................................................................................................................
BCM and IP Office interoperability...................................................................................................
BCM, IP Office, and CS1000 interoperability...................................................................................
Analog line audio performance.................................................................................................................
Digital Mobility Solution support................................................................................................................
Licensing...................................................................................................................................................
Chapter 2: Upgrading to IP Office.....................................................................................
Upgrade workflow.....................................................................................................................................
Installing IP Office Manager......................................................................................................................
Preparation for data migration..................................................................................................................
Updating BCM firmware...................................................................................................................
7
7
10
11
14
15
15
19
20
21
23
24
24
25
26
26
27
27
28
28
29
29
30
30
32
32
33
33
33
34
34
38
40
41
42
43
44
46
46
49
49
51
53
53
BCM/Norstar to IP Office Phone Convergence Handbook October 2012 5
Page 6

Obtaining BCM configuration records..............................................................................................
About converting data using Data Migration Manager..............................................................................
Launching Data Migration Manager.................................................................................................
Migrating data from a BCM or SRG system.....................................................................................
Migrating data from a Norstar system..............................................................................................
Migrating data from a file to a B5800 Branch Gateway....................................................................
Viewing the extracted BCM configuration record.............................................................................
Configuring IP Office system particulars using DMM................................................................................
Modifying the hardware information table........................................................................................
Configuring extensions.....................................................................................................................
Optimizing extension mapping.........................................................................................................
Creating IP Office 'hunt groups' to replace BCM 'skillsets'...............................................................
Converting voicemail recordings......................................................................................................
Data migration review...............................................................................................................................
Preparation for IP Office configuration......................................................................................................
Installing the IP Office hardware.......................................................................................................
Preparing IP Office Manager............................................................................................................
System staging.................................................................................................................................
Configuring IP Office.................................................................................................................................
Exporting the existing IP Office configuration...................................................................................
Importing the new configuration into IP Office..................................................................................
Configuring IP Office Manager on a different PC.............................................................................
Configuring IP phone login codes....................................................................................................
Uploading the IP Office configuration to the control unit..................................................................
Configuring voicemail recordings in IP Office...........................................................................................
Voicemail Pro...................................................................................................................................
Embedded Voicemail........................................................................................................................
Uploading the voicemail configuration to IP Office...........................................................................
Completing IP Office system programming...............................................................................................
Phone and trunk rewiring..........................................................................................................................
Updating IP phone firmware......................................................................................................................
Using Element Manager...................................................................................................................
IP phone network addressing...........................................................................................................
Button programming..................................................................................................................................
Confirming user location and button programming...................................................................................
Testing and optimizing the IP Office configuration....................................................................................
Chapter 3: Appendices.......................................................................................................
Appendix 1: Norstar and BCM user feature codes...................................................................................
Appendix 2: Voicemail...............................................................................................................................
Appendix 3: Unified Communications and other features.........................................................................
Appendix 4: Supported languages............................................................................................................
Appendix 5: Loop length differences between BCM and IP Office...........................................................
Index.....................................................................................................................................
54
56
57
57
61
65
68
70
72
74
77
77
79
80
81
81
82
82
85
86
86
88
88
88
90
91
97
102
102
105
108
110
112
114
117
118
119
119
127
134
139
142
145
6 BCM/Norstar to IP Office Phone Convergence Handbook October 2012
Page 7

Chapter 1: Engineering overview
With IP Office Releases 7 and 8, Avaya has introduced a number of new hardware items to enable Norstar
and BCM customers to easily upgrade to the IP Office platform. The upgrade solution, provided in this
guide, allows customers to maintain their investment into their existing telephony infrastructure in order
to leverage IP Office features, thereby increasing profitability, improving productivity, and gaining
competitive advantages.
The purpose of this guide is to provide installers and administrators with all the information required to
upgrade a BCM or Norstar system to IP Office. It is recommended that you follow the procedures from
beginning to end and that you read the notes carefully.
Before performing the upgrade, you will need to obtain a record of your current BCM configuration using
Data Migration Manager to extract the data. Following the upgrade, you will configure your new IP Office
features (for example, you will configure your BCM 'skillsets' as IPO 'hunt groups').
In this guide, you will also find information pertinent to:
• hardware support and limitations
• language support
• firmware and firmware upgrade
• button programming
• voicemail configuration
• ensuring optimal audio performance
• supporting digital mobility solutions
Supported hardware
The desktop PC that is used to run Data Migration Manager must have network LAN access
to the source device to perform a data extraction. Similarly , network access to the target device
must be available to apply the operation. To avoid networking issues, if the source device IP
address is reused for the target device, you will need to disconnect the source device from the
network prior to performing the apply operation (another approach is to use the OAM port
connection on the target device to avoid LAN address contention). Refer to the DMM user
guide for more information.
Prior to performing the upgrade, you must ensure that any existing IP Office, Norstar, or BCM
hardware are supported. Verify that your hardware is listed below.
BCM/Norstar to IP Office Phone Convergence Handbook October 2012 7
Page 8
Engineering overview
IP Office hardware
The TCM8 card, DS16A Module, and DS30A Module all provide support for Norstar and BCM
Digital telephones on the IP Office Platform. The new IP Office Wall Mount Kit allows the IP
Office 500 chassis and Expansion modules to be easily mounted to the wall and provides
integrated cable management.
With IP Office Release 8.0, the C110 Preferred Edition Processor Card provides the option to
run VM Pro and one-X Portal within the main chassis of the IP Office 500 platform. The C110
Card can be installed in one of the four IP Office Slots, which will allow IP Of fice, VM Pro, and
One-X Portal to run on Linux.
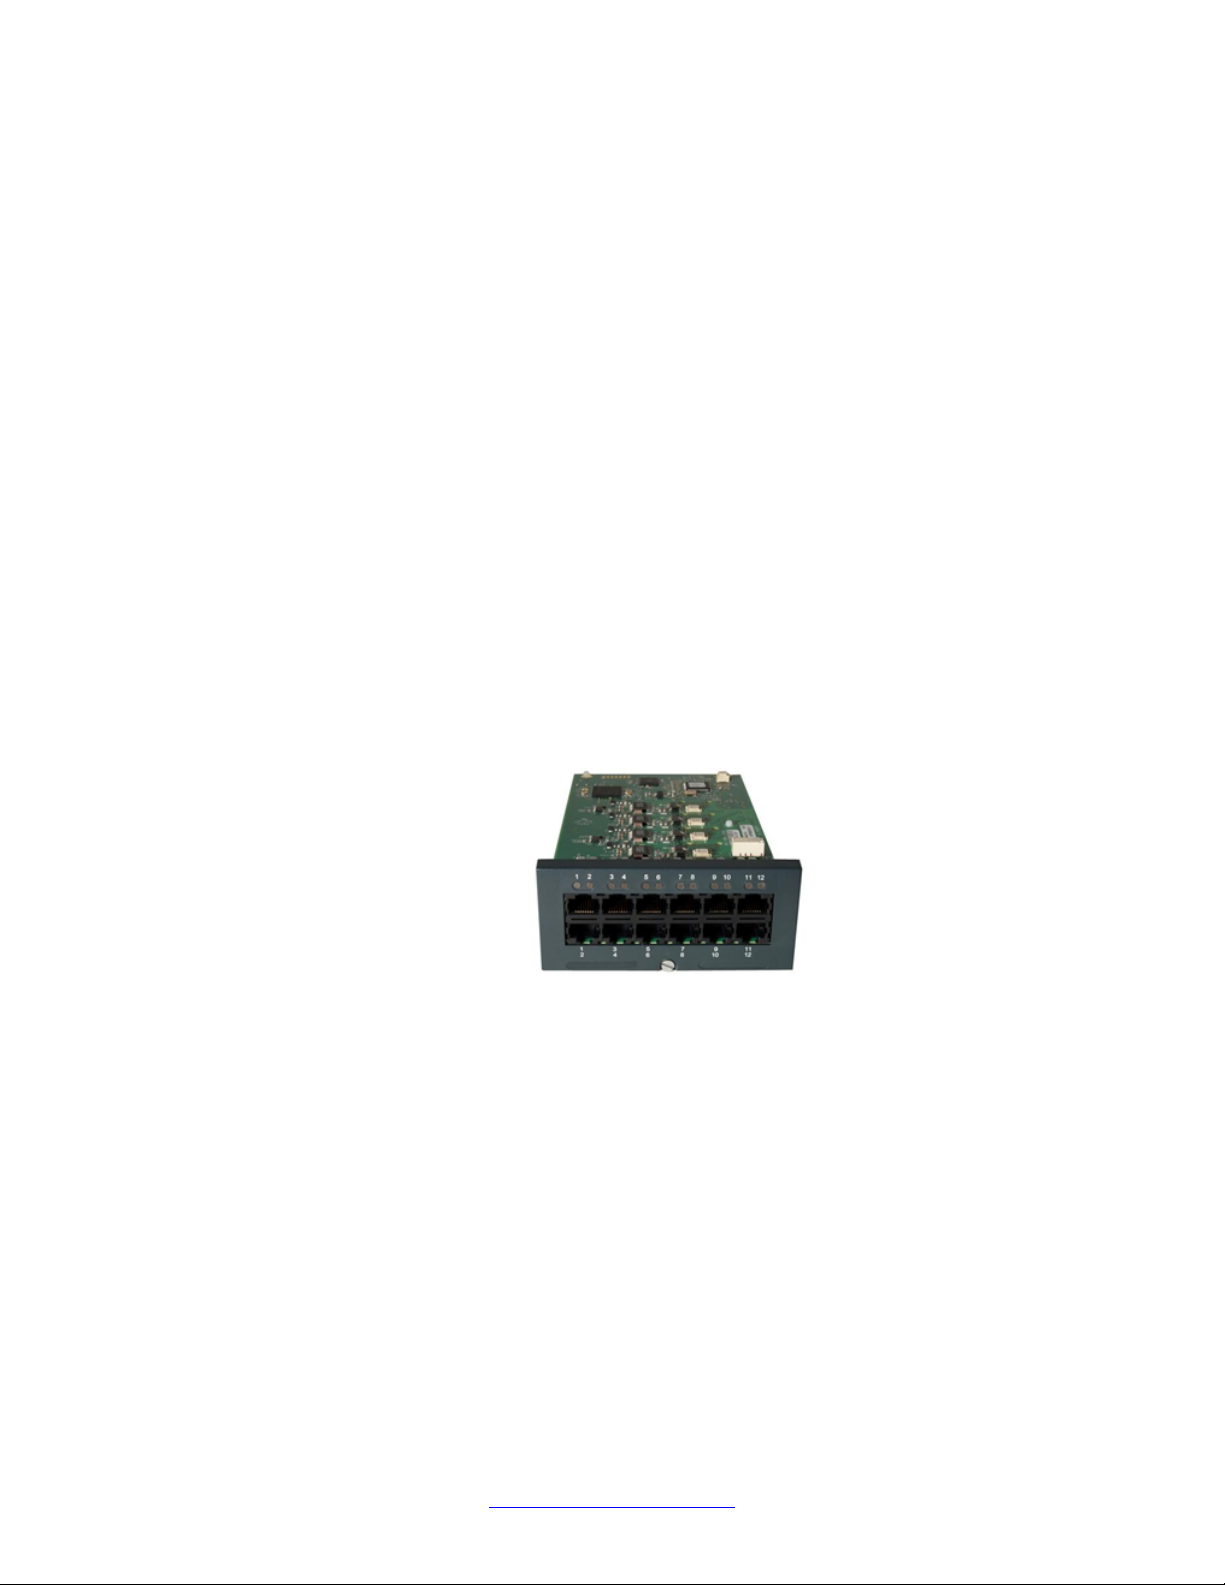
TCM8 Card:
The TCM8 card, shown below, is an 8–port digital extension card that supports Norstar and
BCM digtial telephones. The TCM8 card is only supported on the IP Of fice 500 v2 and requires
IP Office Release 7.0 or later. A maximum of 4 TCM8 cards can be installed per IP Of fice 500
v2 system. The following telephone types are supported on the TCM8:
• Norstar and BCM T7000 Series phones
• Norstar and BCM M7000 Series phones (some limitations apply)
• Norstar and BCM Digital Mobility Solution
• Norstar and BCM Digital Conferencing Unit (NACU)
• Norstar and BCM T7406[E] cordless phone
The TCM8 Card has 12 RJ45 ports of which the first eight are used for the digital station ports.
The remaining four ports are the trunk daughter cards. The following trunk daughter cards can
be used with the TCM8 Card:
• IP500 Analog Trunk Card
• IP500 BRI Trunk Card
• IP500 PRI Trunk Card
The TCM8 Card can be used in combination with all other IP 500 base cards, including the
IP500 Digital Station 8 card.
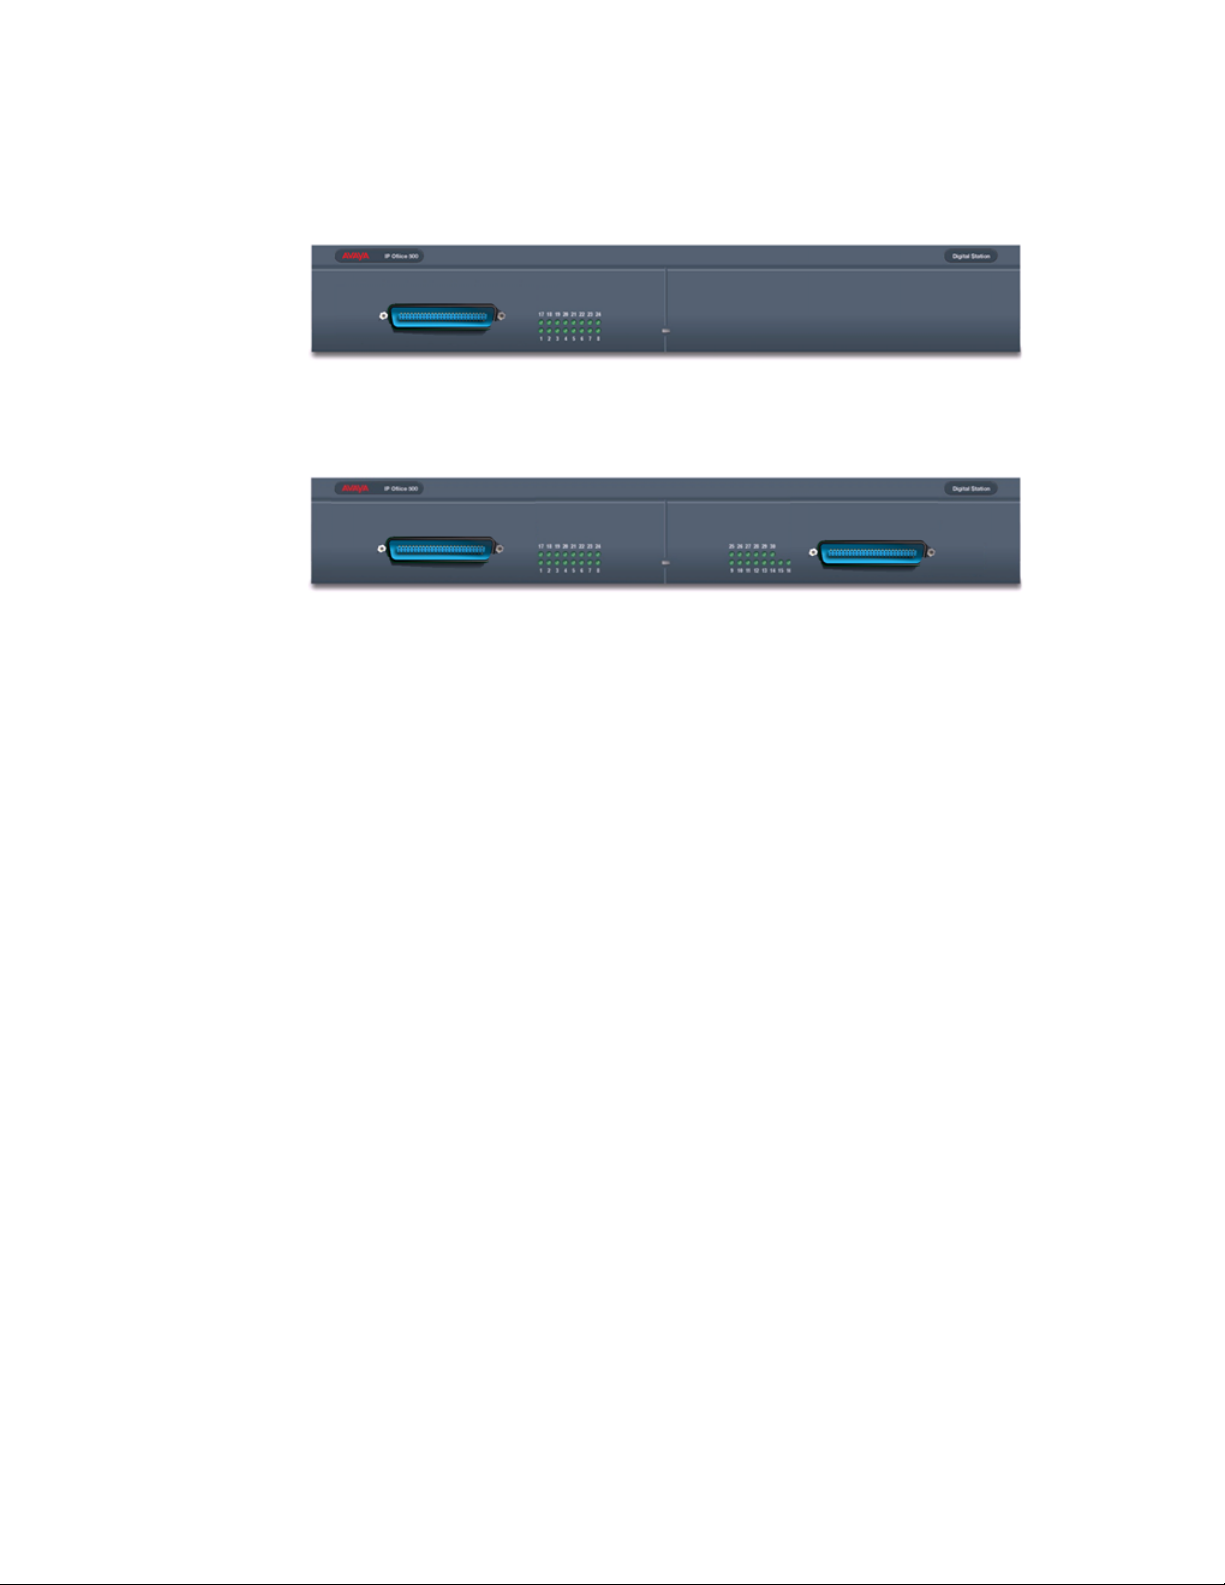
DS16A and DS30A Modules:
The DS16A and DS30A are new 16 and 30–port expansion modules which support the
connection of Norstar and BCM Digital telephones to IP Office. Both modules are only
supported on the IP Office 500 v2 and require IP Office Release 7.0 or later.
8 BCM/Norstar to IP Office Phone Convergence Handbook October 2012
Comments? infodev@avaya.com
Page 9
Supported hardware
Please refer to the IP Office Telephone Support section for more details about support for
legacy BCM and Norstar telephones. Classic Avaya Digital Phones are not supported on the
DS16A and DS30A Expansion Modules.
DS16A Module
DS30A Module
The DS16A and DS30A Expansion Modules feature RJ21 connectors to simplify installation
and minimize rewiring when upgrading from a Norstar or BCM. The RJ21 pin-out is consistent
with the BCM DSM16 or DSM32 Media Bay Module so that they can easily be moved to the
IP Office. In the case of the DS30A, two stations might have to be rewired when upgrading
from a BCM DSM32 Media Bay Module.
A maximum of 12 DS16A /DS30A Expansion Modules are supported on each IP Office system.
They can be used in any combination with the IP500 DS8 and TCM8 cards, or the IP500 DS16
and DS30 Expansions, thereby providing a future growth path with Avaya digital phones.
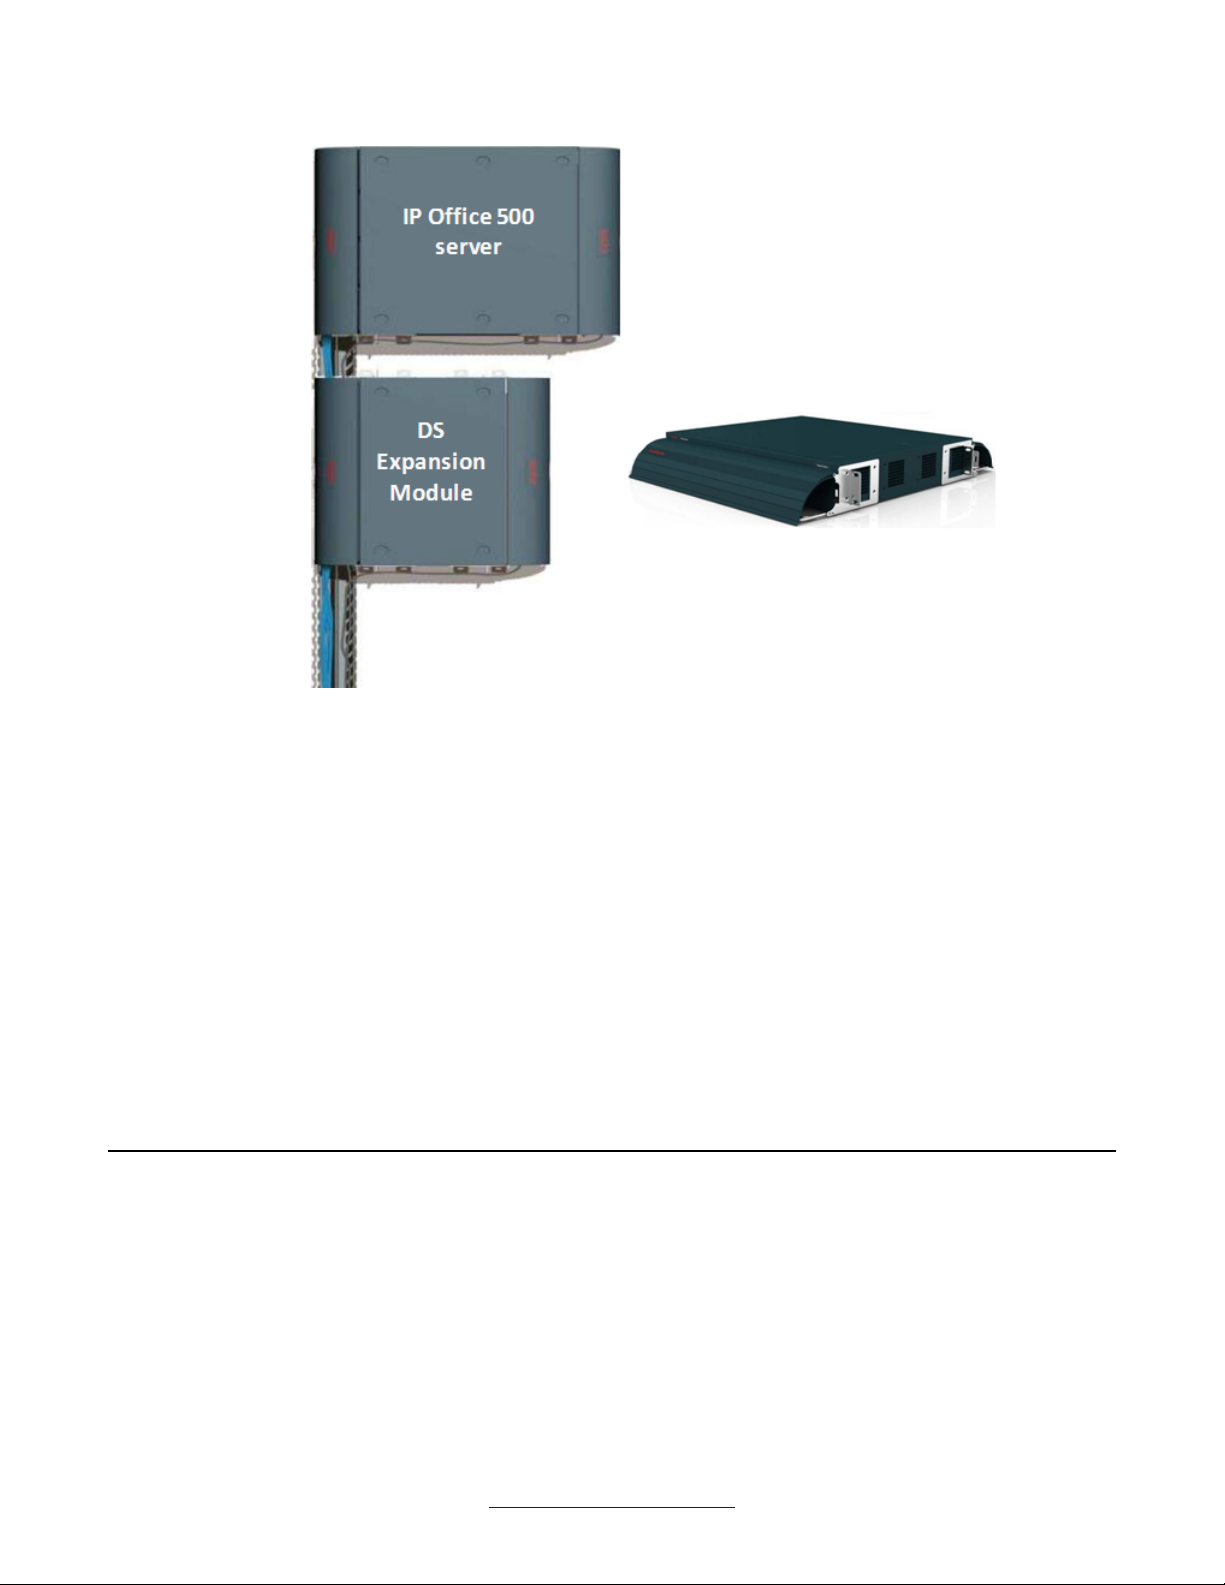
IP Office 500 Wall Mount Kit:
Similar to the BCM50 and BCM450, the IP Office 500 chassis and Expansion modules can be
wall-mounted. The IP Office Wall Mount Kit solution simplifies cable management and allows
for a clean installation covering cables and connectors. It can be installed by a single
person.
BCM/Norstar to IP Office Phone Convergence Handbook October 2012 9
Page 10
Engineering overview
SRG50 and SRG 200/400
Customers of the Survivable Remote Gateway 50 (SRG50) or Survivable Remote Gateway
200/400 (SRG 200/400) system upgrading to IP Office receive the same investment protection
as BCM and Norstar users. SRG systems can either be upgrades to an IP Office or a B5800,
however, it is important to note that neither IP Office 8.0/8.1 or B5800 6.2 support centralized
applications or phone registration.
1120, 1140, 1220 and 1230 Series IP phones can be upgraded to the SIP firmware and
connected to an IP Office or alternatively B5800 system. M7000 and T7000 Series digital
phones, however, are not supported on the SRG50 and hence cannot to be migrated.
It is also not possible to use the Data Migration Manager tool to extract or convert data, voice
messages, or greetings from SRG systems.
Supported BCM and Norstar phones
T o provide investment protection for BCM and Norstar customers, Avaya has integrated a large
number of the phones used on the BCM and Norstar platforms into the IP Office platform. This
protects 40% to 60% of the investment that the customer has made into BCM and Norstar.
The following sections provide an overview of such phones supported on IP Office in terms of
digital phones, IP phones, and wireless phones.
10 BCM/Norstar to IP Office Phone Convergence Handbook October 2012
Comments? infodev@avaya.com
Page 11
Related topics:
Digital phones on page 11
IP phones on page 14
Wireless phones on page 15
List of BCM and Norstar phones supported on IP Office on page 15
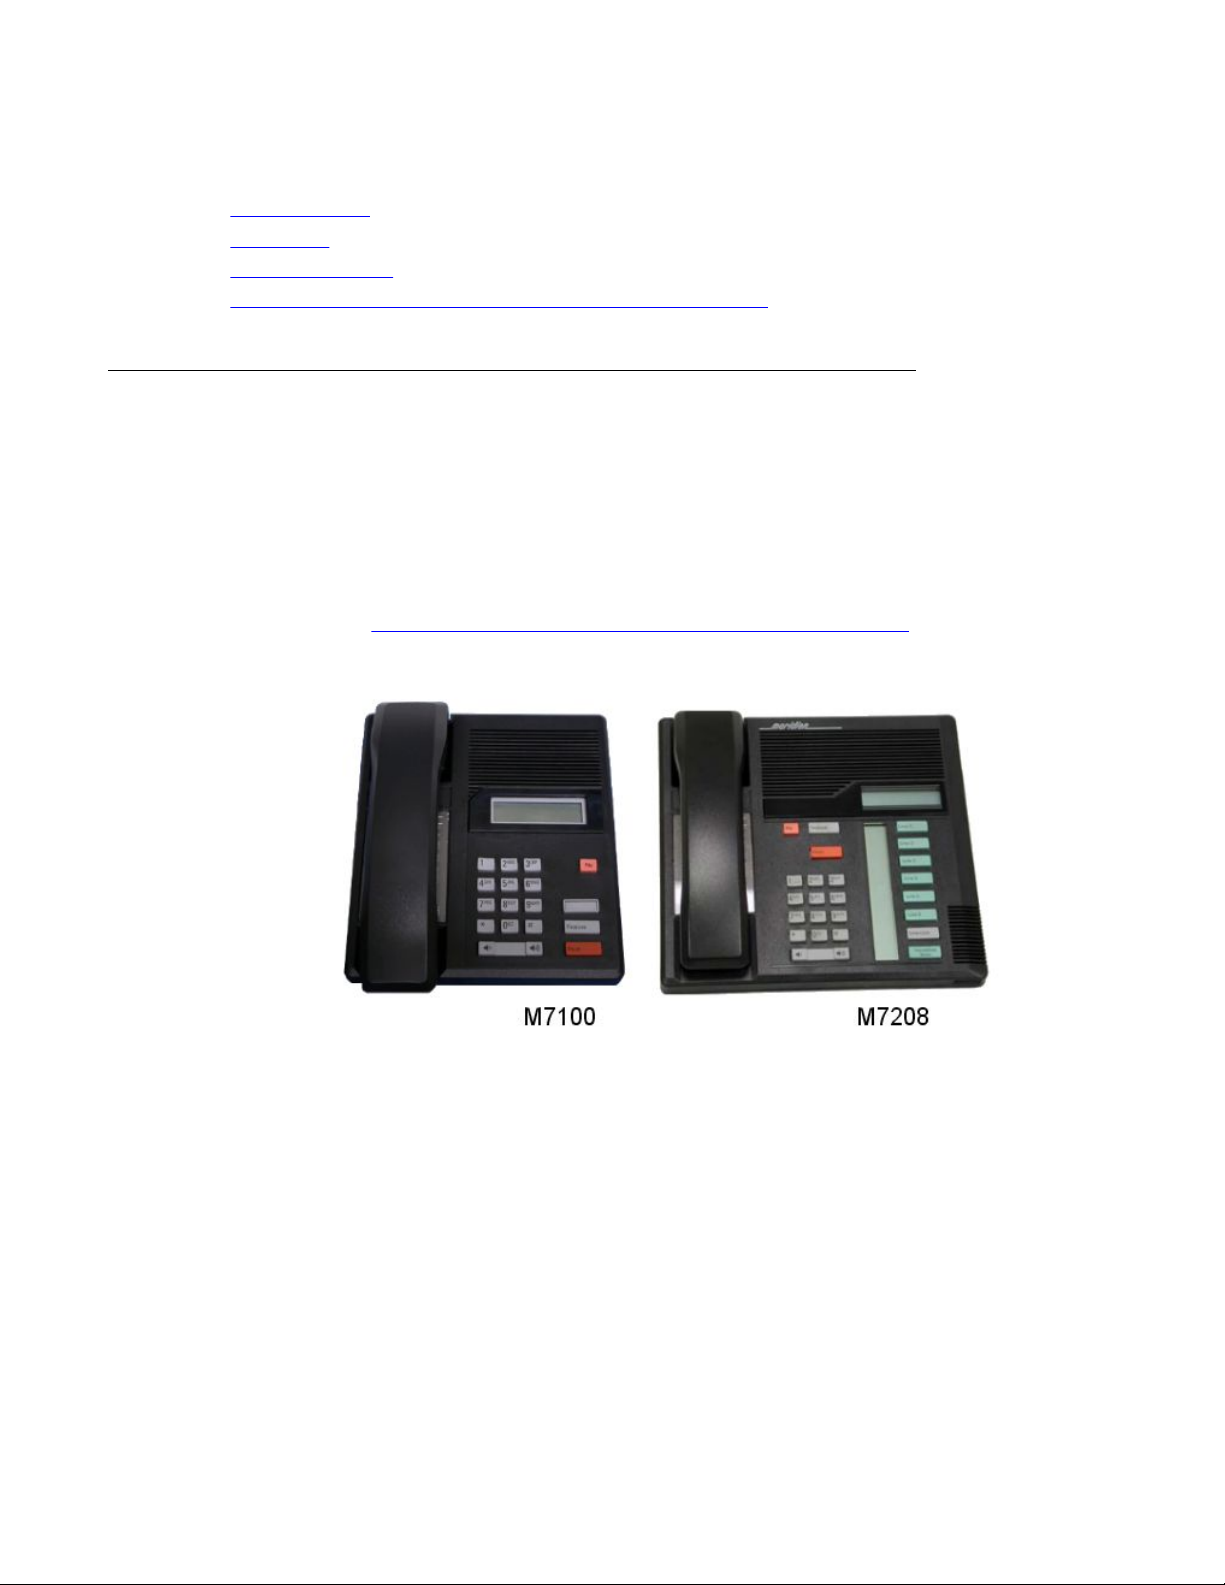
Digital phones
The T7000 and the majority of M7000 Series digital phones from Norstar and BCM can be
transferred to the IP Office by using the DS16A/ DS30A expansion module or a TCM8 card.
While the key telephony functions will operate on IP Office in a familiar fashion, there will be
some differences in feature support and operation, in particular for advanced users.
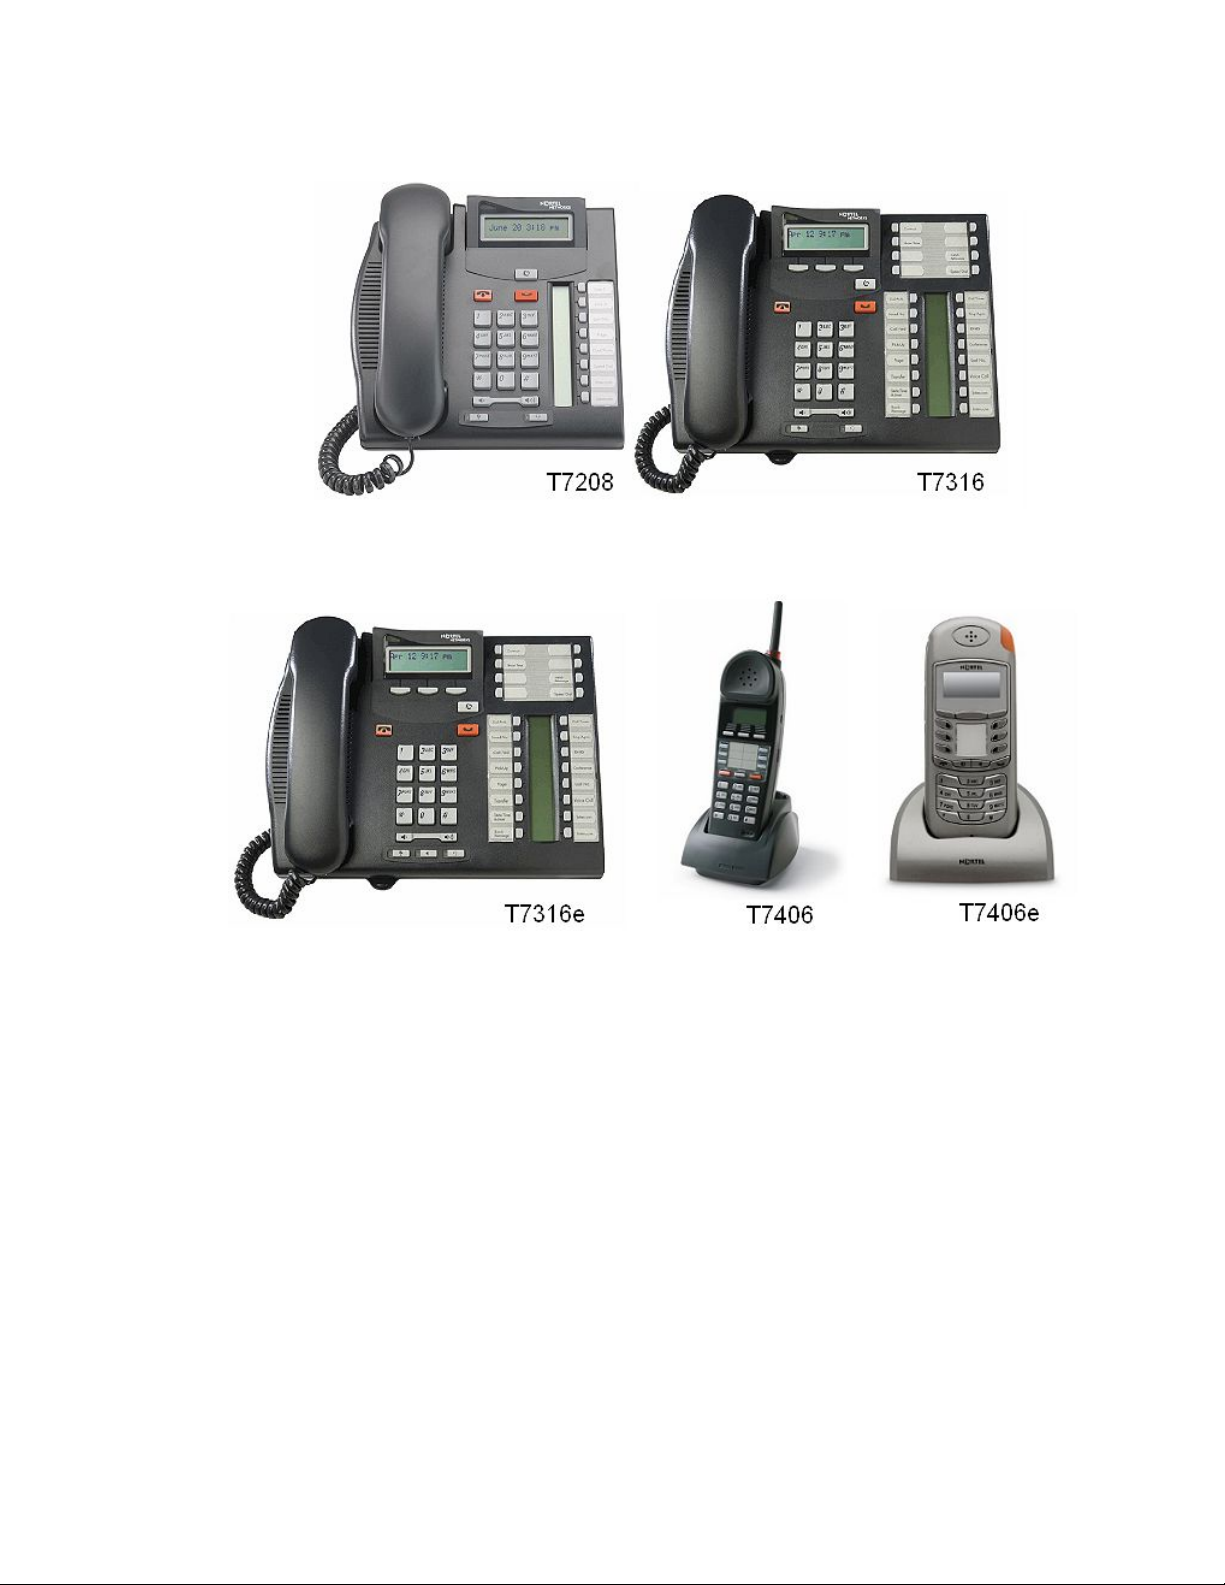
The M7000 and T7000 Series phones that are supported on IP Office are shown below. Note
that the M7xxxN versions of the phones are also supported as indicated in the more
comprehensive List of BCM and Norstar phones supported on IP Office on page 15.
Supported BCM and Norstar phones
BCM/Norstar to IP Office Phone Convergence Handbook October 2012 11
Page 12

Engineering overview
12 BCM/Norstar to IP Office Phone Convergence Handbook October 2012
Comments? infodev@avaya.com
Page 13
Supported BCM and Norstar phones
Notes:
• The firmware of the M7000 and T7000 Series phones cannot be upgraded, nor do they
require an upgrade to be supported on IP Office
• The Analog Terminal Adapter and Doorphone from the BCM and Norstar are not
supported on IP Office
• Digital phones from the CS1000 and Option 11 platform (e.g. M3900 Series digital
phones) are not supported on IP Office
M7000 Series phone support
Global and Non-Global version:
Only the Global version of the M7000 Series phones will be supported on IP Office. The NonGlobal version (also called NA version) of the M7000 Series phone is not supported on IP
Office. The Non-Global versions were available from the late 1980s to the early 1990s and
BCM/Norstar to IP Office Phone Convergence Handbook October 2012 13
Page 14

Engineering overview
were only sold in North America. The Global version was available in all regions including North
America as of the early-to-mid 1990s until the End of Sale of the M7000 Series phones.
The Global and Non-Global phones can best be identified through their contrast level as
follows:
• Global version – 9 contrast levels
• Non-Global version – 4 contrast levels
The contrast level can be identified using F*7 on the BCM and IP Office.
The Global version of the M7000 Series phones can also be identified through the production
release of the phone. M7000 Series phones which meet the minimum production release
requirements as listed in the table below are Global phones:
M7000 Series
Phone
M7100 All releases
M7208 Release 16 or higher
M7310 Release 16 or higher
M7324 Release 5 or higher
Required Production Release of Global M7000 Series Phone
The production release number can be found on a white label on the bottom of the M7000
series phone.
The non-global M7000 Series phones will boot when connected to IP Office, but there might
be impacts to audio quality and volume control when operated on the IP Office, and hence
they are not supported.
It is not possible to determine the version of M7000 Series phones remotely or through the
BCM Element Manager and IP Office Manager.
Avaya recommends that Avaya partners make the end-customers aware that the M7000
phones have reached the End of Life status and limited technical support will be offered for
these phones.
Dial pad lettering:
On the M7000 Series phones, the 'Q' and 'Z' letters are printed on the '0' (zero) digit. When
these phones are used in an IP Office environment, the phones will function as if 'Q' is on the
'7' digit and 'Z' on the '9' digit.
IP phones
A number of popular BCM IP phones running the BCM Unistim firmware can also be used on
IP Office by upgrading the firmware on the phones to the Avaya SIP firmware 4.x. In past
releases, Avaya has improved the operations and feature support of the SIP firmware.
14 BCM/Norstar to IP Office Phone Convergence Handbook October 2012
Comments? infodev@avaya.com
Page 15

Supported BCM and Norstar phones
The 1120, 1140E, 1220, and 1230 IP phones and their expansion modules can be upgraded
to SIP and are supported on IP Office Release 6.1 and higher.
The 1 110, 1210, 2033 conference phone, and 2000 Series IP phones are not supported on IP
Office and need to be replaced as part of an upgrade from BCM to IP Office.
An Avaya IP Endpoint license is required to use the BCM IP phones on IP Office. The user is
not required to purchase a 3rd-party IP Endpoint license.
Before upgrading the 1100/1200 Series IP phones, they need to be on Unistim version
C7M or higher. The firmware data is briefly displayed on the screen at startup. The C7M
06xx
firmware is included in the GA load of BCM 6.0 and the latest Smart Updates of BCM 4.0,
BCM50 R3, BCM450 R1, BCM 5.0 and BCM 6.0.
Note:
All hardware releases of the 1100/1200 Series phones support the SIP 4.x firmware.
However, some older versions of the 1120 phones have only 8MB of memory, which means
user data such as custom ring tones, images, etc. must not exceed a total of 500kB on those
phones.
Supported SIP firmware
• For IP Office Release 6.1, 1100/1200 Series SIP firmware release 4.0 is supported
• For IP Office Release 7.0, 1100/1200 Series SIP firmware release 4.1 is supported
• For IP Office Release 8.0, 1100/1200 Series SIP firmware release 4.3 is supported
Wireless phones
Similar to the T7000 and M7000 Series phones, the Digital Mobility Solution and T7406[E]
phones can be transferred to an IP Office through the use of TCM8 cards or DS16A/30A
expansion modules. The Feature Key functionality will remain available on the IP Office with
the same functionality and limitations as on the T7000 Series phones.
The BCM 6100 and 2000 Series Wi-Fi phones are not supported on the IP Office and need to
be replaced with 3640 Series Wi-Fi sets. It is not possible to upgrade the firmware of the 6100
Series phones to the firmware of the 3640 Series phones or to a generic SIP firmware.
List of BCM and Norstar phones supported on IP Office
All supported Business Series Terminal (BST) phones require IP Office Release 7.0 or higher,
with the exception of the IP Phones which require IP Office Release 6.1 or higher . In the context
of this document, the term 'BST' encompasses all Norstar/BCM M7000 and T7000 phones, as
well as all 11xx/12xx SIP phones.
BCM/Norstar to IP Office Phone Convergence Handbook October 2012 15
Page 16
Engineering overview
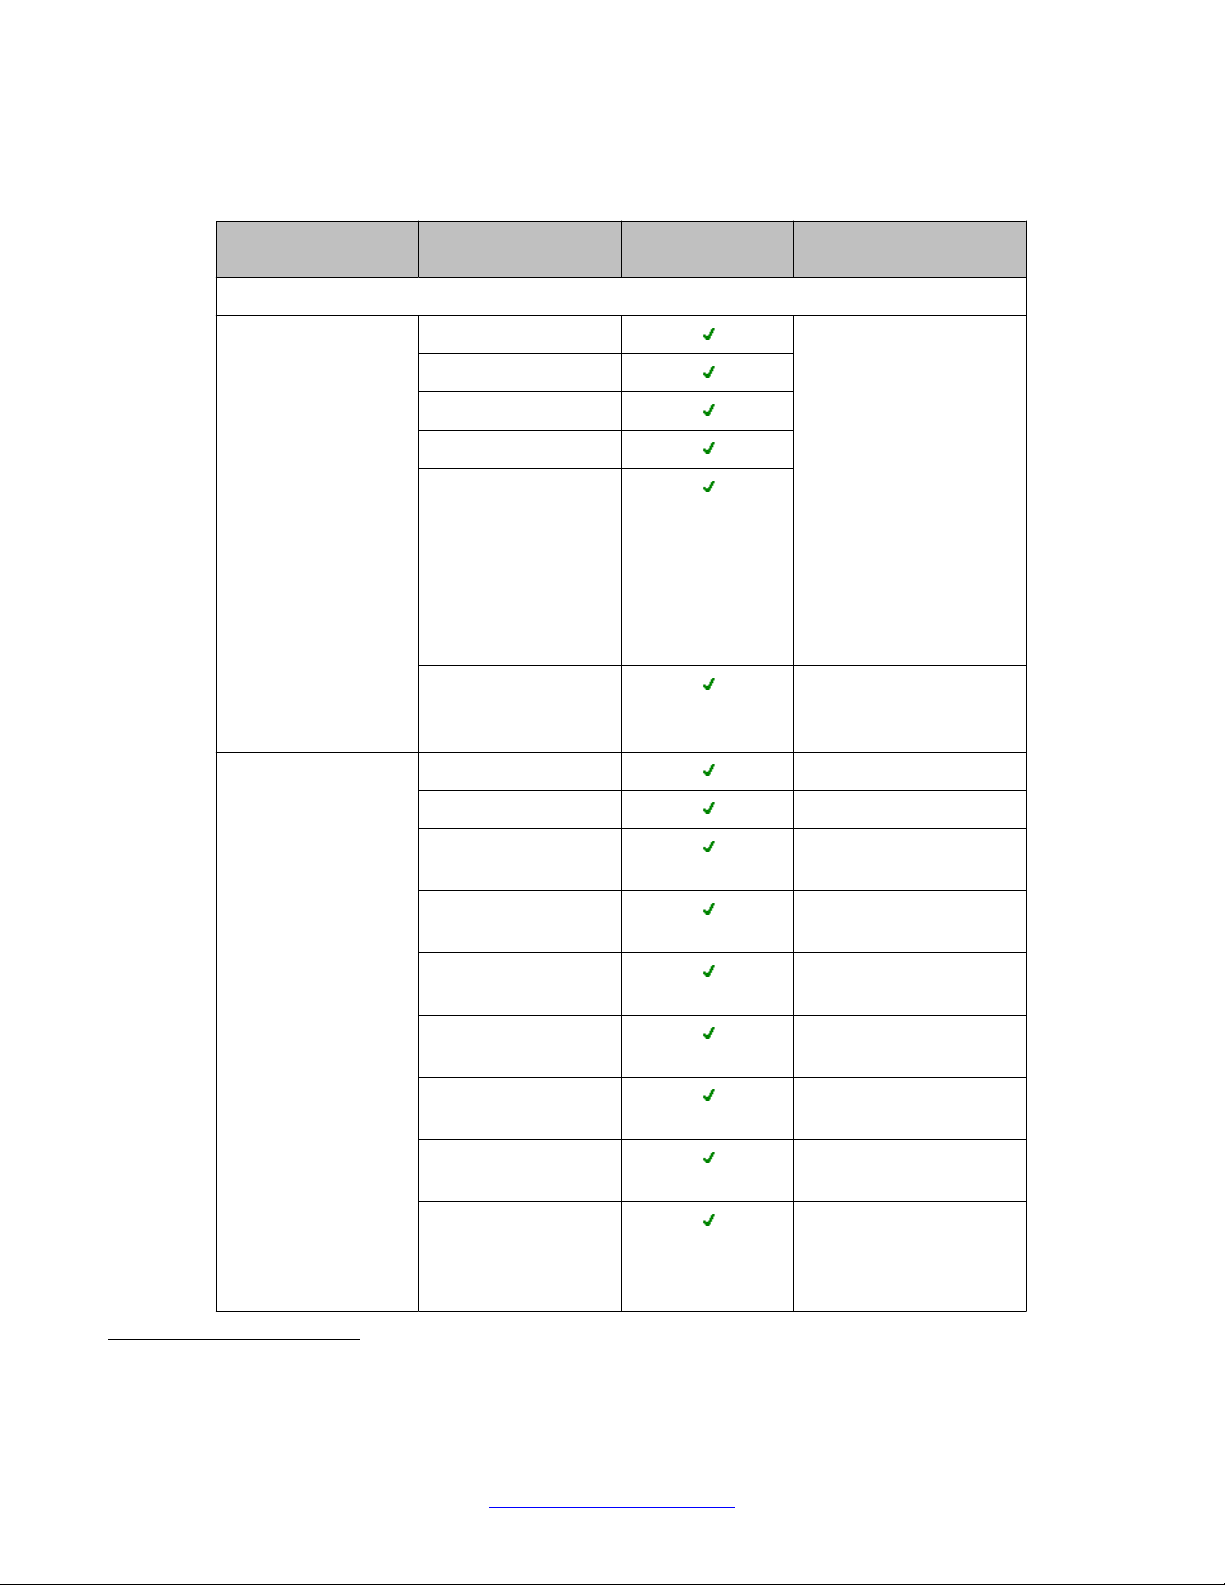
The table below provides an overview of the BST phones and phone accessories and their
support status on IP Office:
Family Model Support on IP
Digital Phones
T7000 Series Digital
Deskphones (BST)
M7000 Series Digital
Deskphones
Comments
Office
T7000 All model and revisions
T7100
T7208
of the T7000 Series
Digital Deskphones are
supported. There are no
regional versions of the
T7316
T7316E
T7000 Digital
Deskphones. Note that
on BCM/Norstar, the
T7000 Series phone
model was only
supported in certain
locales. This restriction
does not exist on IP
Office.
T24 Key Indicator
Module (KIM)
In IP Office all expansion
modules can have line
appearance.
1
M7100 Global
M7100N Global
M7208 Global Bottom button is
dedicated handsfree
M7208N Global Bottom button is
dedicated handsfree
M7310 Global Bottom right button is
dedicated handsfree
M7310 Global + BLF
module
Bottom right button is
dedicated handsfree
M7310N Bottom left button is
dedicated handsfree
M7324 Global Bottom left button is
dedicated handsfree
M7324 CAP Module
(KLM)
In IP Office, all
expansion modules can
have line
appearance.(1)
1
No differentiation between Ordinary CAP and Enhanced CAP; IP Office supports a maximum of 1024 buttons on expansion
modules (programmed and un-programmed) - the maximum is combined for IP and digital phone expansion modules.
16 BCM/Norstar to IP Office Phone Convergence Handbook October 2012
Comments? infodev@avaya.com
Page 17
Supported BCM and Norstar phones
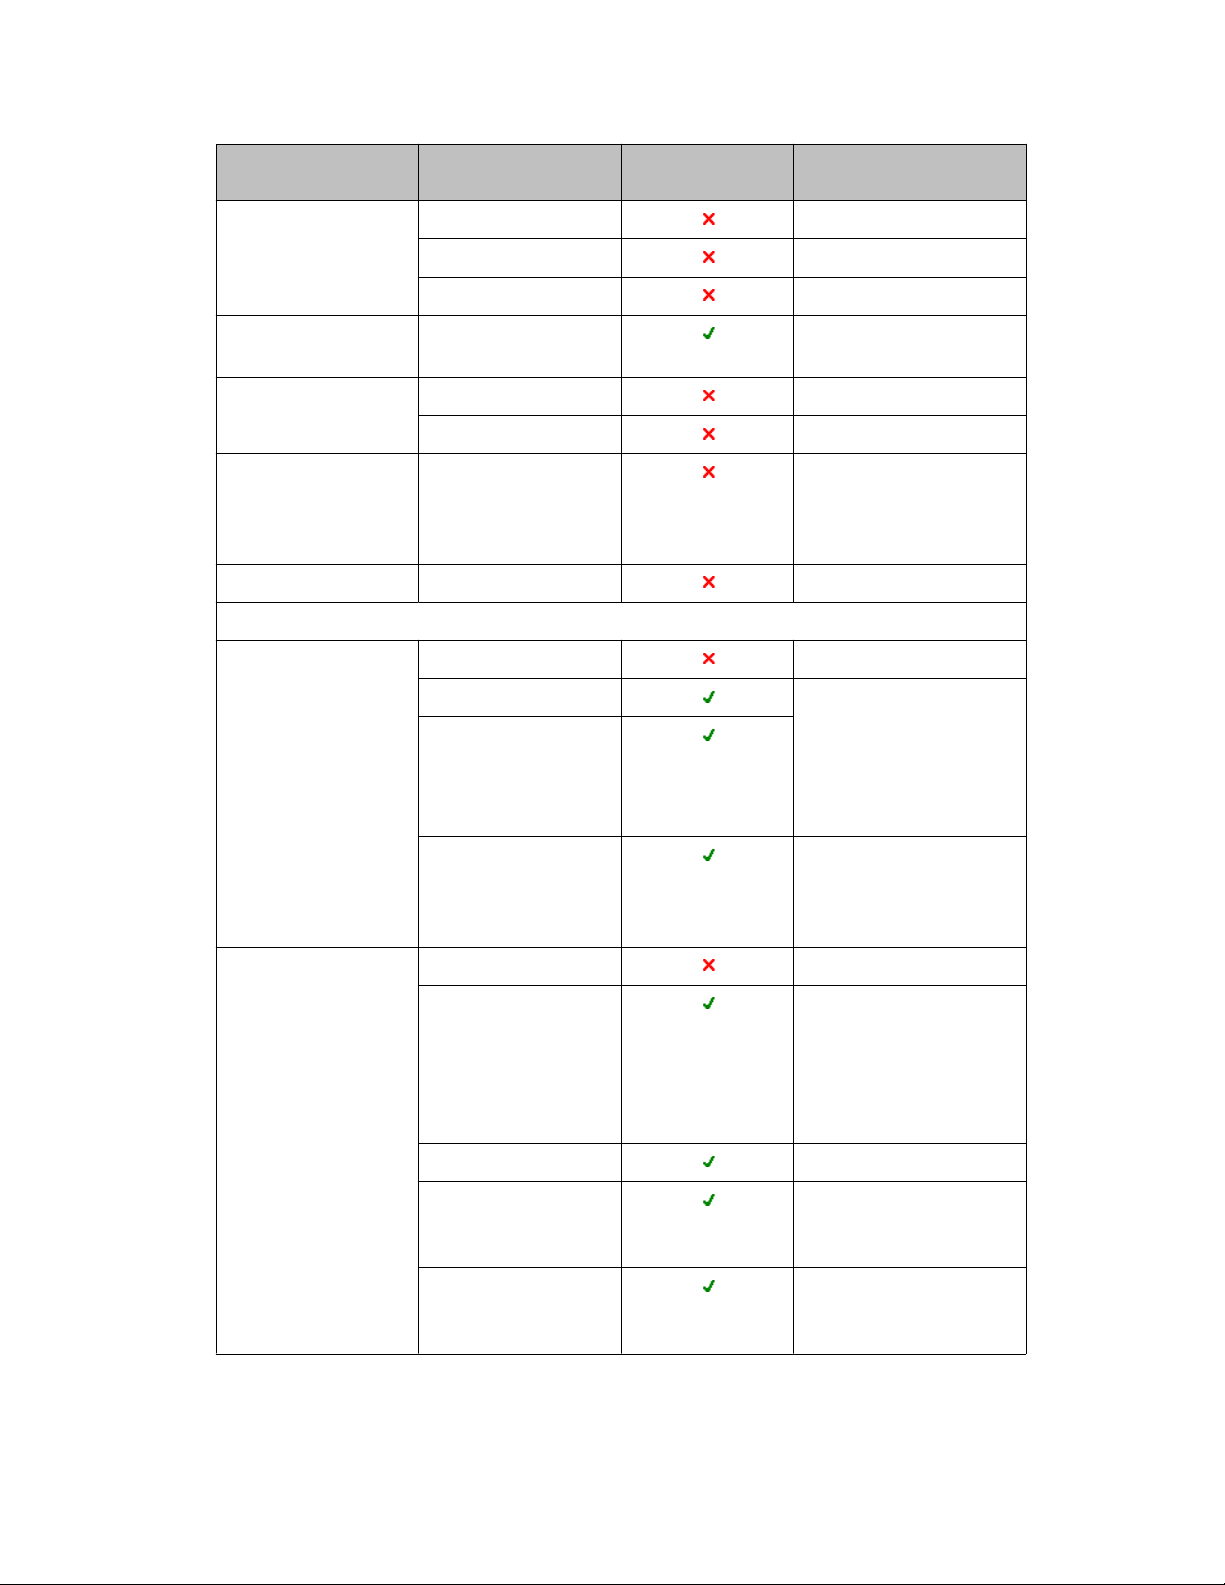
Family Model Support on IP
M7208 Non-global
M7310 Non-global
M7324 Non-global
Digital Audio
Conference Unit
Doorphone BCM Doorphone
Analog Terminal
Adapter
Call Button Algo Call Button
IP Phones
1100 Series IP
Deskphones
(Norstar) Audio
Conference Unit
Norstar Doorphone
Analog Terminal
Adapter (ATA) II
1110 IP Deskphone
1 120E IP Deskphone Text & Icon version,
1 140E IP Deskphone
Comments
Office
All regional versions and
releases of the ATA are
not supported on the IP
Office.
firmware will be updated
to SIP , phones cannot be
reversed to Unistim FW
after the SIP FW has
been installed.
1200 Series IP
Deskphones
1100 Series
Expansion Module
1210 IP Deskphone
1220 IP Deskphone Text & Icon version,
1230 IP Deskphone
1200 Series
Expansion Module 12 Keys Display
1200 Series
Expansion Module 18 Keys Paper
In IP Office, all
expansion modules can
have line
appearance.(1)
firmware will be updated
to SIP , phones cannot be
reversed to Unistim FW
after the SIP FW has
been installed.
In IP Office all expansion
modules can have line
appearance(1)
BCM/Norstar to IP Office Phone Convergence Handbook October 2012 17
Page 18
Engineering overview
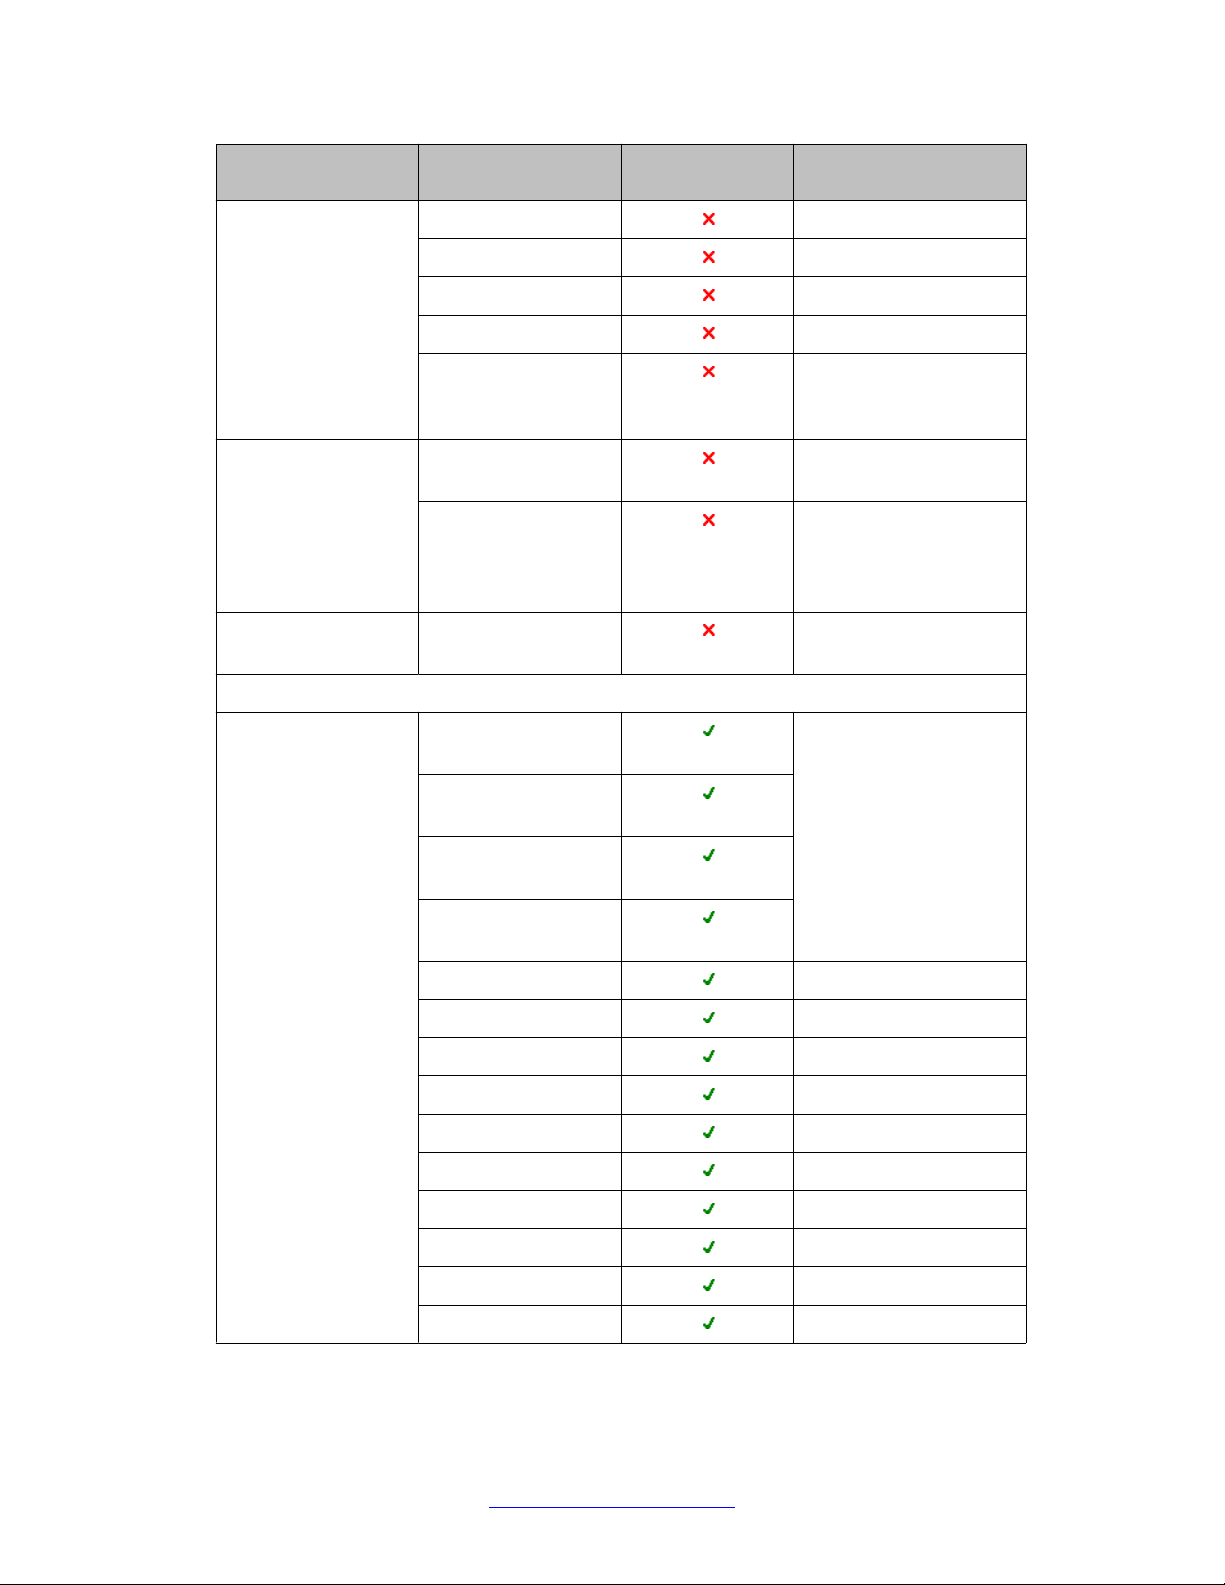
Family Model Support on IP
2000 Series IP
Deskphones
2001 IP Deskphone
2002 IP Deskphone
2004 IP Deskphone
2007 IP Deskphone
i24 Key Expansion
Module for 2000
Series IP Phones
2050 Softphone 2050 IP Softphone
v2 & v4
2050 Mobile Voice
Client
2033 IP Audio
Conferencing Unit
2033 IP Audio
Conferencing Unit
Wireless Phones
Digital Mobility
Solution
Digital Mobility
Controller 080 (NA)
Digital Mobility
Controller 320 (NA)
Comments
Office
Alternative: IP Office
Softphone
Alternative: IP Office
Softphone and One-X
Mobile Preferred Clients
for Android and iOS
All DMC base station
models and repeater
models are support for
use with the IP Office.
Digital Mobility
Controller 081 (Intl)
Digital Mobility
Controller 321 (Intl)
7430 DMC Handset
7434 DMC Handset
7439 DMC Handset
7440 DMC Handset
7444 DMC Handset
7449 DMC Handset
4135 DMC Handset
4145 DMC Handset
4136 DMC Handset
4146 DMC Handset
18 BCM/Norstar to IP Office Phone Convergence Handbook October 2012
Comments? infodev@avaya.com
Page 19

Using M7000 and T7000 Series phones on IP Office
Family Model Support on IP
4145Ex DMC
Handset
T7406[E] Wireless
Phone
M7410 Wireless
Phone
Wifi Phones 6120 Wireless LAN
T7406
T7406E
M7410 See section below for
Handset
Office
Comments
information about
identifying the NonGlobal version M7000
Series phones.
It is not possible to
Upgrade the Unistim
firmware on the phones
to Avaya SIP or H.323
Firmware.
For information on loop length differences, refer to Appendix 5: Loop length differences
between BCM and IP Office on page 142.
Using M7000 and T7000 Series phones on IP Office
In order to minimize the requirement for new end-user training, IP Office supports the majority
of BCM/Norstar button layouts, feature keys, and feature activation codes. While Avaya has
attempted to align the functionality and operation of the M7000 and T7000 Series digital phones
on the IP Office as much as possible with the functionality and operation on the BCM or Norstar
system, there are differences to note when transitioning from a BCM to IP Office. Users will
note differences in important features like conferencing, transferring, or forwarding calls, call
park and page functionality, call ringing display, and voicemail.
These differences will not affect most regular users, but the impact will likely be noticed by
advanced phone users. Avaya recommends that customers moving from Norstar or BCM to
IP Office are made aware of the differences as appropriate in order to set the right
expectations.
The following sections provide an extensive overview of the functional differences when using
the M7000 and T7000 Series phones on IP Office. For a short list of the most common
differences, refer to
features currently supported by M7000 and T7000 Series phones on IP Office, refer to
Appendix 1: Norstar and BCM user feature codes on page 119.
Key feature differences on page 34. To view a table that lists all the
BCM/Norstar to IP Office Phone Convergence Handbook October 2012 19
Page 20

Engineering overview
Related topics:
Idle display and call functionality on page 20
Default button programming on page 21
Programming buttons on page 23
Call transfer on page 24
Conference on page 24
Call forward on page 25
Call park and page on page 26
Directory and speed dials on page 26
Voicemail on page 27
Message Waiting Indicator on page 27
Hold call on page 28
Other on page 28
Idle display and call functionality
Idle display
The idle display of the M7000 and T7000 Series phones will be slightly different on IP Office
than on the BCM. Currently , M7000 and T7000 Series phones do not display any static status
messages on IP Office as you might expect on BCM.
• Time and date will be displayed in a different format
• Status letters will be displayed if, for example, the user is part of a Hunt Group (G), in Do
Not Disturb mode (N), Twinned (T) or Forwarded (D)
• On two-line display phones, the extension number will be displayed
Incoming calls
Incoming calls will provide CLID information on the display and flash the call appearance and
Message Waiting Indicator (MWI) light. On IP Office, the users have the option to Ignore
incoming calls or Divert them to voicemail.
• Ignore: The phone will stop ringing audibly , but will persist and can be picked up through
the Call Appearance. The caller will not know that the called party pressed Ignore.
• Divert/ToVM: The call will be forwarded to the voicemail of the extension.
User of M7000 and T7000 Series phones with soft keys will have an Ignore and a ToVM soft
key while a call is ringing.
Note that if any incoming call contains Name and Number CLID information, only the Name
information will be displayed and it will not be possible to switch to the Number information.
The Number information displays only when the Name information is unavailable.
Active calls
The active call display will show Name and Number CLID information on two-line display
phones and only the Name Information on single-line display phones. It is not possible to switch
20 BCM/Norstar to IP Office Phone Convergence Handbook October 2012
Comments? infodev@avaya.com
Page 21

between Name and Number information on single-line displays (for example, via Feature
811).
Note that M7000 and T7000 Series users will not receive soft keys for T ransfer or Conference.
To activate these features, you need to program BCM/Norstar feature codes:
• F3 = Conference
• F70 = Transfer
Call waiting
M7000 and T7000 Series phones on IP Office provide 2–3 ring splashes for an incoming call
when the user is already on a call. The display will continue to switch between the CLID for
both calls and the Line Appearances will indicate a second call as long as the second call is
ringing. On Norstar and BCM, the M7000 and T7000 Series phones provide a ring-splash for
the entire duration of the call waiting.
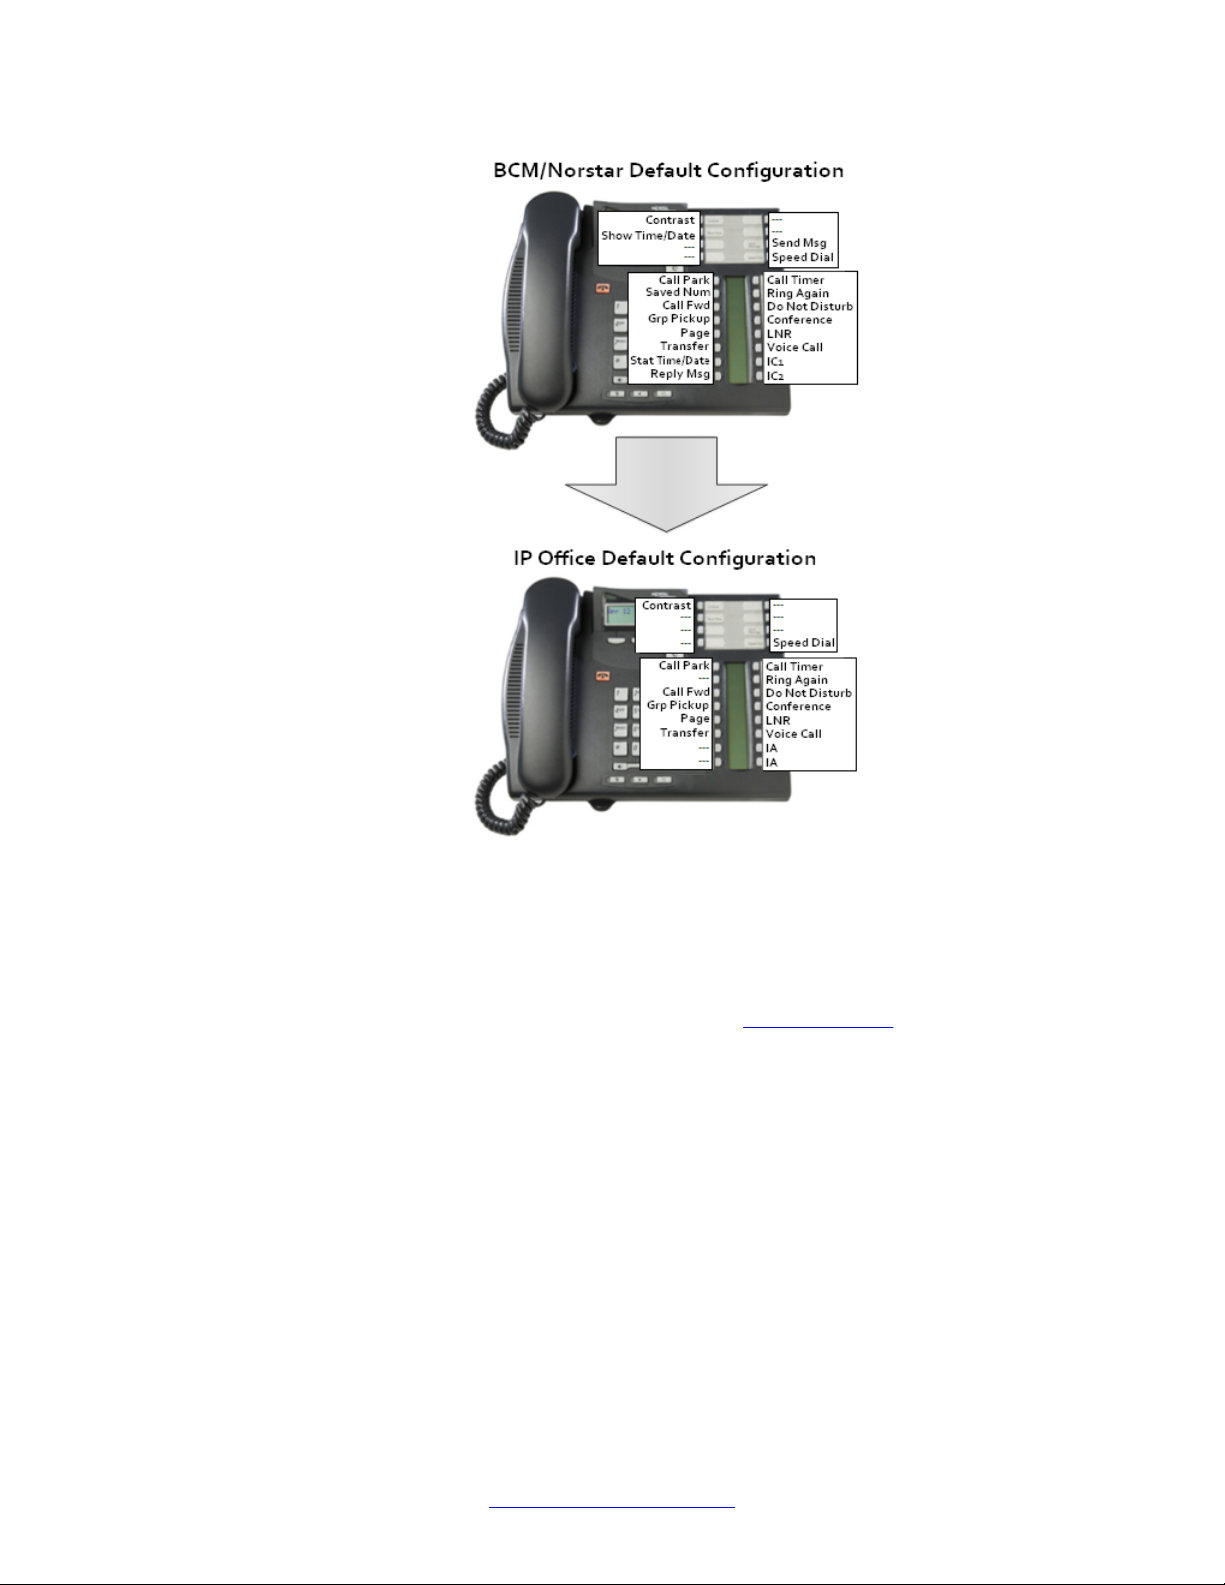
Default button programming
Once the M7000 and T7000 Series phones are connected to an IP Office, default button
programming is not affected. However , if the phone is logging into a User for the first time, that
User's button programming is defaulted (unless the *DCP short code is used; see below). The
default button programming in IP Office is very similar to the BCM default programming, with
the exception of some features which do not exist on IP Office.
Using M7000 and T7000 Series phones on IP Office
The diagram below illustrates just one example of the button conversion when upgrading from
BCM/Norstar to IP Office.
BCM/Norstar to IP Office Phone Convergence Handbook October 2012 21
Page 22
Engineering overview
Button programming will be set to default when the phone is connected for the first time, which
might overwrite any programming that was performed for the extension prior to connecting the
phone. The short code *DCP would prevent this from happening, but the default IP Office
configuration does not contain the *DCP short code. It will be necessary to add the *DCP short
code to each extension if, for example, the button programming is performed prior to
connecting the phones as part of system staging (see
System staging on page 82 for more
information).
Once the phone is connected and the buttons are set to default, IP Office will then automatically
create the *DCP short code, so that the buttons will not be set to default again when the phone
is reconnected or the system reboots.
The *DCP short code is part of the system configuration files and hence it is important to save
the configuration file once the phones have been connected so that they continue to include
the short code. Otherwise, it is possible that an older configuration file for the extension will
default the button programming once applied, without the *DCP short code.
22 BCM/Norstar to IP Office Phone Convergence Handbook October 2012
Comments? infodev@avaya.com
Page 23

Programming buttons
On IP Office, users can continue to self-administer the programmable buttons of M7000 and
T7000 Series phones using Feature *1, Feature *2 and Feature *3. These feature codes are
explained in detail below.
The user may be prompted to enter the login password, if configured, in order to program
buttons. The login password can be configured through IP Office Manager.
Note that if IP Office is in Basic mode, you must select a trunk line before dialing an external
number that has been programmed on a button. It is not possible to assign a trunk line or pool
to a button.
External Autodial (Feature *1)
The user presses F*1, followed by the button to be programmed and the external or internal
number to be programmed on that button. This feature functions the same as it did on BCM.
Internal Autodial (Feature *2)
The user presses F*2, followed by the button to be programmed and the internal number to
be programmed on that button. Internal autodials will have a Busy Lamp Field if the button has
an LED indicator. This feature functions the same as it did on BCM.
Using M7000 and T7000 Series phones on IP Office
Feature button (Feature *3)
On IP Office, users of the M7000 and T7000 Series phones have two additional options to selfadminister feature button programming.
After pressing Feature *3, on two-line display phones, the user will see a More soft key.
Pressing More once will provide a list of call features that can be programmed on buttons. On
single and zero-line display phones, the user must press Feature *3* (note the extra '*') in
order to access the same list. The available features include traditional BCM features, but also
IP Office features which have no equivalent BCM feature code, like Twinning or SelfAdministration.
The table below lists all the features available for programming:
Feature list
Speed Dial Group PickUp Forward On No Answer
Ring Agn/Back Direct PickUp Pickup
Conference Timer Directory
Call Fwd All Do Not Disturb Flash Hook
Lost No. Redial Contrast Internal Auto
Page Group Group Listen Set Hunt GroupN
Voicemail Time of Day Twinning
Voice/Auto IC Call Log Ringer Off
BCM/Norstar to IP Office Phone Convergence Handbook October 2012 23
Page 24

Engineering overview
Priority Call Self-Administration Stamp Log
Transfer Account Code
Call Park Forward On Busy
Note:
Pressing Feature *3 > [Login Code] > More > More > Prog on two-line display phones will
provide the option to reset the button programming to default. To reset button programming
to default on single and zero-line display phones, press Feature *3 [login code] * * #.
Call transfer
The Call Transfer functionality on IP Office works very similar to the BCM and Norstar. Using
Feature 70 will invoke the transfer. The user can enter the destination or, on any two-line
display phone, access the system directory through the Dir soft key.
Feature list
Important to note is that on IP Office the user cannot press the Release button to complete
the transfer. Instead, the user must press the Complete soft key , Transfer button or F70 again.
The user has the option to consult with the transfer recipient to perform either a supervised or
unsupervised transfer.
There will no longer be a Transfer soft key available on the T7316E, M7310 and M7324. Users
either need to use F70 or program a button with the Transfer feature.
On IP Office, a transfer requires a free Call Appearance. By default, there are two Call
Appearances on each M7000 and T7000 Series phone, which means that a user cannot
transfer a call when the user has a second call on hold. In this situation, the administrator needs
to add an additional Call Appearance to the phone.
Note also that On IP Office, if a call is transferred internally, the transfer recipient will receive
the CLID of the caller and not the person transferring the call. For example, User A calls User
B. User B transfers the call to User C. User C will receive the CLID of User A and not User B.
On BCM, User C would have first received the CLID of User B, until the transfer had been
completed.
Conference
Unlike BCM and Norstar, invoking the Conference feature (F3) while only a single (or no) call
exists on the phone will not create the desire conference. Instead, the user is presented with
an error tone and a message indicating that you must have another call in progress (this will
not affect the current call).
24 BCM/Norstar to IP Office Phone Convergence Handbook October 2012
Comments? infodev@avaya.com
Page 25

Using M7000 and T7000 Series phones on IP Office
On the IP Office, the user must have one active call and one or more calls on hold before
invoking the Conference feature (F3) in order to add all parties into the conference. Additional
parties can be added by selecting a free call appearance and dialing the next party . Pressing F3
again will collapse all calls into a single conference call.
It is important to note that on IP Office all conference participants on the same IP Office have
the same rights, which means all conference participants will have the ability to mute or drop
participants through their phones or through the One-X Portal interface. On the BCM, only the
conference originator has these rights.
Also, note that the Conference Split feature is not supported on IP Office. On IP Office, the
conference is consolidated to a single line appearance, which means the conference originator
can no longer press one of the line appearances to put one participant on hold and only speak
to the other participant.
Any conference participants that are registered on the IP Office hosting the conference and
that are using M7000 and T7000 Series or Avaya phones need to press the Release button
twice to disconnect from the conference. Pressing once will provide the option to select a
participant that can be disconnected from the conference.
Call forward
The IP Office platform provides a wider variety of Forward options than the BCM. Using
Feature 4 on M7000 and T7000 Series phones will invoke the IP Office “Call Forward
Unconditional” feature. In general, IP Office does not forward internal and hunt group calls
unless configured in IP Office Manager . By default, when using F4 on M7000 and T7000 Series
phones on the IP Office, Forward Internal is on and Forward Hunt Group is off, much like BCM
behavior.
Feature 4 will enable the Forward and will prompt the user to enter the Call Forward
destination. The user can then enter the destination or , on two-line display phones with the Dir
soft key, select a destination from the Directory.
The Call Forward setting is canceled through Feature #4 like on the BCM. When the user
reactivates Call Forward using F4 again, the phone will display the last number the extension
was forwarded to, at which point the user can either confirm the same destination or enter a
new one.
If the call is not answered at the Forwarded To destination, the call will be treated based on
the Forwarded To extension rules. Short codes will also be based on the Forwarded To
extension rules. Follow Me To/Here is an alternative feature but can only be used to forward
calls to internal destinations. If a call is forwarded through Follow Me To/Here from phone A to
phone B, the call will be treated based on the rules for phone A. For example, the short codes
will be based on phone A and the call would go to phone A's voicemail.
BCM/Norstar to IP Office Phone Convergence Handbook October 2012 25
Page 26

Engineering overview
IP Office has a feature called Single Mailbox Working that allows externally forwarded calls,
which are unanswered, to go back to the IP Office mailbox. Single Mailbox Working requires
trunks with answer supervision.
Note that, depending on the configuration, the user might be prompted for a security PIN in
order to enable (F4) and disable (F#4) call forwarding on the IP Office.
Call park and page
Park/Unpark
On IP Office, calls are parked in a similar way to BCM, but it is no longer possible to unpark
calls by dialing the park code. On IP Office, the user has to invoke the Unpark feature followed
by the Park code. Feature #74 has been added as a new feature code on IP Office to unpark
calls. Parked calls can also be retrieved by the user who originally parked the call by selecting
Feature #74 followed by the Done soft key. On phones that do not have soft keys, pressing
the Hold button completes the unpark operation.
When a call is parked on IP Office, the Line Appearance for the call will remain solid and it will
not flash to indicate its held status.
Note that the park/unpark feature is not supported across an IP Office Small Community
Network (SCN).
Page
On IP Office, a soft key will not be presented after parking a call for Park’and’Page. Users will
have to manually invoke the Page feature through a programmed button, short code, or
Feature 60.
On IP Office, it is necessary to configure Page Hunt Groups that contain the phone extensions
that should receive pages. The user is prompted to enter the Page Group once the Page
Feature is used.
The following BCM and Norstar page features are not supported on IP Office: Page Internal
(Feature 61), Page External (Feature 62) and Page Internal and External (Feature 63). The
administrator can create Page Groups to support these extensions individually or as a
whole.
Directory and speed dials
Directory
M7000 and T7000 Series phone users have access to the directory functionality of IP Office.
A “Directory” button can be configured on the phone via System Administration or by using
F*3. In addition, on two-line display phones with soft keys, a Dir soft key is displayed when the
phone is active or a line appearance is selected.
26 BCM/Norstar to IP Office Phone Convergence Handbook October 2012
Comments? infodev@avaya.com
Page 27

The Directory button enables the user to dial by name and will automatically match search
entries. The user can also scroll through the directory entries using the volume bar on the
M7000 and T7000 Series phones. The entries appear in alphabetical order.
Speed dials
On M7000 and T7000 Series phones on IP Office, the user can program personal speed dials
through Feature *4. The personal speed dials will also be added to the personal directory of
the user.
Personal speed dials can be dialed in a fashion similar to the BCM (press Feature 0, followed
by the speed dial code). Each user has a limit of 100 personal speed dial entries, numbered
from 00 to 99.
Voicemail
M7000 and T7000 Series phone users on IP Office can continue to use Feature 65 or Feature
981 to access their voicemail, but will not have Visual V oicemail. Users must navigate the audio
command prompts of the IP Office, although M7000 and T7000 Series users can use One-X
Portal or One-X Mobile Preferred to get Visual Voicemail functionality.
Using M7000 and T7000 Series phones on IP Office
It is import to understand that IP Office Embedded Voicemail and Voicemail Pro will function
differently than the BCM Voicemail system, including a different flow of options.
For example, if a user wants to save a message in IP Office Embedded Voicemail in order to
listen to it again at a later date, the message needs to be marked as Saved. Otherwise, the
message will be automatically deleted after 24 hours.
Message Waiting Indicator
On Norstar and BCM, the M7000 and T7000 Series phones will notify the user about a new
voice message by displaying “Message(s) For You” on the phone display and by lighting up
the red Messaging Waiting Indicator (MWI) light on that phone.
On IP Office, the M7000 and T7000 Series will not display “Message(s) For You” on the phone
display, but IP Office will light up the red MWI indicator of the T7000 Series phones.
Since the M7000 Series phones have no designated MWI light there will be no message waiting
indication by default. T o receive MWI on IP Of fice, M7000 Series phone users have two options:
BCM/Norstar to IP Office Phone Convergence Handbook October 2012 27
Page 28

Engineering overview
• Indicator Button programmed with F65 or F981: With this button programmed, new
messages will cause the indicator lamp to light up. This option is not available for the
M7100[N] and T7100 phones since they have no programmable indicator button.
• Voicemail Ringback Feature: When this feature is enabled, the IP Office will ring the
phone once it is active again (handset lifted or call placed) to notify the user about the
available voicemail. This feature is disabled by default.
Hold call
When a user places a call on hold on IP Office, the Line Appearance on the same phone will
flash to indicate that the call is being held. The Line Appearance for the same line on other
phones will not be flashing but will remain solid instead.
Other
Saved Number Redial (Feature 67): The BCM Saved Number Redial feature (Feature 67)
is not available on IP Office. Alternatively, users must use either the Call Log feature (F812)
to redial phone numbers or the Last Number Redial (F5) feature.
Ring delay: In North America, on IP Office systems using analog trunks, there will be a delay
of one or two ring cycles before the extension will start to ring. The ring delay is due to IP
Office's ability to route calls based on the incoming CLID information. IP Office waits until the
entire CLID has been transmitted. It is not possible to reduce the delay , however, it is possible
to change the analog trunk configuration to “Loop Start” (rather than “Loop Start ICLID”) such
that incoming calls on that trunk ring immediately without CLID delivery (not that the user must
forfeit access to CLID).
Dialing options: On BCM, the user has the option to choose from three dialing modes by
using Feature *82. The modes are Standard Dial (selection of line followed by number), PreDial (dial number followed by line button) and Automatic Dial (Dial number and automatic
selection of line). On IP Office, Feature *82 enables and disables the Enbloc Dialing feature.
Enbloc Dialing Off is equivalent to Automatic Dial. Enbloc Dialing On is equivalent to PreDial.
Dial Pad lettering: On the M7000 Series phones the 'Q' and 'Z' letters are printed on the '0'
(zero) digit. When these phones are used in conjunction with IP Office, the phones function as
if 'Q' is on the '7' digit and 'Z' is on the '9' digit.
Background music: IP Office does not support the Background Music feature available on
the BCM (Feature 86), which allows the user to play the Music on Hold music through the
phone speaker.
28 BCM/Norstar to IP Office Phone Convergence Handbook October 2012
Comments? infodev@avaya.com
Page 29

Using 1100 and 1200 Series phones on IP Office
Using 1100 and 1200 Series phones on IP Office
The 1120, 1140E, 1220, 1230, and their associated button modules can be used on the IP
Office by upgrading the firmware for the phones to SIP. The SIP firmware has been updated
several times with IP Office Releases 6.1, 7.0, and 8.0. The content in the following sections
is based on IP Office Release 8.0, using SIP firmware Release 4.3.
Once the 1100 or 1200 Series phone firmware has been upgraded from Unistim to SIP, the
functionality of the phone will differ from before. The user will continue to be able to use BCM
feature codes, but the number of feature codes is fewer than on the M7000 and T7000 Series
phones on IP Office.
The major difference for the end user will be that the phones only have one Intercom/Call
Appearance button and it is no longer possible to switch between calls or initiate additional
calls using the Intercom/Call Appearance buttons. However, customers can still have multiple
calls and also switch between them using the soft keys and navigation keys.
The following sections provide an extensive overview of the functional differences when using
the 1 100 and 1200 Series phones on IP Office. For a short list of the most common differences,
refer to
supported by 1 100 and 1200 Series phones on IP Office, refer to Appendix 1: Norstar and BCM
user feature codes on page 119.
Related topics:
Key feature differences on page 34. To view a table that lists all the features currently
Idle display and call functionality on page 29
Line Appearances and Intercom keys on page 30
Programming buttons on page 30
Conference on page 32
Call forward on page 32
Call park and page on page 33
Directory and speed dials on page 33
Voicemail on page 33
Idle display and call functionality
The 1120 and 1220 only have a single line to display call information. It will only display the
caller's Name information. The user can use the Navigation keys to scroll to the Number
information. For external incoming calls without available Name information, the phone display
will simply read “External.” For internal calls, however, the phone will display whatever name
BCM/Norstar to IP Office Phone Convergence Handbook October 2012 29
Page 30

Engineering overview
or number information is available, resorting to “External” only when no other information is
available.
Line Appearances and Intercom keys
The 1100 and 1200 Series phones only display one Line Appearance or Intercom key while
they are connected to the IP Office using SIP.
Users can still handle multiple calls in parallel, but will have to use soft keys to navigate to (and
initiate) additional calls, pickup other incoming calls, or switch between calls.
Making a new call
To establish a new call while already on a call, the user needs to have a free Call Appearance
and select New Call from the soft key menu (press More… to get to the second page of soft
keys).
Answering a call waiting
The user will be notified of incoming calls through a short, single ring splash and the call CLID
details displayed on the phone display. The user can select Answer, Decline, or Ignore for
the call waiting through the appropriate soft key . Answering a call waiting automatically places
all other calls on hold.
Moving between calls
Active calls are displayed and the user can use the navigation keys to select one of the calls.
Calls on hold will have a flashing hold icon and can be retrieved by selecting the call and
pressing the Activate soft key (press More… to get to the second page of soft keys). Retrieving
a call automatically places any other active calls on hold.
Programming buttons
On IP Office, users can continue to self-administer the programmable buttons of 1100 and
1200 Series phones using Feature *1, *2 and *3.
Note that the users must enter their login code before being allowed to program buttons. The
login code is configured through IP Office Manager.
External Autodial (Feature *1) and Internal Autodial (Feature *2)
On the 1 100 and 1200 Series phones with SIP firmware, Feature *1 and Feature *2 basically
perform the same action. The user presses F*1 or F*2, followed by the button to be
programmed and the external or internal number to be programmed on that button.
It is important to note that the use of F*1 and F*2 does not provide Busy Lamp Field (BLF) on
any BST phone. On the 1100 and 1200 Series phones, the BLF buttons can only be
programmed via IP Office Manager.
30 BCM/Norstar to IP Office Phone Convergence Handbook October 2012
Comments? infodev@avaya.com
Page 31

Using 1100 and 1200 Series phones on IP Office
Feature button (Feature *3)
On IP Office, users of the 1100 and 1200 Series phones have two options to self-administer
feature button programming on the phone and the LED/LCD key expansion modules; Feature
*3 or the Feature soft key followed by the BtnPg key.
1. After pressing Feature *3 or the BtnPg soft key, the user can press the button to
be programmed, followed by the Feature code to be programmed on that button.
Only the following Features can be programmed using this method:
• F4 – Call Forward (pressing the programmed button will turn call forwarding
on and off)
• F60 – Page
• F66 – Dial Voice Call
• F74 – Call Park
• F75 – Call Pickup Group
• F76 – Call Pickup Extn
• F85 – Do Not Disturb
• F9*9 – Stamp Log
2. After pressing Feature *3 or the BtnPg soft key, and after selecting the button to
be programmed, the user will be prompted to select the feature to be programmed.
Instead of entering the Feature code, as in step 1, the user can scroll through the
list of programmable features using the soft keys. The available features include
traditional BCM features as well as IP Office features which have no equivalent BCM
Feature Code, like Twinning or Self-Administration.
The following features will be available:
Feature list
Call Forward All
(FwdAll)
Page (GrpPage) Call Pickup Any (PickA) Extension Logout (ElogO)
After Call Work
(ACWrk)
Automatic Callback
(AutoCB)
Private Call (PrivC) Twinning (Twin) Follow Me Here (Here+)
Dial Voice Call (IAuto) Relay On (Relay+) Follow Me To (FollowTo)
Call Park (CPark) Relay Pulse (Relay) Follow Me Cancel (Here–)
Call Pickup Ext (DpkUp) Extension Login (ElogI)
Do Not Disturb (DND) Remote Park (RPark)
Voicemail On (VMOn) Conference MeetMe
(ConfMM)
Call Park Retrieve
(RCall)
Call Pickup Group
(PickG)
BCM/Norstar to IP Office Phone Convergence Handbook October 2012 31
Account Code (Acct) Stamp Log
Call Record (CRec)
Page 32

Engineering overview
Conference
A conference can be set up one of three ways: via IP Office short code, via Conf soft key
available during a call, or by using Feature 3.
1100 and 1200 Series phone users do not have conference control options like Mute or Drop
on their phone.
Call forward
The IP Office platform provides a greater variety of Forward options than the BCM. Using
Feature 4 on 1100/1200 Series phones will invoke the IP Office “Call Forward Unconditional”
feature. In IP Office, Feature 4 enables the Forward and prompts the user to enter the Call
Forward destination. The user can enter the destination number or , as an alternative for users
with two-line display phones and the Dir soft key, select a destination from the Directory. In
general, the IP Office does not forward internal or Hunt Group calls unless configured in IP
Office Manager.
As with the BCM, the Call Forward setting is canceled through Feature #4. When the user reactivates Call Forward using Feature 4 again, the phone will display the last number the
extension was forwarded to and the user can either confirm the same destination or enter a
new destination.
If the call is not answered at the Forwarded To extension, the call will be treated based on the
Forwarded To extension rules. Short codes will be based on the Forwarded To extension.
Follow Me To/Here is an alternative feature but can only be used to forward calls to internal
destinations. If a call is forwarded through Follow Me To/Here from phone A to phone B, the
call will be treated based on the rules for phone A. For example, the short codes will be based
on phone A and the call would go to phones A's voicemail.
IP Office has a feature called Single Mailbox Working that allows externally forwarded calls,
which are unanswered, to go back to the IP Office mailbox. Single Mailbox Working requires
trunks with answer supervision.
Depending on the configuration, the user might be prompted for a Security Pin to enable (F4)
and disable (F#4) call forwarding through IP Office.
32 BCM/Norstar to IP Office Phone Convergence Handbook October 2012
Comments? infodev@avaya.com
Page 33

Call park and page
Park/unpark
On IP Office, calls are parked in a similar way to BCM, but it is no longer possible to unpark
calls by dialing the park code. On IP Office, the user has to invoke the Unpark feature followed
by the Park code. Feature #74 has been added as a new feature code on IP Office to unpark
calls. Parked calls can also be retrieved by the user who originally parked the call by selecting
Feature #74 followed by the Unpark soft key.
When a call is parked on IP Office, the Line Appearance for the call will remain solid and it will
not flash to indicate its held status.
Note that the park/unpark feature is not supported across an IP Office Small Community
Network (SCN).
Page
On IP Office, a soft key will not be available after parking a call for Park’and’Page. Users will
have to manually invoke the Page feature through a programmed button, short code, or
Feature 60.
Using 1100 and 1200 Series phones on IP Office
On IP Office, it is necessary to configure Page Hunt Groups that contain the phone extensions
that should receive pages. The user is prompted to enter the Page Group once the Page
Feature is used.
The following BCM and Norstar page features are not supported on IP Office: Page Internal
(Feature 61), Page External (Feature 62) and Page Internal and External (Feature 63). The
administrator can create Page Groups to support these extensions individually or as a
whole.
Directory and speed dials
Directory
The 1100 and 1200 Series phones provide the user access to the system and personal
directory. Users can search the directory by pressing the Directory button and using the
keypad to enter letters. In addition, the user can select Services > Search and then perform
a Local or Global search.
Speed dials
The speed dial feature is not available on the 1 100 or 1200 Series phones administered on the
IP Office. Users should leverage the directory functionality instead.
Voicemail
1100 and 1200 Series phone users on IP Office can access their voicemail through the Msgs
soft key or through Feature 981. Feature 65 cannot be used to access voicemail and there is
BCM/Norstar to IP Office Phone Convergence Handbook October 2012 33
Page 34

Engineering overview
no support for Visual Voicemail. Users must navigate the audio command prompts of the IP
Office. M7000 and T7000 Series users, on the other hand, can use One-X Portal or One-X
Mobile Preferred to get Visual Voicemail functionality.
It is import to understand that IP Office Embedded Voicemail and Voicemail Pro will function
differently than the BCM Voicemail system, including a different flow of options.
For example, if a user wants to save a message in IP Office Embedded Voicemail in order to
listen to it again at a later date, the message needs to be marked as Saved. Otherwise, the
message will be automatically deleted after 24 hours.
Features and feature codes
On the BCM, most telephony features are used through the Feature key. Avaya has
implemented the Feature key for the most commonly used features on IP Office, but not all of
the features codes will remain available to users post-migration. For an overview of the feature
codes available on the IP Office for the M7000 and T7000 Series phones as well as the
1100/1200 IP phones, refer to
page 119. Detailed information on how to use the features in IP Office can be found in the
following sections:
Appendix 1: Norstar and BCM user feature codes on
• Using M7000 and T7000 Series phones on IP Office on page 19
• Using 1100 and 1200 Series phones on IP Office on page 29
The chapters below illustrate the key differences when accessing features and operating
feature codes on certain phones.
Related topics:
Key feature differences on page 34
Key feature differences
Some of the core telephony features and configurable options differ when used in conjunction
with IP Office. For example, feature codes are available for M7000, T7000, and 1100/1200
Series phone users on IP Office, but a number of feature codes will no longer be available.
User will need to program IP Office Short Codes in order to use equivalent or similar IP Of fice
features (refer to the IP Office user documentation for short code information). For a complete
list of features and feature codes and their support status on IP Office, refer to Appendix 1:
Norstar and BCM user feature codes on page 119.
The following sections identify the key feature differences on IP Office.
34 BCM/Norstar to IP Office Phone Convergence Handbook October 2012
Comments? infodev@avaya.com
Page 35

Features and feature codes
Core telephony and management features
Call Forward:
IP Office provides a greater variety of forwarding options. When F4 is pressed on BST phones,
IP Office enables/disables the call forwarding number (which is configured separately).
The Call Forward routing behavior of BCM and IP Office are similar. IP Office has a feature
called Single Mailbox Working, which allows externally forwarded calls that are unanswered
to go back to the IP Office mailbox. Single Mailbox Working requires trunks with answer
supervision.
The IP Office Follow Me To/Here features are similar to Call Forward. They can only forward
calls to internal extensions, but additional user features (auto-answer features and paging) will
transfer the Follow Me destination.
Call Transfer:
Very similar functionality on IP Office, but the user can no longer press the Release button to
complete the transfer. Instead the user must press the Complete soft key, Transfer button, or
F70 again.
The user has the option to Consult with the Transfer-to party first or can do a direct
(unsupervised) transfer.
On IP Office, a transfer requires a free Call Appearance. By default there are two Call
Appearances on a BST phone, which means that a user cannot transfer a call when the user
has a second call on hold. If this is required, the administrator needs to add an additional Call
Appearance to the phone.
Conference:
In IP Office, users need to establish calls to participants first and then merge them to
conference through F3, Conference button, or soft key . The IP Of fice conference feature does
not support the BCM three-party conference feature (with master and slaves).
Invoking the conference features instantly pulls all active and held calls into one conference.
Also, each user has control over dropping others out as well as dropping themselves out (via
Rls Rls).
Call Park/Unpark:
Calls are parked to park slots which can be entered by the user (by default User ID + 1 digit).
Calls need to be retrieved through the new Unpark feature (F#74 on BST). By default, it is not
possible to simply dial the number of the park slot as on the BCM. Short codes can be used
to simplify the Park Call and Unpark Call interactions. Users can push a Call Park (F74)
programmed feature button when calls have been parked and there is no active call.
Directory:
M7000, T7000, and 1100/1200 Series phone users can leverage the IP Office directory
functionality. Users can press F*3 to program a directory button on the BST.
Voicemail:
BCM users will have to adapt to either of the IP Office Voicemail versions. Overall, the
functionality is very similar, but the user interface will be dif ferent. Users moving from BCM Call
BCM/Norstar to IP Office Phone Convergence Handbook October 2012 35
Page 36

Engineering overview
Pilot voicemail to IP Office Embedded Voicemail will experience a loss in functionality, while
users moving to Voicemail Pro will have a additional functionality.
There will be no visual voicemail support on M7000, T7000, or 1100/1200 Series phones, but
users can use One-X Portal, Phone Manager, and Webmail for easy access to their voice
mails.
Unified Messaging:
IP Office Unified Messaging does not rely on an installable application like the BCM Call Pilot
Desktop Messaging application. On IP Office, the user will set up an IMAP account to retrieve
the mails directly from the IP Office messaging system. Alternatively, voicemail messages can
be stored directly in MS Exchange. The IP Office voicemail files will be available as
standard .wav files, which can be saved or forwarded. BCM Call Pilot Unified Messaging files
require a proprietary audio player to play the voice mail recordings.
Hunt Group functionality:
The IP Office Hunt Group functionality provides significantly greater features and more options
than BCM Skillsets.
User configurable options:
By default, IP Office has less end-user configurable features and options. The Self-
Administration button must be assigned by an administrator to allow the end-user to configure
further buttons.
M7000 and T7000 Series phones
Button programming:
The default button layout has been matched as closely as possible, but certain buttons will be
empty by default. On certain phones, the bottom right button is dedicated to handsfree
operation and cannot be changed.
Idle display:
Different Date and T ime display. The display shows the current user ID when connected to IP
Office. It also shows Hunt Group memberships (G) and DND status (N).
Called, calling, and ringing display:
Ringing display on IP Office; migrated users will have the option to "Ignore" or send a call to
VM ("ToVM") via soft keys. Note that internal call status displays (such as “On another call” or
“Do not disturb”) are not available on IP Office.
Loop length specification:
T7000 Series digital deskphones have different maximum loop length specification when
connected to a TCM8 card or DS16A/30A expansion modules on IP Of fice. Refer to
5: Loop length differences between BCM and IP Office on page 142 for more information.
Expansion modules:
IP Office does not have the concept of Ordinary KIMs and Enhanced KIMs. All buttons can
have line appearances. On IP Office, there is an overall system limit of 1024 buttons of any
Appendix
36 BCM/Norstar to IP Office Phone Convergence Handbook October 2012
Comments? infodev@avaya.com
Page 37

Features and feature codes
kind of expansion module (Digital + IP). However, T7316E phones allow up to 9 KIM add-ons,
while the M7324 allow up to 2 KLM/CAP add-ons.
Program Internal/External Autodialer:
If the user has a login code/password defined, they will be prompted to enter it correctly before
they can program buttons.
Busy Lamp Field (BLF):
BLF module lamps on a M7310 phones now operate as full feature status indicator lamps and
not simply as Busy state indicators as they did on BCM/Norstar. This enables the top 24 buttons
on the M7310+BLF to be status-indicator-equipped programmable buttons (one of these
buttons could be used as an MWI by programming it to Feature 65).
Select dialing option:
In BCM, users had a choice of standard, predial, or automatic. In IP Office, users have the
choice of enbloc on (predial) or enbloc off (automatic dial).
Reply Message Waiting:
In IP Office, this feature connects to audio voicemail (no visual voice).
Page General:
In IP Office, users must enter a group DN rather than a page zone.
Priority Call:
Similar to BCM, this feature in IP Office rings a phone that has DND enabled, but does not
barge in on an active call.
Group Call Pickup:
Group Call Pickup answers a ringing hunt group call of which the user is a member. It does
not pick up non-hunt group calls to other members of the hunt group.
Voicemail login:
The user is brought to IP Office Embedded Voicemail, or Voicemail Pro. There is no visual
voicemail support for BST phones. Users can press F981 or F65 to access voicemail login.
Voicemail/Messages:
F981 only. F65 (get messages) performs the same function as F981 (enter voicemail).
1100 and 1200 Series IP phones with SIP firmware
Idle display:
Different Date and Time display. On two-line display phones, the display shows the current
user ID on the Call Appearance.
Called, calling, and ringing display:
Ringing display on IP Office; migrated users will have the option via soft key to Ignore the call
(the phone stops ringing, but the caller still hears the ring tone) or Decline the call (“Busy”
behaviour, e.g. call to VM).
BCM/Norstar to IP Office Phone Convergence Handbook October 2012 37
Page 38

Engineering overview
Line Appearance/Busy Lamp Field:
Busy Lamp Field (BLF) is supported but needs to be configured through IP Office Manager.
Program Internal/External Autodialer:
On 1100/1200 Series phones, F*1 and F*2 do the same thing.
Select dialing option:
On-hook dialing is equivalent to predial/enbloc dialing. There is no equivalent to BCM/Norstar
Standard dial on IP Office.
Voicemail login:
The user is brought to IP Office Embedded Voicemail, or Voicemail Pro. There is no visual
voicemail support for BST phones. Users can press F981 or F65 to access voicemail login.
Data Migration Manager overview
IP Office Release 8.0 introduces a new tool called the IP Of fice Data Migration Manager (DMM)
designed specifically to facilitate a quick and easy upgrade from BCM and Norstar™ to IP
Office. Using DMM allows you to preserve some of the BCM and Norstar programming and
use it as a baseline for programming the replacement IP Office, thereby saving time and
money.
The DMM application can run on a Microsoft Windows XP SP2, Microsoft Windows Vista, and
Microsoft Windows 7 operating system and requires at least 175MB of disk space to install.
You should consider additional disk space for saving the extracted data (an additional 100MB
of free disk space per source platform is recommended).
The minimum suggested requirements are as follows:
Operating system Windows XP or Linux
Memory 1GB RAM recommended, 512K minimum
DMM also allows you to transfer voicemail and Auto-Attendant messages from BCM and
Norstar Callpilot to IP Office Embedded Voicemail or Voicemail Pro. This makes the migration
to IP Office more seamless and eliminates the need to re-record Auto-Attendant
announcements. However, you will be required to manually move the converted audio files to
the new IP Office and also rebuild the Auto-Attendant tree in IP Office using the converted
files.
Using DMM, you can extract configuration data from the following sources:
38 BCM/Norstar to IP Office Phone Convergence Handbook October 2012
Comments? infodev@avaya.com
Page 39

Data Migration Manager overview
• BCM200/400 4.0
• BCM1000 4.0
• BCM50 3.0 to 6.0
• Norstar MICS Release 7.1 / Call Pilot 100/150 3.1
• Norstar CICS Release 7.1 / Call Pilot 100/150 3.1
There are three steps in the migration process: Extract, Convert, and Apply. The following
sections describe, at a high level, each step in the process, concluding with some important
notes.
Data extraction
The data extraction phase is used to populate Norstar or BCM data into the DMM tool. The
data can be extracted from a Norstar or BCM device or it may be loaded from a file created
during a previous extraction procedure.
Data review and conversion
The data review page displays the data recovered from the data extraction. If the extracted
data came from a BCM 4.0 system, the user is required to input the true MBM configuration
from the BCM 4.0 system. This must be done so that DMM can remove any extraneous data
that exists in the tool.
IP Office data creation
IP Office data creation happens after you review and approve the extracted data. During this
phase, a wizard allows the user to select: the mode of operation in which the target IP Office
is to be configured, the target hardware configuration, the system's IP address, and which
voicemail system to use. You will be able to manually adjust the conversion results before
creating an IP Office configuration file.
Data transfer to IP Office
The data transfer to IP Office is performed using the IP Of fice Manager application. When the
user accepts the IP Office configuration, the data is written to a file and IP Office Manager
reads the data extracted by DMM. The voicemail messages and greetings and the AutoAttendant greetings are available in the folder selected during the IP Office data creation
phase.
Notes about Data Migration Manager
The DMM tool helps to transfer a portion of the previous configuration to save time, but it is
important to note that DMM will not transfer all of the configuration elements and that the
installer will have to review the results, modify them if necessary , and program the configuration
elements not transferred by the DMM tool.
The converted configuration elements include:
• Digital & IP phone extensions – phone type, extension numbers, and names
• Extraction and audio codec conversion for:
- Voicemail (greeting, names, recordings) – requires manual copy and paste into IP
Office
BCM/Norstar to IP Office Phone Convergence Handbook October 2012 39
Page 40

Engineering overview
- Auto-Attendant greetings
- Contact Center greetings
Note that DMM will not convert the following:
• Button programming
• Auto-Attendant trees
• Trunk programming (dial plan, SIP trunks, PRI, analog trunks)
• Any application programming like ICC, RCC, Unified Messaging, FMFM, etc.
Voicemail overview
For a list of all the supported languages, refer to Appendix 4: Supported languages on
page 139. The availability of a language does not necessarily indicate support for IP Office in
a country that uses that language.
Read below for more information about voicemail configurations.
IP Office Preferred Edition Voicemail Pro
By default, the prompts installed match the language of the installer and includes English. If
other languages are required, they need to be selected during a custom installation. When the
IP Office routes a call to a voicemail server, it indicates the locale for which matching prompts
should be provided, if available. Within the IP Office configuration, a locale is always set for
the system. However, differing locales can be set for each user, for each incoming call route,
and for short codes, in addition to the default system locale.
IP Office Embedded Voicemail
The IP Office system “Locale” setting is used to determine the default language prompts. A
locale setting is set for the whole IP Office system. For individual users and incoming call
routes, the system local can be overridden.
For calls to voicemail, the locale used is determined as follows:
• The user locale, if configured, is used when the caller is internal
• The incoming call route locale, if configured, is used when the caller is external
• If no user or incoming call route locale is applicable, the system locale is used
• A short code locale, if configured, is used and overrides the options above if the call is
routed to voicemail using that short code
40 BCM/Norstar to IP Office Phone Convergence Handbook October 2012
Comments? infodev@avaya.com
Page 41

Interoperability
Avaya supports standard SIP interoperability between the BCM and IP Office. The
configuration and support features are documented in the IP Office 7.0 and BCM 6.0 – SIP
Interoperability Configuration Guide found at
applicable to IP Office 8.0).
IP Office releases 8.0 and earlier have not been tested in any configuration involving Avaya
Aura Session Manager (SM). For partners and customers that need a small to medium branch
solution that must be networked with A vaya Aura Core products like Session Manager , Avaya
recommends purchasing the Avaya B5800 product. The B5800 is based on the IP Office
platform but provides advanced SIP interoperability and functionality with Avaya Aura Core
products including Session Manager and Communication Manager, as well as with legacy
Nortel products such as BCM, SRG, CS1000 and Call Pilot.
With IP Office 8.1, Avaya will test and support additional interoperability configurations for IP
Office not involving Avaya Aura SM. The scenarios include:
Interoperability
http://support.avaya.com (this guide is also
1. IP Office 8.1 and Avaya Aura Communication Manager 6.2
2. IP Office 8.1 and BCM 6.0
3. IP Office 8.1, BCM 6.0 and CS1000 7.5 with NRS
Related topics:
BCM and IP Office interoperability on page 42
BCM, IP Office, and CS1000 interoperability on page 43
BCM/Norstar to IP Office Phone Convergence Handbook October 2012 41
Page 42
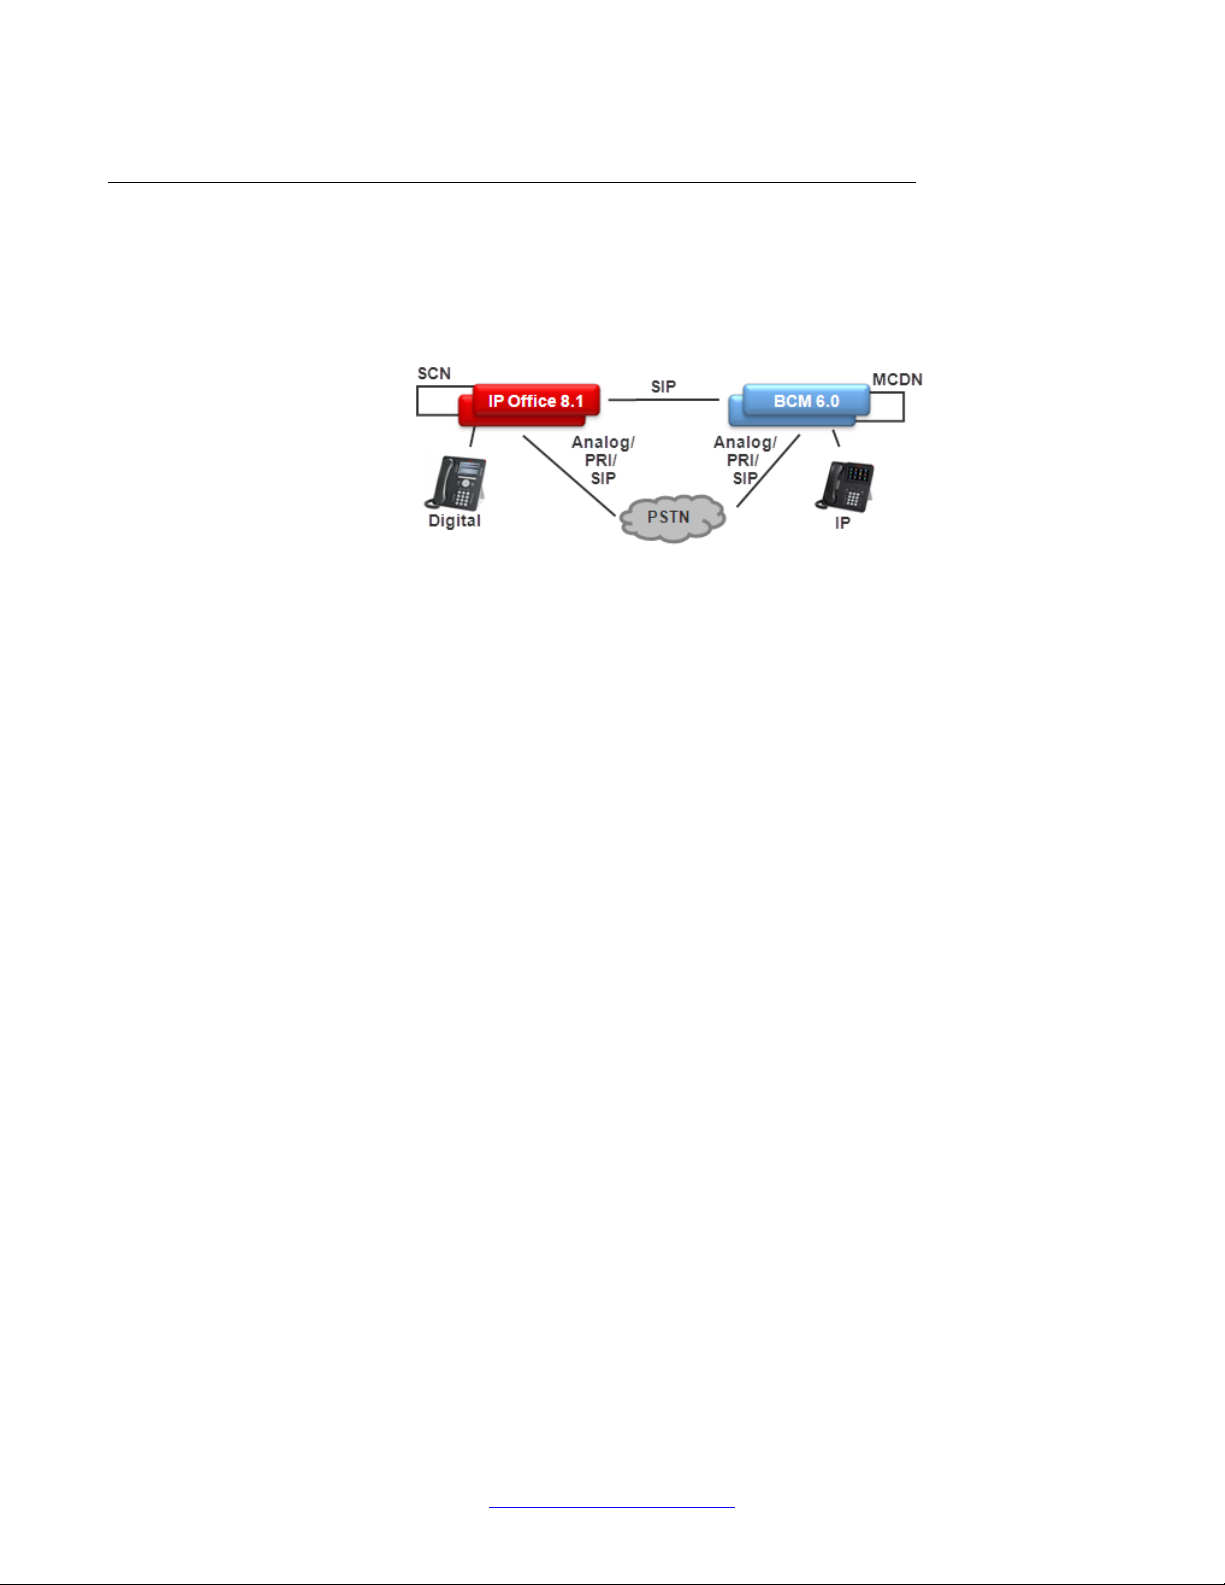
Engineering overview
BCM and IP Office interoperability
The H.323 protocol is used for trunks between the IP Office nodes and the Communication
Manager (CM). The IP Offices are a network of SCNs and can use advanced SCN feature sets
between each other.
Protocol support:
• IP Office to BCM: SIP
• BCM to BCM: SIP or SIP/MCDN
• IP Office to IP Office: H323 - SCN or SIP
It is not possible to network IP Office and BCM via the MCDN or SCN protocol directly.
Platform requirements:
• IP Office
- Release: 8.1
- Edition: Essential, Preferred, Advances, and Midsize
• BCM
- Release: BCM50 and BCM450 6.0
Centralized voicemail:
• The IP Office system may use a centralized Voicemail PRO system in the SCN network
• The BCM systems may use a centralized voicemail within the BCM MCDN network
• Centralized Voicemail across IP Office and BCM systems is not supported
Phones:
• All phones supported on the individual call servers and releases including:
Avaya IP Phone(H323), Avaya Digital phones, BCM 7000 Series Digital phones,
BCM1100/1200 Series IP Phones (SIP), DECT R4, and Analog phones
The advanced feature set of IP Office SCN Networking is available between the IP Of fice nodes
and the BCM MCDN network.
42 BCM/Norstar to IP Office Phone Convergence Handbook October 2012
Comments? infodev@avaya.com
Page 43

BCM, IP Office, and CS1000 interoperability
The following diagram demonstrates how it is possible to migrate a network of BCM and
CS1000 to the IP Office, step-by-step, by adding IP Office systems to it.
Interoperability
Protocol support:
• IP Office to BCM: SIP
• IP Office to CS1000: SIP
• IP Office to IP Office: SIP or H323 - SCN Networking
• BCM to BCM: SIP or SIP/MCDN
• BCM to CS1000: SIP or SIP/MCDN
Platform requirements:
• IP Office
- Release: 8.1
- Edition: Essential, Preferred, Advances, and Midsize
• BCM
- Release: BCM50 and BCM450 6.0
• CS1000
- Release: CS1000 7.5 with NRS
BCM/Norstar to IP Office Phone Convergence Handbook October 2012 43
Page 44

Engineering overview
Centralized voicemail:
• Centralized voicemail for all IP Office system in the SCN network; the BCM system may
use centralized voicemail of the CS1000
• IP Office system cannot use centralized voicemail of CS1000
Phones:
• All phones supported on the individual call servers and releases including:
Avaya IP Phone(H323), Avaya Digital phones, BCM 7000 Series Digital phones,
BCM1100/1200 Series IP Phones (SIP), DECT R4, and Analog phones
Analog line audio performance
It is recommended that tuning be competed on all analog lines connected to the IP Office.
These controls can be used to test the impedance of a line and to then display the best match
resulting from the test. This ensures optimal analog line audio performance. Testing should be
performed with the line connected but the system otherwise idle.
Before testing, ensure that the system Locale setting is correctly configured. Also check that
the system Companding Law settings are configured correctly. If either needs to be changed,
make the required change and save the setting to the system before proceeding with
impedance matching.
44 BCM/Norstar to IP Office Phone Convergence Handbook October 2012
Comments? infodev@avaya.com
Page 45
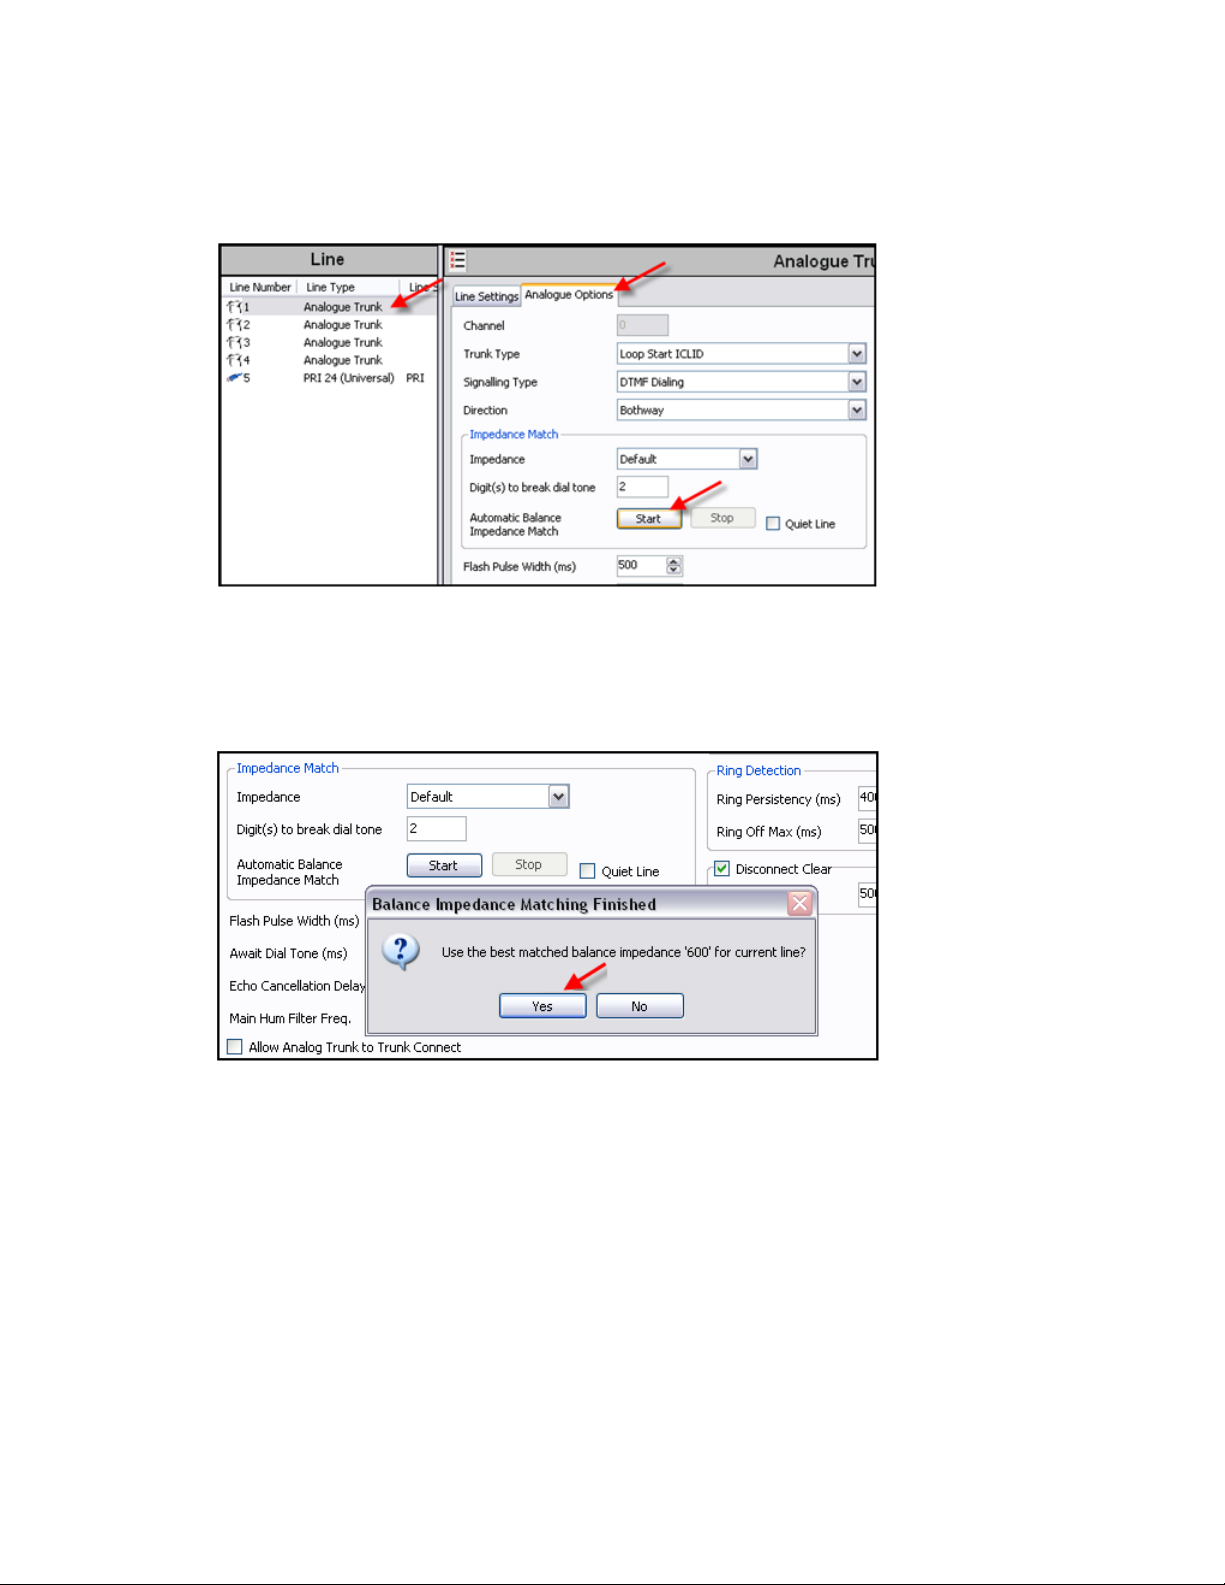
Analog line audio performance
To start testing click Start. The system will attempt to break dial tone using the digit specified,
then send a series of signals to the line and monitor the response, repeating this at each
possible impedance setting.
You can click Stop at any time to cease testing.
When testing is complete, Manager will display the best match and ask whether that match
should be used for the line. If you select Yes, Manager will also ask whether the match should
be applied to all other analog lines provided by the same analog trunk card or module.
Further optimization
If you wish to further optimize your analog lines, you can manually adjust the A -> D (Receive)
and D -> A (Transmit) Gains as well as the Echo Cancellation Delay.
The settings illustrated below prove beneficial where side tone is heard on the M7000 Series
and T7000 Series phones while connected to analog lines.
BCM/Norstar to IP Office Phone Convergence Handbook October 2012 45
Page 46

Engineering overview
Digital Mobility Solution support
All three of the Digital Mobility Solutions are supported:
• 2G4
• 1G9
• 1G8
All 4100 Series and 7400 Series handsets are supported:
• 4135, 4145, 4145EX, 4136, 4146, 4146EX
• 7420, 7430, 7440, 7439, 7449
The DMC080 can be connected to a TCM8, DSM16A or a DSM30A.
The DMC320 can be connected to a DS30A (may require additional hardware to accommodate
the last two ports on the DMC320).
Licensing
License keys are unique 32-character codes based on the feature being activated and the
serial number of the IP Office system's Feature Key dongle. You must obtain and activate
licenses in order to use software and software features using IP Office Manager. In IP Office
Manager, select License in the left window pane, select the license type, and enter the required
details.
Example 1: Enabling software features
Assume that the IP Office system has a valid Phone Manager Pro license that allows for 20
instances. That means that up to 20 IP Office users can be configured to use Phone Manager
46 BCM/Norstar to IP Office Phone Convergence Handbook October 2012
Comments? infodev@avaya.com
Page 47

Licensing
Pro simultaneously. Their previous, license-free Phone Manager Lite software will
automatically change to display Phone Manager Pro features.
Example 2: Enabling software and software features
Assume that the example above also contains a license for Voicemail Pro. This initial Voicemail
Pro license provides for 4 ports between the IP Office system and the Voicemail Pro PC.
Additional Voicemail Pro licenses can be added to increase the number of ports up to the limit
supported by the particular type of IP Office control unit.
When a license key is entered into the IP Office configuration, the following information is
shown.
• Status: The status, which is “Unknown” until the configuration file is sent back to the IP
Office system.
• License: The name of the licensed feature. This may differ from the ordered RFA
name.
• Instances: Depending on the license, this may be the number of ports enabled or number
of simultaneous users of the licensed feature. In some cases, the number of instances is
specified in the license name.
• Expires: Most purchased licenses have no expiry setting. For some features, trial
licenses may be available which will have an expiry date.
The IP500 uses licenses in the same way as other IP Office systems. However there are some
licenses that are specific to the IP500 control unit and may be required during installation to
ensure correct operation of the system.
• IP Office Upgrade Standard to Professional
By default, the IP500 runs in IP Office Standard Edition mode. For full IP Of fice operation,
an IP Office Upgrade Standard to Professional license must be added to the
configuration.
• IP500 Voice Networking
In addition to the upgrade from Standard Edition, if IP trunks are required for voice
networking between the IP Office and other systems, IP500 Standard Networking licenses
are required. This type of license is available as a base license for the first four channels
and then additional licenses for any additional channels required.
• VCM Channels
Each IP500 VCM base card only supports four voice compression channels unlicensed.
Any additional channels available on the card must be licensed by adding IP500 VCM
Channels licenses.
Licenses can be added individually to the IP Office's configuration. However, the licence key
file provided by Avaya from their license ordering web site generates a License.csv file
containing all the ordered licenses. That file can be imported into the configuration.
BCM/Norstar to IP Office Phone Convergence Handbook October 2012 47
Page 48

Engineering overview
Note:
The only license required on the BCM prior to the migration procedure is the Unified
Messaging license which allows voicemail extracts. If you do not have this license, you will
not be able to migrate your voicemail recordings to IP Office.
Before you begin
Ensure that the Feature Key dongle serial number used to generate the license keys matches
that of the Feature Key dongle installed and that all the licenses required have been
included.
You should use this process to individually copy and paste license keys into the configuration.
Cutting and pasting removes any errors that may be caused by the incorrect typing of any
license key.
Procedure
1. Start IP Office Manager and receive the IP Office system's configuration.
2. Select License.
3. To add a license, click on the small folder icon (“add new” icon) and select
License. Enter the new license and click OK.
4. The Status of the new license should be “Unknown” and the license named as
expected. If its Status is “Unknown” and the name is “Invalid,” the most likely cause
is incorrect entry of the license key characters.
5. Repeat the process for any other licences.
6. Click on the Save icon to send the configuration back to the IP Office.
7. Use IP Office Manager to retrieve the configuration again and check that the status
of the license is now “Valid.”
48 BCM/Norstar to IP Office Phone Convergence Handbook October 2012
Comments? infodev@avaya.com
Page 49

Chapter 2: Upgrading to IP Office
Upgrade workflow
The following flowchart provides a high level view of the steps required to migrate data from a
BCM system to IP Office. The workflow is similar when migrating from a BCM or SRG system
to a B5800 Branch Gateway.
BCM/Norstar to IP Office Phone Convergence Handbook October 2012 49
Page 50

Upgrading to IP Office
50 BCM/Norstar to IP Office Phone Convergence Handbook October 2012
Comments? infodev@avaya.com
Page 51

Installing IP Office Manager
IP Office Manager is a Windows PC application used to configure Avaya IP Office telephone
systems.
When a system configuration is loaded into Manager, it is a configuration file copied to the
Manager PC. Any changes made to that configuration have no effect on the system until the
copy is saved back to the system from the Manager PC.
Before you begin
You must have either the IP Office Administrator Applications DVD or the IP Office
Administrator Applications suite, which can be downloaded from Avaya's support website
http://support.avaya.com). You should also meet the minimum system requirements listed
(
below.
Requirement Minimum Recommended
Installing IP Office Manager
Processor 600MHz Pentium or AMD
Opteron, AMD Athlon64,
AMD Athlon XP.
RAM 128MB 256MB
HD Space 1GB - 800MB for .NET2,
200MB for Manager.
Display 800 x 600 - 256 Colors 1024 x 768 - 16-bit High
Operating System Supported on Windows XP Pro, Windows Vista, Windows 7,
Windows 2003 and Windows 2008
• 32-bit and 64-bit versions are supported
• Vista support is only on Business, Enterprise and Ultimate
versions
• Windows 7 support is only on Professional, Enterprise and
Ultimate versions
800MHz Pentium or AMD
Opteron, AMD Athlon64,
AMD Athlon XP.
1.4GB - 800MB for .NET2,
600MB for the full IP Office
Admin suite.
Color
Procedure
1. Using the Add or Remove Programs option in the Windows Control Panel, check
that the PC does not already have a version of the IP Office Administration Suite
installed.
• If 'yes' and the suite is a pre-IP Office 3.2 version, remove the existing IP Of fice
Administration Suite via Add/Remove Programs.
BCM/Norstar to IP Office Phone Convergence Handbook October 2012 51
Page 52

Upgrading to IP Office
• If the existing suite is IP Office 3.2 or higher, it is possible to upgrade without
removing the previous installation. However, if the system already has a USB
Feature Key , the key should be removed prior to upgrading and then reinserted
and the PC restarted.
2. Insert the IP Office Administrator Applications DVD. Select the option for the IP
Office Administration Suit. A folder window will display the installation files for the
administration suite.
3. Double-click on setup.exe.
4. Select the language you want to use for the installation process. This does not affect
the language used by Manager when running. Click Next.
5. Select who should be able to run the Administration Suite application(s). Click
Next.
6. If required select the destination to which the applications should be installed. We
recommend that you accept the default destination. Click Next.
7. The next screen is used to select which applications in the suite should be installed.
Clicking on each will display a description of the application. Click on the drop down
arrow next to each application to change the installation selection. When you have
selected the installations required, click Next.
8. Ensure that at minimum System Monitor and Manager are selected. Click Next.
9. Click Install.
10. Installation of Windows .Net2 components may be required. If menus for this
appear, follow the prompts to install .Net.
11. If requested, reboot the PC.
52 BCM/Norstar to IP Office Phone Convergence Handbook October 2012
Comments? infodev@avaya.com
Page 53

Next steps
Configure the Manager application as necessary. Refer to the IP Office Manager guide found
at http://support.avaya.com.
Preparation for data migration
Preparation for data migration
Related topics:
Updating BCM firmware on page 53
Obtaining BCM configuration records on page 54
Updating BCM firmware
You must ensure that your BCM is patched with the latest software update. The latest update
includes a migration patch that allows you to easily perform the migration of IP phone
information and also provides a more streamlined approach to IP phone provisioning. If you
BCM/Norstar to IP Office Phone Convergence Handbook October 2012 53
Page 54

Upgrading to IP Office
do not have the latest patch, you will have to manually upgrade the firmware on each IP phone
registered to IP Office.
The following hardware platforms and software releases are supported:
Supported Hardware Platform Supported Software Release
BCM/SRG 50
BCM450
BCM/SRG 200/400
• R6
• R5
• R3
• R6
• R5
• R1
• R4
Ensure that your patch filename matches one of the patch filenames below (note that the
filename also indicates the hardware it supports). This list reflects the most recent patch
releases as of IP Office Release 8.1:
• BCM.R400.363-BCM-to-IPO-Migration-1.0-1.1.zip
• BCM450.R500.BCM-to-IPO-Migration-110-1.zip
• BCM450.R600.BCM-to-IPO-Migration-61-1.zip
• BCM450.R100.BCM-to-IPO-Migration-131.zip
Post-patch migration procedure:
Once the patch has been applied, the BCM will reboot. The IP phones are not affected at this
point and the BCM will continue to operate as previous once the boot cycle completes. The
next login attempt to Element Manager will require the download of a new cartridge.
Obtaining BCM configuration records
Using Element Manager, you must obtain and store a backup record of your BCM configuration
before you can upgrade your terminals. Ideally , you will want to backup information pertaining
to
• system configuration
• mailbox information
• extensions
54 BCM/Norstar to IP Office Phone Convergence Handbook October 2012
Comments? infodev@avaya.com
Page 55

Preparation for data migration
• voicemail recordings
• Auto-Attendant and Contact Center recordings
Using Element Manager to obtain programming records:
You will want to perform the following task prior to disconnecting your BCM.
Procedure
1. Open Avaya Business Element Manager.
2. From the Sessions menu, select Save Programming Record > Save All Data.
3. Select the appropriate location for the backed up data (most likely a flash or SD
memory card).
4. From the Sessions menu, select Save Programming Record > Save Selected
Data.
5. In the Configuration tab of the Task Configuration Panel, under Telephony >
Sets, create a backup for All DNs in the same location as before.
6. Recommended: From the CallPilot Reports menu, create reports for “Mailbox
Information” and “System Configuration.”
BCM/Norstar to IP Office Phone Convergence Handbook October 2012 55
Page 56

Upgrading to IP Office
About converting data using Data Migration Manager
Data Migration Manager is used to convert configuration and user data from a BCM, SRG, or
Norstar system to an IP Office or B5800 Branch Gateway. Data Migration Manager provides
the DMM-IPO wizard that guides you through the conversion process. There are four steps to
the conversion process:
• Data extraction — during this phase of the conversion process, the BCM, SRG, or
Norstar data is populated into the Data Migration Manager tool. The data can be extracted
from a BCM, SRG, or Norstar device or it can be loaded from a file created during a
previous extraction procedure.
• Data review — during this phase of the conversion process, you review the data that was
recovered from the data extraction.
• Data creation — during this phase of the conversion process, you select the target
hardware configuration, the system's IP address, the voicemail system to use, and the
mode of operation in which the target IP Office is to be configured. The configuration mode
choices are:
- IP Office Mode
- IP Office Quick Mode
- Norstar Mode
- Partner Mode
56 BCM/Norstar to IP Office Phone Convergence Handbook October 2012
Comments? infodev@avaya.com
Page 57

- B5800 Mode
• Data transfer — this phase of the conversion process is performed using IP Office
Manager. When you accept the IP Of fice configuration, the data is written to a file and IP
Office Manager is executed and reads the data from the Data Migration Manager file.
Related topics:
Launching Data Migration Manager on page 57
Migrating data from a BCM or SRG system on page 57
Migrating data from a Norstar system on page 61
Migrating data from a file to a B5800 Branch Gateway on page 65
Viewing the extracted BCM configuration record on page 68
Launching Data Migration Manager
Data Migration Manager overview on page 38 or refer to the DMM user guide for more
See
information.
About converting data using Data Migration Manager
Before you begin using DMM, be sure to update your control unit software:
1. From the Task Navigation panel in Element Manager, select Software
Management > Software Updates.
2. Select Get New Updates.
Once you've updated your control unit, you are ready to extract the data into IP Office using
DMM. The method you use depends on the control unit environment but is limited to the
following extracted data sources: File, BCM, and Norstar.
Migrating data from a BCM or SRG system
Before you begin
Ensure that the backup file for the telephony configuration is locally stored (either on the hard
drive or on an SD card inserted in the SD card slot). You will need the IP address or host name
of the BCM or SRG system as well as the nnadmin user name and password.
About this task
Use this procedure to migrate data from a BCM or SRG system to an IP Office or B5800 Branch
Gateway. The DMM-IPO wizard prompts you through the migration process.
The BCM or SRG system should be off line before you begin this procedure.
Procedure
1. Launch the Data Migration Manager tool.
BCM/Norstar to IP Office Phone Convergence Handbook October 2012 57
Page 58

Upgrading to IP Office
2. In the Data Migration for IP Office window, click Start.
3. Complete the Data Source Page as follows:
a. In the Select Extracted Data Source drop-down box, select BCM.
Note:
To extract data from an SRG system, you also select BCM.
b. In the IP Address or Hostname field, enter the IP address or host name of the
BCM or SRG system.
c. In the User Name field, enter the appropriate nnadmin user name..
d. In the Password field, enter the appropriate password.
e. To extract voicemail messages from this BCM or SRG system, select the
Extract Voicemail Messages check box,
f. Click Browse, specify a file name and location on your PC where you want to
store the configuration file, and then click Save.
g. On the Data Source Page, click Next.
The extraction process begins. This process takes between 20–45 minutes to
complete, depending on the source system. You can monitor the extraction
process in the DMM-IPO wizard window. The DMM-IPO wizard searches for
CallPilot .dat files and converts them to .wav files. When the extraction is
finished, the DMM Extract dialog box appears.
h. In the DMM Extract dialog box, click OK.
The DMM-IPO wizard indicates the data extraction is Done.
i. In the DMM-IPO wizard window, click Save Report, and then do the following:
i. Enter an appropriate name and select a location for the report.
ii. Click Save.
Note:
Avaya Support requires a copy of this report if you encounter a problem
pertaining to DMM.
j. In the DMM-IPO wizard window, click Close.
The Extracted Data Page appears.
4. Review the extracted data. The extracted data includes:
• Number of sets extracted
• Number of voicemail messages extracted
• Number of auto attendant greetings extracted
• Name
• DN (domain name)
• Model
• Port
58 BCM/Norstar to IP Office Phone Convergence Handbook October 2012
Comments? infodev@avaya.com
Page 59

About converting data using Data Migration Manager
• Mailbox number
• Full name (mailbox name)
• Number of personal greetings
• Number of spoken names
• Number of messages on a per-DN basis.
5. Click Next.
6. Click Save report, and then do the following:
a. Enter an appropriate name and select a location for the report.
b. Click Save.
c. In the DMM-IPO wizard window, click Close
The IP Office Configuration Page appears.
7. In the IP Office Configuration Page, modify the parameters for the target IP Office
or B5800 Branch Gateway as follows:
a. In the IP Office LAN1 IP Address field, enter the IP address of the IP Office
or B5800 Branch Gateway.
b. In the IP Office LAN1 IP Mask field, enter the appropriate IP mask.
c. In the IP Office LAN1 Default Gateway field, enter the appropriate gateway.
d. In the IP Office LAN2 IP Address field, enter the appropriate IP address.
e. In the IP Office LAN2 IP Mask field, enter the appropriate IP mask.
f. In the IP Office LAN2 Default Gateway field, enter the appropriate gateway.
g. In the Configuration Mode drop-down box, select the appropriate mode.
If you are migrating the data to a B5800 Branch Gateway, select B5800
mode.
Note:
If you are extracting data from a BCM system, the default value in this field
is IP Office Mode. If you are extracting data from an SRG system, the default
value in this field is B5800 Mode.
h. In the System Locale drop-down box, select the appropriate location.
i. In the Destination Directory for IP Office Embedded VM and VMPRO files
field, enter the directory used to store voice mail recordings. The default location
is the DMM folder under user\data.
j. In the Voicemail Type drop-down box, select the appropriate voice mail
system..
Note:
B5800 Branch Gateway R6.2 does not support Voicemail Lite/Pro.
k. If you selected Voicemail Lite/Pro, complete the VMPro IP Address fields as
appropriate. This is the external unit responsible for processing voice mail
requests. You can also enter the voice mail backup IP address.
l. In the Main Control Unit section, change the hardware to match the hardware
that is installed on the IP Office or B5800 Branch Gateway . The hardware shown
BCM/Norstar to IP Office Phone Convergence Handbook October 2012 59
Page 60

Upgrading to IP Office
is a recommendation based on the types of phones that were extracted from
the BCM or SRG system. Be sure to select sufficient hardware modules to
support the amount of terminals.
Note:
If you select insufficient hardware, a Hardware Mismatch dialog box
appears. Click OK and adjust your hardware selections accordingly.
m. In the Expansion Module section, change the hardware to match the hardware
that is installed on the IP Office or B5800 Branch Gateway . The hardware shown
is a recommendation based on the types of phones that were extracted from
the BCM or SRG system. Be sure to select sufficient hardware modules to
support the amount of terminals.
Note:
If you select insufficient hardware, a Hardware Mismatch dialog box
appears. Click OK and adjust your hardware selections accordingly.
n. Click Next.
o. Click Save Report, and then do the following:
i. Enter an appropriate name and select a location for the report.
ii. Click Save.
Note:
Avaya Support requires a copy of this report if you encounter a
problem pertaining to DMM.
iii. Click Close.
The IP Office Extensions Page appears. The page displays the selected
hardware and associated extensions. See
Module column description for a
description of the entries in this column.
8. In the IP Office Extensions Page, modify the extensions as appropriate to ensure
successful port-to-extension mapping. If required, move the existing extensions to
different modules or ports by editing the cells in the Extension column.
Note:
Cells in the table turn red when you enter duplicate mapping. The DMM tool
prohibits you from continuing with red cells activated.
For information to help you modify the extensions, see Viewing the extracted BCM
configuration record on page 68.
9. Once you have mapped the appropriate extensions to the available modules, click
Next.
The DMM-IPO wizard applies the BCM or SRG station configuration to the IP Office
or B5800 Branch Gateway hardware.
10. Click Save report, and then do the following:
60 BCM/Norstar to IP Office Phone Convergence Handbook October 2012
Comments? infodev@avaya.com
Page 61

About converting data using Data Migration Manager
a. Enter an appropriate name and select a location for the report.
b. Click Save
Note:
Avaya Support requires a copy of this report if you encounter a problem
pertaining to DMM.
c. Click Close.
IP Office Manager is automatically launched. The Data Migration Manager window
remains open in the foreground.
11. Confirm the BCM/SRG users and extensions have been migrated to the B5800
Branch Gateway. In the IP Office Manager window, do the following:
a. In the left navigation pane, select Extensions to verify the extensions.
b. In the left navigation pane, select Users to verify the users.
12. To import voicemail recordings, in the Data Migration Manager window, click the
Embedded Voicemail Recordings link and follow the procedure provided.
13. See “Uploading the IP Office configuration to the control unit” on page xx to transfer
the configuration to the B5800 Branch Gateway. [see page 82 in the Convergence
Handbook.]
Migrating data from a Norstar system
Before you begin
Ensure that the backup file for the telephony configuration is locally stored (either on the hard
drive or on an SD card inserted in the SD card slot). You will need the IP address or host name
of the Norstar system as well as the nnadmin user name and password.
About this task
Use this procedure to migrate data from a Norstar system to an IP Office or B5800 Branch
Gateway. The DMM-IPO wizard prompts you through the migration process.
The Norstar system should be off line before you begin this procedure.
Procedure
1. Launch the Data Migration Manager tool.
2. In the Data Migration for IP Office window, click Start.
3. Complete the Data Source Page as follows:
a. In the Select Extracted Data Source drop-down box, select BCM.
BCM/Norstar to IP Office Phone Convergence Handbook October 2012 61
Page 62

Upgrading to IP Office
Note:
To extract data from an SRG system, you also select BCM.
b. In the IP Address or Hostname field, enter the IP address or host name of the
BCM or SRG system.
c. In the User Name field, enter the appropriate nnadmin user name..
d. In the Password field, enter the appropriate password.
e. To extract voicemail messages from this BCM or SRG system, select the
Extract Voicemail Messages check box,
f. Click Browse, specify a file name and location on your PC where you want to
store the configuration file, and then click Save.
g. On the Data Source Page, click Next.
The extraction process begins. This process takes between 20–45 minutes to
complete, depending on the source system. You can monitor the extraction
process in the DMM-IPO wizard window. The DMM-IPO wizard searches for
CallPilot .dat files and converts them to .wav files. When the extraction is
finished, the DMM Extract dialog box appears.
h. In the DMM Extract dialog box, click OK.
The DMM-IPO wizard indicates the data extraction is Done.
i. In the DMM-IPO wizard window, click Save Report, and then do the following:
i. Enter an appropriate name and select a location for the report.
ii. Click Save.
Note:
Avaya Support requires a copy of this report if you encounter a problem
pertaining to DMM.
j. In the DMM-IPO wizard window, click Close.
The Extracted Data Page appears.
4. Review the extracted data. The extracted data includes:
• Number of sets extracted
• Number of voicemail messages extracted
• Number of auto attendant greetings extracted
• Name
• DN (domain name)
• Model
• Port
• Mailbox number
• Full name (mailbox name)
• Number of personal greetings
62 BCM/Norstar to IP Office Phone Convergence Handbook October 2012
Comments? infodev@avaya.com
Page 63

About converting data using Data Migration Manager
• Number of spoken names
• Number of messages on a per-DN basis.
5. Click Next.
6. Click Save report, and then do the following:
a. Enter an appropriate name and select a location for the report.
b. Click Save.
c. In the DMM-IPO wizard window, click Close
The IP Office Configuration Page appears.
7. In the IP Office Configuration Page, modify the parameters for the target IP Office
or B5800 Branch Gateway as follows:
a. In the IP Office LAN1 IP Address field, enter the IP address of the IP Office
or B5800 Branch Gateway.
b. In the IP Office LAN1 IP Mask field, enter the appropriate IP mask.
c. In the IP Office LAN1 Default Gateway field, enter the appropriate gateway.
d. In the IP Office LAN2 IP Address field, enter the appropriate IP address.
e. In the IP Office LAN2 IP Mask field, enter the appropriate IP mask.
f. In the IP Office LAN2 Default Gateway field, enter the appropriate gateway.
g. In the Configuration Mode drop-down box, select the appropriate mode.
If you are migrating the data to a B5800 Branch Gateway, select B5800
mode.
Note:
If you are extracting data from a BCM system, the default value in this field
is IP Office Mode. If you are extracting data from an SRG system, the default
value in this field is B5800 Mode.
h. In the System Locale drop-down box, select the appropriate location.
i. In the Destination Directory for IP Office Embedded VM and VMPRO files
field, enter the directory used to store voice mail recordings. The default location
is the DMM folder under user\data.
j. In the Voicemail Type drop-down box, select the appropriate voice mail
system..
Note:
B5800 Branch Gateway R6.2 does not support Voicemail Lite/Pro.
k. If you selected Voicemail Lite/Pro, complete the VMPro IP Address fields as
appropriate. This is the external unit responsible for processing voice mail
requests. You can also enter the voice mail backup IP address.
l. In the Main Control Unit section, change the hardware to match the hardware
that is installed on the IP Office or B5800 Branch Gateway . The hardware shown
is a recommendation based on the types of phones that were extracted from
the BCM or SRG system. Be sure to select sufficient hardware modules to
support the amount of terminals.
BCM/Norstar to IP Office Phone Convergence Handbook October 2012 63
Page 64

Upgrading to IP Office
Note:
If you select insufficient hardware, a Hardware Mismatch dialog box
appears. Click OK and adjust your hardware selections accordingly.
m. In the Expansion Module section, change the hardware to match the hardware
that is installed on the IP Office or B5800 Branch Gateway . The hardware shown
is a recommendation based on the types of phones that were extracted from
the BCM or SRG system. Be sure to select sufficient hardware modules to
support the amount of terminals.
Note:
If you select insufficient hardware, a Hardware Mismatch dialog box
appears. Click OK and adjust your hardware selections accordingly.
n. Click Next.
o. Click Save Report, and then do the following:
i. Enter an appropriate name and select a location for the report.
ii. Click Save.
Note:
Avaya Support requires a copy of this report if you encounter a
problem pertaining to DMM.
iii. Click Close.
The IP Office Extensions Page appears. The page displays the selected
hardware and associated extensions. See
Module column description for a
description of the entries in this column.
8. In the IP Office Extensions Page, modify the extensions as appropriate to ensure
successful port-to-extension mapping. If required, move the existing extensions to
different modules or ports by editing the cells in the Extension column.
Note:
Cells in the table turn red when you enter duplicate mapping. The DMM tool
prohibits you from continuing with red cells activated.
For information to help you modify the extensions, see
Viewing the extracted BCM
configuration record on page 68.
9. Once you have mapped the appropriate extensions to the available modules, click
Next.
The DMM-IPO wizard applies the BCM or SRG station configuration to the IP Office
or B5800 Branch Gateway hardware.
10. Click Save report, and then do the following:
a. Enter an appropriate name and select a location for the report.
b. Click Save
64 BCM/Norstar to IP Office Phone Convergence Handbook October 2012
Comments? infodev@avaya.com
Page 65

About converting data using Data Migration Manager
Note:
Avaya Support requires a copy of this report if you encounter a problem
pertaining to DMM.
c. Click Close.
IP Office Manager is automatically launched. The Data Migration Manager window
remains open in the foreground.
11. Confirm the BCM/SRG users and extensions have been migrated to the B5800
Branch Gateway. In the IP Office Manager window, do the following:
a. In the left navigation pane, select Extensions to verify the extensions.
b. In the left navigation pane, select Users to verify the users.
12. To import voicemail recordings, in the Data Migration Manager window, click the
Embedded Voicemail Recordings link and follow the procedure provided.
13. See “Uploading the IP Office configuration to the control unit” on page xx to transfer
the configuration to the B5800 Branch Gateway. [see page 82 in the Convergence
Handbook.]
Migrating data from a file to a B5800 Branch Gateway
About this task
Use this procedure to migrate data from a file to a B5800 Branch Gateway if the data has
already been extracted from the system and the configuration file already exists.
Procedure
1. Launch the Data Migration Manager tool.
2. In the Data Migration for IP Office window, click Start.
3. On the Data Source Page do the following:
a. In the Select Extracted Data Source drop-down box, select File.
b. Click Browse and select the appropriate data source file.
c. Click Next.
The configuration is imported to the DMM tool. When completed, the DMM-IPO
wizard indicates the import is Done.
4. In the DMM-IPO wizard window, click Save Report, and then do the following:
a. Enter an appropriate name and select a location for the report.
b. Click Save.
Avaya Support requires a copy of this report if you encounter a problem pertaining
to DMM.
BCM/Norstar to IP Office Phone Convergence Handbook October 2012 65
Page 66

Upgrading to IP Office
5. In the DMM-IPO wizard window, click Close.
The Extracted Data Page appears.
6. Review the extracted data. The extracted data includes:
• Number of sets extracted
• Number of voicemail messages extracted
• Number of auto attendant greetings extracted
• Name
• DN (domain name)
• Model
• Port
• Mailbox number
• Full name (mailbox name)
• Number of personal greetings
• Number of spoken names
• Number of messages on a per-DN basis.
7. Click Next.
8. Click Save report, and then do the following:
a. Enter an appropriate name and select a location for the report.
b. Click Save.
c. In the DMM-IPO wizard window, click Close
The IP Office Configuration Page appears.
9. In the IP Office Configuration Page, modify the parameters for the target B5800
Branch Gateway as follows:
a. In the IP Office LAN1 IP Address field, enter the IP address of the B5800
Branch Gateway
b. In the IP Office LAN1 IP Mask field, enter the appropriate IP mask.
c. In the IP Office LAN1 Default Gateway field, enter the appropriate gateway.
d. In the IP Office LAN2 IP Address field, enter the IP address of the B5800
Branch Gateway
e. In the IP Office LAN2 IP Mask field, enter the appropriate IP mask.
f. In the IP Office LAN2 Default Gateway field, enter the appropriate gateway.
g. In the Configuration Mode drop-down box, select B5800 Mode.
h. In the System Locale drop-down box, select the appropriate location.
i. In the Destination Directory for IP Office Embedded VM and VMPRO files
field, enter the directory where the voice mail data is stored. The default location
is the DMM folder under user\data.
This is the directory used to store voicemail recordings.
66 BCM/Norstar to IP Office Phone Convergence Handbook October 2012
Comments? infodev@avaya.com
Page 67

About converting data using Data Migration Manager
j. In the Voicemail Type drop-down box, select Embedded Voicemail.
Note:
B5800 Branch Gateway does not support Voicemail Lite/Pro. [writer's note:
but for IPO 9.0 it might]
k. In the Main Control Unit section, change the hardware to match the hardware
that is installed on the B5800 Branch Gateway. The hardware shown is a
recommendation based on the types of phones that were extracted from the
BCM or SRG system. Be sure to select sufficient hardware modules to support
the amount of terminals.
Note:
If you select insufficient hardware, a Hardware Mismatch dialog box
appears. Click OK and adjust your hardware selections accordingly.
l. In the Expansion Module section, change the hardware to match the hardware
that is installed on the B5800 Branch Gateway. The hardware shown is a
recommendation based on the types of phones that were extracted from the
BCM or SRG system. Be sure to select sufficient hardware modules to support
the amount of terminals.
Note:
If you select insufficient hardware, a Hardware Mismatch dialog box
appears. Click OK and adjust your hardware selections accordingly.
m. Click Next.
n. Click Save Report, and then do the following:
i. Enter an appropriate name and select a location for the report.
ii. Click Save.
Note:
Avaya Support requires a copy of this report if you encounter a
problem pertaining to DMM.
iii. Click Close.
The IP Office Extensions Page appears. The page displays the selected
hardware and associated extensions. See
Module column description for a
description of the entries in this column.
10. In the IP Office Extensions Page, modify the extensions as appropriate to ensure
successful port-to-extension mapping. If required, move the existing extensions to
different modules or ports by editing the cells in the Extension column.
Note:
Cells in the table turn red when you enter duplicate mapping. The DMM tool
prohibits you from continuing with red cells activated.
BCM/Norstar to IP Office Phone Convergence Handbook October 2012 67
Page 68

Upgrading to IP Office
11. Once you have mapped the appropriate extensions to the available modules, click
12. Click Save report, and then do the following:
13. Confirm the BCM/SRG users and extensions have been migrated to the B5800
For information to help you modify the extensions, see “Viewing the BCM
configuration record” on page xx. [procedure is in the handbook, page 68].
Next.
The DMM-IPO wizard applies the BCM or SRG station configuration to the B5800
Branch Gateway hardware.
a. Enter an appropriate name and select a location for the report.
b. Click Save
Note:
Avaya Support requires a copy of this report if you encounter a problem
pertaining to DMM.
c. Click Close.
IP Office Manager is automatically launched. The Data Migration Manager window
remains open in the foreground.
Branch Gateway. In the IP Office Manager window, do the following:
a. In the left navigation pane, select Extensions to verify the extensions.
b. In the left navigation pane, select Users to verify the users.
14. To import voicemail recordings, in the Data Migration Manager window, click the
Embedded Voicemail Recordings link and follow the procedure provided.
15. See “Uploading the IP Office configuration to the control unit” on page xx to transfer
the configuration to the B5800 Branch Gateway. [see page 82 in the Convergence
Handbook.]
Viewing the extracted BCM configuration record
About this task
Use this procedure to locate and view the telephony resource information you backed up from
your BCM. Use the BCM’s extracted programming record to help minimize the amount of
station rewiring when editing the IP Office Extensions Page to allow specific DNs to reside
on specific ports. This should be completed for digital, analog, and IP stations.
Procedure
1. In Element Manager, open the backup file and navigate to the Summary tab.
2. Click Telephone Resources.
68 BCM/Norstar to IP Office Phone Convergence Handbook October 2012
Comments? infodev@avaya.com
Page 69

About converting data using Data Migration Manager
Element Manager lists all of the known BCM-configured modules as well as the
Ports to DN for each module.
The following image shows an example of the extensions, numbered to reflect
current wiring.
Note:
BCM/Norstar to IP Office Phone Convergence Handbook October 2012 69
Page 70

Upgrading to IP Office
Use particular care on systems that have used Change DN or Auto Set
Relocation.
3. Once you have mapped the appropriate extensions to the available modules, click
Next.
4. The DMM-IPO Wizard applies the BCM station configuration to the IP Office or
B5800 Branch Gateway hardware.
5. Click Save report, and then do the following:
a. Enter an appropriate name and select a location for the report.
b. Click Save
Note:
Avaya Support requires a copy of this report if you encounter a problem
pertaining to DMM.
c. Click Close.
Configuring IP Office system particulars using DMM
After you've saved the extracted data page (see Reviewing the extracted data page for more
information), the IP Office configuration page appears. There are three sections to complete:
• System particulars (networking information, system locale, voicemail type, etc.)
• Main control unit hardware configuration
• Expansion module hardware configuration
70 BCM/Norstar to IP Office Phone Convergence Handbook October 2012
Comments? infodev@avaya.com
Page 71

Configuring IP Office system particulars using DMM
Once these configurations have been made, you will be prompted to configure extensions and
optimize extension mapping.
Related topics:
Modifying the hardware information table on page 72
Configuring extensions on page 74
Optimizing extension mapping on page 77
Creating IP Office 'hunt groups' to replace BCM 'skillsets' on page 77
Converting voicemail recordings on page 79
BCM/Norstar to IP Office Phone Convergence Handbook October 2012 71
Page 72

Upgrading to IP Office
Modifying the hardware information table
For this part of the migration it is imperative that you review and modify the hardware
information determined by DMM, and configure and optimize your extensions as required. Be
sure to save a report where indicated.
System Particulars configuration
In the System Particulars section, define the attributes that are currently configured in your
environment. For example, you will want to change the IP address of IP Office LAN1 to match
that of the BCM. You will also want to configure your desired masks and gateways.
Next to “Configuration Mode” ensure that the mode enabled matches that of the software type
(IP Office).
The “Destination Directory” is used to store IP Office voicemail recordings. You can change
the directory, but the default is C:\Documents and Settings\username\DMM\user
\data. DMM converts the audio file based on the type of voicemail associated with it, which
includes both Voicemail Lite/Pro and Embedded V oicemail. Note that if you do select V oicemail
Lite/Pro you will require the IP address of the external unit responsible for processing voicemail
requests (you can also indicate the voicemail backup IP address).
Main Control Unit hardware configuration
The hardware identified in the Main Control Unit section is a recommendation based on the
types of stations that were extracted from the BCM/Norstar configuration. You must change
the parameters to reflect the actual IP Office hardware installed. Be sure to select sufficient
hardware modules available to support the amount of digital terminals.
72 BCM/Norstar to IP Office Phone Convergence Handbook October 2012
Comments? infodev@avaya.com
Page 73

Configuring IP Office system particulars using DMM
Note:
If you select insufficient hardware, when you click Next you will receive the following warning:
Click OK or Cancel and enter more appropriate hardware.
Expansion Module hardware configuration
The hardware identified in the Expansion Module section is a recommendation based on the
types of phones that were extracted from the BCM/Norstar configuration. You must change
the parameters to reflect the actual IP Office hardware installed. Be sure to select sufficient
hardware modules available to support the amount of digital terminals.
Note:
If you select insufficient hardware, when you click Next you will receive the following warning:
BCM/Norstar to IP Office Phone Convergence Handbook October 2012 73
Page 74

Upgrading to IP Office
Click OK or Cancel and enter more appropriate hardware.
Once you have entered in the system particulars and configured the appropriate hardware,
DMM reviews the selected hardware to ensure minimum hardware requirements are met and
then displays the IP Office Extensions Page.
Configuring extensions
The IP Office Extensions Page displays the selected hardware and their associated
extensions. Effectively modifying the extensions will ensure that your Port-to-Extension
mapping is as successful as possible.
It is imperative that you click Save report... where indicated. A vaya Support will require a copy
of this report if you encounter a problem pertaining to the DMM.
Note:
74 BCM/Norstar to IP Office Phone Convergence Handbook October 2012
Comments? infodev@avaya.com
Page 75

Configuring IP Office system particulars using DMM
The cells in the table turn red when you enter duplicate extensions and DMM prohibits you
from continuing with red cells activated.
Extracted BCM configuration record:
Use the following procedure to locate and view the telephony resource information you backed
up from your BCM. Use the BCM’s extracted programming record to help minimize the amount
of station rewiring when editing the IP Office Extensions Page to allow specific DN’s to reside
on specific ports. This should be completed for Digital, Analog and IP stations.
Procedure
1. In Element Manager, open the backup file and navigate to the Summary tab.
2. Click on Telephony Resources.
Element Manager lists all of the known BCM-configured modules as well as the
Ports to DN for each module.
The following image shows an example of the extensions, numbered to reflect
current wiring (as best as possible).
BCM/Norstar to IP Office Phone Convergence Handbook October 2012 75
Page 76

Upgrading to IP Office
Note:
Use additional care on systems that have used 'Change DN' or 'Auto Set
Relocation.'
3. Once you've mapped the appropriate extensions to the available modules, click
Next.
4. The DMM-IPO Wizard applies the BCM station configuration to the IP Office
hardware.
5. Save a report and click Close.
76 BCM/Norstar to IP Office Phone Convergence Handbook October 2012
Comments? infodev@avaya.com
Page 77

The next step is to convert and export the available voicemail recordings.
Optimizing extension mapping
Using the information contained in the extracted BCM configuration record you created in
Element Manager, modify the extensions that reside on the hardware in a way that most
effectively reduces the amount of station rewiring (refer to
record on page 75). For example, IP Office can support 16 and 30–port expansion modules,
whereas BCM can support the 32–port expansion module. You might have two extra users to
account for when upgrading to IP Office, and station rewiring may have to be done. For this
reason, you should try to optimize the extension mapping so as to avoid complex rewiring
wherever possible.
Configuring IP Office system particulars using DMM
Extracted BCM configuration
Creating IP Office 'hunt groups' to replace BCM 'skillsets'
In the BCM, you categorized your users according to their particular abilities in order to route
calls more effectively using 'skillsets.' Y ou can do this in IP Office using 'hunt groups' configured
in IP Office Manager . Use the procedure below to replace your BCM skillsets with hunt groups
in IP Office. This will ensure that the previous call flow is replicated.
Before you begin
Locate the extracted data page and use it as the source for all ring modes, overflow modes,
and Control Directory Number (CDN) configurations indicated below.
Procedure
1. In IP Office Manager , under the Hunt Group tab, specify the hunt group name in the
Name field.
2. Enter the BCM skillset CDN in the Extension field.
3. Select the Ring Mode to match the call distribution mode on the BCM.
4. Select the Overflow Mode as required.
5. Select the user extensions you wish to add to the hunt group from the User List
panel.
The User List panel and the various hunt group configurations can be seen in the
following image:
BCM/Norstar to IP Office Phone Convergence Handbook October 2012 77
Page 78

Upgrading to IP Office
6. Repeat steps 1–5 for each new hunt group that you require (in the image above, a
third hunt group is required to answer 'Closed Business' callers).
7. Under the Queuing tab, ensure that Queuing is enabled.
8. Under the Announcements tab, ensure that Announcements On is enabled. You
can also specify the time between announcements.
78 BCM/Norstar to IP Office Phone Convergence Handbook October 2012
Comments? infodev@avaya.com
Page 79

Configuring IP Office system particulars using DMM
Converting voicemail recordings
Along with generating an IP Office configuration, DMM converts Mailbox Greetings, Spoken
Names, and Voicemail messages to IP Office Voicemail format. You will have to apply these
sound files to the appropriate voicemail system later in IP Office configuration. Note that if you
do not have a Unified Messaging license on the BCM, you will not be able to export these
recordings.
All available voicemail recordings will be converted. Voicemail Pro recordings are converted
to wave (*.wav) type and Embedded Voicemail recordings are converted to CallPilot (*.clp)
type.
BCM/Norstar to IP Office Phone Convergence Handbook October 2012 79
Page 80

Upgrading to IP Office
Data migration review
By this point, you have updated your BCM firmware, obtained its configuration records, and
installed IP Office Manager and Data Migration Manager.
Using DMM, you have extracted the system configuration data from the appropriate location
(either BCM, Norstar, or File). You have also saved the required reports, wherever possible,
throughout the data migration procedure. Using the extracted data, you have configured the
IP Office system particulars (expansion module configuration, main control unit configuration,
etc.) as well as configured and optimized port-to-extension mapping.
Upon converting the voicemail recordings using DMM, IP Office Manager will automatically
open (if installed correctly–refer to
able to configure the IP Office until you install IP Office Manager. While it is not necessary to
install IP Office Manager prior to operating DMM, note that if you choose to install IP Office
Manager only at this stage, DMM will simply close.
Installing IP Office Manager on page 51). You will not be
80 BCM/Norstar to IP Office Phone Convergence Handbook October 2012
Comments? infodev@avaya.com
Page 81

Preparation for IP Office configuration
Preparation for IP Office configuration
Related topics:
Installing the IP Office hardware on page 81
Preparing IP Office Manager on page 82
System staging on page 82
Installing the IP Office hardware
If you haven't yet, you should now install the IP Office hardware and connect it to the local area
network. It is imperative that you follow the installation guide for IP Office and that you bear in
mind all the planning, pre-configuration, and safety statements therein. You can find the latest
guide at http://support.avaya.com.
There are many steps in the installation process, including pre-installation, card installation,
power connection, Manager connection, card/CPU LED checks, licensing, and more. Due to
the length and importance of this installation, A vaya recommends that you follow and read the
entire guide.
BCM/Norstar to IP Office Phone Convergence Handbook October 2012 81
Page 82

Upgrading to IP Office
The following is a general summary of the tools required. Additional tools and equipment will
be required for wall and or rack mounting and to fashion ground cable connections suitable to
local requirements.
• 5mm flat-head screwdriver
• Crosshead screwdriver
• Anti-static wrist strap and ground point
• PC with IP Office Admin suite (Manager and System Status application) and RJ45
Ethernet LAN port
• RJ45-RJ45 Ethernet LAN Cable
• Tools and materials suitable for ground cabling
Once the IP Office hardware is installed, you can proceed to configure the basic telephony
settings, trunks, and dial plans following the instructions in the IP Office guide. You can export
and merge this configuration with the configuration exported by DMM.
Preparing IP Office Manager
Once the DMM has applied the BCM configuration, a window appears that provides detailed
information on IP Office configuration, Embedded V oice mailbox recordings, and VM Pro V oice
mailbox recordings. If IP Office Manager is installed on the same PC as the DMM, IP Office
Manager opens automatically and displays the configuration migrated from DMM.
In the previous steps, DMM has migrated User and Extension information for all DN’s on the
BCM (active and inactive). Delete the Users and Extensions that were created for inactive DN’s
as well as the Application/CallPilot DN’s prior to importing the configuration file into IP Office.
DMM created Users for BCM Skillset Mailboxes. You may wish to delete these users from the
IP Office so there will be no conflict with the Hunt Group names that were created to replicate
the Skillset use on the BCM (refer to
'skillsets' on page 77).
System staging
It is possible to stage a system such that it is wholly configured prior to physically hooking it
up and connecting the phones. For example, an installer plugs in the IP Office main system,
configures it using IP Office Manager (including user button programming) and then sends the
system and its phones to be installed on-site.
Creating IP Office 'hunt groups' to replace BCM
82 BCM/Norstar to IP Office Phone Convergence Handbook October 2012
Comments? infodev@avaya.com
Page 83

Preparation for IP Office configuration
The issue with staging is that without knowing how to properly stage BST phone button
programming, the instant a BST phone is physically plugged into the IP Office for the first time,
all custom button programming for the user of that phone will be wiped.
Preserving button programming:
In order to preserve a User's button programming in a staged installation, a specifically
formatted and valued *DCP short code must be configured for that User.
The steps below describe the quick procedure you can perform during staging to preserve
button programming.
Procedure
1. In IP Office Manager, access a user extension and click on its Short Codes tab.
If a phone has never been plugged into this user, there will typically exist no peruser short codes (proceed to step 2 below).
If any BST phone has ever been plugged into this user, then a *DCP short code is
created in this user’s permanent configuration data and, as such, the button
programming for that user will be preserved. The telephone number associated with
this short code will be something along the lines of “8xxxxxxx, 0, 1, 1, 0” where
x is probably 0, but could be any number. The important number is the number 8.
Similarly, if another (non-BST) Avaya phone has ever been plugged into this user,
the *DCP short code will be apparent and button programming will be preserved,
but the telephone number indicated for that short code (for that user) will begin with
a 4 instead of an 8.
If the telephone number indicated for any *DCP short code begins with a c4 instead
of a 4 or an 8, both an Avaya non-BST phone and a BST phone have previously
been plugged into this user and the button programming will be preserved.
Any other configuration will not preserve button programming and you should
proceed to step 2 below.
2. In the Short Codes tab, click the Add... button.
3. Enter data in the fields as below:
• Code: *DCP
• Feature: Dial
• Telephone Number: 84000004,0,1,1,0
• Line Group ID: 0
4. When complete, click the OK button. The *DCP short code is added to that user's
programming.
Perform this procedure for each user whose programming you wish to preserve
during staging.
BCM/Norstar to IP Office Phone Convergence Handbook October 2012 83
Page 84

Upgrading to IP Office
Related topics:
Notes on preserving button programming on page 84
Notes on preserving button programming
Ring volume and contrast
When adding the *DCP short code during the staging process, you are instructed to include
'4000004' in the Telephone Number field. The digits in this sequence represent different
parameters which you can modify . Using this information you can stage a BST phone’s contrast
and ring volume.
The first digit in this sequence is used to store the BST phone’s contrast level. It can be valued
from 1–9.
The last digit in this sequence is used to store the BST phone’s ring volume attenuation level.
In this situation, attenuation means that a higher value results in a lower ring volume, and vice
versa (e.g., 0 is full volume). The ring volume attenuation level can be valued from 0–7.
Remotely defaulting a BST phone
Using the *DCP short code, an administrator can remotely force a BST phone to return to
default button programming and contrast/ring-volume for that phone type. If you simply remove
the short code from a user extension and then save that back into IP Office, then (if there is a
BST phone currently connected to that user) it will:
• default all button programming per BST phone model currently connected to that user
extension,
• default the BST phone contrast level,
• not affect any calls that are currently active (although caution is recommended).
Note that you can also use this procedure to “reset” a user extension such that the next time
a BST phone model of any type is connected to it, that user’s programming will be defaulted
appropriately to that BST phone.
84 BCM/Norstar to IP Office Phone Convergence Handbook October 2012
Comments? infodev@avaya.com
Page 85

Configuring IP Office
Configuring IP Office
Related topics:
Exporting the existing IP Office configuration on page 86
Importing the new configuration into IP Office on page 86
BCM/Norstar to IP Office Phone Convergence Handbook October 2012 85
Page 86

Upgrading to IP Office
Configuring IP phone login codes on page 88
Uploading the IP Office configuration to the control unit on page 88
Exporting the existing IP Office configuration
If you have an IP Office with prior configuration programming applied, you may wish to export
it prior to importing the configuration created by DMM. If you were to simply apply the
configuration file from DMM you would be overwriting the existing IP Office configuration.
Note:
Note that selecting a Binary output instead of CSV will allow for greater item selection.
It is also possible that you might wish to merge the DMM-created configuration file with the
current IP Office configuration file. Refer to the import procedure below.
Importing the new configuration into IP Office
It is now possible to merge the configuration file created by DMM with the current/default IP
Office configuration file. If you are merging the new configuration but you wish to save your
current configuration, be sure to have exported the Binary file first. Otherwise, proceed with
the import.
Procedure
1. In IP Office Manager, under the File menu, select Import/Export > Import...
86 BCM/Norstar to IP Office Phone Convergence Handbook October 2012
Comments? infodev@avaya.com
Page 87

2. Select Binary from the File Type drop down menu.
You will notice that “Licensing” is not an option.
Configuring IP Office
3. Navigate to the new configuration file and click OK to open it.
Result
The selected items have merged with the existing configuration.
BCM/Norstar to IP Office Phone Convergence Handbook October 2012 87
Page 88

Upgrading to IP Office
Configuring IP Office Manager on a different PC
If IP Office Manager is installed on a different PC, ensure that you copy the xml file specified
in DMM to the PC that will be used. Y ou should use the default directory: C:\Documents and
Settings\username\DMM\user\data\
Configuring IP phone login codes
DMM will migrate User and Extension information for all phone types. When IP phone Users
are created there is no default password configured. This means you will need to manually
add a login code for each IP phone user prior to the phone connecting to the IP Office. If a new
IP phone User attempts to register to the IP Office and the option for Auto-create Extn/User is
enabled, the default password of 0000 is required. It is the fact that the User has already been
created by DMM that the new Login password is required.
Use the extracted data and the DMM to configure the IP phone's login codes as illustrated
below.
Uploading the IP Office configuration to the control unit
Once the required IP Office system particulars have been configured, you can publish the new
configuration to the IP Office control unit.
Before you begin
If the configuration file is already open in IP Office Manager, skip to step 4.
Procedure
1. In IP Office Manager, navigate to the saved xml configuration file located on the
PC.
2. Under the “Files of Type” drop down menu select All Files (*.*)
88 BCM/Norstar to IP Office Phone Convergence Handbook October 2012
Comments? infodev@avaya.com
Page 89

Configuring IP Office
3. Select the appropriate xml file and click Open.
With the desired configuration file open, you must send it to the appropriate
devices.
4. From the File menu select Offline > Send Config...
A window appears requesting IP information.
5. Select the current IP address of the IP Office you wish to apply the configuration to
and press OK.
The Configuration Service User Login window appears.
6. Enter the Service User Password and click OK.
The Send Configuration window appears.
BCM/Norstar to IP Office Phone Convergence Handbook October 2012 89
Page 90

Upgrading to IP Office
7. The new configuration requires a reboot of IP Office. Select a reboot option under
“Configuration Reboot Mode” and click OK when you are ready.
The system reboots.
Configuring voicemail recordings in IP Office
DMM has extracted mailbox greetings, spoken directory names, and voicemail messages into
the required format. These sound files must be applied to the appropriate IP Office voicemail
system. Using the procedures below you must transfer and configure your Voicemail Pro and
Embedded Voicemail recordings, which were previously migrated from DMM, into IP Office.
You will also create Auto Attendant, Contact Center, and Customer Call Reporter greetings.
If you do not require voicemail service or the configuration of voicemail recordings, skip to
Completing IP Office system programming on page 102.
90 BCM/Norstar to IP Office Phone Convergence Handbook October 2012
Comments? infodev@avaya.com
Page 91

Related topics:
Voicemail Pro on page 91
Embedded Voicemail on page 97
Uploading the voicemail configuration to IP Office on page 102
Voicemail Pro
Related topics:
Transferring Voicemail Pro recordings on page 91
Creating Auto Attendant in Voicemail Pro on page 94
Transferring Voicemail Pro recordings
The converted VM files are located in the VM Sound Files folder located at C:/Documents
and Settings/username/DMM/user/data/CP_47.135.155.251_to_VMPro. The
methods used to send the sound files to the IP Office Voicemail system will depend on the IP
Office Voicemail Type.
Configuring voicemail recordings in IP Office
If Voicemail Pro was selected as the Voicemail Type, DMM will convert the Mailbox Greetings,
Spoken Names, and Voicemail messages to a Voicemail Pro backup file. The default location
is:
<DMM Home Directory>/user/data
and all Voicemail recording files will be located in the subfolder:
CP_<IP address of BCM/CallPilot>_to_VMPro
About this task
To upload the converted VM Pro voicemail recordings, the VM Pro backup must be copied to
the server running VM Pro.
Procedure
1. On the VM Pro server, start the the VM Pro client and then connect to the VM Pro
Server.
Ensure that the connection is established prior to the next step.
2. From the VM Pro client, select Administration > Preference > General.
The System Preferences dialog box appears.
3. Click on the Housekeeping tab.
BCM/Norstar to IP Office Phone Convergence Handbook October 2012 91
Page 92

Upgrading to IP Office
4. Click Restore , navigate to the backup folder to be restored, and click OK.
The Voicemail Data Restore screen appears.
5. Under “Restore From,” select the VM Pro backup generated by the DMM that was
copied to the server.
92 BCM/Norstar to IP Office Phone Convergence Handbook October 2012
Comments? infodev@avaya.com
Page 93

Configuring voicemail recordings in IP Office
6. Place a check mark next to 'Voicemails' and 'User Settings & Greetings' then hit the
Restore button. This will import the converted sound files into VM Pro.
You may be prompted to confirm that the existing VM Pro data will be overwritten.
Press OK to continue.
7. Once the restore is complete, click Finish and reboot IP Office. IP Office will
automatically pick up the restored VM Pro greetings and messages.
Note:
There is currently an issue with Voicemail Pro where the restore process cannot
suspend the VM Pro service to complete the restore. If this occurs, the Voicemail
Restore will be stuck with repeating message: “Waiting for Voicemail Pro server
to stop. Sleeping for 30 Seconds.”
T o resolve this issue, start up the Windows Services tool of the PC where VM Pro
server is installed and manually restart the VM Pro Service (shown below). Once
BCM/Norstar to IP Office Phone Convergence Handbook October 2012 93
Page 94

Upgrading to IP Office
the service has restarted, re-log back into the VM Pro Server with the VM Pro
Client and attempt the restore again.
Creating Auto Attendant in Voicemail Pro
Once you've migrated the telephone data and configured the necessary extensions, you can
create an Auto Attendant in the Voicemail Pro client to route incoming calls automatically. As
well as creating the Auto Attendant, you need to create an incoming call route to use the Auto
Attendant.
Procedure
1. Using the Voicemail Pro client, right-click on Modules and select Add.
2. Enter a name for the module in the Name field. In the example below, we have used
'AA.'
94 BCM/Norstar to IP Office Phone Convergence Handbook October 2012
Comments? infodev@avaya.com
Page 95

Configuring voicemail recordings in IP Office
3. Create an Auto Attendant using Voicemail Pro (tutorials are available within the
application). The image below is for example only.
4. Select new greetings or use the greetings exported from the BCM by clicking on the
icon on the Properties panel as shown below.
BCM/Norstar to IP Office Phone Convergence Handbook October 2012 95
Page 96

Upgrading to IP Office
5. Create Test Conditions to route callers based on the time of day. An example is
shown below.
96 BCM/Norstar to IP Office Phone Convergence Handbook October 2012
Comments? infodev@avaya.com
Page 97

Configuring voicemail recordings in IP Office
6. Important: Create an incoming call route to use the Auto Attendant created
above.
a. Using Manager, create an Incoming Call Route.
b. In the Destinations tab, ensure the Destination is set to VM: followed by the
name of the Auto Attendant. In this instance, it should be VM:Test
Condition.
Embedded Voicemail
Related topics:
Transferring Embedded Voicemail recordings on page 98
Creating Auto Attendant in Embedded Voicemail on page 100
BCM/Norstar to IP Office Phone Convergence Handbook October 2012 97
Page 98

Upgrading to IP Office
Transferring Embedded Voicemail recordings
The converted VM files are located in the VM Sound Files folder located at C:/Documents
and Settings/username/DMM/user/data/CP_47.135.155.251_to_VMEbedded.
The methods used to send the sound files to IP Office Voicemail system will depend on the IP
Office Voicemail Type.
If Embedded Voicemail was selected as the Voicemail Type, DMM will convert the mailbox
greetings, spoken names, and voicemail messages to IP Office Embedded voicemail format.
The embedded voicemail files will be stored in the directory specified during the migration. The
default location is
<DMM Home Directory>/user/data
and all Voicemail recording files will be located in the subfolder:
CP_<IP address of BCM/CallPilot>_to_VMEmbedded
About this task
To upload Embedded Voicemail files, you must use Embedded File Management.
Procedure
1. In IP Office Manager, under the File menu, select Advanced > Embedded File
Management....
98 BCM/Norstar to IP Office Phone Convergence Handbook October 2012
Comments? infodev@avaya.com
Page 99

Configuring voicemail recordings in IP Office
2. Select the target IP Office, and enter the user name and password of the IP Office
to gain access to the embedded files.
3. Using Embedded File Management, copy all of the .clp files in the CP_<IP
address of BCM/CallPilot>_to_VMEmbedded subfolder and paste them into
the SYSTEM->DYNAMIC->LVMAIL folder on the flashcard.
BCM/Norstar to IP Office Phone Convergence Handbook October 2012 99
Page 100
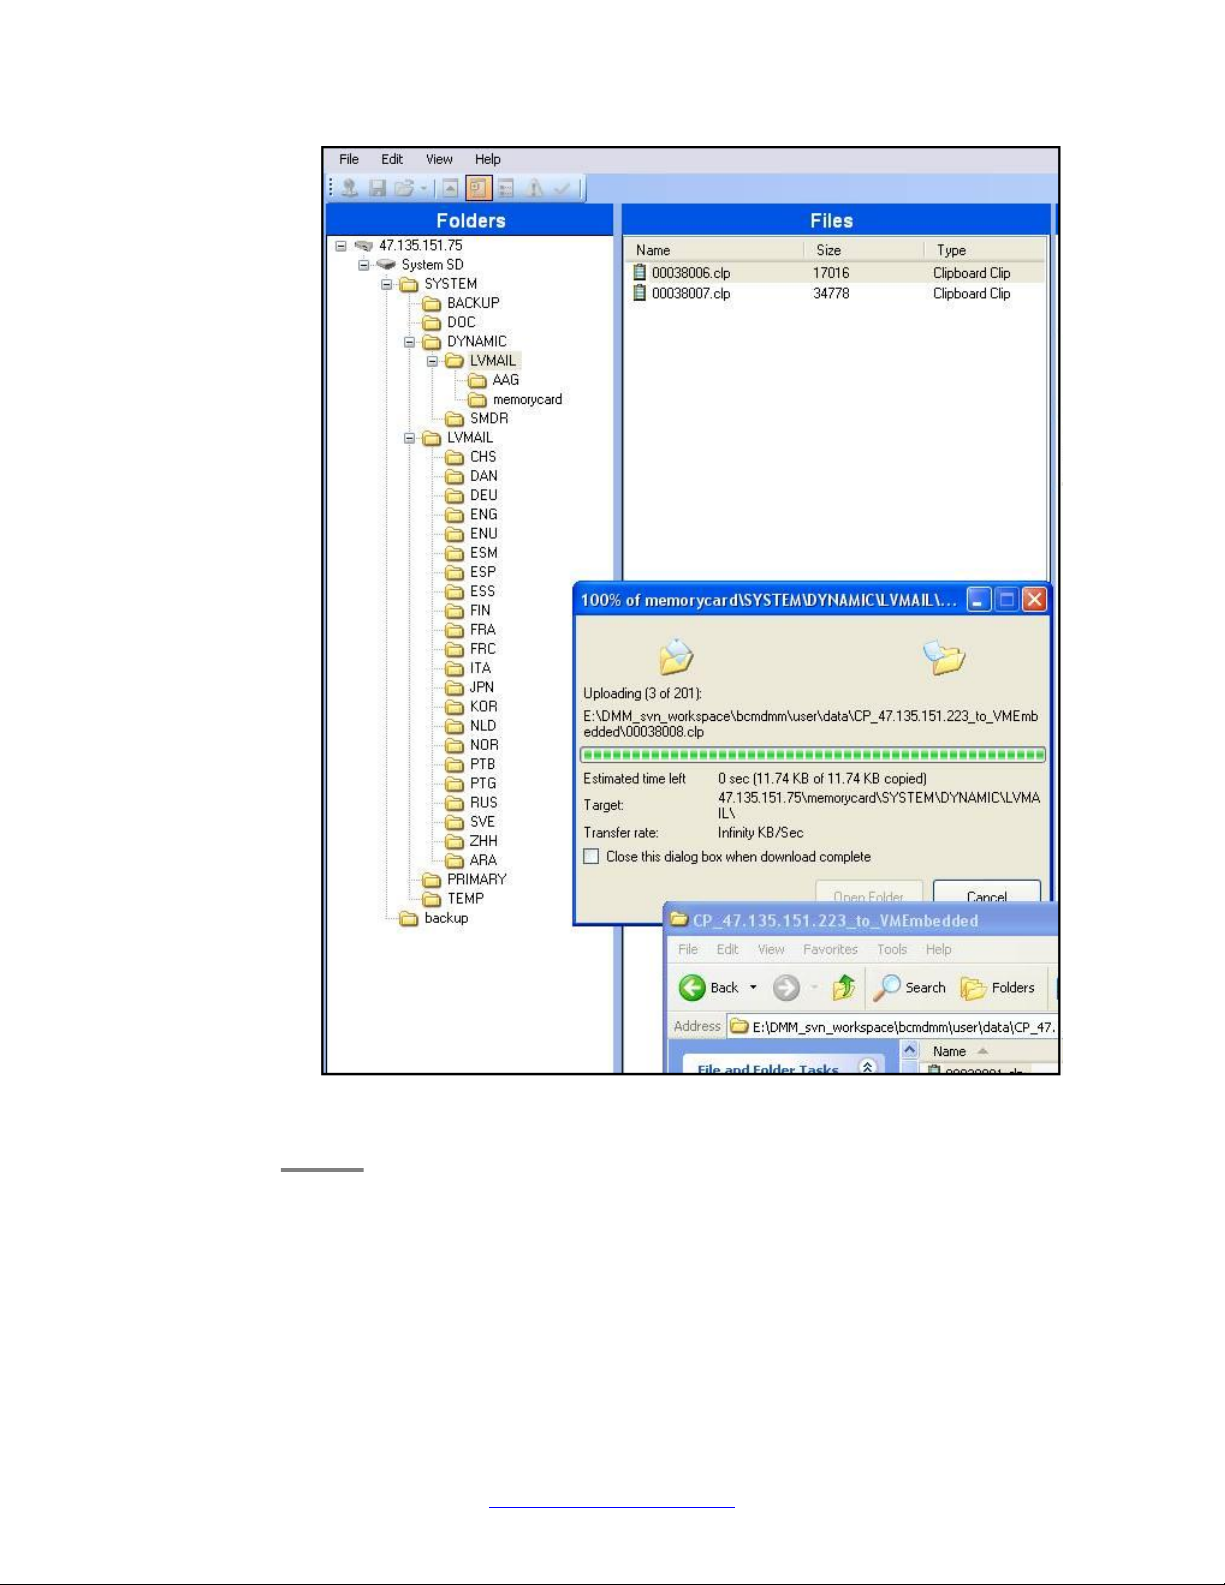
Upgrading to IP Office
Once the files have completed copying, reboot IP Office. IP Of fice will automatically
pick up the uploaded greetings and messages.
Creating Auto Attendant in Embedded Voicemail
Once you've migrated the telephone data and configured the necessary extensions, you can
create an Auto Attendant in the Embedded Voicemail client to route incoming calls
automatically . You will need to create two Auto Attendants; 'AA' and 'Address and Fax.' As well
100 BCM/Norstar to IP Office Phone Convergence Handbook October 2012
Comments? infodev@avaya.com
 Loading...