

Page 1

1
Avaya one-X
9641G User Guide3
4
5
™
Deskphone H.323 9621G/2
16-6035946
Issue 17
May 20108
Avaya - Proprietary. Use pursuant to the terms of your signed agreement or Avaya policy.
DRAFT-June 24, 2010-5:17 PM
Page 2

1
©
2010 Avaya Inc.2
All Rights Reserved.3
Notice4
While reasonable efforts have been made to ensure that the5
information in this document is complete and accurate at the time of6
printing, Avaya assumes no liability for any errors. Avaya reserves the7
right to make changes and corrections to the information in this8
document without the obligation to notify any person or organization of9
such changes.10
Note11
Using a cell, mobile, or GSM phone, or a two-way radio in close12
proximity to an Avaya IP telephone might cause interference.13
Documentation disclaimer14
Avaya shall not be responsible for any modifications, additions, or15
deletions to the original published version of this documentation unless16
such modifications, additions, or deletions were performed by Avaya.17
End User agree to indemnify and hold harmless Avaya, Avaya's agents,18
servants and employees against all claims, lawsuits, demands and19
judgments arising out of, or in connection with, subsequent20
modifications, additions or deletions to this documentation, to the21
extent made by End User.22
Link disclaimer23
Avaya is not responsible for the contents or reliability of any linked Web24
sites referenced within this site or documentation(s) provided by Avaya.25
Avaya is not responsible for the accuracy of any information, statement26
or content provided on these sites and does not necessarily endorse27
the products, services, or information described or offered within them.28
Avaya does not guarantee that these links will work all the time and has29
no control over the availability of the linked pages.30
Warranty31
Avaya provides a limited warranty on this product. Refer to your sales32
agreement to establish the terms of the limited warranty. In addition,33
Avaya’s standard warranty language, as well as information regarding34
support for this product, while under warranty, is available to Avaya35
customers and other parties through the Avaya Support Web site: 36
http://www.avaya.com/support. Please note that if you acquired the37
product from an authorized Avaya reseller outside of the United States38
and Canada, the warranty is provided to you by said Avaya reseller and39
not by Avaya.40
Licenses41
THE SOFTWARE LICENSE TERMS AVAILABLE ON THE AVAYA42
WEBSITE,
APPLICABLE TO ANYONE WHO DOWNLOADS, USES AND/OR44
INSTALLS AVAYA SOFTWARE, PURCHASED FROM AVAYA INC.,45
ANY AVAYA AFFILIATE, OR AN AUTHORIZED AVAYA RESELLER46
(AS APPLICABLE) UNDER A COMMERCIAL AGREEMENT WITH47
AVAYA OR AN AUTHORIZED AVAYA RESELLER. UNLESS48
OTHERWISE AGREED TO BY AVAYA IN WRITING, AVAYA DOES49
NOT EXTEND THIS LICENSE IF THE SOFTWARE WAS OBTAINED50
FROM ANYONE OTHER THAN AVAYA, AN AVAYA AFFILIATE OR AN51
AVAYA AUTHORIZED RESELLER, AND AVAYA RESERVES THE52
RIGHT TO TAKE LEGAL ACTION AGAINST YOU AND ANYONE53
ELSE USING OR SELLING THE SOFTWARE WITHOUT A LICENSE.54
BY INSTALLING, DOWNLOADING OR USING THE SOFTWARE, OR55
AUTHORIZING OTHERS TO DO SO, YOU, ON BEHALF OF56
YOURSELF AND THE ENTITY FOR WHOM YOU ARE INSTALLING,57
DOWNLOADING OR USING THE SOFTWARE (HEREINAFTER58
REFERRED TO INTERCHANGEABLY AS “YOU” AND “END USER”),59
AGREE TO THESE TERMS AND CONDITIONS AND CREATE A60
BINDING CONTRACT BETWEEN YOU AND AVAYA INC. OR THE61
APPLICABLE AVAYA AFFILIATE (“AVAYA”).62
Avaya grants End User a license within the scope of the license types63
described below. The applicable number of licenses and units of64
65
capacity for which the license is granted will be one (1), unless a
different number of licenses or units of capacity is specified in the66
Documentation or other materials available to End User. “Designated67
Processor” means a single stand-alone computing device. “Server”68
means a Designated Processor that hosts a software application to be69
accessed by multiple users. “Software” means the computer programs70
in object code, originally licensed by Avaya and ultimately utilized by71
End User, whether as stand-alone products or pre-installed on72
Hardware. “Hardware” means the standard hardware originally sold by73
Avaya and ultimately utilized by End User.74
License types75
Designated System(s) License (DS). End User may install and use76
each copy of the Software on only one Designated Processor, unless77
a different number of Designated Processors is indicated in the78
Documentation or other materials available to End User. Avaya may79
require the Designated Processor(s) to be identified by type, serial80
number, feature key, location or other specific designation, or to be81
provided by End User to Avaya through electronic means established82
by Avaya specifically for this purpose.83
Shrinkwrap License (SR). With respect to Software that contains84
elements provided by third party suppliers, End User may install and85
use the Software in accordance with the terms and conditions of the86
applicable license agreements, such as “shrinkwrap” or “clickwrap”87
license accompanying or applicable to the Software (“Shrinkwrap88
License”). The text of the Shrinkwrap License will be available from89
Avaya upon End User’s request (see “Third-party Components” for90
more information).91
Copyright92
Except where expressly stated otherwise, no use should be made of93
materials on this site, the Documentation(s) and Product(s) provided94
by Avaya. All content on this site, the documentation(s) and the95
product(s) provided by Avaya including the selection, arrangement and96
design of the content is owned either by Avaya or its licensors and is97
protected by copyright and other intellectual property laws including the98
sui generis rights relating to the protection of databases. You may not99
modify, copy, reproduce, republish, upload, post, transmit or distribute100
in any way any content, in whole or in part, including any code and101
software. Unauthorized reproduction, transmission, dissemination,102
storage, and or use without the express written consent of Avaya can103
be a criminal, as well as a civil, offense under the applicable law.104
Third-party components105
Certain software programs or portions thereof included in the Product106
may contain software distributed under third party agreements (“Third107
Party Components”), which may contain terms that expand or limit108
rights to use certain portions of the Product (“Third Party Terms”).109
HTTP://SUPPORT.AVAYA.COM/LICENSEINFO/ ARE43
Information regarding distributed Linux OS source code (for those110
Products that have distributed the Linux OS source code), and111
identifying the copyright holders of the Third Party Components and the112
Third Party Terms that apply to them is available on the Avaya Support113
Web site:
Preventing toll fraud115
“Toll fraud” is the unauthorized use of your telecommunications system116
by an unauthorized party (for example, a person who is not a corporate117
employee, agent, subcontractor, or is not working on your company's118
behalf). Be aware that there can be a risk of toll fraud associated with119
your system and that, if toll fraud occurs, it can result in substantial120
additional charges for your telecommunications services.121
Avaya fraud intervention122
If you suspect that you are being victimized by toll fraud and you need123
technical assistance or support, call Technical Service Center Toll124
Fraud Intervention Hotline at +1-800-643-2353 for the United States125
and Canada. For additional support telephone numbers, see the Avaya126
Support Web site:
vulnerabilities with Avaya products should be reported to Avaya by128
sending mail to: securityalerts@avaya.com.129
http://www.avaya.com/support/Copyright/.114
http://www.avaya.com/support/. Suspected security127
Avaya - Proprietary. Use pursuant to the terms of your signed agreement or Avaya policy.
DRAFT-June 24, 2010-5:17 PM
2 Avaya one-X™ Deskphone H.323 9621G/9641G User Guide Issue 1 May 2010
Page 3

Trademarks1
All other trademarks are the property of their respective owners.2
Downloading documents3
For the most current versions of documentation, see the Avaya Support4
Web site: http://www.avaya.com/support5
Contact Avaya Support6
Avaya provides a telephone number for you to use to report problems7
or to ask questions about your product. The support telephone number8
is 1-800-242-2121 in the United States. For additional support9
telephone numbers, see the Avaya Web site:
support11
Power over Ethernet (PoE) warning12
This equipment must be connected to PoE networks without routing to13
the outside plant.14
15
http://www.avaya.com/10
16
17
Avaya - Proprietary. Use pursuant to the terms of your signed agreement or Avaya policy.
DRAFT-June 24, 2010-5:17 PM
Avaya one-X™ Deskphone H.323 9621G/9641G User Guide Issue 1 May 2010 3
Page 4

Avaya - Proprietary. Use pursuant to the terms of your signed agreement or Avaya policy.
DRAFT-June 24, 2010-5:17 PM
4 Avaya one-X™ Deskphone H.323 9621G/9641G User Guide Issue 1 May 2010
Page 5

Contents
Chapter 1: Introduction to the 9621G/9641G Deskphone......................................................91
Overview...........................................................................................................................................................92
Scrolling and Navigation..................................................................................................................................113
About Icons.....................................................................................................................................................124
Administrative messages................................................................................................................................175
Adjustable stand and display screen...............................................................................................................176
Using the On-screen Keyboard.......................................................................................................................187
Cleaning the screen........................................................................................................................................198
Chapter 2: The Home Screen.................................................................................................219
Options and Settings.......................................................................................................................................2110
Setting Go To Phone Screen on Calling.................................................................................................2311
Setting Go To Phone Screen on Ringing................................................................................................2312
Setting Go To Phone Screen on Answer................................................................................................2413
Setting dialing options............................................................................................................................2414
Changing the voice dialing setting..........................................................................................................2515
Changing the voice dialing language......................................................................................................2516
Setting redial options..............................................................................................................................2517
Configuring call timers............................................................................................................................2618
Configuring visual alerts.........................................................................................................................2619
Setting the audio path.............................................................................................................................2720
Setting contact names to display during calls.........................................................................................2721
Adjusting the display brightness or contrast...........................................................................................2822
Turning button click sounds on and off...................................................................................................2823
Setting the Home screen to display when the phone is idle...................................................................2924
Turning error tones on or off...................................................................................................................2925
Turning large text on or off......................................................................................................................3026
Choosing your ring tone.........................................................................................................................3027
Changing the display language..............................................................................................................3028
Setting the Quick Touch panel................................................................................................................3129
Personalizing button labels.....................................................................................................................3130
Backing up and restoring your data files................................................................................................3231
Browser...........................................................................................................................................................3332
Chapter 3: About Features.....................................................................................................3533
Accessing the Features menu.........................................................................................................................3534
Feature Table..................................................................................................................................................3535
Calling a person from the directory.................................................................................................................3736
Configuring simultaneous ringing for multiple telephones (EC500)................................................................3737
Chapter 4: Answering a call...................................................................................................3938
Chapter 5: Making a call.........................................................................................................4139
Making an emergency call..............................................................................................................................4140
Clearing a number...........................................................................................................................................4141
Redialing a number.........................................................................................................................................4242
Using voice dialing..........................................................................................................................................4243
Making a call using edit dialing.......................................................................................................................4344
Calling a person from the contacts list............................................................................................................4345
Avaya - Proprietary. Use pursuant to the terms of your signed agreement or Avaya policy.
DRAFT-June 24, 2010-5:17 PM
Avaya one-X™ Deskphone H.323 9621G/9641G User Guide Issue 1 May 2010 5
Page 6

Calling a person from call history....................................................................................................................441
Making a call using a “click to dial” link...........................................................................................................442
Chapter 6: Standard Call-Related Features..........................................................................453
Muting a call....................................................................................................................................................454
Putting a call on hold.......................................................................................................................................455
Transferring a Call...........................................................................................................................................466
Conference calls.............................................................................................................................................467
Setting up a conference call...................................................................................................................468
Adding a person on hold to a conference call........................................................................................479
Putting a conference call on hold...........................................................................................................4710
Muting a person on a conference call.....................................................................................................4711
Dropping a person from a conference call..............................................................................................4812
Forwarding calls..............................................................................................................................................4813
Send All Calls.........................................................................................................................................4814
Forwarding calls.....................................................................................................................................4915
Chapter 7: Bridged call appearances....................................................................................5116
Answering a call on a bridged line..................................................................................................................5117
Joining a call on a bridged line........................................................................................................................5118
Making an outgoing call on a bridged line.......................................................................................................5119
Chapter 8: Contacts................................................................................................................5320
Searching for a contact...................................................................................................................................5321
Viewing contact details....................................................................................................................................5422
Adding a new contact......................................................................................................................................5423
Editing a contact..............................................................................................................................................5524
Setting up Favorite contacts............................................................................................................................5625
Changing the Primary Contact Number..........................................................................................................5626
Deleting a contact...........................................................................................................................................5727
Chapter 9: Call History............................................................................................................5928
Viewing call history..........................................................................................................................................5929
Viewing call history details..............................................................................................................................5930
Adding an entry from the Call History to your contacts list..............................................................................6031
Removing an entry from call history................................................................................................................6032
Clearing all call history entries........................................................................................................................6033
Turning off call history.....................................................................................................................................6134
Chapter 10: Using USB Flash Drives with your phone........................................................6335
Adding contacts from an external file to your contacts list..............................................................................6336
Replacing your contacts list with an external file.............................................................................................6437
Copying your contacts list to a USB flash drive..............................................................................................6538
Temporarily using a USB contacts list.............................................................................................................6539
Using pictures from your USB device as a screensaver.................................................................................6640
Chapter 11: Getting your messages......................................................................................6741
Logging into your voice mail............................................................................................................................6742
Chapter 12: About Logging In to and Out of Your Telephone.............................................6943
Logging in to your telephone extension..........................................................................................................6944
Logging out of your telephone extension........................................................................................................7045
Avaya - Proprietary. Use pursuant to the terms of your signed agreement or Avaya policy.
DRAFT-June 24, 2010-5:17 PM
6 Avaya one-X™ Deskphone H.323 9621G/9641G User Guide Issue 1 May 2010
Page 7

Logging in as a guest user..............................................................................................................................701
Chapter 13: Avaya Home Screen Applications.....................................................................712
Adding World Clock locations..........................................................................................................................713
Viewing World Clock details............................................................................................................................724
Using the Weather application........................................................................................................................735
Using the Calculator........................................................................................................................................746
Chapter 14: Setting up a Bluetooth® headset.......................................................................777
Pairing a Bluetooth® headset with your phone...............................................................................................778
Operating a Bluetooth® headset.....................................................................................................................789
Index.........................................................................................................................................8110
Avaya - Proprietary. Use pursuant to the terms of your signed agreement or Avaya policy.
DRAFT-June 24, 2010-5:17 PM
Avaya one-X™ Deskphone H.323 9621G/9641G User Guide Issue 1 May 2010 7
Page 8

Avaya - Proprietary. Use pursuant to the terms of your signed agreement or Avaya policy.
DRAFT-June 24, 2010-5:17 PM
8 Avaya one-X™ Deskphone H.323 9621G/9641G User Guide Issue 1 May 2010
Page 9

1
Chapter 1: Introduction to the 9621G/9641G2
Deskphone3
Your deskphone provides many features, including a touch-based Phone screen to view and4
manage your calls, a menu of options and settings, a calculator, Web applications like Weather5
and a World Clock, and access to your voicemail. The 9621G and 9641G Deskphones provide6
this information in color.7
The "G" designation in 9621G9641G means this deskphone model has a built-in Gigabit8
Ethernet adapter which speeds data transmission. The 9621G Deskphone has a smaller9
display area than the 9641G Deskphone and does not have a USB or Bluetooth interface.10
Unless specifically stated elsewhere in this guide, the two models are essentially the same in11
terms of features and functionality.12
Not all functions and features described in this user guide may be available on your deskphone.13
If you find that a function or feature is not available, please contact your system administrator.14
Overview15
16
Avaya - Proprietary. Use pursuant to the terms of your signed agreement or Avaya policy.
DRAFT-June 24, 2010-5:17 PM
Avaya one-X™ Deskphone H.323 9621G/9641G User Guide Issue 1 May 2010 9
Page 10
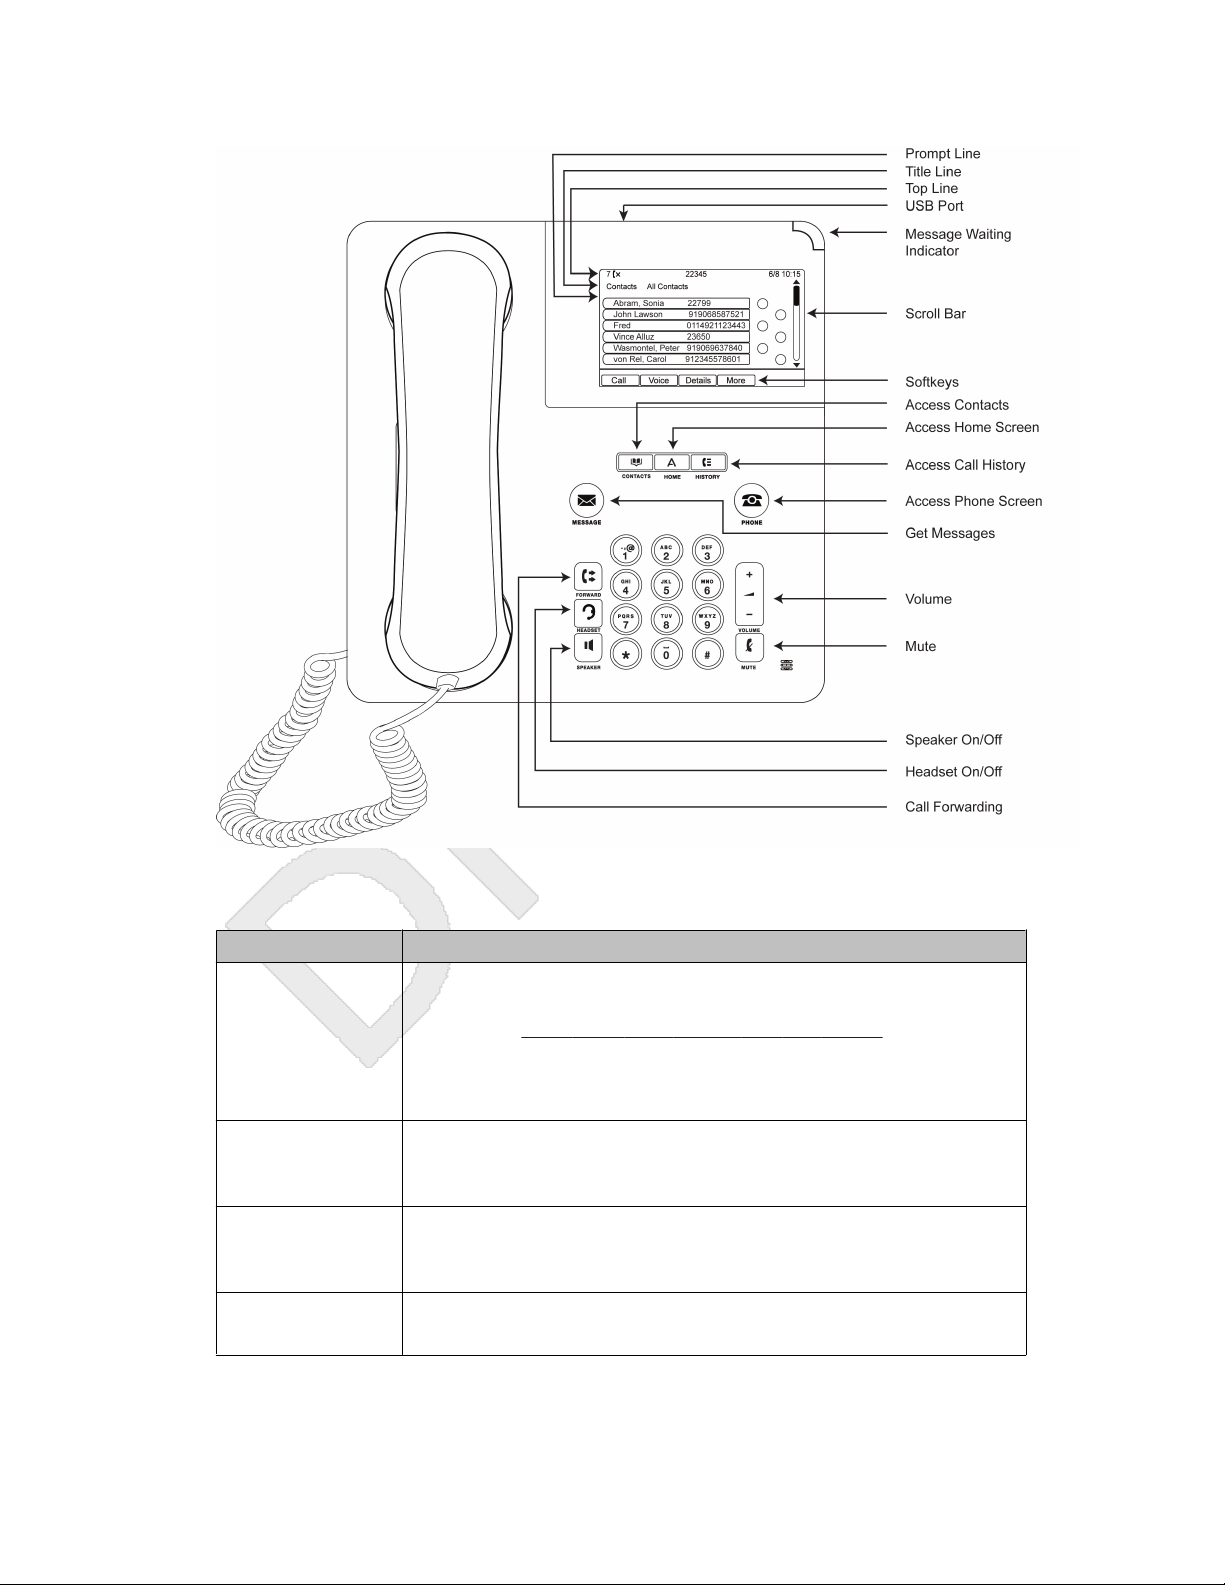
Introduction to the 9621G/9641G Deskphone
1
2
The following table provides button/feature descriptions for the 9621G/9641G deskphone.3
Name Description
USB Port Insert a USB device (also called a memory stick, thumb drive, or flash
drive) to transfer contacts between your phone and an external data
source; see Using USB Flash Drives with your phone on page 63 for
more information. You can also recharge some battery-powered
devices by using a USB cable to connect the device to your
deskphone's USB port. Note: the 9621G does not have a USB port.
Message Waiting
Indicator
Missed Call
Indicator
Prompt Line View the prompt line to see helpful information, such as the expected
An illuminated red light in the upper-right corner of your phone
indicates you have voicemail messages waiting. If visual alerting is
enabled, this light flashes when you receive an incoming call.
The icon on the Call Log button is illuminated when you have missed
calls. The top line shows the Missed Call icon and the number of calls
missed.
action to take on a screen.
Avaya - Proprietary. Use pursuant to the terms of your signed agreement or Avaya policy.
DRAFT-June 24, 2010-5:17 PM
10 Avaya one-X™ Deskphone H.323 9621G/9641G User Guide Issue 1 May 2010
Page 11

Scrolling and Navigation
Name Description
Call Appearances The number of lines available on touchscreen deskphones depend on
how the Quick Touch panel is administered (see Setting the Quick
Touch panel on page 31. Touch the line to initiate or answer a call.
Line Buttons On touchscreen deskphones, call-related icons at the beginning of the
line show which lines are in use or available for calls. Touch the line
to select it. Line buttons also indicate if a feature is enabled or disabled
in the Feature view.
Softkeys Use the softkeys to act on objects displayed on the screen. The softkey
labels show you the action that each key produces.
Message Press the Message button to connect directly to your voicemail
system.
Navigation Arrows Touch the right-facing arrow at the upper right of a screen or to the
right of a list item to move to the next or a related screen.
Phone Press Phone to view and manage your calls.
Contacts Press Contacts to view the entries in your Contacts list.
Call Log Press Call Log to view the history of your outgoing, incoming, and
missed calls.
Home Press Home to configure options and settings, log out, access your
favorite contacts, view network information, and access the calculator,
World Clock, and Weather applications (if available).
Volume Press Volume to adjust the volume of the handset, headset, speaker,
and ringer.
Headset Press Headset to use the headset if it is connected. Only HIS headset
cords are compatible with your phone.
Mute Press Mute to mute a call in progress. To take a call off mute, press
Mute again.
Speaker Press Speaker to use the speakerphone. To take a call off
speakerphone, lift the handset.
Forward Press Forward to display the Forwarding menu.
Scrolling and Navigation1
Use the onscreen up and down arrow buttons on the right middle of the screen to scroll up or2
down through a list. Touch and hold the appropriate scroll button to scroll a page at a time in3
the designated direction or to activate scrolling “auto repeat.”4
To switch between call appearances and features, use the Features button or Calls button in5
the upper right of the Phone screen to switch between call appearances and features. Touch6
Avaya - Proprietary. Use pursuant to the terms of your signed agreement or Avaya policy.
DRAFT-June 24, 2010-5:17 PM
Avaya one-X™ Deskphone H.323 9621G/9641G User Guide Issue 1 May 2010 11
Page 12
Introduction to the 9621G/9641G Deskphone
Features to move from the Phone screen to the Features list, or touch Calls to move from the1
Features list to the Phone screen.2
When a list item has a “Details” button (a blue right-facing arrow), touching it shows more3
information about the item. For example, touching the arrow to the right of a contact name4
produces a detail screen showing all the numbers on file for that person.5
You act on objects such as a line or softkey by touching them or by touching the on-screen6
softkey labels. Softkey labels change according to the context. For example, touch a contact7
to place a call to that person, touch a line on the Phone screen to answer an incoming call,8
to go off hook to place a call, or to resume a call on hold.9
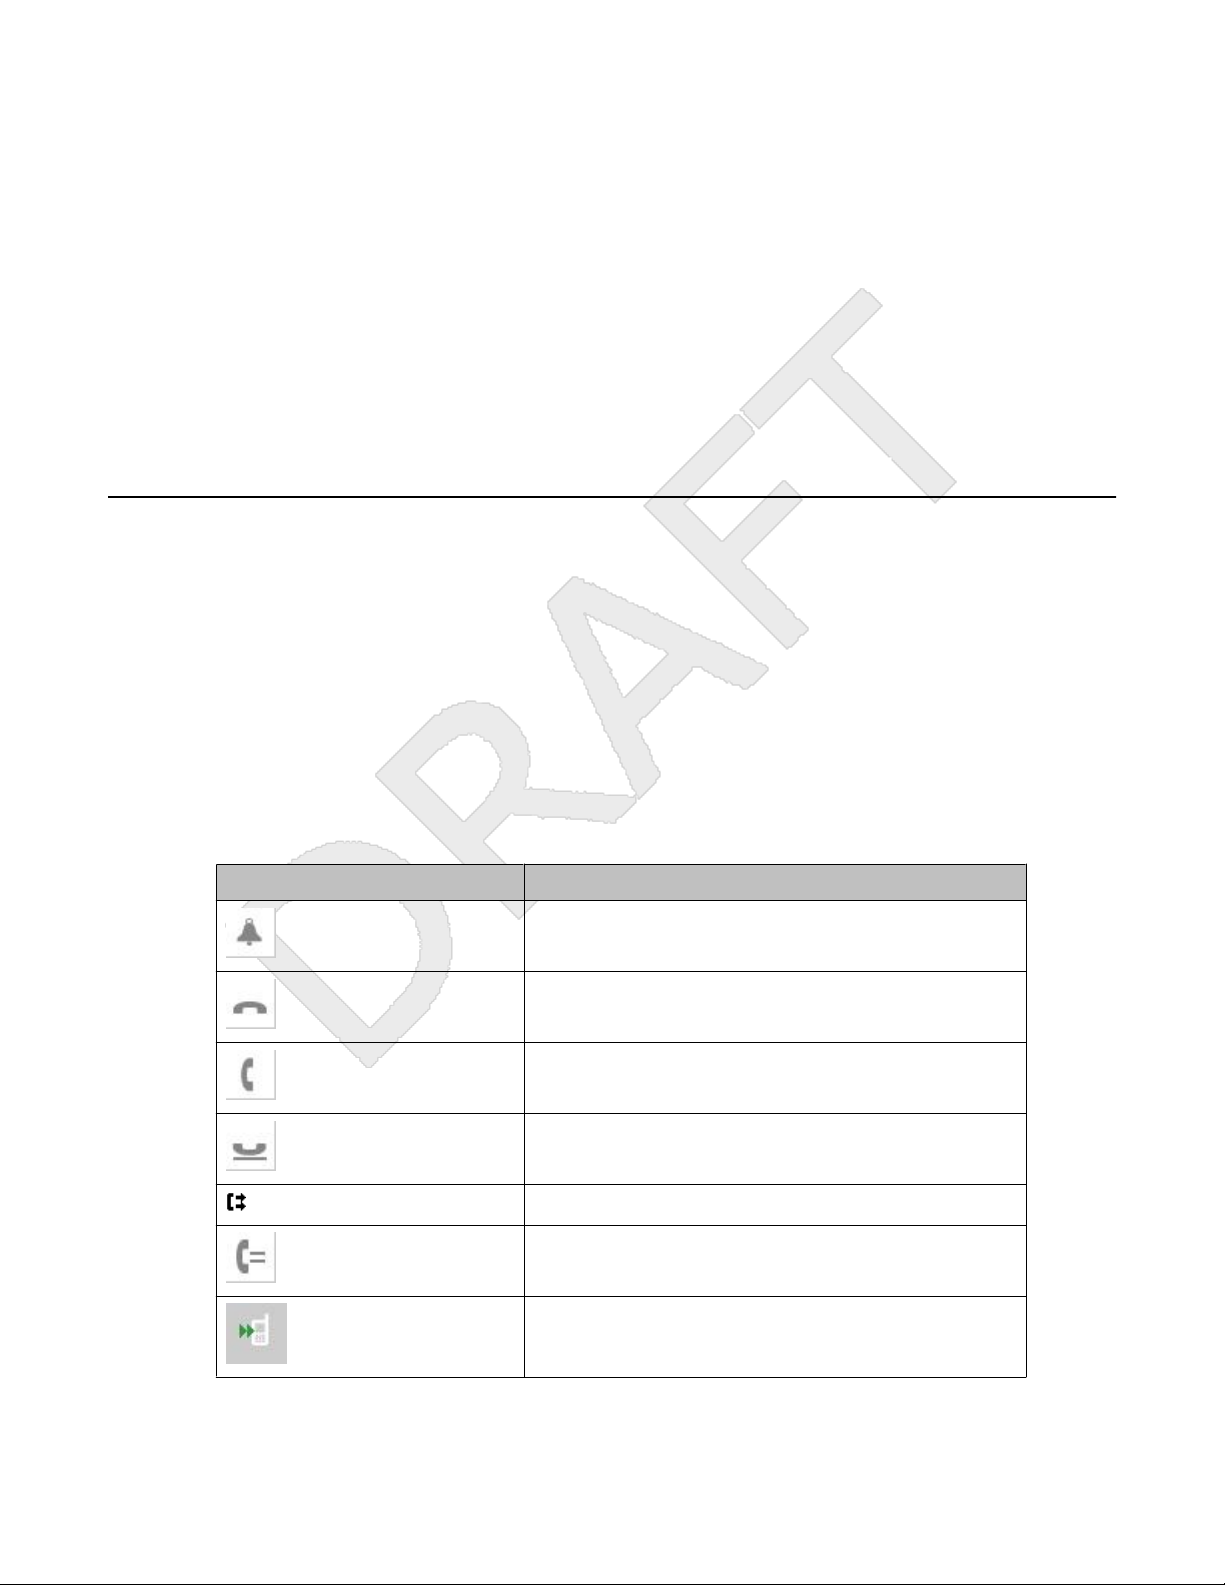
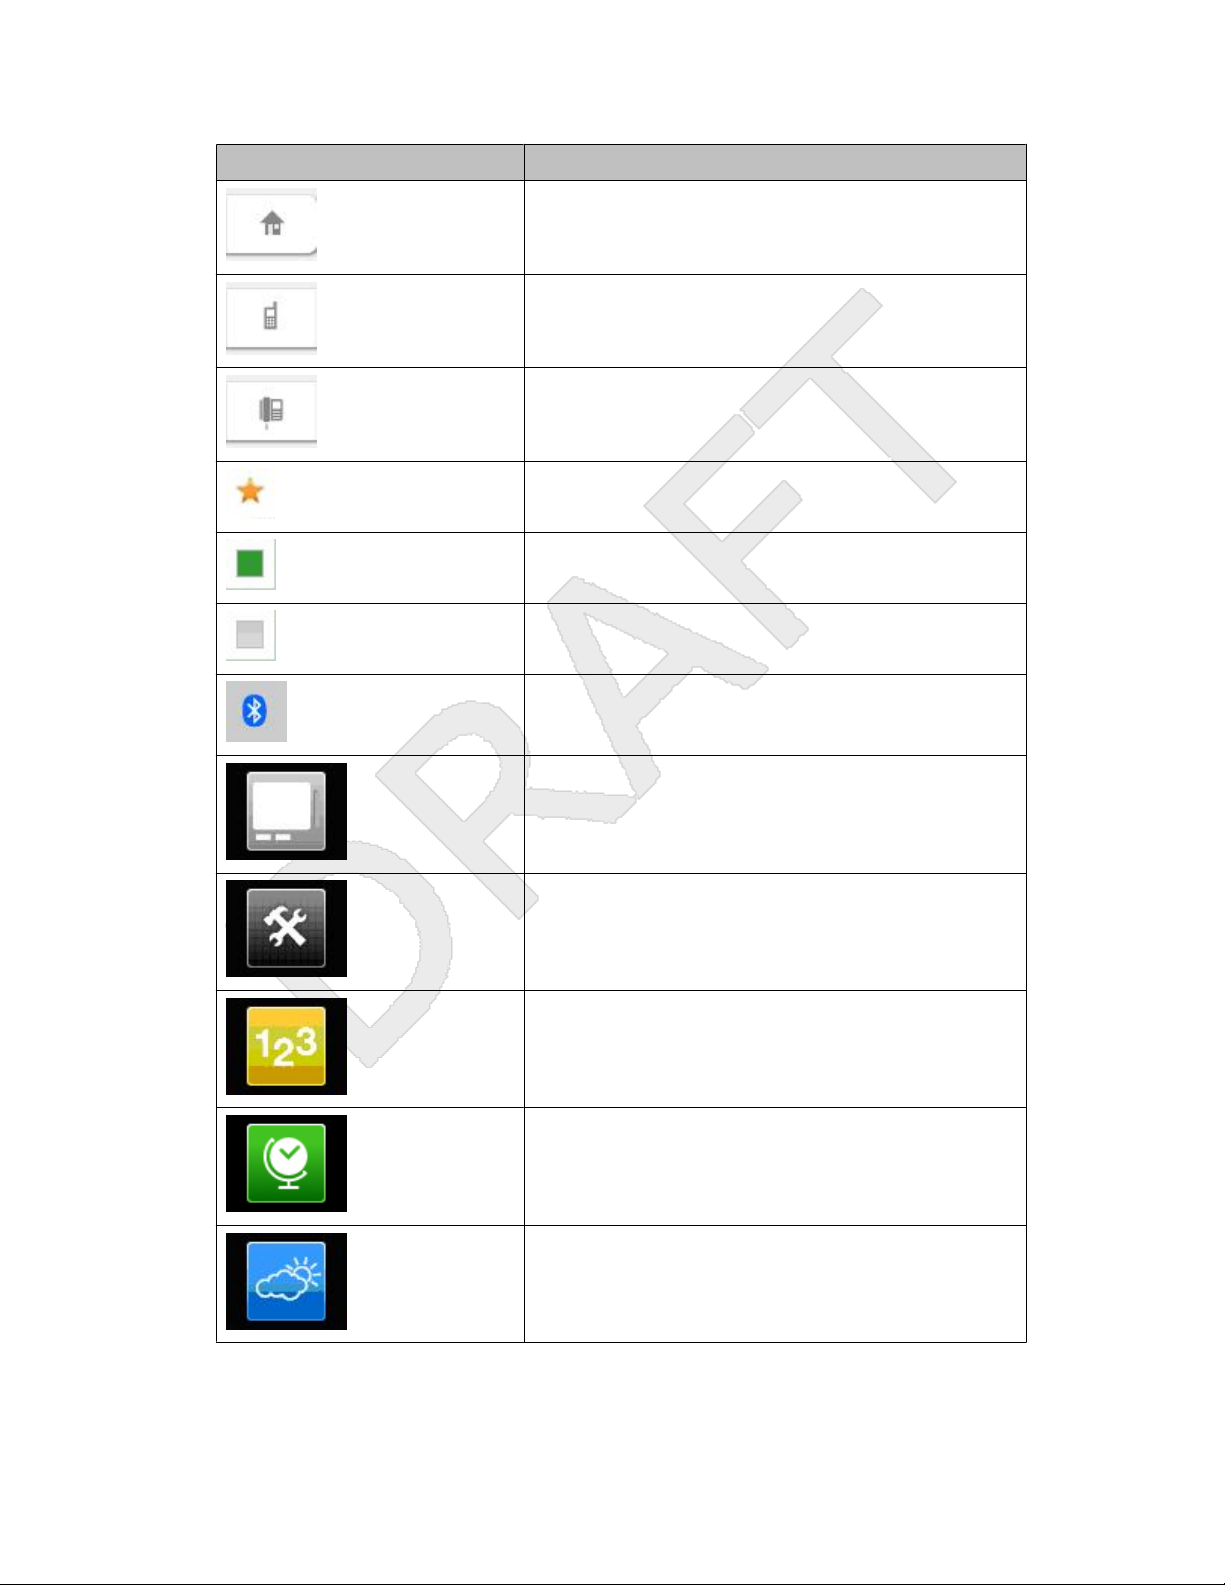
About Icons10
The icons in the following table indicate the state of a call, navigation choices, Call History11
types, Contact phone types, feature status, or the status of an attached or paired device.12
Depending on their purpose, some icons appear on the top line, for example, to notify you13
that a headset is active or that you have missed calls in the Call History. Other icons display14
on call appearance lines to show call states. Icons also appear on application screens like the15
Contacts list, Call History, or World Clock and Weather. Home screen icons are touch-based16
to let you initiate actions like changing telephone settings, accessing the Web browser, or17
accessing Avaya applications like the Calculator, World Clock, and Weather. Your administrator18
might make other, optional Home screen icons available to you that do not appear in this table.19
Such icons represent optional applications for which your administrator can provide20
information.21
Icon
Avaya - Proprietary. Use pursuant to the terms of your signed agreement or Avaya policy.
DRAFT-June 24, 2010-5:17 PM
12 Avaya one-X™ Deskphone H.323 9621G/9641G User Guide Issue 1 May 2010
Description
Incoming call is ringing.
This call appearance line is not currently in use.
Call is active.
You placed this call on hold.
Your calls are being forwarded.
A bridged call appearance is in use.
EC500 is on.
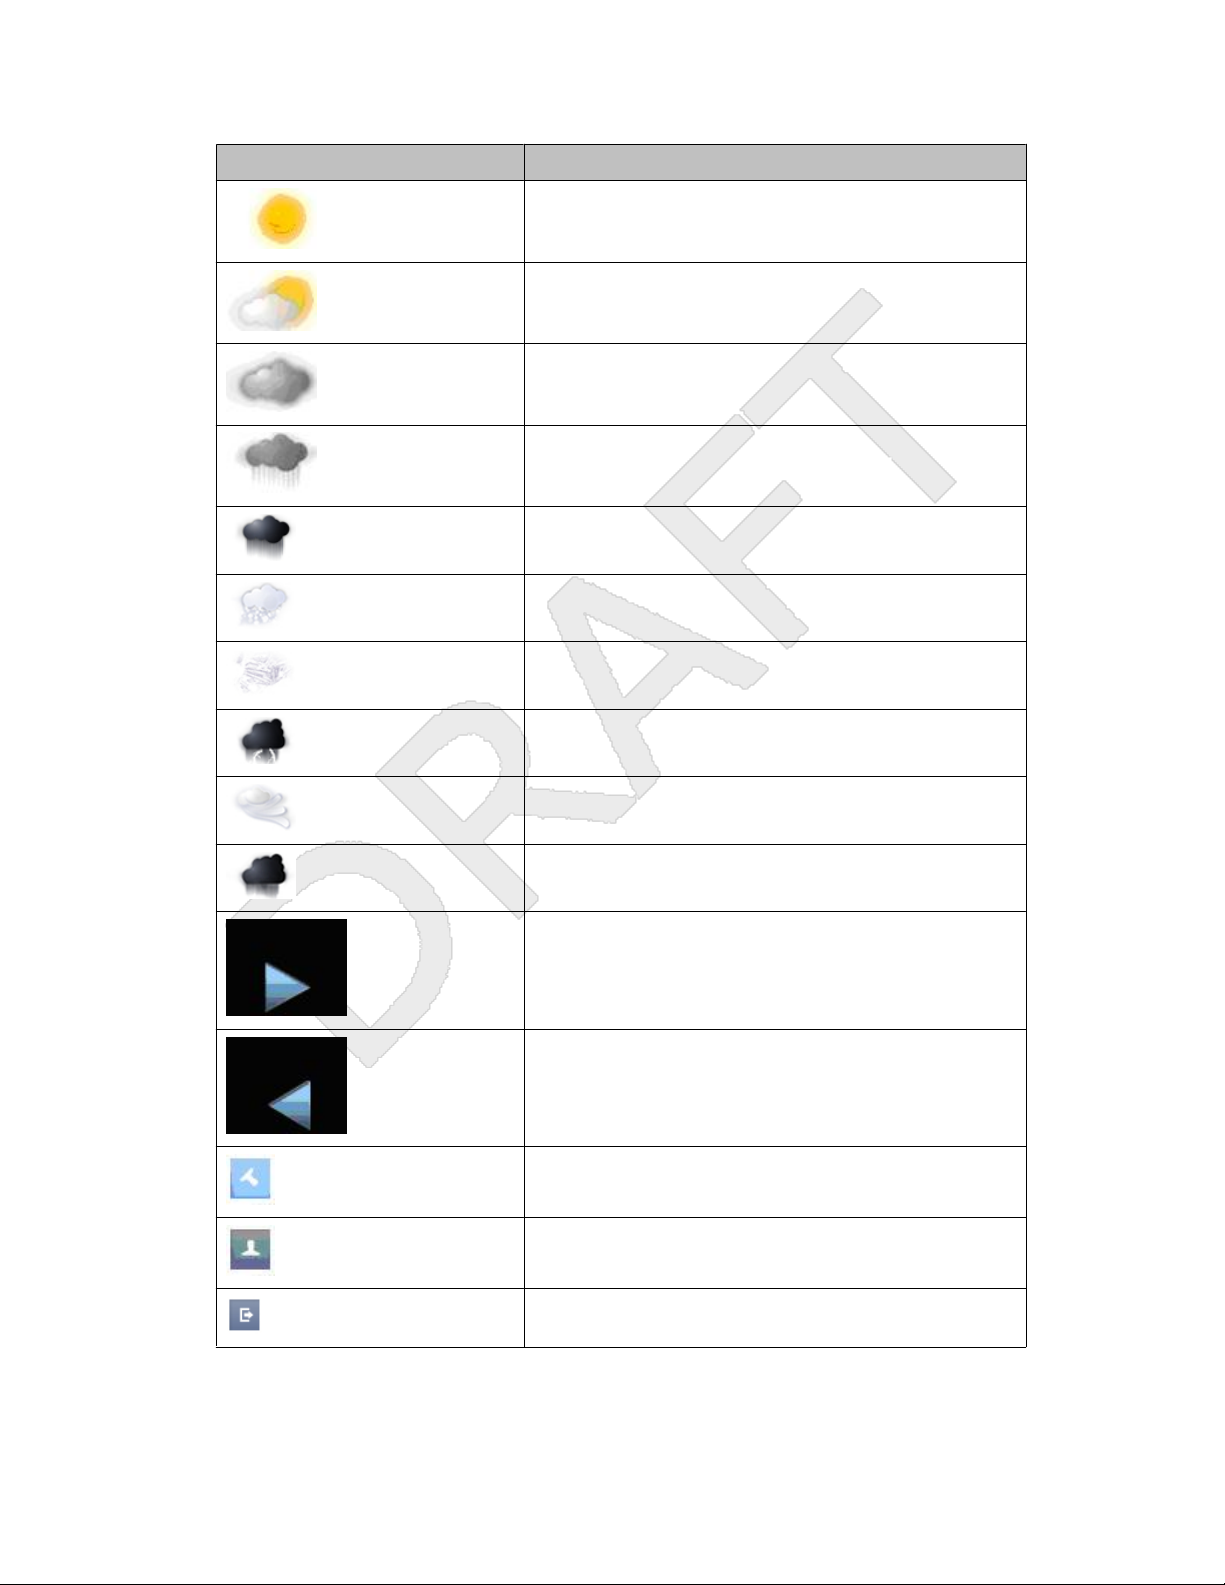
Page 13
Icon Description
A conference call is active.
You placed a conference call on hold.
Speakerphone volume is being adjusted.
Headset volume is being adjusted.
Details button. Touch to display more information about
a line item or to access related information screens.
Unnamed registration in effect.
About Icons
The call in progress is muted.
The ringer volume is off due to pressing - on the Volume
button until the volume turns off. To reinstate volume,
press + on the Volume button.
Your administrator may place this icon on one of your
softkeys as an energy-saving measure, or it appears on
the Settings menu. Pressing this softkey turns the
display backlight off. When the backlight is off, any
activity on your telephone turns it back on.
Indicates that your phone is in an “Unnamed
Registration” state, caused by not entering an extension
within 60 seconds of being prompted for one or not
entering a password. In this situation, your phone may
register with its call server but will show only one call
appearance, no features, and will allow only outgoing
calls. To switch from the unnamed registration state,
login with a valid extension and password.
Team icon indicating this team member is available.
Your system administrator sets up teams as applicable.
Team icon indicating this team member is having calls
forwarded.
Team icon indicating this team member is busy on a call
and not available.
Avaya - Proprietary. Use pursuant to the terms of your signed agreement or Avaya policy.
DRAFT-June 24, 2010-5:17 PM
Avaya one-X™ Deskphone H.323 9621G/9641G User Guide Issue 1 May 2010 13
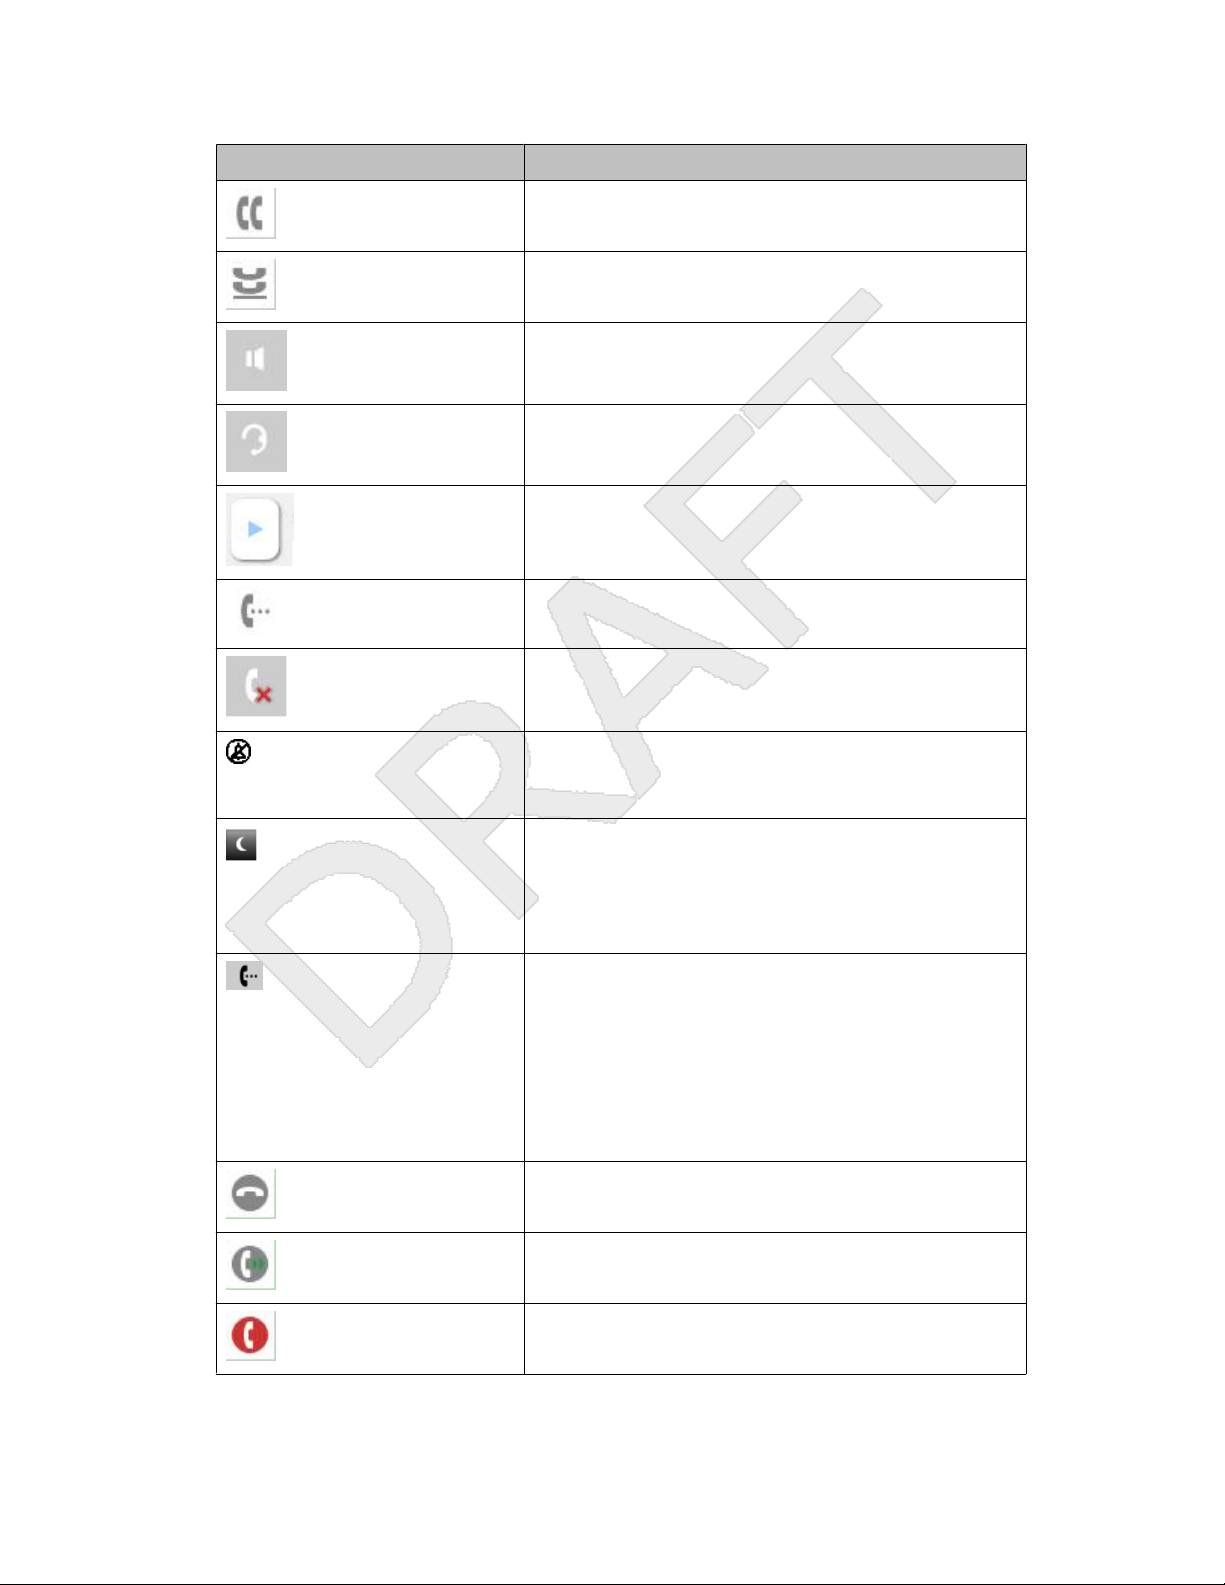
Page 14
Introduction to the 9621G/9641G Deskphone
Icon Description
Team icon indicating this team member is busy and is
forwarding all calls.
Team busy and ring icon.
Team busy and ring (more) icon.
Team icon indicating a team member is calling.
Home screen icon that designates the general phone
number for a favorite Contact. See Setting up favorites
for more information.
Home screen icon that designates the home phone
number for a favorite Contact. See Setting up favorites
for more information.
Home screen icon that designates the work phone
number for a favorite Contact. See Setting up favorites
for more information.
Home screen icon that designates the mobile phone
number for a favorite Contact. See Setting up favorites
for more information.
Call History — all calls.
Call History Missed call.
Call History Outgoing call.
Call History Answered call.
Contact — General telephone number.
Avaya - Proprietary. Use pursuant to the terms of your signed agreement or Avaya policy.
DRAFT-June 24, 2010-5:17 PM
14 Avaya one-X™ Deskphone H.323 9621G/9641G User Guide Issue 1 May 2010
Page 15
Icon Description
Contact — Home telephone number.
Contact — Mobile Telephone number.
Contact — Work telephone number.
Contact — Favorite.
Feature is on.
Feature is off.
About Icons
Phone is paired with and able to communicate with a
Bluetooth® headset.
Access the Home screen WML Browser application (if
available).
Access the Home screen (telephone) Settings menu.
Access the Home screen Calculator application.
Access the Home screen World Clock application.
Access the Home screen Weather application.
Avaya - Proprietary. Use pursuant to the terms of your signed agreement or Avaya policy.
DRAFT-June 24, 2010-5:17 PM
Avaya one-X™ Deskphone H.323 9621G/9641G User Guide Issue 1 May 2010 15
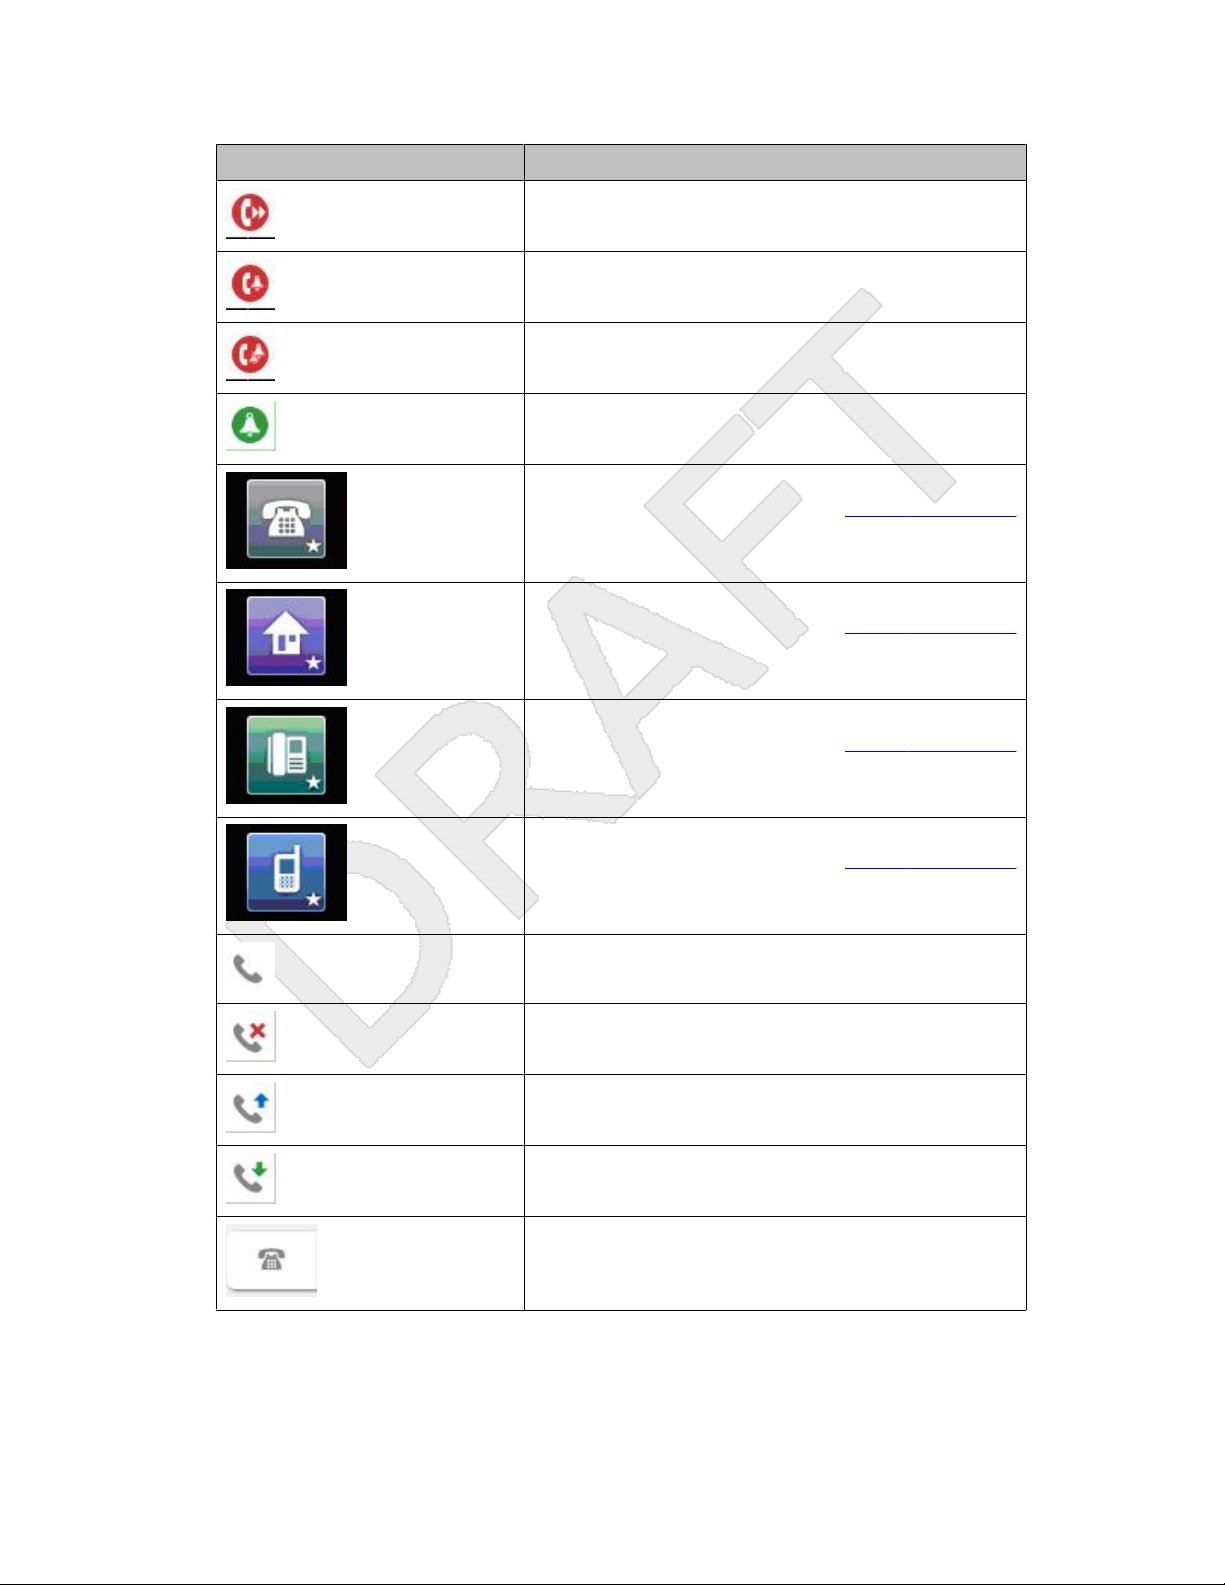
Page 16
Introduction to the 9621G/9641G Deskphone
Icon Description
Weather is clear/fair.
Weather is partly cloudy.
Weather is cloudy.
Weather is a light rain.
Weather is rainy.
Weather is snowy.
Weather is icy.
Weather is thunderstorms.
Weather is windy.
Weather is severe storms.
See more Home screen icons.
See previous “page” of Home screen icons.
Access the Main Menu Clean Screen option.
Access the Main Menu Guest Login option.
Access the Main Menu Log out option.
Avaya - Proprietary. Use pursuant to the terms of your signed agreement or Avaya policy.
DRAFT-June 24, 2010-5:17 PM
16 Avaya one-X™ Deskphone H.323 9621G/9641G User Guide Issue 1 May 2010
Page 17
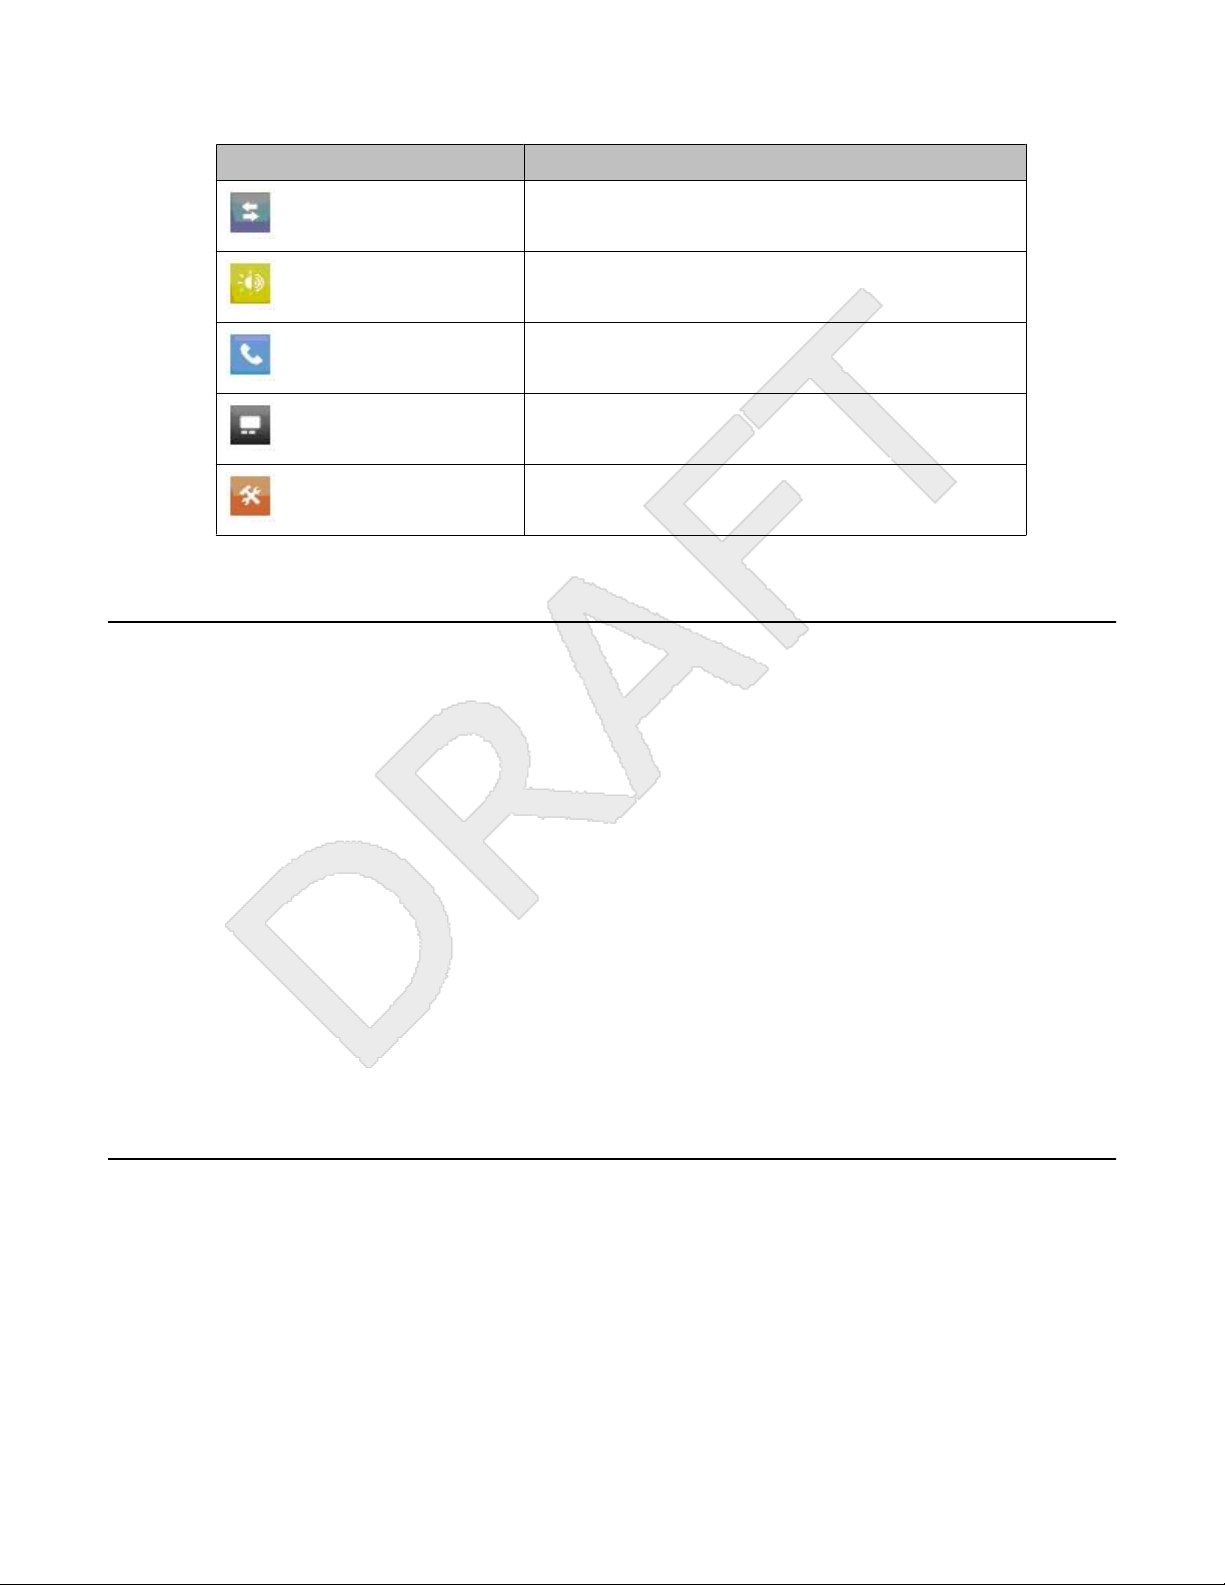
Administrative messages
Icon Description
Access the Main Menu Network info options.
Access the Options & Settings Screen and Sounds
Options menu.
Access the Options & Settings Call Settings menu.
Access the Options & Settings Application Settings
menu.
Access the Options & Settings Advanced Settings
menu.
Administrative messages1
Your administrator can send important messages directly to your telephone, for example,2
notification of an early office closing due to inclement weather or information about an imminent3
service interruption.4
These types of messages can take any of the following forms:5
• a text message streaming across the top display line, accompanied by an audible alert,6
• an audio message broadcasting through the Speaker (or the headset if that device is7
active),8
• an “interrupt” screen notifying you that you are receiving an audio alert, with instructions9
for canceling the message or resuming your previous activity, such as continuing a call.10
While receiving an audio message, you can switch between the Speaker, handset, and headset11
as desired, can terminate the pushed audio content by “going on-hook,” and can adjust the12
volume, as you normally would during a call.13
Adjustable stand and display screen14
You can adjust the display screen to different angles. To move the display screen, gently pull15
from the top of the display screen towards you. As you pull the screen towards you, you will16
hear a clicking sound. Each of these clicks is a locking position for the display screen. Gently17
pull the display screen all the way towards you and push to return it to its original flat position.18
Avaya - Proprietary. Use pursuant to the terms of your signed agreement or Avaya policy.
DRAFT-June 24, 2010-5:17 PM
Avaya one-X™ Deskphone H.323 9621G/9641G User Guide Issue 1 May 2010 17
Page 18
Introduction to the 9621G/9641G Deskphone
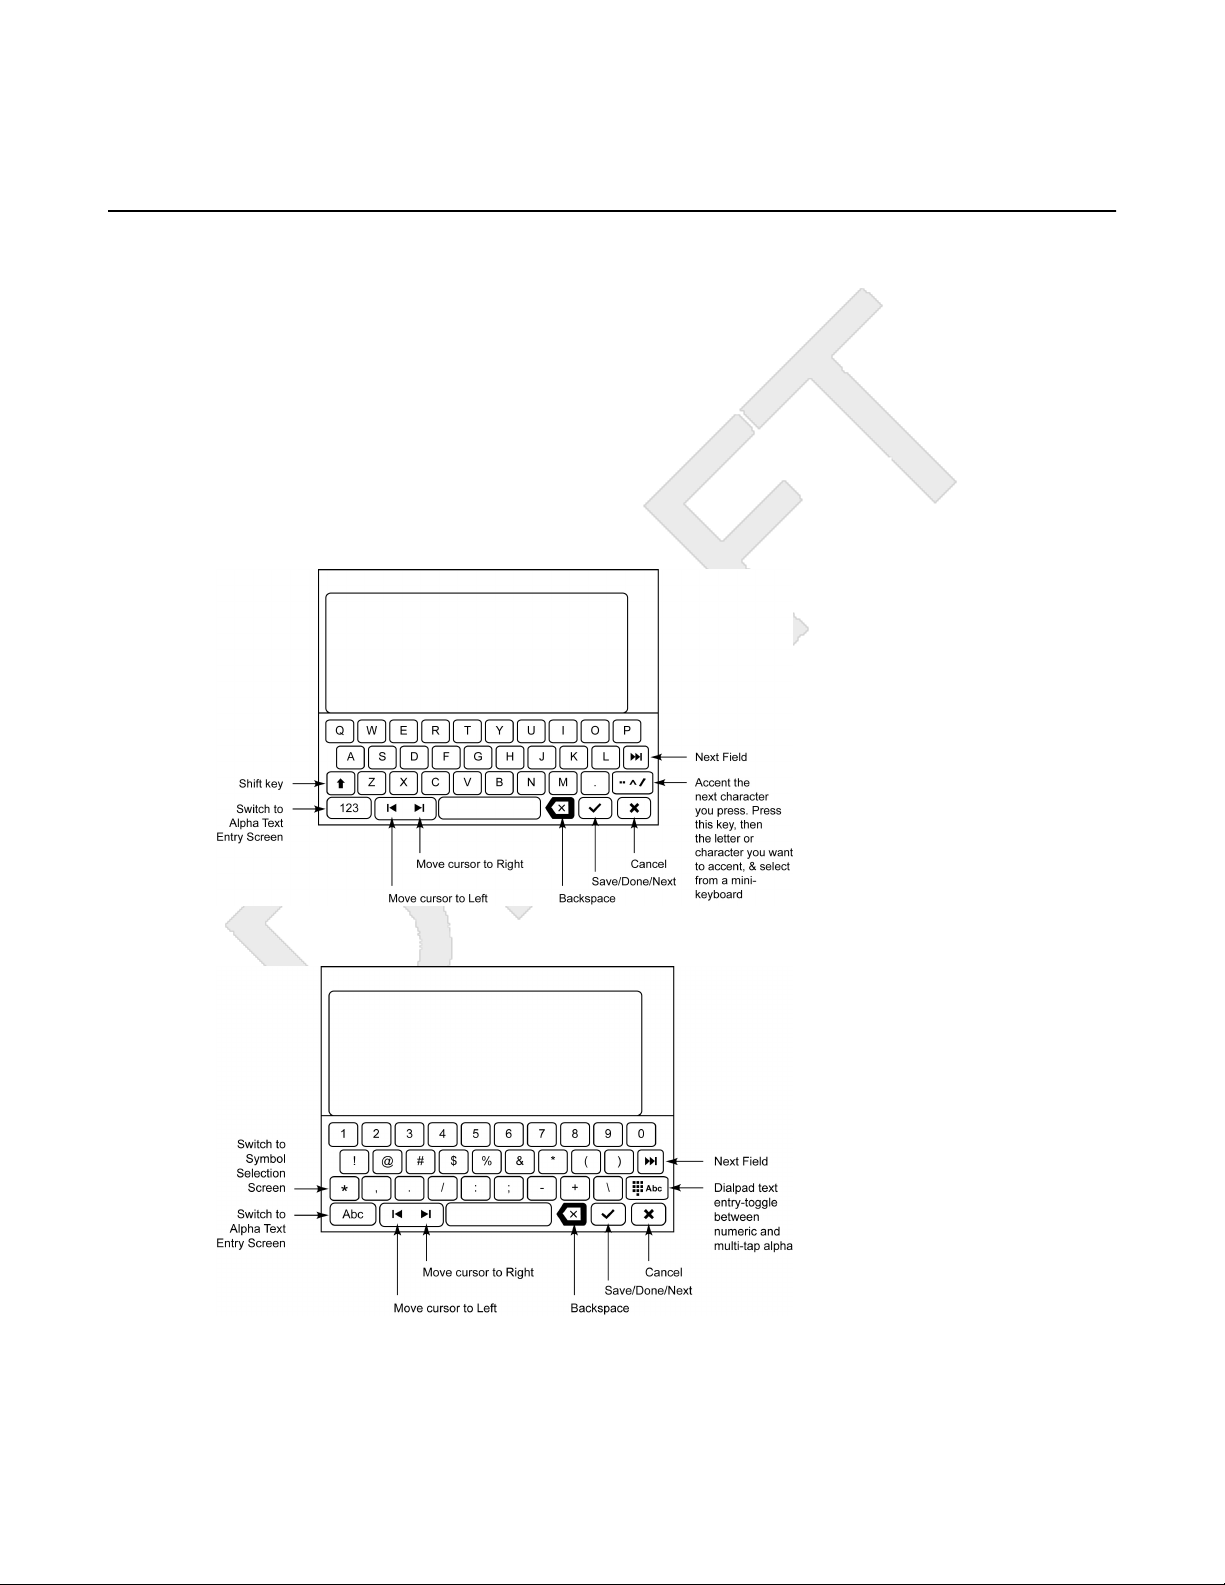
Using the On-screen Keyboard1
An on-screen keyboard appears when you add or edit a contact name or number, or when you2
personalize labels for your call appearances or features. You can switch between alphabetic3
and numeric keyboards, and you can use the keyboard to enter symbols and accented letters.4
Use the diagrams that follow to add or change names, telephone numbers, or labels. Touching5
and holding the Backspace or cursor right/left buttons down produces an “automatic repeat”6
action that stops when you lift your finger or stylus. Remember to touch the “Done” check mark7
when you finish editing. Use the “Cancel” X to discard any edits and return to the previous8
screen, retaining the original information.9
Figure 1: Text Entry Keyboard10
11
Figure 2: Numeric Entry Keyboard12
13
Avaya - Proprietary. Use pursuant to the terms of your signed agreement or Avaya policy.
DRAFT-June 24, 2010-5:17 PM
18 Avaya one-X™ Deskphone H.323 9621G/9641G User Guide Issue 1 May 2010
Page 19

Cleaning the screen
Cleaning the screen1
Clean the touch screen periodically to remove fingerprints and other marks by using a soft,2
slightly damp, lint-free cloth. From the Home screen, select Settings, then Touch Screen3
Cleaning to disable the touch screen so that you can clean it without initiating an action or4
application. Follow the instructions that display and press any phone button like Contacts or5
Home when you are done.6
Warning:7
Use plain water or a cleaner specifically designed for LCD, computer, or touch screens only.8
Do not use harsh chemicals, window cleaner, abrasives, aerosol sprays, ammonia, or solvents9
to clean the touch screen. Do not get moisture into openings.10
Avaya - Proprietary. Use pursuant to the terms of your signed agreement or Avaya policy.
DRAFT-June 24, 2010-5:17 PM
Avaya one-X™ Deskphone H.323 9621G/9641G User Guide Issue 1 May 2010 19
Page 20

Introduction to the 9621G/9641G Deskphone
Avaya - Proprietary. Use pursuant to the terms of your signed agreement or Avaya policy.
DRAFT-June 24, 2010-5:17 PM
20 Avaya one-X™ Deskphone H.323 9621G/9641G User Guide Issue 1 May 2010
Page 21

1
Chapter 2: The Home Screen2
Press the Home button under the display to access the Home screen. The Home screen has3
icons that let you access your telephone's options and settings to adjust or customize them,4
access Web-based applications to get information about the time and weather in different parts5
of the world, display a calculator, view your phone and network settings, use Favorite speed6
dial buttons, and log out. The exact content of your Home screen depends on how your7
administrator has set up your system but it normally includes the following standard Avaya8
features:9
• Settings displays a menu that lets you change your call settings, the language in which10
information displays on the screen, the way your screen looks and sounds, pair your11
phone with a Bluetooth headset, log into a phone as a guest, clean your screen, log your12
phone out, and more.13
• World Clock shows the time and weather in different parts of the world.14
• Weather shows the current weather conditions in an area you choose and a short-term15
weather forecast.16
• Calculator provides a simple, four-function calculator.17
• My Pictures lets you use pictures from a USB device as your telephone screensaver.18
You can also use Contacts to put speed dial icons for up to eight Favorite numbers on your19
Home screen. Your administrator may make other Web-based applications available to you,20
for example, a corporate directory or support page. To invoke any application you see on the21
Home screen, touch its icon. If you have designated more than eight Favorites, or your22
administrator has enabled more than eight total WML and Avaya-provided applications, you23
have a second page for your Home screen. Touch the scroll bar on the right side of the Home24
screen to view the next page.25
Note:26
The Settings options that appear depend on how your extension was administered. Some27
options described in this guide may not be available to you.28
Options and Settings29
The Settings menu contains choices for:30
• Options & Settings31
• Bluetooth Setup32
Avaya - Proprietary. Use pursuant to the terms of your signed agreement or Avaya policy.
DRAFT-June 24, 2010-5:17 PM
Avaya one-X™ Deskphone H.323 9621G/9641G User Guide Issue 1 May 2010 21
Page 22

The Home Screen
• Network Information1
• Guest Login2
• Log Out3
• LightOff4
• Touch Screen Cleaning5
• About Avaya one-X6
The Options & Settings menu provides access to:7
• Call Settings, including choices for automatically displaying the Phone screen when you8
• Application Settings, including choices for personalizing button labels, for turning call11
• Screen & Sound Options, including choices for adjusting the brightness of your phone13
get an incoming call or when you place a call, turning call timers on or off, controlling how9
Redial works, turning Visual Alerting on or off, and more.10
logging on or off, and for including bridged calls in your call log12
display or an attached button module, changing the contrast on an attached button14
module, changing the ring pattern, selecting a different display language, showing the15
quick touch panel, and setting button clicks and tones.16
• Advanced Options, including choices for backing up and restoring your settings, options,17
and button labels. You can also set Automatic Gain Control (AGC) for your headset,18
handset, and/or speaker audio.19
• VPN Settings, if your deskphone is part of a Virtual Private Network and if you have20
authorization to view or change associated settings. If you are an authorized VPN user,21
see the VPN Setup Guide for 9600 Series IP Telephones (Document Number 16–22
602968) for information.23
Bluetooth Setup lets you pair a Bluetooth—capable wireless headset with your phone, so you24
are not tied to your desk during calls. Bluetooth setup is not applicable to the 9621G deskphone25
model.26
Network Information shows summaries of network-related parameters for your phone, often27
used in troubleshooting with your administrator. For more information, see
Information.29
Guest Login lets you log in to another 9621G or 9641G phone and access your own phone's30
features and functionality.31
Log out is used when you want to sign off the phone, to protect your settings or to allow another32
user to log in to your phone. Logging out prevents unauthorized use of your phone. Log out33
does not display unless your phone (and any associated button module) is in an idle state.34
LightOff has a corresponding Light Off icon, which you can touch to temporarily turn off the35
display (and any attached button module) to save energy until you next use the phone. For36
example, if you touch the LightOff icon, the display screen appears to be off, but if you get an37
incoming call, press one of the hard buttons on the phone, or pick up the handset to make a38
call, the display is restored to its normal brightness level.39
Viewing Network28
Avaya - Proprietary. Use pursuant to the terms of your signed agreement or Avaya policy.
DRAFT-June 24, 2010-5:17 PM
22 Avaya one-X™ Deskphone H.323 9621G/9641G User Guide Issue 1 May 2010
Page 23

Options and Settings
Touch Screen Cleaning disables the display so you can remove fingerprints or other marks1
from the touch screen.2
About Avaya one-X provides the release number of your telephone software.3
Setting Go To Phone Screen on Calling4
Set Go to Phone Screen on Calling to Yes, to automatically display the Phone screen when5
you make a call.6
7
1. Press Home.8
2. Touch Settings.9
3. Touch Options & Settings.10
4. Touch Call Settings.11
5. On the Call Settings menu, touch Go To Phone Screen on Calling to change it from12
Yes to No or No to Yes.13
15
19
27
6. Touch Save to save the setting or Cancel to return to the menu without saving.14
Setting Go To Phone Screen on Ringing16
Set Go To Phone Screen on Ringing to Yes to automatically display the Phone screen when17
you get an incoming call.18
1. Press Home.20
2. Touch Settings.21
3. Touch Options & Settings.22
4. Touch Call Settings.23
5. On the Call Settings menu, touch the Go to Phone Screen on Ringing setting to24
change it from Yes to No or No to Yes.25
6. Touch Save to save the setting or Cancel to return to the menu without saving.26
Avaya - Proprietary. Use pursuant to the terms of your signed agreement or Avaya policy.
DRAFT-June 24, 2010-5:17 PM
Avaya one-X™ Deskphone H.323 9621G/9641G User Guide Issue 1 May 2010 23
Page 24

The Home Screen
Setting Go To Phone Screen on Answer1
4
12
Set the Go To Phone Screen on Answer option to Yes to automatically display the Phone screen2
when you answer a call.3
1. Press Home.5
2. Touch Settings.6
3. Touch Options & Settings.7
4. Touch Call Settings.8
5. On the Call Settings menu, touch the Go to Phone Screen on Answer setting to9
change it from Yes to No or No to Yes.10
6. Touch Save to save the setting or Cancel to return to the menu without saving.11
21
28
Setting dialing options13
Your phone has two dialing options. You can dial as you normally would, for example, pick up14
the handset, get a dial tone, and dial the number you want (on-hook dialing). Or, you can set15
"edit dialing" which mimics how you dial a call on a cell phone - you can enter all or part of the16
number, backspace to correct a digit if needed, and when ready, initiate the dialing process17
using a softkey.18
Note:19
Edit dialing may not be available to you, depending on how your system is administered.20
1. Press Home.22
2. Touch Settings.23
3. Touch Options & Settings.24
4. On the Call Settings menu, touch Edit Dialing to change it from On (Enabled) to Off25
(Disabled) or Off to On.26
5. Touch Save to save the setting or Cancel to return to the menu without saving.27
Avaya - Proprietary. Use pursuant to the terms of your signed agreement or Avaya policy.
DRAFT-June 24, 2010-5:17 PM
24 Avaya one-X™ Deskphone H.323 9621G/9641G User Guide Issue 1 May 2010
Page 25

Options and Settings
Changing the voice dialing setting1
2
1. Press Home.3
2. Touch Settings.4
3. Touch Options & Settings.5
4. On the Call Settings menu, touch Voice Dialing to change it from On to Off or Off to6
On.7
5. Touch Save to save the setting or Cancel to return to the menu without saving.8
9
Changing the voice dialing language10
11
19
23
1. Press Home.12
2. Touch Settings.13
3. Touch Options & Settings.14
4. On the Call Settings menu, touch Voice Dialing Language.15
5. Touch the line with the language you want voice dialing to recognize.16
6. Touch Yes to confirm the selected language.17
7. Touch Save to save the setting or Cancel to return to the menu without saving.18
Setting redial options20
You can set Redial to dial the last number you dialed or to display a list of the last numbers21
you dialed.22
1. Press Home.24
2. Touch Settings.25
3. Touch Options & Settings.26
Avaya - Proprietary. Use pursuant to the terms of your signed agreement or Avaya policy.
DRAFT-June 24, 2010-5:17 PM
Avaya one-X™ Deskphone H.323 9621G/9641G User Guide Issue 1 May 2010 25
Page 26

The Home Screen
5
Configuring call timers6
You can set your call settings to display the duration of calls. You can turn the call timer display7
on or off.8
9
4. On the Call Settings menu, touch Redial to change it from List (the last four, five, or1
six numbers display when you touch Redial, depending on your deskphone model)2
to One Number (touching Redial dials the last number called) or One Number to List.3
5. Touch Save to save the setting or Cancel to return to the menu without saving.4
1. Press Home.10
2. Touch Settings.11
3. Touch Options & Settings.12
4. On the Call Settings menu, touch Display Call Timers to change it from On to Off or13
Off to On.14
16
20
27
5. Touch Save to save the setting or Cancel to return to the menu without saving.15
Configuring visual alerts17
When the Visual Alerting option is turned on, incoming calls cause the LED in the top right18
corner of the phone to flash. You can turn Visual Alerting on or off.19
1. Press Home.21
2. Touch Settings.22
3. Touch Options & Settings.23
4. On the Call Settings menu, touch Visual Alerting to change it from Off to On or On24
to Off.25
5. Touch Save to save the setting or Cancel to return to the menu without saving.26
Avaya - Proprietary. Use pursuant to the terms of your signed agreement or Avaya policy.
DRAFT-June 24, 2010-5:17 PM
26 Avaya one-X™ Deskphone H.323 9621G/9641G User Guide Issue 1 May 2010
Page 27

Options and Settings
Setting the audio path1
You can set your phone to go off-hook on the Speaker or the Headset when you make an on-2
hook call.3
This setting also determines whether the Voice Dialing feature gets its input from the Speaker4
or the Headset.5
6
1. Press Home.7
2. Touch Settings.8
3. Touch Options & Settings.9
4. Touch Call Settings.10
5. On the Call Settings menu, touch Audio Path.11
6. Touch the setting to toggle between the available choices.12
For example, if the current setting is “Handset” touching that line changes that13
setting to “Headset”. Touching the setting again changes it to “Speaker” and so on.14
20
24
Note:15
If the audio path is set to Headset and your headset uses switchhook control16
(typically true for wireless headsets), the Voice Dialing feature cannot receive17
input from the headset.18
7. Touch Save to save the setting or Cancel to return to the menu without saving.19
Setting contact names to display during calls21
You can set your phone to use names from your Contacts list when the calling or called party22
number matches a number on your Contacts list.23
1. Press Home.25
2. Touch Settings.26
3. Touch Options & Settings.27
4. Touch Call Settings.28
Avaya - Proprietary. Use pursuant to the terms of your signed agreement or Avaya policy.
DRAFT-June 24, 2010-5:17 PM
Avaya one-X™ Deskphone H.323 9621G/9641G User Guide Issue 1 May 2010 27
Page 28

The Home Screen
4
Adjusting the display brightness or contrast5
12
5. On the Call Settings menu, touch Pair Contacts to Calls to change it from Yes to No1
or No to Yes.2
6. Touch Save to save the setting or Cancel to return to the menu without saving.3
These settings adjust the brightness of either the deskphone or an attached Button Module,6
or the contrast of an attached button module. You cannot adjust a deskphone's color display7
contrast.8
Note:9
The 9621 IP Deskphone does not support button modules, therefore only brightness10
adjustment applies to that model.11
1. Press Home.13
26
2. Touch Settings.14
3. Touch Options & Settings.15
4. Touch Screen & Sound Options.16
5. On the Screen & Sounds menu, touch Brightness or Contrast.17
6. Touch either Phone Screen or Module, depending on which item's brightness or18
contrast you want to adjust.19
Note:20
Contrast adjustment applies only to an attached button module and not to the21
color display screen itself.22
7. Touch either end of the bar indicator to adjust the brightness or contrast, depending23
on which attribute you are adjusting.24
8. Touch Save to save the setting or Cancel to return to the menu without saving.25
Turning button click sounds on and off27
28
1. Press Home.29
2. Touch Settings.30
3. Touch Screen and Sound Options.31
Avaya - Proprietary. Use pursuant to the terms of your signed agreement or Avaya policy.
DRAFT-June 24, 2010-5:17 PM
28 Avaya one-X™ Deskphone H.323 9621G/9641G User Guide Issue 1 May 2010
Page 29

Options and Settings
4. Touch Button Clicks to change it from On to Off or Off to On.1
5. Touch Save to save the setting or Cancel to return to the menu without saving.2
3
Setting the Home screen to display when the phone is idle4
By default, your phone automatically displays the Home screen when there is no input or other5
activity for a specified time period. Set the Return to Home Screen option to No to display the6
screen saver instead of the Home screen upon timeout. The timeout duration is set by your7
administrator or, if not set, defaults to 10 minutes of inactivity.8
9
1. Press Home.10
2. Touch Settings.11
3. Touch Options & Settings.12
4. Touch Screen & Sound Options.13
17
22
5. On the Screen & Sounds menu, touch the Return to Home Screen setting to change14
it from Yes (the default) to No, or No to Yes.15
6. Touch Save to save the setting or Cancel to return to the menu without saving.16
Turning error tones on or off18
If the Error Tones option is On, your telephone produces audible feedback when you press a19
button that isn't valid or try to exceed the size of a text field. If you do not want to hear error20
beeps, set your error tone to Off.21
1. Press Home.23
2. Touch Settings.24
3. Touch Screen and Sound Options.25
4. On the Screen and Sounds menu, touch Error Tones to change it from On to Off or26
Off to On.27
5. Touch Save to save the setting or Cancel to return to the menu without saving.28
29
Avaya - Proprietary. Use pursuant to the terms of your signed agreement or Avaya policy.
DRAFT-June 24, 2010-5:17 PM
Avaya one-X™ Deskphone H.323 9621G/9641G User Guide Issue 1 May 2010 29
Page 30

The Home Screen
Turning large text on or off1
2
8
Choosing your ring tone9
You can choose your ring tone from two different sets of sounds. Classic ring tones are simple10
synthesized sounds. Rich ring tones are richer, more complex sounds. A check mark indicates11
which ring tone is currently selected.12
1. Press Home.3
2. Touch Settings.4
3. Touch Screen and Sound Options.5
4. Touch Text Size to change it from Off to On or On to Off.6
5. Touch Save to save the setting or Cancel to return to the menu without saving.7
13
24
26
1. Press Home.14
2. Touch Settings.15
3. Touch Options & Settings.16
4. Touch Screen and Sound Options.17
5. On the Screen and Sounds menu, touch Personalized Ringing.18
6. If you see a Scroll Bar, scroll to see the full list of ring tone options. To switch between19
the two sets of ring tones, touch Classic Tones or Rich Tones. Otherwise skip this20
step and proceed to the next step.21
7. Touch the ring tone to which you want to change.22
8. Touch Save to save the setting or Cancel to return to the menu without saving.23
Changing the display language25
1. Press Home.27
2. Touch Settings.28
Avaya - Proprietary. Use pursuant to the terms of your signed agreement or Avaya policy.
DRAFT-June 24, 2010-5:17 PM
30 Avaya one-X™ Deskphone H.323 9621G/9641G User Guide Issue 1 May 2010
Page 31

13
Options and Settings
3. Touch Options & Settings.1
4. Touch Screen and Sound Options.2
5. On the Screen and Sounds menu, touch Language.3
6. Touch the language to which you want to change.4
7. Touch Yes to confirm the selected language or Cancel to return to the menu without5
changing the language.6
7
Setting the Quick Touch panel8
When you use the Quick Touch panel, the Phone screen provides access to more of your9
features or speed dial buttons at a glance. You can set the Quick Touch Panel to display one10
(the default) or two lines, or set it not to display at all. Note that displaying the Quick Touch11
panel limits your call appearances display to three lines at a time.12
20
26
1. Press Home.14
2. Touch Settings.15
3. Touch Screen and Sound Options.16
4. On the Screen and Sounds menu, touch the Show Quick Touch Panel setting to17
change it from 1 Line to 2 Lines, from 2 Lines to No, or from No to 1 Line.18
5. Touch Save to save the setting or Cancel to return to the menu without saving.19
Personalizing button labels21
You can change the labels that are displayed for your extensions, features, and speed dial22
buttons. For example, you can change the label for your extension to "My Line." If you have a23
button module attached to your deskphone, you can change any of those labels as well; for24
example, you can change a Help Desk extension to read “Help Desk.”25
1. Edit the label using up to 13 characters.27
Press More then Clear to clear all text fields and start over.28
2. Press Home.29
Note:30
To edit a label on an attached Avaya BM12 Button Module, press the Edit button31
on the module instead and proceed to Step 7.32
Avaya - Proprietary. Use pursuant to the terms of your signed agreement or Avaya policy.
DRAFT-June 24, 2010-5:17 PM
Avaya one-X™ Deskphone H.323 9621G/9641G User Guide Issue 1 May 2010 31
Page 32

The Home Screen
14
3. Touch Settings.1
4. Touch Options & Settings.2
5. Touch Application Settings.3
6. On the Application Settings menu, touch Personalize Labels.4
7. Touch either Extensions... or Feature labels..., depending on which type of label you5
want to personalize.6
8. Touch the label you want to edit.7
9. Use the Edit keyboard to type the new label. For information about using the8
keyboard, see
10. Touch the checkmark to save the new label or Cancel to return to the menu without10
saving.11
11. You can revert back to the default button labels by pressing Home, then touching12
Settings > Application Settings > Restore Default Button Labels.13
Using the On-screen Keyboard on page 18.9
25
Backing up and restoring your data files15
In addition to the automatic backups of telephone information whenever you change or update16
options and settings, and depending on how your system is administered, you can initiate a17
manual backup of your data files. Data files are personal settings like contacts, favorites,18
personalized labels for your phone and any applicable button modules, call history, ring tones,19
and any other options and settings you may have set using the Home screen. Likewise, if20
administered, you can restore your data files to their previous settings using the manual restore21
option. Performing a manual backup or a manual restore of backed up files is not usually22
necessary, but your system administrator may ask you to do this in the event of system23
problems.24
1. Press Home.26
2. Touch Settings.27
3. Touch Options & Settings.28
4. Touch Advanced Options.29
5. Touch Backup/Restore.30
6. Touch the Manual Backup line to start the data file backup.31
The top line displays messages to inform you the backup is in progress and when32
the backup is complete.33
7. To restore your data from a backup file, touch the Manual Restore line.34
Avaya - Proprietary. Use pursuant to the terms of your signed agreement or Avaya policy.
DRAFT-June 24, 2010-5:17 PM
32 Avaya one-X™ Deskphone H.323 9621G/9641G User Guide Issue 1 May 2010
Page 33

Browser
The top line displays messages to inform you that data restoration from the backup1
file is in progress and when the restoration is finished. Your options and settings2
now reflect their previous values.3
4
Browser5
Your telephone includes a Web browser capability that can be used to present additional6
applications. The items available through the Web browser vary depending upon how your7
telephone is administered. Contact your system administrator with any questions.8
Access the browser through the Home screen, by pressing Home. If you don't see the Browser9
option on the Home screen, no Web applications are available for your phone.10
Avaya - Proprietary. Use pursuant to the terms of your signed agreement or Avaya policy.
DRAFT-June 24, 2010-5:17 PM
Avaya one-X™ Deskphone H.323 9621G/9641G User Guide Issue 1 May 2010 33
Page 34

The Home Screen
Avaya - Proprietary. Use pursuant to the terms of your signed agreement or Avaya policy.
DRAFT-June 24, 2010-5:17 PM
34 Avaya one-X™ Deskphone H.323 9621G/9641G User Guide Issue 1 May 2010
Page 35

1
Chapter 3: About Features2
Your administrator may have set up your telephone so that it presents the Features as3
described in this chapter together on one screen with your call appearances; if so, the features4
work as described in this chapter, but they do not appear on a separate Features menu. The5
Features menu gives you access to advanced telephony features, such as Directory,6
Abbreviated Dial, and Call Forwarding. Directory allows you to dial other users on your system7
by name. You can use Send All Calls and Call Forward to have your incoming calls sent to8
other numbers. When set to “on,” EC500 allows calls to your desk phone to also be sent to9
your cell phone. Forwarding features are also listed in the Forward menu. Your system10
administrator may also assign frequently-used features to softkeys, to give you quick11
access.Note that any features assigned to an attached Button Module will not display on the12
Features menu. The particular features available to you depend on what your administrator13
has assigned to your phone.14
Your administrator may also place selected features on softkeys on the call appearance15
(Phone) screen. For more information about what features and options are available for your16
extension, contact your system administrator.17
19
26
Accessing the Features menu18
From the Phone screen, touch the Features button at the upper right corner to view20
the Features menu.21
The LED icon next to the feature name indicates if the feature is currently on or off. If22
the LED to the left of the feature label is green, the feature is on.23
Note:24
To return to the main Phone screen, touch the Calls button at the upper right corner.25
Feature Table27
Feature names are often abbreviated to fit your deskphone or button module display area. Use28
this table as a cross-reference to standard feature names and their corresponding common29
abbreviations. Depending on how your system is administered, not all features shown here30
Avaya - Proprietary. Use pursuant to the terms of your signed agreement or Avaya policy.
DRAFT-June 24, 2010-5:17 PM
Avaya one-X™ Deskphone H.323 9621G/9641G User Guide Issue 1 May 2010 35
Page 36

About Features
may be available to you. For detailed information about a feature, contact your system1
administrator.2
Feature Name Common Abbreviation
Automatic Dialing Phone number or extension set up by your administrator
Automatic Intercom Auto Icom or AI
Automatic Callback Auto Callback; AutoCB
Call Forwarding All Calls Cfrwd or CFwrd with a third-party's extension if
as an auto-dial number, followed by a telephone icon,
“Autodial.” or “AD.”
applicable
Call Forwarding Busy/Don't
Answer
Park a Call Call park
Call Pickup Call pickup
Calling Party Number Blocking CPN Block
Calling Party Number Unblocing CPN Unblock
Dial Intercom Dial Icom
Directed Call Pickup Dir Pickup
EC500 EC500
Exclusion (Calling Party) Exclusion
EC500 Extended Calling Extend Call
Extended Call Pickup Ext Pickup
Malicious Call Tracing Activation MCT Act
One-step Recording Audix Record
Priority Calling Priority Call
Send All Calls SAC or SAC with a third-party's extension, if applicable
CFBDA
Whisper Page Whisper Act
Note:3
If you have personalized labels for any of the features available to you, the personalized4
label is displayed instead of the feature abbreviations shown here.5
Avaya - Proprietary. Use pursuant to the terms of your signed agreement or Avaya policy.
DRAFT-June 24, 2010-5:17 PM
36 Avaya one-X™ Deskphone H.323 9621G/9641G User Guide Issue 1 May 2010
Page 37

12
Calling a person from the directory
Calling a person from the directory1
The Directory feature allows you to dial other users in your system by name.2
3
1. From the Phone screen, scroll right to access the Features menu, select Directory,4
and press Select or OK.5
2. From the Phone screen, touch Features and select Directory.6
3. Use the dialpad keys to start spelling the last name of the person you want to call.7
Press each dialpad key one time for each corresponding letter. For example, for8
“Hill”, press 4,4,5,5.9
4. Select Next to view the next name alphabetically in the directory, if necessary.10
5. Touch Make Call when you see the name you want to dial the call.11
19
25
Configuring simultaneous ringing for multiple telephones13
(EC500)14
The EC500 feature allows you to have incoming calls to your desk phone ring on your office15
telephone and your cell phone at the same time. This allows you to answer office calls while16
you are away from your desk. The cell phone number is programmed by your system17
administrator.18
1. From the Phone screen, scroll right to access the Features menu.20
2. Touch EC 500.21
Note:22
When EC500 is on, the top line displays a cell phone icon; see About Icons on23
page 12 for an illustration.24
Avaya - Proprietary. Use pursuant to the terms of your signed agreement or Avaya policy.
DRAFT-June 24, 2010-5:17 PM
Avaya one-X™ Deskphone H.323 9621G/9641G User Guide Issue 1 May 2010 37
Page 38

About Features
Avaya - Proprietary. Use pursuant to the terms of your signed agreement or Avaya policy.
DRAFT-June 24, 2010-5:17 PM
38 Avaya one-X™ Deskphone H.323 9621G/9641G User Guide Issue 1 May 2010
Page 39

11
1
Chapter 4: Answering a call2
When you receive an incoming call, the incoming call is usually selected automatically.3
However, if you are already on a call or if you receive more than one incoming call at a time,4
you may need to select the call you want to answer manually.5
An incoming call displays as a green line with a ringing bell icon. To answer the call just touch6
the call appearance line.7
Note:8
Depending on how your telephone is administered, there may be some differences in the9
steps this procedure describes.10
Answer an incoming call in one of the following ways:12
• If you are not on another call, lift the handset, touch the ringing call appearance13
line, press Speaker to answer using the speakerphone, or press Headset to14
answer using the headset.15
24
• If you are on another call, you may need to put the active call on Hold first before16
answering the new call. If the telephone does automatically display the incoming17
call, you can touch Ans Hold to automatically put the first call on Hold when you18
answer the new call. Alternately, you can touch Ans Drop to automatically drop19
the first call when you answer the new call.20
To automatically display the Phone screen whenever you receive an incoming call,21
set the Go to Phone Screen on Ringing option to Yes (see
Screen on ringing).23
Setting the Go to Phone22
Avaya - Proprietary. Use pursuant to the terms of your signed agreement or Avaya policy.
DRAFT-June 24, 2010-5:17 PM
Avaya one-X™ Deskphone H.323 9621G/9641G User Guide Issue 1 May 2010 39
Page 40

Answering a call
Avaya - Proprietary. Use pursuant to the terms of your signed agreement or Avaya policy.
DRAFT-June 24, 2010-5:17 PM
40 Avaya one-X™ Deskphone H.323 9621G/9641G User Guide Issue 1 May 2010
Page 41

11
1
Chapter 5: Making a call2
If you are not on a call, simply dial the number you want to call. Use the Phone screen to view3
and manage calls. Press Phone to view the main Phone screen at any time. When the Phone4
screen is displayed, press Phone to move to the top of the call appearance list.5
6
1. Lift the handset, or press Speaker or Headset (if applicable) or touch an idle call7
appearance line.8
2. Dial the number you want to call. If you have a favorite icon on the Home screen9
for the person you want to call, just touch that icon to initiate dialing.10
Making an emergency call12
16
23
25
You do not have to be logged in to make an emergency call. If emergency calling was set up13
by your system administrator, the Phone screen has an Emergency softkey to immediately14
connect you with a preset emergency services number.15
1. Touch the Emerg. softkey. If you do not see an Emerg. softkey, pick up the handset17
or press the Phone button, then touch the Emerg. softkey.18
2. Some phone systems will call back to confirm the emergency status. The phone19
automatically answers the incoming call on the Speaker and displays “Emergency20
Call in Progress”.21
3. To end the emergency call, touch the Drop softkey or press the Speaker button.22
Clearing a number24
Touch Clear to erase all dialed digits and enter a new number.26
27
Avaya - Proprietary. Use pursuant to the terms of your signed agreement or Avaya policy.
DRAFT-June 24, 2010-5:17 PM
Avaya one-X™ Deskphone H.323 9621G/9641G User Guide Issue 1 May 2010 41
Page 42

Making a call
Redialing a number1
2
10
1. From the Phone screen, touch Redial.3
The last number will be redialed or you will see a list of the most recent numbers4
that you have dialed, from which you can select one to redial. See
options on page 25 for information on redial settings.6
Note:7
Your system administrator can disable Redial functionality.8
2. Touch the number you want to redial.9
Setting redial5
16
Using voice dialing11
You can say a name to search for and call any contact when voice dialing is set to on. You can12
optionally add a qualifier like "at home" or "mobile" with the name to get to a specific number13
for the contact. The first two times you use voice dialing, a help screen displays to assist you14
in using this feature.15
1. Press Contacts.17
If Voice dialing is enabled, a Voice softkey displays.18
2. When voice dialing is active a green bar displays on the top of the Voice softkey. If19
you don't say a name, after a while voice dialing times out and the green bar20
disappears.If no tone is generated or if no green bar appears next to the Voice21
softkey, touch Voice again to restart voice dialing.22
Note:23
To make voice-initiated dialing available each time you access your contacts, see 24
Changing the voice dialing setting on page 25. To change the language you want25
to use for voice dialing commands, see Changing the voice dialing language on26
page 25.27
3. Within a few seconds or as soon as you hear the tone, say the name of the person28
you want to call.29
You can say the name in first name, last name order even if the name is displayed as30
last name, first name order (and separated by a comma) in your Contacts list. You31
can add a qualifier, for example, “at home”, “at office”, “mobile phone”, “cell phone”,32
or say one of the contact number types (Home, Work, Mobile) with the name. For33
Avaya - Proprietary. Use pursuant to the terms of your signed agreement or Avaya policy.
DRAFT-June 24, 2010-5:17 PM
42 Avaya one-X™ Deskphone H.323 9621G/9641G User Guide Issue 1 May 2010
Page 43

12
Making a call using edit dialing
example, to reach Sam Jones at his primary number you can simply say “Sam1
Jones”. To reach Sam Jones at home, you might say “Call Sam Jones at home.”2
Note:3
If you don't add a qualifier and multiple numbers exist for that contact, the4
telephone always dials the first number listed.5
4. When one or more contacts display:6
• Touch the entry you want to dial, or scroll to a different number and touch Call.7
• Touch the Details button to view all of the numbers for a contact.8
• If none of the matches represent the contact/number you want, touch Retry9
and repeat the voice-initiated dialing command from Step 3.10
• Touch Cancel to exit voice dialing and return to the main contacts screen.11
17
21
26
Making a call using edit dialing13
Prerequisites14
Your system administrator has to authorize this function. To set up edit dialing, see Setting15
dialing options on page 24.16
Edit dialing works just like making a call on your cell phone - just start entering the number18
without hearing a dial tone. Using the Bksp softkey, you can backspace to "edit" the number19
before actually dialing it.20
1. From the Phone screen, enter the number you want to call.22
2. To edit the number touch the Bksp softkey to erase the previous character, one23
character at a time. To remove the entire number, touch Clear.24
3. Touch Call.25
Calling a person from the contacts list27
You can call someone in your Contacts list by saying their name (see Using voice dialing on28
page 42) or by touching the name in the list. You can find a name by scrolling to it, or by29
using the search box. Use the dialpad keys to enter the first few letters of the name and the30
screen will scroll to the first match in your list. When you find the entry you want, touch that31
Avaya - Proprietary. Use pursuant to the terms of your signed agreement or Avaya policy.
DRAFT-June 24, 2010-5:17 PM
Avaya one-X™ Deskphone H.323 9621G/9641G User Guide Issue 1 May 2010 43
Page 44

Making a call
3
14
line to dial that contact's primary number. If you have entered additional numbers for that1
contact, you can touch the Details button to see them, then touch the number you want to dial.2
1. Press the Contacts button.4
2. Locate the contact you want by starting to type the person's name as it is listed.5
For example, if you added John Smith to your Contacts List as “Smith, John” you6
would start typing his last name rather than his first name. Each time you press the7
dialpad, the list display shifts to match your input. Alternately, you can scroll up or8
down to locate the contact.9
3. To call the contact's primary number, touch the line on which the contact name10
appears.11
4. To call a non-primary number, touch the Details button to move to the detail12
information for the contact, then touch the desired number.13
16
27
Calling a person from call history15
1. Press the History button.17
2. Touch the appropriate Call Log icon at the top right of the screen to view All Calls,18
Missed Calls, Answered Calls, or Outgoing Calls.19
For icon descriptions see
Depending on administration, returning a Missed Call may result in that Call Log21
history entry being deleted when the calls goes through.22
3. If you don't see the name of the person you want, scroll down until the name23
displays.24
4. When you see the name of the person you want to call, touch it to dial the25
corresponding number.26
About Icons on page 12.20
Making a call using a “click to dial” link28
You can make a call using a “click to dial link” on a Web page or any other screen that provides a29
dialing link. Typically, a handset icon indicates a line with this type of link.30
Avaya - Proprietary. Use pursuant to the terms of your signed agreement or Avaya policy.
DRAFT-June 24, 2010-5:17 PM
44 Avaya one-X™ Deskphone H.323 9621G/9641G User Guide Issue 1 May 2010
Page 45

10
1
Chapter 6: Standard Call-Related Features2
Your deskphone offers standard call-related features like muting a call, transferring a call,3
forwarding calls, and conferencing.4
Depending on the action you want, either press the appropriate button on the face of the phone5
or touch the appropriate softkey while on the call.6
Muting a call7
If a call is on mute and you switch between the handset, headset, or speakerphone, the mute8
will be turned off.9
1. Touch Mute during a call so that the other person cannot hear you.11
2. Touch Mute again to unmute the call.12
13
15
22
Putting a call on hold14
1. If you are not active on the line you want to put on hold, touch that line.16
2. Touch Hold.17
Note:18
A hold timer may display when you put a call on hold. For more information, see 19
Configuring call timers on page 26.20
3. Touch Resume or the call appearance of the held call to retrieve the call.21
Avaya - Proprietary. Use pursuant to the terms of your signed agreement or Avaya policy.
DRAFT-June 24, 2010-5:17 PM
Avaya one-X™ Deskphone H.323 9621G/9641G User Guide Issue 1 May 2010 45
Page 46

Standard Call-Related Features
Transferring a Call1
2
1. From the Phone screen, with the call you want to transfer active, touch Transfer.3
2. Dial the number to which you want to transfer the call.4
3. Touch Complete to transfer the call.5
6
Conference calls7
You can use conference calls to speak with up to five people in different locations on the same8
call. Additional conferencing options may be available through Expanded Meet-Me9
Conferencing. Contact your system administrator for more information about this feature.10
12
Setting up a conference call11
1. Select any idle call appearance and dial the first conference participant.13
2. From the Phone screen, touch Conference.14
3. Dial the telephone number, or call the person from the Contacts list, or call the15
person from the Call Log list.16
4. When the person answers, touch Join to add the person to the existing call.17
5. Touch Add.18
6. Repeat these steps to add another person to the conference call.19
7. To see a list of the conference participants, touch the Details button on the20
Conference Call line and then either:21
• Touch a participant name and touch Silence to mute the person.22
• Touch a participant name and touch Drop to drop this person from the23
conference call.24
• Touch Refresh to refresh the conference details.25
Avaya - Proprietary. Use pursuant to the terms of your signed agreement or Avaya policy.
DRAFT-June 24, 2010-5:17 PM
46 Avaya one-X™ Deskphone H.323 9621G/9641G User Guide Issue 1 May 2010
Page 47

11
Conference calls
• Touch Back to exit the conference details screen and return to the Phone1
screen.2
3
Adding a person on hold to a conference call4
5
1. From the Phone screen, select your active call.6
2. Touch Conf, or Add if you are already in a conference.7
3. Select the call on hold that you want to add to the conference.8
4. Touch Resume to take the call off hold.9
5. Touch Join to add the person to the conference call.10
14
16
21
Putting a conference call on hold12
When you put a conference call on hold, the other parties can still talk to each other.13
Touch Hold during a conference call.15
Muting a person on a conference call17
You may be able to silence a person on a conference call using the Silence softkey. The18
individual muting feature is not available on all systems. If you do not see Silence when you19
choose a person, you cannot mute that person.20
1. From the Phone screen, touch More > Details during a conference call.22
2. Select the person you want to mute.23
3. Touch Silence.24
4. Touch Silence again to take the person off mute.25
26
Avaya - Proprietary. Use pursuant to the terms of your signed agreement or Avaya policy.
DRAFT-June 24, 2010-5:17 PM
Avaya one-X™ Deskphone H.323 9621G/9641G User Guide Issue 1 May 2010 47
Page 48

Standard Call-Related Features
Dropping a person from a conference call1
This feature is not available on all systems.2
3
1. From the Phone screen, select your active call.4
2. Touch More then Details.5
3. Select the person you want to drop.6
4. Touch Drop.7
8
Forwarding calls9
26
You can forward your incoming calls to another number or to voicemail. If call forwarding is10
turned on, a Forwarding icon appears on the top line of your display screen and the Forward11
button is illuminated. Alternately, you may have your forwarding feature(s) available on a Quick12
Touch panel, if your administrator has set up this capability. When the Forward button light is13
on, one or more of the forwarding features are active. You can choose from a number of14
forwarding features, including Send All Calls and Call Forward. The forwarding features15
available on your phone depend on the options your system administrator has set. For more16
information about the options available to you, contact your system administrator.17
Send All Calls18
When Send All Calls (SAC) is on, your incoming calls go directly to a predefined coverage19
number, typically your voicemail. Incoming calls ring once at your extension and then go directly20
to a number which is set by your system administrator. Pressing Send All turns Send All Calls21
on. If it is already on, pressing Send All turns it off. Touching the Send All softkey turns Send22
All Calls on, changing the appearance of that softkey to indicate the feature is on. If this feature23
is already on, touching the Send All softkey turns the feature off and the softkey appears24
normal. You can also turn Send All Calls on or off by using the telephone Features list.25
Touch Send All or touch Forward to access the main Forwarding menu, then touch27
Send All Calls to turn Send All Calls on or off.28
29
Avaya - Proprietary. Use pursuant to the terms of your signed agreement or Avaya policy.
DRAFT-June 24, 2010-5:17 PM
48 Avaya one-X™ Deskphone H.323 9621G/9641G User Guide Issue 1 May 2010
Page 49

13
Forwarding calls
Forwarding calls1
Several forwarding features may be available so you can set a number to which your calls will2
be forwarded, or turn off call forwarding if it is already on. If available, your call forwarding3
features are listed on a Forwarding features menu.4
5
1. Touch Forward to access the main Forwarding menu.6
2. From the Phone screen, scroll right to access the Features menu.7
3. Touch the forwarding feature you want to activate or deactivate.8
When you turn on the Call Forwarding feature, you hear a tone prompting you to9
enter the forwarding number.10
4. Enter the number to which you want to forward your calls.11
After you enter the forwarding number, you hear a confirmation tone.12
Avaya - Proprietary. Use pursuant to the terms of your signed agreement or Avaya policy.
DRAFT-June 24, 2010-5:17 PM
Avaya one-X™ Deskphone H.323 9621G/9641G User Guide Issue 1 May 2010 49
Page 50

Standard Call-Related Features
Avaya - Proprietary. Use pursuant to the terms of your signed agreement or Avaya policy.
DRAFT-June 24, 2010-5:17 PM
50 Avaya one-X™ Deskphone H.323 9621G/9641G User Guide Issue 1 May 2010
Page 51

10
1
Chapter 7: Bridged call appearances2
Your phone may show one or more bridged call appearances on the display screen in addition3
to your own call appearances. A bridged call appearance typically belongs to someone else,4
but bridging allows you to see if that call appearance is in use, answer calls on that appearance,5
or join a call in progress on that call appearance from your telephone. You can also make6
outgoing calls on a bridged call appearance when it is not in use.7
Answering a call on a bridged line8
Answering a call on a bridged line is basically the same as a call on a primary line.9
1. Touch the bridged call that you want to answer.11
The ringing line will typically be selected automatically. If you are on another call12
when a call comes in to a bridged line, you have to select the ringing line (just like13
for an incoming call to a primary line).14
16
19
21
2. Touch Answer.15
Joining a call on a bridged line17
You can join an existing call on a bridged line.18
Touch the call appearance of the bridged call in progress that you want to join.20
Making an outgoing call on a bridged line22
When you make a call on a bridged line, you are using another person’s line. The caller ID23
may show the call as coming from you or coming from the person whose line you are using. If24
Avaya - Proprietary. Use pursuant to the terms of your signed agreement or Avaya policy.
DRAFT-June 24, 2010-5:17 PM
Avaya one-X™ Deskphone H.323 9621G/9641G User Guide Issue 1 May 2010 51
Page 52

Bridged call appearances
you have any questions about how the name or extension displays to the person you are1
calling, contact your system administrator.2
3
1. Touch the bridged line you want to use.4
2. Dial the telephone number, or call the person from the Contacts list, or call the5
7
person from the Call Log list.6
Avaya - Proprietary. Use pursuant to the terms of your signed agreement or Avaya policy.
DRAFT-June 24, 2010-5:17 PM
52 Avaya one-X™ Deskphone H.323 9621G/9641G User Guide Issue 1 May 2010
Page 53

1
Chapter 8: Contacts2
You can save up to 250 names and up to 3 telephone numbers per name. You can use voice3
dialing to speak the contact name; see Using voice dialing on page 42 for information. You can4
also import or export a Contact list using a USB device; see
phone on page 63 for information.6
Note:7
When you press the Contacts button you may not see all the functionality described in this8
chapter. This would be because your system administrator has disabled changes to9
Contacts.10
Searching for a contact11
You can search for any name by typing a full name or you can type just a few letters of the12
name and let the telephone display matching entries. For example, if you press 3, the Contacts13
list might display entries starting with D, E, F, or 3 depending on how you set up your contacts.14
With each successive key you press, the Contacts list “drills down” to display more matches.15
Using USB Flash Drives with your5
16
28
1. Press Contacts.17
2. With the phone on-hook, use the dialpad to start typing the name for which you want18
to search.19
Keep in mind how your Contact list is set up. If you set up your contacts as “Last20
Name, First Name” start typing the letters of the last name. If you have set up your21
Contacts using a different scheme, type the most likely letter(s) that would match22
the contact you want to find.23
3. When you see the contact you want:24
• Touch the contact's phone number to dial the person, or25
• Touch the Details button next to the contact's phone number to select a26
different phone number for or see detail information about this contact.27
Avaya - Proprietary. Use pursuant to the terms of your signed agreement or Avaya policy.
DRAFT-June 24, 2010-5:17 PM
Avaya one-X™ Deskphone H.323 9621G/9641G User Guide Issue 1 May 2010 53
Page 54

Contacts
Viewing contact details1
2
1. Press Contacts.3
2. Find the contact you want to view. If necessary, scroll to it or use the searchbox.4
3. If you have entered more than one number for a contact, touch the Details button5
on the Contact line to see all the phone numbers for this person.6
Using Details is the only way to view or dial a second or third number for a contact.7
4. Take one of the following actions:8
• Touch a number to dial it.9
• Touch Edit to change the detail information on this person.10
• Touch Delete to remove this person from your Contacts list.11
13
15
• Touch Back to return to the Contacts list.12
Adding a new contact14
1. Press Contacts.16
2. Touch New.17
3. Enter the name using the keyboard. See Using the On-screen Keyboard on page 1818
for more information.19
4. Touch the check mark to move to the number entry screen.20
5. Enter the primary telephone number using the keyboard. The primary number is the21
first number entered and the one that will always display on the Contacts list without22
having to go into contact details.23
6. Touch the check mark to indicate you are finished entering the name and primary24
telephone number.25
The telephone displays your entries in a business card format.26
7. Take one of the following actions:27
• To change the name, touch that line and edit the entry following Step 3.28
• To change the number, touch that line and edit the entry.29
Avaya - Proprietary. Use pursuant to the terms of your signed agreement or Avaya policy.
DRAFT-June 24, 2010-5:17 PM
54 Avaya one-X™ Deskphone H.323 9621G/9641G User Guide Issue 1 May 2010
Page 55

Editing a contact
• Touch a blank line to add another number using the on-screen keyboard, then1
touch the applicable icon representing the type of number (mobile, work, or2
home). Repeat this step if you want to add a third number for the new contact.3
• Touch Cancel to return to the Contacts list without saving the new contact4
information.5
11
• Touch Primary to change the primary number. See
Contact Number on page 56 for more information.7
8. Touch Save.8
9
Changing the Primary6
Editing a contact10
1. Press Contacts.12
2. Search for the contact you want to edit.13
3. Touch the Details button to the right of the contact to display detail information.14
4. Touch + to add another number for the contact or touch Edit to edit the name or any15
of the numbers.16
5. To edit a name or number, take one of the following actions:17
• Touch Primary to change the primary number. See
Contact Number on page 56 for more information.19
Changing the Primary18
• Touch the Name or number you want to edit.20
• Touch a blank line to add a number.21
• Touch Cancel to return to the Contacts list.22
6. Use the onscreen keyboard to make changes to the contact information. See
the On-screen Keyboard on page 18 for more information.24
7. Touch Done.25
8. To change other contact information, repeat Steps 5 through 7.26
9. When you finish changing contact information, touch Save.27
28
Avaya - Proprietary. Use pursuant to the terms of your signed agreement or Avaya policy.
DRAFT-June 24, 2010-5:17 PM
Avaya one-X™ Deskphone H.323 9621G/9641G User Guide Issue 1 May 2010 55
Using23
Page 56

Contacts
Setting up Favorite contacts1
5
You can assign up to sixteen “favorite” numbers from your Contacts list as one-touch speed2
dial buttons on the Home screen. A contact must be set up before you can assign any3
associated phone numbers as favorites.4
1. Press Contacts.6
2. Search for the contact you want to set up as a favorite.7
3. Touch the Details button for the contact to display detail information.8
4. Touch Favorite.9
5. Touch the number you want to set as a favorite.10
6. Enter a caption or label you want to appear on the Home screen for this favorite.11
See
Using the On-screen Keyboard on page 18 if you need help entering the caption12
or label text.13
22
27
7. If you entered the caption or label using the on-screen keyboard, touch Done.14
Otherwise proceed to Step 8.15
8. Touch Save.16
Note:17
To remove a favorite contact number from the Home screen, follow the same18
procedure as for setting up a favorite and touch the number to toggle it from on to19
off. Make sure its status has changed, then touch Save.20
9. Repeat Steps 3 through 7 to set up another favorite contact.21
Changing the Primary Contact Number23
If a contact has two or three numbers, the primary contact number is the first number in the24
list. It is the number dialed when you touch a contact in the Contacts list. By default, the first25
number you enter for a contact is the primary number.26
1. Press Contacts.28
2. Search for the contact whose primary number you want to change.29
3. Touch the Details button for the contact to display detail information.30
Avaya - Proprietary. Use pursuant to the terms of your signed agreement or Avaya policy.
DRAFT-June 24, 2010-5:17 PM
56 Avaya one-X™ Deskphone H.323 9621G/9641G User Guide Issue 1 May 2010
Page 57

Deleting a contact
4. Touch Edit.1
5. Touch Primary.2
6. Touch the number you want to become the new primary number.3
7. Touch Done.4
8. Touch Save.5
6
Deleting a contact7
8
1. Press Contacts.9
2. Touch the Details button on the contact you want to delete.10
3. Touch Delete.11
14
4. Touch Delete again to confirm or Cancel to cancel the deletion and return to the12
Contact list.13
Avaya - Proprietary. Use pursuant to the terms of your signed agreement or Avaya policy.
DRAFT-June 24, 2010-5:17 PM
Avaya one-X™ Deskphone H.323 9621G/9641G User Guide Issue 1 May 2010 57
Page 58

Contacts
Avaya - Proprietary. Use pursuant to the terms of your signed agreement or Avaya policy.
DRAFT-June 24, 2010-5:17 PM
58 Avaya one-X™ Deskphone H.323 9621G/9641G User Guide Issue 1 May 2010
Page 59

11
1
Chapter 9: Call History2
The History screen provides a list of recent calls, with information about call disposition3
(missed, answered, or outgoing) and with caller name and number (where available), call time,4
and call duration. Call History also shows bridged calls and the number of missed calls from5
a given calling number up for another person or that you missed and were answered by6
someone else in your pickup group. When you have one or more missed calls, the Call Log7
button lights and the Missed Calls icon and the number of missed calls display on the top line.8
To call a person listed in your Call History, see
Viewing call history10
1. Press History.12
You can go to the top of the list by pressing History again.13
Calling a person from call history on page 44.9
17
19
2. If you want to see a different list, touch the applicable icon at the upper right14
representing answered, outgoing, or missed calls.15
3. Scroll up or down to view the entries on the list.16
Viewing call history details18
1. Press History.20
2. If you want to see a different list, touch the icon at the upper right representing the list21
you want to view.22
3. If you don't see the call whose details you want to review, use the scroll bar to find23
it.24
Avaya - Proprietary. Use pursuant to the terms of your signed agreement or Avaya policy.
DRAFT-June 24, 2010-5:17 PM
Avaya one-X™ Deskphone H.323 9621G/9641G User Guide Issue 1 May 2010 59
Page 60

Call History
4
Adding an entry from the Call History to your contacts list5
6
4. Touch the right arrow on the call for which you want to see detail information.1
5. Touch Back to return to the list view, or touch Delete to remove this call from the2
log, or touch +Contact to add this person and phone number to your Contacts list.3
1. Press History.7
2. Touch the Details button of the number you want to add to your Contacts list.8
3. Touch +Contact.9
4. Edit the name and telephone number, if necessary.10
5. Touch Done then Save.11
12
14
22
Removing an entry from call history13
1. Press History.15
2. If you don't see the entry you want to delete, use the scroll bar to find it.16
3. Touch the Details button for the entry you want to delete to see detail information17
about the call.18
4. Touch Delete.19
5. Touch Delete again to confirm, or touch Cancel if you do not want to delete this20
entry.21
Clearing all call history entries23
Clearing all entries from the call history deletes all of the entries for the specific list you are24
viewing. For example, if you are viewing the Outgoing calls list, only outgoing calls are deleted.25
However, if you are viewing the All Calls list, touching Clear All deletes all calls.26
Avaya - Proprietary. Use pursuant to the terms of your signed agreement or Avaya policy.
DRAFT-June 24, 2010-5:17 PM
60 Avaya one-X™ Deskphone H.323 9621G/9641G User Guide Issue 1 May 2010
Page 61

11
Turning off call history
1
1. Press History.2
2. If you do not want to delete all calls, touch the icon at the upper right representing3
the list you want to clear.4
3. Touch Clear All to delete all of the entries in the list you are viewing.5
4. Touch Clear All to confirm.6
7
Turning off call history8
You can turn call logging on or off. If you have bridged call appearances on your phone, you9
can choose whether or not to include calls to your bridged lines in your call log.10
1. Press Home.12
20
2. Touch Settings.13
3. Touch Options & Settings.14
4. Touch Application Settings.15
5. Touch History to change the setting to or from Yes or No.16
To turn logging of bridged lines from Yes to No, touch Log Bridged Calls.17
6. Touch Save to save the new setting or Cancel to return to the Application Settings18
menu.19
Avaya - Proprietary. Use pursuant to the terms of your signed agreement or Avaya policy.
DRAFT-June 24, 2010-5:17 PM
Avaya one-X™ Deskphone H.323 9621G/9641G User Guide Issue 1 May 2010 61
Page 62

Call History
Avaya - Proprietary. Use pursuant to the terms of your signed agreement or Avaya policy.
DRAFT-June 24, 2010-5:17 PM
62 Avaya one-X™ Deskphone H.323 9621G/9641G User Guide Issue 1 May 2010
Page 63

1
Chapter 10: Using USB Flash Drives with2
your phone3
Subject to your administrator's permission, if your telephone has a USB interface and you have4
a USB (Universal Serial Bus) flash drive (also called a thumb drive or memory stick), you can5
log into your phone from anywhere in the world, add contacts to your Contacts list from an E-6
mail or other PC software program, and display pictures from the device on your phone as a7
screensaver. You can also copy your contact list from your phone to a USB flash drive, replace8
the contents of your phone's current contact list with those on the USB flash drive, or9
temporarily use the flash drive's contacts instead of your phone's contact list.10
Note:11
The 9621 IP Deskphone does not have a USB interface.12
Avaya offers a PC application called Avaya one-X™ Deskphone USB Companion to help set13
up your USB device/phone options. Your administrator has certain setup responsibilities and14
can then help you determine which options are available to you and how to use the tool to set15
them up.16
Note:17
USB Login: If you have automatic USB login capability, the only Contacts you can see are18
those on the USB device itself. Note that when you use the USB login, the Log Out menu19
option is not available to you; the only way you can log your phone out is by removing the20
USB device.21
After setup, inserting the flash drive into the telephone's USB jack produces either a list of USB22
actions/options or a display message notifying you that you cannot proceed because your23
device is not supported or the device exceeds the telephone's available power. Whether power24
is provided to the phone's USB interface depends on how the phone is powered and25
administration settings. Only FAT or FAT32 file systems are currently supported; USB drives26
with NTFS file systems are not supported. Multiple LUNS are not supported.27
Adding contacts from an external file to your contacts list28
Use a USB flash drive to add contacts from an external file to your contacts list. Keep in mind29
that your contacts list cannot have more than 250 incoming entries. Contact files merged or30
written to the phone's contacts list must be in a specific format. One way to ensure that the31
file is in the proper format is to export your telephone's Contacts list to your USB device, which32
automatically creates a properly formatted file. Avaya also provides a spreadsheet tool that33
Avaya - Proprietary. Use pursuant to the terms of your signed agreement or Avaya policy.
DRAFT-June 24, 2010-5:17 PM
Avaya one-X™ Deskphone H.323 9621G/9641G User Guide Issue 1 May 2010 63
Page 64

Using USB Flash Drives with your phone
uses macros to convert your Outlook contacts into the Contacts format the telephone uses.1
For information on this tool, search for “Avaya one-X USB Companion” on the Avaya support2
site at http://www.avaya.com/support.3
4
1. Plug the USB device into the jack near the center top edge of your phone.5
2. Touch Select to select Merge file and phone contacts.6
The Merge option is shown only when both the USB file and the phone have7
contacts.8
3. The merge occurs automatically. When complete, review the statistics displayed,9
which show the number of entries, duplicates, and any errors.10
4. Touch Save to write the merged Contacts list back to the USB device and return to11
the list of contacts/USB actions or touch Exit to return to the list of contacts/USB12
actions without writing the merged file to the USB device.13
Note:14
Attempts to merge more than the 250 entries allowed produces a List Full screen15
which lets you either save the partial list (the first 250 entries) or cancel the merge16
without writing the external file's contents to the telephone.17
18
25
Replacing your contacts list with an external file19
Use a USB flash drive to replace your entire contacts list with the contacts from an external20
file. Incoming contacts must have a name and at least one and no more than three telephone21
numbers with associated types. If not provided, the type of number will default to the general22
type. Your system administrator can provide detailed format information about external data23
source files.24
1. Plug the USB flash drive into the jack near thecenter top edge of your phone.26
2. Either scroll to Replace phone contacts with file then touch Select or touch the27
Replace phone contacts with file line directly.28
3. Review the statistics displayed, which show the number of valid and invalid entries,29
and if applicable, how many entries exceed the 250 contact phone maximum.30
4. Touch Save to overwrite and replace your contacts list with the file on your USB31
device or Cancel to cancel the replacement and retain your current contact list.32
33
Avaya - Proprietary. Use pursuant to the terms of your signed agreement or Avaya policy.
DRAFT-June 24, 2010-5:17 PM
64 Avaya one-X™ Deskphone H.323 9621G/9641G User Guide Issue 1 May 2010
Page 65

12
Copying your contacts list to a USB flash drive
Copying your contacts list to a USB flash drive1
You can copy your entire contact list from your phone to a USB flash drive for safekeeping or to2
use in an external software program. If the USB flash drive already contains a contact file, you3
must first confirm that you want to replace that file.4
5
1. Plug the USB flash drive into the jack near the center top edge of your phone.6
2. Either scroll to Write file with phone contacts using the scroll control then touch7
Select or touch the Write file with phone contacts line directly.8
3. Touch OK.9
4. If your USB device currently has a contacts file on it, touch Save to confirm that you10
want to overwrite that file with the telephone's contact list.11
19
28
Temporarily using a USB contacts list13
You can temporarily use a contacts file on a USB flash drive rather than your phone's contact list14
as long the USB flash drive remains attached to the phone. For example, copy your contacts15
list to your USB flash drive and take the device with you while traveling. If you have access16
to a guest phone with the latest telephone software at another site, you can attach the USB17
flash drive and use your contacts list.18
1. Plug the USB flash drive with the contacts file you want to use into the jack near the20
center top edge of your phone.21
2. Either scroll to Use contacts file while present using the scroll control then touch22
Select or touch the Use contacts file while present line directly.23
3. Touch OK to access the contacts list on your USB flash drive.24
Any changes or updates you make to your contacts list while the USB device is25
connected affect only the temporary file on the USB device, and not your “regular”26
telephone contacts list.27
Avaya - Proprietary. Use pursuant to the terms of your signed agreement or Avaya policy.
DRAFT-June 24, 2010-5:17 PM
Avaya one-X™ Deskphone H.323 9621G/9641G User Guide Issue 1 May 2010 65
Page 66

Using USB Flash Drives with your phone
Using pictures from your USB device as a screensaver1
If your USB device has a top level directory named \Pictures or another picture directory2
that is properly administered, you can use pictures in that directory as your phone's3
screensaver. Each picture displays for 5 seconds unless you specify a different value (from 54
seconds to 999 seconds). The maximum allowable height and width for each picture is 500 x5
612 pixels. Your administrator can help you set up this feature. Your administrator can also6
disable this feature, in which case the ”My Pictures” option will not appear on the Home screen.7
11
20
In addition to the features described in the
the Avaya one-X™ Deskphone USB Companion application includes a utility program to9
convert your pictures to the correct format.10
1. Plug the USB device into the jack near the center top edge of your phone.12
2. At the phone, press the Home button.13
3. Select My Pictures to immediately begin displaying the pictures from your USB14
picture directory on the phone and then whenever the screen display “times out”15
after the administered idle period.16
Note:17
If you disconnect the USB device from the telephone, the standard screensaver18
replaces your pictures after the designated idle period.19
Using USB Flash Drives with your phone on page 638
Avaya - Proprietary. Use pursuant to the terms of your signed agreement or Avaya policy.
DRAFT-June 24, 2010-5:17 PM
66 Avaya one-X™ Deskphone H.323 9621G/9641G User Guide Issue 1 May 2010
Page 67

10
1
Chapter 11: Getting your messages2
3
Press the Message button to connect directly to your voicemail system.4
The lighted Message button and a red light on the upper right-hand corner of your5
telephone indicate when you have messages waiting. Your messages are an6
administered function. Contact your system administrator with any questions.7
8
Logging into your voice mail9
1. To log in to your voice mail, press the Message button.11
13
2. Follow the voice prompts from your voice mail system.12
Avaya - Proprietary. Use pursuant to the terms of your signed agreement or Avaya policy.
DRAFT-June 24, 2010-5:17 PM
Avaya one-X™ Deskphone H.323 9621G/9641G User Guide Issue 1 May 2010 67
Page 68

Getting your messages
Avaya - Proprietary. Use pursuant to the terms of your signed agreement or Avaya policy.
DRAFT-June 24, 2010-5:17 PM
68 Avaya one-X™ Deskphone H.323 9621G/9641G User Guide Issue 1 May 2010
Page 69

1
Chapter 12: About Logging In to and Out of2
Your Telephone3
Logging in and out maintains your preferences, call information, and options if you share a4
telephone with other users. Log out to prevent unauthorized use of your telephone during an5
absence.6
Note:7
Depending on how your phone is administered, for example, whether Call Log backup is8
enabled or not, Call Log information may be lost when you log out your extension.9
Your administrator may provide you with a USB device with a pre-programmed Extension and10
Password in it, or may provide you with a PC-based tool for putting this information on a USB11
device. This will enable you to use the USB device to log in to the administered Extension and12
Password automatically, from any telephone in your system. See your administrator for details.13
If you log in with the USB Login option, the only way to log out is by removing the USB device14
from the phone connection.15
22
27
Note:16
When you use the USB Login, the only Contacts you will be able to see are the Contacts17
on the USB device. See Using USB Flash Drives with your phone on page 63 for more18
information.19
Logging in to your telephone extension20
Log in from the initial screen when it prompts you for your extension.21
1. Enter your extension.23
2. Touch Enter.24
3. Enter your password.25
4. Touch Enter.26
Avaya - Proprietary. Use pursuant to the terms of your signed agreement or Avaya policy.
DRAFT-June 24, 2010-5:17 PM
Avaya one-X™ Deskphone H.323 9621G/9641G User Guide Issue 1 May 2010 69
Page 70

About Logging In to and Out of Your Telephone
Logging out of your telephone extension1
2
1. Press Home.3
2. Touch Settings.4
3. Touch Log Out5
4. Touch Log Out to confirm.6
7
Logging in as a guest user8
12
24
Log in to another touch—based phone as a guest to retain the features and functionality of9
your own phone. For example, if you are temporarily using a visitor's office telephone but want10
to have your Contacts list available. The telephone must be on-hook to select this feature.11
1. Touch Home.13
2. Touch Settings.14
3. Select Guest Login.15
4. Enter your extension.16
5. Touch Enter.17
6. Touch Password.18
7. Enter your password.19
8. Touch Enter.20
9. Touch the left or right arrow to select the expected amount of time you will use this21
phone. You can log out as a guest at any time despite the duration you select.22
10. Touch Enter.23
Avaya - Proprietary. Use pursuant to the terms of your signed agreement or Avaya policy.
DRAFT-June 24, 2010-5:17 PM
70 Avaya one-X™ Deskphone H.323 9621G/9641G User Guide Issue 1 May 2010
Page 71

1
Chapter 13: Avaya Home Screen2
Applications3
Avaya provides three useful applications with your phone. The World Clock application allows4
you to find out the time, temperature, day, and date in a selected city or country. The Weather5
application provides forecast information via an internet service for a location you specify. The6
Calculator application lets you perform calculations using the touch screen.7
Note:8
If you press the Home button and don't see any or all of the applications this chapter9
describes, your administrator has not made the application(s) available to you.10
Related topics:11
Adding World Clock locations on page 7112
Viewing World Clock details on page 7213
Using the Weather application on page 7314
Using the Calculator on page 7415
Adding World Clock locations16
You can set up as many as six locations for which you can track the time and related17
information. Once you set up one or more locations, the World Clock application will display18
the associated time of day and an icon representing the current weather condition for the19
location. You can tell at a glance whether it is day or night at a location; when the background20
color of a location is sky blue the time shown is after sunrise and before sunset and if the21
background color is dark blue the time shown is after sunset and before sunrise. You can also22
see detailed information about a selected location which includes the time, day, date,23
temperature and current weather conditions; see
for more information. World Clock weather information is updated every three hours.25
Note:26
If you press the Home button and don't see the World Clock application, your administrator27
has not made this application available to you.28
Note:29
This application relies on internet connectivity to retrieve location-specific information. If30
access to the internet or the Weather.com service is interrupted or if the particular location31
does not return data, a Warning icon will display.32
Avaya - Proprietary. Use pursuant to the terms of your signed agreement or Avaya policy.
DRAFT-June 24, 2010-5:17 PM
Avaya one-X™ Deskphone H.323 9621G/9641G User Guide Issue 1 May 2010 71
Viewing World Clock details on page 7224
Page 72

Avaya Home Screen Applications
1
1. Press Home.2
2. Touch World Clock.3
3. Take one of the following actions:4
• If this is not the first time you are accessing the World Clock application,5
• If this is the first time you are accessing the World Clock application, you will7
proceed to Step 4.6
automatically be presented with the Location Entry screen on which you can8
enter either a United States Postal Zip Code, a City, a City and State, or a City9
and Country. Your entry can be up to 60 characters in length. For information10
about using the keyboard, see
Save the location using the check mark on the on-screen keyboard.12
Note:13
If there is more than one possible match for the location you entered, a14
screen displays a list of up to 10 potential locations. Touch a location on the15
list to select it as your location or touch Back to return to the Location Entry16
screen without making a selection. If you don't see the location you want,17
touch Back and enter more information, such as a comma followed by a18
country name.19
Using the On-screen Keyboard on page 18.11
26
28
4. When the Locations screen displays, you can:20
• Touch Add to add another location, use the on-screen keyboard to enter the21
information as described in Step 3 and save it using the check mark, or22
• Touch a location line to view time-related details about or to delete that location,23
or24
• Touch Back to return to the Home screen.25
Viewing World Clock details27
1. Press Home.29
2. Touch World Clock.30
3. Touch anywhere on the line of the location you want to look at. Details include the31
local time, day, date, location name, local temperature, and an icon indicating the32
local weather conditions. If a temperature is not available, two dashes show in its33
place. When the local weather is not available, that detail is left blank.34
Avaya - Proprietary. Use pursuant to the terms of your signed agreement or Avaya policy.
DRAFT-June 24, 2010-5:17 PM
72 Avaya one-X™ Deskphone H.323 9621G/9641G User Guide Issue 1 May 2010
Page 73

Using the Weather application
Note:1
Temperature units for world time are controlled by the Display Units in the2
Weather application.3
4. Take one of the following actions:4
• Touch Delete to remove this location from your World Clock application.5
• Touch Back to return to the Home screen.6
7
Using the Weather application8
To activate the Weather application, you must input the city or postal code for which you want9
weather reports and indicate whether you want temperatures and wind speeds displayed as10
English or Metric units. Once you set up the location and measurement, the Weather11
application will display the associated current temperature, wind speed and humidity (if the12
temperature is 50 degrees Fahrenheit or 10 degrees Centigrade or more) or wind chill (if the13
temperature is less than 50 degrees Fahrenheit or 10 degrees Centigrade. Icons indicate14
current weather conditions and sunset/sundown times; see
descriptions. Forecasts are shown for the current day and the next day, as is the last time16
weather information was updated. Weather information is updated according to the update17
schedule of the internet service providing the information, whenever you touch the Refresh18
softkey, or change the location.19
About Icons on page 12 for15
Note:20
If you press the Home button and don't see a Weather option, your administrator has not21
made this application available to you.22
Note:23
This application relies on internet connectivity to retrieve location-specific information. If24
access to the internet or the Weather.com service is interrupted or if the particular location25
does not return data, a Warning icon will display.26
Note:27
Depending on the particular location, the High Temperature for Today's forecast may be28
removed after 2:00 p.m. in that location.29
30
1. Press Home.31
2. Touch Weather.32
3. Take one of the following actions:33
Avaya - Proprietary. Use pursuant to the terms of your signed agreement or Avaya policy.
DRAFT-June 24, 2010-5:17 PM
Avaya one-X™ Deskphone H.323 9621G/9641G User Guide Issue 1 May 2010 73
Page 74

Avaya Home Screen Applications
• If this is not the first time you are accessing the Weather application, proceed to1
Step 4.2
• If this is the first time you are accessing the Weather application, use the on-3
screen keyboard to enter a location or postal code of up to 60 characters in4
length. Touch Next to display a second screen to select a unit of measure. A5
unit selection default of Metric displays; touch it to change (toggle) the setting to6
English. Touch Save. For information about using the keyboard, see
On-screen Keyboard on page 18.8
4. When the Weather information for the location you entered displays, you can:15
• Touch Location to change the city or postal code, use the on-screen keyboard16
to enter the information, and save it using the check mark, or17
Using the7
Note:9
If there is more than one possible match for your location, a screen displays10
a list of up to ten potential locations. Touch a location on the list to select it11
as your location or touch Back to return to the location entry screen without12
making a selection. If you don't see the location you want, touch Back and13
enter more information, such as a comma followed by a country name.14
20
• Touch Refresh to view updated weather information, or18
• Touch Back to return to the Home screen.19
Using the Calculator21
The Calculator application works like most PC calculators. A special calculator keyboard lets22
you enter up to nine digits plus a decimal point and a minus sign. An overflow message displays23
and an error beep sounds when more than nine digits are entered. Math equations consider24
two values — x and y. The first value you enter is “x” and the next value is considered as “y”25
unless the next value is an equal sign; any value entered following an equal sign is taken to26
be a new “x” value and so on. Results display following the entry of operations like +, —, x,27
or a division symbol.28
Note:29
If you press the Home button and don't see the Calculator application, your administrator30
has not made this application available to you.31
32
1. Press Home.33
2. Touch Calculator.34
Avaya - Proprietary. Use pursuant to the terms of your signed agreement or Avaya policy.
DRAFT-June 24, 2010-5:17 PM
74 Avaya one-X™ Deskphone H.323 9621G/9641G User Guide Issue 1 May 2010
Page 75

Using the Calculator
3. Use the on-screen calculator keyboard to enter your equation.1
4. Touch the X icon at the top right of the calculator to return to the Home screen.2
3
Avaya - Proprietary. Use pursuant to the terms of your signed agreement or Avaya policy.
DRAFT-June 24, 2010-5:17 PM
Avaya one-X™ Deskphone H.323 9621G/9641G User Guide Issue 1 May 2010 75
Page 76

Avaya Home Screen Applications
Avaya - Proprietary. Use pursuant to the terms of your signed agreement or Avaya policy.
DRAFT-June 24, 2010-5:17 PM
76 Avaya one-X™ Deskphone H.323 9621G/9641G User Guide Issue 1 May 2010
Page 77

1
Chapter 14: Setting up a Bluetooth® headset2
The 9641G deskphone has a Bluetooth interface that supports connection of an Avaya branded3
Bluetooth headset or a non-Avaya headset that complies with the Bluetooth Headset Profile.4
Bluetooth® wireless technology simplifies your work environment and expands the range of5
your deskphone. You now have a wireless headset that allows you to move around while6
engaged in a call.7
If you have problems with your headset or with your telephone while your wireless headset is8
operating, contact your telephone administrator for assistance.9
Related topics:10
Pairing a Bluetooth® headset with your phone on page 7711
Operating a Bluetooth® headset on page 7812
Pairing a Bluetooth® headset with your phone13
22
Before using your wireless headset for the first time it must be paired with your phone so that14
they recognize each other. If you get a new headset, you must repeat the pairing process. The15
9641G deskphone supports only one wireless headset at a time.16
Note:17
If your Bluetooth headset is not an Avaya brand, read the manufacturer's pairing instructions18
before proceeding. Although your headset package may include instructions for pairing the19
headset with any telephone, this procedure provides Avaya one—X™ Deskphone-specific20
pairing information.21
1. Press Home.23
2. Touch Settings.24
3. Touch Bluetooth Setup.25
4. Take one of the following actions:26
• If this is not the first time you are pairing a headset, proceed to Step 5.27
• If this is the first time you are pairing a headset, touch Add. If the correct device28
type is not highlighted, touch the other device type to select it. Follow the29
instructions on the screen and touch Start to begin the pairing process.30
Proceed to Step 6.31
Avaya - Proprietary. Use pursuant to the terms of your signed agreement or Avaya policy.
DRAFT-June 24, 2010-5:17 PM
Avaya one-X™ Deskphone H.323 9621G/9641G User Guide Issue 1 May 2010 77
Page 78

Setting up a Bluetooth® headset
5. If this is not the first time you are pairing a headset, you can reactivate it or pair1
another supported Bluetooth headset; the current device the phone recognizes is2
listed first with a check mark on a list of available devices. Touch the appropriate3
device (headset) to select it from the list, then touch Activate. Alternately, you can4
touch Add to add another device to the list and pair it with the phone as described in5
the previous step.6
6. Every headset has a stored Passkey, but if yours is not processed, you may be7
asked to enter one using the dialpad. Avaya products use 0000 as the Passkey; for8
non-Avaya headsets, consult your manufacturer's documentation. Passkey entry9
can be up to 16 digits, but most devices use four digits. When complete, touch10
Enter.11
7. When the confirmation tone sounds, press Finish.12
13
When pairing completes, the top line of the telephone display shows a Bluetooth
logo icon to indicate the wireless headset is active.14
15
®
22
Operating a Bluetooth® headset16
The operation information provided here is generic and may not apply to all wireless headsets,17
particularly those that are not Avaya branded. Consult the information your headset18
manufacturer provides for specific information.19
Note:20
Be sure your Bluetooth headset's battery is charged according to manufacturer instructions.21
Basic headset operation is as follows:23
• Press and hold the Power button for at least three seconds to turn the headset24
on or off.25
- The Bluetooth icon on the headset flashes blue when the headset is on.26
- If the battery is low, the Bluetooth icon flashes red. Recharge the battery per27
the manufacturer's instructions28
• To answer or end a call, press the headset's Call Control button.29
• To place a call, press the headset's Call Control button. After you hear the dial30
tone, start dialing.31
• If you are using the telephone handset, transfer the call to your headset by briefly32
pressing the Call Control button. To transfer a call from your headset back to the33
Avaya - Proprietary. Use pursuant to the terms of your signed agreement or Avaya policy.
DRAFT-June 24, 2010-5:17 PM
78 Avaya one-X™ Deskphone H.323 9621G/9641G User Guide Issue 1 May 2010
Page 79

Operating a Bluetooth® headset
handset, briefly press the Call Control button again, or if the handset is still on-1
hook, simply pick up the handset.2
3
Avaya - Proprietary. Use pursuant to the terms of your signed agreement or Avaya policy.
DRAFT-June 24, 2010-5:17 PM
Avaya one-X™ Deskphone H.323 9621G/9641G User Guide Issue 1 May 2010 79
Page 80

Setting up a Bluetooth® headset
Avaya - Proprietary. Use pursuant to the terms of your signed agreement or Avaya policy.
DRAFT-June 24, 2010-5:17 PM
80 Avaya one-X™ Deskphone H.323 9621G/9641G User Guide Issue 1 May 2010
Page 81

Index1
A2
Administrative messages3
about ....................................................................174
applications5
contacts ................................................................536
Weather ...............................................................737
Applications8
Calculator .............................................................749
Web ......................................................................7110
World Clock ..........................................................7111
audio path12
on-hook ................................................................2713
Avaya Web Applications14
about ....................................................................7115
B16
Back up data files .......................................................3217
Bluetooth18
about ....................................................................7719
pairing headset with phone ..................................7720
Bluetooth headset21
operating ..............................................................7822
bridged call appearance23
about ....................................................................5124
joining ...................................................................5125
Bridged Calls26
answering .............................................................5127
Brightness, adjusting ..................................................2828
Browser29
about ....................................................................3330
button click sounds31
configuring ...........................................................2832
Button labels33
personalizing ........................................................3134
Button labels, restoring to default labels ....................3135
C36
Calculator ...................................................................7437
call history log38
about ....................................................................5939
Call history, calling from ..............................................4440
call log41
turning off .............................................................6142
viewing .................................................................5943
Call Log44
clearing entries .....................................................6045
removing an entry ................................................6046
viewing details ......................................................5947
Call Settings48
changing dialing setting .......................................2549
changing voice dialing language ..........................2550
Call Timers51
configuring ...........................................................2652
Call-Related Features53
about ....................................................................4554
calling55
using a click to dial link ........................................4456
calling a person57
from the contacts list ............................................4358
from the directory .................................................3759
calling, using voice dialing ..........................................4260
cleaning the screen ....................................................1961
Clearing a number ......................................................4162
click to dial63
making a call using ..............................................4464
Clock65
application ............................................................7166
conference calls67
about ....................................................................4668
muting a person ...................................................4769
putting a call on hold ............................................4770
setting up .............................................................4671
Conference Calls72
adding a person on hold ......................................4773
dropping a person ................................................4874
contacts .........................27, 42, 43, 53–55, 57, 60, 63–6575
using temporary USB files ...................................6576
about ....................................................................5377
adding from call history ........................................6078
calling a person ....................................................4379
copying to USB flash drive ...................................6580
deleting ................................................................5781
editing ..................................................................5582
merging USB files with .........................................6383
name display during calls .....................................2784
searching ........................................................42, 5385
selecting ...............................................................5486
Contacts87
adding a new ........................................................5488
editing favorites ....................................................5689
Avaya - Proprietary. Use pursuant to the terms of your signed agreement or Avaya policy.
DRAFT-June 24, 2010-5:17 PM
Avaya one-X™ Deskphone H.323 9621G/9641G User Guide Issue 1 May 2010 81
Page 82

editing primary number ........................................561
importing/exporting via USB flash drives .............632
Contrast, adjusting .....................................................283
copying contacts list to USB file .................................654
coverage .....................................................................485
D6
Dialing Options7
setting ..................................................................248
directory9
calling a person ....................................................3710
Display11
adjusting brightness .............................................2812
Display, adjusting contrast ..........................................2813
History, of calls ...........................................................5943
History, removing a call from ......................................6044
History, viewing for calls .............................................5945
Historyclearing all call entries .....................................6046
Historyturning off ........................................................6147
Historyviewing call details ..........................................5948
hold49
conference calls ...................................................4750
Home screen51
about ....................................................................2152
Home screen display when phone is idle53
setting ..................................................................2954
I55
E14
Edit dialing ............................................................24, 4315
Emergency call ...........................................................4116
error tones17
turning off .............................................................2918
F19
Favorite contacts20
setting up .............................................................5621
Feature abbreviations .................................................3522
Feature table ..............................................................3523
Features24
about ....................................................................3525
accessing .............................................................3526
Flash drives ................................................................6327
forwarding28
a call .....................................................................4929
Forwarding calls30
about ....................................................................4831
G32
Go To Phone Screen on answer33
setting ..................................................................2434
Go To Phone Screen on Calling35
setting ..................................................................2336
Go To Phone Screen on ringing37
setting ..................................................................2338
guest login ..................................................................7039
Guest login .................................................................6940
H41
History, calling from ....................................................4442
Icons in telephone display56
about ....................................................................1257
incoming calls58
directing to multiple telephones ...........................3759
forwarding ............................................................4960
sending to coverage .............................................4861
transferring ...........................................................4662
Incoming calls63
answering .............................................................3964
K65
Keyboard66
using ....................................................................1867
L68
Language69
changing display ..................................................3070
changing voice dialing ..........................................2571
legal notices .................................................................272
logging in as a guest ..................................................7073
Logging in to your telephone ......................................6974
logging in to your telephone extension .......................6975
Logging out of your telephone extension ...................6976
Login as a guest user .................................................6977
M78
Memory sticks ............................................................6379
messages80
getting ..................................................................6743
Messages44
about ....................................................................1745
muting calls ................................................................4546
Avaya - Proprietary. Use pursuant to the terms of your signed agreement or Avaya policy.
DRAFT-June 24, 2010-5:17 PM
82 Avaya one-X™ Deskphone H.323 9621G/9641G User Guide Issue 1 May 2010
Page 83

N1
Navigation Arrows2
page control ....................................................11, 453
right .................................................................11, 454
up & down .......................................................
O6
On-hook dialing ..........................................................247
On-screen keyboard8
about ....................................................................189
Options & Settings10
about ....................................................................2111
call history ............................................................6112
call logging ...........................................................6113
changing language ...............................................3014
choosing ring pattern ...........................................3015
configuring visual alerts .......................................2616
go to Home screen when idle ..............................2917
go to phone screen on answer .............................2418
go to phone screen on calling ..............................2319
go to phone screen on ringing .............................2320
phone screen on calling .......................................2321
redial settings .......................................................2522
Setting dialing options ..........................................2423
setting the Quick Touch panel ..............................3124
outgoing calls25
making a call ........................................................4126
making a call on a bridged line ............................5227
redialing a number ...............................................4228
Outgoing Calls29
edit dialing a number ............................................4330
45
R
redial ...........................................................................4246
11, 455
redial options47
setting ..................................................................2548
replacing contacts list with an external file .................6449
Restore data files .......................................................3250
Ring Pattern51
choosing ...............................................................3052
S53
screen54
cleaning ................................................................1955
screensaver56
from USB pictures ................................................6657
Scrolling and Navigation58
about ....................................................................1159
SENDALL ...................................................................4860
T61
Telephone display icons62
about ....................................................................1263
Telephone stand64
about ....................................................................1765
text size66
configuring ...........................................................3067
Thumb drives ..............................................................6368
Transfer ......................................................................4669
P31
pairing32
Bluetooth headset and phone ..............................7733
Phone Screen on Calling34
setting ..................................................................2335
Phone Settings36
about ....................................................................2137
pictures38
from USB files as a screensaver ..........................6639
Primary Number40
changing ..............................................................5641
Q42
Quick Touch panel43
configuring ...........................................................3144
Avaya - Proprietary. Use pursuant to the terms of your signed agreement or Avaya policy.
DRAFT-June 24, 2010-5:17 PM
Avaya one-X™ Deskphone H.323 9621G/9641G User Guide Issue 1 May 2010 83
U70
USB files .........................................................63, 65, 6671
merging with contacts list .....................................6372
pictures ................................................................6673
USB flash drives74
working with .........................................................6375
V76
Visual Alerts77
configuring ...........................................................2678
Voice dialing79
changing setting ...................................................2580
changing the language .........................................2581
Voice mail45
logging in ..............................................................6746
Page 84

W1
weather2
adding a location ..................................................733
application ............................................................734
updating ...............................................................735
World Clock6
adding locations ...................................................717
selecting a location ..............................................728
viewing location details ........................................729
Avaya - Proprietary. Use pursuant to the terms of your signed agreement or Avaya policy.
DRAFT-June 24, 2010-5:17 PM
84 Avaya one-X™ Deskphone H.323 9621G/9641G User Guide Issue 1 May 2010
 Loading...