

Page 1

Using Avaya 9608/9608G/9611G IP
Deskphones SIP for Call Center Agents
Release 7.1.13
Issue 1
April 2021
Page 2

©
2014-2021, Avaya Inc.
All Rights Reserved.
Notice
While reasonable efforts have been made to ensure that the
information in this document is complete and accurate at the time of
printing, Avaya assumes no liability for any errors. Avaya reserves
the right to make changes and corrections to the information in this
document without the obligation to notify any person or organization
of such changes.
Note
Using a cell, mobile, or GSM phone, or a two-way radio in close
proximity to an Avaya IP telephone might cause interference.
Documentation disclaimer
“Documentation” means information published in varying mediums
which may include product information, operating instructions and
performance specifications that are generally made available to users
of products. Documentation does not include marketing materials.
Avaya shall not be responsible for any modifications, additions, or
deletions to the original published version of Documentation unless
such modifications, additions, or deletions were performed by or on
the express behalf of Avaya. End User agrees to indemnify and hold
harmless Avaya, Avaya's agents, servants and employees against all
claims, lawsuits, demands and judgments arising out of, or in
connection with, subsequent modifications, additions or deletions to
this documentation, to the extent made by End User.
Link disclaimer
Avaya is not responsible for the contents or reliability of any linked
websites referenced within this site or Documentation provided by
Avaya. Avaya is not responsible for the accuracy of any information,
statement or content provided on these sites and does not
necessarily endorse the products, services, or information described
or offered within them. Avaya does not guarantee that these links will
work all the time and has no control over the availability of the linked
pages.
Warranty
Avaya provides a limited warranty on Avaya hardware and software.
Refer to your sales agreement to establish the terms of the limited
warranty. In addition, Avaya’s standard warranty language, as well as
information regarding support for this product while under warranty is
available to Avaya customers and other parties through the Avaya
Support website:
https://support.avaya.com/helpcenter/
getGenericDetails?detailId=C20091120112456651010 under the link
“Warranty & Product Lifecycle” or such successor site as designated
by Avaya. Please note that if You acquired the product(s) from an
authorized Avaya Channel Partner outside of the United States and
Canada, the warranty is provided to You by said Avaya Channel
Partner and not by Avaya.
Licenses
THE SOFTWARE LICENSE TERMS AVAILABLE ON THE AVAYA
WEBSITE,
HTTPS://SUPPORT.AVAYA.COM/LICENSEINFO,
UNDER THE LINK “AVAYA SOFTWARE LICENSE TERMS (Avaya
Products)” OR SUCH SUCCESSOR SITE AS DESIGNATED BY
AVAYA, ARE APPLICABLE TO ANYONE WHO DOWNLOADS,
USES AND/OR INSTALLS AVAYA SOFTWARE, PURCHASED
FROM AVAYA INC., ANY AVAYA AFFILIATE, OR AN AVAYA
CHANNEL PARTNER (AS APPLICABLE) UNDER A COMMERCIAL
AGREEMENT WITH AVAYA OR AN AVAYA CHANNEL PARTNER.
UNLESS OTHERWISE AGREED TO BY AVAYA IN WRITING,
AVAYA DOES NOT EXTEND THIS LICENSE IF THE SOFTWARE
WAS OBTAINED FROM ANYONE OTHER THAN AVAYA, AN AVAYA
AFFILIATE OR AN AVAYA CHANNEL PARTNER; AVAYA
RESERVES THE RIGHT TO TAKE LEGAL ACTION AGAINST YOU
AND ANYONE ELSE USING OR SELLING THE SOFTWARE
WITHOUT A LICENSE. BY INSTALLING, DOWNLOADING OR
USING THE SOFTWARE, OR AUTHORIZING OTHERS TO DO SO,
YOU, ON BEHALF OF YOURSELF AND THE ENTITY FOR WHOM
YOU ARE INSTALLING, DOWNLOADING OR USING THE
SOFTWARE (HEREINAFTER REFERRED TO
INTERCHANGEABLY AS “YOU” AND “END USER”), AGREE TO
THESE TERMS AND CONDITIONS AND CREATE A BINDING
CONTRACT BETWEEN YOU AND AVAYA INC. OR THE
APPLICABLE AVAYA AFFILIATE (“AVAYA”).
Avaya grants You a license within the scope of the license types
described below, with the exception of Heritage Nortel Software, for
which the scope of the license is detailed below. Where the order
documentation does not expressly identify a license type, the
applicable license will be a Designated System License as set forth
below in the Designated System(s) License (DS) section as
applicable. The applicable number of licenses and units of capacity
for which the license is granted will be one (1), unless a different
number of licenses or units of capacity is specified in the
documentation or other materials available to You. “Software” means
computer programs in object code, provided by Avaya or an Avaya
Channel Partner, whether as stand-alone products, pre-installed on
hardware products, and any upgrades, updates, patches, bug fixes,
or modified versions thereto. “Designated Processor” means a single
stand-alone computing device. “Server” means a set of Designated
Processors that hosts (physically or virtually) a software application
to be accessed by multiple users. “Instance” means a single copy of
the Software executing at a particular time: (i) on one physical
machine; or (ii) on one deployed software virtual machine (“VM”) or
similar deployment.
License types
Designated System(s) License (DS). End User may install and use
each copy or an Instance of the Software only on a number of
Designated Processors up to the number indicated in the order.
Avaya may require the Designated Processor(s) to be identified in
the order by type, serial number, feature key, Instance, location or
other specific designation, or to be provided by End User to Avaya
through electronic means established by Avaya specifically for this
purpose.
Shrinkwrap License (SR). You may install and use the Software in
accordance with the terms and conditions of the applicable license
agreements, such as “shrinkwrap” or “clickthrough” license
accompanying or applicable to the Software (“Shrinkwrap License”).
Copyright
Except where expressly stated otherwise, no use should be made of
materials on this site, the Documentation, Software, Hosted Service,
or hardware provided by Avaya. All content on this site, the
documentation, Hosted Service, and the product provided by Avaya
including the selection, arrangement and design of the content is
owned either by Avaya or its licensors and is protected by copyright
and other intellectual property laws including the sui generis rights
relating to the protection of databases. You may not modify, copy,
reproduce, republish, upload, post, transmit or distribute in any way
any content, in whole or in part, including any code and software
unless expressly authorized by Avaya. Unauthorized reproduction,
transmission, dissemination, storage, and or use without the express
written consent of Avaya can be a criminal, as well as a civil offense
under the applicable law.
Third Party Components
“Third Party Components” mean certain software programs or
portions thereof included in the Software or Hosted Service may
contain software (including open source software) distributed under
third party agreements (“Third Party Components”), which contain
terms regarding the rights to use certain portions of the Software
(“Third Party Terms”). As required, information regarding distributed
Linux OS source code (for those products that have distributed Linux
OS source code) and identifying the copyright holders of the Third
Party Components and the Third Party Terms that apply is available
in the products, Documentation or on Avaya’s website at:
https://
support.avaya.com/Copyright or such successor site as designated
by Avaya. The open source software license terms provided as Third
Party Terms are consistent with the license rights granted in these
Software License Terms, and may contain additional rights benefiting
You, such as modification and distribution of the open source
software. The Third Party Terms shall take precedence over these
Software License Terms, solely with respect to the applicable Third
Party Components to the extent that these Software License Terms
impose greater restrictions on You than the applicable Third Party
Terms.
T9 Text Input and other products are covered by one or more of the
following patents: U.S. Pat. Nos. 5,187,480,5,818,437, 5,945,928,
5,953,541, 6,011,554, 6,286,064, 6,307,548, 6,307,549, and
6,636,162,6,646,573, 6,970,599; Australia Pat. Nos. 727539,
746674, 747901; Austria Pat. Nos. AT225534, AT221222; Brazil P.I.
Page 3

No. 9609807-4; Canada Pat. Nos. 1,331,057, 2,227,904,2,278,549,
2,302,595; Japan Pat. Nos. 3532780, 3492981; United Kingdom Pat.
No. 2238414B; Hong Kong Standard Pat. No. HK1010924; Republic
of Singapore Pat. Nos. 51383, 66959, 71979; European Pat. Nos. 1
010 057 (98903671.0), 1 018 069 (98950708.2); Republic of Korea
Pat. Nos. KR201211B1, KR226206B1, 402252; People's Republic of
China Pat. No. ZL96196739.0; Mexico Pat. Nos. 208141, 216023,
218409; Russian Federation Pat. Nos. 2206118, 2214620, 2221268;
additional patent applications are pending
Preventing Toll Fraud
“Toll Fraud” is the unauthorized use of your telecommunications
system by an unauthorized party (for example, a person who is not a
corporate employee, agent, subcontractor, or is not working on your
company's behalf). Be aware that there can be a risk of Toll Fraud
associated with your system and that, if Toll Fraud occurs, it can
result in substantial additional charges for your telecommunications
services.
Avaya Toll Fraud intervention
If You suspect that You are being victimized by Toll Fraud and You
need technical assistance or support, call Technical Service Center
Toll Fraud Intervention Hotline at +1-800-643-2353 for the United
States and Canada. For additional support telephone numbers, see
the Avaya Support website:
successor site as designated by Avaya.
Trademarks
All non-Avaya trademarks are the property of their respective owners.
Downloading Documentation
For the most current versions of Documentation, see the Avaya
Support website:
as designated by Avaya.
Contact Avaya Support
See the Avaya Support website:
product or Hosted Service notices and articles, or to report a problem
with your Avaya product or Hosted Service. For a list of support
telephone numbers and contact addresses, go to the Avaya Support
website:
designated by Avaya), scroll to the bottom of the page, and select
Contact Avaya Support.
FCC/Industry Canada Radiation Exposure Statement
This device complies with the FCC's and Industry Canada's RF
radiation exposure limits set forth for the general population
(uncontrolled environment) and must not be co-located or operated in
conjunction with any other antenna or transmitter.
Warning
The handset receiver contains magnetic devices that can attract
small metallic objects. Care should be taken to avoid personal injury.
Power over Ethernet (PoE) warning
This equipment must be connected to PoE networks without routing
to the outside plant.
https://support.avaya.com (or such successor site as
https://support.avaya.com, or such successor site
https://support.avaya.com or such
https://support.avaya.com for
Page 4

Contents
Chapter 1: Introduction to the Avaya Call Center agent phones......................................... 6
Differences between the H.323 and SIP deskphones................................................................. 6
About Call Center Agent phone screens.................................................................................... 7
Agent work modes and states.................................................................................................. 9
About call center-related icons................................................................................................ 10
Agent Status line display combinations for agents.................................................................... 12
Incoming calls display............................................................................................................ 15
Message Waiting Indicator..................................................................................................... 16
Chapter 2: Call Center Agent operations.............................................................................. 17
About Call Center Agent features............................................................................................ 17
About Reason Codes............................................................................................................. 17
Logging in as an agent........................................................................................................... 17
Logging out as an agent......................................................................................................... 19
Activating After Call Work....................................................................................................... 19
Activating Auxiliary Work........................................................................................................ 19
Activating Auto In.................................................................................................................. 20
Activating Manual In.............................................................................................................. 21
Activating Logout Override..................................................................................................... 21
Agent Greetings.................................................................................................................... 22
Creating Agent Greetings................................................................................................. 24
Recording a greeting message......................................................................................... 26
Playing a manual greeting during an incoming call............................................................. 26
Retrieving Agent greetings............................................................................................... 27
Deleting an Agent Greeting.............................................................................................. 27
Chapter 3: Call Center Deskphone operations.................................................................... 28
Answering a call.................................................................................................................... 28
Handling calls and conferences using Multiple Device Access.................................................. 29
Enabling wireless headset bidirectional signaling..................................................................... 29
Viewing contact presence status............................................................................................. 30
Changing the presence status................................................................................................ 30
Enabling SAC when DND is active.......................................................................................... 30
Entering Stroke Counts.......................................................................................................... 31
Entering Call Work Codes...................................................................................................... 32
Viewing Queue Stats............................................................................................................. 32
Viewing Vu Stats................................................................................................................... 33
Activating Supervisor Assist................................................................................................... 34
Viewing ASAI UUI................................................................................................................. 34
Call observation.................................................................................................................... 35
Activating or deactivating call observation............................................................................... 36
April 2021 Using Avaya 9608/9608G/9611G IP Deskphones SIP for Call Center Agents 4
Comments on this document? infodev@avaya.com
Page 5

Contents
Assisting an agent on an observed call................................................................................... 36
April 2021 Using Avaya 9608/9608G/9611G IP Deskphones SIP for Call Center Agents 5
Comments on this document? infodev@avaya.com
Page 6

Chapter 1: Introduction to the Avaya Call
Center agent phones
The 9608, 9608G, 9611G, 9621G, 9641G, 9641GS Deskphone and Avaya J100 Series IP Phones
are used in a standard office environment or with Avaya Call Center 3.0 or later releases. The
9621G, 9641G, and 9641GS deskphones are touch-based phones with a color display. The 9611G,
9608, 9608G, and Avaya J100 Series IP Phones are button-based phones. The 9611G, and J179
has a color display, J189 has two color display, and 9608, J169 has a monochrome display.
To extend call appearances or features or both you can attach up to three button modules in Avaya
9608 IP Deskphone and Avaya 9611G IP Deskphone. Avaya J169/J179 IP Phone supports three
JBM24 Button Module or Avaya J100 Expansion Module (JEM24) and Avaya J189 IP Phone
supports up to two Avaya J100 Expansion Module (JEM24).
With these deskphones you can obtain convenient features and capabilities at your fingertips,
including a Phone Screen to view and manage your calls, and icons indicating agent status, call
states, feature status, queued calls, and missed calls. Using the designated feature buttons, you can
change your agent work mode or state with one touch.
Not all functions and features described in this user guide may be available on your deskphone or
applicable to the way your call center operates. If you find that a function or feature is not available,
contact your supervisor or administrator.
Important:
This guide describes only the features and operation of the 9608 and 9611G deskphones in a
call center environment. Specific user guides address standard office deskphone operation and
features such as placing calls, reviewing call history, conference calling, and modifying
deskphone options and settings for your personal preferences. Depending on which deskphone
model you are using, see Using Avaya J169/J179 IP Phone H.323, Using Avaya189 IP Phone
H.323, Avaya one-X® Deskphone SIP for 9608 and 9611G IP Telephone User Guide or the
Avaya one-X® Deskphone SIP 9621G and 9641G User Guide for 9600 Series IP Telephones,
available on the Avaya Support Site:
http://avaya.support.com.
Differences between the H.323 and SIP deskphones
April 2021 Using Avaya 9608/9608G/9611G IP Deskphones SIP for Call Center Agents 6
Comments on this document? infodev@avaya.com
Page 7
About Call Center Agent phone screens
There are differences between the H.323 deskphones and the SIP deskphones, which include:
• The Agent Greetings feature is supported by H.323 deskphones, but is currently not available
for the 96x1 SIP deskphones. The feature is supported only with phones that use the Avaya
one-X® Deskphone H.323 application.
• Call Center features, such as login and logout, function differently with SIP using the
advanced capabilities of the SIP architecture.
• If collected digits are available for a call, they appear on the Agent Status line automatically
on the SIP deskphones. No action is required on your part.
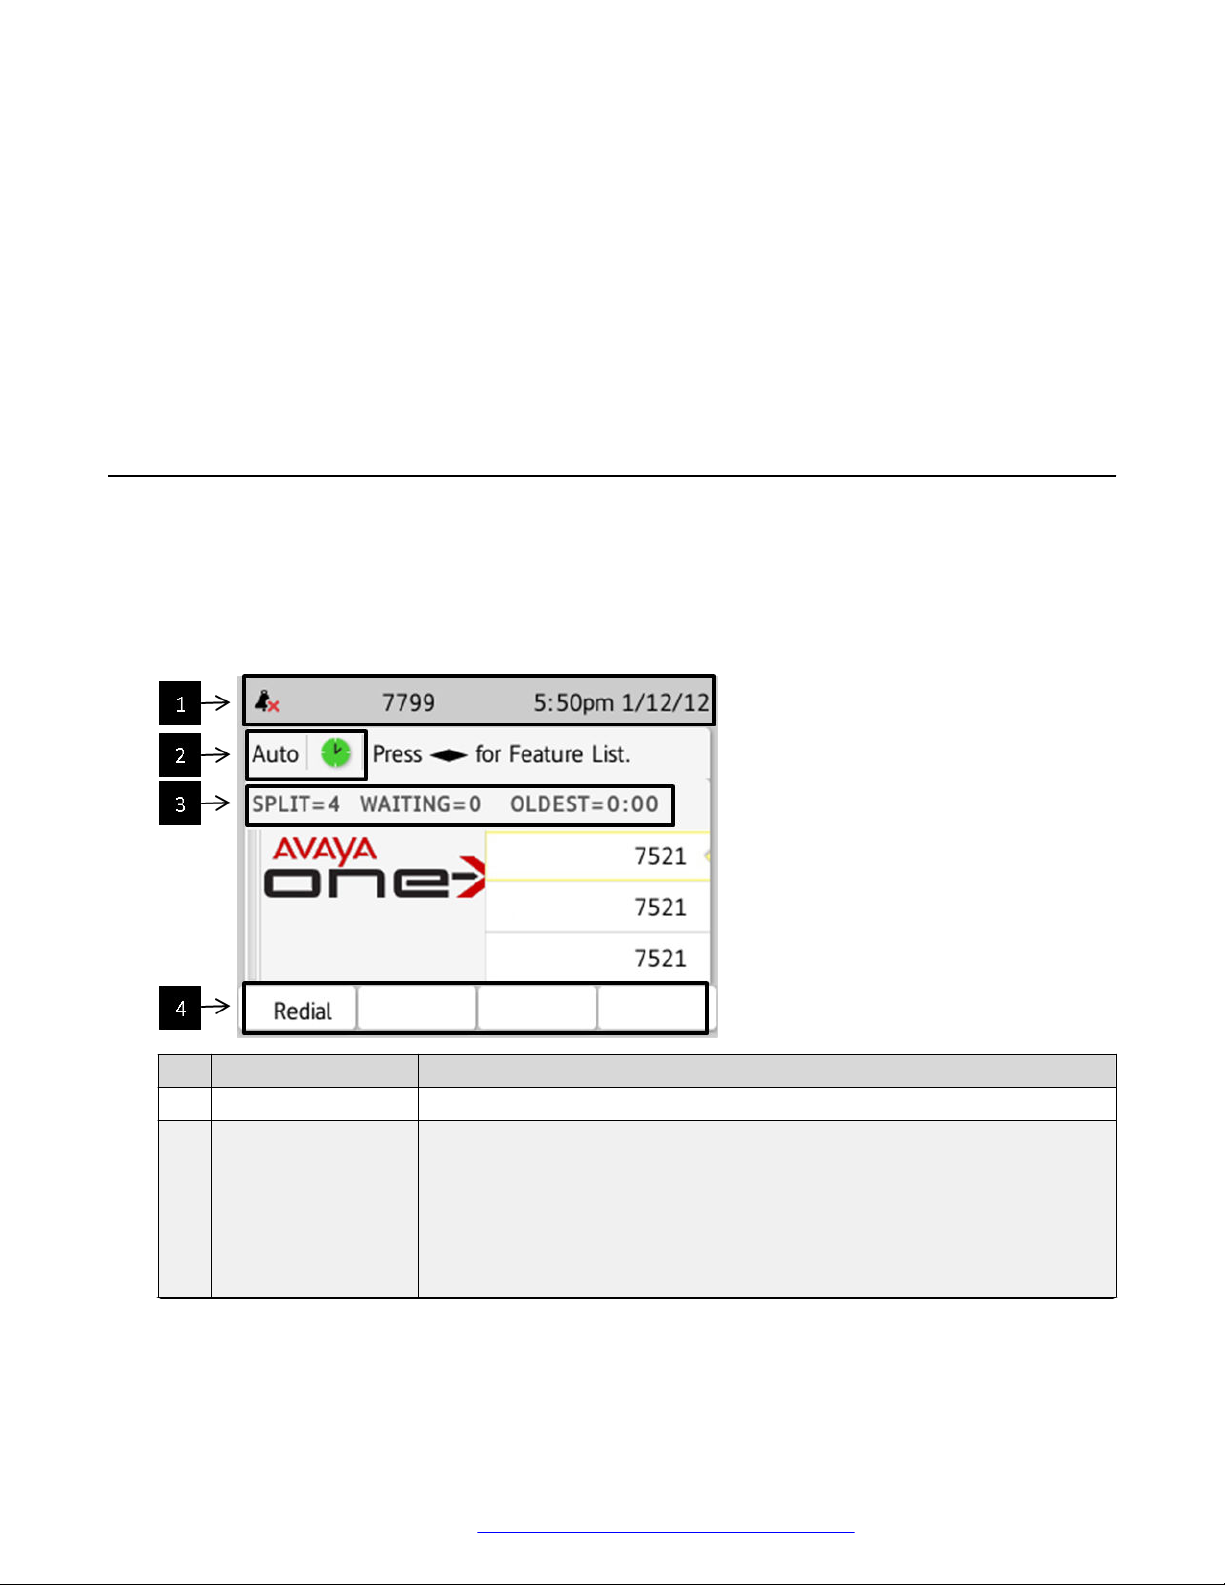
About Call Center Agent phone screens
Your Phone screen displays information about your phone and agent settings as well as
information about calls.
What is displayed on your Phone screen is dependent on the phone model and what has been
configured for your system by your system administrator.
No. Name Description
1 Top Line Display Displays date and time and set information.
2 Agent Status Line Displays agent information, such as work mode and state, and when
provided, collected digits.
If collected digits are available with the call, they are displayed without any
action on your part.
If User-to-User Information (UUI) is associated with the call, it is displayed
here when you press the UUI-Info button.
Table continues…
April 2021 Using Avaya 9608/9608G/9611G IP Deskphones SIP for Call Center Agents 7
Comments on this document? infodev@avaya.com
Page 8
Introduction to the Avaya Call Center agent phones
No. Name Description
3 Agent Information
Line
4 Softkeys Press to perform that task. What is displayed here is dependent on which
Displays Vu Stats information when you press Vu Stats.
When you press Queue Stats, the Queue Stats information overrides the Vu
Stats information. If Interruptible Aux is activated, the Interruptible Aux
message is displayed.
features are active and whether you are on a call.
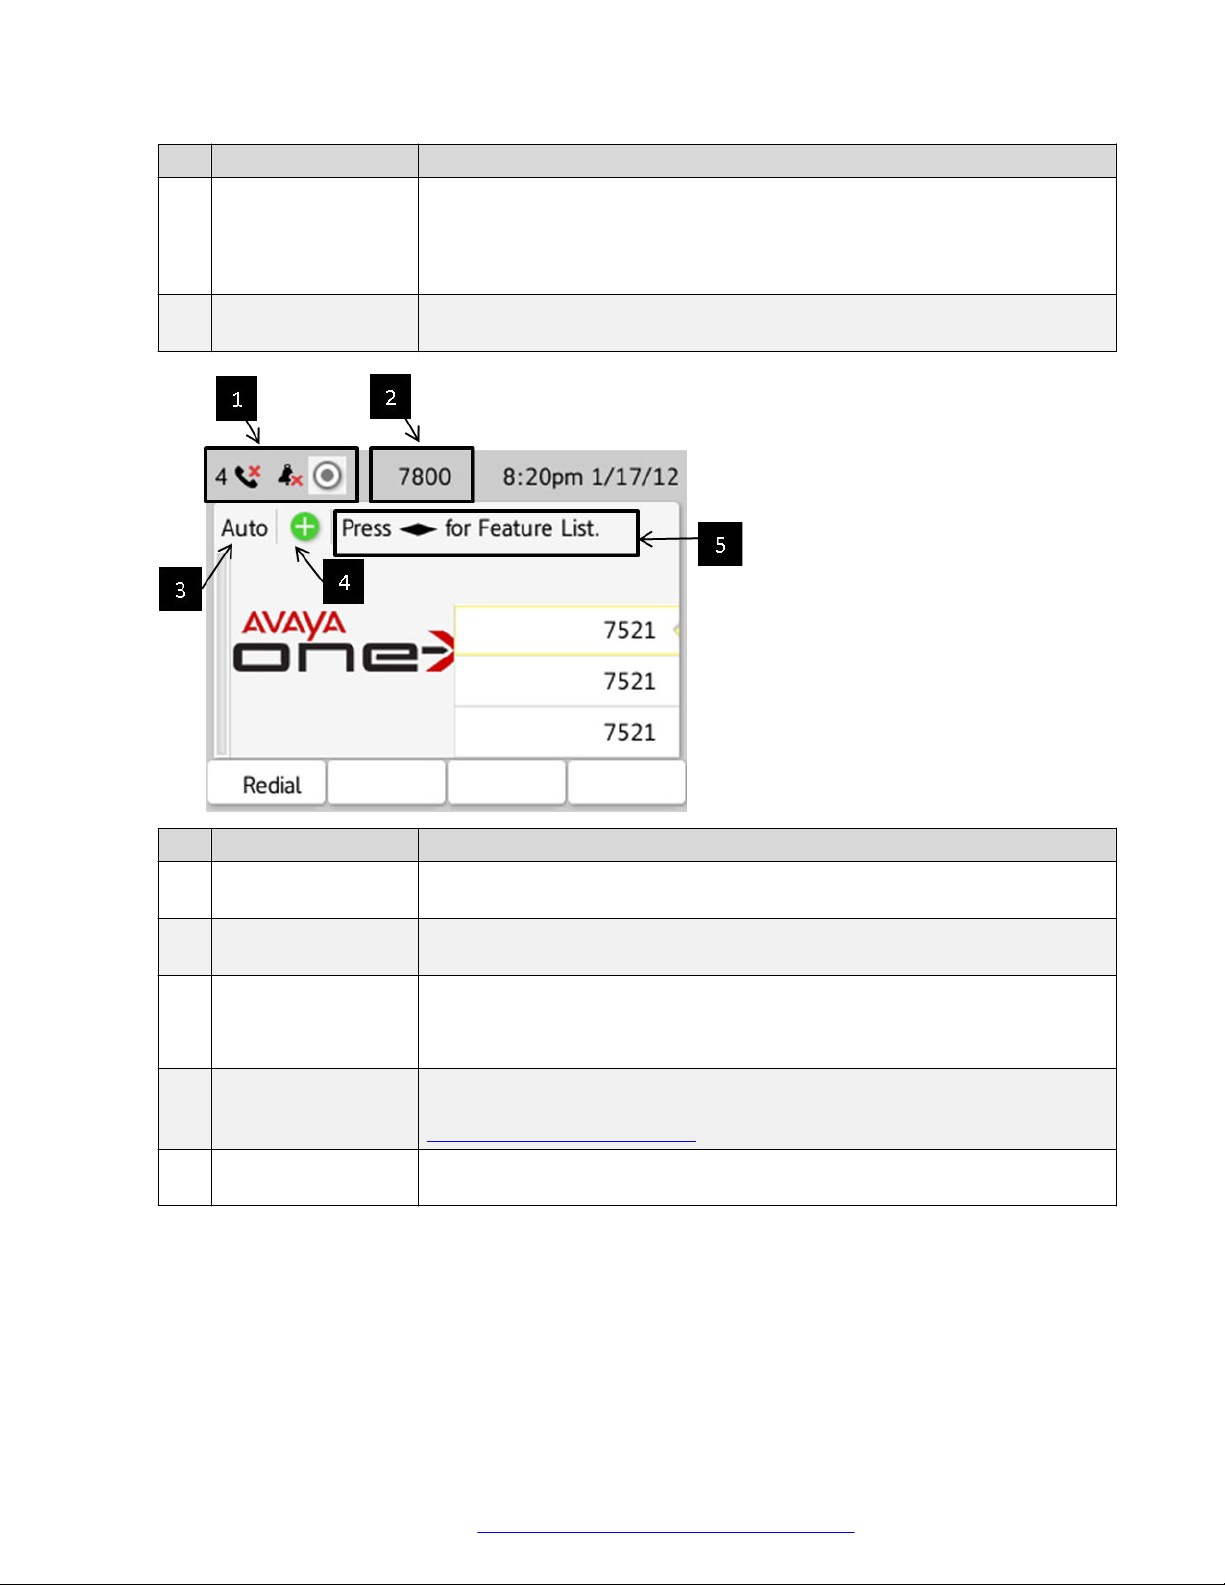
No. Name Description
1 Icon area Displays icons such as Forced Logout, Forced Logout Override, pending
state changes, and phone settings.
2 Agent ID Displays your Agent ID when you have logged in. The phone extension is
displayed when you are not logged in.
3 Agent Work Mode Displays your agent work mode: Auto or Manual.
No icon is displayed when the agent is not logged in. As well, no icon is
displayed if you are logged in but have not selected a work mode
4 Agent State Displays your agent state as a icon: Available, Auxiliary Work (with or
without Reason Code), After Call Work, or On call (ACD or non-ACD). See
About call center-related icons on page 10.
5 Features Screen Press the up or down arrow button to access the configured Call Center
Features.
The Top line display, Agent State line and Agent Information line are also visible when viewing the
Features screen.
April 2021 Using Avaya 9608/9608G/9611G IP Deskphones SIP for Call Center Agents 8
Comments on this document? infodev@avaya.com
Page 9
Agent work modes and states
Agent work modes and states
The Agent Status line shows your current work mode and state.
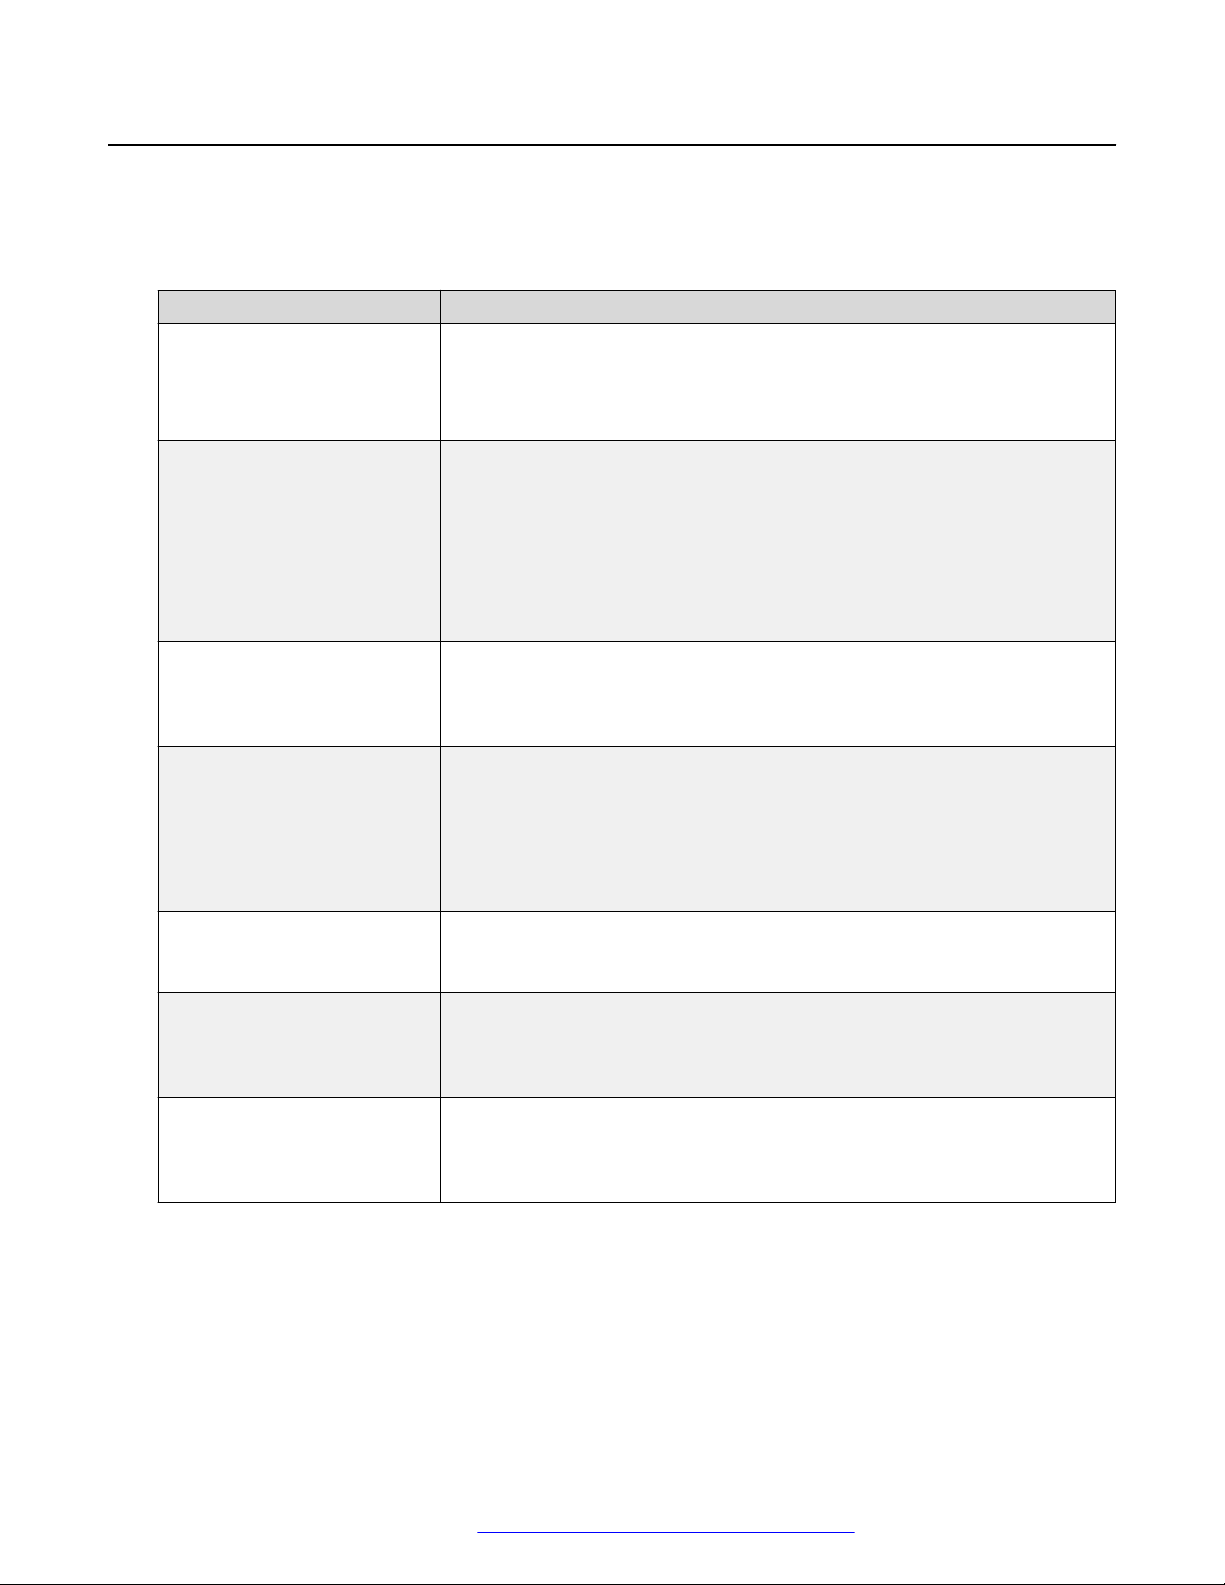
The following table shows the possible agent states:
State Description
Available This state is automatically assigned when you are available to receive
ACD calls. With Auto In, you are returned to Available after each call is
released. With Manual In, you must press Manual In to return to the
Available state.
Aux Work You are placed in the Auxiliary Work state after agent login without a
specified work mode. You must change to Auto In or Manual In work
mode to become available to receive incoming Call Center calls and to
select your mode of operation. You can change back to Auxiliary Work to
indicate you are not available to receive Call Center calls, for example,
when you want to take a break. Depending on how your system is
administered, you might be prompted to enter a reason code when
changing to Aux Work.
Interruptible Aux Work Interruptible Aux Work mode notifies the agents in Aux work mode with an
interruptible reason code (RC) to become available. When the configured
threshold is exceeded, the phone receives a visual as well as audio
indication of a full ring cycle.
After Call Work Switch to ACW to perform after-call work, such as completing a call-
related form. The call distribution system automatically changes your
agent state to ACW if you are in Manual-In mode.
You may also enter this state automatically when you are in Auto-In mode,
if your system administrator has configured automatic ACW for a preset
time period after call completion.
On Call This state is automatically assigned when you are active on a call. The
phone displays the On-ACD Call icon when you are active on an ACD call,
else it displays the On non-ACD Call icon.
Forced Logout This state is assigned at a specified time determined by your system
administrator. The Top line displays the Forced Logout icon only if the
administrator has assigned a logout time for you. If you are not on a call,
you are logged out from ACD regardless of which agent state you are in.
Logout Override You can set this state if you want to continue working after your scheduled
logout time. The Logout Override icon is displayed on the Top line only if
you have set the status to override the administered Forced Logout before
the scheduled time.
When an ACD call is received, the work mode changes from Aux Work to Auto In or Manual In.
Pending states are assigned whenever you request a state change while active on a call. For
example, you request to change to an Aux Work state while active on a call. When the call is
released, the pending state change becomes effective immediately.
April 2021 Using Avaya 9608/9608G/9611G IP Deskphones SIP for Call Center Agents 9
Comments on this document? infodev@avaya.com
Page 10
Introduction to the Avaya Call Center agent phones
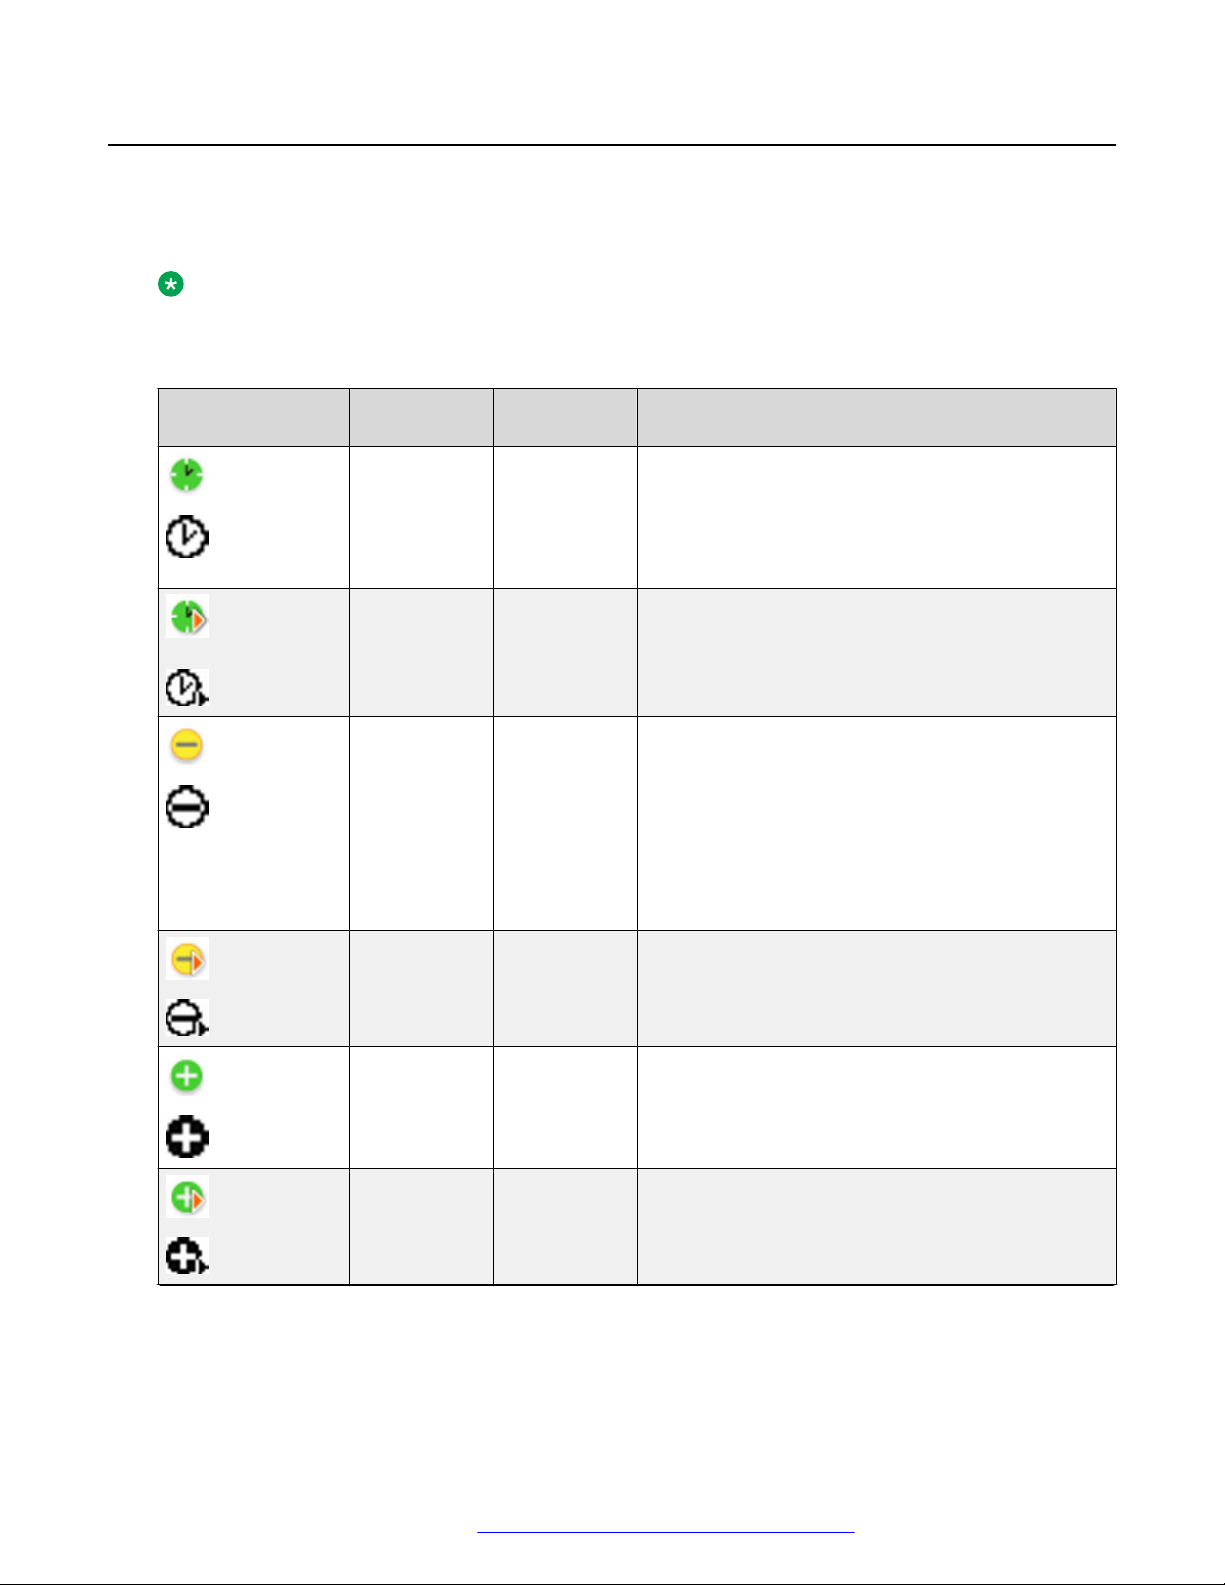
About call center-related icons
What you see on the Deskphone display depends on the features that are provisioned for your
Deskphone.
Note:
The 9611G Deskphone displays colored icons.
The 9608 Deskphone displays black and white icons.
Icon Icon name Where it
appears
After Call
Work
Pending ACW Top Line
Aux Work Agent Status
Pending Aux Top Line
Agent Status
line
display
line
display
Description
The Deskphone displays this icon when you
activate ACW.
Use this state when you are performing any after
call-related work, such as filling in paperwork after
an ACD call.
The Deskphone displays this icon when you
activate ACW when you are active on a call.
The Deskphone displays this icon when you
activate Aux Work.
Enter this state when you are performing non-ACD
activities such as taking a break, or placing an
outgoing call. You may need to enter a Reason
Code for entering the Aux Work state if this
requirement is configured by your system
administrator.
The Deskphone displays this icon when you
activate Aux Work while you are active on a call.
Available Agent Status
line
Pending
Available
April 2021 Using Avaya 9608/9608G/9611G IP Deskphones SIP for Call Center Agents 10
Top Line
display
Comments on this document? infodev@avaya.com
You are available for any incoming call.
The Deskphone displays this icon when you are not
active on a call, in ACW, or in Aux Work.
The Deskphone displays this icon when you are
changing your state to Available from Aux Work or
ACW and you are active on a call.
Table continues…
Page 11
About call center-related icons
Icon Icon name Where it
appears
Forced
Logout
Forced
Logout
Top Line
display
Top Line
display
Override
Pending
Logout
Top Line
display
Alerting icon Agent Status
line
On call Agent Status
line
Description
The Deskphone displays this icon when Forced
Logout is active for your Agent ID.
The Deskphone displays this icon if you activate
Forced Logout Override.
The Deskphone displays this icon if you press the
Log Out button while you are active on a call or
when the Forced Logout time arrives and you are
active on an ACD call.
The Deskphone displays this icon when you receive
an incoming call. When you receive an ACD or DAC
call, the icon displays the respective text, ACD or
DAC, horizontally beside the bell.
The Deskphone displays this icon when you are
active on a call. When you receive an ACD or DAC
call, the icon displays the respective text, ACD or
DAC, horizontally.
Held call Agent Status
line
Queue Stats Agent
Information
line
Time in
Queue
Queue Stats
feature button
Threshold
warning
Call threshold
warning
Queue Stats
feature button
If you are active on an ACD call, the On ACD call
icon is displayed, otherwise, the On non-ACD call
icon is displayed.
The Deskphone displays this icon when you have
placed a call on hold. When you place an ACD or
DAC call on hold, the icon displays the respective
text, ACD or DAC, vertically.
The Deskphone displays this icon when you
activate Queue Stats.
The clock icon appears before the oldest call time
and the calls icon appears before the number of
calls in the queue.
The Deskphone displays this icon to indicate when
the time threshold for the oldest call in the queue
has been reached.
The Deskphone displays this icon when the number
of calls in the queue has reached the maximum
configured by your system administrator.
Table continues…
April 2021 Using Avaya 9608/9608G/9611G IP Deskphones SIP for Call Center Agents 11
Comments on this document? infodev@avaya.com
Page 12
Introduction to the Avaya Call Center agent phones
Icon Icon name Where it
appears
UUI icon Agent Status
line
Collected
Digits
Information
Agent Status
line
Description
If an incoming call has UUI information, the UUI
feature button lamp is solid.
When you tap the feature, or press the button
associated with this feature, the Deskphone
displays this icon before the UUI information.
If the incoming call has collected digits information,
the Deskphone displays this icon before the digits.
Collected digits are digits that the caller entered
before reaching you.
Agent Status line display combinations for agents
What you see on the Agent Status line of the screen depends on what you are doing at the time
(your agent work mode) and whether you are idle or have an active, held, or incoming call.
In the following example, the Agent Status line indicates you are in Auto In mode and there is an
incoming DAC call.
Use this chart as a guide to possible agent status line display combinations.
• ACD=Automatic Call Distribution
• ACW=After Call Work
• Auto=Auto In
• Aux=Auxiliary Work state
• DAC=Direct Agent Call
• Man=Manual In
• RC=Reason Code #
Agent Work
Mode shows
Auto or Man You are ready to receive DAC or ACD calls.
Agent Status
shows
Icon area shows What this means:
Table continues…
April 2021 Using Avaya 9608/9608G/9611G IP Deskphones SIP for Call Center Agents 12
Comments on this document? infodev@avaya.com
Page 13

Agent Status line display combinations for agents
Agent Work
Mode shows
Agent Status
shows
Icon area shows What this means:
Auto or Man Incoming You have an incoming non-ACD or non-DAC
call.
Auto or Man Incoming-ACD You have an incoming ACD call.
Auto or Man Incoming-DAC You have an incoming DAC call.
Auto or Man On-ACD You are on an ACD call.
Auto or Man On-ACD A DAC call is waiting in the queue while you
are on an ACD call.
Auto or Man On-DAC You are on a DAC call.
Auto or Man On-DAC A DAC call is waiting in the queue while you
are on a DAC call.
Auto or Man Hold You have a non-ACD, non-DAC call on hold.
Auto or Man Hold A DAC call is waiting in the queue while you
have a non-ACD, non-DAC on hold.
Auto or Man On-ACD-Hold You have an ACD call on hold.
Auto or Man On-ACD-Hold A DAC call is waiting in the queue while you
have an ACD call on hold.
Auto or Man On-DAC-Hold You have a DAC on hold.
Table continues…
April 2021 Using Avaya 9608/9608G/9611G IP Deskphones SIP for Call Center Agents 13
Comments on this document? infodev@avaya.com
Page 14

Introduction to the Avaya Call Center agent phones
Agent Work
Mode shows
Agent Status
shows
Icon area shows What this means:
Auto or Man On-DAC-Hold A DAC call is waiting in the queue while you
have a DAC on hold.
Auto or Man Aux or Aux RC
You are performing auxiliary work and not
available to receive DAC or ACD calls.
Note:
(RC if applicable)
If you have just logged in as an agent,
the work mode is blank.
Auto or Man Aux or Aux RC
A DAC call is waiting in the queue while you
are performing auxiliary work and not
available to receive DAC or ACD calls.
(RC if applicable)
Note:
If you have just logged in as an agent,
the work mode is blank.
Auto or Man ACW You are performing after call work and not
available to receive DAC or ACD calls.
Auto or Man ACW A DAC call is waiting in the queue while you
are performing after call work and not
available to receive DAC or ACD calls.
Auto or Man On-ACD
or
Aux Pend or Aux RC
Pend
You are active on a call, are switching into
Aux state, and have no incoming or pending
calls.
On-DAC
Auto or Man On-ACD
or
On-DAC
Aux Pend or Aux RC
Pend
You are active on a call, a DAC call is waiting
in the queue while you are switching into Aux
state.
Note:
If you put a call on hold, then the Agent
Status line displays the On-hold icon.
Table continues…
April 2021 Using Avaya 9608/9608G/9611G IP Deskphones SIP for Call Center Agents 14
Comments on this document? infodev@avaya.com
Page 15

Incoming calls display
Agent Work
Mode shows
Auto or Man On-ACD
Auto or Man On-ACD
Agent Status
shows
or
On-DAC
or
On-DAC
Incoming calls display
Icon area shows What this means:
ACW Pend You are active on a call, you are switching
into ACW state, and have no incoming or
pending calls.
ACW Pend You are active on a call and a DAC call is
waiting in the queue while you are switching
into ACW state.
Note:
If you put a call on hold, then the Agent
Status line displays the On-hold icon.
An incoming call displays the information about the call type.
VDN information
A Vector Directory Number (VDN) is a contact number in Communication Manager that is used as
a point of entry of a call into a Call Center. In many cases, it is the mapping of 1–800 telephone
number that a caller dials to access the services provided by a Call Center. Depending on the
vector programming configuration for your system, an incoming call may traverse multiple VDNs
or stay within the original VDN that received it.
If the call traverses multiple VDNs, one of these VDNs is configured as the active VDN for the call.
The active VDN controls the display of information on the phone that receives the call.
Your phone displays the following information: caller_ID info→ VDN_name, where
caller_ID info is the calling party identification, if available, and VDN_Name is the
administered name of the active VDN before delivery to you. The incoming call displays the active
VDN and Call Redirected indicator (CR) for an unanswered redirected call and Routing On No
Answer (RONA) call.
Adjunct/Switch Application Interface User-to-User Information
When you receive a call with Adjunct/Switch Application Interface User-to-User Information (ASAI
UUI), the UUI feature button lights on the phone screen. When you press the UUI key, the UUI
icon is displayed, followed by the UUI details. The UUI icon is used to distinguish UUI from other
call information, such as collected digits.
April 2021 Using Avaya 9608/9608G/9611G IP Deskphones SIP for Call Center Agents 15
Comments on this document? infodev@avaya.com
Page 16

Introduction to the Avaya Call Center agent phones
Collected digits
The Agent Status line displays the Info icon followed by the collected digits that are associated
with the incoming call.
When this information is cleared from the Agent Status line is dependent on your system
configuration.
Incoming call ring alert type
• All internal ACD or DAC calls ring with an internal alert type.
• All external ACD or DAC calls ring with an external alert type.
• All internal ACD or DAC priority calls ring with a priority alert type.
• All supervisor assist calls ring with the priority alert type.
Message Waiting Indicator
An illuminated red LED in the upper-right corner of your phone and the Message button on the
phone faceplate indicate you have unopened voice mail messages. If Visual Alerting is enabled,
the corner LED also flashes when you receive an incoming call. Depending on your system
configuration, the message waiting indicators indicate messages either for the phone extension, or
for the Agent Login ID after agent login. When configured for Agent Login ID, the message waiting
indications are for the agent when the agent is logged in. Immediately after agent login, the phone
screen displays MWI is indicated for the Agent ID or MWI is indicated for the
extension.
April 2021 Using Avaya 9608/9608G/9611G IP Deskphones SIP for Call Center Agents 16
Comments on this document? infodev@avaya.com
Page 17

Chapter 2: Call Center Agent operations
About Call Center Agent features
Most Call Center features are provisional and configured by your system administrator. You may
not see all the features described in the next two chapters.
The feature name that is displayed on your deskphone is dependent on your deskphone display
settings.
Note:
The half-width mode is not supported for Avaya Aura® Contact Center Elite features.
About Reason Codes
Some Call Center features, such as Agent Logout and Auxiliary Work state, may require you to
enter a Reason Code.
Reason Codes are configured as “Forced” or “Requested”, or “None”. Forced means a Reason
Code must be entered and Requested means you can bypass entering a Reason Code.
If your system administrator did not configure Reason Codes, you may not be prompted to enter a
Reason Code.
Speak to your system administrator or supervisor for more information about the Reason Codes
your system uses.
Logging in as an agent
Before you begin
To log in as an agent, your extension must be registered to the Avaya Aura network and you must
have your agent ID and, if required by your system administrator, your password.
Procedure
1. Press the right or left navigation arrows to access the Features list.
April 2021 Using Avaya 9608/9608G/9611G IP Deskphones SIP for Call Center Agents 17
Comments on this document? infodev@avaya.com
Page 18

Call Center Agent operations
2. From the Features list, select Agent Login using the up or down navigation arrows.
3. Press Select, or press the OK button.
4. Enter your Agent ID.
5. Press Enter or press the OK button.
6. If an agent password has been configured, enter your password. If not, proceed to the
following step.
7. Press Enter, or press the OK button.
Result
The deskphone displays the following information:
• Whether Message Wait Indicator is configured for your Agent ID, or for the extension
• Which agent skills you are assigned and logged into
• Which agent skills you are assigned, but not logged into, perhaps because that assigned skill
has reached a predetermined system limit
Note:
You can view Skills information at any time by pressing the Skills softkey from the Features
screen.
Upon log in, your agent state is Aux Work and you do not have a work mode assigned. You must
select a work mode to become available.
Upon successful login, the Agent Login feature toggles to the Agent Logout feature.
Note:
If you enter an incorrect password, you hear an error beep and the following error message
shows on the display:
Incorrect Password
April 2021 Using Avaya 9608/9608G/9611G IP Deskphones SIP for Call Center Agents 18
Comments on this document? infodev@avaya.com
Page 19

Logging out as an agent
Logging out as an agent
Before you begin
Your system administrator can configure Reason Codes as “Forced” which means a Reason Code
must be entered upon Agent Log Out. Speak to your system administrator or supervisor for more
information about the Reason Codes your system uses.
Procedure
1. Press the right or left navigation arrows to access the Features list.
2. From the Features list, select Agent Logout using the up or down navigation arrows.
3. Press Select, or press the OK button.
4. If configured by your system administrator, enter the Reason Code for logout.
5. Press Enter, or press the OK button.
Result
Upon successful logout, the Agent Logout feature toggles to the Agent Login feature.
Activating After Call Work
About this task
You can activate After Call Work at any time while you are logged in as an agent. If After Call
Work is activated while on a call, the phone indicates it is pending After Call Work until after your
active call is released.
Procedure
1. Press the right or left navigation arrows to access the Features list.
2. From the Features list, select After Call Work using the up or down navigation arrows.
3. Press Select, or press the OK button.
Result
The After Call Work icon (
) appears on the Agent Status Line.
Activating Auxiliary Work
About this task
You can activate the Aux Work state to notify the system that you are unavailable for any call at
this moment.
April 2021 Using Avaya 9608/9608G/9611G IP Deskphones SIP for Call Center Agents 19
Comments on this document? infodev@avaya.com
Page 20

Call Center Agent operations
If configured by your system administrator, you may need to specify a reason by entering a
Reason Code.
Note:
Your Deskphone supports the Interruptible Aux work feature. If configured for your system, this
feature can display messages such as “You are needed” and the system can change your status
to Auto or Manual In.
See About Reason Codes on page 17 for more information.
Procedure
1. Press the right or left navigation arrows to access the Features list.
2. From the Features list, select Aux Work using the up or down navigation arrows.
3. Press Select, or press the OK button.
4. If optional or forced Reason Codes have been configured by your system administrator,
enter the Reason Code .
5. Press Select, or press the OK button.
Result
The Aux Work icon (
entered), or the Aux Work Pending icon ( ) appears on the Top Line display followed by the
Reason Code (if entered).
Note:
You see the Aux Work Pending icon if you activate Aux Work while active on a call. Once the
call has been released, you enter the Aux Work state.
) appears on the Agent Status line followed by the Reason Code (if
Activating Auto In
About this task
The Auto In work mode enables you to go back to the Automatic Call Distribution (ACD) available
queue as soon as you end the ongoing call.
Note:
In most configurations, either the Auto In feature or the Manual In feature is available, but not
both.
Procedure
1. Press the right or left navigation arrows to access the Features list.
2. From the Features list, select Auto In using the up or down navigation arrows.
April 2021 Using Avaya 9608/9608G/9611G IP Deskphones SIP for Call Center Agents 20
Comments on this document? infodev@avaya.com
Page 21

Activating Manual In
3. Press Select, or press the OK button.
Result
The Auto and Available ( ) icons appear on the Agent Status line and you are available to take
calls.
Activating Manual In
About this task
The Manual-in work mode requires that you press the Manual-in button following each call in order
to make yourself available to service the ACD queue.
Note:
In most configurations, either the Auto In feature or the Manual In feature is available, not
both.
When you are in Manual In mode, the system automatically changes your status to After Call
Work (ACW) as soon as you end the ongoing call. To go back to the ACD available queue, you
must again activate Manual In mode.
Note:
Depending on your provisioning, you may be required to enter a Stroke Count or Call Work
Code before being allowed to enter the manual-in mode. Contact your supervisor for
additional information.
Procedure
1. Press the right or left navigation arrows to access the Features list.
2. From the Features list, select Manual In using the up or down navigation arrows.
3. Press Select, or press the OK button.
Result
The Manual and Available ( ) icons appear on the Agent Status line.
Activating Logout Override
About this task
If configured by your system administrator, the system automatically logs out at a predefined time.
If you need to continue working after your scheduled time, use the Logout Override feature to
disable the automatic logging out.
April 2021 Using Avaya 9608/9608G/9611G IP Deskphones SIP for Call Center Agents 21
Comments on this document? infodev@avaya.com
Page 22

Call Center Agent operations
Note:
You must enable the Logout Override feature before your specified logout time.
If you are active on a call and you have reached the predefined logout time set by your
administrator, you hear a beeping sound to indicate logout is pending. You can request logout
override while on the call; the beeping ceases, and you will stay logged in after the call is
released.
Procedure
1. Press the right or left navigation arrows to access the Features list.
2. From the Features list, select Logout Override using the up or down navigation arrows.
3. Press Select, or press the OK button.
Result
The Logout Override icon (
) appears on the Top Line Display if activated before the predefined
logout time is reached.
Agent Greetings
When you work in a call center environment, you can use the Agent Greetings feature. When it is
enabled by your system administrator, you can record greetings with your own voice and play
them back for incoming calls. You can create up to 6 greeting messages and save them on your
phone.
If your system administrator has enabled this option, the phone saves your greetings when you log
out of your station and retrieves them when you log in again. If this option is disabled, the phone
deletes greetings upon agent logout.
When you record your greeting, you can specify its name (up to 14 symbols) type, subtype
(incoming call match criteria), and textual data for the subtype (up to 14 symbols).
When you are logged in as an agent, you can edit and delete your greetings and record new ones.
You can record and use the following types of greetings:
Greeting type
Manual Use the Greetings soft key to manually
Auto Answer (default) The phone automatically plays this
Description Match Criteria
None
start playback of this type of greetings for
an incoming call.
The phone plays this message for
greeting for incoming calls or for any
incoming calls that doesn't fully match
other options.
all incoming calls on default or in
ready mode for incoming calls
when the Agent Status is Available
Table continues…
April 2021 Using Avaya 9608/9608G/9611G IP Deskphones SIP for Call Center Agents 22
Comments on this document? infodev@avaya.com
Page 23

Greeting type Description Match Criteria
VDN Vector Directory Number. Call vectors are
commands that route incoming calls to the
call center and determine how these calls
are processed. The VDN permits each call
to be treated uniquely according to a
number of factors, including the number
the caller dials, the number the caller calls
from, the number of calls in the queue,
and the time of day or day of the week or
both.
Available matches are:
• Anywhere:
The data matches any set of
characters in the incoming callassociated display message.This
is the option set by default.
• On the left:
The data matches the characters
on the left end of the incoming
call-associated display message.
• On the right:
The data matches the characters
on the right end of the incoming
call-associated display message.
• Exact match:
The data matches exactly the
entire incoming call-associated
display message.
ANI Automatic Number Identification. This type
of message makes routing decisions
based on the caller identity and the
number of the originating line.
Available matches are:
• Anywhere:
The data matches any set of
characters in the incoming callassociated display message.
This is the option set by default.
Agent Greetings
• On the left:
The data matches the characters
on the left end of the incoming
call-associated display message.
• On the right:
The data matches the characters
on the right end of the incoming
call-associated display message.
• Exact match:
The data matches exactly the
entire incoming call-associated
display message.
Table continues…
April 2021 Using Avaya 9608/9608G/9611G IP Deskphones SIP for Call Center Agents 23
Comments on this document? infodev@avaya.com
Page 24

Call Center Agent operations
Greeting type Description Match Criteria
Prompted Digits Used in call centers with automatic
recordings that prompt the caller to enter
digits to reach a specific area of
assistance in the call center. For example,
a caller might be prompted to press 1 to
reach Sales or 2 for Billing inquiries.
Available matches are:
• Anywhere:
• On the left:
• On the right:
• Exact match:
The data matches any set of
characters in the incoming callassociated display message.
This is the option set by default.
The data matches the characters
on the left end of the incoming
call-associated display message.
The data matches the characters
on the right end of the incoming
call-associated display message.
The data matches exactly the
entire incoming call-associated
display message.
You can only record two or more greetings for the manual type. You can record and save only one
greeting of other types at a time.
Related links
Creating Agent Greetings on page 24
Recording a greeting message on page 26
Playing a manual greeting during an incoming call on page 26
Retrieving Agent greetings on page 27
Deleting an Agent Greeting on page 27
Creating Agent Greetings
About this task
Use this procedure to record a new Agent greeting and save it on your phone or edit an existing
one.
Before you begin
Ensure that the administrator activates the feature. Contact your administrator for details.
Make sure your headset is plugged in. Recording of Agent greetings is available only from the
headset microphone.
April 2021 Using Avaya 9608/9608G/9611G IP Deskphones SIP for Call Center Agents 24
Comments on this document? infodev@avaya.com
Page 25

Procedure
1. Press Main menu.
2. Navigate to Agent Greetings and press Select.
3. Do one of the following:
• Toggle to an epty greeting line and press Create to create a new greeting.
• Toggle to an existing greeting and press Select to edit an existing greeting.
The phone opens Agent greeting configuration view.
4. Toggle to the Label line and enter the Agent Greeting name.
5. Press one of the following:
• Save to save the name
• Cancel to clear the Label field
If you enter a label which already exists, the phone displays the following topline text :
Failed: greeting duplicated
6. Toggle to Greeting Type and select the desired greeting type.
Agent Greetings
7. Toggle to Recording and press Record.
You can record a message up to 10 seconds.
8. Press one of the following:
• Save to save the name
• Cancel to clear the Label field
9. Toggle to Match Criteria and press the Toggle softkey to select the desired criterion.
This option is not available if you have selected manual greeting type.
10. Press one of the following:
• Save to save the name
• Cancel to clear the Match Criteria field
11. Toggle to Match String and enter a desired match string.
12. Press one of the following:
• Save to save the name
• Cancel to clear the Match String field
This option is not available if you have selected manual greeting type.
Related links
Agent Greetings on page 22
April 2021 Using Avaya 9608/9608G/9611G IP Deskphones SIP for Call Center Agents 25
Comments on this document? infodev@avaya.com
Page 26

Call Center Agent operations
Recording a greeting message
About this task
Use this precedure to record a greeting message in the Recording dialogue box.
Before you begin
Ensure that the administrator activates the feature. Contact your administrator for details.
Make sure your headset is plugged in. Recording of Agent greetings is available only from the
headset microphone.
Procedure
1. Navigate to Main menu > Agent Greetings.
2. Toggle to an existing or empty greeting on the list and press Select.
3. Toggle to Recording and press Record.
The phone opens the Recording dialogue box.
4. When you are ready to speak, press Start and read your greeting message.
5. When you finish, press Stop.
The recording stops after 10 seconds automatically.
6. Press one of the following:
• Save to save the name.
• Cancel to clear the Recording field.
7. (Optional) Press Play to playback your recorded message.
Related links
Agent Greetings on page 22
Playing a manual greeting during an incoming call
About this task
Use this procedure to playback manual greetings when you receive an incoming call.
Before you begin
Make sure you have at least one valid manual greeting recorded on your phone.
Procedure
1. When there is an incoming call, press Greeting softkey.
The phone opens the list of all manual greetings.
2. Toggle to the greeting you want to playback and press Select.
April 2021 Using Avaya 9608/9608G/9611G IP Deskphones SIP for Call Center Agents 26
Comments on this document? infodev@avaya.com
Page 27

Related links
Agent Greetings on page 22
Retrieving Agent greetings
About this task
If have stored your greetings on a backup server, you can use this precedure upon logging into
another Agent device.
Before you begin
Make sure your system administrator has enabled the back up server option for greeting
messages storage.
Procedure
1. Log in with your Agent credentials.
The phone displays the Agent Skills view.
2. Press the Greetings softkey.
Agent Greetings
3. From the Agent Greetings list menu, press Update
The phone displays the following topline text when each greeting is loaded:
Updating...
Related links
Agent Greetings on page 22
Deleting an Agent Greeting
About this task
Use this procedure to permanently delete an Agent greeting message from your phone.
Before you begin
Make sure you have at least one Agent greeting message stored on your phone.
Procedure
1. Press Main menu.
2. Navigate to Agent Greetings and press Select.
3. Toggle to the greeting message you want to delete and press Delete.
The phone deletes the greeting without confirmation.
Related links
Agent Greetings on page 22
April 2021 Using Avaya 9608/9608G/9611G IP Deskphones SIP for Call Center Agents 27
Comments on this document? infodev@avaya.com
Page 28

Chapter 3: Call Center Deskphone
operations
Answering a call
About this task
When you receive an ACD call, the phone displays a string of up to 16 digits on the Agent
Information line, if collected digits are associated with the call.
Procedure
1. When you receive an incoming call, you can:
• Press Answer to answer the call.
• Press Ignore to silence the alerting without answering the call.
2. Press End Call to end the ongoing call.
Result
If the incoming call has collected digits information, it is automatically displayed on the Agent
Information line. The Information icon appears before the digits.
If the incoming call has user-to-user information associated with it, the UUI feature button lights.
When you press the UUI feature button, the phone displays UUI on the Agent Information line,
with the UUI icon appearing before the call information. The UUI replaces the collected digits
information for a short period of time before returning to display the collected digits information.
When you receive an incoming call, the phone uses the Vector Directory Number (VDN) name
feature and displays certain information about the caller on the phone screen.
To use a headset to answer the calls, connect the headset to the phone, and press the Headset
button. The handset is deactivated and the Headset button lights.
Note:
If you press the End Call softkey to end the call, the light on the Headset button might turn
off. You can still use the headset to answer the next call.
April 2021 Using Avaya 9608/9608G/9611G IP Deskphones SIP for Call Center Agents 28
Comments on this document? infodev@avaya.com
Page 29

Handling calls and conferences using Multiple Device Access
Handling calls and conferences using Multiple Device
Access
About this task
With the Avaya Aura® and Multiple Device Access feature, you can have up to ten devices
configured with the same extension number. You can use this extension number to transfer active
calls between your devices.
Before you begin
Ensure that the system administrator has activated the Multiple Device Access feature (MDA) for
your extension.
Procedure
1. Initiate a call from your phone.
2.
If the MDA phone that is joining the call uses a different signaling mode address family, you
might notice the Limited Service icon appear on your device for a brief moment. After the
MDA phone that is joining the call switches to using the signaling mode address family of
the active call, the icon disappears.
Enabling wireless headset bidirectional signaling
Before you begin
Check if the headset supports electronic hook switch (EHS) signaling.
Procedure
1. Press the Main menu.
2. Press Select to select Options & Settings > Call Settings > Headset Signaling.
3.
• Disabled: Disables signaling from the phone to the headset.
• Switch hook and alert: Activates the link to the headset if you press Headset. When
the phone receives an incoming call, you hear the alert tone in the headset.
• Switch hook only: Activates the link to the headset if you press Headset. When the
phone receives an incoming call, you do not hear the alert tone in the headset.
4. Press Save.
April 2021 Using Avaya 9608/9608G/9611G IP Deskphones SIP for Call Center Agents 29
Comments on this document? infodev@avaya.com
Page 30

Call Center Deskphone operations
Viewing contact presence status
Procedure
1. Press Contacts.
2. Scroll to the required contact.
The phone displays presence icon for the contact to show the status.
Changing the presence status
About this task
The phone displays your presence status on the top line that you can change manually.
Procedure
1. Press Main Menu.
2. Press Select to select My Presence.
3. Scroll and press Select to choose any of the following options:
• Automatic: To let the phone manage the presence state.
• Available: To show you are available and open for communication.
• Busy: To show you are busy.
• Away: To show you are away from the phone.
• Do not Disturb: To show you are not open for communication.
• Out of Office: To show you are out of office.
• Offline: To appear invisible. The phone continues to keep the presence subscriptions
with the Presence Server. The phone also keeps receiving notifications for the contacts
for whom the phone subscribed to watch.
4. Press Save.
Enabling SAC when DND is active
About this task
Perform the following procedure to activate the Send All Calls (SAC) feature to redirect calls to the
redirection number when you have manually set the presence status to Do Not Disturb (DND).
This feature is available only if your administrator configured it for you.
April 2021 Using Avaya 9608/9608G/9611G IP Deskphones SIP for Call Center Agents 30
Comments on this document? infodev@avaya.com
Page 31

Entering Stroke Counts
Procedure
1. Press Main Menu.
2. Press Select to select Options & Settings > Advanced Options > Presence
Integration.
3. Select DND affects SAC and change the value to Yes.
4. Press Save.
Entering Stroke Counts
The Stroke Count feature allows your administrator to define up to nine different customer-related
events using keys 0 through 9.
Note:
Stroke Count 0 is used for tracking any audio quality issues. It can be entered while in any
agent state or work mode as long as you are logged in as an agent.
About this task
Use these pre-defined keys to report the number of times that a particular event occurs. On a
single call, you can send any of the configured stroke counts and repeat them as many times as
the incident occurs.
To enter a stroke count, you must be logged in and be in one of the following states:
• Active state on an ACD or DAC call
• ACW state after disconnecting from a call
• Timed ACW state after disconnecting from a call
If you are not in any of these states, the Deskphone displays “INVALID STATE” on the Top Line
and the Stroke Count information is not sent. As well, the LED associated with this feature or the
touch phone equivalent will flutter.
Your Feature screen displays Stroke Count (#), where # is the number from 0 to 9 that your
system administrator has defined for specific customer events.
Contact your supervisor or your system administrator for more information about the defined
events.
Procedure
1. Press the right or left navigation arrows to access the Features list.
2. From the Features list, select Stroke Count using the up or down navigation arrows.
3. Press Select, or press the OK button.
Result
The Stroke Count information is sent to the CC Elite server.
April 2021 Using Avaya 9608/9608G/9611G IP Deskphones SIP for Call Center Agents 31
Comments on this document? infodev@avaya.com
Page 32

Call Center Deskphone operations
Entering Call Work Codes
About this task
The Call Work Code feature allows you to enter a Call Work Code, if configured by your system
administrator. The Call Work Code can be up to 16 digits in length.
To enter Call Work Codes, you must be logged in and be in one of the following states:
• Active on an ACD or DAC call
• ACW state after disconnecting from a call
• Timed ACW state after disconnecting from a call
Procedure
1. Press the right or left navigation arrows to access the Features list.
2. From the Features list, select Call Work Code using the up or down navigation arrows.
3. Press Select, or press the OK button.
4. Enter the code.
5. Press Enter or press the # key, or press the OK button.
Result
The Call Work code is sent to the CC Elite server.
Viewing Queue Stats
About this task
The Queue Stats feature displays the following information on the deskphone screen for 10
seconds:
• The configured name of the skill group associated with the Queue Stats feature button
• Time of the oldest call in queue
• Number of calls in queue
The Queue Stats feature button label is displayed as Queue Stats followed by the skill number in
brackets; for example, Queue Stats (4).
Procedure
1. Press the right or left navigation arrows to access the Features list.
2. From the Features list, select Queue Stats using the up or down navigation arrows.
3. Press Select, or press the OK button.
Result
The Queue Stats are displayed on the Agent Information line.
April 2021 Using Avaya 9608/9608G/9611G IP Deskphones SIP for Call Center Agents 32
Comments on this document? infodev@avaya.com
Page 33

Viewing Vu Stats
If VuStats is active when you press the Queue Stats feature, the Deskphone deactivates the
VuStats session when Queue Stats are received and the Agent information line is overwritten with
the Queue Stats information.
Note:
In addition to the above information displayed by pressing a Queue Stats feature button, the
Deskphone also displays icons associated with the feature button, based on queue statistics
received from CC Elite, which are associated with the skill assigned to the Queue Stats
feature button.
If there is at least one call in the skill queue, the feature lamp state turns solid. If the
configured threshold for the number of calls in queue has been reached, the appropriate icon
is displayed ( ). If the configured threshold for the oldest call in queue is reached, the
appropriate icon is displayed (
feature lamp state displays the flutter state.
). When either of the threshold conditions are reached, the
Viewing Vu Stats
About this task
The VuStats feature allows the Deskphone to display specific reporting details, such as
information related to VDNs, Skills, Trunks, or Agents.
The format of the information that the Deskphone displays depends on how your system
administrator has administered the format number associated with the feature button. Format
numbers supported are 1 to 50. This information is displayed on the Agent Information Line.
If the information exceeds one line, select the Agent Information Line by pressing the feature
button next to it, and use the All soft key to view the full VuStats information. It is important to note
that if the current format number is linked to another format number through format number
configuration, then a Next soft key would be displayed when the Agent Information Line is
selected while VuStats is being displayed. Use Next to view the VuStats information associated
with the next format number. Use ExitVu on the Agent Information Line to deactivate the VuStats
session
Procedure
1. Press the right or left navigation arrows to access the Features list.
2. From the Features list, select Vu Stats using the up or down navigation arrows.
3. Press Select, or press the OK button.
4. Press the VuStats information displayed on the Agent Information line.
5. Enter the resource (Skill, VDN, Agent ID, or Trunk Group) number as prompted by the
Deskphone and press Enter.
6. Press Next to view the next Vu Stats format, if applicable.
April 2021 Using Avaya 9608/9608G/9611G IP Deskphones SIP for Call Center Agents 33
Comments on this document? infodev@avaya.com
Page 34

Call Center Deskphone operations
7. Press All to view the Vu Stats on the entire display screen, if the information exceeds one
line.
8. Press Back to return to the single line view.
9. Press Exit to deactivate the current Vu Stats session.
Activating Supervisor Assist
About this task
Use the Supervisor Assist feature if you need assistance from your supervisor during a call, or if
you are not on a call and need to contact your supervisor. When your supervisor answers the call,
you can opt to conference your supervisor with the caller, transfer the ongoing call to your
supervisor, or drop your supervisor and go back to the current call.
The Supervisor Assist feature button label displays as Assist (#), where # is the skill number.
However, the skill number may be blank. If the skill number is blank, CC Elite determines the
appropriate skill number to be associated with the Supervisor Assist call.
Procedure
1. Press the right or left navigation arrows to access the Features list.
2. From the Features list, select Assist using the up or down navigation arrows.
3. Press Select, or press the OK button. The active call is put on hold and you are directed to
your supervisor.
Result
If you are active on a call, your call is placed on hold while your supervisor is contacted.
After your supervisor answers the call, your display still displays the Conf and Trans softkeys.
Viewing ASAI UUI
About this task
If the incoming call has UUI information associated with it, the UUI Info feature button is lit. When
you press the UUI Info button, the Deskphone displays the UUI information on the Agent
Information line, with the UUI icon (
information replaces the collected digits information for a short period of time before returning to
display the collected digits information.
) appearing before the call information. The UUI
Procedure
1. Press the UU Info feature button to view the information associated with the call.
April 2021 Using Avaya 9608/9608G/9611G IP Deskphones SIP for Call Center Agents 34
Comments on this document? infodev@avaya.com
Page 35

Call observation
2. If the UUI associated with the call is too long to fit in the screen, press Next to see the
entire UUI.
3. Press Exit to clear UUI information from the screen.
Call observation
You can use the Service Observe feature to observe an incoming call, outgoing call to a
deskphone, an agent, or a VDN. You can also change to the talk mode during a call observation to
assist the agent or to manage the call quality.
You can activate the Service Observe feature only when you are not logged in as an agent or
when you are logged in as an agent, but you are in the AUX state and the call is not on hold. The
deskphone displays the not available icon ( ) and beeps an error message
Feature not available
if you activate the Service Observe feature without logging in as an agent.
If the observed deskphone has multiple calls, you can observe only the active call.
You can activate the Service Observe feature in one of the following modes:
• Basic: Activates the feature in the listen-only mode. You can change between talk and listenonly modes, if configured via Avaya Aura® System Manager.
• No-talk: Activates the feature in the listen-only mode, and you cannot change to the talk
mode.
• Next-Call: Activates the feature in the listen-only mode when the next call starts. You can
change between talk and listen-only modes, if configured via Avaya Aura® System Manager.
• By-Location: Activates the feature in the listen-only mode for a VDN. You must provide a
VDN and a location ID. You can observe the call only when the agent at the required location
connects. You can change between talk and listen-only modes, if configured via Avaya Aura
System Manager.
The deskphone displays the Service Observe feature status in the Agent Information Line. The
deskphone deactivates the Service Observe feature if you make or answer a call when the feature
is active.
Use the Computer Telephony Integration (CTI) client to remotely activate or deactivate the Service
Observe feature. For information on using the CTI client, see Avaya Aura® Application Enablement
Services documentation.
®
April 2021 Using Avaya 9608/9608G/9611G IP Deskphones SIP for Call Center Agents 35
Comments on this document? infodev@avaya.com
Page 36

Call Center Deskphone operations
Activating or deactivating call observation
About this task
Use the following procedure to observe a call of another deskphone, agent, or VDN. The
deskphone displays the observing modes depending on the configuration made by your
administrator.
Before you begin
Ensure that you are not logged in as an agent. If you have already logged in, ensure that you are
in the AUX mode.
• To activate call observation:
1. Go to the Features screen.
2. Select Service Observe.
3. Select one of the following options: Basic, No-talk, Next-Call, or By-Location.
4. Enter the deskphone or the location details that you want to observe.
5. Press Enter.
• To deactivate call observation, perform one of the following actions:
- While on the call observation line, press the Release softkey.
- On the Features screen, select Service Observe.
- Answer an incoming call.
- Select an idle call appearance line.
- Change to an on-hold call.
- Go on-hook.
- Logout.
Assisting an agent on an observed call
About this task
Use the following procedure to assist an agent whose call you are observing. The caller cannot
hear you when you are speaking to assist the agent.
Before you begin
Ensure that your administrator has configured the coaching feature and you are already observing
a call.
April 2021 Using Avaya 9608/9608G/9611G IP Deskphones SIP for Call Center Agents 36
Comments on this document? infodev@avaya.com
Page 37

Assisting an agent on an observed call
Procedure
While on the call observer line, press the Coach softkey to observe and End Coach softkey to
stop observing.
April 2021 Using Avaya 9608/9608G/9611G IP Deskphones SIP for Call Center Agents 37
Comments on this document? infodev@avaya.com
Page 38

Index
A
activate call observation ...................................................... 36
After Call Work .................................................................9, 10
activating ...................................................................... 19
pending .........................................................................10
Agent Greetings
Creating ........................................................................ 24
Deleting ........................................................................ 27
overview ....................................................................... 22
Playback ....................................................................... 26
Recording .....................................................................
Updating ....................................................................... 27
agent information line ............................................................ 8
agent state ............................................................................. 8
agent status line .....................................................................7
display combinations .................................................... 12
agent work mode ............................................................... 8, 9
ASAI UUI information ...........................................................15
assist an agent on an observed call .................................... 36
Auto in activating .................................................................
Auxiliary Work ..................................................................9, 10
activating ...................................................................... 19
pending .........................................................................10
Available .......................................................................... 9, 10
pending .........................................................................10
26
20
C
E
enable wireless headset ...................................................... 29
Enabling SAC when DND is active ......................................
30
F
Forced Logout ..................................................................9, 11
override .....................................................................9, 11
pending ......................................................................... 11
H
H.323 phone differences ........................................................6
I
icon area ................................................................................
Interruptible Aux Work ...........................................................
L
legal notices .............................................................................
Log in ................................................................................... 17
Log out .................................................................................19
Logout Override
activating ...................................................................... 21
8
9
Call Center agent phone screens .......................................... 7
call observation ....................................................................
calls
answering ..................................................................... 28
collected digits ........................................................ 12, 16
held ............................................................................... 11
incoming ..................................................................11, 15
in queue ........................................................................
multiple device access ..................................................29
releasing ....................................................................... 28
switching phone ............................................................29
threshold warning ..........................................................11
UUI ...................................................................
VDN information ........................................................... 15
Call Work Code
entering .........................................................................32
change presence status .......................................................30
collected digits ......................................................... 12, 15, 28
configured features .............................................................. 17
12, 15, 34
35
11
D
deactivate call observation .................................................. 36
display icons ........................................................................ 10
M
Manual In
activating ...................................................................... 21
multiple device access
handling calls ................................................................29
handling conference ..................................................... 29
MWI, Voicemail ....................................................................16
Q
Queue Stats ......................................................................... 11
viewing ..........................................................................32
R
reason codes ....................................................................... 17
entering .........................................................................20
RONA information ................................................................15
S
service observe ....................................................................
35
April 2021 Using Avaya 9608/9608G/9611G IP Deskphones SIP for Call Center Agents 38
Comments on this document? infodev@avaya.com
Page 39

signaling ...............................................................................29
skills ..................................................................................... 18
Stroke Count ........................................................................31
zero ...............................................................................31
Supervisor Assist
activating ...................................................................... 34
T
top line display ....................................................................... 7
U
Index
UUI information ..................................................
12, 15, 28, 34
V
VDN information ............................................................ 15, 28
view contact presence status ...............................................30
Vu Stats
viewing ..........................................................................33
April 2021 Using Avaya 9608/9608G/9611G IP Deskphones SIP for Call Center Agents 39
Comments on this document? infodev@avaya.com
 Loading...