

Page 1
OWIM GmbH & Co. KG
Stiftsbergstraße 1
D-74167 Neckarsulm
Model No.: 103806-14-01/ 103806-14-02/
103806-14-03/ 103806-14-04/ 103806-14-05/
103806-14-06
Version: 10/2014
IAN 103806
103806_15_Auriol_ES_PT_02.indb 1 8/20/14 12:17 PM
5
Page 2
RELOJ DE PULSERA
Instrucciones de utilización y de seguridad
OROLOGIO DA POLSO
Indicazioni per l’uso e per la sicurezza
RELÓGIO DE PULSO
Instruções de utilização e de segurança
WRISTWATCH
Operation and safety notes
ARMBANDUHR
Bedienungs- und Sicherheitshinweise
IAN 103806
103806_15_Auriol_ES_PT_02.indb 2 8/20/14 12:17 PM
Page 3

103806_15_Auriol_ES_PT_02.indb 3 8/20/14 12:17 PM
ES Página 5
IT/MT Pagina 16
PT Página 27
GB/MT Page 38
DE/AT/CH Seite 49
Page 4
103806_15_Auriol_ES_PT_02.indb 3 8/20/14 12:17 PM
103806-14-01
103806-14-02/04
3
Page 5
4
103806_15_Auriol_ES_PT_02.indb 4 8/20/14 12:17 PM
103806-14-03
103806-14-05/06
Page 6
RELOJ DE PULSERA
� Uso correcto
El reloj de pulsera indica la hora y la fecha, y
dispone de una función de alarma y de cronómetro.
El producto no está concebido para el uso comercial.
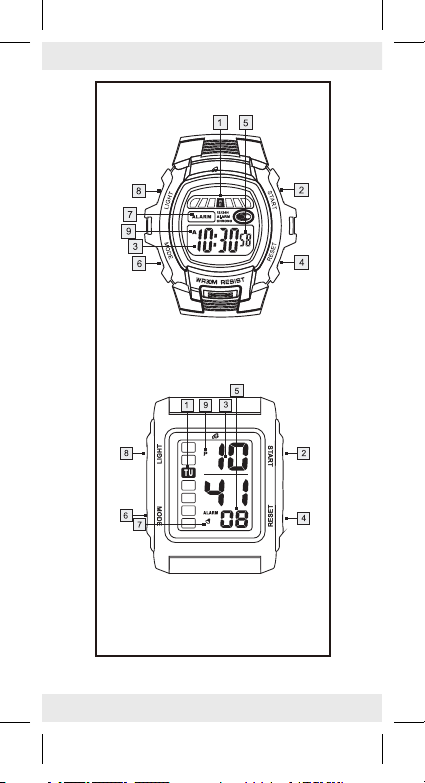
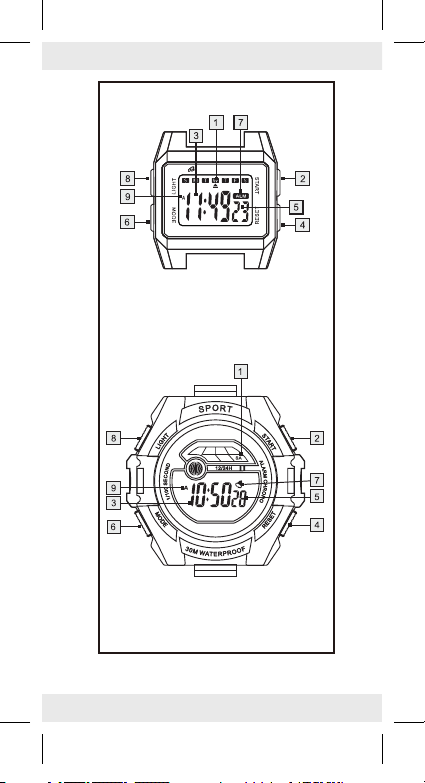
� Descripción de las piezas
Indicador de días de la semana
1
Botón de START
2
Indicador de hora
3
Tecla RESET
4
Indicador de segundos / Indicador “H”
5
Tecla MODE
6
Símbolo de alarma
7
Botón LIGHT
8
Indicador “A” / “P”
9
Indicaciones de
seguridad
¡GUARDAR TODAS LAS ADVERTENCIAS E
INDICACIONES DE SEGURIDAD POR SI LAS
NECESITA EN UN FUTURO!
103806_15_Auriol_ES_PT_02.indb 5 8/20/14 12:17 PM
5 ES
Page 7
sin vigilancia con el material de embalaje.
Existe peligro de asfixia.
¡ADVERTENCIA!
Podrían tra garse las baterías, lo cual puede
suponer un peligro mortal. Si se ha tragado
una batería, debe buscar asistencia médica
inmediatamente.
De ninguna manera desarme el producto.
Las reparaciones inadecuadas pueden poner
en grave riesgo al usuario. Deje que sólo un
especialista lleve a cabo las reparaciones.
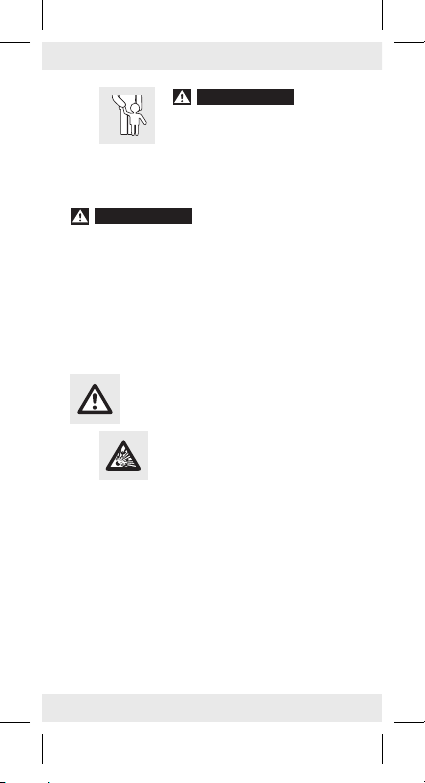
¡ADVERTENCIA!
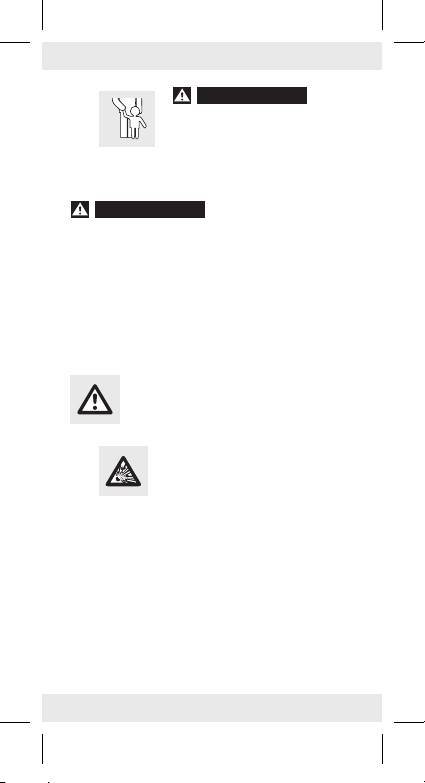
¡PELIGR O DE MUERTE Y
ACCIDENTES PARA BEBÉS Y
NIÑOS! Nunca deje a los niños
¡PELIGRO DE MUERTE!
Indicaciones de
seguridad sobre baterías
¡CUIDADO! ¡PELIGR O DE
Retire inmediatamente la pila agotada del
¡Las pilas no pertenecen a la basura doméstica!
¡Todos los usuarios están obligados legalmente
Mantenga las pilas alejadas de los niños,
6 ES
103806_15_Auriol_ES_PT_02.indb 6 8/20/14 12:17 PM
EXPLOSIÓN! ¡Nunca recargue
las pilas!
aparato. ¡Existe elevado peligro de derrame!
a eliminar las pilas correctamente!
no las eche al fuego, no las ponga en
cortocircuito, ni las desarme.
Page 8
El incumplimiento de las indicaciones puede
ocasionar que la pila se descargue más allá
de su tensión final. Esto ocasionará riesgo de
derrame. ¡Si la pila se hubiese derramado en
su aparato, retírela inmediatamente a fin de
evitar daños en el aparato!
Evite el contacto con la piel, los ojos y las
mucosas. ¡En caso de contacto con el ácido
de la pila, enjuague la zona afectada con
abundante agua y/o consulte un médico!
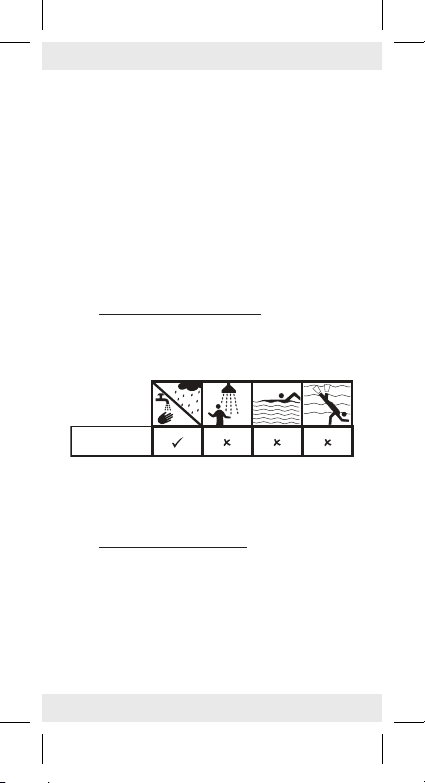
� Resistencia al agua
Este reloj es sumergible hasta 3 bar según
DIN 8310.
resistencia al
agua 3 bar
No pulse ningún botón cuando el reloj entre en
contacto con el agua.
� Cambio de la pila
Nota: Las baterías deben ser sustituidas en
una tienda especializada.
Para evitar daños de la maquinaria. deberá
dejar en manos de un especialista tanto
la sustitución de la pila como cualquier
reparación.
103806_15_Auriol_ES_PT_02.indb 7 8/20/14 12:17 PM
7 ES
Page 9
Deseche las pilas usadas respetando el medio
ambiente.
No tire el reloj a la basura doméstica.
� Manejo
Pulse el botón MODE 6 para ajustar el modo
deseado: modo hora > cronómetro > alarma >
ajuste de hora > modo hora.
� Ajustar hora y fecha
1. Pulse tres veces el botón MODE 6. El indicador
de segundos 5 y el indicador de día de la
semana 1 parpadean en la pantalla.
2. Pulse el botón START 2 para poner a 0 el
indicador de segundos 5.
3. Pulse el botón RESET 4 para confirmar
su introducción. El indicador de minutos
parpadea en la pantalla.
4. Pulse el botón START 2 para ajustar los
minutos.
5. Pulse el botón RESET 4 para confirmar su
introducción. El
indicador de horas parpadea en la pantalla.
6. Pulse el botón START 2 para ajustar la hora.
Nota: al ajustar la hora, tenga en cuenta los
símbolos A, P 9 y H 5 que aparecen en la
pantalla. A y P (A = a.m. / P = p.m.) indican el
formato de 12 horas. H indica el formato de
24 horas. Pulse el botón START
el valor y el formato deseados. Pulse el botón
para confirmar su introducción.
RESET
4
para ajustar
2
8 ES
103806_15_Auriol_ES_PT_02.indb 8 8/20/14 12:17 PM
Page 10
7. Pulse el botón RESET 4 para confirmar su
introducción. El indicador de fecha parpadea
en la pantalla.
8. Pulse el botón START 2 para ajustar la fecha.
9. Pulse el botón RESET 4 para confirmar su
introducción. El indicador del mes parpadea
en la pantalla.
10. Pulse el botón START 2 para ajustar el mes.
11. Repita los pasos 8 y 9 para ajustar el día de
la semana 1. Los días de la semana están
abreviados como sigue:
MO = lunes
TU = martes
WE = miércoles
TH = jueves
FR = viernes
SA = sábado
SU = domingo
12. Pulse el botón MODE 6 para acceder a la
visualización estándar.
� Uso de iluminación
Pulse y mantenga el botón LIGHT 8 para
encender la luz.
Vuelva a soltar el botón LIGHT 8 y la luz
se apagará después de aproximadamente 3
segundos.
� Visualizar la fecha
Pulse el botón START 2 mientras el reloj se
encuentre en el modo hora. La fecha aparece
en la pantalla.
103806_15_Auriol_ES_PT_02.indb 9 8/20/14 12:17 PM
9 ES
Page 11
Vuelva a soltar el botón START 2 para volver
a acceder al modo hora.
� Ajustar la alarma
Pulse el botón MODE 6 dos veces para
acceder al modo alarma. El indicador de hora
de la alarma parpadea en la pantalla.
Pulse el botón START 2 para ajustar la hora.
Pulse el botón RESET 4 para confirmar su
introducción. El indicador de minutos parpadea
en la pantalla.
Pulse el botón START 2 para ajustar los
minutos.
Pulse el botón RESET 4 para confirmar su
introducción.
Pulse el botón MODE 6 para acceder al
modo hora.
� Conectar / desconectar
la alarma
Conecte y desconecte la alarma pulsando y
manteniendo el botón START 2 y el botón
RESET 4 en el modo tiempo. Cuando la
alarma está conectada, aparece el símbolo de
alarma 7 en la pantalla.
Cuando la alarma suena, pulse el botón START
para activar la función de repetición.
2
Después de 4 o 5 minutos vuelve a sonar la
alarma. Mientras siga pulsando el botón START
volverá a sonar la alarma.
2
10 ES
103806_15_Auriol_ES_PT_02.indb 10 8/20/14 12:17 PM
Page 12
Pulse el botón RESET 4 para detener la
alarma. Si no pulsa ningún botón, la alarma
sonará durante aproximadamente 1 minuto.
Pulse el botón RESET 4 mientras el reloj se
encuentre en el modo hora para visualizar la
hora de alarma ajustada.
Cuando el reloj se encuentre en el modo
hora, pulse y mantenga el botón RESET 4.
A continuación pulse el botón START 2 para
desconectar la alarma. El símbolo de alarma
desaparece.
7
� Activar / desactivar
el tono de señal
Nota: a cada hora en punto el reloj emite un breve
tono de señal.
Pulse el botón MODE 6 hasta que aparezca
el indicador de hora 3 en la pantalla.
Mantenga pulsado el botón RESET 4 y pulse
simultáneamente el botón MODE 6. Todos los
días del indicador de día de la semana 1 se
iluminan. El tono de señal está activado.
Mantenga pulsado el botón RESET 4 y pulse
simultáneamente el botón MODE 6. Los
indicadores de todos los días de la semana 1
se apagan. El tono de señal está desactivado.
� Uso del cronómetro
Pulse el botón MODE 6 hasta que aparezca
el indicador de hora 3 en la pantalla.
103806_15_Auriol_ES_PT_02.indb 11 8/20/14 12:17 PM
11 ES
Page 13
Pulse el botón MODE 6 una vez para
acceder al modo cronómetro.
Pulse el botón START 2 para iniciar el
cronómetro.
Vuelva a pulsar el botón START 2 para
detener el cronómetro.
Pulse el botón RESET 4 para poner el
cronómetro a 0.
Medir el tiempo intermedio:
Pulse el botón MODE 6 hasta que aparezca
el indicador de hora 3 en la pantalla.
Pulse el botón MODE 6 una vez para
acceder al modo cronómetro.
Pulse el botón START 2 para iniciar el
cronómetro.
Pulse el botón RESET 4 para visualizar
el tiempo intermedio. El cronómetro sigue
funcionando en un segundo plano.
Vuelva a pulsar el botón RESET 4 para volver
al tiempo cronometrado.
Pulse el botón START 2 para detener el
cronómetro.
Pulse el botón RESET 4 para poner el
cronómetro a 0.
� Limpieza y mantenimiento
Limpie el producto con un paño seco y sin
pelusa. Una gamuza para gafas resulta ideal.
12 ES
103806_15_Auriol_ES_PT_02.indb 12 8/20/14 12:17 PM
Page 14
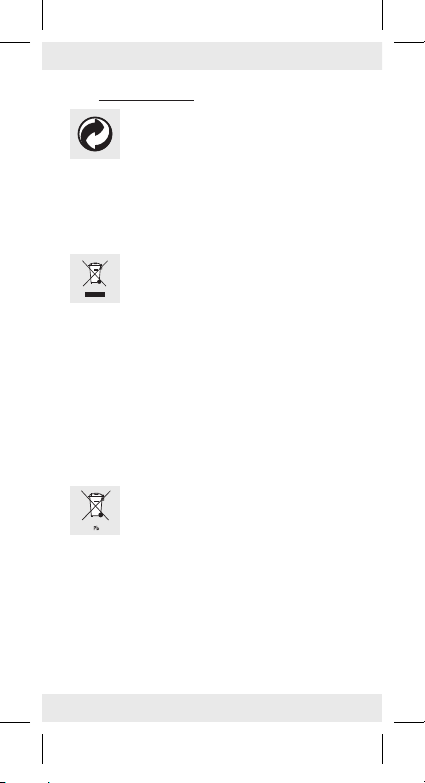
� Eliminación
El embalaje está compuesto por
materiales no contaminantes que
pueden ser eliminados en el centro de
Puede averiguar las posibilidades de eliminación
del producto estropeado en la administración de su
comunidad o ciudad.
Las pilas defectuosas o usadas deben ser recicladas
según lo indicado en la directiva 2006/66/EC. Para
ello devuelva las pilas y/o el aparato en los puntos
de recogida indicados.
Las pilas no deben eliminarse junto a los residuos
domésticos. Las pilas pueden contener metales
pesados tóxicos que debe tratarse conforme a
la normativa aplicable a los residuos especiales.
Los símbolo químicos de los metales pesados son:
Cd = Cadmio, Hg = Mercurio, Pb = Plomo. Las
pilas deben reciclarse en el punto de recolección
específico para ello.
reciclaje local.
No elimine el producto estropeado
con los desechos domésticos, sino
hágalo de manera correcta. Proteja
así el medio ambiente. Se puede
informar en la oficina competente de
su administración sobre los puestos de
recogida y sus horarios de atención al
público.
¡Daño medioambiental debido
a un reciclaje incorrecto de las
pilas!
13 ES
103806_15_Auriol_ES_PT_02.indb 13 8/20/14 12:17 PM
Page 15

� GARANTÍA
El aparato ha sido fabricado cuidadosamente
siguiendo exigentes normas de calidad y ha sido
probado antes de su entrega. En caso de defecto
del producto, usted tiene derechos legales frente
al vendedor del mismo. Nuestra garantía (abajo
indicada) no supone una restricción de dichos
derechos legales.
Este aparato tiene una garantía de 3 años a partir
de la fecha de compra. El plazo de garantía
comienza a partir de la fecha de compra. Por favor,
conserve adecuadamente el justificante de compra
original. Este documento se requerirá como prueba
de que se realizó la compra.
Si en el plazo de tres años a partir de la fecha de
compra se produce un fallo de material o fabricación
en este producto, repararemos el producto o lo
sustituiremos gratuitamente por un producto nuevo
(según nuestra elección). La garantía quedará
anulada si el producto resulta dañado o es utilizado
o mantenido de forma inadecuada.
La garantía cubre defectos de materiales o de
fabricación. Esta garantía no cubre aquellos
componentes del producto sometidos a un desgaste
normal y que, por ello, puedan considerarse piezas
de desgaste (por ej. las pilas). Tampoco cubre
daños de componentes frágiles como, por ejemplo,
los interruptores, baterías y piezas de cristal.
14 ES
103806_15_Auriol_ES_PT_02.indb 14 8/20/14 12:17 PM
Page 16
Además, la garantía tampoco cubre la pérdida de
impermeabilidad. La resistencia al agua no es una
propiedad duradera, por lo que debe revisarse
regularmente. Tenga en cuenta que si permite la
apertura y reparación del reloj por personas no
autorizadas, perderá los derechos de garantía.
103806_15_Auriol_ES_PT_02.indb 15 8/20/14 12:17 PM
15 ES
Page 17
OROLOGIO DA POLSO
� Utilizzo secondo la
destinazione d’uso
L’orologio da polso visualizza orario e data e
dispone di una funzione di allarme e di cronometro.
Il prodotto non è determinato per l‘uso professionale.
� Descrizione dei componenti
Visualizzazione del giorno della settimana
1
Tasto START
2
Visualizzazione dell’orario
3
Tasto RESET
4
Visualizzazione dei secondi / Visualizzazione ”H”
5
Tasto MODE
6
Simbolo dell’allarme
7
Tasto LIGHT
8
Visualizzazione “A”/”P”
9
Versione delle
informazioni
CONSERVARE LE INDICAZIONI DI SICUREZZA
E LE ISTRUZIONI PER EVENTUALI NECESSITÀ
FUTURE!
16 IT/MT
103806_15_Auriol_ES_PT_02.indb 16 8/20/14 12:17 PM
Page 18
mai i bambini incu stoditi con il materiale di
imballaggio.Pericolo di soffocamento.
ATTENZIONE!
Le batterie possono essere ingoiate con
conseguente pericolo di vita. Se è stata
ingoiata la batteria, rivolgersi immediatamente
alle cure di un medico.
Non smontare mai il prodotto. Riparazioni
inadeguate possono causare notevoli pericoli
per l’utente. Lasciare eseguire le riparazioni
solo da personale specializzato.
ATTENZIONE!
PERICOLO DI VITA E DI
LESIONI PER BAMBINI E
INFANTI! Non lasciare
PERICOLO DI VITA!
Avvertenze di sicurezza
relative alle batterie
ATT ENZIONE! PERICOLO DI
Rimuovere immediatamente la batteria scarica
dall’apparecchio. Esiste il pericolo di fuoriuscita
del liquido dalle batterie!
Le batterie non vanno smaltite tra i rifiuti
domestici!
Ogni consumatore ha l’obbligo per legge di
smaltire le batterie in modo appropriato!
Tenere le batterie lontano dalla portata dei
bambini, non gettarle nel fuoco, non metterle
sotto cortocircuito e non smontarle.
ESPLOSIONE! Non ricaricare
mai le batterie!
103806_15_Auriol_ES_PT_02.indb 17 8/20/14 12:17 PM
17 IT/MT
Page 19

In caso di inosservanza delle avvertenze, la
batteria può scaricarsi per via della tensione
finale. In questo caso esiste il rischio di
fuoriuscita del liquido. Nel caso in cui la
batteria all’interno dell’apparecchio sia scaduta
lasciarla rimuovere immediatamente per evitare
danni al prodotto!
Evitare il contatto con la pelle, gli occhi e le
mucose. In caso di contatto con l’acido delle
batterie, sciacquare subito la parte colpita con
acqua abbondante e / o rivolgersi subito a un
medico!
� Resistenza all’acqua
Ai sensi delle disposizioni della norma
DIN 8310 questo orologio è impermeabile
all’acqua fino a 3 bar.
impermeabile all’
acqua fino a 3 bar
Non toccare alcun tasto quando l’orologio
entra in contatto con l’acqua.
� Sostituzione della batteria
Nota: Far sostituire le batterie in un negozio
specializzato.
18 IT/MT
103806_15_Auriol_ES_PT_02.indb 18 8/20/14 12:17 PM
Page 20

Per evitare danni al meccanismo dell’orologio,
fare eseguire la sostituzione della batteria
e le riparazioni solamente da personale
specializzato.
Smaltire le batterie usate senza recare
nocumento all’ambiente.
Non gettare l’orologio nella spazzatura
domestica!
� Funzionamento
Per impostare la modalità desiderata premere il
tasto MODE 6: Modalità orario >
Cronometro > Allarme > Impostazione
dell’orario > Modalità orario.
� Impostazione dell’orario e
della data
1. Premere tre volte il tasto MODE 6. Sul display
lampeggiano la visualizzazione dei secondi 5
nonché quella del giorno della settimana 1.
2. Per azzerare la visualizzazione dei secondi 5
premere il tasto START 2.
3. Per confermare l’immissione premere il
tasto RESET 4. Sul display lampeggia la
visualizzazione dei minuti.
4. Per impostare i minuti premere il tasto START 2.
5. Per confermare l’immissione premere il
tasto RESET
visualizzazione delle ore.
6. Per impostare le ore premere il tasto START
. Sul display lampeggia la
4
2
.
103806_15_Auriol_ES_PT_02.indb 19 8/20/14 12:17 PM
19 IT/MT
Page 21

Nota: Impostando il valore delle ore fare
attenzione ai simboli A, P 9 e H 5 che
appaiono sul display. Le lettere A e P (A =
ore antimeridiane / P = ore successive al
mezzogiorno) vengono utilizzate qualora si
scelga il formato a 12 ore. La lettera H viene
utilizzata qualora si scelga il formato a 24 ore.
Per impostare il valore e il formato desiderati
premere il tasto START 2. Per confermare
l’immissione premere il tasto RESET 4.
7. Per confermare l’immissione premere il
tasto RESET 4. Sul display lampeggia la
visualizzazione della data.
8. Per impostare la data premere il tasto START 2.
9. Per confermare l’immissione premere il
tasto RESET 4. Sul display lampeggia la
visualizzazione del mese.
10. Per impostare il mese premere il tasto START 2.
11. Per impostare il valore del giorno della
settimana 1 ripetere i passi 8 e 9. I giorni della
settimana vengono abbreviati con le seguenti
sigle:
MO = Lunedì
TU = Martedì
WE = Mercoledì
TH = Giovedì
FR = Venerdì
SA = Sabato
SU = Domenica
12. Per accedere alla visualizzazione standard
premere il tasto MODE 6.
20 IT/MT
103806_15_Auriol_ES_PT_02.indb 20 8/20/14 12:17 PM
Page 22

� Utilizzo dell’illuminazione
Per accendere la luce premere e tenere premuto
il tasto LIGHT 8.
Una volta rilasciato il tasto LIGHT 8, la luce si
spegnerà dopo circa 3 secondi.
� Visualizzazione della data
Premere il tasto START 2 mentre l’orologio si
trova in modalità orario. Sul display appare
la data.
Per accedere nuovamente alla modalità orario
rilasciare il tasto START 2.
� Impostazione dell‘allarme
Per accedere alla modalità di allarme premere
due volte il tasto MODE 6. Sul display appare
la visualizzazione dell’orario di allarme.
Per impostare le ore premere il tasto START 2.
Per confermare l’immissione premere il
tasto RESET 4. Sul display lampeggia la
visualizzazione dei minuti.
Per impostare i minuti premere il tasto START 2.
Per confermare l’immissione premere il tasto
RESET 4.
Per accedere alla modalità orario premere il
tasto MODE 6.
103806_15_Auriol_ES_PT_02.indb 21 8/20/14 12:17 PM
21 IT/MT
Page 23

� Accensione / spegnimento
dell‘allarme
Accendere e spegnere l’allarme premendo e
mantenendo premuto il tasto START 2 e il tasto
RESET 4 nella modalità orario. Se l’allarme
è acceso, sul display appare il simbolo
dell’allarme 7.
Se l’allarme risuona, attivare la funzione
Snooze premendo il tasto START 2. L´allarme
risuona nuovamente dopo 4-5 minuti. Se si
preme il tasto START 2, l’allarme risuona
nuovamente.
Per disattivare l’allarme premere il tasto
RESET 4. Se non si preme alcun tasto,
l’allarme risuona per circa 1 minuto.
Per visualizzare l’ora di allarme impostata
premere il tasto RESET 4 mentre l’orologio si
trova in modalità orario.
Se l’orologio si trova in modalità orario,
premere e mantenere premuto il tasto
RESET 4. Premere in seguito il tasto START 2
per spegnere l’allarme. Il simbolo dell’allarme
si spegne 7.
� Attivazione / Disattivazione
del segnale acustico
Nota: A ogni ora piena risuona un breve segnale
acustico.
Premere ripetutamente il tasto MODE 6
fino a quando sul display 3 appare la
visualizzazione dell’orario.
22 IT/MT
103806_15_Auriol_ES_PT_02.indb 22 8/20/14 12:17 PM
Page 24

Premere e mantenere premuto il tasto
RESET 4 e contemporaneamente premere il
tasto MODE 6. Si illuminano tutti i giorni della
visualizzazione del giorno della settimana 1.
Il segnale acustico viene attivato.
Premere e mantenere premuto il tasto RESET 4
e premere contemporaneamente il tasto
MODE 6. Si spengono le visualizzazioni di
tutti i giorni della visualizzazione del giorno
della settimana 1. Il segnale acustico è
disattivato.
� Utilizzo del cronometro
Premere ripetutamente il tasto MODE 6
fino a quando appare sul display 3 la
visualizzazione dell’orario.
Per accedere a un’altra modalità premere il
tasto MODE 6.
Per avviare il cronometro premere il tasto
START 2.
Per fermare il cronometro premere nuovamente
il tasto START 2.
Per azzerare il cronometro premere il tasto
RESET 4.
Misurazione del tempo intermedio:
Premere ripetutamente il tasto MODE 6
fino a quando appare sul display 3 la
visualizzazione dell’orario.
Per accedere alla modalità cronometro premere il
tasto MODE 6 una volta.
103806_15_Auriol_ES_PT_02.indb 23 8/20/14 12:17 PM
23 IT/MT
Page 25

Per avviare il cronometro premere il tasto
START 2.
Per visualizzare il tempo intermedio premere
il tasto RESET 4. Sullo sfondo il cronometro
continua a scorrere.
Per tornare al tempo del cronometro premere
nuovamente il tasto RESET 4.
Per fermare il cronometro premere il tasto
START 2.
Per azzerare il cronometro premere il tasto
RESET 4.
� Pulizia e manutenzione
Pulire il prodotto con un panno asciutto e
privo di peli. Un panno per pulire gli occhiali
rappresenta un panno ideale per questa
operazione.
� Smaltimento
La confezione è prodotta in materiale
riciclabile e biodegradabile, smaltibile
Potete informarvi sulle possibilità di smaltimento del
prodotto consumato dall‘amministrazione comunale
e cittadina.
24 IT/MT
nei luoghi di raccolta differenziati.
Per la salvaguardia della tutela
ambientale, quando il vostro prodotto
non funziona più, non gettatelo nei
rifiuti domestici bensì nei luoghi adatti
di raccolta. Potete informarvi sui luoghi
di raccolta e i loro orari di apertura
dall‘amministrazione competente.
103806_15_Auriol_ES_PT_02.indb 24 8/20/14 12:17 PM
Page 26

Batterie difettose o usate devono essere riciclate ai
sensi della Direttiva 2006 / 66 / EC. Smaltire le
batterie e / o l’apparecchio presso i punti di raccolta
indicati.
Vi possono essere conseguenze
negative per l’ambiente a
seguito di uno smaltimento non
corretto delle batterie!
Le batterie non devono essere smaltite nella
spazzatura domestica. Esse possono contenere
metalli pesanti velenosi e devono essere trattate quali
rifiuti speciali. I simboli chimici dei metalli pesanti
sono i seguenti: Cd = Cadmio, Hg = mercurio,
Pb = piombo. Consegnare quindi le batterie usate ad
un punto di raccolta comunale.
� GARANZIA
L‘apparecchio è stato prodotto secondo severe
direttive di qualità e controllato con premura prima
della consegna. In caso di difetti del prodotto,
l‘acquirente può far valere i propri diritti legali nei
confronti del venditore. Questi diritti legali non
vengono limitati in alcun modo dalla garanzia di
seguito riportata.
103806_15_Auriol_ES_PT_02.indb 25 8/20/14 12:17 PM
25 IT/MT
Page 27

Se entro tre anni dalla data di acquisto di questo
prodotto si rileva un difetto di materiale o di
fabbricazione, il prodotto verrà riparato o sostituito
gratuitamente, a nostra discrezione. Il termine di
garanzia ha inizio a partire dalla data di acquisto.
Conservare lo scontrino di acquisto originale in
buone condizioni. Questo documento servirà a
documentare l‘avvenuto acquisto.
l‘apparecchio da Lei acquistato dà diritto ad
una garanzia di 3 anni a partire dalla data di
acquisto. La presente garanzia decade nel caso
di danneggiamento del prodotto, di utilizzo o di
manutenzione inadeguati.
La prestazione di garanzia vale sia per difetti
di materiale che per difetti di fabbricazione. La
presente garanzia non si estende a parti del prodotto
soggette a normale usura e che possono essere
identificate, pertanto, come parti soggette a usura (p.
es., le batterie), né a danni su parti staccabili, come
interruttore, batterie o simili, realizzate in vetro.
Si esclude dalla garanzia l’eventuale riduzione
dell’impermeabilità. L’impermeabilità, infatti, non
è una una proprietà permanente e deve essere
regolarmente sottoposta a manutenzione. Prestare
attenzione per evitare che l’apertura e la riparazione
del vostro orologio, eseguita da personale non
autorizzato, possa far decadere la garanzia.
26 IT/MT
103806_15_Auriol_ES_PT_02.indb 26 8/20/14 12:17 PM
Page 28

RELÓGIO DE PULSO
� Utilização correcta
O relógio de pulso indica as horas e a data e
dispõe de uma função de alarme e de cronómetro.
Este artigo não é indicado para uma utilização
comercial.
� Descrição das peças
Indicador dos dias da semana
1
Botão START
2
Indicador da hora
3
Botão RESET
4
Indicador dos segundos / Indicador ”H”
5
Botão MODE
6
Símbolo do alarme
7
Botão LIGHT
8
Indicador ”A“ /”P ”
9
Indicações de segurança
GUARDE TODAS AS INDICAÇÕES DE
SEGURANÇA E INSTRUÇÕES PARA FUTURA
CONSULTA!
103806_15_Auriol_ES_PT_02.indb 27 8/20/14 12:17 PM
27 PT
Page 29

Nunca deixe crianças sem vigilância com
o material da embalagem. Existe perigo de
asfixia.
AVISO!
podem ser engolidas, o que constitui perigo
de morte. Se uma pilha for engolida, procure
imediatamente ajuda médica.
Nunca desmonte o artigo. Através de
reparações mal efectuadas poder-se-ão
verificar perigos para o utilizador. Permita que
as reparações sejam efectuadas apenas por
pessoal especializado.
AVISO!
PERIGO DE
MORTE E DE ACIDENTES
PARA BEBÉS E CRIANÇAS!
PERIGO DE MORTE! As pilhas
Indicações de segurança
referentes ao uso das
pilhas
CUIDADO! PERIGO DE
Mande substituir a pilha do relógio se ela
estiver gasta. Existe um perigo agravado da
pilha deixar escorrer ácido!
As pilhas não devem ser misturadas com o lixo
doméstico!
Cada consumidor vê-se na obrigação legal de
eliminar as pilhas de forma adequada!
EXPLOSÃO! Nunca recarregue
as pilhas!
28 PT
103806_15_Auriol_ES_PT_02.indb 28 8/20/14 12:17 PM
Page 30

Mantenha a pilha afastada das crianças, não
a jogue para o fogo, não a coloque em curtocircuito e não a desmonte.
O não seguimento destas indicações poderá
originar o descarregamento da pilha através
das suas extremidades. Existe o perigo
de a pilha derramar ácido. Se a pilha
derramar ácido no seu aparelho, remova-a
imediatamente, a fim de se evitarem danos no
artigo!
Evite o contacto com a pele, os olhos e as
mucosas. Se o ácido da pilha entrar em
contacto com as referidas zonas, lave bem a
zona afectada e / ou procure um médico!
� Estanqueidade
Este relógio é resistente à água até 3 bar,
conforme a norma DIN 8310.
Resistência de
3 bar à água
Não pressione os botões quando o relógio
entrar em contacto com a água.
� Substituir a pilha
Nota : Para substituir as pilhas vá a uma loja
especializada.
103806_15_Auriol_ES_PT_02.indb 29 8/20/14 12:17 PM
29 PT
Page 31

A substituição das pilhas e as reparações
só devem ser efectuadas por pessoal
especializado, de forma a evitar danos no
funcionamento do relógio.
Elimine devidamente as pilhas gastas,
respeitando o meio-ambiente.
Não elimine o relógio no lixo doméstico.
� Utilização
Pressione o botão MODE 6, de forma a
configurar o modo desejado: Modo das
horas > Cronómetro > Alarme > Configuração
das horas > Modo das horas.
� Configurar a hora e a data
1. Pressione três vezes o botão MODE 6. O
indicador dos segundos 5, assim como o
indicador dos dias da semana 1 piscam no
visor.
2. Pressione o botão START 2 para repor o
indicador dos segundos 5 a 0.
3. Pressione o botão RESET 4 para confirmar a
sua introdução. A indicação dos minutos pisca
no visor.
4. Pressione o botão START 2 para configurar os
minutos.
5. Pressione a tecla RESET 4 para confirmar a
sua introdução. A indicação das horas pisca
no visor.
6. Pressione o botão START 2 para configurar as
horas.
30 PT
103806_15_Auriol_ES_PT_02.indb 30 8/20/14 12:17 PM
Page 32

Nota: Na introdução das horas tenha em
atenção os símbolos A, P 9 e H 5 que
aparecem no visor. O A e o P (A = manhã/
P = tarde) representam o formato de 12 horas.
O H representa o formato de 24 horas.
Pressione o botão START 2 para configurar o
formato pretendido. Prima o botão RESET 4
para confirmar a sua introdução.
7. Pressione o botão RESET 4 para confirmar a
sua introdução. A indicação da data pisca no
visor.
8. Pressione o botão START 2 para configurar a
data.
9. Pressione a tecla RESET 4 para confirmar a
sua introdução.
A indicação do mês pisca no visor.
10. Pressione o botão START 2 para configurar o
mês.
11. Repita os passos 8 e 9 para configurar o dia
da semana 1. Os dias da semana encontramse abreviados da seguinte forma:
MO = Segunda-feira
TU = Terça-feira
WE = Quarta-feira
TH = Quinta-feira
FR = Sexta-feira
SA = Sábado
SU = Domingo
12. Pressione o botão MODE 6 para aceder à
indicação padrão.
103806_15_Auriol_ES_PT_02.indb 31 8/20/14 12:17 PM
31 PT
Page 33

� Utilizar a iluminação
Mantenha o botão LIGHT 8 pressionado para
ligar a luz.
Liberte novamente o botão LIGHT 8 e a luz
desliga-se após aproximadamente 3 segundos.
� Indicar a data
Pressione o botão START 2, enquanto o
relógio se encontra no modo das horas. A data
aparece no visor.
Solte o botão START 2 para voltar ao modo
das horas.
� Configurar o alarme
Pressione duas vezes o botão MODE 6 para
aceder ao modo de alarme. A indicação das
horas do temporizador do alarme pisca no
visor.
Pressione o botão START 2 para configurar
as horas.
Pressione o botão RESET 4 para confirmar a
sua introdução. A indicação dos minutos pisca
no visor.
Pressione o botão START 2 para configurar
os minutos.
Pressione o botão RESET 4 para confirmar a
sua introdução.
Solte o botão MODE 6 para voltar ao modo
das horas.
32 PT
103806_15_Auriol_ES_PT_02.indb 32 8/20/14 12:17 PM
Page 34

� Ligar/desligar o alarme
Ligue e desligue o alarme, no modo das horas,
mantendo o botão START 2 e o botão
RESET 4 pressionados. Quando o alarme
estiver ligado, aparece o símbolo do
alarme 7 no visor.
Quando o alarme toca, activa a função
“Snooze“ ao pressionar o botão START 2.
O alarme volta a tocar após 4 a 5 minutos.
Sempre que pressionar o botão START 2, o
alarme volta a tocar.
Pressione o botão RESET 4 para desactivar
o alarme. Se não carregar em nenhum
botão, o alarme tocará durante
aproximadamente 1 minuto.
Pressione o botão RESET 4 enquanto o
relógio se encontra no modo das horas,
de forma a visualizar a hora do alarme
introduzida.
Enquanto o relógio se encontra no modo
de horas, mantenha o botão RESET 4
pressionado, Pressione em seguida o botão
START 2 para desligar o alarme. O símbolo
do alarme 7 apaga.
� Activar/desactivar
o sinal sonoro
Nota: De hora a hora toca um sinal sonoro breve.
Pressione repetidamente o botão MODE
até aparecer a indicação das horas
visor.
6
no
3
103806_15_Auriol_ES_PT_02.indb 33 8/20/14 12:17 PM
33 PT
Page 35

Mantenha o botão RESET 4 pressionado e,
em simultâneo, o botão MODE 6. Acendem
todos os dias do indicador dos dias da
semana 1. O sinal sonoro está activado.
Mantenha o botão RESET 4 pressionado e,
em simultâneo, o botão MODE 6. Apagam-se
os indicadores de todos os dias da semana 1.
O sinal sonoro está desactivado.
� Utilizar o cronómetro
Pressione repetidamente o botão MODE 6
até aparecer a indicação das horas 3 no
visor.
Pressione uma vez o botão MODE 6 para
aceder ao modo de cronómetro.
Pressione o botão START 2 para iniciar o
cronómetro.
Pressione novamente o botão START 2 para
parar o cronómetro.
Pressione o botão RESET 4 para repor o
cronómetro a 0.
Medir o tempo intermédio:
Pressione repetidamente o botão MODE 6
até aparecer a indicação das horas 3 no
visor.
Pressione uma vez o botão MODE 6 para
aceder ao modo de cronómetro.
Pressione o botão START 2 para iniciar o
cronómetro.
34 PT
103806_15_Auriol_ES_PT_02.indb 34 8/20/14 12:17 PM
Page 36

Pressione o botão RESET 4 para visualizar o
tempo intermédio. O cronómetro continua a
funcionar em segundo plano.
Pressione novamente o botão RESET 4 para
voltar às horas de paragem do cronómetro.
Pressione o botão START 2 para parar o
cronómetro.
Pressione o botão RESET 4 para repor o
cronómetro a 0.
� Limpeza e conservação
Limpe o produto com um pano seco que não
largue fios. Um pano dos óculos é o ideal.
� Eliminação
A embalagem é feita de materiais não
poluentes que podem ser eliminados
nos contentores de reciclagem locais.
As possibilidades de reciclagem dos artigos
utilizados poderão ser averiguadas no seu Município
ou Câmara Municipal.
No interesse da protecção do
ambiente, não deite fora este produto
juntamente com o lixo doméstico;
entregue-o num ponto de recolha
adequado. Pode informar-se no seu
município sobre os locais de recolha
adequados e o seu período de
funcionamento.
103806_15_Auriol_ES_PT_02.indb 35 8/20/14 12:17 PM
35 PT
Page 37

As pilhas avariadas ou gastas têm de ser recicladas
de acordo com a directiva 2006/66/EC. Entregue
as pilhas e/ou o aparelho nos locais específicos
destinados à sua recolha.
Danos ambientais devido à
eliminação incorrecta das
As pilhas não podem ser eliminadas no lixo
doméstico. Podem conter metais pesados tóxicos e
são consideradas resíduos perigosos. Os símbolos
químicos dos metais pesados são os seguintes:
Cd = cádmio, Hg = mercúrio, Pb = chumbo. Como
tal, deposite as pilhas utilizadas num ponto de
recolha adequado do seu município.
pilhas!
� GARANTIA
O aparelho foi cuidadosamente fabricado segundo
rigorosas directivas de qualidade e meticulosamente
testado antes da sua distribuição. Em caso de falhas
deste aparelho, possui direitos legais relativamente
ao vendedor do aparelho. Os seus direitos legais
não estão limitados pela garantia representada de
seguida.
Tem sobre este aparelho 3 anos de garantia a partir
da data de compra. A validade da garantia inicia-se
com a data de compra. Guarde o talão da caixa
como comprovativo da compra. Esse documento é
necessário para comprovar a compra.
36 PT
103806_15_Auriol_ES_PT_02.indb 36 8/20/14 12:17 PM
Page 38

Caso num espaço de tempo de 3 anos a partir da
data da compra deste aparelho surja um erro de
material ou de fabrico, o aparelho será reparado
ou substituído por nós – segundo a nossa escolha
– e sem qualquer custo. Esta garantia expira se o
aparelho estiver danificado, se não for devidamente
utilizado ou se não for efectuada a devida
manutenção.
A garantia é válida em caso de defeitos de material
ou de fabrico. Esta garantia não é extensível a
componentes do produto que se desgastam com o
uso e que, por isso, podem ser consideradas peças
de desgaste (por ex.º pilhas) ou a danos em peças
frágeis, por ex.º interruptores, baterias ou peças de
vidro.
Na garantia não está também incluída a diminuição
da estanqueidade contra água. O estado da
estanqueidade contra água não constitui uma
característica permanente e deve, por isso, fazer-se a
manutenção da mesma com regularidade. Por favor
atente que se o seu relógio for aberto e reparado
por pessoas que não estão habilitadas para esse
efeito, perderá os seus direitos de garantia.
103806_15_Auriol_ES_PT_02.indb 37 8/20/14 12:17 PM
37 PT
Page 39

WRISTWATCH
� Proper use
The wrist watch displays the time and date. It also
has an alarm and can be used as a stopwatch. The
product is not intended for commercial use.
� Description of parts
Day of the week display field
1
START button
2
Time field
3
RESET button
4
Second field / “H” indicator
5
MODE button
6
Alarm symbol
7
LIGHT button
8
“A” / “P” indicator
9
General Safety
Instructions
KEEP ALL THE SAFETY ADVICE AND
INSTRUCTIONS IN A SAFE PLACE FOR FUTURE
REFERENCE!
38 GB/MT
103806_15_Auriol_ES_PT_02.indb 38 8/20/14 12:17 PM
Page 40

packaging material. Packaging material can
cause suffocation.
WARNING!
can be swallowed, which can prove fatal.
Consult a doctor immediately if anyone
swallows a battery.
Never take the product apart on any account.
Improper repairs could cause considerable
danger for the user. Only let qualified people
carry out any repairs.
WARNING!
TO LIFE AND RISK OF
ACCIDENTS FOR INFANTS
AND CHILDREN! Never leave
children unattended with the
DANGER TO LIFE! Batteries
DANGER
Battery Safety
Instructions
CAUTION! RISK OF
Have a spent battery removed from the
Batteries must not be disposed of in household
Consumers are under a legal obligation to
103806_15_Auriol_ES_PT_02.indb 39 8/20/14 12:17 PM
EXPLOSION! Never recharge the
batteries.
instrument immediately. There is an increased
risk of leakage.
waste.
dispose of batteries in the proper way.
39 GB/MT
Page 41

Keep the battery out of the reach of children,
do not dispose of the battery in fire, do not
short-circuit it, and do not take it apart.
Failure to observe these instructions may result
in the battery discharging beyond its end
voltage, which poses a risk of leakage. If the
battery in your instrument has leaked, have it
removed immediately to prevent damage to the
instrument.
Avoid contact with skin, eyes and mucous
membrane. In the event of contact with battery
acid, rinse the affected area with plenty of
water and /or consult a doctor.
� Water resistance
This watch is water-resistant up to 3 bar in
accordance with DIN 8310.
3 bar water
resistant
Do not press any buttons if the watch comes
into contact with water.
40 GB/MT
103806_15_Auriol_ES_PT_02.indb 40 8/20/14 12:17 PM
Page 42

� Replacing the battery
Note: Have batteries changed in a specialist
shop.
Have any repairs or battery replacements
carried out by a suitably experienced specialist
in order to avoid damaging the insides of the
watch.
Dispose of used batteries in an environmentally
compatible manner.
Do not dispose of the watch with the household
rubbish.
� Operation
Press the MODE button 6 to set the desired
mode: Time mode > Stop watch > Alarm >
Setting the time > Time mode.
� Setting the time and date
1. Press the MODE button 6 three times. The
second field 5 and the day of the week field
flash in the display.
1
2. Press the START button 2 to set the second field
to 0.
5
3. Press the RESET button 4 to confirm your
setting. The minute field flashes in the display.
4. Press the START button 2 to set the desired
minute value.
103806_15_Auriol_ES_PT_02.indb 41 8/20/14 12:17 PM
41 GB/MT
Page 43

5. Press the RESET button 4 to confirm your
setting. The hour field flashes in the display.
6. Press the START button 2 to set the desired hour
value.
Note: Pay attention to the symbols A, P
and
9
H 5 in the display when setting the hour value.
A and P (A = a.m. / P = p.m.) are used for the
12-hour time format. H is used for the 24-hour
format. Press the START button 2 to set the
desired value and format. Press the RESET button
to confirm your setting.
4
7. Press the RESET button 4 to confirm your
setting. The date field flashes in the display.
8. Press the START button 2 to set the desired date
value.
9. Press the RESET button 4 to confirm your
setting. The month field flashes in the display.
10. Press the START button 2 to set the desired
month value.
11. Repeat steps 8 and 9 to set the day of the week
field. The names of the days of the week are
1
shortened as follows:
MO = Monday
TU = Tuesday
WE = Wednesday
TH = Thursday
FR = Friday
SA = Saturday
SU = Sunday
12. Press the MODE button 6 to enter the default
display.
42 GB/MT
103806_15_Auriol_ES_PT_02.indb 42 8/20/14 12:17 PM
Page 44

� Lighting the display
Press and keep pressed the LIGHT button 8 to
switch on the light.
Release the LIGHT button 8 and the light will
switch off after approx. 3 seconds.
� Displaying the date
Press the START button 2 while the watch is in
time mode. The date appears on the display.
Release the START button 2 to return to time
mode.
� Setting the alarm
Press the MODE button 6 twice to enter the
alarm mode. The hour field of the alarm time
flashes in the display.
Press the START button 2 to set the desired
hour value.
Press the RESET button 4 to confirm your
setting. The minute field flashes in the display.
Press the START button 2 to set the desired
minute value.
Press the RESET button 4 to confirm your
setting.
Press the MODE button 6 to enter the time
mode.
103806_15_Auriol_ES_PT_02.indb 43 8/20/14 12:17 PM
43 GB/MT
Page 45

� Switching the alarm on / off
Switch the alarm on or off by pressing and
keeping pressed the START button 2 and the
RESET button 4 while in time mode. If the
alarm is switched on, the alarm symbol 7
appears in the display.
When the alarm sounds, you can activate
the Snooze function by pressing the START
button 2. The alarm sounds again after 4 to
5 minutes. The alarm will keep on sounding as
many times as you press the START button 2.
Press the RESET button 4 to stop the alarm.
The alarm will keep on sounding for approx. 1
minute if you don’t press any button.
Press the RESET button 4 when the watch is in
time mode to display the alarm time.
If the watch is in time mode, press and keep
pressed the RESET button 4. Press the START
button 2 to switch off the alarm. The alarm
symbol 7 disappears.
� Activating / deact ivating
the acoustic signal
Note: An acoustic signal will sound every hour on
the hour.
Press the MODE button 6 repeatedly until the
time field 3 appears in the display.
Press and keep pressed the RESET button 4
and while doing this, press the MODE button
. All the day of the week fields 1 appear.
6
The audible signal function is activated.
44 GB/MT
103806_15_Auriol_ES_PT_02.indb 44 8/20/14 12:17 PM
Page 46

Press and keep pressed the RESET button
and while doing this, press the MODE
4
button 6. All the day of the week fields 1
disappear. The audible signal function is
deactivated.
� Using the stopwatch
Press the MODE button 6 repeatedly until the
time field 3 appears in the display.
Press the MODE button 6 once to enter the
stopwatch mode.
Press the START button 2 to start the
stopwatch.
Press the START button 2 again to stop the
stopwatch.
Press the RESET button 4 to set the stopwatch
to 0.
Measuring an intermediate time:
Press the MODE button
time field 3 appears in the display.
Press the MODE button 6 once to enter the
stopwatch mode.
Press the START button 2 to start the
stopwatch.
Press the RESET button 4 to display the
intermediate time. The stopwatch continues to
run in the background.
Press the RESET button 4 to return to the
stopwatch time.
repeatedly until the
6
103806_15_Auriol_ES_PT_02.indb 45 8/20/14 12:17 PM
45 GB/MT
Page 47

Press the START button 2 to stop the
stopwatch.
Press the RESET button 4 to set the stopwatch
to 0.
� Cleaning and care
Clean the product with a dry, fluff-free cloth. A
spectacles cloth is ideal.
� Disposal
The packaging is made entirely of
recyclable materials, which you may
dispose of at local recycling facilities.
Contact your local refuse disposal authority for more
details of how to dispose of your worn-out product.
To help protect the environment, please
dispose of the product properly when
it has reached the end of its useful
life and not in the household waste.
Information on collection points and
their opening hours can be
obtained from your local authority.
Faulty or used batteries must be recycled in
accordance with Directive 2006 / 66 / EC . Please
return the batteries and / or the device to the
available collection points.
46 GB/MT
103806_15_Auriol_ES_PT_02.indb 46 8/20/14 12:17 PM
Page 48

Environmental damage through
incorrect disposal of the
Batteries may not be disposed of with the usual
domestic waste. They may contain toxic heavy metals
and are subject to hazardous waste treatment rules
and regulations. The chemical symbols for heavy
metals are as follows: Cd = cadmium, Hg= mercury,
Pb = lead. That is why you should dispose of used
batteries at a local collection point.
batteries!
� WARRANTY
The device has been manufactured to strict quality
guidelines and meticulously examined before
delivery. In the event of product defects you have
legal rights against the retailer of this product.
Your legal rights are not limited in any way by our
warranty detailed below.
The warranty for this device is 3 years from the date
of purchase. Should this device show any fault in
materials or manufacture within three years from the
date of purchase, we will repair or replace it - at our
choice - free of charge to you.
The warranty period begins on the date of purchase.
Please keep the original sales receipt in a safe
location. This document is required as your proof
of purchase. This warranty becomes void if the
device has been damaged or improperly used or
maintained.
103806_15_Auriol_ES_PT_02.indb 47 8/20/14 12:17 PM
47 GB/MT
Page 49

The warranty applies to faults in material or
manufacture. This warranty does not cover
product parts subject to normal wear, thus possibly
considered consumables (e.g. batteries) or for
damage to fragile parts, e.g. switches, rechargeable
batteries or glass parts.
The warranty further excludes a reduction in
water tightness. The state of water tightness is not
a permanent property and should therefore be
regularly maintained. Please note, opening and
repairs performed by unauthorized individuals will
void any warranty.
48 GB/MT
103806_15_Auriol_ES_PT_02.indb 48 8/20/14 12:17 PM
Page 50

ARMBANDUHR
� Bestimmungsgemäße
Verwendung
Die Armbanduhr zeigt Zeit und Datum an und verfügt
über eine Alarm- und Stoppuhrfunktion. Das Produkt
ist nicht für den gewerblichen Einsatz bestimmt.
�
Teilebeschreibung
Wochentagsanzeige
1
START-Taste
2
Uhrzeitanzeige
3
RESET-Taste
4
Sekundenanzeige / „H“-Anzeige
5
MODE-Taste
6
Alarmsymbol
7
LIGHT-Taste
8
„A“ / „P“ -Anzeige
9
Sicherheit
BEWAHREN SIE ALLE SICHERHEITSHINWEISE
UND ANWEISUNGEN FÜR DIE ZUKUNFT AUF!
103806_15_Auriol_ES_PT_02.indb 49 8/20/14 12:17 PM
49 DE/AT/CH
Page 51

unbeaufsichtigt mit dem Verpackungsmaterial.
Es besteht Erstickungsgefahr.
WARNUNG!
können verschluckt werden, was
lebensgefährlich sein kann. Ist eine
Batterie verschluckt worden, muss sofort
medizinische Hilfe in Anspruch genommen
werden.
Nehmen Sie das Gerät keinesfalls auseinander.
Durch unsachgemäße Reparaturen können
erhebliche Gefahren für den Benutzer
entstehen. Lassen Sie Reparaturen nur von
Fachkräften durchführen.
WARNUNG!
UND UNFALLGEFAHR FÜR
KLEINKINDER UND KINDER!
Lassen Sie Kinder niemals
LEBENSGEFAHR! Batterien
LEBENS-
Sicherheitshinweise
zu Batterien
VORSICHT!
Lassen Sie eine erschöpfte Batterie umgehend
aus dem Gerät entfernen. Es besteht erhöhte
Auslaufgefahr!
Batterien gehören nicht in den Hausmüll!
Jeder Verbraucher ist gesetzlich verpflichtet,
Batterien ordnungsgemäß zu entsorgen!
EXPLOSIONSGEFAHR! Laden
Sie Batterien niemals wieder auf!
50 DE/AT/CH
103806_15_Auriol_ES_PT_02.indb 50 8/20/14 12:17 PM
Page 52

Halten Sie die Batterie von Kindern fern, werfen
Sie sie nicht ins Feuer, schließen Sie sie nicht
kurz und nehmen Sie sie nicht auseinander.
Bei Nichtbeachtung der Hinweise kann
die Batterie über ihre Endspannung hinaus
entladen werden. Es besteht dann die Gefahr
des Auslaufens. Falls die Batterie in Ihrem
Gerät ausgelaufen sein sollte, lassen Sie diese
sofort entnehmen, um Schäden am Gerät
vorzubeugen!
Vermeiden Sie den Kontakt mit Haut,
Augen und Schleimhäuten. Bei Kontakt mit
Batteriesäure spülen Sie die betroffene Stelle
mit reichlich Wasser ab und / oder suchen Sie
einen Arzt auf!
� Wasserdichtigkeit
Diese Uhr ist wasserdicht bis 3 bar gemäß
DIN 8310.
3 bar
wasserresistent
Drücken Sie keine Tasten, wenn die Uhr mit
Wasser in Berührung kommt.
103806_15_Auriol_ES_PT_02.indb 51 8/20/14 12:17 PM
51 DE/AT/CH
Page 53

� Batterie auswechseln
Hinweis: Lassen Sie Batterien in einem
Fachgeschäft austauschen.
Lassen Sie einen Batteriewechsel und
Reparaturen nur von einem Fachmann
durchführen, um eine Beschädigung des
Uhrwerks zu vermeiden.
Entsorgen Sie gebrauchte Batterien
umweltfreundlich.
Werfen Sie die Uhr nicht in den Hausmüll.
� Bedienung
Drücken Sie die MODE-Taste 6, um den
gewünschten Modus einzustellen: Zeitmodus >
Stoppuhr > Alarm > Zeiteinstellung > Zeitmodus.
� Uhrzeit und Datum einstellen
1. Drücken Sie die MODE-Taste 6 drei
Mal. Die Sekundenanzeige 5 sowie die
Wochentagsanzeige 1 blinken im Display.
2. Drücken Sie die START-Taste 2, um die
Sekundenanzeige 5 auf 0 zu setzen.
3. Drücken Sie die RESET-Taste 4, um Ihre Eingabe
zu bestätigen. Die Minutenanzeige blinkt im Display.
4. Drücken Sie die START-Taste 2, um die Minuten
einzustellen.
5. Drücken Sie die RESET-Taste 4, um Ihre Eingabe
zu bestätigen. Die Stundenanzeige blinkt im Display.
52 DE/AT/CH
103806_15_Auriol_ES_PT_02.indb 52 8/20/14 12:17 PM
Page 54

6. Drücken Sie die START-Taste 2, um die Stunden
einzustellen.
Hinweis: Achten Sie beim Einstellen der
Stunden auf die Symbole A, P 9 und H 5,
die im Display erscheinen. A und P
(A = vormittags / P = nachmittags) stehen für das
12-Stunden-Format. H steht für das 24-StundenFormat. Drücken Sie die START-Taste 2, um den
gewünschten Wert und das gewünschte Format
einzustellen. Drücken Sie die RESET-Taste 4, um
Ihre Eingabe zu bestätigen.
7. Drücken Sie die RESET-Taste 4, um Ihre Eingabe
zu bestätigen. Die Datumsanzeige blinkt im
Display.
8. Drücken Sie die START-Taste 2, um das Datum
einzustellen.
9. Drücken Sie die RESET-Taste 4, um Ihre Eingabe
zu bestätigen. Die Monatsanzeige blinkt im Display.
10. Drücken Sie die START-Taste 2, um den Monat
einzustellen
11. Wiederholen Sie die Schritte 8. und 9., um den
Wochentag 1 einzustellen. Die Wochentage
sind wie folgt abgekürzt:
MO = Montag
TU = Dienstag
WE = Mittwoch
TH = Donnerstag
FR = Freitag
SA = Samstag
SU = Sonntag
12. Drücken Sie die MODE-Taste 6, um in die
Standardanzeige zu gelangen.
103806_15_Auriol_ES_PT_02.indb 53 8/20/14 12:17 PM
53 DE/AT/CH
Page 55

� Beleuchtung verwenden
Drücken und halten Sie die LIGHT-Taste 8, um
das Licht einzuschalten.
Lassen Sie die LIGHT-Taste 8 wieder los und
das Licht erlischt nach ungefähr 3 Sekunden.
� Datum anzeigen
Drücken Sie die START-Taste 2, während sich
die Uhr im Zeitmodus befindet. Das Datum
erscheint auf dem Display.
Lassen Sie die START-Taste 2 los, um wieder in
den Zeitmodus zu gelangen.
� Alarm einstellen
Drücken Sie die MODE-Taste 6 zwei Mal,
um in den Alarm-Modus zu gelangen. Die
Stundenanzeige der Alarmzeit blinkt im Display.
Drücken Sie die START-Taste 2, um die
Stunden einzustellen.
Drücken Sie die RESET-Taste 4, um Ihre
Eingabe zu bestätigen. Die Minutenanzeige blinkt
im Display.
Drücken Sie die START-Taste 2, um die
Minuten einzustellen.
Drücken Sie die RESET-Taste 4, um Ihre
Eingabe zu bestätigen.
54 DE/AT/CH
103806_15_Auriol_ES_PT_02.indb 54 8/20/14 12:17 PM
Page 56

Drücken Sie die MODE-Taste 6, um in den
Zeitmodus zu gelangen.
� Alarm ein- / ausschalten
Schalten Sie den Alarm ein und aus, indem
Sie im Zeitmodus die START-Taste 2 und die
RESET-Taste 4 drücken und halten. Wenn der
Alarm eingeschaltet ist, erscheint im Display das
Alarm-Symbol 7.
Wenn der Alarm ertönt, aktivieren Sie die
Snooze-Funktion, indem Sie die START-Taste
drücken. Nach 4 bis 5 Minuten ertönt der
2
Alarm erneut. So lange Sie die START-Taste 2
drücken, ertönt der Alarm erneut.
Drücken Sie die RESET-Taste 4, um den Alarm
zu stoppen. Wenn Sie keine Taste drücken, wird
der Alarm ungefähr 1 Minute lang ertönen.
Drücken Sie die RESET-Taste 4, während
sich die Uhr im Zeitmodus befindet, um die
eingestellte Alarmzeit anzuzeigen.
Befindet sich die Uhr im Zeitmodus, drücken
und halten Sie die RESET-Taste 4. Drücken
Sie anschließend die START-Taste 2, um den
Alarm auszuschalten. Das Alarmsymbol 7
erlischt.
� Signalton aktivieren /
deaktivieren
Hinweis: Zu jeder vollen Stunde ertönt ein kurzer
Signalton.
55 DE/AT/CH
103806_15_Auriol_ES_PT_02.indb 55 8/20/14 12:17 PM
Page 57

Drücken Sie so oft die MODE-Taste 6, bis die
Uhrzeitanzeige 3 im Display erscheint.
Halten Sie die RESET-Taste 4 gedrückt und
drücken Sie gleichzeitig die MODE-Taste 6.
Alle Tage der Wochentagsanzeige 1 leuchten
auf. Der Signalton ist aktiviert.
Halten Sie die RESET-Taste 4 gedrückt
und drücken Sie gleichzeitig die MODETaste 6. Die Anzeigen aller Tage der
Wochentagsanzeige 1 erlöschen. Der
Signalton ist deaktiviert.
� Stoppuhr verwenden
Drücken Sie so oft die MODE-Taste 6, bis die
Uhrzeitanzeige 3 im Display erscheint.
Drücken Sie die MODE-Taste 6 ein Mal, um in
den Modus der Stoppuhr zu gelangen.
Drücken Sie die START-Taste 2, um die
Stoppuhr zu starten.
Drücken Sie erneut die START-Taste 2, um die
Stoppuhr anzuhalten.
Drücken Sie die RESET-Taste 4, um die Stoppuhr
auf 0 zu setzen.
Zwischenzeit messen:
Drücken Sie so oft die MODE-Taste 6, bis die
Uhrzeitanzeige 3 im Display erscheint.
Drücken Sie die MODE-Taste 6 ein Mal, um in
den Modus der Stoppuhr zu gelangen.
Drücken Sie die START-Taste 2, um die
Stoppuhr zu starten.
56 DE/AT/CH
103806_15_Auriol_ES_PT_02.indb 56 8/20/14 12:17 PM
Page 58

Drücken Sie die RESET-Taste 4, um die
Zwischenzeit anzuzeigen. Die Stoppuhr läuft im
Hintergrund weiter.
Drücken Sie die RESET-Taste 4 erneut, um zur
Stoppzeit zurückzukehren.
Drücken Sie die START-Taste 2, um die
Stoppuhr anzuhalten.
Drücken Sie die RESET-Taste 4, um die Stoppuhr
auf 0 zu setzen.
� Reinigung und Pflege
Reinigen Sie das Produkt mit einem trockenen,
fusselfreien Tuch. Ein Brillenputztuch ist ideal.
� Entsorgung
Die Verpackung besteht aus
umweltfreundlichen Materialien, die Sie
über die örtlichen Recyclingstellen
entsorgen können.
Möglichkeiten zur Entsorgung des
ausgedienten Produkts erfahren Sie bei Ihrer
Gemeinde oder Stadtverwaltung.
Werfen Sie Ihr Produkt, wenn es
ausgedient hat, im Interesse des
Umweltschutzes nicht in den
Hausmüll, sondern führen Sie es
einer fachgerechten Entsorgung
zu. Über Sammelstellen und deren
Öffnungszeiten können Sie sich
bei Ihrer zuständigen Verwaltung
informieren.
57 DE/AT/CH
103806_15_Auriol_ES_PT_02.indb 57 8/20/14 12:17 PM
Page 59

Defekte oder verbrauchte Batterien müssen gemäß
Richtlinie 2006 / 66 / EC recycelt werden. Geben Sie
Batterien und / oder das Gerät über die angebotenen
Sammeleinrichtungen zurück.
Umweltschäden durch falsche
Entsorgung der Batterien!
Batterien dürfen nicht über den Hausmüll entsorgt
werden. Sie können giftige Schwermetalle enthalten
und unterliegen der Sondermüllbehandlung. Die
chemischen Symbole der Schwermetalle sind wie
folgt: Cd = Cadmium, Hg= Quecksilber, Pb = Blei.
Geben Sie deshalb verbrauchte Batterien bei einer
kommunalen Sammelstelle ab.
� GARANTIE
Das Produkt wurde nach strengen Qualitätsrichtlinien
sorgfältig produziert und vor Anlieferung
gewissenhaft geprüft. Im Falle von Mängeln dieses
Produkts stehen Ihnen gegen den Verkäufer des
Produkts gesetzliche Rechte zu. Diese gesetzlichen
Rechte werden durch unsere im Folgenden
dargestellte Garantie nicht eingeschränkt.
Sie erhalten auf dieses Gerät 3 Jahre Garantie
ab Kaufdatum. Die Garantiefrist beginnt mit dem
Kaufdatum. Bitte bewahren Sie den Original
Kassenbon gut auf. Diese Unterlage wird als
Nachweis für den Kauf benötigt.
58 DE/AT/CH
103806_15_Auriol_ES_PT_02.indb 58 8/20/14 12:17 PM
Page 60

Tritt innerhalb von drei Jahren ab dem Kaufdatum
dieses Produkts ein Material- oder Fabrikationsfehler
auf, wird das Produkt von uns – nach unserer Wahl
– für Sie kostenlos repariert oder ersetzt. Diese
Garantie verfällt, wenn das Produkt beschädigt, nicht
sachgemäß benutzt oder gewartet wurde.
Die Garantieleistung gilt für Material- oder
Fabrikationsfehler. Diese Garantie erstreckt sich nicht
auf Produktteile, die normaler Abnutzung ausgesetzt
sind (z. B. Batterien) und daher als Verschleißteile
angesehen werden können oder für Beschädigungen
an zerbrechlichen Teilen, z. B. Schalter, Akkus oder
die aus Glas gefertigt sind.
Von der Garantieleistung ausgeschlossen ist ebenfalls
das Nachlassen der Wasserdichtheit.
Der Zustand der Wasserdichtheit ist keine bleibende
Eigenschaft und sollte daher regelmäßig gewartet
werden. Bitte beachten Sie, dass durch das Öffnen
und Reparieren Ihrer Uhr durch Personen, die hierzu
nicht ermächtigt sind, Ihre Garantieansprüche
erlöschen.
103806_15_Auriol_ES_PT_02.indb 59 8/20/14 12:17 PM
59 DE/AT/CH
 Loading...