

Page 1
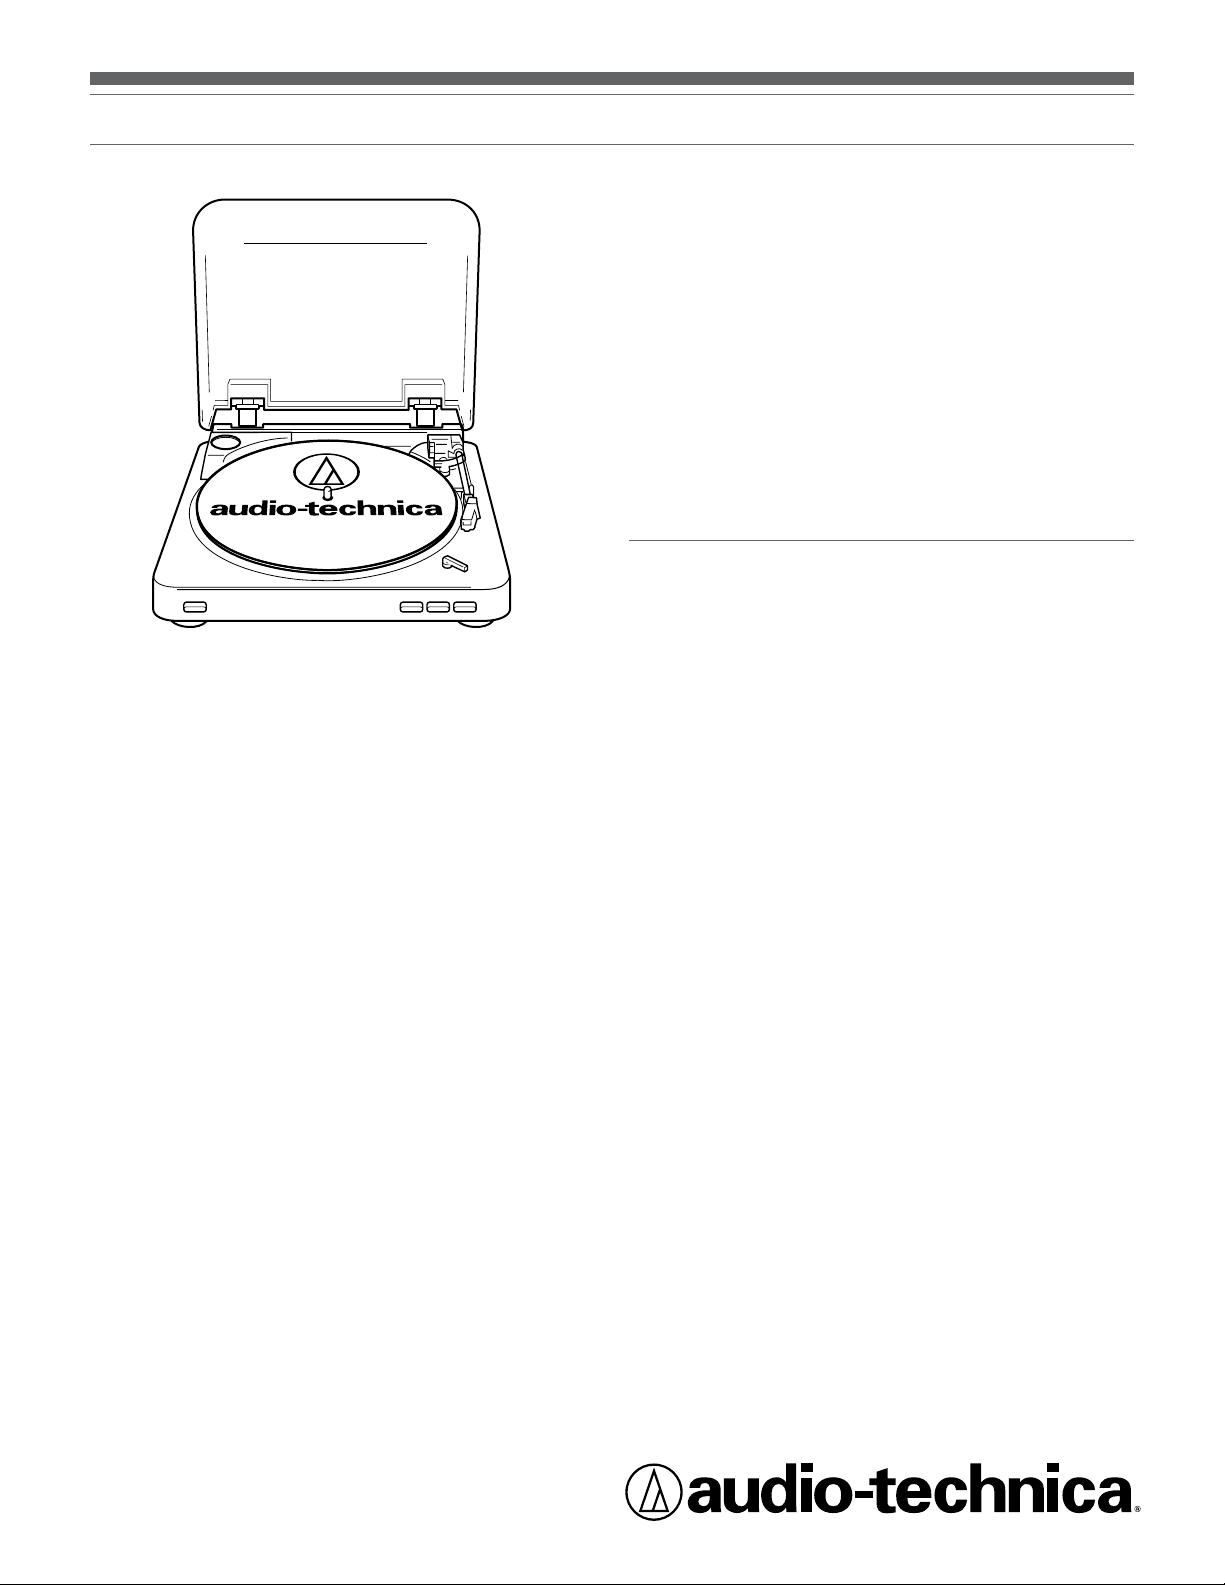
AT-LP60-USB Automatic Stereo Turntable System
Installation and Operation Pages 2-8
AT-LP60-USB
Système de tourne-disque stéréo USB
Installation et utilisation Pages 9-15
AT-LP60-USB
Sistema tocadiscos USB estéreo
Instalación y funcionamiento Páginas 16-22
Page 2
USB Stereo Turntable System
Safety instructions
1. Read these instructions.
2. Keep these instructions.
3. Heed all warnings.
4. Follow all instructions.
5. Do not use this apparatus near water.
6. Clean only with a dry cloth.
7. Do not block any of the ventilation openings. Install in accordance
with the manufacturer’s instructions.
8. Do not install near any heat sources such as radiators, heat registers,
stoves, or other apparatus (including amplifiers) that produce heat.
9. Do not defeat the safety purpose of the polarized or grounding
plug. A polarized plug has two blades with one wider than the other.
A grounding plug has two blades and a third grounding prong. The
wide blade or the third prong is provided for your safety. If the
provided plug does not fit into your outlet, consult an electrician for
replacement of the obsolete outlet.
10. Protect the power cord from being walked on or pinched particularly
at plugs, convenience receptacles, and the point where they exit
from the apparatus.
11. Only use attachments/accessories specified by the manufacturer.
12. Use only with a cart, stand, tripod, bracket or table specified by
the manufacturer, or sold with the apparatus. When a cart is used,
use caution when moving the cart/apparatus combination to avoid
injury from tip-over.
13. Unplug this apparatus during lightning storms or when unused for
long periods of time.
14. Refer all servicing to qualified service personnel. Servicing is
required when the apparatus has been damaged in any way, such
as power-supply cord or plug is damaged, liquid has been spilled or
objects have fallen into the apparatus, the apparatus has been
exposed to rain or moisture, does not operate normally, or has
been dropped.
15. Where a mains plug is used as the disconnect device, the
disconnect device shall remain readily operable.
16. Please keep the unit in a good ventilation environment.
17. Apparatus shall not be exposed to dripping or splashing and
no objects filled with liquids, such as vases, shall be placed
on apparatus.
Warning: To reduce the risk of fire or electric shock, do not
expose this apparatus to rain or moisture. The apparatus shall not
be exposed to dripping or splashing and that no objects filled with
liquids, such as vases, shall be placed on the apparatus.
Introduction
Thank you for purchasing the AT-LP60-USB. Audio-Technica brings its
legendary quality and audio fidelity to the digital realm with this LP-toDigital Recording System. In the box, you’ll find everything you need
to transfer your classic LP collection to digital files: Audio-Technica’s
AT-LP60-USB stereo turntable, complete with USB output that allows
direct connection to your computer; Audacity recording software (for
MAC or PC); an integral dual-magnet Audio-Technica phono cartridge;
a USB cable and adapter cables. The turntable also offers a built-in
switchable phono/line preamp that allows connection to a stereo
system equipped with either a phono or line-level input.
AT-LP60-USB stereo turntable features:
• USB output –no special drivers required for direct connection
to your computer
• Built-in switchable stereo phono/line level pre-amplifier. Permits use
of turntable with stereo systems having either magnetic-phono inputs
or “AUX” (line-level) inputs; also allows convenient use of turntable
with most powered speakers
• PC & Mac compatible
• Fully automatic operation
• Two speeds: 33
1
/
RPM and 45 RPM
3
• Professional aluminum turntable platter
• Integral Audio-Technica Dual Magnet
™
phono cartridge with
replaceable diamond stylus
• Damped lift/cueing mechanism with front-panel control
• Removable dust cover
To assure maximum satisfaction from this product, please read the
information and follow the instructions presented in this manual. Please
keep the manual in an accessible location for future reference.
We suggest that you save all the packaging materials for possible future
storage, moving or shipping.
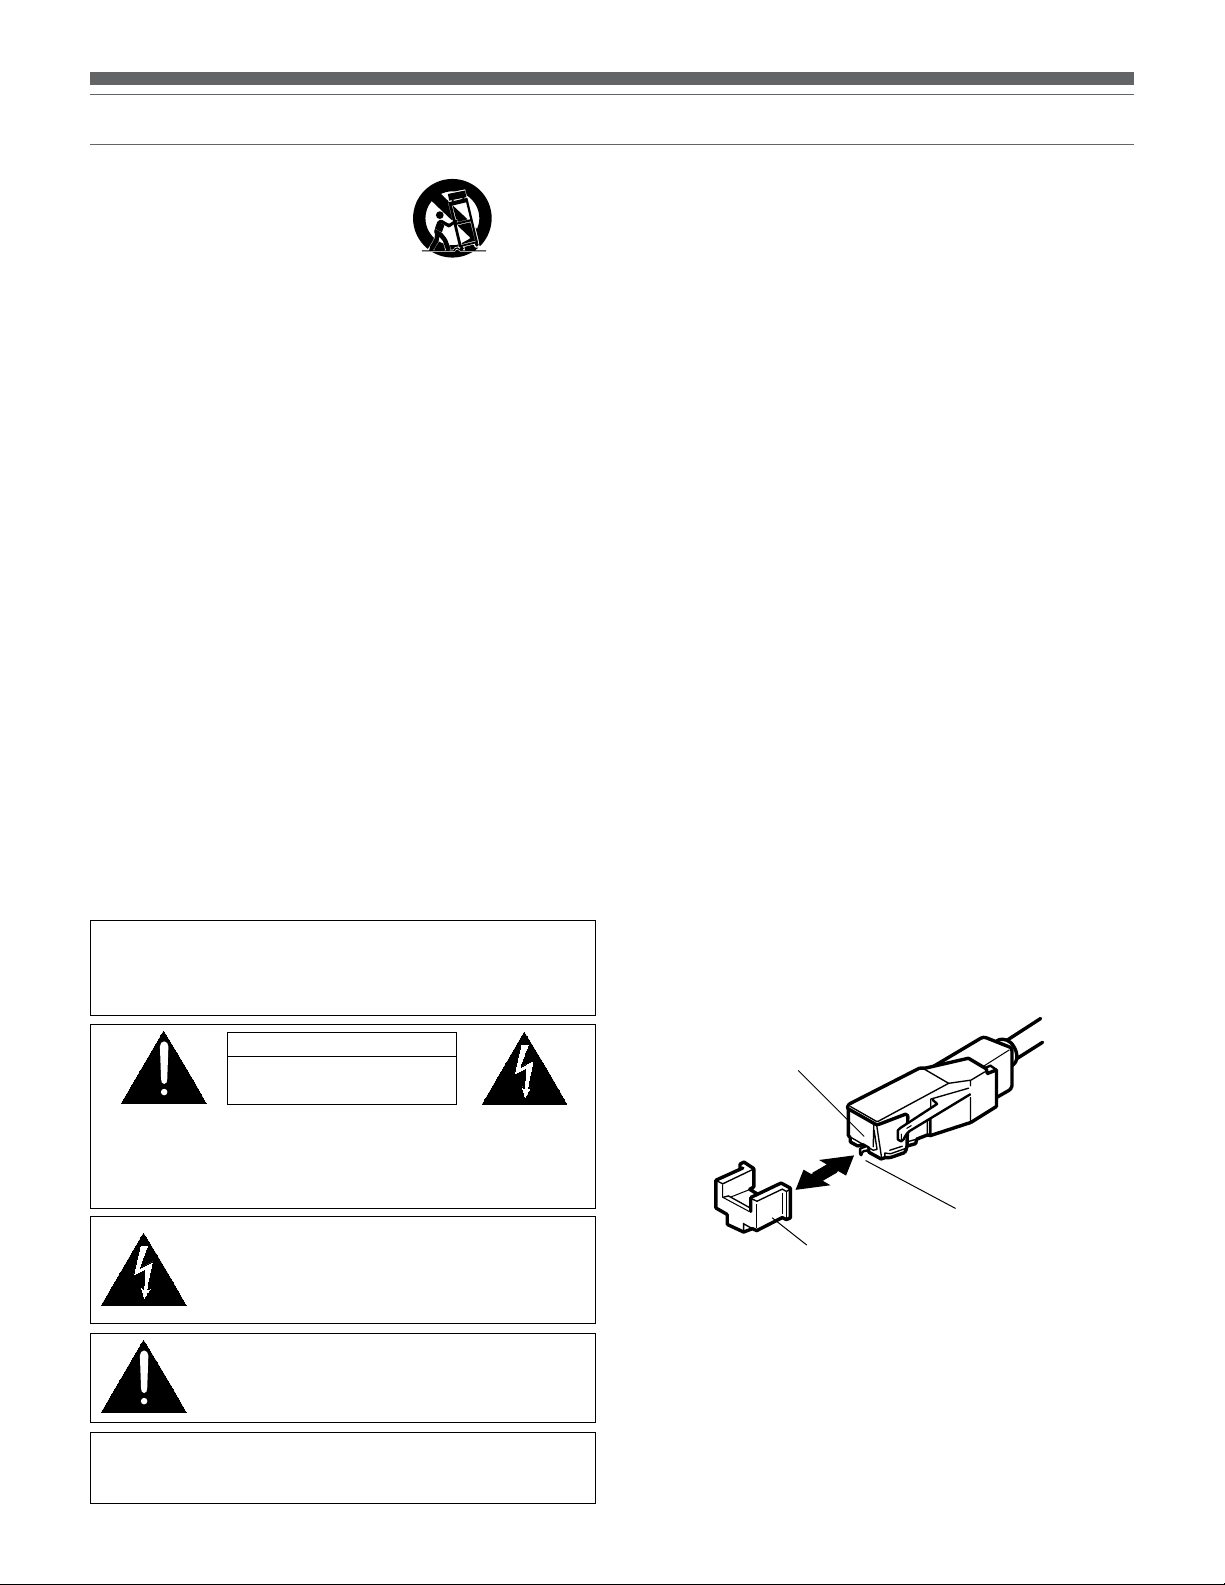
CAUTION: To avoid stylus damage, make certain the
included stylus guard is in place whenever the turntable
is being installed, moved or cleaned.
CAUTION
RISK OF ELECTRIC SHOCK
DO NOT OPEN
Caution: To reduce the risk of fire or electric shock, do not expose
this apparatus to rain or moisture. The apparatus shall not be
exposed to dripping or splashing, and no objects filled with liquids,
such as vases, shall be placed on the apparatus.
The lightning flash with arrowhead symbol within the
equilateral triangle is intended to alert the use to the
presence of uninsulated “dangerous voltage” within
the product’s enclosure that may be of sufficient
magnitude to constitute a risk of electric shock.
The exclamation point within the equilateral triangle is
intended to alert the user to the presence of important
operation and maintenance (servicing) instructions in
the literature accompanying this appliance.
Caution: To prevent electric shock, do not use this polarized plug
with an extension cord, receptacle or other outlet unless the blades
can be fully inserted to prevent blade exposure.
2
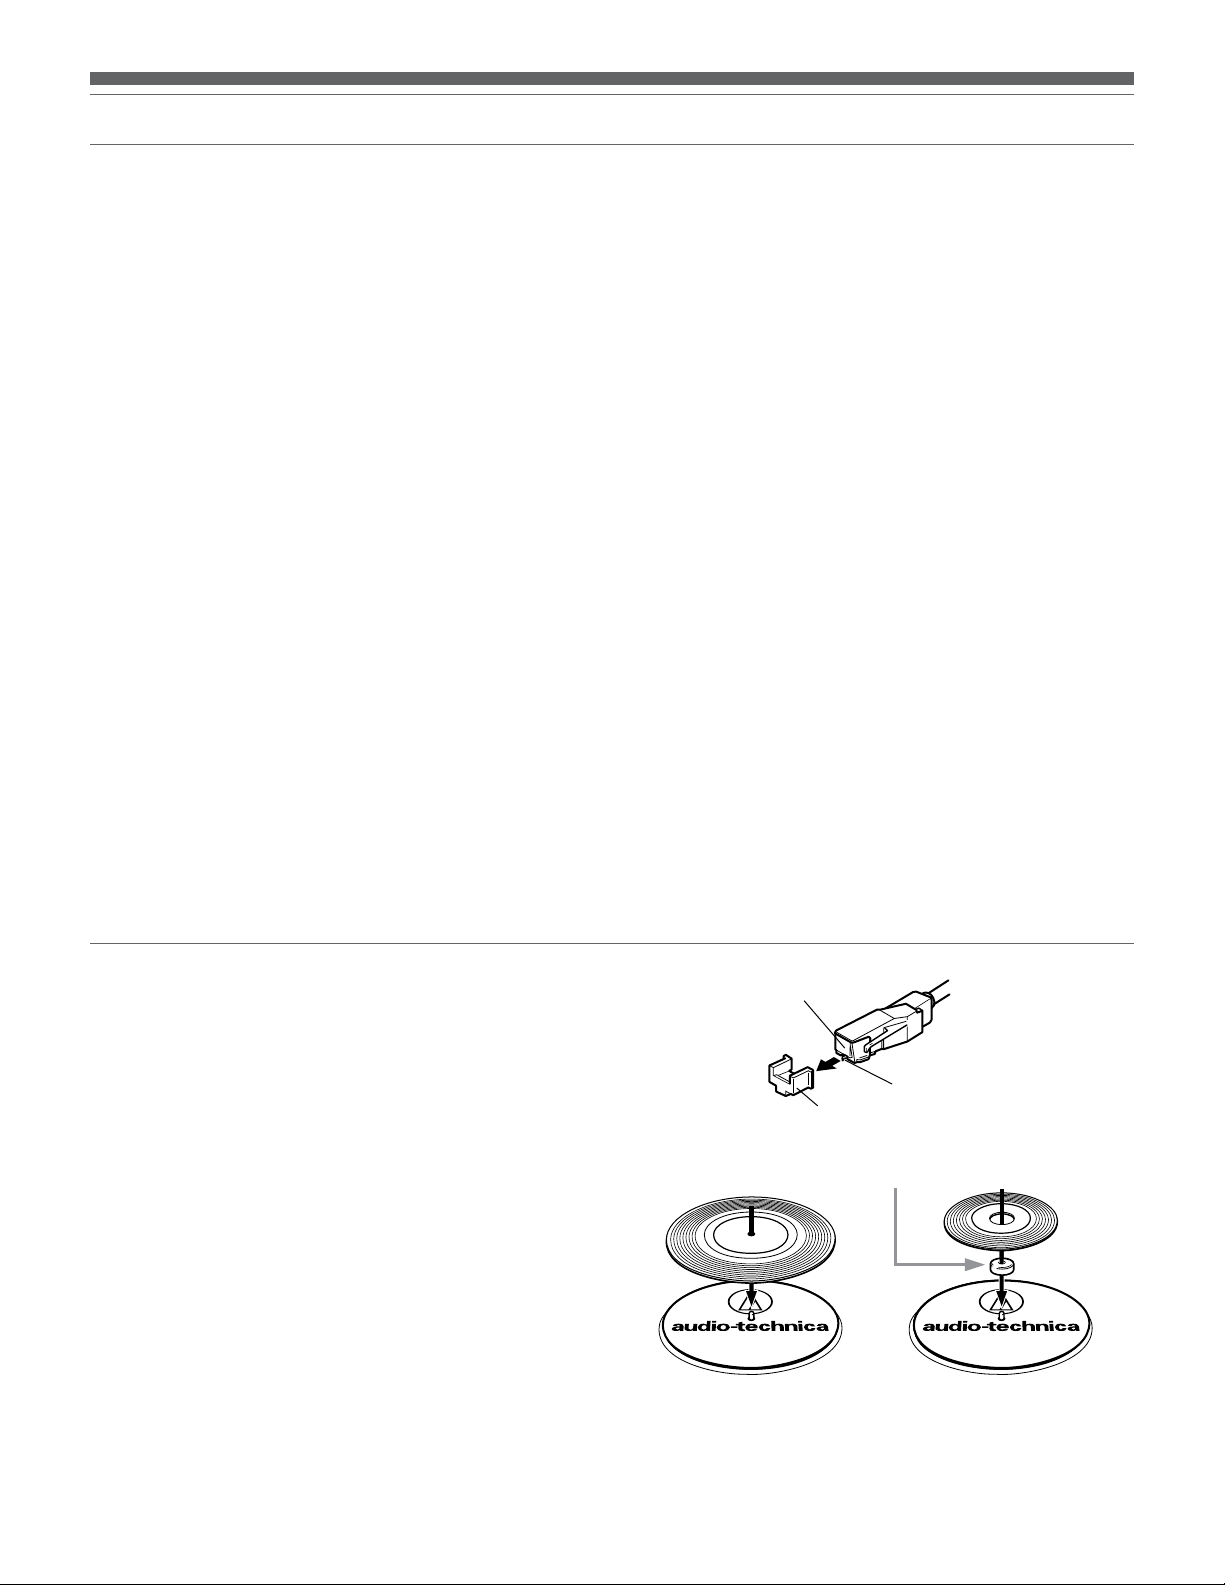
Stylus assembly
Stylus (“Needle”)
Stylus guard
Page 3
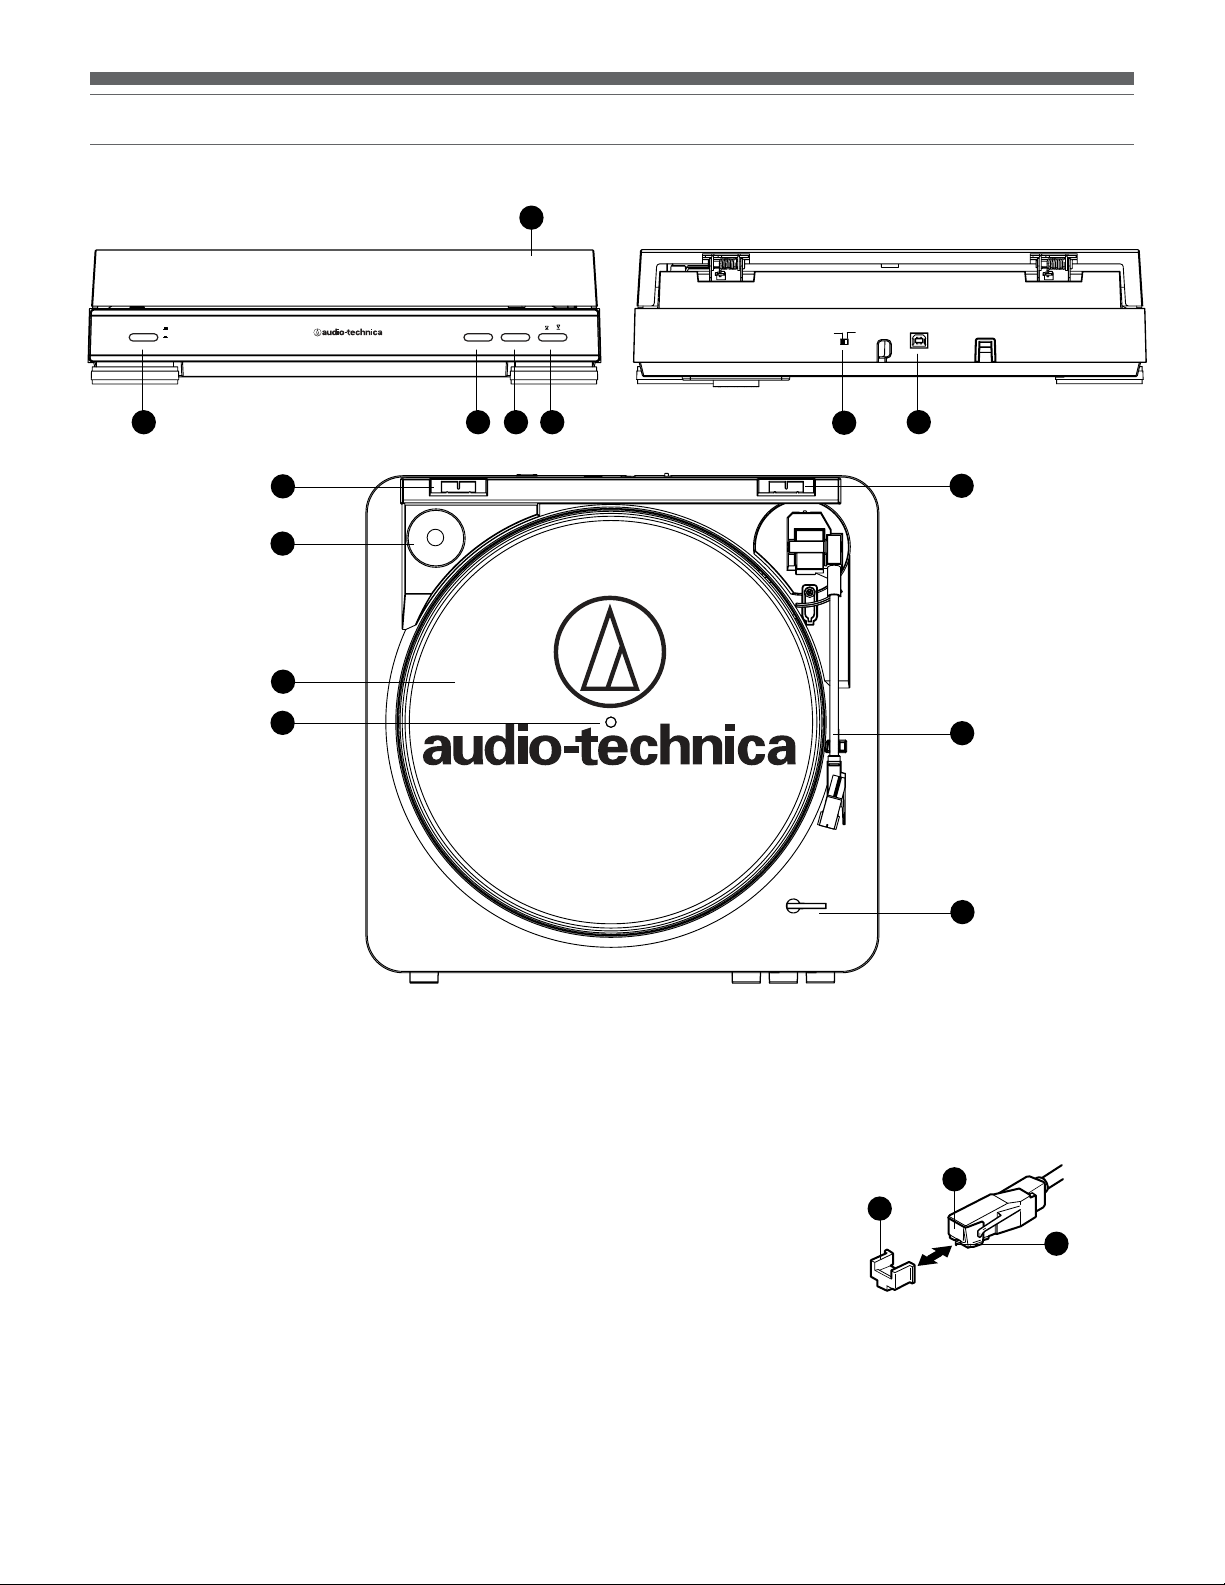
Figure 1
PHONO
LINE
USB (PC)
12"
7"
SIZE
PHONO
LINE
USB (PC)
Front Back
10
English
Main Features
33
SPEED
45
AT-LP60-USB
STEREO TURNTABLE
4
9
START
STOP
1
2 3
PHONO
15
USB (PC)
LINE
16
9
8
6
7
SIZE
12"
7"
11
5
1. START BUTTON
Engages the motor/platter and begins automatic operation.
2. STOP BUTTON
Disengages the motor/platter and returns tone arm to rest.
3. TONE ARM LIFT BUTTON
Lifts and lowers tone arm for manual selection.
4. PLATTER SPEED BUTTON
Select 33 RPM (button in high position) or 45 RPM
(button in low position) platter speed.
5. SIZE SELECTOR
Select the size of the record: 12" or 7".
6. PLATTER
Aluminum platter mounts directly to center spindle/
motor shaft.
7. CENTER SPINDLE
Precision-machined platter-mount portion of the motor shaft.
8. 45-RPM ADAPTER (Shown in receptacle)
Adapts 7" records with large center holes to fit center spindle.
9. DUST COVER HINGE HOLDERS
Attachment points for removable hinged dust cover.
10. DUST COVER
11. TONE ARM/HEADSHELL ASSEMBLY
Tone arm is permanently attached to the headshell
assembly.
12. STYLUS ASSEMBLY
13. STYLUS (“NEEDLE”)
14
12
13
14. STYLUS GUARD
15. PRE-AMP SELECTOR SWITCH (PHONO/LINE)
(On back of turntable) Use PHONO setting when you
connect to the phono input on your home stereo. Use the
LINE level when you connect to CD/TAPE/AUX inputs of
your home stereo.
16. USB OUTPUT
Use this output to connect your turntable to the USB input
of your computer. Please see included software guide
for instructions.
3
Page 4
Initial Setup
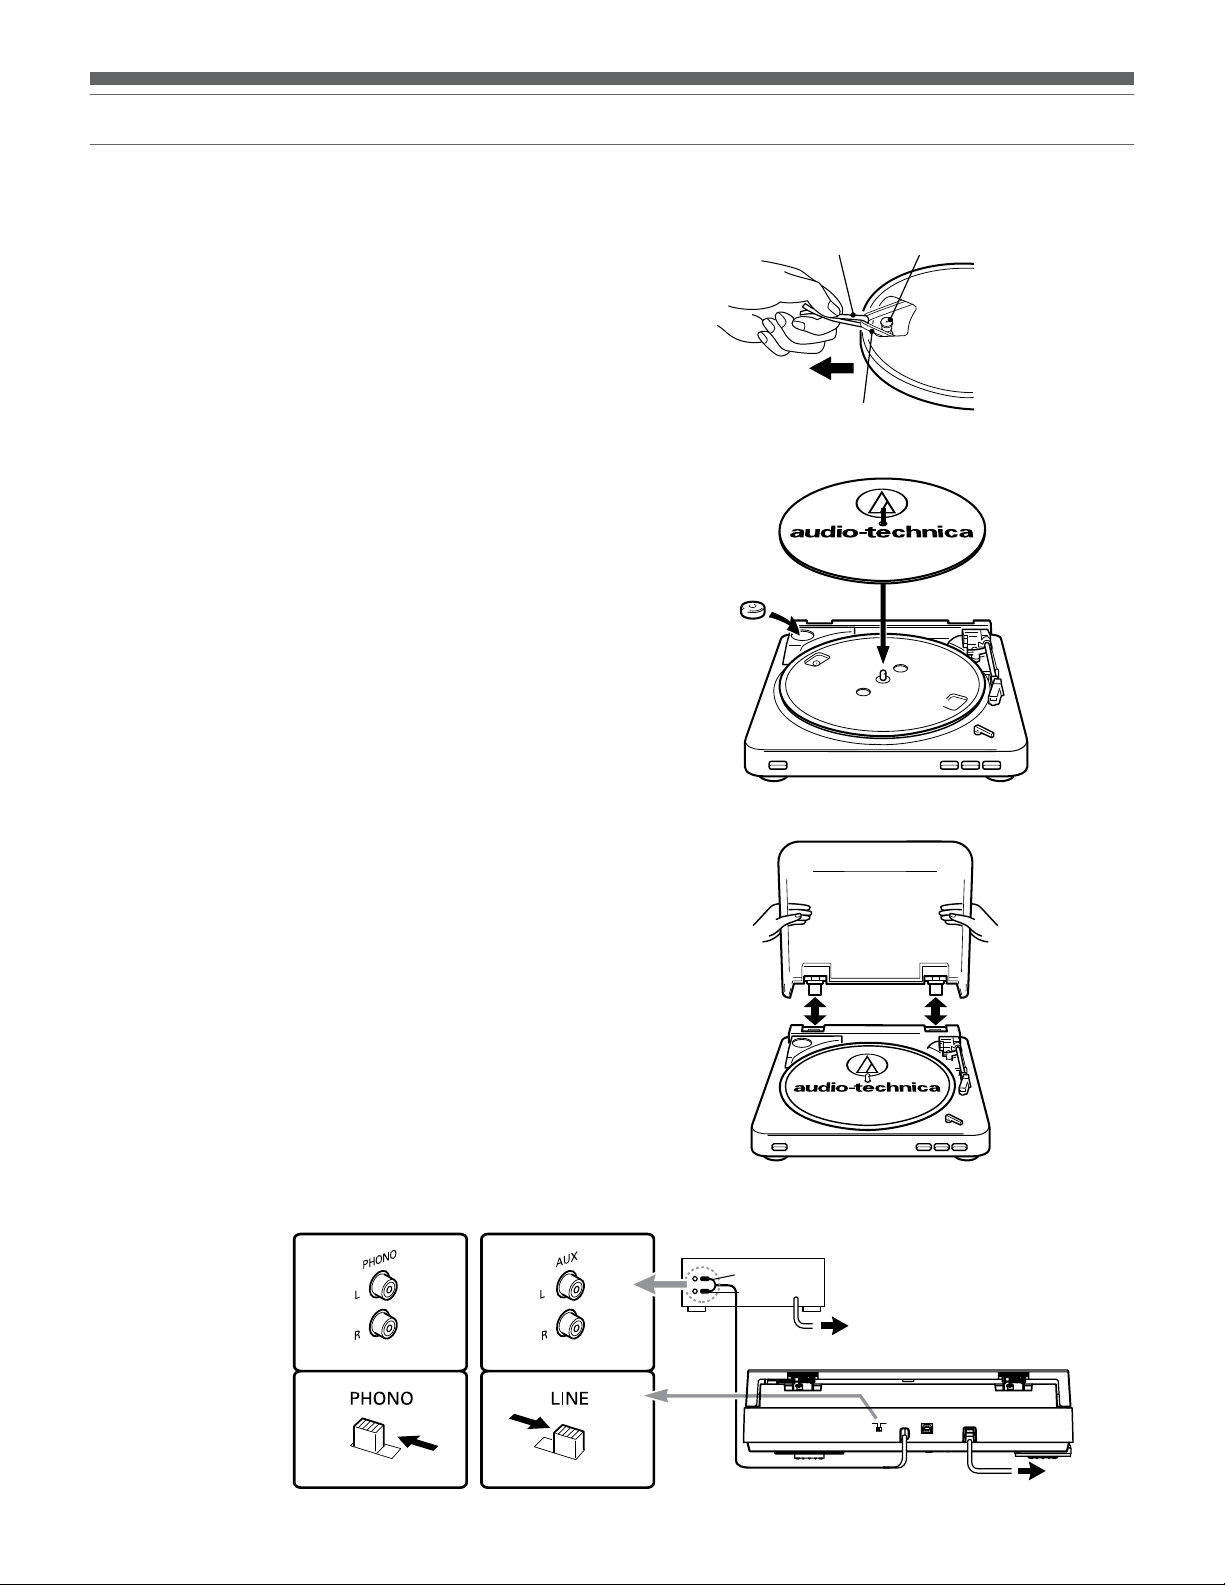
Assembling the Turntable
The AT-LP60-USB requires some assembly before first use.
IMPORTANT: Do not connect the AC power cord until assembly is
complete.
1. Carefully place the turntable platter on the center spindle,
making certain the platter is fully seated on the spindle.
2. While holding both ends of the red tape ribbon on the
turntable belt, carefully pull the belt over the motor pulley (Fig.
2a). (If the belt drops off, remove the turntable platter and put
the belt back on it, as described on page 7.)
3. Once the belt is seated in the pulley’s groove, carefully
remove the ribbon. Make certain the belt is not twisted.
4. Place the turntable mat on top of the turntable platter
(Fig. 2b).
5. If desired, the hinged dust cover may be removed. Hold both
sides of the dust cover and pull upward gently and evenly to
detach the cover from the turntable (Fig. 2c). Keep the cover
in a safe, clean place.
6. To re-install the dust cover, guide the dust cover hinges into
the two hinge receptacles located at the back of the turntable
housing
Connecting to Computers with USB Input
The USB cable (included) connects your AT-LP60-USB turntable to your
computer without need for special drivers. Refer to included software
guide (also available online at www.audio-technica.com) before
connecting the turntable to your computer.
Setting the Pre-amp (Phono/Line) Switch
For increased flexibility of use, this turntable has an internal stereo
phono pre-amplifier. The Pre-amp Selector (Phono/Line) Switch is
located on the back of the turntable. If the stereo system you are using
has a PHONO input, set the Pre-amp Selector Switch to the “PHONO”
position. If your stereo system does not have a PHONO input, set
the Pre-amp Selector Switch to the “LINE” position and connect the
turntable’s output cables to the AUX or other high-level input on your
stereo system (described later) (Fig. 3).
Figure 2 – Assembling the Turntable
2a – Drive belt
Red ribbon
Drive belt
2b – Record mat
2c – Dust cover removal
Motor spindle
NOTE: If you are using the USB cable to connect your turntable to a
computer, the Pre-amp Selector Switch setting has no effect on USB
operation.
Figure 3
PHONO
“AUX”
Input
Jacks
Pre-amp
Selector
Switch
Stereo System
White
Red
PHONO
AC
USB
LINE
AC
4
Page 5
English
Initial Setup (continued)
Connecting to Stereo System
1. Connect the red RCA-type pin-plug to the right channel input
and the white RCA-type pin-plug to the left channel input of
your stereo system (Fig. 3, page 4).
2. With the tone arm still fastened to the tone arm rest, slowly
turn the turntable platter clockwise ten times, to make certain
the automatic mechanism is fully cycled.
3. Remove the vinyl tie that holds the tone arm on its rest.
4. Connect the power cord plug to an AC outlet.
5. NOTE: You do not need to disconnect your turntable from
your stereo system in order to connect it to a computer via
the USB port. This allows you to monitor your recordings
when using recording software. See software guide for further
information.
Connecting to Computers or Audio Devices with 3.5 mm Input
The AT-LP60-USB connects without adapters to devices equipped with
RCA connectors. For maximum flexibility, we have included two adapter
cables to fit other popular audio inputs.
The first of these adapter cables-dual RCA to stereo 3.5 mm mini-plug
(male)-is designed to fit most popular computer* audio inputs. It may
also be used to connect the turntable’s RCA output to other equipment,
including:
• a stereo/boombox* equipped with a 3.5 mm mini input
• powered speakers* equipped with a 3.5 mm mini input
• a mixer* or PA system* equipped with a 3.5 mm mini jack
The second included adapter cable–dual RCA to stereo 3.5 mm miniplug (female)–permits connection of the turntable output to amplified
speakers* or similar devices. The 3.5 mm stereo minijack on the cable
adapter accepts stereo mini-plugs.
To use either adapter cable, connect the turntable’s red and white RCAtype plugs to the cable adapter’s RCA-type jacks.
* When using either cable adapter, always set the AT-LP60-USB
turntable’s Pre-amp Selector Switch to the “LINE” position.
(Switch is located on the back of the turntable.)
NOTE: If connection is desired to a mono amplifier/speaker, make
certain to use a stereo-to-mono adapter, available from your dealer or
an electronic parts store. Inserting a mono plug in the stereo jack will
disable one of the stereo channels. Other adapter cable configurations
will be available from dealers and parts stores for connecting to devices
needing different terminations.
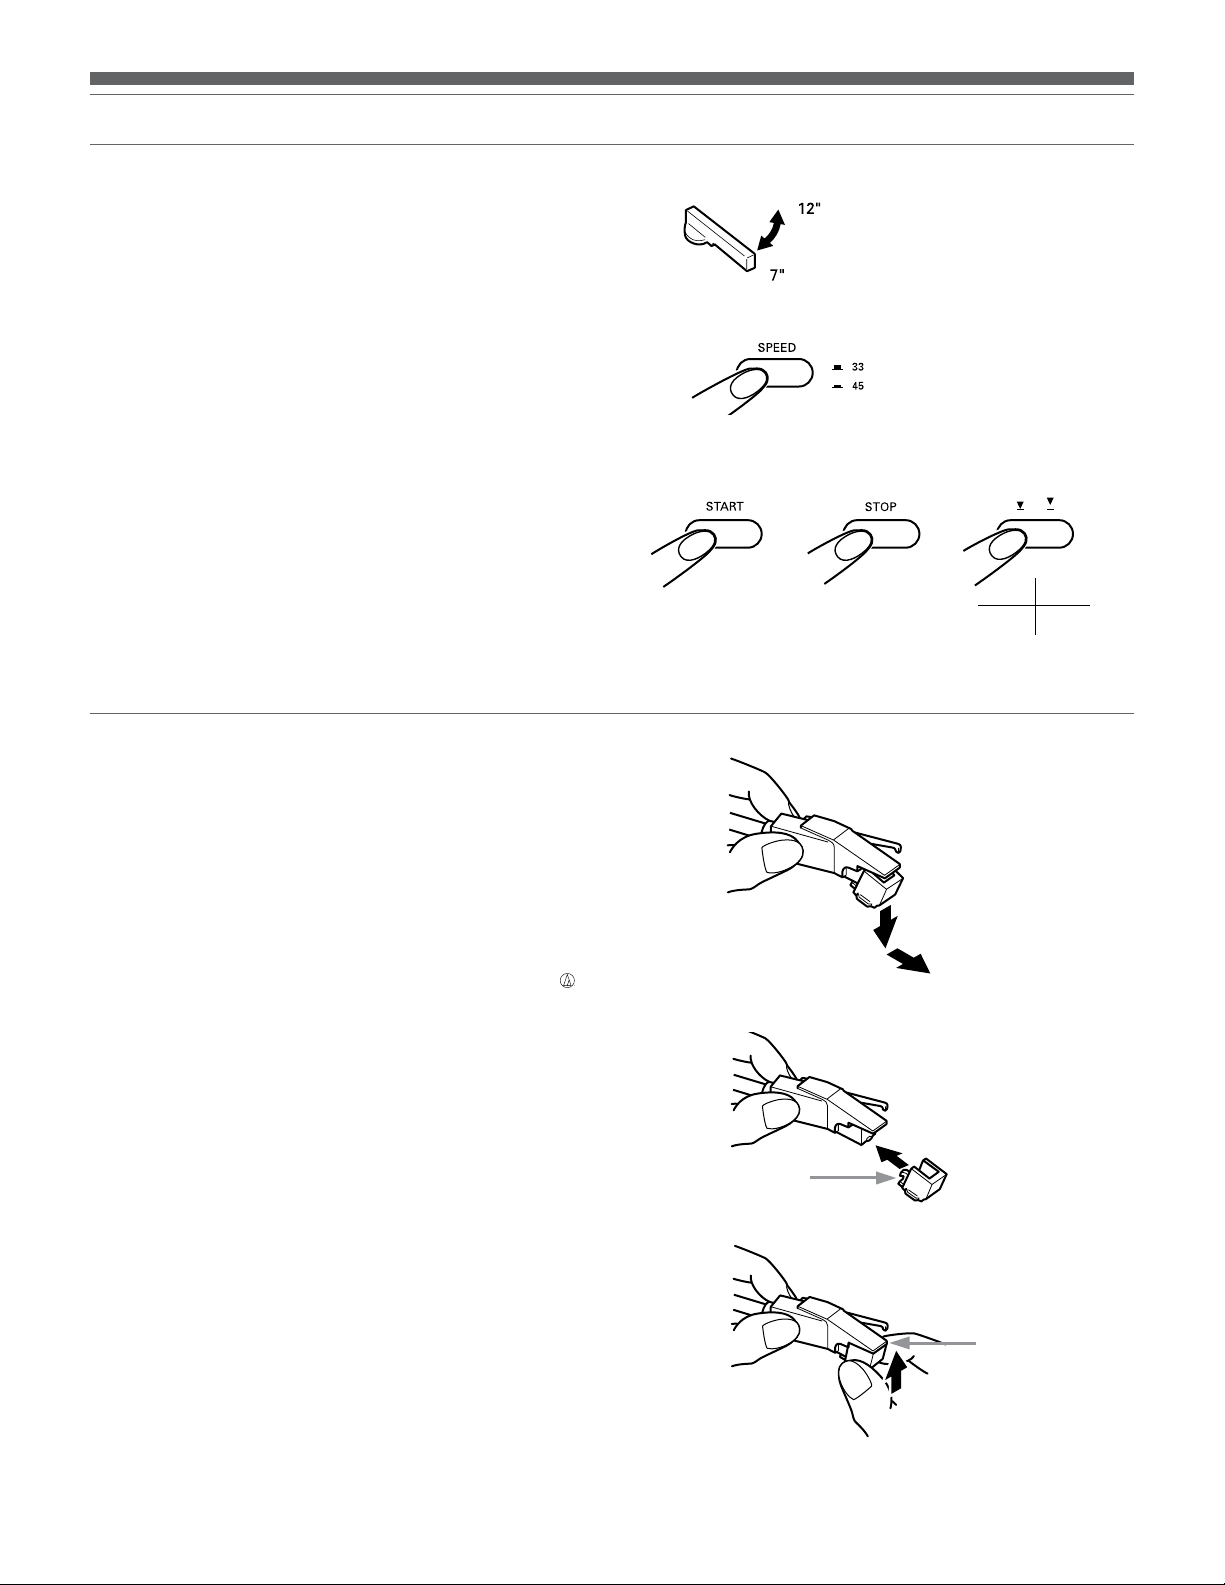
Operation
Automatic Operation
1. Remove the stylus guard from the stylus assembly (Fig. 4).
2. Put a record on the turntable. If needed, use the 45 RPM
adapter (Fig. 5).
3. Select the size of record: 12" or 7" (Fig. 6).
1
4. Select the speed: 33
5. Start: Gently push the START button (Fig. 8a). The turntable
will start and the tone arm automatically will move to the leadin groove. When the record has finished playing, the tone arm
will automatically return to the tone arm rest and the turntable
will shut off.
6. Stop: To stop playing the record before it reaches the end,
press the STOP button (Fig. 8b). The tone arm will lift and
return to the tone arm rest, and the turntable will shut off.
7. Pause: To pause the record before it has completed playing,
press the tone arm Lift button (Fig. 8c). Press the Lift button
again to continue playing the record.
/3 RPM or 45 RPM (Fig. 7).
Figure 4
Stylus assembly
Figure 5
Stylus (“Needle”)
Stylus guard
45 RPM adapter
55
Page 6
Operation (continued)
Caution: When the tone arm reaches the end of the record, it will
lift and return to the tone arm rest automatically. When this happens, do not interfere with the tone arm’s motion, or damage
to the mechanism may occur.
If the tone arm does not return automatically to the tone arm rest
after the record has finished playing, simply press the STOP button
to complete operation.
Manual Operation
1. Remove the stylus guard from the stylus assembly (Fig. 4).
2. Put a record on the turntable. If needed, use the 45 RPM
adapter (Fig. 5).
3. Select the size of record: 12" or 7" (Fig. 6).
4. Select the speed: 33
5. Press the Lift button IN to raise the tone arm (Fig. 8c).
6. Gently move the tone arm so the stylus is over the point on
the record where play is desired to begin.
7. Press the Lift button again to gently lower the tone arm and
play record.
1
/
RPM or 45 RPM (Fig. 7).
3
Replacing the Stylus
While holding the head of the tone arm, rotate the front of the stylus
assembly in a forward and down motion to remove it (Fig. 9). (As you
remove the old assembly, note its position and “feel,” to aid in properly
installing the new one.)
Figure 6
Figure 7
Figure 8
8a 8b 8c
Button Position:
Tone Arm Action:
Figure 9 – Removing the stylus
Out In
Lower Raise
Install the new stylus assembly as shown in Figures 10a/10b, being
careful not to touch the actual stylus. Make certain that the projection
at the back of the assembly is fully seated in the cartridge body first
(Fig. 10a), and that the assembly “clicks” up into place, with no gap
between its top edge and the front of the black plastic tone arm head
(Fig. 10b). Replace the stylus after 400 hours of use.
To maintain original performance, insist upon a genuine Audio-Technica
brand replacement stylus. Look for the Audio-Technica trademark ( )
on the front of the stylus assembly and on the packaging.
Figure 10 – Installing a new stylus
10a
Engage in
body first
10b
No gap here
6
Page 7
English
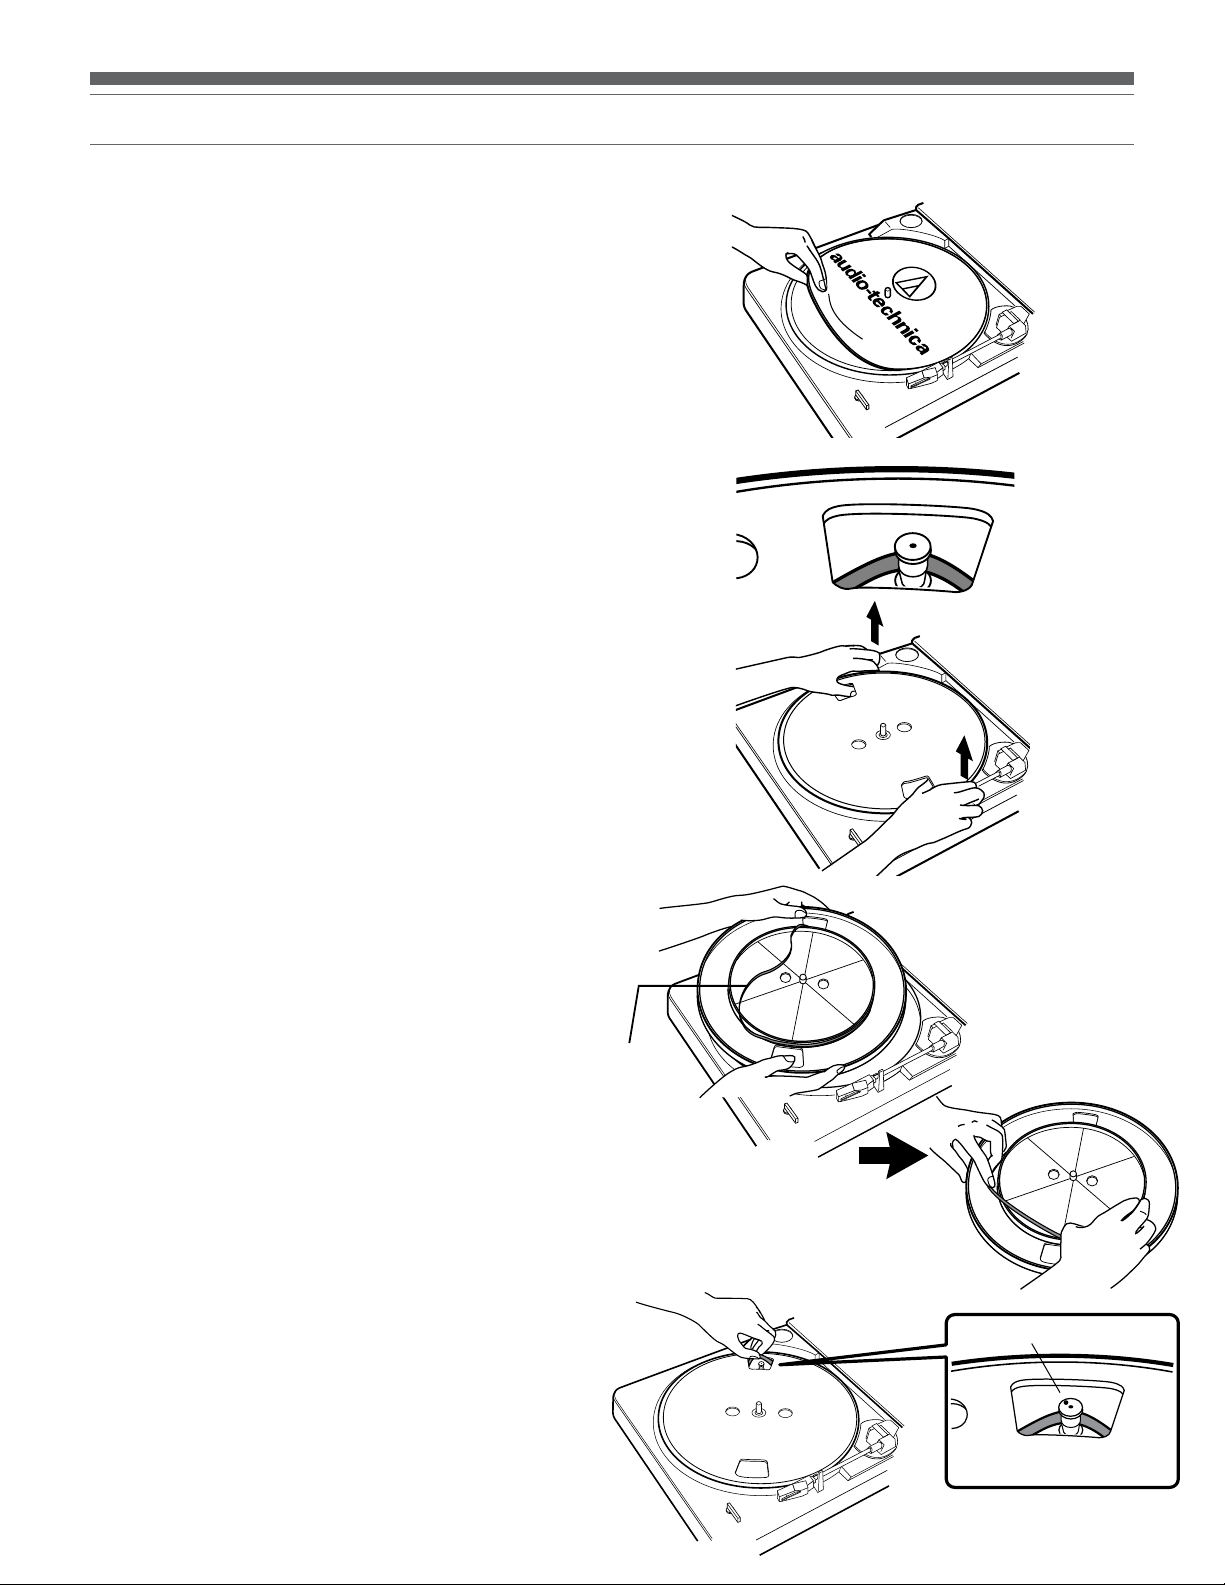
Troubleshooting
Turntable does not operate
1. Make certain the turntable’s AC cord is plugged into an AC
outlet, and that the AC outlet is “live.”
2. Check the drive belt to make certain it is on correctly. (See
Figure 11.)
A) Remove the record mat from the turntable platter (Fig.
11a). Place the mat in the cardboard packaging sleeve for
safekeeping. Through an opening in the turntable platter,
visually inspect to see if the drive belt is around the motor
pulley (Fig. 11b).
B) If the drive belt is not around the motor pulley: Lift and
remove the turntable. Place a thumb into each of the left and
right openings on the turntable platter; and, using the fingers
to press down on the turntable housing’s surface, pull the
platter straight up (Fig. 11c). Avoid pressing on the tone arm.
C) With the turntable platter bottom side up, place the belt
along the outside wall of the turntable platter’s drive rim,
making certain that the belt is smooth and flat all the way
around (Fig. 11d).
D) Put the turntable back on the center spindle, make certain
it is fully seated, and align one of its openings over the motor
pulley position.
E) Through the opening, carefully hook the turntable belt with
a finger or with the original red ribbon (never use a sharp
object) and pull the belt over the motor pulley (Fig. 11e). Make
certain the belt is not twisted between the pulley and the
platter’s drive rim.
F) Put the record mat back on the platter.
G) While holding the tone arm in its rest position, slowly turn
the platter by hand clockwise at least 10 rotations to clear the
mechanism’s automatic cycle.
Turntable operates, but no sound at all
1. The stylus guard is still in place.
2. The tone arm Lift button is pressed in.
3. Amplifier controls set incorrectly: wrong input selected, tape
monitor on, speakers switched off, etc.
4. Check the stylus on phono cartridge for correct placement.
Refer to the instructions for replacing the stylus on page 6.
Turntable operates, but no sound, or sound not loud enough
1. If the turntable is connected to an AUX (high-level) input: The
Pre-amp Selector Switch may be set to the “PHONO” position
(phono-input level).
2. The input gain of the amplified speaker or similar device may
be too low.
3. The stylus assembly may not be fully seated in the cartridge
body. (See Fig. 10 on page 6.)
Sound is very distorted
1. Turntable connected to an amplifier’s PHONO input: If the
pre-amp switch is set to the “LINE” position (AUX high-level
output), a phono input will be overloaded.
Record/tone arm moves slightly up and down
1. Usually this is a normal condition and not a problem. If this
causes the turntable to be unable to track the record, please
contact your dealer or our service department. Make very
certain the surface upon which the turntable is resting is
not picking up vibrations from the floor or walls, or from
direct speaker sound.
Figure 11 – Checking the drive belt
11a
11b
11c
11d
Drive belt
11e
Motor pulley
77
Page 8

Tips For Better Performance
Tips For Better Performance
• When opening or closing the turntable cover, handle it gently,
moving it either at the center or equally from both sides.
• Do not touch the stylus tip with your fingers; avoid bumping
the stylus on the turntable mat or a record’s edge.
• Clean the stylus tip frequently, using a soft brush with a
back-to-front motion only.
• If you use a stylus cleaning fluid, use it very sparingly.
• Wipe the dust cover and turntable housing gently with a soft
cloth. Use only a small amount of mild detergent solution to
clean the turntable and dust cover.
• Never apply harsh chemicals or solvents to any part of the
turntable system.
• Prior to moving the turntable, always unplug it from the AC
outlet and fasten the tone arm on the tone arm rest with the
vinyl twist-tie.
Specications
Type Belt drive turntable, fully automatic
Platter Aluminum
Motor DC servo-controlled
Speeds 33
Wow and flutter Less than 0.25% (WTD) @ 3 kHz (JIS)
Signal-to-noise ratio >50 dB (DIN-B)
Cartridge Integral Dual Magnet
Output level
Pre-amp “PHONO” 2.5 mV nominal at 1 kHz, 5 cm/sec
Pre-amp “LINE” 150 mV nominal at 1 kHz, 5 cm/sec
Phono pre-amp gain 36 dB nominal, RIAA equalized
USB function
A/D, D/A 16 bit 44.1 kHz or 48 kHz USB selectable
Computer interface USB 1.1 Compliant Windows XP, Vista or MAC OSX
Power 120V AC, 60 Hz, 3W
Dimensions 360.0 mm (14.17") W x 97.5 mm (3.84") H x 356.0 mm (14.02") D
Net weight 3 kg (6.6 lbs.)
Furnished accessories Dual RCA (female) to 3.5 mm (
mini-plug (female) stereo adapter cable; 45 RPM adapter; USB cable; recording software
Replacement stylus ATN3600L
1
/3 RPM, 45 RPM
™
stereo cartridge with diamond stylus
1
/8") mini-plug (male) stereo adapter cable; dual RCA (female) to 3.5 mm (1/8")
8
Page 9

Français
Système de tourne-disque stéréo USB
Instructions de sécurité
1. Veuillez lire les instructions ci-dessous.
2. Conservez-les.
3. Tenez compte de tous les avertissements.
4. Suivez toutes les instructions.
5. N’utilisez pas l’appareil à proximité de l’eau.
6. Nettoyez-le uniquement avec un chiffon sec.
7. N’obstruez aucun des orifices de ventilation. Installez l’appareil en
suivant les instructions du fabricant.
8. Ne le placez pas à proximité de toute source de chaleur telle qu’un
radiateur, une grille de chauffage, un poêle ou tout autre appareil (y
compris un amplificateur) produisant de la chaleur.
9. Ne retirez pas l’option de sécurité de la fiche polarisée ou de mise
à la terre. Une fiche polarisée comporte deux lames dont une est
plus large que l’autre. Une fiche de mise à la terre possède deux
lames et une troisième broche de mise à la terre. La lame large ou
la troisième broche assure la sécurité de l’utilisateur. Si la fiche
fournie ne s’adapte pas à la prise électrique, demandez à un
électricien de remplacer la prise hors normes.
10. Protégez le cordon d’alimentation afin que personne ne marche
dessus et que rien ne le pince, en particulier au niveau des fiches,
des prises de courant et du point de sortie de l’appareil.
11. Utilisez uniquement les accessoires spécifiés par le fabricant.
12. N’utilisez l’appareil qu’avec un chariot, un pied, un trépied,
un support ou une table spécifiés par le fabricant ou vendus avec
l’appareil. Si un chariot est utilisé, déplacez l’ensemble chariot appareil avec précaution afin de ne pas le renverser, ce qui pourrait
entraîner des blessures.
13. Débranchez l’appareil en cas d’orage ou de non-utilisation prolongée.
14. Confiez tout entretien à une personne qualifiée. Un entretien est
nécessaire lorsque l’appareil a été endommagé de quelque façon
que ce soit, par exemple en cas de détérioration du cordon ou de la
prise d’alimentation, de renversement de liquide ou de chute
d’objets à l’intérieur de l’appareil, d’exposition de l’appareil à la pluie
ou à l’humidité, de fonctionnement anormal ou de chute de
l’appareil.
15. Si une prise secteur est utilisée comme dispositif de
débranchement, ce dernier doit toujours être opérationnel.
16. Conservez l’appareil dans un environnement bien aéré.
17. L’appareil ne doit pas être exposé à des égouttements d’eau ou
des éclaboussures et aucun objet rempli de liquide, tel qu’un vase,
ne doit être placé sur l’appareil.
Attention : afin de réduire les risques d’incendie ou de choc
électrique, n’exposez pas l’appareil à la pluie ou à l’humidité.
L’appareil ne doit pas être exposé à des égouttements d’eau ou des
éclaboussures et aucun objet rempli de liquide, tel qu’un vase, ne
doit être placé sur l’appareil.
Introduction
Merci d’avoir choisi le tourne-disque AT-LP60-USB. Ce système
d’enregistrement numérique pour microsillons vous permet de
bénéficier de la légendaire qualité et de la haute fidélité Audio-Technica
en transposant vos enregistrements sur vinyles dans le monde
numérique. Dans cette boîte, vous trouverez tout ce qui est nécessaire
pour convertir la musique de vos microsillons classiques en fichiers
numériques : le tourne-disque stéréo Audio-Technica AT-LP60-USB,
muni d’une sortie USB pour une connexion directe à votre ordinateur,
les logiciels d’enregistrement Audacity (pour MAC ou PC), une cellule
phono Audio-Technica Integral Dual-Magnet, un câble USB et des câbles
adaptateurs. Le tourne-disque est également muni d’un préamplificateur
commutable phono/ligne intégré qui permet de le brancher sur un
système stéréo équipé d’une sortie phono ou ligne.
Le tourne-disque stéréo AT-LP60-USB offre les caractéristiques
suivantes :
• Sortie USB - aucun gestionnaire de périphérique n’est nécessaire
pour relier le tourne-disque directement à votre ordinateur
• Préamplificateur stéréo commutable phono/ligne intégré. Le
tourne-disque peut ainsi être utilisé avec des systèmes stéréo
disposant de sorties magnétique-phono ou « AUX » (ligne) ;
emploi aisé avec la plupart des enceintes
• Compatible PC & Mac
• Fonctionnement entièrement automatique
• Deux vitesses : 33
1
/
tr/min et 45 tr/min
3
• Platine aluminium de qualité professionnelle
• Cellule phono Audio-Technica Integral Dual Magnet
™
avec
diamant de lecture remplaçable
• Mécanisme de levage/de repérage amorti avec commande
sur le panneau avant
• Couvercle anti-poussière amovible
Pour utiliser ce produit à votre meilleure satisfaction, lisez les
informations et suivez les instructions données dans ce manuel. Gardez
le manuel à un endroit accessible pour pouvoir le consulter aisément
lorsque vous en aurez besoin.
Nous vous recommandons de garder tous les emballages pour
entreposer, déplacer ou transporter l’appareil au besoin.
ATTENTION : Pour éviter les risques de dommage à la pointe de
lecture, veillez à ce que la protection fournie est en place lorsque
vous installez, déplacez ou nettoyez le tourne-disque.
RISQUE DE CHOC ÉLECTRIQUE
ATTENTION
NE PAS OUVRIR
Attention : afin de réduire le risque de choc électrique, ne retirez
pas le couvercle. L’appareil ne comporte aucune pièce réparable
par l’utilisateur. Confiez l’entretien de l’appareil uniquement à un
personnel qualifié.
Le symbole de l’éclair avec une pointe de flèche dans
un triangle équilatéral est destiné à prévenir l’utilisateur
de la présence à l’intérieur du boîtier d’une « tension
dangereuse » non isolée dont la magnitude peut être
suffisante pour constituer un risque de choc électrique.
Le point d’exclamation dans un triangle équilatéral
a pour but d’avertir l’utilisateur de la présence
d’importantes instructions de fonctionnement et de
maintenance (entretien) dans la documentation fournie
avec l’appareil.
Attention : pour éviter tout choc électrique, n’utilisez pas cette
fiche polarisée avec un cordon prolongateur, un connecteur
femelle ou une autre prise, sauf si les lames peuvent s’insérer
complètement afin d’empêcher leur exposition.
Porte-pointe
Pointe de lecture
(« aiguille »)
Protection de la
pointe
9
Page 10

Principaux éléments
PHONO
LINE
USB (PC)
PHONO
LINE
USB (PC)
12"
7"
SIZE
Figure 1
Avant Arrière
10
33
SPEED
45
AT-LP60-USB
STEREO TURNTABLE
4
9
START
STOP
1
2 3
PHONO
15
USB (PC)
LINE
16
9
8
6
7
SIZE
12"
7"
11
5
1. BOUTON DE DÉMARRAGE
Pour mettre en marche le moteur/la platine et lancer le
fonctionnement en mode automatique.
2. BOUTON D’ARRÊT
Pour arrêter le moteur/la platine et faire revenir le bras de
lecture à la position de repos.
3. BOUTON DE LEVAGE DU BRAS DE LECTURE
Pour lever et abaisser le bras de lecture en mode de
sélection manuelle.
4. SÉLECTEUR DE VITESSE DE ROTATION DE LA PLATINE
Pour sélectionner une vitesse de rotation de 33 tr/min
(bouton en position haute) ou de 45 tr/min (bouton en
position basse).
5. SÉLECTEUR DE TAILLE
Pour sélectionner la taille du disque : 30 cm (12") ou 17 cm (7").
6. PLATINE
Platine aluminium montée directement sur l’axe moteur.
7. AXE CENTRAL
Partie de l’axe moteur dépassant de la platine ; pièce à
usinage de précision.
10
8. ADAPTATEUR 45 TR/MIN (placé dans son logement sur
l’illustration) Pour maintenir autour de l’axe central les
disques de 17 cm à trou large.
9. LOGEMENTS DES CHARNIÈRES DU COUVERCLE
ANTI-POUSSIÈRE
Points de fixation des charnières du couvercle anti-poussière.
10. COUVERCLE ANTI-POUSSIÈRE
11. ENSEMBLE BRAS DE LECTURE/CELLULE
Le bras de lecture est fixé à demeure sur l’ensemble cellule.
12. PORTE-POINTE
14
12
13. POINTE DE LECTURE (« AIGUILLE »)
14. PROTECTION DE LA POINTE
13
15. SÉLECTEUR DE PRÉAMPLIFICATION (PHONO/LIGNE)
(A l’arrière du tourne-disque) Réglez le sélecteur sur PHONO
lorsque vous connectez le tourne-disque sur l’entrée phono de
votre chaîne stéréo. Réglez le sélecteur sur LINE (Ligne) lorsque
vous connectez le tourne-disque à une entrée CD/TAPE/AUX de
votre chaîne stéréo.
16. SORTIE USB
Cette sortie vous permet de connecter le tourne-disque à
l’entrée USB de votre ordinateur. Consultez le guide
d’utilisation du logiciel.
Page 11

Français
Conguration initiale
Assemblage du tourne-disque
Vous devez assembler certains éléments du tourne-disque
AT-LP60-USB avant de pouvoir vous servir de ce dernier.
IMPORTANT : Ne branchez pas le cordon d’alimentation CA avant
d’avoir terminé l’assemblage.
1. Placez avec précaution la platine sur l’axe central ; assurezvous que la platine est placée correctement sur l’axe.
2. Prenez les deux extrémités de la languette rouge et tirez avec
précaution sur la courroie pour la mettre en place par-dessus
la poulie du moteur (fig. 2a). (Si la courroie tombe, retirez la
platine et remettez la courroie en place comme décrit à la
page 14.)
3. Une fois la courroie placée dans la rainure de la poulie, retirez
avec précaution la languette de mise en place. Vérifiez que la
courroie n’est pas tordue.
4. Placez le tapis antidérapant sur la face supérieure de la platine
(fig. 2b).
5. Retirez le couvercle anti-poussière si vous le souhaitez. Pour
détacher le couvercle anti-poussière du tourne-disque, prenez
le couvercle des deux côtés et tirez-le vers le haut, sans
forcer et en exerçant une force égale de part et d’autre
(fig. 2c). Conservez le couvercle à l’abri dans un endroit
propre.
6. Pour remettre en place le couvercle anti-poussière, guidez et
insérez les charnières du couvercle dans les deux logements
situés à l’arrière du boîtier du tourne-disque.
Connexion à un ordinateur à entrée USB
Le câble USB (fourni) vous permet de connecter le tourne-disque
AT-LP60-USB à un ordinateur sans gestionnaire de périphérie spécialisé.
Avant de connecter le tourne-disque à votre ordinateur, reportez-vous au
guide d’utilisation du logiciel (fourni - disponible également en ligne sur
le site www.audio-technica.com).
Figure 2 – Assemblage du tourne-disque
2a – Courroie d’entraînement
Languette rouge
Poulie du moteur
Courroie d’entraînement
2b – Tapis antidérapant
2c – Retrait du couvercle anti-poussière
Réglage du sélecteur de préamplification (phono/ligne)
Pour une plus grande souplesse d’utilisation, le tourne-disque est
muni d’un préamplificateur stéréo phono interne. Le sélecteur de
préamplification (phono/ligne) est situé à l’arrière du tourne-disque. Si
votre chaîne stéréo possède une entrée PHONO, réglez le sélecteur
de préamplification sur « PHONO ». Si votre chaîne ne possède pas
d’entrée PHONO, réglez le sélecteur sur « LINE » (Ligne) et connectez
les câbles de sortie du tourne-disque à l’entrée AUX ou à une autre
entrée à niveau élevé de la chaîne (voir plus bas) (fig. 3).
REMARQUE : Si vous connectez le tourne-disque à un ordinateur à
l’aide du câble USB, le réglage du sélecteur de préamplification n’a pas
d’incidence sur la connexion USB ni sur le fonctionnement du tournedisque.
Figure 3
PHONO
« AUX »
Jacks
d’entrée
Chaîne stéréo
Blanc
Rouge
CA
Sélecteur de
préamplification
PHONO
USB
LINE
CA
11
Page 12

Conguration initiale (suite)
Connexion au système stéréo
1. Branchez le connecteur RCA mâle rouge sur l’entrée du canal
droit de votre chaîne ; branchez le connecteur RCA mâle blanc
sur l’entrée du canal gauche (fig. 3, page 11).
2. Le bras de lecture restant immobilisé sur son support, tournez
lentement la platine à la main sur dix tours dans le sens des
aiguilles d’une montre de façon à faire effectuer un cycle
complet au mécanisme automatique.
3. Retirez l’attache en vinyle maintenant le bras de lecture sur son
support.
4. Branchez la fiche du cordon d’alimentation sur une prise secteur
CA.
5. REMARQUE : Vous ne devez pas débrancher le tourne-disque
de la chaîne stéréo pour la connecter à un ordinateur via un port
USB. Le double branchement vous permet de surveiller les
enregistrements effectués à l’aide d’un logiciel d’enregistrement.
Pour plus d’informations, consultez le guide d’utilisation du
logiciel.
Connexion à un ordinateur ou appareil d’écoute à connecteur
d’entrée de 3,5 mm
Le tourne-disque AT-LP60-USB peut être connecté sans adaptateur aux
appareils munis de connecteurs RCA. Pour une souplesse maximale,
le tourne-disque est fourni avec deux câbles adaptateurs permettant le
branchement sur d’autres types d’entrées courantes.
Le premier câble adaptateur (double RCA - mini-prise stéréo 3,5
mm mâle) convient à la plupart des entrées équipant couramment les
ordinateurs*. Il permet également de connecter la sortie RCA du tournedisque à d’autres équipements, tels que :
• boombox stéréo* avec mini-jack d’entrée de 3,5 mm
• haut-parleurs à alimentation autonome* avec mini-jack
d’entrée de 3,5 mm
• mélangeur* ou sonorisation de salle* avec mini-jack de 3,5 mm
Le deuxième câble adaptateur (double RCA - mini-prise stéréo 3,5
mm mâle) permet de connecter le tourne-disque à des haut-parleurs
amplifiés* ou des équipements similaires. Le mini-jack stéréo de 3,5
mm du câble adaptateur accepte les mini-prises stéréo.
Pour utiliser les câbles adaptateurs, branchez les prises RCA rouge et
blanche du tourne-disque sur les jacks RCA du câble.
* Lorsque vous utilisez un câble adaptateur, réglez toujours le
sélecteur de préamplification du tourne-disque AT-LP60-USB sur
« LINE » (Ligne). (Le sélecteur est situé à l’arrière du tourne-disque.)
REMARQUE : Pour connecter le tourne-disque à un amplificateur/ hautparleur mono, veillez à utiliser un adaptateur stéréo-mono (disponible
auprès de votre revendeur Audio-Technica ou dans les magasins
d’électronique). Lorsque vous branchez une prise mono sur le jack
stéréo sans adaptateur stéréo-mono, l’un des deux canaux stéréo
sera désactivé. Votre revendeur Audio-Technica ou votre magasin
d’électronique pourront vous fournir d’autres câbles et accessoires
pour connecter le tourne-disque à des appareils nécessitant d’autres
terminaisons.
Utilisation
Fonctionnement en mode automatique
1. Retirez la protection de la pointe de lecture (fig. 4).
2. Placez un disque sur la platine. Si nécessaire, utilisez l’adaptateur
45 tr/min (fig. 5).
3. Sélectionnez la taille du disque, 30 cm (12") ou 17 cm (7") (fig. 6).
1
/
4. Sélectionnez la vitesse : 33
5. Démarrage : Appuyez sur le bouton Démarrage, sans forcer
(fig. 8a). Le tourne-disque démarre et le bras de lecture se place
automatiquement sur le sillon de départ. Lorsque la lecture du
disque est terminée, le bras de lecture revient automatiquement
sur son support et le tourne-disque s’arrête.
6. Arrêt : Pour arrêter la lecture du disque avant la fin, appuyez sur
le bouton Arrêt (fig. 8b). Le bras de lecture se relève et revient
sur son support, après quoi le tourne-disque s’arrête.
7. Pause : Pour interrompre la lecture du disque avant la fin,
appuyez sur le bouton de levage du bras de lecture (fig. 8c).
Appuyez à nouveau sur le bouton de levage pour poursuivre la
lecture du disque.
tr/min ou 45 tr/min (fig. 7).
3
Figure 4
Figure 5
Porte-pointe
Pointe de lecture (« aiguille »)
Protection de la pointe
Adaptateur 45 tr/min
12
Page 13

Français
Utilisation (suite)
Attention : Lorsque le bras de lecture arrive à la fin du disque, le
levage du bras et son retour sur le support sont commandés par
le mécanisme automatique. Lors de cette opération, ne tentez
pas d’agir sur le mouvement du bras de lecture, au risque
d’endommager le mécanisme.
Si le bras de lecture ne revient pas automatiquement sur son support
après la lecture d’un disque, il suffit d’appuyer sur le bouton Arrêt
pour lever et ramener le bras.
Utilisation en mode manuel
1. Retirez la protection de la pointe de lecture (fig. 4).
2. Placez un disque sur la platine. Si nécessaire, utilisez l’adaptateur
45 tr/min (fig. 5).
3. Sélectionnez la taille du disque, 30 cm (12") ou 17 cm (7") (fig. 6).
4. Sélectionnez la vitesse : 33
5. Pour lever le bras de lecture, appuyez sur le bouton de levage
pour le mettre en position enfoncée (fig. 8c).
6. Sans forcer, déplacez le bras de lecture de façon à ce que la
pointe de lecture se trouve au-dessus de l’endroit du disque où
vous souhaitez commencer la lecture.
7. Appuyez à nouveau sur le bouton de levage pour abaisser le bras
et commencer la lecture du disque.
1
/3 tr/min ou 45 tr/min (fig. 7).
Remplacement de la pointe
Figure 6
(30 cm)
(17 cm)
Figure 7
Figure 8
8a 8b 8c
(VITESSE)
(Relevé)
(Enfoncé)
(Démarrage) (Arrêt) (Relevé) (Enfoncé)
Position du bouton :
Action du bras de lecture :
BOUTON SORTI BOUTON ENFONCÉ
S’ABAISSE SE RELÈVE
En tenant la tête du bras de lecture, abaissez le porte-pointe et tirez
dessus pour le retirer (fig. 9). (En retirant le porte-pointe, observez
sa position et sentez-la des doigts de façon à pouvoir remettre plus
facilement en place la nouvelle pointe.)
Installez la nouvelle pointe et son porte-pointe comme illustré aux
figures 10a/10b, en veillant à ne pas toucher la pointe des doigts.
Veillez d’abord à ce que la saillie à l’arrière du porte-pointe soit bien
engagée dans la cellule (fig. 10a) ; ensuite, relevez le porte-pointe et
assurez-vous qu’il s’enclique en place, sans interstice entre le bord
supérieur et l’avant de la tête en plastique noir du bras de lecture (fig.
10b). Remplacez la pointe après 400 heures de lecture.
Pour conserver toutes les performances du tourne-disque à la lecture,
veillez à utiliser une pointe de rechange Audio-Technica d’origine. Les
pointes de rechange d’origine portent la marque Audio-Technica ( ) sur
l’avant du porte-pointe et sur l’emballage.
Figure 9 Retrait de la pointe
Figure 10 Mise en place d’une nouvelle pointe
10a
Engager dans
la cellule d’abord
10b
Pas d’interstice
13
Page 14

Dépannage
Le tourne-disque ne fonctionne pas
1. Vérifiez que le cordon d’alimentation CA du tourne-disque est
branché sur une prise secteur CA et que la prise est alimentée
en courant.
2. Vérifiez que la courroie d’entraînement est correctement mise en
place. (Voir figure 11.)
A) Retirez le tapis antidérapant de la platine (fig. 11a). Placez
le tapis dans son emballage en carton pour le mettre à l’abri.
Par un des perçages dans la platine, vérifiez que la courroie
d’entraînement se trouve correctement placée sur la poulie du
moteur (fig. 11b).
B) Si la courroie d’entraînement ne se trouve pas correctement
placée sur la poulie : soulevez et retirez la platine. Placez un
pouce dans chacun des perçages de la platine ; en appuyant des
doigts sur le boîtier du tourne-disque, tirez la platine à la verticale
vers le haut (fig. 11c). Évitez d’appuyer sur le bras de lecture.
C) Retournez la platine et placez la courroie autour du moyeu
d’entraînement en veillant à ce que la courroie ne soit ni tordue
ni croquée (fig. 11d).
D) Remettez la platine en place en l’engageant complètement sur
l’axe central ; ensuite, amenez l’un des perçages au-dessus de la
poulie du moteur.
E) En passant par le perçage, prenez la courroie par un doigt
ou tirez dessus à l’aide de la languette rouge d’origine (ne vous
servez jamais d’un objet pointu) et amenez la courroie par-dessus
la poulie du moteur (fig. 11e). Veillez à ce que la courroie ne soit
pas tordue entre la poulie et le moyeu de la platine.
F) Remettez le tapis antidérapant sur la platine.
G) En maintenant le bras de lecture dans sa position de repos,
tournez lentement la platine à la main sur dix tours dans le sens
des aiguilles d’une montre de façon à faire effectuer un cycle
complet au mécanisme automatique.
Le tourne-disque fonctionne mais il n’y a pas de son
1. La protection de la pointe de lecture est restée en place.
2. Le bouton de levage du bras de lecture est enfoncé.
3. Les réglages de l’amplificateur sont incorrects : sélection de sortie
erronée, contrôle d’écoute activé, haut-parleurs désactivés, etc.
4. Vérifiez si la pointe de lecture est correctement placée dans la
cellule. Pour le placement de la pointe de lecture, reportez-vous
aux instructions données à la page 13.
Le tourne-disque fonctionne mais il n’y a pas de son ou le volume
du son est très faible
1. Si le tourne-disque est connecté à une entrée AUX (niveau
élevé) : il se peut que le sélecteur de préamplification soit réglé sur
« PHONO » (niveau d’entrée phono).
2. Le gain d’entrée du haut-parleur amplifié ou d’un appareil
similaire peut être trop faible.
3. Il se peut que le porte-pointe ne soit pas correctement placé
dans la cellule. (Voir figure 10 à la page 13.)
Distorsion importante du son
1. Si le tourne-disque est connecté à l’entrée PHONO d’un
amplificateur : si le sélecteur de préamplification est réglé sur «
LINE » (Line - entrée AUX de niveau élevé), l’entrée phono sera
en saturation.
La platine oscille légèrement
1. Généralement, ce comportement est normal et ne constitue pas
un problème. Si l’oscillation de la platine est telle qu’elle rend
impossible la lecture du disque, veuillez vous adresser à votre
revendeur ou à notre service après-vente. Assurez-vous de
façon certaine que la surface sur laquelle se trouve le tournedisque ne répercute pas des vibrations provenant du sol, des
murs voisins ou du son diffusé directement par des hautparleurs.
Figure 11 – Vérification de la courroie d’entraînement
11a
11b
11c
11d
Courroie
d’entraînement
11e
Poulie du moteur
14
Page 15

Conseils d’optimisation des performances
• En ouvrant ou en fermant le couvercle du tourne-disque,
veillez à ne pas forcer le mécanisme des charnières : prenez le
couvercle par le milieu ou exercez une force égale de part et
d’autre si vous le prenez par les côtés.
• Ne touchez jamais la pointe de lecture des doigts ; évitez de
cogner la pointe contre le tapis antidérapant ou sur le bord du
disque.
• Nettoyez fréquemment le bout de la pointe de lecture à l’aide
d’une brosse douce ; brossez toujours et exclusivement
d’arrière en avant.
• Si vous utilisez un liquide de nettoyage pour la pointe de lecture, veillez toujours à l’utiliser en très faible quantité.
• Nettoyez le couvercle anti-poussière et le boîtier du tournedisque à l’aide d’un chiffon doux, sans exercer de pression
excessive. Pour nettoyer le tourne-disque et le couvercle antipoussière, utilisez toujours une solution de détergent doux en
faible quantité.
• Ne mettez jamais les éléments du tourne-disque en contact
avec des produits chimiques agressifs ou des solvants.
• Avant de déplacer le tourne-disque, débranchez toujours le cordon d’alimentation de la prise secteur CA et fixez le bras de
lecture sur son support à l’aide de l’attache en vinyle.
Français
Conseils d’optimisation des performances
Caractéristiques techniques
Type Tourne-disque à entraînement par courroie, entièrement automatique
Platine Aluminium
Moteur A servocommande CC
Vitesses 33
Fluctuations de vitesse Moins de 0,25 % (WTD) à 3 kHz (JIS)
Rapport signal/bruit >50 dB (DIN-B)
Cellule Cartouche stéréo Integral Dual Magnet
Niveau de sortie
Préamplification « PHONO » 2,5 mV nominal à 1 kHz, 5 cm/sec
Préamplification « LINE » 150 mV nominal à 1 kHz, 5 cm/sec
Gain du préamplificateur de 36 dB nominal, égalisé R.I.A.A.
phonographe
Fonction USB 16 bits 44,1 kHz ou 48 kHz USB
USB 1.1 ; Windows XP, Vista ou MAC OSX
Puissance absorbée 120 V CA, 60 Hz, 3 W
Dimensions L 36,0 cm (14,17") x H 9,75 cm (3,84") x P 35,6 cm (14,02")
Poids net 3 kg (6,6 lbs.)
Accessoires fournis Câble adaptateur double RCA femelle - mini-prise 3,5 mm (
femelle - 3,5 mm (
Pointe de lecture de remplacement ATN3600L
1
/3 tr/min, 45 tr/min
™
avec pointe de lecture en diamant
1
") mâle ; câble adaptateur stéréo double RCA
8
1
") femelle ; adaptateur 45 tr/min ; câble USB ; logiciel d’enregistrement
8
/
/
15
Page 16

Sistema tocadiscos estéreo USB
Instrucciones de seguridad
1. Lea las siguientes instrucciones.
2. Conserve las siguientes instrucciones.
3. Aténgase a las advertencias.
4. Siga todas las instrucciones.
5. No utilice el aparato cerca del agua.
6. Límpielo únicamente con paño seco.
7. No bloquee ninguna de las aberturas de ventilación. Realice la
instalación conforme a las instrucciones del fabricante.
8. No haga la instalación cerca de fuentes de calor, como radiadores,
reguladores de calor, estufas u otros aparatos (incluido
amplificadores) que generen calor.
9. No anule la polaridad o la conexión a tierra de los enchufes, ya que
su único propósito es la seguridad. Los enchufes polarizados tienen
dos contactos salientes, uno más ancho que el otro. Los enchufes
con conexión a tierra tienen dos contactos salientes y una tercera
punta, conectada a tierra. El contacto saliente de anchura mayor,
en un caso, y la tercera punta de contacto a tierra, en el otro, son
para su seguridad. Si el enchufe que se incluye no encaja en su
toma de corriente, solicite a un electricista que sustituya la toma de
corriente obsoleta.
10. Proteja los cables eléctricos de pisadas o presiones, especialmente
en los enchufes, las carcasas de los dispositivos y en los puntos de
salida de los aparatos.
11. Utilice únicamente los complementos/accesorios especificados por
el fabricante.
12. Utilícelo solamente con carro, estante, trípode, soporte o mesa
especificados por el fabricante, o vendidos junto con el aparato.
Cuando utilice un carro, tenga cuidado al desplazar la combinación
carro/aparato para evitar daños por vuelcos.
13. Desenchufe el aparato durante tormentas eléctricas o cuando no
vaya a utilizarse durante períodos prolongados.
14. Para realizar cualquier reparación, póngase en contacto con
personal de servicio cualificado. La reparación es necesaria cuando
el aparato haya sufrido cualquier tipo de daño, como daños en el
cable de alimentación o en el enchufe, cuado se derramen líquidos
sobre el aparato o sea golpeado por un objeto, si se ha expuesto a
la lluvia o a la humedad, cuando no funcione con normalidad o haya
sufrido una caída.
15. Cuando se utiliza un enchufe de conexión a la red como dispositivo
de desconexión, éste debe permanecer siempre operativo.
16. Mantenga la unidad en un entorno bien ventilado.
17. No debe exponerse el aparato a goteos o derrames, y no deben
colocarse sobre él objetos con líquidos, como floreros.
Advertencia: A fin de reducir el riesgo de incendio o descargas
eléctricas, no exponga el aparato a la lluvia o la humedad. No debe
exponerse el aparato a goteos o derrames, y no deben colocarse
sobre él objetos con líquidos, como floreros.
Introducción
Gracias por adquirir el AT-LP60-USB. Audio-Technica acerca su calidad y
fidelidad de audio legendarias al mundo digital a través de este sistema
de grabación de LP a formato digital. En la caja encontrará todo lo que
necesita para transferir su colección de discos de larga duración (LP)
clásicos a archivos digitales. El tocadiscos estéreo AT-LP60-USB de
Audio-Technica incluye una salida USB, que permite la conexión directa
a el ordenador, el software de grabación Audacity (para MAC o PC), un
cartucho fonográfico Integral Dual Magnet
™
de Audio-Technica, un cable
USB y cables adaptadores. Además, incorpora un preamplificador de
nivel fonográfico/de línea
conmutable integrado que permite la conexión a un sistema estéreo
equipado con una entrada de nivel fonográfico o una de nivel de línea.
Funciones del tocadiscos estéreo AT-LP60-USB:
• Salida USB: no se requieren controladores especiales para la
conexión directa a el ordenador
• Preamplificador de nivel fonográfico/de línea estéreo con
mutable integrado. Permite el uso de sistemas estéreo que dispongan
de entradas fonográficas magnéticas o “AUX” (nivel de línea),
además de con la mayoría de altavoces con alimentación propia
• Compatible con PC y Mac
• Funcionamiento totalmente automático
• Dos velocidades: 33
1
/
RPM y 45 RPM
3
• Plato de tocadiscos profesional de aluminio
• Cartucho fonográfico con agujas de diamante reemplazables
Integral Dual Magnet
™
de Audio-Technica
• Mecanismo elevador/de entrada amortiguado con mando de
control en el panel frontal
• Cubierta antipolvo desmontable
Para garantizar el máximo nivel de satisfacción con este producto, lea la
información y siga las instrucciones de este manual. Tenga el manual a
mano por si lo necesita en el futuro.
Le recomendamos que guarde todo el material de empaquetado para un
posible uso en el futuro: almacenamiento, desplazamiento o envío.
PRECAUCIÓN: Para evitar daños en la aguja, asegúrese de que
el protector de aguja incluido está bien colocado cuando instale,
desplace o limpie el tocadiscos.
16
PRECAUCIÓN
PELIGRO DE DESCARGA
ELÉCTRICA NO ABRIR
Precaución: Para reducir el riesgo de descarga eléctrica, no retire
ninguna tapa. En el interior no hay piezas de recambio. Utilice
exclusivamente los servicios de personal cualificado.
El símbolo de rayo con punta de flecha dentro del
triángulo equilátero alerta al usuario de la presencia de
“voltaje peligroso” sin aislar dentro de habitáculo del
producto que puede tener la magnitud suficiente para
constituir un peligro de descarga eléctrica.
El punto de exclamación dentro del triángulo equilátero
indica al usuario la presencia de instrucciones de
funcionamiento y mantenimiento importantes en la
documentación que acompaña a este dispositivo.
Precaución: Para evitar descargas eléctricas, no utilice este enchufe
polarizado con un alargador, receptáculo u otro tipo de toma de
corriente a menos que los contactos salientes se puedan insertar
completamente.
Unidad de la aguja
Aguja
Protector de aguja
Page 17

Figura 1
PHONO
LINE
USB (PC)
12"
7"
SIZE
PHONO
LINE
USB (PC)
Parte delantera Parte trasera
10
Español
Funciones principales
33
SPEED
45
AT-LP60-USB
STEREO TURNTABLE
4
9
START
STOP
1
2 3
PHONO
15
USB (PC)
LINE
16
9
8
6
7
SIZE
12"
7"
11
5
1. BOTÓN START (INICIAR)
Acciona el motor/plato e inicia el funcionamiento automático.
2. BOTÓN STOP (PARAR)
Detiene el motor/plato y devuelve el brazo al soporte.
3. BOTÓN DE ELEVACIÓN DEL BRAZO DE LECTURA
Sube y baja el brazo de lectura para la selección manual.
4. BÓTÓN SPEED (VELOCIDAD)
Seleccione 33 RPM (botón arriba) o 45 RPM (botón abajo).
5. SELECTOR DE TAMAÑO
Seleccione el tamaño del disco: 12" o 7".
6. PLATO
El plato de aluminio se monta directamente en el eje
central/eje del motor
7. EJE CENTRAL
Parte de precisión del eje del motor para montura del plato.
8. ADAPTADOR DE 45 RPM (se muestra en el receptáculo)
Adapta discos de 7” con grandes agujeros centrales para
que ajusten en el eje central.
9. SOPORTES DE LAS BISAGRAS DE LA CUBIERTA ANTIPOLVO
Puntos de unión de la cubierta antipolvo abisagrada desmontable.
10. CUBIERTA ANTIPOLVO
11. UNIDAD BRAZO DE LECTURA/CABEZAL
El brazo de lectura está unido de forma permanente al
cabezal.
12. UNIDAD DE LA AGUJA
13. AGUJA
14
12
13
14. PROTECTOR DE AGUJA
15. CONMUTADOR DEL SELECTOR DE PREAMPLIFICADOR:
PHONO/LINE (FONO/LÍNEA)
(En la parte trasera del tocadiscos) Utilice PHONO (FONO) cuando
conecte el tocadiscos a la entrada fonográfica de su equipo estéreo
doméstico. Utilice LINE (NIVEL DE LÍNEA) cuando conecte el toca
discos a las entradas CD/TAPE/AUX de su equipo estéreo
doméstico.
16. SALIDA USB
Utilice esta salida para conectar el tocadiscos al puerto USB del
ordenador. Consulte la guía de software incluida para obtener
instrucciones.
17
Page 18

Instalación inicial
Montaje del tocadiscos
Antes de utilizar el AT-LP60-USB por primera vez, es necesario realizar
algunas tareas de montaje. IMPORTANTE: No conecte el cable de
alimentación de CA hasta que finalice el montaje.
1. Coloque con cuidado el plato del tocadiscos en el eje central;
asegúrese de que queda totalmente encajado.
2. Sujete ambos extremos de la cinta roja sobre la correa del
tocadiscos y colóquela con cuidado alrededor de la polea del
motor (Fig. 2a). (Si la correa se sale, retire el plato del tocadiscos
y vuelva a colocarla tal y como se describe en la página 21.)
3. Cuando la correa esté encajada en la ranura de la polea, retire
con cuidado la cinta. Asegúrese de que la correa no está
retorcida.
4. Sitúe la estera del tocadiscos en la parte superior del plato
(Fig. 2b).
5. Si lo desea, puede retirar la cubierta antipolvo abisagrada.
Sujétela por ambos lados y tire hacia arriba con delicadeza y
sin ladearla para separarla del tocadiscos (Fig. 2c). Guarde la
cubierta en un lugar seguro y limpio.
6. Para volver a colocar la cubierta antipolvo, sitúe las bisagras en los
dos receptáculos situados en la parte trasera de la carcasa del
tocadiscos.
Conexión a ordenadores mediante la entrada USB
El cable USB (incluido) conecta el tocadiscos AT-LP60-USB al ordenador
sin necesidad de utilizar controladores especiales. Consulte la guía de
software incluida (también disponible en línea en www.audio-technica.
com) antes de conectar el tocadiscos al ordenador.
Figura 2 – Montaje del tocadiscos
2a – Correa de transmisión
Cinta roja
Correa de transmisión
2b – Estera
Polea del motor
Ajuste del conmutador (Phono/Line) de preamplificador
Para aumentar la flexibilidad de uso, este tocadiscos dispone de un
preamplificador fonográfico estéreo interno. El conmutador (Phono/
Line) del selector de preamplificador está situado en la parte trasera
del tocadiscos. Si el sistema estéreo que está utilizando dispone de
entrada PHONO, sitúe el conmutador del selector de preamplificador en
la posición “PHONO” (FONO). Si el sistema estéreo que está utilizando
no dispone de una entrada PHONO, sitúe el conmutador del selector de
preamplificador en la posición “LINE” (LÍNEA) y conecte los cables de
salida del tocadiscos a la entrada AUX (Auxiliar) o a otra entrada de nivel
superior de su sistema estéreo (se describe más adelante) (Fig. 3).
NOTA: Si está utilizando el cable USB para conectar el tocadiscos al
ordenador, el ajuste del conmutador del selector de preamplificador no
afecta al funcionamiento a través de USB.
Figura 3
“AUX”PHONO
Conectores de
entrada
2c – Desinstalación de la cubierta antipolvo
Sistema estéreo
Blanco
Rojo
CA
18
Conmutador del
selector de
preamplificador
PHONO
USB
LINE
CA
Page 19

Español
Instalación inicial (continuación)
Conexión al sistema estéreo
1. Enchufe el conector RCA rojo a la entrada del canal derecho y
el conector RCA blanco a la entrada del canal izquierdo de su
equipo estéreo (Fig. 3, página 18).
2. Con el brazo lectura en su soporte, gire lentamente el plato
del tocadiscos en el sentido de la agujas del reloj diez
veces para asegurarse de que el mecanismo automático se ha
iniciado.
3. Retire el amarre de vinilo que mantiene el brazo de
lectura en su soporte.
4. Enchufe el cable de alimentación a una toma de CA.
5. NOTA: No es necesario que desconecte el tocadiscos del
sistema estéreo para conectarlo a un ordenador a través del
puerto USB. Esto le permitirá supervisar sus grabaciones
cuando utilice el software de grabación. Para obtener más
información, consulte la guía de
software.
Conexión de ordenadores o dispositivos de audio mediante la
entrada de 3,5 mm
El AT-LP60-USB se conecta sin adaptadores a dispositivos equipados
con conectores RCA. Para que disponga de la
máxima flexibilidad, hemos incluido dos cables adaptadores para otras
entradas de audio muy utilizadas.
El primero de estos cables adaptadores, RCA doble a miniconector
(macho) de 3,5 mm estéreo, está diseñado para
ajustarse a las entradas de audio de ordenadores* más
habituales. También puede utilizarse para conectar la salida RCA del
tocadiscos a otro equipo, por ejemplo:
• Un radiocasete* estéreo equipado con una entrada mini de 3,5 mm
• Altavoces con alimentación propia* equipados con una entra da mini
de 3,5 mm
• Un mezclador* o sistema de megafonía* equipado con un
miniconector de 3,5 mm
El segundo cable adaptador, RCA dual a miniconector (hembra) de 3,5
mm estéreo, permite la conexión de la salida del tocadiscos a altavoces
amplificados* o a dispositivos similares. El miniconector (hembra)
estéreo de 3,5 mm del adaptador de cables admite miniconectores
(macho) estéreo.
Para utilizar cualquiera de los cables adaptadores, enchufe los
conectores RCA rojo y blanco del tocadiscos a las tomas RCA del cable
adaptador.
* Cuando utilice uno de los cables adaptadores, sitúe siempre
el conmutador del selector de preamplificador del tocadiscos
AT-LP60-USB en la posición “LINE” (LÍNEA). (El conmutador está
situado en la parte trasera del tocadiscos.)
Funcionamiento
Funcionamiento automático
1. Retire el protector de aguja de la unidad de la aguja (Fig. 4).
2. Ponga un disco en el tocadiscos. Si fuera necesario, utilice el
adaptador de 45 RPM (Fig. 5).
3. Seleccione el tamaño del disco: 12" o 7" (Fig. 6).
1
/
4. Seleccione la velocidad: 33
5. Inicio: pulse suavemente el botón START (INICIAR) (Fig.
8a). El tocadiscos comenzará a girar y el brazo de lectura
se colocará automáticamente en el surco inicial. Cuando
finalice la reproducción del disco, el brazo de lectura volverá
automáticamente al soporte y el tocadiscos se detendrá.
6. Parada: para detener la reproducción del disco antes de que
llegue al final, pulse el botón STOP (PARAR) (Fig. 8b). El brazo
de lectura se elevará y volverá al soporte, y el tocadiscos se
detendrá.
7. Pausa: para interrumpir la reproducción del disco antes de que
finalice, pulse el botón de elevación (Fig. 8c). Vuelva a pulsarlo
para continuar la reproducción del disco.
RPM o 45 RPM (Fig. 7).
3
NOTA: Si desea realizar una conexión a un amplificador/altavoz mono,
asegúrese de que utiliza un adaptador estéreo a mono; podrá encontrarlo
a través de su distribuidor o en la tienda de electrónica más cercana.
Si inserta un conector mono a la toma estéreo, se anulará uno de los
canales estéreo. Para realizar conexiones a dispositivos que necesiten
terminaciones distintas, póngase en contacto con un distribuidor o
visite una tienda de electrónica para conseguir otros tipos de cables
adaptadores.
Figura 4
Unidad de la aguja
Aguja
Protector de aguja
Figura 5
Adaptador de 45 RPM
19
Page 20

Funcionamiento (continuación)
Precaución: Cuando el brazo de lectura alcanza el final del disco, se
levanta y vuelve al soporte de forma automática. En esta situación,
no interfiera con el movimiento del brazo de lectura o pueden
producirse daños en el mecanismo.
Si el brazo de lectura no vuelve automáticamente al soporte una vez
finalizada la reproducción del disco, pulse el botón STOP (PARAR).
Funcionamiento manual
1. Retire el protector de aguja de la unidad de la aguja (Fig. 4).
2. Ponga un disco en el tocadiscos. Si fuera necesario, utilice el
adaptador de 45 RPM (Fig. 5).
3. Seleccione el tamaño del disco: 12" o 7" (Fig. 6).
1
/
4. Seleccione la velocidad: 33
5. Pulse el botón de elevación para levantar el brazo de lectura
(Fig. 8c).
6. Desplace suavemente el brazo de lectura de manera que la aguja
se sitúe justo sobre el punto del disco donde desea que se inicie
la reproducción.
7. Pulse el botón de elevación de nuevo para bajar el brazo de
lectura y reproducir el disco.
RPM o 45 RPM (Fig. 7).
3
Sustitución de la aguja
Figura 6
Figura 7
Figura 8
8a 8b 8c
(VELOCIDAD)
(Arriba)
(Abajo)
(Iniciar) (Parar) (Arriba) (Abajo)
Posición del botón:
Acción del brazo de lectura:
FUERA DENTRO
BAJADO ELEVADO
Sujete el cabezal del brazo de lectura y gire la parte frontal de la unidad
de la aguja con un movimiento hacia delante y hacia abajo hasta retirarla
(Fig. 9). (Cuando retire la unidad antigua, fíjese en su posición y observe
cómo está instalada; eso le ayudará a instalar la nueva.)
Instale la nueva unidad de la aguja como se muestra en las Figuras
10a/10b, teniendo cuidado de no tocar la propia aguja. En primer
lugar asegúrese de que el saliente de la parte posterior de la unidad
está totalmente encajado en el cuerpo del cartucho (Fig. 10a), y que
la unidad entra perfectamente (oirá un “clic”), sin que quede ningún
espacio entre su borde superior y la parte frontal del cabezal negro de
plástico del brazo de lectura (Fig. 10b). Sustituya la aguja tras 400 horas
de uso.
Para mantener el rendimiento original, utilice siempre una aguja de
repuesto genuina de la marca Audio-Technica. Busque el distintivo de
marca registrada de Audio-Technica ( ) en la parte frontal de la unidad
de la aguja y en el embalaje.
Figura 9 – Cómo retirar la aguja
Figura 10 – Instalación de una nueva aguja
10a
Encájela en
el cuerpo primero
10b
20
Sin espacio aquí
Page 21

Español
Solución de problemas
El tocadiscos no funciona
1. Asegúrese de que el cable de CA del tocadiscos está enchufado
en la toma de CA, y que ésta suministra corriente.
2. Compruebe que la correa de transmisión está colocada
correctamente. (Véase la Figura 11.)
A) Retire la estera del plato del tocadiscos (Fig. 11a). Para
mantenerla protegida, coloque la estera en la funda del estuche
de cartón. Mire a través de uno de los orificios del plato del
tocadiscos para comprobar que la correa pasa por la polea del
motor (Fig. 11b).
B) Si la correa no pasa por la polea del motor, levante y retire
el tocadiscos. Sitúe un pulgar en cada uno de los orificios del
plato del tocadiscos y, a continuación, presione con los dedos
la superficie de la carcasa del tocadiscos y tire del plato hacia
arriba (Fig. 11c). Tenga cuidado de no hacer presión sobre el
brazo de lectura.
C) Con el plato del tocadiscos boca arriba, coloque la correa a lo
largo de la pared exterior del borde del transmisor del plato del
tocadiscos y asegúrese de que queda cómodamente alojada y
plana por todos lados (Fig. 11d).
D) Vuelva a colocar el tocadiscos en el eje central, de forma que
quede bien encajado, y alinee uno de sus orificios con la posición
de la polea del motor.
E) A través del orificio, agarre con cuidado la correa del
tocadiscos con un dedo o con la cinta roja original (nunca utilice
un objeto afilado) y pase la correa por la polea del motor (Fig.
11e). Compruebe que la correa no queda retorcida entre la polea
y el borde del transmisor del plato.
F) Vuelva a colocar la estera sobre el plato.
G) Manteniendo el brazo de lectura en su soporte, gire
lentamente el plato con la mano en el sentido de las agujas del
reloj al menos diez veces para iniciar el ciclo automático del
mecanismo.
El tocadiscos funciona, pero no suena
1. No ha retirado el protector de aguja.
2. El botón de elevación del brazo de lectura está pulsado.
3. Los controles del amplificador están definidos de forma
incorrecta: la entrada seleccionada no es correcta, el monitor de
cinta está activado, los altavoces desactivados, etc.
4. Compruebe que la aguja del cartucho fonográfico está bien
colocada. Consulte las instrucciones para la sustitución de la
aguja en la página 20.
El tocadiscos funciona, pero no suena, o lo hace a un
volumen bajo
1. Si el tocadiscos está conectado a una entrada AUX (nivel
superior), es posible que el conmutador del selector de
preamplificador esté en la posición “PHONO” (FONO) (nivel de
entrada fonográfica).
2. Puede que la ganancia de entrada del altavoz amplificado o
dispositivo similar sea demasiado baja.
3. Es posible que la unidad de la aguja no esté bien encajada en el
cuerpo del cartucho. (Véase la Fig. 10 en la página 20)
El sonido está muy distorsionado
1. El tocadiscos está conectado a la entrada PHONO de un
amplificador: si el conmutador del preamplificador está en
la posición “LINE” (salida de alto nivel AUX), la entrada
fonográfica estará sobrecargada.
El tocadiscos se mueve ligeramente arriba y abajo
1. Normalmente se trata de un funcionamiento normal y no de un
problema. Si por esta causa el tocadiscos no pudiese reproducir
el disco correctamente, póngase en contacto con su distribuidor
o con nuestro Departamento de Servicio. Compruebe que la
superficie sobre la que reposa el tocadiscos no recoge las
vibraciones del suelo o las paredes, o incluso del sonido
directo de los altavoces.
Figura 11 – Comprobación de la correa de transmisión
11a
11b
11c
11d
Correa de
transmisión
11e
Polea del motor
21
Page 22

Consejos para un mejor rendimiento
Consejos para un mejor rendimiento
• Cuando abra o cierre la cubierta del tocadiscos, hágalo con
suavidad; desplácela por el centro o de forma homogénea por
ambos lados.
• No toque la punta de la aguja con los dedos; evite
golpear la aguja contra la estera o contra el borde del disco.
• Limpie la punta de la aguja con frecuencia. Utilice un cepillo
suave y realice solamente movimientos de atrás hacia
delante.
• Si utiliza un líquido de limpieza de agujas, hágalo en cantidades
mínimas.
• Limpie la cubierta antipolvo y la carcasa del tocadiscos
con cuidado y utilice un paño suave. Utilice sólo pequeñas
cantidades de solución detergente suave para limpiar el
tocadiscos y la cubierta antipolvo.
• No aplique nunca productos químicos ni disolventes fuertes a
ninguno de los componentes del sistema tocadiscos.
• Antes de desplazar el tocadiscos, desenchúfelo siempre de la
toma de CA y fije el brazo de lectura al soporte con el amarre
de vinilo.
Especicaciones
Tipo Tocadiscos de transmisión por correa, completamente automático
Plato Aluminio
Motor Servocontrolado de CC
Velocidades 33
Lloro y trémolo Menos del 0,25% (WTD) a 3 kHz (JIS)
Relación señal/ruido >50 dB (DIN-B)
Cartucho Cartucho estéreo Integral Dual Magnet™ con agujas de diamante
Nivel de salida
Preamplificador “PHONO” (FONO) 2,5 mV nominal a 1 kHz, 5 cm/seg
Preamplificador “LINE” (LÍNEA) 150 mV nominal a 1 kHz, 5 cm/seg
Ganancia del preamplificador phono 36 dB nominal, RIAA ecualizado
Función USB 16 bits 44,1 kHz o 48 kHz USB
USB 1.1; Windows XP, Vista o MAC OSX
Alimentación 120 V CA, 60 Hz, 3 W
Dimensiones 360,0 mm (14,17") Ancho x 97,5 mm (3,84") Alto x 356,0 mm (14,02") Profundidad
Peso neto 3 kg (6,6 lbs)
Accesorios incluidos Cable adaptador estéreo RCA doble (hembra) a miniconector (macho) de 3,5 mm (
estéreo RCA doble (hembra) a miniconector (hembra) de 3,5 mm (
software de grabación
Aguja de repuesto ATN3600L
1
/3 RPM, 45 RPM
1
"); adaptador de 45 RPM; cable USB;
8
/
1
"); cable adaptador
8
/
22
Page 23

Español
23
Page 24

Visit our Web Site: www.audio-technica.com
One-Year Limited Warranty
Audio-Technica brand products purchased in the U.S.A. are warranted for one year from date of purchase by Audio-Technica U.S., Inc. (A.T.U.S.) to be
free of defects in materials and workmanship. In event of such defect, product will be repaired promptly without charge or, at our option, replaced
with a new product of equal or superior value if delivered to A.T.U.S. or an Authorized Service Center, prepaid, together with the sales slip or other
proof of purchase date. Prior approval from A.T.U.S. is required for return. This warranty excludes defects due to normal wear, abuse, shipping
damage, or failure to use product in accordance with instructions. This warranty is void in the event of unauthorized repair or modification, or removal
or defacing of the product labeling.
For return approval and shipping information, contact the Service Dept., Audio -Technica U.S., Inc., 1221 Commerce Drive, Stow, Ohio 44224.
Except to the extent precluded by applicable state law, A.T.U.S. will have no liability for any consequential, incidental, or special damages;
any warranty of merchantability or fitness for particular purpose expires when this warranty expires.
This warranty gives you specific legal rights, and you may have other rights which vary from state to state.
Outside the U.S.A., please contact your local dealer for warranty details.
Visitez notre site web : www.audio-technica.com
Garantie limitée de 1 an
Les produits de la marque Audio-Technica achetés aux États-Unis sont garantis pendant un an à compter de la date d’achat contre tout défaut de
matériau et de fabrication par Audio-Technica U.S., Inc. (A.T.U.S.). Dans l’éventualité d’un tel défaut, le produit sera soit réparé gratuitement et dans
les plus brefs délais, soit remplacé à notre convenance par un nouveau produit d’une valeur égale ou supérieure. Le produit doit être retourné en port
payé à A.T.U.S. ou à un centre agréé de service après-vente avec un ticket de caisse ou autre preuve de la date d’achat. Le renvoi ne peut avoir
lieu sans l’accord préalable de A.T.U.S. Cette garantie exclut les défauts liés à une usure normale, à un usage abusif, à tout incident survenu lors
du transport ou à une utilisation non conforme au mode d’emploi. Cette garantie n’est pas valable en cas de réparation ou de modification effectuée
par un personnel non agréé ou dans le cas où la marque du produit aurait été enlevée ou abîmée.
Pour obtenir notre accord pour le retour et pour tout renseignement concernant le transport, veuillez prendre contact avec le département de
service après-vente, Audio-Technica U.S., Inc., 1221 Commerce Drive, Stow, Ohio 44224.
A.T.U.S. ne sera pas tenu responsable des dommages indirects, accessoires ou spéciaux à moins que la loi applicable de l’État n’en dispose
autrement ; lorsque cette garantie expire, toute garantie de valeur marchande ou d’aptitude à un usage particulier expire.
Cette garantie vous confère des droits spécifiques ; il se peut par ailleurs que vous ayez d’autres droits qui varient d’un État à l’autre.
En dehors des États-Unis, veuillez prendre contact avec votre revendeur local pour plus de détails concernant la garantie.
Visite nuestro sitio Web: www.audio-technica.com
Garantía limitada de un año
Audio-Technica U.S., Inc. (A.T.U.S.) ofrece una garantía de un año desde la fecha de compra en lo que se refiere a materiales y fabricación para
todos los productos de la marca Audio-Technica adquiridos en Estados Unidos. En caso de que tenga algún defecto, el producto será reparado
inmediatamente sin cargo alguno o, según nuestro criterio, reemplazado por uno nuevo de valor igual o superior, si se envía a A.T.U.S. o a un
Centro de Servicio autorizado, franqueado y junto con el recibo de compra u otro comprobante de la fecha de compra. Toda devolución requiere la
autorización previa de A.T.U.S. Esta garantía excluye defectos debidos al uso diario, al uso inapropiado, al transporte o a otros problemas que se
produzcan por no utilizar el producto según las instrucciones. Esta garantía no será válida en caso de reparaciones o modificaciones no autorizadas
o si se ha retirado la identificación del producto.
Para aprobación de devoluciones e información de envío, póngase en contacto con el Departamento de Servicio de Audio-Technica U.S., Inc.,
1221 Commerce Drive, Stow, Ohio 44224 (EE. UU.).
En la medida en que lo permita la ley aplicable del estado, A.T.U.S. renuncia a toda responsabilidad por los daños especiales, incidentales,
consecuentes o indirectos comoquiera que se produzcan; toda garantía de comerciabilidad e idoneidad para un fin determinado caduca
al hacerlo esta garantía.
Esta garantía le otorga a usted derechos legales específicos y puede tener otros derechos que varían de un estado a otro.
Fuera de Estados Unidos, póngase en contacto con su distribuidor local para conocer los detalles de la garantía.
Audio-Technica U.S., Inc., 1221 Commerce Drive, Stow, Ohio 44224 330/686-2600 www.audio-technica.com
P52119-02 ©2010 Audio-Technica U.S., Inc.
 Loading...