

Page 1

Audio-Technica AT-LP60-USB, AT-LP120-USB, AT-LP240-USB & AT-LP1240-USB Turntables
Software Guide
Page 2

Audio-Technica USB Turntables
Contents
A note about software ....................................................................................................... 2
System requirements ........................................................................................................ 2
Installing Audacity software for Mac OSX and above ................................................... 3
Setting up your Mac (OSX and above) to work with your USB Turntable ................. 4
Additional Mac audio settings ..........................................................................................6
Installing Audacity software for PC .................................................................................. 7
Setting up your PC (with Windows XP) to work with your USB Turntable ................ 8
Setting up your PC (with Windows Vista or Windows 7) to work with
your USB Turntable ......................................................................................................11
Setting up your PC to work with Audacity ................................................................... 13
Recording albums with Audacity ...................................................................................15
To learn more about Audacity ........................................................................................ 15
A note about software
Your Audio-Technica AT-LP60-USB, AT-LP120-USB, AT-LP240-USB or AT-LP1240-USB
turntable is supplied with Audacity recording software for your convenience. Please note
that other third-party recording software packages are also compatible with this turntable.
Audacity is free software, distributed under the GNU General Public License (GPL). More
information and open source code is on the included Audacity CD and on the Audacity
web site: http://audacity.sourceforge.net
System Requirements
PC or Mac with an available USB port (USB1.1 or higher)
CD-R or CD-RW writer for burning CDs & installation
Audacity requires:
Mac running OSX* or; PC running Windows (XP or above*)
NOTE: For use with Windows 7, Windows Vista and Mac OSX 10.6/10.7: If the Audacity
*
recording software included with this turntable is version 1.2.6, please download Audacity
recording software for these operating systems from http://audacity.sourceforge.net.
Mac is a trademark of Apple Inc., registered in the U.S. and other countries.
Windows is a registered trademark of Microsoft Corporation in the U.S. and other countries.
2
Page 3
Installing Audacity software for MAC OSX and above
1. Before installing software, assemble the turntable, following directions in the
included Owners Manual.
2. Plug the AC cord on your turntable into an AC power outlet.
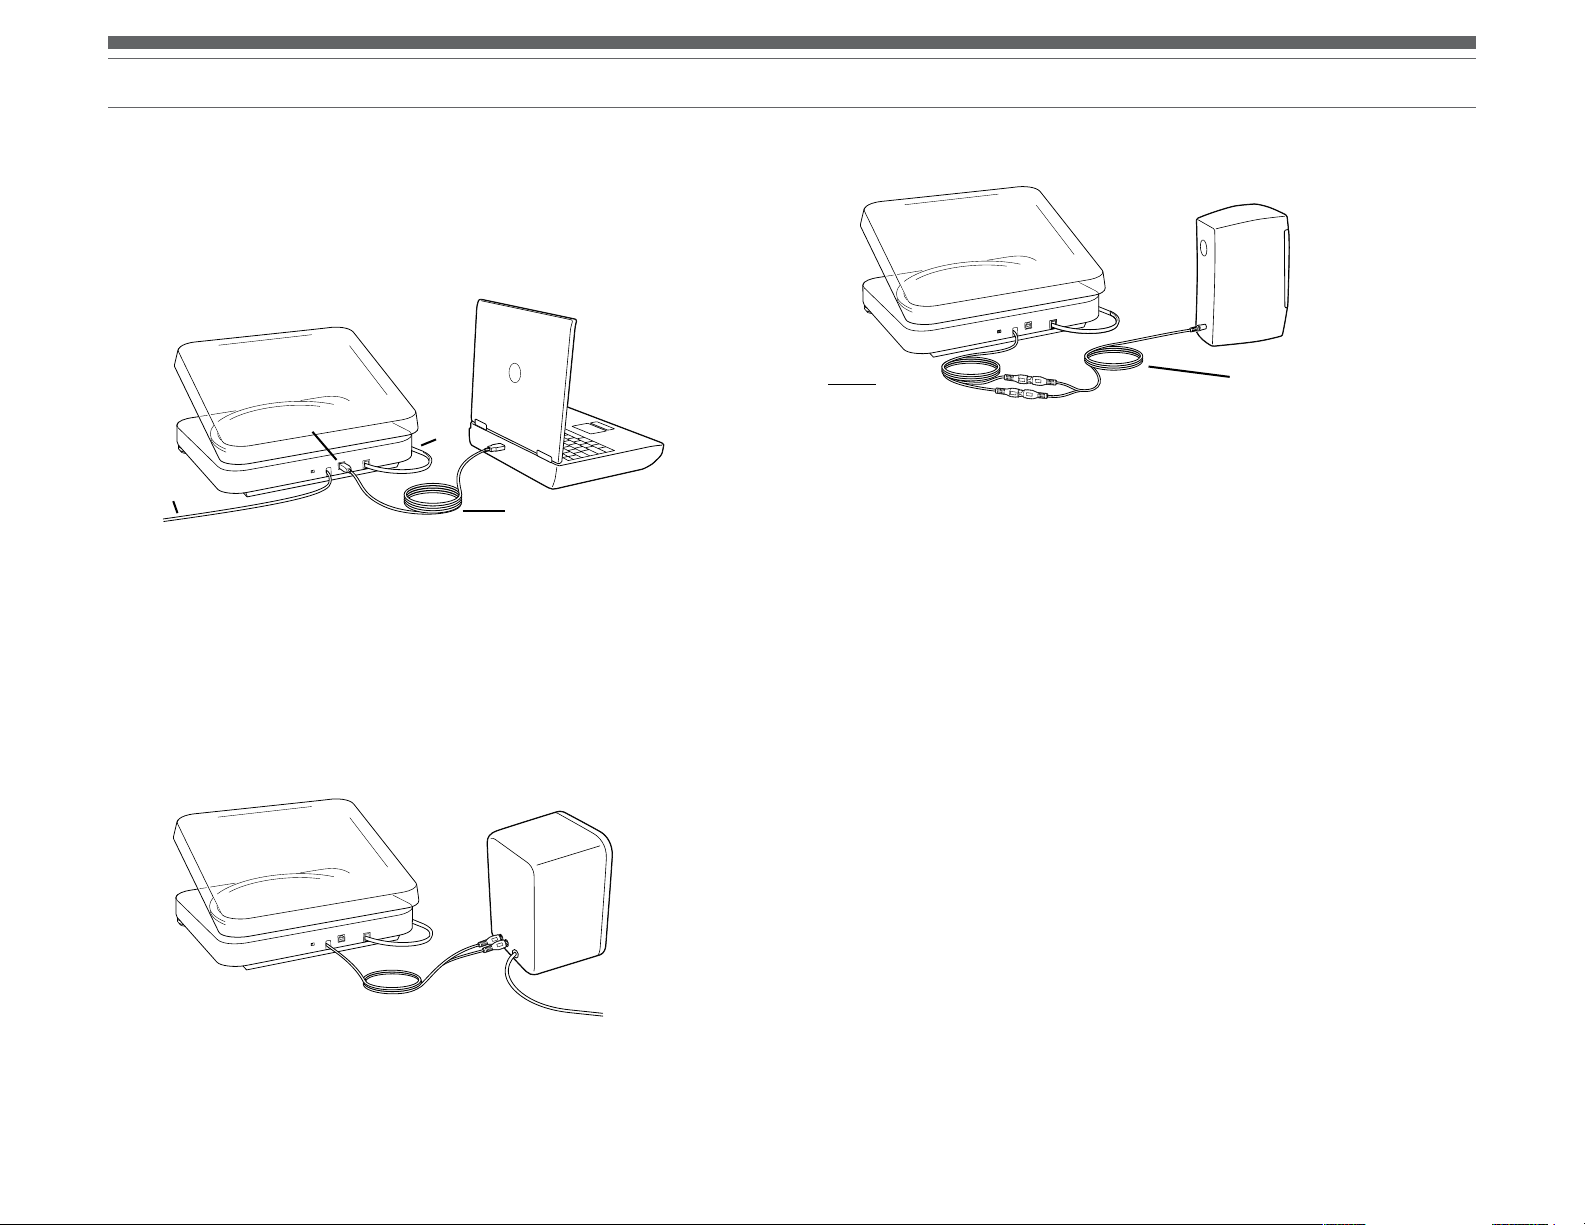
3. Next, use the included USB cable to connect the turntable to your Mac’s USB port.
USB
AC
RCA
USB cable (included)
4. If you have external self-powered speakers, make certain they are plugged into
your computer’s audio input or into the line-out RCA plugs of the USB turntable, and
that the Phono/Line switch on your turntable is switched to Line. (Audacity offers
a software play-through feature that allows you to listen to the album through your
computer while recording, even if you don’t have external speakers.) If your computer
has a headphone output, you can choose to monitor your recording with headphones.
NOTE: On the AT-LP240-USB and the AT-LP1240-USB, the RCA cables are not
permanently attached to the turntable; they plug into the RCA jacks on the back of
the turntable. See the AT-LP240-USB and AT-LP1240-USB owner’s manuals for cable
connection instructions.
Typical connection for:
Speakers with 3.5 mm
stereo input
(using adapter cable)
Included adapter cable (RCA
Cables
Red to Red
White to White
5. Turn your computer on.
6. Insert the included Audacity CD in your Mac’s CD drive. Open the CD icon on your
desktop. Drag the installation folder for Audacity to your applications folder.
When the files have been copied, eject the CD.
to 3.5 mm stereo male)
Typical connection for: Speakers with
RCA inputs
3
Page 4
Setting up your MAC (OSX and above) to work with your USB Turntable
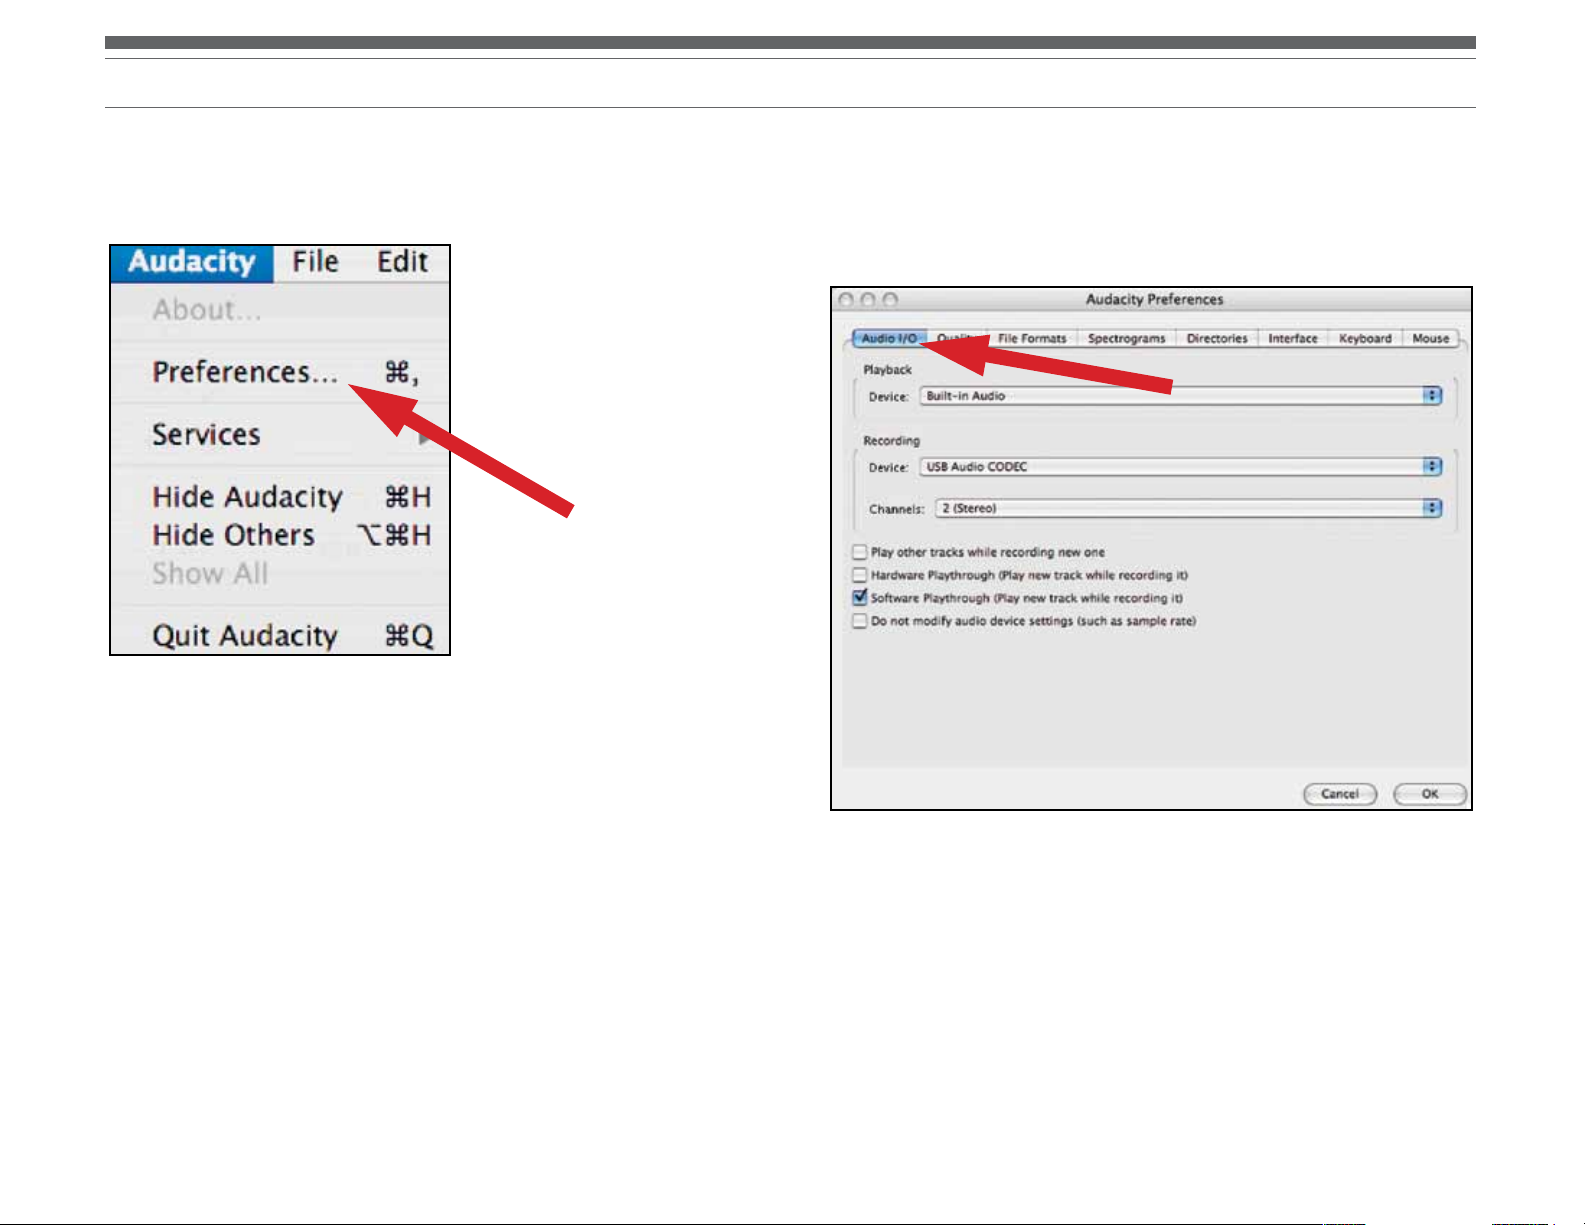
1. Open the Audacity program.
2. Select Preferences from the Audacity menu.
3. Select Audio I/O tab at the top left.
• Under Playback, Device, select Built-in Audio.
• Under Recording, Device, select USB Audio CODEC.
• Under Recording, Channels, select 2 (Stereo).
• Check the box marked Software Playthrough.
NOTE: The screens shown are from Audacity 1.2.6; later versions of Audacity
may change.
4
Page 5
Setting up your MAC (OSX and above) to work with your USB Turntable
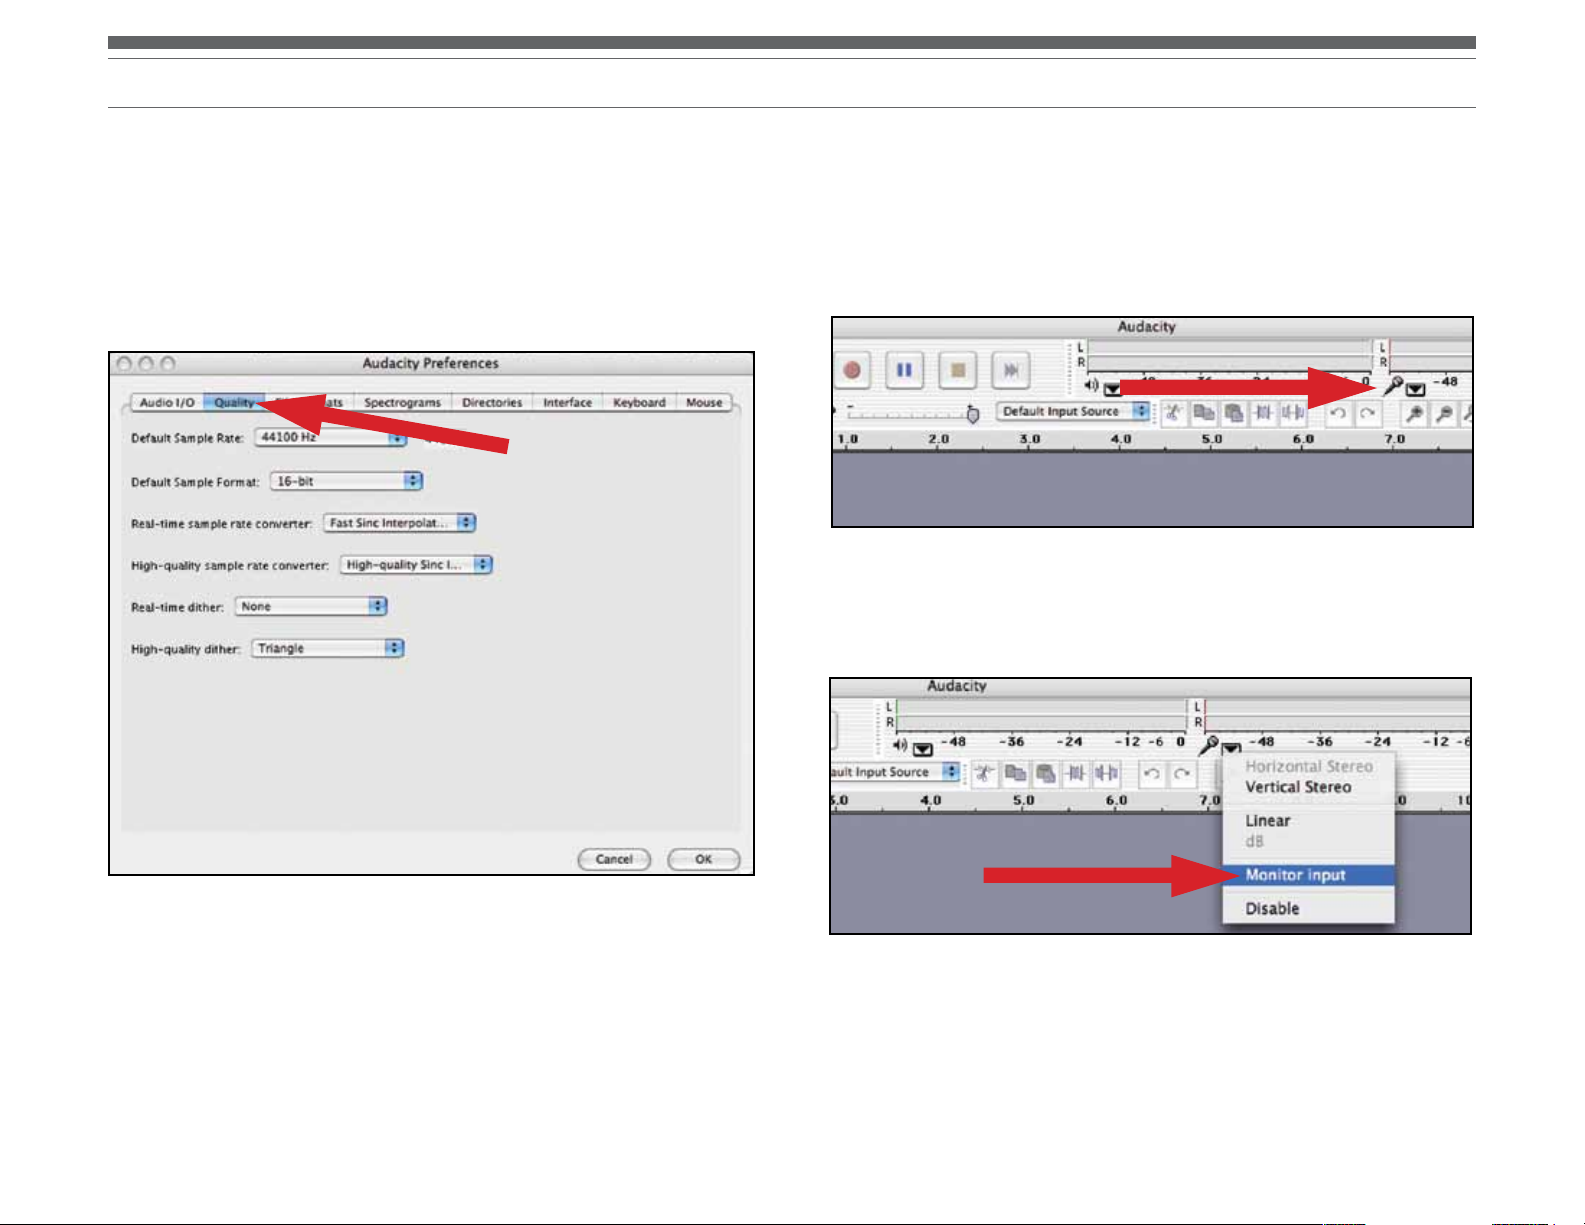
4. Next, select Quality tab at the top.
• Default Sample Rate: 44100 Hz.
• Default Sample Format: 16-bit.
• Real-time sample rate converter: Fast Sinc Interpolation.
• High-quality sample rate converter: High-quality Sinc Interpolation.
• Real-time dither: None.
• High-quality dither: Triangle.
• Select OK to save settings and exit Preferences menu.
5. Next, from the main Audacity window, select the drop-down box (arrow pointing
down) next to the microphone at the right side of your screen.
• If you don’t see the drop-down box or the microphone pictured below, return
to Preferences Menu (see step 2, page 17). Select the Interface tab. Check
Enable Meter Toolbar. This will allow you to see the microphone with the
drop-down box on your main screen.
6. Select Monitor Input from the drop-down menu. NOTE: You will need to select
this setting every time you launch Audacity. The other settings selected above will
be saved when you exit the program.
NOTE: The screens shown are from Audacity 1.2.6; later versions of Audacity
may change.
5
Page 6

Additional MAC audio settings
We have set the Audacity playback and record settings. Now it’s time to set the
separate Macintosh audio playback and record settings.
1. Go to Applications > Utilities > then select and open Audio MIDI Setup.
2. In the Audio Midi window under the tab Audio Devices, select the following:
• Under System Settings, Default Input, select USB Audio CODEC.
• Under System Settings, Properties For, select USB Audio CODEC.
• Under Default output, select Built-in Audio, or Built-in Output.
• For System output, select Built-in Audio.
This will allow other programs (in addition to Audacity) to use your Mac’s internal sound
card for audio output.
NOTE: The screens shown are from Audacity 1.2.6; later versions of Audacity
may change.
6
Page 7

Installing Audacity software for PC
1. Before installing software, assemble the turntable, following directions in the
included Owners Manual.
2. Plug the AC cord on your turntable into an AC power outlet.
3. Next, use the included USB cable to connect the turntable to your PC’s USB port.
USB
AC
RCA
USB cable (included)
NOTE: If the signal drops out when using the USB output on a Windows-based
desktop computer:
1. Make certain you are utilizing a USB port on the CPU portion of your computer. Do
not use the USB ports on a hub or monitor, as there is unregulated power to these
ports which can cause loss of USB connection. Please check the Microsoft website
for additional detail if needed.
2. Check to make certain the cable is secured in both the turntable and computer.
3. On the AT-LP240-USB and the AT-LP1240-USB, make certain the Line/Phono switch
is set to the “Line” position when using the USB output.
4. If you have external self-powered speakers, make certain they are plugged into
your computer’s audio input or into the line-out RCA plugs of the USB turntable, and
that the Phono/Line switch on your turntable is switched to Line. (Audacity offers
a software play-through feature that allows you to listen to the album through your
computer while recording, even if you don’t have external speakers.) If your computer
has a headphone output, you can choose to monitor your recording with headphones.
NOTE: On the AT-LP240-USB and the AT-LP1240-USB, the RCA cables are not
permanently attached to the turntable; they plug into the RCA jacks on the back of
the turntable. See the AT-LP240-USB and AT-LP1240-USB owner’s manuals for cable
connection instructions.
Typical connection for: Speakers with
RCA inputs
Typical connection for:
Speakers with 3.5 mm
stereo input
(using adapter cable)
Cables
Red to Red
White to White
5. Turn your computer on.
6. Insert the included Audacity CD. An Audacity window will appear. Click Audacity
Setup icon to install. Follow the directions on the pop-up windows to install
the software.
7. Re-start your computer.
Included adapter cable (RCA
to 3.5 mm stereo male)
7
Page 8

Setting up your PC (with Windows XP) to work with your USB Turntable
1. Close programs operating on your computer.
2. Start menu > Control Panel > Sounds and Audio Devices
• Begin at your Start menu. Select Control Panel.
• Select (double-click) Sounds and Audio Devices.
8
Page 9

3. The following screen will pop up:
4. Select the Voice tab.
• In the Voice playback area of the window, select your computer’s internal
sound card (not USB Audio CODEC; not Microsoft Sound Mapper).
• In the Voice recording area of the window, select USB Audio CODEC. Click Apply.
NOTE: If the “USB Audio CODEC” option does not appear, check the USB
cable to ensure it is properly connected to the USB port.
9
Page 10

Setting up your PC (with Windows XP) to work with your USB Turntable
5. Next, select the Audio tab.
• In the Sound playback area of the window, select your computer’s internal
sound card.
• In the Sound recording area of the window, select USB Audio CODEC.
• Check the following box: Use only default devices.
• Click Apply; then click OK.
10
Page 11

Setting up your PC (with Windows Vista or Windows 7) to work with your USB Turntable
1. Start menu > Control Panel > Sound.
Begin at your Start menu. Select Control Panel (classic view).
2. Select (double-click) Sound.
3. Select the Recording tab. Make sure that the USB Audio CODEC is set as the
default recording device. (You should see a green check mark beside USB
Audio CODEC.)
NOTE: If the “USB Audio CODEC” option does not appear, check the USB cable
to ensure it is properly connected to the USB port.
11
Page 12

Setting up your PC (with Windows Vista or Windows 7) to work with your USB Turntable
4. Select the Playback tab. Select your internal sound card speakers (these are
usually the first listed).
5. Click Apply; then click OK.
6. Close your Control Panel.
12
Page 13

Setting up your PC to work with Audacity
1. Launch the Audacity program from your Start menu.
2. Select Preference from the Edit tab in the Audacity Menu.
3. Select Audio I/O tab at the top left.
• Under Playback, Device, select your internal sound card.
• Under Recording, Device, select USB Audio CODEC.
• Under Recording, Channels, select 2 (Stereo).
• Check the box marked Software Playthrough.
NOTE: The screens shown are from Audacity 1.2.6; later versions of Audacity
may change.
13
Page 14

Setting up your PC to work with Audacity
4. Next, select Quality tab at the top.
• Default Sample Rate: 44100 Hz.
• Default Sample Format: 16-bit.
• Real-time sample rate converter: Fast Sinc Interpolation.
• High-quality sample rate converter: High-quality Sinc Interpolation.
• Real-time dither: None.
• High-quality dither: Triangle.
• Select OK to save settings and exit Preferences menu.
5. Next, from the main Audacity window, select the drop-down box (arrow
pointing down) next to the microphone near the middle of your screen.
• If you don’t see the drop-down box or the microphone pictured above, return
to Preferences Menu (see step 2, page 21). Select the Interface tab. Check
Enable Meter Toolbar. This will allow you to see the microphone with the
drop-down box on your main screen.
• Select Monitor Input from the drop-down menu. NOTE: You will need to
select this setting every time you launch Audacity. The other settings selected
above will be saved when you exit the program.
14
NOTE: The screens shown are from Audacity 1.2.6; later versions of Audacity
may change.
Page 15

Recording Albums with Audacity
To get started with Audacity, follow the instructions below. For in-depth information
on recording and saving projects, please visit the on-line Audacity manual at http://
audacity.sourceforge.net/manual-1.2/index.html
1. Saving a project
• Audacity writes all the changed and recorded audio to a directory called
Projectname_data, which is located right where you saved the project
file itself.
• Thus, select Save project as from your Audacity File tab and choose a
location and filename for your project.
• Please note that when you startup Audacity fresh, only the “Save As...”
menu option is available.
2. How to record
• Set your USB turntable up to play the song or album you want to record.
• Click on the red Record button to begin recording.
• Lower tone arm on USB turntable onto album and track you want to record.
• Click on the blue Pause button to pause the recording. Press it
again to continue.
• Click on the yellow Stop button.
That’s it. You can now play around with your recording and explore the editing
capabilities of Audacity. Remember that you can use the Undo function almost
without limits while the project is open.
NOTE: CD’s cannot be burned directly from the Audacity application. Other CD
burning applications should be used.
To learn more about Audacity
For in-depth information on recording and saving projects, please visit the on-line
Audacity manual at http://audacity.sourceforge.net/manual-1.2/index.html
NOTE: The screens shown are from Audacity 1.2.6; later versions of Audacity
may change.
15
Page 16

Audio-Technica U.S., Inc.
1221 Commerce Drive, Stow, Ohio 44224 (330) 686-2600
audio-technica.com
©2011 Audio -Technica U.S., Inc. P52251-02
 Loading...