

Page 1

AT-LP2D-USB Turntable
Software Guide
Tourne-disque AT-LP2D-USB
Guide logiciel
Tornamesas AT-LP2D-USB
Guía de software
Page 2

AT-LP2D-USB Turntable
Contents
A note about software ......................................................................................................2
System requirements ........................................................................................................2
Installing Cakewalk pyro Audio Creator software (for PC use only) ............................3
Setting up your PC (with Windows XP) to work with AT-LP2D-USB Turntable..........4
Setting up your PC (with Windows Vista) to work with AT-LP2D-USB Turntable ......7
Recording Albums and Burning CDs with Cakewalk pyro Audio Creator....................9
Saving Audio Files with Cakewalk pyro Audio Creator ..............................................11
To Save Files in Wave Format ....................................................................................11
To Save Files in MP3 Format ......................................................................................12
To Save Files in WMA Format ....................................................................................12
To Save Your Project ..................................................................................................12
Burn an Audio CD with Cakewalk pyro Audio Creator ................................................13
Overview of pyro Audio Creator GUI and Controls ......................................................14
Editing Audio in pyro Audio Creator ..............................................................................15
Installing Audacity software (for Mac OSX and above) ..............................................16
Setting up your Mac (OSX and above) to work with AT-LP2D-USB Turntable..........17
Additional Macintosh audio settings..............................................................................19
Installing Audacity software (for PC)..............................................................................20
Setting up your PC to work with Audacity....................................................................21
Recording albums with Audacity....................................................................................23
To learn more ....................................................................................................................23
A note about software
Your Audio-Technica AT-LP2D-USB turntable is supplied with Cakewalk pyro Audio Creator
and Audacity recording software for your convenience. Please note that other third-party
recording software packages are also compatible with this turntable.
Cakewalk pyro Audio Creator is provided as our recommended PC software because of
its ease of use and recording versatility. It allows you to create MP3, WAV, and WMA files,
as well as remove clicks, pops, and crackles from noisy LPs with DeClicker; and clean hiss,
hum, and other annoyances from LPs with DeNoiser.
NOTE: The MP3 encoder supplied with this version of Cakewalk pyro Audio Creator is valid
for 30 days from the point that you load the software. After that, you have the choice of
continuing your MP3 encoder subscription through Cakewalk or using a freeware version
available through various online sources. You will still have full Cakewalk recording capabilities
including the ability to save in the .WAV and .WMA file formats after the initial 30-days; this
trial period only affects the MP3 encoding portion of the software.
Audacity, provided for Mac users (also works with Windows), is free software, distributed
under the GNU General Public License (GPL). More information and open source code is on
the included Audacity CD and on the Audacity web site: http://audacity.sourceforge.net. For
tutorials, visit http://audacity.sourceforge.net/help/tutorials.
System Requirements
PC or Mac with an available USB port (USB1.1 or higher)
CD-R or CD-RW writer for burning CDs & installation
Cakewalk pyro Audio Creator™requires:
PC running Windows XP / Vista / Vista x64*
*required to run 64-bit edition of pyro Audio Creator
1 GB free disk space
NOTE: Pyro is not compatible with Mac or Apple-based computers,
or with Windows 98/98SE/Me/95 or NT
Mac is a trademark of Apple Inc., registered in the U.S. and other countries.
Windows is a registered trademark of Microsoft Corporation in the U.S. and other countries.
2
Audacity requires:
Mac running OSX or above or
PC running Windows (XP and above)
Page 3

Installing Cakewalk pyro Audio Creator software
(for PC use only)
EN
1. Before installing software, assemble the turntable, following directions in the
included AT-LP2D-USB Turntable Owners Manual.
2. Plug the AC cord on your turntable into an AC power outlet.
3. Next, use the included USB cable to connect the turntable to your PC's USB port.
USB
RCA
4. Make certain your self-powered speakers are plugged into the line-out RCA plugs
of the A
switched to Line.
T-LP2D-USB turntable, and that the Phono/Line switch on your turntable is
AC
USB cable (included)
Typical connection for:
Speakers with
RCA inputs
Using the supplied 3.5 mm-to-RCA female adapter cable, you can plug a pair of
headphones directly into the line output of your turntable. This will allow an
additional means of monitoring while recording, although you will not be able to
adjust the level (volume) of your headphones, because the turntable has a
constant output level.
Cables
Red to Red
White to Black
Either connection to the turntable (speakers or headphones) will allow you to
monitor the album that you're recording. NOTE: the system will operate without
speakers or headphones. Both pyro Audio Creator and Audacity offer a software
play-through/monitor feature that allows you to listen to the album through your
computer while recording.
5. Turn your computer on. The computer may display a detection message for
indicating that a new device is connected.
Included adapter cable (RCA
to 3.5 mm stereo female
Cables
Red to Red
White to White
Speakers with 3.5 mm
stereo input
(using
adapter cable)
Included adapter cable (RCA
to 3.5 mm stereo male)
6. Insert the included Cakewalk pyro Audio Creator CD. An AutoPlay window for the
Audio Creator New Hardware W
depending upon your preference. Follow the directions on the pop-up windows to
install or run the software.
7. Re-start your computer.
izard will appear. Click Install or Run program,
3
Page 4
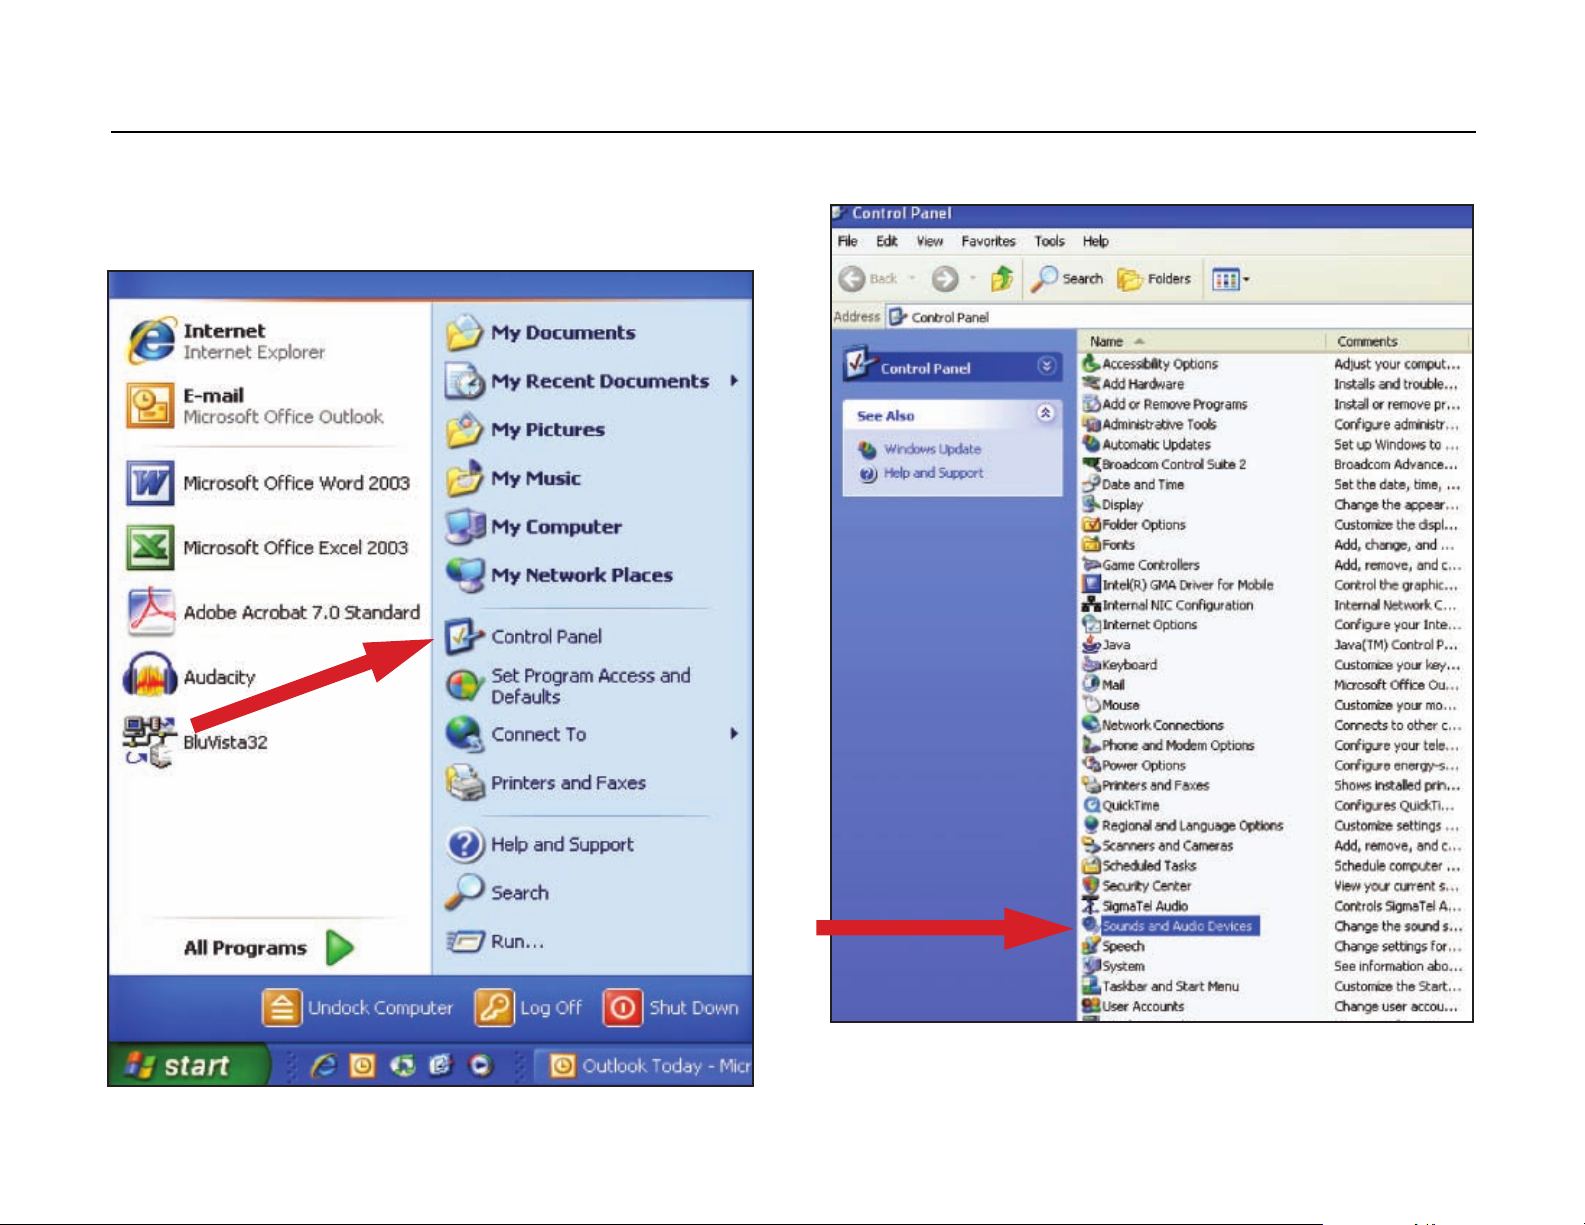
Setting up your PC (with Windows XP) to work with AT-LP2D-USB Turntable
(for either pyro Audio Creator or Audacity software packages included with your turntable)
1. Close programs operating on your computer.
2. Star
t menu > Control Panel > Sounds and Audio Devices
• Begin at your Start menu. Select Control Panel.
• Select (double-click) Sounds and Audio Devices.
4
Page 5
EN
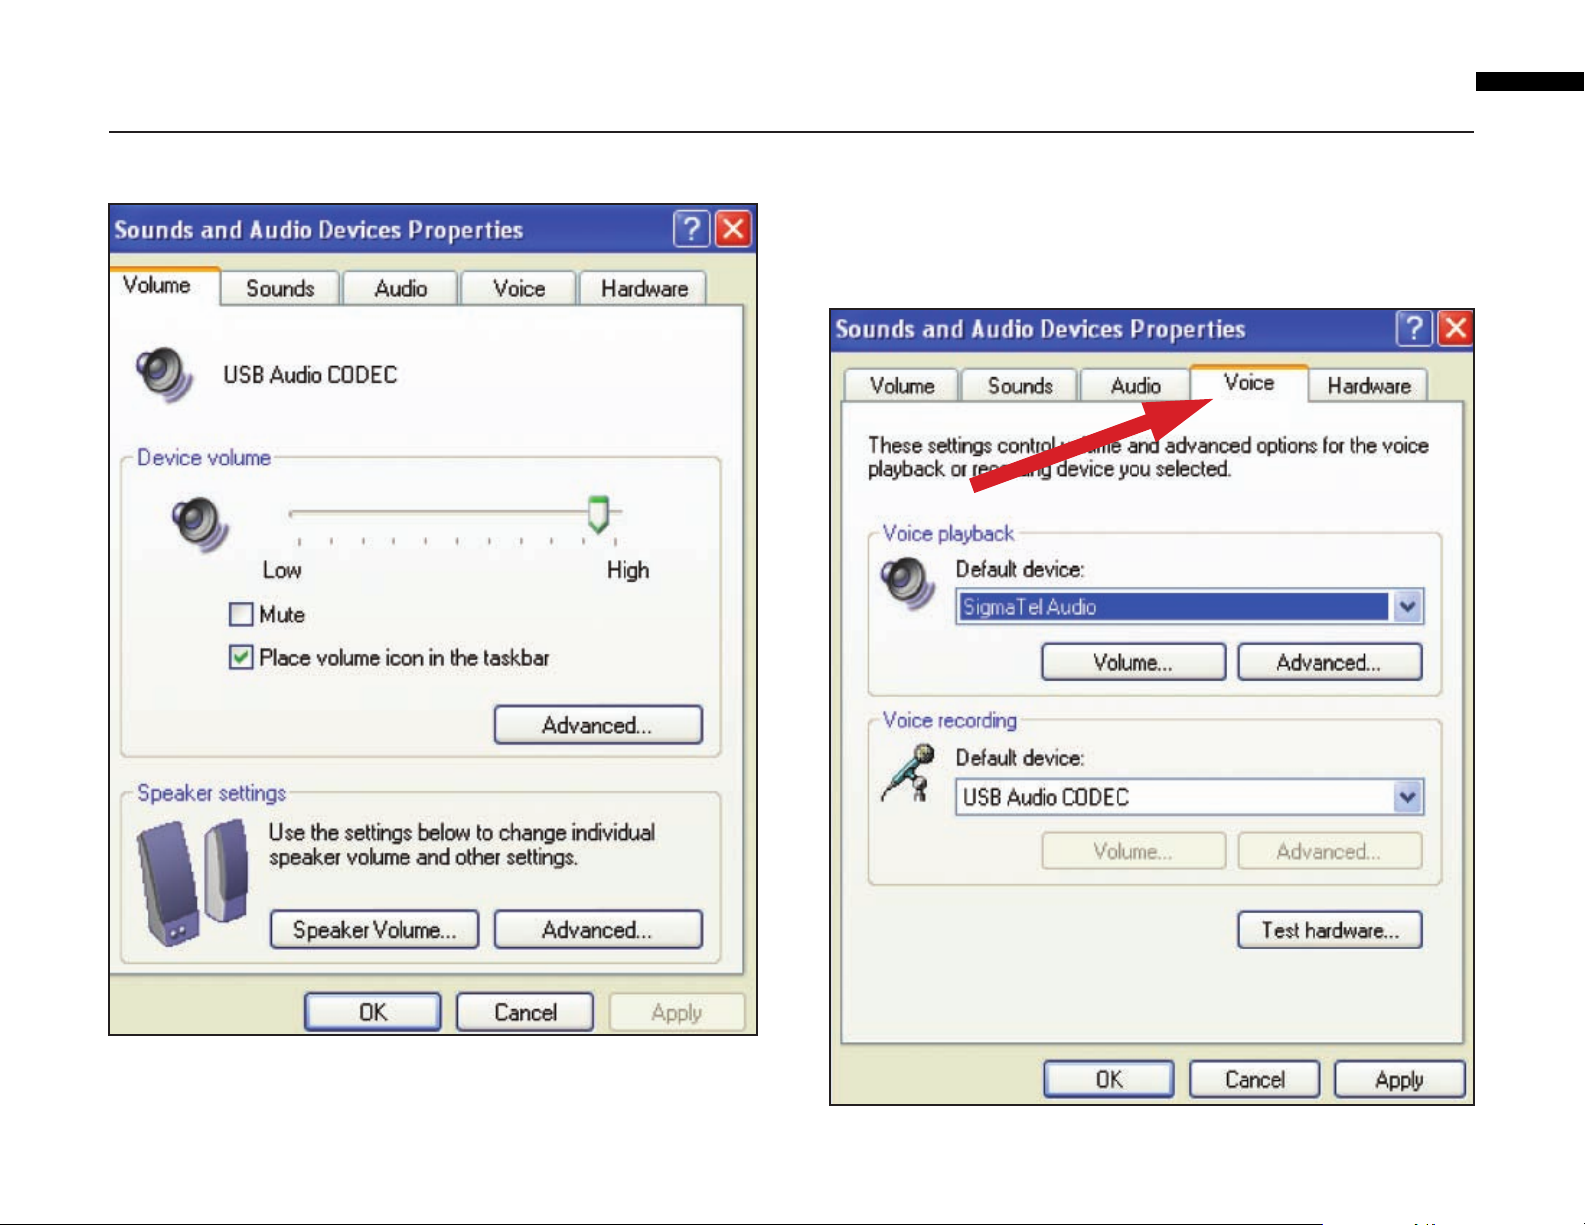
3. The following screen will pop up:
4. Select the Voice tab.
• In the Voice playback area of the window, select your computer's internal
sound card (not USB Audio CODEC; not Microsoft Sound Mapper).
• In
the Voice recording area of the window, select USB Audio CODEC. Click Apply.
NOTE: If the “USB Audio CODEC” option does not appear, check the USB
cable to ensure it is properly connected to the USB port.
5
Page 6
Setting up your PC (with Windows XP) to work with AT-LP2D-USB Turntable
(for either pyro Audio Creator or Audacity software packages included with your turntable)
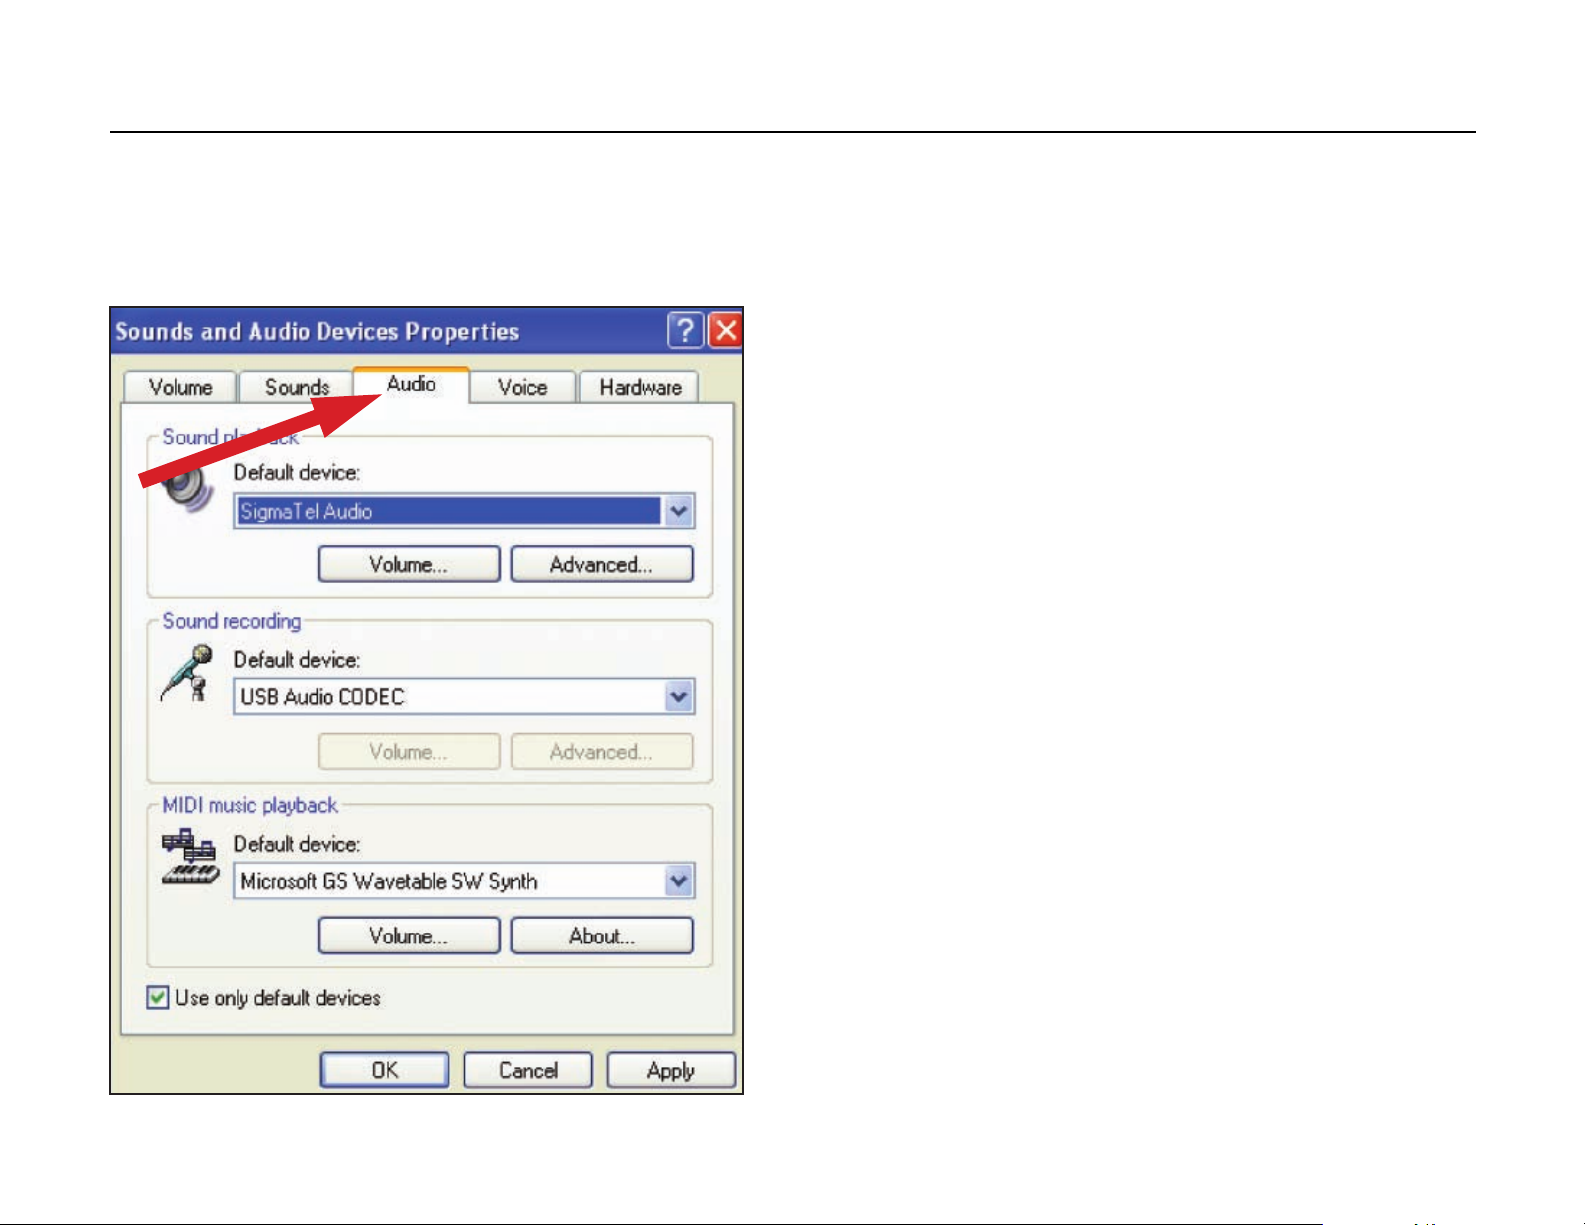
5. Next, select the Audio tab.
• In the Sound playback area of the window, select your computer's internal
sound card.
•
In the Sound recording area of the window, select USB Audio CODEC.
•
Check the following box: Use only default devices.
•
Click Apply; then click OK.
6
Page 7
Setting up your PC (with Windows Vista) to work with AT-LP2D-USB Turntable
(for either pyro Audio Creator or Audacity software packages included with your turntable)
EN
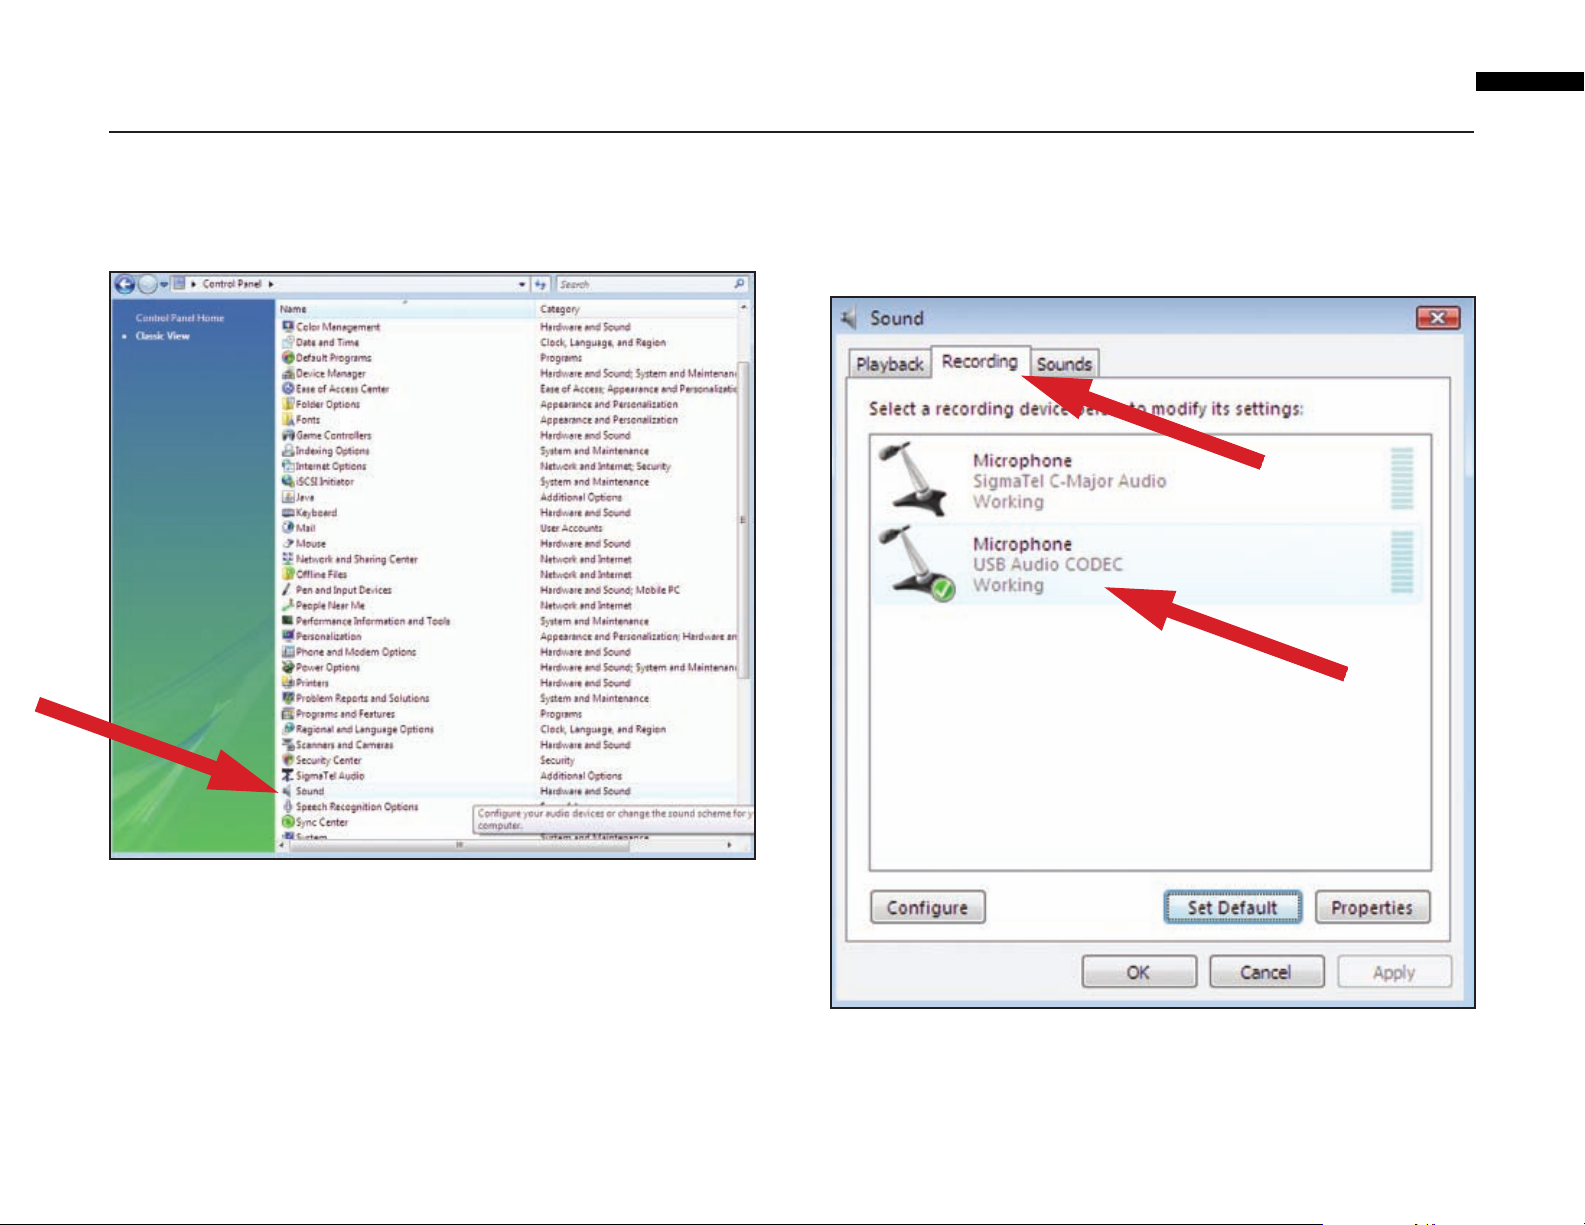
1. Start menu > Control Panel > Sound.
Begin at your Start menu. Select Control Panel (classic view).
2. Select (double-click) Sound.
3. Select the Recording tab. Make sure that the USB Audio CODEC is set as the
default recording device. (Y
CODEC.)
NOTE: If the “USB Audio CODEC” option does not appear, check the USB cable
to ensure it is properly connected to the USB port.
ou should see a green check mark beside USB Audio
7
Page 8

Setting up your PC (with Windows Vista) to work with AT-LP2D-USB Turntable
(for either pyro Audio Creator or Audacity software packages included with your turntable)
4. Select the Playback tab. Select your internal sound card speakers (these are
usually the first listed).
5. Click Apply; then click OK.
6. Close your Control Panel.
8
Page 9
Recording Albums and Burning CDs with Cakewalk pyro Audio Creator
These are basic instructions using Cakewalk pyro Audio Creator. For complete instructions, please see the Help menu on your Cakewalk pyro Audio Creator program.
EN
1. Open the Cakewalk pyro Audio Creator application. Two screens will appear
initially: the welcome (help) screen for pyro Audio Creator, and the program
screen. If you wish, you can minimize or close the welcome screen.
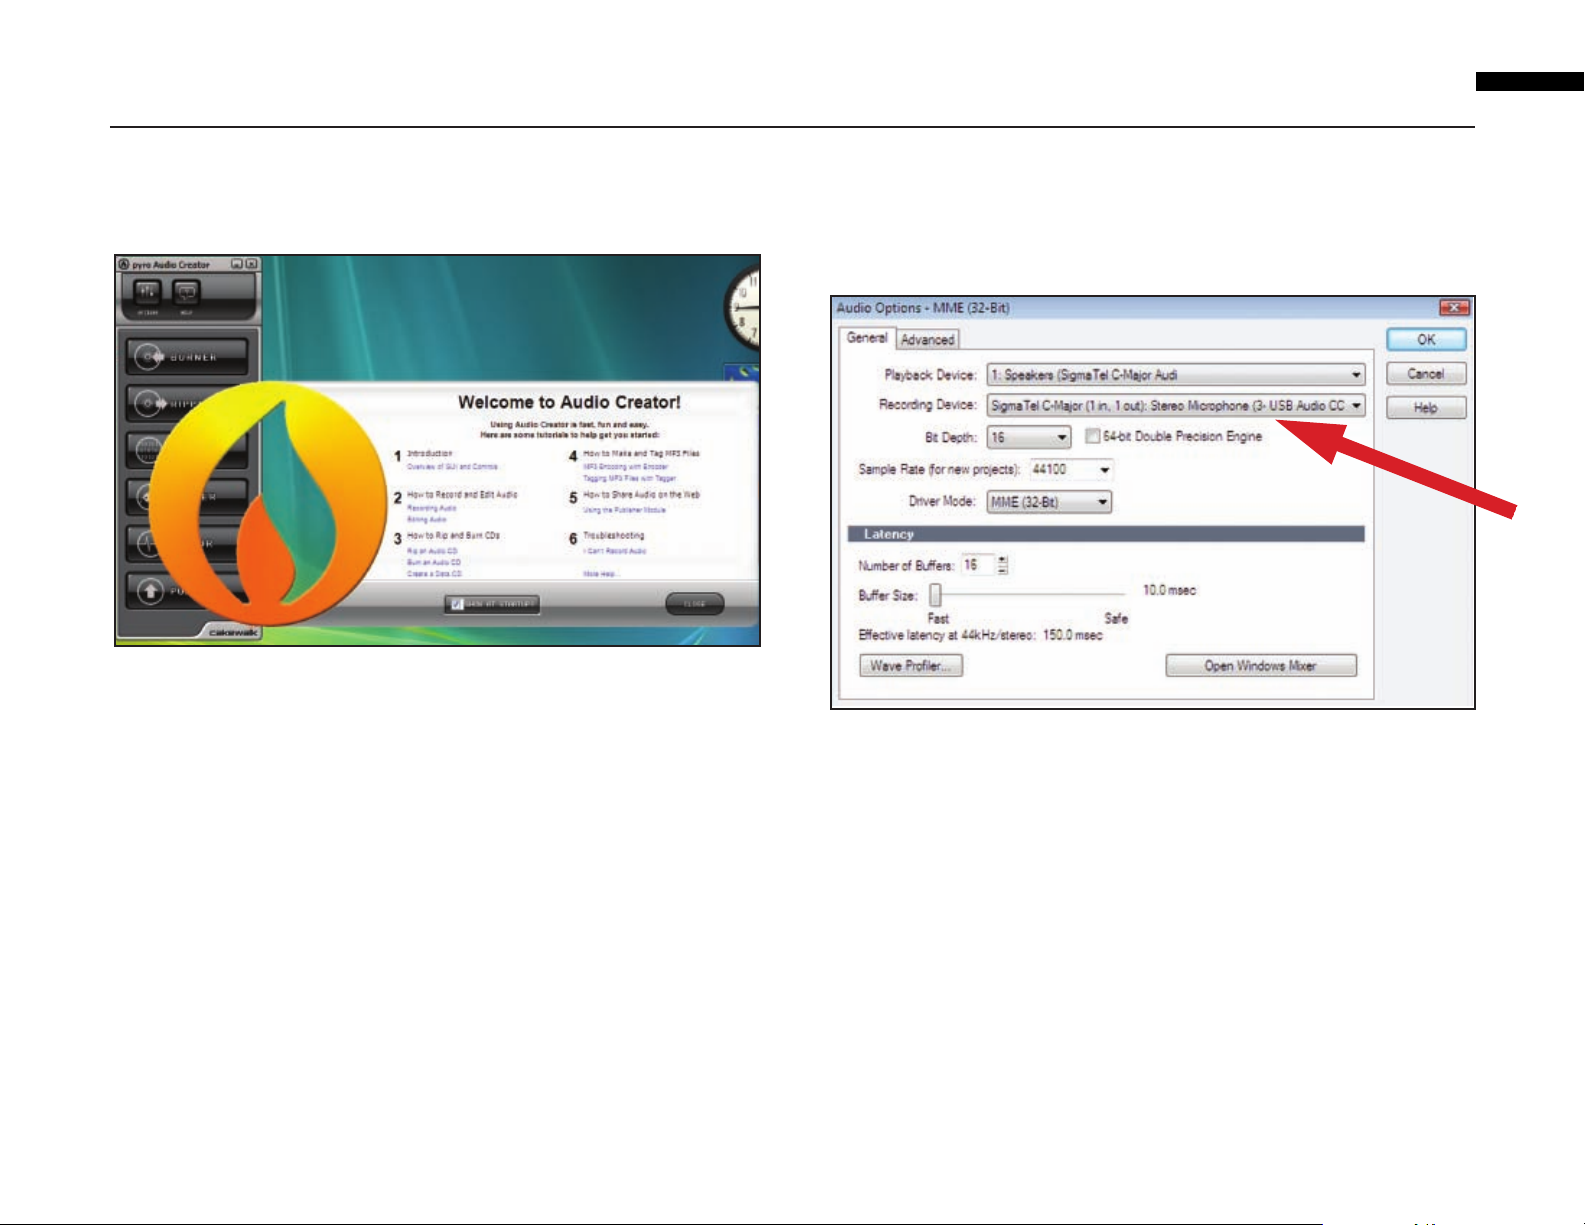
2. Next, open the Audio Options dialog by clicking the Options button in the Audio
Creator toolbar, and on the General tab, in the Recording Device field, select the
stereo version. Also in Audio Options, make certain your Playback device is set
to your internal sound card speakers (usually the first listed). Click OK to close
the dialog.
9
Page 10
Recording Albums and Burning CDs with Cakewalk pyro Audio Creator
These are basic instructions using Cakewalk pyro Audio Creator. For complete instructions, please see the Help menu on your Cakewalk pyro Audio Creator program.
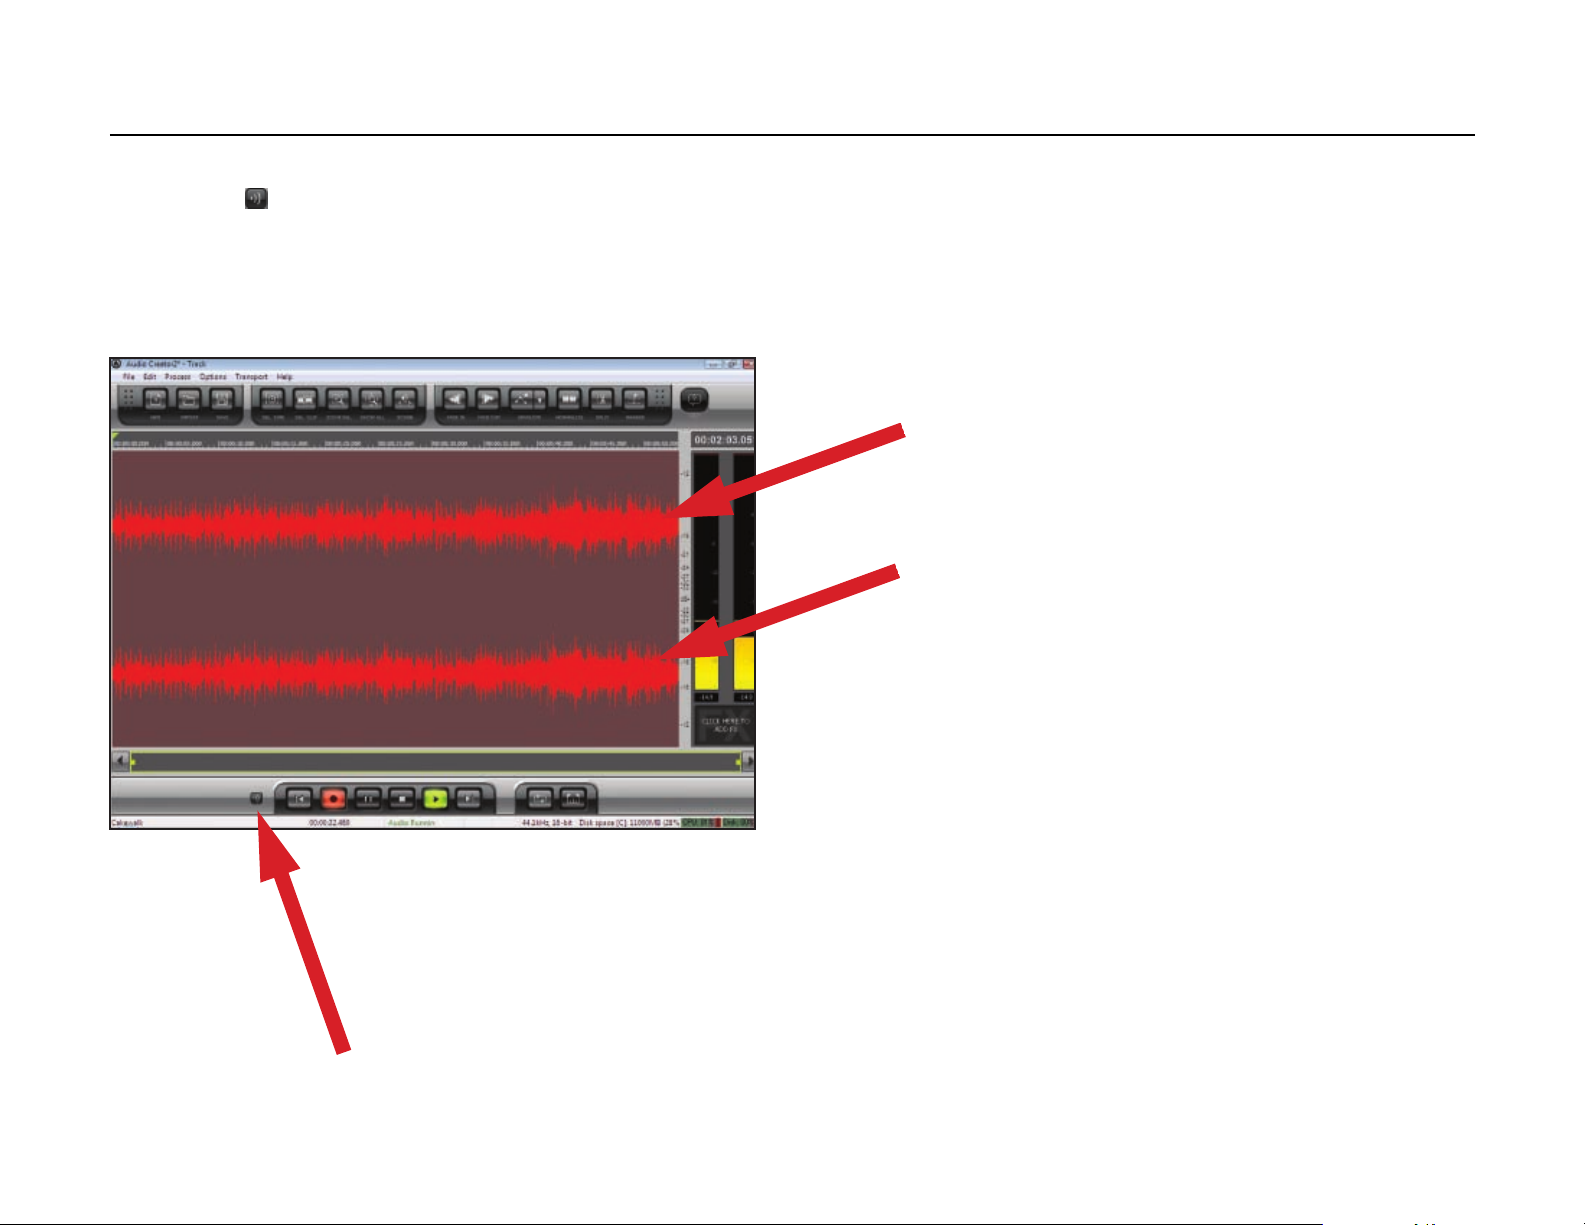
3. Next, click on the Editor button. To monitor your recording, click on the Input
Monitor button in the lower left portion of the window.
4. Then, click on the Record button in the Audio Editor, play your record, and watch
the record meters.
5. Two wave forms (left and right stereo) should appear on your screen as you
record.
6. You are now ready to record. Click the Record button; to start recording, deselect
your Pause button; begin playing your record. Click the Stop button when the
record is finished.
7. See the next section for how to save your audio file.
10
Page 11
Saving Audio Files with pyro Audio Creator
EN
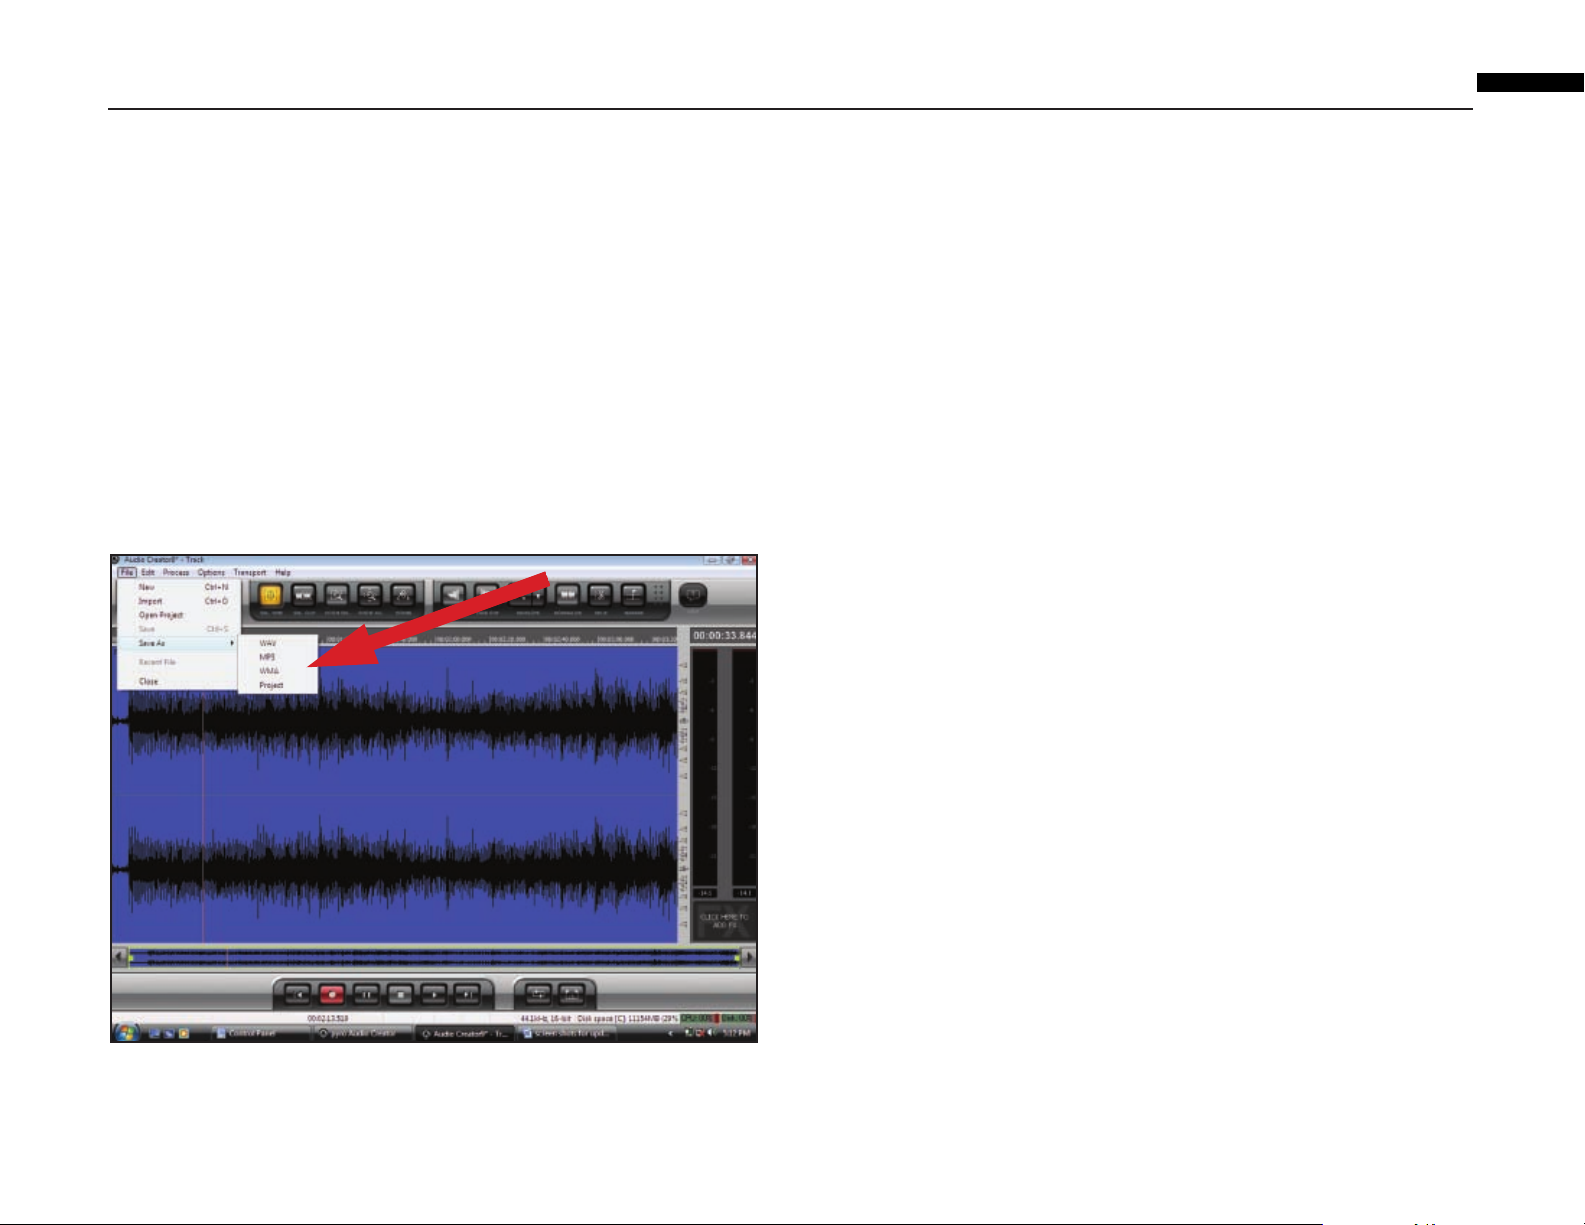
Audio Creator has two save commands: Save and Save As.
Use the Save As command (actually File-Save As) to save your files when you have
finished editing them. This command allows you to create new files that include all
the changes you have made in the Audio Editor
convert files to different formats for publishing on the web, burning CDs, etc.
NOTE: when you save a file, it is usually a good idea to save it under a different
name from the original file. This way you preserve your original file.
When you want to save your files, you can choose to save them in several different
formats:
• W
ave (.wav file extension)--this is CD format.
• MP3 (.mp3 file extension).
• WMA (.wma file extension)--this is Microsoft's file compression format which is
similar to MP3.
• Project (.pac file extension)--this option does not create new audio files, it just
preserves the state of your editing project so that you can open it later, and
start editing where you left off.
, and at the same time allows you to
To Save Files in Wave Format
This is the format you use if you want to burn a file or files to a CD. When you save
a file in this format, all the audio clips and/or files in your project are saved as one
wave file. However, if you add markers between different files in the Audio Editor,
you get the option to save separate files starting at each marker
To Save Files in Wave Format:
1. Use the File-Save As-Wav command to open the Save As dialog.
2. Navigate to where you want to store the new Wave file or files, and if you are
only saving one file, and not using markers to separate your saved files (see next
step), type a name for the new file.
3. If you want to use track markers to create separate files during the save process,
enable the Use Markers As T
start of a new file and also names the new file. Make sure you have a marker at
the beginning of your project if you want that part of the project to be included in
the save process.
4. Make sure that the Channel Format field is set to Stereo (unless you want a mono
file), the Sample Rate is set to 44100, and the Bit Depth is 16.
5. If you want to add this file or files to the Audio CD Track list, enable the Add to
Audio CD T
NOTE: if you choose to add files to the Audio CD Track list, copies of the files in
the correct format for CD burning are automatically created and added to the list.
Y
ou don't have to worry about choosing the correct file format options for CD
burning.
rack List checkbox.
rack Indicators checkbox. Each marker marks the
.
6.Click the Save button. A progress bar appears while your files are saved. Each file
you save gets the .wav file extension.
11
Page 12

Saving Audio Files with pyro Audio Creator
To Save Files in MP3 Format
This is a very popular format for compressing files in order to send them over the
Internet or prepar
To Save Files in MP3 Format:
1. Use the File-Save As-MP3 command to open the Save As dialog.
2. Navigate to where you want to store the new MP3 file, and if you are only saving
one file, and not using track markers to separate your saved files (see step 4),
type a name for the new file.
3. Usually you will leave the Channel Format field set to Stereo (unless you want a
mono file), the Sample Rate set to 44100, and the Bit Depth set to 16.
4. If you want to use track markers to create separate files during the save process,
enable the Use Markers As T
start of a new file and also names the new file. Make sure you have a marker at
the beginning of your project if you want that part of the project to be included in
the save process.
5. Click the Save button. The MP3 Save Options dialog appears.
6. Select the options you want. Click the Help button to open the help file for this
dialog.
7. Click OK to finish saving your file. If you are saving multiple files, this dialog will
appear one time for each file you are saving. Y
file extension.
e them to be played on portable players.
rack Indicators checkbox. Each marker marks the
our files are saved with the .MP3
To Save Files in WMA Format
This is Microsoft's file format for compressing files. It is a high-quality format similar
to MP3.
T
o Save Files in WMA Format:
1. Use the File-Save As-WMA command to open the Save As dialog.
2. Navigate to where you want to store the new WMA file, and if you are only saving
one file, and not using track markers to separate your saved files (see next step),
type a name for the new file.
3. If you want to use track markers to create separate files during the save process,
enable the Use Markers As T
start of a new file and also names the new file. Make sure you have a marker at
the beginning of your project if you want that part of the project to be included in
the save process.
4. Usually you will leave the Channel Format field set to Stereo (unless you want a
mono file), the Sample Rate set to 44100, and the Bit Depth set to 16.
5. Click the Save button. The Windows Media Format Encode Options dialog appears.
6. Select the options you want. Click the Help button to open the help file for this
dialog.
7. Click OK to finish saving your file. If you are saving multiple files, this dialog will
appear one time for each file you are saving. Y
file extension.
rack Indicators checkbox. Each marker marks the
our files are saved with the .wma
NOTE: The MP3 encoder supplied with this version of Cakewalk pyro Audio Creator is valid
for 30 days from the point that you load the software. After that, you have the choice of
continuing your MP3 encoder subscription through Cakewalk or using a freeware version
available through various online sources. You will still have full Cakewalk recording capabilities
including the ability to save in the .WAV and .WMA file formats after the initial 30-days; this
trial period only affects the MP3 encoding portion of the software.
12
To Save Your Project
This command simply preserves all the files and edits you've done in a project, so
that you can open it later to do more editing.
T
o Save Your Project:
1. Use the File-Save As-Project command to open the Save As dialog.
2. Navigate to where you want to store your project.
3. Type a file name for your project, and click Save. Your Project is saved under the
name that you chose, with a .pac file extension.
Page 13

Burn an Audio CD with Cakewalk pyro Audio Creator
1. Insert a blank CD-R disc in the destination drive.
2. Open the Burner module by clicking the Burner button in the Audio Creator Toolbar.
3. Click the Audio CD Burner tab of the module.
4. Select a destination CD-writing drive by using the Target Drive dropdown list.
5. Click Add Track to locate and import the audio files you wish to burn to CD.
When the Open dialog appears, you can select multiple files by holding down the
Ctrl key while you click files.
If the files are not in CD format (16-bit, 44.1 kHz .wav files), copies of the files are
automatically created and converted to this format for burning purposes (you don't
have to do a thing--just continue on!).
6. Place the tracks in the desired order by using the Move Up and Move Down buttons.
7. You can delete tracks by selecting them (use Ctrl+click or Shift+click to select
multiple files), and clicking the Delete Track button.
8. Check the disc capacity fields at the bottom of the Burner module or the capacity
graph on the right side of the module to make sure you have not exceeded the
capacity of your blank disc.
EN
9. Click Burn CD.
Audio Creator verifies the tracks, perfor
current track list to CD medium in the selected drive. After the disk is completed,
the disk is ejected from the drive.
ms a layout of the tracks, and writes the
13
Page 14
Overview of pyro Audio Creator GUI and Controls
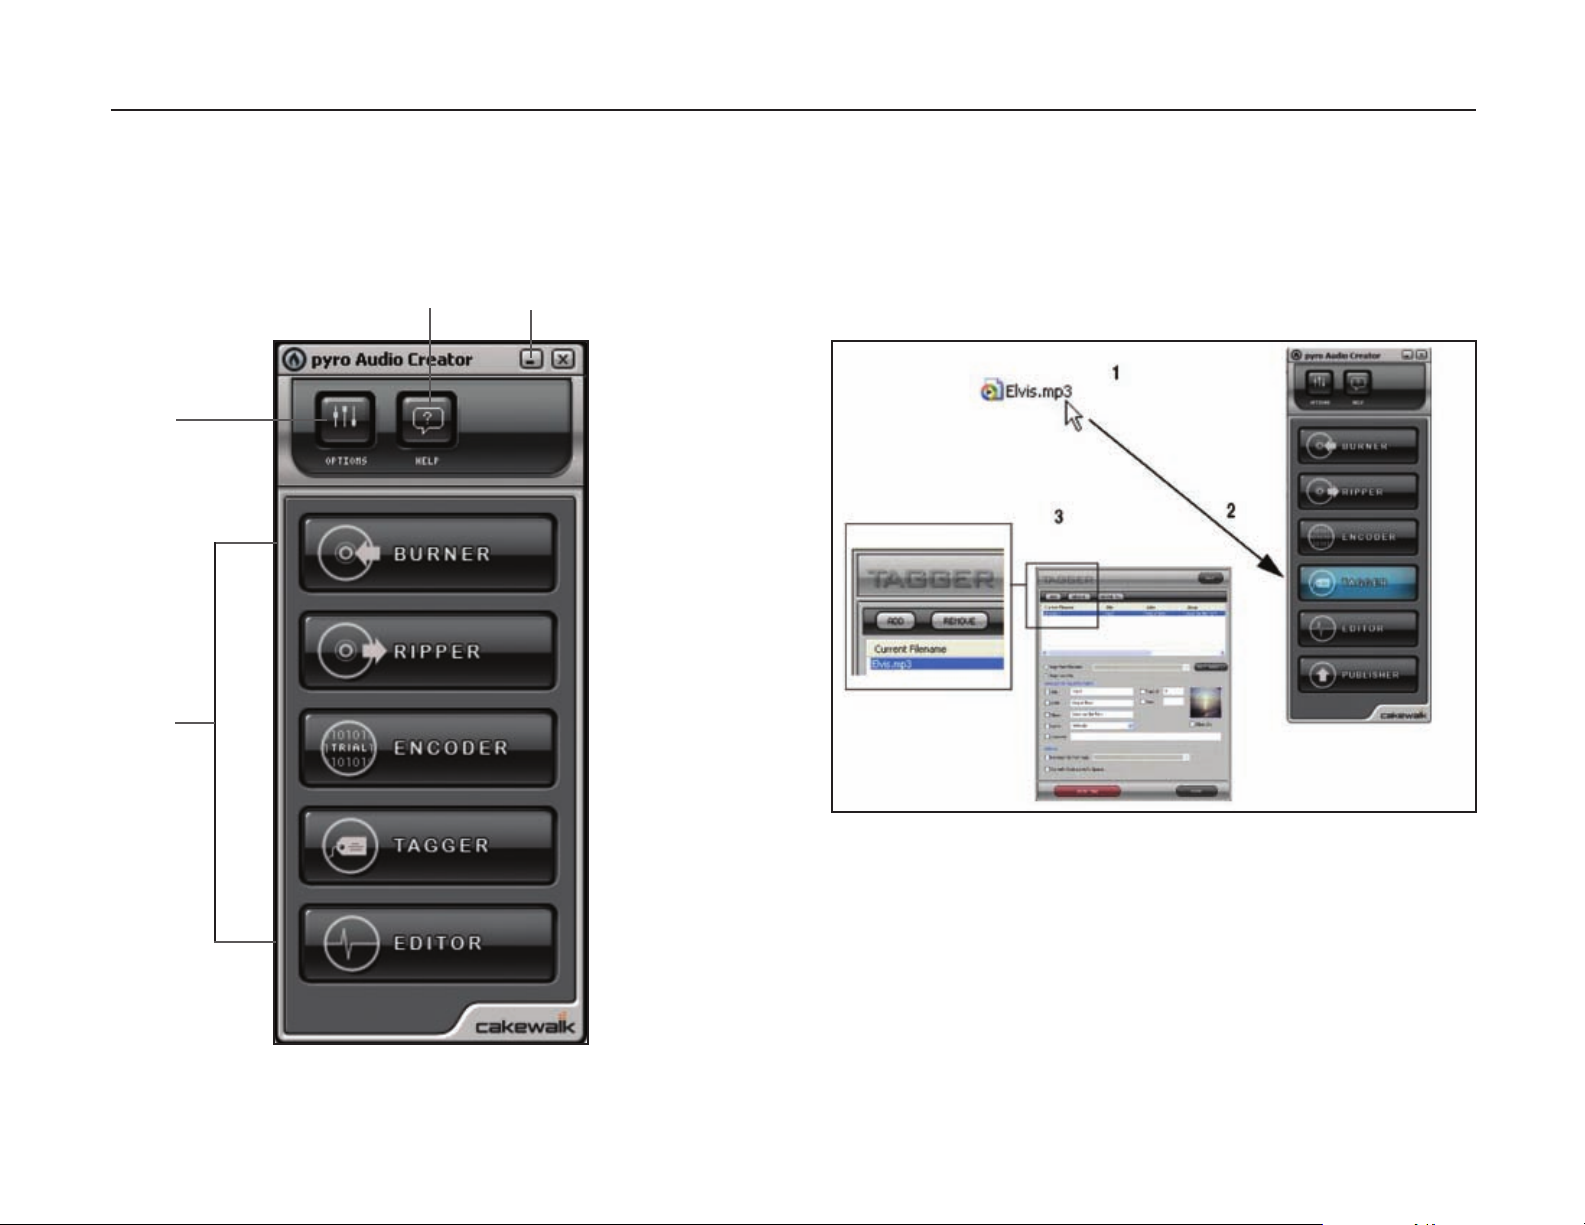
The Toolbar is your primary access point for Audio Creator's various modules. Each
module (except the Audio Editor) is dedicated to a single task. You can access a
module simply by clicking its button on the Toolbar, or by dragging files onto a button.
You can also access application help and preferences via the Toolbar. Because Audio
Creator is meant to be left on (open and running)–the Toolbar can be minimized to
the Windows system tray.
C.
B.
A.
D.
Starting most tasks is easy:
1. Drag an audio file (.mp3, .wav, .wma, etc.) onto the button that names the task
you want to do.
2. Release the file on the button.
3. The correct module for that task opens, with the file or files you dragged
already displayed.
A. Module buttons
B. Button to open the Audio Options dialog
C. Help button
D. Minimize to Tray button
14
When you click a module button, or drag files onto it, the button turns blue, and
stays blue as long as that module is open. You can have more than one module
open at a time.
Page 15

Editing Audio in pyro Audio Creator
EN
The Audio Editor module displays files as waveforms (graphical representations of
audio files), and gives you simple audio editing tools to do common editing tasks
quickly and easily. Most audio editing involves simple cut-copy-paste edits, adding
fade-ins or fade-outs, and adjusting volume. However, the Audio Editor module also
contains numerous professional-level editing tools and commands that are there if
you need them. You can use plug-in audio effects, convert bit depths and sample
rates, normalize, remove DC offset, and more.
Here's a description of the tools in the Audio Editor module:
M.
A.
B.
C.
D.
Here's a description of the tools in the Audio Editor toolbar:
A.
A. New Project
B. Import Audio
C. Save current audio file
D. Time Select tool
E. Clip Select tool
F. Show and Fit Selection
L.
K.
J.
G. Show All (displays your whole project)
H. Scrub tool
I. Fade In tool
J. Fade Out tool
K. Envelope tool
L. Show/Hide Envelopes
M. Normalize tool
N. Split
O. Insert Marker
P. Help
C.
B.
D.
E.
G.
F.
H.
I.
J.
M.
L.
K.
N.
O.
P.
E.
F.
A. Audio Editor toolbar
B. Time Ruler
C. Waveform
D. Scroll button
E. Navigator view
F. Transport controls (rewind, record, pause, stop, play, go to end)
G. Loop On/Off
H. Set Loop to Selection
I. Status bar
J. FX bin
K. Playback/Record meters
L. Now Time display
M. Name of current project
G.
H.
I.
15
Page 16

Installing Audacity software
(instructions for Mac OSX and above)
1. Before installing software, assemble the turntable, following directions in the
included AT-LP2D-USB Turntable Owners Manual.
2. Plug the AC cord on your turntable into an AC power outlet.
3. Next, use the included USB cable to connect the turntable to your Mac’s USB port.
USB
RCA
4. If you have external self-powered speakers, make certain they are plugged into
your computer's audio input or into the line-out RCA plugs of the A
turntable, and that the Phono/Line switch on your turntable is switched to Line.
(Audacity offers a software play-through feature that allows you to listen to the
album through your computer while recording, even if you don't have external
speakers.) If your computer has a headphone output, you can choose to monitor
your recording with headphones.
AC
USB cable (included)
T-LP2D-USB
Typical connection for:
Speakers with
RCA inputs
5. Turn your computer on.
6. Insert the included Audacity CD in your Mac's CD drive. Open the CD icon on your
desktop. Drag the installation folder for Audacity to your applications folder
When the files have been copied, eject the CD.
.
Cables
Red to Red
White to White
16
Speakers with 3.5 mm
stereo input
(using
adapter cable)
Included adapter cable (RCA
to 3.5 mm stereo male)
Page 17

Setting up your MAC (OSX and above) to work with AT-LP2D-USB Turntable
(Audacity)
EN
1. Open the Audacity program.
2. Select Preferences from the Audacity menu.
3. Select Audio I/O tab at the top left.
• Under Playback, Device, select Built-in Audio.
• Under Recording, Device, select USB Audio CODEC.
• Under Recording, Channels, select 2 (Stereo).
• Check the box marked Software Playthrough.
17
Page 18

Setting up your MAC (OSX and above) to work with AT-LP2D-USB Turntable
(Audacity)
4. Next, select Quality tab at the top.
• Default Sample Rate: 44100 Hz.
• Default Sample Format: 16-bit.
• Real-time sample rate converter: Fast Sinc Interpolation.
• High-quality sample rate converter: High-quality Sinc Interpolation.
• Real-time dither: None.
• High-quality dither: Triangle.
• Select OK to save settings and exit Preferences menu.
5. Next, from the main Audacity window, select the drop-down box (arrow pointing
down) next to the microphone at the right side of your screen.
• If you don't see the drop-down box or the microphone pictured below, return
to Preferences Menu (see step 2, page 17). Select the Interface tab. Check
Enable Meter Toolbar. This will allow you to see the microphone with the
drop-down box on your main screen.
6. Select Monitor Input from the drop-down menu. NOTE: You will need to select
this setting every time you launch Audacity. The other settings selected above will
be saved when you exit the program.
18
Page 19

Additional Macintosh audio settings
We have set the Audacity playback and record settings. Now it's time to set the
separate Macintosh audio playback and record settings.
1. Go to Applications > Utilities > then select and open Audio MIDI Setup.
2. In the Audio Midi window under the tab Audio Devices, select the following:
•
Under System Settings, Default Input, select USB Audio CODEC.
•
Under System Settings, Properties For, select USB Audio CODEC.
•
Under Default output, select Built-in Audio, or Built-in Output.
•
For System output, select Built-in Audio.
This will allow other programs (in addition to Audacity) to use your Mac's internal
sound card for audio output.
EN
19
Page 20

Installing Audacity software
(instructions for PC)
1. Before installing software, assemble the turntable, following directions in the
included AT-LP2D-USB Turntable Owners Manual.
2. Plug the AC cord on your turntable into an AC power outlet.
3. Next, use the included USB cable to connect the turntable to your PC's USB port.
USB
RCA
4. If you have external self-powered speakers, make certain they are plugged into
your computer's audio input or into the line-out RCA plugs of the A
turntable, and that the Phono/Line switch on your turntable is switched to Line.
(Audacity offers a software play-through feature that allows you to listen to the
album through your computer while recording, even if you don't have external
speakers.) If your computer has a headphone output, you can choose to monitor
your recording with headphones.
AC
USB cable (included)
T-LP2D-USB
Typical connection for:
Speakers with
RCA inputs
5. Turn your computer on.
6. Insert the included Audacity CD. An Audacity window will appear. Click Audacity
Setup icon to install. Follow the directions on the pop-up windows to install
the software.
7. Re-start your computer.
Cables
Red to Red
White to White
20
Speakers with 3.5 mm
stereo input
(using
adapter cable)
Included adapter cable (RCA
to 3.5 mm stereo male)
Page 21

Setting up your PC to work with Audacity
(See Setting up your PC to work with AT-LP2D-USB Turntable on page 4.)
EN
NOTE: See page 4 for important instructions on how to setup your PC to work with
AT-LP2D-USB turntable before continuing.
1. Launch the Audacity program from your Start menu.
2. Select Preference from the Edit tab in the Audacity Menu.
3. Select Audio I/O tab at the top left.
• Under Playback, Device, select your internal sound card.
• Under Recording, Device, select USB Audio CODEC.
• Under Recording, Channels, select 2 (Stereo).
• Check the box marked Software Playthrough.
21
Page 22

Setting up your PC to work with Audacity
(See Setting up your PC to work with AT-LP2D-USB Turntable on page 4.)
4. Next, select Quality tab at the top.
• Default Sample Rate: 44100 Hz.
•
Default Sample Format: 16-bit.
•
Real-time sample rate converter: Fast Sinc Interpolation.
•
High-quality sample rate converter: High-quality Sinc Interpolation.
•
Real-time dither: None.
•
High-quality dither: Triangle.
•
Select OK to save settings and exit Preferences menu.
5. Next, from the main Audacity window, select the drop-down box (arrow
pointing down) next to the microphone near the middle of your screen.
• If you don't see the drop-down box or the microphone pictured above, return
to Preferences Menu (see step 2, page 21). Select the Interface tab. Check
Enable Meter T
drop-down box on your main screen.
•
Select Monitor Input from the drop-down menu. NOTE: You will need to
select this setting every time you launch Audacity
above will be saved when you exit the program.
oolbar. This will allow you to see the microphone with the
. The other settings selected
22
Page 23

Recording Albums with Audacity
EN
To get started with Audacity, follow the instructions below. For in-depth information
on recording and saving projects, please visit the on-line Audacity manual at
http://audacity.sourceforge.net/manual-1.2/index.html and the detailed on-line
tutorials at http://audacity.sourceforge.net/help/tutorials.
1. Saving a project
• Audacity writes all the changed and recorded audio to a directory called
Projectname_data, which is located right where you saved the project file
itself.
•
Thus, select Save project as from your Audacity File tab and choose a
location and filename for your project.
•
Please note that when you startup Audacity fresh, only the “Save As...”
menu option is available.
2. How to record
• Set your USB turntable up to play the song or album you want to record.
•
Click on the red Record button to begin recording.
• Lower tone arm on USB turntable onto album and track you want to record.
• Click on the blue Pause button to pause the recording. Press it
again to continue.
• Click on the yellow Stop button.
That's it. You can now play around with your recording and explore the editing
capabilities of Audacity. Remember that you can use the Undo function almost
without limits while the project is open.
NOTE: CD's cannot be burned directly from the Audacity application. Other CD
burning applications should be used.
To learn more about Cakewalk pyro Audio Creator
Cakewalk pyro Audio Creator offers many features for filtering and/or editing
recordings, like removing clicks, pops, and crackles, or cleaning hisses, hums, and
other annoyances from your recordings. These features are described in great detail
within the User's Guide found in the Cakewalk pyro Audio Creator Help window (this
is on the Cakewalk pyro Audio Creator LE CD included with the AT-LP2D-USB
turntable). For help, contact Cakewalk at www.cakewalk.com/support.
To learn more about Audacity
For in-depth information on using Audacity, please visit the on-line Audacity manual
at http://audacity.sourceforge.net/manual-1.2/index.html and the detailed on-line
tutorials at http://audacity.sourceforge.net/help/tutorials.
23
Page 24

Tourne-disque AT-LP2D-USB
Table des matières
Remarque concernant les logiciels ................................................................................24
Configuration système requise ......................................................................................24
Installation du logiciel Cakewalk pyro Audio Creator (pour PC uniquement) ..........25
Configuration de votre PC (avec Windows XP) pour pouvoir utiliser le
tourne-disque AT-LP2D-USB ..........................................................................................25
Configuration de votre PC (avec Windows Vista) pour pouvoir utiliser le
tourne-disque AT-LP2D-USB ............................................................................................26
Enregistrement d’albums et gravure de CD avec Cakewalk pyro Audio Creator ....26
Enregistrement de fichiers audio avec Cakewalk pyro Audio Creator ......................27
Enregistrer des fichiers au format Wave ....................................................................27
Enregistrer des fichiers au format MP3 ....................................................................28
Enregistrer des fichiers au format WMA ....................................................................28
Enregistrer votre projet ................................................................................................28
Graver un CD audio avec Cakewalk pyro Audio Creator..............................................29
Aperçu de l’interface utilisateur graphique et des commandes de
pyro Audio Creator ..........................................................................................................29
Édition de fichiers audio dans pyro Audio Creator ......................................................30
Installation du logiciel Audacity (pour Mac OSX et versions supérieures) ................30
Configuration de votre Mac (OSX et versions supérieures) pour pouvoir
utiliser le tourne-disque AT-LP2D-USB ..........................................................................31
Paramètres audio Macintosh supplémentaires ............................................................31
Installation du logiciel Audacity (pour PC) ....................................................................32
Configuration de votre PC pour pouvoir utiliser Audacity ..........................................32
Enregistrement d’albums avec Audacity ......................................................................33
En savoir plus ...................................................................................................................33
Remarque concernant les logiciels
Votre tourne-disque Audio-Technica AT-LP2D-USB est accompagné des logiciels
d’enregistrement pyro Audio Creator de Cakewalk et Audacity. Veuillez noter que d’autres
progiciels d’enregistrement sont également compatibles avec ce tourne-disque.
Nous recommandons l’utilisation du logiciel Cakewalk pyro Audio Creator sur PC en raison
de sa simplicité d’utilisation et de sa grande polyvalence en matière d’enregistrement. Il permet
la création de fichiers MP3, WAV et WMA, l’élimination des grésillements, crépitements et
craquements présents sur les vinyles grâce à DeClicker, la suppression des souffles,
ronflements et autres bruits grâce à DeNoiser.
REMARQUE : L’encodeur MP3 fourni avec cette version de Cakewalk pyro Audio Creator
est valable 30 jours à partir de la date d’installation du logiciel. Après quoi vous avez le choix
entre maintenir votre abonnement à l’encodeur MP3 via Cakewalk ou utiliser une version
gratuite du logiciel, disponible à partir de nombreuses sources en ligne. Après les 30 premiers
jours, vous disposez toujours des toutes les fonctions d’enregistrement de Cakewalk, ainsi
que de la possibilité d’enregistrer des fichiers aux formats .WAV et .WMA ; cette période
de test ne concerne que la partie du logiciel dédiée à l’encodage en MP3.
Audacity, fourni pour les utilisateurs de Mac (fonctionne également avec Windows), est un
logiciel libre distribué sous la Licence Publique Générale GNU (GNU GPL). Vous trouverez
plus d’informations ainsi que le code open source sur le CD d’Audacity inclus avec le tournedisque et sur le site Internet d’Audacity : http://audacity.sourceforge.net. Pour les tutoriaux,
consultez http://audacity.sourceforge.net/help/tutorials.
Configuration système requise
PC ou Mac avec un port USB disponible (USB1.1 ou supérieur)
Lecteur/graveur CD-R ou CD-RW pour la réalisation de CD et l’installation
Configuration système requise pour Cakewalk pyro Audio Creator™ :
un PC s’exécutant sous Windows XP / Vista / Vista x64*
*nécessaire pour exécuter l’édition 64 bits de Pyro Audio Creator
1 Go d’espace disque disponible
REMARQUE : PYRO n’est pas compatible avec les ordinateurs Mac ou Apple, ni avec
Windows 98/98SE/Me/95 ou NT
24
Configuration système requise pour Audacity :
un Mac s’exécutant sous OSX ou versions supérieures
ou un PC s’exécutant sous Windows (XP et versions supérieures)
Page 25

Installation du logiciel Cakewalk
pyro Audio Creator
1. Avant d’installer le logiciel, assemblez le tourne-disque en suivant les instructions
du Manuel de l’utilisateur fourni avec le tourne-disque AT-LP2D-USB.
2. Branchez le cordon CA de votre tourne-disque dans une prise de courant alternatif.
3. Puis, utilisez le câble USB fourni pour connecter le tourne-disque au port USB de
votre PC.
4. Assurez-vous que les haut-parleurs à alimentation autonome sont bien branchés
dans les prises RCA de sortie de ligne du tourne-disque A
commutateur Phono/Line (Phono/Ligne) de votre tourne-disque est sur Line (Ligne).
Câbles
rouge sur rouge
blanc sur blanc
À l’aide du câble adaptateur femelle 3,5 mm/RCA, vous pouvez brancher une
paire d’écouteurs directement sur la sortie de ligne de votre tourne-disque. Ceci
constitue un moyen supplémentaire de contrôle au cours de l’enregistrement,
bien que vous ne puissiez pas régler le niveau (volume) de vos écouteurs en
raison du niveau de sortie constant du tourne-disque.
Câbles
rouge sur rouge
blanc sur noir
Quelle que soit la connexion à votre tourne-disque (haut-parleurs ou écouteurs),
elle vous permet de contrôler l’album que vous êtes en train d’enregistrer.
REMARQUE : Le système fonctionne sans haut-parleurs et sans écouteurs. Les
l
ogiciels pyro Audio Creator et Audacity possèdent tous deux une fonctionnalité playthrough/contrôle vous permettant d’écouter l’album via votre ordinateur, au cours
de son enregistrement.
(pour PC uniquement)
T-LP2D-USB et que le
Configuration de votre PC (avec Windows XP) pour
pouvoir utiliser le tourne-disque AT-LP2D-USB
(valable pour les deux progiciels pyro Audio Creator et Audacity fournis avec votre
tourne-disque)
1. Fermez tous les programmes en cours d’exécution sur votre ordinateur.
2. Start menu (Démarrer) > Control Panel (Panneau de configuration) > Sounds and
Audio Devices (Sons et périphériques audio)
• Pour commencer, cliquer sur le menu Start (Démarrer). Sélectionnez Control
Panel (Panneau de configuration).
• Double-cliquez sur Sounds and Audio Devices (Sons et périphériques audio).
3. La fenêtre « Sounds and Audio Devices Properties » (« Propriétés de Sons et
périphériques audio
4. Cliquez sur l’onglet Voice (Voix).
• Dans la zone Voice playback (Lecture de la parole), sélectionnez la carte son
interne de votre or
Microsoft Sound Mapper).
• Dans la zone Voice recording (Enregistrement vocal), sélectionnez USB
Audio CODEC (CODEC Audio USB). Cliquez sur Apply (Appliquer).
REMARQUE : Si l’option « USB Audio CODEC » (« CODEC Audio USB »)
n’apparaît pas, assurez-vous que le câble USB est correctement connecté au
port USB.
5. Puis, sélectionnez l’onglet Audio.
• Dans la zone Sound playback (Lecture audio), sélectionnez la carte son
interne de votre or
• Dans la zone Sound recording (Enregistrement audio), sélectionnez USB
Audio CODEC (CODEC Audio USB).
• Cochez la case
périphériques par défaut).
• Cliquez sur Apply (Appliquer) puis sur OK.
») s’affiche.
dinateur (ni USB Audio CODEC [CODEC Audio USB], ni
dinateur.
: Use only default devices (Utiliser uniquement les
FR
5. Mettez votre ordinateur en marche. Il est possible que l’ordinateur affiche un
message de détection indiquant qu’un nouveau périphérique est connecté.
6. Insérez le CD de Cakewalk pyro Audio Creator fourni. Une fenêtre d’exécution
automatique de l’assistant d’ajout de nouveau matériel d’Audio Creator s’affiche.
Cliquez au choix sur Install ou Run program (Installer ou Exécuter programme).
Suivez les instructions des fenêtres contextuelles pour installer et exécuter le logiciel.
7. Redémarrez votre ordinateur.
25
Page 26

Configuration de votre PC (avec Windows Vista)
pour pouvoir utiliser le tourne-disque AT-LP2D-USB
(valable pour les deux progiciels pyro Audio Creator et Audacity fournis avec votre
tourne-disque)
tart menu (Démarrer) > Control Panel (Panneau de configuration) > Sound (Son).
1. S
Pour commencer, cliquez sur le menu Start (Démarrer). Sélectionnez Control
Panel (Panneau de configuration) (affichage classique).
2. Double-cliquez sur Sound (Son).
3. Cliquez sur l’onglet Recording (Enregistrement). Assurez-vous que
USB Audio CODEC (CODEC Audio USB) est bien défini comme périphérique
d’enregistrement par défaut. (Une coche verte doit apparaîtr
Audio CODEC (CODEC Audio USB).)
REMARQUE : Si l’option « USB Audio CODEC » (« CODEC Audio USB »)
n’apparaît pas, assurez-vous que le câble USB est correctement connecté au
port USB.
4. Cliquez sur l’onglet Playback (Lecture). Sélectionnez les haut-parleurs de la carte
son interne (ils figurent en général en premier dans la liste).
e en regard de USB
Enregistrement d’albums et gravure de CD avec
Cakewalk pyro Audio Creator
Il s’agit ici des instructions de base pour l’utilisation de Cakewalk pyro Audio Creator.
Pour obtenir des instructions plus détaillées, veuillez vous référer à l’aide de
Cakewalk pyro Audio Creator
1. Ouvrez l’application Cakewalk pyro Audio Creator. Deux écrans apparaissent :
l’écran d’accueil (aide) de pyro Audio Creator et l’écran du programme. V
pouvez, si vous le souhaitez, réduire ou fermer l’écran d’accueil.
2. Ouvrez la boîte de dialogue Audio Options (Options audio) en cliquant sur le
bouton Options (Options) dans la barre d’outil d’Audio Creator ; puis dans
l’onglet General (Général), dans le champ Recording Device (Périphérique
d’enregistrement), sélectionnez la version stereo (stéréo). Assur
que, dans Audio Options (Options audio), le périphérique Playback (Lecture) est
réglé sur les haut-parleurs de votre carte son interne (en général en premier dans
la liste). Cliquez sur OK pour fermer la boîte de dialogue.
3. Puis, cliquer sur le bouton Editor (Éditeur). Pour contrôler votre enregistrement,
cliquez sur le bouton Input Monitor (Contrôler entrée), situé dans la partie
inférieure gauche de la fenêtre.
.
ous
ez-vous également
5. Cliquez sur Apply (Appliquer) puis sur OK.
6. Fermez le Control Panel (Panneau de configuration).
26
4. Puis, cliquez sur le bouton Record (Enregistrement) dans Audio Editor (Éditeur
audio), lisez votre enregistrement et observez le niveau d’enregistrement.
5. Deux formes d’onde (stéréo gauche et droite) doivent apparaître sur votre écran
pendant l’enregistrement.
6. Vous êtes maintenant prêt à enregistrer. Cliquez sur le bouton Record
(Enregistrement) pour démarrer l’enregistrement, désélectionnez le bouton
Pause (Pause) et commencer votre enregistrement. Cliquez sur le bouton Stop
(Stop) une fois l’enregistrement terminé.
7. Pour enregistrer votre fichier audio, voir le paragraphe suivant.
Page 27

Enregistrement de fichiers audio avec pyro Audio Creator
FR
Audio Creator possède deux commandes d’enregistrement : Save (Enregistrer) et
Save As (Enregistrer sous). Utilisez la commande Save As (en fait File-Save As,
Enregistrer fichier sous) pour enr
modifier. Cette commande vous permet de créer de nouveaux fichiers contenant
toutes les modifications que vous avez effectuées dans Audio Editor, ainsi que de
convertir des fichiers dans des formats différents afin de les publier sur Internet,
graver des CD, etc.
REMARQUE : Lorsque vous enregistrez un fichier, il est en général utile de lui
donner un nom différent du fichier d’origine. De cette manièr
quel votre fichier d’origine.
Lorsque vous souhaitez enregistrer vos fichiers, vous pouvez choisir de le faire dans
différents formats :
• Wave (extension de fichier .wav)–il s’agit du format utilisé pour les CD.
• MP3 (extension de fichier .mp3).
• WMA (extension de fichier .wma)–il s’agit du format de compression de fichier
de Microsoft ; il est similaire au format MP3.
• Project (extension de fichier .pac)–cette option ne crée pas de nouveau fichier
audio, elle conserve simplement l’état de votre projet d’édition, de sorte que
vous puissiez le rouvrir plus tard et poursuivre les modifications là où vous les
aviez arrêtées.
egistrer vos fichiers lorsque vous avez fini de les
e vous conservez tel
Enregistrer des fichiers au format Wave
Il s’agit du format utilisé pour graver un ou plusieurs fichiers sur un CD. Lorsque
vous enregistrez un fichier dans ce format, tous les clips audio et/ou fichiers de votre
projet sont enregistrés en un unique fichier wave. Cependant, si vous ajoutez des
marqueurs entre différ
d’enregistrer des fichiers séparés, délimités par les marqueurs.
Enregistrer des fichiers au format Wave :
1. Utilisez la commande File-Save As-Wav (Enregistrer fichier sous Wav) pour
ouvrir la boîte de dialogue Save As (Enregistrer sous).
2. Naviguez jusqu’à l’emplacement où vous souhaitez enregistrer le ou les
nouveau(x) fichier(s) W
marqueurs pour séparer vos fichiers enregistrés (voir étape suivante), saisissez un
nom pour le nouveau fichier.
3. Si vous souhaitez utiliser des marqueurs de piste pour créer des fichiers séparés
lors du processus d’enregistrement, activez la case Use Markers As T
Indicators (Utiliser les marqueurs comme indicateurs de pistes). Chaque marqueur
définit le début d’un nouveau fichier et donne également son nom au nouveau
fichier. Assurez-vous qu’un marqueur est présent au début du projet si vous
voulez que cette partie du projet soit incluse dans le processus d’enregistr
4. Assurez-vous que le champ Channel Format (Format canal) est défini sur Stereo
(Stéréo) (sauf si vous souhaitez un fichier mono), la fréquence d’échantillonnage
sur 44
100 et la profondeur de bit sur 16.
ents fichiers dans Audio Editor, vous avez la possibilité
ave. Si vous enregistrez un seul fichier et n'utilisez pas de
rack
ement.
5. Si vous voulez ajouter ce ou ces fichier(s) à la liste Audio CD Track (Pistes du CD
audio), activez la case Add to Audio CD Track List (Ajouter à la liste de pistes
du CD audio).
REMARQUE : Si vous choisissez d’ajouter des fichiers à la liste des pistes du CD
audio, des copies de ces fichiers sont créées automatiquement dans un format
adapté à la gravure sur CD, puis ajoutées à la liste. V
soucier de choisir les bonnes options de format de fichier pour graver un CD.
6. Cliquez sur le bouton Save (Enregistrer). Une barre indiquant la progression de
l'enregistrement de vos fichiers apparaît. Chaque fichier enregistré possède
l’extension .wav
.
ous n’avez donc pas à vous
27
Page 28

Enregistrement de fichiers audio avec pyro Audio Creator
Enregistrer des fichiers au format MP3
Ce format est très populaire pour compresser des fichiers afin de les envoyer via
Internet ou de les lire sur des lecteurs portables.
Enregistrer des fichiers au for
1. Utilisez la commande File-Save As-MP3 (Enregistrer fichier sous MP3) pour
ouvrir la boîte de dialogue Save As (Enregistrer sous).
2. Naviguez jusqu’à l’emplacement où vous souhaitez enregistrer le ou les
nouveau(x) fichier(s) MP3. Si vous enregistrez un seul fichier et n'utilisez pas de
marqueurs pour séparer vos fichiers enregistrés (voir étape
pour le nouveau fichier.
3. En général, le champ Channel Format (Format canal) doit être défini sur Stereo
(Stéréo) (sauf si vous souhaitez un fichier mono), la fréquence d’échantillonnage
sur 44
100 et la profondeur de bit sur 16.
4. Si vous souhaitez utiliser des marqueurs de piste pour créer des fichiers séparés
lors du processus d’enregistrement, activez la case Use Markers As T
Indicators (Utiliser les marqueurs comme indicateurs de pistes). Chaque marqueur
définit le début d’un nouveau fichier et donne également son nom au nouveau
fichier. Assurez-vous qu’un marqueur est présent au début du projet si vous
voulez que cette partie du projet soit incluse dans le processus d’enregistrement.
5. Cliquez sur le bouton Save (Enregistrer). La boîte de dialogue MP3 Save Options
(Options d’enregistrement en MP3) s’affiche.
6. Sélectionnez l’option souhaitée. Cliquez sur le bouton Help (Aide) pour accéder au
fichier d’aide de cette boîte de dialogue.
7. Cliquez sur OK pour terminer l’enregistrement de votre fichier. Si vous enregistrez
plusieurs fichiers, cette boîte de dialogue apparaît pour chaque fichier
sont enregistrés avec l’extension de fichier .MP3.
REMARQUE : L’encodeur MP3 fourni avec cette version de Cakewalk pyro Audio Creator
est valable 30 jours à partir de la date d’installation du logiciel. Après quoi vous avez le choix
entre maintenir votre abonnement à l’encodeur MP3 via Cakewalk ou utiliser une version
gratuite du logiciel, disponible à partir de nombreuses sources en ligne. Après les 30 premiers
jours, vous disposez toujours des toutes les fonctions d’enregistrement de Cakewalk, ainsi
que de la possibilité d’enregistrer des fichiers aux formats .WAV et .WMA ; cette période
de test ne concerne que la partie du logiciel dédiée à l’encodage en MP3.
mat MP3 :
4), saisissez un nom
rack
. Vos fichiers
Enregistrer des fichiers au format WMA
Il s’agit du format de fichier Microsoft servant à compresser des fichiers. C’est un
format de grande qualité, similaire au for
Enregistrer des fichiers au format WMA :
1. Utilisez la commande File-Save As-WMA (Enregistrer fichier sous WMA) pour
ouvrir la boîte de dialogue Save As (Enregistrer sous).
2. Naviguez jusqu’à l’emplacement où vous souhaitez enregistrer le ou les
nouveau(x) fichier(s) WMA. Si vous enregistrez un seul fichier et n'utilisez pas de
marqueurs pour séparer vos fichiers enregistrés (voir étape suivante), saisissez un
nom pour le nouveau fichier
3. Si vous souhaitez utiliser des marqueurs de piste pour créer des fichiers séparés
lors du processus d’enregistrement, activez la case Use Markers As T
Indicators (Utiliser les marqueurs comme indicateurs de pistes). Chaque marqueur
définit le début d’un nouveau fichier et donne également son nom au nouveau
fichier. Assurez-vous qu’un marqueur est présent au début du projet si vous
voulez que cette partie du projet soit incluse dans le processus d’enregistrement.
4. En général, le champ Channel Format (Format canal) doit être défini sur Stereo
(Stéréo) (sauf si vous souhaitez un fichier mono), la fréquence d’échantillonnage
100 et la profondeur de bit sur 16.
sur 44
5. Cliquez sur le bouton Save (Enregistrer). La boîte de dialogue Windows Media
Format Encode Options (Options d’encodage du format Windows Media) s’af
6. Sélectionnez l’option souhaitée. Cliquez sur le bouton Help (Aide) pour accéder au
fichier d’aide de cette boîte de dialogue.
7. Cliquez sur OK pour terminer l’enregistrement de votre fichier. Si vous enregistrez
plusieurs fichiers, cette boîte de dialogue apparaît pour chaque fichier
sont enregistrés avec l’extension de fichier .wma.
Enregistrer votre projet
Cette commande sert à conserver tous les fichiers et toutes les modifications
apportées à un projet, de sorte que vous puissiez le r
les modifications.
Enregistrer votre projet :
1. Utilisez la commande File-Save As-Project (Enregistrer fichier sous projet) pour
ouvrir la boîte de dialogue Save As (Enregistrer sous).
.
mat MP3.
rack
fiche.
. Vos fichiers
ouvrir plus tard et poursuivre
28
2. Naviguez jusqu’à l’emplacement où vous souhaitez enregistrer votre projet.
3. Saisissez un nom de fichier pour votre projet et cliquez sur Save (Enregistrer).
otre projet est enregistré sous le nom que vous avez choisi, avec une extension
V
de fichier .pac.
Page 29

Graver un CD audio avec Cakewalk pyro Audio
Creator
Aperçu de l’interface utilisateur graphique et
des commandes de pyro Audio Creator
FR
1. Insérez un disque CD-R vierge dans le lecteur cible.
2. Ouvrez le module Burner (Graveur) en cliquant sur le bouton Burner dans la barre
d’outils d’Audio Creator
3. Cliquez sur l’onglet Audio CD Burner (Graveur CD audio).
4. Sélectionnez un lecteur cible permettant la gravure de CD à l'aide de la liste
déroulante Target Drive (Lecteur cible).
5. Cliquez sur Add Track (Ajouter piste) pour rechercher et importer les fichiers
audio à graver sur le CD. Lorsque la boîte de dialogue Open (Ouvrir) s’affiche,
vous pouvez sélectionner plusieurs fichiers à la fois en maintenant la touche Ctrl
enfoncée, tout en sélectionnant les fichiers.
Si les fichiers ne sont pas au format CD (fichiers .wav 16
copies de tous les fichiers sont créées automatiquement puis converties dans ce
format pour la gravure (vous n’avez rien à faire, juste à continuer !).
6. Organisez les pistes dans l’ordre souhaité à l’aide des boutons Move Up
(Déplacer vers le haut) et Move down (Déplacer vers le bas).
7. Vous pouvez supprimer des pistes en les sélectionnant (utiliser Ctrl+clic ou
Shift+clic pour sélectionner plusieurs fichiers à la fois), puis en cliquant sur le
bouton Delete Track (Supprimer piste).
8. Consultez les champs de capacité du disque en bas du module du graveur ou le
graphique de capacité à droite du module, afin de vous assurer que vous n’avez
pas dépassé la capacité de votre disque vierge.
.
bit, 44,1 kHz), des
La barre d’outil constitue votre premier accès aux différents modules d’Audio
Creator. Chaque module (excepté Audio Editor) est dédié à une tâche unique. Vous
accédez à un module en cliquant simplement sur le bouton correspondant dans la
barre d’outils ou en glissant les fichiers sur ce bouton. Vous pouvez également
accéder à l’aide et aux préférences de l’application via la barre d’outils. Audio Creator
est conçu pour être laissé ouvert et en cours d’exécution, la barre d’outils peut donc
être minimisée dans la barre d'état système de Windows.
Le démarrage des tâches principales est simple :
1. Glissez un fichier audio (.mp3, .wav, .wma, etc.) sur le bouton portant le nom de la
tâche que vous souhaitez exécuter
2. Relâchez le fichier sur le bouton.
3. Le module correspondant s’ouvre, le ou les fichier(s) glissé(s) s'affichent.
Lorsque vous cliquez sur le bouton d’un module ou glissez des fichiers dessus, le
bouton devient bleu et reste bleu tant que le module est ouvert. Plusieurs modules
peuvent être ouverts simultanément.
.
9. Cliquez sur Burn CD (Graver CD).
Audio Creator vérifie les pistes, effectue leur mise en forme et copie la liste de
pistes sur le CD situé dans le lecteur sélectionné. Après la fin de la gravure, le
disque est automatiquement éjecté hors du lecteur
.
29
Page 30

Édition de fichiers audio avec pyro Audio Creator
Le module Audio Editor affiche les fichiers sous forme d’ondes (représentations
graphiques de fichiers audio) et vous offre des outils d’édition audio vous permettant
d’effectuer rapidement et simplement des tâches d’édition classiques. La plupart
des outils d’édition audio possèdent de simples fonctionnalités de couper-copiercoller, d’ouverture et de fermeture en fondu et de réglage du volume. Le module
Audio Editor contient en plus de nombreux outils d’édition et commandes
professionnels, qui peuvent vous être utiles. Vous pouvez utiliser des effets plug-in
audio, convertir des profondeurs de bit et des fréquences d’échantillonnage,
normaliser, supprimer le décalage CC, etc.
Installation du logiciel Audacity
(instructions pour Mac OSX et versions supérieures)
1. Avant d’installer le logiciel, assemblez le tourne-disque en suivant les instructions
du Manuel de l’utilisateur fourni avec le tourne-disque AT-LP2D-USB.
2. Branchez le cordon CA de votre tourne-disque dans une prise de courant alternatif.
3. Puis, utilisez le câble USB inclus pour connecter le tourne-disque au port USB de
votre Mac.
4. Si vous possédez des haut-parleurs à alimentation autonome, assurez-vous qu’ils
sont bien branchés sur la sortie audio de votre ordinateur ou sur les prises RCA de
sortie de ligne du tourne-disque A
de votre tourne-disque soit sur ligne. (Audacity possède une fonctionnalité playthrough/contrôle vous permettant d’écouter l’album via votre ordinateur pendant
son enregistrement, mêmes si vous ne disposez pas de haut-parleurs externes.) Si
votre ordinateur possède une sortie écouteurs, vous pouvez choisir de contrôler
votre enregistrement avec les écouteurs.
Câbles
rouge sur rouge
blanc sur blanc
5. Mettez votre ordinateur en marche.
T-LP2D-USB et que le commutateur phono/ligne
30
6. Insérez le CD d’Audacity fourni dans le lecteur CD de votre Mac. Ouvrez l’icône
CD sur votre bureau. Glissez le dossier d’installation d’Audacity dans le dossier
des applications. Lorsque les fichiers sont copiés, éjectez le CD.
Page 31

Configuration de votre MAC (OSX et versions
supérieures) pour pouvoir utiliser le tournedisque AT-LP2D-USB
(Audacity)
1. Ouvrez le programme Audacity.
2. Sélectionnez Preferences (Préférences) dans le menu d’Audacity.
Paramètres audio Macintosh supplémentaires
Les paramètres de lecture et d’enregistrement d’Audacity sont maintenant configurés.
Il reste à définir les paramètres de lecture et d’enregistrement audio Macintosh
séparés.
1. Allez dans Applications (Applications) > Utilities (Outils) > puis sélectionnez et
ouvrez Audio MIDI Setup (Configuration Audio MIDI).
FR
3. Sélectionnez l’onglet Audio I/O (E/S Audio) en haut à gauche.
• Sous Playback (Lecture), Device (Périphérique), sélectionnez Built-in Audio
(Audio intégré).
• Sous Recording (Enregistrement), Device (Périphérique), sélectionnez USB
Audio CODEC (CODEC Audio USB).
• Sous Recording (Enregistrement), Channels (Canaux), sélectionnez 2 (Stereo).
• Cochez la case Software Playthrough (Logiciel Playthrough).
4. Puis sélectionnez l’onglet Quality (Qualité) dans la partie supérieure.
• Fréquence d’échantillonnage par défaut
• Format d’échantillonnage par défaut
• Real-time sample rate converter (Convertisseur de taux d’échantillonnage - En
temps réel)
• High-quality sample rate converter (Convertisseur de taux d’échantillonnage -
Haute qualité)
de haute qualité).
• Real-time dither (T
• High-quality dither (T
• Sélectionnez OK pour enregistrer les paramètres et quittez le menu
Preferences (Préférences).
5. Puis, à partir de la fenêtre principal d’Audacity, sélectionnez la liste déroulante
(flèche pointant vers le bas) à côté du microphone, à la droite de votre écran.
• Si vous ne voyez pas la liste déroulante ou le microphone, retour
menu Preferences (Préférences) (voir étape 2). Sélectionnez l’onglet
Interface (Interface). Cochez Enable Meter Toolbar (Activer barre d’outils
indicateur). Ceci vous permet de visualiser le microphone et la liste
déroulante sur votre écran principal.
: Fast Sinc Interpolation (Interpolation de synchronisation rapide).
: High-quality Sinc Interpolation (Interpolation de synchronisation
ramage - En temps réel) : None (Aucun).
ramage - (Haute qualité) : Triangle (Triangle).
: 44 100 Hz.
: 16 bits.
nez dans le
2. Dans la fenêtre Audio Midi, sous l’onglet Audio Devices (Périphériques audio) :
• sous System Settings (Paramètres systèmes), Default Input (Entrée par
défaut), sélectionnez USB Audio CODEC (CODEC Audio USB).
• sous System Settings (Paramètres systèmes), Properties For (Pr
sélectionnez USB Audio CODEC (CODEC Audio USB).
• sous Default output (Sortie par défaut), sélectionnez Built-in Audio (Audio intégré)
ou Built-in Output (Sortie intégrée).
• Pour System output (Sortie système), sélectionnez Built-in Audio (Audio intégré).
Ceci autorise d'autres programmes (en plus d'Audacity) à utiliser la carte son interne
du Mac comme sortie audio.
opriétés de),
6. Sélectionnez Monitor Input (Entrée moniteur) dans le menu déroulant.
REMARQUE : Vous aurez besoin de sélectionner ce paramètre à chaque lancement
d’Audacity
vous quittez le programme.
. Les autres paramètres sélectionnés plus haut sont enregistrés lorsque
31
Page 32

Installation du logiciel Audacity
(instructions pour PC)
1. Avant d’installer le logiciel, assemblez le tourne-disque en suivant les instructions
du Manuel de l’utilisateur fourni avec le tourne-disque AT-LP2D-USB.
2. Branchez le cordon CA de votre tourne-disque dans une prise de courant alternatif.
3. Puis, utilisez le câble USB fourni pour connecter le tourne-disque au port USB de
votre PC.
Configuration de votre PC pour pouvoir utiliser
Audacity
(Voir Configuration de votre PC pour pouvoir utiliser le tourne-disque AT-LP2D-USB,
page 25.)
REMARQUE : Avant de poursuivre, reportez-vous à la page 25 pour les instructions
importantes sur la configuration de votre PC pour pouvoir utiliser le tourne-disque
T-LP2D-USB.
A
1. Lancez le programme Audacity à partir du menu Start (Démarrer).
4. Si vous possédez des haut-parleurs à alimentation autonome, assurez-vous qu’ils
sont bien branchés sur la sortie audio de votre ordinateur ou sur les prises RCA de
sortie de ligne du tourne-disque A
de votre tourne-disque soit sur ligne. (Audacity possède une fonctionnalité playthrough/contrôle vous permettant d’écouter l’album via votre ordinateur pendant
son enregistrement, mêmes si vous ne disposez pas de haut-parleurs externes.) Si
votre ordinateur possède une sortie écouteurs, vous pouvez choisir de contrôler
votre enregistrement avec les écouteurs.
Câbles
rouge sur rouge
blanc sur blanc
5. Mettez votre ordinateur en marche.
6. Insérez le CD d’Audacity fourni. Une fenêtre Audacity apparaît. Cliquez sur l’icône
Audacity Setup pour installer le programme. Suivez les instructions des fenêtres
contextuelles pour installer le logiciel.
7. Redémarrez votre ordinateur.
T-LP2D-USB et que le commutateur phono/ligne
2. Sélectionnez Preference (Préférences) dans l'onglet Edit (Édition), dans le menu
d’Audacity
3. Sélectionnez l’onglet Audio I/O (E/S Audio) en haut à gauche.
4. Puis sélectionnez l’onglet Quality (Qualité) dans la partie supérieure.
5. Puis, à partir de la fenêtre principal d’Audacity, sélectionnez la liste déroulante
(flèche pointant vers le bas) à côté du microphone, au milieu votre écran.
.
• Sous Playback (Lecture), Device (Périphérique), sélectionnez votre carte son
interne.
• Sous Recording (Enregistrement), Device (Périphérique), sélectionnez USB
Audio CODEC (CODEC Audio USB).
• Sous Recording (Enregistrement), Channels (Canaux), sélectionnez 2 (Stereo).
• Cochez la case Software Playthrough (Logiciel Playthrough).
• Fréquence d’échantillonnage par défaut
• Format d’échantillonnage par défaut
• Real-time sample rate converter (Convertisseur de taux d’échantillonnage - En
temps réel)
• High-quality sample rate converter (Convertisseur de taux d’échantillonnage Haute qualité)
de haute qualité).
• Real-time dither (T
• High-quality dither (T
• Sélectionnez OK pour enregistrer les paramètres et quittez le menu
Prefer
• Si vous ne voyez pas la liste déroulante ou le microphone représentés
ci-dessus, retournez dans le menu Prefer
Sélectionnez l’onglet Interface (Interface). Cochez Enable Meter
T
oolbar (Activer barre d’outils indicateur). Ceci vous permet de visualiser
le microphone et la liste déroulante sur votre écran principal.
• Sélectionnez Monitor Input (Entrée moniteur) dans le menu déroulant.
REMARQUE : Vous aurez besoin de sélectionner ce paramètre à chaque
lancement d’Audacity
enregistrés lorsque vous quittez le programme.
: Fast Sinc Interpolation (Interpolation de synchronisation rapide).
: High-quality Sinc Interpolation (Interpolation de synchronisation
ramage - En temps réel) : None (Aucun).
ramage - Haute qualité) : Triangle (Triangle).
ences (Préférences).
. Les autres paramètres sélectionnés plus haut sont
: 44 100 Hz.
: 16 bits.
ences (Préférences) (voir étape 2)
32
Page 33

Enregistrement d’albums avec Audacity
En savoir plus sur Cakewalk pyro Audio Creator
FR
Pour prendre en main Audacity, suivez les instructions ci-dessous. Pour obtenir des
informations plus détaillées sur l’enregistrement de disques et de projets, consultez
le manuel d’Audacity en ligne sur
et les tutoriaux en ligne sur http://audacity.sourceforge.net/help/tutorials.
1. Enregistrer un projet
• Audacity écrit toutes les données audio modifiées et enregistrées, dans le répertoire
Projectname_data, situé à l’emplacement où vous avez enregistré le fichier du
projet.
• Puis, sélectionnez Save project as (Enregistrer projet sous) à partir de l’onglet
Audacity File (Fichier Audacity) et choisissez un emplacement et un nom pour
votre projet.
• V
euillez noter que lorsque vous démarrez Audacity, seule l’option de menu
« Save As... » (« Enregistrer sous... ») est disponible.
2. Comment enregistrer
• Configurez votre tourne-disque USB pour lire les musiques ou albums que vous
souhaitez enregistrer
• Cliquez sur le bouton rouge Record (Enregistrer) pour démarrer l’enregistrement.
Abaissez le bras de lecture du tourne-disque USB sur l’album et la piste à
enregistrer.
• Cliquez sur le bouton bleu Pause (Pause) pour mettre en pause l’enregistrement.
Appuyer à nouveau dessus pour poursuivre l’enregistrement.
• Cliquez sur le bouton jaune Stop (Stop).
C’est terminé. Vous pouvez maintenant lire comme vous le souhaitez votre
enregistrement et explorer les fonctions d’éditions d’Audacity. Souvenez-vous que
vous pouvez utiliser la fonction Undo (Annuler) presque sans limite, tant que le projet
est ouvert.
.
http://audacity.sourceforge.net/manual-1.2/index.html
Cakewalk pyro Audio Creator propose de nombreuses fonctions de filtrage et/ou
d’édition, telles que l’élimination des grésillements, crépitements et craquements, la
suppression des souffles et ronflements et autres bruits, de vos enregistrements.
Ces fonctions sont décrites en détail dans le guide de l’utilisateur se trouvant dans la
fenêtre d’aide de pyro Audio Creator (sur le CD Cakewalk pyro Audio Creator fourni
avec le tourne-disque AT-LP2D-USB). Si vous avez besoin d’aide, contactez Cakewalk
sur www.cakewalk.com/support.
En savoir plus sur Audacity
Pour obtenir des informations plus détaillées sur l’utilisation d’Audacity, consultez le
manuel Audacity en ligne sur http://audacity.sourceforge.net/manual-1.2/index.html
et les tutoriaux en ligne sur http://audacity.sourceforge.net/help/tutorials.
REMARQUE : Il n’est pas possible de graver les CD directement à partir du logiciel
Audacity
. Vous devez pour cela utiliser d’autres logiciels.
33
Page 34

Tornamesas AT-LP2D-USB
Contenido
Nota sobre el software ....................................................................................................34
Requisitos del sistema ....................................................................................................34
Instalación de Cakewalk pyro Audio Creator software (sólo para PC) ......................35
Configuración del PC (con Windows XP) para trabajar con el tornamesas
AT-LP2D-USB ....................................................................................................................35
Configuración del PC (con Windows Vista) para trabajar con el tornamesas
AT-LP2D-USB ....................................................................................................................36
Grabación de álbumes y CD con Cakewalk pyro Audio Creator ................................36
Almacenamiento de archivos de audio con pyro Audio Creator ................................37
Almacenamiento de archivos en formato Wave........................................................37
Almacenamiento de archivos en formato MP3 ........................................................38
Almacenamiento de archivos en formato WMA ......................................................38
Almacenamiento del proyecto ....................................................................................38
Grabación de un CD de audio con Cakewalk pyro Audio Creator ..............................39
Descripción general de los controles y la interfaz de usuario de
pyro Audio Creator ..........................................................................................................39
Edición de audio en pyro Audio Creator........................................................................40
Instalación del software Audacity (para Mac OSX y versiones superiores) ..............40
Configuración del MAC (con OSX o versiones superiores) para trabajar
con el tornamesas AT-LP2D-USB ....................................................................................41
Parámetros de audio de Macintosh adicionales ..........................................................41
Instalación del software Audacity software (para PC) ................................................42
Configuración del PC par trabajar con Audacity ..........................................................42
Grabación de álbumes con Audacity .............................................................................43
Para obtener más información........................................................................................43
Nota sobre el software
Su tornamesas AT-LP2D-USB de Audio-Technica viene con el software de grabación pyro
Audio Creator de Cakewalk y Audacity. Tenga en cuenta que otros paquetes de software de
grabación de terceros también son compatibles con este tornamesas.
Recomendamos Cakewalk pyro Audio Creator como software para PC por su facilidad de
uso y versatilidad de grabación. Permite crear archivos MP3, WAV y WMA, así como eliminar
los chasquidos, estallidos y crepitaciones de los ruidosos LP gracias a DeClicker; limpiar
seseos, zumbidos y otras molestias de los LP con DeNoiser.
NOTA: el descodificador MP3 que se incluye con esta versión de Cakewalk Pyro Audio
Creator es válido durante un período de 30 días a partir de la fecha de instalación del software.
Transcurrido ese período, puede elegir continuar con la suscripción al descodificador MP3 a
través de Cakewalk o utilizar una versión gratuita disponible a través de distintos sitios en
Internet. Tras los primeros 30 días, dispondrá de todas las funciones de grabación de
Cakewalk, incluida la capacidad de guardar en los formatos de archivo .WAV y .WMA; este
período de prueba sólo afecta a la parte del software relativa a la descodificación MP3.
Audacity, se incluye para los usuarios de Mac (también funciona con Windows) y es un
software gratuito distribuido por Licencia Pública General GNU (GNU GPL). Encontrará más
información y además del código fuente abierto en el CD de Audacity que se incluye, así
como en el sitio Web de Audacity: http://audacity.sourceforge.net. Para tutoriales, visite
http://audacity.sourceforge.net/help/tutorials.
Requisitos del sistema
PC o Mac con un puerto USB disponible (USB1.1 o posterior)
Grabadora de CD-R o CD-RW para grabar CD y realizar la instalación
Requisitos de Cakewalk pyro Audio Creator™:
PC con Windows XP / Vista / Vista x64*
*necesario para ejecutar la edición de 64 bits de Pyro Audio Creator
1 GB de espacio libre en disco
NOTA: PYRO no es compatible con computadoras Mac o basadas en Apple, ni con
Windows 98/98SE/Me/95 o NT
34
Requisitos de Audacity:
Mac con OSX o superior, o
PC con Windows (XP y versiones posteriores)
Page 35

Instalación del software Cakewalk
pyro Audio Creator
1. Antes de instalar el software, monte el tornamesas siguiendo las instrucciones
incluidas en el Manual del usuario del tornamesas AT-LP2D-USB.
2. Conecte el cable de CA del tornamesas al enchufe de alimentación de CA.
3. A continuación, utilice el cable USB que se incluye para conectar el tornamesas al
puerto USB del PC.
4. Asegúrese de que los altavoces autoalimentados están conectados en las tomas
RCA de salida de línea del tornamesas A
Phono/Line (Fono/línea) del tornamesas está en la posición Line (Línea).
(sólo para PC)
T-LP2D-USB, y que el conmutador
Configuración del PC (con Windows XP) para
trabajar con el tornamesas AT-LP2D-USB
(válida para los dos paquetes de software que se incluyen con el tornamesas:
pyro Audio Creator y Audacity)
1. Cierre todos los programas en ejecución de su computadora.
2. Start menu > Control Panel > Sounds and Audio Devices (Menú Inicio >
Panel de control > Dispositivos de sonido y audio)
• Seleccione el menú Start (Inicio). Elija Control Panel (Panel de control).
•
Seleccione Sounds and Audio Devices (Dispositivos de sonido y audio).
3. Aparece el cuadro de diálogo “Sounds and Audio Devices Properties” (Propiedades
de Dispositivos de sonido y audio):
ES
Cables
Rojo con rojo
Blanco con blanco
Mediante el cable adaptador hembra de 3,5 mm a RCA, puede enchufar un par de
auriculares directamente a la salida de línea del tornamesas. Esto le facilitará un
mayor control mientras realiza la grabación, aunque no podrá ajustar el nivel (volumen)
de los auriculares, ya que el tornamesas tiene un nivel de salida constante.
Cables
Rojo con rojo
Blanco con negro
Cualquiera de las conexiones al tornamesas (altavoces o auriculares) le permitirán
controlar el álbum que esté grabando. NOTA: el sistemas funcionará sin altavoces
ni auriculares. Tanto pyro Audio Creator como Audacity ofrecen una función de
reproducción/control que permite escuchar el álbum a través de la computadora
mientras se realiza la grabación.
5. Encienda la computadora. La computadora mostrará un mensaje de detección para
indicar que se ha conectado un nuevo dispositivo.
6. Inserte el CD de Cakewalk pyro Audio Creator que se incluye. Aparecerá una
ventana de reproducción automática del asistente para hardware nuevo encontrado
para Audio Creator
programa), en función de lo que desee hacer. Siga las instrucciones de la ventanas
emergentes para instalar o ejecutar el software.
. Haga clic en Install (Instalar) o en Run program (Ejecutar
4. Seleccione la ficha Voice (Voz).
• En el área Voice playback (Reproducción de voz), seleccione la tarjeta de
sonido interna de la computadora (ni USB Audio CODEC [CÓDEC de audio
USB]; ni Microsoft Sound Mapper [Asignador de sonidos de Microsoft]).
• En el área Voice recording (Grabación de voz) de la ventana, seleccione
USB Audio CODEC (CÓDEC de audio USB). Haga clic en Apply (Aplicar).
NOTA: si no aparece la opción “USB Audio CODEC” (CÓDEC de audio USB),
compruebe que el cable USB está conectado correctamente en el puerto USB.
5. A continuación, seleccione la ficha Audio.
• En el área Sound playback (Reproducción de sonido) de la ventana, seleccione
la tarjeta de sonido interna de la computadora.
• En el área Voice recording (Grabación de voz) de la ventana, seleccione
USB Audio CODEC (CÓDEC de audio USB)
• Active la siguiente casilla: Use only default devices (Usar sólo dispositivos
predeterminados).
• Haga clic en Apply (Aplicar) y, a continuación, en OK (Aceptar).
7. Reinicie la computadora.
35
Page 36

Configuración del PC (con Windows Vista) para
trabajar con el tornamesas AT-LP2D-USB
(válida para los dos paquetes de software que se incluyen con el tornamesas:
pyro Audio Creator y Audacity)
t menu > Control Panel > Sound (Menú Inicio > Panel de control > Sonido)
1. Star
Seleccione el menú Start (Inicio). Seleccione Control Panel (Panel de control)
(vista clásica).
2. Haga doble clic en Sound (Sonido).
3. Seleccione la ficha Recording (Grabación). Asegúrese de que USB Audio
CODEC (CÓDEC de audio USB) está definido como dispositivo de grabación
predeterminado. (Debe apar
Audio CODEC.)
NOTA: si no aparece la opción “USB Audio CODEC” (CÓDEC de audio USB),
compruebe que el cable USB está conectado correctamente en el puerto USB.
ecer una marca de verificación verde junto a USB
Grabación de álbumes y CD con Cakewalk
pyro Audio Creator
A continuación se indican las instrucciones básicas para utilizar Cakewalk pyro Audio
Creator. Para obtener una información más completa, consulte, el menú Help
yuda) del programa Cakewalk pyro Audio Creator.
(A
1. Abra la aplicación Cakewalk pyro Audio Creator. Inicialmente aparecen dos
pantallas: la pantalla de bienvenida (ayuda) de pyro Audio Creator y la pantalla del
programa. Si lo desea, puede minimizar o cerrar la pantalla de bienvenida.
2. A continuación, abra el cuadro de diálogo Audio Options (Opciones de audio)
haciendo clic en el botón Options (Opciones) de la barra de herramientas de
Audio Creator
grabación), seleccione la versión estéreo. En Audio Options (Opciones de audio),
asegúrese de que como dispositivo de Playback (Reproducción) tiene definidos
los altavoces de la tarjeta de sonido interna (normalmente aparecen en primer
lugar en la lista). Haga clic en OK (Aceptar) para cerrar el cuadro dé diálogo.
, y en la ficha General del campo Recording Device (Dispositivo de
4. Seleccione la ficha Playback (Reproducción). Seleccione los altavoces de la
tarjeta de sonido interna (normalmente aparecen en primer lugar en la lista).
5. Haga clic en Apply (Aplicar) y, a continuación, en OK (Aceptar).
6. Cierre el Control Panel (Panel de control).
3. A continuación, haga clic en el botón Editor. Para controlar la grabación, haga clic
en el botón Input Monitor (Control de entrada) de la parte inferior izquierda de la
ventana.
4. A continuación, haga clic en el botón Record (Grabar) del Audio Editor (Editor
de audio), reproduzca el disco y observe los medidores de grabación.
5. Durante la grabación deben aparecer en pantalla dos formas de onda (estéreo
izquierda y derecha).
6. Ya está listo para grabar. Haga clic en el botón Record (Grabar) para comenzar a
grabar
, desactive el botón Pause (Pausa); reproduzca su disco. Haga clic en Stop
(Parar) cuando el disco haya finalizado.
7. Consulte la siguiente sección para obtener información sobre cómo guardar el
archivo de audio.
36
Page 37

Almacenamiento de archivos de audio con pyro Audio Creator
ES
Audio Creator tiene dos comandos que permiten guardar: Save (Guardar) y Save
As (Guardar como). Utilice el comando Save As (Guardar como) (en realidad el
comando es File-Save As [Archivo-Guardar como]) para guardar los archivos
cuando haya terminado de editarlos. Este comando permite crear nuevos archivos
que incluyen todos los cambios realizados en el Audio Editor (Editor de audio) y
mismo tiempo, permite convertir los archivos a formatos distintos para publicarlos
en la Web, crear CD, etc.
NOTA: cuando guarde un archivo, resulta conveniente hacerlo con un nombre distin-
to al archivo original. Esto le permite conservar el archivo original.
Cuando desee guardar los archivos, puede hacerlo en varios formatos distintos:
• W
ave (extensión de archivo .wav): se trata del formato de CD.
• MP3 (extensión de archivo .mp3).
• WMA (extensión de archivo .wma): se trata del formato de compresión de
archivos de Microsoft, similar al formato MP3.
• Project (extensión de archivo .pac): esta opción no crea nuevos archivos de
audio, sino que conserva el estado de proyecto que está editando para que
pueda abrirlo en otro momento y continuar donde lo dejó.
, al
Almacenamiento de archivos en formato Wave
Este es el formato que se utiliza cuando desea grabar un archivo o archivos en un
CD. Al guardar un archivo en este formato, todos los clips de audio y/o archivos del
proyecto se guardan como un sólo archivo wave. Sin embargo, si añade marcadores
entre los distintos archivo en Audio Editor (Editor de audio), puede elegir guardar
archivos separados que comiencen en cada marcador
Para guardar archivos en formato Wave:
1. Utilice el comando File-Save As-Wav (Archivo-Guardar como-Wav) para abrir el
cuadro de diálogo Save As (Guardar como).
2. Desplácese hasta la ubicación donde desea guardar los nuevos archivos Wave, y
si solamente va a guardar un archivo y no va a utilizar marcadores para separar los
archivos guardados (paso siguiente), escriba el nombre del nuevo archivo.
3. Si desea utiliza marcadores de pistas para crear archivos distintos durante el
proceso de almacenamiento, active la casilla de verificación Use Markers As T
Indicators (Utilizar marcadores como indicadores de pistas). Cada marcador indica
el inicio de un nuevo archivo y además le da nombre. Asegúrese de que tiene un
marcador al principio del proyecto si desea que esa parte del mismo se incluya en
el proceso de almacenamiento.
4. Asegúrese de que el campo Channel Format (Formato de canal) está definido a
Stereo (Estéreo) (a menos que desee un archivo mono), el valor de Sample Rate
(Frecuencia de muestreo) es 44100, y el de Bit Depth (Profundidad de bit) es 16.
5. Si desea agregar este archivo o archivos a la lista Audio CD Track (Pistas de CD de
audio), active la casilla de verificación Add to Audio CD Track List (Agregar a la
lista de pistas de CD de audio).
NOTA: si elige agregar archivos a la lista de pistas de CD de audio, se crean y se
añaden a la lista de manera automática copias de los archivos en el formato
adecuado para grabar CD. No tendrá que preocuparse de elegir las opciones de
formato de archivo correctas para la grabación de CD.
.
rack
6. Haga clic en el botón Save (Guardar). Aparece una barra de progreso mientras se
guardan los archivos. Cada uno de los archivos que guarde tendrá la extensión .wav
.
37
Page 38

Almacenamiento de archivos de audio con pyro Audio Creator
Almacenamiento de archivos en formato MP3
Este es un formato de compresión de archivos muy popular, que permite enviarlos a
través de Internet o prepararlos para su repr
Para guardar archivos en formato MP3:
1. Utilice el comando File-Save As-MP3 (Archivo-Guardar como-MP3) para abrir el
cuadro de diálogo Save As (Guardar como).
2. Desplácese hasta la ubicación donde desea almacenar los nuevos archivos MP3, y
si solamente va a guardar un archivo y no va a utilizar marcadores para separar los
archivos guardados (véase el paso 4), escriba el nombre del nuevo ar
3. Normalmente el campo Channel Format (Formato de canal) debe estar definido en
Stereo (Estéreo) (a menos que desee un archivo mono), el valor de Sample Rate
(Frecuencia de muestreo) en 44100, y el de Bit Depth (Profundidad de bit) en 16.
4. Si desea utiliza marcadores de pistas para crear archivos distintos durante el
proceso de almacenamiento, active la casilla de verificación Use Markers As T
Indicators (Utilizar marcadores como indicadores de pistas). Cada marcador indica
el inicio de un nuevo archivo y además le da nombre. Asegúrese de que tiene un
marcador al principio del proyecto si desea que esa parte del mismo se incluya en
el proceso de almacenamiento.
5. Haga clic en el botón Save (Guardar). Aparece el cuadro de diálogo MP3 Save
Options (Opciones de almacenamiento de MP3).
6. Seleccione las opciones que desee. Haga clic en el botón Help (Ayuda) para abrir
el archivo de ayuda correspondiente a este cuadro de diálogo.
7. Haga clic en OK (Aceptar) para terminar de guardar el archivo. Si va a guardar
varios archivos, este cuadro de diálogo aparecerá una vez para cada uno de los
archivos. Los archivos se guardan con la extensión .MP3.
NOTA: el descodificador MP3 que se incluye con esta versión de Cakewalk Pyro Audio
Creator es válido durante un período de 30 días a partir de la fecha de instalación del software.
Transcurrido ese período, puede elegir continuar con la suscripción al descodificador MP3 a
través de Cakewalk o utilizar una versión gratuita disponible a través de distintos sitios en
Internet. Tras los primeros 30 días, dispondrá de todas las funciones de grabación de
Cakewalk, incluida la capacidad de guardar en los formatos de archivo .WAV y .WMA; este
período de prueba sólo afecta a la parte del software relativa a la descodificación MP3.
oducción en reproductores portátiles.
chivo.
rack
Almacenamiento de archivos en formato WMA
Este es el formato de compresión de archivos de Microsoft. Se trata de un formato
de alta calidad, similar al MP3.
Para guardar archivos en formato WMA:
1. Utilice el comando File-Save As-WMA (Archivo-Guardar como-WMA) para abrir
el cuadro de diálogo Save As (Guardar como).
2. Desplácese hasta la ubicación donde desea almacenar los nuevos archivos WMA,
y si solamente va a guardar un archivo y no va a utilizar marcadores para separar los
archivos guardados (véase el paso siguiente), escriba el nombre del nuevo archivo.
3. Si desea utiliza marcadores de pistas para crear archivos distintos durante el
proceso de almacenamiento, active la casilla de verificación Use Markers As T
Indicators (Utilizar marcadores como indicadores de pistas). Cada marcador indica
el inicio de un nuevo archivo y además le da nombre. Asegúrese de que tiene un
marcador al principio del proyecto si desea que esa parte del mismo se incluya en
el proceso de almacenamiento.
4. Normalmente el campo Channel Format (Formato de canal) debe estar definido en
Stereo (Estéreo) (a menos que desee un ar
(Frecuencia de muestreo) en 44100, y el de Bit Depth (Profundidad de bit) en 16.
5. Haga clic en el botón Save (Guardar). Aparece el cuadro de diálogo Windows
Media Format Encode Options (Opciones de codificación del formato de Windows
Media).
6. Seleccione las opciones que desee. Haga clic en el botón Help (Ayuda) para abrir
el archivo de ayuda correspondiente a este cuadro de diálogo.
7. Haga clic en OK (Aceptar) para terminar de guardar el archivo. Si va a guardar
varios archivos, este cuadro de diálogo aparecerá una vez para cada uno de los
archivos. Los archivos se guardan con la extensión .wma.
Almacenamiento del proyecto
Este comando simplemente conserva todos los archivos y modificaciones que haya
realizado a un proyecto, de manera que pueda abrirlo en otro momento y continuar
editándolo.
Para guardar el proyecto:
1. Utilice el comando File-Save As-Project (Archivo-Guardar como-Proyecto) para
abrir el cuadro de diálogo Save As (Guardar como).
chivo mono), el valor de Sample Rate
rack
38
2. Desplácese a la ubicación en la que desea almacenar el proyecto.
3. Escriba un nombre de archivo para el proyecto y haga clic en Save (Guardar). El
proyecto se guarda con el nombr
e elegido y con la extensión .pac.
Page 39

Grabación de un CD de audio con Cakewalk
pyro Audio Creator
Descripción general de los controles y la interfaz
de usuario de pyro Audio Creator
ES
1. Introduzca un disco CD-R virgen en la unidad de destino.
2. Abra el módulo de grabación haciendo clic en el botón Burner (Grabador) de la
barra de herramientas de Audio Creator
3. Haga clic en la ficha Audio CD Burner (Grabador de CD de audio).
4. Seleccione una unidad de CD de destino en la lista desplegable Target Drive
(Unidad de destino).
5. Haga clic en Add Track (Agregar pista) para ubicar e importar los archivos de
audio que desea grabar en CD. Cuando aparezca el cuadro de diálogo Open (Abrir),
puede seleccionar varios archivos manteniendo pulsada la tecla Ctrl mientras hace
clic en los archivos.
Si los archivos no están en formato de CD (archivos .wav de 16
se crean y convierten de forma automática copias de los archivos para fines de
grabación (no es necesario que haga nada).
6. Sitúe las pistas en el orden deseado mediante los botones Move Up (Mover
arriba) y Move Down (Mover abajo).
7. Para eliminar pistas, selecciónelas (utilice la combinación Ctrl+clic del ratón o
Mayús+clic del ratón para seleccionar varios archivos) y haga clic en el botón
Delete Track (Eliminar pista).
8. Compruebe los campos de capacidad del disco en la parte inferior del módulo de
grabación o el gráfico de capacidad de la parte derecha del mismo para asegurarse
de que no supera la capacidad del disco virgen.
.
bits, 44.1 kHz ),
La barra de herramientas es el principal punto de acceso a los distintos módulos de
Audio Creator. Cada módulo (excepto el Audio Editor) está dedicado a una única
tarea. Para acceder a un módulo basta con hacer clic en el botón correspondiente de
la barra de herramientas o arrastrar archivos hasta el botón. La barra de herramientas
también permite acceder a la ayuda de la aplicación y a las preferencias. Audio
Creator debe permanecer abierto y en ejecución, por lo tanto puede minimizar la
barra de herramientas en la bandeja del sistema de Windows.
Iniciar las tareas principales es bien sencillo:
1. Arrastre un archivo de audio (.mp3, .wav, .wma, etc.) hasta el botón que tiene el
nombre de la tarea que desea realizar
2. Suelte el archivo sobre el botón.
3. En ese momento se abrirá el módulo correspondiente a esa tarea, y mostrará el
archivo o archivos que haya arrastrado.
Cuando hace clic en el botón de un módulo, o arrastra archivos hasta él, el botón se
vuelve azul y permanece en ese color mientras el módulo esté abierto. Puede tener
más de un módulo abierto de forma simultánea.
.
9. Haga clic en Burn CD (Grabar CD).
Audio Creator comprueba las pistas, se asegura del formato y graba la lista de
pistas actual en el CD situado en la unidad seleccionada. Cuando finalice el proceso
de grabación del disco, se expulsa de la unidad.
39
Page 40

Edición de audio en pyro Audio Creator
El módulo Audio Editor (Editor de audio) muestra los archivos como formas de onda
(representaciones gráficas de los archivos de audio) y pone a su disposición sencillas
herramientas de edición de audio que le permitirán realizar las tareas de edición más
comunes de manera fácil y rápida. La mayoría de las tareas de edición de audio se
reducen a operaciones de cortar y pegar, agregar efectos fade-in (aumento progresivo)
y fade-out (disminución progresiva), y ajustar el volumen. Sin embargo el módulo
Audio Editor también contiene un gran número de herramientas y edición y comandos
de nivel profesional que puede utilizar si las necesita. Puede utilizar efectos plug-in
audio, convertir profundidades de bits y frecuencias de muestreo, eliminar el desfase
de CC y mucho más.
Instalación del software Audacity
(instrucciones para Mac OS X y versiones superiores)
1. Antes de instalar el software, monte el tornamesas siguiendo las instrucciones
incluidas en el Manual del usuario del tornamesas AT-LP2D-USB.
2. Conecte el cable de CA del tornamesas al enchufe de alimentación de CA.
3. A continuación, utilice el cable USB que se incluye para conectar el tornamesas al
puerto USB del Mac.
4. Si dispone de altavoces autoalimentados externos, asegúrese de que están
conectados en las entradas de audio de al computadora o en los conectores RCA
de salida de línea del tornamesas A
(Fono/Línea) del tornamesas está en la posición Line (Línea). (Audacity ofrece una
función de reproducción que permite escuchar el álbum a través de la computadora
mientras se realiza la grabación, incluso si no dispone de auriculares externos.) Si
su computadora tiene una entrada de auriculares, puede supervisar la grabación a
través de los auriculares.
Cables
Rojo con rojo
Blanco con blanco
5. Encienda la computadora.
T-LP2D-USB, y que el conmutador Phono/Line
40
6. Inserte el CD de Audacity en la unidad de CD del Mac. Abra el icono CD del
escritorio. Arrastre la carpeta de instalación de Audacity a la carpeta de aplicaciones.
Cuando se hayan copiado los archivos, extraiga el CD.
Page 41

Configuración del MAC (con OSX o superior)
para trabajar con el tornamesas AT-LP2D-USB
(Audacity)
1. Abra el programa Audacity.
Parámetros de audio de Macintosh adicionales
Ya hemos configurado los valores de reproducción y grabación de Audacity. Ahora
es el momento de definir los distintos valores de reproducción y grabación de audio
de Macintosh.
ES
2. Seleccione Preferences (Preferencias) en el menú Audacity.
3. Seleccione la ficha Audio I/O (Audio E/S) en la parte superior izquierda.
• En Playback (Reproducción), Device (Dispositivo), seleccione Built-in Audio
(Audio incorporado)
• En Recording (Grabación), Device (Dispositivo), seleccione USB Audio
CODEC (CÓDEC de audio USB).
• En Recording (Grabación), Channels (Canales), seleccione 2 (Stereo)
(2 [Estéreo]).
• Active la casilla Software Playthrough (Reproducir a través del software).
4. A continuación, seleccione Quality (Calidad) en la parte superior.
• Default Sample Rate (Frecuencia de muestreo predeter
• Default Sample Format (Formato de muestra predeter
• Real-time sample rate converter (Conversor de frecuencia de muestreo - T
real): Fast Sinc Interpolation (Interpolación de sincronía rápida).
• High-quality sample rate converter (Conversor de frecuencia de muestreo - Alta
calidad): High-quality Sinc Interpolation (Interpolación de sincronía de
alta calidad).
• Real-time dither (Fusión - T
•
High-quality dither (Fusión - Alta calidad): Triangle (Triángulo).
• Seleccione OK (Aceptar) para guardar los valores y salir del menú
Preferences (Preferencias).
5. A continuación, desde la ventana principal de Audacity, seleccione el cuadro
desplegable (la flecha que apunta hacia abajo) junto al micrófono, en el lado
derecho de la pantalla.
• Si no ve el cuadro desplegable o el micrófono, vuelva al menú Preferences
(Prefer
encias) (véase el paso 2). Seleccione la ficha Interface
(Inter
faz). Active Enable Meter Toolbar (Activar barra de herramientas de
medidor). De esta forma podrá ver el micrófono con la casilla desplegable en
la pantalla principal.
iempo real): None (Ninguno).
minada): 44100 Hz.
minado): 16 bits.
iempo
1. Vaya a Applications > Utilities > (Aplicaciones > Utilidades) y, a continuación
seleccione y abra Audio MIDI Setup (Configuración de MIDI de audio).
2. En la ventana Audio Midi (Midi de audio), bajo la ficha Audio Devices
(Dispositivos de audio), seleccione lo siguiente:
• En System Settings (Configuración del sistema), Default Input (Entrada
predeterminada), seleccione USB Audio CODEC (CÓDEC de audio USB).
• En System Settings (Configuración del sistema), Properties For (Propiedades
para), seleccione USB Audio CODEC (CÓDEC de audio USB).
• En Default output (Salida predeterminada), seleccione Built-in Audio (Audio
incorporado) o Built-in Output (Salida incorporada).
• En System output (Salida del sistema), Device (Dispositivo), seleccione
Built-in Audio (Audio incorporado).
Esto permitirá que otros programas (además de Audacity) utilicen la tarjeta de sonido
interna del Mac como la salida de audio.
6. Seleccione Monitor Input (Entrada de monitor) en el menú desplegable. NOTA:
tendrá que seleccionar este valor cada vez que inicie Audacity. El resto de valores
seleccionados anteriormente se guardarán al salir del programa.
41
Page 42

Instalación del software Audacity
(instrucciones para PC)
Configuración del PC par trabajar con Audacity
(Consulte el apartado Configuración del PC para trabajar con el tornamesas
AT-LP2D-USB, en la página 35.)
1. Antes de instalar el software, monte el tornamesas siguiendo las instrucciones
incluidas en el Manual del usuario del tornamesas AT-LP2D-USB.
2. Conecte el cable de CA del tornamesas al enchufe de alimentación de CA.
3. A continuación, utilice el cable USB que se incluye para conectar el tornamesas al
puerto USB del PC.
4. Si dispone de altavoces autoalimentados externos, asegúrese de que están
conectados en las entradas de audio de al computadora o en los conectores RCA
de salida de línea del tornamesas A
(Fono/Línea) del tornamesas está en la posición Line (Línea). (Audacity ofrece una
función de reproducción que permite escuchar el álbum a través de la computadora
mientras se realiza la grabación, incluso si no dispone de auriculares externos.) Si
su computadora tiene una entrada de auriculares, puede supervisar la grabación a
través de los auriculares.
Cables
Rojo con rojo
Blanco con blanco
5. Encienda la computadora.
6. Inserte el CD de Audacity incluido. Aparecerá una ventana de Audacity. Haga
clic en el icono Audacity Setup (Instalación de Audacity) para iniciar la
instalación. Siga las instrucciones de la ventanas emergentes para instalar
el software.
7. Reinicie la computadora.
T-LP2D-USB, y que el conmutador Phono/Line
NOTA: consulte la página 35 para obtener instrucciones importantes sobre cómo
configurar el PC para trabajar con el tornamesas A
1. Inicie el programa Audacity desde el menú Start (Inicio).
2. Seleccione Preferences (Preferencias) en la ficha Edit (Editar) del menú Audacity.
3. Seleccione la ficha Audio I/O (Audio E/S) en la parte superior izquierda.
• En Playback (Reproducción), Device (Dispositivo), seleccione, su tarjeta de
sonido interna.
• En Recording (Grabación), Device (Dispositivo), seleccione USB Audio
CODEC (CÓDEC de audio USB).
• En Recording (Grabación), Channels (Canales), seleccione 2 (Stereo)
(2 [Estéreo]).
• Active la casilla Software Playthrough (Reproducir a través del software).
4. A continuación, seleccione Quality (Calidad) en la parte superior.
• Default Sample Rate (Frecuencia de muestreo predeter
• Default Sample Format (Formato de muestra predeter
• Real-time sample rate converter (Conversor de frecuencia de muestreo T
iempo real): Fast Sinc Interpolation (Interpolación de sincronía rápida).
• High-quality sample rate converter (Conversor de frecuencia de muestreo Alta calidad): High-quality Sinc Interpolation (Interpolación de sincronía
de alta calidad).
• Real-time dither (Fusión - T
• High-quality dither (Fusión - Alta calidad): Triangle (Triángulo).
• Seleccione OK (Aceptar) para guardar los valores y salir del menú
Preferences (Preferencias).
iempo real): None (Ninguno).
T-LP2D-USB antes de continuar.
minada): 44100 Hz.
minado): 16 bits.
42
5. A continuación, desde la ventana principal de Audacity, seleccione el cuadro
desplegable (la flecha que apunta hacia abajo) junto al micrófono, cerca de la parte
central de la pantalla.
• Si no ve el cuadro desplegable o la representación del micrófono, vuelva al
menú Preferences (Pr
Interface (Interfaz). Active Enable Meter Toolbar (Activar barra de
herramientas de medidor). De esta forma podrá ver el micrófono con la
casilla desplegable en la pantalla principal.
• Seleccione Monitor Input (Entrada de monitor) en el menú desplegable.
NOTA: tendrá que seleccionar este valor cada vez que inicie Audacity. El resto
de valores seleccionados anteriormente se guardarán al salir del programa.
eferencias) (véase al paso 2). Seleccione la ficha
Page 43

Grabación de álbumes con Audacity
Para comenzar a utilizar Audacity, siga las siguientes instrucciones. Para obtener
información detallada sobre la grabación y el almacenamiento de proyectos, consulte
el manual en línea de Audacity en http://audacity.sourceforge.net/manual-1.2/index.html
y los tutoriales en línea detallados en http://audacity.sourceforge.net/help/tutorials.
1. Almacenamiento de un proyecto
• Audacity copia todo el audio modificado y grabado en un directorio llamado
Projectname_data, que se encuentra en la ubicación en la que se almacena el
p
ropio proyecto.
• A continuación, seleccione Save project as (Guardar proyecto como) en la ficha
Audacity File (Archivo Audacity) y elija la ubicación y el nombre de archivo para el
royecto.
p
• Tenga en cuenta que al iniciar Audacity por primera vez, sólo está disponible la
opción “Save As...” (Guardar como...).
2. Grabación
• Prepare el tornamesas USB para que reproduzca la canción o el álbum que
desea grabar
• Haga clic en el botón Record (Grabar) para iniciar la grabación.
• Sitúe el brazo de lectura del tornamesas USB en el álbum o pista que desea
grabar.
• Haga clic en el botón azul Pause (Pausa) para interrumpir la grabación. Púlselo de
nuevo para continuar.
• Haga clic en botón amarillo Stop (Parar).
.
Para obtener más información sobre Cakewalk
pyro Audio Creator
Cakewalk pyro Audio Creator ofrece muchas funciones para filtrar y/o editar
grabaciones, como eliminar chasquidos, estallidos, crepitaciones, o limpiar siseos,
zumbidos y otros ruidos molestos de sus grabaciones. Estas funciones se describen
en detalle en la Guía del usuario incluida en la ventana de ayuda de pyro Audio
Creator (en el CD de Cakewalk pyro Audio Creator que se incluye con el tornamesas
AT-LP2D-USB). Para solicitar ayuda, póngase en contacto con Cakewalk en
www.cakewalk.com/support.
Para obtener más información sobre Audacity
Para obtener información detallada sobre el uso de Audacity, consulte el manual en
línea de Audacity en http://audacity.sourceforge.net/manual-1.2/index.html y los
tutoriales en línea detallados en http://audacity.sourceforge.net/help/tutorials.
ES
Eso es todo. A partir de este momento puede manipular la grabación y explorar las
posibilidades de edición de Audacity. Recuerde que puede utilizar la función Undo
(Deshacer) prácticamente sin límites mientras el proyecto está abierto.
NOTA: no se pueden grabar CD directamente desde la aplicación Audacity. Para ello,
es necesario utilizar otras aplicaciones de grabación de CD.
43
Page 44

Audio-Technica U.S., Inc.
1221 Commerce Drive, Stow, Ohio 44224 (330) 686-2600
www.audio-technica.com
P52024 ©2008 Audio-Technica U.S., Inc. Printed in China Imprimé en Chine Impreso en China
 Loading...