

Page 1
AT-LP1240-USB
XP EDITION
User Manual
Direct Drive Professional Turntable
Manuel de l’utilisateur
Platine professionnelle à entraînement direct
Manual de usuario
Tocadiscos profesional con accionamiento directo
EN
FR
ES
Page 2

Introduction
Thank you for purchasing this Audio-Technica product.
Before using the product, read through this user manual to ensure that you will use the product correctly. Please keep this manual for future reference.
This product can be used only in the countries where the product is sold. Make sure that the operating voltage of the product is correct for the
country you live in.
Package contents
Make sure that you have all the included items listed below before using this product.
If some items are missing or damaged, contact your local Audio-Technica dealer.
• Turntable body
• Dust cover
• Platter
• Slip mat
• Counterweight
• Headshell (AT-HS1) with cartridge (AT-XP5)
• 45 RPM adapter
• USB cable (1.9 m (6.2'))
• RCA audio cable (Approx. 1.4 m (4.6'))
• Power cable
• Stylus target light
• User manual (this document)
After purchase, we suggest that you save all packaging materials for possible future storage, moving, or shipping.
1
Page 3
Safety precautions
Although this product was designed to be used safely, failing to use
it correctly may result in an accident. To ensure safety, observe all
warnings and cautions while using the product.
Cautions for the product
Warning:
• Do not use a power cable other than the included one. Doing so may
cause a fire, electric shock, damage or malfunction.
• Stop using the product and disconnect the power cable from the
product if the product begins to malfunction, producing smoke, odor,
heat, unwanted noise or showing other signs of damage. In such a
case, contact your local Audio-Technica dealer. Continuing to use the
product may cause fire or damage.
• Do not place any naked flame sources (such as lighted candles) on
the product.
• Do not disassemble, modify or attempt to repair the product to
prevent electric shock, malfunction or fire.
• Do not subject the product to strong impact to prevent electric shock,
malfunction or fire.
• Do not handle the product with wet hands to prevent electric shock
or injury.
• Do not expose the product to drips or splashes to prevent electric
shock, malfunction or fire.
• Do not put foreign matter such as combustible materials, metal, or
liquid in the product to prevent electric shock, malfunction or fire.
• Do not cover the product with a carpet or a cloth to prevent fire or
injury by overheating.
• Store the included plastic bag out of the reach of small children or
away from a heat sources to prevent accident or fire.
• Place the product close enough to the AC outlet to easily grasp the
power cable plug at any time. In case of emergency, disconnect the
power cable plug of the product quickly.
• Connect the product with Class Ⅰ construction to the AC outlet with
a protective grounding connection.
Caution:
• Do not install the product on an unstable surface to prevent injury or
damage from the product falling.
• Do not install the product in a poorly ventilated place to prevent
accident or fire by accumulated heat. Make enough clearance around
the product to radiate heat when installing it on a rack.
• Do not store the product in direct sunlight, near heating devices, or
in hot, humid, or dusty places to prevent electric shock, malfunction
or fire.
• Do not place any objects filled with liquids, such as vases, on the
product to prevent electric shock, malfunction or, in the worst case,
fire in the worst case.
• Do not use chemicals such as benzine, thinner or electrical contact
cleaner to prevent damage or malfunction.
For customers in the USA
UL/CSA notice
CAUTION
RISK OF ELECTRIC SHOCK
DO NOT OPEN
Caution:
no user-serviceable parts inside. Internal adjustments are for qualified
professionals only. Refer all servicing to qualified service personnel.
Caution: To prevent electric shock, do not use this polarized plug
with an extension cord, receptacle or other outlet unless the blades
can be fully inserted to prevent blade exposure.
Safety instructions
1. Read these instructions.
2. Keep these instructions.
3. Heed all warnings.
4. Follow all instructions.
5. Do not use this apparatus near water.
6. Clean only with dry cloth.
7. Do not block any ventilation openings. Install in accordance with the
8. Do not install near any heat sources such as radiators, heat
9. Do not defeat the safety purpose of the polarized or grounding-type
10. Protect the power cord from being walked on or pinched particularly
11. Only use attachments/accessories specified by the manufacturer.
12. Use only with the cart, stand, tripod, bracket or table specified by
13. Unplug this apparatus during lightning storms or when unused for
14. Refer all servicing to qualified service personnel. Servicing is
To prevent electric shock, do not remove the cover. There are
The lightning Flash Symbol, with “The Lightning Flash with
arrowhead symbol within an equilateral triangle, is intended
to alert the user to the presence of uninsulated “dangerous
voltage” within the product enclosure that may be of sufficient
magnitude to constitute a risk of shock to persons”.
The exclamation Point Symbol, with “The exclamation
point within an equilateral triangle is intended to alert
the user to the presence of important operating and
maintenance (servicing) instructions in the literature
accompanying the product”.
manufacturer’s instructions.
registers, stoves, or other apparatus (including amplifiers) that
produce heat.
plug. A polarized plug has two blades with one wider than the other.
A grounding type plug has two blades and a third grounding prong.
The wide blade or the third prong are provided for your safety. If the
provided plug does not fit into your outlet, consult an electrician for
replacement of the obsolete outlet.
at plugs, convenience receptacles, and the point where they exit
from the apparatus.
the manufacturer, or sold with the apparatus. When a cart is used,
use caution when moving the cart/apparatus combination to avoid
injury from tip-over.
long periods of time.
required when the apparatus has been damaged in any way, such
as power-supply cord or plug is damaged, liquid has been spilled
or objects have fallen into the apparatus, the apparatus has been
exposed to rain or moisture, does not operate normally, or has been
dropped.
EN
2
Page 4

Safety precautions
Notes on use
FCC Notice
Warning:
This device complies with Part 15 of the FCC Rules. Operation is
subject to the following two conditions: (1) This device may not cause
harmful interference, and (2) this device must accept any interference
received, including interference that may cause undesired operation.
Caution:
You are cautioned that any changes or modifications not expressly
approved in this manual could void your authority to operate this
equipment.
Note: This equipment has been tested and found to comply with
the limits for a Class B digital device, pursuant to part 15 of the FCC
Rules. These limits are designed to provide reasonable protection
against harmful interference in a residential installation. This equipment
generates, uses and can radiate radio frequency energy and, if not
installed and used in accordance with the instructions, may cause
harmful interference to radio communications. However, there is no
guarantee that interference will not occur in a particular installation. If
this equipment does cause harmful interference to radio or television
reception, which can be determined by turning the equipment off and
on, the user is encouraged to try to correct the interference by one or
more of the following measures:
– Reorient or relocate the receiving antenna.
– Increase the separation between the equipment and receiver.
– Connect the equipment into an outlet on a circuit different from that
to which the receiver is connected.
– Consult the dealer or an experienced radio/TV technician for help.
Turntable body
• Do not set and use the product in locations that are considerably hot
or humid, dirty, or subject to extreme vibrations.
• The product should be positioned on a flat, level surface.
Cartridge
• Attach the protector to protect the stylus when the product is not in
use.
• Do not touch the stylus of the cartridge with your finger.
• Do not allow the cartridge's stylus to bump against the platter or the
edge of the record.
For customers in Canada
IC statement:
CAN ICES-3 (B)/NMB-3(B)
3
Page 5
Part names and functions
Overall diagram
2
1
2
5
4 6
3
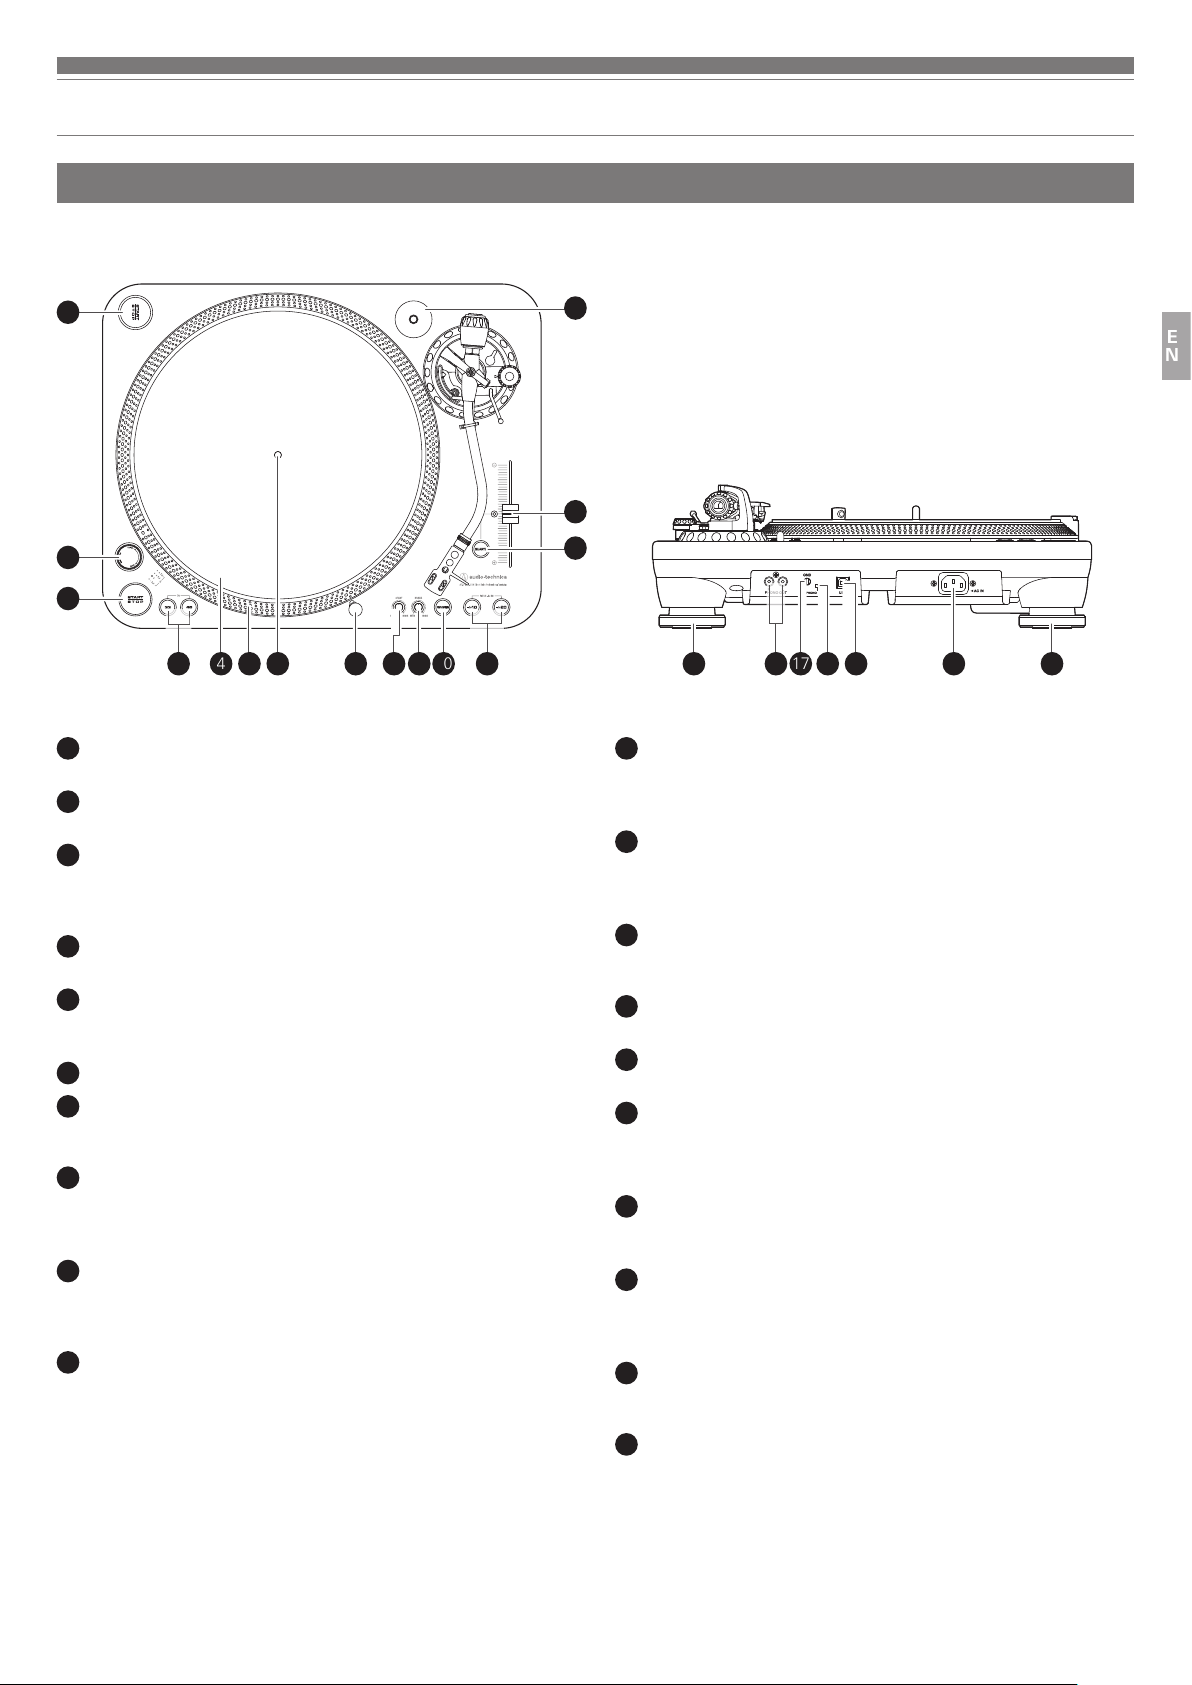
Power dial
1
Controls power to the unit.
Dual start/stop buttons
2
Engages and disengages the motor/platter.
Platter speed buttons
3
Select 33 or 45 RPM platter speed. 78 RPM is selected by pressing
both the 33 and 45 buttons simultaneously; both buttons should
be illuminated.
Platter
4
Cast aluminum platter mounts directly to center spindle/motor shaft.
Strobe dots (on platter edge)
5
Operate in conjunction with stroboscopic light located under the
power dial to provide visual indication of accurate platter speeds.
Spindle
6
Removable stylus target light
7
Provides illumination directed at the stylus position for easier
cueing in low light. Easily plugs into jack on top of turntable deck.
Start control knob
8
Rotate the start control knob to increase or decrease platter start
time between 0.2 – 6.0 seconds. (Minimum setting is the quickest
start; maximum setting is the slowest start to reach selected speed.)
Brake control knob
9
Rotate the brake control knob to increase or decrease platter brake
time between 0.2 – 6.0 seconds. (Minimum setting is the quickest
stop; maximum setting is slowest.)
Reverse control button
10
Controls platter’s rotational direction.
7 8 9
10
14
13
12
18 2015 1517 191611
Speed range button
11
Select +/- 10 or 20% speed range.
• +/-50% is selected by pressing both the 10 and 20 buttons
simultaneously.
Quartz button
12
Turns the pitch function on and off. When the quartz is activated
the platter will hold the RPMs at 0% pitch, regardless of the pitch
slider position and speed range control settings.
Pitch adjust slide control
13
Use in conjunction with pitch button to vary the platter’s rotational
speed. In the center detent position quartz lock is active.
45-RPM adapter
14
Adapt 7" records with large center holes to fixed center spindle
Feet
15
Adjust the level of the product.
Stereo output terminals
16
Connect the RCA audio cable. Connect it to either the amplifier's (DJ
mixer's) PHONO input jack or its line input jack. The red terminal is
the right channel and the white terminal is the left channel.
Ground (earth) terminal
17
Connect the amplifier's ground (earth) terminal to this terminal
using the RCA audio cable's ground line.
Pre-amplifier selector switch
18
If connecting to an amplifier's (DJ mixer's) PHONO input jack, set
this switch to the PHONO position. If connecting to the LINE/AUX
jack of an amplifier (DJ mixer), set this switch to the LINE position.
USB output
19
Use this output to connect your turntable to the USB input of your
computer.
AC inlet
20
Use to connect the included power cable.
EN
4
Page 6
Part names and functions
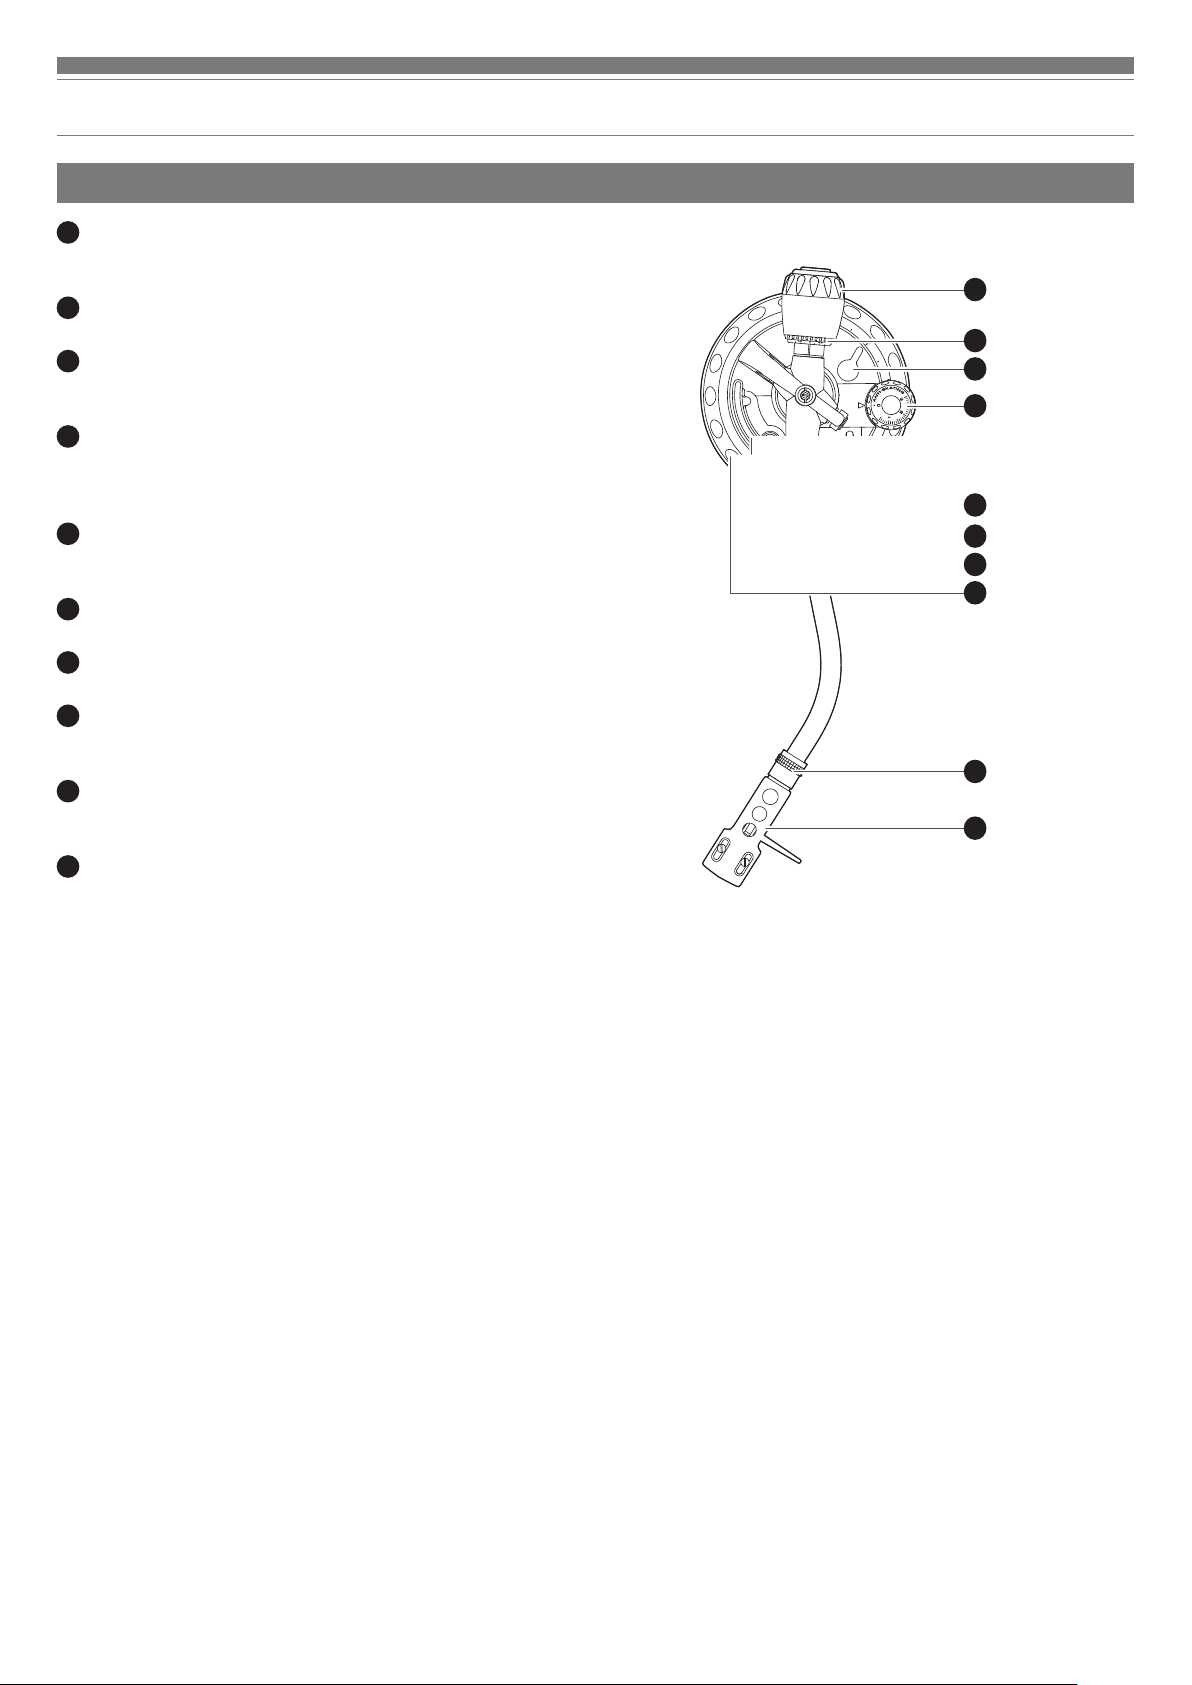
Tonearm
Counterweight
21
Balances the tonearm and provides adjustment for proper
downward tracking force on the stylus.
Tracking force gauge ring
22
Use to adjust the tracking force.
Tonearm height lock
23
Locks the tonearm height setting.
• Always fully unlock before attempting to make a height adjustment.
Anti-skate control dial
24
While the record is playing, a force acts on the stylus tip to pull it
inward. This force can be counteracted by setting the same values
for anti-skate and the tracking force.
Tonearm lift control lever
25
Controls action of tonearm lift.
• Lift mechanism is hydraulically damped to slow tonearm descent.
Tonearm rest with clamp
26
Use the clamp to secure the tonearm so that it does not move.
Tonearm lift
27
Moves the tonearm vertically to and from the face of the record.
Tonearm height adjustment dial
28
Raises and lowers the tonearm to allow it to remain parallel to the
record surface.
Locking ring
29
Rotate the ring to the left (counterclockwise) to secure the
headshell. To remove the headshell, rotate the ring to the right.
Headshell
30
The cartridge (AT-XP5) is attached to the headshell (AT-HS1).
21
22
23
24
25
26
27
28
29
30
5
Page 7
Preparation for use
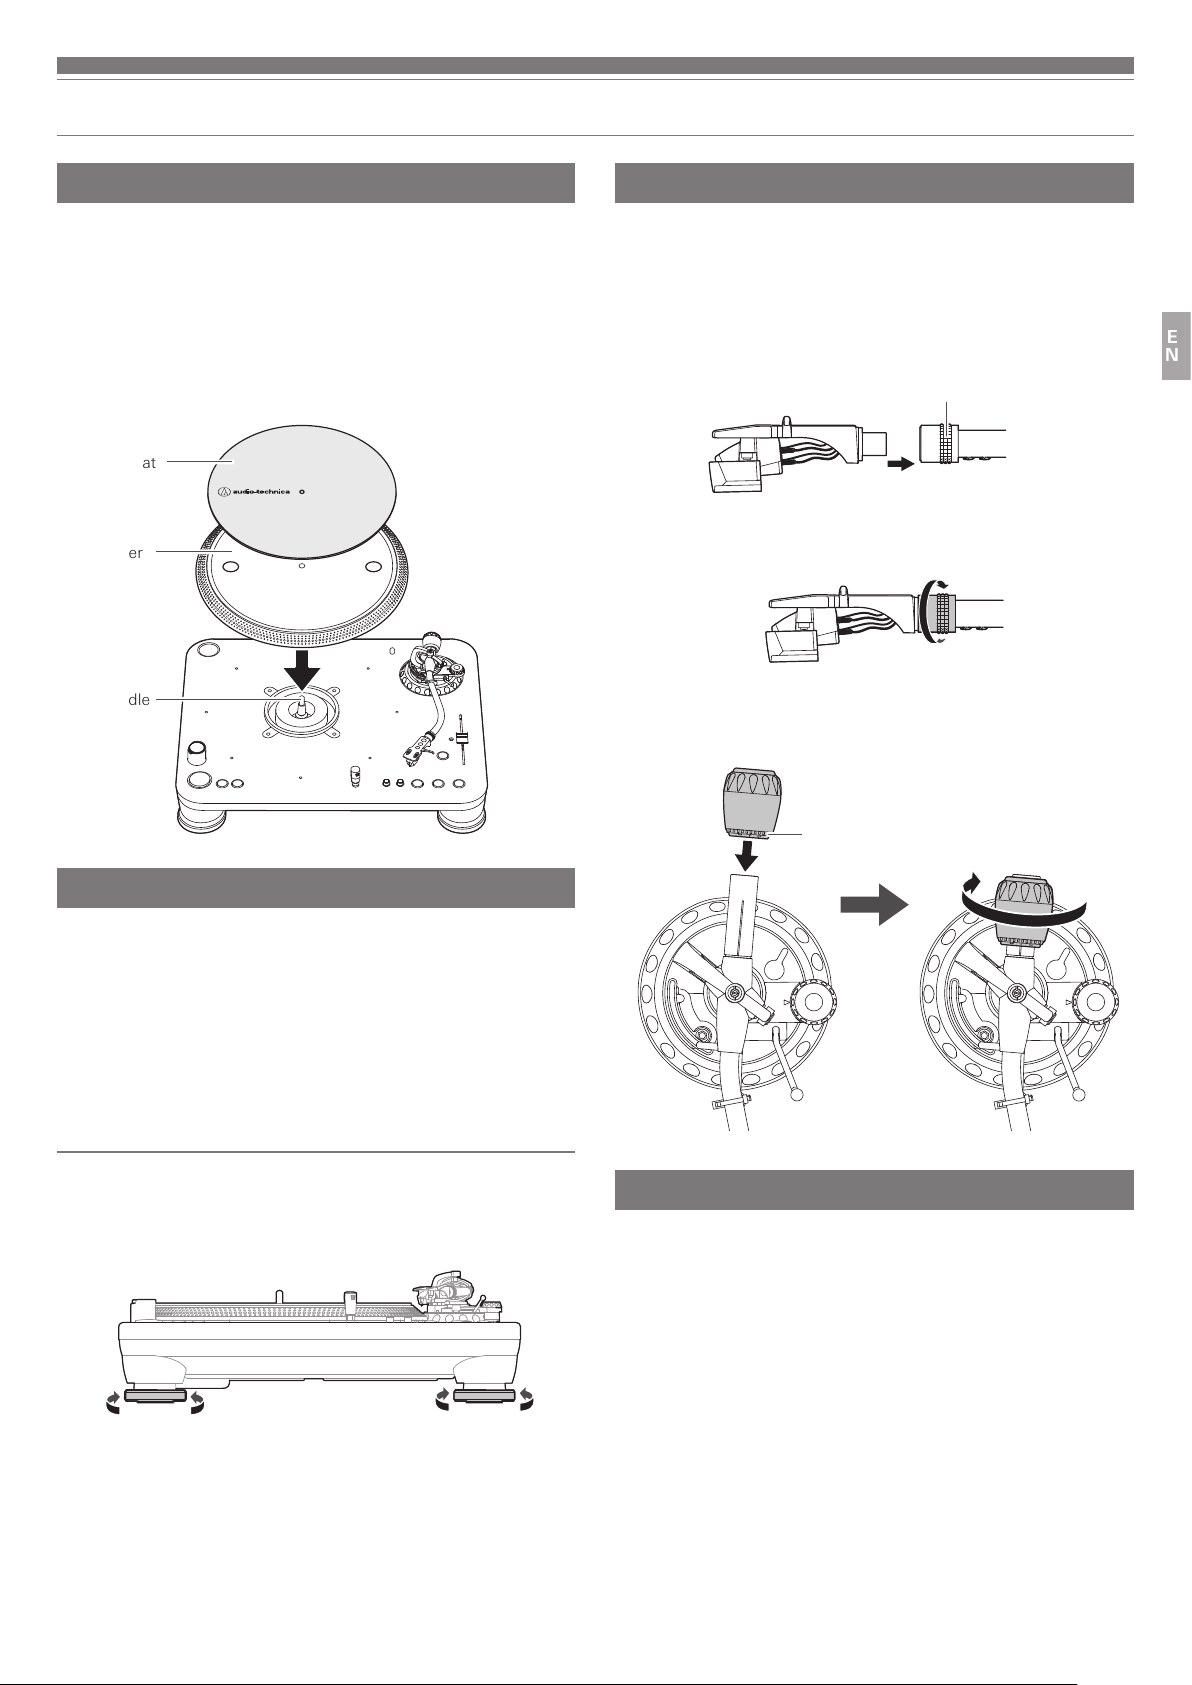
Placing the platter
This product requires some assembly before using it for the first time.
Do not connect the power cable until assembly is complete.
1. Set the platter on the spindle.
• To avoid damaging the spindle when seating the platter, align the positions
of the spindle and the platter's hole, and then slowly seat the platter.
• Make certain that the platter is fully seated on the spindle.
2. Place the slip mat on top of the platter.
Slip mat
Platter
Spindle
Assembling the tonearm
1. Remove the cable tie used to secure the tonearm at the time of
delivery.
• Use the clamp to temporarily secure the tonearm to the tonearm rest.
2. Insert the headshell into the tonearm.
• Hold the right and left edges of the headshell so that you do not damage
the stylus or cut the cartridge’s wires.
Locking ring
3. With the headshell inserted, turn the locking ring
counterclockwise (to the left).
4. With the tracking force gauge ring facing forward, attach the
counterweight to the back of the tonearm, and slowly turn it
counterclockwise (to the left).
EN
Setting up the turntable
• Position the product on a level surface.
• To avoid the effects of vibrations and acoustic pressure, do not
mount the product next to such items as speakers.
• The product may pick up radio static if placed next to a radio.
Therefore, try to keep the product away from radios.
• If the product is near equipment (cell phone, etc.) that emits strong
radio waves, noise may occur.
Leveling the turntable
After positioning the product where you want to use it, adjust the feet
so that the product is level.
• Use a level (sold separately) as needed to ensure that the product is
level.
Tracking force gauge ring
Tonearm balance and tracking force
In order for the cartridge to pick up sound correctly from the record’s
grooves, the tonearm’s balance and tracking force must be adjusted
to fit the specifications of the cartridge. If the tonearm’s balance and
tracking force are not properly adjusted, the record or the cartridge’s
stylus may become damaged.
• Do not drag the cartridge’s stylus across the record or platter when
adjusting the tonearm’s balance or tracking force. Doing so may
damage the stylus.
6
Page 8
Preparation for use
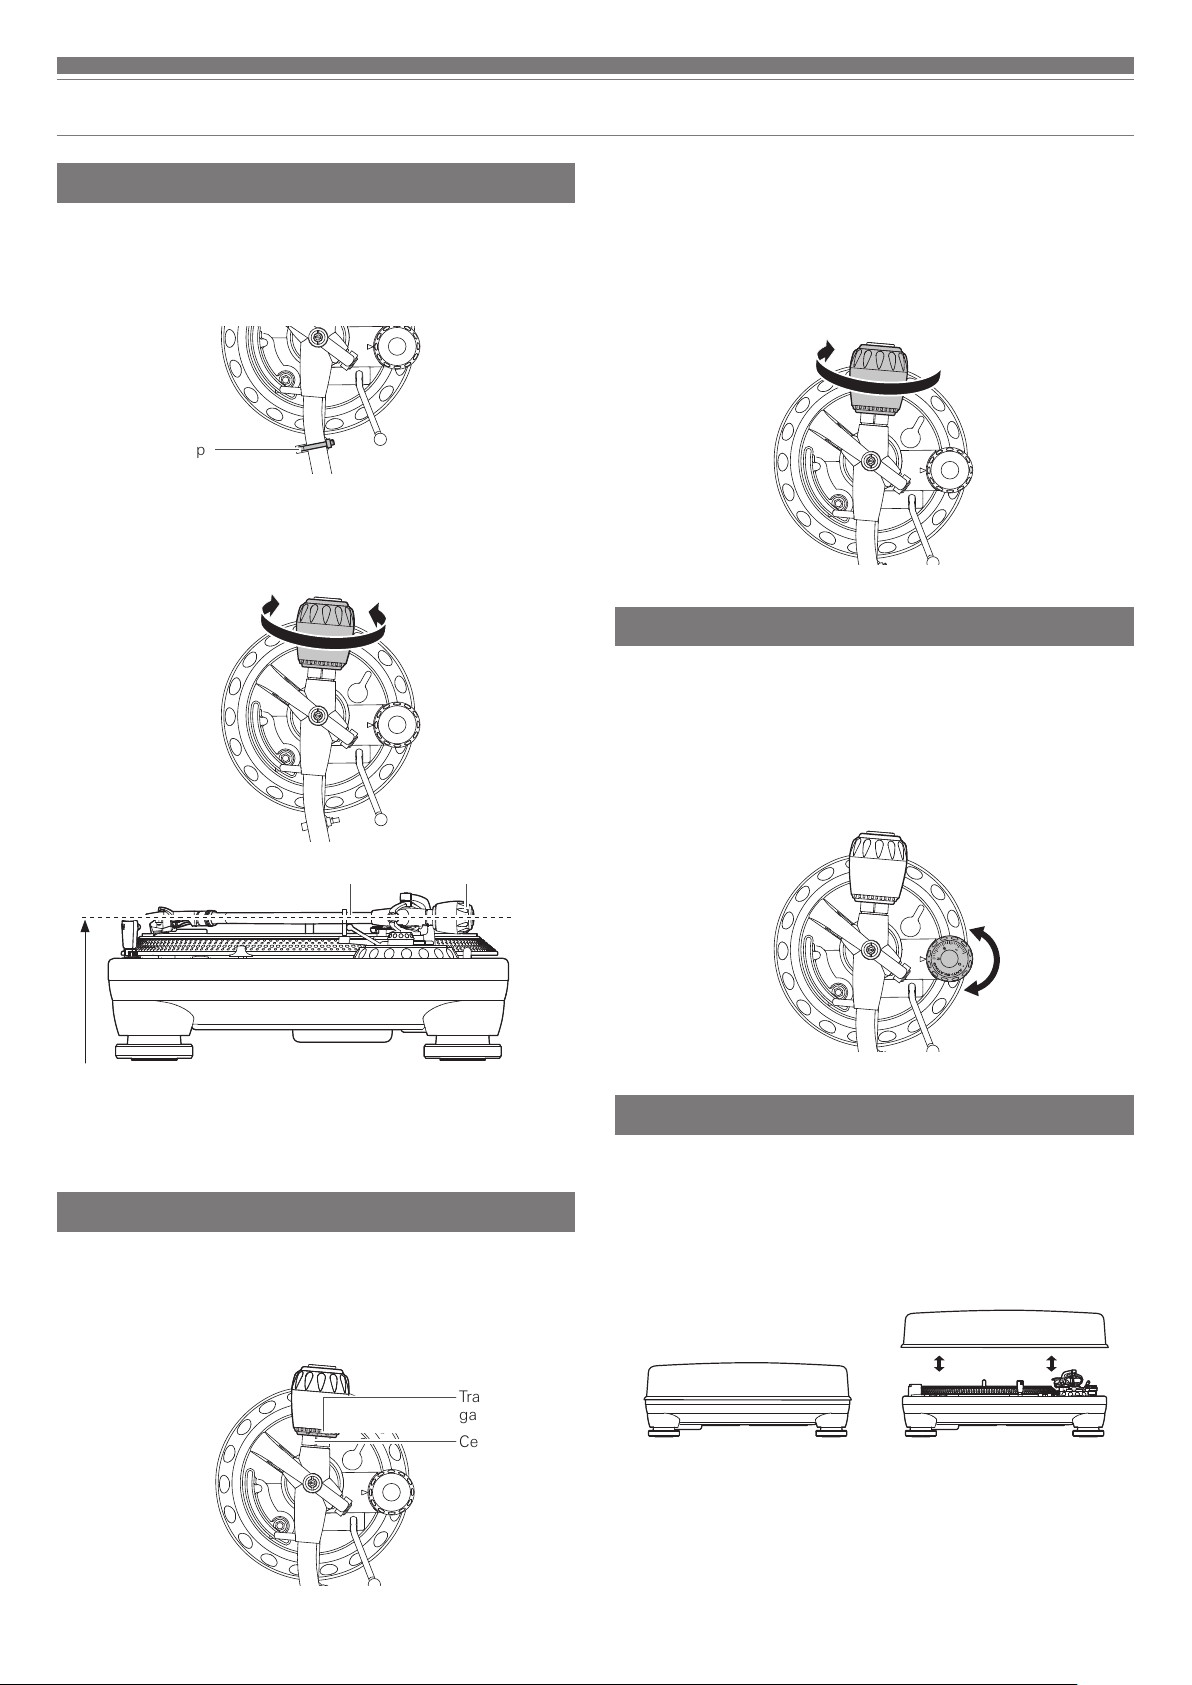
Setting tonearm balance
1. Remove the cartridge's protector.
2. While lightly holding the headshell so as not to move the
tonearm, unlatch the clamp.
• The tonearm is tilted because the balance has yet to be adjusted.
Clamp
3. While still lightly holding the headshell, turn the counterweight to
adjust the tonearm’s balance.
•
Adjust the balance so that the tonearm is level when you release the headshell.
2. Turn the counterweight and the tracking force gauge ring
together counterclockwise (to the left) until the centerline value
matches the recommended tracking force value for the cartridge
you are using.
• Refer to the cartridge maker’s specifications for the recommended tracking
force value.
• The standard tracking force value for the cartridge provided with this
product is 3.0 g.
Setting the anti-skate adjustment
While the record is playing, a force acts on the stylus tip to pull it
inward. This force can be counteracted by setting the same values for
anti-skate and the tracking force.
Adjust the anti-skate control dial to have the same value as the tracking
force value.
• The standard tracking force value for the cartridge provided with this
product is 3.0 g.
Tonearm Counterweight
Adjust so that tonearm is level
4. Return the tonearm to the tonearm rest and latch the clamp.
Setting tracking force
1. While supporting the counterweight so that it does not move,
turn the tracking force gauge ring so that its “0” position lines up
with the centerline on the back of the tonearm.
• The tracking force is not adjusted simply by turning the tracking force
gauge ring.
Tracking force
gauge ring
Centerline
Installing/removing the dust cover
• The dust cover is designed to protect the product's sensitive
components when the product is not in use. It should remain off
while records are playing.
• Using the dust cover during play may result in record damage or
sound degradation.
• Always remove and replace the dust cover carefully.
7
Page 9
Preparation for use
Setting pre-amplifier selector switch
This product has a built-in phono equalizer function. You can use the
product, even if you do not have a phono amplifier or connectable
equipment with a built-in phono amplifier, by connecting an active
speaker, etc.
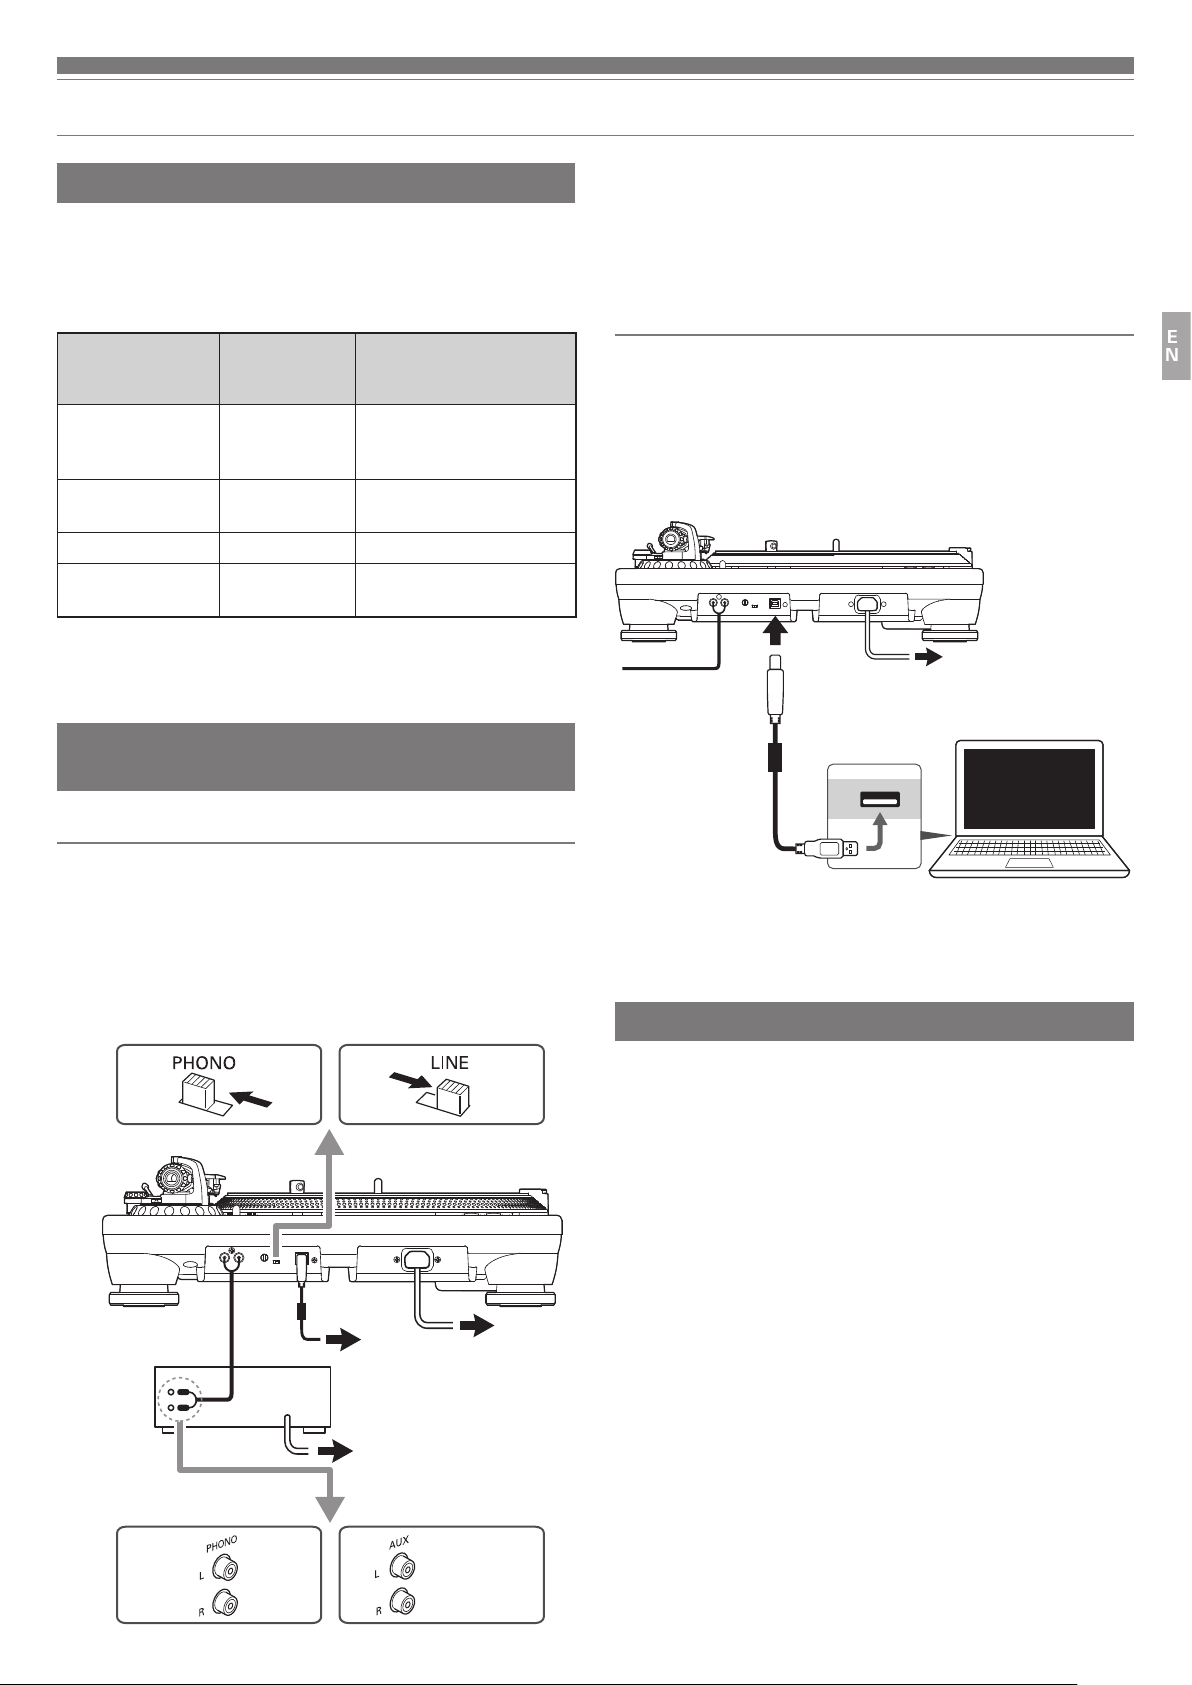
Use the pre-amplifier selector switch to set the output, as shown below.
Connectable
equipment being
used
Device with phono
input
Device without
phono input
PC sound card LINE Sound card's line input jack*
Device with USB
input
*1 An audio adapter (sold separately) may be required to connect the
RCA audio cable to the PC sound card's line input jack.
2
*
Use included USB cable instead of RCA audio cable to connect.
Position of
pre-amplifier
selector switch
PHONO Phono input jack and
LINE AUX or line input jack of
LINE USB input of your
Where to connect the
RCA audio cable
ground (earth) terminal of
connectable equipment
connectable equipment
computer*
2
Connecting to connectable equipment (active
speakers, amplifiers, DJ mixer, etc.)
• Depending on the equipment you are connecting, a ground (earth)
terminal may exist near the phono input jack. If this is the case,
connect to it using the ground line from the RCA audio cable. This
will help prevent a low humming noise that might otherwise be heard
during playback.
Connecting to computers with USB input
Follow the settings for the pre-amplifier selector switch to connect the
included USB cable to the USB input of your computer.
The included USB cable connects the product to your computer
without need for special drivers.
Audacity (refer to http://www.audacityteam.org for details) and other
compatible third-party recording software packages are available,
allowing you to record from the product to your computer.
1
EN
Connecting to audio source
Align the settings for the pre-amplifier selector switch and connect
the RCA audio cable to an input jack that is compatible with the
connectable equipment you are using (amplifier, receiver, active
speakers, sound card, etc.).
The RCA audio cable's red jack is for the right (R) channel, and the
white jack is for the left (L) channel.
With PHONO input*
Connectable
equipment
(amplifier,
DJ mixer,
etc.)
Without PHONO input
To
USB port
To outlet
To outlet
• Be sure to set the pre-amplifier selector switch to the LINE position.
Connecting the power cable
Finally, after all audio connections are made, attach the included
power cable to the product. Then connect the power cable’s plug to a
convenient AC outlet.
With PHONO input*
Without PHONO input
Or LINE
connection
8
Page 10
Playing a record
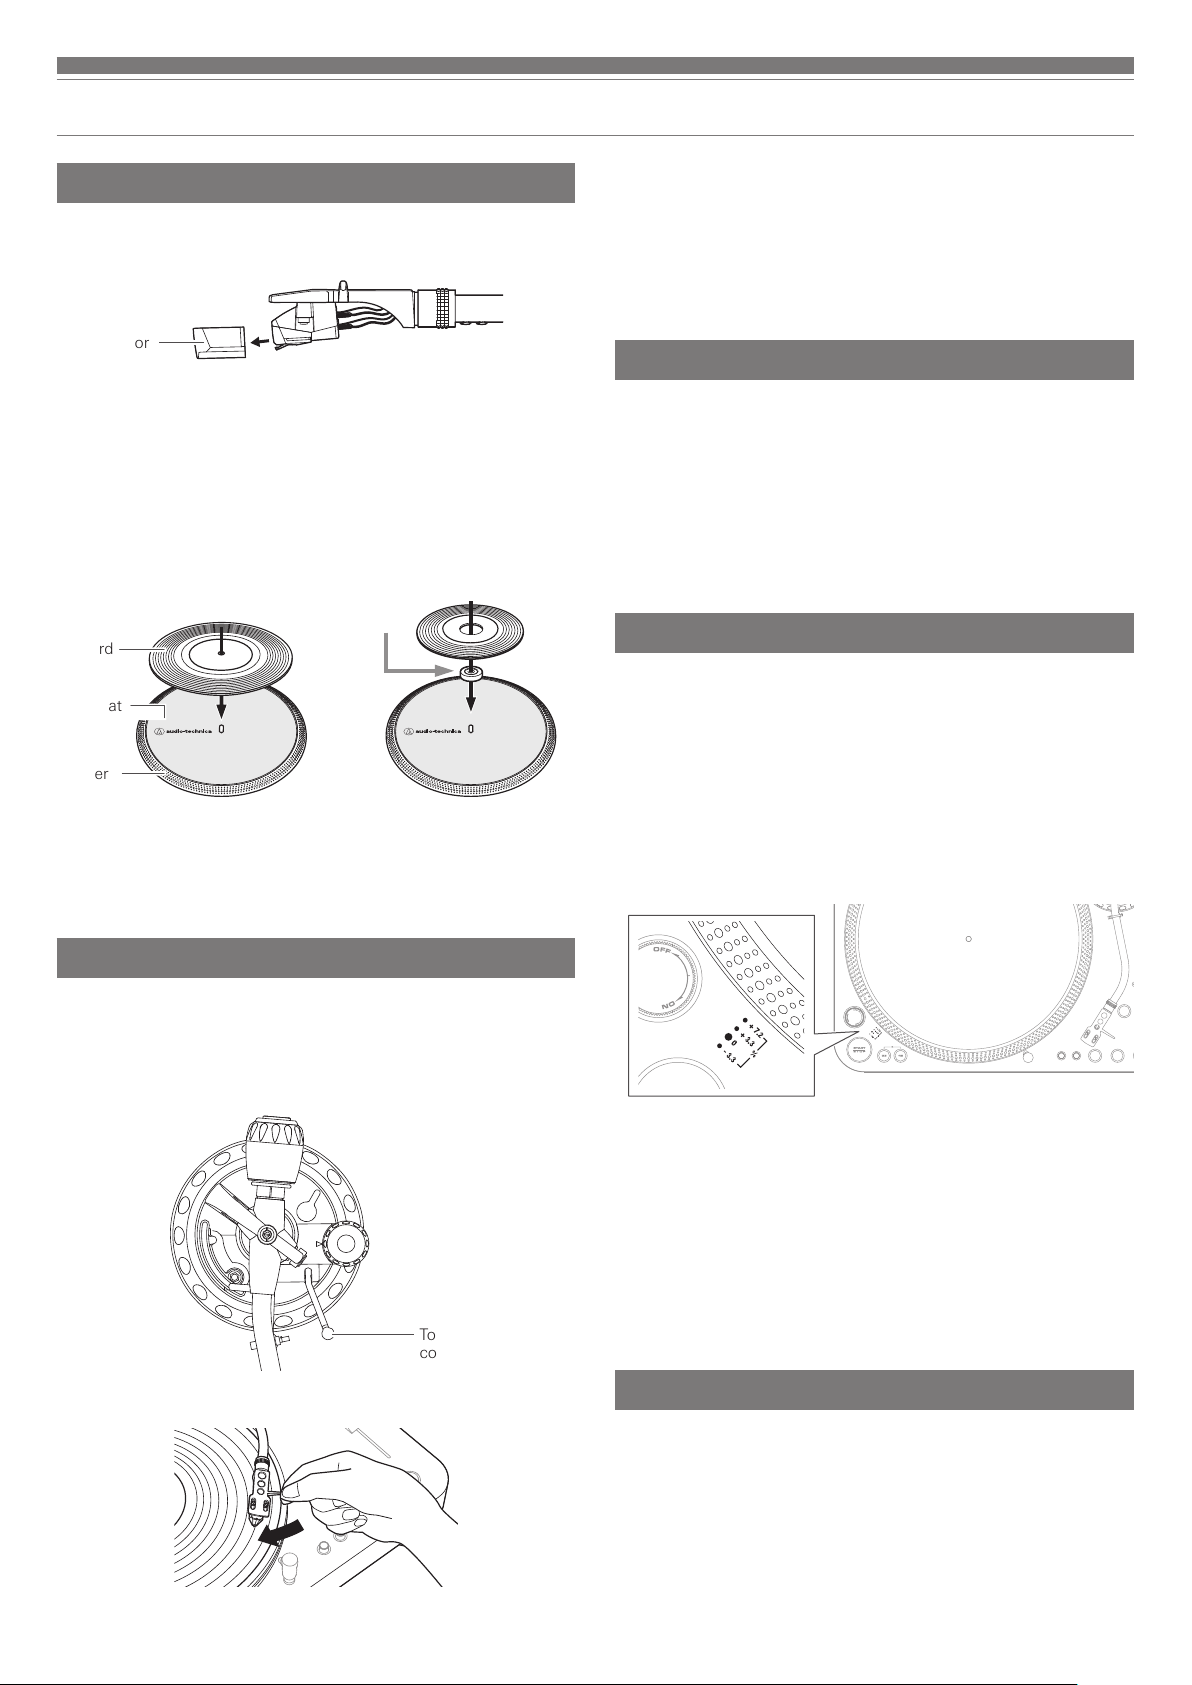
Before playing a record
1. Remove the cartridge's protector.
• If the tonearm is fixed to the tonearm rest, unlatch the clamp.
Protector
2. Turn the power dial to the ON position.
• The speed selector and strobe illuminator will light up.
3. If desired, plug in the stylus target light for illumination of the
stylus tip position on the record.
4. Place the record on the platter so that the center hole aligns with
the spindle.
• If playing a 45 RPM record, attach the 45 RPM adapter (see the diagram to
the right below).
At 33-1/3 RPM At 45 RPM
Record
Slip mat
Platter
5. Set the platter rotation speed (33/45/78) to match that of the record.
• To set the platter speed for 78 RPM, press both the 33 and 45 RPM buttons
simultaneously.
45-RPM
adapter
4. Lower the tonearm by moving the tonearm lift control lever to the
DOWN position. The tonearm descends slowly onto the record
and play begins.
• Alternatively, you can skip steps 2 to 4, and use your fingers to lift the
headshell, move the tonearm over the desired location on the record, and
then place the headshell down to begin playing the record.
• Do not subject the product to strong impact during playback.
Setting pitch
1. Press the quartz button to turn the pitch function off.
• The internal quartz lock holds the platter at the precise rated speed (0 %
pitch), regardless of the pitch slider position and speed range control settings
when the quartz button is on.
2. Use the pitch adjust slide control in conjunction with the pitch
buttons to vary the platter’s rotational speed by as much as +/50%.
• When the pitch adjust slide control is in the center detent position, the
quartz lock is active.
Measuring pitch
Four rows of strobe dots on the platter edge are designed to measure
and verify the platter speed (pitch).
Confirm the moves of strobe dots illuminated by the stroboscopic light
located under the power dial.
When the corresponding row of strobe dots appears to be stationary,
the turntable will be at the operating speed percentage indicated below.
If the dots appear to be moving to the right, the platter is moving
below rated speed. If they appear to be moving to the left, the platter is
moving above rated speed.
Playing a record
Lower the volume of the amplifier, speakers, etc. sufficiently.
1. Press one of the start/stop button.
• The platter begins to rotate.
2. Raise the tonearm by lifting the tonearm lift control lever to the
UP position.
Tonearm lift
control lever
3. Position the tonearm over the desired location (groove) on the
record.
+7.2 % change in pitch when the dots in the top row are stationary [point
to top row of dots]
+3.3 % change in pitch when the dots in the second row are stationary
[point to second row of dots]
0 % change in pitch (normal speed) when the dots in the third row are
stationary [point to third row of dots]
-3.3 % change in pitch when the dots in the bottom row are stationary
[point to bottom row of dots]
Adjusting platter start speed and brake speed
Rotate the start control knob to increase or decrease platter start time
between 0.2 – 6.0 seconds. (Minimum setting is the quickest start;
maximum setting is the slowest start to reach selected speed.)
Rotate the brake control knob to increase or decrease platter brake
time between 0.2 – 6.0 seconds. (Minimum setting is the quickest stop;
maximum setting is slowest.)
9
Page 11

Playing a record
Care
Reversing the record
If desired, press the reverse control button to reverse the rotation of the
platter.
• The reverse control button will illuminate.
Pausing the record
After lowering the volume of the amplifier, speakers, etc. sufficiently, lift
the tonearm with the tonearm lift control lever.
Stopping the record
1. Lower the volume of the amplifier, speakers, etc. sufficiently.
2. Lift the tonearm lift control lever, return the tonearm to the
tonearm rest, and fix it with the clamp.
3. If using the stylus target light, turn it off by removing it from the
jack.
4. Press one of the start/stop buttons to stop the platter rotation.
• The platter slows down and rotation stops.
5. Turn the power dial to the OFF position.
6. Remove the record after the platter has come to a complete stop.
Turntable body
• When the turntable body is dirty or dusty, first disconnect the power
cable plug, and then wipe off the dirt and dust with a soft, dry cloth.
• Do not use benzenes, thinners, etc.
• When storing the product for a long time, disconnect the power
cable plug from the outlet and wrap the equipment in plastic; do not
allow it to become damp.
Stylus tip
• If dirt and grime are stuck to the stylus tip, clean it before each use.
• We recommend using a stylus cleaner (sold separately) if the stylus
tip is considerably dirty. Clean the stylus tip by moving the brush
from the rear to the front of the stylus tip.
EN
• To prevent the record from becoming scratched or warped, remove it
after use.
• Do not use a platter other than the one provided.
10
Page 12
Replacing the stylus
Replacing a cartridge
Removing the stylus
• In addition to the deterioration of sound quality, records may also be
damaged as the cartridge’s stylus tip wears down.
• As a rule of thumb, replace the stylus after 300 hours of use. Heavy
scratching may shorten the life of the stylus.
• Be sure to disconnect the product’s power cable plug from the outlet.
1. Release the headshell from the tonearm.
• Fix the tonearm with the clamp and then remove the headshell gently.
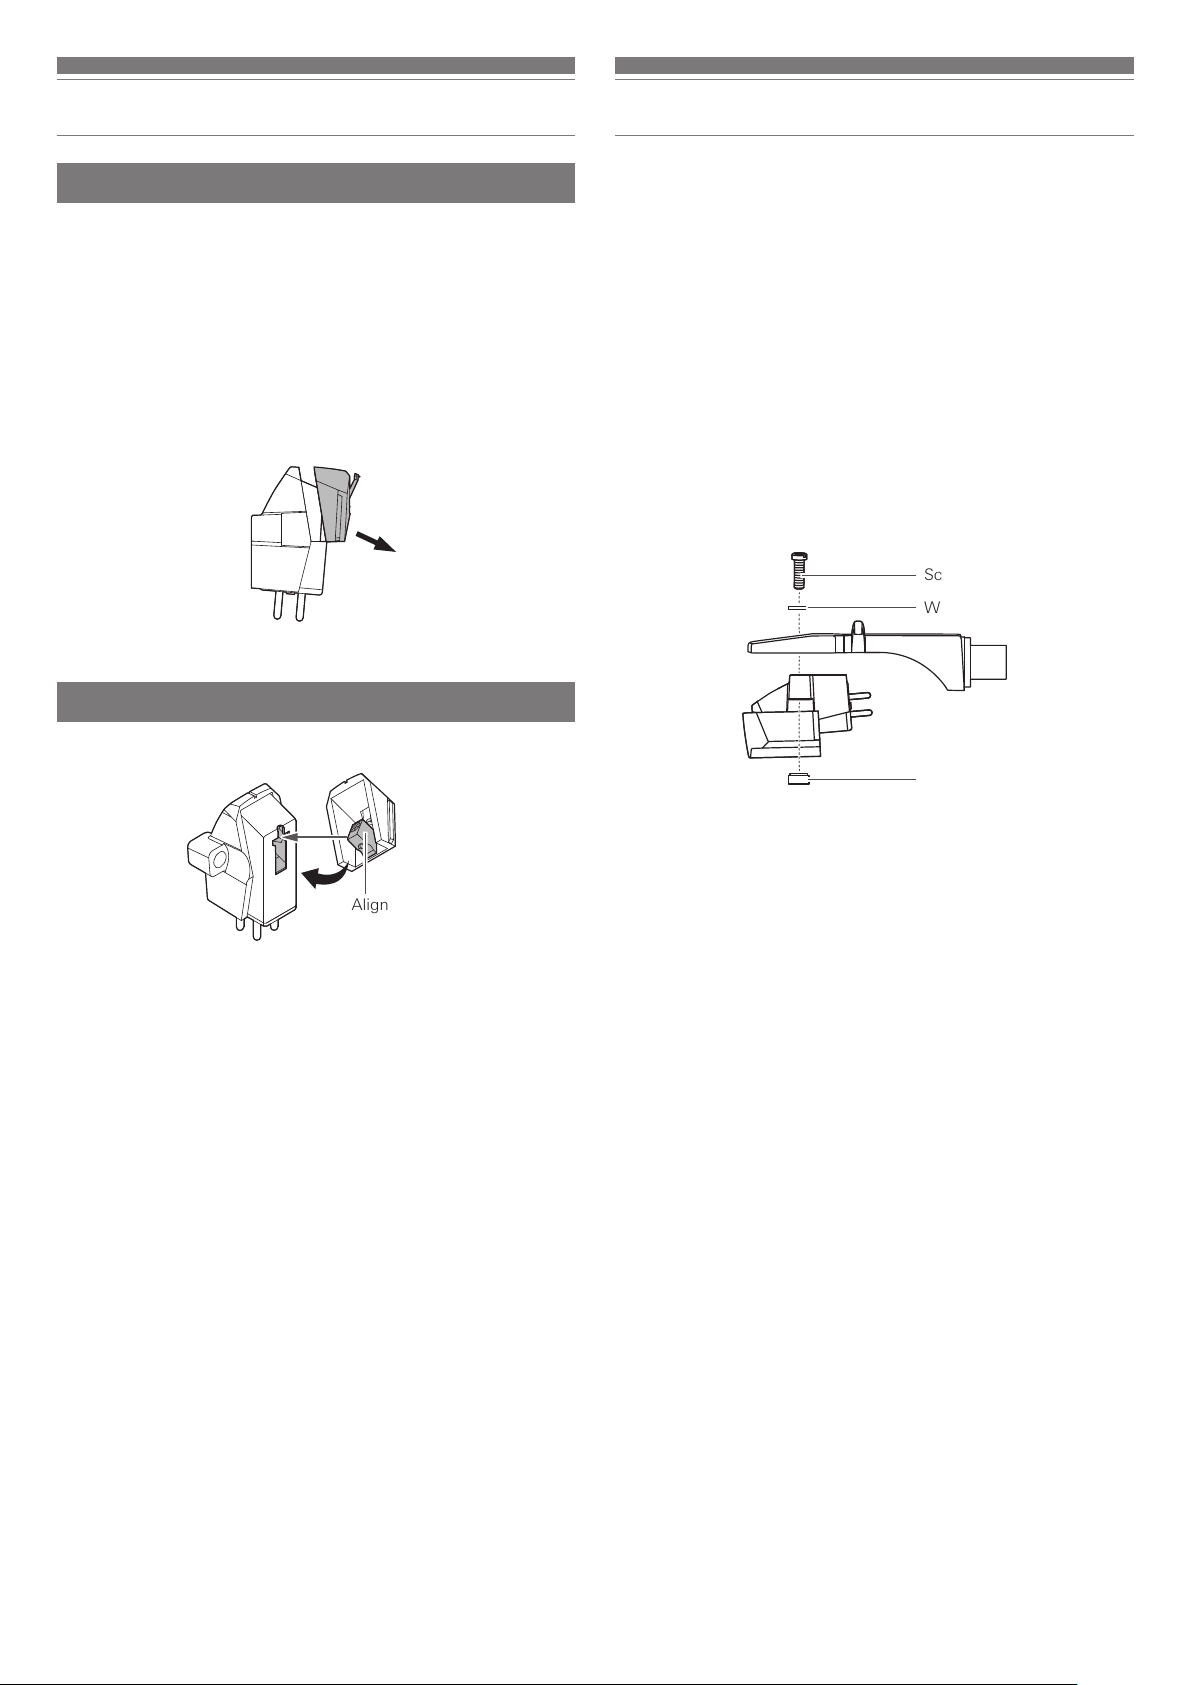
2. After removing the cartridge's protector, remove the stylus
by pulling in the direction of the arrow without touching the
cantilever, stylus tip, and magnets.
Pull
Installing a new replacement stylus
1. Mount the new replacement stylus to the cartridge.
Refer to the user manual for the cartridge that you will be using if you
are replacing the cartridge (AT-XP5) included with this product with
another, commercially available cartridge. After you replace the old
cartridge with a new one, you must readjust the overhang and the
tonearm’s balance and tracking force.
1. Release the headshell from the tonearm.
• Use the clamp to secure the tonearm and then remove the headshell gently.
2. Remove the stylus from the cartridge.
• Refer to “Removing the stylus” on p. 11 (this page).
3. Remove the lead tips.
• Be careful not to damage the lead tips.
4. Using a commercially sold, non-magnetic slotted screwdriver,
remove the installation screws, and then remove the cartridge
from the headshell.
5. Refer to the user manual for the new cartridge for mounting
instructions and connecting to the lead tips.
Screws
Washers
Nuts
Align the position of the inner
protrusion.
2. Mount the headshell onto the tonearm.
6. Using a commercially sold, non-magnetic slotted screwdriver,
tighten the screws in both places, and then adjust the overhang.
• After the adjustments are complete, tighten the screws securely.
7. Attach the headshell to the tonearm.
8. Adjust the tonearm's height.
• Refer to “Adjusting the tonearm's height” on p. 12 while doing the
adjustments.
9. Adjust the tonearm balance and tracking force.
• Refer to "Setting tonearm balance" and "Setting tracking force" on p. 7.
11
Page 13
Adjusting the tonearm's height
When the turntable is moved
When installing a cartridge other than the one provided, you must
maintain a suitable distance between the cartridge and the surface of
the record. Place the stylus on the record and confirm that the tonearm
is parallel to the record's surface. If it is not parallel, adjust the height
of the tonearm.
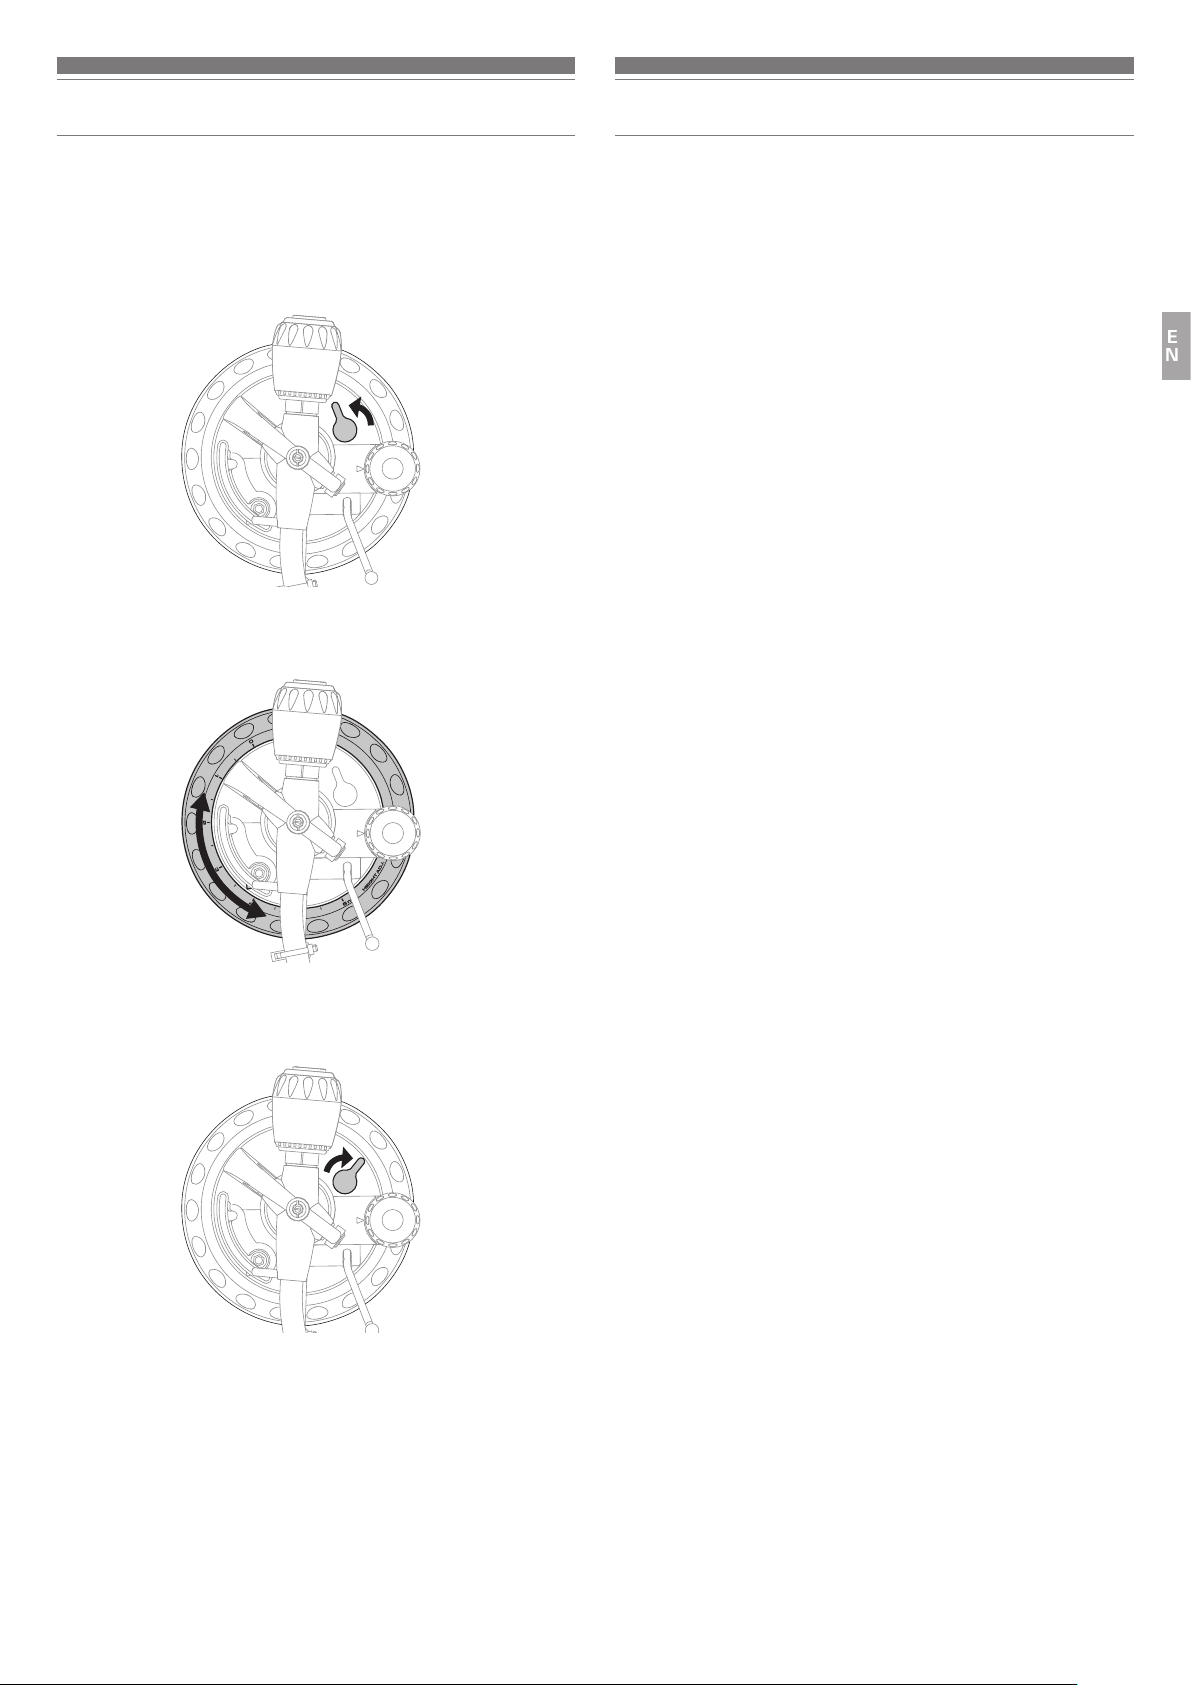
1. Rotate the tonearm height lock to loosen the tonearm's anchor.
2. Rotate the tonearm height adjustment dial and adjust the
tonearm's height.
Using the product's original packing materials, wrap the turntable in
the reverse order from when you unwrapped it. If you do not have the
packaging materials, take the following measures:
• After unplugging the power cable plug from the outlet, remove the
platter, and then wrap it so that it does not get damaged. If the product
is moved while the platter is still seated, it may damage the spindle.
• Fix the tonearm with the clamp.
• Remove the counterweight.
• Remove the headshell from the tonearm with the cartridge's protector
attached, and then wrap the entire headshell assembly so that it does
not get damaged.
• Wrap the turntable body with a soft cloth so that it does not get
damaged.
EN
3. After the adjustments are complete, rotate the tonearm height
lock to set the tonearm.
12
Page 14
Troubleshooting
Problem Solution
The platter does not spin. • Is the power cable connected to the outlet? Connect power cable to the outlet.
• Has the power cable's plug come off? Check whether or not the plug is properly attached to the product.
The platter spins, but there is
no sound or the volume is not
loud enough.
The stylus skips. • Is the tracking force set too light or too heavy? Adjust the tracking force.
There is howling. • Is the product picking up excessive vibrations from the floor, surfaces of the walls, or nearby speakers?
There is noise when the record
is playing.
The sound when the record is
playing is either too fast or too
slow.
Moving pitch adjust slider
produces no effect.
Strobe dots are difficult to see and/
or stylus illuminator is very dim.
Humming is heard during
playback.
• Is the cartridge's protector still in place? Remove the cartridge's protector.
• Is the tonearm in the lift position? Lower the tonearm.
• Are the function settings and input for connected equipment (amplifier, etc.) selected correctly? Check
whether the settings for the connected equipment are correct.
• Is the stylus damaged? Check the stylus and replace it, if necessary.
• Is the stylus placed correctly on the body of the cartridge? Check the cartridge and adjust it, if necessary.
• Are the setting positions for the pre-amplifier selector switch correct? Check that the pre-amplifier settings
are correct, noting the following common problems and their causes:
- If there is no sound, or if the volume is not loud enough, the product is set to the “PHONO” position
and connected to the amplifier’s AUX/LINE input.
- If the volume is too loud or is distorted, the product is set to the “LINE” position and connected to the
amplifier's PHONO input.
• Is the tracking force set too heavy? Adjust the tracking force.
• Is the anti-skate set improperly? Verify anti-skate is set for same value as cartridge tracking force.
• Is the record warped? Check the record.
• Is the record scratched? Check the record.
Decrease the vibrations or mount the product on a surface that is not subject to the effects of vibrations.
• Is the product mounted on an unstable surface? Check whether the surface on which the product is
mounted is suitable.
• Is there dust on the cartridge’s stylus tip? If dust is stuck to the stylus tip, clean it with a commercially
sold brush.
• Are the speed settings for the product correct? Use the platter speed buttons to select the correct speed
for the type of record being played.
• Is variable pitch engaged? Depress quartz button or return pitch adjust slider to center detent position to
engage quartz lock.
• If the LED next to the pitch adjust slider center detent position remains blue when the slider is moved,
quartz lock is engaged. Depress the quartz button to disengage the quartz lock and activate variable
pitch. The LED should turn off.
• Excessively bright or fluorescent light interferes with strobe indicator. Hold hand, record jacket, etc. over
strobe indicator to shield it from bright light.
• Is the ground line connected correctly? Make sure the ground line is properly connected.
• Is the headshell attached to the tonearm firmly? Make sure the locking ring is tight.
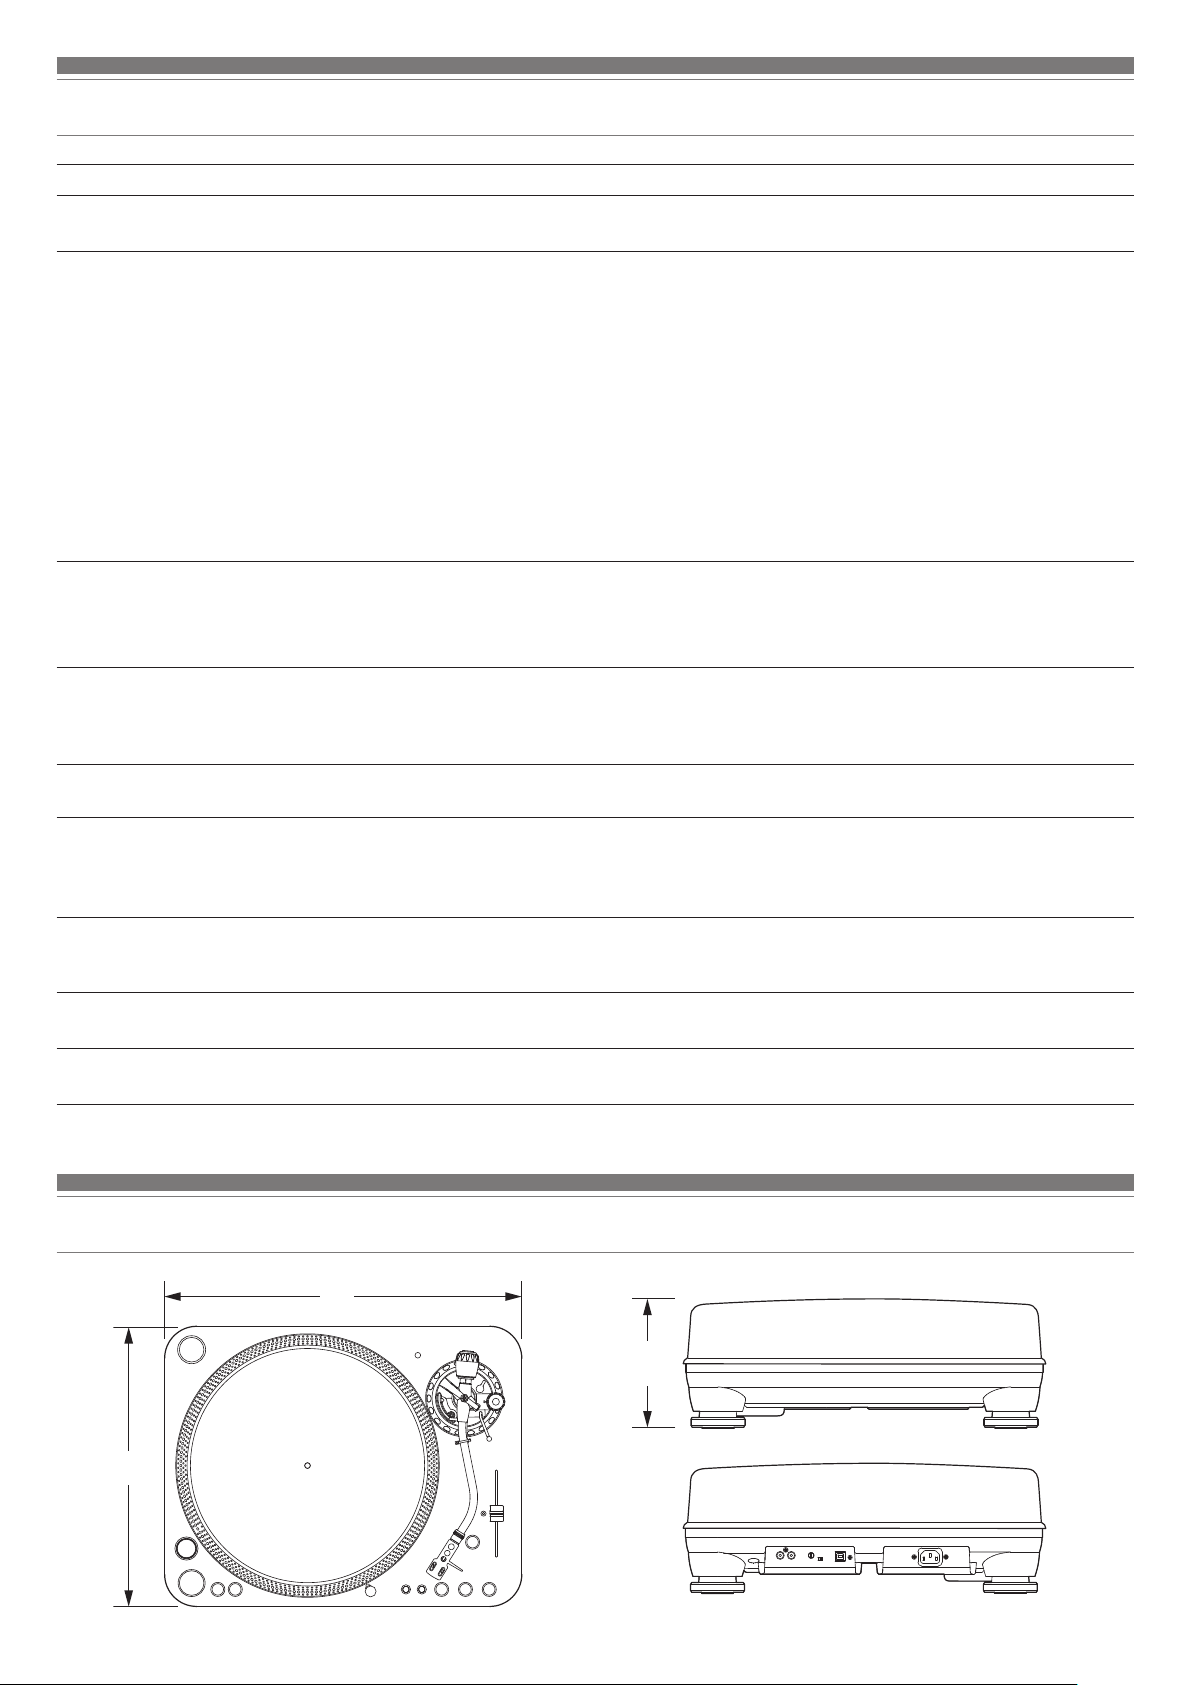
Dimensions
353
13
450
166.5
(Unit: mm)
Page 15

Specifications
Turntable specifications
Type
Motor 16-pole, 3-phase, brushless DC motor
Drive method Direct drive
Speeds 33-1/3 RPM, 45 RPM, 78 RPM
Turntable platter 332 mm diameter die-cast aluminum
Starting torque >4.5 kgf.cm
Braking system Electronic brake
Wow and flutter
Signal-to-noise ratio > 55 dB (DIN-B)
Output levels
“PHONO”
“LINE (MM)”
RIAA
Tonearm specifications
Type
Effective length 230 mm
Overhang 15 mm
Maximum tracking error angle Less than 3°
Stylus pressure adjustment
range
Applicable cartridge weight
range (including headshell)
Height of tonearm adjustment
range
Anti-skating range
3-Speed, fully manual operation
< 0.1% WRMS (JIS WTD) with 33 RPM
5.5 mV nominal at 1 kHz, 5 cm/sec
300 mV nominal at 1 kHz, 5 cm/sec
20-20kHz, +1/-3dB (In: 1.5mV 1kHz)
Static balanced S-shaped tonearm
with detachable headshell
0 to 4.0 g
13 to 18 g
0 to 6 mm
0 to 3 g
USB function
A/D, D/A 16 bit 44.1 kHz or 48 kHz USB
selectable
Computer interface USB 1.1 Compliant Windows 7 or
above, or MAC OSX or above
General specifications
Power supply requirements 120V AC, 60 Hz (U.S.A)
240V AC, 50 Hz (Australia)
230V AC, 50 Hz (Singapore)
Power consumption 13 W
Dimensions 450 mm (17.72") × 353 mm (13.90")
× 166.5 mm (6.56")
(W × D × H)
Weight 12.5 kg (27.6 lbs)
Accessories Slip mat, dust cover, platter, 45 RPM
adapter, counterweight, headshell
with cartridge, power cable, USB
cable, dual RCA (male) cable with
integrated ground wire, stylus target
light
Replacement stylus
(sold separately)
Replacement headshell
(sold separately)
Specifications are subject to change without notice due to
improvements.
ATN-XP5
AT-HS1
EN
Cartridge and headshell specifications
Cartridge Model AT-XP5
Cartridge Type VM
Recommended load
impedance
Output voltage 5.5 mV (1 kHz, 5 cm/sec)
Stylus 0.3 × 0.7 mil bonded elliptical stylus
Cantilever ABS with carbon
Tracking force range 2.0 to 4.0 g (3.0 g standard)
Cartridge weight 6.2 g (0.22 oz)
Headshell model AT-HS1
Headshell weight 10 g (0.35 oz)
Headshell overhang
adjustment
47,000 ohms
± 4 mm
14
Page 16

Introduction
Nous vous remercions d’avoir fait l’acquisition de ce produit Audio-Technica.
Avant de l’utiliser, lisez entièrement ce manuel de l’utilisateur afin de vous assurer d’utiliser correctement le produit. Conservez ce manuel pour
référence ultérieure.
Ce produit ne peut être utilisé que dans les pays où il est vendu. Veillez à ce que la tension d’utilisation du produit corresponde à celle employée
dans le pays d’utilisation.
Contenu de l’emballage
Vérifiez que tous les articles inclus dans liste ci-dessous sont présents avant d’utiliser le produit.
Si certains éléments sont manquants ou endommagés, contactez votre distributeur local Audio-Technica.
• Corps de la platine
• Couvercle anti-poussière
• Plateau
• Tapis antidérapant
• Contrepoids
• Porte-cellule (AT-HS1) avec cellule (AT-XP5)
• Adaptateur 45 tours
• Câble USB (1,9 m)
• Câble audio RCA (environ 1,4 m)
• Câble d’alimentation
• Éclairage de cible de la pointe de lecture
• Manuel d’utilisation (ce document)
Après l’achat, nous vous suggérons de conserver tous les emballages pour un éventuel stockage, déménagement ou transport.
1
Page 17

Consignes de sécurité
Bien que ce produit soit conçu pour une utilisation sûre, une utilisation
incorrecte peut entraîner un accident. Pour garantir la sécurité,
respectez tous les avertissements et consignes lors de l’utilisation du
produit.
Consignes relatives au produit
Avertissement:
• N’utilisez pas un autre câble d’alimentation que celui fourni. Vous
risqueriez de provoquer un incendie, un choc électrique, une
détérioration ou un dysfonctionnement.
• Cessez d’utiliser le produit et débranchez le câble d’alimentation
si le produit commence à dysfonctionner, émet de la fumée, une
odeur, de la chaleur, un bruit indésirable ou présente d’autres signes
de détérioration. Dans un tel cas, contactez votre distributeur local
Audio-Technica. Poursuivre l’utilisation du produit peut entraîner un
incendie ou des dommages.
• Ne placez pas de flammes nues (telles que des bougies allumées) sur
le produit.
• Pour éviter tout choc électrique, dysfonctionnement ou incendie,
ne démontez pas, ne modifiez pas le produit et ne tentez pas de le
réparer.
• Pour éviter tout choc électrique, dysfonctionnement ou incendie,
n’exposez pas le produit à un fort impact.
• Pour éviter tout choc électrique ou blessure, ne manipulez pas le
produit avec les mains humides.
• Pour éviter tout choc électrique, dysfonctionnement ou incendie,
n’exposez pas le produit à des gouttes ou éclaboussures humides.
• Pour éviter tout choc électrique, dysfonctionnement ou incendie, ne
placez pas de corps étrangers tels que matières combustibles, métal
ou liquide dans le produit.
• Pour éviter tout incendie ou blessure par surchauffe, ne recouvrez
pas le produit de moquette ou tissu.
• Pour éviter tout accident ou incendie, rangez le sac en plastique
fourni avec le produit hors de portée des jeunes enfants et éloigné
des sources de chaleur.
• Placez le produit suffisamment près de la prise secteur pour pouvoir
saisir aisément la fiche du câble d’alimentation à tout moment. En
cas d’urgence, débranchez rapidement la fiche du câble d’alimentation
du produit.
• Branchez le produit à une prise secteur de classe Ⅰ avec mise à la
terre de protection.
Attention:
• N’installez pas le produit sur une surface instable pour éviter les
blessures ou les détériorations en cas de chute du produit.
• Pour éviter tout accident ou incendie dû à l’accumulation de
chaleur, n’installez pas le produit dans un lieu mal aéré. Ménagez
suffisamment d’espace autour du produit pour que la chaleur se
diffuse s’il est installé dans une baie.
• Pour éviter tout choc électrique, dysfonctionnement ou incendie, ne
stockez dans un endroit où il est exposé aux rayons directs du soleil
ni dans un lieu chaud, humide ou poussiéreux.
• Ne placez pas d’objets remplis de liquide, tels que vase, sur le produit
pour éviter tout choc électrique, dysfonctionnement ou, dans le pire
des cas, un incendie.
• N’utilisez pas de substances chimiques telles que benzine, diluant
ou nettoyant pour contacts électriques afin d’éviter dommages ou
dysfonctionnement.
Pour les clients aux États-Unis
Notice UL/CSA
ATTENTION
RISQUE DE CHOC ÉLECTRIQUE
NE PAS OUVRIR
Attention:
Il ne contient aucune pièce réparable par l’utilisateur. Les réglages
internes doivent être réservés à des professionnels qualifiés. Réservez
toutes les opérations de réparation à du personnel qualifié.
Attention: Pour éviter tout choc électrique, n’utilisez pas cette prise
polarisée avec une rallonge électrique, un réceptacle ou une autre
prise si les lames ne s’insèrent pas entièrement pour les protéger de
toute exposition.
Consignes de sécurité
1. Lisez ces instructions.
2. Conservez ces instructions.
3. Respectez tous les avertissements.
4. Suivez toutes les instructions.
5. N’utilisez pas cet appareil à proximité de l’eau.
6. Nettoyez uniquement avec un chiffon sec.
7. Ne bloquez aucun aérateur. Installez le produit conformément aux
instructions du fabricant.
8. N’installez pas le produit à proximité de sources de chaleur
telles que radiateurs, chauffage, cuisinières ou autres appareils
(notamment amplificateurs) qui produisent de la chaleur.
9. Ne déjouez pas l’objectif de sécurité de la fiche polarisée ou avec
mise à la terre. Une fiche polarisée compte deux lames, l’une plus
large que l’autre.
Une fiche avec mise à la terre compte deux lames plus une
troisième broche de mise à la terre. La lame large ou la troisième
broche est présente pour votre sécurité. Si la fiche fournie ne s’insère
pas dans votre prise, consultez un électricien pour remplacer la prise
obsolète.
10. Protégez le cordon d’alimentation des pas ou des pincements,
particulièrement au niveau des fiches, des réceptacles de service et
du point où il sort de l’appareil.
11. Utilisez uniquement les raccords/accessoires spécifiés par le
fabricant.
12. Utilisez uniquement le chariot, socle, trépied, support ou table
spécifié par le fabricant ou vendu avec l’appareil. Lorsque vous
utilisez un chariot, déplacez la combinaison chariot/appareil avec
précaution pour éviter tout accident dû à un renversement.
13. Débranchez cet appareil pendant les orages ou lorsqu’il demeure
inutilisé pendant une période prolongée.
14. Réservez toutes les opérations de réparation à du personnel qualifié.
Une réparation est nécessaire lorsque l’appareil a été endommagé
d’une quelconque manière, comme par exemple lorsque le cordon
d’alimentation est endommagé, si du liquide a été renversé ou si
des objets sont tombés dans l’appareil, s’il a été exposé à la pluie
ou à l’humidité, s’il ne fonctionne pas normalement ou a chuté.
Pour éviter tout choc électrique, n’ouvrez pas le boîtier.
Le symbole d’éclair, avec «l’éclair présentant une flèche
dans un triangle équilatéral, est destiné à alerter l’utilisateur
de la présence de «tension dangereuse» non isolée à
l’intérieur du boîtier du produit, d’une ampleur constituant
un risque de choc pour les personnes».
Le symbole de point d’exclamation, avec «le point
d’exclamation dans un triangle équilatéral est destiné
à alerter l’utilisateur de la présence d’instructions de
fonctionnement et d’entretien (réparation) importantes
dans la documentation qui accompagne le produit».
FR
2
Page 18

Consignes de sécurité
Remarques d’utilisation
Notice FCC
Avertissement:
Cet appareil est conforme à la section 15 des règles FCC. Son
fonctionnement est soumis aux deux conditions suivantes: (1) Cet
appareil ne doit pas provoquer d’interférence nuisible et (2) cet appareil
doit accepter toute interférence reçue, notamment celles qui peuvent
provoquer un fonctionnement indésirable.
Attention:
Vous êtes informé que tous les changements et modifications qui ne
sont pas expressément approuvés dans ce manuel peuvent annuler
votre droit d’utilisation de cet équipement.
Remarque: Cet équipement a été testé et déclaré conforme avec les
limites concernant les appareils numériques de classe B, conformément
à la section 15 des règles FCC. Ces limites sont destinées à assurer
une protection raisonnable contre les interférences nuisibles dans
une installation résidentielle. Cet équipement génère, utilise et peut
diffuser une énergie de radiofréquence et, s’il n’est pas installé et utilisé
conformément aux instructions, peut provoquer des interférences
nuisibles pour les communications radio. Il n’est toutefois apporté
aucune garantie que l’interférence ne se produise pas dans une
installation particulière. Si cet équipement provoque une interférence
nuisible pour la réception radio ou télévision, ce qui peut être déterminé
en arrêtant l’équipement et en le remettant en marche, l’utilisateur est
invité à tenter de corriger l’interférence en adoptant une ou plusieurs
des mesures suivantes:
– Réorienter ou déplacer l’antenne de réception.
– Augmenter l’écart entre l’équipement et le récepteur.
– Brancher l’équipement dans une prise sur un circuit différent de celui
auquel le récepteur est branché.
– Consulter un revendeur ou un technicien radio/TV expérimenté.
Corps de la platine
• Ne placez pas et n’utilisez pas le produit dans des endroits soumis à
de fortes chaleurs ou une humidité élevée, très sales ou soumis à des
vibrations extrêmes.
• Le produit doit être placé sur une surface plane et lisse.
Cellule
• Fixez la protection sur la cellule lorsque le produit n’est pas utilisé.
• Ne touchez pas la pointe de lecture de la cellule avec le doigt.
• Empêchez la pointe de lecture de percuter le plateau ou le bord du
disque.
Pour les clients au Canada
Déclaration IC:
CAN ICES-3 (B)/NMB-3(B)
3
Page 19

Noms des pièces et fonctions
Schéma d’ensemble
2
1
2
5
4 6
3
Cadran de puissance
1
Contrôle la puissance de l’appareil.
Double bouton marche/arrêt
2
Engage et désengage le moteur/plateau.
Boutons de vitesse du plateau
3
Sélectionnez vitesse du plateau 33 ou 45 tours. Pour sélectionner
78 tours, appuyez simultanément sur les boutons 33 et 45 tours;
les deux boutons doivent être allumés.
Plateau
4
Le plateau en fonte d’aluminium s’installe directement sur l’axe
central/l’axe du moteur.
Points stroboscopiques (sur le bord du plateau)
5
Utiliser conjointement à la lumière stroboscopique située sous
le cadran de puissance pour fournir une indication visuelle des
vitesses de plateau précises.
Axe
6
Éclairage de cible de la pointe de lecture amovible
7
Assure l’éclairage dirigé sur la position de la pointe de lecture pour
une meilleure indication visuelle par faible éclairage. Branchement
facile dans la prise sur le dessus de la platine.
Molette de commande de démarrage
8
Tournez la molette de commande de démarrage pour augmenter
ou diminuer le temps de démarrage du plateau entre 0,2 et 6,0
seconde. (Le réglage minimum correspond au démarrage le plus
rapide; le réglage maximum correspond au démarrage le plus lent
pour atteindre la vitesse sélectionnée.)
Molette de commande de frein
9
Tournez la molette de commande de frein pour augmenter ou
diminuer le temps de freinage du plateau entre 0,2 et 6,0 seconde.
(Le réglage minimum correspond à l’arrêt
le plus rapide; le réglage maximum correspond au plus lent.)
Bouton de commande d’inversion
10
Commande le sens de rotation du plateau.
7 8 9
10
14
13
12
18 2015 1517 191611
Boutons de la plage de vitesse
11
Sélectionnez une plage de vitesse +/- 10 ou 20%.
• Pour sélectionner +/-50%, appuyez simultanément sur les
boutons 10 et 20.
Bouton à quartz
12
Active et désactive la fonction de pitch. Lorsque le quartz est
activé, le plateau maintient la vitesse de rotation à un pitch de
0%, quelle que soit la position du curseur de pitch et les réglages
de commande de plage de vitesse.
Curseur de commande de réglage du pitch
13
Utiliser conjointement au bouton de pitch pour varier la vitesse de
rotation du plateau. Le verrouillage du quartz est actif en position
centrale de détente.
Adaptateur 45 tours
14
Adapte les disques de 7pouces à grand trou central à l’axe central
fixe
Pieds
15
Ajuste le niveau du produit.
Bornes de sortie stéréo
16
Branchez le câble audio RCA. Branchez-le à la prise d’entrée
PHONO de l’amplificateur (mixage DJ) ou à sa prise d’entrée de
ligne. La borne rouge correspond au canal de droite et la borne
blanche au canal de gauche.
Borne de masse (terre)
17
Connectez la borne de masse (terre) de l’amplificateur à cette
borne en utilisant la ligne de masse du câble audio RCA.
Sélecteur de préamplificateur
18
Si vous utilisez un amplificateur avec une prise entrée PHONO
(mixage DJ), placez cet interrupteur en position PHONO. En cas
de connexion d’un amplificateur (mixage DJ) à la prise LINE/AUX,
placez ce sélecteur sur la position LINE.
Sortie USB
19
Utilisez cette sortie pour raccorder votre platine à l’entrée USB de
votre ordinateur.
Entrée d’alimentation
20
Utilisez-la pour brancher le câble d’alimentation fourni.
FR
4
Page 20

Noms des pièces et fonctions
Bras de lecture
Contrepoids
21
Équilibre le bras de lecture et permet d’ajuster la force d’appui
vers le bas correcte sur la pointe de lecture.
Bague de réglage de la force d’appui
22
Utilisez pour régler la force d’appui.
Verrou de hauteur du bras de lecture
23
Verrouille le réglage de hauteur du bras de lecture.
• Déverrouillez toujours complètement avant d’effectuer un
réglage de hauteur.
Cadran de commande anti-patinage
24
Pendant la lecture du disque, une force agit sur la pointe de lecture
pour la tirer vers l’intérieur. Cette force peut être contrebalancée
en réglant les mêmes valeurs pour la force anti-patinage et la
force d’appui.
Levier de commande de levage du bras de lecture
25
Contrôle l’action de levage du bras de lecture.
• Le mécanisme de levage est amorti par hydraulique pour ralentir
la descente du bras de lecture.
Support de bras de lecture avec pince
26
Utilisez la pince pour fixer le bras de lecture afin qu’il ne bouge
pas.
Porte-bras de lecture
27
Déplace le bras de lecture verticalement vers et depuis la face du
disque.
Cadran de réglage de hauteur du bras de lecture
28
Soulève et abaisse le bras de lecture afin qu’il demeure parallèle à
la surface du disque.
Bague de verrouillage
29
Tournez la bague vers la gauche (dans le sens anti-horaire) pour
fixer le porte-cellule. Pour enlever le porte-cellule, tournez la bague
vers la droite.
Porte-cellule
30
La cellule (AT-XP5) est fixée sur le porte-cellule (AT-HS1).
21
22
23
24
25
26
27
28
29
30
5
Page 21

Préparation pour l’utilisation
Positionnement du plateau
Ce produit nécessite un peu de montage avant de l’utiliser pour la
première fois.
Ne connectez pas le câble d’alimentation jusqu’à ce que le montage
soit terminé.
1. Placez le plateau sur l’axe.
• Pour éviter d’endommager l’axe en installant le plateau, alignez les
positions de l’axe et de l’orifice du plateau, puis posez lentement le plateau.
• Assurez-vous que le plateau est correctement installé sur l’axe.
2. Placez le tapis antidérapant sur le plateau.
Tapis
antidérapant
Plateau
Axe
Montage du bras de lecture
1. Déposez l’attache-câble utilisé pour fixer le bras de lecture au
moment de la livraison.
• Utilisez la pince pour fixer temporairement le bras de lecture à son support.
2. Installez le porte-cellule sur le bras de lecture.
• Maintenez les bords gauche et droit du porte-cellule afin de ne pas
endommager la pointe de lecture ou couper les fils de la cellule.
Bague de verrouillage
FR
3. Une fois le porte-cellule inséré, tournez la bague de verrouillage
dans le sens anti-horaire (vers la gauche).
4. Avec la bague de réglage de la force d’appui face vers l’avant,
fixez le contrepoids à l’arrière du bras de lecture, et tournez-le
lentement dans le sens anti-horaire (vers la gauche).
Installation de la platine
• Montez le produit sur une surface plane.
• Pour éviter les effets de vibrations et la pression acoustique, ne
montez pas le produit à côté d’éléments tels que des haut-parleurs.
• Le produit peut percevoir des parasites s’il est placé à côté d’une
radio. Par conséquent, essayez de maintenir le produit éloigné des
radios.
• Si le produit est proche d’équipements (téléphone portable, etc.)
qui émettent de fortes ondes de radio, des bruits parasites peuvent
survenir.
Mise de niveau de la platine
Une fois le produit positionné à l’emplacement d’utilisation, réglez les
pieds de sorte que le produit soit de niveau.
• Utilisez un niveau (vendu séparément) selon les besoins pour vérifier
que le produit est de niveau.
Bague de réglage de la force d’appui
Équilibre du bras de lecture et force d’appui
Afin que la cellule perçoive correctement le son des rainures du disque,
l’équilibre du bras de lecture et la force d’appui doivent être réglés
pour s’adapter aux spécifications de la cellule. Si l’équilibre du bras de
lecture et la force d’appui ne sont pas correctement ajustés, le disque
ou la pointe de lecture de la cellule peuvent être endommagés.
• Ne faites pas glisser la pointe de lecture de la cellule sur le disque
ou le plateau lors du réglage de l’équilibre du bras de lecture ou
de la force d’appui. Dans un tel cas, la pointe de lecture peut être
endommagée.
6
Page 22

Préparation pour l’utilisation
Réglage de l’équilibre du bras de lecture
1. Retirez le protecteur de cellule.
2. En maintenant légèrement le porte-cellule afin de ne pas déplacer
le bras de lecture, débloquez la pince.
• Le bras de lecture est incliné car l’équilibre n’est pas encore réglé.
Pince
3. En maintenant encore légèrement le porte-cellule, tournez le
contrepoids pour régler l’équilibre du bras de lecture.
•
Ajustez l’équilibre de sorte que le bras de lecture soit à niveau lorsque vous
libérez le porte-cellule.
2. Tournez le contrepoids et la bague de réglage de la force d’appui
dans le sens anti-horaire (vers la gauche) jusqu’à ce que la valeur
de la ligne centrale corresponde à la valeur de la force d’appui
pour la cellule utilisée.
• Reportez-vous aux spécifications du fabricant de la cellule en ce qui
concerne la valeur de la force d’appui recommandée.
• La valeur standard de force d’appui pour la cellule fournie avec ce produit
est de 3,0 g.
Réglage de l’ajustement anti-patinage
Pendant la lecture du disque, une force agit sur la pointe de lecture
pour la tirer vers l’intérieur. Cette force peut être contrebalancée en
réglant les mêmes valeurs pour la force anti-patinage et la force d’appui.
Réglez le cadran de contrôle anti-patinage pour avoir la même valeur
que la valeur de force d’appui.
• La valeur standard de force d’appui pour la cellule fournie avec ce
produit est de 3,0 g.
Bras de lecture Contrepoids
Ajustez de sorte que le bras de
lecture soit à niveau
4. Remettez le bras de lecture sur son support et verrouillez la pince.
Réglage de la force d’appui
1. En maintenant le contrepoids afin qu’il ne bouge pas, tournez
la bague de réglage de la force d’appui de sorte que sa position
«0» s’aligne avec la ligne centrale à l’arrière du bras de lecture.
• La force d’appui ne se règle pas simplement en tournant la bague de
réglage de la force d’appui).
Bague de réglage
de la force d’appui
Ligne centrale
Installation/dépose du couvercle
anti-poussière
• Le couvercle anti-poussière est conçu pour protéger les composants
sensibles du produit lorsqu’il n’est pas utilisé. Il doit être retiré pour la
lecture des disques.
• L’utilisation du couvercle anti-poussière pendant la lecture peut
endommager le disque ou dégrader le son.
• Retirez et remettez toujours le couvercle anti-poussière avec soin.
7
Page 23

Préparation pour l’utilisation
Réglage du sélecteur de préamplificateur
Ce produit possède une fonction d’égaliseur phono intégré. Vous pouvez
utiliser le produit même sans amplificateur phono ou équipement connecté
avec un amplificateur phono intégré, en raccordant un haut-parleur actif, etc.
Utilisez le sélecteur de préamplificateur pour régler la puissance, comme
indiqué ci-dessous.
Équipement
connecté en
cours d’utilisation
Appareil avec
entrée phono
Appareil sans
entrée phono
Carte son
d’ordinateur
Appareil avec
entrée USB
*1
Un adaptateur audio (vendu séparément) sera peut-être nécessaire pour brancher
le câble audio RCA à la prise d’entrée de ligne de la carte son de l’ordinateur.
*2
Utilisez le câble USB fourni à la place du câble audio RCA pour le branchement.
Position du
sélecteur de
préamplificateur
PHONO
LINE
LINE Prise d’entrée de ligne de
LINE Entrée USB de votre
Où brancher le câble
audio RCA
Prise d’entrée phono et borne
de mise à la masse (terre) de
l’équipement connecté
AUX ou prise d’entrée de ligne
de l’équipement connecté
carte son d’ordinateur
ordinateur*
2
*1
• En fonction de l’équipement connecté que vous utilisez, une borne
de masse (terre) peut-être être présente à proximité de la prise d’entrée
phono. Dans ce cas, raccordez-la en utilisant la ligne de masse du
câble audio RCA. Cela empêchera un faible bourdonnement qui
pourrait sinon être entendu pendant la lecture.
Raccordement aux ordinateurs avec entrée USB
Suivez les réglages pour le sélecteur de préamplificateur pour raccorder
le câble USB fourni à l’entrée USB de votre ordinateur.
Le câble USB fourni raccorde le produit à votre ordinateur sans pilotes
spéciaux.
Audacity (voir le site http://www.audacityteam.org pour des
informations détaillées) et d’autres logiciels tiers d’enregistrement
compatibles sont disponibles pour vous permettre d’enregistrer depuis
le produit vers votre ordinateur.
FR
Raccordement à l’équipement connecté (hautparleurs actifs, amplificateurs, mixage DJ, etc.)
Raccordement à la source audio
Alignez les réglages pour le sélecteur de préamplificateur et branchez le
câble audio RCA à une prise d’entrée qui est compatible avec l’équipement
connecté utilisé (amplificateur, récepteur, haut-parleurs actifs, carte son, etc.).
La prise rouge du câble audio RCA correspond au canal droit (R), et la
prise blanche correspond au canal gauche (L).
Appareil avec entrée PHONO*
Équipement
connecté
(amplificateur,
mixage DJ,
etc.)
Appareil sans entrée PHONO
Vers
port USB
Vers la prise
Vers la prise
• Veillez à régler le sélecteur de préamplificateur sur la position LINE.
Raccordement du câble d’alimentation
Enfin, une fois toutes les connexions audio effectuées, fixez le câble
d’alimentation inclus au produit. Branchez ensuite la fiche du câble
d’alimentation une prise secteur commode.
Appareil avec entrée PHONO*
Appareil sans entrée PHONO
Ou
raccordement
LINE
8
Page 24

Lecture d’un disque
Avant la lecture d’un disque
1. Retirez le protecteur de cellule.
• Si le bras de lecture est fixé sur son support, déverrouillez la pince.
Protection
2. Tournez le cadran de puissance sur ON.
• Le sélecteur de vitesse et l’éclairage stroboscopique s’allument.
3. Au besoin, branchez l’éclairage de cible de la pointe de lecture
pour éclairer la position de la pointe de lecture sur le disque.
4. Placez le disque sur le plateau de sorte que l’orifice au centre soit
aligné avec l’axe.
• Lors de la lecture d’un disque 45 tours, fixez l’adaptateur 45 tours (voir le
diagramme de droite ci-dessous).
À 33-1/3 tr/min À 45 tr/min
Disque
Tapis
antidérapant
Plateau
5. Réglez la vitesse de rotation du plateau (33/45/78) en fonction de
celle du disque.
• Pour régler la vitesse du plateau sur 78 tr/min, appuyez simultanément sur
les boutons 33 et 45 tr/min.
Adaptateur
45 tours
4. Abaissez le bras de lecture en baissant le levier de levage en
position «DOWN». Le bras de lecture descend lentement sur le
disque et la lecture commence.
•
Vous pouvez également ignorer les étapes de 2 à 4 et soulever le porte-cellule
avec les doigts, déplacer le bras de lecture à l’emplacement voulu sur le
disque, puis abaisser le porte-cellule pour commencer la lecture d’un disque.
• Ne soumettez pas le produit à de forts impacts pendant la lecture.
Réglage du pitch
1. Appuyez sur le bouton à quartz pour désactiver la fonction de pitch.
•
Le verrouillage interne du quartz maintient le plateau à la vitesse nominal précise
(0 % de pitch), quelle que soit la position du curseur de pitch et les réglages de
commande de plage de vitesse, lorsque le bouton à quartz est activé.
2. Utilisez le curseur de commande de réglage du pitch
conjointement aux boutons de pitch pour varier la vitesse de
rotation du plateau jusqu’à +/- 50%.
• Lorsque le curseur de commande de réglage du pitch se trouve en position
centrale de détente, le verrouillage du quartz est actif.
Mesure du pitch
Les quatre rangées de points stroboscopiques sur le bord du plateau sont conçues
pour mesurer et vérifier la vitesse du plateau (pitch).
Vérifiez les mouvements des points stroboscopiques éclairés par la lumière
stroboscopique située sous le cadran de puissance.
Lorsque la rangée correspondante de points stroboscopiques semble fixe, la
platine se trouve au pourcentage de vitesse de fonctionnement indiqué ci-dessous.
Si les points semblent se déplacer vers la droite, le plateau tourne en-dessous de
la vitesse nominale. S’ils semblent se déplacer vers la gauche, le plateau tourne
au-dessus de la vitesse nominale.
Lecture d’un disque
Baissez le volume de l’amplificateur, des haut-parleurs, etc., de manière
suffisante.
1. Appuyez sur l’un des bouton marche/arrêt.
• Le plateau commencer à tourner.
2. Relevez le bras de lecture en plaçant le levier de levage en
position relevée «UP».
Levier de commande de
levage du bras de lecture
3. Placez le bras de lecture à l’endroit désiré (sillon) sur le disque.
+7,2 % de changement de pitch lorsque les points de la rangée
supérieure sont fixes [point de la rangée supérieure]
+3,3 % de changement de pitch lorsque les points de la deuxième
rangée sont fixes [point de la deuxième rangée]
0 % de changement de pitch (vitesse normale) lorsque les points de la
troisième rangée sont fixes [point de la troisième rangée]
-3,3 % de changement de pitch lorsque les points de la rangée
inférieure sont fixes [point de la rangée inférieure]
Réglage de la vitesse de démarrage et de
freinage du plateau
Tournez la molette de commande de démarrage pour augmenter ou diminuer le
temps de démarrage du plateau entre 0,2 et 6,0 seconde. (Le réglage minimum
correspond au démarrage le plus rapide; le réglage maximum correspond au
démarrage le plus lent pour atteindre la vitesse sélectionnée.)
Tournez la molette de commande de frein pour augmenter ou diminuer le
temps de freinage du plateau entre 0,2 et 6,0 seconde. (Le réglage minimum
correspond à l’arrêt le plus rapide; le réglage maximum est le plus lent.)
9
Page 25

Lecture d’un disque
Entretien
Inversion d’un disque
Au besoin, appuyez sur le bouton de commande d’inversion pour
inverser la rotation du plateau.
• Le bouton de commande d’inversion s’allume.
Interrompre la lecture du disque
Après avoir baissé le volume de l’amplificateur, des haut-parleurs, etc.,
de manière suffisante, levez le bras de lecture à l’aide du levier.
Arrêt du disque
1. Baissez le volume de l’amplificateur, des haut-parleurs, etc., de
manière suffisante.
2. Soulevez le levier de commande de levage du bras de lecture,
reposez le bras de lecture sur son support et fixez-le avec la
pince.
3. Si vous utilisez l’éclairage de cible de la pointe de lecture,
éteignez-le en le retirant de la prise.
4. Appuyez sur l’un des bouton marche/arrêt pour arrêter la rotation
du plateau.
• Le plateau ralentit et s’arrête.
5. Tournez le cadran de puissance sur OFF.
6. Enlevez le disque une fois que le plateau est à l’arrêt complet.
Corps de la platine
• Lorsque le corps d’une platine est sale ou poussiéreux, débranchez
d’abord la fiche du câble d’alimentation, puis essuyez les impuretés
et poussières avec un chiffon doux et sec.
• N’utilisez pas de benzène, de solvants, etc.
• Lors du stockage du produit pendant une période prolongée,
débranchez la fiche du câble d’alimentation de la prise et enroulez
l’équipement dans un emballage plastique; évitez qu’il ne prenne
l’humidité.
FR
Pointe de lecture
• Si des impuretés et des salissures sont collées à la pointe de lecture,
nettoyez-la avant chaque utilisation.
• Nous recommandons d’utiliser un nettoyant pour pointe de lecture
(vendu séparément) si la pointe est très sale. Nettoyez la pointe de
lecture en déplaçant la brosse de l’arrière vers l’avant de la pointe de
lecture.
• Pour éviter que le disque ne soit rayé ou déformé, enlevez-le après
utilisation.
• N’utilisez pas un autre plateau que celui fourni.
10
Page 26

Remplacement de la pointe de lecture
Remplacement d’une cellule
Dépose de la pointe de lecture
• Outre la détérioration de la qualité du son, les disques peuvent
également être endommagés si la pointe de lecture de la cellule est
usée.
• En règle générale, remplacez la pointe après 300 heures d’utilisation.
De fortes rayures peuvent écourter la durée de service de la pointe
de lecture.
• Veillez à débrancher la fiche du câble d’alimentation du produit de la
prise.
1. Enlevez le porte-cellule du bras de lecture.
• Maintenez le bras de lecture puis enlevez délicatement le porte-cellule.
2. Une fois la protection de la cellule retirée, déposez la pointe de
lecture et tirant dessus dans le sens de la flèche sans toucher le
cantilever, la pointe de lecture et les aimants.
Tirer
Reportez-vous au manuel d’utilisation pour la cellule que vous utilisez
si vous remplacez la cellule (AT-XP5) incluse avec ce produit par une
autre cellule vendue dans le commerce. Après avoir remplacé l’ancienne
cellule par une neuve, vous devez réajuster l’avancée, l’équilibre du
bras de lecture et la force d’appui.
1. Enlevez le porte-cellule du bras de lecture.
• Maintenez le bras de lecture avec la pince puis enlevez délicatement le
porte-cellule.
2. Enlevez la pointe de la cellule.
• Reportez-vous à «Dépose de la pointe de lecture» à la p. 11 (la présente
page).
3. Enlevez les pointes de câble.
• Veillez à ne pas endommager les pointes de câbles.
4. À l’aide d’un tournevis fendu non magnétique vendu dans le
commerce, enlevez les vis d’installation, puis enlevez la cellule du
porte-cellule.
5. Reportez-vous au manuel d’utilisation pour les instructions de
montage de la nouvelle cellule et de branchement des pointes de
câble.
Vis
Rondelles
Installation d’une nouvelle pointe de lecture
1. Montez la pointe de lecture de remplacement sur la cellule.
Alignez la position de
l’avancée intérieure.
2. Installez le porte-cellule sur le bras de lecture.
Écrous
6. À l’aide d’un tournevis fendu non magnétique vendu dans le
commerce, serrez les vis aux deux emplacements, puis ajustez
l’avancée.
• Une fois les réglages terminés, serrez fermement les vis.
7. Fixez le porte-cellule du bras de lecture.
8. Ajustez la hauteur du bras de lecture.
• Reportez-vous à «Réglage de la hauteur du bras de lecture» à la p. 12
pour effectuer les réglages.
9. Réglez l’équilibre du bras de lecture et la force d’appui.
• Reportez-vous à «Réglage de l’équilibre du bras de lecture» et à «Réglage
de la force d’appui» à la p. 7.
11
Page 27

Réglage de la hauteur du bras de
lecture
Lorsque vous installez une cellule différente de celle fournie, vous
devez maintenir une distance adaptée entre la cellule et la surface du
disque. Placez la pointe de lecture sur le disque et vérifiez que le bras
de lecture est parallèle à la surface du disque. Sinon, réglez la hauteur
du bras de lecture.
1. Tournez le verrouillage de hauteur du bras de lecture pour
desserrer l’ancrage de ce dernier.
2. Tournez le cadran de réglage de hauteur du bras de lecture pour
effectuer ce réglage.
Lors du transport de la platine
À l’aide du matériel d’emballage d’origine du produit, emballez la
platine dans le l’ordre inverse du déballage. Si vous n’avez pas de
matériel d’emballage, prenez les mesures suivantes:
• Après avoir débranché la fiche du câble d’alimentation de la prise,
enlevez le plateau, puis emballez-le afin de ne pas l’endommager. Si
le produit est déplacé avec le plateau toujours en place, l’axe peut
être endommagé.
• Fixez le bras de lecture avec la pince.
• Enlevez le contrepoids.
• Enlevez le porte-cellule du bras de lecture avec la protection fixée à
la cellule, puis emballez l’ensemble du porte-cellule afin de ne pas
l’endommager.
• Emballez le corps de la platine dans un chiffon doux afin de ne pas
l’endommager.
FR
3. Une fois les réglages terminés, tournez le verrouillage de hauteur
du bras de lecture pour le fixer.
12
Page 28

Dépannage
Problème Solution
Le plateau ne tourne pas. • Le câble d’alimentation est-il branché à la prise? Branchez le câble d’alimentation à la prise.
• La fiche du câble d’alimentation est-elle détachée? Vérifiez si la fiche est correctement fixée au produit.
Le plateau tourne mais aucun
son n’en sort ou le volume n’est
pas assez fort.
La pointe de lecture saute. • La force d’appui est-elle trop faible ou trop forte? Réglez la force d’appui.
Le son est hurlant. •
Il y a un bruit lorsque le disque
tourne.
Le son lorsque le disque tourne
est trop rapide ou trop lent.
Déplacer le curseur de réglage
du pitch n’a aucun effet.
Les points stroboscopiques sont
difficiles à distinguer et/ou l’éclairage
de la pointe de lecture est très faible.
Un bourdonnement est audible
pendant la lecture.
• La protection de la cellule est-elle toujours en place? Retirez le protecteur de cellule.
• Le bras de lecture est-il en position relevée? Abaissez le bras de lecture.
• Les paramètres de fonction et l’entrée pour un équipement connecté (amplificateur, etc.) sont-ils
correctement sélectionnés? Vérifiez que les paramètres pour l’équipement connecté sont corrects.
• La pointe de lecture est-elle endommagée? Vérifiez la pointe de lecture et remplacez-la au besoin.
•
La pointe de lecture est-elle placée correctement sur le corps de la cellule? Vérifiez la cellule et réglez-la au besoin.
• Les positions de réglage pour le sélecteur de préamplificateur sont-elles correctes? Assurez-vous que les
réglages du préamplificateur sont corrects, en notant les problèmes courants suivants et leurs causes:
- S’il n’y a pas de son, ou si le volume n’est pas assez fort, le produit est réglé sur la position «PHONO»
et raccordé à l’entrée AUX/LINE de l’amplificateur.
- Si le volume est trop fort ou est déformé, le produit est réglé en position «LINE» et l’équipement
connecté est raccordé à l’entrée PHONO.
• La force d’appui est-elle trop forte ? Réglez la force d’appui.
• L’anti-patinage est-il mal réglé? Vérifiez que l’anti-patinage est réglé sur la même valeur que la force d’appui
de la cellule.
• Le disque est-il déformé? Vérifiez le disque.
• Le disque est-il rayé? Vérifiez le disque.
Le produit perçoit-il trop de vibrations du sol, des surfaces des parois, ou des haut-parleurs à proximité?
Diminuez les vibrations ou installez le produit sur une surface qui n’est pas soumise à des effets de vibrations.
•
Le produit est-il monté sur une surface instable? Vérifiez que la surface sur laquelle le produit est monté est appropriée.
• Y-a-t-il de la poussière sur la pointe de lecture de la cellule? Si de la poussière est collée sur la pointe de
lecture, nettoyez-la à l’aide d’une brosse vendue dans le commerce.
• Le réglage de la vitesse est-il correct pour ce produit? Utilisez le bouton de vitesse de plateau pour
sélectionner la vitesse correcte pour le type de disque en cours de lecture.
• Le pitch variable est-il engagé? Appuyez sur le bouton du quartz ou remettez le curseur de réglage du
pitch en position de détente centrale pour engager le verrouillage du quartz.
• Si le témoin proche de la position de détente centrale du curseur de réglage du pitch demeure bleu
lorsque le curseur est déplacé, le verrouillage du quartz est engagé. Appuyez sur le bouton du quartz pour
désengager le verrouillage du quartz et activer le pitch variable. Le témoin doit être éteint.
• Un éclairage excessivement lumineux ou fluorescent interfère avec l’indicateur stroboscopique. Tenez
une main, une pochette de disque, etc. au-dessus de l’indicateur stroboscopique pour le protéger du fort
éclairage.
La ligne de terre est-elle correctement branchée? Vérifiez que la ligne de terre est correctement raccordée.
•
• Le porte-cellule est-il solidement fixé au bras de lecture? Vérifiez que la bague de verrouillage est serrée.
Dimensions
353
13
450
166,5
(Unité: mm)
Page 29

Caractéristiques techniques
Caractéristiques de la platine
Type 3 vitesses, fonctionnement
entièrement manuel
Moteur Moteur CC sans charbons triphasé à
16 pôles
Mécanisme d’entraînement Entrainement direct
Vitesses 33-1/3tr/min, 45tr/min, 78 tr/min
Plateau de la platine Fonte d’aluminium de 332 mm de
diamètre
Coupe de démarrage > 4,5 kgf.cm
Système de freinage Frein électronique
Fluctuations de vitesse
Rapport signal-bruit > 55 dB (DIN-B)
Niveaux de sortie
«PHONO»
«LINE (MM)»
RIAA
Caractéristiques du bras de lecture
Type Bras de lecture en S statique et
Longueur utile 230 mm
Réglage de l’avancée de la cellule
Angle maximal d’erreur de piste
Ajustement de la force d’appui
vertical
Plage de poids de cellule
applicable (porte-cellule inclus)
Hauteur de la plage de
réglage du bras de lecture
Plage d’anti-patinage 0 à 3 g
< 0,1% WRMS (JIS WTD) en 33 tr/min
5,5 mV nominal à 1kHz, 5cm/s
300 mV nominal à 1kHz, 5cm/s
20-20kHz, +1/-3dB
(Entrée: 1,5mV 1kHz)
équilibré avec porte-cellule amovible
15 mm
Moins de 3°
0 à 4,0 g
13 à 18 g
0 à 6 mm
Fonction USB
A/D, D/A USB à sélectionner 16 bits 44,1 kHz
ou 48 kHz
Interface avec l’ordinateur USB 1.1 compatible Windows 7 ou
version supérieure ou MAC OSX ou
version supérieure
Caractéristiques générales
Alimentation requise 120V CA, 60 Hz (États-Unis)
240V CA, 50 Hz (Australie)
230V CA, 50 Hz (Singapour)
Consommation d’énergie 13 W
Dimensions 450 mm × 353 mm × 166,5 mm
(L × l × P)
Poids
Accessoires Tapis antidérapant, couvercle anti-
Pointe de lecture de
remplacement (vendue
séparément)
Porte-cellule de remplacement
(vendu séparément)
Les caractéristiques sont susceptibles de changer sans préavis en cas
d’améliorations.
12,5 kg
poussière, plateau, adaptateur 45
tours, contrepoids, porte-cellule avec
cellule, câble d’alimentation, câble
USB, double câble RCA (mâle) avec
fil de masse intégré, éclairage de
cible de la pointe de lecture
ATN-XP5
AT-HS1
FR
Caractéristiques du porte-cellule et de la cellule
Modèle de cellule AT-XP5
Type de cellule VM
Impédance de charge
recommandée
Tension de sortie 5,5 mV (1 kHz, 5 cm/s)
Pointe de lecture Pointe de lecture elliptique fixée de
Cantilever ABS avec carbone
Plage de force d’appui 2,0 à 4,0 g (standard 3,0 g)
Poids de la cellule 6,2 g
Modèle de porte-cellule AT-HS1
Poids du porte-cellule 10 g
Réglage d’avancée du portecellule
47000 ohms
0,3 × 0,7 mm
± 4 mm
14
Page 30

Introducción
Gracias por adquirir este producto de Audio-Technica.
Antes de utilizar el producto, lea detenidamente este manual del usuario para asegurarse de que usa el producto correctamente. Guarde este
manual para futuras consultas.
Este producto solo puede utilizarse en los países en los que está disponible para su venta. Asegúrese de que la tensión de red eléctrica del producto
es la correcta para el país de destino.
Contenido del paquete
Antes de utilizar este producto, compruebe que cuenta con todos los artículos que se detallan a continuación.
Si falta algún artículo o está dañado, póngase en contacto con su distribuidor local de Audio-Technica.
• Cuerpo del giradiscos
• Cubierta antipolvo
• Plato
• Disco del plato
• Contrapeso
• Portacápsulas (AT-HS1) con cápsula (AT-XP5)
• Adaptador de 45 RPM
• Cable USB (1,9 m)
• Cable de audio RCA (aprox.1,4 m)
• Cable de alimentación
• Luz de la aguja
• Manual del usuario (este documento)
Le recomendamos que guarde todo el material de embalaje por si en el futuro lo necesita para almacenamiento, traslado o envío del producto.
1
Page 31

Precauciones de seguridad
Este producto se ha diseñado para un uso seguro; no obstante, un uso
incorrecto podría ocasionar un accidente. Para garantizar la seguridad,
tenga en cuenta siempre todos los avisos y precauciones cuando utilice
el producto.
Precauciones para el producto
Advertencia:
• No utilice un cable de alimentación distinto al suministrado. De lo
contrario, puede provocar un incendio, una descarga eléctrica, daños
o un mal funcionamiento.
• Deje de usar el producto y desconecte el cable de alimentación si el
producto comienza a funcionar mal, produce humo, olor, calor, ruido
no deseado o muestra otros signos de daños. En tal caso, póngase
en contacto con el distribuidor de Audio-Technica local. Seguir
utilizando el producto puede provocar un incendio o daños.
• No coloque sobre el producto ninguna fuente de llama viva (como
una vela encendida).
• No desmonte, modifique o intente reparar el producto para evitar
descargas eléctricas, averías o incendios.
• No someta el producto a fuertes impactos para evitar descargas
eléctricas, averías o incendios.
• No manipule el producto con las manos mojadas para evitar
descargas eléctricas o lesiones.
• Para evitar descargas eléctricas, averías o incendios, no exponga el
producto a goteos o salpicaduras.
• No coloque materiales extraños como materiales combustibles,
metales o líquidos en el producto para evitar descargas eléctricas, un
mal funcionamiento o un incendio.
• No cubra el producto con un tapete o un paño para evitar incendios
o lesiones por sobrecalentamiento.
• Guarde la bolsa de plástico incluida fuera del alcance de los niños o
lejos de fuentes de calor para evitar accidentes o incendios.
• Coloque el producto cerca de la toma de CA para poder acceder
fácilmente al enchufe del cable de alimentación en cualquier
momento. En caso de emergencia, desconecte rápidamente el cable
de alimentación del producto.
• Conecte el producto con estructura de clase Ⅰ a la toma de corriente
alterna con una conexión de protección a tierra.
Precaución:
• No instale el producto en una superficie inestable para evitar lesiones
o daños en caso de caída del producto.
• No instale el producto en un lugar mal ventilado para evitar
accidentes o incendios a causa de la acumulación de calor. Si instala
el producto en un bastidor, deje suficiente espacio libre alrededor del
dispositivo para posibilitar la irradiación de calor.
• No almacene el producto bajo la luz directa del sol, cerca de equipos
de calefacción o en lugares calientes, húmedos o polvorientos para
evitar descargas eléctricas, un mal funcionamiento o incendios.
• No coloque objetos llenos de líquido, como jarrones, sobre el
producto para evitar descargas eléctricas, un mal funcionamiento o,
en el peor de los casos, un incendio.
• No utilice productos químicos como bencina, diluyente o limpiador
de contactos eléctrico para evitar daños o un mal funcionamiento.
Para clientes de Estados Unidos
Aviso UL/CSA
PRECAUCIÓN
RIESGO DE DESCARGA ELÉCTRICA
NO ABRIR
Precaución:
extraiga la tapa. En el interior no hay ninguna pieza que el usuario
pueda reparar. Los ajustes internos debe realizarlos únicamente
personal calificado. Solicite al personal de servicio cualificado que
realice todas las acciones de mantenimiento.
Precaución: Para evitar descargas eléctricas, no utilice este enchufe
polarizado con un cable de extensión, receptáculo u otra toma de
corriente a menos que las clavijas se puedan insertar por completo y
evitar, así, que queden expuestas.
Instrucciones sobre seguridad
1. Lea estas instrucciones.
2. Conserve estas instrucciones.
3. Preste atención a todas las advertencias.
4. Siga todas las instrucciones.
5. No utilice este equipo cerca del agua.
6. Limpie el equipo solo con un paño seco.
7. No bloquee ninguna abertura de ventilación. Realice la instalación
según se indica en las instrucciones del fabricante.
8. No instale el producto cerca de fuentes de calor, como radiadores,
registros de calefacción, estufas u otros equipos (inclusive
amplificadores) que produzcan calor.
9. No anule el propósito de seguridad del enchufe polarizado o con
conexión a tierra. Un enchufe polarizado tiene dos clavijas, una más
ancha que la otra.
Un enchufe del tipo de conexión a tierra tiene dos clavijas y una
tercera clavija de conexión a tierra. La clavija más ancha o la tercera
clavija se proporcionan por seguridad. Si el enchufe suministrado
no encaja en la toma de corriente, consulte a un electricista para
cambiar la toma obsoleta.
10. Proteja el cable de alimentación para evitar que sea pisado o
pellizcado, especialmente en los enchufes, en los receptáculos y en
el punto donde salen del aparato.
11. Utilice únicamente los accesorios especificados por el fabricante.
12. Utilice el equipo solo con el carro, soporte, trípode o mesa
especificados por el fabricante, o vendidos junto con el aparato. Si
utiliza un carro, tenga cuidado al mover la combinación de carro/
aparato para evitar lesiones causadas por un posible vuelco.
13. Desenchufe este aparato durante las tormentas eléctricas o cuando
no lo utilice durante largos períodos de tiempo.
14. Solicite al personal de servicio cualificado que realice todas las
acciones de mantenimiento. Es necesario realizar un mantenimiento
cuando el aparato se ha dañado de algún modo, como, por ejemplo,
si el cable de alimentación o el enchufe están dañados, si se ha
derramado líquido o ha caído algún objeto dentro del aparato, si el
aparato ha estado expuesto a la lluvia o humedad, si no funciona
normalmente o si se ha caído.
Para evitar que se produzcan descargas eléctricas, no
El símbolo de relámpago con una punta de flecha dentro de
un triángulo equilátero tiene por objeto alertar al usuario de
la presencia de “tensión peligrosa” no aislada dentro de la
caja del producto que puede ser de magnitud suficiente para
constituir un peligro de descarga eléctrica para las personas.
El signo de exclamación dentro de un triángulo
equilátero tiene por objeto alertar al usuario de
la presencia de importantes instrucciones de
funcionamiento y mantenimiento (servicio) en la
documentación que acompaña al producto.
ES
2
Page 32

Precauciones de seguridad
Indicaciones de uso
Aviso de FCC
Advertencia:
Este dispositivo cumple con la sección 15 de las normas FCC. El
funcionamiento está sujeto a las dos condiciones siguientes: (1) Este
dispositivo no debe causar interferencias dañinas, y (2) este dispositivo
debe aceptar cualquier interferencia recibida, incluyendo interferencias
que puedan causar un funcionamiento no deseado.
Precaución:
Cualquier cambio o modificación no aprobada expresamente en este
manual podría anular su autoridad para utilizar este equipo.
Nota: Este equipo ha sido probado y se ha comprobado que cumple
con los límites para un dispositivo digital de Clase B, de acuerdo con
la sección 15 de las normas FCC. Estos límites están diseñados para
proporcionar una protección razonable ante interferencias perjudiciales
en una instalación residencial. Este equipo genera, utiliza y puede
irradiar energía de radiofrecuencia y, si no se instala y utiliza de
acuerdo con las instrucciones, puede causar interferencias perjudiciales
a las comunicaciones de radio. Sin embargo, no hay garantía de que
no se produzcan interferencias en una instalación en particular. Si este
equipo causa interferencias perjudiciales en la recepción de radio o
televisión, lo que se puede determinar encendiendo y apagando el
equipo, se recomienda al usuario que intente corregir la interferencia
tomando alguna de las siguientes medidas:
– Cambie la orientación o ubicación de la antena receptora.
– Aumente la separación entre el equipo y el receptor.
– Conecte el equipo a una toma de corriente en un circuito diferente al
que está conectado el receptor.
– Póngase en contacto con el distribuidor o con un técnico
experimentado en radio/TV para obtener ayuda.
Cuerpo del giradiscos
• No coloque ni utilice el producto en lugares sometidos a condiciones
de altas temperaturas, humedad, suciedad o vibraciones.
• El producto debe colocarse sobre una superficie plana nivelada.
Cápsula
• Coloque el protector para proteger la aguja cuando no vaya a utilizar
el producto.
• No toque la aguja de la cápsula con el dedo.
• No permita que la aguja de la cápsula golpee el plato ni el borde del
disco.
Para clientes de Canadá
Declaración IC:
CAN ICES-3 (B)/NMB-3(B)
3
Page 33

Nombre y función de los componentes
Diagrama general
2
1
2
5
4 6
3
Botón de encendido
1
Controla la alimentación de la unidad.
Botón duales de inicio/parada
2
Activa y desactiva el motor/plato.
Botones de velocidad del plato
3
Seleccione la velocidad del plato de 33 o 45 RPM. Para seleccionar
la velocidad 78 RPM, debe pulsar ambos botones 33 y 45 al
mismo tiempo; los dos botones deberían iluminarse.
Plato
4
El plato de aluminio fundido se monta directamente en el eje
central del motor.
Puntos estroboscópicos (en el borde del plato)
5
Funcionan conjuntamente con la luz estroboscópica situada
debajo botón de encendido para ofrecer una indicación visual
sobre la velocidad del plato.
Eje
6
Luz de aguja extraíble
7
Proporciona iluminación dirigida a la posición de la aguja para
facilitar su ubicación en situaciones de poca luz. Se enchufa
fácilmente al conector en la parte superior de la plataforma
giratoria.
Botón de control de arranque
8
Gire el botón de control de inicio para aumentar o reducir el
tiempo de arranque del plato entre 0,2 y 6,0 segundos. (Ajustado
al mínimo mínima es el arranque más rápido; ajustado al máximo
es el arranque más lento para alcanzar la velocidad seleccionada.)
Botón de control de parada
9
Gire el botón de control de parada para aumentar o reducir el
tiempo de parada del plato entre 0,2 y 6,0 segundos. (El ajuste
mínimo es la parada
más rápida; el ajuste máximo es la más lenta.)
Botón de control de inversión
10
Controla la dirección de giro del plato.
7 8 9
10
14
13
12
18 2015 1517 191611
Botóns del rango de velocidad
11
Seleccione el rango de velocidad +/- 10 o 20%.
• Para seleccionar +/-50%, debe pulsar los botones 10 y 20 al
mismo tiempo.
Botón de activación del control por cuarzo
12
Activa y desactiva la función de pitch. Si se activa el cuarzo, el
plato mantendrá las RPM a un pitch del 0%, independientemente
de la posición del control deslizante de pitch y de los ajustes de
control del rango de velocidad.
Control deslizante para ajustar el pitch
13
Se utiliza junto con el botón de pitch para variar la velocidad de
giro del plato. En la posición de tope central se activa el bloqueo
de cuarzo.
Adaptador de 45 RPM
14
Adapta los discos de 7" con un orificio grande central al eje central
fijo
Pie
15
Ajusta el nivel del producto.
Terminales de salida estéreo
16
Permiten conectar el cable de audio RCA. Conéctelo a la toma
de entrada PHONO del amplificador (mezclador DJ) o a su toma
de entrada de línea. El terminal rojo es el canal de la derecha y el
terminal blanco es el de la izquierda.
Terminal de toma de tierra
17
Conecte el terminal de toma de tierra del amplificador a este
terminal utilizando la línea de tierra del cable de audio RCA.
Interruptor selector de preamplificador
18
Si realiza la conexión a una toma de entrada PHONO (mezclador
DJ) del amplificador, ajuste este interruptor en la posición PHONO.
Si realiza la conexión al conector LINE/AUX de un amplificador
(mezclador DJ), ajuste este interruptor en la posición LINE.
Salida USB
19
Utilice esta salida para conectar el giradiscos a la entrada USB del
ordenador.
Entrada de CA
20
Utilice esta entrada para conectar el cable de alimentación
suministrado con el producto.
ES
4
Page 34
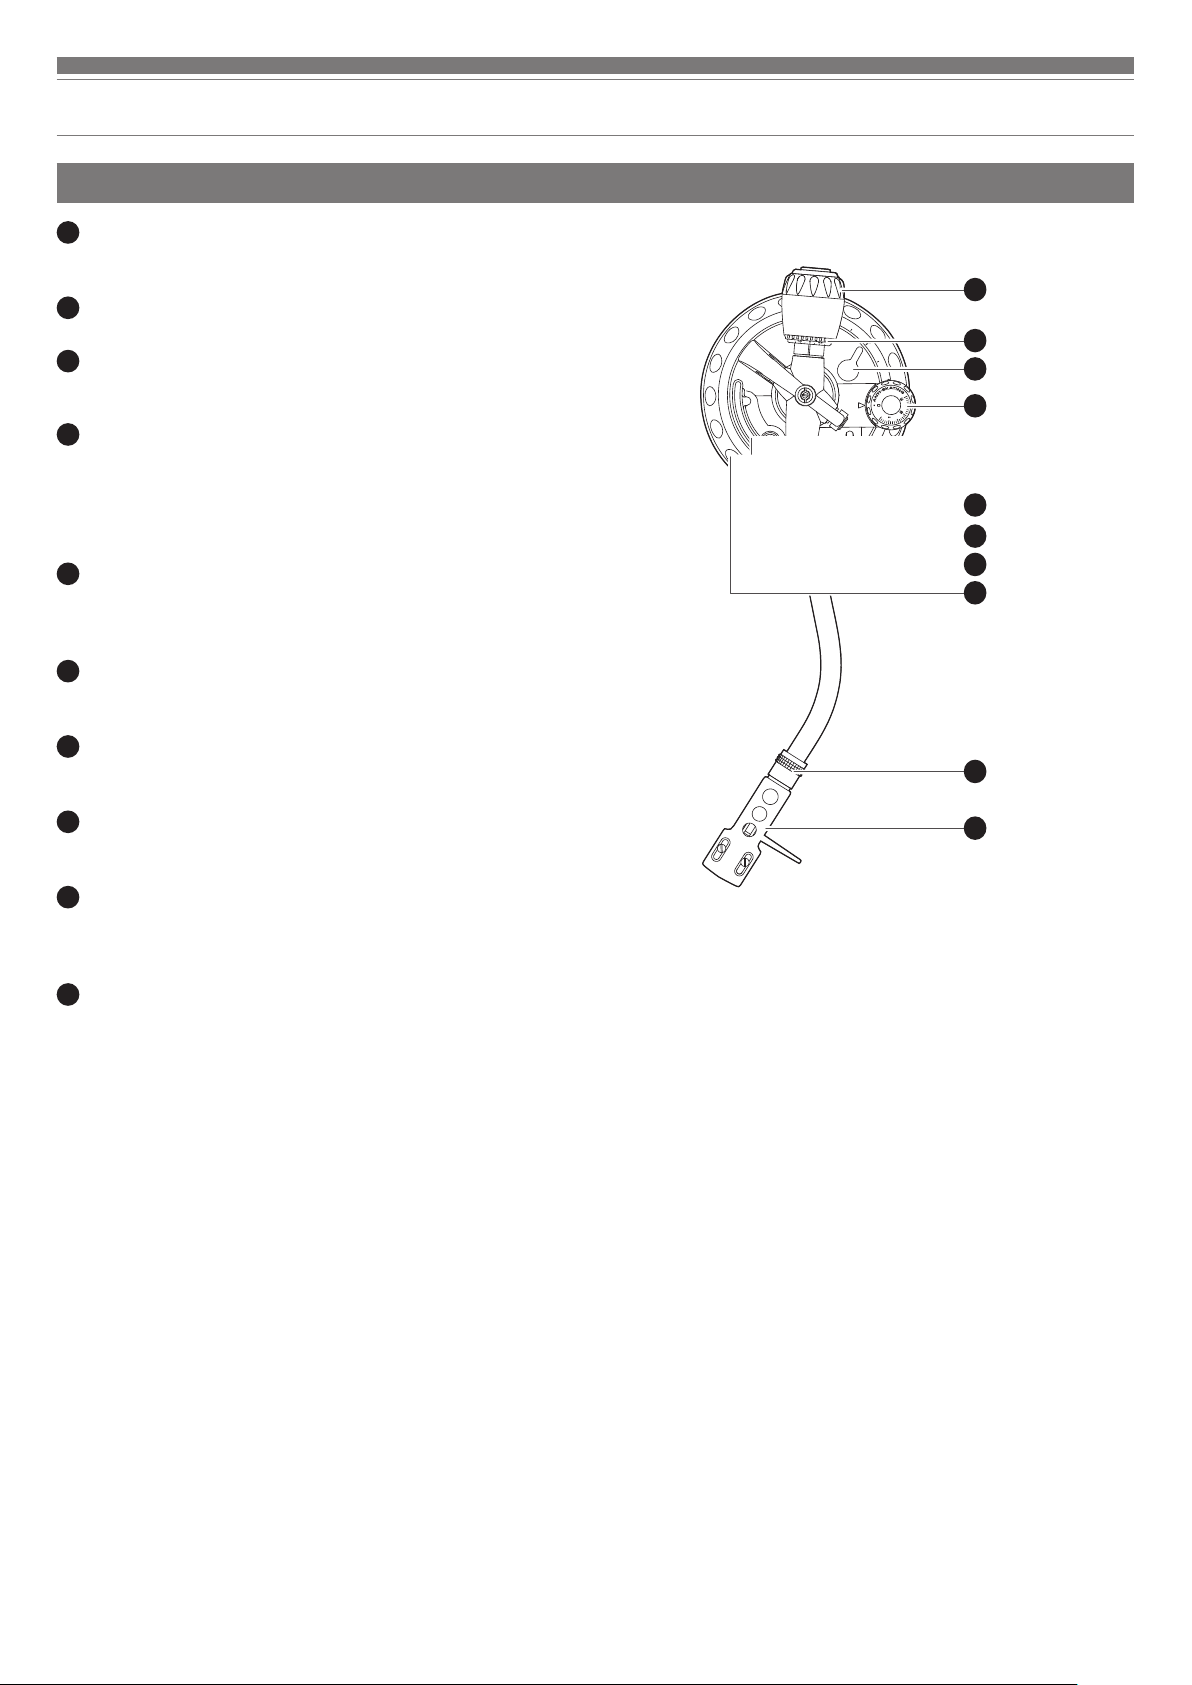
Nombre y función de los componentes
Brazo fonocaptor
Contrapeso
21
Equilibra el brazo fonocaptor y permite ajustar la fuerza de
seguimiento descendente adecuada en la aguja.
Anillo calibrador de la fuerza de seguimiento
22
Utilice este anillo para ajustar la fuerza de seguimiento.
Bloqueo de altura del brazo fonocaptor
23
Bloquea el ajuste de altura del brazo fonocaptor
• Desbloquéelo siempre antes de intentar ajustar la altura.
Selector de control anti-skate o de compensación de la fuerza
24
lateral
Durante la reproducción del disco, una fuerza actúa sobre la
punta de la aguja que tira de ella hacia dentro. Dicha fuerza puede
compensarse estableciendo los mismos valores anti-skate o de
compensación de la fuerza lateral y de fuerza de seguimiento.
Palanca de control del elevador del brazo fonocaptor
25
Controla la acción de elevación del brazo fonocaptor.
• El mecanismo de elevación está amortiguado hidráulicamente
para retardar el descenso del brazo fonocaptor.
Soporte del brazo fonocaptor con abrazadera
26
Utilice la abrazadera para fijar el brazo fonocaptor de modo que
no se mueva.
Elevador del brazo fonocaptor
27
Desplaza el brazo fonocaptor verticalmente hacia y desde la cara
del disco.
Selector de ajuste de la altura del brazo fonocaptor
28
Eleva y baja el antebrazo para permitir que permanezca paralelo a
la superficie del disco.
Anillo de bloqueo
29
Gire el anillo hacia la izquierda (sentido antihorario) para fijar el
portacápsulas. Para retirar el portacápsulas, gire el anillo hacia la
derecha.
Portacápsulas
30
La cápsula (AT-XP5) está acoplada en el portacápsulas (AT-HS1).
21
22
23
24
25
26
27
28
29
30
5
Page 35

Preparativos
Colocación del plato
Este producto requiere cierta labor de montaje antes de poderse utilizar
por primera vez.
No conecte el cable de alimentación hasta no haber completado el
montaje.
1. Coloque el plato en el eje.
• Para evitar dañar el eje al asentar el plato, alinee las posiciones del eje y el
orificio del plato, y luego asiente lentamente el plato.
• Asegúrese de que el plato quede totalmente encajado en el eje.
2. Coloque el disco encima del plato.
Disco del plato
Plato
Eje
Montaje del brazo fonocaptor
1. Retire la brida utilizada para fijar el brazo fonocaptor cuando se
entrega el producto.
• Utilice la abrazadera para fijar temporalmente el brazo fonocaptor al
soporte del brazo fonocaptor.
2. Inserte el portacápsulas en el brazo fonocaptor.
• Sujete el portacápsulas por los bordes derecho e izquierdo para no dañar la
aguja ni cortar el cableado de la cápsula.
Anillo de bloqueo
ES
3. Una vez que haya insertado el portacápsulas, gire el anillo de
bloqueo en sentido antihorario (hacia la izquierda).
4. Con el anillo calibrador de fuerza de seguimiento mirando hacia
delante, acople el contrapeso en la parte posterior del brazo
fonocaptor y gírelo lentamente en sentido antihorario (hacia la
izquierda).
Ubicación del giradiscos
• Coloque el producto sobre una superficie nivelada.
• Para evitar los efectos de vibraciones y presión acústica, no sitúe el
producto cerca de aparatos tales como altavoces.
• El producto podría captar electricidad estática de radio si se sitúa
próximo a una radio. Así pues, procure mantener el producto alejado
de cualquier radio.
• Si el producto se encuentra cerca de algún aparato (teléfono móvil,
etc.) que emite ondas de radio intensas, podría producirse ruido.
Nivelación del giradiscos
Una vez que haya situado el producto en la posición deseada, ajuste
los pies para que el producto quede nivelado.
• Utilice un nivel (vendido por separado) para asegurarse de que el
producto está nivelado.
Anillo calibrador de fuerza
de seguimiento
Equilibrio y fuerza de seguimiento del brazo
fonocaptor
Para que la cápsula pueda captar correctamente el sonido de los
surcos del disco, el equilibrio y la fuerza de seguimiento del brazo
fonocaptor deben ajustarse según las especificaciones de la cápsula. Si
el equilibrio y la fuerza de seguimiento no se ajustan correctamente, el
disco o la aguja de la cápsula podrían sufrir daños.
• No arrastre la aguja de la cápsula a lo ancho del disco o del plato
cuando ajuste el equilibrio o la fuerza de seguimiento del brazo
fonocaptor. Si lo hace, la aguja podría resultar dañada.
6
Page 36

Preparativos
Ajuste del equilibrio del brazo fonocaptor
1. Retire el protector de la cápsula.
2. Sostenga con cuidado el portacápsulas para no mover el brazo
fonocaptor y desenganche la abrazadera.
•
El brazo fonocaptor está inclinado porque todavía no se ha ajustado su equilibrio.
Abrazadera
3. Siga sujetando con cuidado el portacápsulas y gire el contrapeso
para ajustar el equilibrio del brazo fonocaptor.
• Ajuste el equilibrio de modo que el brazo fonocaptor esté nivelado cuando
suelte el portacápsulas.
Brazo fonocaptor Contrapeso
2. Gire el contrapeso y el anillo calibrador de fuerza de seguimiento
juntos en sentido antihorario hasta que el valor de la línea central
coincida con el valor de fuerza de seguimiento recomendado para
la cápsula que esté utilizando.
• Consulte las especificaciones del fabricante de la cápsula para conocer el
valor de fuerza de seguimiento recomendado.
• El valor de fuerza de seguimiento estándar de la cápsula suministrada con
este producto es de 3,0g.
Ajuste del valor anti-skate o de
compensación de la fuerza lateral
Durante la reproducción del disco, una fuerza actúa sobre la punta de
la aguja que tira de ella hacia dentro. Dicha fuerza puede compensarse
estableciendo los mismos valores anti-skate o de compensación de la
fuerza lateral y de fuerza de seguimiento.
Ajuste el selector de control anti-skate o de compensación de la fuerza
lateral en el mismo valor que el de fuerza de seguimiento.
• El valor de fuerza de seguimiento estándar de la cápsula suministrada
con este producto es de 3,0g.
Ajustar hasta nivelar el brazo
fonocaptor
4. Coloque de nuevo el brazo fonocaptor en el soporte y cierre la
abrazadera.
Ajuste de la fuerza de seguimiento
1. Sujetando el contrapeso para que no se mueva, gire el anillo
calibrador de fuerza de seguimiento hasta alinear su posición “0”
con la línea central de la parte posterior del brazo fonocaptor.
• La fuerza de seguimiento no se ajusta simplemente girando el anillo
calibrador de fuerza de seguimiento.
Anillo calibrador de
fuerza de seguimiento
Línea central
7
Instalación/retirada de la cubierta antipolvo
• La cubierta antipolvo está diseñada para proteger los componentes
sensibles del producto cuando éste no está en uso. Debe retirarse
mientras se reproducen los discos.
• El uso de la cubierta protectora antipolvo durante la reproducción
puede provocar daños en el disco o la degradación del sonido.
• Vaya siempre con mucho cuidado cuando retire o instale la cubierta
antipolvo.
Page 37

Preparativos
Ajuste del interruptor selector de preamplificador
Este producto incorpora una función de ecualizador phono. Puede utilizar el
producto, incluso si no dispone de un amplificador fonográfico o equipo de
sonido con un amplificador phono incorporado, conectando un altavoz activo, etc.
Utilice el interruptor selector del preamplificador para ajustar la salida, como se
muestra a continuación.
Equipo
conectable
utilizado
Dispositivo con
entrada phono
Dispositivo sin
entrada phono
Tarjeta de sonido
del ordenador
Dispositivo con
entrada USB
*1 Es posible que sea necesario utilizar un adaptador de audio (se
vende por separado) para conectar el cable de audio RCA al conector
de entrada de línea de la tarjeta de sonido del ordenador.
2
*
Utilice el cable USB en lugar del cable de audio RCA para realizar la conexión.
Posición del
interruptor selector
de preamplificador
PHONO
LINE
LINE
LINE Entrada USB del
Dónde conectar el cable
de audio RCA
Conector de entrada phono
y terminal de toma de tierra
(masa) del equipo de sonido
Conector AUX o de entrada
de línea del equipo de sonido
Conector de entrada de línea
de la tarjeta de sonido*
ordenador*
2
1
• Según el equipo de sonido que esté conectando, puede que haya
un terminal de toma de tierra (masa) presente cerca del conector de
entrada phono. En tal caso, utilice la línea de toma de tierra del cable
de audio RCA para conectarlo. Esto ayudará a evitar el zumbido bajo
que de lo contrario se oiría durante la reproducción.
Conexión a un ordenador con entrada USB
Siga los ajustes del interruptor selector del preamplificador para
conectar el cable USB incluido con el producto a la entrada USB del
ordenador.
El cable USB conecta el producto al ordenador sin necesidad de utilizar
controladores especiales.
Audacity (consulte http://www.audacityteam.org para obtener más
detalles) y otros paquetes compatibles de software de grabación de
terceros permiten grabar desde el producto en el ordenador.
ES
Conexión a un equipo de sonido (altavoces
activos, amplificadores, mezclador DJ, etc.)
Conexión a la fuente de audio
Alinee los ajustes del interruptor selector de preamplificador y conecte el cable de
audio RCA a un conector de entrada que sea compatible con el equipo de sonido
que esté utilizando (amplificador, receptor, altavoces activos, tarjeta de sonido, etc.).
El conector rojo del cable de audio RCA es para el canal derecho (R) y el conector
blanco, para el canal izquierdo (L).
Con entrada PHONO*
Equipo
de sonido
(amplificador,
mezclador
DJ, etc.)
Sin entrada PHONO
A
puerto USB
A toma de corriente
A toma de
corriente
• Asegúrese de ajustar el interruptor selector del preamplificador en la
Por último, una vez realizadas todas las conexiones de audio, conecte
el cable de alimentación incluido al producto. A continuación, enchufe
el cable de alimentación a una toma de corriente CA.
posición LINE.
Conexión del cable de alimentación
Con entrada PHONO*
Sin entrada PHONO
O conexión
LINE
8
Page 38

Reproducción de discos
Antes de reproducir un disco
1. Retire el protector de la cápsula.
• Si el brazo fonocaptor está sujeto en su suporte, abra la abrazadera.
Protector
2. Gire el botón de encendido a la posición ON.
• El selector de velocidad y el iluminador estroboscópico se encenderán.
3. Si lo desea, conecte la luz de la aguja para iluminar la posición de
la punta de la aguja sobre el disco.
4. Coloque el disco en el plato de manera que el agujero central
quede alineado con el eje.
• Si va a reproducir un disco de 45RPM, coloque el adaptador de 45RPM
(véase la parte derecha de la imagen siguiente).
A 33-1/3 RPM A 45 RPM
Disco
Disco del
plato
Plato
5. Establezca la velocidad de rotación del plato (33/45/78) según el
disco.
• Para establecer la velocidad del disco en 78 RPM, pulse los botones de 33
y 45RPM al mismo tiempo.
Adaptador
de 45 RPM
4. Baje el brazo fonocaptor situando la palanca de control de elevación
del brazo fonocaptor en la posición DOWN. El brazo fonocaptor
desciende lentamente sobre el disco y comienza la reproducción.
•
Como alternativa, puede omitir los pasos 2 a 4 y, con la ayuda de los dedos,
levantar el portacápsulas, mover el brazo fonocaptor sobre la ubicación deseada
del disco y luego bajar el portacápsulas para empezar a reproducir el disco.
• No someta el producto a impactos fuertes durante la reproducción.
Ajuste del pitch
1. Pulse el botón de activación del control por cuarzo para
desactivar la función del pitch.
•
El bloqueo de cuarzo interno mantiene el disco a la velocidad nominal
precisa (pitch 0 %), independientemente de la posición del control deslizante
del pitch y del rango de velocidad cuando el botón de activación del control
por cuarzo está activado.
2. Utilice el control deslizante de ajuste del
botones de
hasta +/- 50%.
• Cuando el control deslizante de ajuste del pitch se encuentra en la posición
de retén central, el bloqueo de cuarzo está activo.
para modificar la velocidad de giro del plato
pitch
junto con los
pitch
Medición del pitch
Las cuatro filas de puntos estroboscópicos del borde del plato están
diseñados para medir y modificar la velocidad del plato (pitch).
Confirme los movimientos de los puntos estroboscópicos iluminados por la
luz estroboscópica situada debajo del botón de encendido.
Si la fila de puntos estroboscópicos correspondiente aparece inmóvil, el plato
girará según el porcentaje de velocidad de operación indicado a continuación.
Si parece que los puntos se mueven hacia la derecha, ello indica que el plato se
mueve a una velocidad inferior a la indicada. Si parece que se mueven hacia la
izquierda, ello indica que el plato se mueve a una velocidad superior a la indicada.
Reproducción de discos
Baje el volumen del amplificador, altavoces, etc. lo suficiente.
1. Pulse uno de los botones de inicio/parada.
• El plato empezará a girar.
2. Suba el brazo fonocaptor situando la palanca de control de
elevación del brazo fonocaptor en la posición UP.
Palanca de control del
elevador del brazo fonocaptor
3. Coloque el brazo fonocaptor en la posición deseada (surco) del
disco.
9
Cambio de +7,2 % en el pitch cuando los puntos de la fila superior
están inmóviles [apuntan hacia la fila superior de puntos]
Cambio de +3,3 % en el pitch cuando los puntos de la segunda fila
están inmóviles [apuntan hacia la segunda fila de puntos]
Cambio de 0 % en el pitch (velocidad normal) cuando los puntos de la
tercera fila están inmóviles [apuntan hacia la tercera fila de puntos]
Cambio de -3,3 % en el pitch cuando los puntos de la fila inferior están
inmóviles [apuntan hacia la fila inferior de puntos]
Ajuste de la velocidad de arranque y la
velocidad de parada del disco
Gire el botón de control de arranque para aumentar o reducir el tiempo
de inicio del plato entre 0,2 y 6,0 segundos. (La configuración mínima
es el arranque más rápido; la configuración máxima es el arranque más
lento para alcanzar la velocidad seleccionada.)
Gire el botón de control de parada para aumentar o reducir el tiempo
de parada del plato entre 0,2 y 6,0 segundos. (El ajuste mínimo es la
parada más rápida; el ajuste máximo es la más lenta.)
Page 39

Reproducción de discos
Cuidados
Inversión del giro del disco
Si lo desea, pulse el botón de control de inversión para invertir la
rotación del plato.
• El botón de control de inversión se encenderá.
Interrupción de la reproducción de un disco
Una vez bajado el volumen del amplificador, altavoces, etc., lo
suficiente, levante el brazo fonocaptor con la palanca de control del
elevador del brazo fonocaptor.
Detención de la reproducción del disco
1. Baje el volumen del amplificador, altavoces, etc. lo suficiente.
2. Levante la palanca de control de elevación del brazo fonocaptor,
coloque de nuevo el brazo fonocaptor encima del soporte y fíjelo
con la abrazadera.
3. Si utiliza la luz de la aguja, desconéctela del conector para
apagarla.
4. Pulse los botones de inicio/parada para detener el movimiento de
rotación del plato.
• El plato se ralentiza y se detiene la rotación.
5. Gire el botón de encendido a la posición OFF.
6. Retire el disco cuando el plato se haya detenido por completo.
Cuerpo del giradiscos
• Si el cuerpo del giradiscos tiene polvo o suciedad, en primer lugar
desconecte el enchufe del cable de alimentación y luego limpie la
suciedad y el polvo con un paño suave y seco.
• No utilice bencenos, diluyentes, etc.
• Cuando vaya a guardar el producto durante un periodo de tiempo
prolongado, desconecte el enchufe del cable de alimentación de la
toma de corriente y envuelva el equipo en plástico; procure que no
se humedezca.
Punta de la aguja
• Si se adhiere suciedad o mugre a la punta de la aguja, límpiela antes
de cada uso.
• Se recomienda utilizar un limpiador de agujas (se vende por
separado) si la punta de la aguja está muy sucia. Limpie la punta de
la aguja moviendo el cepillo de atrás hacia delante de la punta de la
aguja.
ES
• Para evitar que el disco se raye o deforme, retírelo una vez utilizado.
• No utilice un plato distinto al suministrado.
10
Page 40

Reposición de la aguja
Sustitución de una cápsula
Retirada de la aguja
• Además del deterioro en la calidad del sonido, los discos también
podrían sufrir daños a medida que la punta de la aguja de la cápsula
se va desgastando.
• Por regla general, cambie la punta al cabo de 300 horas de uso. El
scratch fuerte puede acortar la vida útil de la aguja.
• Desconecte el enchufe del cable de alimentación del producto de la
toma de corriente.
1. Libere el portacápsulas del brazo fonocaptor.
• Sujete el brazo fonocaptor con la abrazadera y retire el portacápsulas con
cuidado.
2. Después de retirar el protector del portacápsulas, retire la aguja
tirando de ella en la dirección de la flecha sin tocar el voladizo, la
punta de la aguja ni los imanes.
Tirar
Si va a sustituir la cápsula (AT-XP5) que venía con este producto por
otra disponible en tiendas, consulte el manual del usuario de la cápsula
que vaya a utilizar. Una vez que haya sustituido la cápsula antigua por
una nueva, deberá reajustar la proyección así como el equilibrio y la
fuerza de seguimiento del brazo fonocaptor.
1. Libere el portacápsulas del brazo fonocaptor.
• Utilice la abrazadera para fijar el brazo fonocaptor y retire el portacápsulas
con cuidado.
2. Retire la aguja de la cápsula.
• Consulte “Retirada de la aguja” en la página 11 (esta página).
3. Retire las puntas de plomo.
• Preste atención para no dañar las puntas de los cables.
4. Sirviéndose de un destornillador no magnético de pala común,
extraiga los tornillos de montaje y, a continuación, retire la
cápsula del portacápsulas.
5. Para obtener instrucciones de montaje y de conexión a las puntas
de los cables, consulte el manual del usuario de la cápsula nueva.
Tornillos
Arandelas
Instalación de una aguja nueva
1. Instale la aguja de repuesto nueva en la cápsula.
Alinee la posición de la
protuberancia interna.
2. Acople el portacápsulas al brazo fonocaptor.
Tuercas
6. Sirviéndose de un destornillador no magnético de pala común,
apriete los tornillos en ambos puntos y, a continuación, ajuste la
proyección.
• Una vez realizados los ajustes, apriete los tornillos firmemente.
7. Acople el portacápsulas al brazo fonocaptor.
8. Ajuste la altura del brazo fonocaptor.
• Consulte “Ajuste la altura del brazo fonocaptor” en la página 12 cuando
realice los ajustes.
9. Ajuste el equilibrio y la fuerza de seguimiento del brazo
fonocaptor.
• Consulte “Ajuste del equilibrio del brazo fonocaptor” y “Ajuste de la fuerza
de seguimiento” en la página 7.
11
Page 41

Ajuste la altura del brazo fonocaptor
Traslado del giradiscos
Cuando instale una cápsula distinta de la suministrada, debe mantener
una distancia adecuada entre la cápsula y la superficie del disco.
Coloque la aguja sobre el disco y confirme que el brazo fonocaptor está
paralelo a la superficie del disco. Si no está paralelo, ajuste la altura del
brazo fonocaptor.
1. Gire la pieza de bloqueo de la altura del brazo fonocaptor para
aflojar el anclaje.
2. Gire el selector de ajuste de la altura del brazo fonocaptor y
ajuste la altura de este.
Utilizando el material de embalaje original del producto, envuelva el
giradiscos en orden inverso al proceso de desembalaje. Si no dispone
del material de embalaje, realice las siguientes acciones:
• Una vez que haya desenchufado el cable de alimentación de la toma
de corriente, retire el plato y envuélvalo para evitar que sufra daños.
Mover el producto con el plato instalado puede provocar daños en el
eje.
• Fije el brazo fonocaptor con la abrazadera.
• Retire el contrapeso.
• Retire el portacápsulas del brazo fonocaptor con el protector de la
cápsula acoplado y, a continuación, envuelva el conjunto completo
del portacápsulas para evitar que sufra daños.
• Envuelva el cuerpo del giradiscos en un paño suave para evitar que
sufra daños.
ES
3. Una vez realizados los ajustes, gire la pieza de bloqueo de la
altura del brazo fonocaptor para fijar el brazo.
12
Page 42

Solución de problemas
Problema Solución
El plato no gira. •
El plato gira, pero no hay
sonido o el volumen no es lo
suficientemente alto.
La aguja da saltos. • ¿Está la fuerza de seguimiento ajustada muy floja o muy fuerte? Ajuste la fuerza de seguimiento.
Se produce chillido. • ¿Está absorbiendo el producto demasiadas vibraciones del suelo, paredes o altavoces cercanos? Reduzca
Se produce ruido durante la
reproducción del disco.
El sonido durante la reproducción
del disco es demasiado rápido o
demasiado lento.
No ocurre nada al mover el
control deslizante de ajuste del
pitch.
Es difícil ver los puntos estroboscópicos
o la luz de la aguja es muy tenue.
¿Está conectado el cable de alimentación a la toma de corriente? Enchufe el cable de alimentación a la toma de corriente.
•
¿Se ha desconectado el enchufe del cable de alimentación? Compruebe si el enchufe está correctamente conectado al producto.
• ¿El protector de la cápsula sigue en su lugar? Retire el protector de la cápsula.
• ¿El brazo fonocaptor está levantado? Baje el brazo fonocaptor.
• ¿Se han seleccionado correctamente los ajustes de función y la entrada para el equipo conectado
(amplificador, etc.)? Compruebe si los ajustes para el equipo conectado son correctos.
• ¿Está dañada la aguja? Compruebe la aguja y cámbiela si fuese necesario.
•
¿Está la aguja correctamente colocada en el cuerpo de la cápsula? Compruebe la cápsula y realice los ajustes necesarios.
•
¿Son correctas las posiciones de ajuste del interruptor selector de preamplificador? Compruebe que los ajustes
de preamplificador son correctos, teniendo en cuenta los siguientes problemas habituales y sus causas:
- Si no hay sonido, o si el volumen no es lo suficientemente alto, esto indica que el producto está
ajustado en la posición PHONO y conectado a la entrada AUX/LINE del amplificador.
- Si el volumen es excesivamente alto o está distorsionado, esto indica que el producto está ajustado en
la posición LINE y conectado a la entrada PHONO del amplificador.
• ¿Está la fuerza de seguimiento ajustada muy fuerte? Ajuste la fuerza de seguimiento.
• ¿Está el anti-skate, o compensación de la fuerza lateral, mal ajustado? Compruebe que está definido con
el mismo valor que la fuerza de seguimiento de la cápsula.
• ¿Está el disco deformado? Compruebe el disco.
• ¿Está el disco rayado? Compruebe el disco.
las vibraciones o instale el producto en una superficie que no esté sometida a los efectos de las vibraciones.
• ¿Está el producto instalado en una superficie inestable? Compruebe si la superficie donde se encuentra
instalado el producto es inestable.
• ¿Hay polvo en la punta de la aguja de la cápsula? Si hay polvo adherido a la punta de la aguja, limpie la
aguja con un cepillo común.
• ¿Está la velocidad bien ajustada para el producto? Utilice los botones de velocidad del plato para
seleccionar la velocidad correspondiente al tipo de disco que se esté reproduciendo.
• ¿Está activado el pitch variable? Pulse el botón de activación del control por cuarzo o sitúe el control
deslizante del pitch de nuevo en la posición de retén central para activar el bloqueo de cuarzo.
• Si el LED que se encuentra junto a la posición de retén central del control deslizante de ajuste del pitch
permanece de color azul al mover el control deslizante, esto indica que el bloqueo de cuarzo está activado.
Pulse el botón de activación del control por cuarzo para desactivar el bloqueo de cuarzo y activar el pitch
variable. El LED se debería apagar.
• Una luz demasiado fuerte o fluorescente interfiere en el indicador estroboscópico. Cubra el indicador
luminoso estroboscópico con la ayuda de mano, la funda del disco, etc., para protegerlo de la luz brillante.
Se oye un zumbido durante la
reproducción.
Dimensiones
353
13
•
¿Está la línea de toma de tierra conectada correctamente? Compruebe que la línea de toma de tierra esté bien conectada.
•
¿Está el portacápsulas acoplado firmemente al brazo fonocaptor? Compruebe que el anillo de bloqueo esté apretado.
450
166,5
(Unidades en mm)
Page 43

Especificaciones
Especificaciones del giradiscos
Tipo Funcionamiento de 3 velocidades
completamente manual
Motor Motor CC sin cepillos, de 3 fases y
16 polos
Método de control Tracción directa
Velocidades 33-1/3 rpm, 45 rpm, 78 rpm
Plato del giradiscos
Torque de arranque > 4,5 kgf.cm
Sistema de frenado Freno electrónico
Ululación y vibración
Relación señal/ruido > 55 dB (DIN-B)
Niveles de salida
“PHONO”
“LINE (MM)”
RIAA 20-20 kHz, +1/-3 dB
Especificaciones del brazo fonocaptor
Tipo Brazo fonocaptor en forma de S con
Longitud efectiva 230 mm
Proyección 15 mm
Ángulo de error de
seguimiento máximo
Rango de ajuste de presión de
la aguja
Rango de peso aplicable
a la cápsula (incluido el
portacápsulas)
Altura del rango de ajuste del
brazo fonocaptor
Rango de anti-skating De 0 a 3 g
Aluminio fundido de 332mm de diámetro
< 0,1% WRMS (JIS WTD) con 33 rpm
5,5 mV nominal a 1 kHz, 5 cm/seg
300 mV nominal a 1 kHz, 5 cm/seg
(Entrada: 1,5 mV 1 kHz)
equilibrio estático y portacápsulas
extraíble
Menos de 3°
De 0 a 4,0 g
De 13 a 18 g
De 0 a 6 mm
Función USB
A/D, D/A USB seleccionable de 16 bits 44,1
kHz o 48 kHz
Interfaz informática MAC OSX o superior o Windows 7 o
superior compatible con USB 1.1
Especificaciones generales
Requisitos de alimentación 120 V CA, 60 Hz (EE. UU.)
240 V CA, 50 Hz (Australia)
230 V CA, 50 Hz (Singapur)
Consumo de energía 13 W
Dimensiones 450 mm × 353 mm × 166,5 mm
(Al × An × F)
Peso 12,5 kg
Accesorios Disco, cubierta antipolvo, plato,
adaptador de 45 rpm, contrapeso,
portacápsulas con cápsula, cable de
alimentación, cable USB, cable RCA
(macho) dual con cable de toma a
tierra integrado, luz de aguja
Aguja de repuesto
(se vende por separado)
Portacápsulas de repuesto
(se vende por separado)
Especificaciones sujetas a cambio sin previo aviso debido a mejoras.
ATN-XP5
AT-HS1
ES
Especificaciones de la cápsula y el portacápsulas
Modelo de cápsula AT-XP5
Tipo de cápsula VM
Impedancia de carga
recomendada
Voltaje de salida 5,5 mV (1 kHz, 5 cm/seg)
Aguja Aguja elíptica de 0,3 × 0,7 mil
Cantilever ABS con carbono
Rango de fuerza de seguimiento
Peso de la cápsula 6,2 g
Modelo de portacápsulas AT-HS1
Peso del portacápsulas 10 g
Ajuste de la proyección del
portacápsulas
47.000 ohmios
De 2,0 a 4,0 g (3,0 g estándar)
± 4 mm
14
Page 44

Visit our website www.audio-technica.com
One-Year Limited Warranty
Audio-Technica brand products purchased in the U.S.A. are warranted for one year from date of purchase by AudioTechnica U.S., Inc. (A.T.U.S.) to be free of defects in materials and workmanship. In event of such defect, product will be
repaired promptly without charge or, at our option, replaced with a new product of equal or superior value if delivered
to A.T.U.S. or an Authorized Service Center, prepaid, together with the sales slip or other proof of purchase date.
approval from A.T.U.S. is required for return.
damage, or failure to use product in accordance with instructions. This warranty is void in the event of unauthorized repair
or modification, or removal or defacing of the product labeling.
For return approval and shipping information
Drive, Stow, Ohio 44224.
Except to the extent precluded by applicable state law,
special damages; any warranty of merchantability or fitness for particular purpose expires when this warranty expires
This warranty gives you specific legal rights, and you may have other rights which vary from state to state.
Outside the U.S.A., please contact your local dealer for warranty details.
Visitez notre site web : www.audio-technica.com
Les produits de la marque Audio-Technica achetés aux États-Unis sont garantis pendant un an à compter de la date d’achat
contre tout défaut de matériau et de fabrication par Audio-Technica U.S., Inc. (A.T.U.S.). Dans l’éventualité d’un tel défaut, le
produit sera soit réparé gratuitement et dans les plus brefs délais, soit remplacé à notre convenance par un nouveau produit
d’une valeur égale ou supérieure. Le produit doit être retourné en port payé à A.T.U.S. ou à un centre agréé de service aprèsvente avec un ticket de caisse ou autre preuve de la date d’achat.
de A.T.U.S.
transport ou à une utilisation non conforme au mode d’emploi. Cette garantie n’est pas valable en cas de réparation ou de
modication effectuée par un personnel non agréé ou dans le cas où la marque du produit aurait été enlevée ou abîmée.
Pour obtenir notre accord pour le retour et pour tout renseignement concernant le transport
avec le département de service après-vente, Audio-Technica U.S., Inc., 1221 Commerce Drive, Stow, Ohio 44224.
A.T.U.S. ne sera pas tenu responsable des dommages indirects, accessoires ou spéciaux
de l’État n’en dispose autrement ;
un usage particulier expire
Cette garantie vous confère des droits spéciques ; il se peut par ailleurs que vous ayez d’autres droits qui varient d’un État
à l’autre.
Cette garantie exclut les défauts liés à une usure normale, à un usage abusif, à tout incident survenu lors du
lorsque cette garantie expire, toute garantie de valeur marchande ou d’aptitude à
.
This warranty excludes defects due to normal wear, abuse, shipping
, contact the Service Dept., Audio-Technica U.S., Inc., 1221 Commerce
A.T.U.S. will have no liability for any consequential, incidental, or
Garantie limitée de 1 an
Le renvoi ne peut avoir lieu sans l’accord préalable
Prior
.
, veuillez prendre contact
à moins que la loi applicable
En dehors des États-Unis, veuillez prendre contact avec votre revendeur local pour plus de détails concernant la garantie.
Visite nuestro sitio Web: www.audio-technica.com
Garantía limitada de un año
Audio-Technica U.S., Inc. (A.T.U.S.) ofrece una garantía de un año desde la fecha de compra en lo que se reere a materiales y
fabricación para todos los productos de la marca Audio-Technica adquiridos en Estados Unidos. En caso de que tenga algún
defecto, el producto será reparado inmediatamente sin cargo alguno o, según nuestro criterio, reemplazado por uno nuevo de
valor igual o superior, si se envía a A.T.U.S. o a un Centro de Servicio autorizado, franqueado y junto con el recibo de compra
u otro comprobante de la fecha de compra.
excluye defectos debidos al uso diario, al uso inapropiado, al transporte o a otros problemas que se produzcan por no utilizar
el producto según las instrucciones. Esta garantía no será válida en caso de reparaciones o modicaciones no autorizadas o si
se ha retirado la identificación del producto.
Para aprobación de devoluciones e información de envío
Audio-Technica U.S., Inc., 1221 Commerce Drive, Stow, Ohio 44224 (EE. UU.).
En la medida en que lo permita la ley aplicable del estado,
daños especiales, incidentales, consecuentes o indirectos comoquiera que se produzcan; toda garantía de
comerciabilidad e idoneidad para un n determinado caduca al hacerlo esta garantía
Esta garantía le otorga a usted derechos legales específicos y puede tener otros derechos que varían de un estado a otro.
Fuera de Estados Unidos, póngase en contacto con su distribuidor local para conocer los detalles de la garantía.
Toda devolución requiere la autorización previa de A.T.U.S.
, póngase en contacto con el Departamento de Servicio de
A.T.U.S. renuncia a toda responsabilidad por los
Esta garantía
.
Audio-Technica Corporation
2-46-1 Nishi-naruse, Machida, Tokyo 194-8666, Japan
©2017 Audio-Technica Corporation
Global Support Contact: www.at-globalsupport.com
169502080-01-01 ver.1 2017.12.31
 Loading...