

Page 1
AT- HS6
User Manual / Headshell
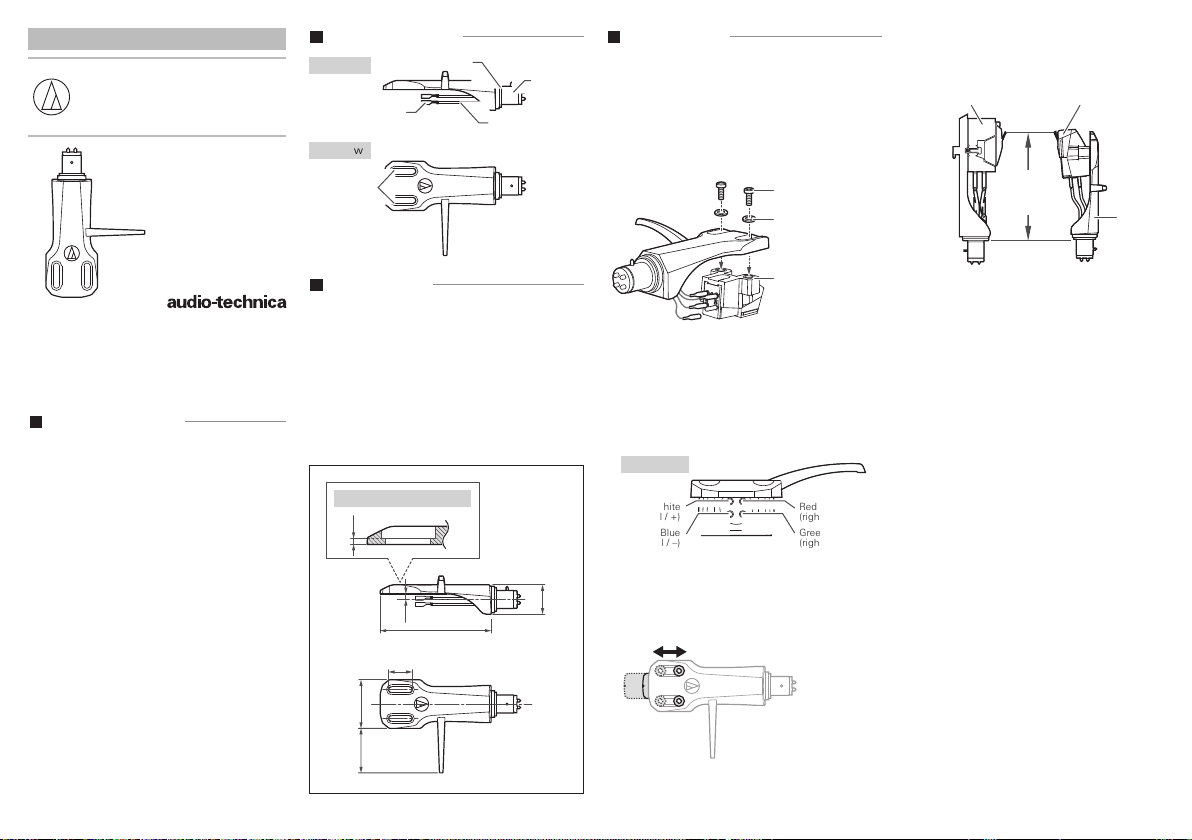
Name of each part
Side view
Top view
Screw holes
Rubber washer
Lead tip
Lead wire
Connector
How to install
1. Mount a cartridge onto the headshell using
the cartridge installation slotted screw and
plastic washer provided, and tighten lightly so
that cartridge position can be adjusted.
• When using a cartridge without threaded inserts,
use screws and nuts to install the cartridge.
• Take care that the screws are short enough so as
not to touch and damage the record.
• Read the user manual of the cartridge.
Cartridge installation
slotted screw
Plastic washer
If you are unsure about the overhang
adjustment, align the stylus tip with the stylus
on the cartridge that originally came with the
turntable (see figure below).
Cartridge that came
with turntable
Make this
distance as
exact as
possible.
Connected cartridge
AT-HS6
Thank you for purchasing this Audio-Technica
product. Before using the product, read through this
user manual to ensure that you will use the product
correctly. Please keep this manual for future
reference.
Safety precautions
• Keep the product out of the reach of small
children to avoid accidental ingestion of
screws, nuts and washers, or damage to
product.
• Do not use the product for any purpose other
than to mount a phono cartridge.
• Do not put the product in a location where it
is exposed to direct sunlight, near heating
devices, or in places with high temperatures,
high humidity, or high concentrations of dust.
• Do not attempt to disassemble or modify the
product.
• Do not subject the product to strong impact.
Specifications
Material
Weight
(excluding cartridge
installation screws)
Dimensions
(excluding connector
and protrusions)
Accessories
Specifications are subject to change without notice due to
improvements.
Cross section of screw hole
1.5
: Aluminum
: Approx. 9.3 g (0.33 oz) (including
lead wires)
Approx. 8.4 g (0.30 oz) (excluding
lead wires)
: 13.0 mm (0.51”) × 21.4 mm (0.84”)
× 48.9 mm (1.93”) (H × W ×D)
: Cartridge installation slotted screw
(M2.6) (10 mm × 2 and 8 mm × 2),
Nut x 2, Plastic washer x 2
2.5
48.9
10.5
21.419.6
13.0
(Unit : mm)
Threaded insert
2. Slide the lead tips over the cartridge
connections.
• Do not apply heat.
• Use tweezers, small pliers, and non-magnetic
screwdriver(s) to mount the headshell/cartridge.
•If a lead tip is loose, flatten it out slightly to attach it.
●Layout of headshell leads
Front view
White
(left channel / +)
Blue
(left channel / –)
3. Loosen screws with a non-magnetic
screwdriver and adjust for overhang. Tighten
the screws firmly when position is fixed.
Overhang adjustment
Red
(right channel / +)
Green
(right channel / –)
Loosen screws
and adjust the
position
4. Attach the headshell to the tonearm.
5. Refer to the turntable's user manual and
adjust the tonearm balance, tracking force
and anti-skate.
Other language versions of this manual are
available for download at
http://eu.audio-technica.com/
Audio-Technica Corporation
2-46-1 Nishi-naruse, Machida, Tokyo 194-8666, Japan
www.audio-technica.com
©2019 Audio-Technica Corporation
Global Support Contact: www.at-globalsupport.com
162501280-01-02 ver.2 2019.08.01
ver.1 2018.08.01
Page 2
AT-HS6
取扱説明書 / ヘッドシェル
お買 い上げ ありがとうござい ます。ご 使 用 の前 にこの 取
扱説明書を必ずお読みのうえ、正しくご使用ください。•
またいつでもすぐ読 める場所に保 管しておいてください。
安全上の注意
本製品は安全性に充分な配慮をして設計していますが、
使い か たを誤 ると 事 故が 起こることがありま す。事故 を
未然に防ぐために下記の内容を必ずお守りください。
この表示は「取り扱いを誤った場合、使 用者
が死亡または重傷を負う可能性があります」
警 告
を意 味して いま す。
この表示は「取り扱いを誤った場合、使 用者
が傷害を負う、または物的損害が発生する
注 意
可能性があります」を意味しています。
警 告
••幼児の手の届かないところに置かないでください。取り
付けビス、ナットやワッシャーなどの誤飲 、事 故の原因に
なります。
注 意
••カートリッジを取り付ける用途 以 外には使 用しないでく
ださい。破損や事故の原因になります。
••直射日光の当たる場所、暖房器具の近く、高温多湿やほ
こりの多い場所に置かないでください。故障や不具合の
原 因になりま す。
••分解や改造はしないでください。故障の原因になります。
••強い衝撃を与えないでください。故障の原因になります。
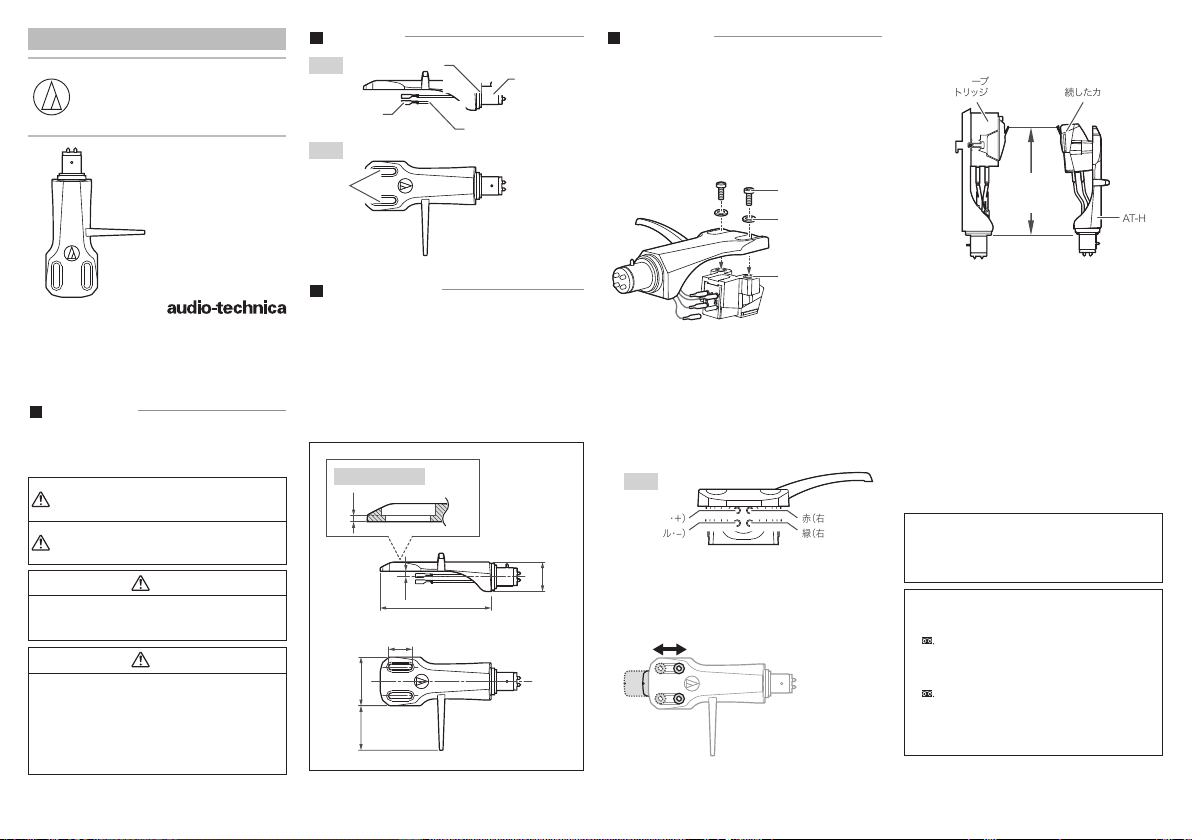
各部の名称
リード チ ップ
ゴムワッシャ ー
コネクタ ー 部
リード線
側面
天面
取り付け
ビス穴
テクニカルデータ
材質 : アルミニ ウム
質量•
( 取り付 けビ ス除 く)
外形寸法(コネクター
部、突起部除く)
付属品 : 取り付けビス(M2.6)(10mm×2、8mm
改良 のた め予 告なく変 更 することが あります。
ビス穴部の断面図
: 約9.3g(リード線含む)、
約8.4g(リード線除く)
: 13.0×21.4×48.9mm(H×W×D)
×2)、ナット×2、プラスチックワッシャー
×2
1.5
2.5
48.9
10.5
21.419.6
13.0
(単位:mm)
接続のしかた
1. 本製品とカートリッジ(別売)を、付属の取り付けビ
ス 、プ ラ ス チ ッ ク ワ ッ シ ャ ー を 使 用 し て 仮 留 め し 、 位
置を 決 め ます。
••インサートナット( 埋め 込み 式 )の 付いていな いカートリッジ
を使 用 する場 合 は、取り付けビスとナットを使 用してカートリッ
ジを 取り 付 けます。
••取り付けビスを上から通して固定する場合は、レコードに取
り付けビスが 当たらないようにご注意ください。
••ご使用のカートリッジの取扱説明書も併せてご確認ください。
取り付けビ ス
プラスチ ックワッシャ ー
イン サ ー トナ ット
(埋め込み式)
2. リード線の 先端 にあるリードチップをカ ートリッジ
に差し込み 接続します。
••絶 対 に 熱 など を 加 え ない でくだ さい 。
••ヘッドシェルとカートリッジの取り付けには 、市販 のピンセッ
ト、スモ ール ペンチ や 非 磁 性マイナスドライバー など を使 用
して取 り 付 けること をお す すめ しま す。
••リードチップが緩い場合は、少しつぶして接続してください。
●ヘッドシェルリード線 の配 列
前面
白( 左 チ ャ ン ネ ル ・ + ) 赤( 右 チ ャ ン ネ ル ・ + )
青(左チャンネル・−) 緑(右チャンネル・−)
3. 2 カ所 の 取 り付 けビ スを 非 磁 性マイナスドライバー
で緩めて、オーバーハングの調整をします。調整終
了 後 は 取り 付 け ビ ス を 本 締 めし てくだ さ い 。
オーバー ハング調 整
2カ所の 取り付け
ビスを緩 めて調 整
する。
不明な場合は、ターンテーブルに最初から付い
ているカートリッジの針先位置に合わせてくだ
さい(下図)。
ター ン テ ーブ ル 付 属 の
カ ートリッジ
4. ターンテーブルのトーンアームに本製品を接続
します。
5. ターンテーブルの取扱説明書を参照し、水平バ
ランス、針圧、アンチスケーティングの調整を行
います。
アフターサ ービ スにつ いて
本製品をご家庭用として、取扱説明や接続・注意書きに沿ったご
使用において万が一、製造上の原因による品質不良が発生した場
合は新品とお取り換えいたします。それ以外の責はご了承ください。
お取り換えの際は、お買い上げの確認のため領 収書またはレシー
トなどが必要になりますので大切に保管ください。
お問い合わせ先(電話受付/ 平日9:00〜17:30)
製品の仕様・使いかたや修理・部品のご相談は、お買い上げのお
店または当 社窓 口およびホームペ ージの サポートまでお願 いします。
● お客様相談窓口(製品の仕様・使いかた)
0120-773-417
(携帯電話・PHSなどのご利用は 03-6746-0211)
FAX:042-739-9120•
Eメール:support@audio-technica.co.jp
● サービスセンター(修理・部品)
0120-887-416
(携帯電話・PHSなどのご利用は 03-6746-0212)
FAX:042-739-9120•
Eメール:servicecenter@audio-technica.co.jp
● ホームページ(サポ ート)
www.audio-technica.co.jp/atj/support/
株式会社オーディオテクニカ
〒194-8666 東京都町田市西成瀬2-46-1
www.audio-technica.co.jp
©2019 Audio-Technica Corporation
この距 離 をでき
るだけ正 確に 合
わせる
接 続 した カ ー トリッジ
AT-HS6
 Loading...