

Page 1

Administrator's Guide
AudioCodes One Voice Operations Center (OVOC)
Device Manager Pro
Version 7.8
Page 2

Notice
Device Manager Pro | Administrator's Guide
Notice
Information contained in this document is believed to be accurate and reliable at the time
of printing. However, due to ongoing product improvements and revisions, AudioCodes
cannot guarantee accuracy of printed material after the Date Published nor can it accept
responsibility for errors or omissions. Updates to this document can be downloaded from
https://www.audiocodes.com/library/technical-documents.
This document is subject to change without notice.
Date Published: September-03-2020
WEEE EU Directive
Pursuant to the WEEE EU Directive, electronic and electrical waste must not be disposed of
with unsorted waste. Please contact your local recycling authority for disposal of this product.
Customer Support
Customer technical support and services are provided by AudioCodes or by an authorized
AudioCodes Service Partner. For more information on how to buy technical support for
AudioCodes products and for contact information, please visit our website at
https://www.audiocodes.com/services-support/maintenance-and-support.
Documentation Feedback
AudioCodes continually strives to produce high quality documentation. If you have any
comments (suggestions or errors) regarding this document, please fill out the Documentation
Feedback form on our website at https://online.audiocodes.com/documentation-feedback.
Stay in the Loop with AudioCodes
Related Documentation
Document Name
400HD Series IP Phone User Manuals
400HD Series IP Phone with Microsoft Skype for Business User Manuals
400HD Series IP Phones Administrator's Manual
- ii -
Page 3
Notice
Device Manager Pro | Administrator's Guide
Document Name
400HD Series IP Phone with Microsoft Skype for Business Administrator's Manual
400HD Series IP Phone Quick Guides
400HD Series IP Phone with Microsoft Skype for Business Quick Guides
Device Manager for Third-Party Vendor Products Administrator's Manual
Device Manager Agent Installation and Configuration Guide
One Voice Operations Center IOM Manual
One Voice Operations Center User's Manual
Document Revision Record
LTRT Description
91097 Initial release for 7.8. Set as VIP. Network Topology page. Polycom phones
provisioned to sites. System Settings and tabs. Rearranged GUI.
- iii -
Page 4

Content
Device Manager Pro | Administrator's Guide
Table of Contents
1 Introduction 1
About this Document 1
Zero Touch Provisioning 1
Zero Touch Provisioning Process - Skype for Business Phone 2
Zero Touch Provisioning – non Skype for Business Phone 4
2 Starting up and Logging in 5
3 Adding Users & Devices in Non-Skype for Business Environments 7
Exporting 'System User' to zip File 10
Adding Users and Devices Information to the csv File 12
Importing the csv File 12
4 Using the Zero Touch Setup Wizard to Provision Phones 13
5 Provisioning Phones without the Zero Touch Setup Wizard 16
Before Implementing Zero Touch 16
Defining a Tenant 16
Configuring an Endpoints Group 18
Preparing a Template for a Tenant/Model 20
Uploading .img Firmware File to the Server 23
Configuring DHCP Option 160 with a Tenant URL 23
Configuring DHCP Option 160 with System URL 27
Editing the DHCP Option 160 cfg File 28
Editing the SBC HTTP Proxy 30
6 Provisioning Android-based Teams Phones 31
Configuring a Periodic Provisioning Cycle 32
Configuring TimeZone and Daylight Savings 32
Managing Devices with HTTPS 33
Supported Parameters 33
7 Managing Devices Behind a NAT using SBC HTTP Proxy 36
8 Monitoring and Maintaining the Phone Network 38
Monitoring the Network from the Dashboard 38
Viewing Network Topology 40
Checking Devices Status 41
Monitoring Alarms 48
Searching for Alarms 49
Performing Actions on Alarms 49
Maintaining Users 49
Searching for Users/Devices 49
Adding a User 50
Adding a Phone 51
Editing a User 52
- iv -
Page 5

Content
Viewing Device Status 53
Deleting a User 54
Device Manager Pro | Administrator's Guide
Managing Multiple Users 54
Maintaining Multiple Devices 58
Managing Configuration Files 61
Managing Firmware Files 61
Upgrading Devices to the Latest Firmware Versions 66
9 Viewing Your License 69
Licensing Endpoints 70
10 Approving Users 71
Skype for Business Environment 71
Non-Skype for Business Environment 74
11 Managing Templates 75
System Settings and Placeholders 75
Selecting a Template 79
Editing a Configuration Template 80
About the Template File 82
Restoring a Template to the Default 82
Downloading a Template 83
Uploading an Edited Template 83
Generating an Edited Template 83
Defining Template Placeholders 84
Viewing Default Placeholders Values 85
Template Placeholders 86
Tenant Placeholders 87
Devices Placeholders 90
12 Configuring the LDAP Directory 92
13 Managing Device Manager Agents 95
Enabling Device Manager to Support Agents 96
Monitoring Device Manager Agents 97
16 Performing Polycom Configuration 98
17 Configuring Phones to Operate in an OVR Deployment 99
18 Signing in to a Phone into which Another User is Signed 101
19 Troubleshooting 102
Displaying Last n Activities Performed in the Web Interface 102
Displaying Archived Activities Performed in the Web Interface 103
Displaying Last n Activities Performed in Device Manager Pro 105
Displaying Archived Activities Performed in Device Manager Pro 106
- v -
Page 6

CHAPTER1 Introduction
1 Introduction
AudioCodes' Device Manager Pro features a user interface that enables enterprise network
administrators to effortlessly and effectively provision and maintain up to 30000 400HD Series
IP phones and third-party vendor devices in globally distributed corporations.
The Device Manager Pro client, which network administrators can use to connect to the server,
can be any standard web browser supporting HTML5: Microsoft's Edge, Internet Explorer
version 11 and later, Chrome (recommended) or Firefox.
REST (Representational State Transfer) based architecture enables statuses, commands and
alarms to be communicated between the devices and the server. The devices send their status
to the server every hour for display in the user interface.
Accessed from AudioCodes' One Voice Operations Center (referred to as OVOC for short in this
document), the Device Manager Pro enables network administrators to effortlessly load
configuration files and firmware files on up to 30000 IP phones and third-party vendor devices.
Device Manager Pro | Administrator's Guide
Other actions administrators can perform on multiple phones are to upload a csv file with
devices' MAC addresses and SIP credentials (supported in all environments except Skype for
Business), approve devices at the press of a button (supported in Skype for Business
environments only), send messages to phones' screens, reset phones, and move phones
between tenants.
A configuration file template feature lets network administrators customize configuration files
per phone model, tenant, and device.
Integrated into the OVOC, the Device Manager Pro server provides added value to
AudioCodes' 400HD Series IP phones and third-party vendor devices.
About this Document
This document shows network administrators how to enable automatic provisioning (Zero
Touch provisioning) of the AudioCodes devices in an enterprise network from a single central
point.
● For information on third-party vendor products (for example Jabra and Polycom),
see the Device Manager for Third-Party Vendor Products Administrator's Manual
● For information on the Device Manager Agent, see:
✔ Device Manager Agent Installation and Configuration Guide
✔ Managing Device Manager Agents on page95
● For detailed descriptive information about the Agent, see the Device Manager
Agent Installation and Configuration Guide.
Zero Touch Provisioning
AudioCodes' IP phones can be automatically provisioned when they are plugged in to the
enterprise's network if Zero Touch provisioning has been implemented.
- 1 -
Page 7
CHAPTER1 Introduction
➢ To implement Zero Touch provisioning:
1. Build your network topology of tenants and sites using the One Voice Operations Center
(see the One Voice Operations Center User's Manual for more information).
2. Start up and log into the Device Manager Pro.
3. Choose the Zero Touch provisioning method. Either:
● Configure the DHCP server to provision the phone with an IP address that is in the
● Use DHCP Option 160.
4. Choose the default template for each tenant and model.
Device Manager Pro | Administrator's Guide
Applies to all phones irrespective of Skype for Business/non-Skype for Business.
tenant/site range. Configure the phone to receive the IP address or subnet mask of
the tenant/site.
Phones that reside behind a NAT and whose IP addresses are internal can be managed
by the OVOC via SBC HTTP proxy. For more information, see Managing Devices
Behind a NAT using SBC HTTP Proxy on page36.
Zero Touch Provisioning Process - Skype for Business Phone
The figure below illustrates the 1-9 step provisioning process for AudioCodes' IP phones for
Skype for Business when the Zero Touch feature is implemented.
Figure 1-1: Zero Touch Provisioning - Skype for Business Phone
*If the network administrator does not define a tenant in the URL in DHCP Option 160, the
phone is allocated a tenant/site according to best match , that is, according to either tenant
- 2 -
Page 8

CHAPTER1 Introduction
Subnet Mask or site Subnet Mask configured in the OVOC. See the One Voice Operations
Center User's Manual for more information.
Device Manager Pro | Administrator's Guide
- 3 -
Page 9
CHAPTER1 Introduction
Zero Touch Provisioning – non Skype for Business Phone
The figure below illustrates the 1-8 step provisioning process for AudioCodes' non Skype for
Business phones when the Zero Touch feature is implemented.
Figure 1-2: Zero Touch Provisioning – non Skype for Business Phone
Device Manager Pro | Administrator's Guide
- 4 -
Page 10
CHAPTER2 Starting up and Logging in
2 Starting up and Logging in
After installation, start the Device Manager Pro and log in. Before logging in, you need to run
the OVOC.
● To access the Device Manager Pro without running the OVOC, point your web
browser to https://<OVOC_IP_Address>/ipp and then in the login screen that
opens, log in. If the browser is pointed to HTTP, it will be redirected to HTTPS.
● Device Manager Pro is a secured web client that runs on any standard web
browser supporting HTML5: Internet Explorer v11 and later, Chrome or Firefox.
For information on installing and operating the OVOC, see the OVOC Server IOM Manual and
the OVOC User's Manual.
➢ To log in to the Device Manager Pro via the OVOC:
Device Manager Pro | Administrator's Guide
1. In the OVOC's Network page, click the Endpoints tab and from the dropdown select
Configuration . The Login to Device Manager Pro screen opens.
Figure 2-1: Login
The 'Username' and 'Password' used to log in to the Device Manager Pro are the same
as those used to log in to the OVOC.
2. Enter your Username and Password (default = acladmin and pass_1234)and click Sign In;
the application is launched and the Monitor Dashboard is displayed.
- 5 -
Page 11
CHAPTER2 Starting up and Logging in
Device Manager Pro | Administrator's Guide
Figure 2-2: Monitor Dashboard
● See Monitoring and Maintaining the Phone Network on page38 for more
information about monitoring phones.
● The following topics show how to provision phones using Zero Touch.
- 6 -
Page 12

CHAPTER3 Adding Users & Devices in Non-Skype for Business Environments
Device Manager Pro | Administrator's Guide
3 Adding Users & Devices in Non-Skype for Business
Environments
Administrators can import
■ users and devices -or-
■ only users
If the administrator imports users and devices, the association between users and devices was
made before Version 7.6
■ using the device's MAC address
■ through user name and password
■ via an imported CSV file
■ before deployment
➢ To add users and devices with a version earlier than Version 7.6 of Device Manager
Pro:
■ After plugging the phones into the network, log in to Device Manager Pro and then (best
practice):
● Export the automatically created 'System User' to a zip file (see Exporting 'System
User' to zip File on page10)
● Unzip the zip file, open the csv file and add users and devices in the same format (see
Adding Users and Devices Information to the csv File on page12)
● Import the csv file with users and devices back into Device Manager Pro (see
Importing the csv File on page12
➢ To add only users:
● Applies only to Version 7.6 and later
● The association is manually made after deployment, using the Approve button in
the Devices Status page
● When the phone is connected to the network for the first time, the user is prompted
to enter their username/password; it's matched with that on the Device Manager
Pro. After the match, the Manager associates the device with the user.
Usernames/ passwords are then uploaded to the Manager through the import CSV
without using MAC address. After authentication, the Manager downloads the cfg
file to the phone.
1. After installing the Device Manager Pro, add the HTTP authentication configuration
properties to the initial configuration file (taken from DHCP Options 160) and to the
templates.
2. Select an authentication mode. Two possibilities are available:
- 7 -
Page 13
CHAPTER3 Adding Users & Devices in Non-Skype for Business Environments
● With username/password
● Without password; only username or extension
● The default authentication mode is username/password
● The Login screen then allows the user to authenticate with username only,
excluding password
● If you want the user to use 'password only' for authentication, enable the 'no
password' option
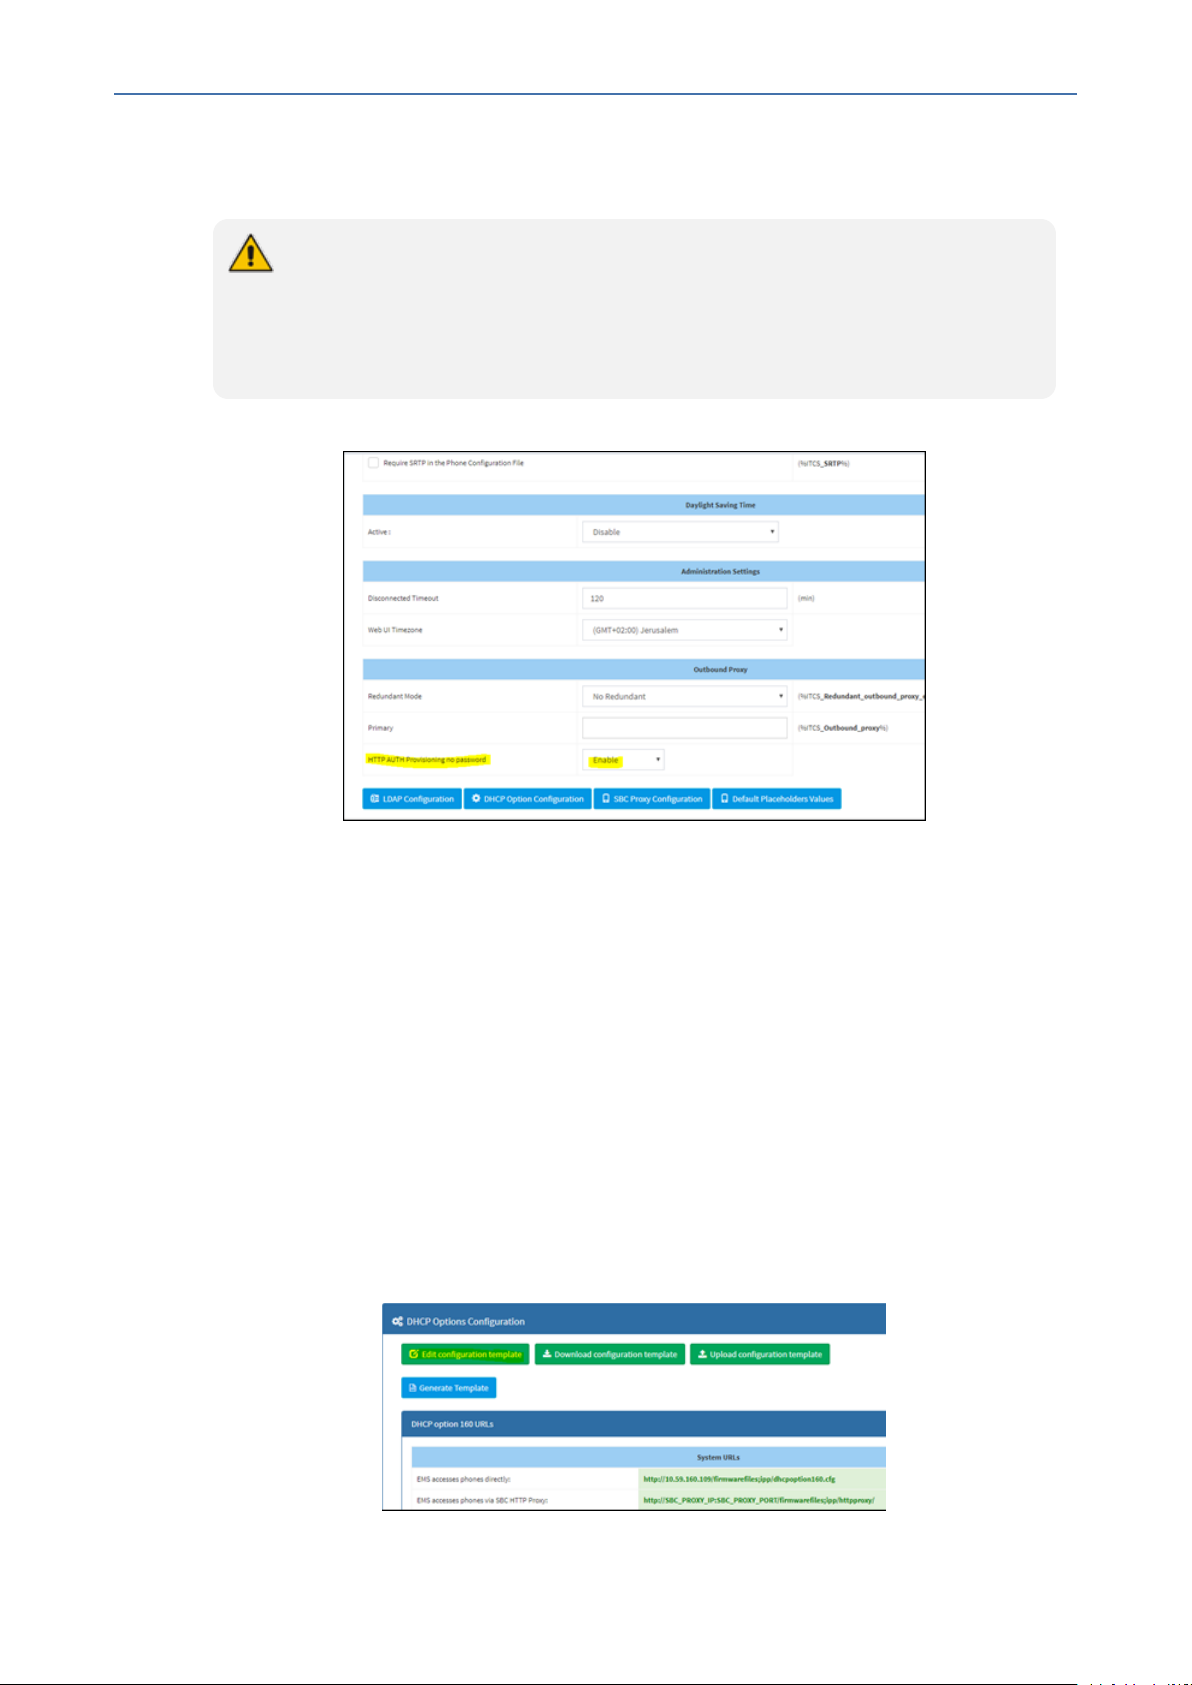
Figure 3-1: System Settings Page - HTTP AUTH Provisioning No Password
Device Manager Pro | Administrator's Guide
3. Configure DHCP Options for HTTP Authentication. To prompt the user for username and
password, add the following HTTP authentication parameters to the DHCP option 160 cfg
file:
● provisioning/configuration/http_auth/password=
● provisioning/configuration/http_auth/ui_interaction_enabled=1
● provisioning/configuration/http_auth/user_name=
4. Update the parameter 'provisioning/configuration/url'
◆ provisioning/configuration/url=<HTTP_OR_S>://<IP_ADDRESS>/ip-
p/admin/httpauth/auth_prov.php
5. Open the DHCP Option Configuration page (Setup > Devices Configuration > DHCP
Options Configuration)
Figure 3-2: DHCP Options Configuration
- 8 -
Page 14
CHAPTER3 Adding Users & Devices in Non-Skype for Business Environments
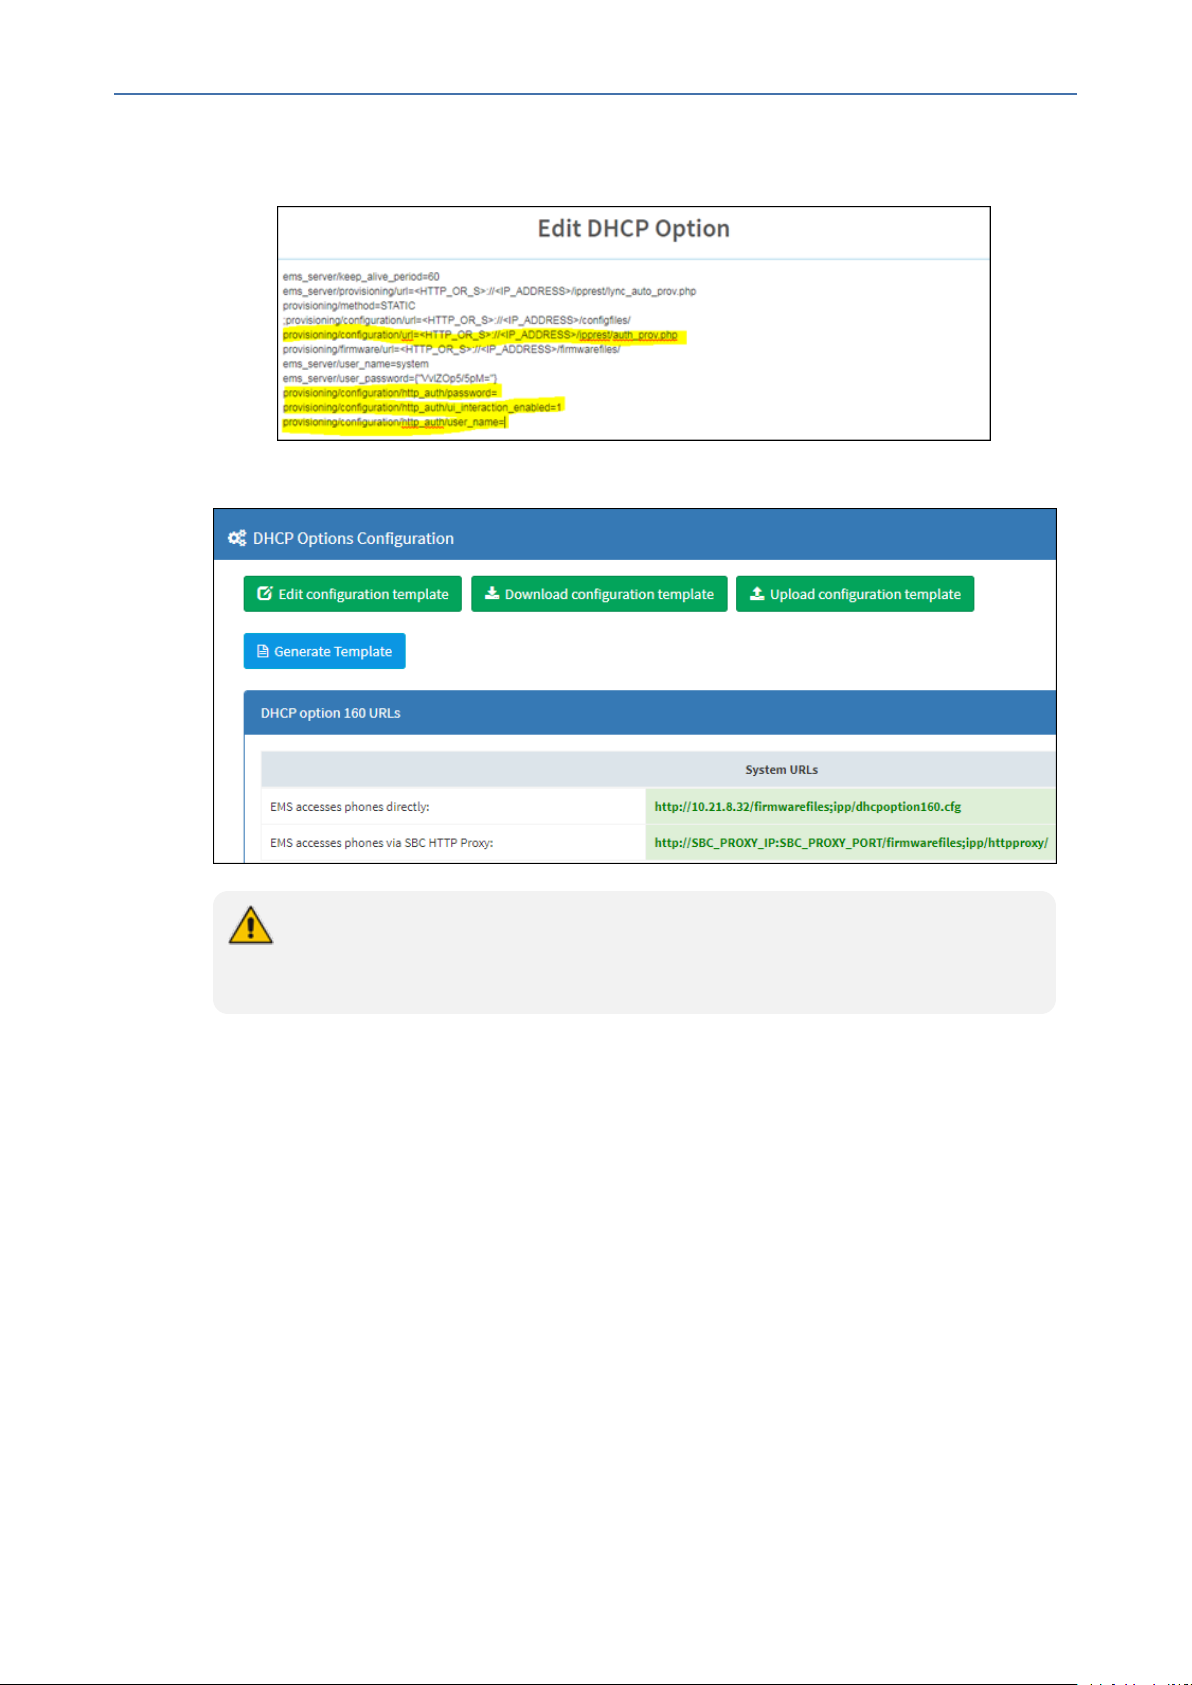
6. Click Edit configuration template:
Figure 3-3: Edit DHCP Option
7. Click Generate Template:
Device Manager Pro | Administrator's Guide
If you want password to be excluded from HTTP user authentication, configure parameter 'provisioning/configuration/http_auth/password' to 1234. Users will then not have
to enter a password when performing authentication.
8. Configure each template to operate with HTTP authentication. Open each template you
want to operate with HTTP authentication and add the following values to each:
● provisioning/configuration/http_auth/password=%ITCS_Line1AuthPassword%
● provisioning/configuration/http_auth/ui_interaction_enabled=1
● provisioning/configuration/http_auth/user_name=%ITCS_Line1AuthName%
9. Update the parameter 'provisioning/configuration/url':
◆ provisioning/configuration/url=%ITCS_HTTP_OR_S%://%ITCS_HTTP_PROXY_
IP%:%ITCS_HTTP_PROXY_PORT%/ipp/admin/httpauth/auth_prov.php
10. Close the Directory 'configfiles'. For security reasons, it's preferable to close the 'configfiles'
web directory as from now on all cfg files will be downloaded from the new location
http:<SERVER_IP_ADDRESS>/ipprest/lync_auto_prov.php rather than from
http:<SERVER_IP_ADDRESS>/configfiles/MAC.cfg
- 9 -
Page 15
CHAPTER3 Adding Users & Devices in Non-Skype for Business Environments
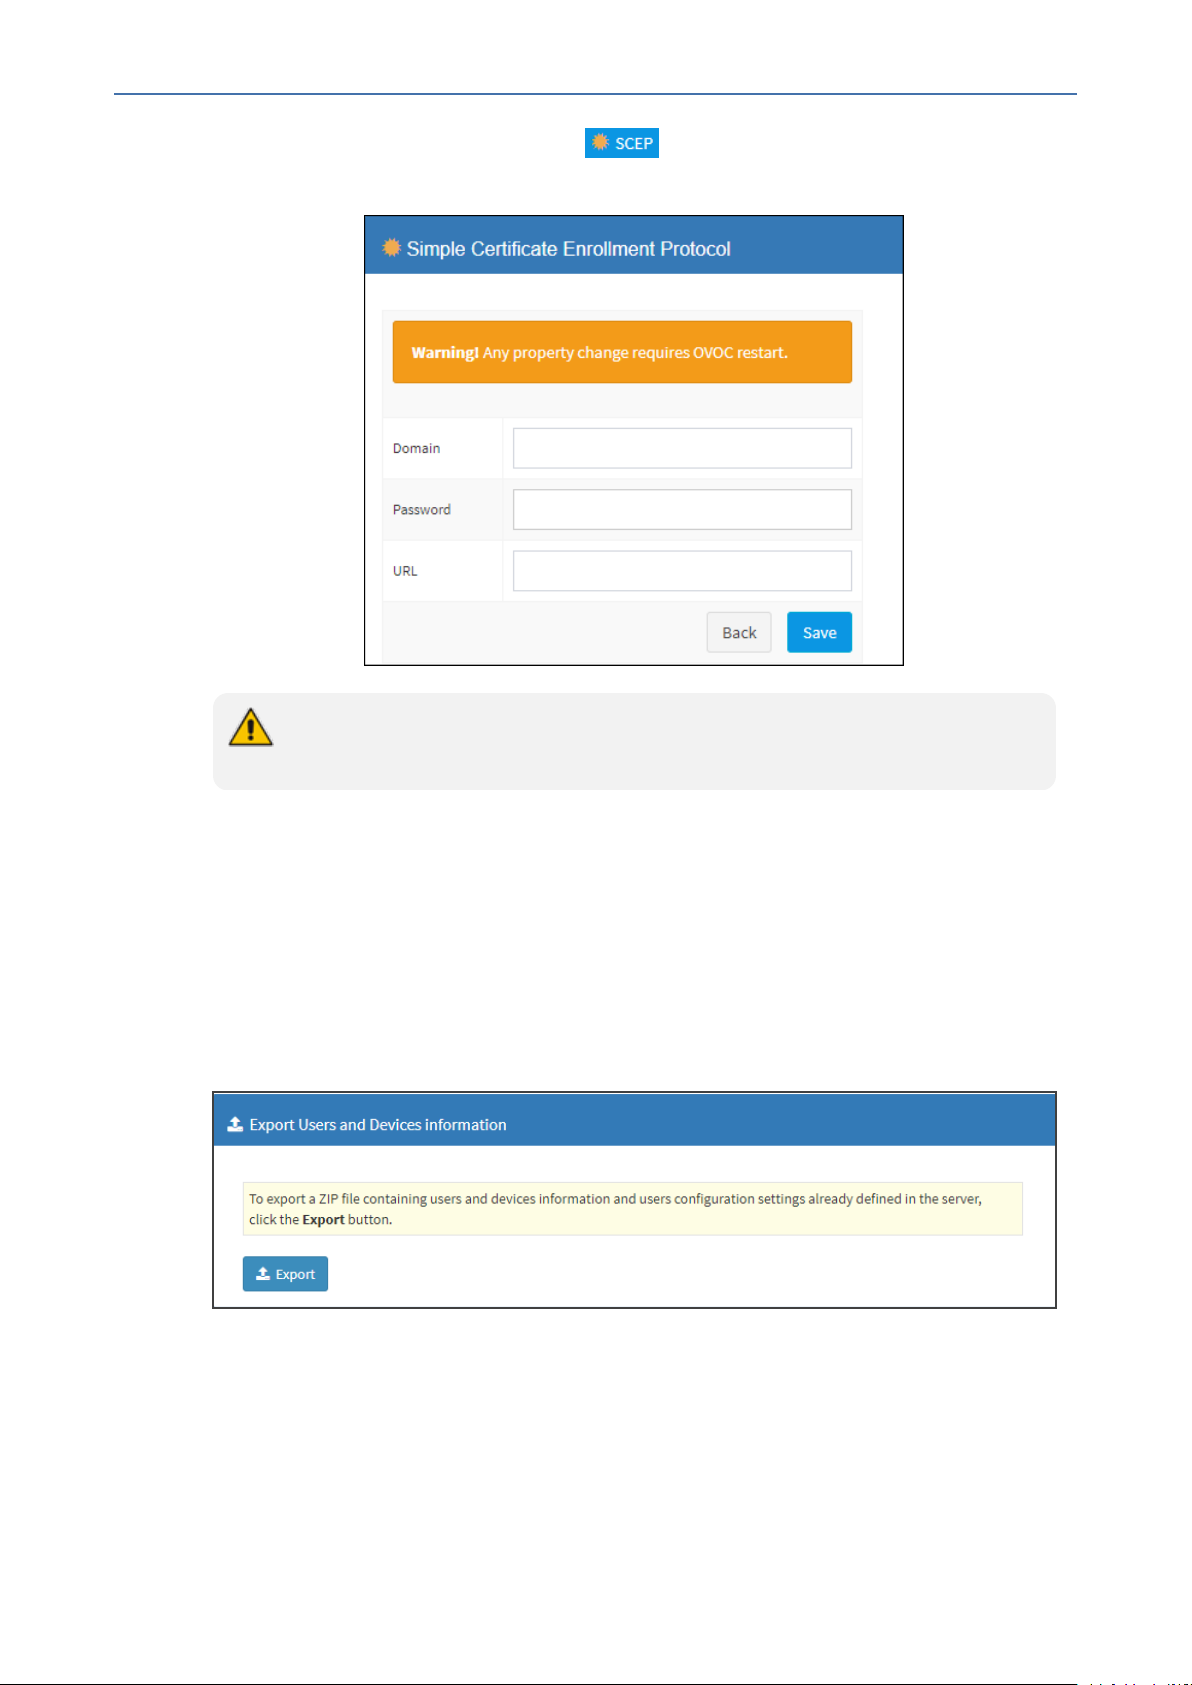
11. In the System Settings page, click the button.
Figure 3-4: Simple Certificate Enrollment Protocol
Device Manager Pro | Administrator's Guide
Device firmware does not support Simple Certificate Enrollment Protocol yet. Future
device firmware will support it.
Exporting 'System User' to zip File
Here's how to export the 'system user' that is automatically created after you log in to Device
Manager Pro, to a zip file.
➢ To export the 'system user' to a zip file:
1. Open the Export Users and Devices Information page (Setup > Import/Export).
Figure 3-5: Export Users and Devices Information
2. Click Export; a link to the users.zip file is added to the lowermost left corner of the page.
3. Click the link; the unzipped file opens displaying a csv file and a cfg file.
4. Open the csv (in Excel):
- 10 -
Page 16

CHAPTER3 Adding Users & Devices in Non-Skype for Business Environments
Figure 3-6: csv File in Excel
Excel displays the information related to 'system user'.
Device Manager Pro | Administrator's Guide
- 11 -
Page 17
CHAPTER3 Adding Users & Devices in Non-Skype for Business Environments
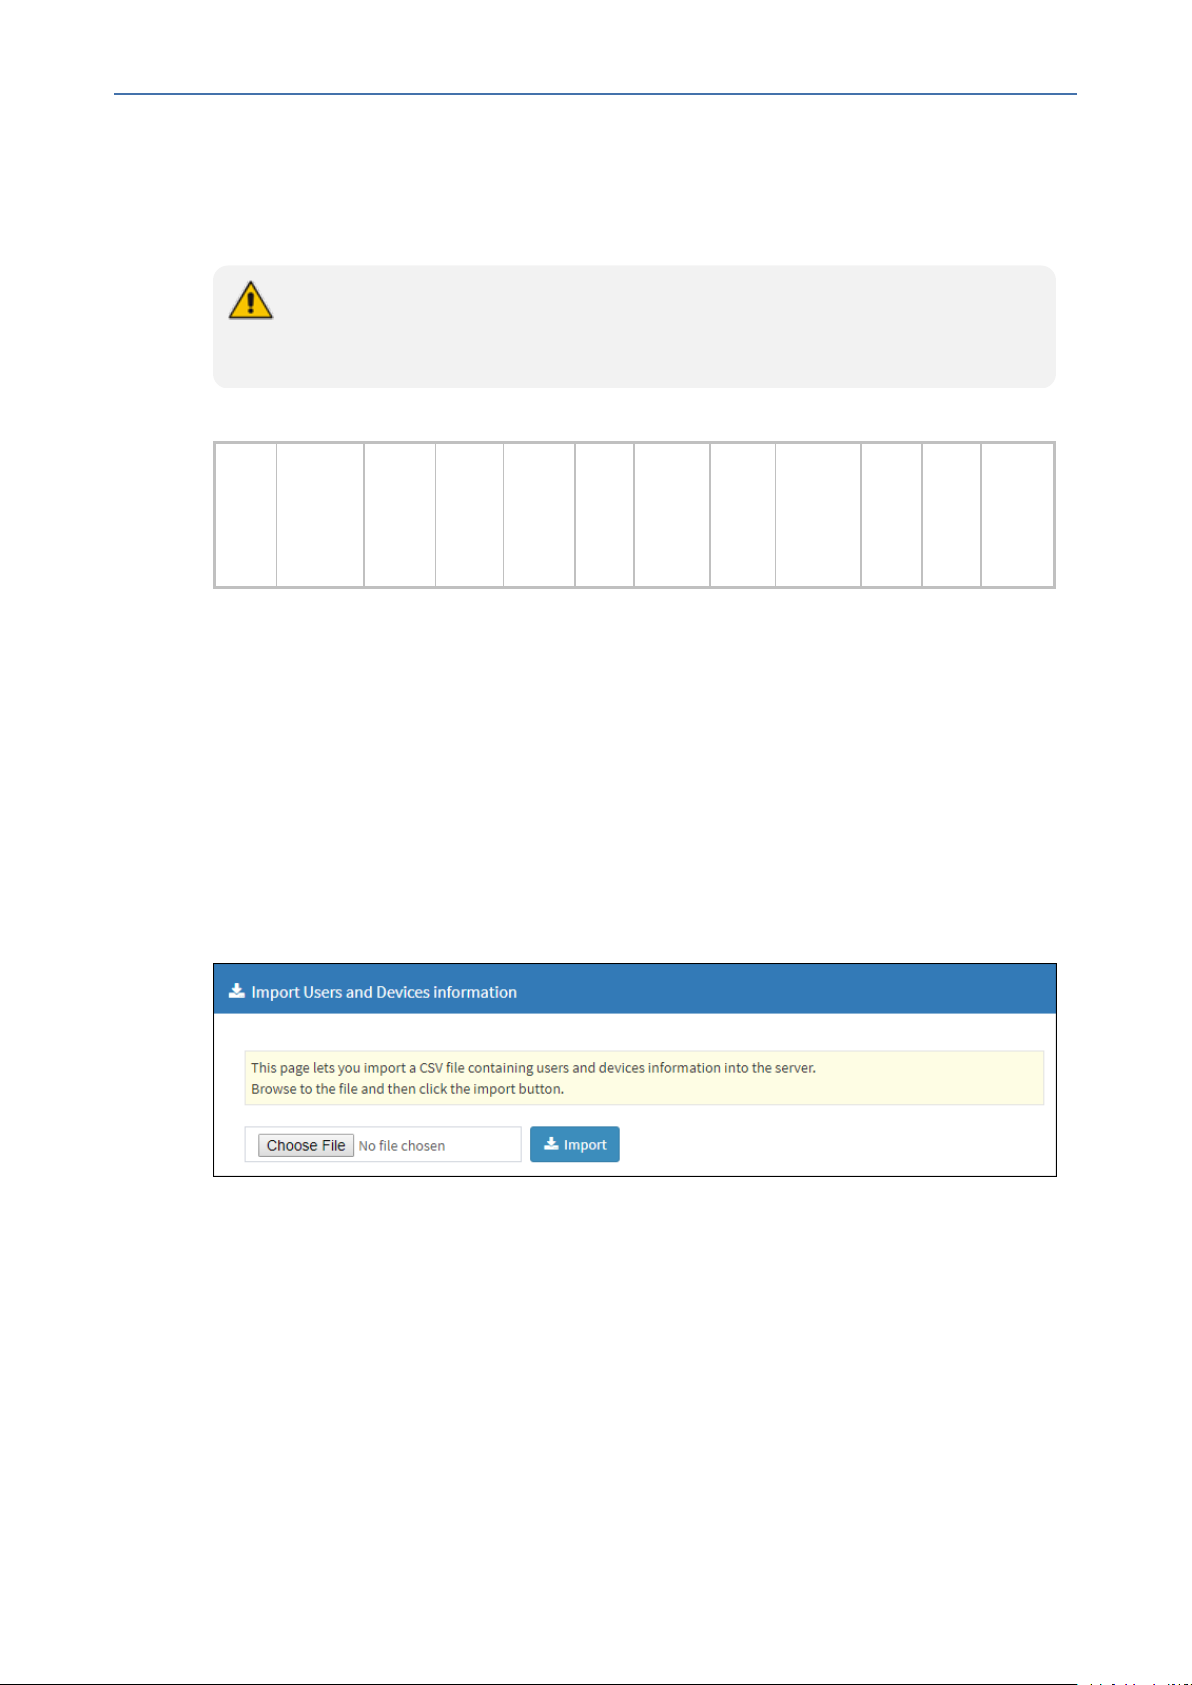
Adding Users and Devices Information to the csv File
You need to add to the csv file the information related to all the users and devices in your
enterprise's network.
To facilitate this task, you can export a csv from your enterprise PBX and then edit it to
conform to the 'system user' csv row shown in the figure above and the columns shown
in the table below.
Table 3-1: csv File Information
Device Manager Pro | Administrator's Guide
Na-mePass-
word
Up to 30000 users and devices can be defined in the csv file. After defining users and devices,
save the csv file on your desktop from where you can import it into the Device Manager Pro.
Display
Name
Tenant
Display
Name
Serial
MAC
Address
Phone
Model
Language
VLAN
Mode
VLAN
ID
VLAN Priority
Importing the csv File
After adding to the csv file the information related to all the users and devices in your
enterprise's network, import the new csv file into the Device Manager Pro.
➢ To import the new csv file into the Device Manager Pro:
1. Open the Import Users & Devices Information page (Setup > Import/Export).
Figure 3-7: Import Users & Devices Information
2. Click Import and then navigate to and select the csv file which you created and saved on
your desktop previously; the file is imported into the Device Manager Pro.
3. Open the Manage Users page (Setup > Users & Devices) and make sure all enterprise
users you imported are displayed.
- 12 -
Page 18
CHAPTER4 Using the Zero Touch Setup Wizard to Provision Phones
Device Manager Pro | Administrator's Guide
4 Using the Zero Touch Setup Wizard to Provision
Phones
When plugged in to the enterprise network, phones can automatically be provisioned through
the Zero Touch feature.
■ Zero Touch determines which template the phone will be allocated.
■ The template is allocated per phone model and per phone tenant.
■ The template determines which firmware file and configuration file the phone will be
allocated.
Zero Touch provisioning accelerates uptime by enabling multiple users and phones to
automatically be provisioned and added to the Manager.
You can use the Setup Wizard feature to set up Zero Touch provisioning. The Wizard simplifies
deployment of phones in the enterprise for network administrators. The Wizard's functions
were already implemented in versions of Device Manager Pro earlier than Version 7.4, only
now they're centralized in a single location for a friendlier deployment experience. Here're the
steps to follow to provison phones using the Wizard.
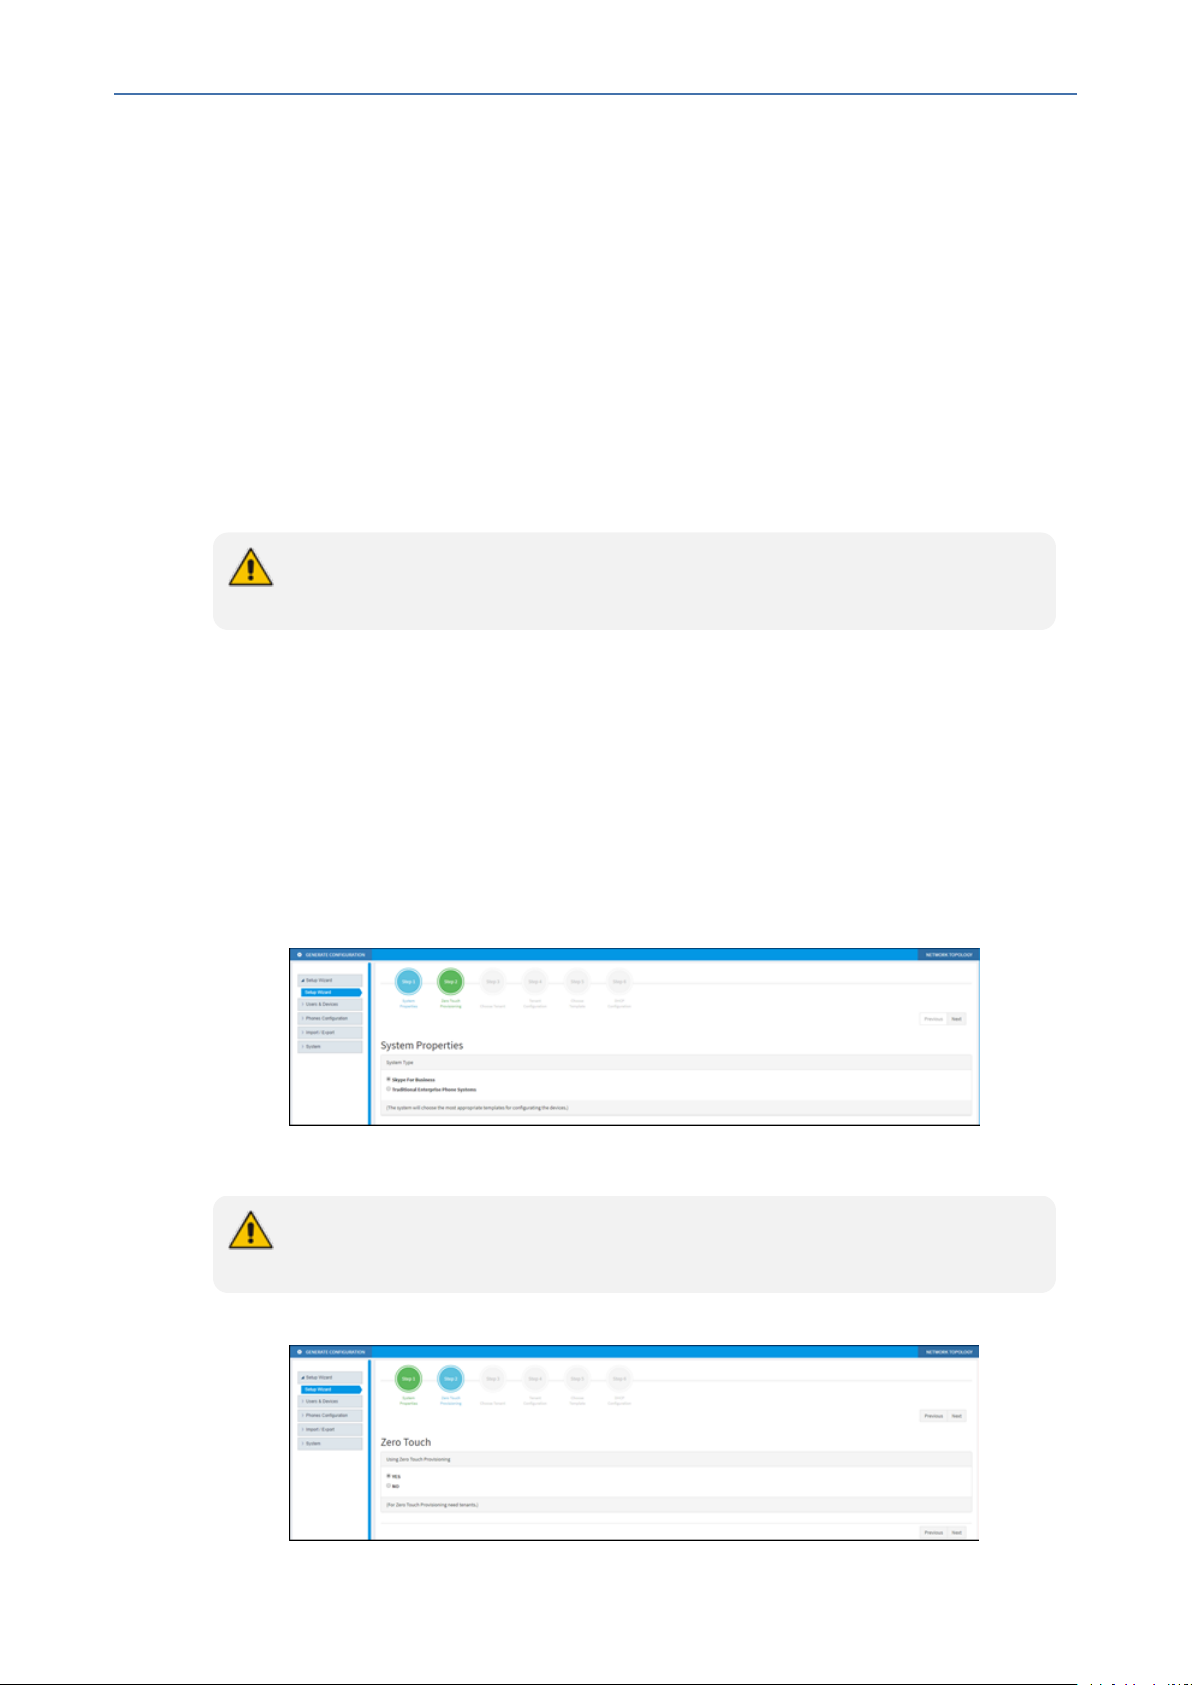
➢ To provison phones using the Zero Touch Setup Wizard:
1. In the main screen, click the 'Setup' menu and then click the Setup Wizard option.
Figure 4-1: Step 1 – System Type
2. Select Skype for Business and then click Next.
The Setup Wizard will be closed if you intend to use other PBXs besides Skype for
Business. The Setup Wizard is intended exclusively for Skype for Business.
Figure 4-2: Step 2 - Zero Touch
- 13 -
Page 19
CHAPTER4 Using the Zero Touch Setup Wizard to Provision Phones
3. Select Yes and then click Next.
Figure 4-3: Step 3 – Choose Tenant
4. Choose an existing tenant from the dropdown and click Next. If a tenant doesn't already
exist, click Next and configure one. This is to be able to create a specific configuration for
the tenant and configure the URL in DHCP Option 160 so devices will use this tenant. If
there's no specific tenant configuration to configure, click Next.
Figure 4-4: Step 4 – Tenant Configuration
Device Manager Pro | Administrator's Guide
5. Click Next.
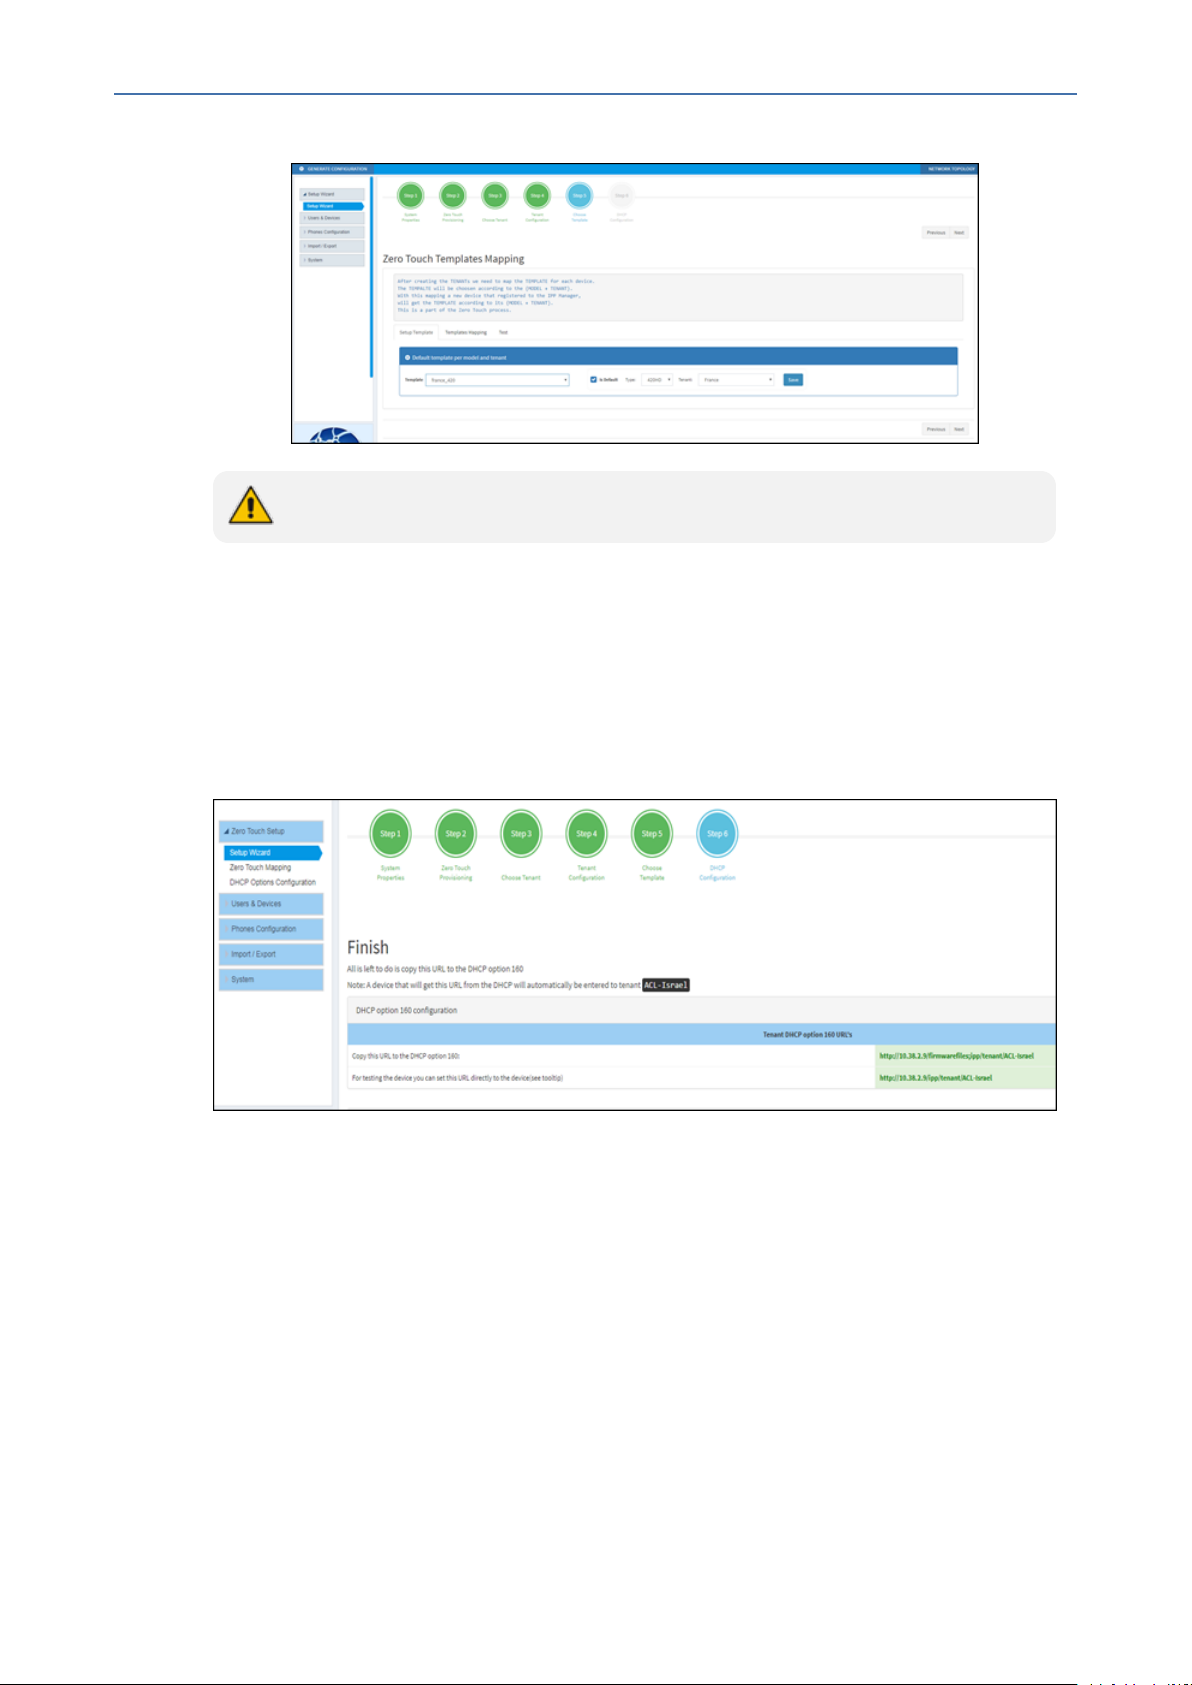
Figure 4-5: Step 5 – Templates Mapping
6. From the 'Template' dropdown, choose a template.
- 14 -
Page 20
CHAPTER4 Using the Zero Touch Setup Wizard to Provision Phones
Figure 4-6: Step 5 – Templates Mapping
This page is an alternative view to the Devices Configuration Templates page.
7. Associate a template according to the MODEL and TENANT. The page displays a mapping
table in which you need to map {MODEL + TENANT} to TEMPLATE.
a. Select 'IsDefault'; from this point on, the template chosen will be used.
Device Manager Pro | Administrator's Guide
b. From the 'Phone' dropdown, select the model.
c. From the 'Tenant' dropdown, select the tenant and then click Next.
Figure 4-7: Step 6 – DHCP Configuration
8. Define the URL in DHCP Option 160.
- 15 -
Page 21

CHAPTER5 Provisioning Phones without the Zero Touch Setup Wizard
Device Manager Pro | Administrator's Guide
5 Provisioning Phones without the Zero Touch Setup
Wizard
You can set up zero touch provisioning in the Manager without using the Setup Wizard. When
plugged in to the enterprise network, phones will then automatically be provisioned.
■ Zero Touch determines with which template the phone will be provisioned.
■ The template is provisioned per phone model and per phone tenant.
■ The template determines with which firmware file (img) and configuration file (cfg) the
phone will be provisioned.
Zero Touch accelerates uptime by enabling multiple users and phones to automatically
be provisioned and added to the Manager.
Before Implementing Zero Touch
Before implementing Zero Touch, you need to prepare the network.
This applies to:
■ the network administrator of the enterprise whose OVOC is installed on premises (in the
enterprise's LAN)
■ the system integrator of the Service Provider whose OVOC is installed in the cloud (WAN)
➢ To prepare the network for Zero Touch provisioning:
1. Define a tenant (see Defining a Tenant below).
2. Prepare a template per tenant (see Preparing a Template for a Tenant/Model on page20).
3. Upload the firmware .img file to the server (see Uploading .img Firmware File to the Server
on page23).
4. Configure the DHCP server's Option 160 to allocate the phone to the tenant/site URL (see
Configuring DHCP Option 160 with a Tenant URL on page23).
Defining a Tenant
You need to define a tenant before you can implement Zero Touch.
➢ To define a tenant:
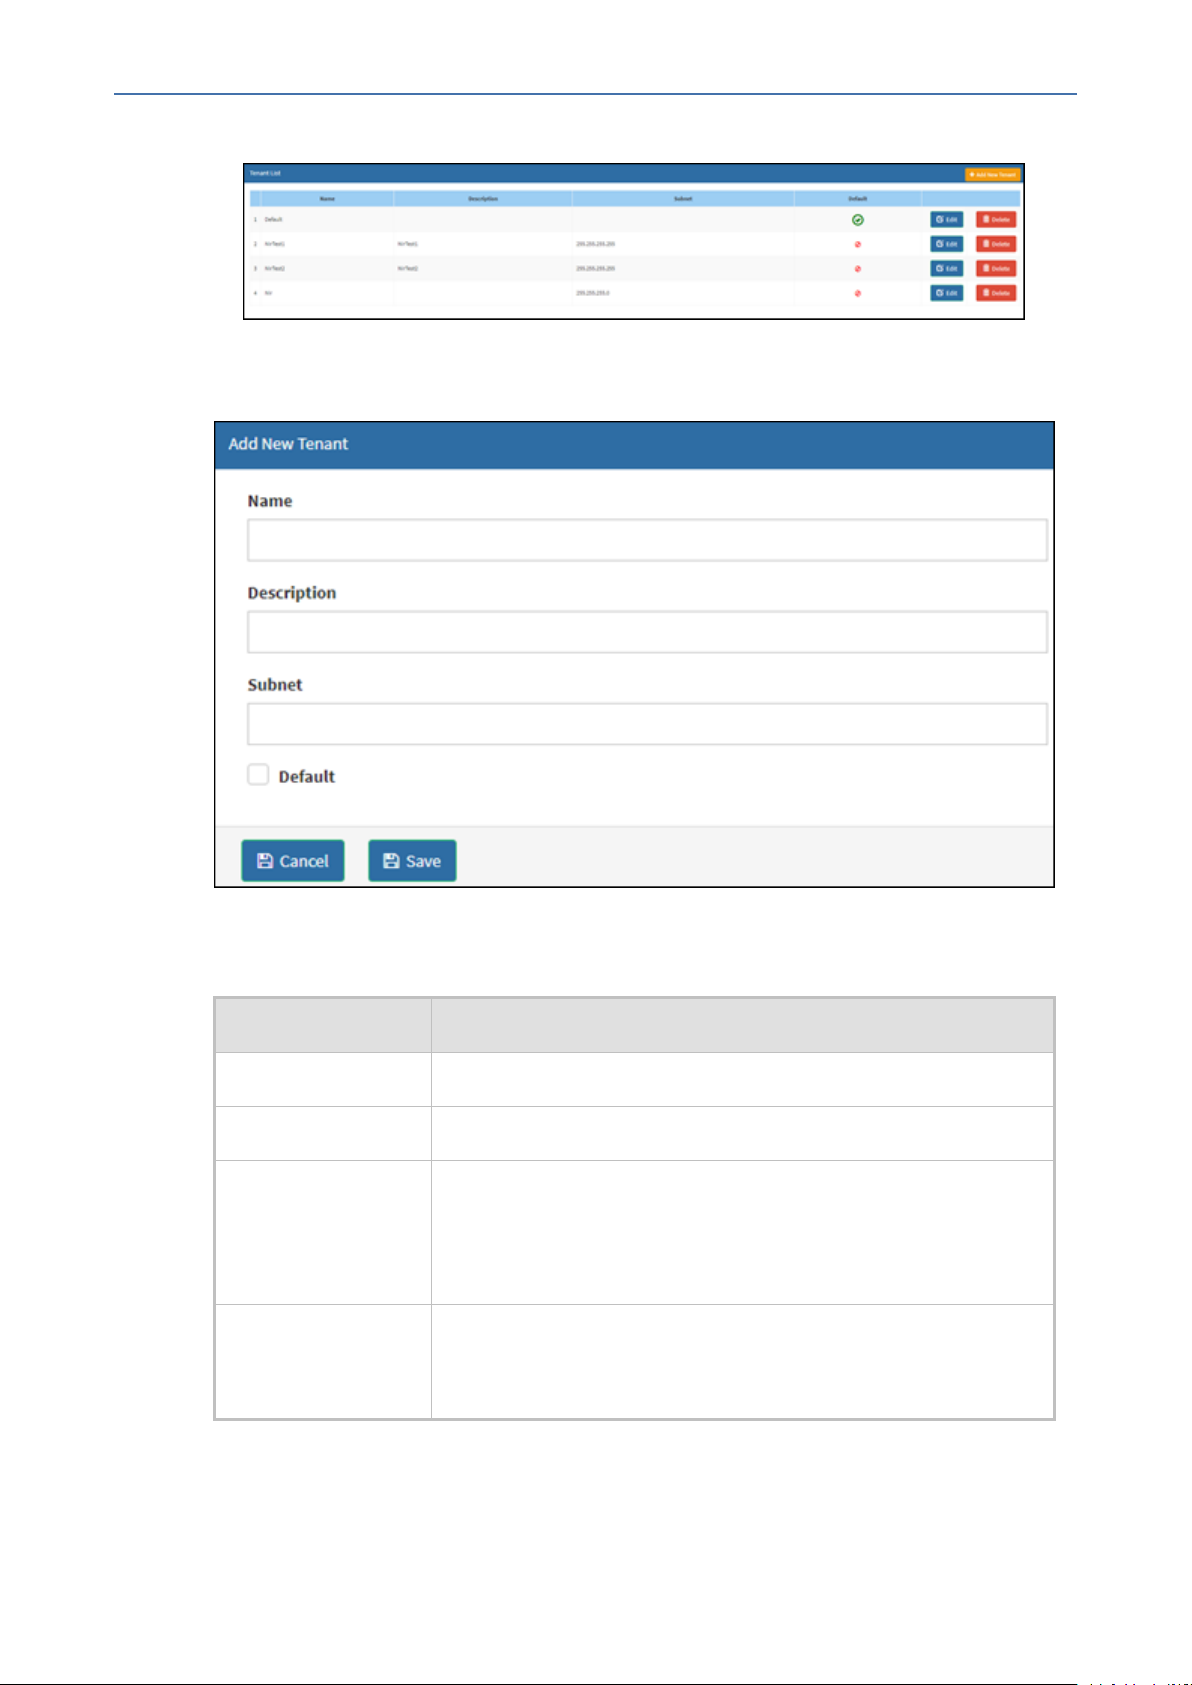
1. Open the Tenant List page (Setup > System > Tenants).
- 16 -
Page 22
CHAPTER5 Provisioning Phones without the Zero Touch Setup Wizard
Figure 5-1: Tenant List
2. Click the +Add New Tenant button.
Figure 5-2: Add New Tenant
Device Manager Pro | Administrator's Guide
3. Use the table below as reference.
Table 5-1: Add New Tenant
Parameter Description
Name Enter an intuitive name to facilitate effective management later.
Description Enter a tenant description to facilitate effective management later.
Subnet Enter the tenant's subnet mask. Must be in prefix format x.x.x.x/y.
For example: 255.255.0.0/16. For any region under the tenant, subnet mask is not mandatory, but if it is configured, its subnet mask
must be within the tenant's, for example, 255.255.0.0/1.
Default Defines the default tenant. Only this newly added tenant can be
the default. The default is used for devices/endpoints autodetection.
4. Click Save.
- 17 -
Page 23
CHAPTER5 Provisioning Phones without the Zero Touch Setup Wizard
Configuring an Endpoints Group
After adding a group to the OVOC as shown in the OVOC User's Manual, you can add an endpoint - or multiple endpoints - to that group as shown in Checking Devices Status on page41
under the action Change Group, and then you can configure the endpoints in the group as
shown here. The feature benefits a customer who wants for example 10 of 500 phones in a site
in their enterprise organized in a group for a software upgrade to apply exclusively to the 10
phones in that group. In contrast to sites, groups are logical entities but configuration of both
are identical; both are per tenant.
➢ To configure an endpoints group:
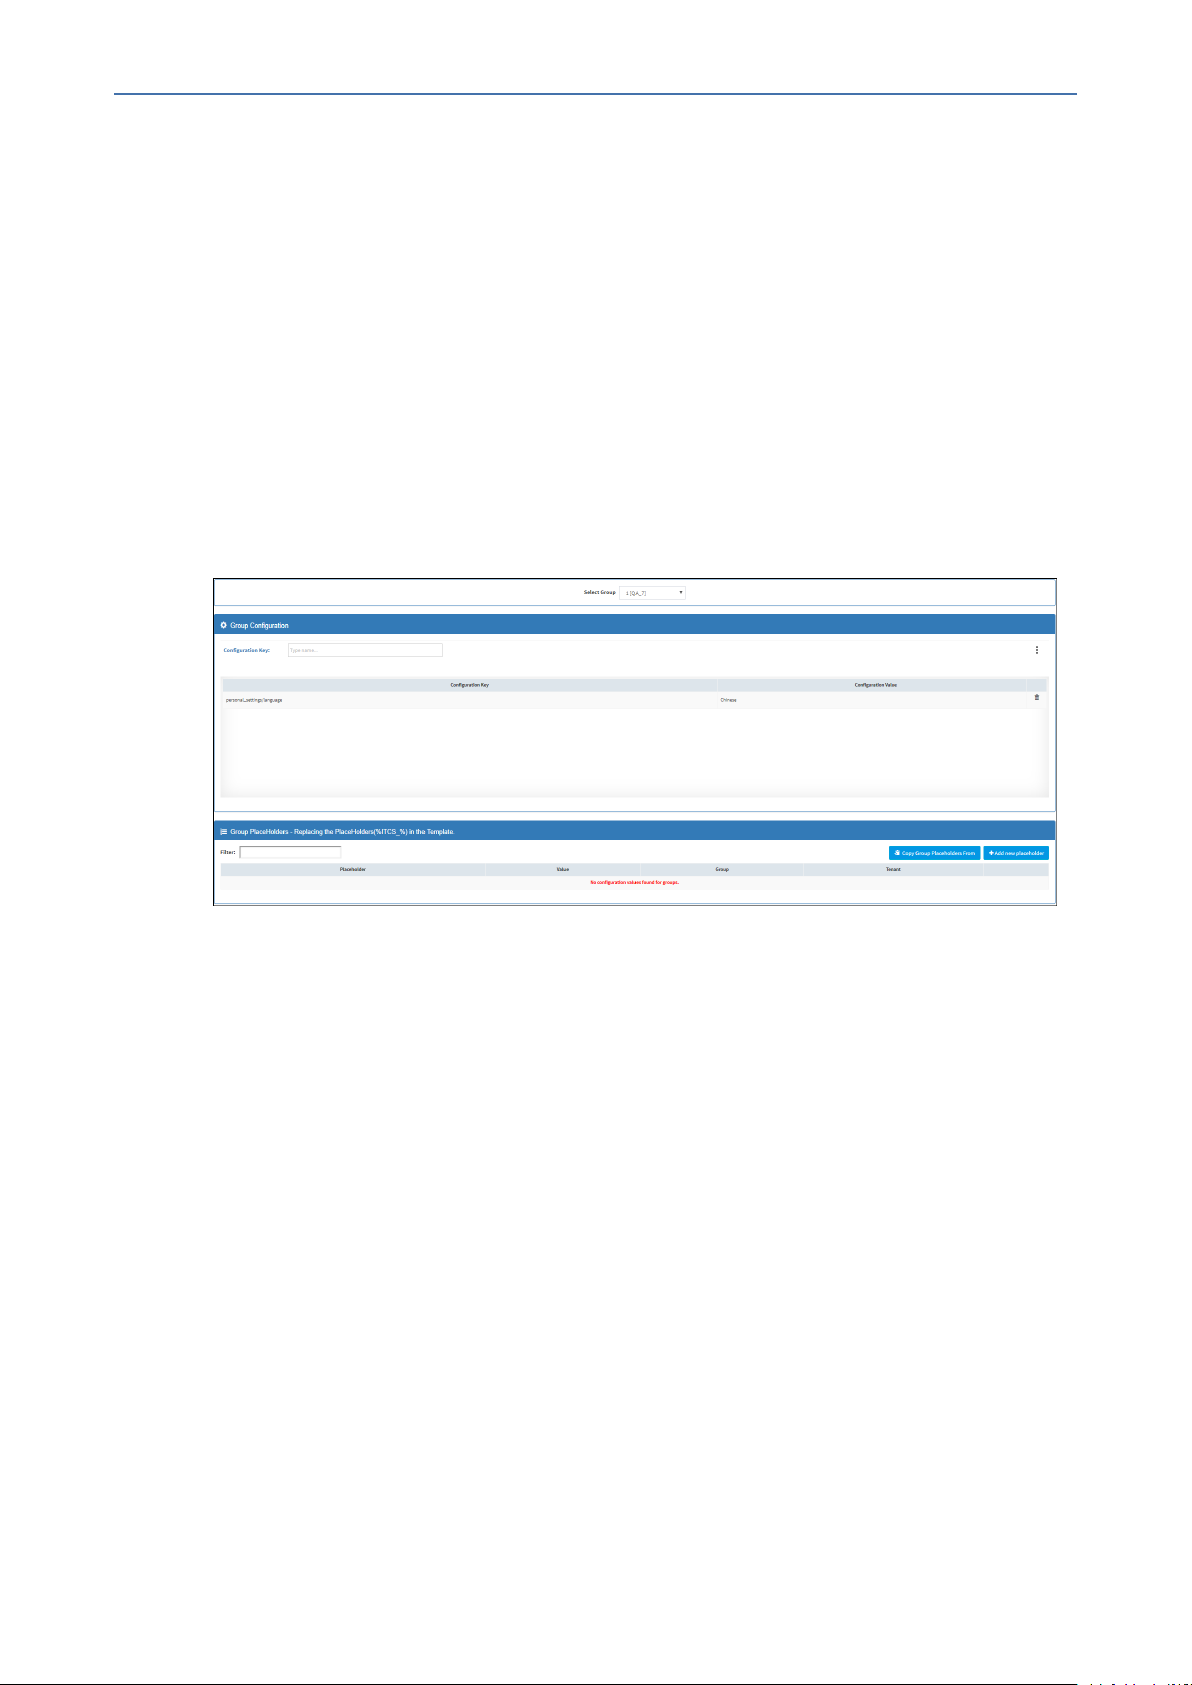
1. Open the Group Configuration page (Setup > Devices Configuration > Group
Configuration).
Figure 5-3: Group Configuration
Device Manager Pro | Administrator's Guide
2. From the 'Select Group' drop-down, choose the group (added to the OVOC) under which
you want to organize endpoints.
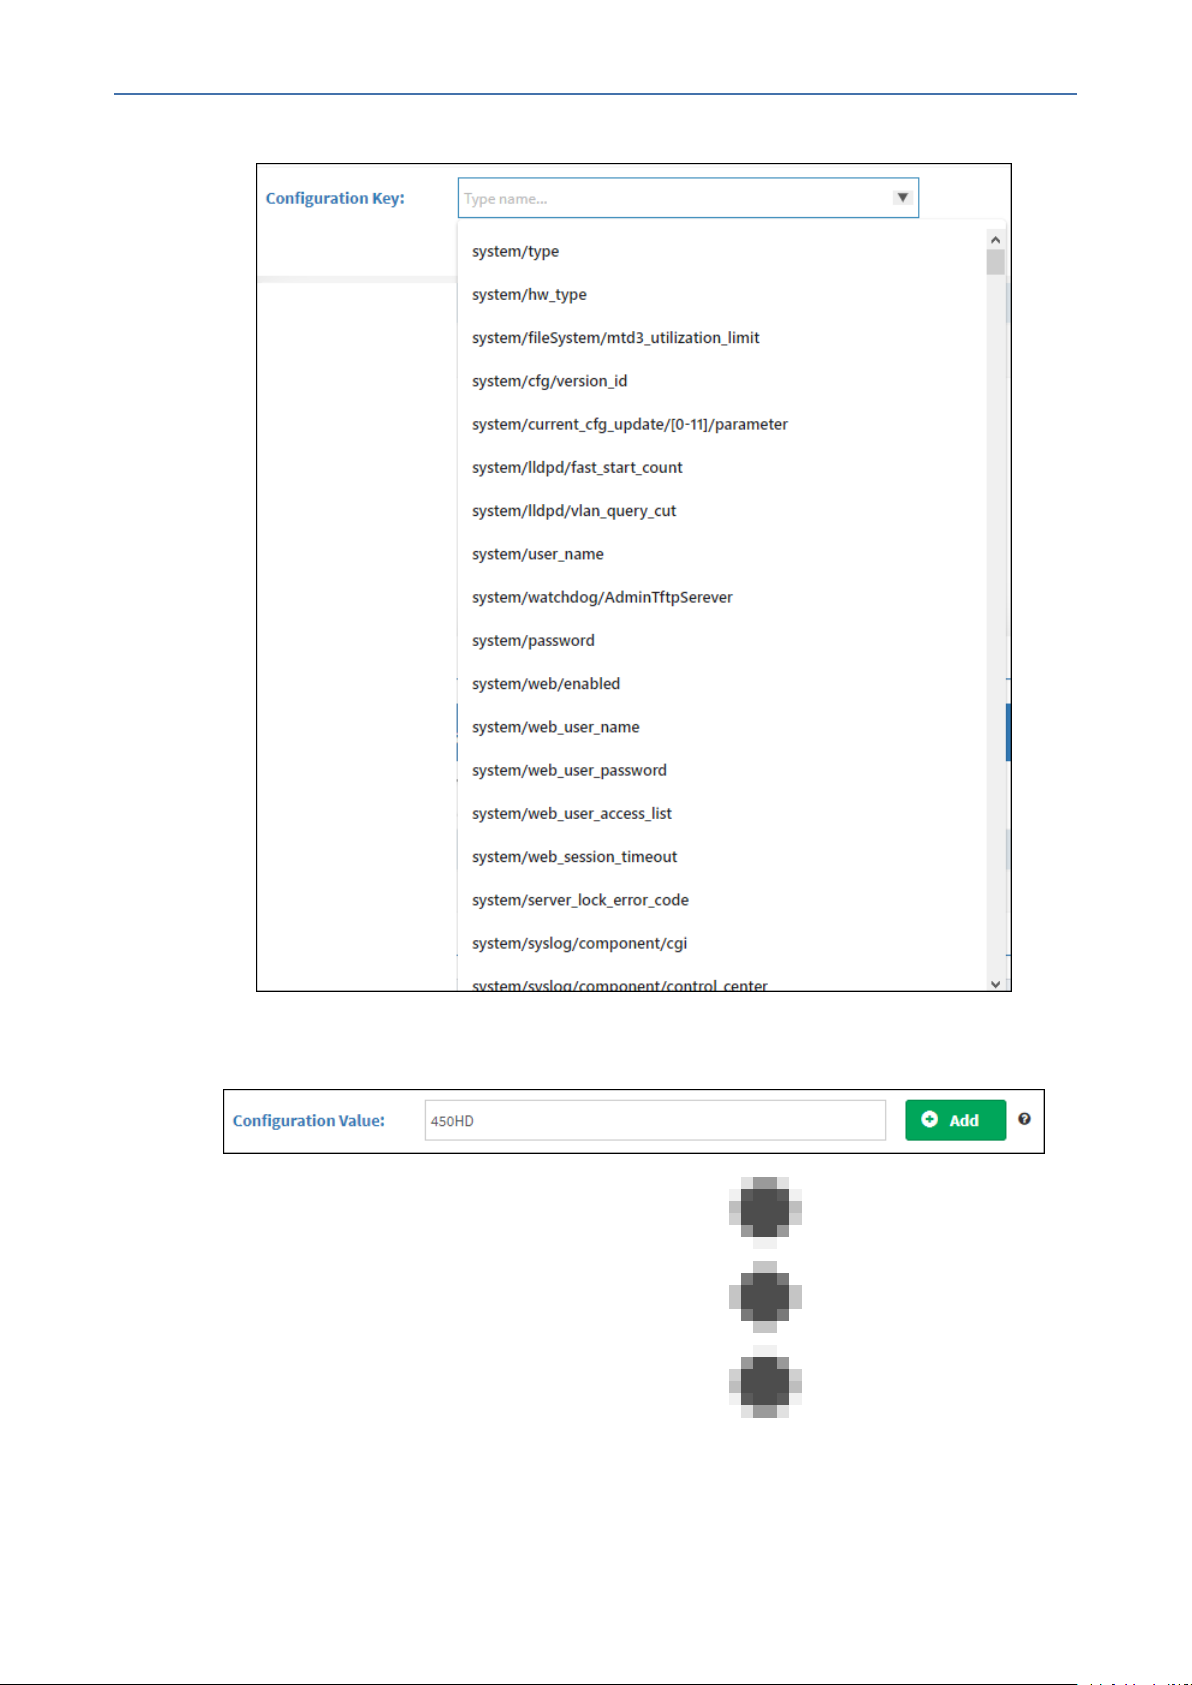
3. From the 'Configuration Key' drop-down, select a parameter to configure for the
endpoints group.
- 18 -
Page 24
CHAPTER5 Provisioning Phones without the Zero Touch Setup Wizard
Figure 5-4: Configuration Key
Device Manager Pro | Administrator's Guide
4. In the 'Configuration Value' field displayed after a selection, provision the parameter with
a value and then click Add. Click ? for more information if necessary.
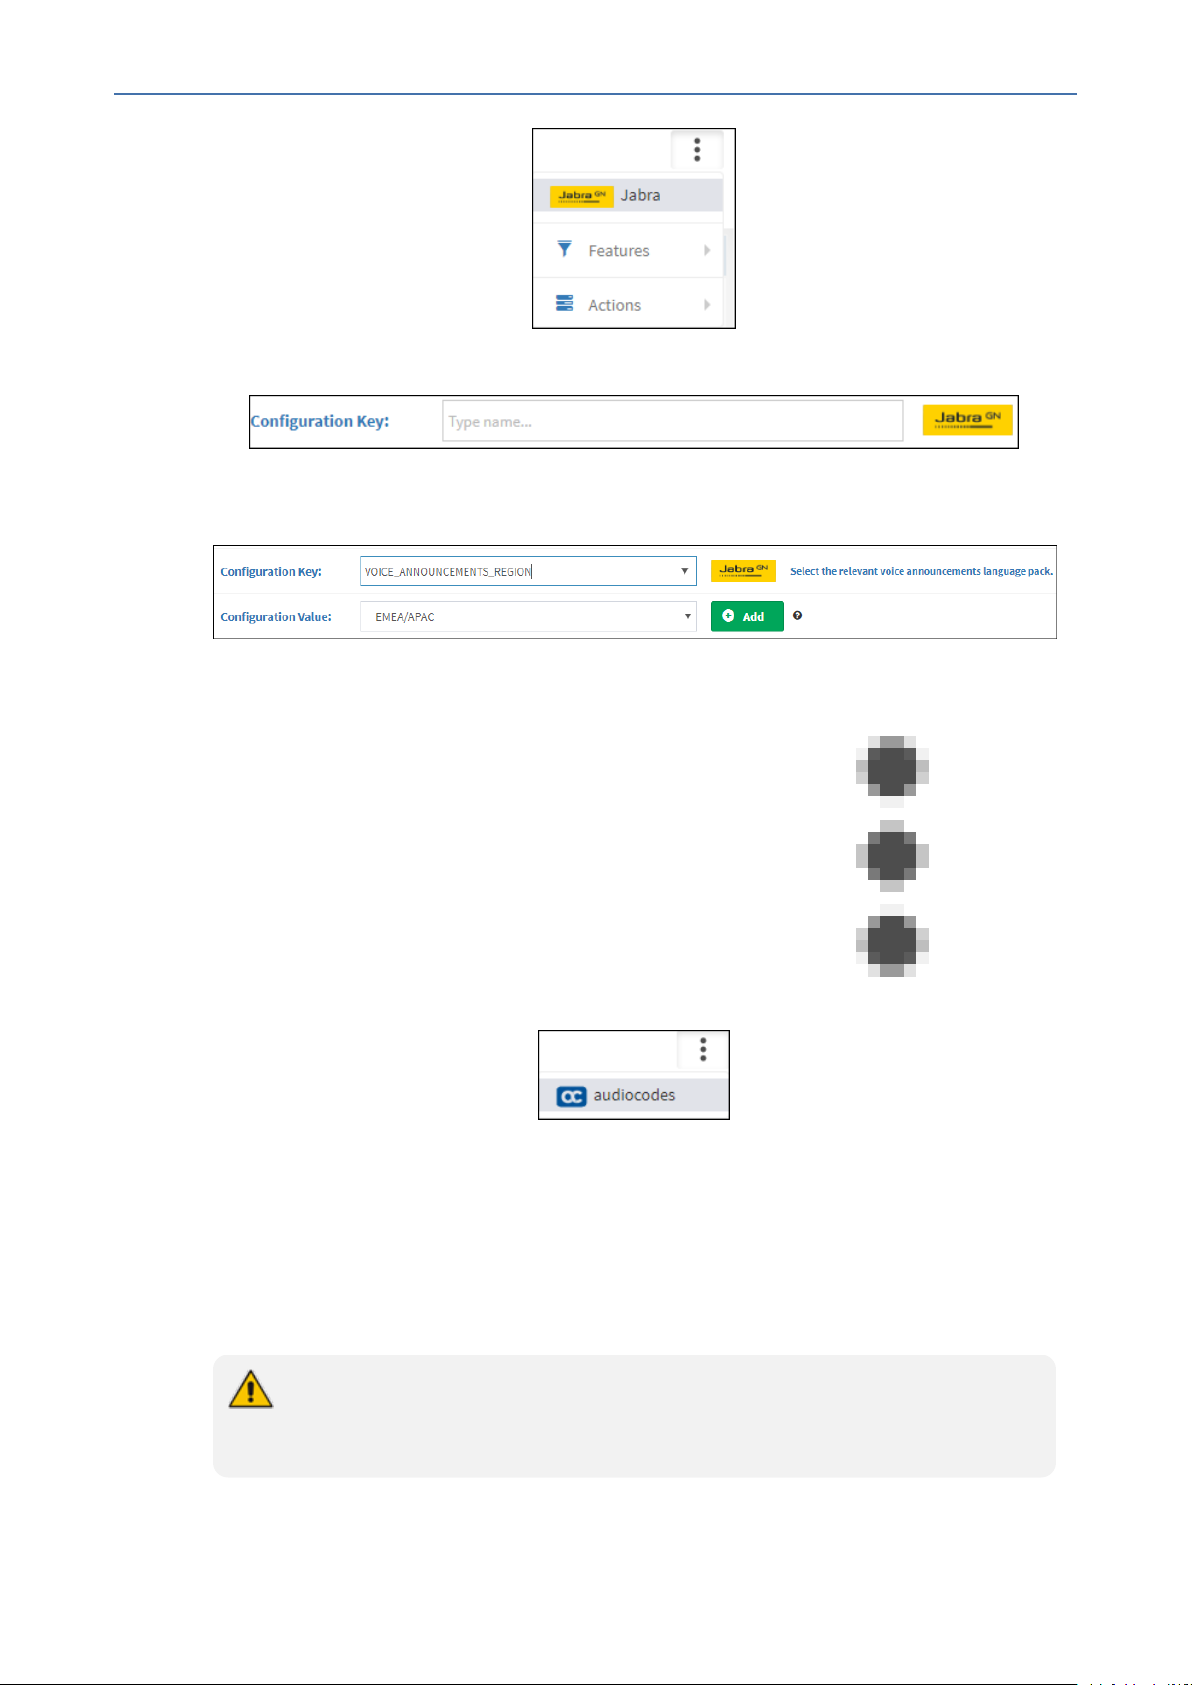
5. To configure Jabra endpoints group parameters, click adjacent to the
'Configuration Key' field and select Jabra.
- 19 -
Page 25
CHAPTER5 Provisioning Phones without the Zero Touch Setup Wizard
6. View the following:
7. From the 'Configuration Key' drop-down, select a Jabra parameter to configure for the
Jabra endpoints group.
Device Manager Pro | Administrator's Guide
8. In the 'Configuration Value' field displayed after a selection, provision the parameter with
a value and then click Add. Click ? for more information if necessary.
9. To switch back to an AudioCodes (non Jabra) endpoints group, click adjacent to
the 'Configuration Key' field and select AudioCodes.
Preparing a Template for a Tenant/Model
You need to prepare a template per tenant / type (phone model) in the deployment. The
template informs the server how to generate the .cfg configuration file when the phones are
plugged in to the network. When the phones are plugged in, the .cfg configuration file is
downloaded to them from the server.
User-configured Speed Dials and Programmable Keys are saved in the device's cfg file
and backed up on the server. After the user configures them (see the device's User's
Manual for details), the phone automatically updates the cfg file on the server. They're
- 20 -
Page 26
CHAPTER5 Provisioning Phones without the Zero Touch Setup Wizard
downloaded to the phone after:
● they're deleted or some other 'crisis' occurs
● the phone is restored to factory defaults
● the user starts working with a new device
● the user deploys another device at their workstation
● the user's phone is upgraded
This saves the user from having to configure Speed Dials and Programmable Keys from the
beginning. The user only needs to configure them once, initially.
If there is no cfg file on the server, the server gets the data from the phone.
➢ To prepare a template for a tenant / phone model:
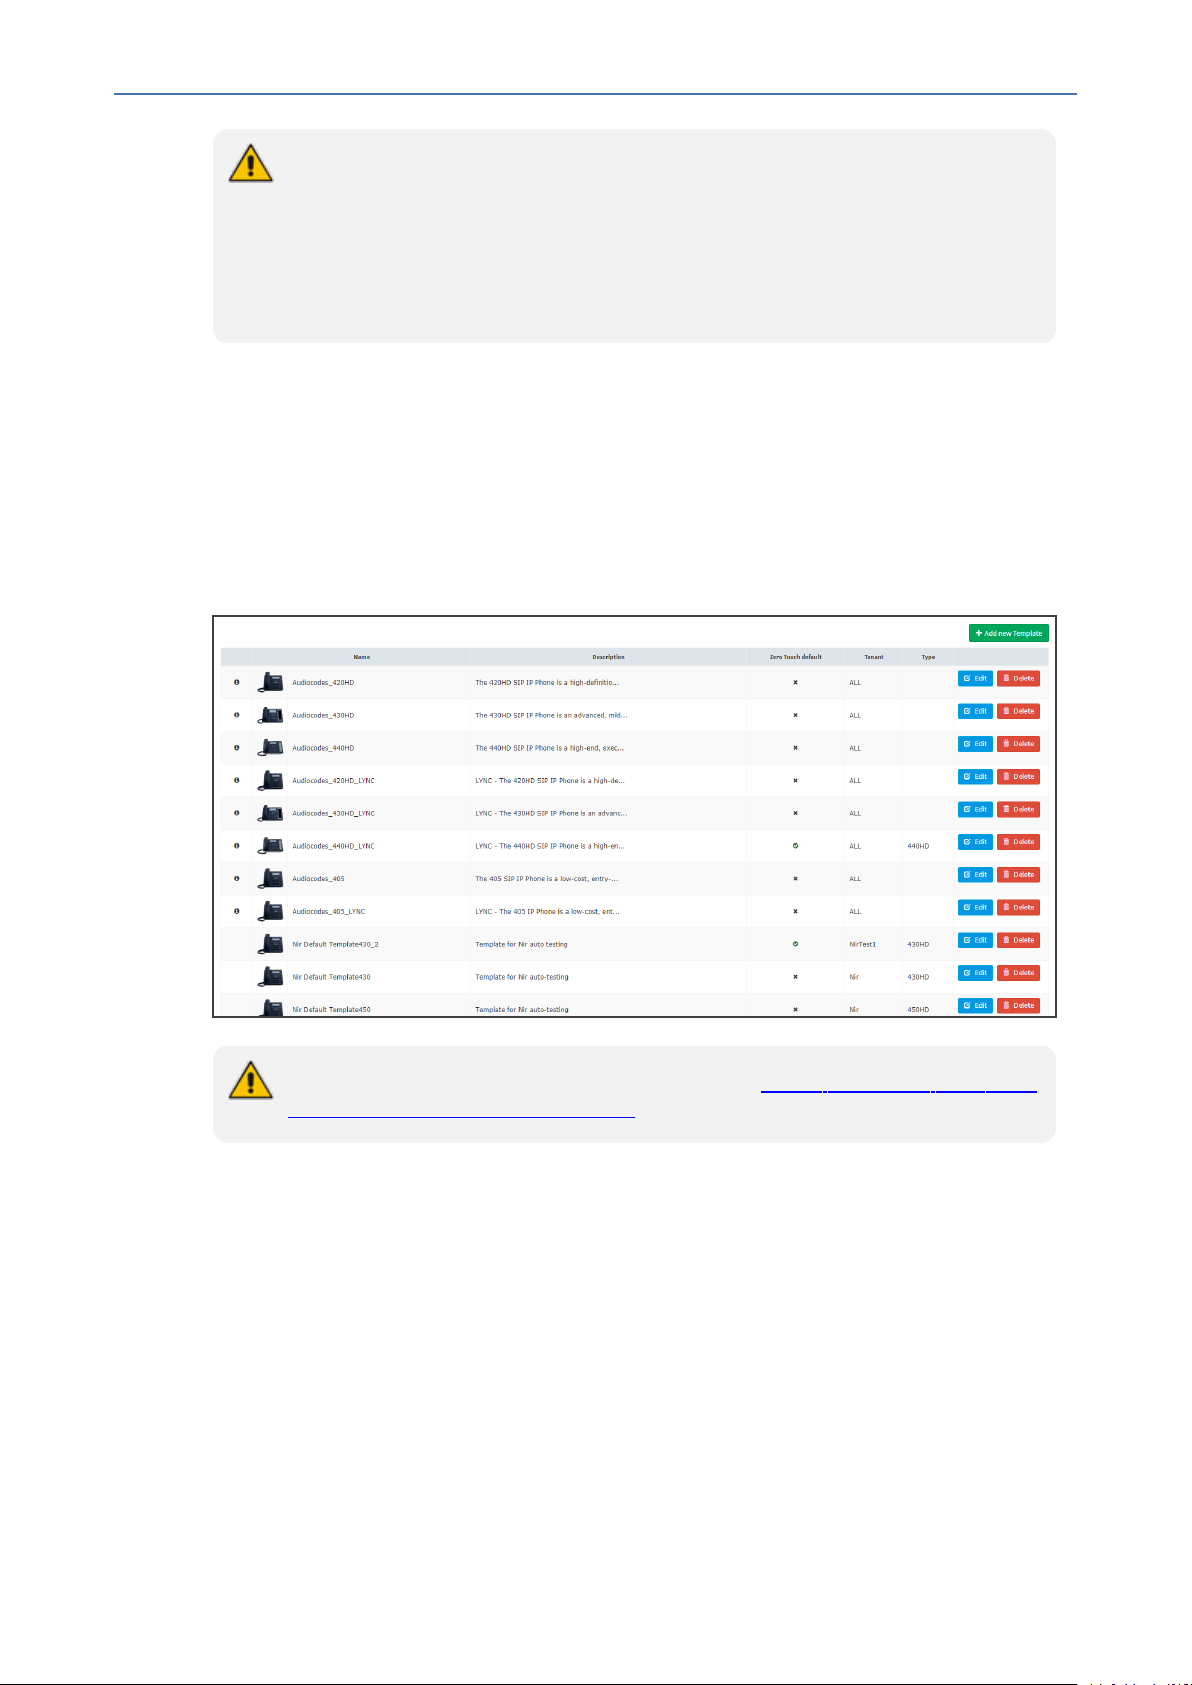
1. Open the 'Add new template' screen (Setup > Devices Configuration > Templates).
Figure 5-5: Devices Configuration Templates
Device Manager Pro | Administrator's Guide
For information on third-party vendor products, see the Device Manager for Third-Party
Vendor Products Administrator's Manual
2. Click the Add New Template button.
- 21 -
Page 27
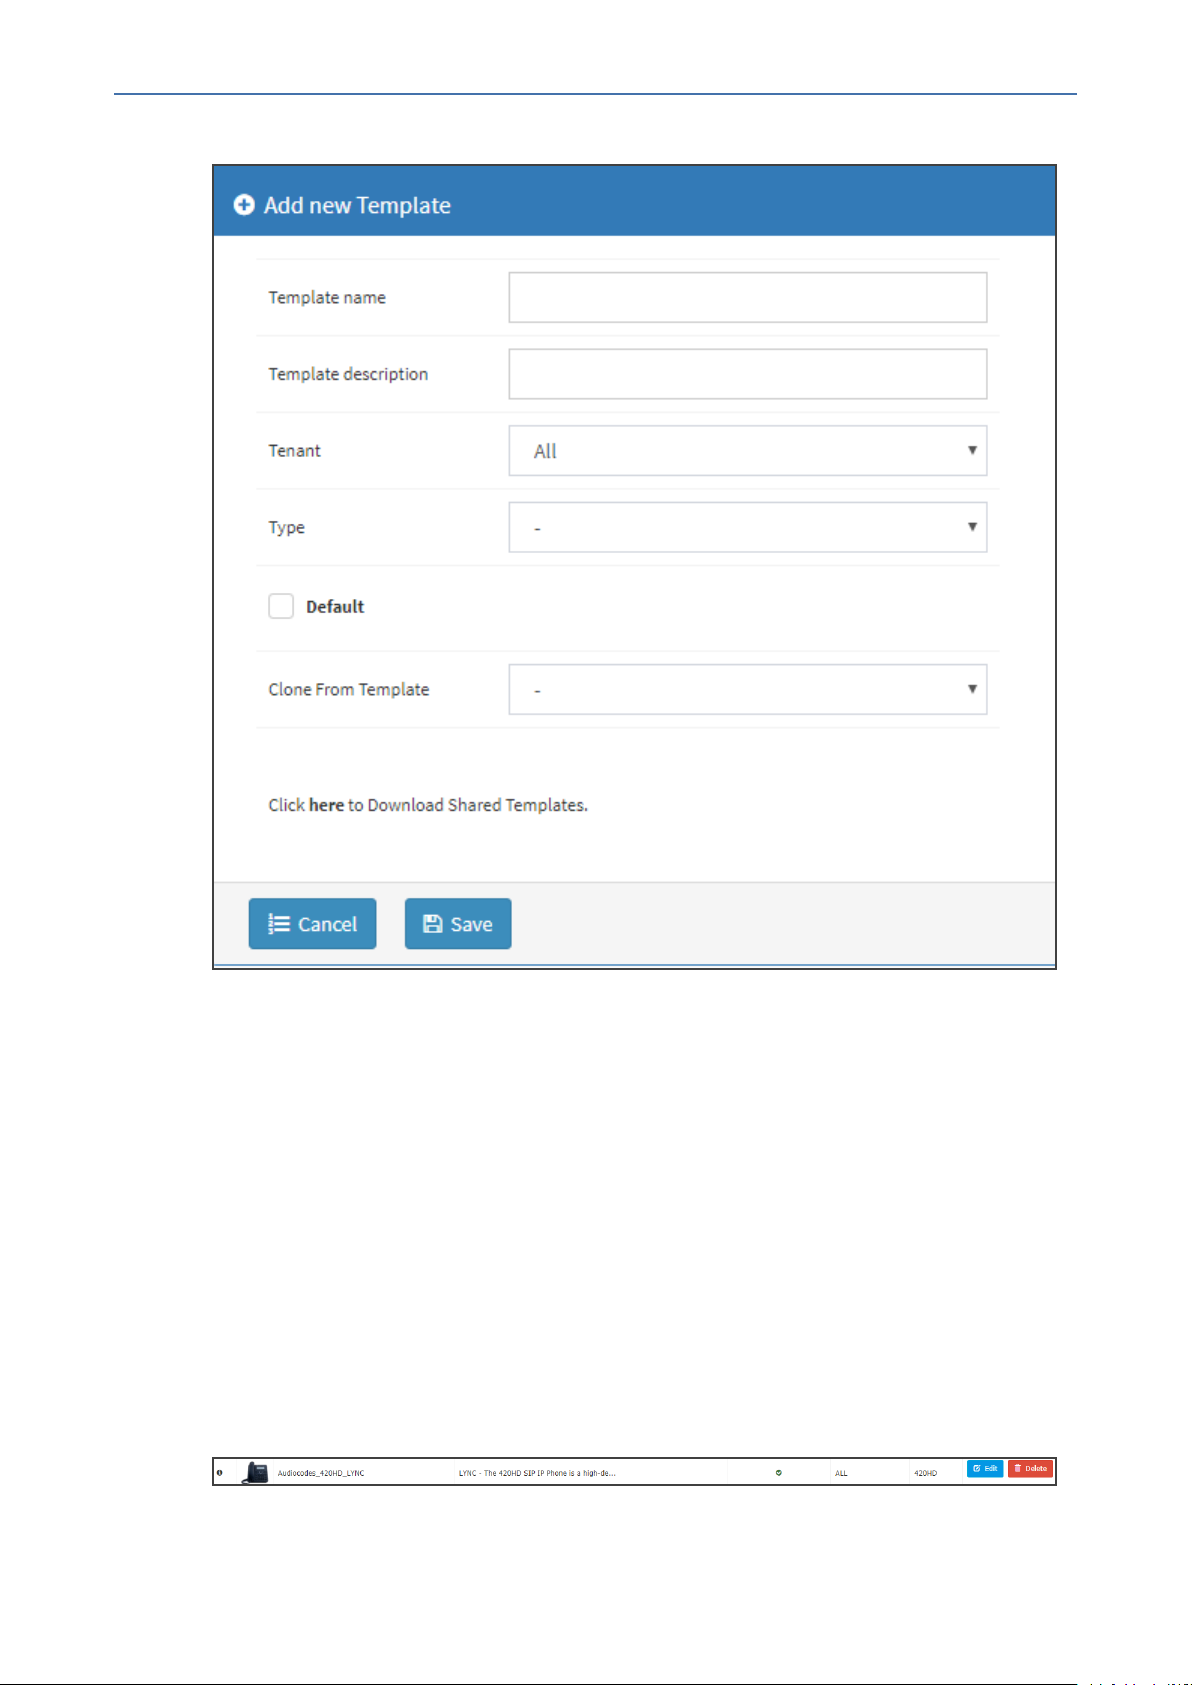
CHAPTER5 Provisioning Phones without the Zero Touch Setup Wizard
Figure 5-6: Add New Template
Device Manager Pro | Administrator's Guide
3. Enter a name for the template. Make the name intuitive. Include tenant and model
aspects in it.
4. Provide a description of the template to enhance intuitive maintenance.
5. From the 'Tenant' dropdown list, select the tenant.
6. From the 'Type' dropdown list, select the phone model.
7. Select the Default Tenant option for the template to be the default for this tenant. More
than one phone type can be in a tenant. All can have a common template. But only one
template can be configured for a tenant. If a second template is configured for the tenant,
it overrides the first. After a template is added, it's displayed as shown below in the
Devices Configuration Template page. When a phone is then connected to the network, if
the phone is of this type and located in this tenant, it will automatically be provisioned via
the DHCP server from the OVOC provisioning server (Zero Touch).
Figure 5-7: Default Template Indication
- 22 -
Page 28
CHAPTER5 Provisioning Phones without the Zero Touch Setup Wizard
8. From the 'Clone From Template' dropdown list, select a template to clone from. If the
template is for phones in a tenant that are Microsoft Skype for Business phones, choose a
Skype for Business template.
9. Do this for all tenants and types (phone models) in the network.
10. If necessary, click the here link in 'Click here to Download Shared Templates'; your
browser opens displaying AudioCodes share file in which all templates are located, for
example, the templates used with Genesys.
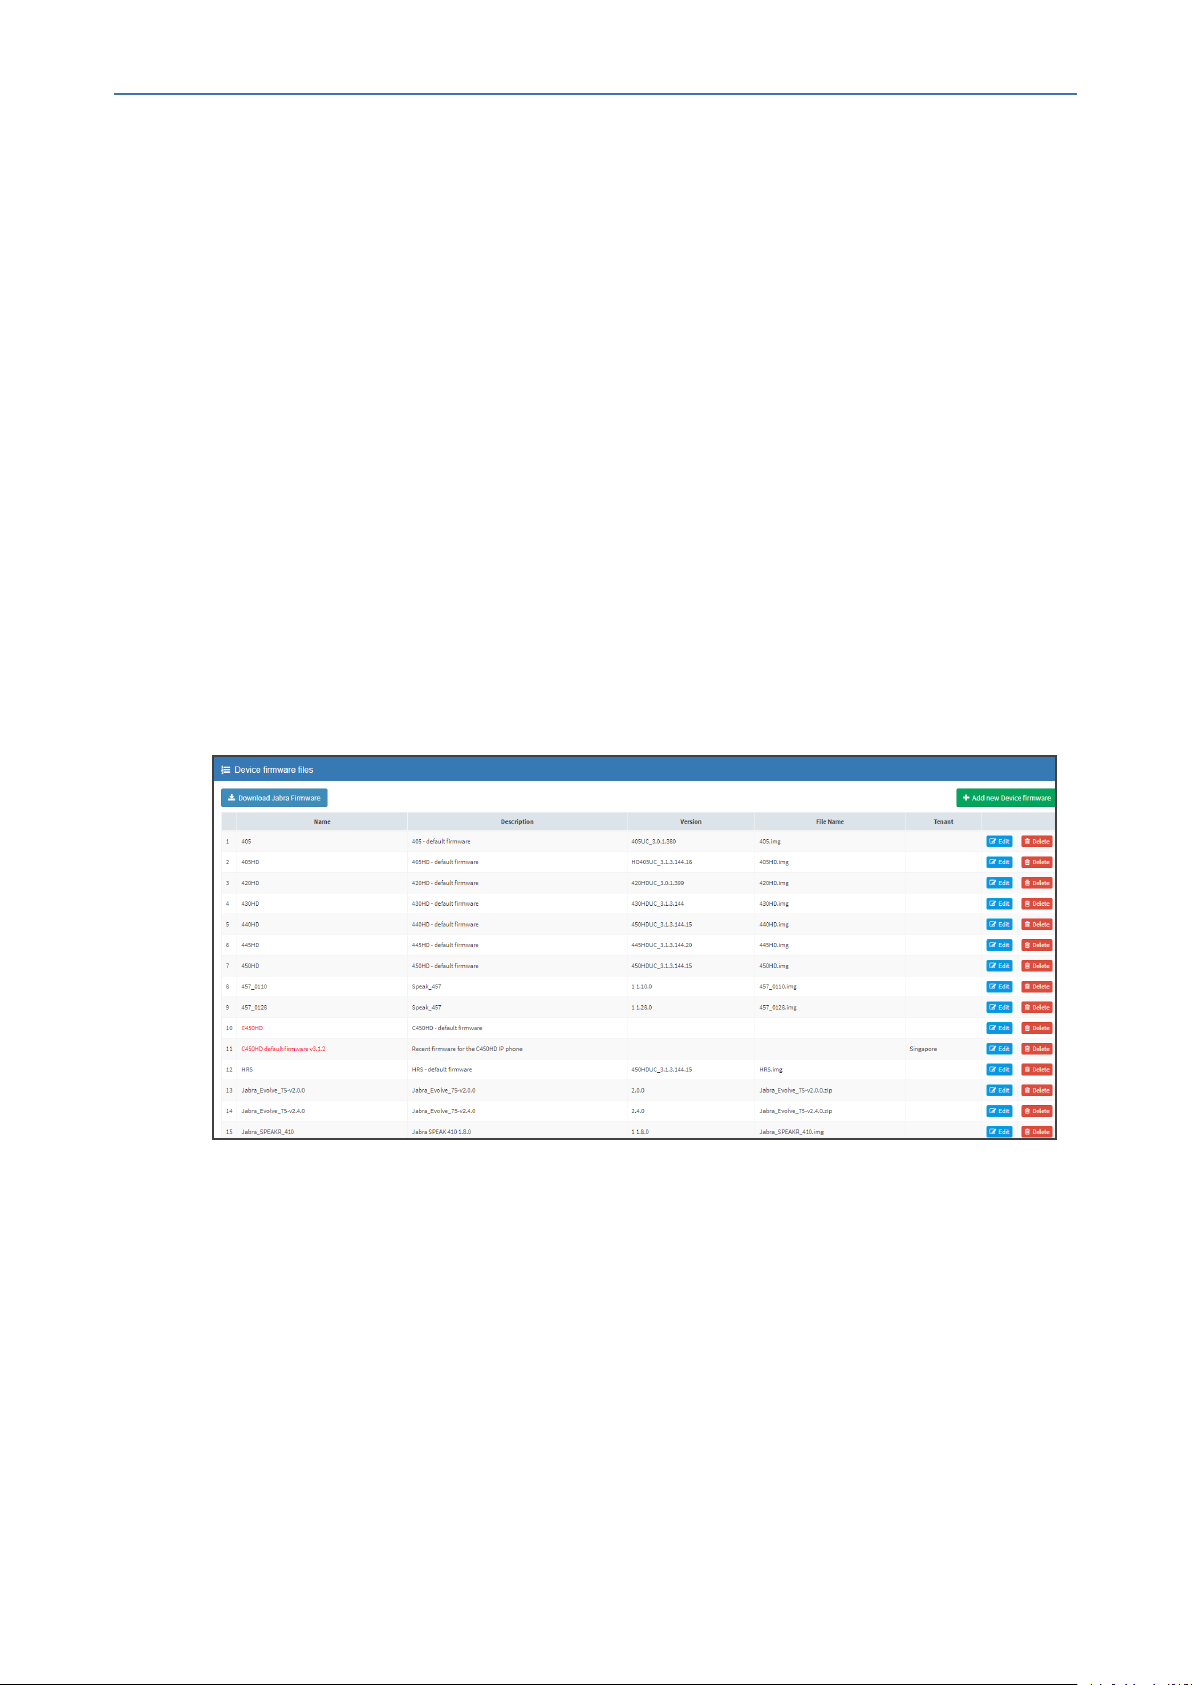
Uploading .img Firmware File to the Server
After obtaining the device's latest .img firmware file from AudioCodes, upload it to the OVOC
provisioning server. When devices are later connected to the network, they're automatically
provisioned with firmware from the server. You can also upload the .dfu firmware files for the
speakers of the Huddle Room Solution (HRS).
➢ To upload the .img firmware file to the OVOC provisioning server:
Device Manager Pro | Administrator's Guide
1. In the Device Manager Pro, access the Firmware Files page (Setup > Devices Configuration
> Firmware Files).
Figure 5-8: Phone Firmware Files
2. In the Firmware Files screen, click the Add new Device firmware button.
3. Navigate to the .img file and/or .dfu firmware files for the HRS speakers, and upload to the
OVOC provisioning server.
Configuring DHCP Option 160 with a Tenant URL
You need to point DHCP Option 160 to a tenant URL so that the phones will be automatically
provisioned with their .img firmware file and cfg configuration file when they're plugged in to
the network for the first time (Zero Touch provisioning).
Either of the following two methods can be used to implement Zero Touch:
- 23 -
Page 29
CHAPTER5 Provisioning Phones without the Zero Touch Setup Wizard
■ Configure the DHCP server to provision the phone with an IP address that is in the
tenant/site range. Configure the phone to receive the IP address or subnet mask of the
tenant/site.
■ Use DHCP Option 160
The Device Manager Pro supports backward compatibility so you can point DHCP
Option 160 to a region URL. See the Administrator's Manual v7.2 and earlier.
Later when the (Skype for Business) phones are signed in, phones and users are automatically
added to Device Manager Pro which loads their specific .cfg files to them.
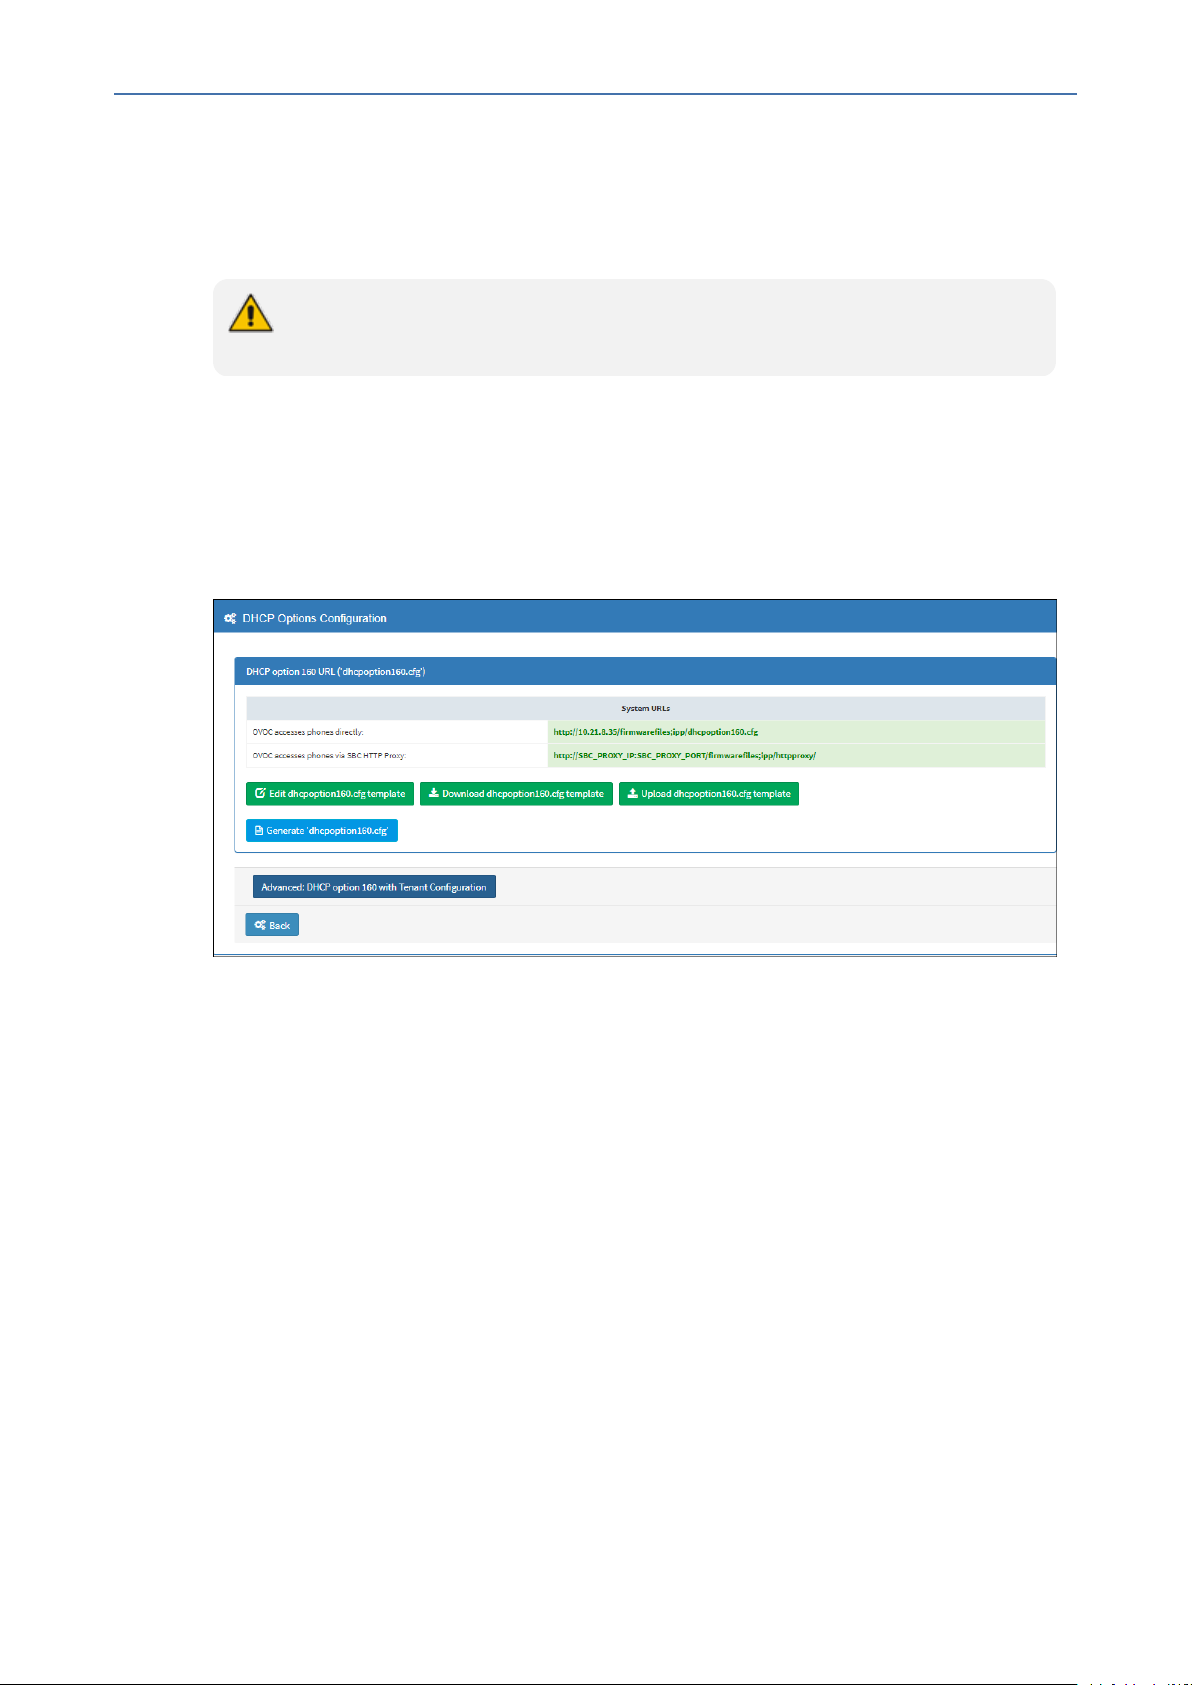
➢ To point DHCP Option 160 to a tenant URL:
1. In the Device Manager Pro, open the DHCP Options Configuration page (Setup > Devices
Configuration > DHCP Options Configuration).
Device Manager Pro | Administrator's Guide
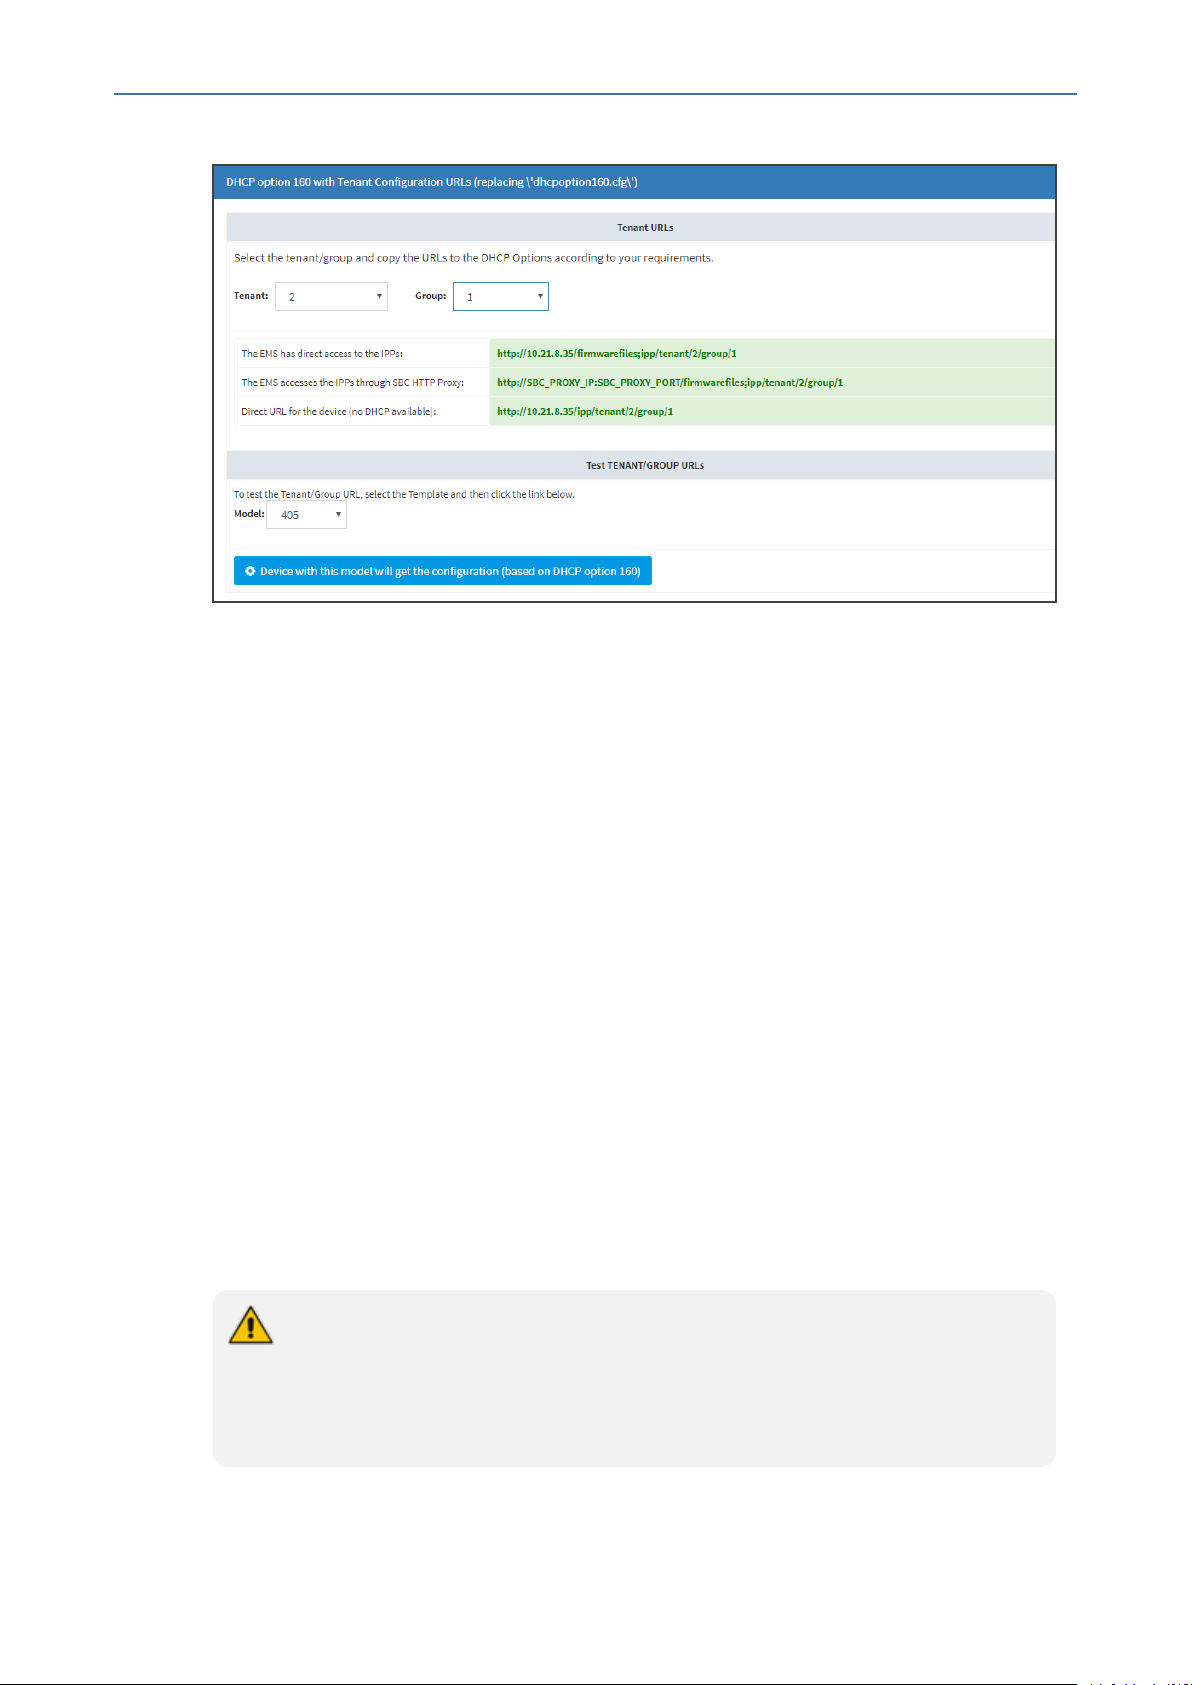
2. Click the Advanced: DHCP option 160 with Tenant Configuration link located lowermost
and under the Tenant URLs section, select from the 'Tenant' dropdown a tenant with
which to associate a new device, as shown in the next figure (Tenant '2').
3. From the 'Group' dropdown list, select a group with which to associate a new device, as
shown in the next figure (Group '1').
- 24 -
Page 30
CHAPTER5 Provisioning Phones without the Zero Touch Setup Wizard
Figure 5-9: Tenant URL
Device Manager Pro | Administrator's Guide
You can configure the device's tenant URLs to retrieve files either directly from the OVOC
server or via an SBC HTTP proxy. Using an SBC HTTP proxy server is useful for customers
whose OVOC is installed in the cloud, or when phones are located behind a NAT.
4. Choose either:
● The OVOC has direct access to the phones. The DHCP server will connect the phones
directly to the OVOC server IP address.
◆ Copy (Ctrl+C) the following URL and paste it into DHCP Option 160 in the
enterprise's DHCP server:
HTTP://<OVOC_IP_Address>/firmwarefiles;ipp/tenant/<tenant selected in Step
1>/group/<group selected in step 1>
● The OVOC access the IPP's through the SBC HTTP proxy. The DHCP server directs the
phones firstly to an SBC HTTP proxy server, which then redirects to the OVOC server.
◆ If the phones communicate with an SBC HTTP proxy rather than directly with the
OVOC server, copy (Ctrl+C) the following URL into DHCP Option 160 in the
enterprise's DHCP server: http://SBC_PROXY_IP:SBC_PROXY_
PORT/firmwarefiles;ipp/tenant/Tenant
● Direct URL for the IPP (No DHCP Available) – typically used for debugging purposes
when no DHCP is available.
● Configure DHCP Option 160 to point to the OVOC provisioning server's URL if the
phones are not behind a NAT. DHCP Option 66/67 can also be used.
● If the phones reside behind a NAT and an SBC HTTP proxy is available, configure
DHCP Option 160 to point to the SBC HTTP proxy; phone-OVOC communications
will then be via the SBC HTTP proxy rather than direct.
- 25 -
Page 31

CHAPTER5 Provisioning Phones without the Zero Touch Setup Wizard
5. After copying the tenant URL (Ctrl+C) and pasting it into the enterprise's DHCP server's
DHCP Option 160, select the phone model from the 'IPP Model' dropdown and then click
the button IPP with this model will get from the DHCP; an output of the configuration
file that you have configured to provision is displayed. Verify it before committing to
provision multiple phones.
When a deployment covers multiple tenants, the tenants definition can be in two main
hierarchies:
● DHCP server
● Subnet
For Zero Touch provisioning to function, tenant granularity must correspond with the number
of DHCP servers/subnets already located within the enterprise network.
Figure 5-10: Verifying the device's Configuration File
Device Manager Pro | Administrator's Guide
Zero Touch is supported for phones with sign-in capabilities only.
- 26 -
Page 32

CHAPTER5 Provisioning Phones without the Zero Touch Setup Wizard
Configuring DHCP Option 160 with System URL
● This configuration is applicable when Zero Touch is not used to provision the
phones.
● The instructions below therefore describe a provisioning method that is not the
choice method.
The figure below shows the file dhcpoption160.cfg located on the server.
Figure 5-11: cfg File Located on the Server
Device Manager Pro | Administrator's Guide
Legend Description
1 Points to the URL of the OVOC provisioning server.
2 STATIC provisioning method, so the cfg and img files are automatically pulled
from the OVOC provisioning server rather than from the DHCP server.
3 Location of the cfg file, pulled by the phones when they're plugged into the
network, on the OVOC provisioning server.
4 Location of the img file, pulled by the phones when they're plugged into the
network, on the OVOC provisioning server.
5 Name of the 'system user', necessary for basic REST API authentication when the
phones are plugged in to the network for the first time.
6 (Encrypted) Password of the 'system user', necessary for basic REST API
authentication when the phones are plugged in to the network for the first time.
● The dhcpoption160.cfg file is created when logging in for the first time to the
Device Manager Pro.
● The file is an internal OVOC file and cannot be manually modified.
After installation, the first, second and third lines in the file are automatically updated.
- 27 -
Page 33

CHAPTER5 Provisioning Phones without the Zero Touch Setup Wizard
Editing the DHCP Option 160 cfg File
Administrators can opt to edit the initial DHCP Options 160 cfg file. Choose the DHCP Option
Configuration button if your phones are communicating with a DHCP server. A DHCP server is
mandatory if the phones are behind a NAT, or when communicating with an SBC HTTP proxy.
➢ To edit the DHCP Option 160 cfg File:
1. Open the System Settings page (Setup > Devices Configuration > DHCP Options
Configuration).
Figure 5-12: DHCP Option Configuration
Device Manager Pro | Administrator's Guide
2. Click the Edit cfg template button.
- 28 -
Page 34

CHAPTER5 Provisioning Phones without the Zero Touch Setup Wizard
Figure 5-13: Edit DHCP Option
Device Manager Pro | Administrator's Guide
3. Edit the DHCP option using the table below as reference.
Table 5-2: DHCP Option
Parameter Description
Keep alive
period
You can configure how often the phones generate a keep-alive trap
towards the Device Manager Pro. Default: Every 60 minutes. It's
advisable to configure a period that does not exceed an hour. The
management system may incorrectly determine that the phone is
disconnected if a period of more than an hour is configured.
Provisioning
URL
Provisioning
Method
Defines the URL (including IP address and port) of the provisioning server
(OVOC server).
Defines the provisioning method, i.e., STATIC or Dynamic (DHCP). Do not
change this setting. The setting must remain STATIC. If not, the phone
will continuously perform restarts.
Provisioning
Configuration
Defines the URL of the location of the configuration files (including IP
address and port) in the provisioning server (OVOC server).
URL
- 29 -
Page 35

CHAPTER5 Provisioning Phones without the Zero Touch Setup Wizard
Parameter Description
Device Manager Pro | Administrator's Guide
Provisioning
Firmware URL
User Name
Defines the URL of the location of the firmware files (including IP address
and port) in the provisioning server (OVOC server).
Defines the user name for the REST API. Default: System. Later, each
phone receives its own unique user name.
User
Password
You can always restore these settings to their defaults if necessary by clicking the
Restore to default button in the DHCP Option Configuration dialog, but it's advisable
to leave these settings unchanged. The button is displayed only after the DHCP Option
is changed.
Encrypted. Defines the user password for the REST API. Default: System.
Later, each phone receives its own unique user password.
Editing the SBC HTTP Proxy
Administrators can opt to edit the initial DHCP Options 160 cfg file. Choose the HTTP Proxy
Configuration button if your phones are communicating with an SBC HTTP proxy, which is
required when the phones are behind a NAT.
➢ To configure the SBC HTTP proxy:
1. Open the System Settings page (Setup > Devices Configuration > System Settings) and
then in the System Settings page click the More tab and then the SBC Proxy
Configuration button.
Figure 5-14: Proxy DHCP Options Configuration
2. Click the Edit template button; the same Edit DHCP Option screen shown previously
opens. Edit as described previously.
3. Click Save.
- 30 -
Page 36

CHAPTER6 Provisioning Android-based Teams Phones
Device Manager Pro | Administrator's Guide
6 Provisioning Android-based Teams Phones
AudioCodes' Device Manager manages Android-based Teams phones in a similar way to UCtype phones. Teams phones' configuration parameters are in the same format as UC phones.
A .cfg configuration file is defined for each device. Device Manager version 7.8.2000 and later
(Pro and Express) supports Android-based Teams devices.
Zero Touch Provisioning is supported in a non-tenant aware manner; each local DHCP Option
160 must be configured with a fully-specified URL pointing to dhcpoption160.cfg as shown
here:
Table 6-1: DHCP Option 160 URL
This URL is displayed in the Device Manager page under Setup > DHCP options configuration.
After devices are added to the Device Manager, they're allocated to tenants by selecting
Change Tenant in the ‘Actions’ menu. Unless already used, it's recommended to leave the
default tenant as a ‘lobby’ for the new devices. The above URL can also be configured in
AudioCodes' Redirect Server. Android-based Teams devices currently support:
■ Provisioning of configuration
■ Provisioning of firmware
■ Switching to UC / Teams
■ Monitoring (based on periodic Keep-Alive messages sent from devices)
■ Resetting the device
The Device Manager's ‘internal’ functions (which don't involve devices) are:
■ Change tenant
■ Change template
■ Show info
■ Generate Configuration
■ Delete device status
■ Nickname
- 31 -
Page 37

CHAPTER6 Provisioning Android-based Teams Phones
Actions that go beyond the devices’ periodic provisioning cycle will be supported in next
releases. The Check Status option is irrelevant for Android-based Teams devices therefore it's
omitted from the 'Actions' menu.
● To change a device's configuration, see the Device Manager Administrator's
Manual. Changing a device's configuration using the Device Manager is the same
for Android-based Teams devices as for UC devices.
● To commit a change made at the template/tenant/site/group/user level, perform
Generate Configuration. The change can be validated in the device’s .cfg file.
The Android-based endpoint pulls the updated configuration when the next periodic
provisioning cycle occurs.
Configuring a Periodic Provisioning Cycle
Network administrators can configure how often periodic provisioning cycles will occur, to suit
enterprise management preference.
Device Manager Pro | Administrator's Guide
➢ To configure how often periodic provisioning cycles will occur:
■ Use the following table as reference.
Table 6-2: Periodic Provisioning Cycle
Parameter Description
provisioning/period/type Defines the frequency of the periodic provisioning cycle. Valid
values are:
■ HOURLY
■ DAILY (default)
■ WEEKLY
■ POWERUP
■ EVERY5MIN
■ EVERY15MIN
Each value type is accompanied by additional parameters (see
Supported Parameters on the next page) that further defines
the selected frequency.
Configuring TimeZone and Daylight Savings
Network administrators can configure TimeZone and Daylight Savings to suit enterprise
requirements.
➢ To configure TimeZone and Daylight Savings:
■ Use the following table as reference.
- 32 -
Page 38

CHAPTER6 Provisioning Android-based Teams Phones
Table 6-3: TimeZone And Daylight Savings
Parameter Description
Device Manager Pro | Administrator's Guide
date_time/timezone
date_time/time_dst
For example, to configure Central European Summer Time (CEST) you can either configure:
date_time/timezone=+01:00
date_time/time_dst=1
-OR-
date_time/timezone=+02:00
Defines the Timezone. Valid values are:
■ +00:00
■ +01:00
■ +02:00
■ Etc.
[Boolean parameter]. Configuring ENABLED adds one hour to the configured time. Valid values are:
■ 1
■ 0
date_time/time_dst=0
Managing Devices with HTTPS
Android-based Teams devices support an HTTPS connection.
➢ To establish an HTTPS connection:
■ The server certificate must be signed by a well-known Certificate Authority
-OR-
■ A root/intermediate CA certificate must be loaded to the device’s trust store either via
802.1x or configuration parameter ‘/security/ca_certificate/[0-4]/uri’
➢ To maintain backward compatibility with devices previously running UC versions:
■ Configure parameter '/security/SSLCertificateErrorsMode' to Ignore
Supported Parameters
Listed here are the configuration file parameters currently supported by Android-based Teams
devices. They're in AudioCodes’ UC version format. The parameters are comprised of
Microsoft configuration profile settings and AudioCodes’ device-specific parameters.
- 33 -
Page 39

CHAPTER6 Provisioning Android-based Teams Phones
■ general/silent_mode = 0 (default)/1
■ general/power_saving = 0 (default)/1
■ phone_lock/enabled = 0 (default)/1
■ phone_lock/timeout = 900 (default) (in units of seconds)
■ phone_lock/lock_pin = 123456
■ display/language = English (default)
■ display/screensaver_enabled = 0/1
■ display/screensaver_timeout = 1800 (seconds)
■ display/backlight = 80 (0-100)
■ display/high_contrast = 0 (default) /1
■ date_time/timezone = +02:00
■ date_time/time_dst = 0 (default) /1
Device Manager Pro | Administrator's Guide
■ date_time/time_format = 12 (default) / 24
■ network/dhcp_enabled = 0/1
■ network/ip_address =
■ network/subnet_mask =
■ network/default_gateway =
■ network/primary_dns =
■ network/pecondary_dns =
■ network/pc_port = 0/1
■ office_hours/start = 08:00
■ office_hours/end = 17:00
■ logging/enabled = 0/1
■ logging/levels = VERBOSE, DEBUG, INFO, WARN, ERROR, ASSERT, SILENT
■ admin/default_password = 1234
■ admin/ssh_enabled=0/1 (default)
■ security/SSLCertificateErrorsMode = IGNORE, NOTIFICATION, DISALLOW (default)
■ security/ca_certificate/[0-4]/uri – uri to download costumer’s root-ca
■ provisioning/period/daily/time
■ provisioning/period/hourly/hours_interval
■ provisioning/period/type = HOURLY, DAILY (default), WEEKLY, POWERUP, EVERY5MIN,
EVERY15MIN
- 34 -
Page 40

CHAPTER6 Provisioning Android-based Teams Phones
■ provisioning/period/weekly/day
■ provisioning/period/weekly/time
■ provisioning/random_provisioning_time
Device Manager Pro | Administrator's Guide
- 35 -
Page 41

CHAPTER7 Managing Devices Behind a NAT using SBC HTTP Proxy
Device Manager Pro | Administrator's Guide
7 Managing Devices Behind a NAT using SBC HTTP
Proxy
Devices that reside behind a NAT and whose IP addresses are internal, can be managed by the
OVOC via SBC HTTP proxy.
The SBC HTTP Proxy also supports HTTPS.
If the phones are located behind a NAT and the SBC HTTP proxy isn't used, then only partial
management of the phones is possible:
■ Alarms and statuses can be sent from the phones to the Device Manager Pro, i.e., REST
requests originate from the phone and the OVOC functions as a REST server.
■ The Device Manager Pro can perform auto-discovery of the endpoints for the purpose of
uploading configuration and firmware files.
■ 'Actions' menu items cannot be applied, for example, Reset Phone, i.e., the OVOC
functions as a REST client.
HTTP/S updates can be sent from the phones to the OVOC server across a NAT but
requests cannot be sent from the OVOC server to the phones without the mediation of
the SBC HTTP Proxy server.
If the phones are not behind a NAT, phone-OVOC server communications are direct, without
the requirement of the SBC HTTP proxy.
The OVOC automatically updates phones' .cfg configuration file. The phone periodically checks
whether there is a new file on the OVOC server (directly, or via the SBC HTTP proxy if the
phones are behind a NAT). The frequency of the check is configurable: Every night, Every hour,
etc. The default setting is Every day at 00:00. The administrator can change a value in the .cfg
file using the management interface and view the result after the phone loads the new file.
The OVOC automatically updates phones' .img firmware file. The phone periodically checks
whether there is a new .img file on the OVOC server (directly, or via SBC HTTP proxy if the
phones are behind a NAT).
■ When the OVOC communicates with the the SBC HTTP proxy, for example, when it
communicates Actions (Check Status, Change Tenant, Update Firmware, Open Web
Admin, Reset Phone, Update Configuration, Send Message, Delete Status and Telnet),
- 36 -
Page 42

CHAPTER7 Managing Devices Behind a NAT using SBC HTTP Proxy
communications are always over HTTPS. Similarly, when the SBC HTTP proxy
communicates with the OVOC, communications can be over HTTPS (recommended).
■ The string used to configure DHCP Option 160 for communication with the OVOC is
different to the string used to configure DHCP Option 160 for communication with the SBC
HTTP Proxy.
■ A port firewall configuration must be defined for communication with the SBC HTTP Proxy.
● The listening port (and IP) for HTTP/S must not collide with any other port such as SIP
5060/1 HTTP for AudioCodes' Web server 80/443.
● If AudioCodes' Web server uses an interface other than SBC HTTP Proxy , the well-
known ports 80 and 443 can be used.
■ When a device uses the SBC HTTP Proxy, the Device Manager Pro indicates this with the
following icon:
The administrator can also view phones' online statuses (Started, Registered, Unregistered,
etc.). The SBC HTTP Proxy also supports actions such as Send Message, Restart, Open Web
Admin and Check Status.
Device Manager Pro | Administrator's Guide
To support this feature, the SBC HTTP Proxy should be correctly configured. For more
information, see the relevant device's User's Manual (Section 'HTTP- based Proxy
Services').
- 37 -
Page 43

CHAPTER8 Monitoring and Maintaining the Phone Network
Device Manager Pro | Administrator's Guide
8 Monitoring and Maintaining the Phone Network
You can monitor and maintain the enterprise's telephony network.
Monitoring the Network from the Dashboard
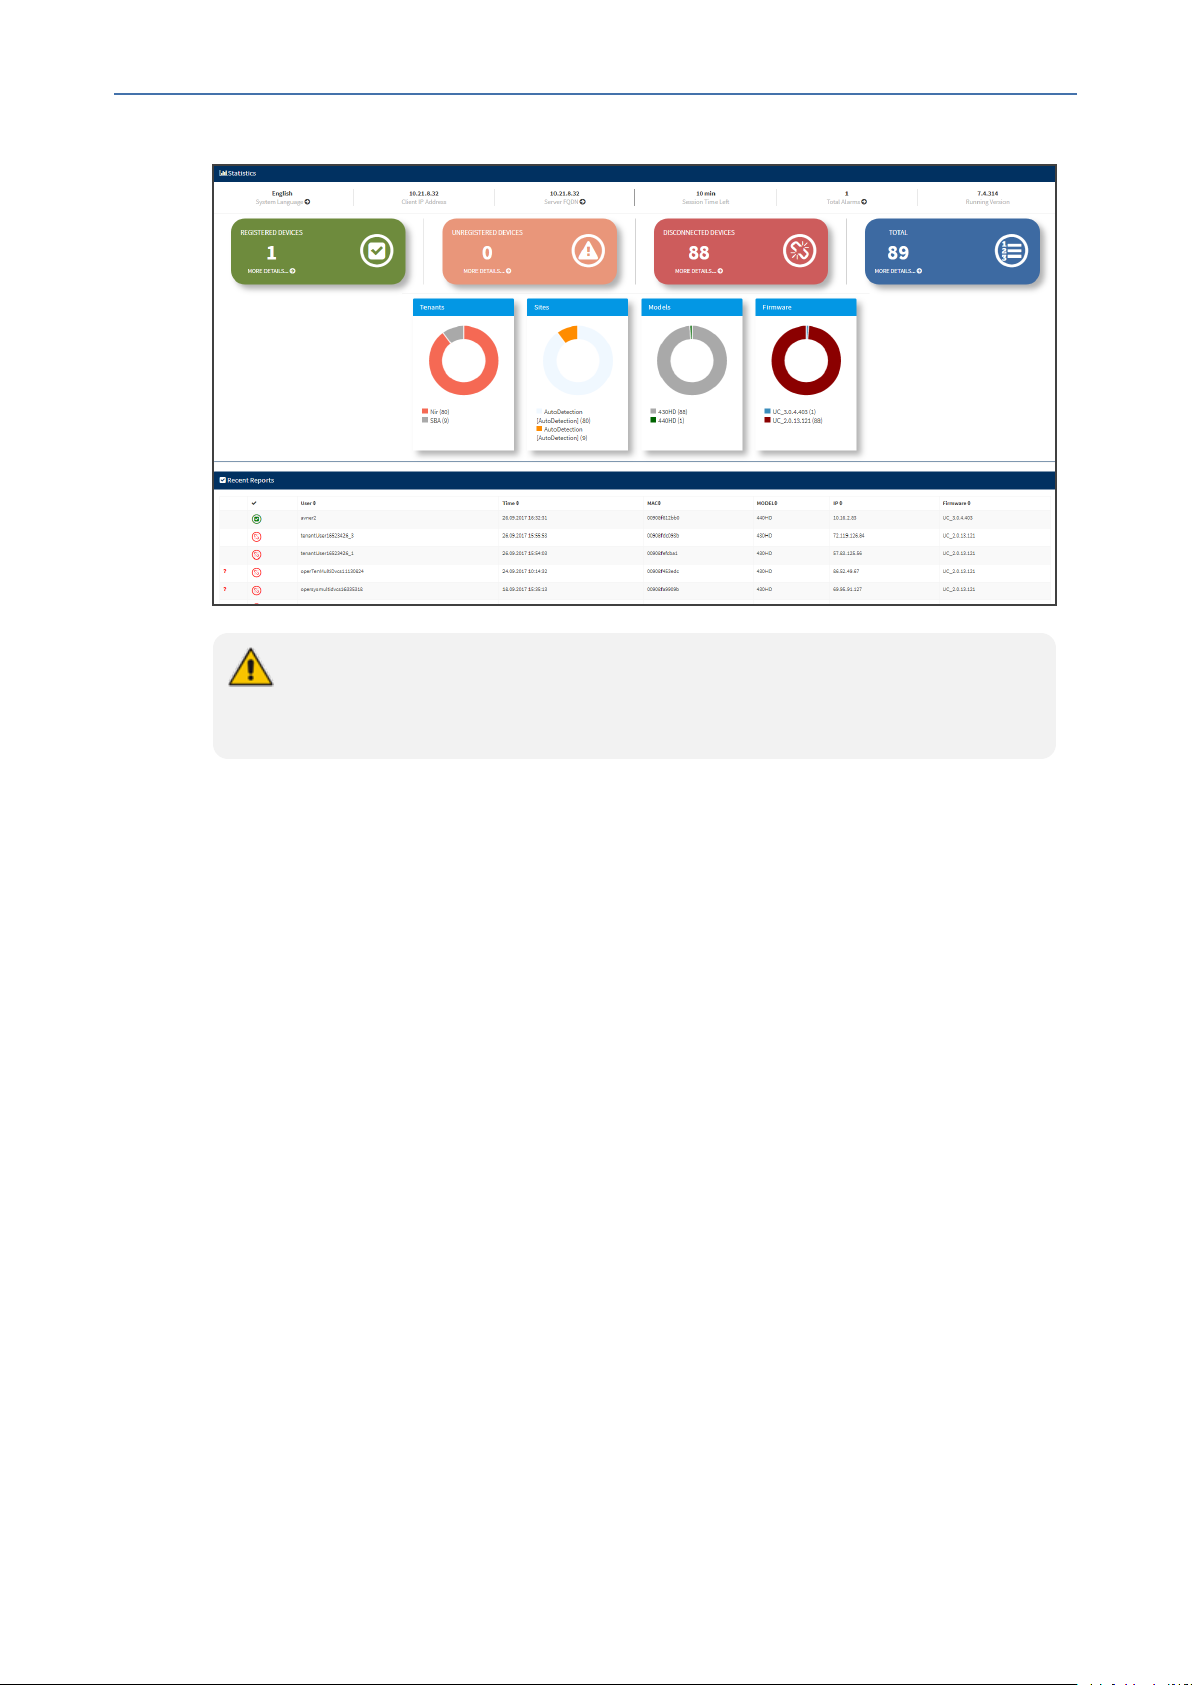
The Dashboard page lets you quickly identify
■ which phones in the network are registered
■ which phones in the network are non-registered
■ # of registered and non-registered phones (in terms of SIP registration)
■ % of registered phones
■ MAC and IP address of each phone
■ the time the information was reported
■ the firmware version
➢ To open the Dashboard page:
■ Under the Monitor tab, click Dashboard > Dashboard.
Figure 8-1: Dashboard
■ If a Skype for Business IP phone is signed out (offline, or not registered), you'll see an x
icon inside a grey circle, and the 'User' column will be blank, as shown in the figure below.
It will be counted as a Non Registered Device.
Figure 8-2: Dashboard - Skype for Business IP Phone Offline
- 38 -
Page 44

CHAPTER8 Monitoring and Maintaining the Phone Network
■ Point your mouse over the icon to view the 'offline' tooltip.
■ If the phone is not registered, you'll view a red triangle enclosing an exclamation mark.
■ View the status thumbnails. Use this table as reference.
Table 8-1: Dashboard – Status Thumbnails
Device Manager Pro | Administrator's Guide
Status
Thumbnail
Description
Indicates the number of registered devices.
Click MORE DETAILS… to quickly access the Devices Status page.
Indicates the number of unregistered devices.
Click MORE DETAILS… to quickly access the Devices Status page.
Indicates the number of disconnected devices.
Click MORE DETAILS… to quickly access the Devices Status page.
Indicates the number of devices running the version stated above it. Click
MORE DETAILS… to quickly access the Devices Status page.
Pie chart showing the number of devices per tenant that are registered.
Hover over a segment of the pie to view the tenant's name and the number
of devices registered under it. Click a segment of the pie to open the Devices
Status page displaying that tenant and the devices registered under it.
Pie chart showing the number of devices per site that are registered. Click a
segment of the pie to open the Devices Status page.
Pie chart showing how many phones of each model are registered. Click a
segment of the pie to open the Devices Status page.
Pie chart showing how many phones of each firmware version are
registered. Click a segment of the pie to open the Devices Status page.
- 39 -
Page 45

CHAPTER8 Monitoring and Maintaining the Phone Network
Viewing Network Topology
Located in the uppermost right corner of the Dashboard page, the Network Topology button
allows network administrators to view devices in their IP telephony networks according to
sites, internal or external IP address, or IP address class.
The Network Devices Topology page that opens displays these buttons:
Click the Show Sites button to display the Network Devices Topology page according to sites.
Figure 8-3: Network Devices Topology page per sites
Device Manager Pro | Administrator's Guide
The preceding figure shows multiple sites in a single-tenant network. The page allows administrators to determine at a glance which sites are causing traffic overload (for example). Administrators can point their mouse at a device to view information on that device displayed in a
tool tip.
- 40 -
Page 46

CHAPTER8 Monitoring and Maintaining the Phone Network
Figure 8-4: Point your mouse at a device to view information on it
Device Manager Pro | Administrator's Guide
Click the Show Internal IP | Show LAN IP button to display devices in the page according to
internal IP address or LAN IP address. Each device in the network has an internal IP address -
the IP address of the device located within the enterprise network. Some devices also use a
LAN IP address - the IP address of a router via which calls transit (for example). The button displays devices according to the administrator's choice.
Click the Show Class B or Show Class C button. Every IP address in quad-dotted notation comprises four 'classes'. This button allows displaying devices according to IP addresses of Class B
or Class C.
■ Show Class B shows the first two classes, for example, 10.10
■ Show Class C shows the first three classes, for example, 10.10.10.
A higher number of devices will be displayed if Show Class B is selected than if Show Class C is
selected since more devices' IP addresses begin with 10.10 than with 10.10.10.
Checking Devices Status
The Devices Status page lets you check a device's status, for example, whether it's connected
or not, as well as perform actions on an individual device or on multiple selected devices.
➢ To check a device's status:
1. Open the Devices Status page (Monitor > Dashboard > Devices Status)
- 41 -
Page 47

CHAPTER8 Monitoring and Maintaining the Phone Network
Figure 8-5: Devices Status
2. Click Filter; the filter lets you view specific information in the page, preventing information
irrelevant to you from cluttering the page.
Figure 8-6: Devices Status Filter
Device Manager Pro | Administrator's Guide
- 42 -
Page 48

CHAPTER8 Monitoring and Maintaining the Phone Network
3. You can filter per user, phone #, MAC, IP address, model, version, status (registered,
offline or disconnected), approved or approval pending, users with multiple devices, VIP
Devices, tenant, site, group, template or maximum devices shown in the page.
4. View in column 'USB Headset Type' if a headset is connected to a phone’s USB port; in
addition, column 'IPP Model' displays the USB icon.
5. View in column 'HRS Speaker Model' the Huddle Room Solution model (457 or 458) if an
HRS is connected; in addition, you can view in column 'HRS Speaker FW' the speaker
firmware version.
6. Non-Skype for Business phones are displayed differently to Skype for Business phones.
● The format of 'User Agent' for non-Skype for Business phones is for example AUDC-
IPPhone/2.0.4.30 (430HD; 00908F4867AF) while the format for Skype for Business
phones is AUDC-IPPhone-430HD_UC_2.0.7.70/1.0.0000.0
● Only Skype for Business phones are displayed under the 'Location' column; non-
Skype for Business phones are not displayed under the 'Location' column.
7. View in the column 'IPP Model' the entries Spectralink 8440, Polycom Trio 8800, Polycom
VVX, etc. if these phone models are connected; they can be monitored, configured and
templates can be mapped.
Device Manager Pro | Administrator's Guide
8. You can click the Export link to export all entries in the page - or a selected list of entries -
to a csv file. This facilitates inventory management; it lets you easily obtain a list of phone
MAC addresses or serial numbers, for example. After generating a csv file, a download
option is displayed in the lower-left corner. You can save the csv file or open it directly in
Excel which displays the same information as that on the page.
9. You can click an individual user's Actions link.
Figure 8-7: Actions Menu - Single User
Table 8-2: Actions Menu
Action Description
Check Status Select the 'Check Status' option.
- 43 -
Page 49

CHAPTER8 Monitoring and Maintaining the Phone Network
Action Description
Device Manager Pro | Administrator's Guide
Change
Tenant
Update
Firmware
Select the 'Change Tenant' option.
From the dropdown, select the tenant, and then click Change.
You can update firmware per device, or for multiple selected devices.
Choose the 'Update Firmware' menu option.
- 44 -
Page 50

CHAPTER8 Monitoring and Maintaining the Phone Network
Action Description
Device Manager Pro | Administrator's Guide
The figure above shows the screen that opens after selecting multiple
devices. The screen for a single device is identical but without the option
to execute the action in batches.
From the dropdown, select the firmware file, and then click Update; the
firmware file is updated. You can simultaneously update the device's
configuration file.
If you select multiple devices and then click the Selected Rows Actions
link in the title bar to choose 'Update Software' from the drop-down, the
screen (as shown in the figure above) will include the option to
■ update firmware simultaneously for a batch of devices, each batch
containing 5 | 10 | 20 | 30 | 50 | 100 devices
■ configure a 0 second | 2 second | 5 second | 10 second | 30 second |
2 minute | 5 minute delay between batches
Note that if the ↑ icon is displayed in the 'Firmware' column adjacent to a
listed device in the Devices Status page, it indicates that that device's
firmware is not the latest firmware available; you can click the icon to
upload the device's latest firmware.
- 45 -
Page 51

CHAPTER8 Monitoring and Maintaining the Phone Network
Action Description
Device Manager Pro | Administrator's Guide
Open Web
Admin
Opens the Web interface (see the device's Administrator's Manual). By
default, the Web interface opens in HTTPS.
Nickname Allows you to provide a nickname for the enterprise employee to
facilitate more effective user and phone management.
Reset Phone Sends a reset command to the selected device/s. Note that some phone
models wait for the user to finish an active call, while others may perform
an immediate restart.
Generate
configuration
Generates the device's configuration file according to its tenant, site and
template. The user configuration will also be generated in case it will be
needed.
Change
Group
Allows you to add an endpoint to an endpoints group or to change endpoints groups. Endpoints groups are added in the OVOC (see the OVOC
User's Manual for more information). The feature benefits the customer
who wants (for example) 10 of 500 phones in a site in the enterprise organized in a group for a software upgrade to apply exclusively to those 10
phones. The groups are across sites, within a specific tenant. After clicking
the Actions menu option, this prompt is displayed:
■ From the 'Group' drop-down, select the group and click Change.
- 46 -
Page 52

CHAPTER8 Monitoring and Maintaining the Phone Network
Action Description
■ Configure an endpoints group in the Group Configuration page as
shown in Configuring an Endpoints Group on page18.
Device Manager Pro | Administrator's Guide
Update
configuration
Sends a command to the phone to check whether there is a new
configuration file to upload and updates the phone after a configurable
'Delay Time' (Default = 2 seconds).
Send
Message
Lets you send a message to the screen/s of the selected device/s. Enter
the message in the 'Text' field. You can configure for how long the
message will be displayed in the screen/s.
Set as VIP Allows network administrators to configure the phone as a VIP phone;
VIP phones feature a different disconnect time interval and support
disconnect / unregistered alarms. A phone configured as a VIP phone is
typically a Common Area Phone (CAP) located in the lobby of an
enterprise, or a conference phone located in an enterprise's meeting
rooms. It's important that it be continuously connected hence the
different disconnect time interval and the disconnect / unregistered
alarms.
Delete
Deletes the devices from the Devices Status table.
Devices
Status
Switch to UC Applies to the two flavors of the C450HD phone: Microscope Teams
Native and Microscope Teams Compatible. Select this option to switch
the C450HD phone from the one flavor to the other.
Telnet Allows administrators to send Telnet (CLI) debug commands to the
phone for debugging purposes.
Important: For this feature to function, Telnet must be enabled on the
device. You can enable Telnet from the Web interface's Telnet page
(Management > Remote Management > Telnet).
10. You can select multiple users and then click the Selected Rows Actions link.
- 47 -
Page 53

CHAPTER8 Monitoring and Maintaining the Phone Network
Figure 8-8: Actions Menu - Selected Rows
See the table above for descriptions. Any action you choose will apply to all selected rows. For
example, select rows, click the Selected Rows Actions link, and then select the Update
Firmware option; all selected devices will be updated with the firmware file you select.
Device Manager Pro | Administrator's Guide
Monitoring Alarms
Devices send alarms via the REST protocol. They're forwarded by the OVOC as mail, SNMP
traps, etc. The Alarms page (Monitor > Dashboard > Alarms) shows you
■ each device alarm in the network
■ a description of each alarm
■ MAC address of the device (source)
■ alarm severity
■ IP address of the device
■ last action time
■ date and time of receipt of the alarm
Figure 8-9: Alarms
The Device Manager Pro displays active alarms, not historical alarms.
Red indicates a severity level of Critical
Orange indicates a severity level of Major
- 48 -
Page 54

CHAPTER8 Monitoring and Maintaining the Phone Network
After an alarm is cleared, it disappears from the Alarms screen.
See also AudioCodes' One Voice Operations Center Monitoring Guide for more information
about each alarm.
Searching for Alarms
You can search for alarms in the Alarms page. The 'Search' field enables the functionality. You
can search by
■ alarm name
■ a device's MAC address
■ a device's IP address
Performing Actions on Alarms
You can perform actions on alarms in the Alarms page. Click the Actions link and from the
popup menu select Delete Alarm or Telnet. The Telnet option lets administrators debug
directly if an issue arises. See Telnet on page47 for more information.
Device Manager Pro | Administrator's Guide
Maintaining Users
The Manage Users page lets you maintain users. You can
■ search for a user/device
■ add a user
■ add a device to a user
■ edit user/device
■ view device status
■ delete a user/device
■ search for a device by tenant
■ search for a device by name
Searching for Users/Devices
You can search for a user in the Manage Users page (Setup > Users & Devices > Manage
Users).
- 49 -
Page 55

CHAPTER8 Monitoring and Maintaining the Phone Network
Figure 8-10: Searching for a User/Device
When searching for a user or a device:
■ From the 'Filter by Tenant' dropdown, select a tenant in which to search. This narrows the
search.
■ From the 'Search Users' dropdown, select Search Users and then in the 'Search Item' field
enter the name of the user who you are trying to locate.
■ From the 'Search Users' dropdown, select Search Users & Devices and then in the 'Search
Item' field enter the name of the user you are trying to locate or the MAC address of the
device you are trying to locate.
Device Manager Pro | Administrator's Guide
■ From the '25' dropdown, select the number of users you want displayed per page. The
default is 25.
Adding a User
You can add a user to the Device Manager Pro.
➢ To add a user to the Device Manager Pro:
1. Open the Manage Users page (Setup > Users & Devices > Manage Users).
2. Click +New User. Before adding phones you need to add users.
- 50 -
Page 56

CHAPTER8 Monitoring and Maintaining the Phone Network
Figure 8-11: New User
Device Manager Pro | Administrator's Guide
3. Define a name and password for the user.
4. Define the 'Display Name' and select a tenant from the ' Tenant' dropdown.
Tenant/s must first be defined in the OVOC. See the One Voice Operations Center
User's Manual for more information.
5. Click Submit; you're returned to the Manage Users page. Locate the added user.
Adding a Phone
You can manually add a single phone to the server.
➢ To add a phone:
1. In the Manage Users page, click + in the row of the listed added user.
- 51 -
Page 57

CHAPTER8 Monitoring and Maintaining the Phone Network
Figure 8-12: Add New Device to User
Device Manager Pro | Administrator's Guide
2. Enter the 'Display Name', i.e., the device's name to be displayed in the Device Manager
Pro.
3. From the 'Device Template' dropdown, select a template.
4. Enter the 'MAC Address'.
5. From the 'Firmware' dropdown, select the firmware relevant to the phone.
6. [Optional] Expand +Advanced Settings.
● From the 'Devices Language' dropdown, select the language you want the phone
interface to display.
● From the 'VLAN Discovery mode' dropdown, select Manual / CDP / LLDP / CDP_LLDP.
See under Appendix Skype for Business Environment on page71 for more
information.
7. Click Submit and then click Back to see the added device in the Manage Users page under
the Devices column (click +).
Editing a User
You can edit a user if (for example) they relocate to another tenant or if they are given another
phone.
➢ To edit a user:
1. Click the Edit button in the row adjacent to the user; the Edit User screen opens.
2. Edit the same fields as when adding the device.
- 52 -
Page 58

CHAPTER8 Monitoring and Maintaining the Phone Network
Viewing Device Status
You can quickly assess a device's status from the Manage Users page by clicking the ü icon in
the Devices Status column.
Device Manager Pro | Administrator's Guide
- 53 -
Page 59

CHAPTER8 Monitoring and Maintaining the Phone Network
Deleting a User
You can delete a user if, for example, they leave the company.
➢ To delete a user:
■ Click the Delete button in the row adjacent to the user; the user and device are removed.
Managing Multiple Users
The Manage Multiple Users page lets you perform an action on a single user or on multiple
users simultaneously:
■ reset passwords
■ delete users
■ restart devices
■ generate devices configuration files
Device Manager Pro | Administrator's Guide
■ update configuration files
■ send a message to multiple phones
➢ To manage multiple users:
1. Open the Manage Multiple Users page (Setup > Users & Devices > Manage Multiple
Users):
Figure 8-13: Manage Multiple Users
- 54 -
Page 60

CHAPTER8 Monitoring and Maintaining the Phone Network
2. In the Available Users pane, select a user or select multiple users on whom to perform an
action.
3. Click > to add a single user to the Selected Users pane.
4. Click >> to add multiple users to the Selected Users pane.
5. Click < to remove a single user from the Selected Users pane - after selecting them in the
pane.
6. Click << to remove multiple users from the Selected Users pane - after selecting them in
the pane.
7. From the Action dropdown, select the required action.
Device Manager Pro | Administrator's Guide
● Use the table below as reference.
- 55 -
Page 61

CHAPTER8 Monitoring and Maintaining the Phone Network
Table 8-3: Managing Multiple Users - Actions
Action Description
Set Users
Tenant
Sets the tenant for users selected.
Reset Users
Passwords
Device Manager Pro | Administrator's Guide
Resets users passwords. A random password is generated for each user.
To generate a single password for all users selected, select the Set the
same password to all users option.
To load the new user passwords:
■ Generate the device's configuration file
■ Restart/Update the device
Delete Users Deletes users and applies a configurable 'Delay Time' (Default = 2
seconds) after each delete is performed.
Restart
Devices
Restarts devices. A reset command is sent to all selected devices. The
commands are sent in batches; each batch contains 5 devices with a
delay of 2 minutes between each batch.
From the dropdown, choose the type of restart:
■ Graceful (default)
■ Force
■ Scheduled
Before restarting, some models wait for the user to finish an active call
while others may perform an immediate restart.
- 56 -
Page 62

CHAPTER8 Monitoring and Maintaining the Phone Network
Action Description
Device Manager Pro | Administrator's Guide
Generate
Devices
Configuration
Files
Update
Configuration
Files
Send
Message
Generates new configuration files. Updates each device with the newly
generated configuration files after a configurable 'Delay Time' (default = 2
seconds) - if you select the Updating Devices and restarting Devices
after generating files option. You can generate a private configuration
file per user group, device group, or specific tenants.
Updates each device after a configurable 'Delay Time' (default = 2
seconds).
Lets you send a message to the screens of all user devices selected. Enter
the message in the 'Text' field. You can configure the length of time the
message will be displayed in the screens. Phones beep to alert users
when messages come in.
User
Configuration
Configures the values that will be added to the mac.cfg file for the
selected users. Note that you can copy from one user to multiple users.
Delete User
Deletes the user configuration for the selected users.
Configuration
The page also lets you
■ filter per tenant before selecting users on whom to perform an action
■ configure performing the action on a batch of 1 | 5 | 10 | 20 | 30 | 50 | 100 devices
simultaneously
■ configure a 0 second | 2 second | 5 second | 10 second | 30 second | 2 minute | 5 minute
delay between batches
- 57 -
Page 63

CHAPTER8 Monitoring and Maintaining the Phone Network
Maintaining Multiple Devices
The Manage Multiple Devices page lets you perform a single operation on all or on many user
devices. The page lets you
■ delete multiple devices
■ change devices type
■ change language
■ restart multiple devices
■ generate devices configuration files
■ update configuration files
■ send a message to multiple phones
These operations can also be performed on an endpoints group or on all endpoints
groups; from the 'Groups' drop-down in the Manage Multiple Devices page shown in the
figure below, select a single endpoints group, or All. For more information about adding
an endpoint to a group, see under Checking Devices Status on page41. For more
information about configuring an endpoints group, see Configuring an Endpoints Group
on page18.
Device Manager Pro | Administrator's Guide
➢ To manage multiple devices:
1. Open the Manage Multiple Devices page (Setup > Users & Devices > Manage Multiple
Devices):
- 58 -
Page 64

CHAPTER8 Monitoring and Maintaining the Phone Network
Figure 8-14: Manage Multiple Devices
Device Manager Pro | Administrator's Guide
2. You can filter devices per tenant, before selecting those to perform an action on.
3. You can enter a string in the 'Search' field and then click Go to search for devices.
4. In the Available Devices pane, select a device on which to perform an action and then click
> to add it to the Selected Devices pane -or- select multiple devices on which to perform an
action and then click >> to add them to the Selected Devices pane.
5. In the Selected Devices pane, select a single device and then click < to remove it, or select
multiple Selected Devices and then click << to remove them.
6. From the Action dropdown, select an action. Use the table below as reference.
Table 8-4: Managing Multiple Devices - Actions
Action Description
Delete
Devices
Change
Template
Deletes selected devices from the server applying a configurable 'Delay
Time' (default = 2 seconds) in the process.
This action will update the device template in the database. To finish the
action, you need to:
1. Generate the device's Configuration File
2. Restart/Update the phone.
- 59 -
Page 65

CHAPTER8 Monitoring and Maintaining the Phone Network
Action Description
Device Manager Pro | Administrator's Guide
Change
Language
Restart
Devices
Generate
Devices
Configuration
Files
Changes the phone language. Select the language from the Language
dropdown and click Change. To view the usage of a language, click View
Usage.
To load a new language:
1. Generate the device's configuration file.
2. Restart/update the phone.
Restarts online devices. Before restarting, some models wait for the user
to finish an active call while others may perform an immediate restart.
From the dropdown, choose the type of restart:
■ Graceful (default)
■ Force
■ Scheduled
Generates new configuration files. Updates each phone with the newly
generated configuration files after a configurable 'Delay Time' (default = 2
seconds) - if you selected the Updating Devices and restarting Devices
after generating files option (by default it is selected).
Update
Configuration
Updates each phone after a configurable 'Delay Time' (default = 2
seconds).
File
Send
Message
Lets you send a message to the screens of all user phones selected. Enter
the message in the 'Text' field. You can configure the length of time the
message will be displayed in the screen. Phones beep to alert users when
messages come in.
Change
Lets you upload a different .img firmware file to the phone.
Firmware
Change VLAN
Discovery
Mode
Used to change the virtual phone network's mode of operation. Go to
Skype for Business Environment.htm for the options descriptions
[Manual/CDP/LLDP/CDP_LLDP]
➢ To update all existing configuration files according to the new template:
■ After selecting devices, select from the 'Action' dropdown the Generate Devices
Configuration Files option in the Manage Multiple Devices page.
- 60 -
Page 66

CHAPTER8 Monitoring and Maintaining the Phone Network
Managing Configuration Files
You can manage devices' configuration files. All cfg files are created and located on the OVOC
server. You can view and manage storage, and upload and delete files from storage. To avoid
network congestion, a delay feature enables an interval between each installation.
➢ To manage devices' configuration files:
■ Open the Manage Configuration Files page (Setup > Devices Configuration > Generated
Config Files).
Figure 8-15: Manage Configuration Files
Device Manager Pro | Administrator's Guide
The page lets you
● Filter the .cfg configuration files listed by name
● Browse to a location on your PC and upload a .cfg configuration file
● Select and delete any or all of the .cfg configuration files listed
● Open any of the .cfg configuration files listed in an editor
● Save any of the .cfg configuration files listed
● Download any of the .cfg configuration files listed
● View all configuration files currently located on the server (global configuration files,
company directory configuration files, and IP phone configuration files and third-party
vendor product configuration files)
Managing Firmware Files
The 'Device firmware files' page allows network administrators to download, edit, delete and
add devices' .img firmware files.
➢ To manage the .img firmware files:
■ Open the Device Firmware Files page (Setup > Devices Configuration > Firmware Files).
- 61 -
Page 67

CHAPTER8 Monitoring and Maintaining the Phone Network
Figure 8-16: Device Firmware Files
For information on third-party vendor products, see the Device Manager for Third-Party
Vendor Products Administrator's Manual
Device Manager Pro | Administrator's Guide
In this page you can
■ View all .img firmware files currently located on the server
■ Add a new device firmware file. Note that if default names are used (e.g., 420HD.img), all
devices of this type will automatically use it.
■ Manage the .dfu firmware files of the Huddle Room Solution (HRS) speakers.
■ Filter by filename the .img firmware files listed
■ Determine if the device has firmware or not. If the device does not have firmware, its
name will be red-coded and a tool tip will indicate a missing firmware file when you point
the cursor at it.
■ If this is the case, upload the device's .img firmware file that you obtained from
AudioCodes, to the OVOC provisioning server:
a. Click the red-coded name of the phone.
- 62 -
Page 68

CHAPTER8 Monitoring and Maintaining the Phone Network
Figure 8-17: .img Firmware File Upload
Device Manager Pro | Administrator's Guide
b. Click the Upload firmware file button and then navigate to the .img file you received
from AudioCodes and put on the OVOC provisioning server. You can perform this part
of the installation procedure before or after configuring your enterprise's DHCP Server
with DHCP Option 160.
● If Microsoft's Internet Information Services (IIS) web server is deployed in the
network, you need to change the default value of the parameter 'Max allowed
content length (Bytes)' (shown in the following figure) to the size of the .img file (at
least) before uploading the .img file of the 445HD or 440HD phone to the Device
Manager Pro.
● If it's left unchanged at the Microsoft default, the .img file for the 445HD and
440HD phone will not be uploaded to the Device Manager Pro because it's heavier
than the Microsoft default.
- 63 -
Page 69

CHAPTER8 Monitoring and Maintaining the Phone Network
Device Manager Pro | Administrator's Guide
■ After an .img firmware file has been uploaded to a phone, you can download it to your pc.
Click the device's name and then in the screen that opens, click the Download firmware
file button.
■ Edit a device's .img firmware file. Click the name or click the Edit button in the row.
■ Delete any .img firmware file listed. Click the Delete button in the row.
■ Manage .img firmware files by grouping them.
a. Click the Add new Device firmware button.
- 64 -
Page 70

CHAPTER8 Monitoring and Maintaining the Phone Network
b. Define an intuitive 'Name' and 'Description' to facilitate easy identification. You can
leave the 'Version' field empty, and then click Continue & Upload.
Device Manager Pro | Administrator's Guide
c. Click Upload firmware file:
d. Click Browse, navigate to the .img file, and then click Save; the 'Version' field is
populated and the .img file is uploaded to the phone.
➢ To download Jabra firmware files:
1. In the 'Device firmware files' page, click the Download Jabra Firmware button.
- 65 -
Page 71

CHAPTER8 Monitoring and Maintaining the Phone Network
Device Manager Pro | Administrator's Guide
2. Locate the device firmware you require; point your cursor over each entry for detailed
information on each device to be displayed, and then click the Download button adjacent
to the device whose firmware you require.
3. After the download, view the downloaded file indication in the lowermost left corner of
the page.
4. To upload the file to the device, follow the same procedure as that described for uploading
phone firmware.
Upgrading Devices to the Latest Firmware Versions
The Device Manager's 'Latest versions' page allows network administrators to get the latest
device firmware files from AudioCodes' firmware repository located in the cloud, before
upgrading the devices in the 'Devices Status' page. The 'Latest versions' page allows network
administrators to 'sync' with the repository before performing the upgrade.
- 66 -
Page 72

CHAPTER8 Monitoring and Maintaining the Phone Network
➢ To sync with the repository:
1. Open the 'Latest versions' page (Setup > Devices & Configuration > Latest Firmware
Versions).
Figure 8-18: Latest Versions
Device Manager Pro | Administrator's Guide
2. Click the Get latest Skype for Business versions (Sync) button or the Get latest Generic
SIP versions (Sync) button.
Very few deployments, if any, feature both Skype for Business phones and generic SIP
phones, so when performing a sync, do so for either one or the other, never for both.
- 67 -
Page 73

CHAPTER8 Monitoring and Maintaining the Phone Network
Figure 8-19: Sync
3. Click the Download button; the latest firmware files for the selected phone type are pulled
from the repository in the cloud and displayed in the 'Latest Versions' page.
Device Manager Pro | Administrator's Guide
4. Open the 'Devices Status' page (Monitor > Dashboard > Devices Status) and from the
'Actions' button adjacent to a phone, select Update Firmware; the phone will use the
firmware file listed in the 'Latest Versions' page.
● The same procedure applies to Jabra firmware files viewed under the Jabra tab in
the 'Latest Versions' page.
● See also Checking Devices Status on page41.
- 68 -
Page 74

CHAPTER9 Viewing Your License
9 Viewing Your License
Use of OVOC server platform processes is managed by a license that controls the time period
validity for the use of the platform.
The License page displays the license's properties, including the number of days remaining
until it expires.
➢ To view your license's properties:
1. Open the License Properties page (Setup > System > License).
Figure 9-1: License Properties
2. Use the table below as reference.
Table 9-1: License Properties
Action Description
Device Manager Pro | Administrator's Guide
Status Indicates the license's status (Enable or Disable). If enabled and the
configured time expires, connection to the OVOC server platform is denied.
When it expires, the Device Manager Pro is rendered non-usable. Contact
your AudioCodes partner if the license expires.
Expiration
Displays DD:MM:YY.
Date
Days Left The number of days remaining until your license expires. Minus indicates
your license has expired. Contact your AudioCodes partner if the license
expires.
Number
The total number of devices deployed in your enterprise network.
of devices
If a license expires, communications with all servers will be suspended; users will not
be able to log in, and it will not be possible to add new phones.
The time zone is determined by the OVOC server's Date & Time menu settings. If an expiration
date is not configured, the 'Expiration Date' field displays Unlimited.
● As the license's expiration date approaches, warning alarms are issued:
✔ A Major alarm is sent when 80% of the period defined in the currently running
device's license is consumed
✔ A Critical alarm is sent when 100% of the period defined in the currently
running device's license is consumed
- 69 -
Page 75

CHAPTER9 Viewing Your License
● When the maximum number of devices reporting to the OVOC is exceeded, the
OVOC server blocks them and sends an alert that is displayed in the Home page.
Figure 9-2: 100% of Endpoints License Capacity Reached
Licensing Endpoints
You can license endpoints using the One Voice Operations Center (see also the One Voice
Operations Center User's Manual).
➢ To license endpoints:
Device Manager Pro | Administrator's Guide
1. When adding a new tenant in the One Voice Operations Center, click the License tab in the
Tenant Details screen and then scroll down to the Endpoints Management section.
Figure 9-3: One Voice Operations Center: Endpoints Management
2. In the Endpoints field, enter the number of endpoints the Device Manager Pro application
supports for this tenant (30000 maximum).
- 70 -
Page 76

CHAPTER10 Approving Users
10 Approving Users
Approving users is not necessary
● when using the Zero Touch provisioning method
● when importing a csv file containing devices (as well as users)
If you are not using the Zero Touch provisioning method or importing a csv file, then after
plugging the phones into the network you need to approve the users.
Skype for Business Environment
After plugging the phones in, they report to the Device Manager Pro which does not display
user name in the UI until sign-in is performed or, until users are approved in the UI.
➢ To approve users in a Skype for Business environment:
Device Manager Pro | Administrator's Guide
1. In the Device Manager Pro UI, open the Devices Status page (Dashboard > Devices Status).
Figure 10-1: Devices Status
Screen functions:
You can click the Export link; a csv file is generated; a download option is displayed in the
lower-left corner. The same information on the page, e.g., Serial Number which allows
administrators to efficiently manage devices stocktaking, is displayed in Excel format.
Actions: Check status, Change Tenant, Update Firmware, Open Web Admin (opens in HTTPS),
Reset Phone, Update Configuration, Send Message (to the phone), Delete Status, Telnet.
Approve button. Displayed if the System URL is configured for the DHCP Option because the
OVOC will then not know the tenant in which the device is located . If the Tenant URL is
configured for the DHCP Option, the Approve button will not be displayed.
Last Update Status. Indicates the last time the status of the device changed.
Other columns: User, Phone Number, MAC, IP, Model, Firmware Version, Report Time,
Location, Subnet, VLAN ID
- 71 -
Page 77

CHAPTER10 Approving Users
Search option
Smart Filter(s)
1. Select the upper left checkbox (in the figure below it's indicated in red); the Selected Rows
Actions menu and the Approve Selected button are displayed.
Figure 10-2: Devices Status – Selected Rows Actions - Approve Selected
2. Click the Approve Selected button; you're prompted to approve the phone/s selected.
Device Manager Pro | Administrator's Guide
- 72 -
Page 78

CHAPTER10 Approving Users
Device Manager Pro | Administrator's Guide
Figure 10-3: Approve Device
3. In the prompt, select the tenant and then click Approve; all selected users are approved;
all phones restart; the cfg file is automatically uploaded to the phones from the OVOC
provisioning server, which the DHCP server points them to.
4. From the 'VLAN Discovery mode' dropdown, select either:
● NONE
● Disabled
● Manual Configuration [of the LAN; static configuration of VLAN ID and priority]
● Automatic - CDP [automatic configuration of the VLAN - VLAN discovery mechanism
based on Cisco Discovery Protocol]
● Automatic - LLDP [automatic configuration of VLAN - VLAN discovery mechanism
based on LLDP]
- 73 -
Page 79

CHAPTER10 Approving Users
● Automatic - CDP_LLDP [automatic configuration of VLAN (default) - VLAN discovery
mechanism based on LLDP and Cisco Discovery Protocol. LLDP protocol is with higher
priority].
Non-Skype for Business Environment
Unlike Skype for Business phones, the network administrator in a non Skype for Business
environment needs to log in users phones. The network administrator can do this by
importing a csv/zip file with the phones properties, or by approving the phones users one at a
time.
● In contact centers, where multiple users may use a particular phone, a 'user' is
sometimes made the equivalent of the Direct Inward Dialing (DID) number
associated with the phone.
● After plugging in phones, the phones report to the Device Manager Pro, which does
not display user names whose MAC address are unknown.
Device Manager Pro | Administrator's Guide
➢ To approve users:
1. In the Device Manager Pro, open the Devices Status page (Monitor > Dashboard); the non
Skype for Business screen is identical to the Skype for Business screen.
2. Click Approve next to the user; the Approve Device dialog opens – the non Skype for
Business screen is identical to the Skype for Business screen.
3. Enter the User Name and the Display Name, and then click Approve; the user name is
displayed in the Device Manager Pro and the user is approved.
The User Name and Password will function as the SIP user name and password.
● This procedure only applies when connecting phones for the first time. After first-
time connection, the cfg file - containing user name and password - is
automatically uploaded to the phones from the OVOC provisioning server, which
the DHCP server points them to.
● In some non-Skype for Business environments, for example, in Genesys contact
centers, Password is not specified.
- 74 -
Page 80

CHAPTER11 Managing Templates
11 Managing Templates
This topic shows how to manage templates.
System Settings and Placeholders
The System Settings screen allows you to configure devices according to enterprise
requirements. Settings under some tabs also include placeholders so that when you generate
a template, the settings values will be applied to the template. Default placeholder values can
be viewed in the Default Placeholders Values page.
➢ To configure system settings:
1. Open the System Settings page (Setup > Devices Configuration > System Settings).
Figure 11-1: System Settings
Device Manager Pro | Administrator's Guide
2. Use the table below as reference.
The tab Generic SIP applies only to enterprises whose environments are non Skype
for Business. All other tabs in the screen apply to both Skype for Business and non
Skype for Business environments.
Table 11-1: System Settings
Tab/Parameter Description
Monitoring
Disconnected
Timeout
Determines how long, in minutes, a device's status will be indicated as
'Disconnected' if not reported otherwise. Default: 20 minutes. The
phone reports its status to the server every hour. If it does not report
its status before 'Disconnect Timeout' lapses, i.e., if the parameter is
left at its default and two hours pass without a status report, the
status will change from Registered to Disconnected and the device's
'Status' column in the Devices Status screen will be red-coded.
Send KEEPALIVE Every
[Only displayed after clicking Advanced] Determines how often, in
minutes, a KEEP-ALIVE message is sent from the device.
- 75 -
Page 81

CHAPTER11 Managing Templates
Tab/Parameter Description
Device Manager Pro | Administrator's Guide
VIP
Disconnected
Timeout
VIP Send KEEPALIVE Every
Send
Unregistered
alarm
Send
Disconnect
Alarm
Determines how long, in minutes, a VIP device's status will be indicated
as 'Disconnected' if not reported otherwise. An alarm can be sent to
the network administrator if the timeout is exceeded. Default: 5
minutes. A VIP device is typically a Common Area Phone (CAP) located
in the lobby of an enterprise, or a conference phone located in an
enterprise's meeting rooms. It's important for a VIP device to be
connected, hence the default timeout of 5 minutes compared to the
default of 20 minutes for a non VIP device.
[Only displayed after clicking Advanced] Determines how often, in
minutes, a KEEP-ALIVE message is sent from the VIP device.
Select this option for an alarm to be sent when VIP device status
changes to 'Unregistered'.
Select this option for an alarm to be sent when VIP device status
changes to 'Disconnected'. It's important for a VIP device to be
connected, hence the default Disconnected Timeout of 5 minutes
compared to the default of 20 minutes for a non VIP device.
Security (HTTP/S)
Secure (HTTPS)
communication
from the Device
Manager to the
Devices
Secure (HTTPS)
communication
from the
Devices to the
Device
Manager
Devices Status:
Open Device
Web
Administrator
using HTTPS
Sends secured (HTTPS) requests from the Device Manager Pro server to
the phone. If the option is selected, communications and RESTactions
such as Restart, Send Message, etc., will be carried out over HTTPS.
Not relevant when using an SBC proxy, see here.
Sends secured (HTTPS) requests from the phone to the Device Manager
Pro server. If the option is selected, communications and REST updates
such as keep-alive, alarms and statuses between phone and server will
be carried out over HTTPS. Also used for loading firmware and
configuration files, and when there is an SBC proxy, see here.
The browser immediately opens the device's Web interface, over
HTTPS, without prompting that there is a problem with the website's
security certificate and that it is not recommended to continue to the
website.
Only allow
devices added
Select this option to allow into the OVOC only those phones that were
added by the network administrator.
- 76 -
Page 82

CHAPTER11 Managing Templates
Tab/Parameter Description
Device Manager Pro | Administrator's Guide
by the administrator into
OVOC
■ Phones that were not added by the network administrator will be
blocked by the OVOC.
■ If a device's Mac Address is not listed in the 'Manage Users &
Devices' page, it will be blocked by the OVOC.
The OVOC must be restarted for the parameter to take effect.
Default Device Configuration
Server FQDN [Recommended] Points phones to the OVOC server using the server's
name rather than its IP address. If phones are pointed to the OVOC
server's IP address, then if the server is moved due to organizational
changes within the enterprise, all phones are disconnected from it.
Pointing using the server's name prevents this, making organizational
changes easier.
Devices
Language
From the dropdown select the language you want displayed in the
phones' screens: English (default), French, German, Hebrew, Italian,
Polish, Portuguese, Russian, Spanish or Ukraine.
NTP Server IP
Address
Enter the IP address of the Network Time Protocol (NTP) server from
which the phones can get the time.
Voice Mail
Number
Enter the number of the enterprise's exchange.
Configuration depends on the enterprise environment, specifically, on
which exchange the enterprise has. If the enterprise has a Skype for
Business environment, ignore this parameter. Default=1000.
Require SRTP in
the Phone
Select this option for Secure RTP. Real-time Transport Protocol (RTP) is
the standard packet format for delivering voice over IP.
Configuration
File
Daylight Saving Time
Active Determines whether the phone automatically detects the Daylight
Saving Time for the selected Time Zone.
■ Disable
■ Enable (default)
Date Format Configures the date format. Valid values are:
■ FIXED. Date is specified as: Month, Day of month.
■ Day of Week. Date is specified as Month, Week of month, Day of
- 77 -
Page 83

CHAPTER11 Managing Templates
Tab/Parameter Description
Start Time Defines precisely when to start the daylight saving offset.
End Time Defines precisely when to end the daylight saving offset.
Device Manager Pro | Administrator's Guide
week.
■ month - defines the specific month in the year
■ week – defines the specific week in the month (first – fourth)
■ day - defines the specific day in the week
■ hour - defines the specific hour in the day
■ minute - defines the specific minute after the hour
Configures the precise moment the phone will start daylight savings
with a specific offset.
■ month - defines the specific month in the year
■ week – defines the specific week in the month (first – fourth)
■ day - defines the specific day in the week
■ hour - defines the specific hour in the day
■ minute - defines the specific minute after the hour
Configures the precise moment the phone will end daylight savings
with a specific offset.
Offset The offset value for the daylight saving. Range: 0 to 180.
Generic SIP
Redundant
Mode
From the dropdown select No Redundant (default) or
Primary/Backup. Allows the administrator to set the primary PBX /
Skype for Business server to which the phone registers and the fallback
option if the server is unavailable. Primary/Backup, or 'outbound
proxy', is a feature that enables the phone to operate with a primary or
backup PBX/Skype for Business server. If the primary falls, the other
backs it up.
Primary Enter the primary PBX/Skype for Business server's IP address, i.e., the
outbound proxy's IP address.
HTTP AUTH
Provisioning no
password
If set to Enabled, only the extension number will be used for provisioning HTTP authentication. The default HTTP AUTH password will be
1234. In DHCP option 160 and on the templates, the setting 'pro-
visioning/configuration/http_auth/password' must be configured to
- 78 -
Page 84

CHAPTER11 Managing Templates
Tab/Parameter Description
3. Click the More... tab and if necessary, in the 'Accept Extensions' field define file extensions
you'll require which aren't already defined, then click Save.
● For information about the LDAP Configuration button, see Configuring the LDAP
Directory on page92
● For information about the SBC Proxy Configuration button, see Editing the SBC HTTP
Proxy on page30
● For information about the Default Placeholders Values button, see Viewing Default
Placeholders Values on page85
● For information about the SCEP button, see under Adding Users & Devices in Non-
Skype for Business Environments on page7
4. Click Save All Settings.
Device Manager Pro | Administrator's Guide
1234 to activate the feature.
Selecting a Template
Templates are available
■ per tenant
■ per phone model
■ per model for Microsoft Skype for Business server phones
■ per model for regular (non-Skype for Business) third-party server phones
Depending on the tenant, model and the server in the enterprise, select a template for:
■ AudioCodes 405
■ AudioCodes 420HD
■ AudioCodes 430HD
■ AudioCodes 440HD
■ AudioCodes 450HD
■ AudioCodes 420HD Skype for Business
■ AudioCodes 430HD Skype for Business
■ AudioCodes 440HD Skype for Business
■ AudioCodes 450HD Skype for Business
For information on third-party vendor products, see the Device Manager for Third-Party
Vendor Products Administrator's Manual
- 79 -
Page 85

CHAPTER11 Managing Templates
➢ To select a template:
■ Open the Devices Configuration Templates page (Setup > Devices Configuration >
Templates):
Device Manager Pro | Administrator's Guide
Figure 11-2: Devices Configuration Templates
■ Click for more information about the phone whose template is displayed.
■ Click Edit to modify a template.
Editing a Configuration Template
You can edit a device's template but typically it's unnecessary to change it.
For information on third-party vendor products, see the Device Manager for Third-Party
Vendor Products Administrator's Manual
➢ To edit a template:
1. In the Devices Configuration Templates page (Setup > Devices Configuration >
Templates), click the link of the device or its Edit icon.
- 80 -
Page 86

CHAPTER11 Managing Templates
2. To use this template in the Zero Touch procedure:
Device Manager Pro | Administrator's Guide
Figure 11-3: Device Configuration Template
a. From the 'Tenant' dropdown under the Zero Touch Configuration screen section
shown in the figure above, select the tenant.
b. From the 'Type' dropdown, select the phone model.
c. Select the option Zero Touch default template.
When a new device of model x and tenant y will be connected for the first time to the network,
it will use this template.
1. Click the Edit configuration template button; the template opens in an integral editor:
- 81 -
Page 87

CHAPTER11 Managing Templates
Device Manager Pro | Administrator's Guide
Figure 11-4: Edit Configuration Template
2. Edit the template and then click Save; in the Devices Configuration Templates page, the
name of an edited template is displayed in green. See the device's Administrator's Manual
for parameter descriptions.
About the Template File
The template is an xml file. It defines how a device's configuration file will be generated. The
template shows two sections.
■ The upper section defines the global parameters that will be in the global configuration
file
■ The lower section defines the private user parameters that will be in the device
configuration file
Restoring a Template to the Default
You can restore a template to the factory default at any time.
➢ To restore a template to the default:
■ Click the Restore to default button (displayed only if a change was made); the template
and its description are displayed.
- 82 -
Page 88

CHAPTER11 Managing Templates
Downloading a Template
You can download a template, for example, in order to edit it in a PC-based editor.
➢ To download a template:
■ Click the Download configuration template button and save the xml file in a folder on
your PC.
Uploading an Edited Template
You can upload a template, for example, after editing it in a PC-based editor.
➢ To upload an edited template:
■ Click the Upload configuration template button and browse to the xml template file on
your PC. The file will be the new template for the phone model.
Generating an Edited Template
Device Manager Pro | Administrator's Guide
After editing a template, you must generate the cfg files for the users/devices with
whom/which the template is associated.
➢ To generate an edited template:
1. Click the Generate Configuration link located in the upper left corner of the screen, shown
in the figure below.
Figure 11-5: Generate Configuration
2. In the Manage Multiple Users – Generate Configuration screen that opens shown in the
figure below, select the relevant users.
- 83 -
Page 89

CHAPTER11 Managing Templates
Figure 11-6: Manage Multiple Users – Generate Configuration
Device Manager Pro | Administrator's Guide
3. After selecting users, click the Generate Devices Configuration Files button
Defining Template Placeholders
Templates include placeholders whose values you can define. After defining values, the
placeholders are automatically resolved when you generate the template. For example,
placeholder %ITCS_ TimeZoneLocation% is replaced with local time. Placeholders can be
defined per tenant, model, etc. The cfg file includes default values and overwritten values
according to configured placeholders. If no placeholder is configured, the cfg file will include
only default values.
➢ To show placeholders:
1. In the Device Configuration Template page (Setup > Devices Configuration > Templates),
click the Edit button in the same row as the device model.
Figure 11-7: Devices Configuration Template
2. Click the Show Placeholders button.
- 84 -
Page 90

CHAPTER11 Managing Templates
The figure above shows placeholders currently defined in the xml Configuration Template file
for the 420HD phone. There are four kinds of placeholders: (1) System (2) Template (3) Tenant
(4) Devices.
■ To manage an available placeholder, see here.
Device Manager Pro | Administrator's Guide
Figure 11-8: Templates Placeholders
■ To add/edit/delete a template placeholder, see here.
■ To add/edit/delete a tenant placeholder, see here.
■ To add/edit/delete a device placeholder, see here.
Viewing Default Placeholders Values
Before defining values for placeholders, you can view the default placeholders values.
➢ To view default placeholders values:
■ Open the Default Placeholders Values page (Setup > Devices Configuration > System
Settings) and then click the Default Placeholders Values button located lowermost in the
page.
Figure 11-9: Default Placeholders Values
- 85 -
Page 91

CHAPTER11 Managing Templates
Template Placeholders
You can edit the values defined for an existing template placeholder and/or you can add a new
template placeholder.
Editing Template Placeholders
You can edit the values for existing template placeholders.
➢ To edit values for existing template placeholders:
■ Open the Template Placeholders page (Setup > Devices Configuration > Template
Placeholders):
Device Manager Pro | Administrator's Guide
Figure 11-10: Template Placeholders
The page shows the placeholders and their values defined for a template.
➢ To edit a value of an existing template placeholder:
1. Click the adjacent Edit button.
Figure 11-11: Edit Template Placeholder
2. In the 'Name' field, you can edit the name of the placeholder.
3. In the 'Value' field, you can edit the value of the placeholder.
- 86 -
Page 92

CHAPTER11 Managing Templates
4. In the 'Description' field, you can edit the placeholder description.
5. Click Save; the edited placeholder is added to the table.
Adding a New Template Placeholder
You can add a new template placeholder. A new placeholder can be added and assigned with a
new value.
➢ To add a new template placeholder:
1. Open the Template Placeholders page (Setup > Devices Configuration > Template
Placeholders):
2. From the Template dropdown, select the template , e.g., Audiocodes_420HD.
3. Click the Set Value to Place Holder button located in the upper right corner of the screen.
Device Manager Pro | Administrator's Guide
Figure 11-12: Add New Template Placeholder
4. In the 'Name' field, enter the name of the new placeholder.
5. In the 'Value' field, enter the value of the new placeholder.
6. In the 'Description' field, enter a short description for the new placeholder.
7. Click Save; the new placeholder is added to the table.
Tenant Placeholders
You can edit values for existing tenant placeholders and/or add new tenant placeholders.
- 87 -
Page 93

CHAPTER11 Managing Templates
Editing Tenant Placeholders
You can edit the values for existing tenant placeholders.
➢ To edit values for existing tenant placeholders:
1. Open the Tenant Configuration page (Setup > Devices Configuration > Tenant
Configuration):
Figure 11-13: Tenant Configuration – Tenant Placeholders
Device Manager Pro | Administrator's Guide
2. Under the Tenant Placeholders section, select the placeholder and then click the Edit
button.
Figure 11-14: Edit Placeholder
3. In the 'Name' field, you can edit the name of the placeholder.
4. In the 'Value' field, you can edit the value of the placeholder.
5. From the 'Tenant' dropdown, you can select another tenant.
6. Click Save; the edited placeholder is added to the table.
- 88 -
Page 94

CHAPTER11 Managing Templates
Adding a New Tenant Placeholder
You can add a new tenant placeholder.
➢ To add a new tenant placeholder:
1. Open the Tenant Configuration page (Setup > Devices Configuration > Tenant
Configuration).
2. Under the Tenant Placeholders section of the page, click the +Add new placeholder
button.
Device Manager Pro | Administrator's Guide
Figure 11-15: Add New Placeholder
3. In the 'Name' field, enter / select the name of the new placeholder.
4. In the 'Value' field, enter the value of the new placeholder.
5. From the 'Tenant' dropdown, select a new tenant.
6. Click Save; the new placeholder is added to the table.
Adding a New Site Placeholder
You can add a new site placeholder.
➢ To add a new site placeholder:
1. Open the Site Configuration page (Setup > Devices Configuration > Site Configuration).
2. Under the Site Placeholders section of the page, click the +Add new placeholder button.
- 89 -
Page 95

CHAPTER11 Managing Templates
Device Manager Pro | Administrator's Guide
Figure 11-16: Add New Placeholder
3. From the 'Name' field drop-down, select the name of the new placeholder.
4. In the 'Value' field, enter the value of the new placeholder.
5. From the 'Site' drop-down, select a site to which the phone will automatically be
provisioned.
Prior to version 7.8, Polycom phones could only be provisioned to 'AutoDetection' by
default. As of version 7.8, the 'Site' drop-down allows selecting a site to which Polycom
phones will also be automatically provisioned.
6. Click Save; the new placeholder is added to the table.
Devices Placeholders
You can change placeholders values for specific phones, for example, you can change
placeholders values for the CEO's phone. You can also edit a device's placeholders values.
Changing a Device Placeholder Value
➢ To change a device placeholder value:
1. Open the Manage Devices Placeholders page (Setup > Devices Configuration > Devices
Placeholders):
Figure 11-17: Manage Devices Placeholders
- 90 -
Page 96

CHAPTER11 Managing Templates
Use the 'Filter' field to quickly find a specific device if many are listed. You can search for a
device by its name or by its extension
2. Select the device whose placeholder value you want to change and click Edit.
Device Manager Pro | Administrator's Guide
Figure 11-18: Change Device Placeholder
3. Make sure the correct device is selected; the read-only 'Device' field is filled.
4. From the Key dropdown, choose the phone configuration key.
5. Enter the device's default value in the 'Default Value' field, and then click Save; the edited
device placeholder is added to the table.
The new default value is not automatically generated in the device's configuration file.
To generate it, choose the relevant device and then click the Generate Configuration
link located in the upper left corner of the page.
- 91 -
Page 97

CHAPTER12 Configuring the LDAP Directory
12 Configuring the LDAP Directory
This section is inapplicable if you're operating in a Microsoft Skype for Business
environment because Skype for Business uses its own Active Directory server.
The Device Manager Pro lets you configure an enterprise's LDAP directory.
➢ To access the LDAP directory:
1. Open the System Settings page (Setup > Phones Configuration > System Settings).
2. Click the LDAP Configuration button.
Figure 12-1: LDAP Configuration
Device Manager Pro | Administrator's Guide
3. From the 'Active' parameter dropdown, select Enable.
4. Configure the parameters using the table below as reference.
Table 12-1: LDAP Configuration
Parameter Description
Server
address
Port Enter the LDAP service port.
Enter the IP address, or URL, of the LDAP server.
- 92 -
Page 98

CHAPTER12 Configuring the LDAP Directory
Parameter Description
Device Manager Pro | Administrator's Guide
User
Enter the user name used for the LDAP search request.
Name
Password Enter the password of the search requester.
Base Enter the access point on the LDAP tree.
Active
From the dropdown, select Disable LDAP (default) or Enable LDAP. If Enable
is selected, the parameters below are displayed.
Name
Filter
Specify your search pattern for name look ups. For example, when you type
in the(&(telephoneNumber=*)(sn=%)) field, the search result includes all
LDAP records which have the 'telephoneNumber' field set, and the '(“sn”->surname)' field starting with the entered prefix.
When you type in the (|(cn=%)(sn=%)) field, the search result includes all
LDAP records which have the '(“cn”-->CommonName)' OR the '(“sn”->Surname)' field starting with the entered prefix.
When you type in the (!(cn=%)) field, the search result includes all LDAP
records which “do not” have the 'cn' field starting with the entered prefix.
Name
Attributes
Specifies the LDAP name attributes setting, which can be used to specify the
“name” attributes of each record which is returned in the LDAP search
results. When you type in the following field, for example, cn sn
displayName”, this requires you to specify 'cn-->commonName'. This is the
Full name of the user, sn-->Surname, last name or family name and
“displayName” fields for each LDAP record.
Number
Filter
Number
Attributes
Display
Name
Specifies your search pattern for number look ups.
When you type in the following field, for example, (|(telephoneNumber=%)
(Mobile=%)(ipPhone=%)), the search result is all LDAP records which have the
“telephoneNumber” OR “Mobile” OR “ipPhone”field match the number
being searched.
When you type in the (&(telephoneNumber=%)(sn=*)) field, the search result
is all LDAP records which have the 'sn' field set and the
“telephoneNumber”match the number being searched.
Specifies the LDAP number attributes setting, which can be used to specify
the “number” attributes of each record which is returned in the LDAP search
results. When you type in the following field, for example, Mobile
telephoneNumber ipPhone, you must specify 'Mobile', 'telephoneNumber'
and 'ipPhone' fields for each LDAP record.
Specifies the format in which the “name, e.g. “Mike Black” of each returned
search result is displayed on the IPPHONE.
- 93 -
Page 99

CHAPTER12 Configuring the LDAP Directory
Parameter Description
When you type in the following field, for example, %sn,%givenName, the
displayed result returned should be “Black, Mike”.
Device Manager Pro | Administrator's Guide
Max Hits
(1~1000)
Country
Code
Area
Code
Sort
Result
Search
Timeout
Call
Lookup
5. Click Save.
Specifies the maximum number of entries expected to be sent by the LDAP
server (this parameter is sent to the LDAP server).
Defines the country code prefix added for number search.
Defines the area code prefix added for number search.
Sorts the search result by display name on the client side.
The timeout value (in seconds) for LDAP search (sent to the LDAP server).
Defines the user name used for the LDAP search request.
- 94 -
Page 100

CHAPTER13 Managing Device Manager Agents
Device Manager Pro | Administrator's Guide
13 Managing Device Manager Agents
An Agent enables devices located behind a NAT | Firewall in a local enterprise network to be
managed from a global cloud network. The application allows the Device Manager to send
actions directly to devices. Deployed on an enterprise’s premises, the Agent opens a communications channel with the Device Manager located in the global cloud network. The Device
Manager is then able to send commands to devices in the local network.
The Device Manager consequently allows
■ Internet Telephony Service Providers (ITSPs) to remotely manage devices in enterprise
customer networks, through cloud services
■ Software as a Service (SaaS) by a centralized hosting business
■ Enterprise network administrators to manage devices located within their own network
For information on how to install and configure a Device Manager Agent, see the
Device Manager Agent Installation and Configuration Guide. See this same guide for
more detailed descriptive information about the Device Manager Agent.
- 95 -
 Loading...